

Page 1
Page 2

Page 3
MITSUBISHI OPERATING GUIDE
Table of Contents
Chapter 1: Getting to Know Your TV .............................................................................................. 1
Overview of the Control Panel ..................................................................................................... :2
Overview of the Remote Control .................................................................................................... 4
Getting ready to use the remote control ................................................................................. 4
Remote control buttons and functions .................................................................................... 6
Chapter 2: Operating Your TV ......................................................................................................... 13
Getting Started ............................................................................................................................. 14
Adjusting the color purity ....................................................................................................... 15
Using the remote control .......................................................................................................... 16
Turning the TV on/off ................................................................................................................ 19
Selecting the input source ........................................................................................................ 20
Changing channels ................................................................................................................... 21
Understanding the ViewPoint III on-screen menus ................................................................ 24
Memorizing channels ............................................................................................................... 25
Setting the clock ....................................................................................................................... 27
Adding and deleting channels ................................................................................................. 29
Setting the A/V Network ......................................................................................................... 30
Choosing a menu display ......................................................................................................... 32
Renaming the inputs ............................................................................................................... 34
Naming the channels ............................................................................................................... 35
Locking A/V functions ............................................................................................................. 36
Using the advanced PIP functions ........................................................................................... 37
Using the power restore feature ............................................................................................. 39
Adjusting the sound ................................................................................................................. 40
Adjusting the picture ............................................................................................................... 42
Using the closed caption decoder ............................................................................................ 43"
Using the Advanced Features ...................................................................................................... 44
Setting the timer ....................................................................................................................... 45
Using the parental lock ........................................................................................................... 46
Using Super Quick View ......................................................................................................... 48
Using home theater ................................................................................................................. 52
Resetting the sound and the picture ......................................................................................... 53
Chapter 3: Using the Special Features ............................................................................................ 55
Understanding the On-Screen Displays ........................................................................................ 56
Using the Off-Timer ...................................................................................................................... 57
Setting the off-timer ................................................................................................................ 58
Changing or canceling the off-timer ......................................................................................... 59
Table of Contents i
Page 4
Using Picture-in-Picture (PIP) ...................................................................................................... 60
Selecting the PIP image .......................................................................................................... 61
Selecting the source and channel ............................................................................................ 62
Exchanging and moving the PIP image .................................................................................. 63
Switching the sound reception ................................................................................................ 64
Freezing the PIP image ........................................................................................................... 65
Using the Snap-shot feature ..................................................................................................... 66
Using the Replay feature ......................................................................................................... 67
Using the Active A/V Network Feature ....................................................................................... 68
Chapter 4: Troubleshooting .............................................................................................................. 73
Caution and Care ........................................................................................................................... 76
Calling for Service ......................................................................................................................... 77
Appendix: Automatic Procedure for the Parental Lock ............................................................... 79
Index .................................................................................................................................................. 81
ii Table of Contents
Page 5
CHAPTER 1
Getting to Know Your TV
_>Important:
Now that you have connected your TV and subscribed to the
StarSight service, it's time to understand the exciting features :your
Mitsubishi TV offers.
If you have not connected your TV and subscribed to StarSight,
please see Booklet #1, '_YIitsubishi Installation and Setup
Guide" before reading this owner's guide.
This chapter will introduce you to the range of options avai:[able by
using the buttons on the control panel of the TV or the remote
control. You'll find information on:
Overview of the Control Panel.
Overview of the Remote Control
Page 6

Overview of the Control Panel
POWER O PROG. TIMER
I
Push to open the cont_._ol panel
Control Panel
@ @
• VOL •
@@@
• CH • INPUT
Op°wer button (POWER)
Use to turn the TV on or off.
C)program timer indicator (PROG. TIMER)
Lights up when the TV is programmed to turn on at a particular
time.
@volume controls (VOL)
Press the .button to turn tip the volume and theVbutton to
turn down the volume.
@channel controls (CH)
Use the ,button to switch toa channel with a higher number
and the Vbutton to switch to a channel with a lower number.
input button (INPUT)
Use this button to select the input source to view:
• Antenna A,
• Antenna B, or
• External 1, 2 or 3.
2 Chapter 1 : Getting to Know Your TV
Page 7
_>Important:
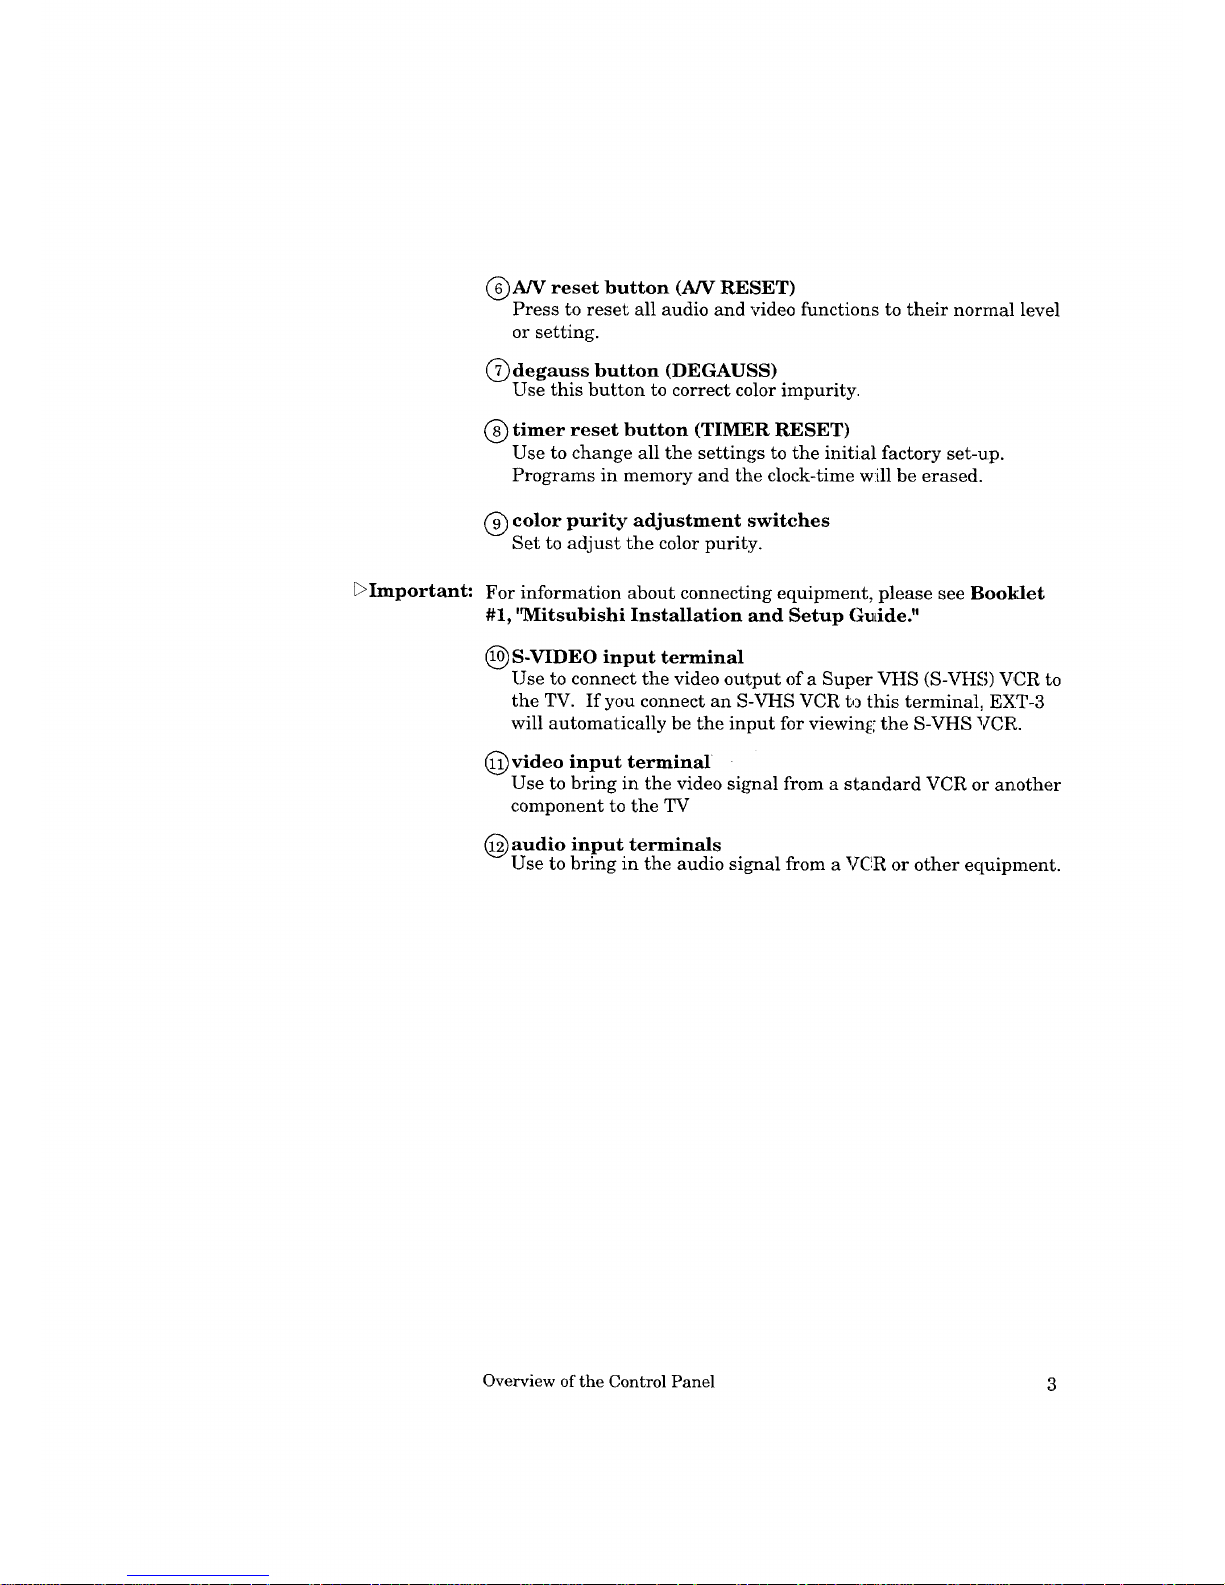
C)A]V reset button (AN RESET)
Press to reset all audio and 'video functions to their normal level
or setting.
@ degauss button (DEGAUSS)
Use this button to correct color impurity.
@ timer reset button (TIMER RESET)
Use to change all the settings to the initial factory set-up.
Programs in memory and the clock-time will be erased.
@ color purity adjustment switches
Set to adjust the color purity.
For information about connecting equipment, please see Booklet
#1, '_Iitsubishi Installation and Setup Gudde."
(_) S-VIDEO input terminal
Use to connect the video output of a Super VHS (S-VHS) VCR to
the TV. If you connect an S-VHS VCR to this terminal, EXT-3
will automatically be the input for viewing; the S-VHS VCR.
(_) video input terminal
Use to bring in the video si_mal from a standard VCR or another
component to the TV
(_)audio input terminals
Use to bring in the audio signal from a VCR or other ectuipment.
Overview of the Control Panel 3
Page 8
. Overview of the Remote Control
Getting ready to use the remote control
If you subscribed to StarSight, you have already completed the
following instructions. Please skip ahead to pa_e 6.
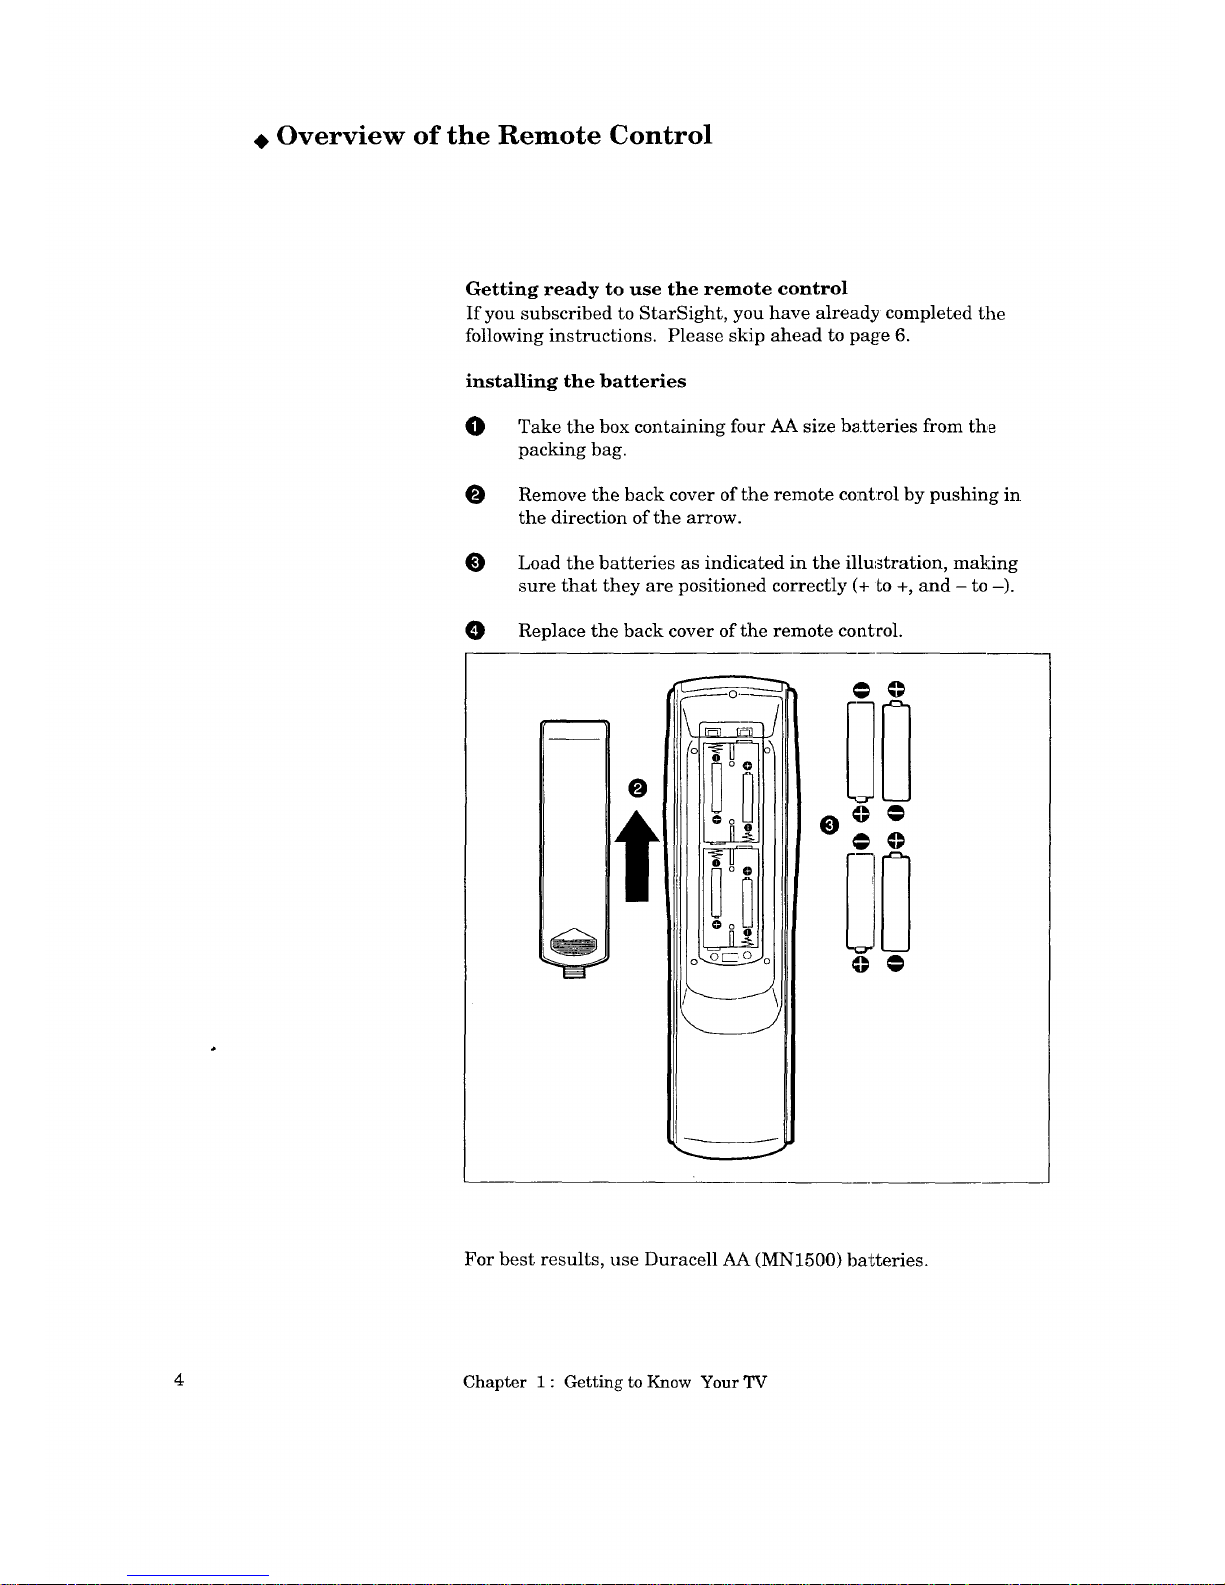
installing the batteries
O
Take the box containing four AA size batteries from the
packing bag.
O Remove the back cover of the remote control by pushing in
the direction of the arrow.
O
Load the batteries as indicated in the illu.._tration, making
sure that they are positioned correctly (+ to +, and - to -).
O Replace the back cover of the remote coatvol.
@ @
@ @
For best results, use Duracell AA (MN1500) ba_teries.
4 Chapter 1 : Getting to Know Your TV
Page 9
some dos and don'ts
To ensure that your remote control will continue working properly,
follow these guidelines:
Don't press two or more buttons at the same time, unless
specifically instructed to do so in this owner's guide.
Don't allow the remote control to get we1; or become heated.
Avoid dropping the remote control on a ]lard surface.
When cleaning the remote control, don't use any harsh
chemicals. Use only a soft, slightly moistened cloth.
general instructions
When using the remote control to operate the TV, VCR or cable box:
O Be within 20 feet of the desired equipment.
Point the top of the remote control towa:cd the equipraent.
Press the appropriate button or groups of buttons.
guidelines for using batteries
• Don't use a new battery with an old one.
• Don't heat, take apart, or throw batteries into a fire.
The following section explains more about the range of options
available when using the remote control.
Overview of the Remote Control
5
Page 10
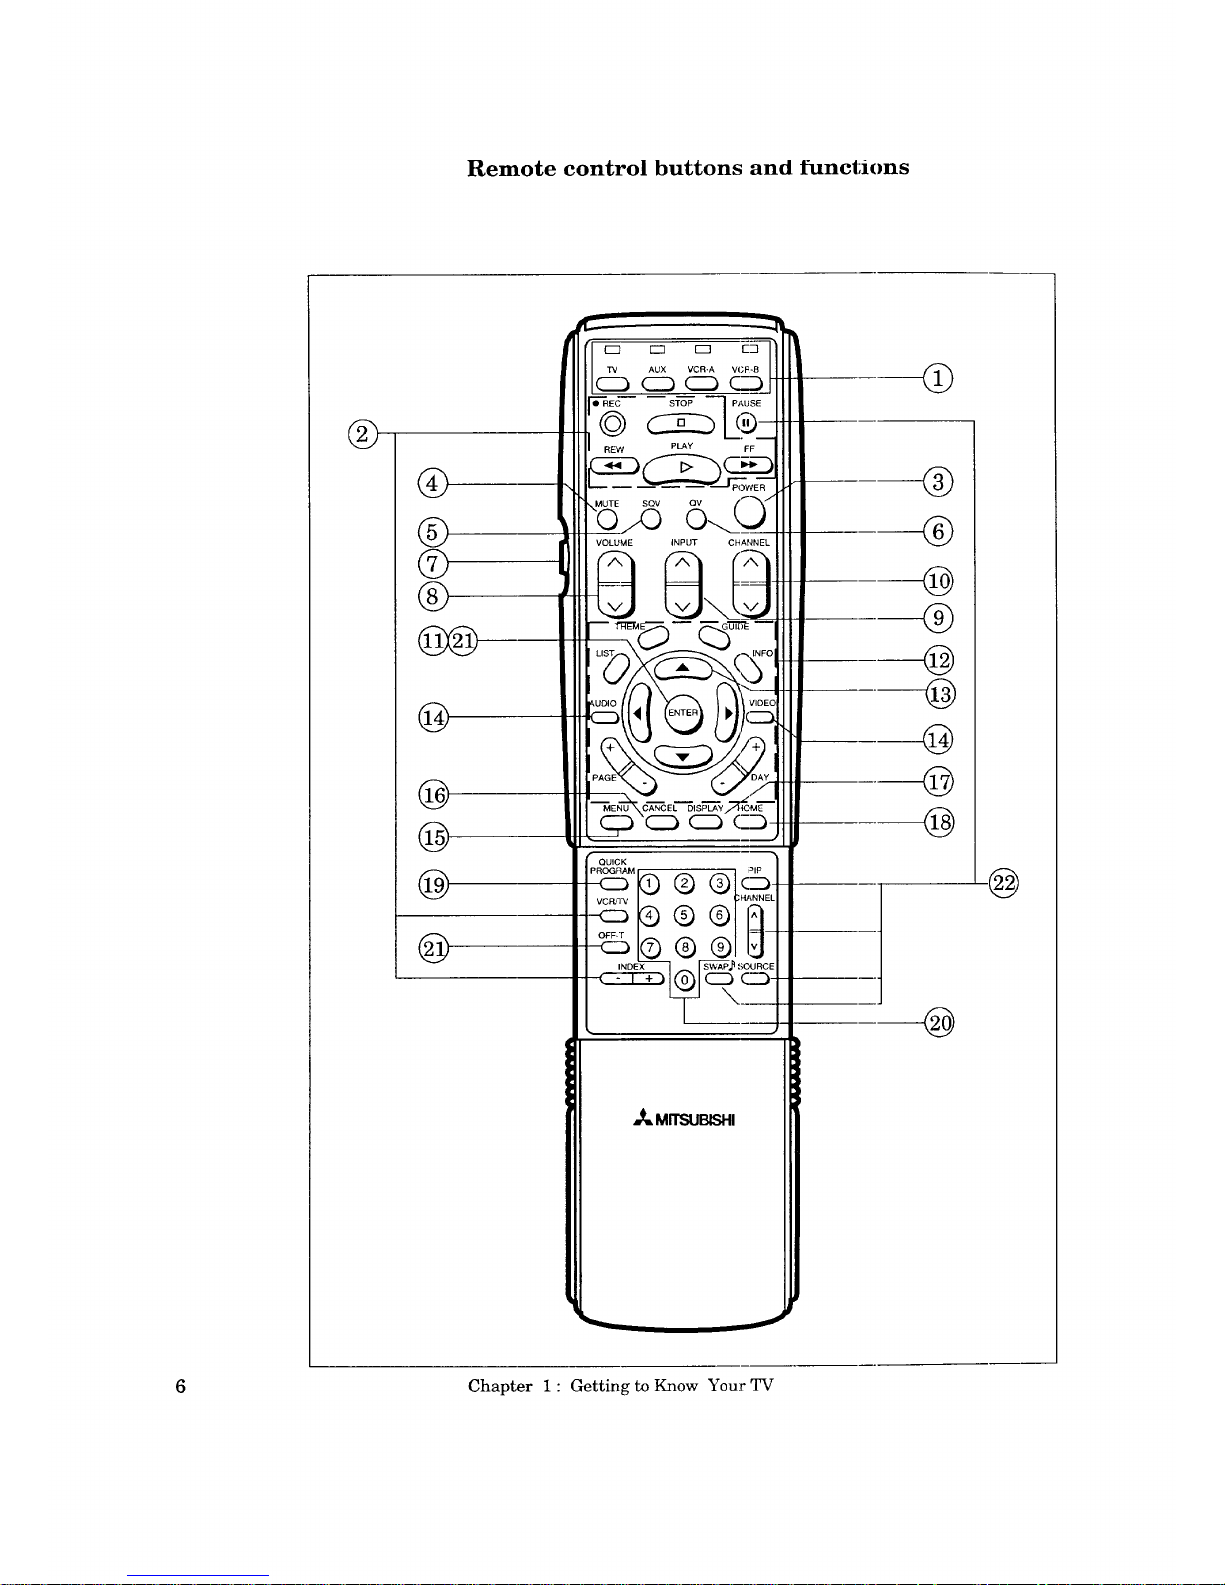
Remote control buttons and l_nctmns
®
@
®
©
®
@
@
@
@
@
(_ AUX VCR-A VCF-8
CDCD_
O'RE_ STOP
REW PLAY FF
MUTE SQV QV /_'_7
VOLUME INPUT CHANNEL
8 8 8-
'IDE(]
:::)
Pc_ c_ c5
QUICK
-_l®® ® ?
INDEX
@
®
®
@
®
@
@
@
@
@
@
@
6 Chapter 1 : Getting to Know Your TV
Page 11
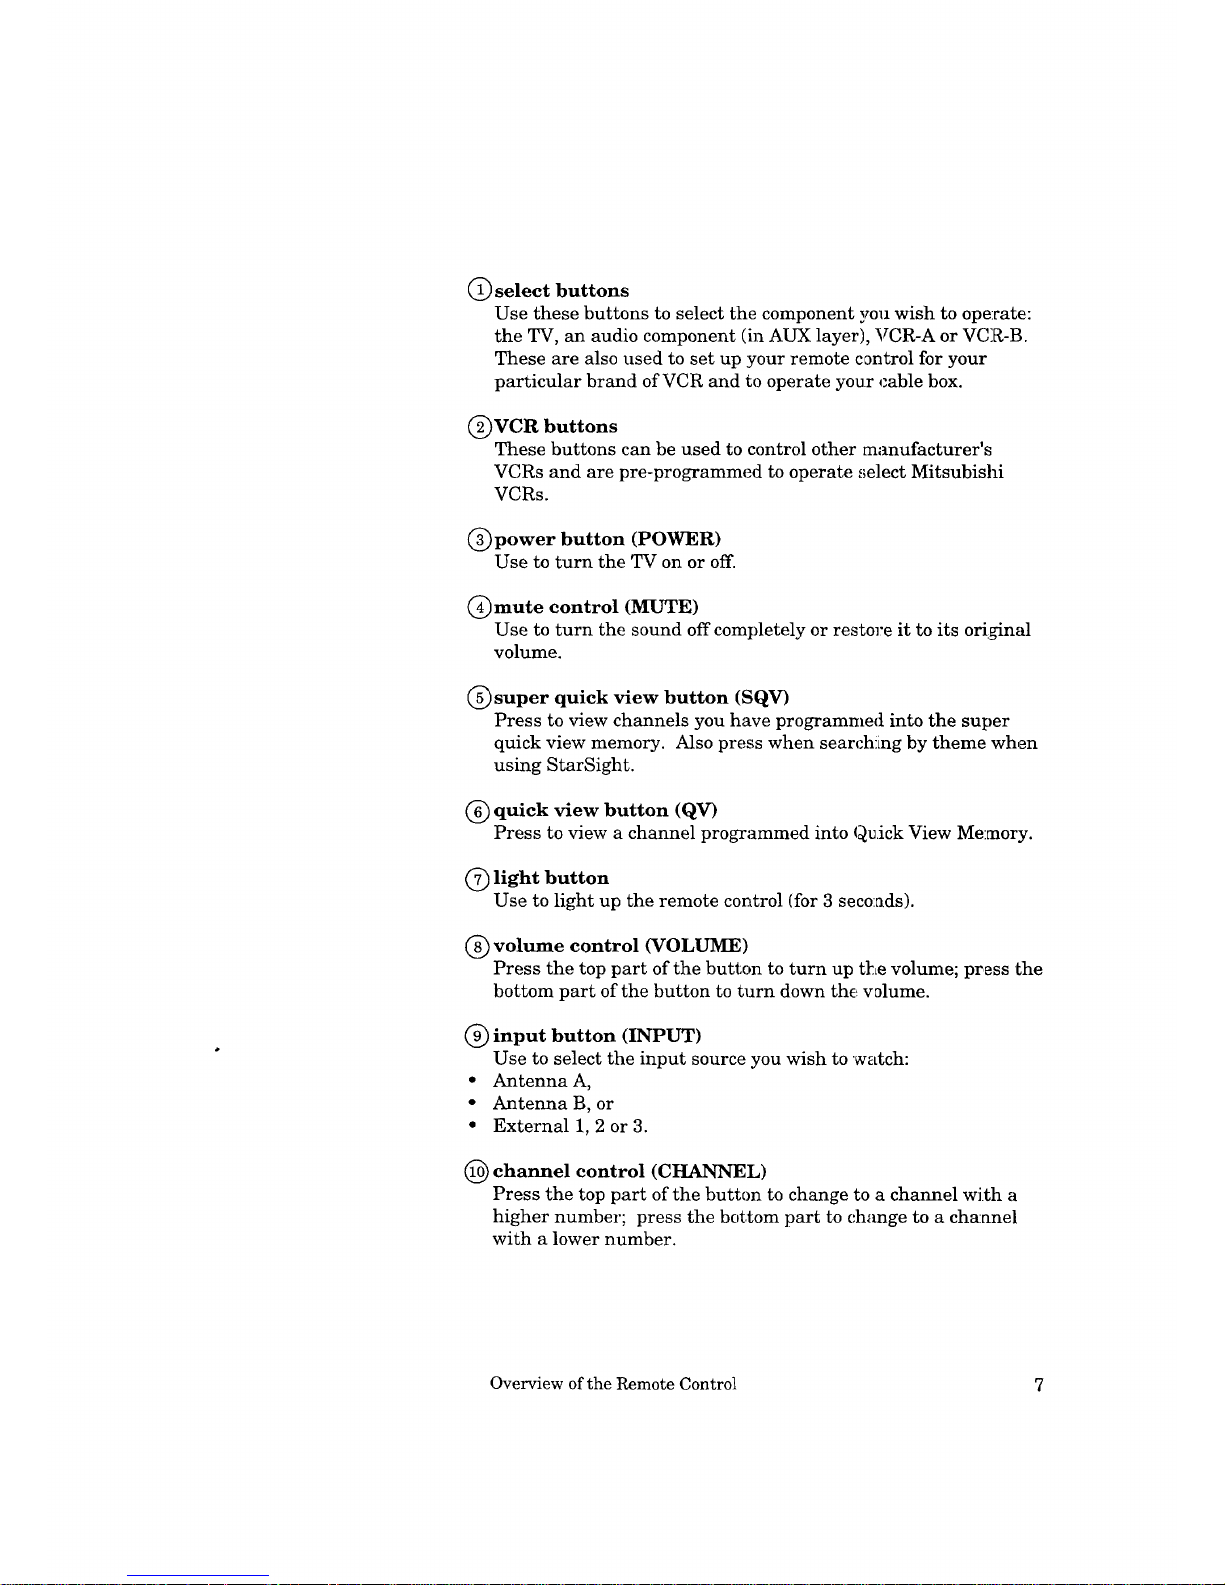
C) select buttons
Use these buttons to select the component you wish to ope:rate:
the TV, an audio component (in AUX layer), VCR-A or VCR-B.
These are also used to set up your remote control for your
particular brand of VCR and to operate your (:able box.
C)VCR buttons
These buttons can be used to control other manufacturer's
VCRs and are pre-programmed to operate ,;elect Mitsubishi
VCRs.
(_)power button (POWER)
Use to turn the TV on or off.
(_)mute control (MUTE)
Use to turn the sound off completely or restore it to its original
volume.
(_ super quick view button (SQV)
Press to view channels you have programmed into the super
quick view memory. Also press when searchlLng by theme when
using StarSight.
(_ quick view button (QV)
Press to view a channel programmed into Qu.ick View Memory.
C) light button
Use to light up the remote control (for 3 seconds).
(_) volume control (VOLUME)
Press the top part of the button to turn up the volume; press the
bottom part of the button to turn down the volume.
(_) input button (INPUT)
Use to select the input source you wish to watch:
• Antenna A,
• Antenna B, or
• External 1, 2 or 3.
(_ channel control (CHANNEL)
Press the top part of the button to change to a channel with a
higher number; press the bottom part to c.hange to a channel
with a lower number.
Overview of the Remote Control 7
Page 12
Remote control buttons and functions (cont.)
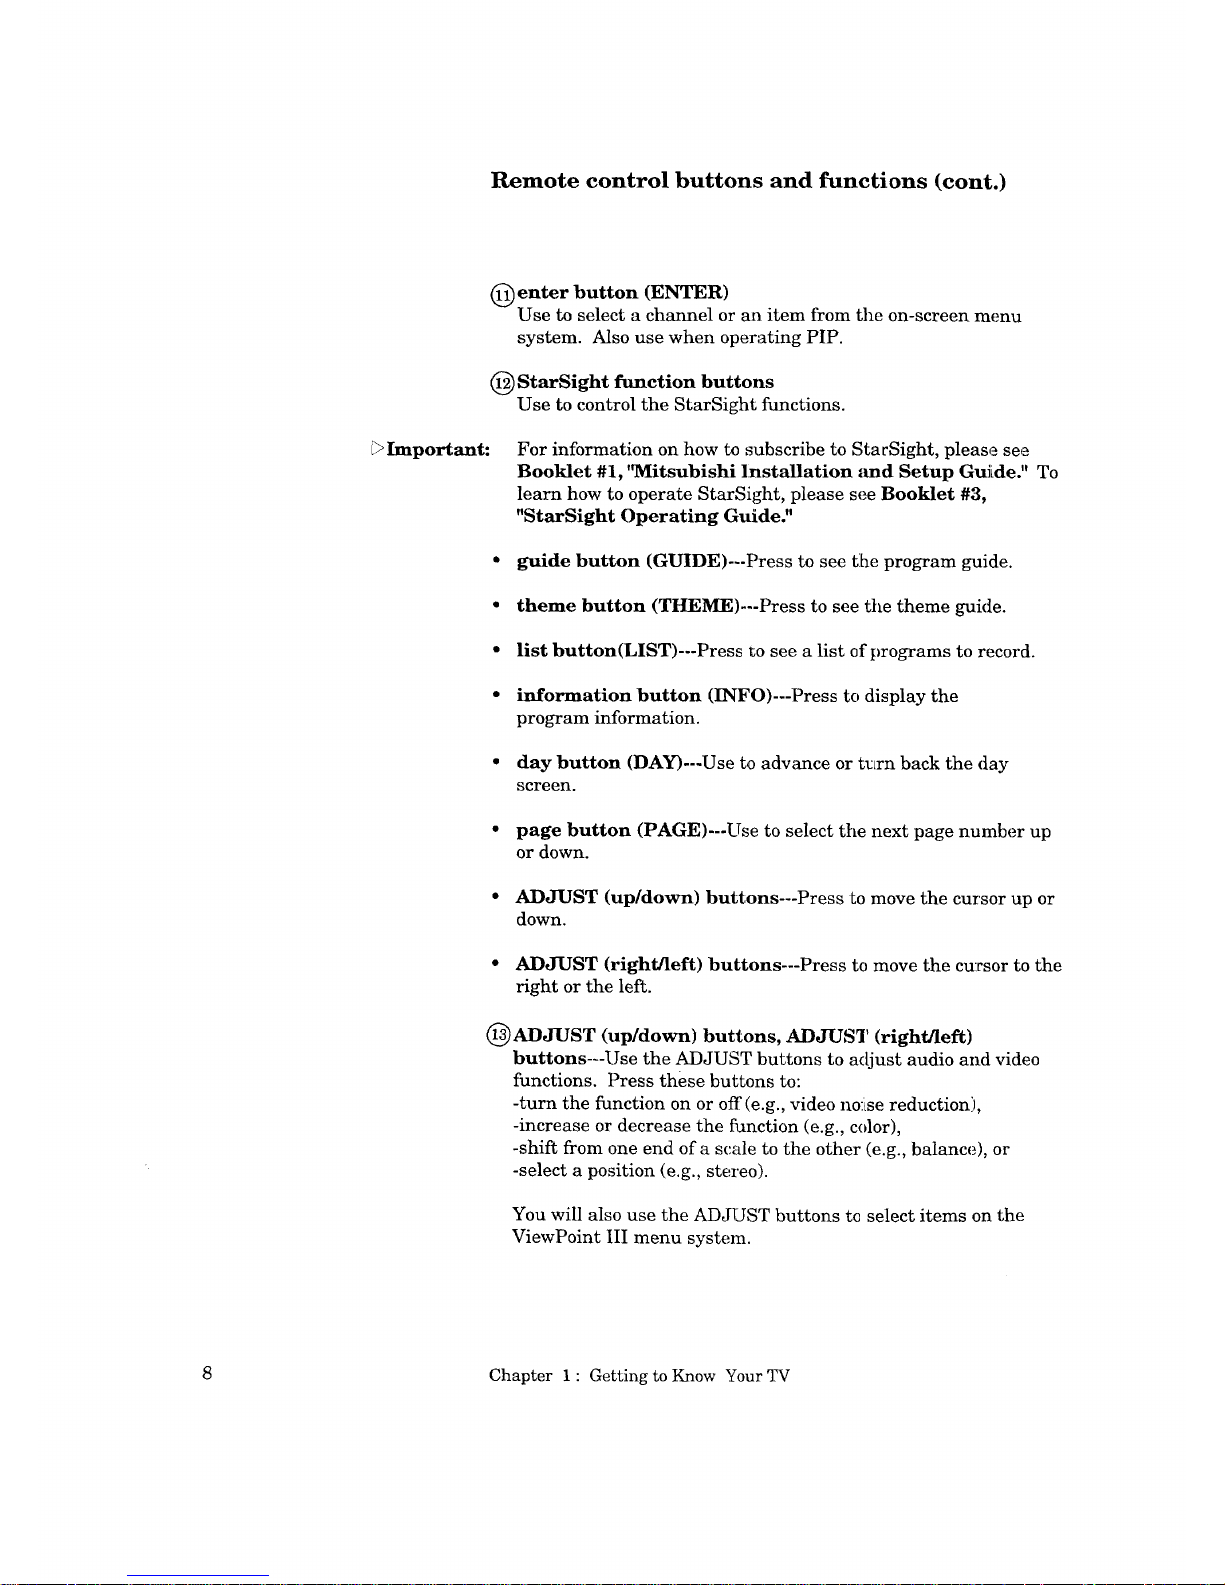
(_ enter button (ENTER)
Use to select a channel or an item from the on-screen menu
system. Also use when operating PIP.
(_ StarSight function buttons
Use to control the StarSight functions.
Important:
For information on how to subscribe to StacSight, please see
Booklet #1, 'WIitsubishi Installation _md Setup Guide." To
learn how to operate StarSight, please see Booklet #3,
"StarSight Operating Guide."
• guide button (GUIDE)---Press to see tlhe program guide.
• theme button (THEME)---Press to see the theme guide.
• list button(LiST)---Press to see a list of programs to record.
• information button (INFO)---Press to display the
program information.
• day button (DAY)---Use to advance or t_Lrn back the (tay
screen.
• page button (PAGE)---Use to select tile next page number up
or down.
• ADJUST (up/down) buttons---Press to move the cursor up or
down.
• ADJUST (right/left) buttons---Press to move the cursor to the
right or the left.
(I_ADJUST (up/down) buttons, ADJUST (right/left)
buttons---Use the ADJUST buttons to adjust audio and video
functions. Press these buttons to:
-turn the function on or off(e.g., video noise reduction:),
-increase or decrease the function (e.g., color),
-shift from one end of a scale to the other (e.g., balance), or
-select a position (e.g., stereo).
You will also use the ADJUST buttons tc select items on the
ViewPoint III menu system.
8 Chapter 1 : Getting to Know Your TV
Page 13
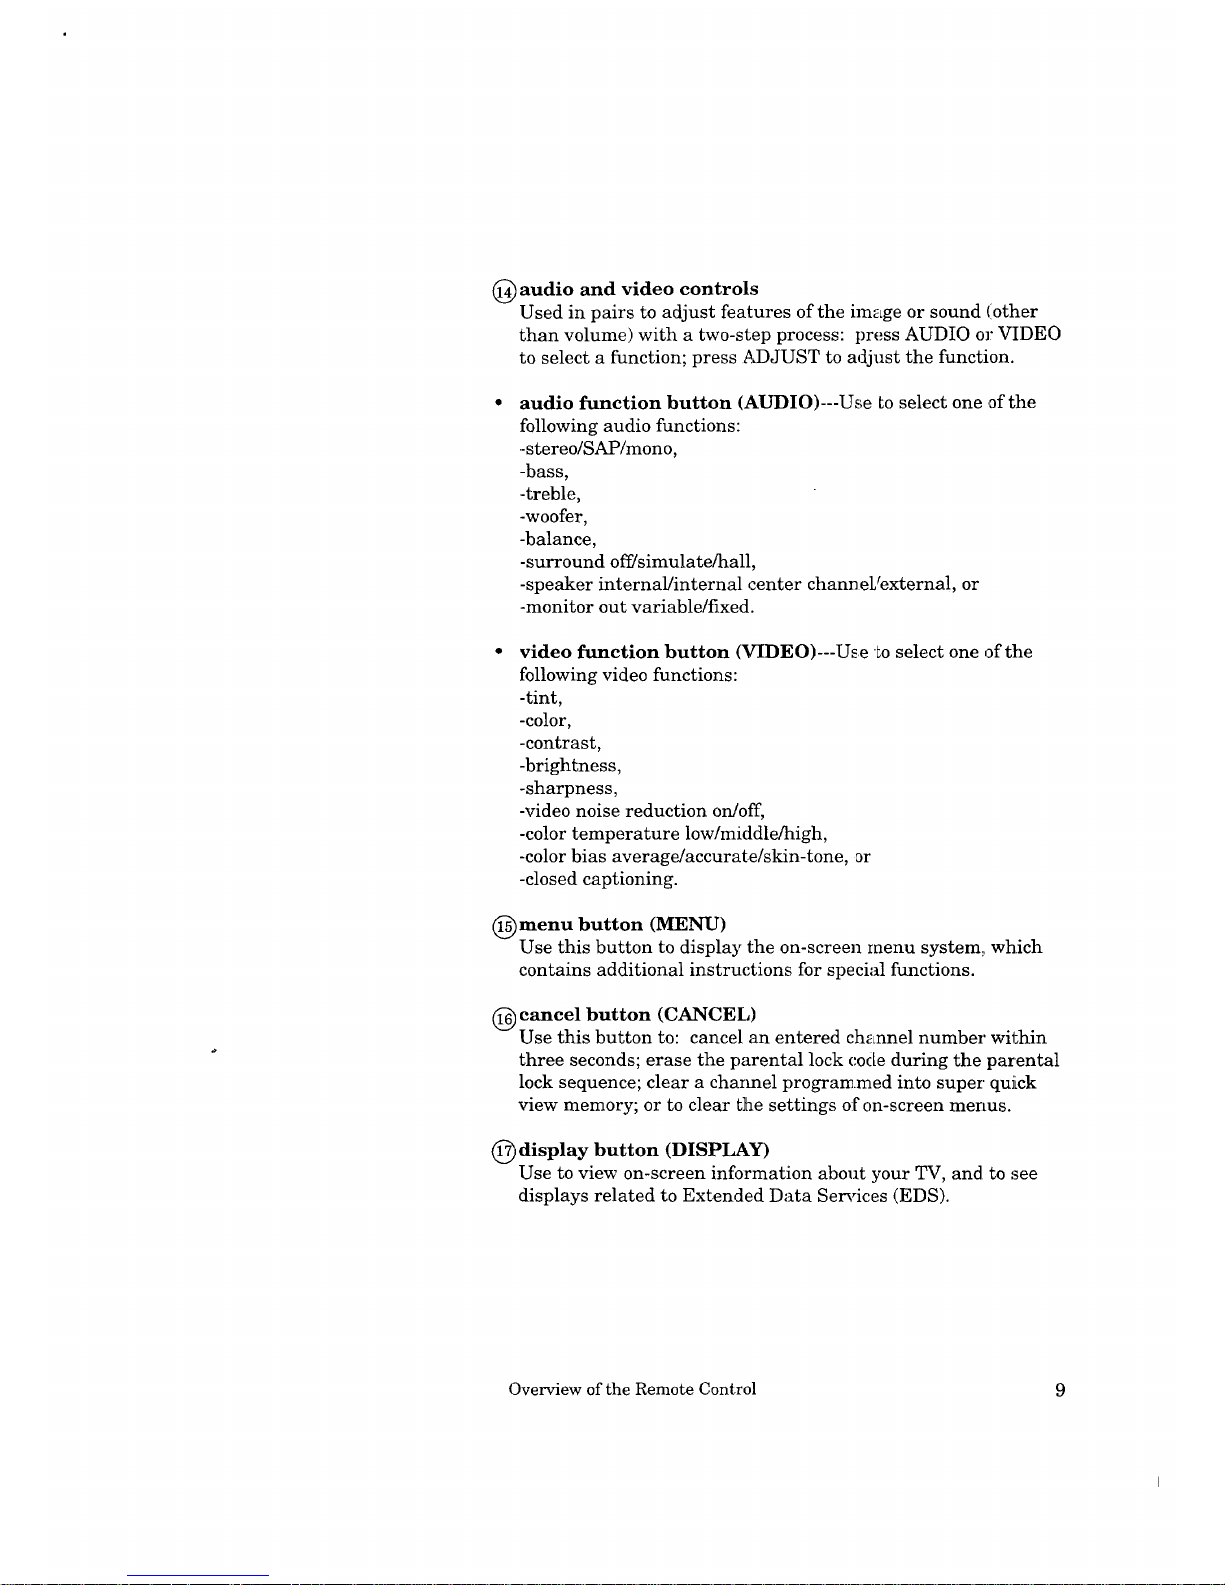
(_) audio and video controls
Used in pairs to adjust features of the image or sound (other
than volume) with a two-step process: press AUDIO or VIDEO
to select a function; press _J)JUST to adjust the function.
audio function button (AUDIO)---Use Loselect one of the
following audio functions:
-stereo/SAP/mono,
-bass,
-treble,
-woofer,
-balance,
-surround off/simulate/hall,
-speaker internal/internal center channeL_external, or
-monitor out variable/fixed.
video function button (VIDEO)---U_e Lo select one of the
following video functions:
-tint,
-color,
-contrast,
-brightness,
-sharpness,
-video noise reduction on/off,
-color temperature low/middle/high,
-color bias average/accurate/skin-tone, _r
-closed captioning.
(_) menu button (MENU)
Use this button to display the on-screen menu system: which
contains additional instructions for special functions.
(_ cancel button (CANCEL)
Use this button to: cancel an entered channel number within
three seconds; erase the parental lock code during the parental
lock sequence; clear a charmel programmed into super' quJLck
view memory; or to clear the settings of on-screen menus.
(_ display button (DISPLAY)
Use to view on-screen information about your TV, and to :see
displays related to Extended Data Services (EDS).
Overview of the Remote Control
9
Page 14

Remote control buttons and functions (cont.)
@home button (HOME)
Press to return to regular TV viewing from tlhe on-screen
displays and menus.
_) quick program button (QUICK PROGRAlVl)
Use this button to quickly program your Mitsubishi VCR to
record.
_>Important: You must connect your Mitsubishi VCR wiLtLthe A/V Network to
use Quick Program.
number buttons (0-9)
Use to select a channel number, and to enter the parental lock
code.
@ off-timer button (OFF-T)
Use to program the TV to turn off automatically at a later time.
@picture-in-picture controls
Use to control the special picture-in-picture (PIP) function.
• PIP button (PIP)---Press to see the PIP iLmage or cance] it.
• channel button (CHANNEL)---Press to c_Lange the channel of
the reduced PIP image.
10 Chapter 1 : Getting to Know Your TV
Page 15
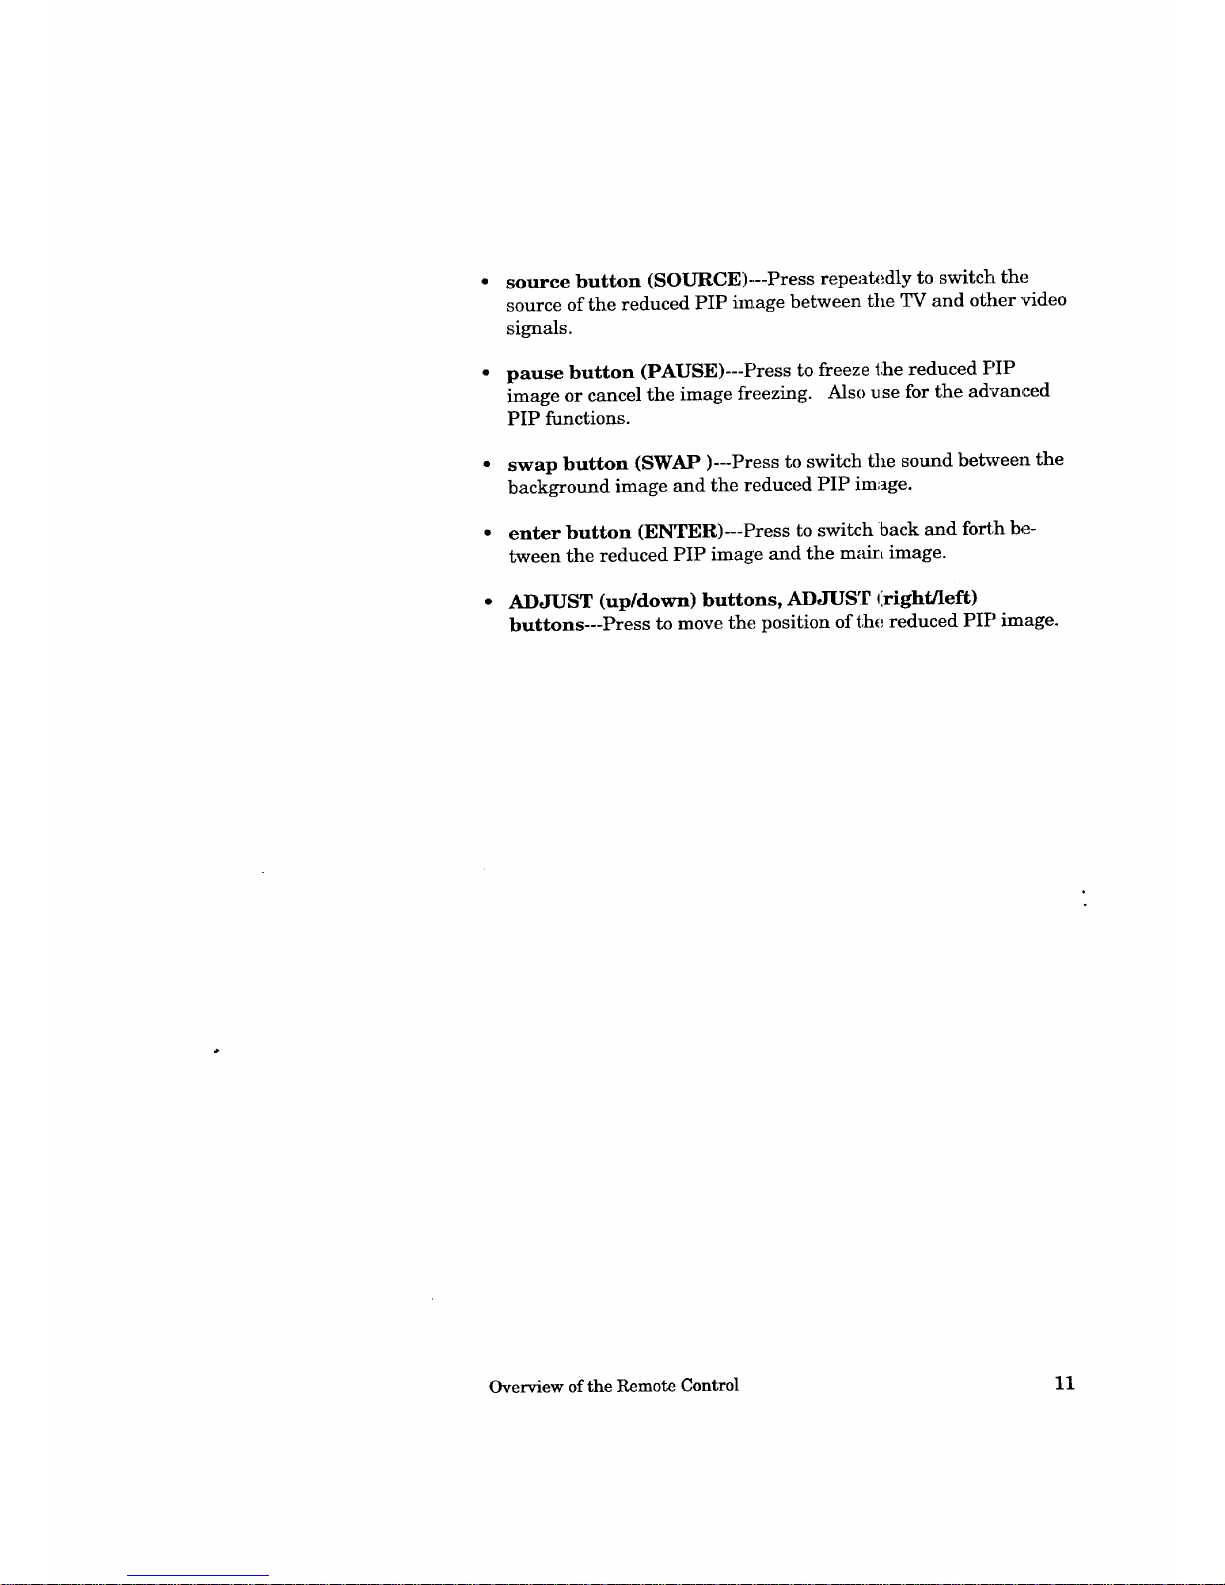
source button (SOURCE)-.--Press repeat_._dly to switch the
source of the reduced PIP image between the TV and other video
signals.
pause button (PAUSE)---Press to freeze the reduced PIP
image or cancel the image freezing. Also use for the advanced
PIP functions.
swap button (SWAP)---Press to switch the sound between the
background image and the reduced PIP image.
enter button (ENTER)---Press to switch back and forth be-
tween the reduced PIP image and the main image.
ADJUST (up/down) buttons, ADJUST (right/left)
buttons---Press to move the position of the reduced PIP image.
Overview of the Remote Control 11
Page 16

Page 17
CHAPTER 2
Your
_Important:
This chapter will explain how to operate your TV, first focusing on
functions that are basic and easy and then explaining some of the
advanced features.
Please see Booklet #3, "StarSight Operating Guide" for
information on using the StarSight feature.
This chapter explains:
• Getting Started
• Using the Advanced Features
Page 18
. Getting Started
This section will introduce you to the basic features of your
Mitsubishi TV.
You'll find information on:
Adjusting the color purity,
Using the remote control,
Turning the TV on/off,
Selecting the input source,
Changing channels,
Understanding the ViewPoint III on-screen menus,
Memorizing channels,
Setting the clock,
Adding and deleting channels,
Setting the AN Network,
Choosing the menu display,
Renaming the inputs,
Naming the channels,
Locking AN functions,
Using the advanced PIP functions,
Using the power restore feature,
Adjusting the sound,
Adjusting the picture, and
Using the closed caption decoder.
,Warnin_
--Do_t leave stationary images, such as those generated from stock
market reports or video games, on-screen for more than 10 min-
utes. Still patterns can scar the TV causing permanent damage
to the picture tube.
14 Chapter 2 : Operating Your TV
Page 19
Adjusting the color purity
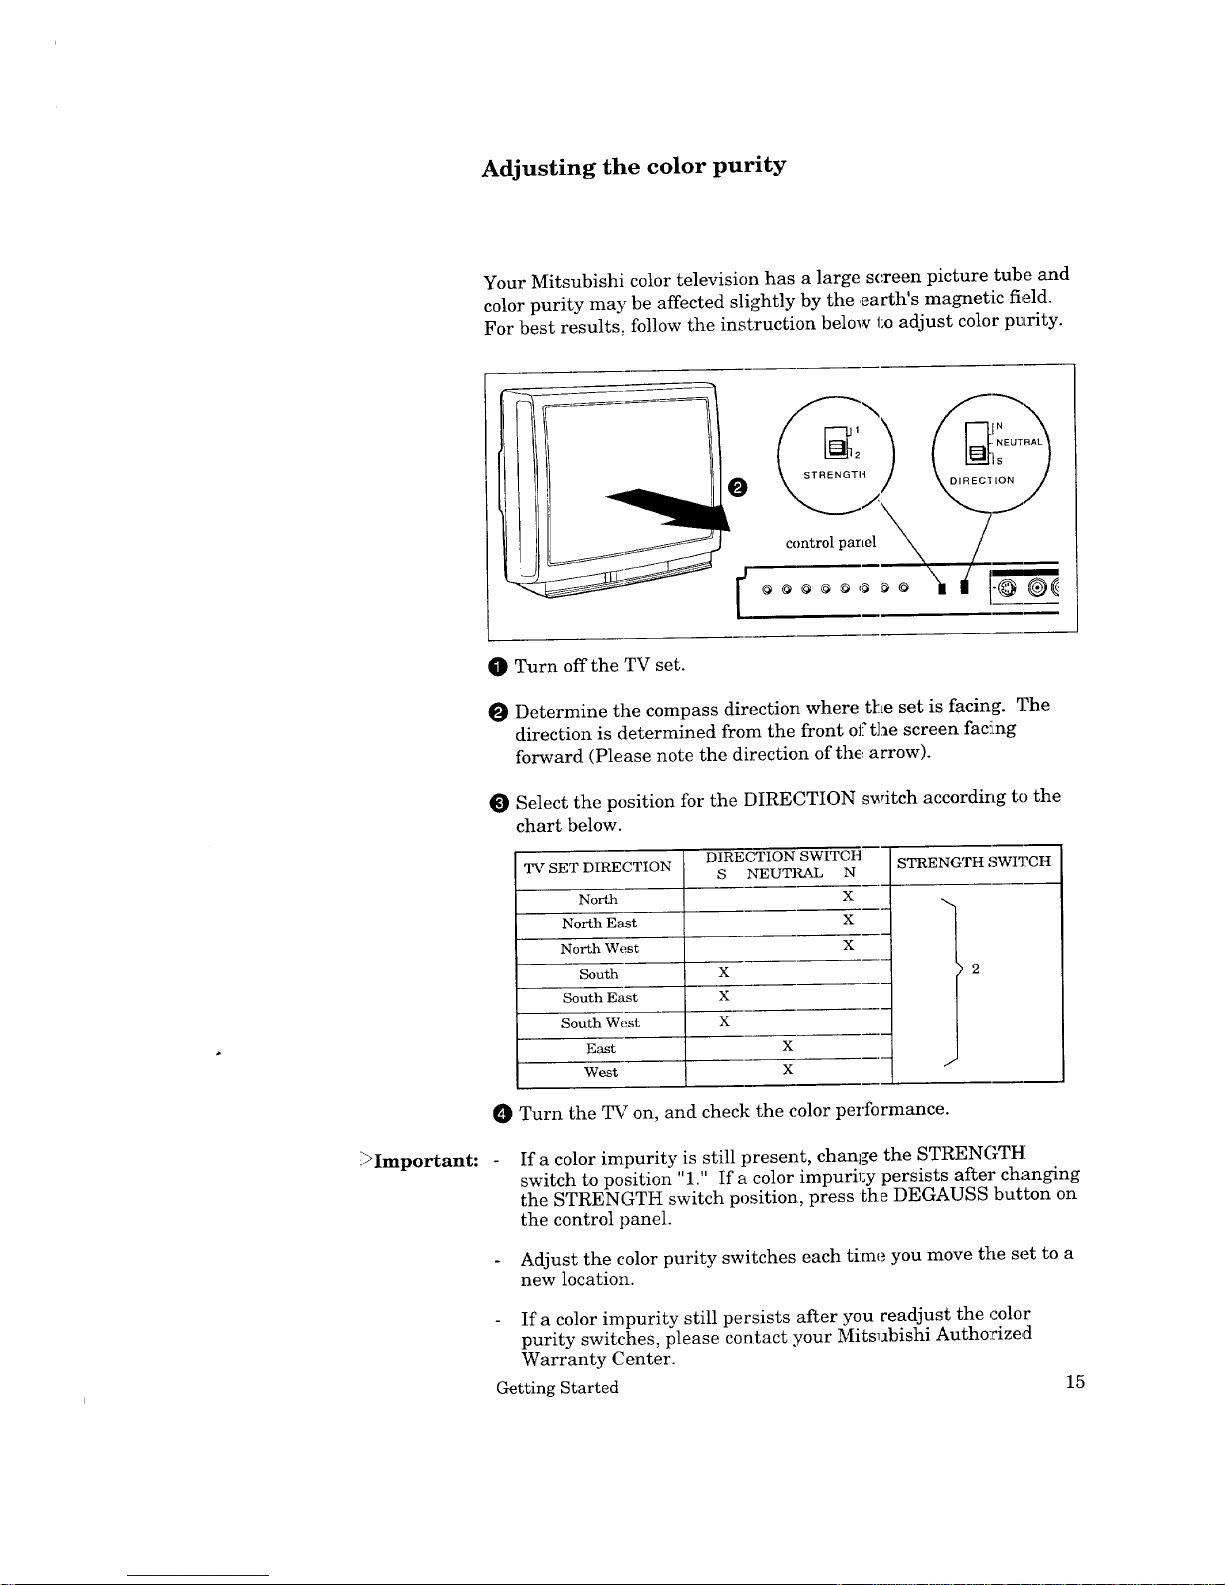
Your Mitsubishi color television has a large screen picture tube and
color purity may be affected slightly by the .earth's magnetic field.
For best results_ follow the instruction below to adjust color purity.
O
k
[
control parLel
!
_Important:
O Turn off the TV set.
O Determine the compass direction where t[_e set is facing. The
direction is determined from the front of the screen fac!ing
forward (Please note the direction of the, arrow).
Select the position for the DIRECTION switch according to the
chart below.
TV SET DIRECTION
North
North East
North West
South
South East
South West
East
West
DIRECTION SWITCH
S NEUTI_AL N
X
X
X
X
X
X
X
X
STRENGTH '_WI3?CH
O Turn the TV on, and check the color performance.
If a color impurity is still present, change the STRENGTH
switch to position "1." If a color impuril:y persists after changing
the STRENGTH switch position, press the DEGAUSS button on
the control panel.
Adjust the color purity switches each time you move tile set to a
new location.
If a color impurity still persists after you readjust the color
purity switches, please contact your Mitsubishi Authorized
Warranty Center.
Getting Started 15
Page 20
Using the remote control
_Important:
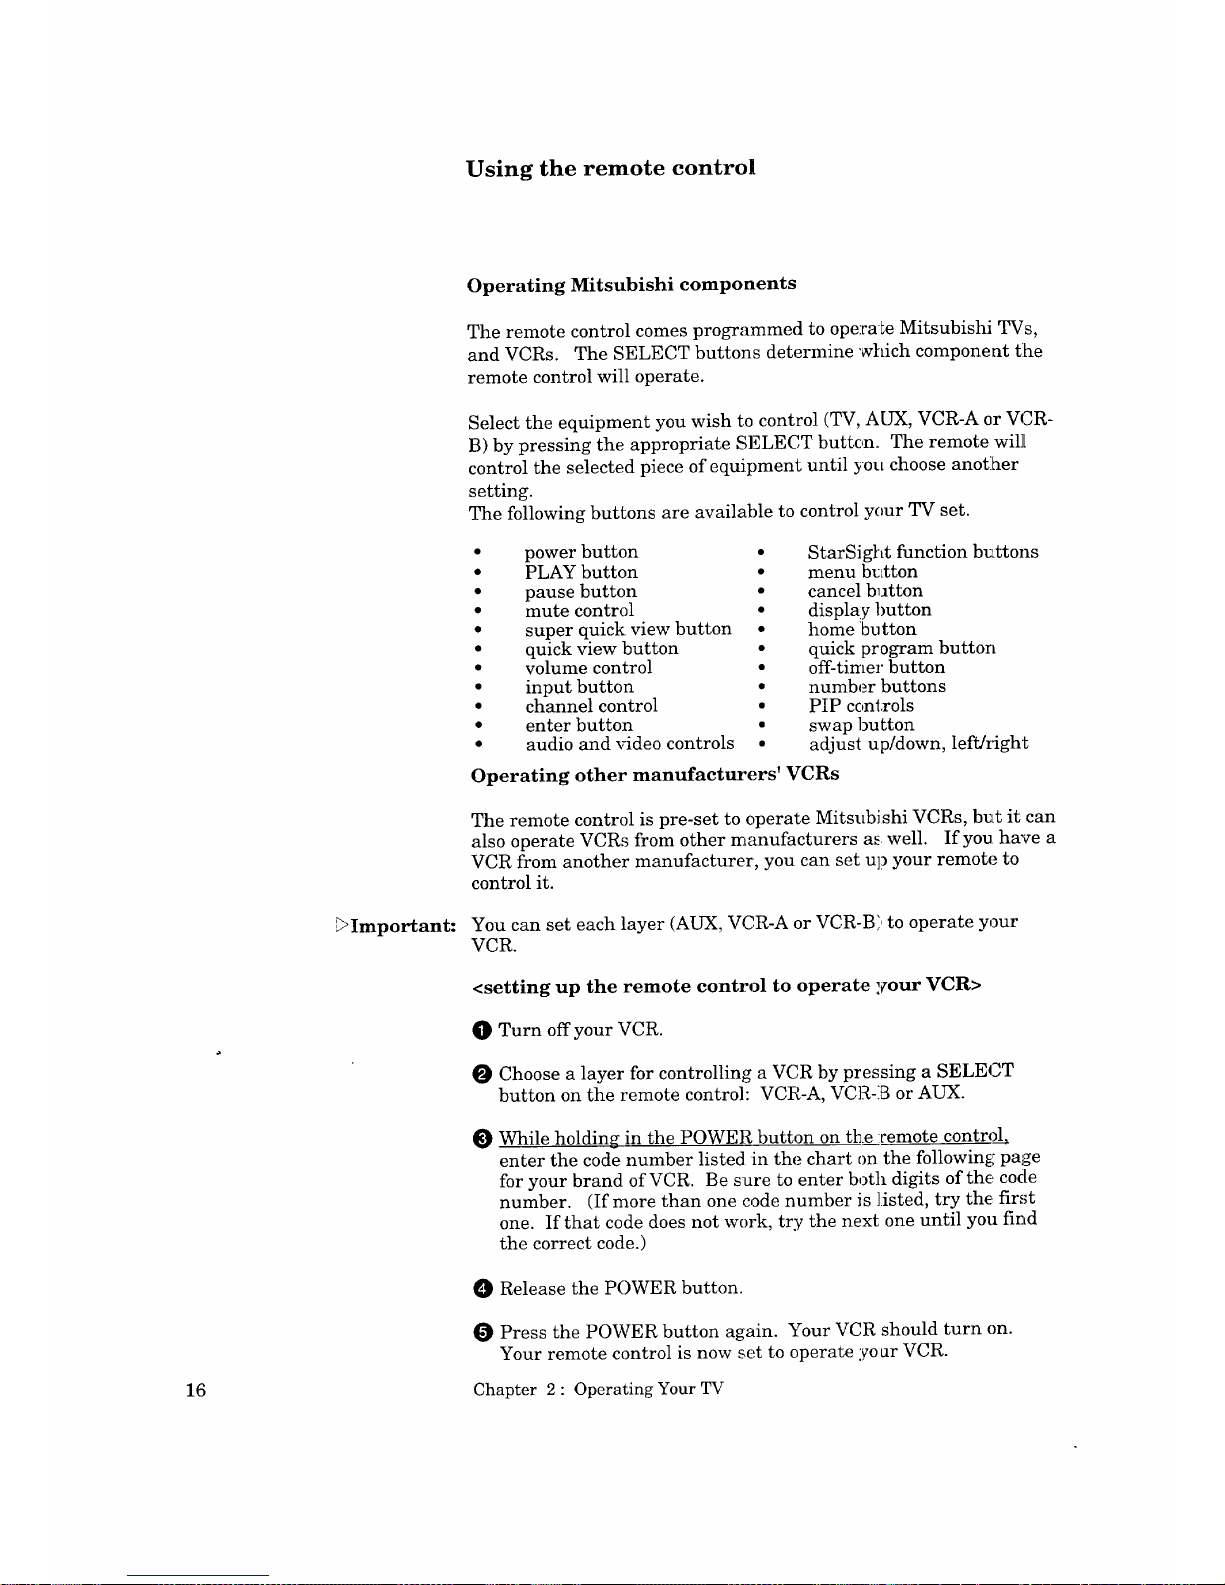
Operating Mitsubishi components
The remote control comes programmed to operate Mitsubishi TVs,
and VCRs. The SELECT buttons determine which component tlhe
remote control will operate.
Select the equipment you wish to control (TV, AUX, VCR-A or VCR-
B) by pressing the appropriate SELECT buttc,n. The remote wil]L
control the selected piece of equipment until you choose anotlher
setting.
The following buttons are available to control your TV set.
power button
PLAY button
pause button
mute control
super quick view button
quick view button
volume control
input button
channel control
enter button
audio and xSdeo controls
StarSight function buttons
menu b_Ltton
cancel button
display button
home button
quick program button
off-timer button
number buttons
PIP controls
swap button
adjust up/down, left]Iight
Operating other manufacturers' VCRs
The remote control is pre-set to operate Mitsubishi VCRs, b_Lt it can
also operate VCRs from other manufacturers as well. If you have a
VCR from another manufacturer, you can set up your remote to
control it.
You can set each layer (AUX, VCR-A or VCR-B} to operate your
VCR.
<setting up the remote control to operate your VCR>
O Turn off your VCR.
Choose a layer for controlling a VCR by pressing a SELECT
button on the remote control: VCR-A, VCR-3 or AUX.
While holding in the POWER button on the :cemote contr_
enter the code number listed :in the chart on the following; page
for your brand of VCR. Be sure to enter both digits of the code
number. (If more than one code number is listed, try the first
one. If that code does not work, try the next one until you find
the correct code.)
O Release the POWER button.
Press the POWER button again. Your VCR should turn on.
Your remote control is now set to operate yo _r VCR.
16 Chapter 2 : Operating Your TV
Page 21
If your VCR is this
brand...
Mitsubishi (A)
Mitsubishi (B)
Canon
Emerson
Funai
GE
Goldstar
Hitachi
JVC
Magnavox
Multitech
NEC
Panasonic
Philco
If your VCR this
...enter this code ...enter this code
brand..
Philips 03, 10, 11
Quasar 03
RCA 08, 1"3, 20
Sanyo 14
Scot 15
Sharp 16
Sony 17, 18
Sylvani_ 03, 10, 11
Symphon" 06
TeknikE 04, 06
Toshib_ 15
Totevisi,: 07
Zenith 19
Ol
02
03
04, 05
06
O3
07
08
O9
03, 10, 11
06
12
03
II
_Important:
_Important:
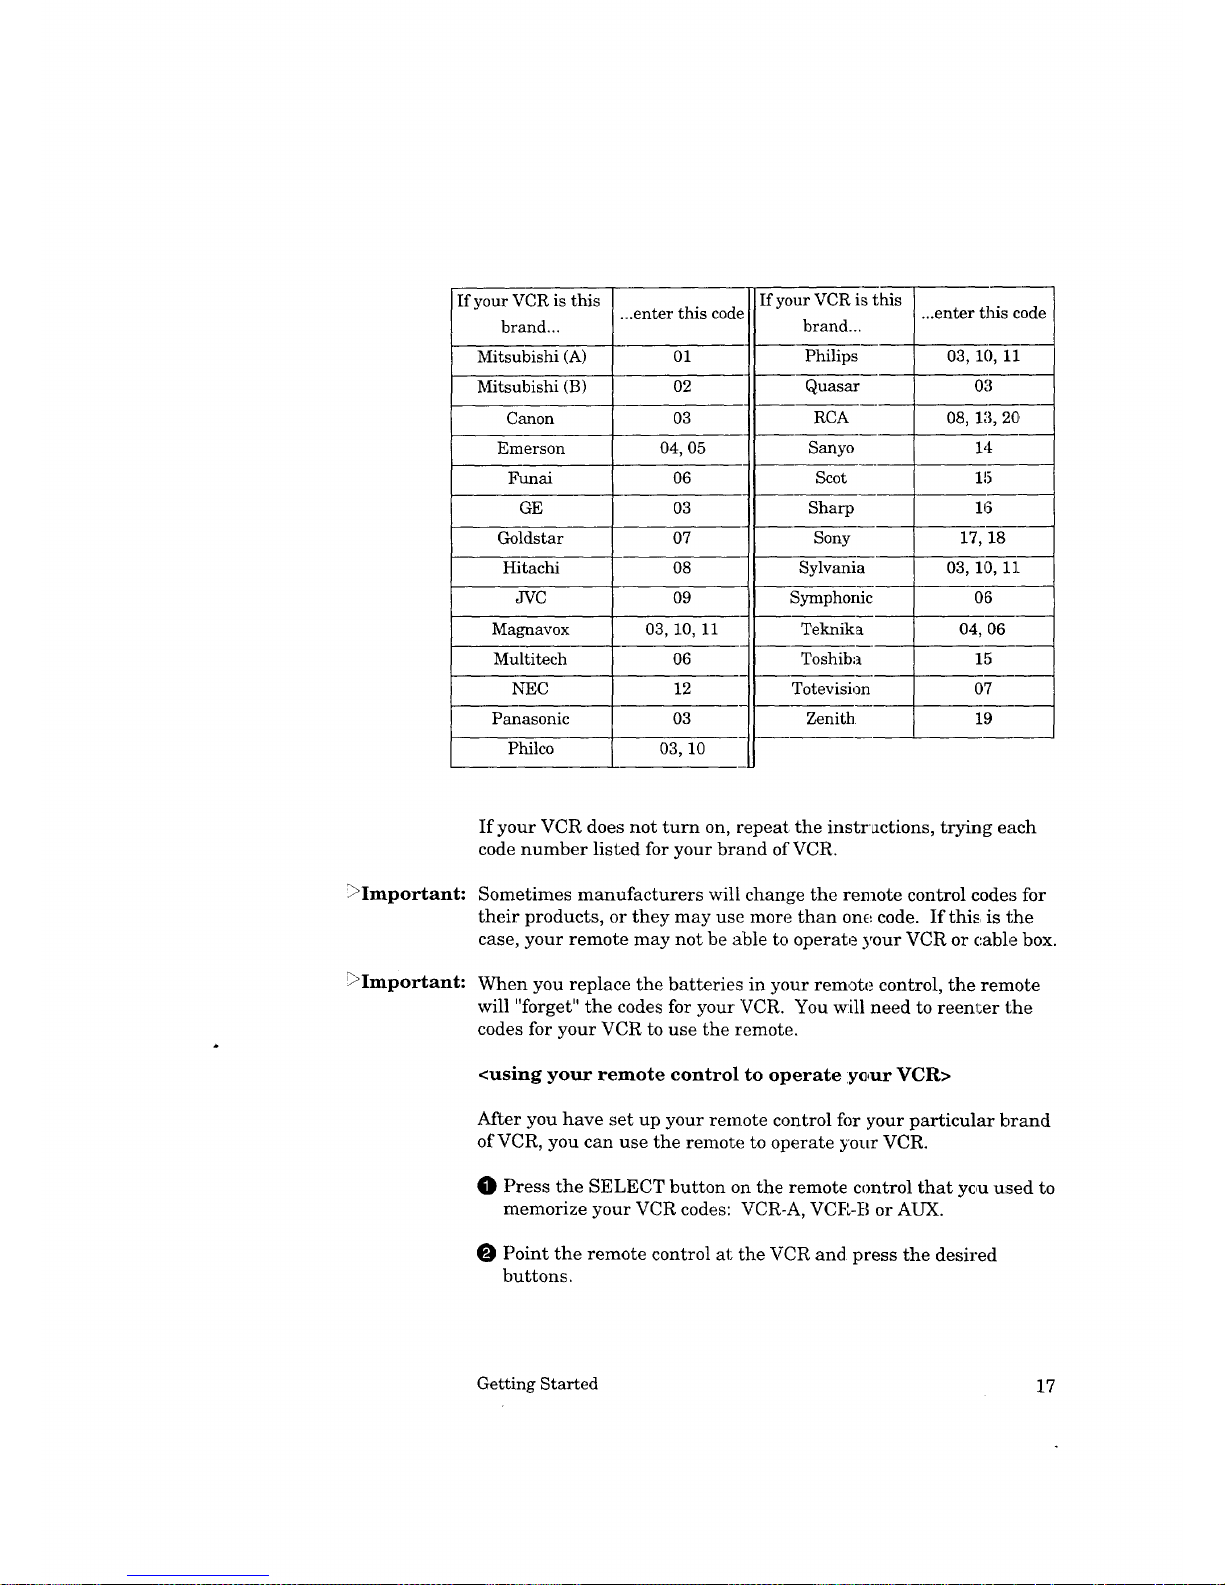
If your VCR does not turn on, repeat the instractions, trying each
code number listed for your brand of VCR.
Sometimes manufacturers will change the remote control codes for
their products, or they may use more than one code. If this is the
case, your remote may not be able to operate your VCR or cable box.
When you replace the batteries in your remote control, the remote
will "forget" the codes for your VCR. You will need to reenl:er the
codes for your VCR to use the remote.
<using your remote control to operate yc,ur VCR>
After you have set up your remote control fi)r your particular brand
of VCR, you can use the remote to operate your VCR.
O Press the SELECT button on the remote control that yc,u used to
memorize your VCR codes: VCR-A, VCR-B or AUX.
Point the remote control at the VCR and press the desired
buttons.
Getting Started 17
Page 22
Using the remote control (cont.)
_>Important: If you are using a Mitsubishi VCR, you will be able to use all of the
buttons on the remote control to operate your VCR except for
MUTE, VOLUME and the PIP hmction buttons.
If you are using another brand of VCR, you can use the POWER,
CHANNEL, REC, STOP, PAUSE, REW, PLAY, FF and INDEX
buttons to operate your VCR.
<using your remote control to operate your cable box>
If you wish to use your remote control to operate a cable box, please
see Booklet #1, '_¢Iitsubishi Installation and Setup Guide."
18 Chapter 2: Operating Your TV
Page 23
Turning the TV on/off
_Important:
_Important:
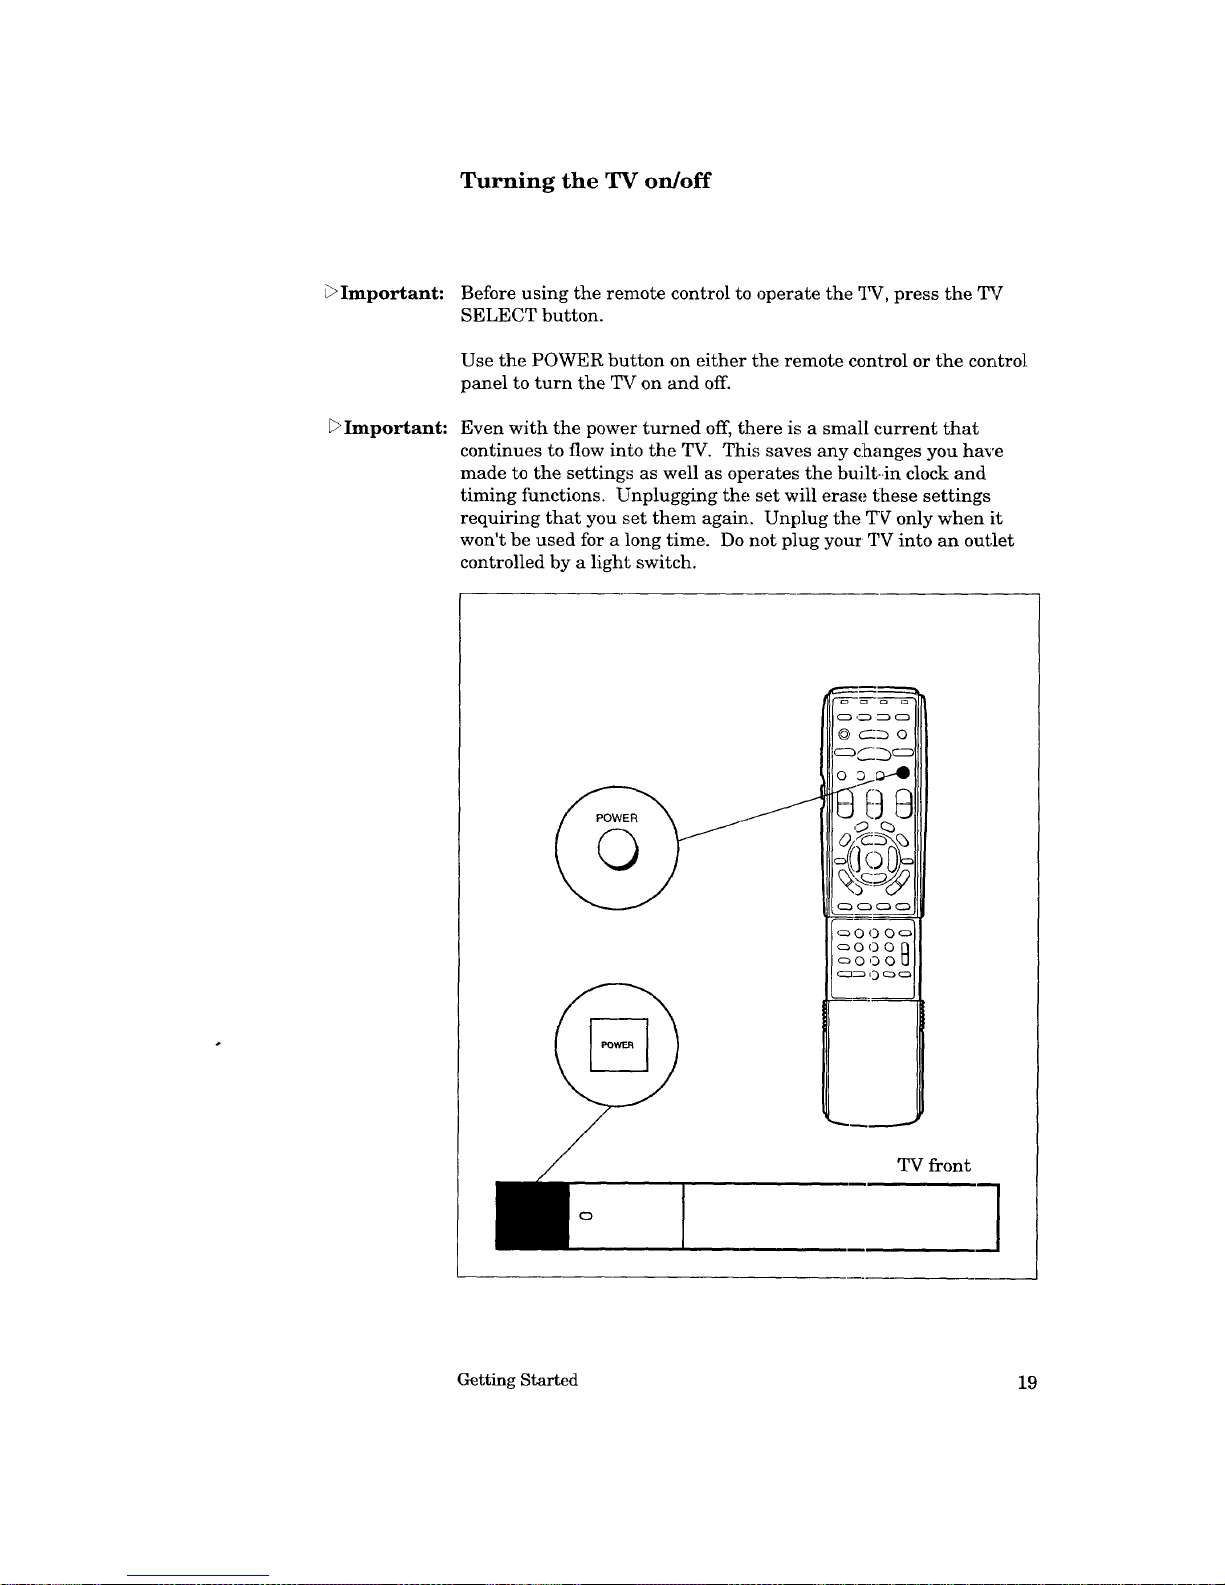
Before using the remote control to operate the _IW, press the TV
SELECT button.
Use the POWER button on either the remote control or the control
panel to turn the TV on and off.
Even with the power turned off, there is a small current that
continues to flow into the TV. This saves any clhanges you have
made to the settings as well as operates the built-.in clock and
timing functions. Unplugging the set will erase these settings
requiring that you set them again. Unplug the T_ only when it
won't be used for a long time. Do not plug your TV into an outlet
controlled by a light switch.
o D o
C:::_ _ C:3 C:3
c:_O O
TV front
]
Getting Started 19
Page 24
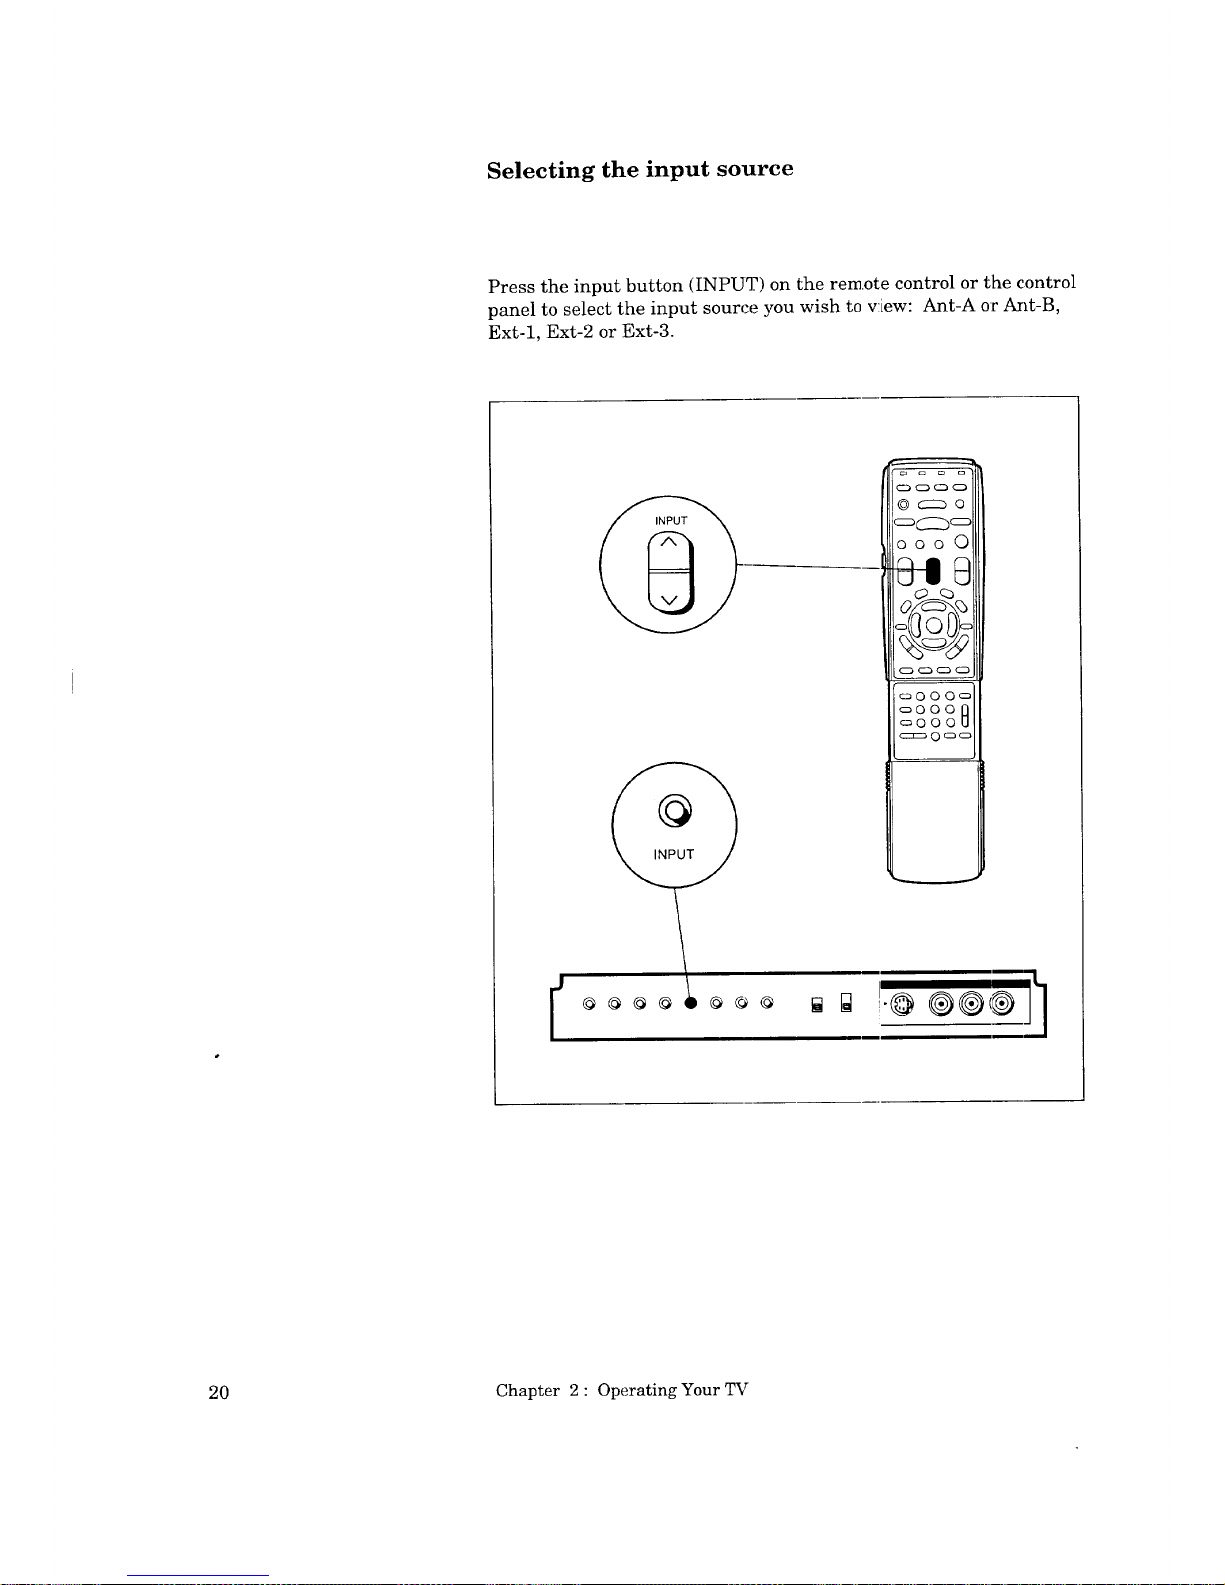
Selecting the input source
Press the input button (INPUT) on the remote control or the control
panel to select the input source you wish to view: Ant-A or Ant-B,
Ext-1, Ext-2 or Ext-3.
© _:::b o
_(::::_c::)
O0 0 0
c_O 00c_
c_O
oo° 0
c:_ 0 c_o
@
20 Chapter 2 : Operating Your TV
Page 25
Changing channels
Your TV offers you four ways of changing channels once their
numbers have been programmed into channel memory.
• changing channels automatically;
• changing channels directly;
• using the quick view option; or
• using the Super Quick View option.
Important:
To change channels faster:
Enter three digits for every channel number, using zeros where
needed. (For example, enter "004" to v!Lewchannel 4 and "028"
to view channel 28.)
€" Press the ENTER button after selectin_g the number of the
channel. (For example, press "4" and "ENTER" to view channel
4.)
Cable stations channel numbers 0 and greater than 126 are
unassigned. If you are using an antenna system with your TV,
stations 0, 1 and 70 through 999 are unassiigned. If you press these
channel numbers, the channel remains unchanged.
Getting Started 21
Page 26
Changing channels (cont.)
oo00
_000o
o000
o000_
I @@@@
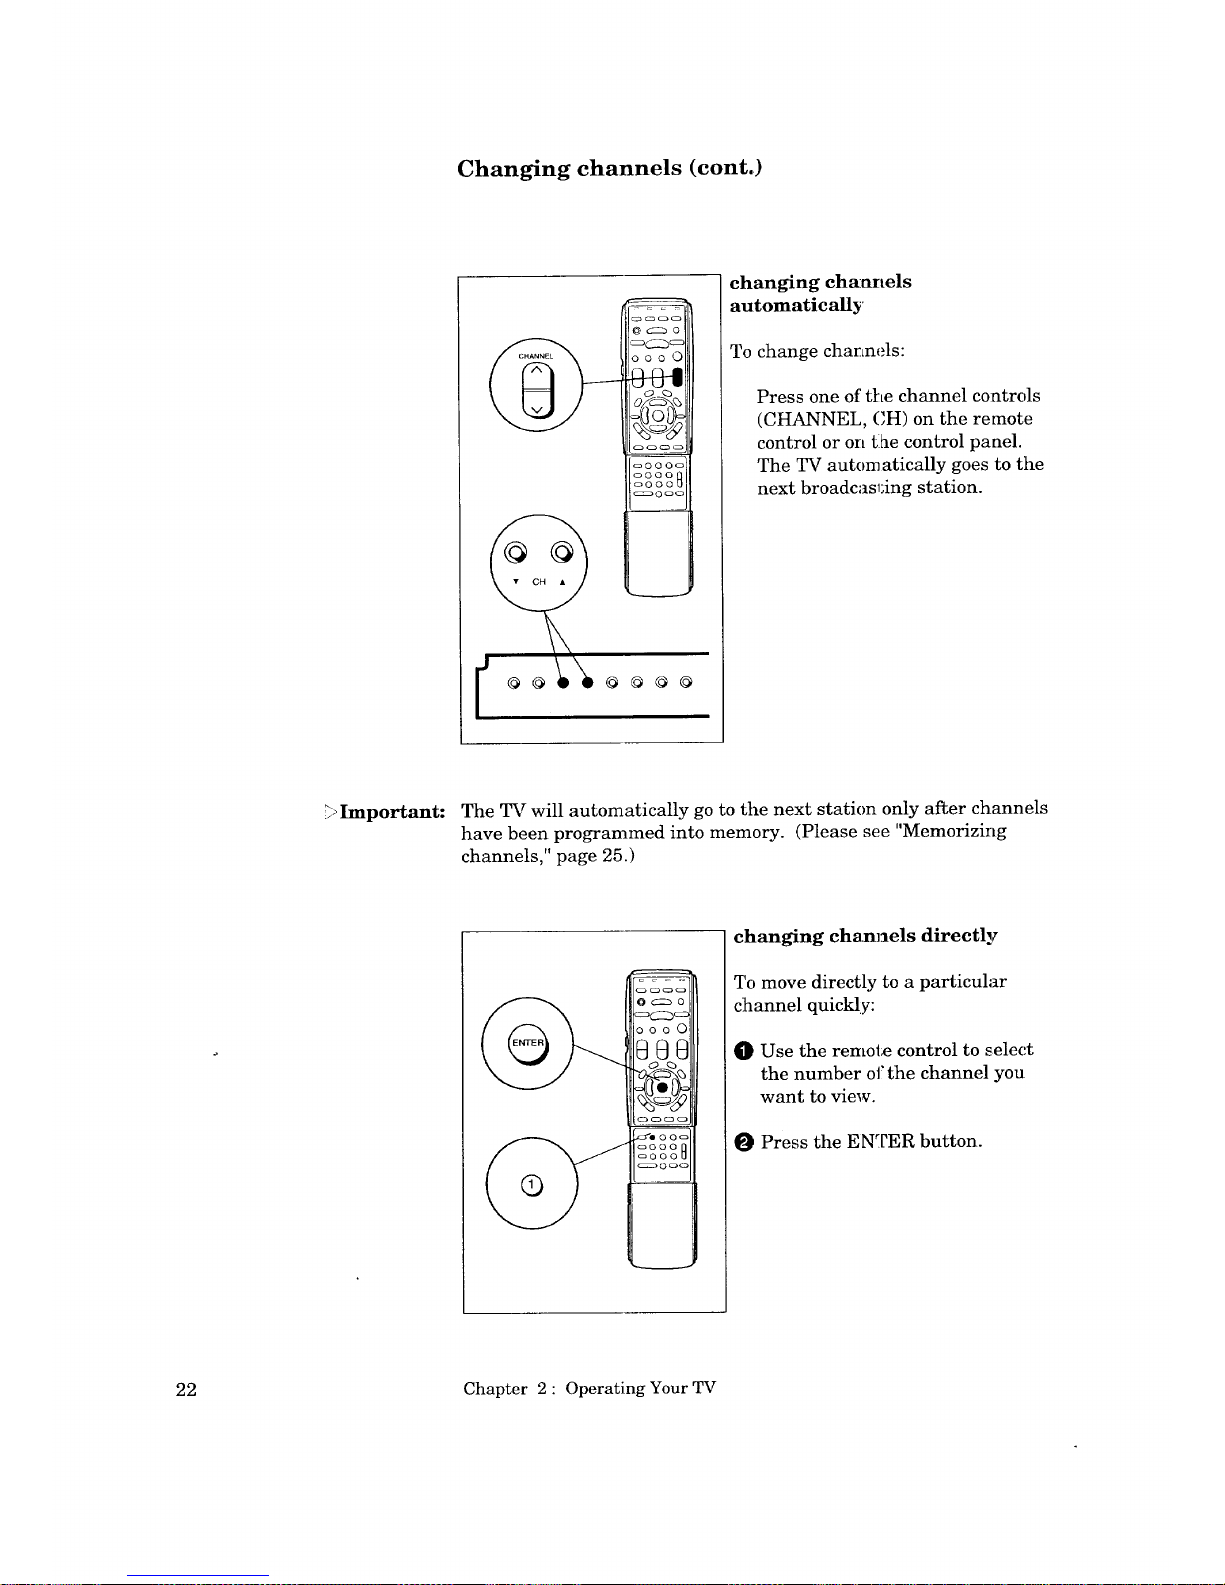
changing ch_anels
automatically
To change channels:
Press one of the channel controls
(CHANNEL, CH) on the remote
control or on tlhe control panel.
The TV automatically goes to the
next broadcasl:ing station.
_,Important: The TV will automatically go to the next station only after channels
have been programmed into memory. (Please see "Memorizing
channels," page 25.)
000 0
_,o'e 00o
o000
_000_
changing cham_els directly
To move directly to a particular
channel quickly:
_]} Use the remote control to selec.t
the number oi, the channel you
want to view.
Press the ENTER button.
22 Chapter 2 : Operating Your TV
Page 27
_000_
_000_
_O00U
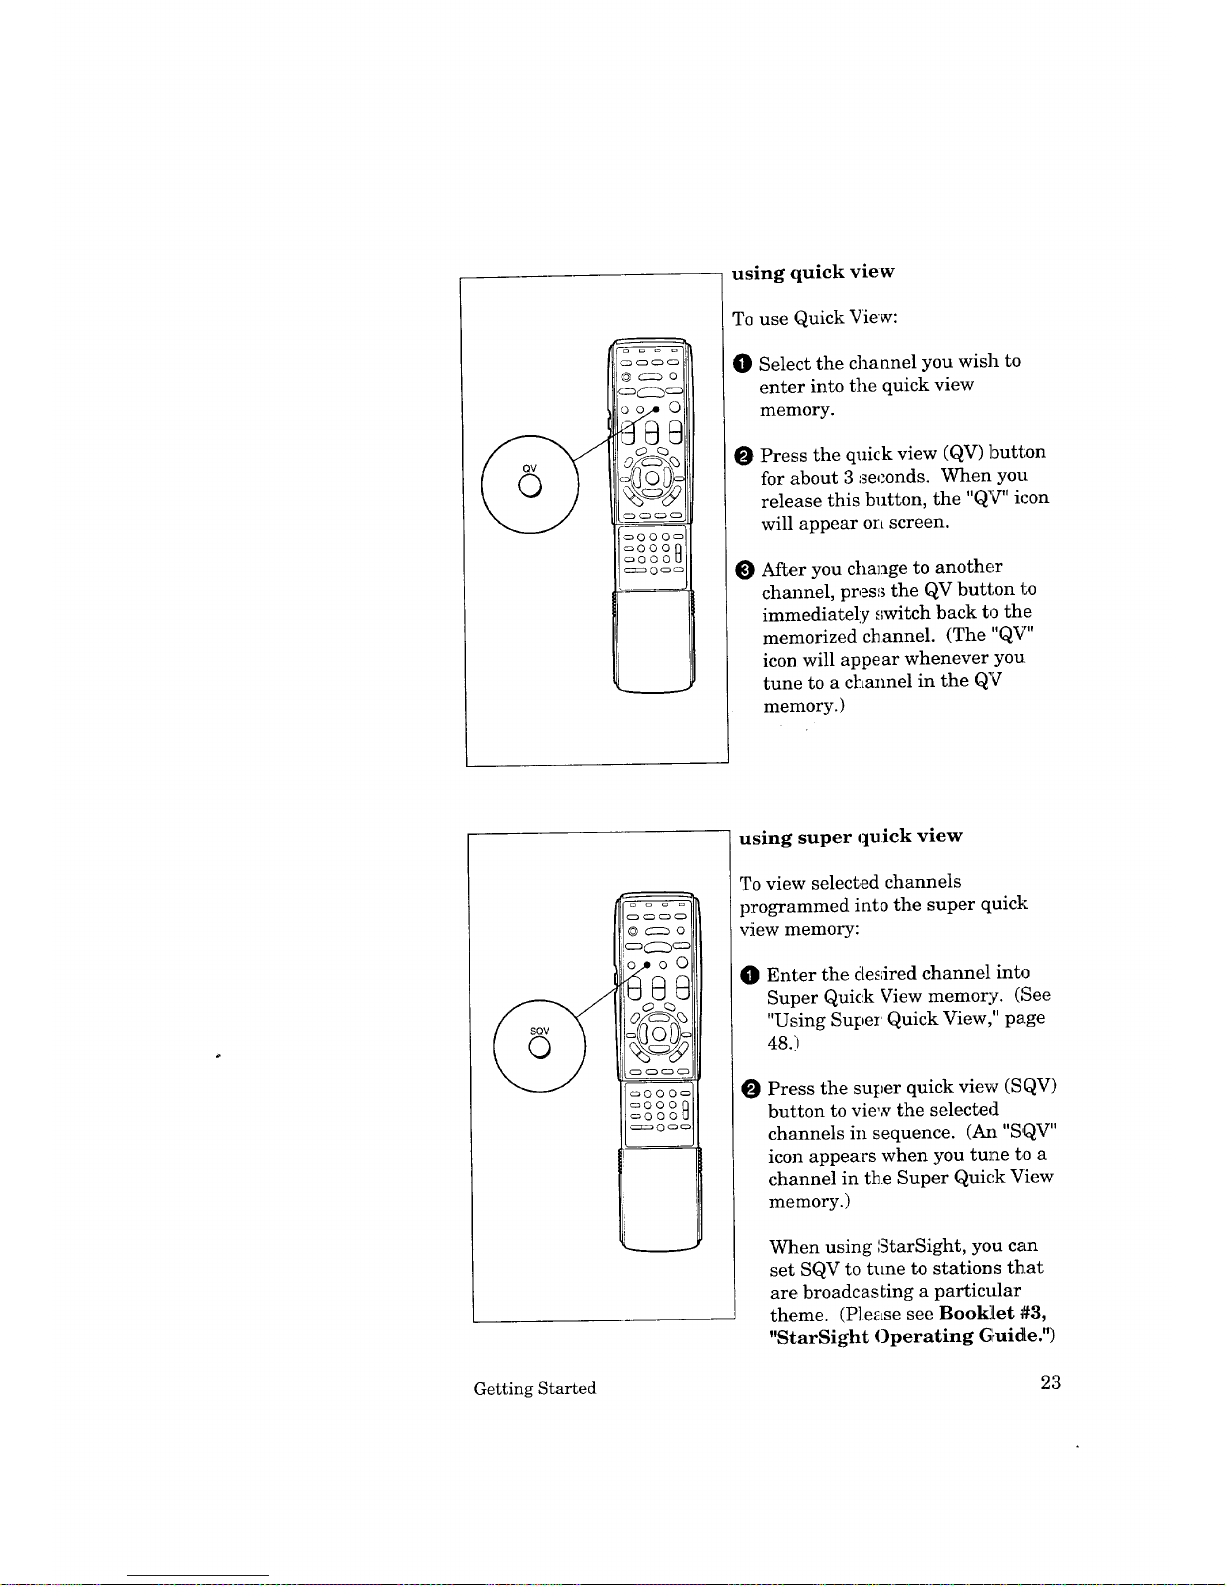
using quick view
To use Quick View:
O Select the channel you wish to
enter into the quick view
memory.
O Press the quick view (QV) button
for about 3 seconds. When you
release this button, the "QV" icon
will appear on screen.
O After you change to another
channel, press the QV button to
immediately switch back to the
memorized channel. (The "QV"
icon will appear whenever you
tune to a cl:Lannel in the QV
memory.)
© c::_ o
_000_
_O0OQ
_0OOU
c_zs_ 0 _ _
using super quick view
To view selected channels
programmed into the super quick
view memory:
O
Enter the desired channel into
Super Quick View memory. (See
"Using Super Quick View," page
48.)
O Press the super quick view (SQV)
button to view the selected
channels in sequence. (Azl "SQV"
icon appears when you tune to a
channel in the Super Quick View
memory.)
When using StarSight, you can
set SQV to tune to stations that
are broadcasLing a particular
theme. (Please see Booldet #3,
"StarSight Operating G_uide.")
Getting Started 23
Page 28

Understanding the View.L'o]nt Ill on-screen menus
One of the distinctive features of this TV is Mitsubishi's exclusive
ViewPoint III On-Screen Operating System. Unlike other
television menu systems, ViewPoint is designed with a special
Picture-In-Picture screen to let you view the _ while you ar_
selecting its special features.
When using the ViewPoint III menu system, please note:
€" The selected menu item is indicated in whit,_.
€" The on-screen menus will clear if no item is selected within 5
minutes.
J
Some menu items are available (displayed) only when you set
up StarSight. (Please see Booklet #3, "StarSight
Operating Guide" for more information about the StarSight
menus.)
€"
Some on-screen menu items must be set beibre other items are
available. For example, "Set the timer" will only be available if
you have already set the clock. (If you ar_ using StarSight, the
clock will be set automatically.)
€" You can exit the on-screen menus by pres_,;ir.g the HOME
button once on the remote control.
€" You can also exit the on-screen menus any time by pressing the
MENU button repeatedly. You will then return to regular TV
viewing.
24 Chapter 2 : Operating Your TV
Page 29

Memorizing channels
Your TV automatically memorizes the channel_ you can receive.
Once channels are memorized, you can scan l_h::ough them _Lsing
the channel control on the remote control and control panel.
To memorize channels:
[] MAIN MENU
_ irst Time Set Up I
Customize Display
Advanced Features
StarSight Setup
Use these buttons on the remote:
[_ADJUST ENTER _ MENU to
to select [] to enter go back
O Press the MENU button on the
remote control. The MAIN
MENU wi:[1 appear on the screen.
O Select "First Time Setup" using
the ADJUST button; then press
the ENTER button.
[] FI RST TIME SET UP
_ emorize channels
Set the clock
Add/delete channel
Set A]V Network
Setup Cablebox
Use these buttons on the remote:
[] ADJUST107ENTER_ MENUto
to select -- to enter go back
You will see the "FIRST TIME
SETUP" screen. Select "Memo-
rize chan_,els" using the AD-
JUST button; then press the
ENTER button.
[]MEMOR,ZECHANNELSI I
Antenna A (Ant-A) I I
IOI Antenna B (Ant-B) I
I
Your TV has two
antenna inRuts c._lled
Antenna A (Ant-A} and
Antenna B (Ant-B).
On which input would you like to
memorize channels?
Use these buttons on the remote:
[] ADJUST [] ENTER _ MENU tO
to select to enter go back
O The instructions for memorizing
channels wi:[1appear.
Choose either Antenna A (Ant-A)
or Antenna B (Ant-B) to memo-
rize channels. Choose whichever
input you connected your an--
tenna or cable to. If you con-
nected an antenna to each input,
then you should memorize the
channels for one input now, and
for the other input later.
_Important: Your TV can also memorize cable box channels. However, you must
first set-up your TV for cable box control. (Please see Booldet #1,
'rMitsubishi Installation and Setup Guide.")
Getting Started 25
Page 30

Memorizing channels (cont.)
If you select Antenna A
[] MEMORIZE CHANNELS
[] I I
[] Cable antenna
What kind of antenna is connected
to your T.V. on Antenna A (Ant-A)?
Use these buttons on the remote:
[_ADJUST ENTER [_ MENU torbq
to select -- to enter go back
O Use the _)JUST button to
choose the type of antenna :you
connected to Antenna A: Indoor/
outdoor antenna or Cable
antenna. _en press the
ENTER button.
If you select AntennaB
[] MEMORIZE CHANNELS I
[] Indoor/outdoor
antenna
[] Cable antenna
without a cable box
[] Cable antenna
with a cable box
What kind of antenna is connected
to your T.V. on Antenna B (Ant-B)?
Use these buttons on the remote:
I_ADJUST ENTER I_a MENU to
to select [] to enter go back
Use the ADJUST button to
choose tile type of antenna :you
connected 1_oAntenna B: Indoor/
outdoor antenna or Cable
antenna. _?hen press the ENTER
button.
[] MEMORIZE CHANNELS
[] Channel 015
In memory
Now memorizing all
the channel you can
receive on Antenna A
(Ant-A).
Please stand by.
Use these buttons on the remote:
CANCEL to cancel memorization
O You will see a message stating
that channel memorization is in
progress. A channel being
memorize will read, "In memory,"
channels not being memorized
read, "Not in memory." You may
stop channel memorization at
any time by pressing the
CANCEL button.
_Important: When you select "Cable antenna with a cable box," channels will be
automatically memorized from channel 1 to 99. If your cable ]box is
able to receive up to 125 channels, you should add channels from
100 to 125 using the "ADD/DELETE CHANNEL" menu.
It can take up to 20 minutes for your TV to memorize cable box
channels.
26
Chapter 2 : Operating Your TV
Page 31

Setting the clock
Your TV has a built-in clock that shows the curr_,nt time. If there
is a broadcaster in your area that :is sending the time along with its
regular broadcast signal, or if you subscribe to StarSight, then yoar
TV can automatically set its clock with these signals. Otherwise,
you may set the clock manually.
O Press the MENU button on the remote control The MAIN
MENU will appear on the screen.
O Select "First Time Setup" using the ADJUST button; then press
the ENTER button.
OFRSTT'ESETUPI I
_ emorize channels
Set the clock
Add/delete channel
Set A/V Network
Setup Cablebox
Use these buttons on the remote:
[] ADJUST[] ENTEa_ ME.Uto
to select to enter go back
You will see the "FIRST TIME
SETUP" screen. Select "Set the
clock" using tile ADJUST button;
then press the ENTER button.
Automatic setting
[] SET THE CLOCK
_ utomatic
setting : ON
Day : - -
Time : - -
Use these buttons on the remote:
]ADJUST
to turn automatic setting off
i-_ ENTER
for clock to set automatically'
[] MENU to go back
,O If you want your TV to set its
clock automatically, use the
ADJUST button to set "Auto-
matic setting" to "ON"; if you
want to set t_._eclock yourself, set
"Automatic setting" to "OFF."
The instructions for setting the
clock automatically will appear.
[] SET THE CLOCK
_] Which time zone are you in?
Atlantic
[] _ you follow daylight saving time?
Current Time: Not set
Use these buttons on the remote:
]ADJUSTto choose time zone
[_ ENTER to enter
[] MENU to go back
Select the time zone you are iJa
using the ADJUST button; then
press the F,NTER button. The
available time zones are:
Atlantic, Eastern, Central,
Mountain, Pacific, Alaska and
Hawaii.
Getting Started 27
Page 32

Setting the clock (cont.)
[] SETTHE CLOCK
r_] Which time zone are you in?
Central
[] Doyou follow daylight saving time?
Current Time: 5:30 pm
Use these buttons on the remote:
s eY Tno
ENTER to enter
[] MENU to go back
O
Manual setting
[] SET THE CLOCK I
Automatic
I
setting : OFF
_._ Day : - -
L_J Trme : - -
Use these buttons on the remote:
-_----] ADJUST
to turn automatic setting on
F_ ENTER
to set the day
[] MENU to go back
O
If you follow daylight saving
time, set the next option to "Yes"
using the ADJUST butto_a. If
you do not, set it to "No." Then
press the ENTER button.
The automatic setting is com-
pleted, and the clock will start
automatically.
The screen will return to the
"FIRST TIME SETUP" r_Lenu.
Set "Automatic setting" to "OFF"
using the AI)JUST button; then
press the ENTER button.
[] SET THE CLOCK
Automatic
I_ setting : OFF
Day : Wednesday
IOITime : --
Use these buttons on the remote:
"_ ADJUST
to select the day
IZ_] ENTER
to set the time
[] MENU to go back
Select the day using the ADJUST
button; then press the ENTER
button.
[] SET THE CLOCK I
Automatic
I
setting : OFF
Day : Wednesday
Time : 9:00pm
Use these buttons on the remote:
[] tAoDJey$T the time
[_ ENTER
1o start the clock
[] MENU to go back
Set the time using the ADJUST
button. Press the ENTER button
when the correct time appears.
The screen will return to the
"FIRST TIME SETUP" menu.
_Important: The TV can only set the clock automatically ("Automatic setting")
when there is a broadcaster that sends the time via Extended Data
Services (EDS).
28 Chapter 2 : Operating Your TV
Page 33

Adding and deleting channels
+
_%Important: When you subscribe to StarSight, add/delete channels on antenna B
with the StarSight menus. (Please see Booklet #3, StarSight
Operating Guide.")
After all available channels have been memorized, you can add or
delete any unwanted channels by using the following procedure.
Either "In memory" or--
"Not in memory" wil!
appear.
I
Use ADJUST to add
when the channel is
"Not in memory" or to
delete when the
channel is "In
memory."
_Important:
[] FIRST TIME SET UP I
_ Memorize channets
I_ Set the clock
Add/delete channel
Set AN Network
Setup CaNebox
Use these buttons on the remote:
[] ADJUST [] ENTER I_ MENU to
to select to enter go back
i
O Press the MENU button on the
remote con_;rol. The MAIN
MENU will appear on the screen.
Select "First Time Setup" using
the ADJUST button; then press
the ENTER button.
Select "Add/delete channer' using
the ADJU_,T button; then press
the ENTER button.
(_ ADD/DELETE CHANNEL
_ Antenna A (Ant-A)
Antenna B (Ant-B)
Your TV has two
antenna inLquts called
Antenna A (Ant-A) and
Antenna B (Ant-B).
On which input would you like to
add or delete channels.
Use these buttons on the remote:
[_ADJUST [] ENTER r_ MENU to
to select to enter go back
O
Select ei_:her Antenna A or
Antenna B (whichever contains
the channel you would like to
add or delete) using the ADJUST
button; then press the ENTER
button.
[] ADD/DELETE CHANNE_ ]
Current settings: | |
Antenna : A / I
(Cable) |
L_J Channel : 003 /
- [] Not in memory
Use these buttons on the remote:
]ADJUST ENTER _MENUtoroq
to select --to enter go back
O Select the channel you would like
to add or delete using the
ADJUST button; then press the
ENTER button. The selected
channel w_ll appear in the _op
right corner of the screen.
Channels that are in memory
will be labeled, "In memory";
channels not in memory are
labeled, "Not in memory."
Follow the additional on-
screen instructions, adding a
channel into channel memory or
deleting a channel from channel
memory.
You may switch between the antennas (Antenna A and Antenna B)
by pressing the input button (INPUT).
Getting Started 29
Page 34

Setting the AN Network
_Important:
The A/V Network is a special system that Mitsubishi developed to
make it easier to use a home theater system. When the cable is
connected between two Mitsubishi products with the A/V Network,
you can point the remote control at one product and it will "pass"
the remote control command to the other.
When you subscribe to StarSight, you will not need to use the
Quick Program or Quick Play features. StarSight offers an easy,
one-button method for recording program,;.
To use the A/V Network:
[] FIRST TIME SET UP
_ emorize channels
Set the clock
Add/delete channel
Set AN Network
Setup Cablebox
Use these buttons on the remote:
[] ADJUST [] ENTER _ MENU tO
to select to enter go back
O Press the MENU button on the
remote control. The MAIN
MENU will appear on the screen.
e Select "First Time Setup" using
the ADJUST button; then press
the ENTER button.
[] SET A/V NETWORK
[] AN Network: Active
When AN Network is
set to "Active" or
"Basic', your TV can
perform automated
operations with other
Mitsubishi I?roducts.
Set to "off" if you do not have other
Active A/V Network products.
Use these buttons on the remote:
]ADJUST _ MENU to
to select go back
O
O
Select "Set A/V Netwo:rk" using
the ADJUST button; t:hen press
the ENTER button. The "SET
A/V NETWORK" screen will
appear
Use the !_J)JUST button to
select "Active," "Basic," or "OFF."
Check 1;he rear terminals of your
VCR, then use the chart below to
determine how you should set
your TV.
Press tlhe MENU button to
return to the "FIRST TIME SET
UP" mena,
30 Chapter 2 : Operating Your TV
Page 35

-it---1
If your VCR has a rear ...and you have set yore"
terminal that reads: VCR to: ...then set you_ TV to:
A/V Network Basic
Active A/V Network OFF Basic
Active A/V Network Active Active
Does not have an A/V
Network rear terminal OFF
_Important:
_Important:
When an AN Network cable is connected between the TV and VCR
and the following conditions are met, your TV has two additionM
features.
If...
J You set up "StarSight," and
J Your VCR is one of the following models: HS-U500,
HS-U550, HS-U650, or HS-U770, and
J You have set "A/V Network" orLyour TV and VCR to
"Active."
Then...
J The TV will control your VCR 1;orecord present and
future programs.
¢" An error message will be displayed when you record
from the "StarSight" screen if the VCR is:
• currently recording;
• playing a tape;
• turned off; or
• if a tape is not inserted into the VCR
When an AN Network cable is connected between two products
(such as a TV and VCR), you can operate the VCR by pointing l:he
VCR's remote control directly at the TV even if "A/V Network" is
set to "OFF."
If you do not use the A/V Network system, set "A/V Network" to
"OFF."
If you are using a Mitsubishi VCR with A/V Network or Active A/V
Network, you should have connected the VCR to the External 1
(EXT-1) input of your TV.
Getting Started 31
Page 36

Choosing a menu display
You have three options for displaying the on-screen menus:
The "Standard Menu," provides step-by-step instructions for all
features.
The "Intermediate Menu" lets you choose features directly by
selecting an icon (and feature name).
The "Advanced Menu" lets you use menu fi._atures directly by
selecting a menu icon.
[] MAIN MENU
_ irst Time Set Up
Customize Display
Advanced Features
StarSight Setup
I
Use these buttons on the remote:
ADJUST ENTER _ MENU to
to selecl -- to enter go back
O Press the MENU button on the
remote control. The lVLkIN
°l
MENU wr.1 appear on the ,_creen.
O Select "Customize Display" using
the ADJUST button; tl_,en press
the ENTER button.
[] CUSTOMIZE DISPLAY
[] Menu display
choices
[] Rename the inputs
[] Name the channels
[] Lock AN functions
[] Use Advanced PIP
[] Use Power Restore
Use these buttons on the remote:
[_ADJUST ENTER [_ MENU to
to select [] to enter go back
You will see the "CUSTOMIZE
DISPLAY" screen. Select "Menu
display choices" using the
ADJUST button; then press the
ENTER button.
[] MENU DISPLAY CHOICES
@ tandard Menu
Intermediate Menu
Advanced Menu
The Standard Menu tets you select
features in a step-by-step method,
and contains fulldescriptions of
the features. The TV's picture will
be reduced in size.
Use these buttons on the remote:
[_ ADJUST _] ENTER I'_ MENU to
tO select to enter go back
_O Use the ADJUST button to select
"Standard Menu," "Intermediate
Menu," or "Advanced Menu."
O Press the ENTER button. When
you select the "Standard Menu,"
the screen will return to the
"CUSTOMIZE DISPLAY" menu;
when you select the "Intermedi-
ate Menu," or "Advanced Menu,"
the screen will change to ),our
selected main menu display.
32 Chapter 2 : Operating Your TV
Page 37

You will see the following "MAIN MENU" display when using the
"Intermediate Menu" or "Advanced Menu."
Menu display choices _
First Time Set Up
Customize Display
Advanced Features
• Set the timer
• Use parental lock
• SuperQuickView choices
• Reset Audio/Video
• Use Home Theater
-[]
[]
[]
[]
[]
--- StarSight proi_am
guide
• StarSight Setup
• Theme Guide
• Recordings
• Program Guide
Menu display choices
I
The feature name of the icon which
you are choosing will appear only
when using the "Intermediate
Menu."
Important: The "Intermediate Menu" and "Advanced Menu" displays will clear
within i minute if you do not select a menu item.
Getting Started 33
Page 38

I?
Renaming the inputs
This feature allows you to rename the external inputs. For
example, you may want to name one input "¥CR," and another,
"DISC." The new name will appear on-screen.
[] CUSTOMIZE DISPLAY
[]Menu display
choices
[] Rename the inputs
[] Name the channels
[] Lock A!V functions
[] Use Advanced PIP
[]Use Power Restore
Use these buttons on the remote:
J_ADJUST [] ENTER {]_ MENU to
to select to enter go back
O
O
O
Press the MENU button on the
remote control. The MAIN
MENU will appear on the screen.
Select "Customize Display"
using the ADJUST button; then
press tile ENTER button.
Select "Rename the inputs" using
the ADJUST button; t:hen press
the ENTER button.
[] RENAME THE INPUTS
Current settings:
_ Ext-1
Ext-2
Ext-3 .....
Use these buttons on the remote:
[_ DJUST to _ CANCEL to cancel
select an input
[] ENTER to enter _ MENU to go back
O
Use the ADJUST button to select
which input (Ext-1, Ext-2 or Ext-
3) you want to rename. T]hen
press the ENTER button.
[] RENAME THE INPUTS r_-_
Current settings:
_ xt-1 ABCD-
O_ Ext-2
LOJExt-3
Use these buttons on the remote:
J_ DJUST to r_ CANCEL to cancel
name the input
[] ENTER to enter I_ MENU to go back
Choose tile new name using the
ADJUST button and the ENTER
button.
You can rename the inputs using
letters (A-Z), numbers (0-9), or
symbols (:/., ( ) ! " # $ % &' * + ;
< = > ? blank -).
You can always clear 1;he ..selected
input By pressing the CANCEL
button.
After naraing, press the MENU
buttom the screen will1 return to
the "CUSTOMIZE DISPLAY"
menu.
34 Chapter 2 : Operating Your TV
Page 39

Naming the channels
C ?
This feature lets you name the channels. Ai_erwards, the channel
name will appear on the TV screen.
[] CUSTOMIZE DISPLAY
i'-'_ Menu display
choices
[] Rename the inputs
[] Name the channels
[] Lock NV functions
[] Use Advanced PIP
[-_Use Power Restore
Use these buttons on the remote:
-]ADJUST ENTER [_ MENU to
to select [] to enter go back
O
O
O
Press the MENU button on the
remote control. The MAi[N
MENU will appear on the screen.
Select "CusLomize Display"
using the ADJUST button; then
press the ENTER button..
Select "Nanm the channels"
using the ADJUST button; then
press the ENTER button.
[] NAME THE CHANNELS
Current settings:
r_qAntenna : A
(Indoor/outdoor)
Channel : 003
io] Name : .....
Use these buttons on the remote:
[_ ADJUST to
select a channel
[] ENTER to enter [_ MENU to go back
O
O
O
Select an antenna using the
ADJUST button; then press the
ENTER button.
Select a channel to name using
the ADJUS]? button and the
ENTER button.
Set the new name using the
ADJUST button and the ENTER
button.
[] NAME THE CHANNELS I
Current settings: I
r_qAntenna : A I
L_J (Indoor/outdoor)
[] Channel : 003 I
IOI Name : ABC-
Use these buttons on the remote:
i_ DJUST to _ CANCEL to cancel
change the letter
[] ENTER to enter [_ MENU to go back
You can name the channels using
letters (A-7), numbers (0-9), or
symbols (:/., () ! " # $ % &' * + ;
< = > ? blank -).
While you are setting the name,
you can clear the name by press-
ing the CANCEL button. A_ter
naming, press the MENU button;
the screen will return to the.
"CUSTOM]ZE DISPLAY" menu.
_Important: You can name up to sixty channels. If you try to name more than
sixty channels, you will see an on-screen mes,_age that says
"Memory over !" This indicates that the memory is full.
If you subscribe to StarSight, tlhe StarSight system will
automatically name the channels.
Getting Started 35
Page 40

Locking AN functions
You can lock some audio and video functions to their cur:rent
settings. Once you lock a particular setting, that function will not
be displayed on-screen until you unlock it.
[] CUSTOMIZE DISPLAY
[] Menu display
choices
[] Rename the inputs
[] Name the channels
[] Lock A/V functions
[] Use Advanced PIP
['_'_ Use Power Restore
Use these buttons on the remote:
[_]ADJUST [] ENTER I_ MENU to
to select to enter go back
O
O
O
Press tlhe MENU button on the
remote control. The MAIN
MENU will appear on the screen.
Select ' C astomize Dislplay"
using tlhe ADJUST button.; then
press the ENTER button.
Select "Lock AN functions"
using tlhe ADJUST button; then
press the ENTER button.
[] LOCK NV FUNCTIONS
[] TV Listen to : Stereo
unlocked
You can lock some AN functions to
their current settings. When you de
this, the function will not be
displayed until it is unlocked.
Use these buttons on the remote:
AUDIO or VIDEO F_] ADJUST to lock
to select
a menu item
MENU to go back
[] LOCK AN FUNCTIONS
[] TV Tint
unlocked
You can lock some AN functions to
their current settings. When you de
this, the function will not be
displayed until it is unlocked,
Use these buttons on the remote:
1_ AUDIO or VIDEO [_]ADJUSTto lock
to select
a menu item
MENU to go back
O To lock an audio function, select
the audio function to lock using
the AUDI[O button.
To lock a video function, select
the video function to lock using
the VII)EO button.
Use the ._X)JUST button to
switch bc,tween "locked" and
"unlocked."
Press the MENU button to
return to the "CUSTOMIZE
DISPLA_._ '' menu.
.>Important: The speaker functions
(internal/internal center
channel/external) and closed
captioning _ ) cannot be
locked. If you try to lock
these functions, the on-screen
display shows:
[] LOCK AN FUNCTIONS
[O_ TV Speaker : External
cannot be locked
You can lock some NV functions to
their current settings. When you do
this, the function w_ll not be
displayed until it is unlocked.
Use fhese but13ns on the remote:
AUDIO or '¢ID ff.O
to select
a menu ite 11
[_ MENU to go back
36 Chapter 2 : Operating Your TV
Page 41

Using the advanced PIP functions i QI
You can use the pause button in the Picture-in-Picture mode to
display special PIP features. (See "Using Picture-in-Picture [PIP],"
page 60.)
• In "TV Still," the PIP image switches between still mid moving.
• In "Snap-shot," you can f_eeze a scene, and display a moving
PIP image and up to two still images on the screen.
In '_eplay," you can view the still PIP images in sequence for a
"strobe" animation effect.. These images will appear in sets of
three (front a total of seven stored images) at the speed you
select.
[] CUSTOMIZE DISPLAY
[] Menu display
choices
[] Rename the inputs
[] Name the channels
[] Lock A/V functions
[] Use Advanced PIP
[_--] Use Power Restore
Use these buttons on the remote:
_ ADJUST [] ENTER _ MENU to
to select to enter go back
0 Press the MENU button on the
remote control. The TV Main
Menu will appear on the screen.
Select "Customize Display"
using the ADJUST button; then
press the ENTER button.
Select "Use Advanced PIP" using
the ADJUST button; then press
the ENTER button.
[] USE ADVANCED PIP
Current setting
[] :TV Still
The picture in the
PIP window will freeze when the
PAUSE button is pressed.
This feature is available on
Antenna A(Ant-A) and external inputs.
Use these buttons on the remote:
ADJUST [] ENTER [_ MENU tG
to select to enter go back
O
Select a setting: TV Still, Snap-
shot or Peplay, using the
ADJUST button. Then press the
ENTER button.
Getting Started 37
Page 42

I ol
Using the advanced PIP functions (cont.)
[] USE ADVANCED PIP
[] Current setting
: Replay
[] Replay Speed
: 1
Use these buttons on the remote:
[_ADJUST [] ENTER _ MENU to
to select to enter go back
When you select "Replay:," the
next option will be "Replay
speed." Use the ADJUST
button to set the replay speed
from 1-9: l=short interwal and
9=long i:aterval. (The ADJUST
up butten will change the speed
to a higher number; ADJUST
down :button will cha:age to a
lower n_Lmber.) Press ENTER.
The main image will replay in
sets of three in a "strobe" anima-
tion effect at the speed you
selected.
Press LheMENU butLon to
return, tt) the "CUSTOMIZE
DISPLAY" menu.
38 Chapter 2 : Operating Your TV
Page 43

Using the power restore feature
When you use this feature, the TV will autoraatically turn on when
electric current is supplied. This feature is useful when your TV is
plugged into an outlet that you control with a wall switch.
%Important: When using StarSight, you must have a constant source of power
for the feature to properly work. Do not p!Lugyour TV into an A/V
receiver or a power source controlled by a wall switch when you
subscribe to StarSight. Do not use this feature if you subscribe to
StarSight.
To use power restore:
[] CUSTOMIZE DISPLAY
_J Menu display
choices
[] Rename the inputs
Name the channels
[] Lock AN functions
Use Advanced PIP
[] Use Power Restore
Use these buttons on the remote:
_._ADJUST ENTER _ MENU te
to select [] to enter go back
O
l
O
O
Press the MENU button on the
remote control. The MAIN
MENU will appear on the screen.
Select "Customize Display" using
the ADJUST button; t:_en press
the ENI_ER button.
Select "U_e Power Restore" using
the AD.JI_ST button; then press
the ENTER button.
[] USE POWER RESTORE I
[] Power Restore: OFF I
When this feature is I
used, the TV will |
turn on when power is L
supplied. Use this
feature when the TV's
power cord is plugged into a cable box,
a home theater receiver, or an outlet
controlled by a wall switch.
Do not use this feature when you
subscribe to StarSight,
Use these buttons on the remote:
[_ ADJUST [_ MENU to
to turn on go back
0
The "USE POWER RESTORE"
screen will appear. Use the
ADJUST button to switch to
"ON."
Press the MENU button to
return to the "CUSTOMIZE
DISPLAY" menu.
5>Important: For this feature to work, you must leave your TV turned on when
you turn off the electric current.
[:>Important: Even when you use power restore, unplugging the set requires that
you reset functions such as the built-in clock and timing functions.
Getting Started 39
Page 44

Adjusting the sound
40
Important:
You can adjust all of your television's audio functions by u,_ing a
pair of buttons: AUDIO to choose an audio function; ADJUST to
adjust it.
After adjusting the sound, an on-screen display will indicate the
function and level you've selected.
what you'll adjust:
€" '%isten to: Stereo/SAP/Mono" allows you to change the audio
to stereo, separate audio programming (SSLP), or monaural
(mono), depending on the type ofbroadcasl: you are receiving.
• The "Stereo" setting allows you to receive both mono land
stereo broadcasts.
• The separate audio programming ("SAP") setting offers
you the option of listening to either of two separate audio
programs. For example, a combinatic,n television/radio
station may broadcast through the TV.
• The '_VIono" setting reduces unwanted background noise
when you receive a weak stereo broad.cast. When you
use the "Mono" setting, you will hear the broadcast in
monaural even when the broadcast signal is in stereo.
An on-screen display appears when programs_ are broadcast in
stereo or when separate audio programming (SAP) is available.
€" '_Bass" controls the volume of low frequency sound.
,/ "treble" controls the volume of high freq_:ency sound.
J" '%Voofer" adjusts the sound level of the super woofer st)eaker.
J" '_Balance" adjusts the level of sound between the left and right
speakers.
J "Surround: Off/Simulate/Hall" allows you to simulate or
expand stereo sound.
• "Off' does not change the sound.
• "Simulate" gives you a pseudo-stereo effect when receiving
monaural sound broadcasts.
• '_Iall" makes stereo sound seem wider and extend around
behind you.
Chapter 2 : Operating Your TV
Page 45

Important:
"Speaker: Internal/Internal Center Channel/External"
lets you choose a speaker to listen to (built-in or external).
° Set to "Internal" to hear the TV's built-in speakers.
Set to "Internal Center Channel" when you connect the
center channel input terminal to an amplifier that delivers
surround sound. Your television's speaker will play the
center channel signal from your amplifier.
Set to '_xternal" when you connect the TV to exter:aal
speakers or audio system.
J 'rMonitor out: Variable/Fixed" lets you set up the TV for use
with a home theater receiver or audio system.
Choose 'Wariable" when you wish 1:ouse the TV
remote control for such functions as volume and mute.
Choose 'rFixed" if you connected a home theater receiver or
audio system. This lets you control functions such as
volume and mute through the receiver or audio system.
When you subscribe to StarSight, only the ADJUST (right/left)
buttons will adjust the audio functions. The ADJUST (up/down)
buttons are used for StarSight functions.
adjusting 1:he audio functions
0 Use the AUDIO button on the
remote control to select one of the
functions.
Use the .ADJUST (up/down)
button, o:rright/left button on the
remote control to adjust the
function,
Getting Started 41
Page 46

Adjusting the picture
Important:
You can adjust all of your television's picture functions by using a
pair of buttons: VIDEO to choose a picture function; ADJUST to
adjust it.
When you subscribe to StarSight, only the ADJUST (right/left;)
buttons will adjust the video functions. The ADJUST (up/down)
buttons are used for StarSight functions.
what you'll adjust:
€" 'Tint" adjusts the proportion of red to green that determines the
tones of color.
I "Color" determines the intensity of the color.
I "Contrast" controls the level of white-to-black in the picture.
J "Brightness" controls the light level of the image on scree:a.
,/ "Sharpness" adjusts the detail and clarity of the picture.
€" '_¢ideo N(oise) R(eduction): On]Off' is used to reduce
background noise that can occur with weak signals. Usually this
function is set to "Off'.
l
,!
l
"Color temp(erature): LowfLVliddle/High" is used to change
the relative warmth of the :picture.
"Color bias: Average/Accurate/Skin-tone" is used t_ improve
the color reproduction.
"[_ (closed captioning): 1/2/3/4]Text l/Text 2/Text 3/Text
4JWhen muting/Off' is used to display text on the TV screen.
oooO
_000_
_00©
oO00B
_0_
adjusting the video functions
O Use the VIDEO button on the
remote control to select one of the
functions.
O Use the ADJUST (up/down)
button or right]left button on the
remote control to adjust the
function.
42 Chapter 2 : Operating Your TV
Page 47

Using the closed caption decoder
!>Important:
Many broadcasters now supply closed caption.ing information along
with their regular broadcasts.
There are two types of captioning that broadcasters can send:
"standard" and "text."
Standard captioning displays text that is related to the program
that is being shown. Standard captioning usually follows the
dialogue of the characters on-screen.
Text captioning often contains information such as weather or
news. Text captioning may block your view of the program you are
watching.
Your TV can decode four different "standard captioning" signals
and four different "text captioning" signals o:a each TV channel
(when supplied by the broadcaster).
_©OO
_000_
_O_
I
To use the closed caption decoder:
O Press the VIDEO button o:n the
remote control until the closed
captioning ([_) display
appears o:a the screen.
0 Press the ADJUST (rightJleft)
button on the remote
control to select the captioning
signal you wish to display:
a_/BT 2,'B7 3/cc
Text 1/132U] Text 2/_',C_ Text 31
[_ Text-4/_WherL muting/
Off.
You can choose to display one of four "stm_dard captioning" signals
(indicated by the word _] and a number), to display one of four
"text captioning" signals (indicated by the, word "Text" m_d a
number), to display captions when muting, or to turn the captions
off.
If you select "When muting," the standard captioning signal
will appear whenever you use the MUTE', button.
Closed captioning was initially designed so that those with hearing
difficulties can enjoy viewing television more. However, closed
captioning can also be used in other ways, such as:
• helping children learn to read,
• learning a foreign language, and
• using the television without disturbing others.
Getting Started 43
Page 48

Using the Advanced Features
_Important:
This section explains how to use the more advanced features of
your Mitsubishi TV.
For information on operating StarSight, please; see Bookle_L #3,
"StarSight Operation Guide."
In this chapter, you will learn about:
Setting the timer,
Using the parental lock,
Using Super Quick View,
Using home theater, and
Resetting the sound and the picture.
44 Chapter 2 : Operating Your TV
Page 49

Setting the timer
This special feature allows you to program the TV to turn on
automatically at a preset time. To set the timer:
[] MAiN MENU
_ irst Time Set Up I
Customize Display
Advanced Features
StarSight Setup
Use these buttons on the remote:
[_ ADJUST [-_ ENTER _ MENU to
tO select to enter go back
O Press thE; MENU button on the
remote control. The MAIN
MENU wilt appear on the screen.
O Select "Advanced Features" using
the _'
ADJUncT button; then press
the ENTER button.
[] AOVANCEDFEATU,ESI I
[] Set the timer
[] Use parental lock ]
[] Set SuperQu ckV ew
[] Use Home Theater
[] Reset AudioNideo
Use these buttons on the remote:
[_ADJUST ENTER F_5] MENU to
_q
to select -- to enter go back
You will see the "ADVANCED
FEATURES" screen. Select "Set
the timer" using the ADJUST
button; then press the ENTER
button.
[] SET THE TIMER
Day : Sunday
Start time : - -
Input ; - -
Channel :--
Use these buttons on the remote:
_ ADJUST to select the day
[] ENTER to enter _ MENU to go back
O Follow the additional on-
screen ins';ructions to set Day,
Start time, Input and Channel.
After setting the timer, check to
see that the program timer
indicator lights up. The indicator
will not light up when using the
menus, or when the parental lock
message i'_ being displayed.
)>Important:
When the timer turns the TV on, the display will flash as a
warning. If you do not press a TV function button for about 5
minutes, the TV will automatically turn off again. If you: press a
TV function button, (eg. display button), the TV will remain on and
the display will stop flashing.
Using the Advanced Features 45
Page 50

Using the parental lock
locking the TV
This special feature locks the entire TV or one particular channel
to prevent others from watching it.
O Press the MENU button on the remote control. The MAIN
MENU will appear on the screen.
Select "Advanced Features" using the ADJUncT button; then
press the ENTER button.
Select "Use parental lock" using the ADJUST button; then press
the ENTER button.
[] USE PARENTAL LOCK I-_
Lock the TV
Lock channel
Use these buttons on the remote:
[_ADJUST [] ENTER [_MENUto
to select to enter go back
0
Select "Lock the TV" using the
ADJUST button; then press the
ENTER button. The message for
locking the TV will appear.
O Enter a secret, four digit code
using the number buttons (0-9);
tlhen press the ENTER button.
_Important: You cannot use the timer when the TV is locked.
[] USE PARENTAL LOCK
Lock the TV : OFF
[] Secret code : ....
After you turn the TV
OFF, you will not be
able to watch the TV
w(thout the code.
Use these buttons on the remote:
[] NUMBER KEYS to enter a 4-digit code
[] ENTER to enter [_ MENU to go back
When you set the parental lock to
"ON" and the 1Qck message
appears on the screen, the TV
will turn off again in about 5
minutes unless you enter the
code to unlock it.
The lock message appears when
you turn the '1_r on until yol;Lset;
the parental flock to "OFF." You
can clear the code by pressing
the C_&NCEL button.
[] USE PARENTAL LOCK '1
Lock tile rv : ON
]Secret ('ode : ....
Use these buttons on the remote:
[] NUMBER KEYS to enter a 4-digit code
[] ENTER to enter
When you set; "]Lock the TV" to
"ON," you wiT1 see a message
when you next _urn the television
on asking you to enter your secret
(:ode.
46 Chapter 2 : Operating Your TV
Page 51

locking a channel
[] USE PARENTAL LOCK
Lock channel : OFF
_ ntenna : A
(Cable)
Channel : 010 AAAA
[] Secret code : ....
You will not be able to watch
channel 010 without the code.
Use these buttons on the remote:
[_ADJUST [] ENTER _ MENU to
to select to enter go back
O
I"
O
Select "Lock the channel."
Following the additional
on-screen instructions, set
Antenna and Channel using the
ADJUST button and the ENTER
button.
Enter the secret code in four
digits using the number buttons
(0-9); then press the ENTER
button.
[] USE PARENTAL LOCK
Lock channel : ON
_] Secret code : ....
Use these buttons on the remote:
[] NUMBER KEYS to enter a 4-digit code
[] ENTER to enter
0
canceling the parental lock:
OUSE'''''T'LL 'II
Lock the TV : ON
_ Secret code : ....
Use these buttons on the remote:
[] NUMBER KEYS to enter a 4-digit code
[] ENTER to enter [_ MENU to go back
0
0
0
You can clear the code pressing
the CANCEL button.
When you set "Lock channel" to
"ON," you will see a message
when you r_ext select the channel
asking you to enter your secret
code.
Press the channel control
(CHANI_EL) or input button
(INPUT) to view an unlocked
channel.
Press the MENU button on the
remote control. The MtLIN
MENU will appear on tlhe screen.
Select "Advanced Features"
using the ADJUST button; then
press the ENTER button.
Select "Use parental lock" using
the ADJUST button; then press
the ENTER button.
_Important:
[] USE PARENTAL LOCK
Lock channel : ON
[] Secret code : ....
Use these buttons on the remote:
[] NUMBER KEYS to enter a 4-digit code
[] ENTER to enter
0 Using t_.LeADJUST button, select
the lock you want to ca_acel;
then press the ENTER button.
O Enter the four digits of your
secret code using the number
tmttons (0-9); then press the
ENTER button.
Press the :MENU buttoa to
return to the "ADVANCED
FEATURES" menu.
If you forget the parental lock code, please see page 79.
Using the Advanced Features 47
Page 52

- when not using "StarSight" -
Using Super Quick View
Super Quick View lets you cycle through as many _.s ten TV
stations when you press the SQV button.
{]} Press the MENU button on the remote controL. The MAIN
MENU will appear on the screen.
O Select "Advanced Features" using the ADJUST button; then
press the ENTER button.
[] ADVANCEDFEATURESI I
[] Set the limer
[] Use parental lock I
[] Set SuperQuickV ew i
[] Use Home Theater
[] Reset Audio/Video
Use these buttons on the remote:
---] ADJUST [] ENTER _ MENU tO
to select to enter go back
Select "Set SuperQuickView"
using the ADJUST button; then
press the ENTER button.
[] SET SUPERQUICKVIEW
The SuperQuickView button can be
programed to scan through a custom
list of channels.
Press ENTER to edit list.
Use these buttons on the remote:
[] ENTER to continue
r_ MENU to go back
;_ The message _bz' setting the
super quick view will appear.
Press the ENTER button to edit
the SQV channel list.
[] SET SUPERQUICKVIEW
Ant. Channel Ant. Channel
[] ........ [] ........
Use these buttons on the remote:
-'] DJUST to _ CANCEL to cancel
select a position
[] ENTER to enter _ MENU to go back
Select a posit!ion to store a TV
channel using tire ADJUST
button; then press the ENTER
button.
[] SET SUPERQUICKVIEW
Ant. Channel Ant. Channel
[] ........ [] ........
Use these buttons on the remote:
_] DJUST to {_ CANCEL to cancel
select an input
[] ENTER to enter _ MENU to go back
Use the ADJUST button to
select an anten:aa. Then press
the ENTER button.
48 Chapter 2 : Operating Your TV
Page 53

[] SET SUPERQUICK VIEW
Ant. Channel Ant. Channel
o,-A0o, !!!
[] ........ [] ........
Use these buttons on the remete:
[_ DJUST to [_ CANCEL to cancel
select a channel
[] ENTER to enter [_ MENU to go back
@
O
QV
Set a channel number to program
into Super Quick View memory
using the ADJUST button and
the number buttons; then press
the ENTER button.
Continue setting the inputs and
channel numbers until your
desired channels are
programmed into Super Quick
View memory,
Press the M]_NU button to
return to the "ADVANCED
FEATURES" menu.
- when using "StarSight" -
[] AOVANCEOFEATURESI I
[] Set the timer I I
[] Use parental lock I [
SuperQuickView
choices | I
[] Use Home Theater
[] Reset Audio/Video
Use these buttons on the remote:
[_ADJUST [] ENTER _ MENU to
to select to enter go back
[] SUPERQUICKVIEW CHOICES
[] Customized Channels I
[] Setected Theme
Channel SuperQuickView will
scan through your list o| up to
t 0 customized channels.
Use these buttons on the remote:
[-_-]ADJUST ENTER r_ MENU toroq
to select -- to enter go back
O Press the MENU button on the
remote control. The MAIN
MENU will appear on the screen.
Select "Ad.vanced Features"
using the ADJUST button; then
press the ENTER button.
O
Select "S_.perQuickView
choices" using the ADJUST
button; then press the ENTER
button.
O Select the way you want to use
the super quick view (SQV)
button by choosing either
"Customized Channels" or
"Selected Theme" using the
ADJUST button; then press the
ENTER bu_ton.
'_Important: For more information about using Super Quick View with
StarSight, please see Booklet #3, "StarSight Operating Guide."
Using the Advanced Features 49
Page 54

QV
Using Super Quick View (cont.)
-selecting "Customized Channels"
[] CUSTOMIZED CHANNELS
Ant. Channel Ant. Channel
[] ........ [] ........
Use these buttons on the remote:
[_ DJUST to i-_ CANCEL to cancel
select a position
[] ENTER to enter _ MENU to go back
O Select a position to store a TV
channel us:rag the ADJUST
button; then press the ENTER
button.
[] CUSTOMIZED CHANNELS
Ant. Channel Ant. Channel
_!nt-A --- _ ........
[] ........ [] ........
Use these buttons on the remote:
-_-] DJUST to [_ CANCEL to cancel
select an input
[] ENTER to enter _ MENU to go back
O Use the ADJUST button to
select an input. Then press the
ENTER button.
[] CUSTOMIZED CHANNELS
Ant. Channel Ant. Channel
Ant-A 001
[] ........ [] ........
Use these buttons on the remote:
[_ DJUST to r_ CANCEL to cancel
select a channel
[] ENTER to enter [_ MENU to go back
O Set a channel number to program
into Super Quick View memory
using the ._D,JUST button and
the number buttons; then press
the ENTER button.
Continue setting the inputs and
channel numbers until your
desired chamlels are pro-
grammed into Super Quick View
memory.
• Press the MENU button to return to the "._J)VANCED
FEATURES" menu.
_Important: You can clear each setting (input or channel) by pressing the
CANCEL button.
50 Chapter 2 : Operating Your TV
Page 55

QV
-using "Selected Theme" To use the "Selected Theme" feature, please see Booklet #3,
1, •
StarSlght Operating Guide."
[] SUPERQUICKVIEW CHOICES
i_ Customized Channels
Selected Theme ]
Theme SuperQuickView will scan
through channels which are currently
displaying a selected topic (SQV Theme)
Press SQV at the SQV Theme Screen
to select a topic.
Use these buttons on the remote:
ADJUST ENTER _ MENU to
to select -- to enter go back
Using the Advanced Features 51
Page 56

Using home theater
Use this feature if you connected a Home Theater Receiver. It "will
set your TV to external 1 (EXT-:t).
O Press the MENU button on the remote control. The MAIN
MENU will appear on the screen.
O Select "Advanced Features" using the ADJUST button; then
press the ENTER button.
[] ADVANCED FEATURESI
[] Set the timer
[] Use parental lock
[] Set SuperQuickView
[] Use Home Theater
[] Reset Audio/Video
Use these buttons on the remote:
[] ADJUST [] ENTER r_ MENU to
to select to enter go back
[] USE HOME THEATER
[] ]'his feature io_ _
This feature lets you
control all input
switchinqfrom a Home
Theater Receiver.
Before using this feature make
sure you have a Home "_heater
Recewer connected.
Use these buttons on the remote:
[] ENTER to use this feature
MENU to go back
Select U_e Home Theater" using
the ADJUSqP button; then press
the ENTER button.
The message explaining this
feature will appear. Pre,_s the
ENTER button to turn home.
theater ON.
O The screen will return to the,
"ADVANCE;D FEATURES"
menu.
[] USE HOME THEATER
[] This feature is :
ON
Use these buttons on the remote:
r_ CANCEL to turn this feature off
MENU to go back
After turning home theater ON,
you will see a message when you
select the "Use Home Theater"
menu funct:ion.
To turn this feature off, press the
CANCEL button.
_Important: When you set this feature to "ON,"
- The input source will be fixed, to external 1 (EXT-1),
- The input button (INPUT) will switch between antennas A and B
(ANT-A/B), and
- All input switching will be controlled by a Home Theater
Receiver. (See your Home Theater Receiw._r's Owner's GcLide for
more information.)
52 Chapter 2 : Operating Your TV
Page 57

ese,,iog,hesounaand, epittLre
This feature allows you to reset all audio and video functions to
their normal level or setting.
Certain settings will not reset, including volume, reception mode
(Stereo/SAP/Menu), Woofer, TV Speaker (Internal]Internal Center
Channel/External) and monitor out (Variable/Fixed).
O Press the MENU button on the remote control. The M:AIN
MENU will appear on the screen.
O Select "Advanced Features" using the SdgJUST button; then
press the ENTER button.
[] ADVANCED FEATURES
[] Set the timer
[] Use parental lock
[] Set SuperQuickView
[] Use Home Theater
[] Reset Audio/Video
Use these buttons on the remote:
[_ADJUST [] ENTER _ MENU to
to select to enter go back
Select "Reset Audio/Video" using
the ADJUST button; then press
the ENTER button.
[] RESET AUDION}DEO
This feature will
reset art of the
audio and video
|unctions to their
initial settings.
It will also unlock any A/V functions
that you have Iockedie that menu.
Use these buttons on the remote:
[] ENTER to reset
[_ MENU to exit
O The message for resetting the
audio and video functions will
appear, Press the ENTER button
to reset.
The screen will return to the
"ADVANCED FEATURES"
menu.
DImportant: This feature will also unlock any AN funct!ions that you have
locked in the "Lock AN functions" menu.
DImportant: You can use AV reset button on the control panel to reset audio and
video functions as well.
Using the Advanced Features 53
Page 58

Page 59

cH____ArTER 3
Using the Special Features
In addition to the basic and advanced functions explained in the
previous chapter, this TV offers the user .¢everal special i_atures
not generally available on other brand TVs. This chapter will
explain how to use these distinctive feature,;. It contains; the
following topics:
• Understanding the On-Screen Displays
• Using the Off-Timer
• Using Picture-in-Picture (PIP)
• Using the Active AfV Network: Features
Page 60

Understanding the On-Screen Displays
Your TV provides on-screen displays of its current settings,
including information about the Extended Data Services (EDS).
To view this information, press the display button (DISPLAY) oil
the remote control repeatedly.
_Ant-A 023 ESPN
Stereo & SAP
PIPB 010
L
Thursday 10:23 am
This display indicates:
• the sound is coming from the
main image,
• input source, (antenna), channel
number and name,
• stereo and/or SAP are available
for reception on this channel,
• this channel is programmed into
super quick view memory (SQV),
• PIP input source (when you
select a PIP image) and,
• day of the ,seek and time.
Ext-1
S-VIDEO
.f_PIP A 023
Thursday 10:23 am
This display indicates:
• input source (external source)
and or the input name,
• S-_IS cable has been connected,
• the sound is coming from the PIP
image,
• PIP input source (when you
select the PIP image),
• day of the week and time.
network name
program name ]
This display s]hows you where the
network name and program name
will appear if the broadcaster is
supplying that information via EDS.
program description
This display" shows you where the
program description will appear if
the broadcaster is supplying that
information via EDS.
If the broadcaster is not supplying
information via EDS, then the
message of"no data" will appear
("No name available," "No descrip-
tion available€') Additionally, the
"call letters" wi[1 not appear.
56 Chapter 3 : Using the Special Features
Page 61

• Using the Off-Timer
This special function allows you to set the TV to turn off
automatically. You can set the TV to turn offfrom 10 to 120
minutes (2 hours). In this section you'll learn:
• Setting the off-timer, and
• Changing or canceling the off-timer.
Using the Off-Timer 57
Page 62

Setting the off-timer
OFF-T
O Press the off-timer button
(OFF-T) on 1;he remote control.
TV Off timer 120 min.
O Select how long you want the
TV to stay on by repeatedly
pressing the off-timer button
(OFF-T). The time will decrease
in 10 mi_ul;e intervals each time
you press the button.
O To view the amount of time:
press the off-timer button (OFF-
T) once. Tile on-screen display
indicates "oif-timer" and[ shows
the amount of time remaining.
L%Important: During the last minute before the TV is set to turn off, "Off-timer 1
min." will flash in red to remind you that tile off-timer is set,
TV Off timer 1 min.
58 Chapter 3 : Using the Special Features
Page 63

Changing or canceling the off-timer
TV Off timer 10 min
O Press the off-timer button
(OFF-T) oll the remote control.
An on-striven display shows the
amount of time remaining until
the TV will turn off.
e Continue pressing the off-timer button (0 FF-T) repeatedly to
change the remaining time or cancel the off-timer. The off-
timer is canceled when "---" appears instead of the remaining
time.
Using the Off-Timer 59
Page 64

Using Picture-in-Picture (PIP)
One of the special features of the TV is the picture-in-picture (PIP)
mode, which allows you to view two different; pictures at the same
time. In this section you'll learn:
• Selecting the PIP image,
• Selecting the source and channel,
• Exchanging and moving the PIP image,
• Switching the sound reception,
• Freezing the PIP image,
• Using the Snap-shot feature, and
• Using the Replay feature.
IX AN IMPORTANT NOTE ABOUT PIP !
1
If you are watching your TV on Antenna B _md select Antenna A as
a PIP source:
• you will see a live action image in the PIP window, but
• you should not exchange tile main imagE.' fbr the small one.
If you exchange images when Antenna A is the PIP source while
watching TV in Antenna B, you cannot exchange back to A_te:ana
B. You will need to use the INPUT button to return to viewing TV
on Antenna B.
60 Chapter 3 : Using the Special Features
Page 65

Selecting the PIP image
0_o
OOO 0
9SS
_00o_
_O00U
O Select the number of the TV
channel you want to view by
using the channel control
(CHANNEL).
O Press the PIP button. A reduced
image wi!il appear in the bottom
right corner of the screen.
_=Ant-A 023 ESPN
Stereo & SAP
PIP A023
Press PIP again; the size of
the reduced image will
change.
_=Ant-A 023 ESPN
Stereo & SAP
PIPA 023
_Important:
0 Press the PIP button once again to cancel the PIP image.
When the main image is monochrome (black and white), the PIP
image will also appear in black and white ,even if the PIP source is
in color.
Using Picture-in-Picture (PIP) 61
|
Page 66

Selecting the source and channel
To select the source:
@ c::_ o
oooQ
':::_0 O 0 _
O Press the source butto:a
(SOURCE) on the remote ,control
repeatedly to select the source of
the PIF' image.
O The PIP image will change as
follows,
L TV -_ Ext-1--" Ext-2 ----"Ext-3J
[:'Important: You cannot select Antenna B as a PIP source when watching
Antenna A.
To select the channel:
_ c::) c:3 c:3
_ C:::b 0
o o o q..)
_U L_ U_
%X'-.._//d
c:_O 0 0 II
_=
Press the PIP channel button
(CHANNEL) on the remote control
to change the channel of the PIP
image.
62 Chapter 3 : Using the Special Features
Page 67

Exchanging and moving the PIP image
To exchange images:
000 O:
866
_000_1
_000 :
_000_
_0_1
Press the enter (ENTER) button to
exchange the positions of the
background image and the reduced
image.
Remember: you should not;
exchange images when the raain
image is Antenna B and the PIP
image is Antenna A. (Please see
page 60 for more information.)
ei_Ant-A 023 ESPN
Stereo & SAP
VCR-1
,,_ I-_-xt-1VCR-1
PIP A023
To move the PIP image:
©_o
O0 0 C)
888
_O00_
_OOO
c>OO0_
Press the A]:)JUST up/down or
, ADJUST right/left button to move
the reduced [n:..age to any position on
the screen.
Using Picture-in-Picture (PIP) 63
Page 68

Switching the sound reception
Use the swap button (SWAP) to
switch the sound of the speaker
between the main image and the
PIP.
_Important:
_Ant-A 023 ESPN
Stereo & SAP
PIP Ext-1
An:-A 023 ESPN
',-3tereo & SAP
_PIP Ext-1
The sound from the PIP image will not be in stereo.
64 Chapter 3 : Using the Special Features
Page 69

Freezing the PIP image
[] USE ADVANCED PIP I I
[] Current setting
:TV Still
"[he picture in the
PIP window will freeze when the
PAUSE button is pressed.
This feature is available on
Antenna A(Ant-A) and external inputs,
Use these buttons on the remote:
[_ ADJUST [] ENTER 1_ MENU to
to select to enter go back
O Select "Use Advanced PIP" in
"Customize Display" menu;
then set the current setting to
"TV Still."
O Use the MENU button to return
to the normal picture.
8@8
m
_000_
oO00U
Press the pause button (PAUSE)
to freeze the reduced image on
the screen.
_) Press again to cancel the image
freezing.
_Important: When you press the pause button while viewing the normal picture,
the PIP image will appear and be frozen.
TV Still
disappears after a
few seconds
Using Picture-in-Picture (PIP) 65
Page 70

Using the Snap-shot feature
[] USE ADVANCED PIP I
[] Current setting
I
:Snap-shot
A snapshot of the
picture in the PIP
window will be recorded each time the
PAUSE button is pressed. The screen
will display the last two snapshots.
This feature is available on Antenna A
(._.nt-A) and External Inputs.
Use these buttons on the remote:
[] ADJUST [] ENTER [_ MENU to
to select to enter go back
®
O Select "Use Advanced PIP" in
the "Customize Display" menu;
then set the current setting t.o
"Snap-shot.'
O Use the MENU button to return
to the normal picture.
<if PIP is off>
PAUSE
©
<if PIP is on>
C:D
c::_O O O
c:_O O O [_
[]
[]
PAUSEo [
-[
Press the pause button (PAUSE);
the frozen. PIP image and the
moving PIP image will appear.
O
O
ie
Press the PAUSE button again;
the third PIP image will appear,
moving. [[_e previous two PIP
images w/ill be frozen.
Each time you press the PAUSE
button, the PIP images will ,_hift
upwards one by one. The top
image will disappear and a
frozen image appear when you
press PAUSE.
To cancel tl=e PIP image, press
the PIP butLon.
[-_
PAUSE
©
[]
[]
[]
PAUSE
0
[]
[]
PAUSE
0
[Sq
[-q
[,_
PAUSE
0
[]
[]
[]
: the moving image
• the frozen image at the instant you press the
PAUSE button.
66 Chapter 3 : Using the Special Features
Page 71

Using the Replay feature
[] USE ADVANCED PIP I
Current setting
I
[] :Replay
Three images of
previous scenes witl
be shown on the screen after the PAUSE
button is pressed. Timing between
images can be controlled by adjusting
speed. This feature is available on
Antenna A (Ant-A) and external inputs.
Use these buttons on the remote:
-----_ ADJUST [] ENTER [_ MENU to
to select to enter go back
O
O
Select "Use Advanced PIP" in
"Customize Display" menu;
then set the current setting to
"Replay."
Set the replay speed between 1
(short intel-eal) and 9 (lon;g
interval).
[] USE ADVANCED PIP I , I
[] Current setting
: Replay
[] Replay Speed
• 1
Use these buttons on the remote:
{-'_ADJUST [] ENTER I'_ MENUto
to select to enter go back
o000_
o000
oOOO_
0
0
0
Use the MENU button to return
to the normal picture.
Press the pause button (PAUSE).
The main image will be frozen
and replayed in sequence for a
"strobe" arLimation effect. These
images will appear in set,_ of
three (from a total of severn
stored images) at the speed you
select.
Each time you press PAUSE, the
PIP image,; will shift upwards
one by one
To cancel the, PIP image, press
the PIP button.
[]
[]
[] A
PAUSE PAUSE
,.-£8 ,,-Ks-I ,,-[]
[] [] []
Using Picture-in-Picture (PIP)
PAUSE
0 []
[]
[]
PAUSE
©
[]
PAUSE
(3 []
[]
[]
]
67
Page 72

Using the Active A/V Network Feature
Important:
This A/V Network is a special feature that makes it easier to use
your television and other components in a home theater system.
When you connect the A/V Network, you ca_, point the remote
control at the television, and it will "pass" the remote control
command to the other components.
The Active A/V Network allows you to perform many of the
commonly used features of your' system at the press of just one
button.
When you subscribe to StarSight, the Active A]V Network features
will be replaced by a new set of user convenience features.
Therefore, you will not be able to use the Active A/V Network
features called One Key Play and Quick Program.
before you begin
J You must have connected an A/V Network cable from the
Active A/V Network terminal of your TV to the A/V Network IN
terminal of your VCR. See Booklet #1 I_YIitsubishi
Installation and Setup Guide."
J You must have connected your VCR to External 1 (EXT-1) of
your TV.
,/ You must have set your TV's "AN Network" setting to "Active"
or "Basic." See "Setting the AN Network," page 30.
€" Your VCR's remote control switch (if any') should be set to
"VCR-A."
•/ Your VCR's video mute setting should be turned ON.
68 Chapter 3 : Using the Special Features
Page 73

DImportant: For StarSight subscribers: You will not be able to use the Quick
Program (QP) feature when you subscribe to StarSight. The
StarSight system for programming your VCR is all that you will
need.
what the Active A/V Network does
The Active A/V Network makes it easier and faster to use the
VCR's Program and Play commands and the _i_'s PIP commands.
When using the Active A/V Network, you should always point :your
remote control at your television.
using the quick program button (QUICK PROGRAM)
When you press QUICK PROGRAM to begin programming your
VCR:
J
Active A/V Network will turn on your VCR and bring it to the
"Program to Record" screen. (If the VCR's clock has not been
set, you will see the "Set the clock" screen. See your VC,R's
Owner's Guide for information about setting the VCR c:[ock.)
J Active A/V Network will turn on your TV (if it is off), and switch
the TV to EXT-1.
You can program your VCR by pointing your remote control al: the
Using the Active A/V Network Features 69
Page 74

Using the Active AN Network feature (cont.)
Important:
TV.
When you press QUICK PROGRAM to end programming
your VCR:
,z Active AN Network will tura offyour VCR (unless a tape is
currently playing or recording), in Active mode only.
€" Active A/V Network will return your TV to the channel it was
on before, or turn it off (if it was off originally).
For StarSight subscribers: You will not be able to use t:he Auto
Play feature when you subscribe to StarSight.
using the PLAY button (AUTO PLAY)
When you press PLAY on the remote:
J Active A/V Network will turn your VCR on and begin playing
the tape (if any).
J Active A/V Network will turn your TV on and switch it to EXT-1.
When you turn your TV off:
J Your VCR will turn off(unless it is playing or recording), in
Active mode only.
70 Chapter 3 : Using the Special Features
Page 75

_>Important:
E>Important:
_Important:
If you turn offthe TV while it is set to EXT-I: it will return to the
last channel you viewed on Antenna-A or Antenna-B when you turn
the TV back on.
If you leave the TV turned on, set to EXT-1, but the TV is not
receiving a signal on EXT-1, it will automatically turn off after five
minutes. (If you use a TV menu. during this time, the TV will turn
offfive minutes after you stop using the menus.)
You should not press the PIP button while you are watching a
channel that is not receiving any broadcasts. You will not be able to
see the small PIP image, and yeu will not be able to change
channels on the main image. You may need tc turn off the ]_V and
turn it back on, change to a channel that is receiving a broadcast,
and begin again.
Using the Active AN Network Features 71
Page 76

Page 77

CHAPTER 4
,Troubleshooting
Even though you're now familiar with the basic and advanced
operations of the TV, you may run into trouble from time to time as
you become accustomed to the TV. This chapter offers solutions to
some of the common problems you may encounter. We suggest
that you consult this chart before contacting a Mitsubishi service
representative.
Page 78

Troubleshooting (cont.)
Problems Possible Solutions
For More Information
You haw; problems with PIP
"exchange."
You should not exchange
PIP images when the main
image is Antenna B and the
PIP image is Antenna A. If
you do, you must press the
INPUT button to return to
viewing Antenna B.
• Antenna B does not appear • Antenna B is not available
as a PIP source, as a PIP source when you
watch TV on Antenna A.
........ 111_ II11111 ----' _ . _ --IF:' -_
Ittakesseveralsecondsfor
the cablebox to change
channels.
_[_is is normal. It takes
several seconds for the IR
Emitter to pass the remote
control codes to the box.
74 Chapter 4 : Troubleshooting
Page 79

Problems
Possible Solutions For More Information
You forget the code you used
to set the parental lock.
• Use the alternate procedure
that doesn't require the use
of the code.
See the Appendix "Auto-
matic Procedure fo:cthe
Parental Lock."
You cannot see a picture
when you trytoplay back a-
tape.
If you cormected your VCR:
using a video cable, use the
INPUT button to select the
input (Ext-1, 2, 3) that the
VCR is connected to.
You cannot see a picture
when you try to play back a
tape using channel 3 or 4 on
your TV.
If you are _sing a cable box,
make sure the Output
channel of your VCR and
cable box are both set to the
same chm_el, or use the
INPUT button to select the
input (Ext-1, 2, 3) that the
VCR is connected to.
Troubleshooting 75
Page 80

Caution and Care
l_Warning: Don't leave stationary images, such as those generated from stock
market reports or video games, on-screen for more than 10 rain-.
utes. Still patterns can scar the TV causing permanent dainage
to the picture tube.
E>Important: If you plan to place speakers next to the TV, make sure they are
magnetically shielded. Ordinary speakers will cause distortion in
the picture due to their strong magnets. This distortion, howew_r,
will not harm the picture tube.
For maximum enjoyment and safe operation of your Mitsubishi
Color TV, please read the "IMPORTANT SAFEGUARDS" carefully
and apply them properly. (Please see Booklet #1, '_¢Iitsubishi
Installation and Setup Guide.")
76 Chapter 4 : Troubleshooting
Page 81

Calling for service
If you are unable to correct the problem, consult your Mitsubishi
dealer or Mitsubishi Authorized Warranty Service Center.
Do not adjust any controls not described in this owner's guide.
Do not remove the protective back cover of this unit.
If you see the following display on your screen, :you should not
change any settings. This is a special display used by the factory.
OPTION MENU
Initial Call letters : ON
E2 Initial Program descrp. : ON
Hotel : OFF Program network: ON
Input balance: OFF SS ATTACH : ON
3Dia : ON Woofer :ON
Speaker ext : ON
Dolby : OFF
13_ :ON
Auto clock : ON
If this display appears, make sure that all of the on/off settings are
the same as the illustration above and then turn the TV off. If any
of the settings are different than the illustral_ion above, turn the TV
off and consult your Mitsubishi dealer or Mits_bishi Authorized
Warranty Service Center.
Troubleshooting 7 7
Page 82

Page 83

APPENDIX
Automatic Procedure for the Parental Lock
Cut along dotted line and file after reading
79
[:>Important:
After you lock the TV, you will need the secret code in order to:
view the locked TV, or
cancel the lock.
If you forget the code, you can view the locked TV without entering
the code. To do this, simply press the buttons labeled "QV" and "9"
at the same time.
This procedure will only unlock the TV temporarily. To c_mcel the
lock completely, follow the procedure below:
O Press the "QV" button and the "9" button on the remote
control at the same time. This will allow you to turn on, a
locked TV.
O
Press the MENU button to view the main menu. Use the
ADJUST button to select "Advanced Features." Press
ENTER.
O
Use the ADJUST button to select "L,_ck the TV." Press
ENTER.
O
Press the "QV" button and the "9" button on the reraote
control at the same time. This will turn offthe lock:.
Page 84

Page 85

AIndex
A
Active .&_ network, setting ..... 30
adding and deleting channels .. 29
adjust buttons ............. 8, 9, 11, 63
advanced features, using .......... 44
advanced PIP functions, using. 37
audio button (AUDIO) .......... 8, 41
audio input terminals ............. 2, 3
Auto clock .................................. 27
Auto Play ................................... 70
AUX ........................................... 16
A]V functions, locking ............... 36
A/V Network
setting .................................... 30
using. ...................................... 68
A/V reset (AN RESET) ........... 3, 53
B
balance ...................................... 40
bass ............................................ 40
batteries
installing .................................. 4
guidelines for using ................. 5
brightness .................................. 42
buttons, remote control .............. 6
C
Calling for Service .................... 77
cancel, button (CANCEL) .... 6, 7, 9
Captioning, closed
described ................................ 42
using ....................................... 43
Caution and Care ...................... 76
center channel speaker ............. 41
channels
changing ................................. 21
controls (CH, CHANNEL) .. 2, 7
locking .................................... 47
memorizing ............................ 25
PIP CHANNEL button ... 10, 62
clock, setting ............................. 27
closed caption ............................ 43
color ........................................... 42
color temperature ..................... 42
contrast ..................................... 42
control panel, overview ............... 2
customized channels ................. 50
D
day button (DAY) .................. 3, 15
Degauss button ..................... 3, 15
deleting channels ...................... 29
direction, switch .................... 2, 15
display button ..................... 16, 56
displays, understanding ........... 56
E
enter button (ENTER) ............ 6, 8
exchanging the PIP image ....... 63
Extended Data Services
(EDS) ...................................... 27
external speaker ....................... 41
F
fixed, speaker setting ............... 41
front panel ................................... 2
G
guide button (GUIDE) ................ 8
Getting ready to use the remote
control ...................................... 4
H
hall, adjusting surround ........... 40
home button (HOME) ......... 9, 24
home theater, using .................. 52
I
information button (INFO) .........
input
button (INPUT) ................. 7, 20
selecting the source ............... 20
renaming ................................ 34
installing the batteries ............... 4
L
list button (LIST) ........................ 8
locking,
A/V functions .......................... "36
parental .................................. ,16
L
light button (LIGHT) ................ 7
M
Memorizing channels ................ 25
menu button (MENU) .......... 9, 24
menus, changing display .......... 32
menus, understanding .............. 24
mono .......................................... 40
monitor out ................................. 41
mute control (MUTE) .............. 6, 7
N
number butl.ons ........................ 10
O
offtimer button (OFF-T)10, 57, 58
off-timer, using ......................... 57
on/off, tu:ming the TV ............... 19
on-screen menus ....................... 24
Operating Your TV .................... 13
P
page button (PAGE) .................... 8
parental lock ....................... 46, 79
pause button ................. 10, 37, 60
picture, adiusting ....................... 42
PIP
advanced functions ................ 37
Index 81
Page 86

channelcontrol......................62
controls,descriptionof....... 10
exchangingtheimage........63
freezingtheimage................65
movingtheimage..................63
replayingtheimage............67
snapshot,using....................66
sound,receptionof ................ 64
source, selecting .................... 62
power button (POWER) ........ 2, 19
power restore ........................... 39
program timer indicator (PROG.
TIMER) ......................... 2, 45
source button ...................... 10, 62
source, selecting the PIP .......... 62
speaker .................................. 41
StarSight, buttons ...................... 8
stereo ....................................... 40
strength switch ......................... 15
super quick view button (SQV) ._7
super quick view feature ........ 48
surround .................................... 40
swap button, (SWAP) ......... 11, 64
S-VIDEO input terminal ........ 2, 3
Q
quick view button (QV) ............... 7
quick view feature .................... 23
quick program button ........... 10
quick program, using ................ 69
R
Renmning the inputs ................ 34
Remote control
buttons and functions ............. 6
dos and don'ts .......................... 5
general instructions ................ 4
installing batteries .................. 4
operating Mitsubishi
components ........................ 16
operating other components. 16
oveIwiew ................................... 4
replay. ..................................... 67
Resotting sound, picture ...... 53
restore, power ........................ 39
S
SAP ...................................... 40
select buttons ............................ 16
Selecting the input source ........ 20
Setting the clock ...................... 27
Setting the off-timer ................. 58
Setting the timer ................. 45
sharpness ................................ 42
sound, adjusting ........................ 40
T
text captioning .......................... 43
theme, selecting ...................... 52
time, setting ............................ 27
timer
indicator ................................... 2
off-timer ................................. 57
setting .................................... 45
tint ............................................. 42
treble ......................................... 40
Troubleshooting ........................ 75
Turning the TV on/off ............... 19
U
Understanding the displays ..... 56
V
variable, speaker setting ........ 41
VCR, controlling ........................ 16
vide<) function button (VIDEO)8, 42
vide() input terminal ............... 2, 3
video noise reduction ................ 42
volume controls (VOLUME) ....... 8
W
woofer, adjusting ............. 40, 41
82 Index
Page 87

MITSUBISHI COLOR TELEVISION OR COLOR MoNrrOR
LIMITED WARRANTY
MITSUBISHI ELECTRONICS AMERICA, INC. CMELA") warrants to the original purchaser of this television that if purchased from an authorized
MITSUBISHI Audio/Video Dealer, should it prove defective by reason of improper workmanship and/or material:
a. Picture Tube. For two years from the date of original purchase at retail, we will repair or replace at our option, any deti:ctive picture tube without charge
for the tube.
b. Other Parts. For one year from the date of original purchase at retail, we will repair or replace, at our option, any o':her defective part without charge for
the part.
c. All parts used for replacement are warranted for the remainder of the original warranty period.
d. Labor. For one year from the original purchase at retail, we will provide the labor for a warraaty repair by an authorized MITSUBISHI service center
without charge.
e. Notice. To obtain warranty service, you must notify an authorized MITSUBISHI service center of any defect within the. applicable warramy time period.
1. TO OBTAIN WARRANTY SERVICE DURING THE FIRST YEAR:
a. Contact your nearest authorized MITSUBISHI service center whose name and address can be obtained from your MITSUBISHI dealer or by writing or
calling MELA at the address and telephone number provided below.
b. Warranty service will be provided in your home or, if required, at an authorized service shop, provided that your television is located within Lhege:ographic
territory customarily covered by an authorized MITSUBISHI service center. If not, you must either deliver your television tc an authorized service location at
your own expense, or pay for any travel and/or transportation costs the service center may charge to and from )our home. Aclual service labor will be provided
without charge:.
c. Proof o;" purchase date from an authorized Mitsubishi dealer is required when requesting warranty service. Present your sales receipt or other document
which establishes proof and date of purchase. THE RETURN OF THE OWNER REGISTRATION CARD IS NOT A CONDITION OF WARRANTY
COVERAGE. However, please detach and return the Owner Registration Card so that we can contact you should a question of safety arise which could affect you.
2. AFTER THE FIRST YEAR, to obtain warranty service for a defective picture tube, you are responsible for delivering the television or monitor to an authorized
M1TSUBISHI service center at your own expense.
3. THIS WARRANTY DOES NOT COVER damage caused by: modification, alteration, repair or service of the product bz/anyone other than an authorized
MITSUBISHI service center; physical abuse to, or misuse of, the product; operation in a manner contrary to the instructions which accompar_y the product;
freight damage; or any damage caused by acts of God such as lightning or fluctuation in electrical power. Tl-ds warranty aI;o excludes all costs arising from
installatiom adjustment of user controls, external antenna systems, service of products purchased or serviced outside the U.:_.A., initial technical adjustments
(set-up) and user-required maintenance. Consult the operating instructions furnished with the product for information regarding user controls.
4. ANY EXPRESS WARRANTY NOT PROVIDED HEREIN, AND ANY REMEDY WHICH, BUT FOR THIS PROVISION, MIGHT APdSE BY
IMPLICATION OR OPERATION OF LAW, IS HEREBY EXCLUDED AND DISCLAIMED. THE IMPLIED WARRANFIES OF MERCHANTABILITY
AND OF FITNESS FOR ANY PARTICULAR PURPOSE ARE EXPRESSLY LIMITED TO A TERN[ OF ONE YEAR.
5. UNDER NO CIRCUMSTANCES SHALL MELA BE LIABLE TO PURCHASER OR ANY OTHER PERSON FOR ANY INCIDENTAL, SPECIAL OR
CONSEQUENTIAL DAMAGES, WHETHER ARISING OUT OF BREACH OF WARRANTY, BREACH OF CONTRACT, OR OTHERWISF2.
6. Some states do not allow limitation on how long an implied warranty lasts, or the exclusion or limitation of incidental, special, or consequential damages, so
the above limitations or exclusions may not apply to you.
7. This warranty gives you specific legal rights, and you may also have other rights which vary from state to state.
8. BEFORE REQUESTING SERVICE, please review the instruction booklet to insure proper installation and correcl customer control adjastment. If the
problem persists, contact your nearest MITSUBISHI Dealer for name(s) of authorized MITSUBISHI Service Center(s) If you are unable to obtain this
information, please call 800-332-2119, or write us at the address below.
P.o.MITSUBISHIELECTRONICS AMERICA,INC.Box5025 MITSUBISHI
Norcross, GA 30091-5025
FIETAIN THIS PORTION FOR YOUR RECORDS. I
MODEL 1`40.
SERIAL 1'40.
CUSTOMER NAME
STREET ADDRESS
C:ITY STATE ZIP
PHONE ( ) - PURCHASE DATE / /
A/C MO DAY YR
PLACE OF PURCHASE
Page 88

_= MITSUBISHI
MITSUBISHI ELECTRONICS AMERICA, INC.
6100 Atlantic Boulevard
Norcross, GA 30071-1305
871C906C8 Printed in U.S.A.
 Loading...