

:
1
Chapter 1
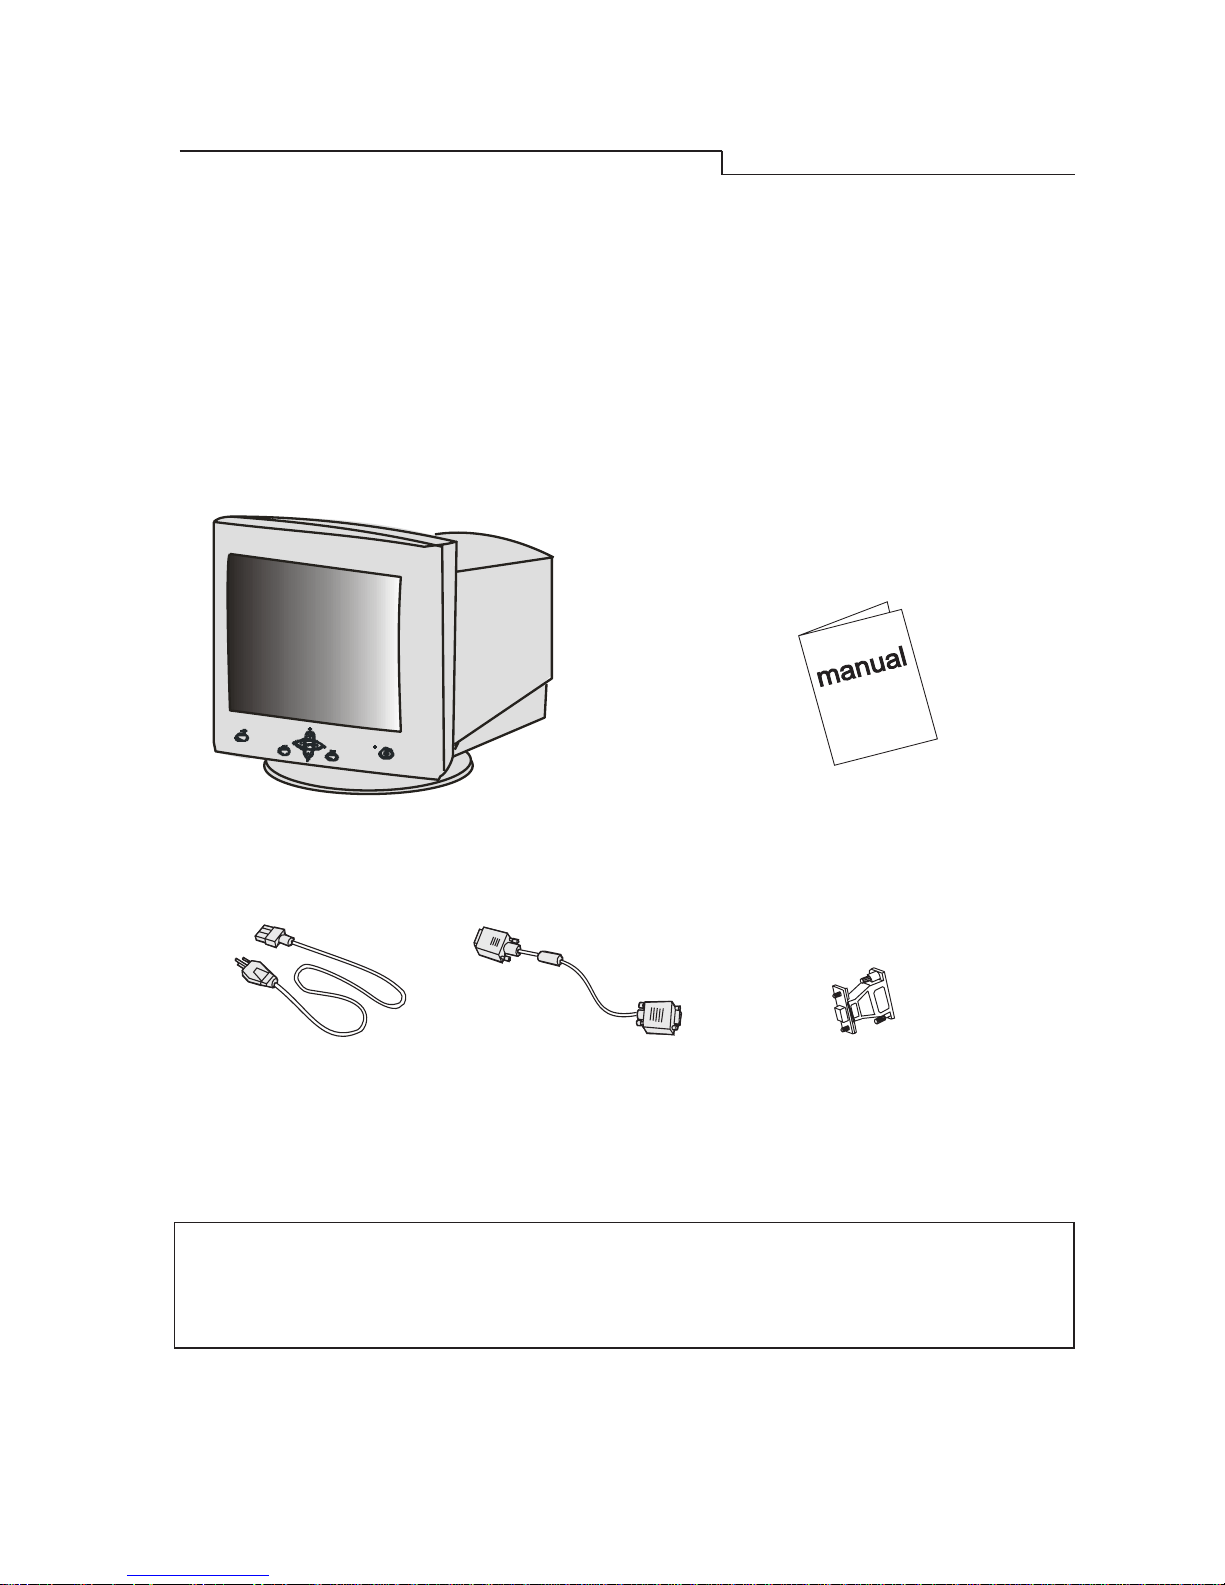
Unpacking the Package
Check following items. If they are missing or damaged, consult your place of purchase
immediately.
2107e color monitor Users manual
Power cord 15-pin D-SUB Macintosh adapter
signal cable
?
Locate the model name and the serial number labeled on the back
of your monitor. Write down the related information of your
monitor and dealer in the space on page iii for future reference.
Unpacking the Package

:
2
Features
Super-fine Dot Pitch With 0.25mm super-fine dot pitch and anti-static
coating, 2107e color monitors offer strikingly sharp
and high resolution image up to 1600 x 1200.
Wide Range AutoScan Horizontal frequency ranges from 30KHz to 107
KHz to support 1600 x 1200 @ 90Hz resolution.
Flicker-Free design for vertical frequency of up to
160Hz.
Auto key Pressing the Auto key, the monitor will
automatically adjust displays size and position
to the optimum. No re-configuration or
adjustment is needed when a user changes
display mode.
Low radiation 2107e meets strictest low radiation regulations of
MPRII.
Users and Environment 2107e is produced by the ISO 14001 certified
manufacturer, and in compliance with the global
environmental labelling scheme- MPRII.
Plug’n Play Compatibility Supporting VESA DDC I and DDC 2B
standards, 2107e is compatible with Plugn
Play feature of Window® 95 and Window 98
®
Chapter 1

:
3
Power Management
The Power management of this monitor complies with these VESA power
saving modes:
Mode Power Horizontal Vertical L E D
Consumption Syne Sync
On Normal On On Green
Stand-by < 15 W Off On Amber
Suspend < 15 W On Off Amber
Off < 5 W Off Off Amber Blinking
Overide Normal Off Off Green
Factory Preset Timings
Resolution Vertical Frequency Horizontal Frequency
(Hz) (KHz)
640 x 400 70 31.47
640 x 480 60 31.47
640 x 480 75 37.50
800 x 600 75 46.88
1024 x 768 75 60.02
1024 x 768 85 68.68
1280 x 1024 75 79.98
1280 x 1024 85 91.15
1600 x 1200 75 93.75
1600 x 1200 85 106
** All above timings are non-Interlace timings.
Unpacking the Package
:
4
Chapter 2
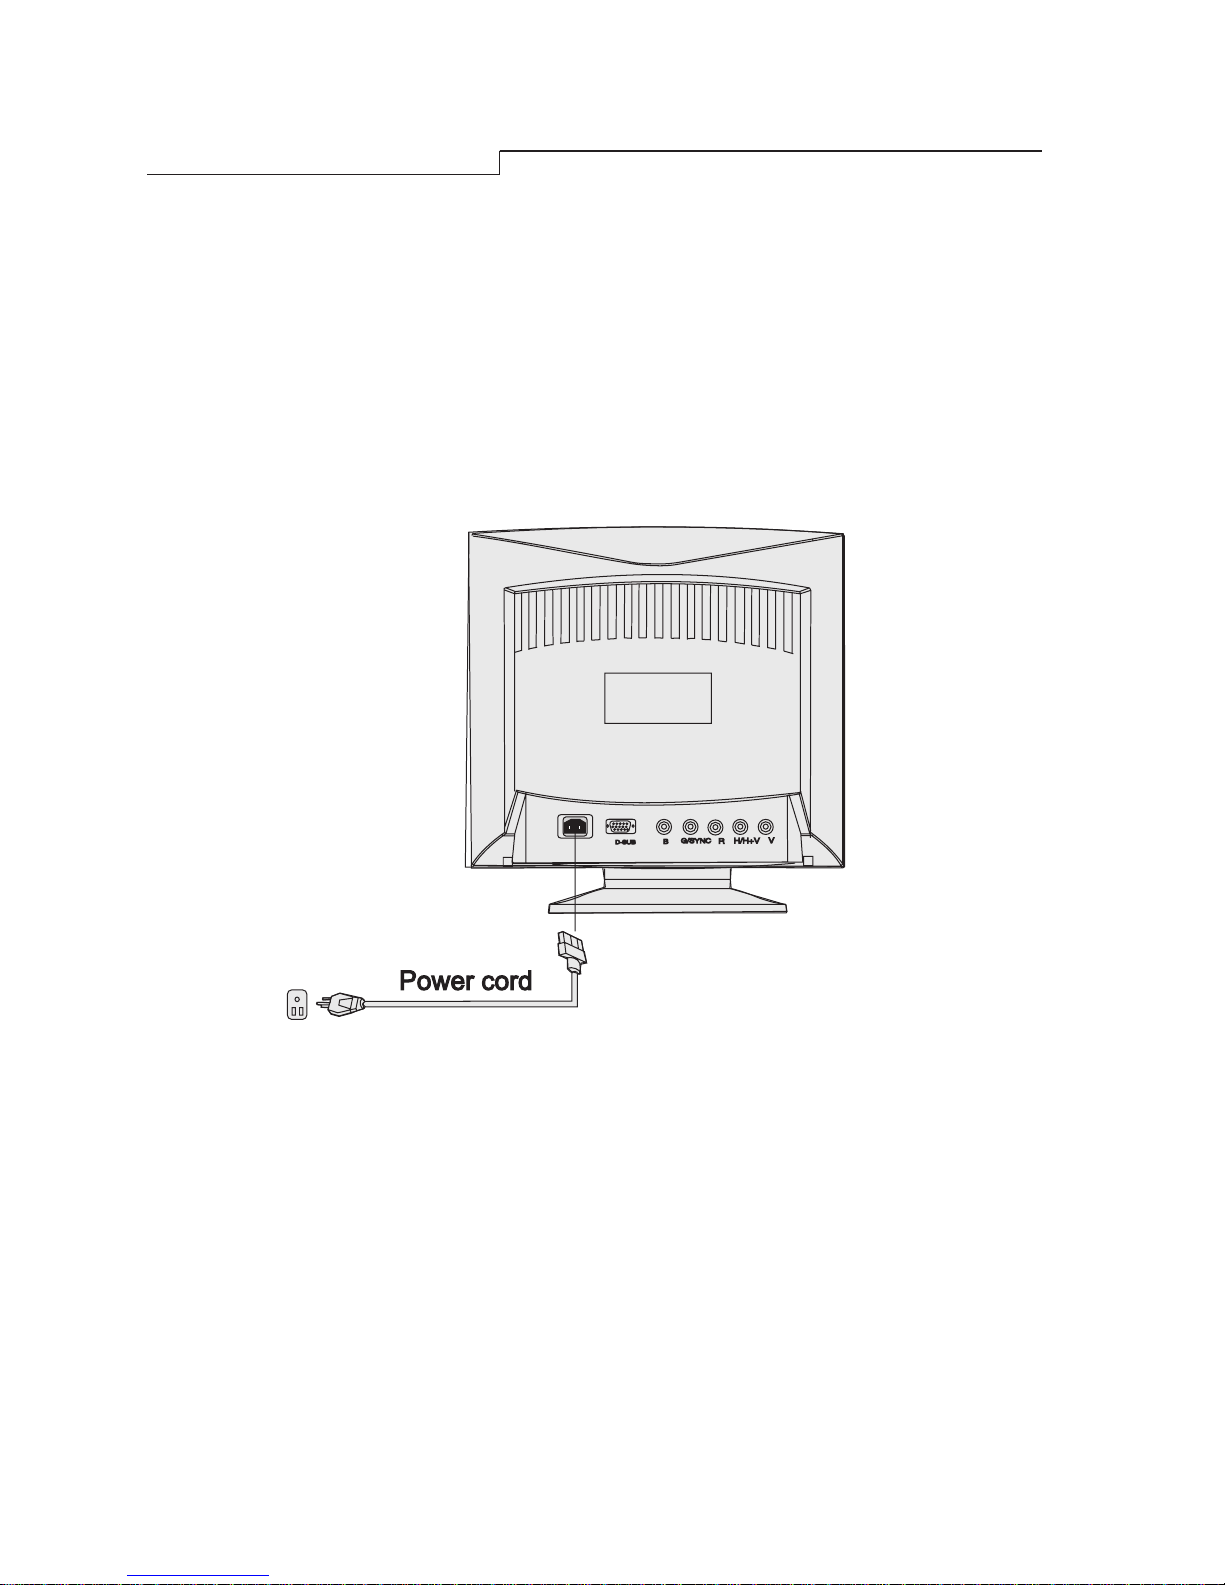
Chapter 2
Installing the Monitor
This monitor is equipped with an autosensing universal compatible power supply for
voltage ranges 100-120/200-240V AC, 50~60Hz.. Please confirm the line voltage
designation at the rear panel of the monitor before connecting the machine.
1)
Make sure that the system power is turned off.
2) Please refer to the instructions below to connect the signal cable through D-SUB or
BNC.
3) Connect the power cord to the monitor and attach it to power source.
4) Turn on the computer and the monitor.
:
5
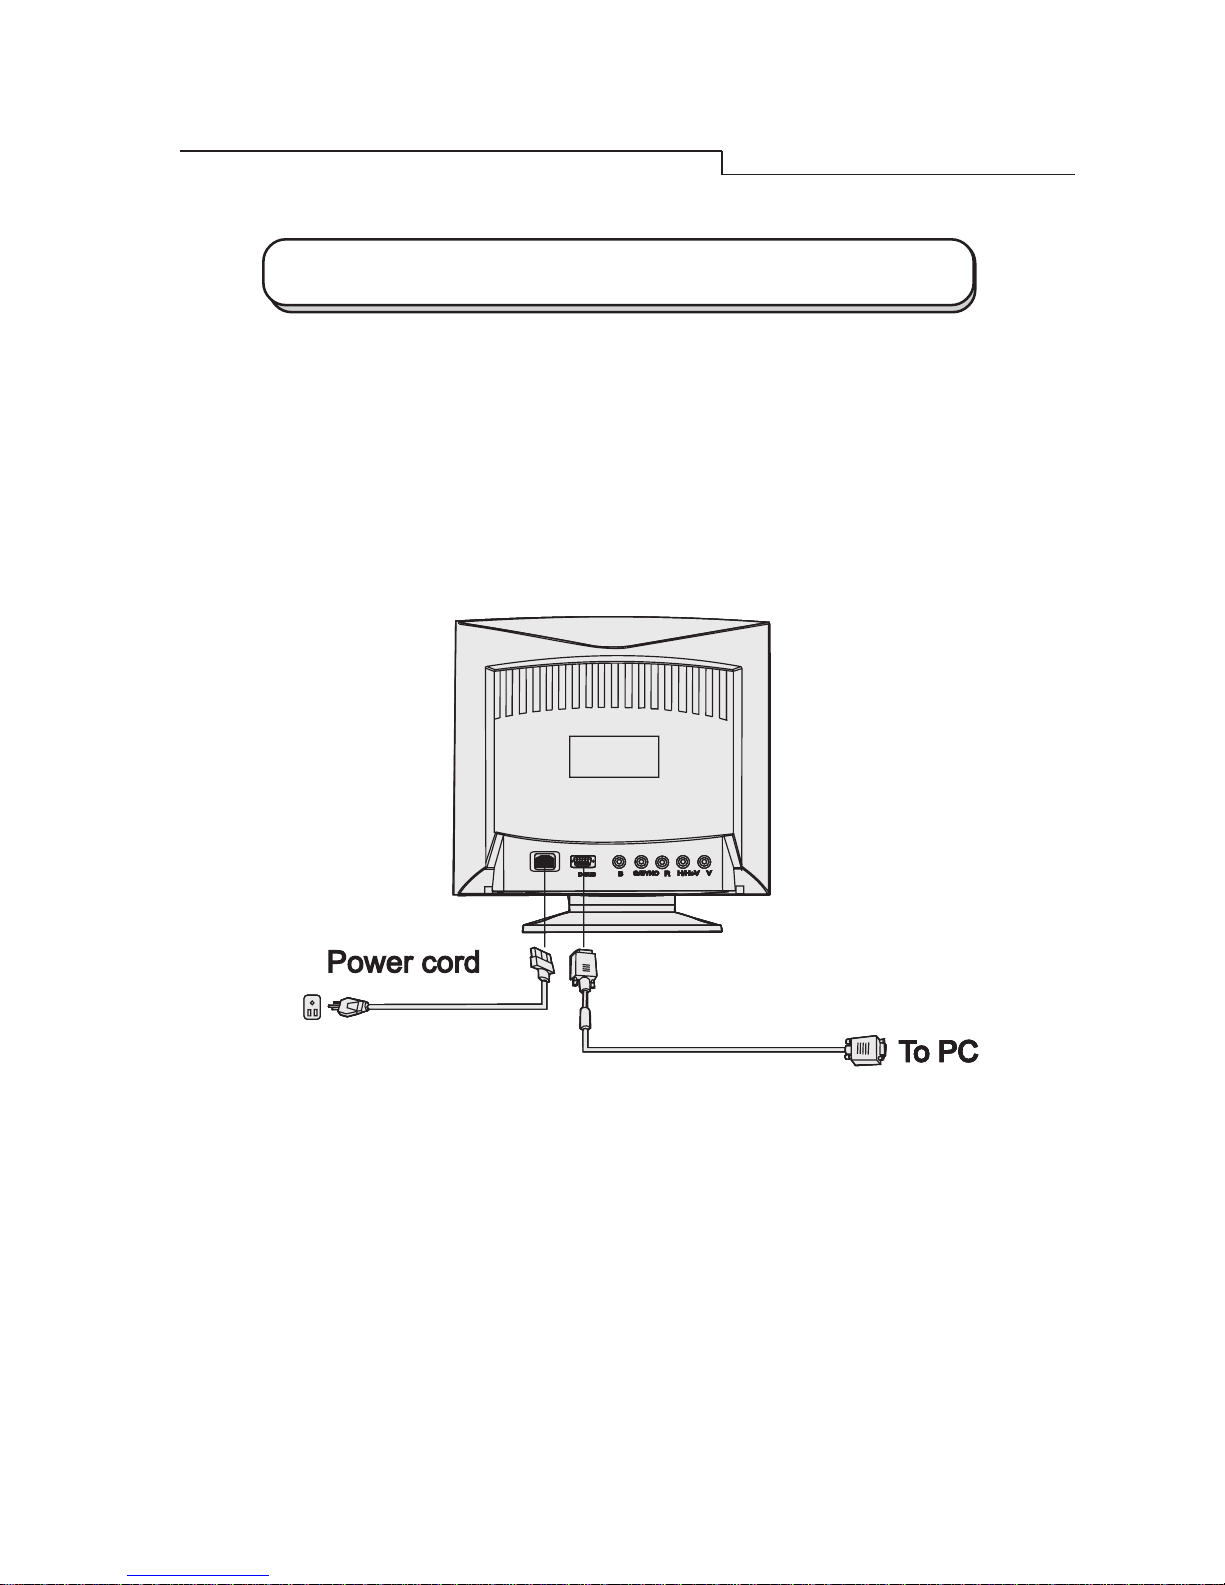
Connecting the Signal Cable
Your 2107e provides both D-SUB and BNC signal connectors. The D-SUB or BNC
signals can automatically be detected by its microprocessor.
✏ Connecting through D-SUB signal connector
1) Make sure that the system power is turned off.
2) Connect the computer end of the D-SUB cable to the 15-pin output connector on
the video board of your computer.
3) Connect the monitor end of the D-SUB cable to the D-SUB receptacle on the back
of the monitor.
Installing the Monitor
:
6
Chapter 2
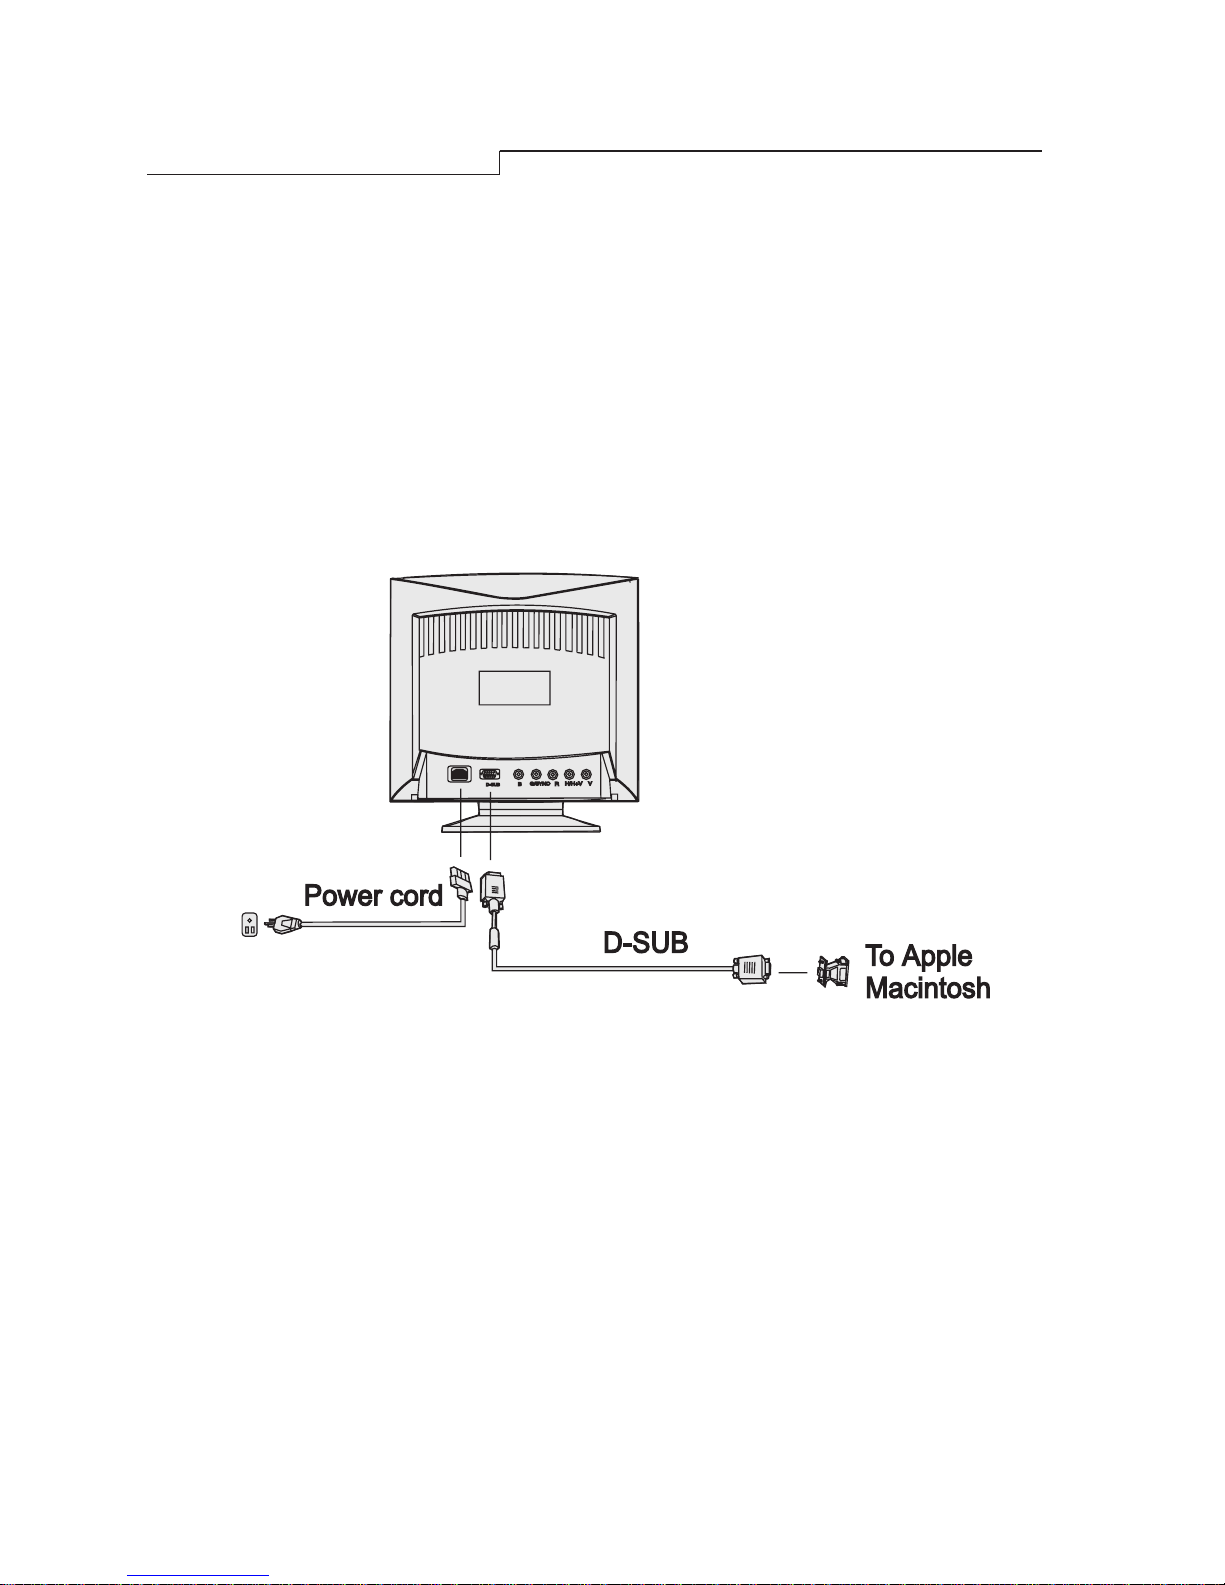
✏ Connecting to An Apple
If you connect the monitor to an Apple Macintosh through a D-Sub cable, you need to
add the Macintosh adapter to connect the video signal port of your computer and the
monitor signal cable. Before connecting the adapter please refer to the user's guide of the
adapter to set the switches of the adapter.
:
7
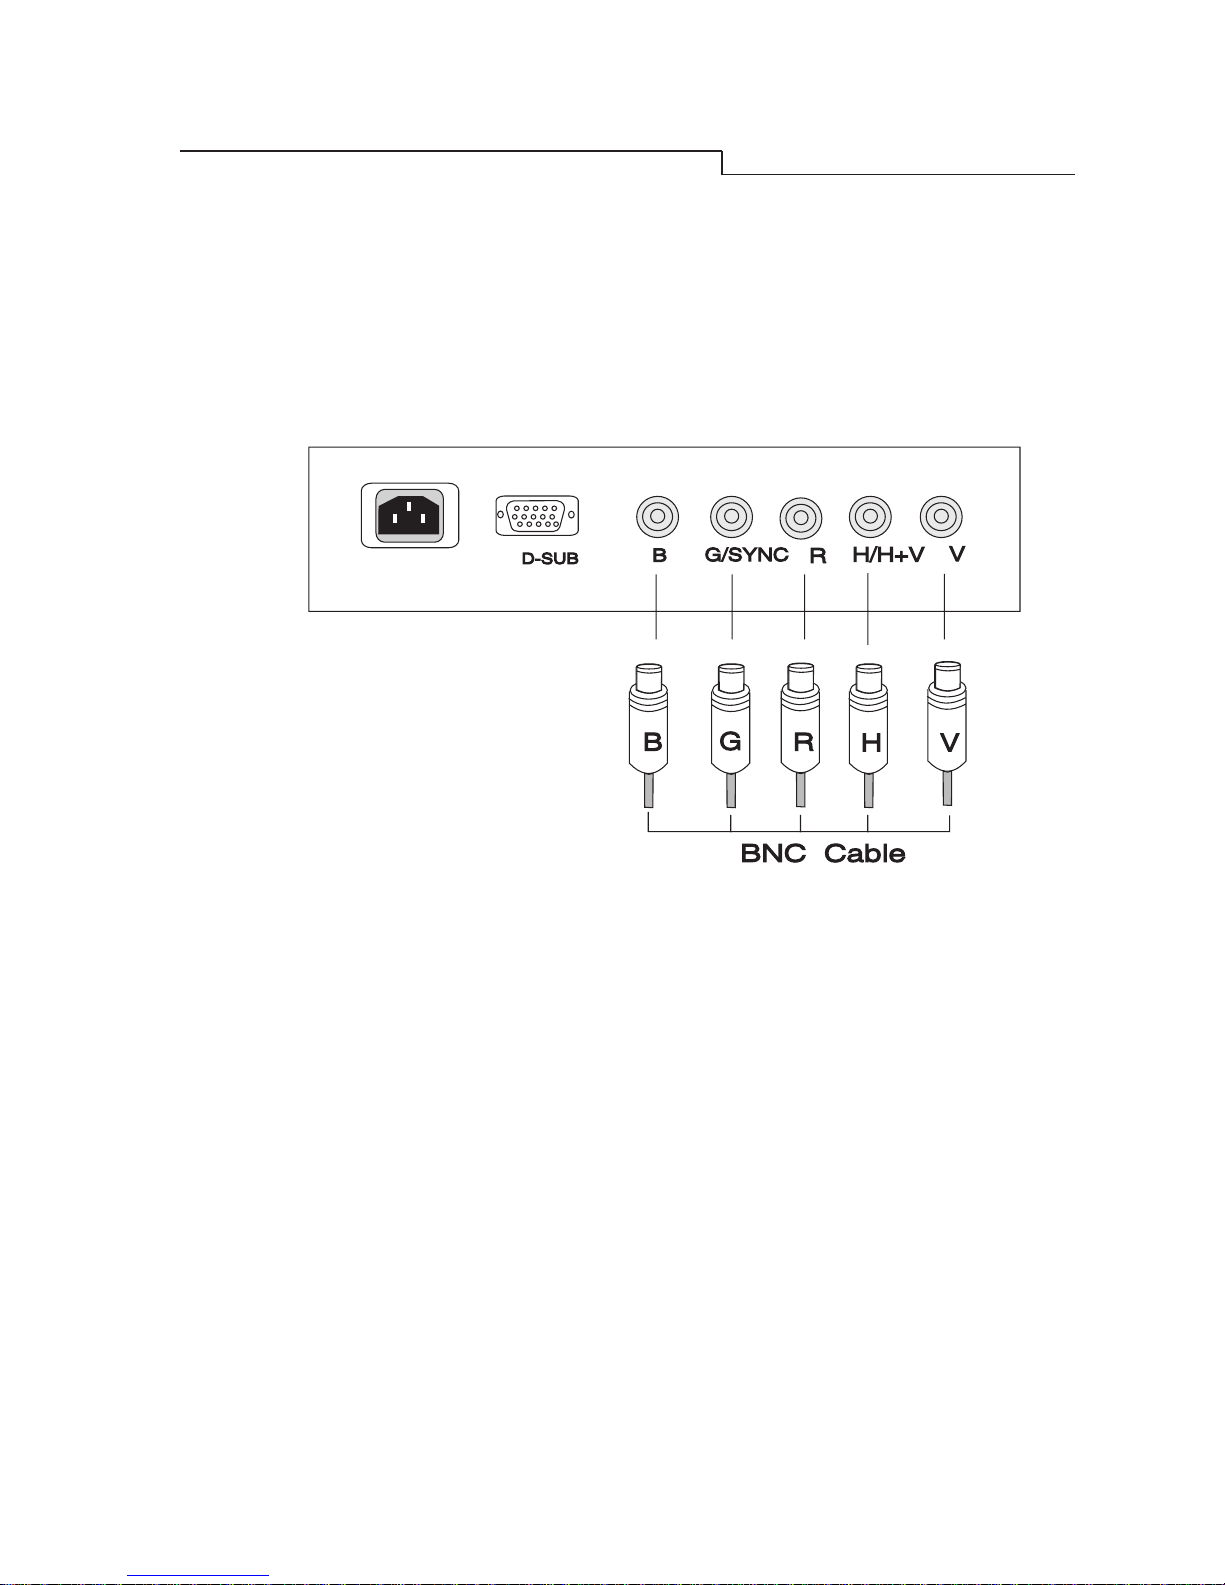
Installing the Monitor
✏ Connecting through BNC Signal Connector
1) Make sure that the system power is turned off.
2) Connect the computer end of the BNC cable to the output connector on the video
board of your computer.
3) Connect the monitor end of the BNC cable to the BNC receptacle on the back of
the monitor.
:
8
Chapter 3
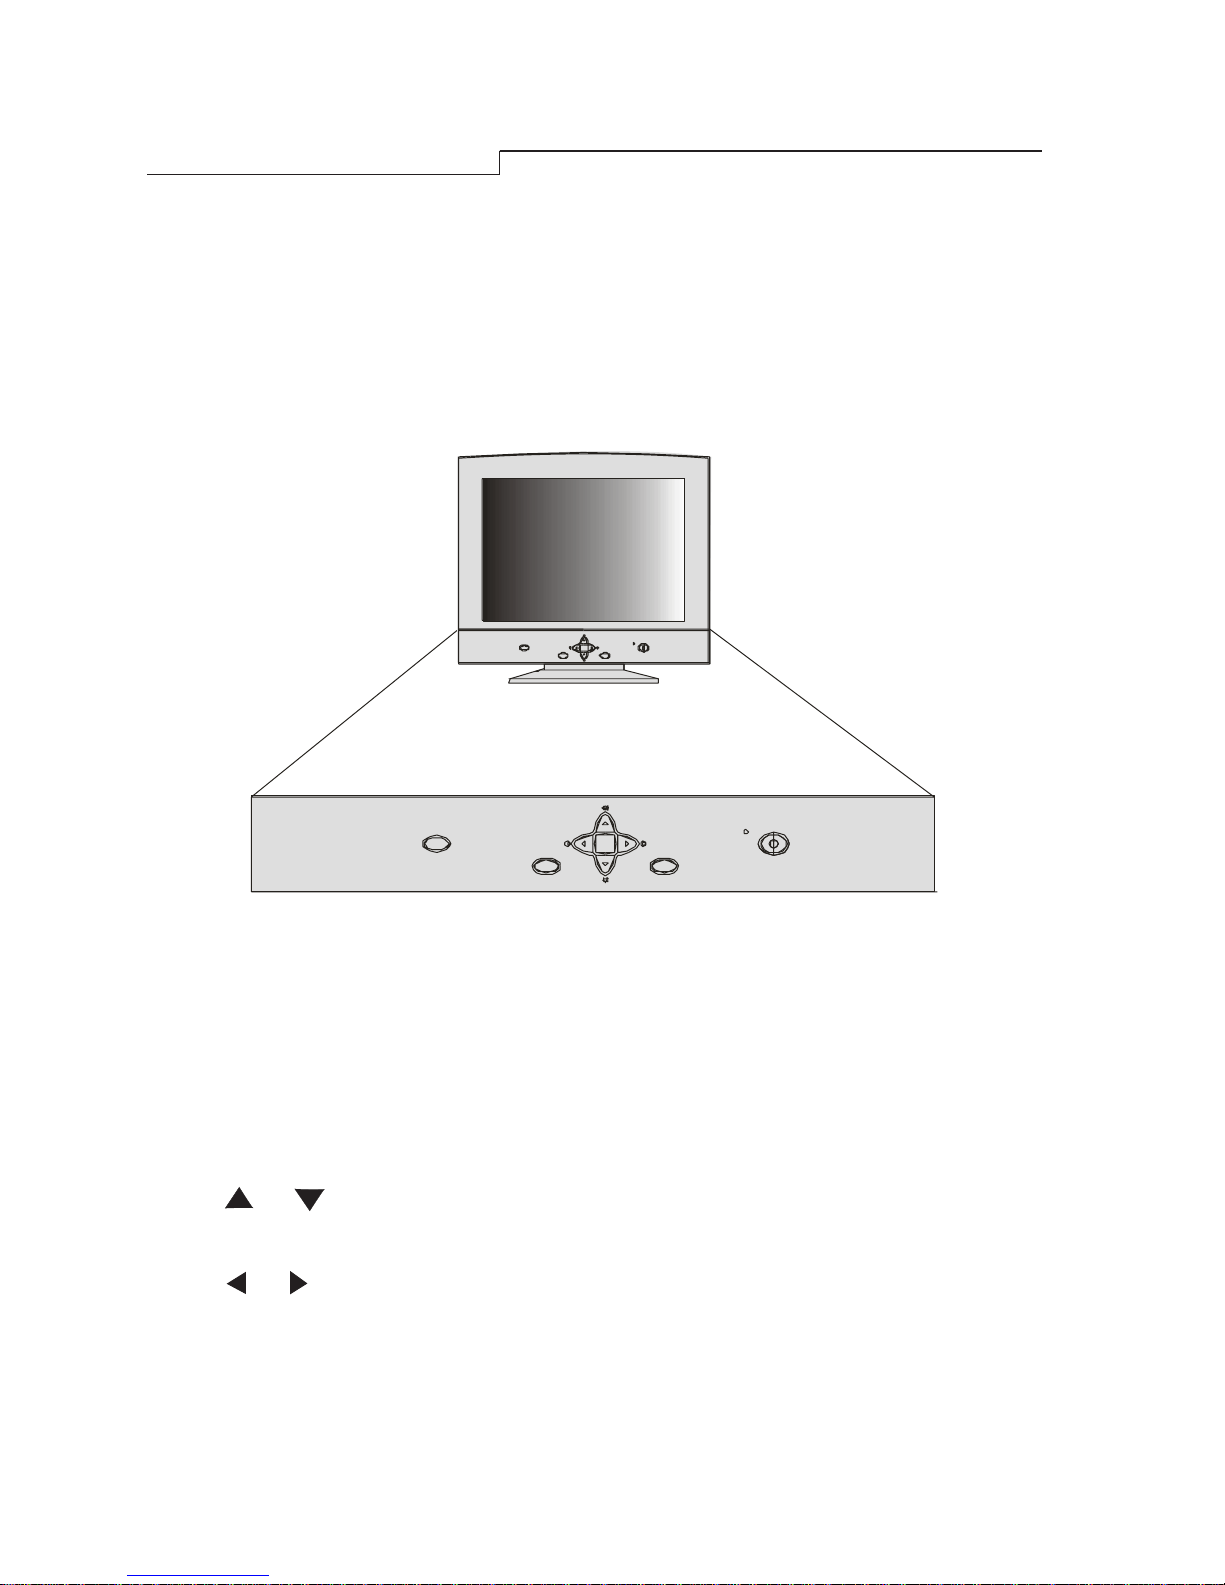
l Menu key : enters or changes Main menus. There are three main menus.
l Enter key : enters sub-menus or selects items.
l Exit key : goes back to main menus (auto save), or leaves OSD.
l
& key : scrolls the light coloured bar up or down and represents
HOT KEY for brightness adjustment.
l
&
key : scrolls the light coloured bar left or right and represents
HOT KEY for contrast adjustment.
l Auto key : is used for Fuzzy Automatic calibration adjustment.
Chapter 3
A Look at the Control Panel
Auto
Exit Enter
Menu
Auto key
Exit Enter
Menu
 Loading...