

Page 1
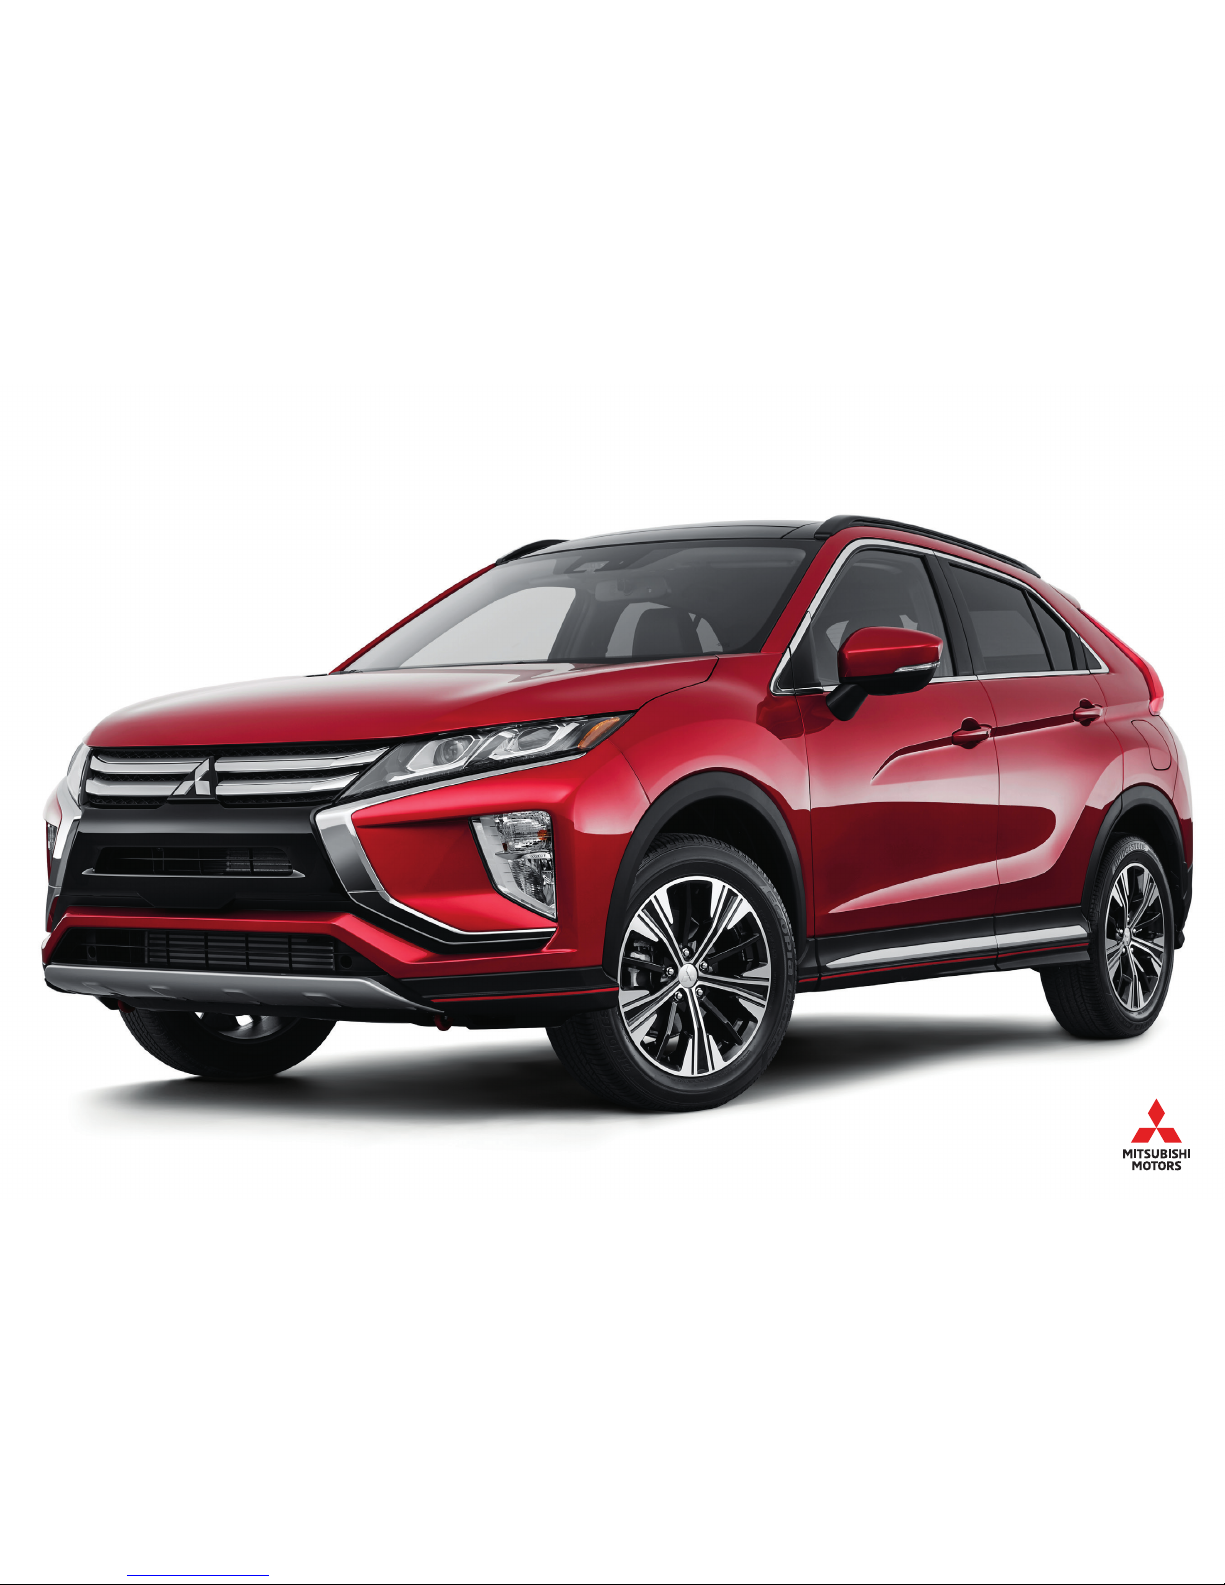
2018 ECLIPSE CROSS
OWNER’S HANDBOOK
Page 2

PLEASE PLACE COPIES OF THE FOLLOWING ITEMS IN THE POCKET BELOW:
1. Pre-Delivery Inspection Form (Customer Copy)
2. Triple Diamond Delivery Checklist (Customer Copy)
3. Salesperson or Key Dealership Contact’s Business Card
Page 3

1
Thank you for buying a Mitsubishi Eclipse Cross. There’s no doubt you’ve already realized how well your
car drives on the open road. What you may not know is all the great features that help your car perform
the way it does. In the pages ahead we’re going to run through the basics and prepare you for the road.
We hope you will visit the Mitsubishi Owner’s site where we store the latest Mitsubishi news
and special offers. Here you can also keep track of your car’s warranty and servicing needs,
get Roadside Assistance Information and tap into other owner-centric details. Just log on to
WWW.MITSUBISHICARS.COM/OWNERSONLY.
Some of the information contained in this booklet may not be correct due to product changes which may have occurred after the time it was
published. Mitsubishi Motors North America, Inc. reserves the right to make changes at any time, without notice, to prices, color, materials,
specification and models.
TABLE OF CONTENTS
Driver’s View ................Page 2
My Mitsubishi Connect App .....Page 4
Controls ....................Page 6
Own the Road ................Page 8
Switches. . . . . . . . . . . . . . . . . . . . Page 9
Advanced Technology .........Page 10
Operations .................Page 13
HomeLink® (if equipped) ......Page 14
Display Audio System
(if equipped) ...............Page 15
Smartphone Link Thin-Display
Audio (SDA) (if equipped) ......Page 16
Bluetooth® Operation
with SDA (if equipped) ........Page 18
Comfort and Convenience .....Page 19
Multi-Information Display .....Page 20
FAQ’s .....................Page 21
Page 4
2
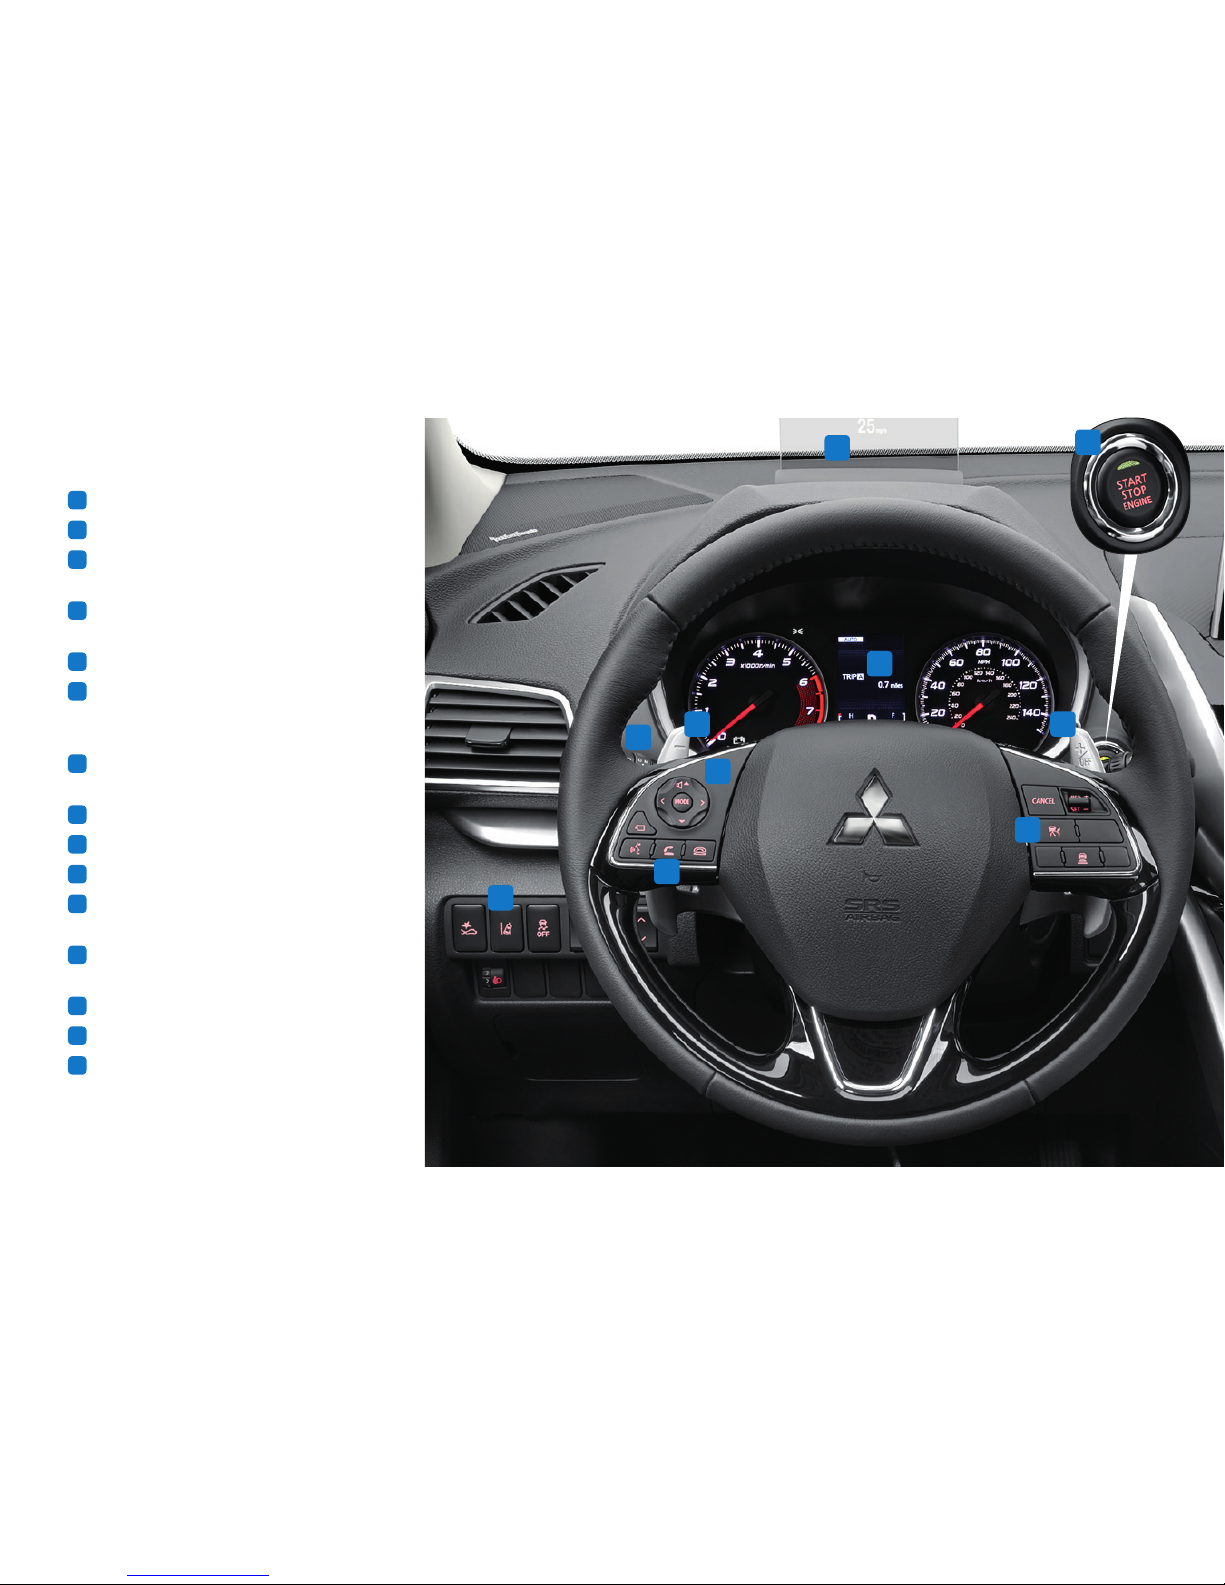
DRIVER’S VIEW
1
Climate Controls ..................Page 6
2
Headlights .......................Page 6
3
Cruise Control / Adaptive Cruise
Control (if equipped) ...............Page 8
4
S-AWC Drive Mode Selector
(if equipped)
.....................Page 8
5
Paddle Shifters (if equipped) ......... Page 8
6
Lane Departure Warning (LDW) Switch
and Forward Collision Mitigation (FCM)
Switch (if equipped) ................Page 9
7
Start/Stop Engine Switch
(if equipped with F.A.S.T.-Key Fob) ....Page 13
8
Head Up Display (if equipped)
.......Page 12
9
HomeLink® (if equipped) ........... Page 14
10
Audio Remote Control Switch ........ Page 14
11
Display Audio / Smartphone Link
Thin-Display Audio ................Page 15
12
Bluetooth® Controls for SDA
(if equipped) ....................Page 18
13
Seat Heater Switch (if equipped) .....Page 19
14
Heated Steering Wheel Switch .......Page 19
15
Multi-Information Display (MID) ...... Page 20
8
2
10
15
5 5
12
6
3
7
Page 5

3
1
4
13
11
9
14
Page 6
4
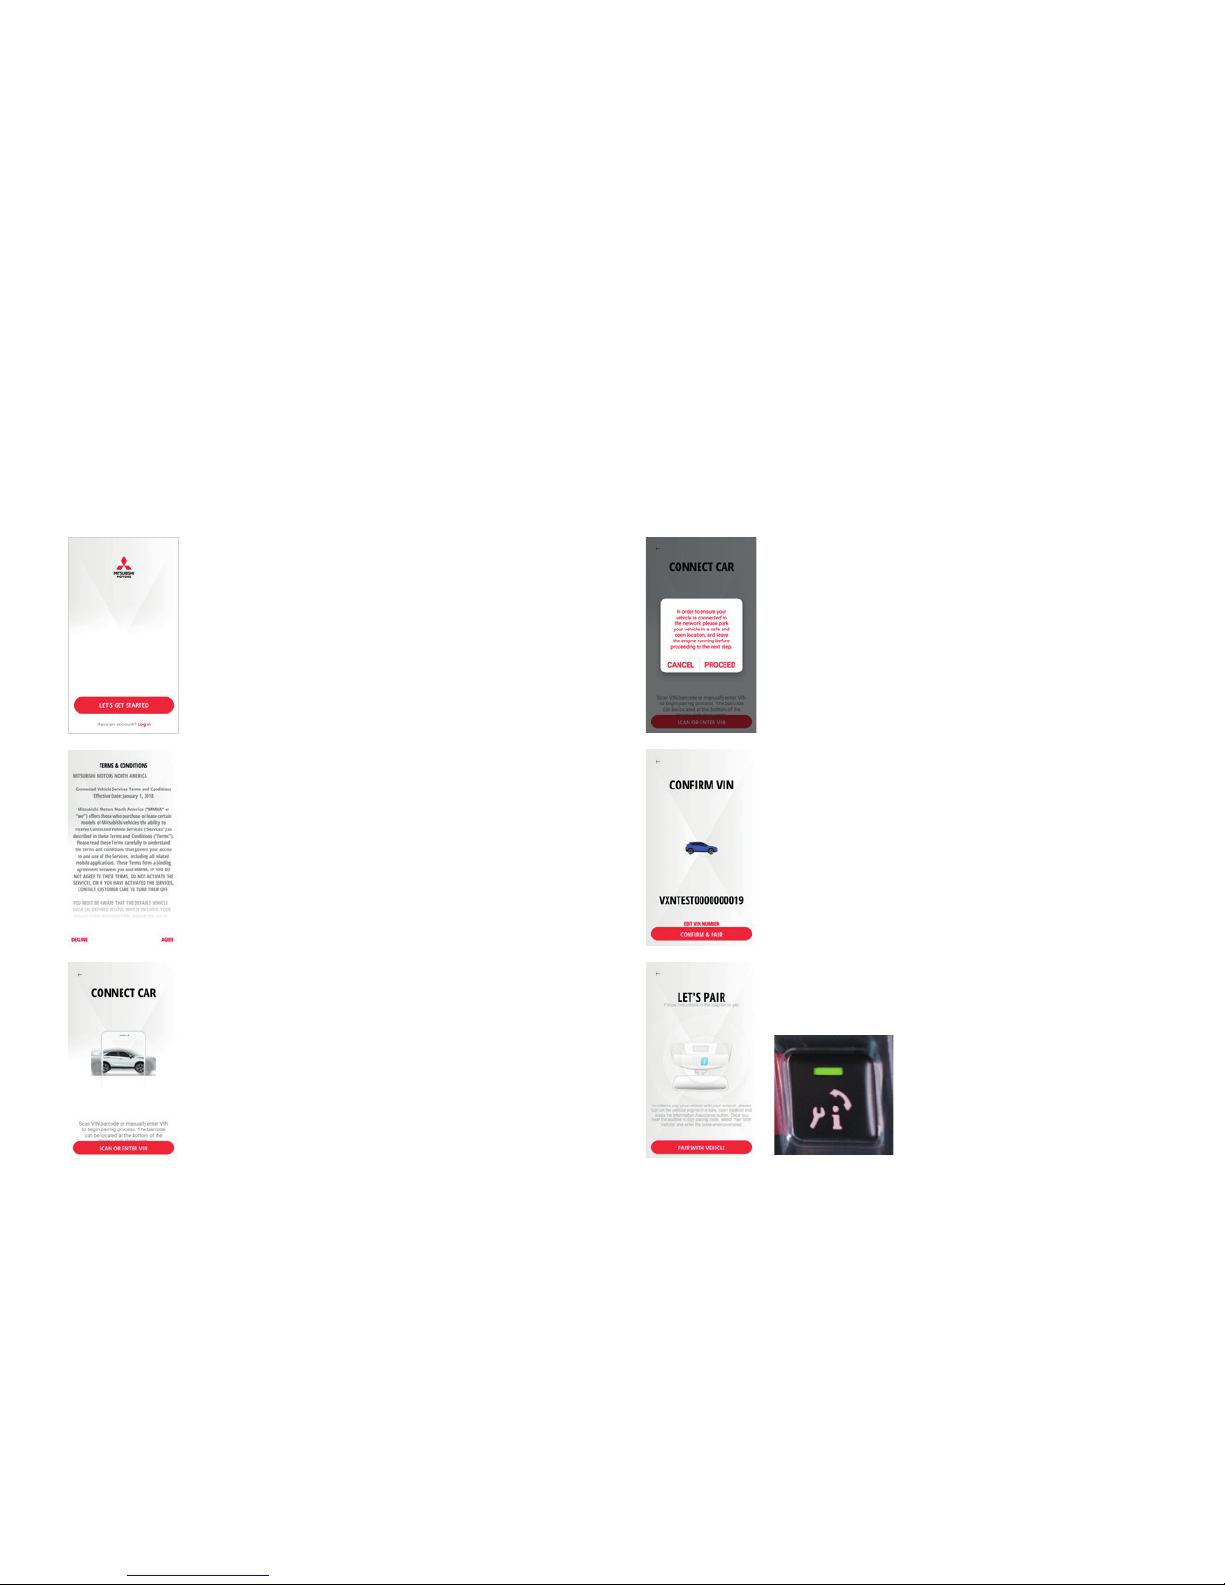
MY MITSUBISHI CONNECT APP
Go to the Apple App Store or Google Play Store and search for the “My MITSUBISHI CONNECT” app and download.
MITSUBISHI CONNECT ENROLLMENT PROCESS
Open the app and click on the "Let's Get Started" button
to begin enrollment process.
Read the Terms & Conditions and press "Accept" at
the bottom right of the smartphone screen to proceed
with registration. If you “Decline” you will be unable to
continue with enrollment.
Start engine and idle for 60 seconds to get vehicle
online, leave engine ON until account setup is complete.
Scan or manually enter the Vehicle Identification Number.
Confirm Vehicle Identification Number is your vehicle and
then press "Pair With Vehicle" button on the app.
Now press the black "i" button in the overhead console.
This will send an outbound call and generate a random
4-digit audio pairing code.
1 4
2 5
3 6
Page 7
5
MY MITSUBISHI CONNECT APP
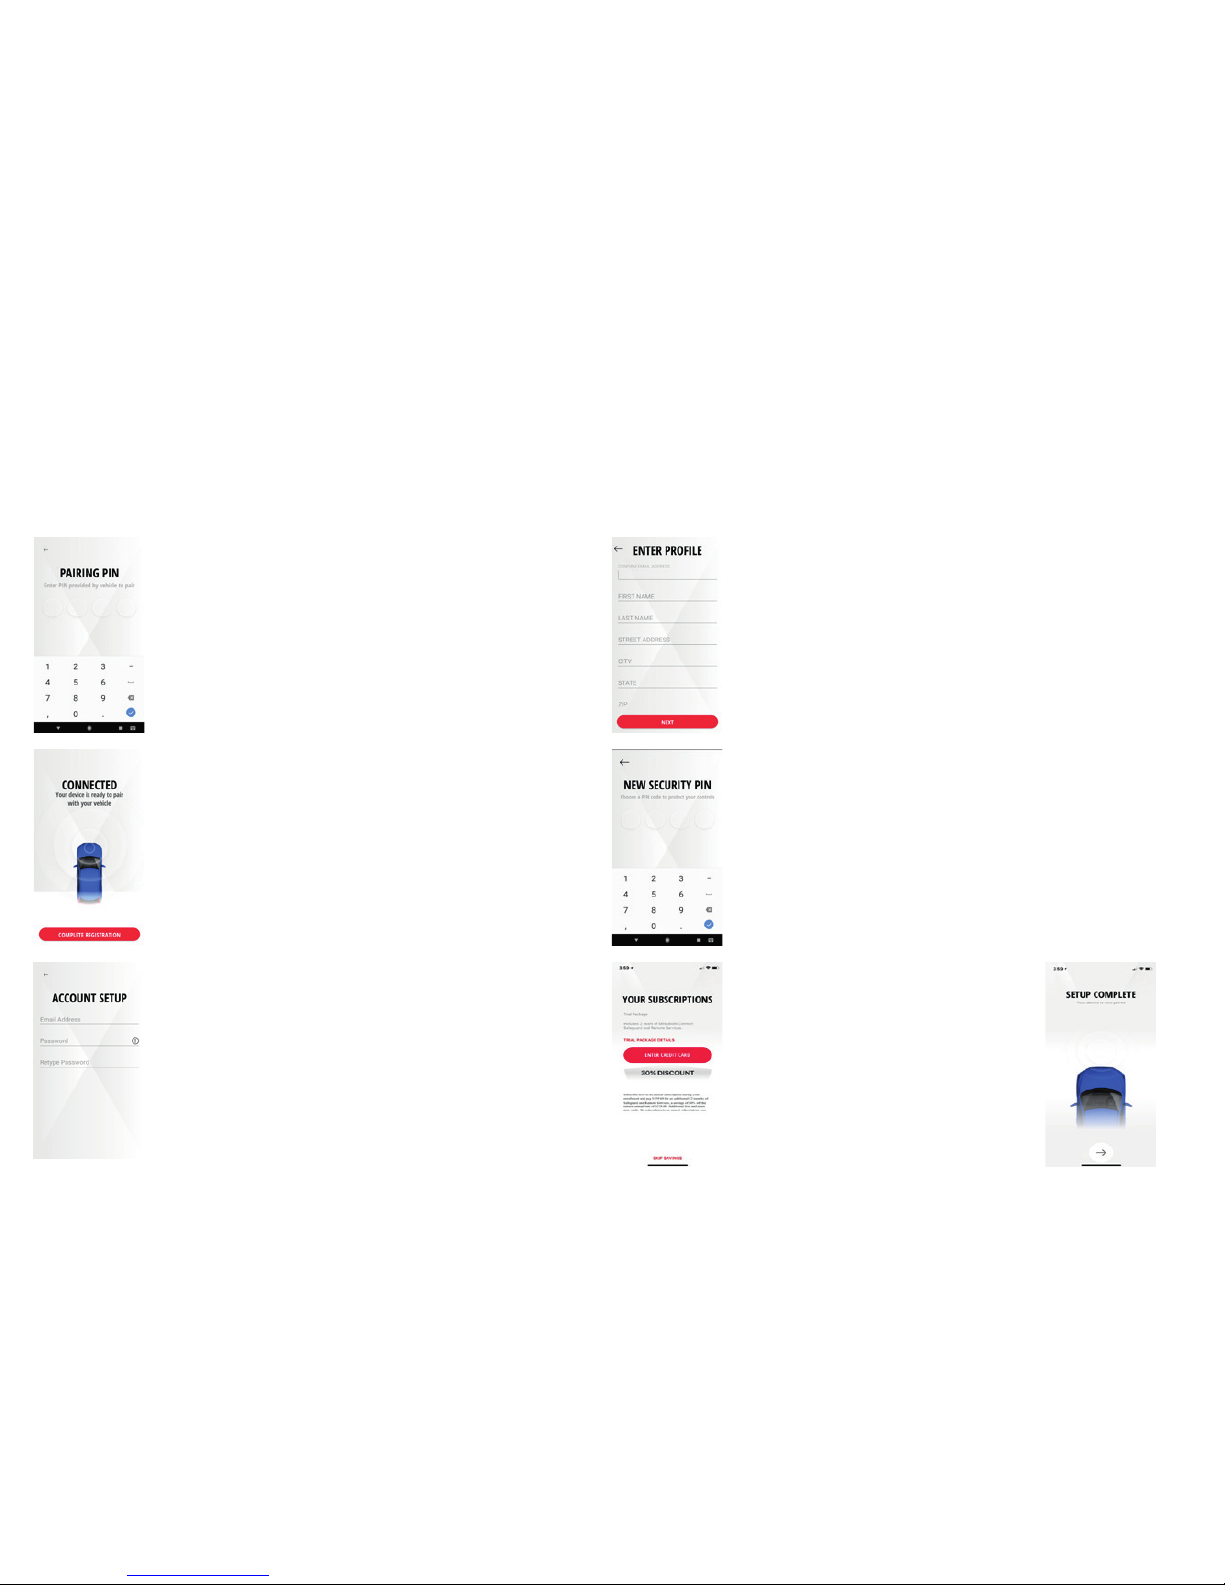
Enter your personal profile information, such as first and
last name, street address, city, state and mobile phone
and confirm.
Create an easy to remember 4 digit security PIN to
protect access to your remote app controls.
Enter or skip credit card entry. By
providing a valid credit card during
enrollment you will receive a 30%
savings on renewal of Safeguard and
Remote Services subscription bundle.
IMPORTANT: YOUR CREDIT CARD
• Your credit card will not be charged
until expiration of trial period
YOU ARE NOW CONNECTED!
Listen for a recorded voice to announce a 4-digit audio
PAIRING PIN. Enter this 4 digit PAIRING PIN in the app to
register your vehicle.
Your device is now registered to your vehicle, press
"Complete Registration" on app and continue to setup
your account profile.
Enter your primary email address and password in the
Account Setup screen.
IMPORTANT: YOUR PASSWORD
• Must be between 8 to 15 characters, have one
uppercase letter, one lowercase letter, one special
character and one number
IMPORTANT: YOUR EMAIL ADDRESS
• This email will be the primary email for all account
communications
7 10
8 11
9 12
Page 8
6
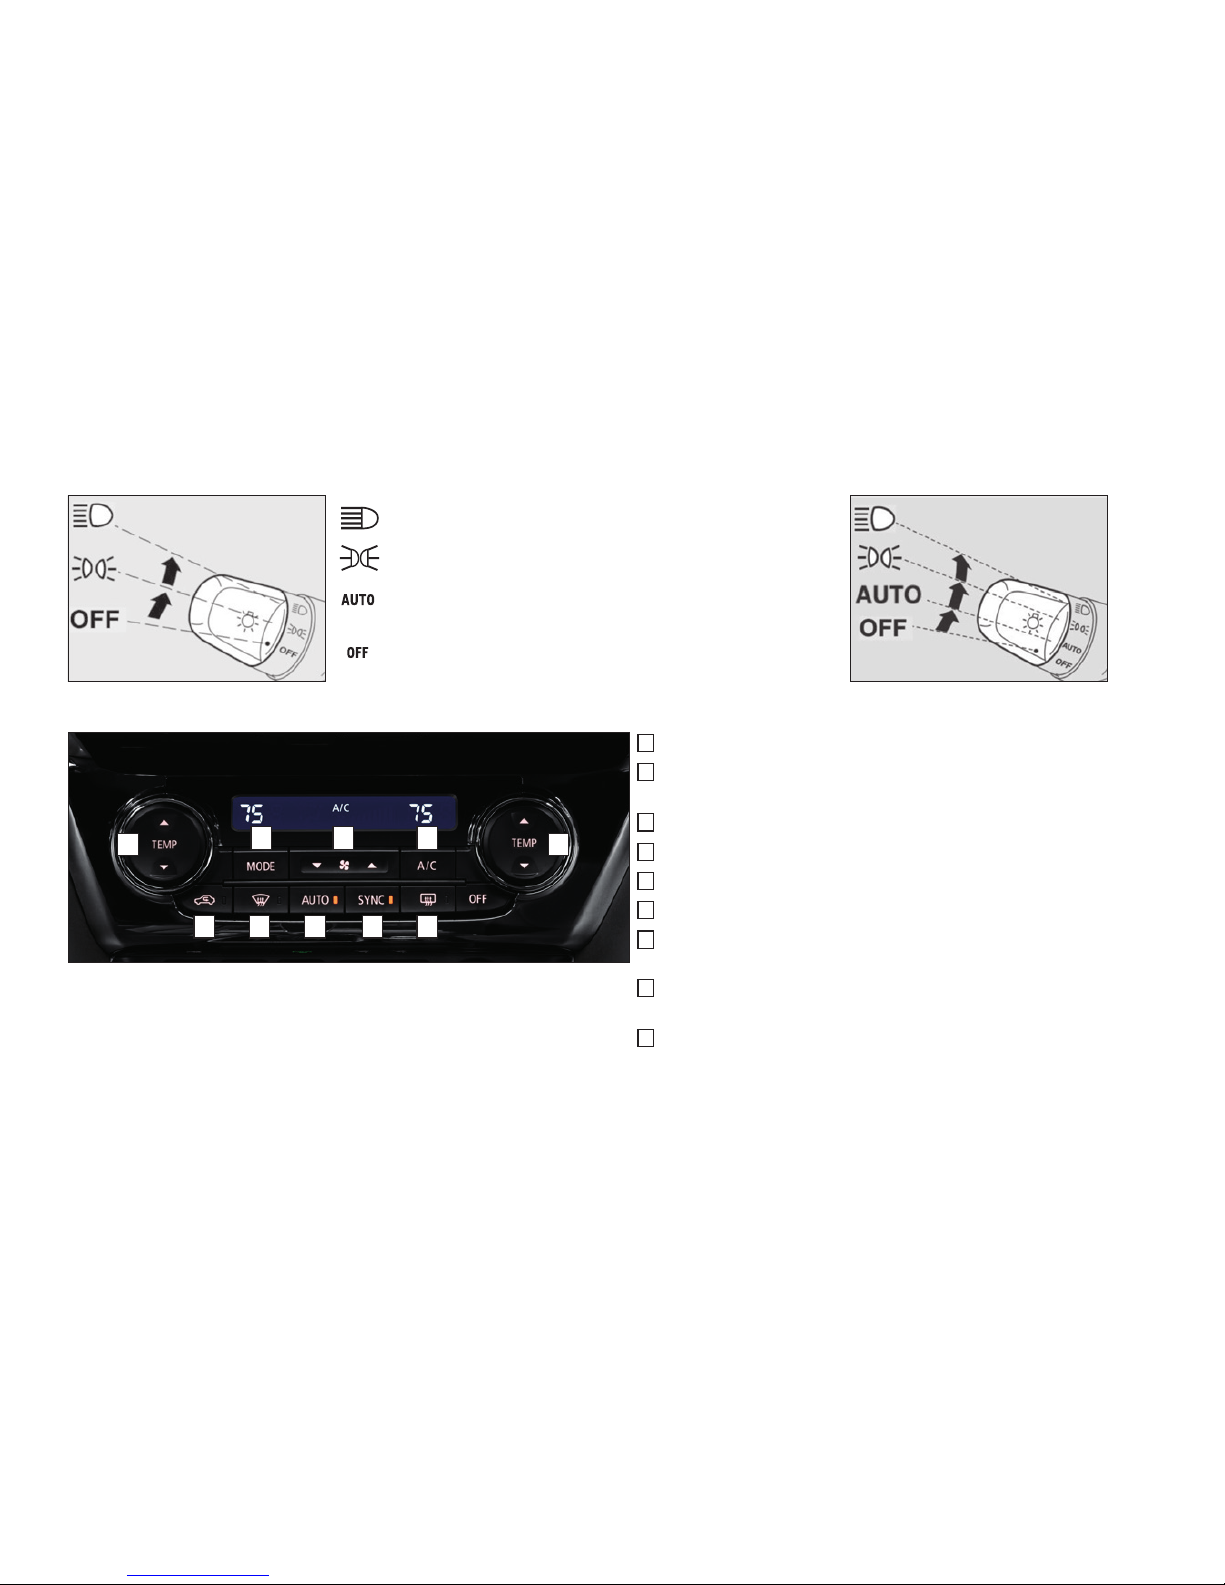
CONTROLS
REGULAR HEADLIGHTS AUTOMATIC HEADLIGHTS (IF EQUIPPED)
Headlights and other lights on.
Parking, tail, front and rear sidemarker lights, license plate
and instrument panel lights on.
Headlights and other lights turn on and off automatically in
accordance with outside light level.
All lights off.
DUAL-ZONE AUTOMATIC CLIMATE CONTROL (IF EQUIPPED)
A
- Push to select the desired temperature
B
- Push to select outside air (Indicator light off) or recirculated air
(Indicator light on)
C
- Push for air conditioning ON/OFF
D
- Push to select the blower speed
E
- Push to select the position of air flowing from the vents
F
- Push to defog windshield
G
- When the AUTO switch is pushed, the settings are automatically
controlled.
H
- Pressing the SYNC switch allows both the driver's and the
passenger's side temperatures to be synchronized.
I
- Push to defog the rear windows and to activate the
De-Icer Controls (if equipped)
A A
E
FB
D
G
C
IH
Page 9
7
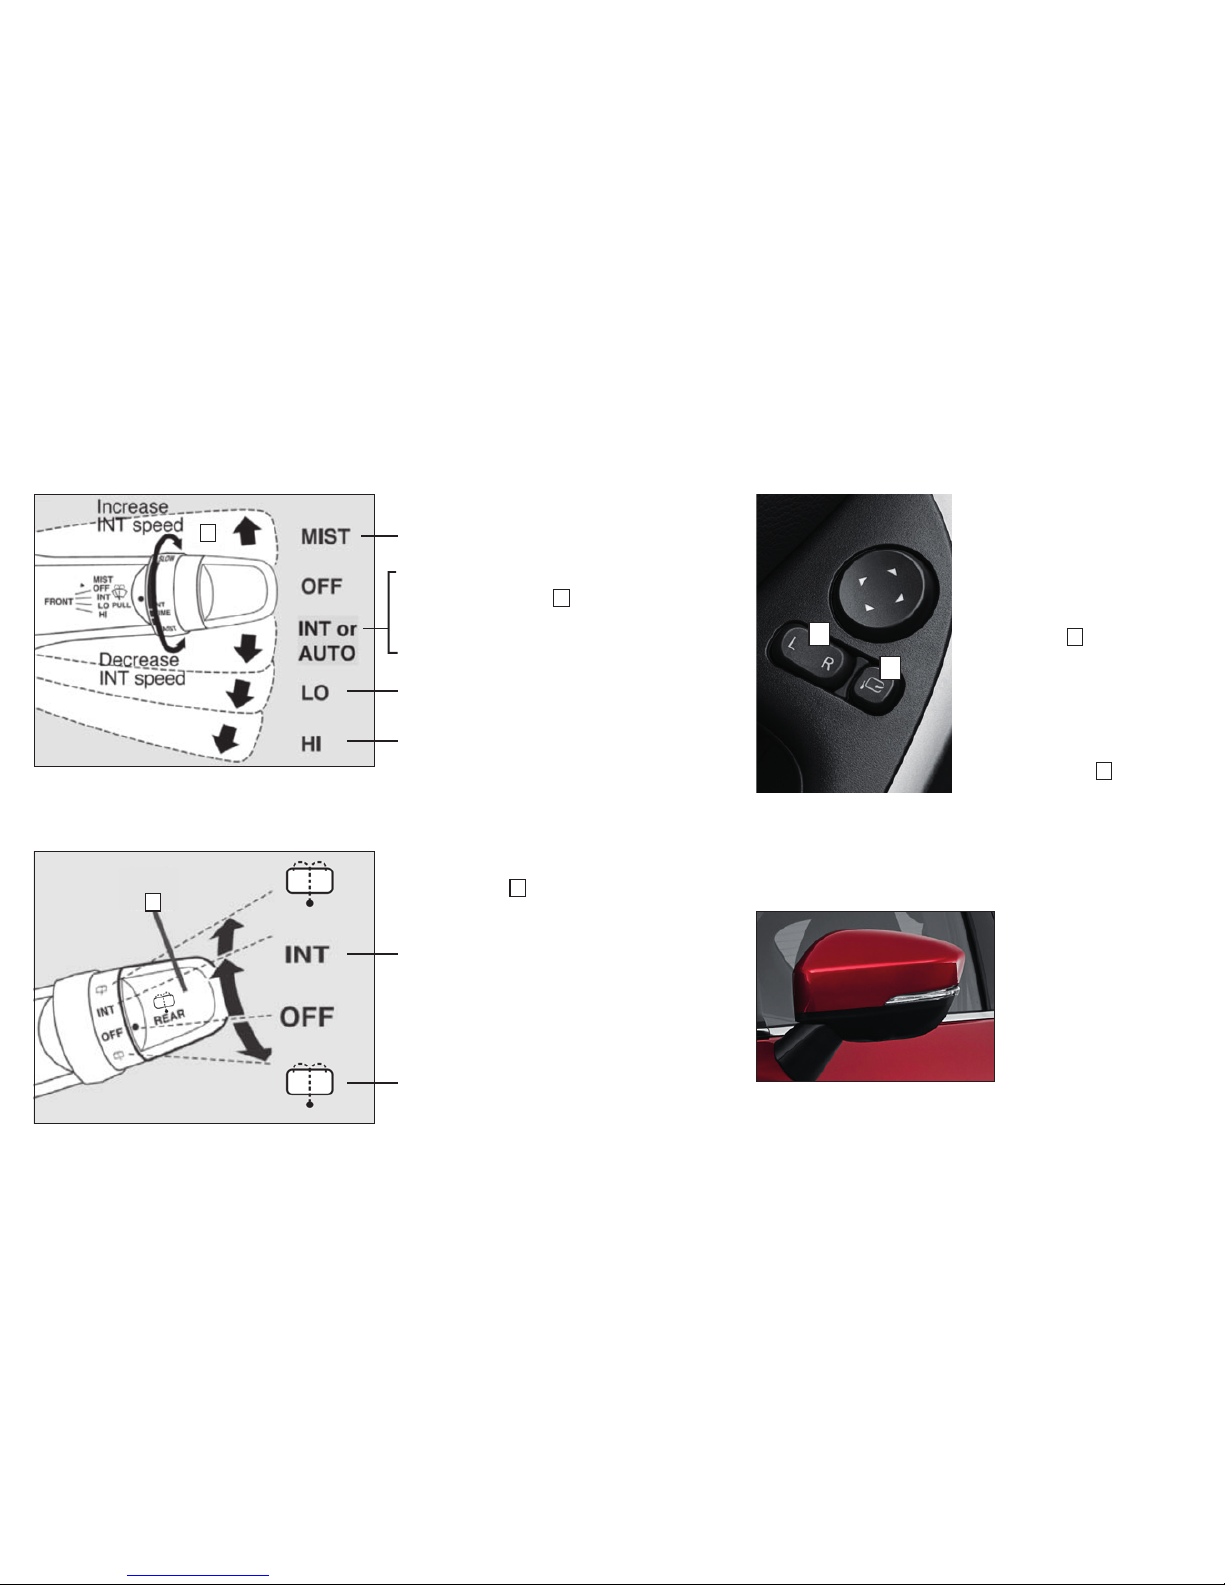
CONTROLS
REAR WINDOW WIPER/WASHER
Turn the knob B to operate the rear
window wiper.
The wiper operates continuously for several
seconds then operates intermittently at
intervals of about 8 seconds.
Washer fluid is sprayed, the wiper will
automatically operate 2 or 3 times.
SIDE MIRROR ADJUSTMENT
The outside rearview
mirrors can be adjusted
when the ignition switch is
in the ON or ACC position
or the operation mode is
put in ON or ACC.
Push the lever
A
to the
same side as the mirror
you wish to adjust.
The side mirrors can
be folded in and out by
pressing the Power Folding
Side Mirror switch
B
(if equipped)
.
A
WINDSHIELD WIPERS
The wipers will operate once.
INT: Intermittent intervals can be adjusted
by turning the knob
A
.
AUTO: The wipers will be operated
automatically by rain sensor (if equipped).
Slow
Fast
FOLDING SIDE MIRRORS (IF EQUIPPED)
The mirrors will
automatically fold
in when the vehicle
is turned off and
the vehicle is placed
in Park under
the following two
conditions:
1. The F.A.S.T.-Key button located on the door handle is
pressed to lock the doors.
2. The Lock button on the remote control is pressed.
A
B
A
B
Page 10

8
The drive mode can be switched by pressing the drive mode button
while the ignition switch is in the ON position.
Pressing the SELECTOR will change
the drive mode in order to:
AUTO à SNOW à GRAVEL
OWN THE ROAD
CRUISE CONTROL / ADAPTIVE CRUISE CONTROL (IF EQUIPPED)PADDLE SHIFTERS (IF EQUIPPED)
S-AWC DRIVE MODE SELECTOR (IF EQUIPPED)
Simply upshift or downshift with a tap
of your fingers – without moving your
hands from the steering wheel.
You can return to the “D” operation by
pulling the + (SHIFT UP) side paddle
shifter rearwards (toward the driver)
and holding for over 2 seconds.
A
B
C
D
E
A
- CANCEL: To deactivate the ACC or
cruise control.
B
- RES + : To increase the set speed
or resume control after cancelling
the ACC or cruise control function.
C
- SET – : To set the desired speed
and to reduce the set speed.
D
- ON/OFF: To turn cruise control ON
or OFF.
E
- ACC DISTANCE SWITCH: Used
to set or change the following
distance between your vehicle and
the vehicle in front of you.
TO SET A CRUISING SPEED
1. Press
D
and the “ACC” (if equipped) or “CRUISE” indicators will appear in
the Multi-information Display.
2. Accelerate or decelerate to your desired speed (above 25 mph).
Press
C
and remove your foot from the accelerator pedal.
TO ACCELERATE OR DECELERATE SPEED
Push up
B
to increase set cruising speed.
Push down
C
to decrease set cruising speed.
TO CANCEL THE CRUISING SPEED
Press
A
or press the brake pedal, or press D.
Page 11

9
You can deactivate the system by pressing
down the “ASC OFF” switch for 3 seconds
or longer. When the ASC is deactivated, the
display/indicator will turn on.
To reactivate the ASC, momentarily press the
“ASC OFF” switch; the display/indicator is
turned off.
When you press the LDW switch located on the
left side of the steering column, the “LDW”
indicator on the information screen of the
Multi-information Display turns OFF and the
LDW system is inactive.
Press the switch again, the system
will activate.
Every time the operation mode is turned to
“ON”, the FCM will automatically be
turned on.
To turn off the FCM, press and hold the FCM
switch located on the left side of the steering
column. The “FCM OFF” message and
indicator will appear in the Multi-information
Display.
To change the warning distance mode, briefly
press the FCM switch.
The Forward Collision Mitigation (FCM) system is a driver aid only and is not a
substitute for safe and careful driving. Under certain circumstances, the system
may not detect other vehicles and/or pedestrians correctly.
SWITCHES
ACTIVE STABILITY CONTROL (ASC) OFF SWITCH LANE DEPARTURE WARNING (LDW) SWITCH (IF EQUIPPED)
FORWARD COLLISION MITIGATION (FCM) SWITCH (IF EQUIPPED)
Page 12

10
ADVANCED TECHNOLOGY
The Blind Spot Warning (BSW) is a driving aid system that alerts the driver
when another vehicle which may not be visible through the outside rearview
mirror is traveling in the next lane behind your vehicle. When a vehicle in
the next lane is traveling at same speed or faster in the detection areas, the
Blind Spot Warning light in the corresponding outside rearview mirror will
illuminate. If the turn signal lever is operated to the side where the Blind
Spot Warning light is illuminated, the Blind Spot Warning light will blink and
a buzzer will sound to alert the driver.
Depending on the relative speed between your vehicle and a vehicle in the
next lane, the Blind Spot Warning will detect up to approximately 230 feet
from your vehicle.
BLIND SPOT WARNING WITH LANE CHANGE ASSIST (BSW) (IF EQUIPPED)
The Rear Cross Traffic Alert (RCTA) is an aid system for backing up. When
the RCTA detects vehicles approaching from sides while your vehicle is
reversing, the Blind Spot Warning lights in the outside rearview mirrors on
both sides will blink and a buzzer will sound to alert the driver. A warning
message will also appear on the Multi-information Display.
Rear Cross Traffic Alert will be activated from 0 MPH when the vehicle is
shifted into Reverse and will detect on-coming vehicles that are passing
behind you. (Note: Minimum speed required for passing vehicles. See
Owner’s Manual for details). Rear radar transceivers will detect on-coming
rear traffic and will light up in the mirror and in the Multi-information
Display as well as sound a warning alert.
REAR CROSS TRAFFIC ALERT (RCTA) (IF EQUIPPED)
The Blind Spot Warning, Lane Change Assist and Rear Cross Traffic Alert systems are driver aids only
and are not substitutes for safe and careful driving. Under certain circumstances, these systems may
not detect other vehicles correctly.
Page 13

11
ADVANCED TECHNOLOGY
Press the button on the end of the left stock while turning on the head lamp to
turn on the Auto High Beam (AHB) operation. When an oncoming vehicle or/and
preceding vehicle approaches, AHB switches high-beam to low-beam until that
vehicle is clear of the vehicle’s detection area and switches back to high-beam
once the detection area is clear.
AUTOMATIC HIGH BEAM HEADLIGHTS (AHB) (IF EQUIPPED)
When you put the vehicle into reverse, the rear view camera only
will display the image behind the vehicle. To engage the Multi-View
camera, press the rectangular icon button above the Speech
button. This view can be seen in reverse or in drive, up to a speed
of 5 MPH. Cameras placed at four positions around the vehicle
provide visibility that would normally not be seen. The Display
Audio screen will show two images of the vehicle's immediate
surroundings.
MULTI-VIEW CAMERA
Page 14

12
OPENING THE DISPLAY
1. With the ignition switch in the "ON"
position or the operation mode ON,
push
A
to open the display.
2. The launch screen will be displayed and
then the HUD information will display.
CLOSING THE DISPLAY
1. Press the
A
switch and the ending screen will display.
2. Screen will close.
Turning off the ignition will close the display automatically. DO NOT attempt to
close the screen manually.
ADJUSTING THE ANGLE OF THE DISPLAY
When the display is open, push the
B
to raise or lower the angle of the display.
ADJUSTING THE BRIGHTNESS OF THE DISPLAY
When the display is open, push
C
to adjust brightness of the display.
HEAD-UP DISPLAY (HUD) (IF EQUIPPED)
HUD OPERATIONS
TOUCHPAD CONTROLS (IF EQUIPPED)
ADVANCED TECHNOLOGY
The Head Up Display (HUD) shows information
on a transparent display so you can easily
check the following information while driving:
- Vehicle speed
- Cruise Control information
- Warning information from Forward
Collision Mitigation and Lane
Departure systems
- When utilizing the paddle shifters, the
display will show the current gear the vehicle is in
A BC
ONE FINGER FLICK: Move cursor
TWO FINGER FLICK (UP/DOWN): Vol up/down
HOME
Move to HOME Screen
AUDIO
Change an audio source or move to current
audio scource screen.
APPLE CARPLAY,
ANDROID AUTO
Move to Apple CarPlay or
Android Auto screen
BACK
Return to the previous screen.
TWO FINGER FLICK (LEFT/RIGHT): Audio
PUSH: Select
Page 15

13
OPERATIONS
F.A.S.T.-KEY FOB (IF EQUIPPED)
While carrying the F.A.S.T.-Key
fob, press the driver’s door
lock/unlock switch
.
IF THE F.A.S.T.-KEY FOB IS NOT OPERATING PROPERLY
1. Take the key
A
out to unlock the door
2. Press the break pedal and hold the F.A.S.T-Key fob
B
up to
the Start/Stop Engine Switch button.
3. Starting the engine should now be possible
F.A.S.T.-KEY FOB
OPERATION INDICATOR LIGHT
LOCK (
) BUTTON
UNLOCK (
) BUTTON
PANIC BUTTON
While carrying the F.A.S.T.-Key fob within the operating range, the
Start/Stop Engine Switch can be used to start the engine.
• To start engine, make sure the selector lever is in the (Park)
position and hold the brake pedal down. Push the Start/Stop
Engine Switch.
• To stop the engine, stop the vehicle completely and move the
selector lever to “P” then press the Start/Stop Engine Switch.
*If you have to bring the engine to an emergency stop while driving, press and
hold the Start/Stop Engine Switch for more than 3 seconds..
• If you press the Start/Stop Engine Switch without depressing the brake pedal,
you can change the operation mode in the order of OFF, ACC, ON, OFF. Please
make sure vehicle is completely stopped before changing the operation mode.
*If the engine cannot be started, depress the brake pedal more firmly than usual
with the right foot. Then press the Start/Stop Engine Switch.
• If the engine cannot be started or the operation mode cannot be changed,
check the position of the F.A.S.T.-Key fob or the battery performance of the
F.A.S.T.-Key fob.
SECOND ROW SEAT OPERATION
START/STOP ENGINE SWITCH (IF EQUIPPED WITH F.A.S.T.-KEY FOB)
TO ADJUST THE SEAT BACKS
Pull the seat adjusting lever up and slide the seat forward
or backward to the desired position. Release the adjusting
lever to lock the seat in place.
Pull the lever up and adjust the seatback by hand to the
desired position, and release the lever. The seatback will
lock in place.
B
A
Page 16

14
HOMELINK® (IF EQUIPPED)
PROGRAMMING A NEW HOMELINK
®
To program HomeLink® to operate a garage door, gate, or entry door opener, home or office lighting, you need to be
at the same location as the device.
1. Press the HomeLink
®
button that you would like to program. The indicator light (A) will flash orange slowly.
2. Position the end of your hand-held transmitter (B) 1 to 3 inches away from the HomeLink
®
button while keeping
the indicator light in view.
3. Press and hold the hand-held transmitter button while watching the indicator light (A). Continue pressing the
button until the indicator light (A) changes from slowly flashing orange to either rapidly flashing green (rolling
code) or continuously lit green (fixed code). Now you may release the hand-held transmitter button.
4. Press the just-trained HomeLink
®
button and observe the indicator light.
• If the indicator light stays on constantly green, programming is complete and your device should operate
when the HomeLink
®
button is pressed and released.
• If the indicator light rapidly flashes green, firmly press, hold for 2 seconds and release the programmed
HomeLink
®
button. Repeat the “press/hold/release” sequence a second time, and, depending on the brand
of the garage door opener (or other rolling code equipped device), repeat this sequence a third time to
complete the programming process. At this point if your device operates, programming is complete.
• If the device does not operate, continue with “Programming a new HomeLink
®
” steps 5 to 7 to complete the
programming of a rolling code equipped device.
5. At the garage door opener receiver (motor-head unit) in the garage, locate the “Learn” or “Smart” button. This
can usually be found where the hanging antenna wire is attached to the motor-head unit (see your garage door
opener manual to identify the “Learn” button).
6. Firmly press and release the “Learn” or “Smart” button. (The name and color of the button may vary by
manufacturer.) There are typically 30 seconds to initiate step 7.
7. Return to the vehicle and firmly press, hold for 2 seconds and release the programmed HomeLink
®
button.
Repeat the “press/hold/release” sequence a second time, and, depending on the brand of the garage door
opener (or other rolling code equipped device), repeat this sequence a third time to complete the programming
process. HomeLink® should now activate your rolling code equipped device.
NOTE: Some hand-held transmitters may actually train better from a distance of 6 to 12 inches. Keep this in mind if
you have difficulty with the programming process.
1 - HomeLink
®
button 1
2 - HomeLink
®
button 2
3 - HomeLink
®
button 3
Page 17

15
DISPLAY AUDIO (IF EQUIPPED)
LISTENING TO THE RADIO
A
- Selects AM/FM
B
- Selects type of Media
(MP3 and BT-A)
C
- Phone
D
- Power and Volume knob
E
- Seek stations up or down
F
- Returns to the initial display
G
- Tune stations / adjust
sound settings
TO ADJUST THE CLOCK
1. Press the HOME key
2. Touch SETTING, then CLOCK
- The display changes to the clock setting where time and format can
be adjusted.
3. Touch SET
4. To return to the settings, touch BACK
5. The time setting change is completed
This HD Radio receiver enables:
PSD Program Service Data: Contributes to the superior user
experience of HD Radio Technology. Presents song name,
artist, station IDs, HD2/HD3 Channel Guide, and other
relevant data streams.
HD2/HD3 Adjacent to traditional main stations are extra local FM
channels. These HD2/HD3 Channels provide new, original
music as well as deep cuts into traditional genre.
DIGITAL SOUND Digital, CD-quality sound. HD Radio Technology enables
local radio stations to broadcast a clean digital signal.
AM sounds like today’s FM and FM sounds like a CD.
To Register a Bluetooth® Device:
1. Press the HOME key
2. Touch SETTING, then BLUETOOTH
3. Touch the NEW DEVICES
(If no Bluetooth
®
devices are registered, Step 3 is not required)
• If the Bluetooth
®
device is permitted to pair then it will allow the
connection to be made.
• Supports Ver. 2.1 + EDR
• Supported profiles: Bluetooth
®
Audio A2DP(V1.1), AVRCP(V1.3);
Hands-free HFP(v1.5); Phonebook transfer PBAP(v1.0)
When Bluetooth
®
is connected, 3 icons will display – the antenna level
(1 to 6), battery, Bluetooth
®
connected (shown on the HOME screen)
BLUETOOTH
®
INFORMATION
A
E
F
G
B
C
D
Bluetooth is a registered trademark of Bluetooth SIG, Inc.
Page 18

16
SMARTPHONE LINK THIN-DISPLAY AUDIO (SDA) (IF EQUIPPED)
A
- Apps
B
- Home
C
- Audio
D
- Volume Up
E
- Volume Down
F
- Power
SMARTPHONE LINK DISPLAY AUDIO (SDA) (IF EQUIPPED)
HD RADIO
Make sure you are on the Home Screen and touch either FM or the
AM button.
1. Once the station you want to save is shown on the screen, touch and
hold the preset boxes on the touch screen until you hear a beep.
2. Once you hear a beep, the station will be saved to memory.
To select the HD Radio, touch the Smartphone Link
Thin-Display Audio HD Channel icon. The number of HD
Radio will appear in a drop down menu. Select the designated HD Radio.
Another way to select HD Radio station is to use the touchpad
(if equipped).
With the display identifying HD Radio are present, perform the following:
1. Swipe the touchpad to the left to the radio menu
2. Swipe down to HD Radio
3. Press down on the touchpad to select
4. Swipe through the HD Radio selections
5. Press down on the touchpad to select
The clock adjustment procedure is as follows:
1. Press the HOME key
2. Touch CLOCK
The display changes to the clock setting where time and format can
be adjusted.
3. Touch SET
4. To return to the settings, touch BACK
5. The time setting change is completed
ACCESSING AM OR FM STATIONS
TO SET A STATION IN MEMORY
SETTING THE CLOCK
A D
B E
C F
Page 19

17
1. Park your vehicle in a safe place and
turn the ignition switch to the "OFF"
position or put the Operation Mode
in O F F.
2. Plug in the USB factory cable that is
supplied with your device and connect
the USB end into the input terminal
located below the Climate Controls.
3. Turn the ignition switch or the Operation Mode to the "ACC"
position. Turn on the audio system.
4. There are 2 ways to access your USB
- Go to Home Screen and scroll to USB, press button
- Click on Audio button by Touch Pad on the center console.
5. Depending on your USB device, it may take longer for playback
to start.
6. Once the device is selected, playback starts.
SMARTPHONE LINK THIN-DISPLAY AUDIO (SDA) (IF EQUIPPED)
Apple CarPlay, iPhone, Siri and Lightning are trademarks of Apple Inc., registered in the U.S. and other Countries. Android, Android Auto, Google Play and other marks are trademarks of Google Inc.
1. Make sure your iPhone® has iOS8.0 or later and
that you are using a genuine Apple Lightning®
to USB cable.
2. Connect the Apple Lightning
®
to USB cable to
your phone and to the vehicle's USB port.
3. Apple CarPlay will automatically connect. To
use the iPhone with Apple CarPlay even while locked, choose "Allow" on your
iPhone's screen after the first connection.
4. You can operate Siri by pressing and holding the Steering Wheel Audio Speech
button until prompted on the screen.
ACCESSING APPLE CARPLAY
™
1. Make sure your phone has Android 5.0 or later.
2. You must download the Android Auto app from
the Google Play Store. This process may take
up to a couple of minutes.
3. Connect the manufacturer's phone cable from
your phone into the vehicle's USB port.
4. Follow your phone’s on-screen instructions until you are connected to Android
Auto. You can press the Speech button on the Steering Wheel Audio Controls
to activate voice operation.
ACCESSING ANDROID AUTO
™
AUDIO REMOTE CONTROL SWITCH
VOLUME UP
SEEK
Change station or track
VOLUME DOWN
MODE
Change the audio source
USB INPUT
Number of USB ports may differ
Page 20

18
BLUETOOTH® OPERATION WITH SMARTPHONE LINK THIN-DISPLAY AUDIO (SDA) (IF EQUIPPED)
BLUETOOTH® CONTROLS FOR SDA TO MAKE A CALL
REDIALING
SAYING A TELEPHONE NUMBER (IF EQUIPPED)
MAKING A CALL USING A PHONEBOOK NUMBER
For a list of compatible Bluetooth
®
devices, please go to
http://www.mitsubishicars.com/owners
There are 3 ways to make a call: by saying a telephone number, by using the
Bluetooth 2.0 interface's phonebook, and by redialing a telephone number.
Press the SPEECH button. Say "Redial." The last phone number dialed from
the system will be redialed.
1. Press the Speech button.
2. Say "Dial Number."
3. After the voice guide says "Number please," say the telephone number.
4. The voice guide will say "Dialing <number recognized>." The
Bluetooth 2.0 interface will then make the call. When the confirmation
function is on, the system will confirm the telephone number again.
To continue with that number, answer "Yes." To change the telephone
number, answer "No." The system will say "Number please." then say
the telephone number again.
1. Press the SPEECH button.
2. Say "Address Book" (Note: You must have names stored in the
Phonebook or the voice guide will say "The vehicle phonebook is empty.
Would you like to add a new entry now?")
3. After the voice guide says, "Name please." Say the name you want to
call from those registered in the Phonebook. If there is only 1 match,
the system voice guide will say "Calling <name>" and will dial the
telephone number. If there are 2 or more matches, the voice guide will
say "More than one match was found, would you like to call
<repeats name> ." If that person is the one you want to call, answer
"Yes." If it is not the person, answer "No." The name of the next
matching person will be mentioned by the voice guide.
SPEECH BUTTON
Change to voice recognition
PICK-UP BUTTON
Answer an incoming call
HANG-UP BUTTON
End a call or voice recognition
1. Press the HOME key
2. Touch SETTING, then BLUETOOTH
3. Touch the NEW DEVICES. If the Bluetooth
®
device is permitted to pair
then the SDA system will allow the connection to be made.
4. Go to your phone settings to confirm pairing
If you have paired multiple Bluetooth
®
devices with your SDA system,
the Bluetooth® device that connected last will be selected and will
automatically connect when it is detected.
TO SELECT A DIFFERENT DEVICE:
1. Press the HOME key
2. Touch SETTING, then BLUETOOTH
3. Touch the PAIRED DEVICES
4. Touch the “device name” to connect
5. This will complete the selection of the Bluetooth
®
device
BLUETOOTH
®
PAIRING
Page 21

19
COMFORT AND CONVENIENCE
ELECTRIC PARKING BRAKE SWITCH (IF EQUIPPED)
This system will be used to engage
and/or disengage electric parking brake.
Pull up on switch to engage the parking
brake while depressing brake pedal.
The Brake Warning Lamp and light in
the switch will illuminate when engaged.
Push down on switch to disengage
parking brake while depressing the brake pedal and Brake Warning Lamp
and light in the switch will be off when disengaged.
AUTO HOLD is used to hold the vehicle stationary by pressing the
momentary-contact AUTO HOLD switch prior to releasing the brake pedal.
HEATED STEERING WHEEL SWITCH (IF EQUIPPED)
The warmer will be activated by pressing the
Heated Steering Wheel Switch. To turn off Heated
Steering Wheel, press switch again. Warmer will
automatically turn off after 30 minutes.
FRONT SEAT HEATER SWITCH (IF EQUIPPED)
POSITION ACTION
HI For quick heating
NEUTRAL Heater off
LO Keeps seat warm
PANORAMIC SUNROOF (IF EQUIPPED)
OPENING AND CLOSING THE FRONT SUNROOF
Slide the Sunroof switch
A
towards the back of the
vehicle to open or towards the front of the vehicle to
close the front sunroof automatically.
TILTING THE FRONT SUNROOF
Press
A
to tilt the front sunroof up or pull A down to
lower the front sunroof automatically
OPENING AND CLOSING THE FRONT SUNSHADE
Slide the Sunshade switch
B
towards the back of the vehicle to open or
towards the front of the vehicle to close the front sunshade automatically.
PANORAMIC SUNROOF (IF EQUIPPED)
OPENING AND CLOSING THE REAR SUNSHADE
Slide the rear sunshade switch towards the back of the
vehicle to open or towards the front of the vehicle to
close the rear sunshade automatically.
REAR SEAT HEATER SWITCH (IF EQUIPPED)
Each time the switch is pressed, the mode
changes from OFF
à
HI à LO à OFF
POSITION ACTION
OFF No lights illuminated
HI Two lights illuminated
(For quick heating)
LO One light illuminated
(To keep seat warm)
A
B
Page 22

20
MULTI-INFORMATION DISPLAY
MULTI-INFORMATION DISPLAY SWITCH INSTANT FUEL CONSUMPTION DISPLAY
TIRE PRESSURE MONITORING SYSTEM (TPMS)
Each time the Multi-information Display
switch is operated, the buzzer sounds and
the Multi-information Display changes
between information such as warnings,
trip odometer, average and instant fuel
consumption, distance range, etc.
While driving, the instant fuel
consumption is shown with a bar
graph. The “
” mark in the instant
fuel gauge shows the average fuel
consumption.
When the instant fuel consumption
surpasses the average fuel
consumption, the instant fuel consumption is displayed with a green bar
graph.
Maintaining your fuel consumption above the average fuel consumption
point will help increase your mileage per gallon.
The Tire Pressure Monitoring System light
illuminates when one or more of your tires
is significantly under inflated. Please note
that changes in the outside temperature may
decrease tire pressure causing the TPMS
light to turn on. If the TPMS light remains
illuminated, check your tire pressure. If the
warning light illuminates, take the necessary
measures referring to the owner’s manual.
ECO MODE SWITCH
ECO MODE is an eco-driving support system
which automatically controls the engine and air
conditioning system to improve fuel efficiency.
To activate, press the ECO MODE switch.
Page 23

21
FAQ'S
Q: Is my phone compatible with the factory Mitsubishi Bluetooth® System?
A: Check the list of compatible phones, www.mitsubishicars.com/owners to see if the phone is Bluetooth
®
supported.
Q: How do I use Bluetooth
®
Audio?
A: Please refer to your Owner’s Manual for instructions.
Q: My Eclipse Cross has two 12V accessory outlets. What devices can be plugged into these outlets?
A: These outlets are protected with 15 amp fuses. Always check the current draw rating of any device prior to use in the vehicle. If the device is rated
above 12 amps, this could lead to circuit overload and the electrical fuse opening (no current flow).
Q: Why does the Audio System take so long to upload my music from my audio music device?
A: The Mitsubishi system can read multiple device structures in order to catalog the music files for easy playing and listening. Depending on the amount
of music you have on your device, this may take a few minutes.
Q: What are the different ways of playing music from my portable music player through the stereo system in my vehicle?
A: There are two ways of playing music through your vehicle’s sound system.
• USB port - The system will find the songs in your device and categorize them according to Artist, Album, and Genre. Then you can have the audio
system find and play the song in your device that you prefer without physically searching your device. This is done via voice commands.
• Bluetooth
®
Streaming - Once your device is paired to the system, you can stream music from your device through the audio system to your vehicles
sound system. No wires or cords. Your music stops and restarts at the same song when you exit and when you re-enter the vehicle. Voice commands
are not available.
Q: Why can’t I control the music track selection via voice commands while Bluetooth® streaming?
A: The Mitsubishi system uses AVRCP 1.3 (Audio/Video Remote Control Profile) which does support song information (title, artist, track, etc.). However,
you must have a device that also supports AVRCP 1.3 to supply that information to the Mitsubishi system.
Q: My Eclipse Cross is equipped with “Micron Air Filtration.” Where is the filter located and does it need servicing?
A: The micron air filter is a small filter element which is located in the HVAC box just behind the lower glove box. The filter should be inspected frequently for
debris. The filter works well at filtering incoming air however the filter will clog and lead to reduced outlet air volume if not serviced on a regular basis.
Page 24

22
FAQ’S
Q: Why does my Anti-Lock Braking System (ABS) make a noise?
A: Each time your vehicle is started and driven a short distance, you will hear the sound of the ABS motor operating from the right front engine
compartment. This is the normal sound the Anti-Lock Braking System makes when performing a self check.
Q: How can I get the MPG stated on the window sticker?
A: Vehicle driving styles will greatly affect MPG.
• Avoid sudden starts from a stop and let the vehicle coast to a traffic light. Both of these styles will increase mileage and reduce brake lining wear.
• Vehicles are designed to achieve the best fuel mileage when they are driven at the speed limits on the freeway. Avoid driving over 65 mph.
• Under inflated tires will increase rolling resistance and will reduce fuel mileage. Check tire pressure frequently to increase miles per gallon. Proper
tire pressure also ensures optimum tire performance (including tire wear.)
Q: Why do my Rain Sensing Windshield Wipers operate on their own when it’s not raining?
A: • When the lever is in the AUTO position, the rain sensor detects rain or snow and automatically turns on the wipers.
• The wipers may automatically operate when things such as insects or foreign objects are affixed to the windshield on top of the rain sensor or when
the windshield is frosted over.
• To stop the wipers, place the lever in the OFF position.
Q: Why does my check engine light come on after I put gas in my car?
A: There are many reasons why your check engine light may illuminate. Before calling your dealership, make sure the fuel cap is fully engaged and you
have heard three clicks when tightening it. After checking and hearing three clicks and the light is still on, contact your dealership.
Page 25

23
NOTES
Page 26

24
NOTES
Page 27

2018 ECLIPSE CROSS
MITSUBISHICARS.COM
REV 01/18
 Loading...