

Page 1

,
MITSUBISHI
"ELECTRIC
HIGH-DEFINITION
BASIC
OWNER'S
TELEVISION
GUIDE
MODELS
151
153
249
This manual provides basic connection, setup, and operating instructions.
Please visit our website
detailed owner's guide that fully describes the features of this TV.
• For questions:
Series
Series
Series
at
www. Mitsubishi-TV.com to view or download a
» Visit our website at www.mitsubishi-tv.com.
» E-mail usatMOEAservice@mdea.com.
» Call Consumer Relations at 800-332-2119.
• For information on
To
•
• 153 and 249 Series.
• The full Owner's Guide
order replacement or additional remote controls, visit our website at www.mitsuparts.
com or call 800-553-7278.
either part number 2420483020 (two-ended cable)
cable).
www.Mitsubishi-TV.com/ProductOocuments
System
IR
SCDlDR
-----
PROCESSOR
Downloaded From TV-Manual.com Manuals
Reset, please see the back cover.
emitter cables are available for purchase from Mitsubishi. Request
or
part number 299P254020 (four-ended
is
available electronically at
Command
ENERGY
STAR
Hornl'·
HIG
.....
OEfINITION
MULTIMEOIA INTERFACE
Page 2

FCC
DeclarationofConformity
TO
CAUTION:
SHOCK,
NO
USER
SERVICING
REDUCE
DO
NOT
SERVICEABLE
TO
QUALIFIED
The lightning flash with arrowhead symbol
£ within an equilateral triangle is intended
"'
&
enclosure that may beofsufficient magnitudetoconsti-
tute
a riskofelectric
The exclamation
,
• vicing) instructions in the literature
&
MAINS
the
as
remain readily operable.
WARNING:
MAINS socket outlet with a protective earthing
tion.
alert the userofthe presenceofuninsulated
"dangerous voltage" within
point
intendedtoalert the usertothe
important
panying the product.
DISCONNECTION:
disconnect
This
device. The
product
THE
RISK
OF
ELECTRIC
REMOVE
shocktopersons.
within an equilateral triangle is
operating and maintenance (ser-
COVER
PARTS
SERVICE
The mains plug is used
disconnect
shall be connectedtoa
(OR
BACK).
INSIDE.
PERSONNEL.
the
product's
device shall
REFER
presence
accom-
connec-
to
of
If YourTV Gets Damaged
Crystalline liquid may leak from the LCD panel and
broken glass may be scattered.
CAUTION:
contact
touch
get glass fragments
mouth.
mouth,
water
Disposal
The LCD panel contains a small amountofcrystalline
liquid and the fluorescent
mercury. Both are toxic and should not
DO
NOT
waste.
MERCURY AND MUST
OF ACCORDING TO LOCAL,
LAWS. For disposal
your local authoritiesorthe Electronic Industries Alliance at www.eiae.org.
The
crystalline
with
your
skin,
the
broken glassorcrystalline liquid. DO NOT
or
Should
rinse
and
disposeofthe
THE LAMPS INSIDE THIS PRODUCT CONTAIN
either
the
consult
of
Your TV
contacted
your
or
liquidistoxic.
eyes,ormouth.
crystalline liquid into eyes
contact
doct01G:::\
with
area
your
thoroughly
~=
tube
in the panel contains
TV
with
general
BE
RECYCLED OR DISPOSED
STATE,
recycling information,
AND FEDERAL
Avoid
DO NOT
eyes
MERCURY
be
touched.
household
contact
or
or
with
Product:
Models:
Responsible
Party:
Telephone:
This device complies with Part15of the
Operationissubject to the following two conditions:
(1)
This device
(2)
This device must accept
including interference that may cause undesired
operation.
Note: This equipment
to comply with the limits for a Class B digital device,
pursuant to part
designed to provide reasonable protection against
harmful interference
equipment generates,
frequency energy
accordance with the instructions,
interference to radio communications.
isnoguarantee that interference will not occurina par-
ticular installation. If this equipment does cause harmful
interference to radio or television reception, which
be
determinedbyturning the equipment off
user
is
encouraged to try to correct the interference
one or more of the following measures:
» Reorient or relocate the receiving antenna.
» Increase the separation between the equipment
and
» Connect the equipment into
circuit different from that to which the receiver
is
» Consult the dealer or
technician for
Changesormodifications
by
Mitsubishi could cause harmful interference
and
would
equipment.
LCD Flat Panel HDTV
LT-40151,
LT-40153, LT-46153,
LT-46249,
Mitsubishi Digital Electronics
America, Inc.
9351
Irvine, CA 92618-1904
(800) 332-2119
may
15
of the
and,
the
receiver.
connected.
void
the
LT-46151,
LT-52249
Jeronimo Road
not cause harmful interference, and
any
has
been
tested
FCC
Rules.
in
a residential installation.
uses
and
can
if not installed
an
experienced radio/TV
help.
not
expressly approved
user's
authoritytooperate this
LT-52151
LT-52153
FCC
Rules.
interference received,
and
found
These
limits
are
This
radiate radio
and
used
in
may
cause harmful
However,
an
outletona
and
there
can
on,
the
by
WARNING:
do
not
WARNING: This
to
the
defectsorother reproductive harm.
ENERGY STAR®
settings from their initial values could cause the TV
exeed ENERGY STAR® specifications.
Downloaded From TV-Manual.com Manuals
To
reduce the riskoffireorelectric shock,
expose this apparatustorainormoisture.
product
StateofCaliforniatocause cancer and/or birth
Compliance
contains chemicals known
Changing the video
to
TV
WEIGHT: This TV is heavy! Exercise extreme care
or
when lifting
minimum
avoid jarringormoving it while it is turned on. Always
power
nect
off
all cables before moving it.
moving it. Liftormove the TV with a
of
two
your
adults.
TV,
To
prevent damagetothe
unplug the
power
cord, and
TV,
discon-
Page 3
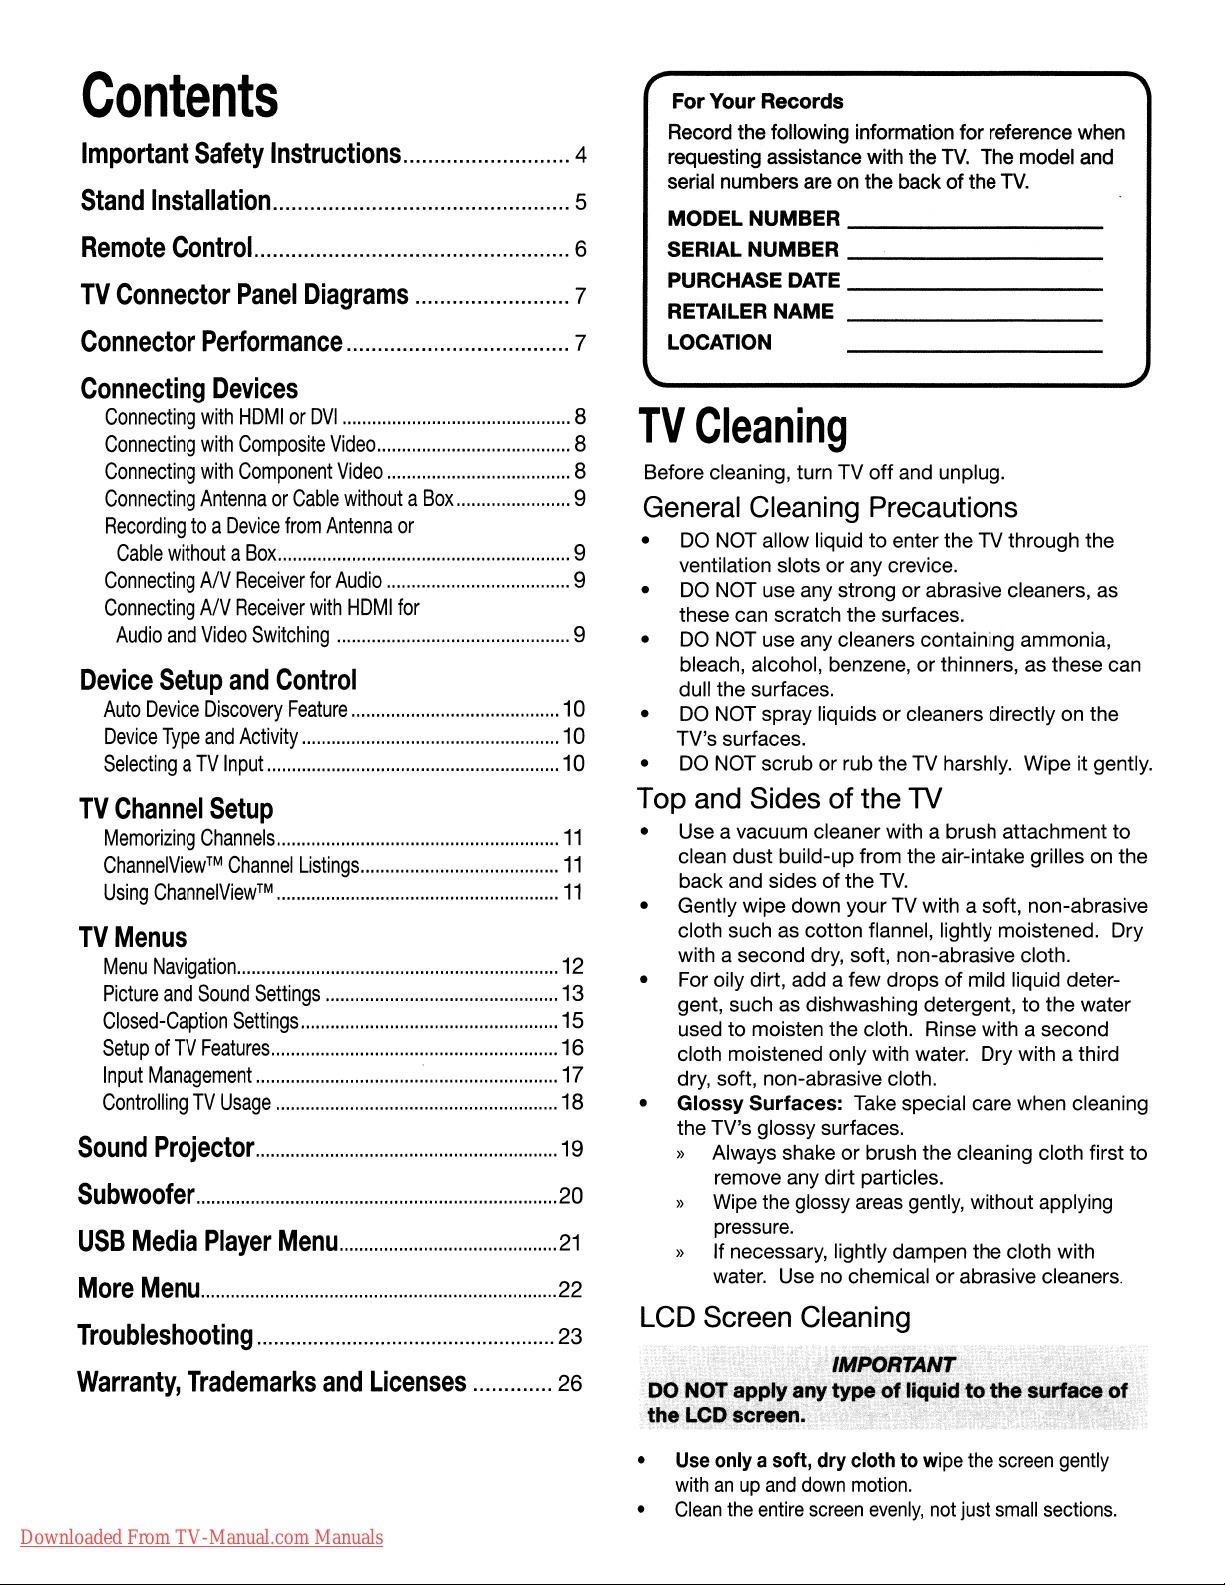
Contents
Important
Stand
Remote
TV
Connector
Safety
Installation
Control
Panel
Instructions
Diagrams
For
Your
Records
Record the following information for reference when
4
5
6
7
requesting assistance with the
serial numbers are on the back
MODELNUMBER
SERIAL
PURCHASEDATE
RETAILER
NUMBER
NAME
TV.
The model and
of
the
TV.
__
__
__
__
Connector
Connecting
Connecting
Connecting
Connecting
Connecting
Recordingtoa
Cable
Performance
Devices
with
HOMIor
with
Composite
with
Component
AntennaorCable
Device
withoutaBox
ConnectingANReceiver
ConnectingANReceiver
Audio
and
Video
Device
TV
TV
Setup
Auto
Device
Device
Type
SelectingaTV
Channel
Memorizing
ChannelView™
Using
ChannelView
and
Discovery
and
Input
Setup
Channels
Channel
Menus
Menu
Navigation
Picture
and
Sound
Closed-Caption
SetupofTV
Input
Features
Management
Activity
Settings
ControllingTVUsage
Sound
Projector
Subwoofer
USB
More
Media
Menu
Player
Troubleshooting
Warranty,
Trademarks
DVI
from
for
with
Switching
Control
Feature
Listings
™
Settings
Menu
and
Video
Video
withoutaBox
Antenna
or
Audio
HOMIfor
Licenses
10
10
10
11
11
11
12
13
15
16
17
18
19
20
21
22
23
26
7
LOCATION
8
TV
8
8
9
9
9
9
Cleaning
Before cleaning, turn TV
General Cleaning Precautions
•
DO
NOT allow liquidtoenter the TV through the
ventilation slots or any crevice.
•
DO
NOT use any strongorabrasive cleaners, as
these can scratch the surfaces.
•
DO
NOT use any cleaners containing ammonia,
bleach, alcohol, benzene, orthinners, as these can
dull the surfaces.
• DO NOT spray liquids
TV's surfaces.
•
DO
NOT scrub or rub the TV harshly. Wipe it gently.
Top
and Sidesofthe TV
• Use a vacuum cleaner with a brush attachment
clean
dust
build-up from the air-intake grilles on the
back and sides of the
• Gently wipe down your TV with a soft, non-abrasive
cloth such as cotton flannel, lightly moistened. Dry
with a second dry, soft, non-abrasive cloth.
• For oily dirt, add a few drops
gent, such as dishwashing detergent,
to
used
cloth moistened only with water. Dry with a third
dry, soft, non-abrasive cloth.
•
Glossy
the TV's glossy surfaces.
)}
)}
)}
moisten the cloth. Rinse with a second
Surfaces:
Always shake or brush the cleaning cloth first
remove any
Wipe the glossy areas gently, without applying
pressure.
If necessary, lightly dampen the cloth with
water. Use no chemical
off
and unplug.
or
cleaners directly on the
TV.
of
mild liquid deter-
to
the water
Take special care when cleaning
dirt
particles.
or
abrasive cleaners.
to
to
LCD Screen Cleaning
IMPORTANT
DO
~OTa~plyany
the.lCD~screen.
~b
:tY~C?{
1i_'J '
.
liquidtothe
"'.
surface
v
of
<il:'A.\'"
Downloaded From TV-Manual.com Manuals
• Use only a soft, dry clothtowipe the
•
withanup
Clean
the
and
entire
down
screen
motion.
evenly,
not
just
screen
small
gently
sections.
Page 4
Important
Please read the following safeguards for your TV and
retain for future reference. Always follow all warnings
and instructions marked on the television.
Safety
Instructions
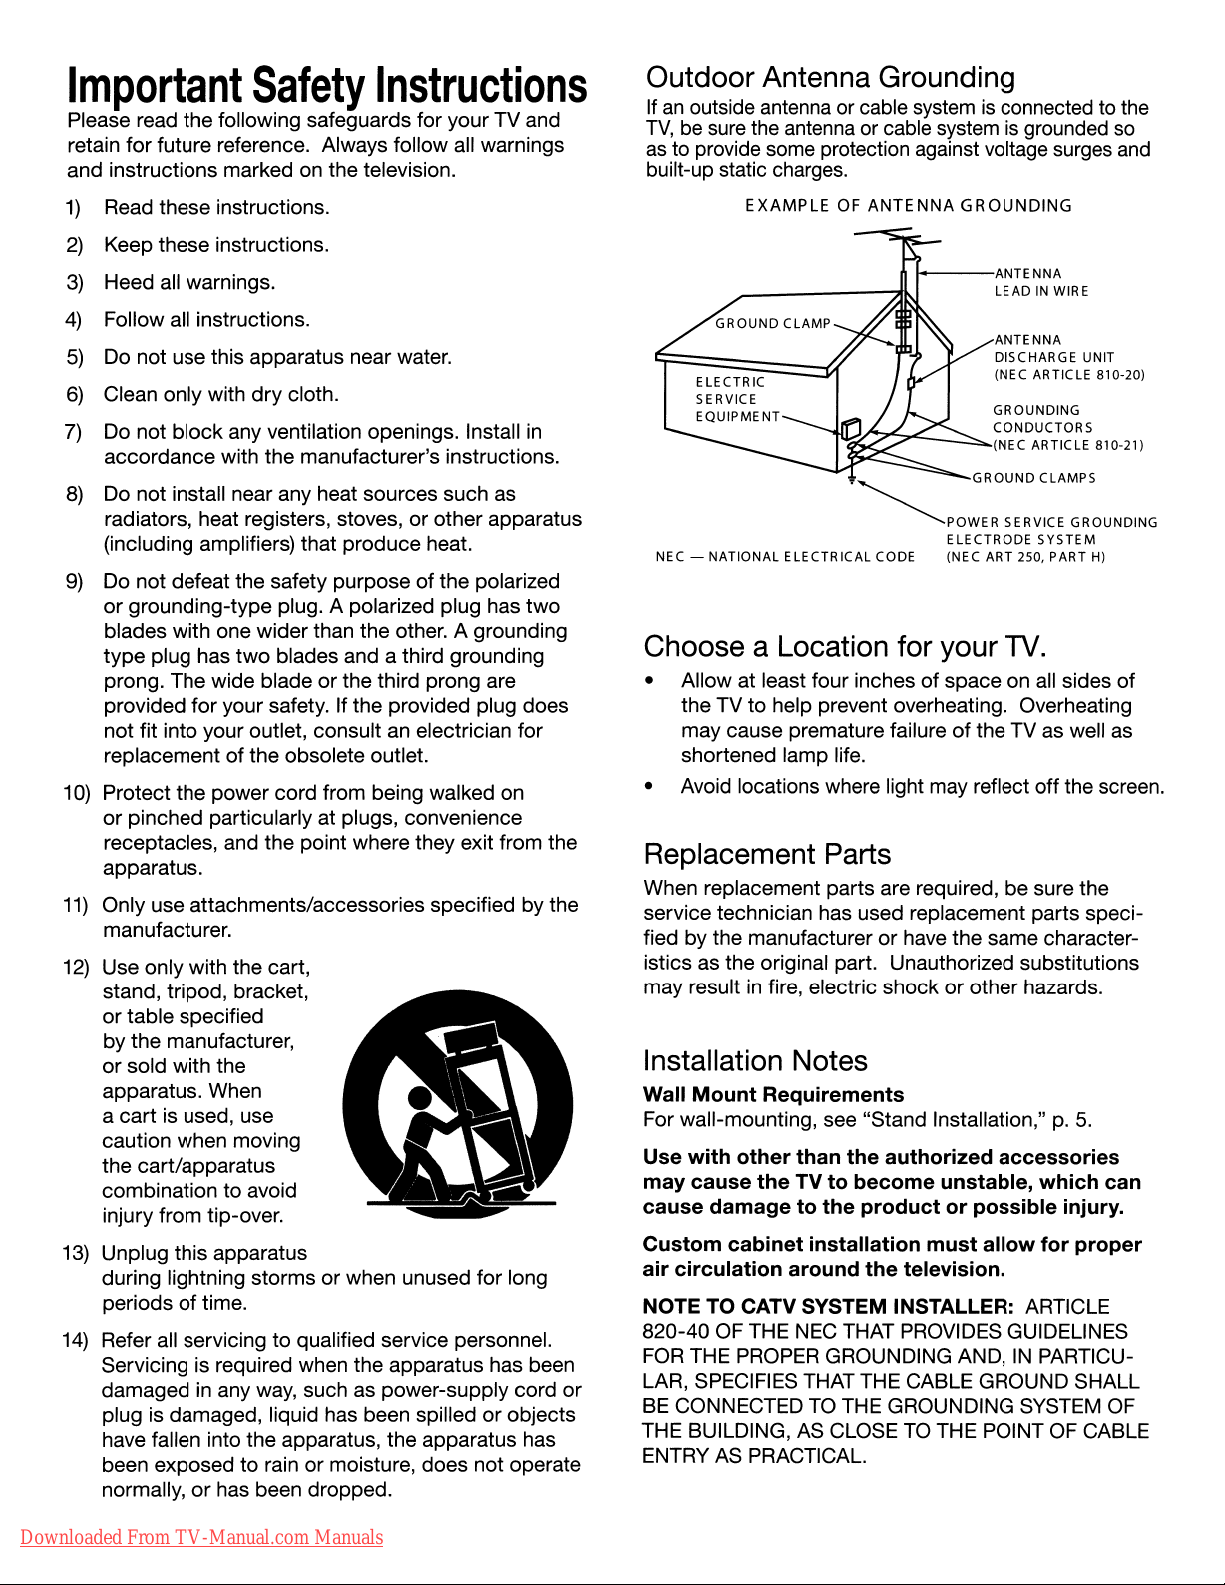
Outdoor Antenna Grounding
Ifanoutside antenna or cable systemisconnected to the
TV,besure the antenna or cable systemisgrounded
as to provide some protection against voltage surges and
built-up static charges.
so
1)
Read these instructions.
2)
Keep these instructions.
3)
Heed all warnings.
4)
Follow all instructions.
5)
Do not use this apparatus near water.
6)
Clean only with dry cloth.
7)
Do not block any ventilation openings. Install
accordance with the manufacturer's instructions.
8)
Do not install near any heat sources such as
radiators, heat registers, stoves, or other apparatus
(including amplifiers) that produce heat.
9)
Do not defeat the safety purposeofthe polarized
or
grounding-type plug. A polarized plug has
blades with one wider than the other. A grounding
two
type plug has
prong. The wide blade or the third prong are
provided for your safety. If the provided plug does
not fit into your outlet, consult an electrician for
replacement
10)
Protect the power cord from being walked on
or pinched particularly at plugs, convenience
receptacles, and the point where they exit from the
apparatus.
11)
Only use attachments/accessories specified by the
manufacturer.
12)
Use only with the cart,
stand, tripod, bracket,
or table specified
by the manufacturer,
or
sold with the
apparatus. When
a cart is used, use
caution when moving
the cart/apparatus
combination to avoid
injury from tip-over.
13)
Unplug this apparatus
during lightning storms or when unused for long
periods
14)
Refer all servicingtoqualified service personnel.
Servicing is required when the apparatus has been
damaged
plug is damaged, liquid has been spilledorobjects
have fallen into the apparatus, the apparatus has
been exposed to rain
normally,
of
time.
in
or
blades and a third grounding
of
the obsolete outlet.
any way, such as power-supply cord
or
moisture, does not operate
has been dropped.
in
two
or
EXAMPLE
NEC -
NATIONAL
Choose a Location for your
• Allow at least four inches of space on
the TVtohelp prevent overheating. Overheating
may cause premature failure
shortened lamp life.
• Avoid locations where light may reflect off the screen.
OF
ANTENNA
~~""'S-~.:::--___
~POWER
ELECTRICAL CODE (NEC ART 2S0, PART
GROUNDING
!---ANTENNA
GROUND
ELECTRODE
LEADINWIRE
ANTENNA
DISCHARGE UNIT
(NEC ARTICLE 810-20)
GROUNDING
CONDUCTORS
(NECARTICLE81
CLAMPS
SERVICE GROUNDING
SYSTEM
TV.
all
sides
of
the TV as well as
0-21)
H)
of
Replacement Parts
When replacement parts are required, be sure the
service technician has used replacement parts speci-
or
fied by the manufacturer
istics as the original part. Unauthorized substitutions
in
may result
fire, electric shockorother hazards.
have the same character-
Installation Notes
Wall
Mount
For wall-mounting, see "Stand Installation,"p.5.
Use
with
may
cause
cause
Custom
air
circulation
NOTE TO CATV SYSTEM INSTALLER: ARTICLE
820-40 OF THE
FOR
THE PROPER GROUNDING AND,INPARTICULAR, SPECIFIES THAT THE CABLE GROUND SHALL
BE
CONNECTEDTOTHE GROUNDING SYSTEM OF
THE BUILDING, AS CLOSE
ENTRY
Requirements
other
than
theTVto
damagetothe
cabinet
installation
around
NEC
AS
PRACTICAL.
the
authorized
become
productorpossible
must
the
television.
THAT PROVIDES GUIDELINES
TO
THE POINT OF CABLE
accessories
unstable,
allow
which
injury.
for
proper
can
Downloaded From TV-Manual.com Manuals
Page 5

5
Stand
At
least
TWO
of
theTVto
tions
may
avoid
resultinpersonal
Installation
(2)
PEOPLE
hands
Required:
Phillips Screwdriver
are
neededtosafely
being
jammed
injury
and
between
damagetothe
o
••••••
CAUTION
install
the
the
TV and
product.
..........
•
•
•
•
•
stand.
the
Two
stand.
people
should
Failuretofollow
Extension
pieces
backofstand
grab
the
these
on
1\:tt1t
marked
recommenda-
areas
o
Back
'§JJ
11~1I101~lmm~I~lmmllnmIlUUlUIUOlnUlIIi
mll"mu
..
"IIIIIIIIUlilWlllllllUIJI
CJ
uDD
...
Wall
(purchased
To
order a
contact Peerless Indutries, Inc.
at
(800)
www.peerlessmounts.com.
Use wall mounting kit Model ST650.
Mounting Kit
separately)
Wall
Mounting Kit, please
473-3753 or visit
CAUTION: Using
authorized
become
the
Downloaded From TV-Manual.com Manuals
productorpossible
accessories
unstable,
this
which
TV
injury.
with
may
can
other
cause
cause
than
the
theTVto
damage
to
Note: Complete instructions are included
with the kit.
To
order a
Mitsubishi Digital Eiectronics America, Inc.,
please visit
www.mitsuparts.com
or call
(800)
Wall
Mounting Kit from
553-7278.
Page 6
6
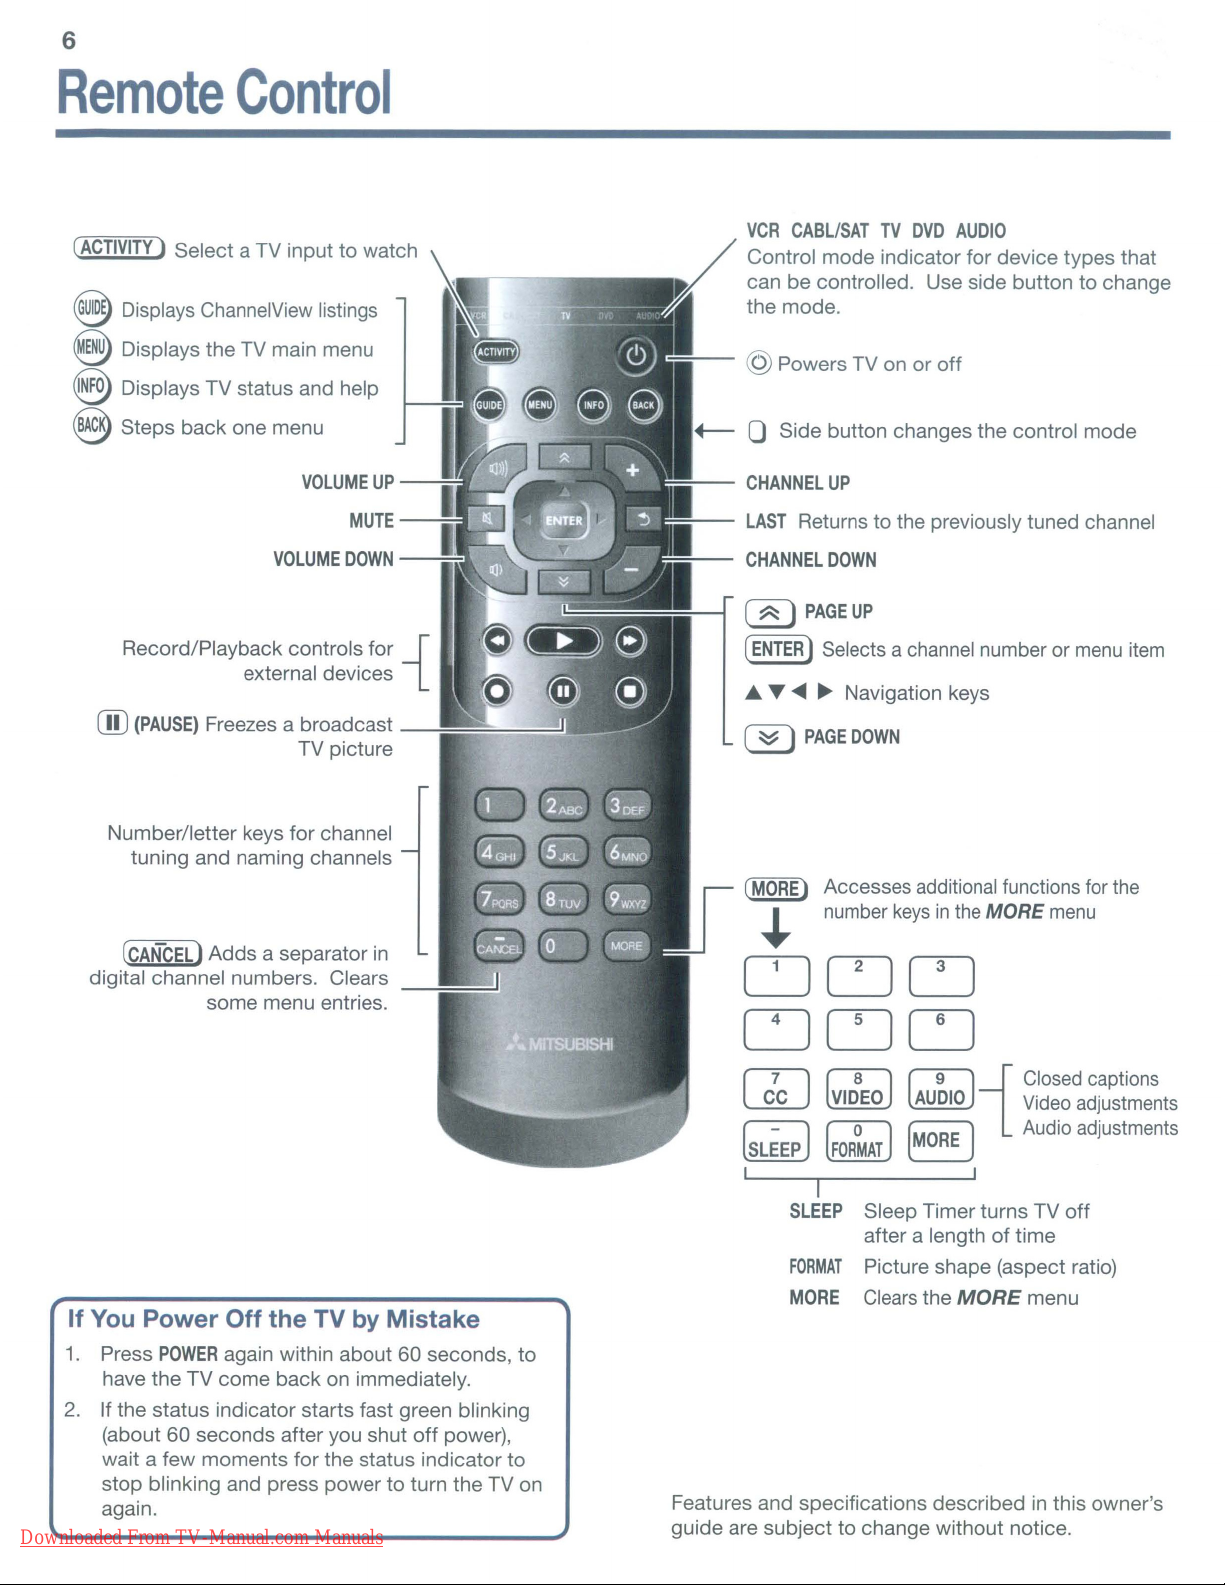
Remote
(ACTIVITY)
~
Select a TV input to watch
Displays ChannelView listings
Control
e Displays the TV main menu
@ Displays TV status and help
8 Steps back one menu
VOLUME
VOLUME
Record/Playback controls for
external devices
ill)
(PAUSE)
Freezes a broadcast
TV picture
UP
-~L.-J
MUTE-.....;:::;:~
DOWN
-~3
-{
:=;--
VCR
CABL/SATTVDVD
Control mode indicator for device types that
can be controlled. Use side button to change
the mode.
@ Powers TV on or
+---
0 Side button changes the control mode
CHANNEL
LAST
CHANNEL
(~)
(ENTER)
... ~
(~)
UP
Returns to the previously tuned channel
DOWN
PAGE
UP
Selects a channel number or
~ ~
Navigation keys
PAGE
DOWN
AUDIO
off
menu
item
Number/letter keys for channel
tuning and naming channels
[CANCEL)
digital channel numbers. Clears
If
You
Power
1.
Press
have the TV come back on immediately.
2.
If the status indicator starts fast green blinking
(about
wait a few moments for the status indicator to
stop blinking and press power to turn the TV on
again.
Downloaded From TV-Manual.com Manuals
Adds a separator
some menu entries.
Off
the
TV
by
POWER
again within about 60 seconds, to
60 seconds after you shut
in
Mistake
off
power),
(MORE)
..
Accesses additional functions for the
number
keysinthe
MORE
menu
CJCJu
DOD
1'71
~
r-=-l
~~
I I
Features and specifications described
guide are subject to change without notice.
(81 (81
~
r<>J
I
SLEEP
FORMAT
MORE
i
Closed
~
[MORE)
Sleep Timer turns TV
after a lengthoftime
Picture shape (aspect ratio)
Clears
the
MORE
Video
Audio adjustments
menu
in
this owner's
captions
adjustments
off
Page 7
7
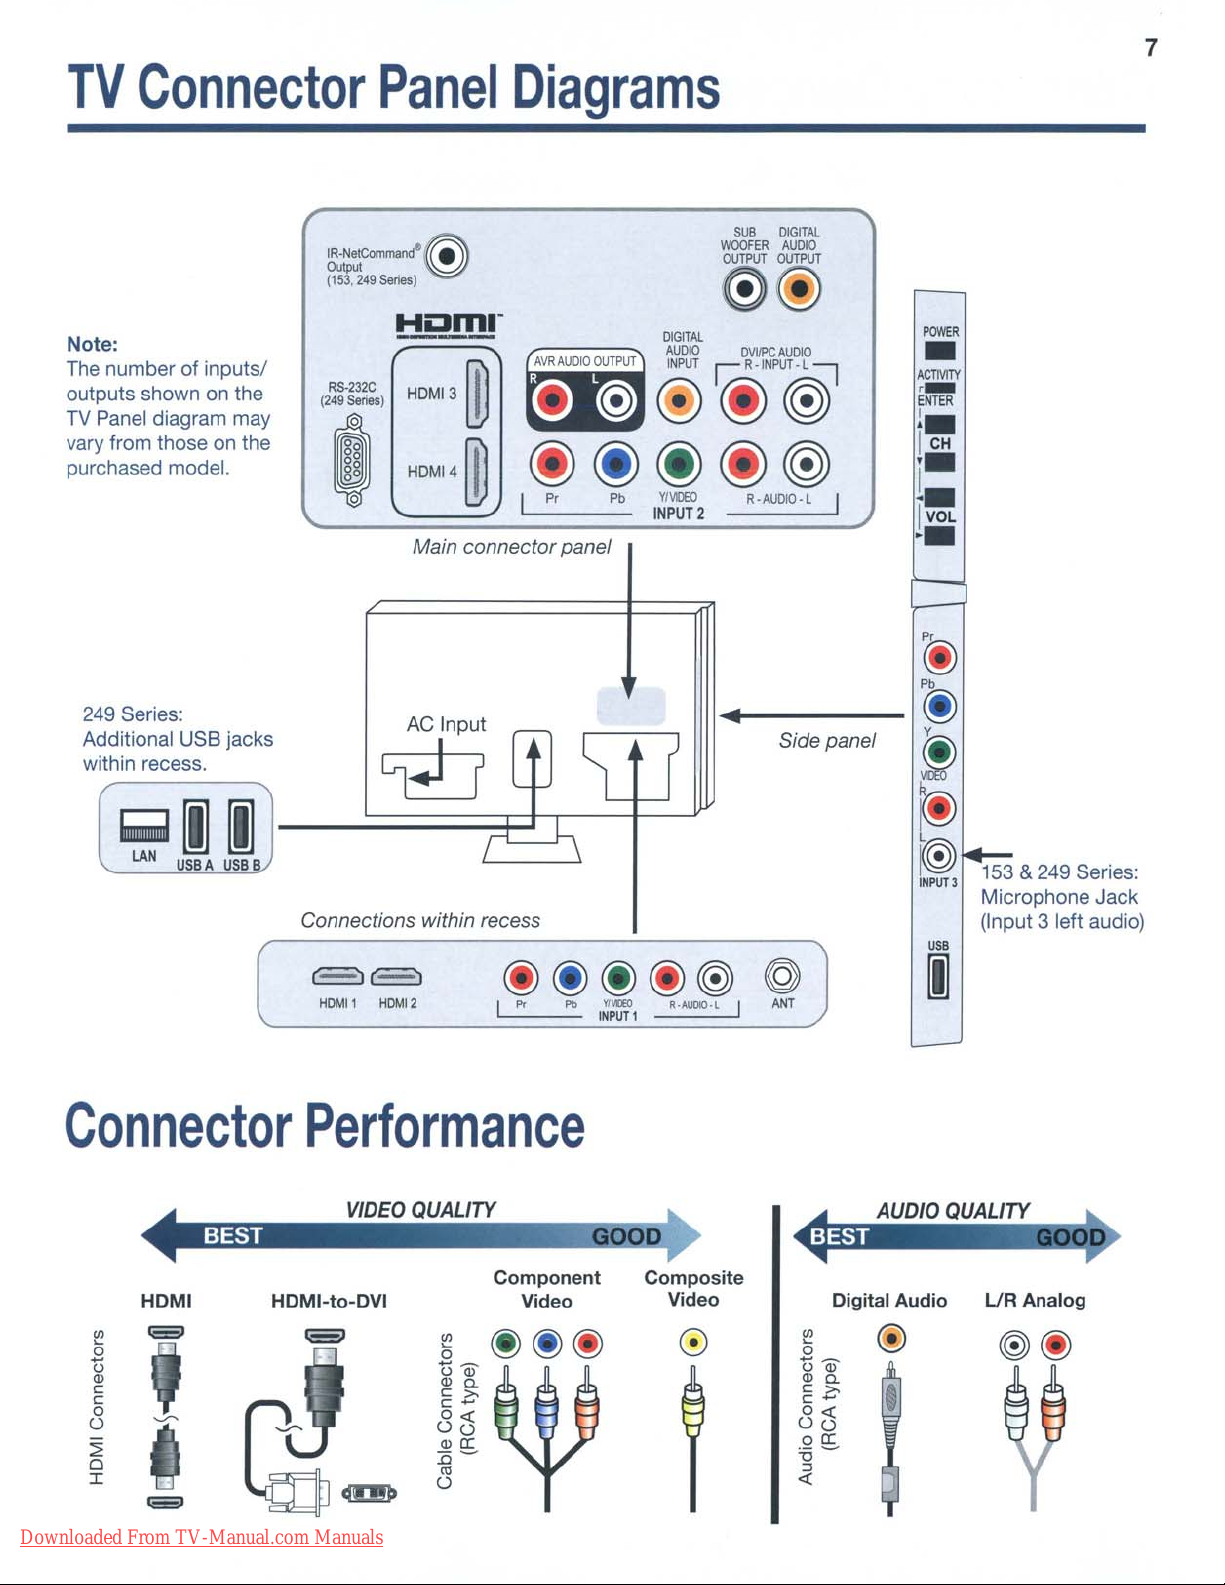
TV
Note:
The number of inputsl
outputs shown
TV
vary from those
purchased model.
Connector
on
the
Panel diagram may
on
the
Panel
Hom."
---
Diagrams
ITl
12~~~1
e
HDMI3
~.
"~"
ill
Main connectorpanel
AVA
AUDIO
OUTPUT
®
let>
et>
DIGITAl..
AUDIO
INPUTr;R·
@)
!
sua
DIGITAl
WOOFER
AUOfO
OUTPUT OUTPUT
@@
OWPC
AUOIO
INPUT·
L
~
@
@)
~-~,
POWER
•
ACTM1Y
,-
ENTER
1.
I
CH
'.
1.
IVOL
••
249
Series:
Additional USB jacks
within recess.
~II
LAN
USBA
USB
Connections within recess
HOMI1
Connector
I!!
o
~
c
c
o
u
:2
o
I
Performance
HDMl-to-DVI
i_I
HOM12
~
om
"Q.
c
c-
Oo<{
Uu
.,c::
:o-
ro
U
>,
Component
Video
@@@
Composite
Video
II
Side panel
@
ANT
~
t>Qr
"Q.
c
>,
c-
oo<{
Uu
oc::
iJ-
:J
0<{
U58
I
Digital Audio
(@)
•
153 & 249 Series:
Microphone Jack
(Input 3 left audio)
LlR Analog
Downloaded From TV-Manual.com Manuals
Page 8
8
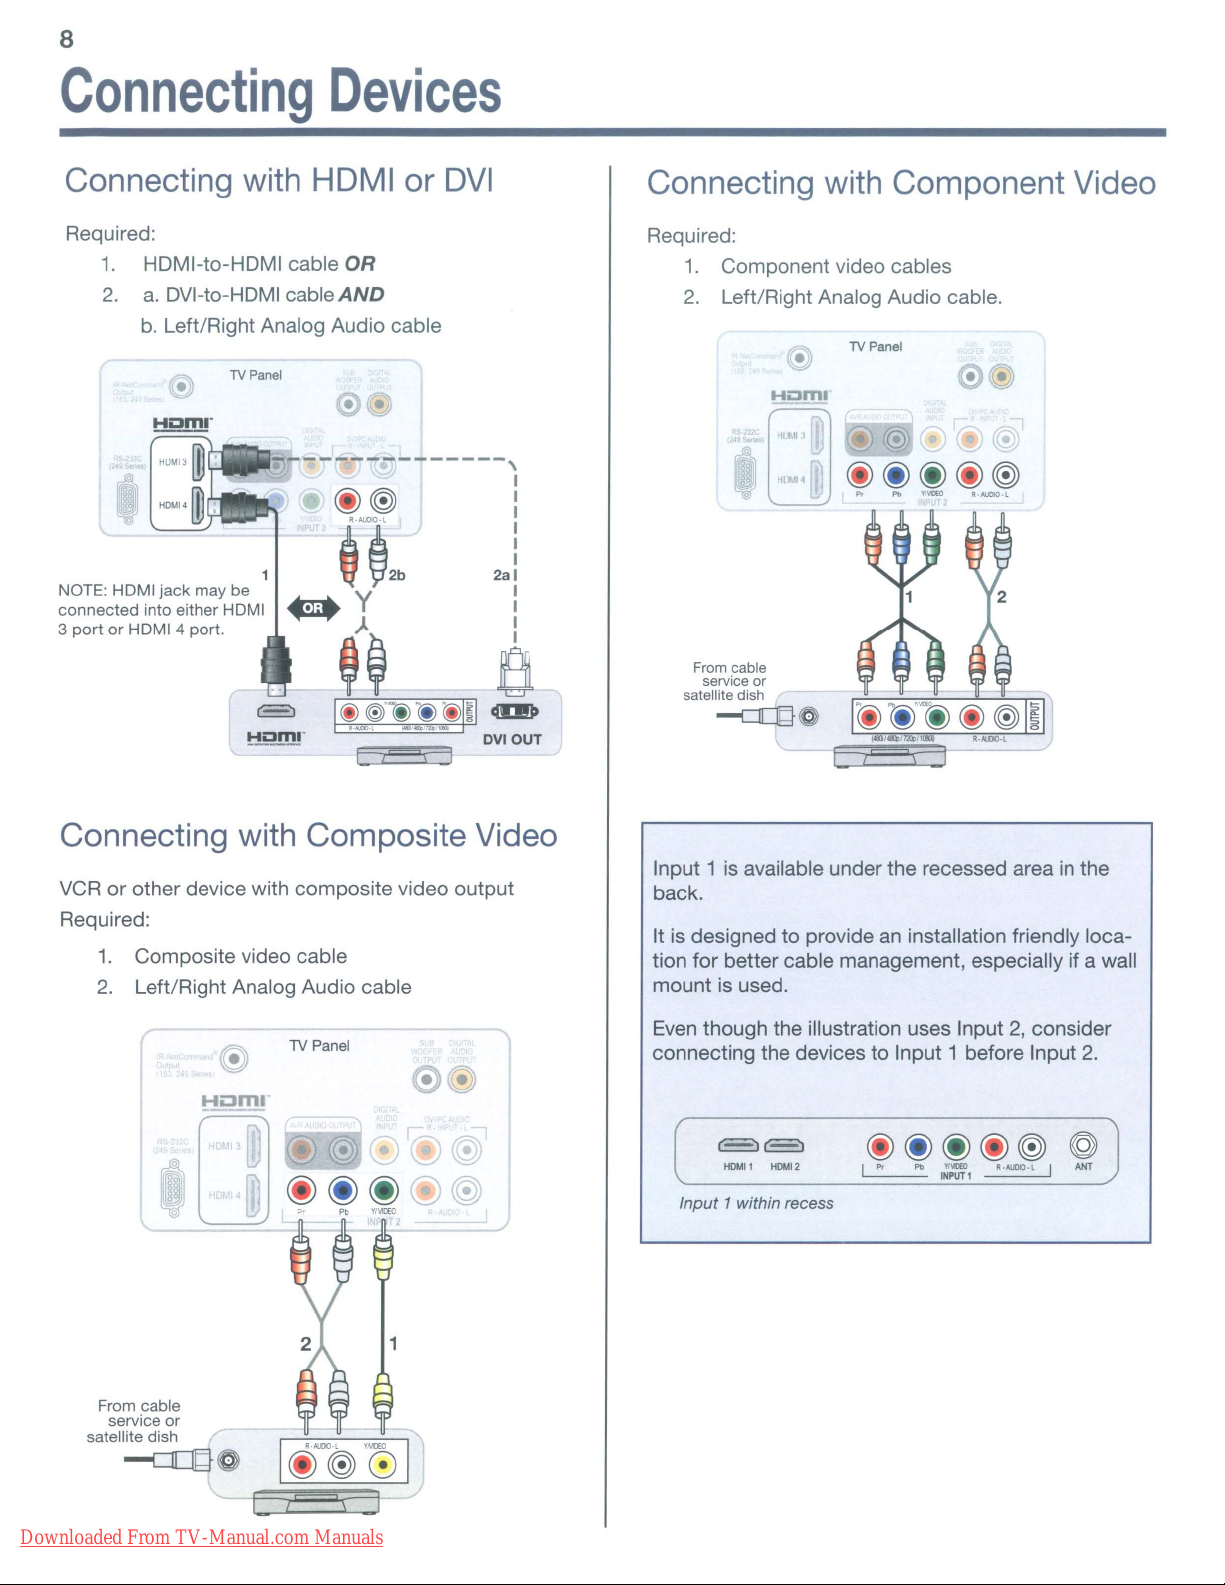
Connecting
Connecting with
Required:
1.
HDMI-to-HDMI cable
2.
a.
DVI-to-HDMI cable
b.
Left/Right Analog Audio cable
IV
Panel
Devices
HDMI
OR
AND
•
WI
__
I~~--
----------,
(j)~
'-~2b
NOTE: HOMI
connected
3
port
jack
may be y I
into either HOMI _ I
or
HDMI4
port.
~
~~~-
I
~_~.~!
)~
or
DVI
Ci)~
I
:
2al
a
cIDJ»
DVIOUT
Connecting with Component Video
Required:
1.
Component video cables
2.
Left/Right Analog Audio cable.
IV
Panel
From cable
service or
satellite dish
.....;:::U}~
Connecting with Composite Video
VCRorother device with composite video output
Required:
1.
Composite video cable
2.
Left/Right Analog Audio cable
TV Panel
e@
From cable
service
satellite dish
or
~~
Input 1 is available under the recessed area
back.
an
It is designed to provide
tion for better cable management, especially if a wall
mount is used.
Even
though the illustration uses Input2,consider
connecting the devices to Input 1 before Input
c=='JE3
HDMll
HDMI2
Input
1 within recess
installation friendly loca-
@ @ @
I
Pr
Pb
1~~1
(j)
R·A!JDIO·l
@)
in
the
2.
@
I
ANT
Downloaded From TV-Manual.com Manuals
Page 9
Connecting Devices
9
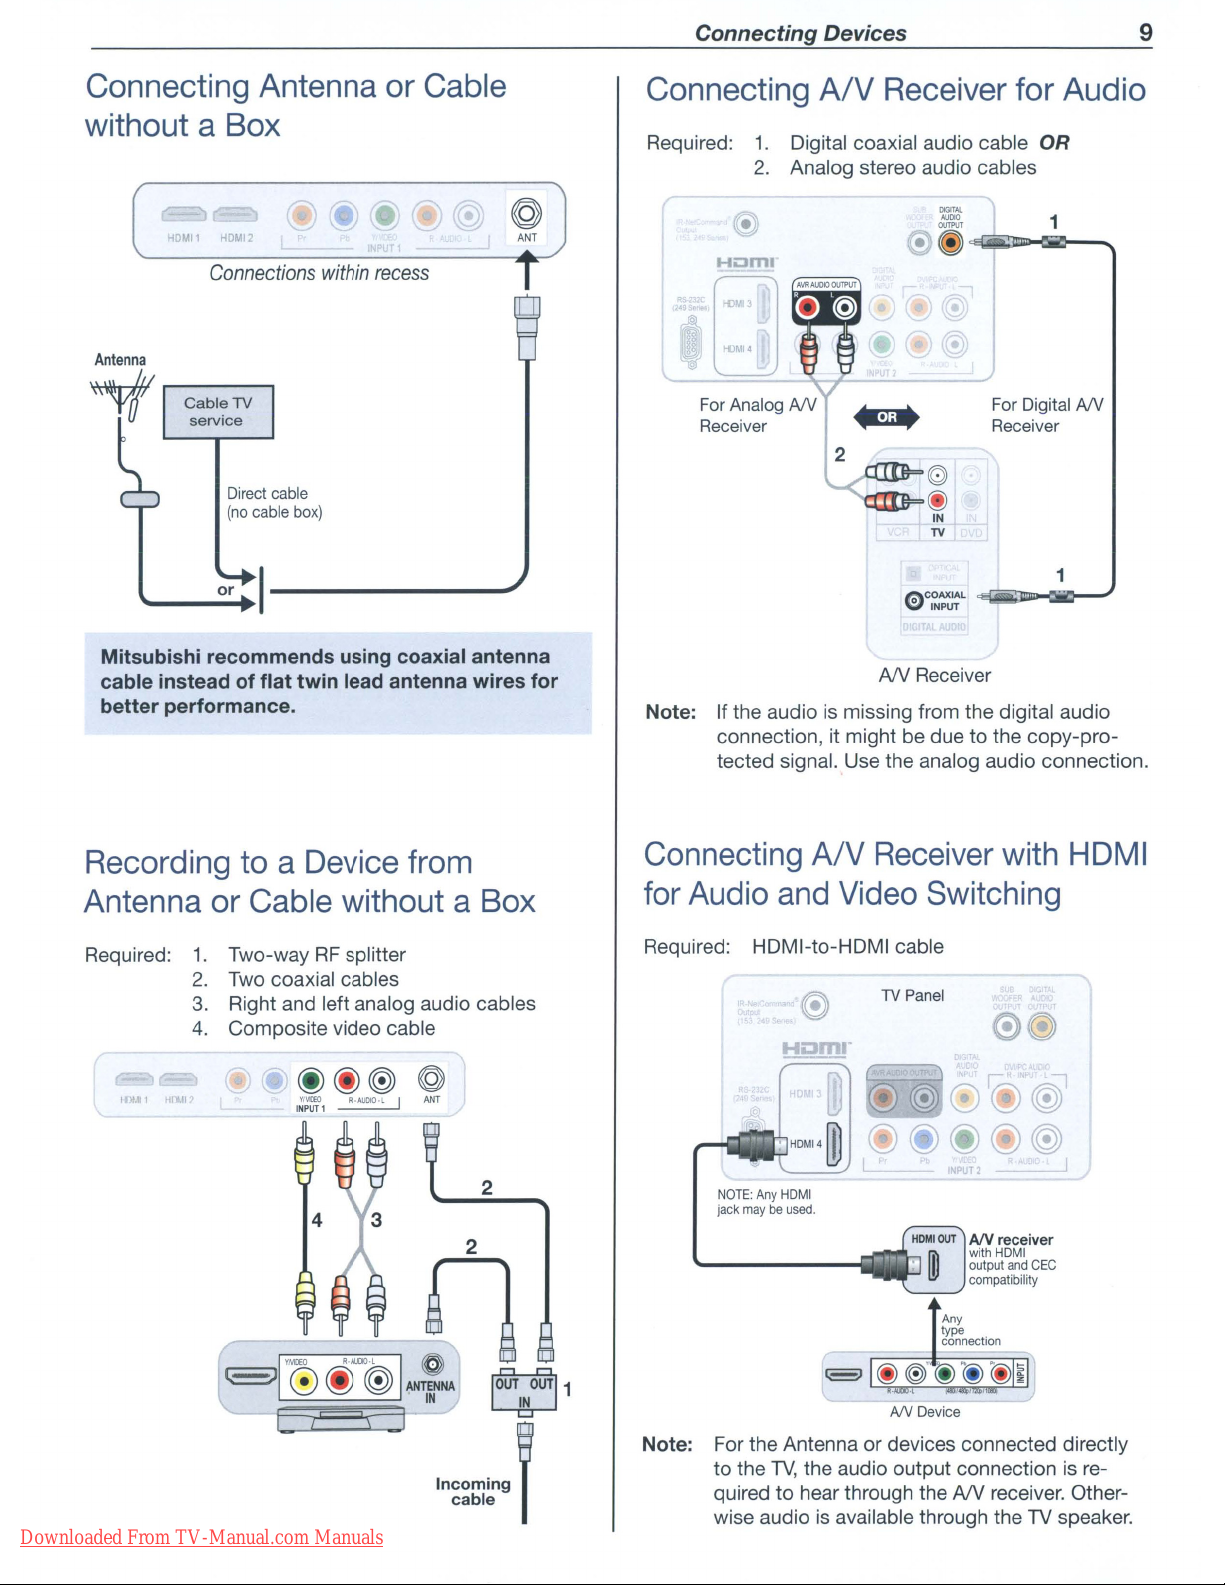
Connecting
Antenna
or
Cable
withoutaBox
HOMI1
HOM!
2
Connections
Antenna
within
recess
V
Direct cable
(no
cable
box)
.....
__
o_r
...
I---------"
Mitsubishi recommends using coaxial antenna
cable instead of flat twin lead antenna wires for
better performance.
Connecting
Required:
Note: Ifthe audio
1.
Digital coaxial audio cable OR
2.
Analog stereo audio cables
Hi:Jm
connection, it might be due to the copy-protected signal. Use the analog audio connection.
A/V
Receiver
DIGITAl
AUDIO
• ~
cEl...iiiiLl1!llD~~-.
for
For
Digital
Receiver
(0)
@
IN
TV
~COAXIAL
\ill'
AN
Receiver
is
missing from the digital audio
~a.'llllllJ-ClliiO-
INPUT
Audio
1
NY
1
Recording
Antenna
Required:
toaDevice
or
Cable
1.
Two-wayRFsplitter
2.
Two
coaxial cables
3.
Right and left analog audio cables
4.
Composite video cable
withoutaBox
@@@
I~:fl
R·AUDIO·l
Downloaded From TV-Manual.com Manuals
from
@
I
ANT
Connecting
for
Audio
Required: HDMI-to-HDMI cable
2
Note: For the Antenna or devices connected directly
NOTE:
jack
maybeused.
'-------iiiiil[]·
to the
quired to hear through the
wise audio
A/V
and
Any
HDMI
TV,
the audio output connectionisre-
Receiver
Video
is
available through theTVspeaker.
Switching
TV
Panel
HOMIOUT
I output
ID
AN
Device
AN
AIV
with
compatibility
receiver. Other-
with
receiver
HDMI
and
CEC
HDMI
Page 10
10
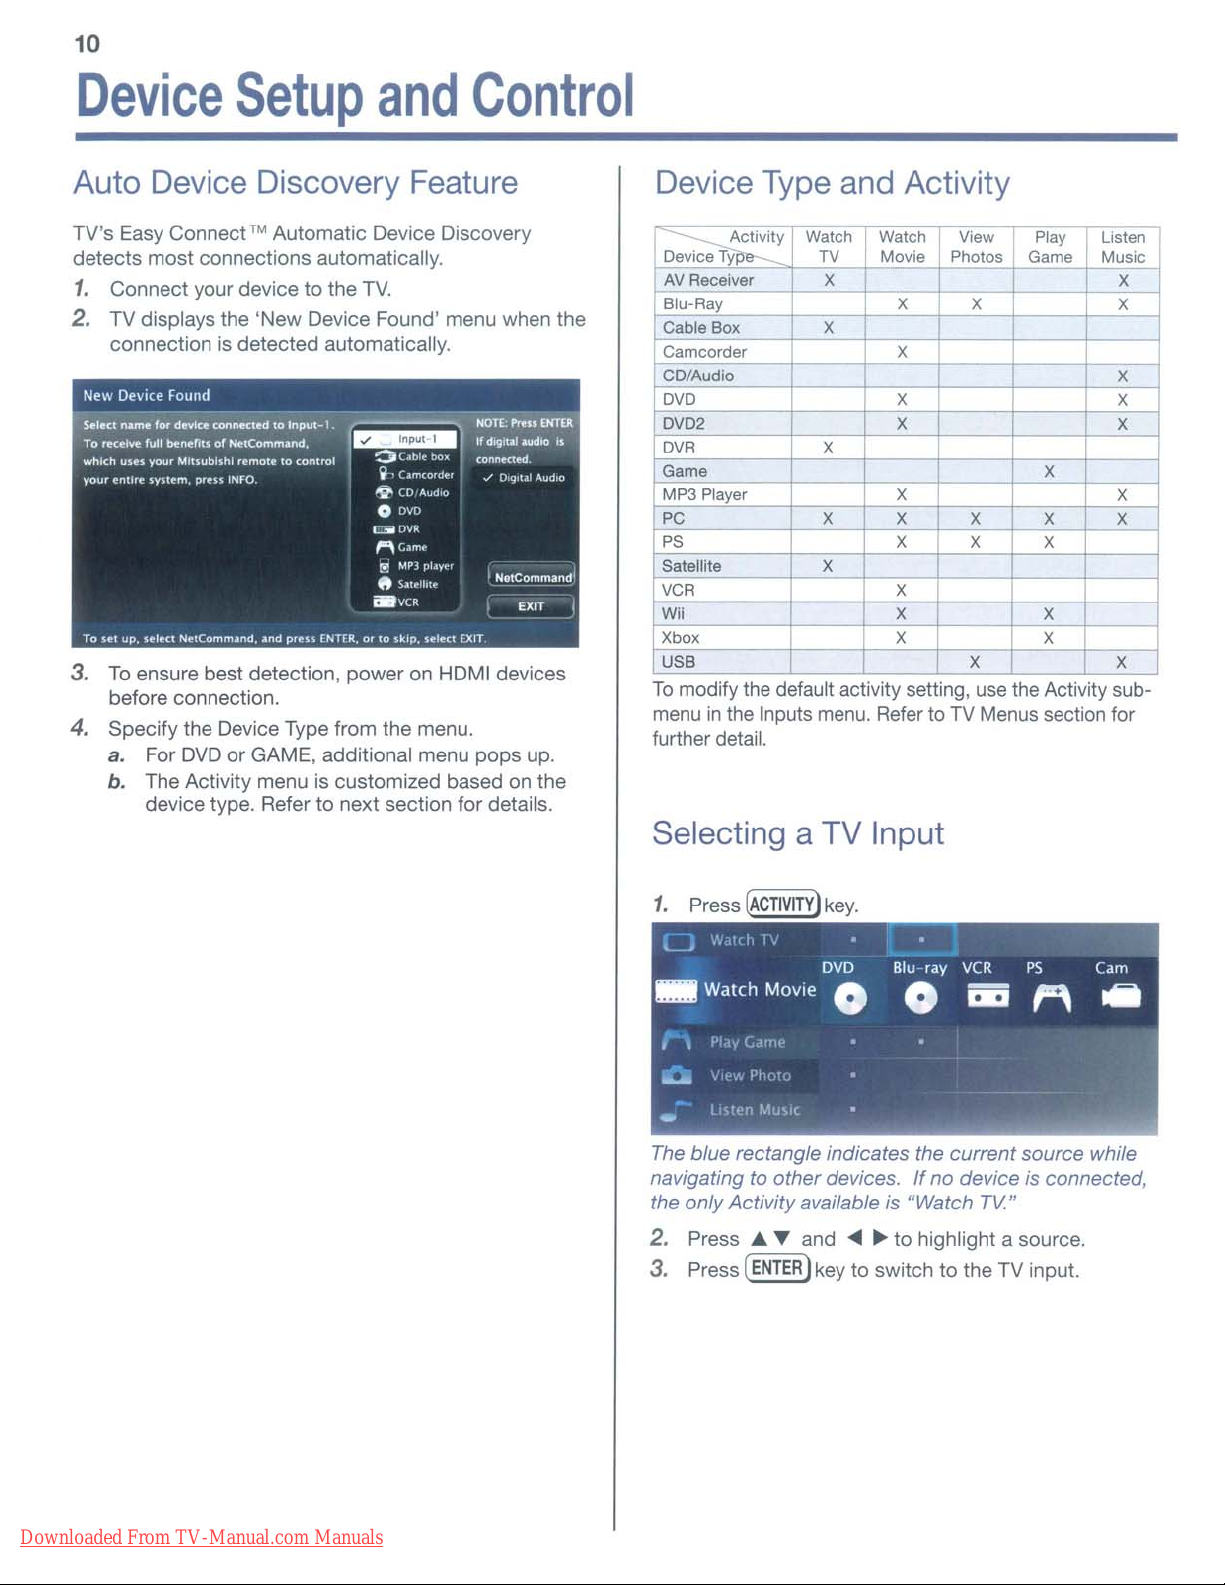
Device
Setup
and
Control
Auto Device Discovery Feature Device Type and Activity
TV's Easy Connect™ Automatic Device Discovery
detects
1.
most
Connect
connections automatically.
your devicetothe
TV.
2. TV displays the 'New Device Found' menu when the
connection is detected automatically.
3.
To
ensure best detection, power on HDMI devices
before connection.
4. Specify the Device Type from the menu.
a. For DVD
b.
The Activity menu is customized based on the
device type. Refer
or
GAME. additional menu
to
next section for details.
pops
up.
~
O
L
:.;e:,:.v;::ic.::.e.:.,Ty=p&---=+--:.TV'--f--'M=ov:;:ie'4-,-P:.:.ho:.;,.::.o_s_
r
L.:
A~V::R7:ec::;;-,ei~ve_r_+---;:x,-+---'-_-l-_~
I
~lu'Ray
Cable
Camcorder
CO/Audio
OVO
OV02
OVR
~me
MP3
PC
PS
Satellite
VCR
M X X
Xbox
r.
-:::S"'B'-------j----1-----"'----+--"::X-t---"--l-----,;-X
U
To
menu
further detail.
Ac"C,7"iv7"ity-'-7'W7"a7"tch
Box
-
X
WatchrView
X
I X
--1r----+-
X
Player
X
X
modify the default activity selling, use the Activity sub-
in
the Inputs menu. Refer to TV Menus section for
X
X
X
X
X
X X
X
XX
Selecting a TV Input
Play
~ame
~
e-
J Music
-1'
I
I X
X
X
X
I
I
Listen
Xx
X
X _
X-
X
- J
1
Downloaded From TV-Manual.com Manuals
The bluerectangle indicates the
navigating
the only Activity available is "Watch
2.
Press
3.
Press
to
other
...."Yand
[ENTER)
devices.Ifno
....~to highlight a source.
keytoswitch to the TV input.
current
source while
device is connected,
TV"
Page 11
11
TV
Channel
Setup
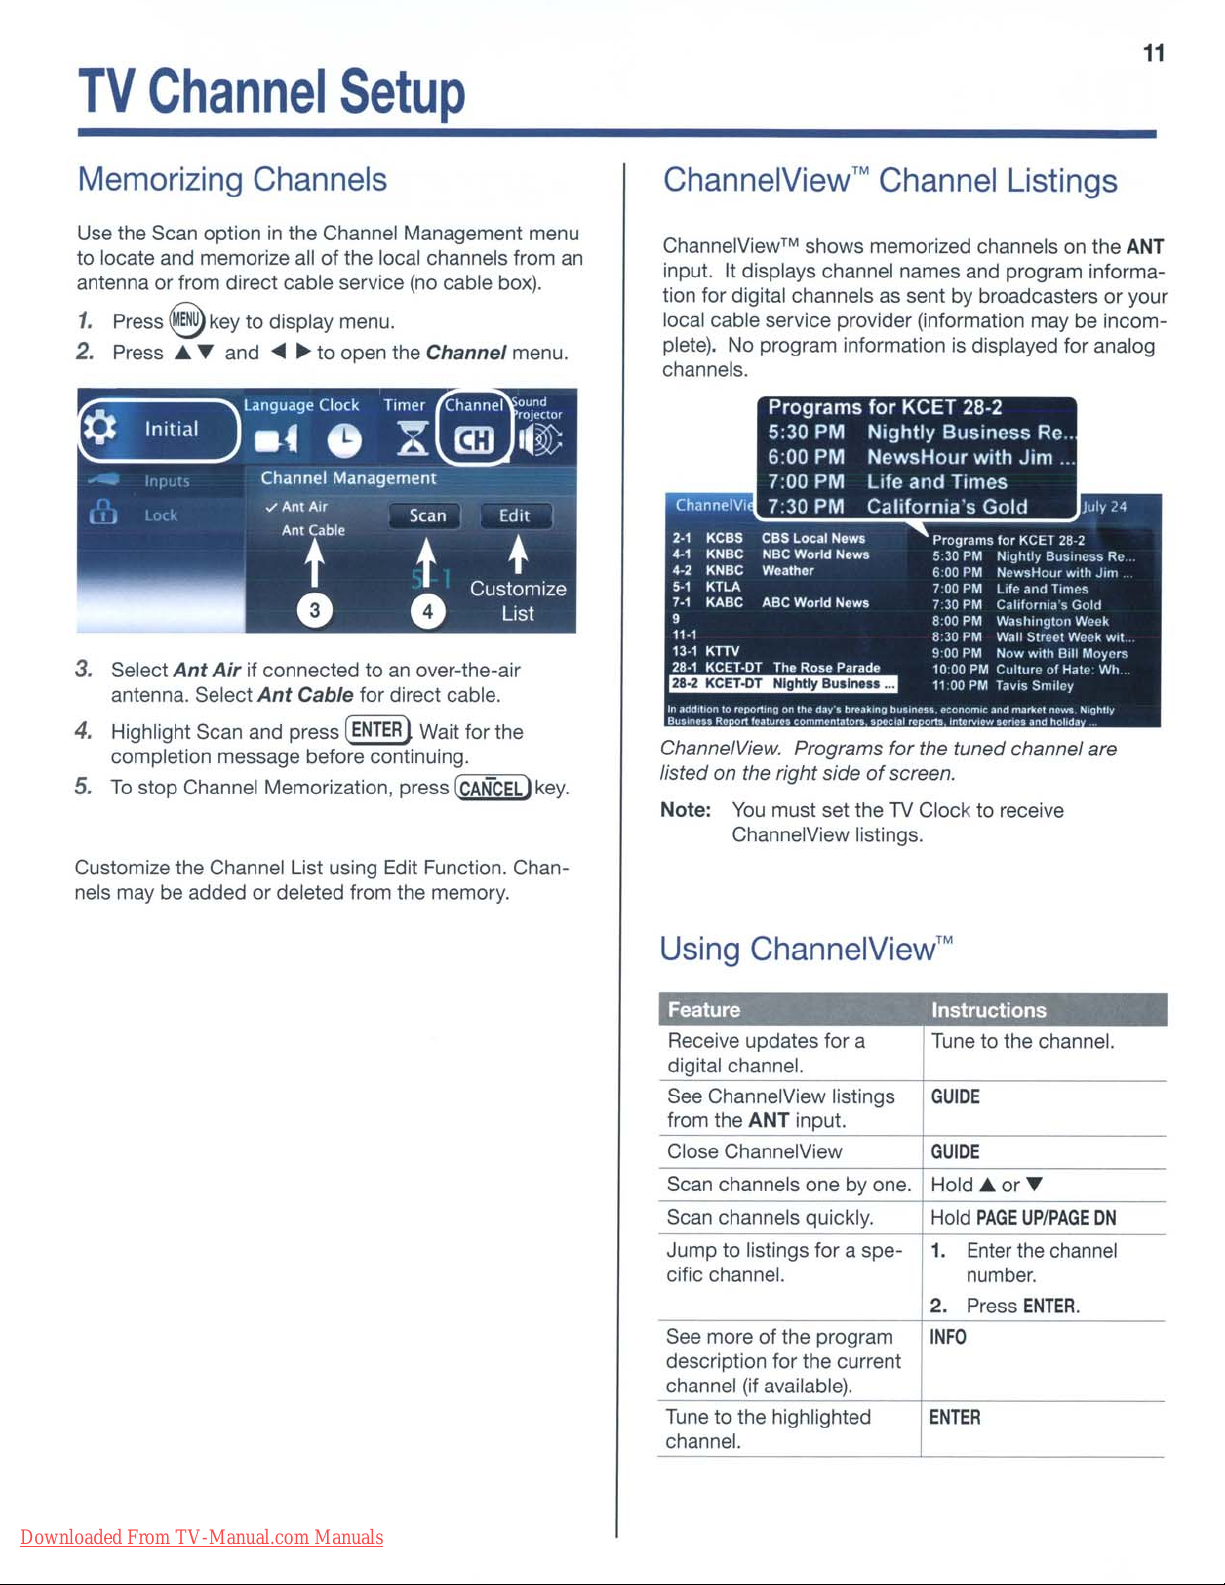
Memorizing Channels
Use the Scan option in the Channel Management menu
to locate and memorize allofthe local channels from an
antenna or from direct cable service
1.
Press
@key
2.
Press A~and ...~to open the Channel menu.
I I J
Initial
I'
r "
."
.
¢
to display menu.
language
.4
Clock Timer
0
Channel Management
./
Ant
Air
Ant
Cable
t
(no
X
Scan
t
0
cable box).
Channel
mJ
ound
fDIl.'uor
II~
Edit
Customize
•
List
•
3. Select
antenna. Select
4.
Highlight Scan and press
completion message before continuing.
5.
To
Customize the Channel List using Edit Function. Chan-
nels may be addedordeleted from the memory.
Ant
Air
if connected toanover-the-air
Ant
Cable for direct cable.
[ENTER
stop Channel Memorization, press
lWait for the
(<=C'7':AN"'-CC=E"'L)
key.
ChannelView™
ChannelView™
input. It displays channel names and program informa-
tion for digital channels as sent by broadcastersoryour
local cable service provider (information maybeincomplete). No program information is displayed for analog
channels.
Chann.IV, 7;30 PM
Kess
2·'
4-,
KNBe
KNBe
4·2
•.
,
KTLA
,.,
KABC
9
11·1
13·'
KTTV
28·1
KeEl·DT
~
In a(ld,\lonto.....
Bu'
ChannelView. Programs for the tuned channel are
listed on the right side
Note:
pottmgOnIll.
.....Rc.,
You
ChannelView listings.
shows memorized channels on the
Programs
5;30
PM
6;00 PM
7;00 PM Life
CBS Locill
NBC
World
WO<lfhor
ABC
World
Tho
Rose
'ulurn
d~y·.
C()/TImC"I.lo~,.
must set theTVClock to receive
Channel Listings
for
KCET 28-2
Nightly
NewsHour
California's
Now~
News
Nows
Pnrad'l.'
''''''l'ng
of
BusinessRe..
with
and
Times
Gold
Programs
5:30 PM
6 00 PM
700
PM
7 30PMCoiIhlouua 5
BOO
PM
830
PM
900
PM
1000PMCultureofHale
1100PM
bulln
.....
cQn()/TIU:
,,,1
'.
o'U,
'nt
..........
screen.
for
Nightly
Ncw~Hour
llff'
W,1slungtOIl WCL'k
Wall SIUtol Waek
Now
TaVIS
""d
U",.
Jim
KCET28·2
BUSiness
.1nd
Trm(>s
With
Bill
Smiley
IT\.1r1o:01"_
a"lS
tlohd~
...
With
ANT
lui,,.
Rl'
Jlnl
Gold
w.1
Moy('r.\
Wh
N,g"Uy
Using
Feature
Receive updates for a
digital channel.
See ChannelView listings
from the ANT input.
Close ChannelView
Scan channels one by one. Hold
Scan channels quickly. Hold
Jump to listings for a spe-
cific channel.
ChannelView™
Instructions
Tune to the channel.
GUIDE
GUIOE
1.
2. Press
See more of the program
description for the current
channel (if available).
Tune to the highlighted
channel.
INFO
ENTER
40r~
PAGE
Enter
the channel
number.
UP/PAGE
ENTER.
ON
Downloaded From TV-Manual.com Manuals
Page 12
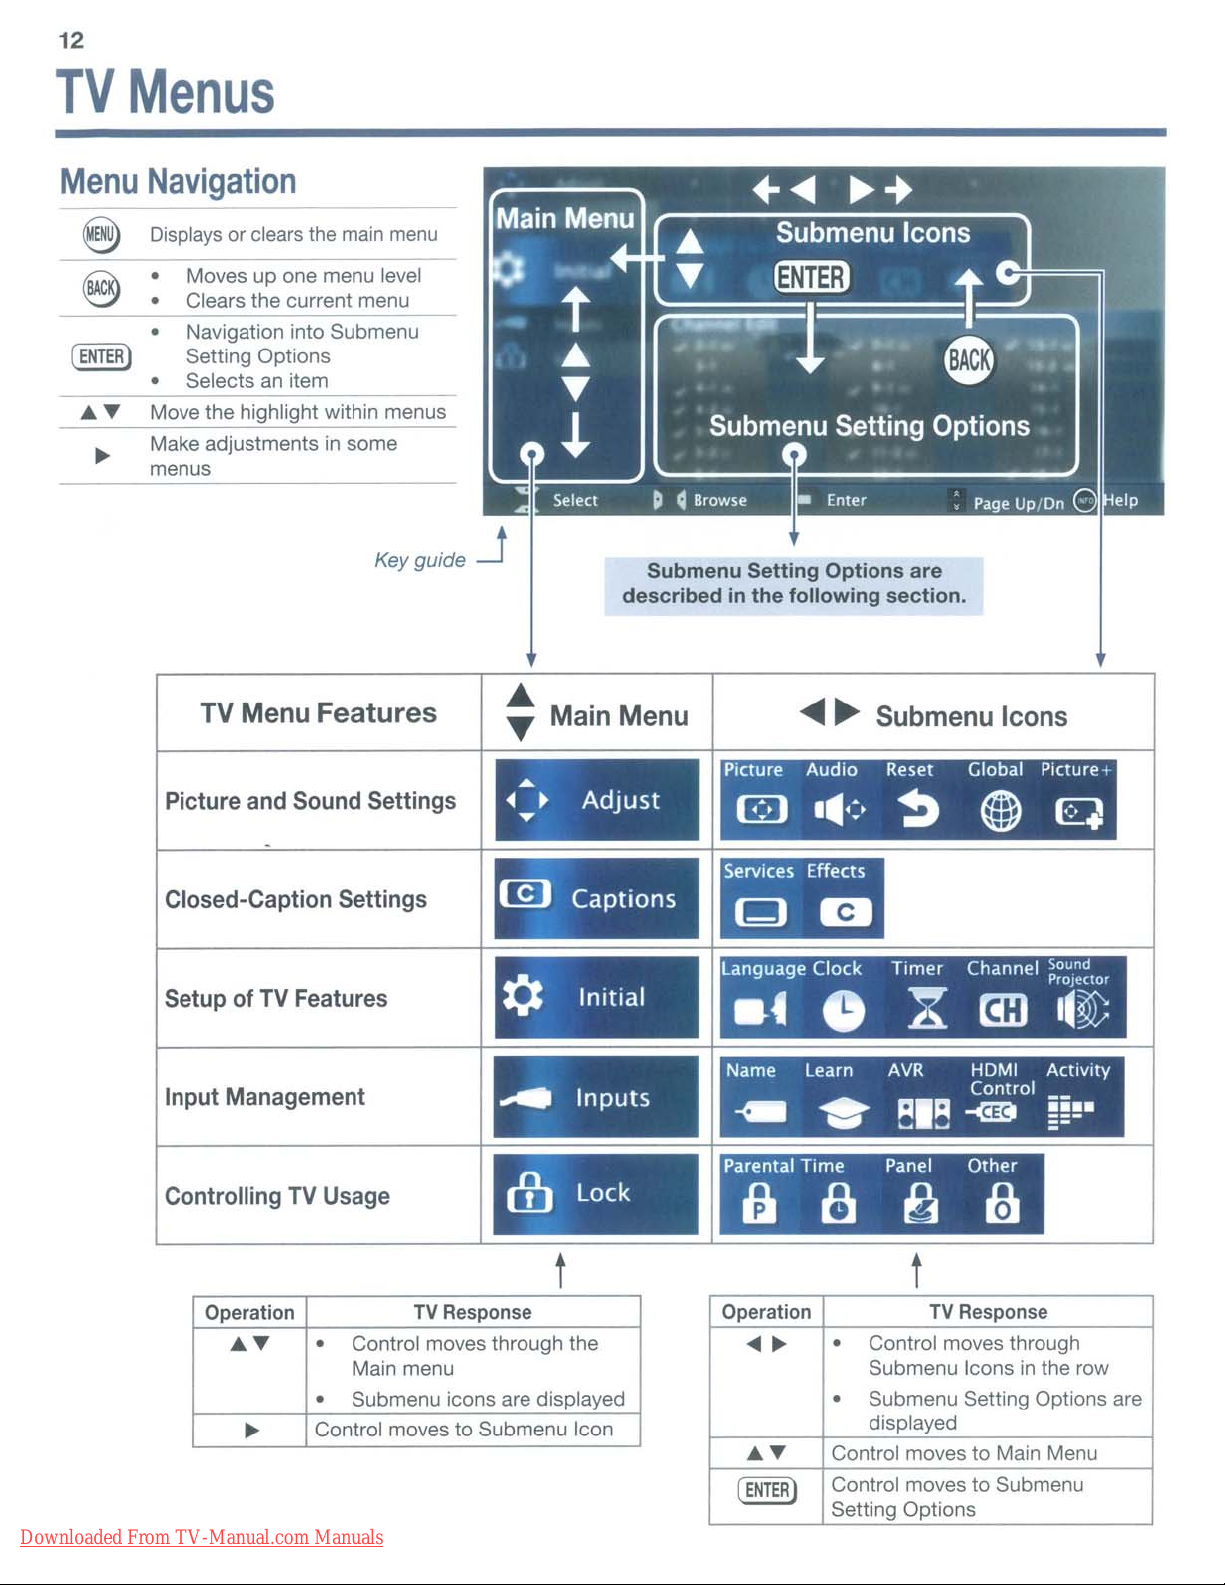
12
TV
Menu
@
8:
Menus
Navigation
Displays
• Navigation into Submenu
• Selects
Move the highlight within menus
Make adjustments in some
menus
or clears
Moves up one menu level
Clears the current menu
Setting Options
an
the
item
main
menu
Key
guide
-.J
Submenu
describedinthe
Setting
Options
following
are
section.
TV
Menu
Picture and Sound Settings
Closed-Caption Settings
Setup of
Input Management
Controlling
Operation
AT
~
Downloaded From TV-Manual.com Manuals
Features
TV
Features
TV
Usage
Control moves through the
•
Main menu
Submenu icons are displayed
•
Control moves to Submenu Icon
TV
Response
Main Menu
..
~
....
[Q)
•
Adjust
Captions
PICture
rn
...
~
language
¢
Initial
.4
Name
....
0)
Inputs
Lock
~
Parental
a 8
t t
Operation
...
~
AT
(
ENTER)
~ ~
Audio
.111-:,
Clock Timer Channel
Learn
Time
Submenu Icons
Reset Global Picture+
~ ~
0 X
AVR
...
~
•
•
Control moves
Control moves
Selling Options
RIR
~
Panel
~
Control moves through
Submenu Icons
Submenu Setting Options are
displayed
HDMI
Control
-<mI
-
Other
TV
Response
to
to
em
bJ
Submenu
q
poun
rejector
II~
Activity
!!!-
=-
in
the row
Main Menu
Page 13

TV
Menus
13
Adjust
Picture
Picture
Mode
Contrast
...
and
Sound
Use
Adjusts the white-to-black level.
• Low contrast shows a variety
• High contrast shows darker images more uniformly black and makes colors appear
• High contrast
• Medium contrast
Settings
Picture Mode to get
Brilliant: Bright light. Unavailable for the Game orPCinputs.
Bright: Daytime viewing
Natural: Night time viewing
Game: Available for Game or
more vibrant.
is
good for brightly lit environments.
is
.....
the
best
good for the most home lighting situations.
Adjust
• Assign names toTVinputs before making video
adjustments (New Device Found or
menu).
• Adjustments will be reset to the defaults if you
name or rename inputs afterwards.
• Set the Picture Mode first before changing other
video settings,
pendently for each Picture Mode.
image
under different viewing conditions. Options
PC
input only
of
shades in darker images.
Picture Audio
G
.111.:-
as
some settings are stored inde-
Reset
~ ~
Global P,cture+
~
Inputs>
Name
are:
Brightness
Color
Tint
Sharpness
Back
Light
Color
Video
Noise
Sharp Edge
DeepField
Imager
Temp
Adjusts overall picture brightness.
Adjusts overall color intensity from no color to
Adjusts the red-to-green ratio.
Adjusts picture detail and clarity.
Adjusts brightness
the TV to exeed the
Adjusts the white balance. Settings are stored independently for each Picture Mode.
High Gives white images a cool cast. May provide the most realistic picture under
bright lighting.
Low
Reduces minor noise (graininess)
This adjustment is not available if the current input
High Option for poor-quality signals.
Medium
Low
Off
Add special edge enhancements to make image appear sharper.
Enhance black levels
(153
and 249 Series only)
On,
Demo
Gives white images a warm cast. Natural/Color Temp at the low setting displays video at approximately the 6500K industry standard for NTSC pictures.
Off
of
the backlight. Changing this setting from the initial value could cause
ENERGY
Option for moderate noise reduction.
Option for good-quality signals.
Use Off to leave the picture unaltered.
in
For comparison, displays a split picture to show On (right side) and
side).
STAR® specifications.
in
the picture. Savedbyinput.
portions of the screen to provide strong contrast.
fUlly
saturated.
is
named
PC
orGame.
Off
(left
Downloaded From TV-Manual.com Manuals
Page 14

14 TV
Menus
<t)
Adjust
Subwooferoptionisavailable
nection
OUTPUT
Subwoofer
Use
wooferorto
Level
To
Subwoofer
ment
continued
has been identified on the
jack.
Off,
On:
Offtoturn
Adjustment:
adjust
slider.
off
audiotoa connected
reset
the
AVR
the
subwoofer volume level, highlight
and press
ENTERtodisplay an adjust-
if
a subwoofer con-
SUBWOOFER
AUDIO
OUTPUT
......
sub-
jack.
....
Picture Audio
Adjust
Speakeroption is available
tion
an
If
detected, available options
TV: Turns on the internalTVspeakers.
AN
Receiver:
Head-
phones:
rn
has not been detected.
AN
receiver or headphone connection has been
Audio available from an
(Headphone option not available.)
• Audio available from headphones.
• Connect to
1111-:-
Reset
~
if
are:
AVR
a
sub
AUDIO
Global PlCture+
@)
woofer connec-
AN
OUTPUT
~
Receiver.
jack.
Sound
Listen
Language
Mode
To
Stereo,"-:
Surround:
Music
Night
Available for analog channels from
Mono:
Stereo:
SAP (Second Selects an additional sound
Audio Program): viewing.
Selects the current language for a digital program from ANT.
--.:N-"o=sp"'e'-'c::.:ia"'l-"a"'u"-d:.::ioc..:e"-ff:.::e:.::c~ts'_'fc:.:ro"_m:..:...::thc.::e::...T-'-V.:....::sr:.e"'a"'k:.::e=rs.
Modifies audio from the TV speakers.
153 and 249 series
• The left and right sound beams are output directly toward the
listening position.
• The Balance setting is unavailable, defaults
153 and 249 series
• Focuses all 16 speakers
focus
only at one point, thus ensuring quiet outside the room.
of
• A range
Subwoofer
•
• The Balance setting is unavailable, defaults
• Press the
center),
Reduces background noise.
The TV plays stereoinstereo and mono
35 degrees from center in both directions is supported.
is muted if present.
ENTER
keytodisplay a slider, default center (relative
to
move the focused soundtoa specific seated location.
ANT
only.
to
the
center channeltoallow sound
track
not
audible during normal TV
to
to
broadcsts
center
to
center
in mono.
Level
Sound
Downloaded From TV-Manual.com Manuals
On,
Off:
Reduces differencesinsound volume between programming segments,
such as between regular broadcast programs and commercials.
Resets audio
input. Highlight the
and
picture adjustments for
Reset
icon and press
the
current
ENTER.
Page 15

TV
Menus
15
<e>
Global
Adjust
~
A press of ENTER on PerfectColor icon displays
PerfectColor and PerfecTint menu if supported.
continued
Vhlt·o
MUIr'
'CI('PIl"d\'P!
"0,
Off Off Off
"0,
Jilm
./
ModI'
Auto
'IllOOlh
1
}Ollt
~
-:1
Bltl!"
"
0'
Oil
(.IU\\I
...
~
.....
11'.,1
PitIUlf"
.'1
~
Adjust
Video
Screensaver
____
Film
Mode
Smooth
Blue
Glow
Test
Picture
PerfectColor
PerfecTint
PICture
B ••
Mute
120Hz
Aud'o
Displays a solid-colored background
when there is no video signal.
Displays a random pattern while
playing
CO/Audio or MP3 Player.
480i
and
Auto, theTVapplies film-decoding
correction to movies filmed at
frames per second.
Reduces
Select On to see blue accent lighting.
(249
Series only)
Displays a test picture for use by TV
servicers.
Sliders adjust the saturation (intensity)
of six colors for the current input.
Sliders adjust six hues for the current
input
(some
To
switch between
PerfecTintT
Adjust
(249
Series
Reset
':-
~
an
audio-only device named
1080i
motion blurinaction
models).
M
adjustments, highlight
and
press'"
only)
Global P,cture+
G q
signals
only.
PerfectColor™
~.
scenes.
In
24
and
Captions
(I!J)
Effects
B
Downloaded From TV-Manual.com Manuals
Closed-Caption
fon'
"'0.1",,"
Sizt
""'"
fOM I
rOM 2
ront l
rofll' .. v
rClrtl
5
ronl
(i
ronl7
Mflt'um
SmAil
Fool
COIOf
""'
"
"uk
........
...
.....
CT.,n
Cy,n
Ilu.
Settings
..
Op.I.cill
JTt~llucMl
","",u,
fu,twn'il
Tr.tn'p¥wnI
~lIt,91JUll
-'Of____
J ltacl;.
""",
M.g'l'lU
...
V,llow
Grnn
(y"n
1111.
...
~11iv;'"
picII)
.....
Tr..,"luam
Opoqu.
Fluhll'l9
Tra'"pvtnt
Advanced
Picture
(£]
Captions Q B
• Provides choices and separate on/off controls for
digital and analog captions.
• Selects background color for analog captions.
Selects settings for the appearance of digital closed
captions.
Technical picture adjustments for use
by a professional installer.
Services
Effects
Page 16

16 TV
Initial
SetupofTV Features
Menus
Timer
~
.8-
Language
---------
./
Enqlhh
hpdrlol
Timer
"'0.
Off
Day
.....O.lily
Mon-Fri
SUndolV
Mond.ay
Tuesday
---
Time Input Channel
12:00
PM
'"
Ant
OVO
Diu-ray
••
--
Choose either English or Spanish for TV menus.
o Use this menu to set the TV clock.
o Choose the DST (Daylight Savings Time) setting
for your area.
o Use this menu to set a day and time for the TV to
2-1
power on automatically.
o Select the input and channel to be used at
Power-On.
Adding/Deleting
o Check mark indicates memorized channels.
o Select and press
Channels
ENTER
to add / delete the channel from
the memory.
Channel Scan searches for channels and adds them
to memory.
o Choose if connected to
an
antenna or direct
cable.
o Press
....~to
Scan
and press
ENTER.
Channel Edit
K(
8~
01
11M
~
"
4'"
'"
.,
..
'"
Sill
./
S·l
II
.,
'"
./71n
• 1
../91d
10-1
./
11 I "
11
./
111
1 "
'"
131
..
I
~'1
...
'41
'"
I.
I
111
181.,
./
Options for power consumption while the TV is
powered off.
o
Standard
keeps the TVincompliance with
ENERGY STAR® efficiency standards while
powered off.
o The
Fast
Power
up
quickly. The TV draws power whileinthe
stateinexcessofENERGY
On setting lets the TV power
STAR
efficiency stan-
off
dards for a powered-down device.
Downloaded From TV-Manual.com Manuals
Page 17

Sound
PrOjl'(fOf
I~~
Il"Pl
(.'1,,',\\..
11
1
"'''Jill
14
h'(>1
Mode
../
Auto
M.HIII,d
~
,_"--..II
"
(
(>1111'1
I('II
I
(OIIWI
Rillhl
It
( 0111(>1
Iv\\...
....
I"~l~
If1
U
The TV's bank
create a surround sound effect.
of
16 speakers can be adjusted to
TV
Menus
11
,
....
I"
....
ld
II
fl"l"l
START
Mode option is available for 153 and 249 Series only.
Auto:
17
• Use only if Microphone is connected to the left
audio jack of the side panel (input
3).
• The audio jack is not automatically detected.
(f)
• Press START to begin automatic calculation.
Manual:
• Custom buttonisdisplayed instead of
START.
• Specify all items before pressing Custom button.
to
• Use the Custom option
fine tune per your
unique room layout. (See page 19).
Name
~
Inputs
Input
Management
Name
An.
On
HDMI-3
HDMI-3
eEe
S.itell'le
..
I:IlI
Input-I
VCR
HOMI-4
Wli
Input-2
lnput-2
CEC CEC
DVD
Input-3
Omcorder
DVR
--
---
HD~
AVR
CEe CEe
OVDl
HDMI-2
~bll!
81u-R.y
Name Learn
AVR
I
nputs
• Assignorchange namesofinputs appearing
the Activity menu.
Box
• Turn the
~...
Ant
input
On/Off
~.9
(to display/hideinthe
Activity menu).
• Delete unused HDMI inputs from the
menu.
For complete setup instructions, see the owner's
guide on the web.
(153
and 249 Series only)
HDMI ActIvity
(ontrol
-<m
~~!.
Activity
in
Downloaded From TV-Manual.com Manuals
Select On
of
a CEC-enabled device. See the owner's guide on
or
Off
to enable or disable the TV's control
the web for use of this feature.
• Customize the Activity menu choices for the
current Viewing input.
• Highlight the activity name and press
ENTER.
• Not available from the Antenna input.
Page 18

18
TV
Menus
Lock
Controlling
TV
Usage
This feature restricts the access according to the
based program ratings, the time of day or by the channels.
Restricting the access using the non-U.S. based ratings
(Alternate Rating System) can be setup from the 'Other'
submenu.
To
•
• The pass code menu is displayed first whenever
setup the restrictionorto watch TV during the
restricted condition, a pass code is required.
Lock is selected on the main menu.
Parental
Ii
lock
,...
TV
Off
On
Rating
j'TV-Y
j'TV-Y7
j'
TV-C
~'TV-PC
j TV-14
II TV-MA
FV
0 l S V
j' j'
j' j'
j' j'
II
II
II
II
II
II
II
Movie
j'
j'
j'
II
II
j
U.S.
Rating
C
PC
PC-13
R
NC-17
X
Not rated
Start
12,00
Setting
• Input four-digit pass code using the number keys
• Press
• Press
• Press
• If you forget the pass code: press the number 9 and
Resetting
The old pass codeisdeleted when entering the Lock
menu, and prompts you to enter a new pass code.
Time
Stop
PM
12,00
a Pass
on the remote control.
one space.
a pass code.
LAST
key on the remote at the same time.
Time
PM
Code
(CANCELlto
8
or
(ENTER
a Pass
Lock by Program Ratings:
• Restricts access to the
• Lock applies only to ANT and compos-
•
delete a numberand move back
§ to close the menu without setting
lto
set the pass code.
Code
by
ratings sent
ite jacks. Some signals
rating information and will not lock.
To
lock for24hours, set the same time
for Start Time and Stop Time.
the broadcasters.
TV
using U.S.
do
not contain
LockbyTime:
• Blocks all use of the TV during the specified time
period.
• Requires pass code to view during the locked
time.
Lock Control Panel:
• Disables the buttons on the TV's control panel.
• Press and hold
10
about
is not available.
Lock by Other Program Ratings:
• Restricts access using non-U.S. based ratings
sent by broadcasters.
• Grayed out if the Other rating is not detected in
the broadcasted signal.
Note: Other rating locks apply only to digital channels
and signals received on the
ACTIVITY
seconds to unlockifthe remote control
button from the panel for
ANT.
Downloaded From TV-Manual.com Manuals
Page 19

19
Sound
The TV's bankofspeakers can be adjusted to reflect
sound
effect. Setup can be performed manually for all models,
and
Manual
1.
2. Highlight
Adjusting
1. Position yourself
2.
3.
off
the room walls to create a surround sound
lor automatically depending on your TV models.
From the
dimensions and layout information requested in the
screen. Press
direction and focusofthe TV's sound output.
TV
Location
./
Center 16
left
l Corner
Right
R Corner
153
and
249
the page
Press
....
Press
<II
the sound level.
Projector
Setup
Initial>
Custom
TVW.II
length
Option
SoundPro menu, enter the room
....
T to specify the value.
feet
and press
Othor
longth
14 rett 12
Wall
ENTER
to fine tune the
TVtoSofa
D
Series:
16),
for
Angles
T to seiect an audio beam.
~
Select
Manual
Custom
to redirect the audio beam or change
button tobedisplayed.
in
your usual viewing location.
option under
(eet
Mode
Custom
(!)
(refer to
Adjusting
1.
Adjust
Levels
Center
Level to the mid level.
2. Adjust individual beam one at a time so that each
one sounds about the sameasthe center level.
3. Check all sound levels by quickly switching
between them using
4. Readjust individual levels
Auto
1.
2. Set
Setup
Plug the microphone into the left audio jack
the side panel
plugged in, the TV will not allow the
ModetoAuto. STARTisdisplayed in place of
Custom.
Option
Highlight START and press
(INPUT
....
T.
in
small increments.
(153or249
3).
If the microphoneisnot
series only)
Auto
ENTER.
of
setup.
3. Quietly exit the room right away as your presence
will interfere with the calibration process.
4. Return to the room after the completion
of
setup.
5. Play some sample audio to check the sound quality.
Note: Do not perform manual adjustments after the
Auto setup. Auto calibration data will be erased.
6.
Store the microphone outofdirect sunlight and
away from heat.
Microphone
Placement
Custom Sound Projector menu
be
Center
Left
Right
Right
round
•
• At extreme beam angles, the image on screen may
Angle
Angle
Angle
Sur-
Angle
To
reset the beams, change the TV
not be accurate.
Sound to
Maximize the sound from the left.
Maximize the sound from the right.
Adjust as if the sound comes from
the left rear side, orsame as that
Left
for
Adjustasif the sound comes from
the right rear side or same as that
Right
for
equalinboth ears.
Angle.
Angle.
Location
field.
• Place the microphone at least 6 feet away from the
TV,
centeredinfront of the
• Place the microphone on a flat, level surface such
as on a tripodoron the backrestofyour seating.
TV
,/
6 ft.
+----------+
• Place the microphone where yours ears would be
when watching
the TV Speakers.
minimum
TV.
Place it within 3 feet height from
TV.
Microphone
/ on a tripod or
on the backrest of your
seat
---------f
3ft
...
_+-..,
TV
Speakers-
!'!-
_t
Downloaded From TV-Manual.com Manuals
Page 20

20
Subwoofer
Connecting
Complete
Required:
1.
Audio cable withanRCA jack
Audio
•
with
TV Panel
Subwoofer
f>==::::::"
Subwoofer
for
Subwoofer
When the
screen displays, highlight
()
Note:
Auto
~I~
AV Receiver
Headphones
The
necting to the
Adjusting
1.
Play sample videoormusic containing low-frequency bass sound.
2.
Press
MORE
woofer
3.
Press'"~to
4.
With
Subwoofer
slider for volume.
5.
Press'"~to adjust subwoofer volume to your
preference.
Discovering
Output
sub woofer must be turnedonbefore con-
Subwoofer
key and
option.
Sensing>
Subwoofer.
SUBWOOFER
New
OUTPUT
Level
AUDIO
key to display the
Subwooferishighlighted.
set to On, press
ENTER
Device
jack.
to display a
Found
Sub-
Downloaded From TV-Manual.com Manuals
Resetting
the
Subwoofer
Jack
1.
Press
MORE
key
and
AUDIO
KEY
to display the
woofer
2.
Power
3. Disconnect the subwooferfrom the
4. Power on the
5. Connect
jack
Found
option and change it to Off.
off
the
TV.
TV.
the
and
devicetothe
the
Auto Output
screen
will
display.
SUBWOOFER OUTPUT
Sensing>
Output
Sub-
TV.
New
Device
Page 21

21
USB
The TV can display photo or music files from a
•
USB device.
Photos must be
•
wma format.
1.
Connect your USB
drive
port
side panel.
2.
The TV ignores all
commands while
reading files. Wait
for icons to appear
in
Player
activating menu
options.
Large files or highcapacity storage
devices may take a
long time to display.
Media
to
the TV's USB
located at the
the USB
Media
menu before
Player
in
JPEG format and music files
Side
Menu
Panel
in
q~
Thumbnail and Playlist Menus
Displays picture thumbnails or a listofmusic files.
Moves thehihli ht from item to item.
CI)
ENTER
Rotates a thumbnail clockwise
increments thumbnail onl .
or Piays the slide show or playlist starting
with the highlighted item.
in
90'-
--+-
@ Selects the last item on the current page.
~
~
CI)
ENTER
GUIDE
INFO
®
@
@@
Always
toadifferentTVinput
your
Some
Backupthe
connectingitto
responsible
Downloaded From TV-Manual.com Manuals
Playa
Starts the slide show or starts playing music.
or
Plays the slide show or playlist.
Rotates an image clockwise
increments
Displays slide name or track name.
Press
Pauses a slide show
Stops a slide show or track.
Displays the previous or next slide
track.
stop
USB
device.
pictures
Slideshow or Playlist
BACK
to clear.
IMPORTANT
playback
may
dataonyour
the
for
any
With@(STOP)
before
not
showonthe
USB
TV.
Mitsubishiisnot
file
damageordata
in
gO·
or
track
or
change
disconnecting
TV.
drive
before
loss.
or
@ Selects the first item on the current page.
PAGE
UPIDN
IDisplays the next or previous page of items.
~
~
Display
Slideshow
For
Interval Select the time interval for display of each
Frequency
NotesonUsing
• Some images opened and resavedona computer
• Some manufacturers' devices may be incompat-
Setup
Displays the USB Media Setup menu.
You
have the option to play music with
the slide show (Slideshow + Music),
__
+-::S"lid:::..eshoworMusic only.
Select Auto or Manual for the slide show
automatic
may not play backordisplayinthe thumbnail list.
ible with the
photos, you can:
» Transfer files to a different USB device.
» Use your digital camera's YNIDEO composite
video output.
advance
slide. The actual interval time may vary
it may take longer for larger files.
Select the numberoftimes (frequency)
to play the complete slide show and/or
playlist Once, Twice,
the
TV.
only:
or
Continuous.
USB
Port
If the TV is unable to display your
as
Page 22
22
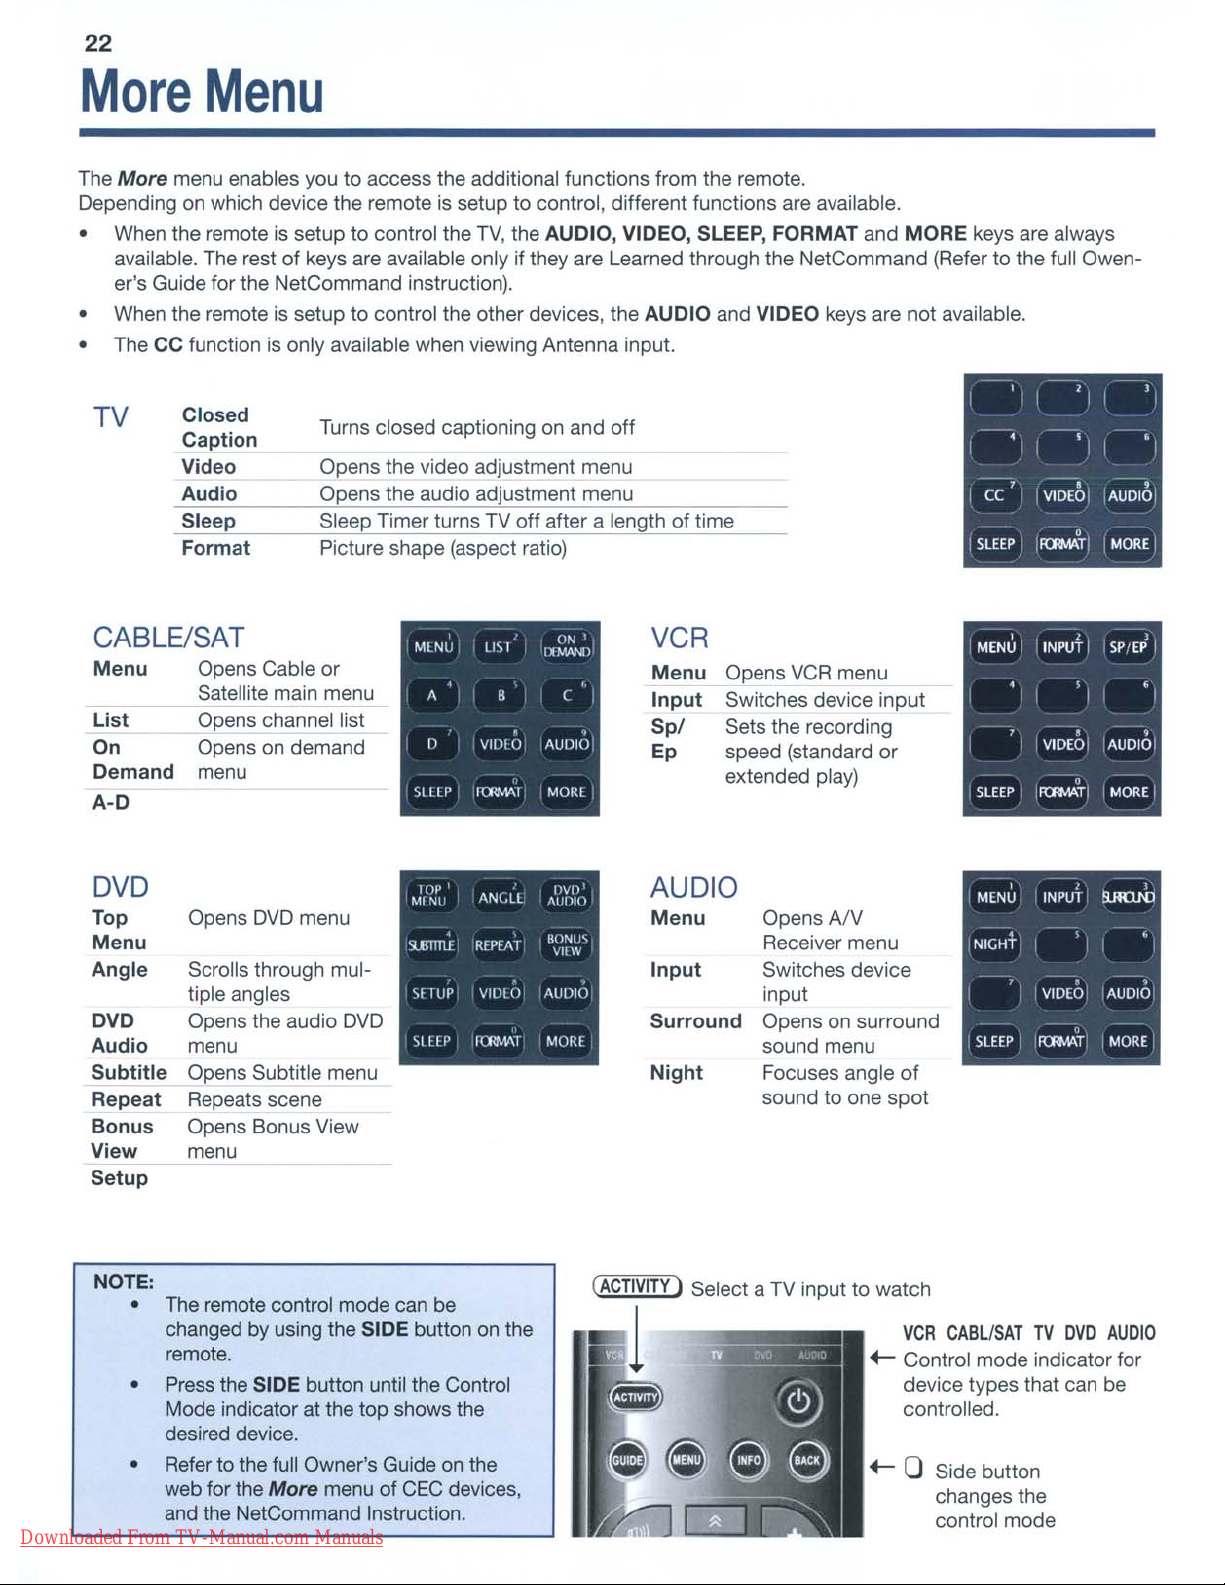
More
The
More
Depending on which device the remote is setup to control, different functions are available.
• When the remote is setup
available. The rest of keys are available only if they are Learned through the NetCommand (Refer to the full Owener's Guide for the NetCommand instruction).
• When the remoteissetup to control the other devices, the AUDIO and VIDEO keys are not available.
• The CC function is only available when viewing Antenna input.
TV
CABLE/SAT
Menu
List
On
Demand
A-D
Menu
menu enables you to access the additional functions from the remote.
to
Closed
Caption
Video
Audio
Sleep
Format
Opens Cable
Satellite main menu
Opens channel list
Opens on demand
menu
Turns closed captioning on and off
Opens the video adjustment menu
Opens the audio adjustment menu
Slee Timer turns TV
Picture shape (aspect ratio)
or
control the
MLNU
StllP
TV,
the AUDIO, VIDEO, SLEEP, FORMAT and MORE keys are always
off
after a length of time
" ON l
LIS'
11VJ\Ml
,
Il
B
VIDIO
1{R\'\l\!
(
,
AUDIO
MORl
VCR
Menu
Input
Spl
Ep
Opens
Switches device input
Sets the recording
speed (standard
extended play)
VCR
menu
or
MENU
SLEEP
,
I
INPUT
VIOEOi
I IRllMATI
,
SPfE~
I
"
AUDIO
,
MORE
I
•
I
•
I
I
DVD
Top Opens
Menu
Angle
DVD
Audio
Subtitle
Repeat
Bonus
View
Setup
NOTE:
Downloaded From TV-Manual.com Manuals
Scrolls through multiple angles input
Opens the audio
menu sound menu
Opens Subtitle menu
Repeats scene
Opens Bonus View
menu
• The remote control mode can be
changed by using the SIDE button on the
remote.
• Press the SIDE button until the Control
Mode indicator at the top shows the
desired device.
• Refer to the full Owner's Guide on the
web for the
and the NetCommand Instruction.
DVD
More
menu
DVD
menu of
CEC
devices,
AUDIO
Menu
Input
Surround
Night
(ACTIVITY
1
I Select a
Opens
Receiver menu
Switches device
Opens on surround
Focuses angle
sound to one
AN
TV
input to watch
of
spot
VCR
+-
Control mode indicator for
device types that can
controlled.
+-
0 Side button
CABLISATTVDVD
changes the
control mode
AUDIO
be
Page 23

Troubleshooting
General TV Op.eration
Symptom
_.~
•.
_-
~._.~.~-".-
1. TheTVremote control does not work.
When
2.
3.
Itry to use the remote control, the
POWER
blinks five times.
.
_--~~_..~.~--~~~-~.
TV does not respond to the remote control or Unplug the AC power cord for 10 seconds.
to
control-panel buttons and TV will not power I Press and hold the POWER button on the control panel for 10
onoroff. ' seconds to perform system reset.
a device is selected from the Activity
menu, the screen
is
blue or black
(no
signal
Remarks
• Check that the batteries are fresh and installed correctly.
• Check that the control mode
•
Benomore
than20feet
from
• Program the remote control to operate the
• Reset the remote control.
Replace the batteries.
.__.
--~~~~-~----~~---"~~'--"--""'--~<,"-
Make sure the selected device is turned on.
of
Begin play
the device.
on
the remote is set to
theTVwhen
using
TV.
the
remote
TV
or other device.
23
control.
You have forgotten your Lock menu pass
code.
Rating restrictions are not working.
_.~.~~.~.~
; On-screen displays appear each time
change a function.
8.
I
have
turned
on
CEC for
controliserratic and Iwish to disable
my
HDMI
.~.~
..~...._..~~....
you
devices but
it.
for
When prompted
the pass code, press the number 9 and
, (LAST) keys on the TV remote control at the same time. This
I process temporarily unlocks the TV.
...
+=-~
-_
Open the
••.
_-~
Lock>
..
_--
Parental Lock menu and:
• Verify that the ratings locks are active.
to
• Check the Lock Time/Unlock Time
checkifrating restric-
tions are disabled.
.,~
•..
~ Rating
re~~.ricti5>nS.
aPE~y
.?.!"'Iy
_to
content on the ANT
NormalTVoperation.
off
• Turn
the
the TV's HDMI control for the specific device. Open .
Inputs>
HDMI Control menu, select the device, select
Off.
I.
Disable CEC on the device itself. See the device's instructions.
.•
If the problem persists,dothe following:
1.
Disconnect the device from the
2. Open the
3. Reconnect the device to the
recognize the device with
Inputs>
Name menu, select the device and delete.
CEC disabled.
TV.
TV
and Auto Input Sensing will
Ci)
inp~!.
Downloaded From TV-Manual.com Manuals
Page 24
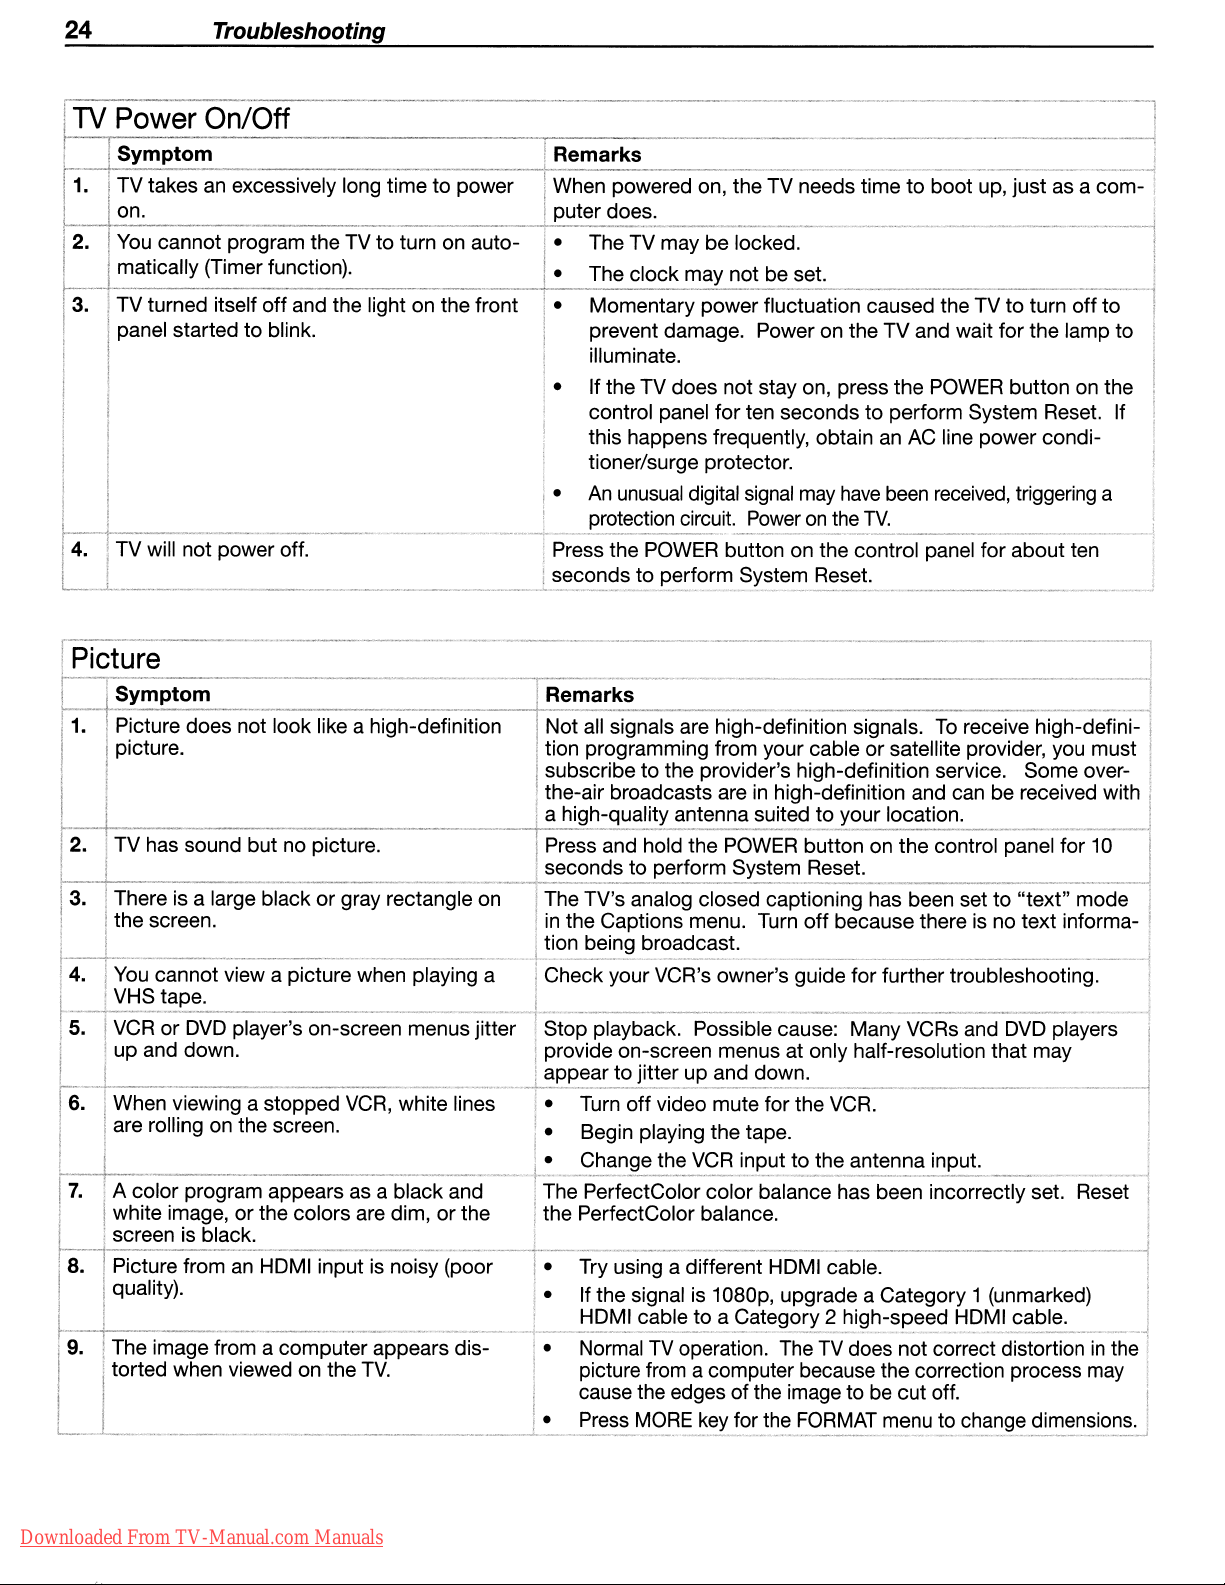
24
....
n\A/c.r
Troubleshooting
On/Off
TV takes an excessively long time to power
You
cannot program the TV to turn on
maltic,ally (Timer function).
turned itself
off
and the light on the front
started to blink.
4. power off.
'-_.--l..
r-IL;LUrt::l
3.
~
__
~
~__._.~~
does not look like a high-definition
black or gray rectangle on
4.
When powered on, the TV needs timetoboot up, just as a com- I
does.
The TV may be locked.
The clock not be set.
• Momentary power fluctuation caused the TVtoturn
off
to
prevent damage. Power on the TV and wait for the lamp to
illuminate.
• Ifthe TV does not stay on, press the
POWER
button on the
control panel forten seconds to perform System Reset. If
this happens frequently, obtain an
AC
line power condi-
tioner/surge protector.
•
An
unusual
digital
circuit.
signal
may
Poweronthe
have
TV.
been
received,
triggering a
Press the POWER button on the control panel for about ten
__
~~.
__
seconds to System Reset.
...
_~.~_._
•._.•
__
~..:......__.
all signals are high-definition signals.
__
~
.
To
receive
~
_
nIOln-(]eTlnItion programming from your cable or satellite provider, you
subscribe to the provider's high-definition service. Some over-
the-air broadcasts areinhigh-definition and can be received with
nlan-(]Uallltv antenna suited to location.
and hold the POWER button on the control panel for 1D
cO/'nr,nc
in
the Captions menu. Turn
to Reset.
TV's analog closed captioning has been set to
off
because there is no text informa-
"text"
mode
being broadcast.
your VCR's owner's guide for further troubleshooting.
6.
stopped
VCR,
screen.
I---+
'
'_"
__
~_~_'
image from a computer appears dis- • NormalTVoperation. TheTVdoes not correct distortioninthe i
when viewed on the
I-..-._~.L_._.
•.__...
_._.~
TV.
__._..
Downloaded From TV-Manual.com Manuals
white lines
' ,__,..__
•
orCrVldle
Possible cause: Many VCRs and
on-screen menus at only half-resolution that may
DVD
to and down.
• Turn
off
video mute for the VCR.
• Begin playing the tape.
• the
VCR
to the antenna
The PerfectColor color balance has been incorrectlyset.
the PerfectColor balance.
Try using a different HDMI cable.
• Ifthe signal is 1
,~
H_D
...
M_I~_
c_a,_b_le._t..o..a
D8Dp,
upgrade a Category 1 (unmarked)
Ca!~g.o!:y.3.~i}h-sp~E!.d-,:!~~~~~~_.
picture from a computer because the correction process
cause the edgesofthe image to be cut off.
• Press
..L-
MORE
for the
FORMAT
menu to dimensions.
players
.J
may
Page 25
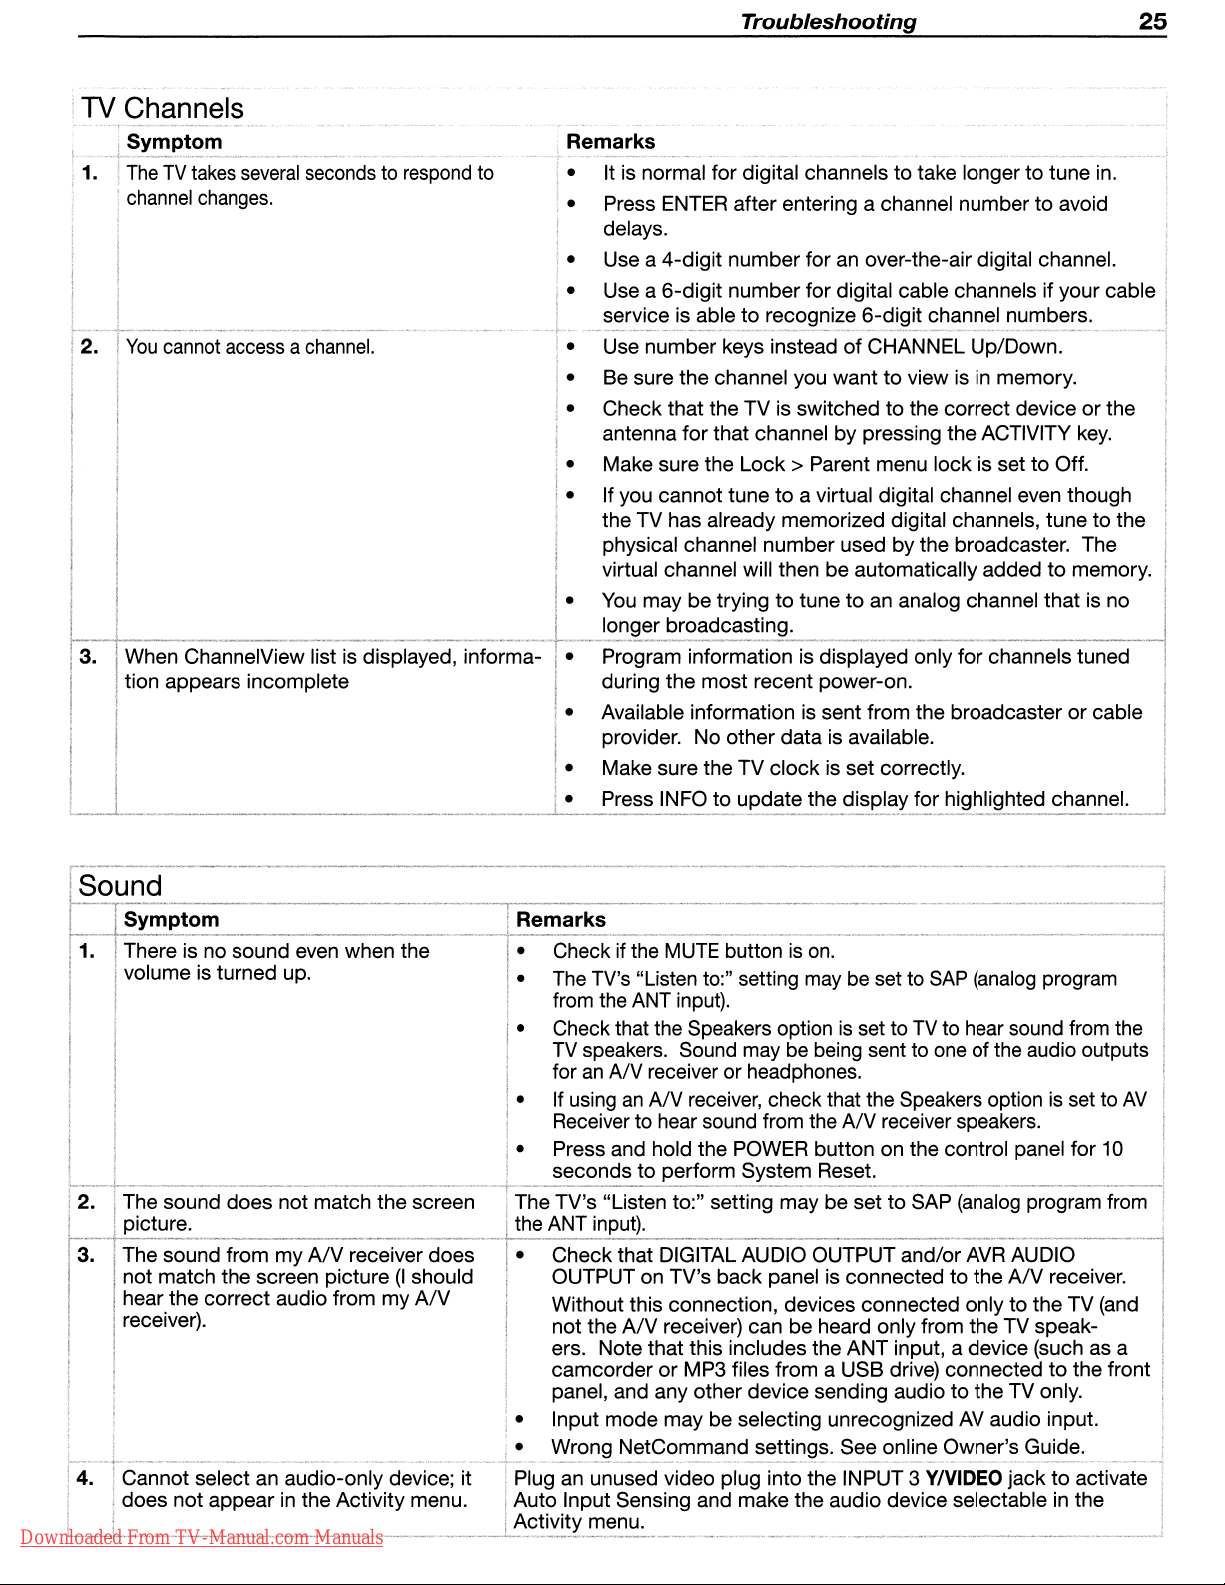
TV Channels
Symptom
~
__
~~_~~~
: 1.
TheTVtakes
i
2.
channel
You
changes.
cannot
__
~~,_.~~
_~",_M__~
__
several
secondstorespond
accessachannel.
Troubleshooting
25
Remarks
to
• Itisnormal for digital channels to take longer to tune in.
• Press
ENTER
after entering a channel number to avoid
delays.
an
• Use a 4-digit number for
over-the-air digital channel.
• Use a 6-digit number for digital cable channels ifyour cable
to
service is able
~~·_·_·W_··~__·_~_.
recognize 6-digit channel numbers.
.~
._~.
._~
.
• Use numberkeys insteadofCHANNEL Up/Down.
to
• Be sure the channel you want
• Check that the TV is switched
viewisin
to
the correct device or the
antenna for that channel by pressing the ACTIVITY
• Make sure the
Lock>
Parent menu lock is set to Off.
memory.
key.
• Ifyou cannot tune to a virtual digital channel even though
the TV has already memorized digital channels, tune to the
physical channel number used by the broadcaster. The
to
virtual channel will then be automatically added
You
•
may be tryingtotunetoan analog channel that is no
memory.
ChannelView list
tion appears incomplete
is
displayed, informa- •
Program information is displayed only for channels tuned
during the most recent power-on.
Available information is sent from the broadcaster or cable
•
provider. No other data is available.
Make sure the TV clock is set correctly.
•
Press INFO to the for channel.
•
1.
is no sound even when the
volume is turned up.
• Check if the
•
The
TV's "Listen to:" setting maybeset to
from the
ANT
MUTE
input).
buttonison.
• Check that the Speakers option
TV
speakers. Sound may be being sent to
for
an
AN
receiver or headphones.
an
AN
• If using
receiver, check that the Speakers optionisset to
Receiver to hear sound from the
• Press and hold the POWER button on the control panel for
seconds to Reset.
2. sound does not match the screen
TV's "Listen to:" setting may be set to SAP
ANT
sound from my
AN
receiver does
match the screen picture
hear the correct audio from my
receiver).
(I
should
AN
Check that DIGITAL AUDIO OUTPUT and/or
OUTPUT on TV's back panel is connected
Without this connection, devices connected only
not the
AN
receiver) can be heard only from the TV speakers. Note that this includes the ANT input, a device (such as a
camcorder
or
MP3 files from a USB drive) connectedtothe front
panel, and any other device sending audio to the TV only.
• Input mode may be selecting unrecognized
-".~----"._"
Wrong NetCommand settings. See online Owner's Guide.
+--
"--_.,-""--"-------_
....
,"._.__...
"-----,-~
4. Cannot selectanaudio-only device; it an unused video plug into the INPUT 3
does not appearinthe Activity menu. Input Sensing and make the audio device selectableinthe
Downloaded From TV-Manual.com Manuals
AC'[IVr[V
menu.
SAP
(analog
is
set toTVto hear sound from the
one
of the audio outputs
AN
receiver speakers.
(analog
AVR
to
the
AV
YIVIDEO
program
program from
AUDIO
AN
receiver.
to
the TV (and
audio input.
jacktoactivate 1
AV
10
Page 26

26
Mitsubishi
MITSUBISHI
chased
a.
Parts.
purchaseatretail.Wewill
replaced
the
original
b.
Embedded Software.
with
the
is
error-free.
authorized
accordance with
plication of
at
MDEA's
Consumer
on
the
this
limited
as
specifically
c. Labor.
consumerissolely
MITSUBISHI
d.
Notice.Toobtain warranty service,
time
period.
DIGITAL
fromanauthorized
All
parts
(except
with
thoseoflike
warranty period.
functional description of
The
warranty containedinthis section
dealer.
If,
such
the
Embedded
sole
discretion
installation.
Embedded
For
Software
warrantyonthe
authorizedbyMDEA.
certain
responsible for
service center without
LCD
ELECTRONICS
MITSUBISHI
any
repair or
kind
MDEA
after prompt notice within
functional descriptioninall
Software,
maybefulfilledbymeans
The
foregoing
also
Embedded
items
that
Flat
AMERICA,
Audio/Video
software incorporated
replace,atour option,
and
quality
warrants that
Embedded
then
shallbeMDEA's
subject to
Software
are
designedtobe
any
replacement
charge
you
INC.
and
maybenew
all
software incorporated into this
Softwareinall
the
material
MDEA
shall
your
compliance with
shallbenull
for
one
must notifyanauthorized
Panel
("MDEA")
Dealer,
into
this
any
shall
continue for a period of
warranty period,
respects
modify or
of modificationorreplacement software containedona replacement memory
sole
obligationtoyou
replacedbythe
labor.
For
year
from
HOlV
warrantstothe
shoulditprove
HDTV)
are
warranted for a period of
defective part without charge
or remanufactured.
material
respects, but
MDEA
andifsuch
replace
and
all
the
the
the
termsofthe
voidifthe
consumer,
other parts,wewill
original
dateofpurchaseatretail.
MITSUBISHI
determines that
Limited
original
defectivebyreason of
Parts
HDTV
MDEA
one
failureisnot
nonconforming
under this limited
Software
Embedded
including (but
provide
service center of
purchaser of this
improper workmanship and/or
one
year
for
the
part.
used
for replacement
(the
"Embedded
does
not
warrant that
year,
from
the
dateofthe
the
Embedded
duetoaccident,
Embedded
warranty.
License
Softwareismodified or
not
the
Agreement
limited
labor
any
for
Warranty
LCD
Flat
Panel
HDTV
from
the
dateofthe
Parts
used
for replacement
are
warranted
Software")
the
original purchase
Software
misuse,
Softwareatno
All
rights
under
applicable to this
changedinany
to)
some
Embedded
awarranty
defect within
for
will
performinaccordance
Embedded
has
failed
modification or misap-
chargetoyou,
this limited
Software,
repairbyan
the
applicable warranty
that if
material:
original
may
the
remainder
Software
from
to perform
card
warranty
HDTV,
manner
authorized
pur-
be
of
the
in
which
for
and
except
the
BEFORE
adjustment.Ifthe problem persists, please arrange for warranty service.
1.TOOBTAIN
a.
writingtothe
b.
the
authorized service locationatyour
you
c. Proof of
document
WARRANTY
which could affect
2.
a.Upto
b.
the
damagedbyexcessive
removed;
beyond
mounting brackets or stands.
found,
this limited
installations oronwall
ness),
systems,
Guide
REQUESTING
WARRANTY
Contact your
Warranty
geographic territory customarily
home.
THIS LIMITED
Cosmetic
productbyanyone
the
service calls
other adjustment necessarytoprepare
furnished
nearest
address
service
Actual service labor
purchase
which
establishes proof
COVERAGE.
.01%pixel
damageorany
product
reasonable
warranty,
or service of products purchased or serviced outside
with
SERVICE,
authorized
provided
willbeprovidedinyour
fromanauthorized
However,
you.
WARRANTY
outages
useinany
related
(small
other damage
other
thananauthorized
physical or electrical
control of
to unsatisfactory audio or
all
costs,
mountings, or set-ups,
the
product
please review theTVowner's guidetoinsure proper installation and correct customer control
SERVICE:
MITSUBISHI
below,
coveredbyan
own
willbeprovided without
and
please
DOES
dot picture
manner
MDEA,
This
limited warranty
expensesorany
for
information regarding user controls.
calling
MDEAat800-332-2119,orusing
home
expense,orpay
MITSUBISHI
date of
return
NOT
COVER:
elements
where
stress);
contrarytothe
suchaspower
any
the
service center
or,ifrequired,atan
authorized
dealerisrequired
purchase.
the
Owner
such
damageiscausedbyunauthorized modification, alteration,
MITSUBISHI
any
Owner's
also
visual
other
damages
adjustments of user controls (including contrast, brightness,
unit for display or
whose
name
authorized service
MITSUBISHI
for
any
travel
and/or transportation costs
charge.
when
THE
RETURNOFTHE
Registration
that
are
dark or incorrectly
service
products that
Guide;
surge
damage
excludes service calls
reception or
arising
the
Cardsothatwecan
center;
have
freight
causedbyelectrical
signal
from
use,
connection with
U.S.A.
Please
service
hadaserial
damage;orany
product installation,
and
address
the
requesting
OWNER
physical
wherenodefectinthe
unless
consult the operating instructions containedinthe
canbeobtained
support
center.Ifnot,
illuminated).
feature
of our websiteatwww.Mitsubishi-tv.com.
shop,
provided that
you
must either deliver
the
service center
warranty service.
REGISTRATION
contact
abusetoor
number or
damage
system
causedbyadefectinthe
any
external
you
misuse
any
causedbyacts of
or damages
product
removal
audio
from
your
MITSUBISHI
your
televisionislocated
may
Present
CARDISNOTACONDITION
should aquestion of safety
of the product
part thereof
from or re-installation
your
repairstoor service
altered,
God
causedbyuse
covered
receiver,
under
product thatiscovered
color,
tint,
antenna,
dealer,
your
televisiontoan
chargetoand
sales
receipt or other
(or
any
product
defaced
or other factors
of third party
this
warranty
into
fine
tuning, sharp-
cable or
by
within
from
OF
arise
of
or
is
under
custom
satellite
Owner's
3.
ANY
EXPRESS
CATIONOROPERATIONOFLAW,ISHEREBY
FITNESS
Downloaded From TV-Manual.com Manuals
FOR
WARRANTY
ANY
PARTICULAR
NOT
PROVIDED
PURPOSE
HEREIN,
EXCLUDED
ARE
EXPRESSLY
AND
AND
ANY
REMEDY
DISCLAIMED.
LIMITEDTOA
WHICH,
TERMOFONE
THE
BUT
IMPLIED
FOR
THIS
PROVISION,
WARRANTIESOFMERCHANTABILITY
YEAR.
MIGHT
ARISEBYIMPLI-
AND
OF
Page 27

Warranty Trademarks
4.
UNDERNOCIRCUMSTANCES
CONSEQUENTIAL
5. Some statesdonot allow limitationsonhow longanimplied warranty lasts, or the exclusionorlimitation of incidental, special, or consequential damages, so the above limitations or exclusions may not apply to you.
6. This limited warranty gives you specific legal rights, and you may also have other rights which vary from state to state.
7.Inthe eventofany dispute under this limited warranty, jurisdiction and venue for resolving that dispute will beinthe state where the television was purchased and the laws
general, consequential, incidental,
ing from use of this television, or cost
DAMAGES,
SHALL
MDEABELIABLETOPURCHASERORANY
WHETHER
of
or
ARISING
such state will govern.Inno event shall Mitsubishi have any liability, including with out limitation, for
special damages for loss, destruction, damageorcorruption of recorded data, media or software result-
of
recovery of lost data, mediaorsoftware therefore.
OUTOFBREACHOFWARRANTY,
and
Licenses
OTHER
PERSON
BREACHOFCONTRACT,OROTHERWISE.
FOR
ANY
INCIDENTAL,
27
SPECIAL
OR
J..
MITSUBISHI
9351
Jeronimo
Irvine,CA92618-1904
Trademark
MITSUBISHI
DIGITAL
ELECTRONICS
Road
and
AMERICA,
License
INC.
Information
LICENSOR'S SUPPLIERS DO NOT MAKE OR PASS ON TO END USER OR ANY OTHER THIRD PARTY, ANY LICENSOR'S SUPPLIERS DO NOT MAKE OR PASS ON TO END USER
OR
IMPLIED
NOT LIMITED TO THE IMPLIED WARRANTIES OF NON-INFRINGEMENT, TITLE, MERCHANTABILITY OR FITNESS
FOR A PARTICULAR PURPOSE.
STATUTORY WARRANTY OR REPRESENTATION ON BEHALF OF SUCH SUPPLIERS, INCLUDING, BUT
OR
ANY OTHER THIRD PARTY, ANY EXPRESS,
1·· Manufactured under license from Cambridge Mechatronics Ltd. Worldwide patents applied for.
Rapidfire and the 1
Manufactured
HDMITM
Licensing LLC.
The software
pendent JPEG Group's software, all rights reserved.
x.v.Color and the x.v.Color logo are trademarks
ChannelView™,
QuickView™, SharpEdge™, Smooth120HzTM are trademarks
Downloaded From TV-Manual.com Manuals
the
HDMIIogo
...
Logo are trademarksofCambridge Mechatronics Ltd.
under
in
license from Dolby Laboratories. "Dolby" and "Pro Logic" are trademarksofDolby Laboratories.
and High-Definition Multimedia Interface are trademarksorregistered trademarksofHDMI
this TV is basedinpart on the workofthe Independent JPEG Group, copyright © 1991-1998, the Inde-
of
Sony Corporation.
DeepField™
Imager, Easy ConnecFM, Net Command®, PerfectColor™, PerfecTint™, Plush 1080p®,
of
Mitsubishi Digital Electronics America, Inc.
Page 28

28 Warranty Trademarks
and
Licenses
Mitsubishi
TV
Software
END-USER LICENSE AGREEMENT FOR EMBEDDED SOFTWARE
IMPORTANT- READ CAREFULLY: This License Agreement is a legal agreement between you (either an individual or
Mitsubishi Digital Electronics America, Inc. (MDEA) for all software pre installed and/or provided along with this television ("Software"). By
utilizing this television and Software, you agree to be bound by the terms of this License Agreement.
The
Software is protected by United States copyright laws and international treaty provisions, as well as other intellectual property laws and
treaties. The Software is licensed, not sold.
1.
only with the Mitsubishi television model that included this owner's guide and owned by you.
2.
Software Not for Resale.
Software has been pre installed.
Prohibition on Reverse Engineering, Decompilation and Disassembly. The Software contains trade secrets
in
Software to any human perceivable form, except to the extent that the foregoing restriction is expressly prohibited by applicable
Separation of Components. The Software is licensed as a single product. Its component parts may not be separated for useonmore than
one
No
Trademarks. This License Agreement does not grant you any rights to any trademarks
3.
may subject you to serious criminal and civil penalties including damages and
violation of this License.
of intellectual property rights that is caused, encouraged or induced by your failure to abide by the terms of the License. This license
is effective until terminated and will terminate immediately without notice from MDEA or judicial resolution if you fail to comply with any
provision
4.
animations, video, audio, music, text, and "applets" incorporated into the Software), and any accompanying printed materials are owned by
or licensed to MDEA. All title and intellectual property rights
the property of the respective content owner and may be protected by applicable copyright or other intellectual property laws and treaties.
This License Agreement grants you no rights to use such content, except that you own the media
MDEA and its licensors retain ownership of the Software itself. All rights not expressly granted are reserved by MDEA.
5.
re-export the Software.
or restricted the export
Sudan, and Syria, orto any national of any such country, wherever located, who intends to transmit or transport the Software back to such
country;
of nuclear, chemical, or biological weapons; or
transactions by any federal agency
agency has suspended, revoked,
6. DISCLAIMER OF WARRANTY. EXCEPT
APPLICABLE TO THE TV,
AND HEREBY EXPRESSLY DISCLAIMS ALL WARRANTIES OF ANY KIND WHATSOEVER, EXPRESS OR IMPLIED, WITH
RESPECT TO THE SOFTWARE. ALL IMPLIED WARRANTIES, INCLUDING, WITHOUT LIMITATION, THE IMPLIED WARRANTIES
OF MERCHANTABILITY AND FITNESS FOR A PARTICULAR PURPOSE ARE HEREBY EXPRESSLY DISCLAIMED
NO EVENT SHALL MDEA BE LIABLE TO YOU OR ANY THIRD PARTIES, IN CONTRACT, IN TORT OR OTHERWISE, FOR ANY
DIRECT, INDIRECT, SPECIAL, INCIDENTAL OR CONSEQUENTIAL DAMAGES OF ANY KIND OR NATURE. BECAUSE SOME
JURISDICTIONS DO NOT ALLOW THE EXCLUSION OR LIMITATION OF IMPLIED WARRANTIES, THE ABOVE LIMITATION MAY NOT
APPLY TO YOU.
7.
PARTIES FOR ANY DAMAGES OF ANY NATURE, WHETHER INDIRECT, SPECIAL, INCIDENTAL, CONSEQUENTIAL OR OTHERWISE,
INCLUDING, BUT NOT LIMITED TO, ANY CLAIMS FOR LOST PROFITS, LOSS OF GOOD WILL OR EXPENDITURES MADE OR
COMMITTED FOR IN RELIANCE ON THE CONTINUATION OF THIS LICENSE. YOU AGREE THAT NEITHER MDEA'S BREACH OF
THIS LICENSE NOR ITS FAILURE TO REPAIR A DEFECT, ERROR OR BUG SHALL CONSTITUTE A FAILURE OF THE ESSENTIAL
PURPOSE OF THIS LICENSE. BECAUSE SOME JURISDICTIONS
FOR CONSEQUENTIAL OR INCIDENTAL DAMAGES, THE ABOVE LIMITATIONS MAY NOT APPLY TO YOU. MDEA's liability to you
for direct damages for any cause whatsoever and regardless
the
8.
LICENSE GRANT. MDEA grants you a non-exclusive, non-transferable, limited right and license
RIGHTS AND LIMITATIONS.
You
may not resell or otherwise transfer for value the Software, exceptinconjunction with a saleofthe TV that
its human perceivable form and to protect them, you may not reverse engineer, decompile, or disassemble, or otherwise reduce the
TV.
Rental.
TV
You
may not rent, lease, lendorsublicense the Software.
of
MDEA.
VIOLATIONS.
of
this License.
COPYRIGHT. All title and intellectual property rights
EXPORT RESTRICTIONS. MDEA is licensing the Software for use within the United States.
(ii)
to any person or entity who you know or have reason to know will utilize the Softwareinthe design, development,orproduction
LIMITATION OF LIABILITY. MDEA SHALL NOT, UNDER ANY CIRCUMSTANCESBELIABLE TO YOU OR ANY THIRD
(based on fair market value of the TV) that caused the damages.
GENERAL. This License Agreement will be governed by the lawsofthe State of California.
You
understand that any use, copying or transferofthe Software, exceptaspermitted pursuant to this License,
an
award to MDEA of attorneys' feesinconnection with any
You
further understand that you may be held legally responsible for any copyright infringement or other violation
in
and to the Software (including but not limited to any images, photographs,
in
and to the content which may be accessed through useofthe Software is
on
You
specifically agree not to export or re-export the Software:
of
goods or services, which currently include, but are not necessarily limited to Cuba, Iran, Iraq, Libya, North Korea,
(iii)
to any person or entity who has been prohibited from participatinginU.S.
of
the U.S. government.
or
denied your export privileges.
AS
MDEA
MAKES NO OTHER WARRANTIES OF ANY KIND WHATSOEVER REGARDING THE SOFTWARE
You
warrant and represent that neitherthe BXA nor any other U.S. federal
OTHERWISE PROVIDED IN THIS LICENSE OR IN THE LIMITED WARRANTY
DO
NOT ALLOW THE EXCLUSION OR LIMITATION OF LIABILITY
of
the
form of the action, will be limited to the money paid by you for
(i)
to any country to which the
to
use one copyofthe Software
or
other proprietary material
which the Software is recorded, but
You
agree that you will not export or
an
entity) and
U.S.
has embargoed
export
BY
MDEA. IN
law.
Downloaded From TV-Manual.com Manuals
Page 29

Copyright
Everyoneispermittedtocopy
The
antee
Software Foundation's software
GNU
Whenwespeakoffree
tribute copies
use
To
certain responsibilities for
For
that
We
the
Also,
modifiedbysomeone
reflectonthe
(C)
1989,
licenses
for
your
library
piecesofitinnew
protect
example,ifyou
they,
protect
software.
for
most
freedomtoshare
General
of
free
your
rights,weneedtomake
too,
receiveorcan
your
rights
each
author's protection
original authors' reputations.
1991
software
and
Public license
software,weare
software
free
programs;
youifyou
distribute copies of
get
with
two steps:
else
and
Free
Software
675
Mass
and
distribute verbatim copiesofthis
are
designedtotake
change
andtoany
instead.)
(and
charge
and
distribute copiesofthe
the
source
and
ours,wewanttomake
passed
Foundation,
Ave,
Cambridge,MA02139,
free
referringtofreedom,
for
that
restrictions that forbid
such
(1)
copyright
on,wewant
away
software--to
other
program
You
can
applyitto
this service if
you
know
aprogram, whether gratisorfor a
code.
And
you
the
software,
its recipientstoknow
GNU
Inc.
your
freedomtoshare
make
sure
whose
authors commit to
your programs,
not
price.
you
wish),
you
candothese
anyonetodeny
software,orif
must
show
and
certain that
Warranty Trademarks
GENERAL
Version2,June
USA
license
the
Our
that
them
(2)
PUBLIC
document, but changingitis
Preamble
and
softwareisfree
too.
General
you
receive
things.
you
you
modify
fee,
these termssothey
offer
you
everyone
that what
LICENSE
1991
change
it.Bycontrast,
for
all
its
using
it.
(Some
Public licenses
source codeorcan
these
rightsorto
it.
you
must
give
know
this license
understands that
they
which
haveisnot
not
users.
other
are
designedtomake
ask
youtosurrender
the
recipients
their rights.
gives
thereisno
the
original,sothat
and
Licenses
allowed.
the
GNU
This
General
Free
Software
getitif
all
you
legal
warranty for this
General
Public
Public license applies to mostofthe
Foundation
sure
you
want
it,
the
the
rights that
permissiontocopy,
any
problems introducedbyothers
licenseisintendedtoguar-
softwareiscoveredbythe
that
you
have
the
that
you
can
change
rights.
These
restrictions translate
you
have.
You
distribute and/or modify
free
software.Ifthe
freedomtodis-
the
software
must
make
software
will
29
Free
or
to
sure
is
not
Finally,
any
patent
licensedatall.
The
O.
This
General
tive
language.
Activities other
restricted,
Program).
1.
You
publish
ranty;
You
2.
You
or
work
These
independent
when
whose
free
licenses,ineffect
precise
license appliestoany
Public
work
under
(Hereinafter,
and
Whether
may
on
each
and
give
may
chargeafee
may
under
a)
You
b)
You
a
wholeatno
c)Ifthe
ordinary
provide a
the
Program
requirements
you
distribute
permissions
programisthreatened constantlybysoftware patents.Wewishtoavoid
terms
license.
copyright
than
the
copy
any
modify
the
must
must
modified program normally
way,
warranty)
and
making
the
program
and
conditions for copying, distribution
programorother work
The
"Program",
law:
thatisto
translationisincluded without limitationinthe
copying, distribution
output
from
the
Programiscovered
thatistrue dependsonwhat
and
distribute verbatim copies of
copyanappropriate copyright notice
other recipients of the
for
the
physical act of transferring a
your
copyorcopies of
termsofSection 1
cause
the
cause
any
chargetoall
to print or displayanannouncement includinganappropriate copyright notice
and
itselfisinteractive but
applytothe
separate
worksinthemselves,
the
same
for
other licensees
above,
modified files to carry prominent notices stating that
work that
third parties under
that
users
modified workasa
sectionsaspart of a
proprietary.Toprevent
and
TERMS
AND
CONDITIONS
which
below,
referstoany
say,
awork containing
and
modification
the
the
Program
you
reads
may
does
extendtothe
acopy of
the
Programorany
provided that
distributeorpublish, thatinwholeorin
the
commands interactively
redistribute
not normally print
then
whole
contains a notice placedbythe
such
are
onlyifits
Program
Program's
and
disclaimerofwarranty;
this
copy,
you
terms
the
program
whole.
If identifiable sections of that work
this
License,
whichisa
entire
whole,
this,wehave
modification
GNU
GENERAL
FOR
programorwork,
the
Programora portion of
term
not
coveredbythis license;
contents constitute a
does.
source codeasyou
License
and
you
portion of
also
meet
of this
License.
under
suchanannouncement, your
and
work
and
thustoeach
follow.
COPYING,
"modification".)
along
with
mayatyour option offer warranty protectioninexchange
it,
thus forming a work
allofthese conditions:
when
run,
these conditions,
its terms,donot
basedonthe
the
made
PUBLIC
keep
you
part containsoris
you
and
danger that redistributorsofa
it clear that
LICENSE
DISTRIBUTION
copyright holder
and
a"work
it,
either verbatimorwith modifications and/or translated
Each
they
work
basedonthe
receive
it,inany
intact
Program.
changed
must
apply to
Program,
every
all
cause
basedonthe
the
and
work
are
part regardless of
the
any
patent
mustbelicensed for everyone's
AND
MODIFICATION
basedonthe
licenseeisaddressedas"you".
are
outside its
the
notices that
files
it,
and
telling
basedonthe
not
those
the
sayingitmaybedistributed under
Program"
scope.
Program
medium,
Program,
and
the
dateofany
derived
from
when
started
anotice that thereisno
the
user
derived
from
sections
distributionofthe
when
means
The
(independent of
provided that
refertothis license
and
the
Programorany
running
howtoview
Programisnot
the
Program,
you
distribute
whole
who
wrote
it.
free
program
actofrunning
you
copy
change.
for
such
warranty
acopyofthis license.
mustbeon
will
individually
free
useornot
the
either
the
Programorany
the
having
been
conspicuously
andtothe
forafee.
and
distribute
part
interactive
(or
requiredtoprintanannouncement.)
and
canbereasonably considered
themasseparate
the
terms
into
Programisnot
madebyrunning
and
absenceofany
such
modifications
thereof,tobe
useinthe
else,
saying
terms of this
appropriately
that
(Exception:
works.
obtain
of this
deriva-
another
licensed
most
you
License,
the
war-
as
if
But
Thus,itis
distributionofderivativeorcollective works
In
bution
3.
provided that
Downloaded From TV-Manual.com Manuals
addition,
medium
You
may
not
the
intentofthis sectiontoclaim
mere
aggregationofanother
does
not
bring
copy
and
distribute
you
alsodooneofthe
the
other
the
work
work
Program
following:
basedonthe
not
under
(orawork
rightsorcontest
Program.
basedonthe
the
scopeofthis
basedonit,
your
rightstowork written entirelybyyou;
Program
with
the
Program
License.
under Section2)in
(or
object codeorexecutable
withawork
rather,
the
basedonthe
form
intentisto
Program)ona
under
the
exercise
terms
the
righttocontrol
volumeofa
of Sections 1
the
storageordistri-
and2above
Page 30

30
a)
Accompanyitwith
medium
customarily
b)
Accompanyitwith
distribution, a
customarily
c)
Accompanyitwith
distribution
The
source
code
the
same
You
may
under
You
are
derivative
the
Program),
Each
time
You
code
for
all
special
(compiler,
executableorobject
place
not
copy,
this
License
not
requiredtoaccept
works.
you
are
not
source
However,asa
components
If
distribution of
from
4.
licenseordistribute
you
5.
its
on
basedonit.
6.
distributeormodify
herein.
Warranty Trademarks
the
complete
used
for
awritten
complete
used
and
forawork
modulesitcontains,
the
you
redistribute
the
responsible
machine-readable
for software
the
information
onlyifyou
means
exception,
kernel,
andsoon)ofthe
countsasdistributionofthe
modify,
sublicense,ordistribute
Programisvoid,
will
not
have
These
actions
indicate
your
the
Program
for
corresponding machine-readable
software
offer,
valid
interchange;
you
received
the
the
preferred
plus
the
source
codeismadebyoffering
and
their
licenses
this
License,
are
prohibitedbylawifyoudonot
acceptanceofthis
Program
subjecttothese
(or
enforcing
and
Licenses
source
interchange;
foratleast
copyofthe
receivedasto
programinobject
any
code
operating
will
since
any
compliancebythird partiestothis
or,
three
years,togive
corresponding
or,
the
offertodistribute corresponding
codeorexecutable
formofthe
associated
distributed
source
automatically terminate
terminatedsolongassuch
work
terms
work
interface definition
need
systemonwhich
access
code,
the
Program
you
have
not
Licensetodo
basedonthe
and
conditions.
for
making
not
include
to copy
even
though
exceptasexpressly
your
signed
accept this
so,
and
Program),
You
source
the
it.
code,
which
any
third
party,
code,tobe
form
with
modifications to
files,
plus
anything
fromadesignated
third parties
rights
parties
However,
all
its
may
thatisnormally
executable
are
provided
under
remaininfull
nothing
License.
terms
and
the
recipient automatically
not
impose
License.
mustbedistributed
for a
chargenomore
distributed
suchanoffer,inaccord
it.
Foranexecutable
the
scripts
runs,
unless
not
compelledtocopy
this
License.
else
Therefore,bymodifyingordistributing
conditions
any
under
source
code.
used
to control compilation
distributed
that component itself
place,
then
under
this
However,
compliance.
grants
you
for
receivesalicense
further restrictionsonthe
under
the
than
your
the
terms of
(This
alternativeisallowed
with
Subsectionbabove.)
work,
complete
(in
either
offering equivalent
the
source
License.
copying,
Any
attempt
parties
who
permissiontomodifyordistribute
distributingormodifying
recipients'
termsofSections1and2aboveona
costofphysically
Sections1and2aboveona
source
and
installationofthe
sourceorbinary
accompanies
accesstocopy
along
with
otherwisetocopy,
have
received
the
Program
from
the
original
performing
only
for
code
means
form)
with
the
executable.
the
the
object
copies,orrights,
the
(or
any
the
Programorworks
licensortocopy,
exerciseofthe
source
medium
noncommercial
all
the
executable.
the
major
source
code
code.
modify,
sub-
Program
work
based
rights
granted
from
or
7.
If,asa
consequenceofacourt
you
(whetherbycourt
you
cannot distributesoas
distribute
indirectly
If
wholeisintendedtoapplyinother circumstances.
Itisnot
sole
ous
decide ifheor
This
8.Ifthe
places
among
9.
spirittothe
Each
the
specify a
10.Ifyou
software
guidedbythe
the
through
any
portionofthis
the
purposeofthis
purposeofprotecting
contributionstothe
sectionisintendedtomake
distribution and/or
the
Program
countries
The
Free
Software
present
versionisgiven
optionoffollowing
version
wishtoincorporate partsofthe
whichiscopyrightedbythe
order,
Programatall.
you,
then
sectionisheld
sheiswillingtodistribute software
two
wide
under
not
thus
Foundation
version,
adistinguishing
the
numberofthis
goalsofpreserving
jUdgmentorallegationofpatent
agreementorotherwise)
to satisfy
the
sectiontoinduce
the
useofthe
this
excluded.Insuch
but
terms
simultaneously
For
example,ifa
only
way
invalidorunenforceable
integrityofthe
rangeofsoftware distributed
thoroughly
License
may
may
differindetailtoaddress
and
conditions either of that
License,
Free
patent
you
could
youtoinfringe
free
clear
Programisrestrictedincertain countries eitherbypatentsorby
may
addanexplicit geographical distribution limitation
case,
publish
revised
version
number.Ifthe
you
may
Program
Software
the
free
statusofall
infringementorfor
that
contradict
your
obligations
license
satisfy
bothitand
under
software distribution
through
whatisbelievedtobeaconsequenceofthe
this
choose
any
through
any
License
and/or
any
into
other
Foundation,
derivatives of
the
conditions of this
under
would
any
patentsorother property
other
incorporates
new
versionsofthe
new
Program
versionorof
version
free
programs
writetothe
this
not
permit royalty-free redistributionofthe
this
License
particular circumstance,
system,
that
systeminrelianceonconsistent application of that
system
andalicensee
the
problemsorconcerns.
specifies a
any
ever
publishedbythe
whose
Free
our
free
any
other
License
whichisimplementedbypublic
limitationasif
General
version
later
Software
software
License,
and
wouldbeto
right
cannot
Public
numberofthis
version
distribution conditions
Foundation;wesometimes
andofpromoting
reason
(not
limitedtopatent
theydonot
any
other pertinent obligations,
refrain
entirely
the
balanceofthe
claimsorto contest validity of
impose
restofthis
excluding
writteninthe
License
publishedbythe
Free
Software
excuse
Programbyall
from
distribution of
sectionisintendedtoapply
license
that
choice.
License.
copyrighted interfaces,
those
countries,sothat distributionispermitted
bodyofthis
from
timetotime.
License
which
Free
Software
Foundation.
are
different, writetothe
the
sharing
issues),
you
from
the
thenasa
those
the
any
practices.
system;itisupto
the
License.
Such
appliestoit
Foundation.Ifthe
make
exceptions
and
reuseofsoftware
conditions
conditions of this
consequence
who
receive
Program.
such
claims;
Many
people
original
copyright
new
versions
and
"any
later
authortoask
for
this.
are
imposed
you
copies
and
the
this
section
have
made
the
author/donor
holder
willbesimilar
version",
Program
for
permission.
Our
decision
generally.
on
License.
sectionasa
may
directly
has
who
onlyinor
you
does
If
not
the
gener-
to
in
have
not
will
or
For
be
11.
BECAUSE
LAW.
WARRANTYOFANY
FITNESS
PROGRAM
12.INNO
MODIFY
TALORCONSEQUENTIAL
DATA
PROGRAMS),
THE
EXCEPT
FORAPARTICULAR
EVENT
AND/OR
BEING
PROGRAMISLICENSED
WHEN
PROVE
DEFECTIVE,
UNLESS
REDISTRIBUTE
RENDERED
EVENIFSUCH
OTHERWISE
KIND,
DAMAGES
INACCURATEORLOSSES
STATEDINWRITING
EITHER
EXPRESSEDORIMPLIED,
PURPOSE.
YOU
ASSUME
REQUIREDBYAPPLICABLE
THE
PROGRAMASPERMITTED
ARISING
HOLDEROROTHER
THE
Downloaded From TV-Manual.com Manuals
FREEOFCHARGE,
ENTIRE
RISKASTO
THE
COSTOFALL
OUTOFTHE
SUSTAINEDBYYOUORTHIRD
PARTY
THEREISNO
THE
COPYRIGHT
INCLUDING,
NECESSARY
LAWORAGREEDTOIN
ABOVE,BELIABLETOYOU
USEORINABILITYTOUSE
HAS
BEEN
NO
WARRANTY
WARRANTY
HOLDERS
BUT
THE
ADVISEDOFTHE
NOT
QUALITY
SERVICING,
WRITING
FOR
AND/OR
LIMITED
AND
PERFORMANCEOFTHE
PARTIESORA
POSSIBILITYOFSUCH
THE
OTHER
TO,
THE
REPAIRORCORRECTION.
WILL
ANY
FOR
THE
PROGRAM
FAILUREOFTHE
PROGRAM,TOTHE
PARTIES
COPYRIGHT
DAMAGES,
PROVIDE
IMPLIED
WARRANTIESOFMERCHANTABILITY
INCLUDING
(INCLUDING
DAMAGES.
PROGRAMISWITH
HOLDER,ORANY
EXTENT
THE
BUT
PROGRAMTOOPERATE
PERMITTEDBYAPPLICABLE
PROGRAM
ANY
NOT
LIMITEDTOLOSSOFDATA
"AS
YOU.
OTHER
GENERAL,
SHOULD
PARTY
SPECIAL,
IS"
WITHOUT
WITH
AND
THE
WHO
INCIDEN-
ANY
OTHER
MAY
OR
Page 31

•
.....
MITSUBISHI
ELECTRIC
Website:
www.mitsubishi-tv.com
E-mail:
MDEAservice@mdea.com
For questions, call Consumer Relations
800-332-2119
To
order replacement or additional
remote controls or
IR
emitter cables:
Visit our website www.mitsuparts.com
or call
800-553-7278
SYSTEM RESET
Ifthe TV does not respond to the remote control,
or
control-panel buttons,
power button for about
will not power on/off, hold
10
seconds.
at
The TV will take longer
reset or
Setting changes you made most recently before the
system reset, may be lost.
© 2009 Mitsubishi Digital ElectronicsAmerica, Inc.
853B710B20
Downloaded From TV-Manual.com Manuals
AC
on.
to
power on afterthe system
VLP41IVLP41
+IVLP41++
Page 32

~'TSUBISHI
~CTRIC
•
Required:
Phillips Screwdriver
o
STAND
t Panel HDTV • 151 Series • 153 Series • 249 Series
INSTALLATION
o
Back
1II11111111111111111111111111111111111111111111111111111111111111111111!111
1111111111111111111111111111111111111111111111111111111111111111111111
CJ
LJDD
•
852B230A10
© 2009 Mitsubishi Digital Electronics America, Inc.
Downloaded From TV-Manual.com Manuals
--
VLP41/+/++
Page 33
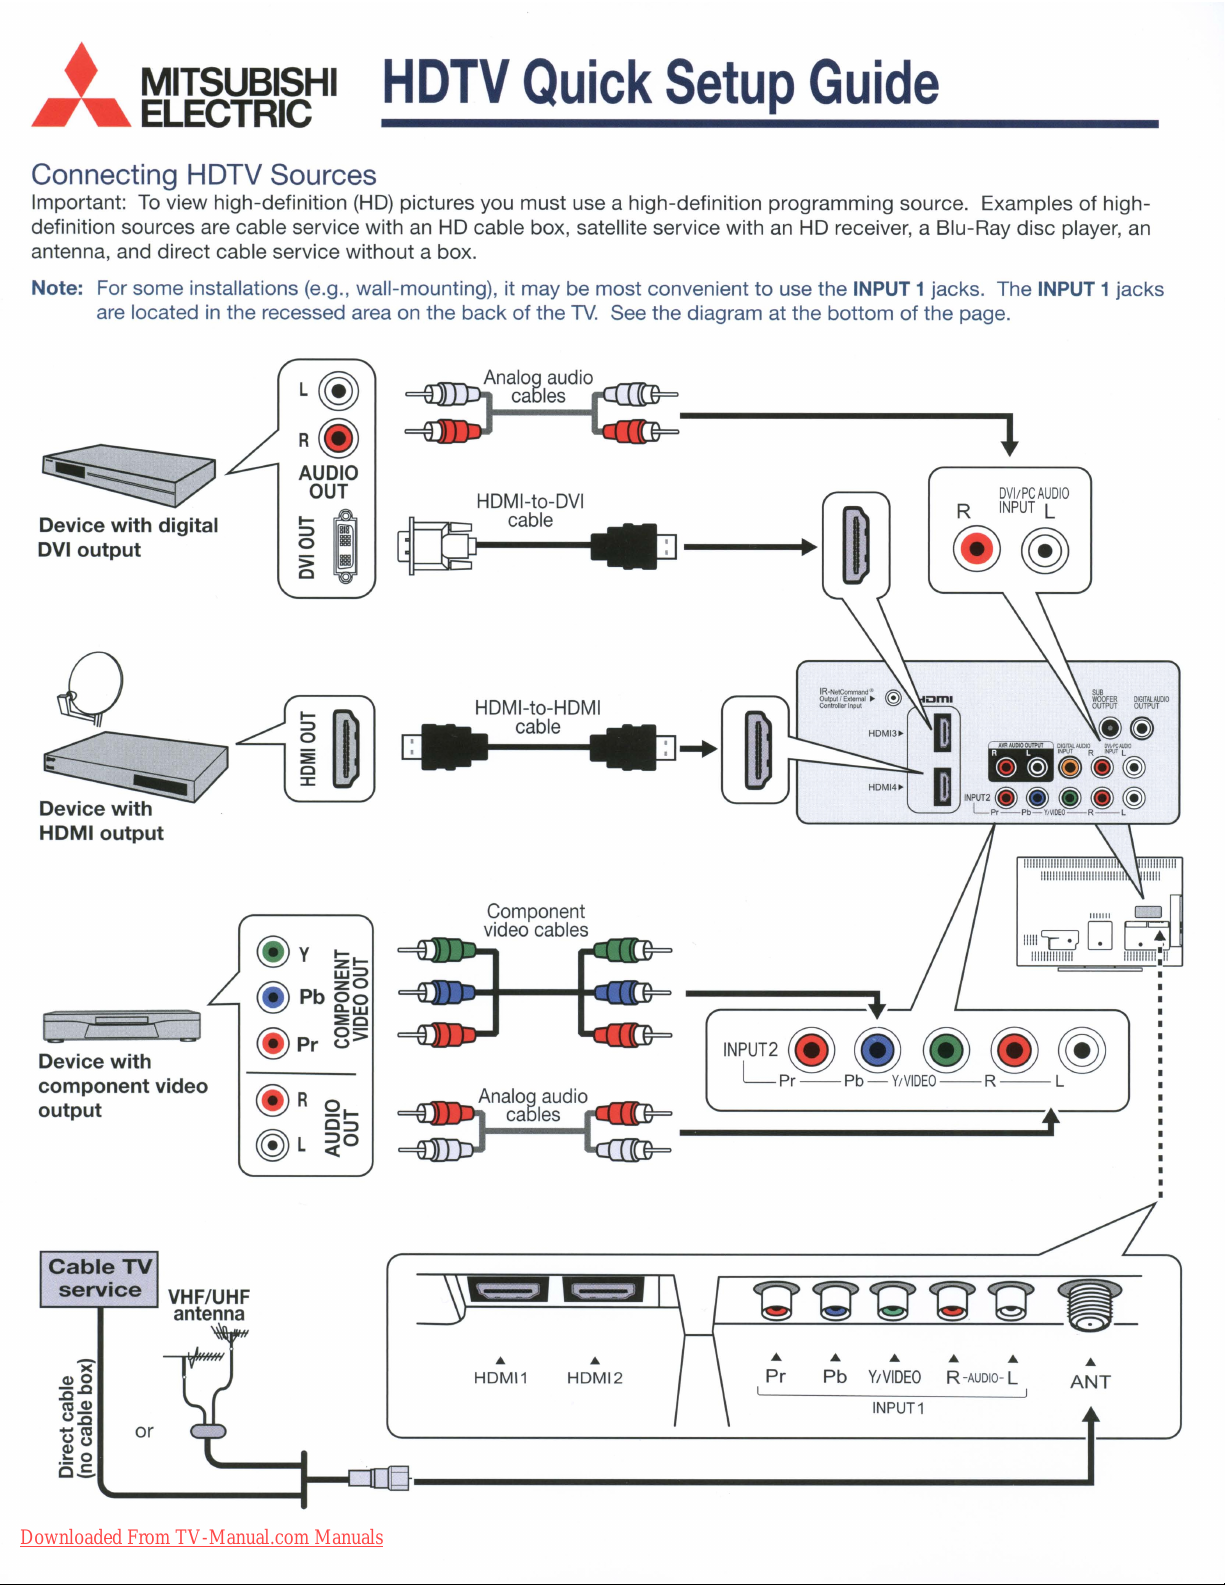
•
....
MITSUBISHI
ELECTRIC
HDTV
Quick
Setup
Guide
Connecting HDTV Sources
Important:Toview high-definition
definition sources are cable service with an HD cable box, satellite service with
antenna, and direct cable service without a box.
Note: For some installations (e.g., wall-mounting), it may be most convenient to use the INPUT 1 jacks. The INPUT 1 jacks
in
are located
the recessed area on the backofthe
(HD)
pictures you must use a high-definition programming source. Examplesofhigh-
an
HD receiver, a Blu-Ray disc player,
TV.
See the diagram at the bottomofthe page.
an
L~
R(I}
AUDIO
Device
DVloutput
with
digital
OUT
~e
c~
HDMI-to-DVI
cable
DVI/PCAUDIO
R
INPUT
(j)@
L
()
~
HDMloutput
Device
component
output
CableTV
with
service
video
VHF/UHF
antenna
Component
video
cables
....
----~
INPUT2~
L Pr
--
________
~ ~
Pb -
Y/VIDEO--R
DMlITAlAUOlO
OUTPUT
•
.~GITAl'UOlO""P"I'"
l!j~~~
INPVT2.
~ ~
Lpr-Pb-Y,VIDEO-R-L
~
--
(I)~
INPUTRlNPIJT
~
~
L
L
~
t
><
(1)0
:o.c
co
(1)
0:0
-co
00
~o
.-
c_
Downloaded From TV-Manual.com Manuals
or
s:
•
HDMI1
•
HDMI2
Pr
•
•
•
Pb
Y/VIDEO
INPUT1
•
R-AUDIO- L
•
•
ANT
t
Page 34

....
•
MITSUBISHI
HDTV
Quick
Setup
Guide
ELECTRIC
Memorizing Channels on the ANT
(Antenna) Input
Save
channelstomemory with achannel
reception ofHDdigital channels. The scan will search for
local channels available
service
only
1.
(no
analog
Press
cable
channels.
MENU.
fromanantenna or direct cable
box).Ifyou
skip this
scantoenable
step,
theTVwill receive
S
e
©!
E:I<9
@-----@:.:;JB
1f~I.A.l~
2. Press
(I
3. Select
4. Highlight Scan
.....
and .......toopen the
menu. Press
Initial
ENTER.
.....
Initial>
~.
••
•
A
T
t
Ant
to an over-the-air antenna.
Select
cable.
completion message before continuting.
Ant
Channel Management
--
Airifconnected
Cable
and
for
press
•
Ant
(able
,
,
.
_-------.
direct
ENTER.
~
11IIIIIIII
Wait
for
Channel
Channel
•
[!II
,
Scan Edit
•
•
•
0 - •
·
,
!
the
Ell
,
,
,
,
,
,
,
,
,
,
•
Setting Up Other Inputs
1.
Connect
whichTVinput
your
devices
jackisused
to the TV, making note
2. Power on all
devicestoensure detection.
e'
3. Power
4.
When
select the
not
Sample
Device Found
S
e e e
r-JQG'\
TheTVwill then display the
for
the
on
the TV.
the
New
device
recognized
New
New
menu
©!
€:-
-I
~
next
connection
e6E:16
r-JQG'\
Device
automatically
DeVice
Found
type
from the listifthe
Found
5. Press
New
it finds.
for
each device.
connected
-@--~
I
menu displays,
device
.
.
-.---
BACK
to
close
the menu.
Device
Found
of
is
..
menu
Selecting a Source
1.
Press
ACTIVITY.
2.
Press"'Yand<llll
to highlight a source.
3.
Press
ENTERtoswitchtothe source.
Downloaded From TV-Manual.com Manuals
853B653A20
to
Watch
...
Identifying HD Broadcasts Received on
the ANT (Antenna) Input
1.
Press
INFO.
2. The status
indicate
analog
(4801),
digital
digital (HD).
Receiving a High-Definition
Digital Signal
display
if
the
standard
standard definition
(SO),
or
[OJ
will
broadcast
definition
high-definition
Tues
9:10
~
6:9
Wide
is
PM
Expand
VLP411+1++
Page 35

Downloaded From TV-Manual.com Manuals
Page 36
Downloaded From TV-Manual.com Manuals
Page 37

Downloaded From TV-Manual.com Manuals
Page 38
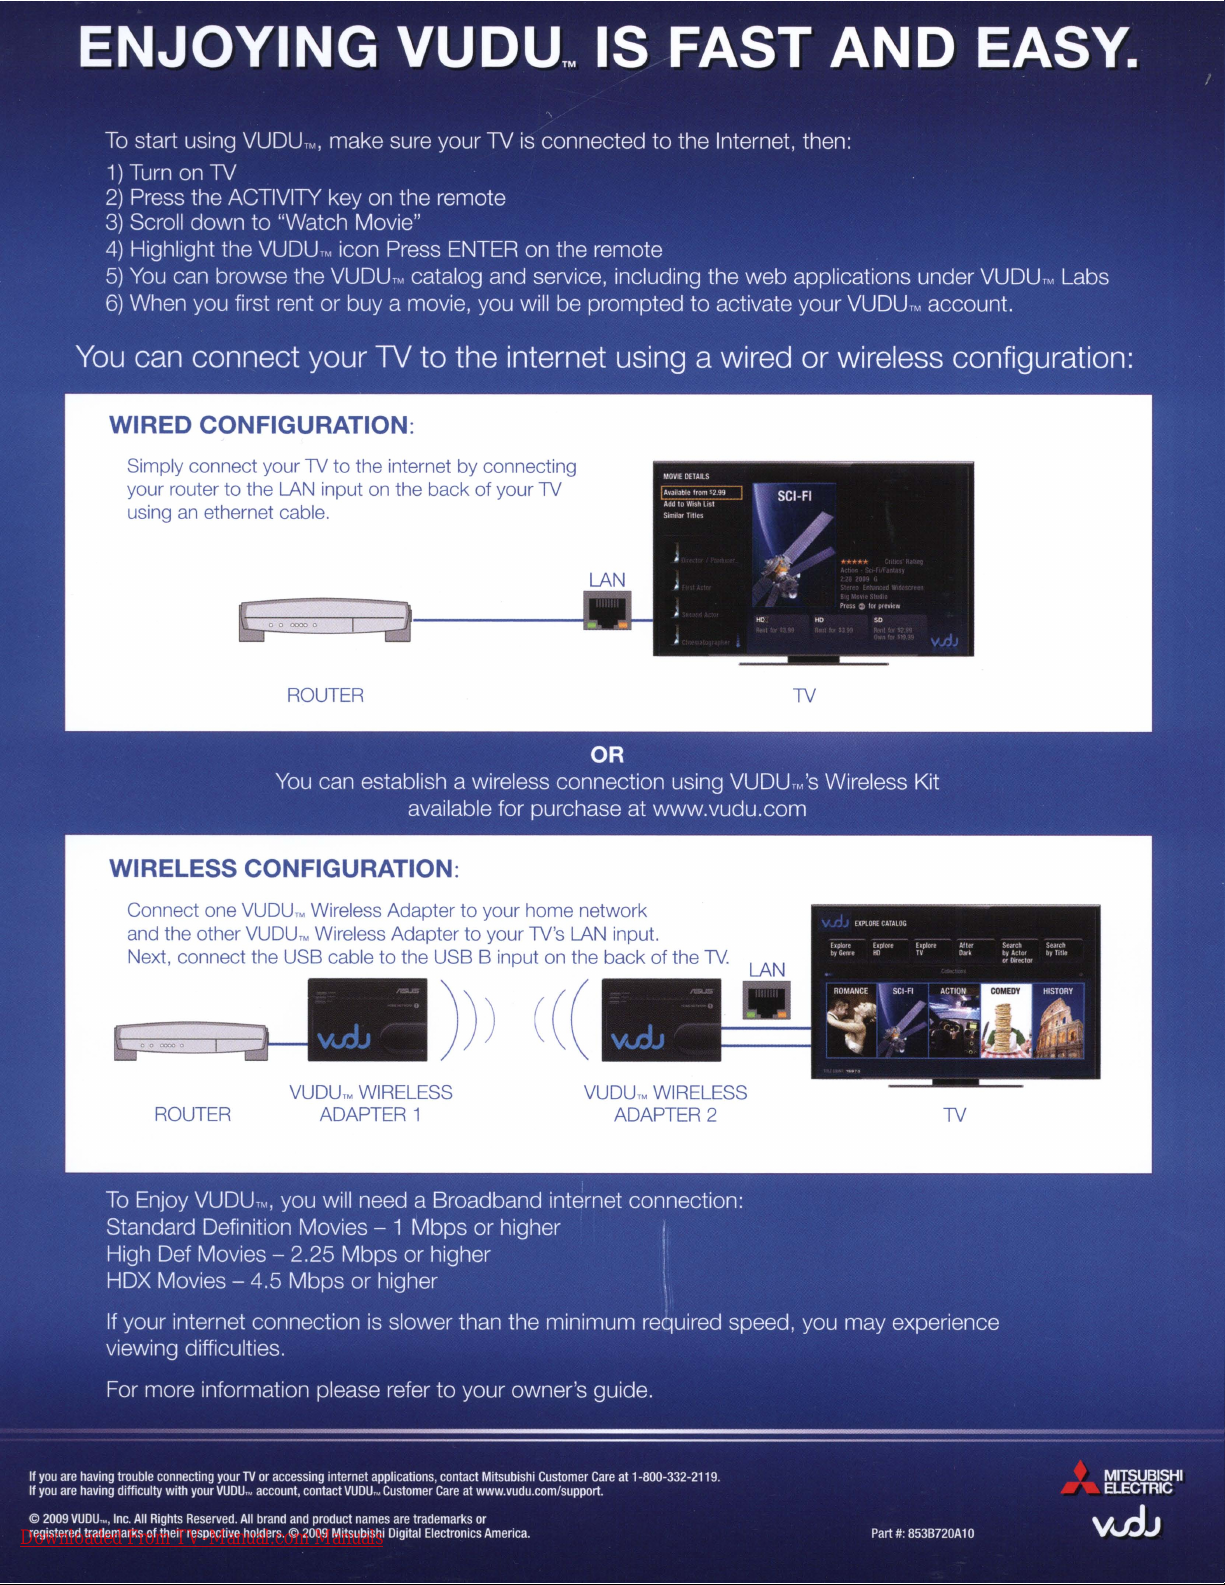
Downloaded From TV-Manual.com Manuals
Page 39

PLEASE
CORRESPONDENCE
MITSUBISHI DIGITAL ELECTRONICS AMERICA, INC.
9351
IRVINE,
SEND
JERONIMO
CA
92618-\
OTHER
TO:
RD.
904
I A L 0 1
PN#
8538700810
•
MITSUBISHI
....
PO
ELECTRIC
BOX
DENVER
1
74268
CO
8021
7-4268
FIRST-CLASS
POSTAGE
REQUIRED
POST
OFFICE
WILL
NOT
DELIVER
WITHOUT
PROPER
POSTAGE.
11,11,111,
•••
1.111.111.
I
II,
1.,1,,111,11111.,1••11'11'11,1'11.1
Downloaded From TV-Manual.com Manuals
Page 40

..
REGISTERING
1.1.DMr.
Fi
E
...............
3.
T-'-P~
(
4.
Yo<.or
...
t n•
dau.
..,.
number:
01
birth:
2.0M....
)
/ /
1.
N
.....
01.--.
........
8.
A.
Do
you h
....
pl
.......
""
1.Dves
II.If_.
_I
you
-,
1.
0 6 me:."Itf'4
2.
0 12 monlhs
9.
Did you
pureh
...ananended
.-.?
1,0Yes
10.
Wl>oot
producu
purch
...
0
"
0
'"
0
"'
00
0
re.
0
00.
0
0
"
11.
Do
you plantoenhance
acquiring
01 a
020-.."""""""
03, 0 OVDpIojo!r 10. 0
04, 0
O!i, 0 HDD\IDpIojoer
06,
0 Anatnn&
07
0
will
?
"""
~
Sote!U~
"""'0'
--
~-
~
~-
--
any
01
the
C8biebo>:
8kH'8y~
Surt'C>u'lcISOU'ICI
-".
12.
Prior
to
making
......
rcft
1.
0
:?,0cneLC<>m
3,
0 MSNtee/'lond
4.0
thlI<
bllow
did
eonsun-repcwts
..-
M-....,C<>m
....
boo
'I"'"
IS
~
purch
tel
....
be
con~
itemII
p
...
·ch
r-'-'-?
EASY.
purch
kiftg
your
...,....
JUST
OR
REGISTER
3.0
Me.
/
,-
.....
;
...
another
2.0Il1o
em.
pu"""."
3, 0
18
0 24
warranty
Il1o
tel
0
"'IV"".""
,"""""
0
Vo:\eo
0
0
""'-
~
0
MitautOhl
A/V"""""'"
VIdeo
0 l:M'I
leh
YlOhoo/Goog!e
monlhs
monlhs
your
game
lI"mf1
of_
4,
2.0
00
00
"
"
"
bllow?
08. 0
09_0~
11. 0 ComPW'l'
12.
5. 0
'.0
, 0
IMPORTANTl
FILL
CUT
THE
4.0M••
Initisl Last neme
40"
or
In
""-
lOt
the
MitaulMhi
purch
...
by
REGISTER
PDRM
BELOW
ONLINE
AT:
WWW.PRODREGISTER.CDM/MITSUBISHI
State/Province
13.
Nor
inr:Juding
lin
~J
of
.........
1.0
:?,
0 0>iId uOOor 1
M.1e
o
1,0
14.
Occupetion/Employment
{d>«J<
ProtasooneVTeemiceI .
lJpfle<
- ma<>agfIrnent
Salea/Mar+.e<:ing
children
,
Noone_"_
F.m.'"
:?O
:?,O
III
thtWY}
m8Mll""'ent,I~
oencavser.;ce~..
T_/M_~/
l"'.,n:"
..
T._/Educator
~
CI:heI'
-..em_
MdU"I
"""'
Sell .mplOye<lfBusinBsll <JWnIII"
Wori<
15.
Which
01 0
02. 0 S15.CCJOS19.999
00.0S20.0::0s29.999
04.
05. 0 S4ClOOO$49.999
06. 0 S5O.OOOS59.999 13. 0
07.
16.
Level
17.
For
18.
Whe1:
19.
When
_""'011"
...........inyour
~fWrce/
, , .
..
.•..._
ft-om
r-.ome
llrouP
~S15.0c()
0 S3UC00S39.999
0 S6IlCCJOS74.999
01
"'ueetion:
1.
0
~l'Ogh"""'"
2.
0
~coIege
3.D~~_
your
,,"mery
1.
0
o..n?
type
of
1 0
~
2,
0
cable
3,0DSL
4,
0
Oi'e'
Wi-Maxl
5
D~
now
products
1,
0 T.r>cItobuysucn
-~?
2 0
T_In_~untiltl>eitemho.been....,...,....1oo"
._-~
YOUR
TO
BE
Zip/PosU.1
.,.,..,...".
wN1:;.elM OEr.mER
and
I""""
Age
'I"S,
'I"S,
NOTIFIED
<JCI.- ..tuIc8 in
M.1e
n.w.:
Ap,.
1,0
OF
code
F.m.1e
o:?o
:?,D
Yoo
0
0
.-
.•.....•.....
_ _ .
_ _ _
_
office.._...._..._
dncribn
internet
broecIbeor<ll.,g,
._1'
••
your
Icr-:l<~level~)
reeidence.
eccendoyou
ttle1: h
on
the
hou~old:
tems
0
0
0
0
0
0
0
0
0
0
0
....
nu.ll.mily
08.
0
S7~.999
09.0
Sl00.CCJQS124,999
lU
0 S,25.CCJQS149,999
11.0
S'50.CCJQS174,999
12.0
S'75.CCJQS199.999
5200£00$249.999
14.0
S25lJ.COjS ......
do you:
2.
0
Rent?
....
_
cr¢c,_
....
!:he
Ietut
m"""e1:.
do
••
I0O<I
III
they
PRODUCT
IMPORTANT
Md
your
Age
.......
"
~.
00.
00. 0
00.
00
"
00. 0
00
"
"
"
".
income?
e1:
hom.?
you
or
....
I A
AGE
0
0
0
0
0
0
0
0
0
0
0
NOW
PRODUCT
LO
1
2.A.
Model
number:
B.ae
numbel':
20.
_'-""
_
___
..-.g.
~_,
...
---,,-you
_-,,-,0
UPDATES
.....
(Please
tor
model end seri.l.......-nber.)
To
help
...
un
pi
....
youOcyouc _
boo
....
Ho_
01.
02.
03, 0
04.
as,
......
indic.~
"'"
0 Gr8ndcflildrM
0
I--io'n
..............
Gort\o<w>g
0 o..n.
0 o..n.
......
06.
0
Cul<ur8l/Prt_
07
0
A.od
os.
09
1U
11.
12. 0
13. 0 Cr'eIta
14. 0
,-'
15.
16, 0 T...........
17.0
18, 0
19, 0
20.
m-dntl
21.
22.
:?3.
24.
:?!i 0
26.
27.
--
28. 0
29.
3U0W_efE
31.
......
32.
33.
34. 0
35.
36.
37.
38.
39.
4U
...
-...
.....
_dhn.ft<om.
-.
0
6ibIe/~
0 Goo.<met
0 Wines
0
Att,I
AnuQuo
Stomp/Coin
Sewingf-';KN::U>g
0
.4rine
F<>n:Iign
Crvioeo!lop~
RV
YlIoC8\iono
0 c..oinogombling
....
0 Sl'Gpping
0 Sl'Gpping
0
Use
Cf'<l<k
0 Donote In
~~making~
0 Contesu/9M!epolt&keo
0 1--Io.rUIQI$I>ootIng
Rshing
0
C&mpingIHoking
0 BootinWS&ing
"-
0
~1
0 Wallcingloo"hoaOh
Heot/VNOlut'OI_
0
Oi«inIVw~
0
SeIl""'P"O""mont
0
GoO'
0
Boking
0 &'owboerdingISnow
0
r-=AR
...
""'""'
..
10
...
T!w'o4'
__
......~...
AND
SPECIAL
Mitsubishi Digital
Elecltonics
AJnerica
LT-52153
reh!c
to
outer
t:&"""
und
our
the
...
dog
cot
"'edO'og
<XlOi<ingIFine_
Wb/F""lL>e<lt
USA
VlI\oeI
Monew
tJy
tJy
",,"rUble
__
cu._re'
inu
....ts.nd
njoy
""rticip.ti"ll
...-...Y,I~
.....ding
coIocung
oolIe<:ting
fIVer"
oat8IogI
mail
inWneO:
"".-.;to
""V'JIorty
CIIUS<lS
a HMICIl
fitneos(&er=o
control
slUing
""'
__
~.y-----
__
OIW
__
lI"<9"""you
......
...
------,,--
OFFERS.
loc.
MODEL
SERIAL
or
bacI<
panel
lifnl:yln,
ae:tMtieeinwhich
on.
Ot'de<
youoo
.._fllIlO_"
___
......
.......-
""""'"""'_
_oo_",.,..
01
product
""llu'.r
_
...
..
Downloaded From TV-Manual.com Manuals
Co!>'frilIht
__
0
1000
.....
1IigII"
..
_
,0.._
.......
'
 Loading...