

Mitox 2800, 3600 Owner's Manual

OWNER’S MANUAL
PETROL BRUSH CUTTER
2800 AND 3600
USER MANUAL, MAINTENANCE INSTRUCTIONS
AND SPARE PARTS
READ THIS MANUAL CAREFULLY BEFORE OPERATING THE MACHINE
WARNING:
THIS SYMBOL INDICATES IMPORTANT SAFETY PRECAUTIONS

1
DESCRIPTION
U
1 BLADE 3 Point blade for grass, weed or brush cutting applications.
2 DRIVE SHAFT Contains the drive shaft.
3 THROTTLE TRIGGER Spring loaded to return to idle when released.
4 IGNITION SWITCH Slide switch, forward to run, back to stop.
5 SAFETY LEVER Prevents accidental operation of the throttle.
6 HANDLE This handle can be adjusted for maximum comfort
7 HARNESS ASSEMBLY Fully adjustable for maximum comfort
8 PETROL CAP
9 PURGE BULB Push the purge bulb to remove the air from the fuel system.
10 FUEL TANK Contains fuel and fuel filter
11 AIR CLEANER Contains replaceable filter
12 CHOKE To help in cold starting
13 STARTER HANDLE Pull to start the engine
14 DEBRIS SHIELD Helps protect the operator from debris
15 CUT-OFF KNIFE Cuts the nylon line to the correct length
16 NYLON CUTTER HEAD Contains replaceable nylon trimming line
17 FRONT HANDLE This handle can be adjusted for maximum comfort
18 GEARBOX For attaching a blade or nylon head to
19 REAR HANDLE Incorporating throttle trigger, switch, and safety lever
20 HARNESS FIXING POINT Fixing point to attach the harness
21 BLADE COVER Blade cover for transportation
L HANDLE
U HANDLE

2
TABLE OF CONTENTS
DESCRIPTION...........................................................................................................1
SAFETY SYMBOLS...................................................................................................3
WARNINGS IN THE MANUAL.......................................................................................4
EXPLANATION OF SYMBOLS ON THE MACHINE......................................................4
ASSEMBLY OF THE BRUSH CUTTER ....................................................................5
INSTALLATION OF THE GUARD..................................................................................5
INSTALLATION OF THE NYLON HEAD.......................................................................5
INSTALLATION OF THE 3 TOOTH BLADE..................................................................6
INSTALLATION OF THE HANDLE ASSEMBLY............................................................7
SAFETY PRECAUTIONS ..........................................................................................8
INTRODUCTION............................................................................................................8
WORK CLOTHING AND SAFETY EQUIPMENT...........................................................8
SAFETY AND OPERATION ..........................................................................................9
SAFE HANDLING OF FUEL..........................................................................................9
BEFORE OPERATING THE BRUSH CUTTER.............................................................9
BEFORE STARTING THE ENGINE ..............................................................................9
AVOID NOISE PROBLEMS.........................................................................................10
SAFETY WHEN USING THE BRUSH CUTTER..........................................................10
TWO-STROKE FUEL...............................................................................................10
FUEL STORAGE .........................................................................................................11
FUELLING....................................................................................................................11
OPERATION ............................................................................................................11
STARTING THE ENGINE............................................................................................11
STOPPING THE ENGINE............................................................................................12
USING THE BRUSH CUTTER.....................................................................................13
3-POINT BLADE ..........................................................................................................13
SPARK PLUG ..............................................................................................................14
AIR FILTER..................................................................................................................14
CARBURETTOR..........................................................................................................14
STORAGE....................................................................................................................15
GEAR CASE................................................................................................................15
LINE HEAD ..............................................................................................................16
SPECIFICATION......................................................................................................17
TROUBLESHOOTING.................................................................................................18
MAINTENANCE SCHEDULE...................................................................................19
CONDITIONS OF WARRANTY ...............................................................................20

3
SAFETY SYMBOLS
Warning: Danger, Caution
Read the documentation and safety instruction s which are provided
in this user manual.
When operating this machine, use protective equipment such as
goggles, helmet, and ear defenders.
Wear security shoes and gloves.
Beware: Keep hands and feet away from moving parts. Always
keep a safe distance from the cutting parts.
Hot surface: Risk of burn.
Danger: Risk of intoxication.
Danger: Risk of fire or explosion
Directive 2000-14/CE: Guaranteed noise levels
Beware of objects being thrown from the operating zone
Warning: Keep all people, animals and vulnerable objects at least 15
metres from the working area.
360°
1
5
m
5
0
f
t

4
TAKING CARE OF WARNING LABELS
• Always keep warning labels clean and free of scratches, which might make them illegible or difficult to
read. If the warning labels provided with your brush cutter become damaged, peel off, or otherwise
become illegible or difficult to read, order new labels from the authorised servicing deale r and replace the
damaged labels. When applying new labels, first wipe away any dirt and dry the surface before applying
the new label in the same place as the original label.
WARNINGS IN THE MANUAL
• This mark indicates instructions which m ust be followed in order to prevent ac cidents which could lead to
serious bodily injury or death.
• This mark indicates instructions which must be follo wed, or it leads to mechanical failure, breakdown, or
damage.
• This mark indicates hints or useful directions in the u s e of the product.
EXPLANATION OF SYMBOLS ON THE MACHINE
• For safe operation and maintenance, symbols are carved in relief on the machine:
FUEL TANK
Fuel tank 2 stroke mix
Position: Fuel cap
CHOKE OPERATION
Starting mode when the engine is hot (choke off).
Position: Air cleaner cover.
Starting mode when the engine is cold (choke on).
PUMP
Air purge bulb
Purges air from the carburettor
Position: Air cleaner cover
5
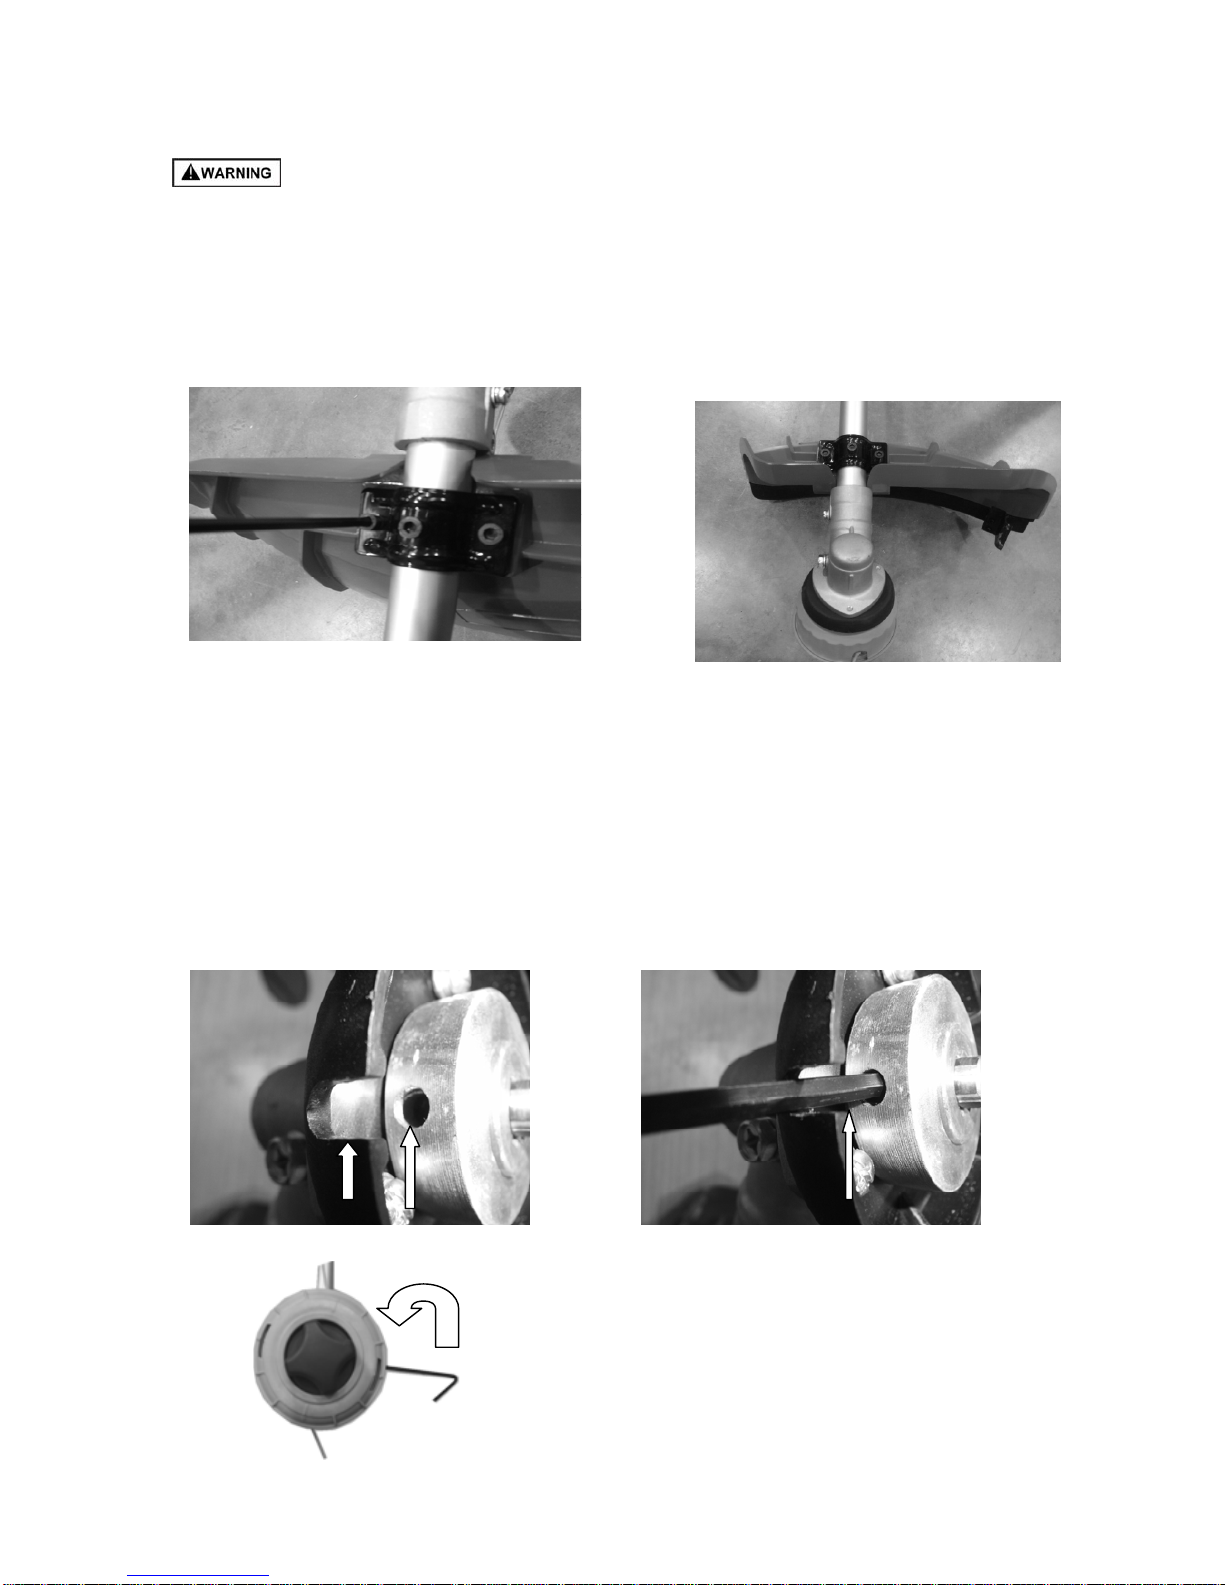
ASSEMBLY OF THE BRUSH CUTTER
The blade fitted to the guard is sharp and can cause injury, always wear gloves
INST ALLATION OF THE GUARD
• Place the brush cutter with the head facing down.
• Fit the shield using the bracket and 3 X M5x16 screws Fig1 & Fig 2.
INST A LLA TION OF THE NYLON HEAD
• Lay the brush cutter on its back with the gearbox shaft facing up.
• Rotate the gearbox shaft until the hole in the holde r A lines up with the slot in the plastic guard Fig 3.
• Insert the Allen key into the hole in the gearbox cover and into holder A Fig 4.
• Screw the nylon head anti-clockwise (turn left) Fig 5 onto the threaded shaft on the end of the gearbox.
• Make sure that the nylon head is securely locked in position.
• Remove the Allen key.
Fig1 Fig
2
Fig 3 PLASTIC GUARD HOLDER A
Fig 4 ALLEN KEY
Fig 5 SCREW THE HEAD ANTI-CLOCKWISE
6
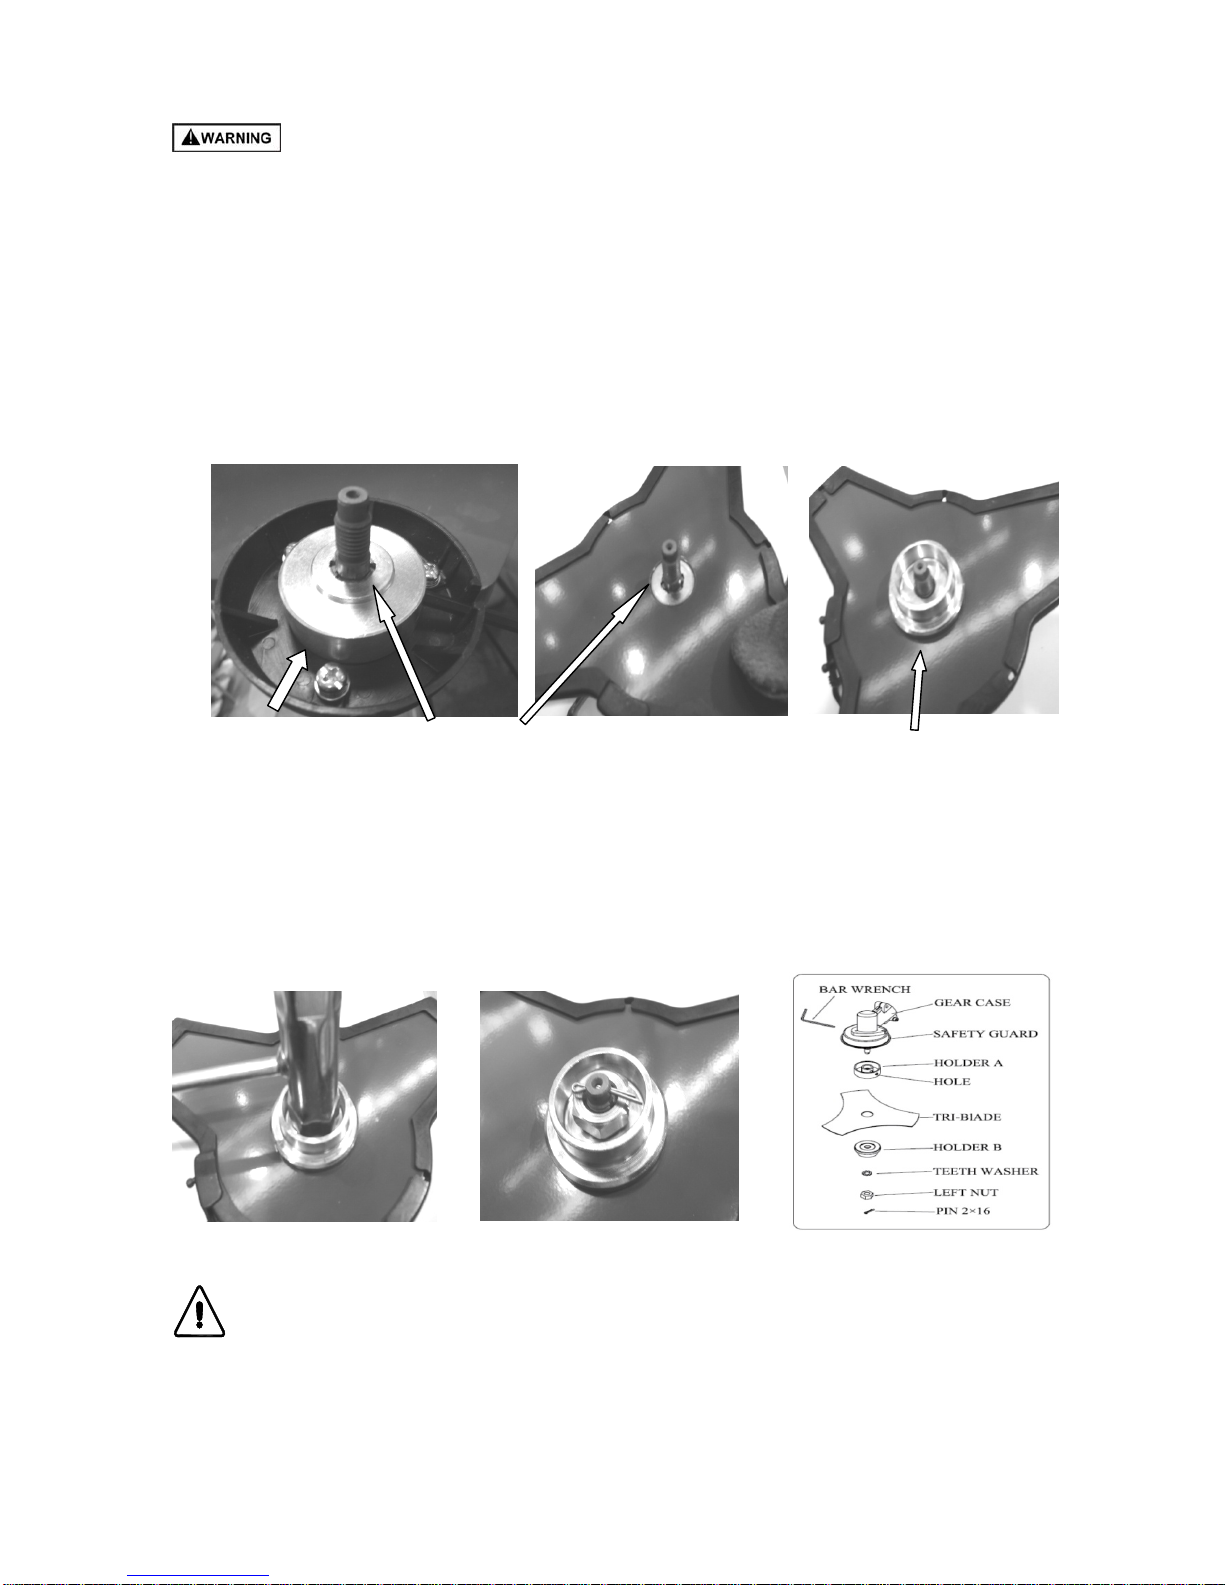
INST ALLA TION OF THE 3 TOOTH BLADE
Always wear gloves when touching the blade
• Lay the brush cutter on its back with the gearbox shaft facing up.
• Rotate the gearbox shaft until the hole in the holder A lines up with the slot in the plastic guard Fig 3.
• Insert the Allen key into the hole in the gearbox cover and into holder A Fig 4.
• Place the 3 tooth blade on the holder A, centring the blade on the raised centre Fig 6 & Fig 7.
Fig 6
HOLDER A RAISED CENTRE
Fig 7 Fig 8
HOLDER B
Fit the holder B Fig 8 and then the washer.
• Screw the nut anti-clockwise (turn left) and tighten using the spanner provided Fig 9.
• Make sure that the blade is completely and safely locked in position, and there is no space between the
blade and the blade holder.
• Fit split pin fig 10.
• Remove the Allen key.
THE BLADE MUST BE CORRECTLY POSITIONED OTHERWISE SERIOUS DAMAGE AND
INJURY TO PERSONS AND PROPERTY COULD RESULT.
Fig 9
Fig 10
7
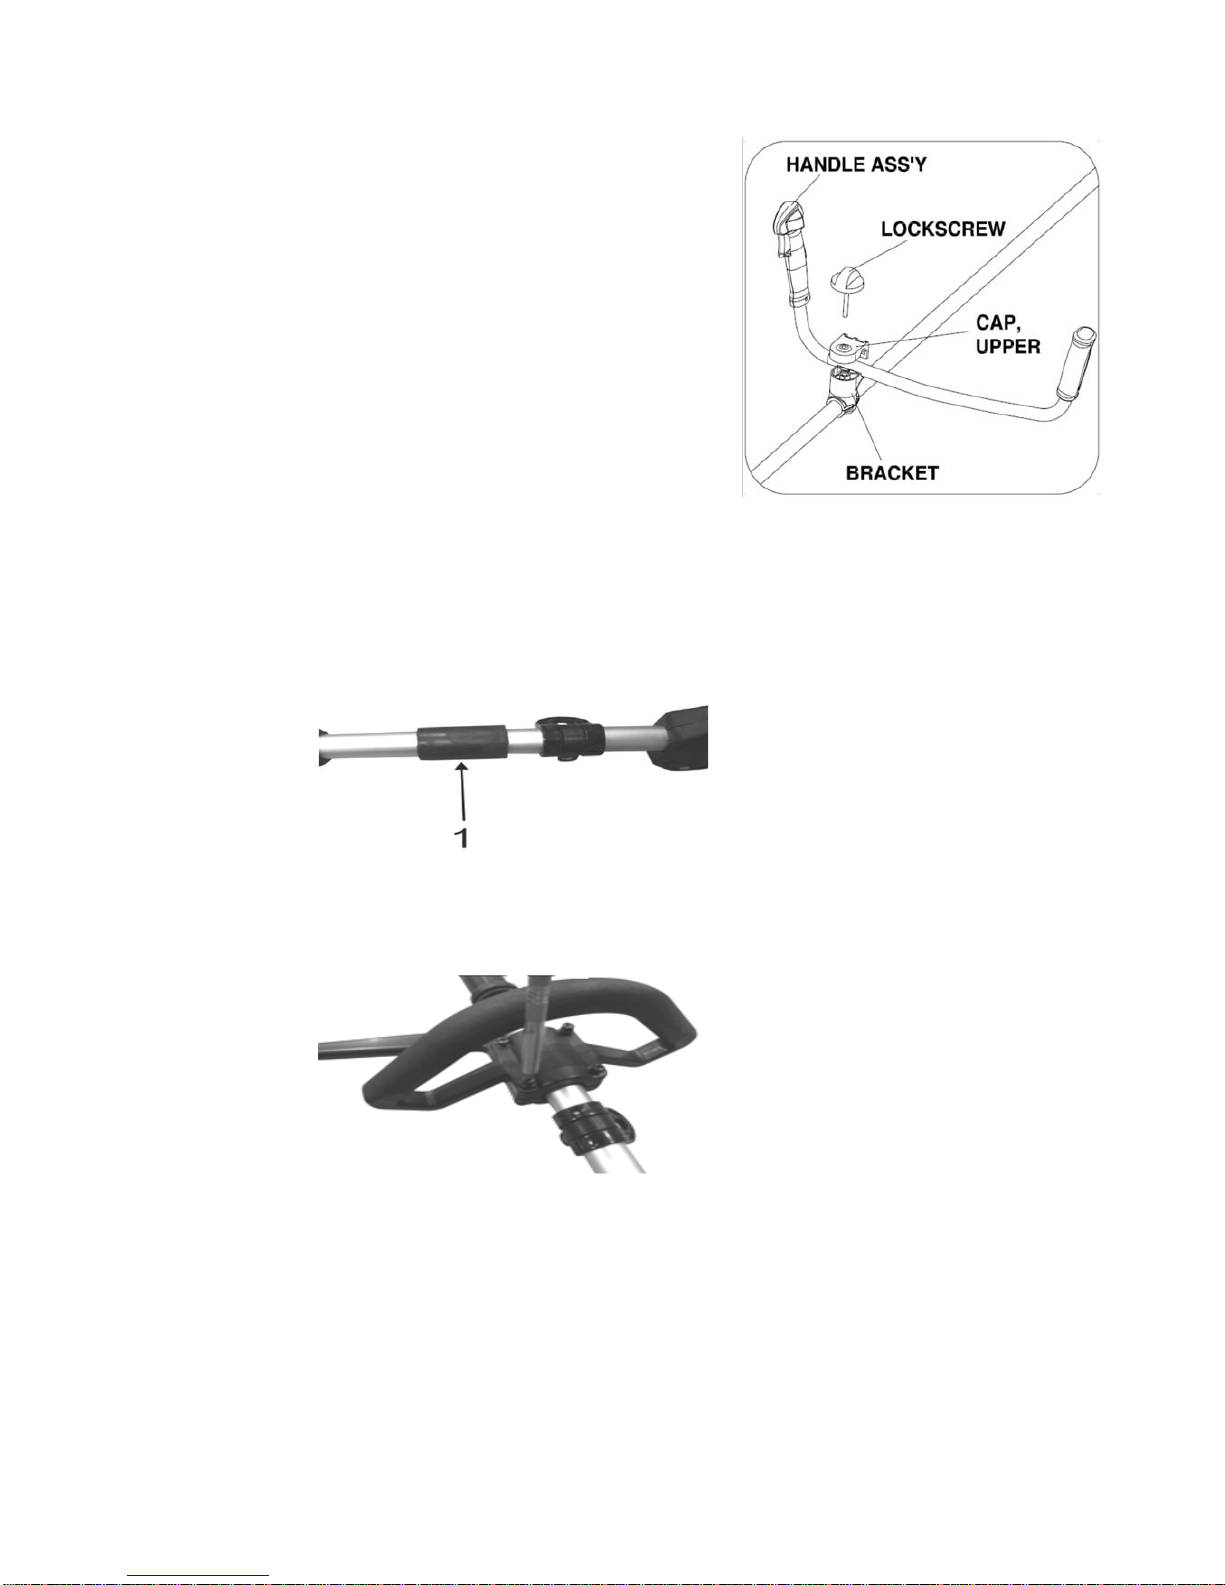
INST ALLATION OF THE HANDLE ASSEMBLY
• Remove the upper cap from the bracket by undoing the
Lockscrew Fig 11.
• Install the handle assembly, upper cap to the bracket and
secure using the Lockscrew.
• Ensure that the controls are located on the right and adjust
the handle for maximum comfort before securing.
FITTING OF THE L HANDLE
• Fix the loop-handle to the shaft over the rubber block provided 1, Fig 11A. Adjust to a comfortable working
position then tighten the fixing screws securely Fig 11B.
Fig 11A
Fig 11B
Fig 11

8
SAFETY PRECAUTIONS
INTRODUCTION
• Read this Owner/Operator Manual carefully. Be sure you understand how to op erate this brush cutter
properly before you use it. Failure to do so could result in serious injury.
• Keep this manual handy so that you may refer to it later whenever any
questions arise. Also note that you are able to contact the dealer from
whom you purchased the product for assistance.
• Always include this manual when selling, lending, or otherwise
transferring the ownership of this product.
• This product has been designed to be used as a brush cutter/grass
trimmer for cutting fresh growth and it should never be used for any other
purpose, doing so could result in unforeseen accidents and injuries
occurring.
• This brush cutter is equipped with extremely sharp blades, always wear sturdy
gloves when handling the blades.
• When using this brush cutter for the first time, take the brush cutter to a wide,
clear, open space, start the engine, and practice handling the brush cutter until
you are sure that you will be able to handle it properly in actual operation.
• You should never use this brush cutter when under the influence of alcohol,
suffering from exhaustion or lack of sleep, suffering from drowsiness as a result
of having taken medicine, or at any other time when your judgement might be
impaired or that you might not be able to operate the brush cutter properly and in
a safe manner.
• Never allow children or anyone unable to fully understand the directions given in this manual to use this
brush cutter.
• When planning your work schedule, allow plenty of time to perform the work and allow plenty of time for
rest. Limit the amount of time you continuously use the brush cutter to 30~40 minutes per session and
take 10~20 minutes of rest between work sessions. Also, try to keep the total amount of work
performed in a single day to 2 hours.
• Never run the engine indoors as the exhaust gases contain harmful carbon monoxide.
Never use the brush cutter in conditions as described below:
• When the ground is slippery or when other conditions exist which might make it difficult to maintain a
steady posture while using the brush cutter.
• At night, at times of heavy fog, or at any other times when your field of vision is limited and it would be
difficult to gain a clear view of the area where the brush cutter is to be used.
• In heavy rain, during lightning storms, at times of strong or gale-force winds, or at any other times when
weather conditions might make it unsafe to use this product.
• Lack of sleep, tiredness, or physical exhaustion results in lower attention spans, and this in turn can lead
to accidents and injury.
WORK CLOTHING AND SAFETY EQUIPMENT
When using the product, you should wear proper clothing and protective equipment.
• Helmet
• Protection goggles or face protector
• Ear protectors
• Thick work gloves
• Non-slip sole work boots
• When using your brush cutter, always wear strong, durable,
work clothing; shirts should be long-sleeved and trousers
should be full-length.
 Loading...