

Mitel Networks AQUA1 User Manual
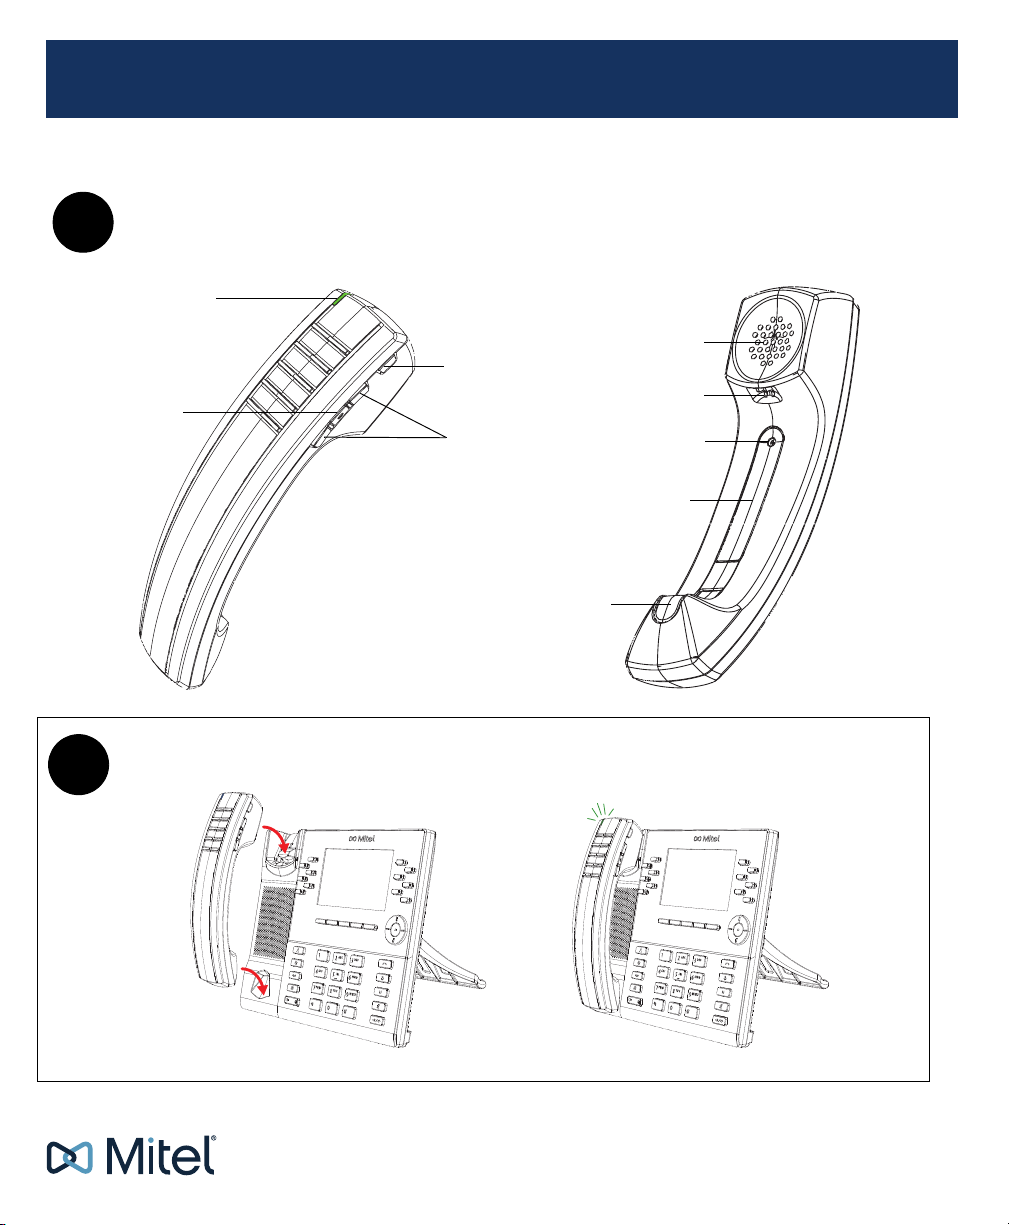
Hardware Features
B
Charging the Handset
Hookswitch Key
Volume
Mute Key
LED Indicator
Speaker
Charging
Microphone
Contacts
Control Keys
Battery
Cover
Screw
INSTALLATION GUIDE
INSTALLATION GUIDE
MITEL CORDLESS BLUETOOTH HANDSET
A
The Mitel word and logo are trademarks of Mitel Networks Corporation.
Any reference to third party trademarks are for reference only and Mitel makes no representation of the ownership of these marks.
Mitel’s Power Over Ethernet (PoE) Powered Device (PD) products are covered by one or more of the U.S. patents (and any foreign patent
counterparts thereto) identified at Mitel’s website: www.mitel.com/patents.
For more information on the PD patents that are licensed, please refer to www.cmspatents.com.
© Copyright 2016, Mitel Networks Corporation. All Rights Reserved.
Important Safety Instructions and Precautions
WARNING: DO NOT CONNECT DIRECTLY TO THE PUBLIC SWITCHED
TELEPHONE NETWORK (PSTN). ANY CONNECTION OF THIS UNIT TO
AN OFF PREMISE APPLICATION, AN OUT OF PLANT APPLICATION, ANY
OTHER EXPOSED PLANT APPLICATION, OR TO ANY EQUIPMENT
OTHER THAN THE INTENDED APPLICATION MAY RESULT IN A SAFETY
HAZARD, AND/OR DEFECTIVE OPERATION, AND/OR EQUIPMENT
DAMAGE. ‚"EXPOSED PLANT" MEANS WHERE ANY PORTION OF THE
CIRCUIT IS SUBJECT TO ACCIDENTAL CONTACT WITH ELECTRIC
LIGHTING OR POWER CONDUCTORS OPERATING AT A VOLTAGE
EXCEEDING 300 V BETWEEN CONDUCTORS OR IS SUBJECT TO
LIGHTNING STRIKES.
WARNING:
SPECIFIED MITEL EQUIPMENT.
WARNING: THIS PRODUCT’
MAGNETIC AND MAY PICK UP SMALL METALLIC OBJECTS, SUCH AS
26/6 GAUGE STAPLES. PLEASE CHECK THE EARCAP REGION FOR
METALLIC OBJECTS BEFORE USE.
WARNING:THE BLUET
CHARGE ONLY WITH SPECIFIED METHODS ACCORDING TO
MANUFACTURER’S INSTRUCTIONS. DO NOT OPEN THE HANDSET,
DISPOSE OF IN FIRE, OR SHORT CIRCUIT - MAY IGNITE, EXPLODE,
LEAK, OR GET HOT CAUSING PERSONAL INJURY.
CAUTION: T
fire if exposed to high temperatures or fire, opened, or disassembled.
CAUTION: I
charge, shut off power to the IP phone, flood the area with water. LITH-X or
copper powder fire extinguishers, sand, dry ground dolomite or soda ash may
also be used.
When using your phone equipment, basic s
followed to reduce the risk of fire, electric shock and injury to persons, including
the following:
• Do not use this product near water, for example, near a bath tub, wash
• Avoid exposing the product to rain or other liquids.
• Do not use the phone and Bluetooth accessories to report a gas leak in the
Maintenance and Repair: T
handset. For repairs, return the handset to an authorized Mitel dealer.
These notices may appear on the product or
DANGER
WARNING
CAUTION
This symbol may appear on the product:
THE BLUETOOTH HANDSET IS FOR USE ONLY WITH
S HANDSET EARCAP REGION IS SLIGHTLY
OOTH HANDSET CONTAINS A BATTERY.
he battery in the Bluetooth Handset can explode, leak or catch
f fire or explosion occurs when the Bluetooth Handset is on
afety precautions should always be
bow
l, kitchen sink or laundry tub, in a wet basement or near a swimming
pool.
vic
inity of a leak.
here are no user serviceable parts inside the
in the technical documentation:
Danger indicates an imminently hazardous situation which, if not avoided,
will result in death or serious injury.
Warning indicates a potentially hazardo
could result in death or serious injury.
Caution indicates a potentially hazardous s
may result in minor or moderate injury and/or damage to the equipment
or property.
The exclamation point within an equilateral triangle indicates that important
operating and maintenance (servicing) instructions are included in the literature
!
accompanying the product.
us situation which, if not avoided,
ituation which, if not avoided,
Description
Congratulations on your purchase of the Mitel Cordless Bluetooth Handset!
Compatible with the Mitel MiVoice 6930 and 6940 IP phones, the Mitel Cordless
tooth Handset employs the same enhanced audio capabilities as the Mitel
Blue
corded handsets but without the curly cord tethering users to their desks.
With the Mitel Cordless Bluetooth Handset, users are free to move around when
n a call – no more missed calls when they step away from their desk to go to
o
the printer or speak to a colleague a few desks away. With a potential range of
up to 10 meters (30 feet), the Mitel Cordless Bluetooth Handset offers
convenience and corridor mobility for Mitel MiVoice 6930 and 6940 IP
phone users.
The Mitel MiVoice 6930 and 6940 IP phones support the following modulations
SK,
PI/4, 8DPSK along with BLE:
GF
• The transmit supported power is up-to 8dBm for the CSR8615 and
9.5dBm for the CSR8811 with level control.
• Tune up tolerance the frequency tolerance of the crystal is +/-100m, which
we are calibrat
crystal is +/- 10ppm, aging is +/-1ppm/year (max 2).
ing to within 1-2ppm. The temperature fluctuation of the
Features
• Compatible with the Mitel MiVoice 6930 and 6940 IP phones
(optional for the Mitel MiVoice 6930 IP phone, included with the
Mitel MiVoice 6940 IP phone)
• Hookswitch (Initiate call/end call) key
• Volume control keys
•Mute key
• Built-in handset ringer
• LED indicators to indicate both connectivity and charging status
• At least six hours talk time
• Over 40 hours standby time
• Handset battery recharge time of three hours or less
• Operating range of up to 30 feet (10 meters) from the IP phone
• Wideband audio capable
Supporting Documentation
To access phone and system-specific documentation:
1. In your browser, go to www.mitel.com.
2. Click Pr
3. Select PDF
4. In the left-hand menu, navigate to T
oduct Manuals under the Support section
drop-down menu.
Guides and Online Help under the End User Documents
elephones.
2
Hardware Features (See Figure A)
Feature Description
LED indicator Blue -
Hookswitch key Lifting the handset from the cradle activates
Mute key Mutes the handset microphone so that your caller cannot hear
Volume control
keys
NOTE:
The Mitel Cordless Bluetooth Handset must be fully charged before
use. This will typically take three hours. A new, fully-charged handset battery
Indicates the status of the handset.
Indicates the status of the handset battery.
Green -
handset is already out of the cradle, pressing the Hookswitch key
is equivalent to taking the handset off hook.
Pressing the key again is equivalent to placing the handset on
hook.
Pressing the Hookswitch key while on a speakerphone call moves
the call to the handset.
you.
Adjusts the volume for the handset. Press the key above the Mute
to increase the volume and press the key below the mute key
key
to decrease the volume.
the handset. If the
has a talk time of six hours.
LED Indicators
The Mitel Cordless Bluetooth Handset has two LEDs:
• Blue – indicates the operational status of the handset.
• Green – indicates the status of the electrical charge of the battery.
LED color, states
LED
Color
Blue
(Handset
no
t in
cradle)
Green
(Handset
cradle)
in
*NOTE:
off. Winking denotes the LED is alternating between being on for a short period
of time and then off for a longer period of time. Fading denotes the LED is
alternating between fading in and out.
, and indicator descriptions are as follows:
*LED
State
Blinking The handset is not connected and is in pairing mode.
Winking The handset is connected but not in use.
Fading The handset is connected and in use.
Solid The battery is fully charged.
Winking The battery is charging.
Off When the handset is cradled and the LED does not flash or
Indicates
It is normal for the handset LED to cycle between
Note:
winking and solid as battery charge is maintained.
illum
inate, this indicates an absence of battery power. During
the first 30 to 60 minutes that the light is off, the battery may
be trickle charging. If that is the case, the LED will resume
normal behavior within that 60 minute period. If the LED
remains off for more than 60 minutes, then either the battery
is no longer chargeable or there is a problem in the charging
circuit.
Blinking denotes the LED is alternating very quickly between on and
On-Screen Battery Indicator
The battery level is also indicated on-screen in the status bar. Icons and
descriptions are as follows:
Icon Description
Battery is fully charged.
Battery is two-thirds charged.
Battery is one-third charged.
Warning - low battery (within 20 minutes of battery life left).
Critical warning - low battery (within 2 minutes of battery life left).
Note: To continue with a
level, switch to speakerphone or headset mode and then charge the
handset by placing the handset on the cradle (see Figure B).
call when the battery of the handset reaches this
Alerting Tones
The Mitel Cordless Bluetooth Handset provides the following alerting tones:
Event Tone
Power OFF Four tones successively decreasing in pitch
Mute key on handset ON Two low pitched tones
Powering On/Off the Handset
To power on the Mitel Cordless Bluetooth Handset place the handset on the IP
phone’s cradle.
To power off the Mitel Cordless Bluetooth Handset, press the Ho
for approximately six seconds until the LED indicator turns blue and then turns
okswitch key
completely off.
Pairing the Handset with the Mitel MiVoice 6930 IP Phone
1. Ensure the Mitel Cordless Bluetooth Handset is powered on.
To check if the
NOTE:
take the handset off the IP phone’s cradle and check the LED indicator.
handset’s blue LED blinks when it is in pairing mode.
2. Press the (Settings) key on the phone to enter the Static
Settings me
3. Navigate to the Blue
4. Ensure Bluetooth functionality is enabled
Turn On softkey to enable Bluetooth functionality.
5. If required, press the down navigation key to view the list of A
Devices.
6. Press the right navigation key to move to the Bluetooth device selection
umn.
col
7. Using the up and down navigation keys, highlight Cord
press the Pair softkey. The phone attempts to pair the Bluetooth handset
and if successful, automatically attempts to connect.
If pairing or connecting fails, a failed error message displays on screen.
NOTE:
Press
Retry
attempt.
Mitel Cordless Bluetooth Handset is in pairing mode,
nu.
tooth setting and press the Select softkey.
. If it is not enabled, press the
to attempt to pair or connect again, or
Cancel
The
vailable
less Handset and
to cancel the
3
8. Press OK to acknowledge the successful connection. The MWI indicator
on the phone flashes blue when successfully connected and the handset
LED starts to wink. The connected Bluetooth handset is added to the list
of Paired Devices and is ready to use.
Pairing the Handset with the Mitel MiVoice 6940 IP Phone
1. Ensure the Mitel Cordless Bluetooth Handset is powered on.
To check if the Mitel Cordless Bluetooth Handset is in pairing mode,
NOTE:
take the handset off the IP phone’s cradle and check the LED indicator. The
handset’s blue LED blinks when it is in pairing mode.
2. Press the (Settings) key on the phone to enter the Static
Settings menu.
3. Tap the Bl
4. Ensure Bluetooth functionality is enabled. If it is not enabled, swipe the
5. If required, tap A
6. Tap Cord
NOTE:
screen. Tap
attempt.
7. Tap OK to acknowledge the successful connection. The MWI indicator on
For information on handset usage, refer to the respective Mitel MiVoice 6900
Series IP Phone User Guide.
uetooth icon.
tooth toggle switch
Blue
functionality.
Bluetooth devices.
to pair the Bluetooth handset and if successful, automatically attempts to
connect.
If pairing or connecting fails, a failed error message displays on
the phone flashes blue when successfully connected and the handset
LED starts to wink. The connected Bluetooth handset is added to the list
of Paired Devices and is ready to use.
vailable Devices to view the list of discoverable
less Handset to start the pairing process. The phone attempts
Retry
to attempt to pair or connect again, or
to the right to enable Bluetooth
Cancel
to cancel the
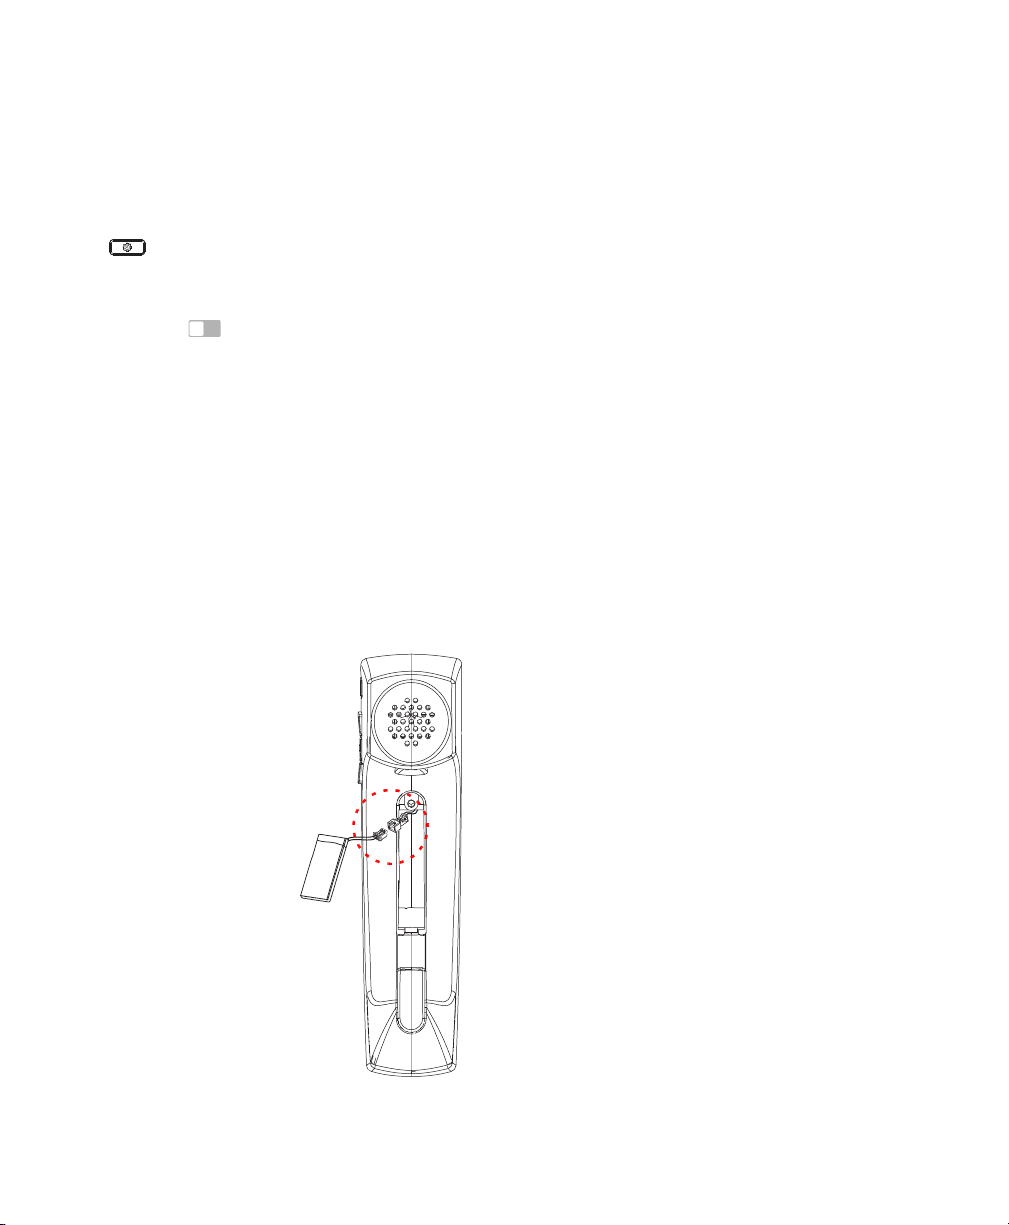
Replacing the Battery
Your Mitel Cordless Bluetooth Handset uses
a 350maH Lithium-Ion Polymer
rechargeable battery. If your Mitel Cordless
Bluetooth Handset fails to hold a charge, it
may be time to replace the battery.
WARNING: US
APPROVED REPLACEMENT BATTERY
(PART NUMBER 50006764).
To replace the battery:
1. Locate the battery cover (see Figure A).
2. Unscrew the battery cover screw using
a Philli
the battery cover.
3. Remove the old battery pack from the
ba
the red and black wired connector from
the plug located in the battery
compartment.
4. Connect the new battery’s red and black
wired con
carefully place the new battery in the
battery compartment.
5. Place the battery cover back on the
ha
attached to the battery cover.
E ONLY A MITEL
ps PH1 screwdiver and remove
ttery compartment by disconnecting
nector to the plug and
ndset and and fasten using the screw
(LiPo)
Notice to Canadian Customers
IC: 173A-AQUA1
This device complies with Industry Ca
Operation is subject to the following two conditions: (1) this device may not
cause interference, and (2) this device must accept any interference, including
interference that may cause undesired operation of the device.
This Class B digital apparatus complies with Canadian ICES-3 (B)/NMB-3(B).
nada license-exempt RSS standard(s).
Avis aux clients canadiens
IC: 173A-AQUA1
Le présent appareil est conforme aux C
appareils radio exempts de licence. L'exploitation est autorisée aux deux
conditions suivantes : (1) l'appareil ne doit pas produire de brouillage, et (2)
l'utilisateur de l'appareil doit accepter tout brouillage radioélectrique subi,
même si le brouillage est susceptible d'en compromettre le fonctionnement.
Cet appareil numérique de la classe B es
Canada.
NR d'Industrie Canada applicables aux
t conforme à la norme NMB-003 du
RF Exposure Canada
This device is compliant to the RF exposure requirements in Industry Canada
RSS-102 issue 5.
Exposition RF Canada
Conformité des appareils de radiocommunication aux limites d'exposition
humaine aux radiofréquences (toutes bandes de fréquences)
Notice to U.S. Customers
FCC ID: EHTAQUA1
This device complies with part 15 of the FCC Rules. Operation is subject to the
ollowing two conditions: (1) This device may not cause harmful interference,
f
and (2) this device must accept any interference received, including
interference that may cause undesired operation.
This equipment has been tested and found to comply with the limits for
NOTE:
a Class B digital device, pursuant to Part 15 of the FCC Rules. These limits are
designed to provide reasonable protection against harmful interference in a
residential installation. This equipment generates, uses, and can radiate radio
frequency energy and, if not installed and used in accordance with the
instructions, may cause harmful interference to radio communications.
However, there is no guarantee that interference will not occur in a particular
installation. If this equipment does cause harmful interference to radio or
television reception, which can be determined by turning the equipment off and
on, the user is encouraged to try to correct the interference by one or more of
the following measures:
• Reorient or relocate the receiving antenna.
• Increase the separation between the equipment and receiver.
• Connect the equipment into an outlet on a circ
which the receiver is connected.
• Consult the dealer or an experienced radio/
Changes or modifications not expressly approved by Mitel Networks™
NOTE:
Corporation may void the user’s right to operate the equipment.
The handset provided with this equipment is hearing aid compatible.
This equipment is not for connection to the telephone network or public coin
hone service. It is only for use when connected to Mitel systems.
p
WHEN PROGRAMMING EMERGENCY NUMBERS AND (OR) MAKING
EST CALLS TO EMERGENCY NUMBERS
T
• Remain on the line and briefly explain to t
call.
• Perform tests during off-peak hours such as
uit different from that to
TV technician for help.
he dispatcher the reason for the
early morning or late evenings
4
 Loading...