

Page 1
MODEL
/
USER GUIDE
Page 2

Table of Contents
Introduction ..................................................................................................1
Methods of installation ................................................................................1
Setting up the 480i CT ................................................................................. 2
Administrator level options in the 480i CT .................................................. 2
Network ................................................................................................................ 2
SIP Settings .......................................................................................................... 3
Phone Status ........................................................................................................ 3
Customizing Your 480i CT Cordless Handset ........................................... 4
Accessing Options ......................................................................................4
Intercom ............................................................................................................... 4
Language ............................................................................................................. 4
Ring Tone ............................................................................................................. 4
Custom name ....................................................................................................... 5
Table of Contents
Call timer .............................................................................................................. 5
Vibrate .................................................................................................................. 5
Handset Pairing .................................................................................................... 5
Key Lock On or Off ............................................................................................... 5
Backlight ............................................................................................................... 5
Silent Alert ............................................................................................................ 6
Aastra 480i CT Web Client ..........................................................................7
Configuring the 480i CT IP phone .............................................................. 8
Network ......................................................................................................8
To change whether DHCP is used ........................................................................8
To configure the networks settings .......................................................................8
TFTP Server settings ..................................................................................8
To set the TFTP server’s address .........................................................................9
Programming Feature Key ........................................................................10
Programming Guideline ............................................................................10
Feature Key Web Interface .......................................................................11
Web Page Language Support ..................................................................11
Using your 480i CT Base Station ............................................................. 12
Hard keys ..................................................................................................12
Softkeys ....................................................................................................12
Idle State ..................................................................................................12
Connected State .......................................................................................12
Multiple Line and Call Appearances .........................................................12
Services ....................................................................................................13
Icom Key ...................................................................................................13
Redial Key ................................................................................................13
Using the 480i CT Cordless Handset ....................................................... 14
Idle Mode ..................................................................................................14
Handset Icons and Status Messages .......................................................14
Screen Icons ......................................................................................................14
Status Messages ................................................................................................ 15
Handset Keys ...........................................................................................15
Page 3

Table of Contents
Softkeys ............................................................................................................. 15
Talk /Hold Key .................................................................................................... 15
Hold Key ............................................................................................................. 15
Release Key ....................................................................................................... 15
Mute Key ............................................................................................................ 15
Redial Key .......................................................................................................... 15
Feature Key List ................................................................................................. 16
Menu List ............................................................................................................ 16
Multifunction Handset LED Indicator ........................................................16
Battery Charging .......................................................................................16
Volume Control .........................................................................................17
Directory – 480i CT Cordless Handset ..................................................... 17
Entering Characters and Numbers .....................................................................17
Adding Record to Directory ................................................................................18
Callers List – 480i CT Cordless Handset ..................................................19
Dialing from Callers List ..................................................................................... 20
Saving Item to Directory ..................................................................................... 20
Deleting Item from Callers List ...........................................................................20
Making Calls from 480i CT Base Station .................................................21
Dialling a Number ..................................................................................... 21
Using Handsfree Speakerphone ..............................................................21
Using a Headset .......................................................................................21
Intercom (Yet to be Implemented) .............................................................22
Redial .......................................................................................................22
Mute ..........................................................................................................22
Receiving Calls .........................................................................................22
Handling Calls ..........................................................................................22
Transferring Calls ......................................................................................23
Ending Calls .............................................................................................24
Additional Features ...................................................................................24
Making Calls from 480i CT Cordless Handset ........................................ 25
Pre-dialling a Number ...............................................................................25
Using a Headset .......................................................................................25
Receiving Calls .........................................................................................25
Call Privacy ...............................................................................................25
Ending Calls .............................................................................................26
Pairing and Unpairing Cordless Handset to Base ..................................27
Pairing Handset ........................................................................................ 27
Unpairing Handset ....................................................................................28
Troubleshooting ........................................................................................30
Appendix A: Parameter Settings ..............................................................31
Appendix B: Sample configuration files .................................................36
Limited Warranty ....................................................................................... 37
Table of Contents
Page 4

Introduction
This guide compliments the Aastra
Model 480i CT Installation Guide that
is included with the phone. Please
refer to the installation guide for
information on hardware
requirements, features and physical
set up of your new 480i CT.
Software Prerequisites
• Permission to register at the IP PBX
• Access to a Trivial File Transfer
Introduction
Protocol (TFTP) server
Methods of installation
The software set up and installation
for 480i CT can be through the user
interface available from the phone
itself or through the AASTRA 480i CT
WEB CLIENT web interface.
When the 480i CT is initialized for the
first time, DHCP is enabled by default.
The DHCP server passes information
to the IP phone so that it can configure
itself for subsequent IP PBX address
and normal runtime operations.
Note:
• If you are planning on using
Dynamic IP addresses, make sure a
DHCP server is running on your
network
• If you are not planning on using
Dynamic IP addresses, refer to section 5,”Configuring the 480i CT IP
phone” on how to set up an IP
address manually
• Make sure a TFTP server is set up
on your network and can accept
connections anonymously
Warning:
phone while the phone is initializing or
downloading firmware.
Do not reset or turn off the
1
Model
/
User Guide
Page 5

Setting up the 480i CT
When the 480i CT is first plugged in or
reset it will automatically download
any firmware updates for the phone.
The binary and configuration files that
are required for the 480i CT are:
firmware.st, aastra.cfg, <mac>.cfg.
“Appendix A: Parameter Settings”
page 31 consists of all the parameters
that can be set for the 480i CT phone.
“Appendix B: Sample configuration
files”
on page 36 consists of some
sample configuration files with all the
basic parameters that need to be set in
order to register the IP phone at the PBX.
1.
Make sure the TFTP server’s
address is configured on the 480i
CT. For details on how to set the
TFTP server setting for the 480i CT,
please refer to section
the 480i CT IP phone”
2.
Copy the firmware file “firmware.st”
to the root directory of the TFTP
server. This firmware file is downloaded only when it is newer than
the one the phone is currently using.
3.
Copy the Aastra configuration file
“aastra.cfg” and <mac>.cfg file to
the root directory of the TFTP server.
Accessing the phone’s Options list:
1.
Press the
phone to enter the options list
2.
Use the
through the list of options
3. Press the Show softkey, the 4 button
or press the number corresponding
to the option to select and option
4. Use the softkeys to change a
selected option
5. Press the Done softkey at any time to
save the change and exit the current
option
6. Press the Cancel softkey, the 4
button or the y button at
any time to exit without saving the
changes
w
s and r to scroll
“Configuring
on page 8.
button on the
on
Administrator level options in the
480i CT
From the phone, administrator level
options include all settings under 8.
Network, 9. SIP Settings and 4.
Factory Default options found under
10. Phone Status option. When
attempting to access these options, the
phone will prompt for the
administrator passcode before
allowing access. The default password
for the administrator is “22222”.
Network
If DHCP is used/enabled, all the
Network settings will be
automatically configured. The 480i
CT’s firmware allows the network
settings to be manually entered if for
any reason the phone cannot populate
any of the settings with DHCP
enabled. If DHCP is not used/
disabled the following network
settings can be configured.
1. DHCP - Turns DHCP on or off. IP
Address, Subnet Mask and Gateway
options are automatically populated
and are read only when DHCP is
used. DHCP is used by default
2. IP Address - The phone’s IP
address. To assign a static IP
address to the phone, disable DHCP
3. Subnet Mask - To assign your own
subnet mask to the phone, disable
DHCP
4. Gateway - To assign your own
gateway IP address, disable DHCP
5. DNS - To assign your own DNS
addresses, disable DHCP
6. TFTP Server - The IP address of the
TFTP server. To assign your own
TFTP server’s IP address, disable
DHCP
Setting up the 480i CT
Model
/
User Guide
2
Page 6

SIP Settings
If you have a proxy server or have a
SIP registrar present at a different
location than the PBX server, the
following settings may need to be
changed.
1. Proxy IP - The proxy server’s IP
address
2. Proxy Port - SIP proxy server’s port
number. By default this number is
set to 5060
3. Registrar IP - Set this to the IP
address of the registrar
4. Registrar Port - SIP registrar’s port
number. By default this is set to 5060
5. Log IP - The IP address of the
computer to which the messages
should be sent. This setting is used
for debugging purposes only.
6. Log Port - The port number that the
Setting up the 480i CT
log messages will be sent. This
setting is used for debugging
purposes only
Note: Configuring the Log IP and Port
does not log the messages sent to or
received by the phone automatically.
A software application that listens to
the port and at that Log IP is necessary to handle the data that is sent.
7. User Name - This is used for
communication purposes in the SIP
protocol
8. Display Name - The string that
should be used to display on the
480i CT. Some PBX systems use this
for the display and some overwrite
this with the string that is set in the
system
9. Auth Name - The authorization
name that is used to register at the
IP PBX
10.Password - The password that is
used to register at the IP PBX
Note: The IP PBX administrator creates the
Auth Name and Password. Contact
your IP PBX administrator to obtain
this information.
Phone Status
1. Network Status
Shows the network status of the
two Ethernet ports at the back of
the phone. You can also view the
phone’s IP and MAC addresses.
a. IP Addr - Shows the IP address
of the phone
b. MAC Addr - The MAC or the
hardware address of the 480i CT’s
Ethernet card
2. Firmware Version
Gives the firmware version
information that is installed
currently on the 480i CT
3. Reset Phone
Reboots the phone. A reset may be
necessary when the network
settings or the settings for the
extension on the IP PBX system are
modified
4. Factory Default
Sets the phone back to the factory
default settings including the
network settings. Performing this
operation will lose all modified
settings
Note: For information on other settings in
the options list of the phone, please
refer to the Aastra 480i CT Installation
Guide provided with the 480i CT.
3
Model / User Guide
Page 7

Customizing Your 480i CT
Cordless Handset
When in an idle state, pressing the
Menu key ÂÂÂÂ of the handset will
present the following list of options.
Once in the menu list the user can
scroll up ÏÏÏÏ and down ÂÂÂÂ using the
scrolling keys to see each option.
Item # Menu list
1 Intercom
2 Language
3 Ring tone
4 Custom name
5 Timer Off
6 Vibrate Off
7 Hset pairing
8 Key lock Off
9 Backlight Off
10 Silent Alert
Note: The display will return to idle if no
action/activity is initiated within 20
seconds.
Accessing Options
Pressing the ÂÂÂÂ key will access the
options list menu. This action results
in displaying a Menu list header with
brief list navigation instructions .
Menu
use´½to view
Navigation of the menu is performed
using the down arrow ( ∂ key) or the
up arrow ( ç key). Shortcut to the
menu item can also be performed by
pressing the corresponding menu item
number. Two digits numbered items
can be short-cutted by pressing the
digits within a one second time span.
Pressing the ∫ key will quit the Menu
and return to the idle mode or call
mode.
Intercom
The 480i CT supports intercom
function between a 480i CT base and
any of its paired cordless handsets,
and vice versa.
Pressing Select while viewing this
option will bring up a list of base and
paired handsets available for
intercom. To select a handset or base
to intercom, navigate to the desired
handset or the base using the ÂÂÂÂ key
or the ÏÏÏÏ key. Then press the Call soft
key. Shortcut to any handset or base in
the list is permitted by pressing the
corresponding numeric key digit; the
order of the list is numbered from zero
(0) for the base (0) and four (4) for the
4th handset in the list.
Language
The prompt on 480i CT handset can be
personalized to English, French, or
Spanish language. A checkmark
beside the language indicate the
currently selected language prompt.
In English?
´½
= Scroll
Cancel Select
Ring Tone
There are 4 selectable Ring tones
available on the 480i CT handset. A
checkmark beside the ring tone
number indicate the currently selected
ring tone.
Ring Tone 1
´½
= Scroll
Cancel Select
Customizing Your 480i CT Cordless Handset
Model / User Guide
4
Page 8

Custom name
Custom name allows the user to
personalize the name/label for the
cordless handset. In a multi-handset
environment, this is an ideal option to
personalize each handset to its user or
extension number.
To customize the name:
1. Press ÂÂÂÂ .
2. Navigate to Custom Name or press
4.
3. Press the Change softkey.
4. Press the Edit softkey. If a custom
name already exists, the Delete
softkey will be presented.
5. Using the keypad, type out a new
label or use the scroll keys ÏÏÏÏ and
ÂÂÂÂ to move the cursor to the desired
display position or to erase text.
6. The ChCase softkey is available to
toggle between upper and lower
case text entry.
7. Press the Save softkey to save the
name.
8. Press the Goodbye ∫ key to return
to the main idle screen.
Note: In editing mode, the Volume Bar can
be used in place of the
keys to control the screen cursor.
Pressing the Lower end volume bar
for Backspace/Erase; and pressing
the Higher end volume bar to add a
Space.
ÏÏ
ÏÏ
and ÂÂÂÂ
Vibrate
The Vibrate option allows the handset
to signal an incoming call by vibrating
as well as ringing. By default, this
option is always Off.
• To enable this feature, press the
Change softkey and the display will
indicate "Vibrate On" and "confirmed-" and will quickly
return to the previous menu
display.
• Once the Vibrate is On, p icon is
shown beside the ringer icon on the
top right line of the display.
• Pressing the ∫ key will return you
to the main idle display screen.
Handset Pairing
All handsets must be paired to a 480i
CT base before it can be used. Please
refer to the section entitled “Pairing
and Unpairing Cordless Handset to
Base” on page 27.
Key Lock On or Off
The key lock option enables the user
to lock the keypad keys. This prevents
accidental activation of the phone.
To lock the keys from the key lock
option page:
• Press Change softkey to turn Key
lock ON or OFF. The screen will
display Key lock On or Key lock Off
-confirmed-.
Pressing the ∫ key will return you to
Call timer
When the call timer is enabled, the
timer starts from the first call and
continues until all calls have been
released.
Note: The call timer is not usable for call
accounting since the timer continues
to increment even when the call is on
Customizing Your 480i CT Cordless Handset
hold.
the main idle display screen.
Note: You can activate the Key Lock Off or
On by pressing only the
the**** key from the idle screen.
ÂÂ
ÂÂ
and then
Backlight
The Backlight option allows the user
to turn on or off the backlit light on the
LCD display.
Press Change softkey to turn Backlight
ON or OFF.
5
Model / User Guide
Page 9

Once the Backlight option is chosen,
the screen will display Backlight On
or Backlight Off -confirmed-.
Silent Alert
The Silent Alert option will activate an
internal hardware vibrator instead of a
regular ringer during an incoming
call. By default, the Silent Alert is
automatically set to Off.
To activate Silent Alert from the option
display:
• Press Change softkey to turn alert
On or Off. The display will show
–confirmed-.
• Once the Alert is On, p icon is
shown on the top line of the
display.
Note: You can activate or deactivate the
Silent alert by pressing only the
key and then the
Note: The Ringer Icon does not appear on
the display when the Silent alert is
On.
# key.
ÂÂ
ÂÂ
Customizing Your 480i CT Cordless Handset
Model / User Guide
6
Page 10
Aastra 480i CT Web Client
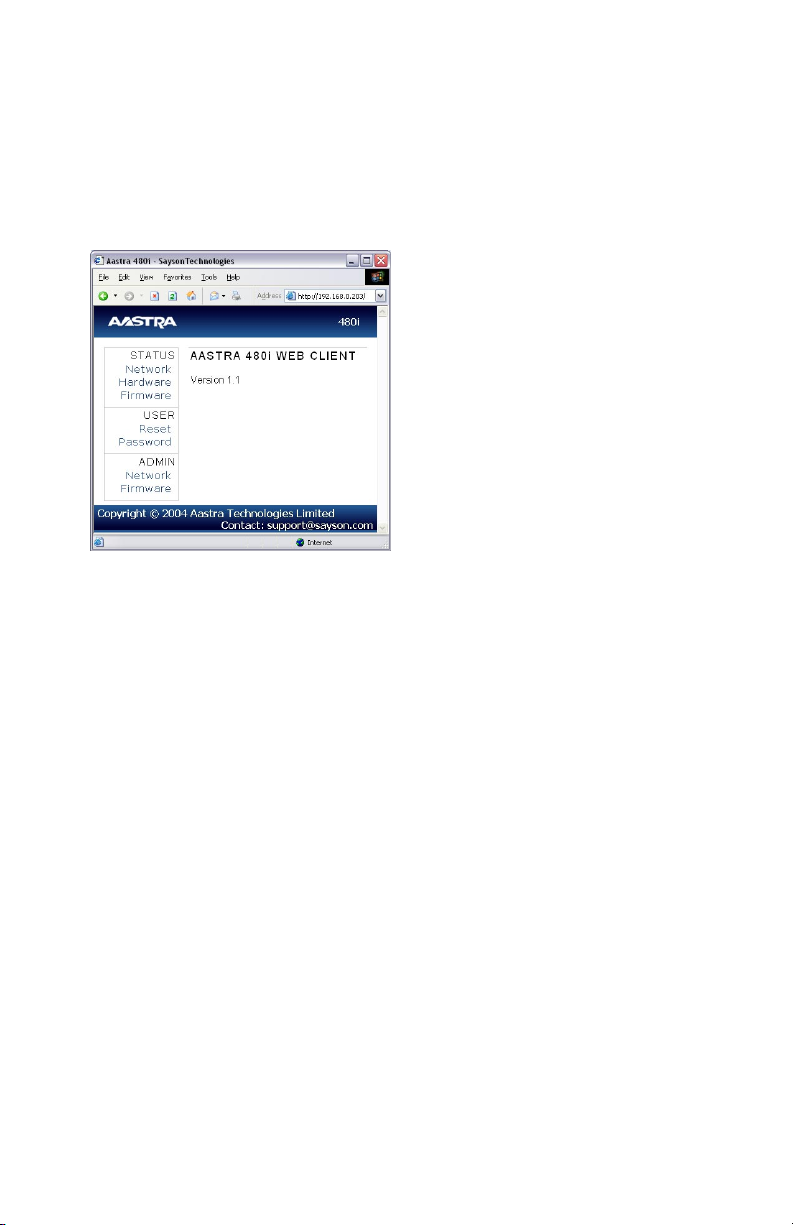
To access the AASTRA 480i CT WEB
CLIENT, open your web browser
(supports Internet Explorer and Gecko
engine based browser like firefox or
mozilla) and enter the phone’s IP
address into the address field, starting
withthe web prefix http://
In the side menu of the AASTRA 480i
CT WEB CLIENT, there are three main
categories: STATUS, USER and
Aastra 480i CT Web Client
ADMIN.
• The STATUS category contains
read only status information for
sub-categories Network, Hardware
and Firmware.
• The USER category contains user
configurable sub-categories Reset
and Password. This section is
accessed through their user level or
the administrator level user name
and password (You’ll be prompted
when one of these options is
selected). For more information,
refer to the Aastra 480i CT Adminis-
trator Guide .
• The ADMIN category contains
administrator only configurable
sub-categories: Network and Firmware. This section is accessed
through the admin level user name
and password (You’ll be prompted
when one of these options is
selected). For more information,
refer to section “Configuring the
480i CT IP phone” on page 8.
For the administrator, the default user
name is “admin” and password is
“22222”, and for the user, the default
user name is “user” and the password
field is left blank. The passwords can
be changed using the web client or by
using the phone’s SIP Settings option.
7
Model / User Guide
Page 11

Configuring the 480i CT IP
phone
The Network and SIP options within
the 480i CT phone can be configured
from the phone or from the AASTRA
480i CT WEB CLIENT web interface.
Administrator level options are
password protected in both the phone
and the web interface. User level
options are password protected within
the web interface only.
Network
DHCP automatically sends the IP
address, Subnet Mask and Gateway
network (also DNS and TFTP Server)
information to the 480i CT phone
during initialization when the phone
is first powered up or reset. By
default, the DHCP setting is enabled.
Keep in mind that the network
settings cannot be changed when
DHCP is used.
To change whether DHCP is used:
From the 480i CT Phone
1. Press the w button to enter
the Options List
2. Select option 8. Network
3. Enter the password. The default (if
it was never changed) password is
22222
4. Press the Enter softkey
5. Select option 1. DHCP
6. Press the Change softkey to indicate
whether DHCP should be used or not.
From the web client
1. Click on the Network sub-category
under the ADMIN main category
2. Enter the administrator user name
and password
3. In the web page that has just
opened check the Use DHCP check
box provided, to use DHCP and
uncheck to indicate that you do not
want to use DHCP
4. Click on the Set Values button to
save the changes that you just made
If you are not using DHCP, you need
to enter the network information for
the phone manually.
To configure the networks settings:
From the 480i CT Phone
1. Press the w button to enter
the Options List
2. Select option 8. Network
3. Enter the password. The default (if
it was never changed) password is
22222
4. Select option 2. IP Address to
change the IP address
5. Select option 3. Subnet Mask to
change the subnet mask
6. Select option 4. Gateway to change
the gateway address
7. Select option 5. DNS to change the
DNS
Note: When an IP address has been
assigned to the phone, you have the
option to either continue configuring the 480i CT through the button
on the phone or to start using the
Aastra 480i CT Web Client.
From the web client
1. Click on the Network sub-category
under the ADMIN main category
2. Enter the administrator user name
and password
3. In the web page that has just
opened enter the IP address of the
phone, the Subnet Mask and the
Gateway IP address in their
corresponding fields.
Contact your network administrator
to obtain information on the Subnet
Mask, Gateway and DNS addresses.
TFTP Server settings
The 480i CT Phone uses the TFTP to
update the phone’s firmware and it’s
configurations.
Configuring the 480i CT IP phone
Model / User Guide
8
Page 12

To set the TFTP server’s address:
From the 480i CT Phone
1. Press the w button to enter
the Options List
2. Select option 8. Network
3. Enter the password. The default (if
it was never changed) password is
22222
4. Select option 6. TFTP Server to
change the TFTP server
From the web client
1. Click on the Firmware sub-category
under the ADMIN main category
2. Enter the administrator user name
and password
3. In the new web page enter the name
of the firmware file and the IP
address of the TFTP server
4. Click the Download Firmware
button if you wish to download the
firmware on to the phone.
Performing this action will
download the firmware. You will
have to reset the phone to use the
currently downloaded firmware.
Configuring the 480i CT IP phone
9
Model / User Guide
Page 13

Programming Feature Key
The Feature key permits the programming of the following functions. The default
functions are marked in bold.
Label Key Function
None No function is selected – this key is empty, no label.
Line 1 Line 1 key - Selects line one
Line 2 Line 2 key - Selects line two
Line 3 Line 3 key - Selects line three
Line 4 Line 4 key - Selects line four
Icom Intercom key – Enter handset list to select handset to call
Dir Directory key – Activate directory feature
Callers Callers key – Activate callers feature
Xfer Transfer key - Activate transfer feature
Conf Conference key - Activate conference feature
Public Public key – Toggle between public & private call mode
Line 5 Line 5 key (if available) - Selects line five
Line 6 Line 6 key (if available) - Selects line six
Line 7 Line 7 key (if available) - Selects line seven
Line 8 Line 8 key (if available) - Selects line eight
Line 9 Line 9 key (if available) - Selects line nine
Programming Guideline
The following is a guideline to use when programming the Feature key:
All handsets will have the same programmed functions since the web interface
apply to all the handsets that are paired with the base.
A newly registered handset or handset that was out-of-range during the
programming will need to perform a "off-hook and on-hook" sequence in order
for the newly programmed function to be broadcasted to the affected handsets.
Simply press the v key from the idle state to go off-hook. Then, press the ∫
key to go back on-hook.
Duplicate function can exist in the Feature key as there is no filtering or duplicate
checking done on the handset or the base.
If no line keys are programmed for the Feature key, the handset will be restricted
to intercom calls only.
If all 12 programmable functions have been programmed to "None", the user will
be presented with a List empty message when the Feature key is pressed.
Programming Feature Key
List empty
Use web page to
configure
For security reason, the user has 180 seconds (3 minutes) to complete the
programming. Otherwise, the phone will respond with the following error: **
Error **: Session expired, Please reload page.
Model / User Guide
10
Page 14
For security reason, the user must submit the page from the same browser that
was used to load the page. If the user tries to submit the page from any other IP
address, the error: ** Error ** Session invalid. Different Client IP Addresses.
— Please reload page will be displayed.
Feature Key Web Interface
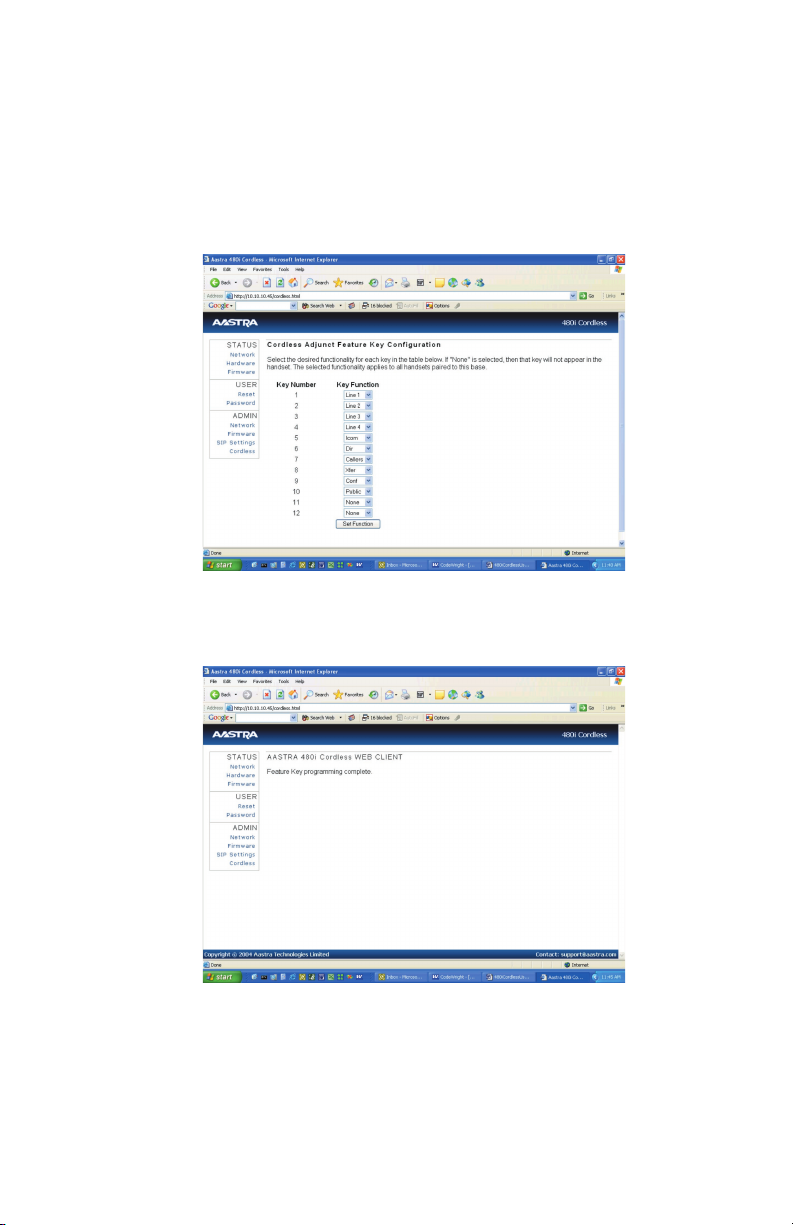
All Feature key functions are programmable via the 480i CT web interface only. To
access the web interface, enter the IP address of the 480i CT phone in your
browser. Then, select the Cordless link under the Admin menu.
Once the functions are programmed, click on the Set Function button at the
bottom of the page. This action will send the programming information to the
phone and the key programming will be sent out to the cordless handsets. Any
Programming Feature Key
key programmed to "None" will not appear in the handset’s list.
Web Page Language Support
The "Cordless" web page will display on of the three languages – English, French,
and Spanish – supported by the phone. However, the web page will be presented
in the language as set on the base unit. The functions in the Feature Key labels will
appear on the handsets in the language selected on the individual handsets.
11
Model / User Guide
Page 15
Using your 480i CT Base
Station
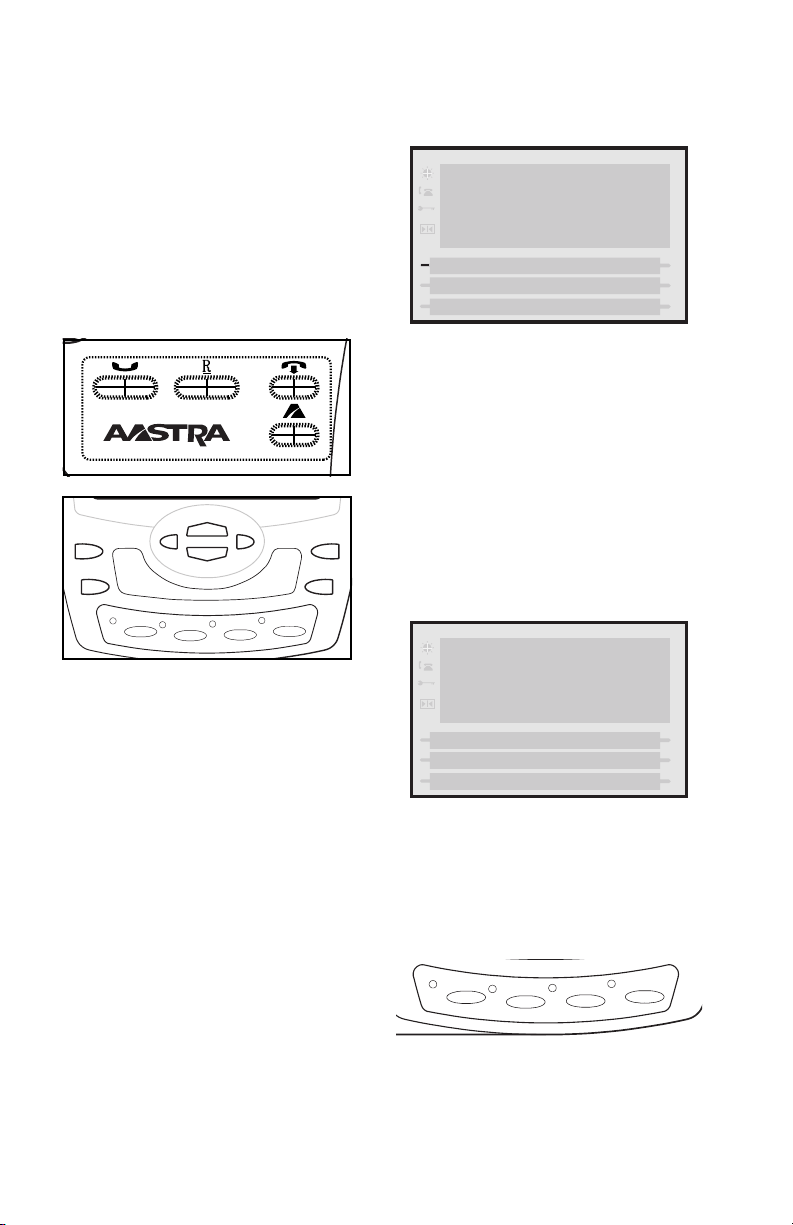
Hard keys
There are Hard keys on your phone, such
as Hold @, Redial #, Xfer
., Icom ] and Conf
= that are configured for the call
handling features. These keys are static
and cannot be reprogrammed or
changed. They are located in two
different areas on the phone.
IcomXfer
Conf Services
L1
L2
Softkeys
Your 480i CT has 6 softkeys, 3 on
either side of the phone’s display.
These softkeys are pre-programmed
for call handling and extension
management features of the SIP
system. The softkey menus will
change depending on the phone’s
state, displaying relevant softkeys
only.
Note: The softkeys outlined in this section
represent the default arrangement of
softkeys within the various screens.
L4
L3
you make calls, pickup calls, check
voicemail, and manage the phone’s
extension and more.
Tue May 17 10:19am
Keri March
201
MM
MM: Message Waiting Icon
Connected State
The Connected State Screen will
appear when you are talking to
someone on the phone. Connected
State functions are available as
softkeys on the connected state screen,
as well as hard keys on the phone.
These softkeys and hard keys allow
you to handle calls, such as
transferring, conferencing, placing
calls on hold and more.
Tue May 17 10:10am 10:17
L1 Connected
>Jay Lampton
202
Multiple Line and Call
Appearances
The 480i CT has 4 line/call appearance
buttons each with a corresponding
status light: 6, 7,
8 and 9.
Using your 480i CT Base Station
Idle State
The idle state menu appears when the
480i CT phone is not in use. The
softkeys in the idle state menu allow
L1
L3
L2
L4
These line/call appearance buttons
and lights can represent physical lines,
calls for the phone’s extensions or calls
Model / User Guide
12
Page 16
from group that the extension is a part
of. By pressing a line/call appearance
button, you connect to the line or a call
it represents.
The line/call appearance light shows
the status of that line or call. When the
phone is taken off-hook, the phone
will automatically select a line for you.
Redial Key
The Redial list contains 100 items.
While on-hook, pressing the v
hard key will invoke the Redial list.
While off-hook, the v key
functions as a "hot redial" where the
last number dialled is dialled again.
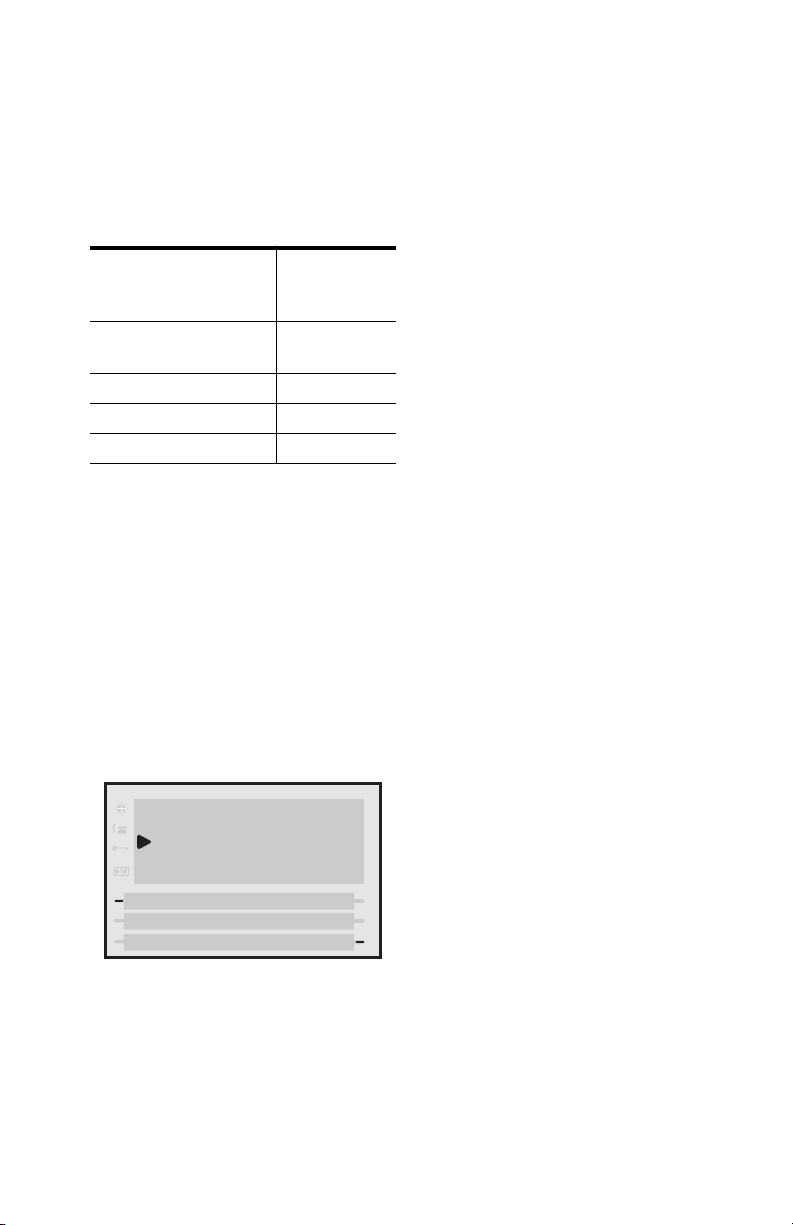
Line/Call
Appearance Light
Behaviour
Off Idle line or no
Light flashes quickly Ringing
Light is solid Connected
Light flashes slowly Hold
Line/Call
Appearance
Status
call activity
Services
The services key on the 480i CT will
access enhanced features and services
provided by third parties. Availability
of this feature will depend on your
phone system or service provider.
Two built-in services that are currently
offered with the 480i CT are Directory
and Callers List. Directory allows you
to store up to 200 entries locally on the
phone. Whereas the Callers List will
store up to 200 calls received –
answered and unanswered.
Using your 480i CT Base Station
Services
1.Directory list
2.Callers
list
Select
Done
Icom Key
On the 480i CT base, the ] key
functions to access the cordless
intercom feature. This feature allows
the base to talk to any registered
cordless handsets.
13
Model / User Guide
Page 17
Using the 480i CT Cordless Handset
Idle Mode
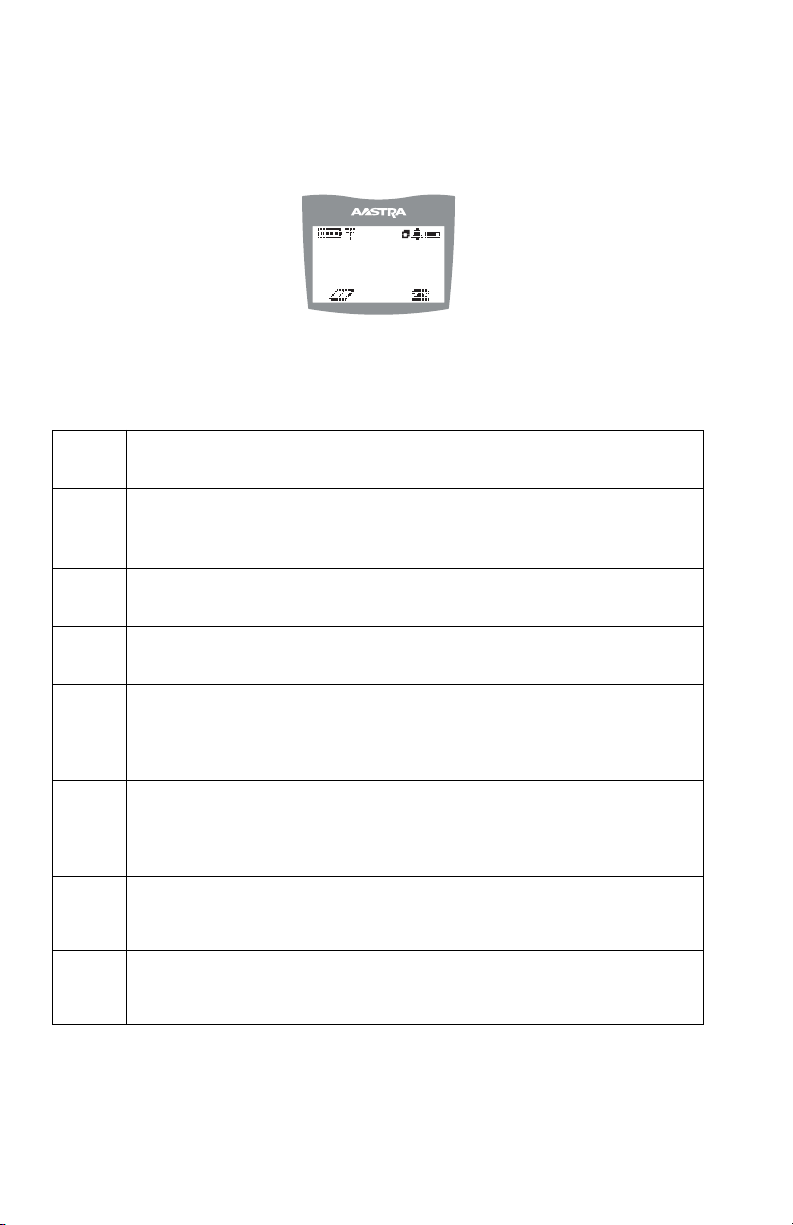
During idle mode (i.e. no incoming call, no active call, or no call on hold), the
handset name, date & time, status messages, and status icons are present on the
display.
Angela
May 17 10:19am
Note: The phone name label (Angela in the diagram above) can be edited in the Options list.
Handset Icons and Status Messages
Screen Icons
Battery Charge State
b
4 bars for battery full and the battery icon flashes when charging
Reception (Radio Link)
On - Within Range: Ready for use
m
OFF - Out of range/no radio link
h
¬b
lb
√
¨
Feature Key Activation
Indicates the phone is off hook or a call is in progress
Silent Alerter
p
Silent alerter activated
Ringer Volume
This icon is available only when the phone is in idle mode to indicate
the ringer volume level. The box will go from empty to fully black to
represent from off to low to high volume.
Receiver Volume
This icon is available only when the phone goes off-hook to indicate the
receiver audio volume. The box will go from empty to fully black to
represent from low to high volume; there are 10 volume levels total.
Directory List
This icon located just above the softkey allows access to the Directory
List feature.
Callers List
This icon located just above the softkey allows access to the Callers
List feature.
Using the 480i CT Cordless Handset
Model / User Guide
14
Page 18

Status Messages
Display Message Description
Microphone mute Indicates when the Mute button has been Activated
Out of range Appears briefly when pressing a key if out of range of the base
station
Handset Keys
Softkeys ( { or })
Your 480i CT cordless handset has 2 softkeys directly under the LCD display. The
softkey menus will change depending on the phone’s state, displaying relevant
softkeys only. These softkeys are pre-programmed for the call handling and
extension management features.
Talk /Hold v Key
The Talk/Hold key v is a multi-purpose key with the following uses:
• To initiate a call by seizing the line or through pre-dial.
• To answer a call during ringing.
• To place a call on hold during an active call.
Hold v Key
Pressing the hold key v while on a call will place the call on hold. While a call is
on hold, and if there are no other active calls, the LED will flash at the hold rate
and the display will present the Call is on hold prompt. In addition, held call
reminder tone will be played in the form of a short ring burst (flash ring).
This handset is equipped with an auto-hold feature. While on an active call,
pressing any other line key will result in the current line being placed on hold and
the new line being seized.
Release Key ( ∫ )
The release key is a multi-purpose key with the following uses:
• To end a call.
Note: If handset is placed in the charger cradle, it will also end the call.
• To silent the ringing during an incoming call.
Using the 480i CT Cordless Handset
• To exit feature such as Menu (options), Directory, Callers, Redial, Predial.
Note: Pressing this key in a feature will not terminate an active call.
Mute Key ( æ )
Use the mute key when you want to be able to hear a caller but have
them not hear you. Press the
to disengage mute. The Microphone mute prompt is displayed when mute is
activated.
æ key to mute the handset. Press the æ key again
Redial Key ( ß)
The Redial key displays a list of the last 10 calls made from the handset. Use the
Ï and  to scroll through the list.
15
Model / User Guide
Page 19

Feature Key List ( Ï )
The 480i CT cordless handset supports a programmable feature key list for easy
access to common features. The available features include line keys, intercom,
directory, callers log, transfer, conference, and public/private call mode.
Menu List ( Â )
The Menu list allows access to intercom calling, and personalization of handset
including language, ring tone, vibrate, backlight and silent alert. Please refer to
the section “Customizing Your 480i CT Cordless Handset” on page 4.
Multifunction Handset LED Indicator
The multifunction Handset LED provides the following user feedback:
• Flash: Message Waiting Indicator – Slow
• Flash: Alerting – Rapid
• Flash: Mute – intermittent
• Flash: Hold – Intermediate
• Solid: On an active call
Battery Charging
The handset is powered by a nickel metal hydride battery pack. To install and
charge the battery:
1. Slide the cover of the battery compartment.
2. Place the battery pack in the compartment with the connector wires pointing
towards the bottom of the handset.
3. Connect the battery terminal wire to the charging pins located in the
compartment
4. Slide the cover of the battery compartment back onto the handset
5. Place the handset, face up, in the charging cradle. The handset should easily
slide into the charging cradel. If it does not, check the battery compartment
cover to ensure it is in the proper position.
To confirm that the battery is charging, check the battery icon symbol on the
handset display to see if the lines inside the icon are flashing left to right.
Note: The battery must be charged for a minimum of six hours prior to initial usage of the
phone.
Using the 480i CT Cordless Handset
Handset Battery Indicator & Status
The display provides "at a glance" information on the handset battery.
dcba
f
Note: The handset is designed to recharge the batteries automatically, when required and
placed on the charger stand. The battery icon will not flash and the handset does not
charge every time it is placed on the stand. If a defective battery is replaced, then the
battery Icon is not identified until the new battery is charged for at least 2 minutes.
The bars indicate the battery charge level — 4 for full, needs
recharging when only 1 bar appear
The bars will flash when the battery is being recharged on the
charger stand.
Model / User Guide
16
Page 20

Volume Control
The volume key, located on the side of the handset, controls both the receiver and
ringer volume.
Note: The volume key can also be used to adjust the right/left cursor to add spaces or to
erase characters on the display when editing or creating names, key labels etc.
To adjust the receiver volume:
• While on a call, press the top of the key to increase the receiver volume and
press the bottom of the key to decrease the volume. The receiver volume icon
on display will indicate the current volume level. In absence of a PBX, the
receiver volume returns to the default setting after each call. However, the PBX
directive can direct the handset default to the volume.
To adjust the ringer volume:
• When the handset is not being used for a call, press the top of the key to
increase the ringer volume and press the bottom of the key to decrease the
ringer volume. The handset ringer will sound on each adjustment to reflect the
new setting and the ringer volume icon on display will also show the current
level chosen.
Directory – 480i CT Cordless Handset
Entering Characters and Numbers
Editing keys
During alphanumeric entry, the volume control keys become edit keys. They are
used to provide backspace and forward-space capability to the unit. For
Backspace/Erase, press the Lower end of the volume bar. To add a space or to
erase from left to right, press the higher end of the volume bar.
Note: The Down scroll key (marked  ) or the Up scroll key (marked Ï ) are also used to
provide backspace and forward space respectively.
General Record Editing
To accommodate adding and editing, use the available characters as labelled on
the keypad. Pause key and special characters are also available:
0 key / Pause key
To allow the user to enter pause characters, the pause key is the 0 digit key in
alphanumeric editing mode. Characters will appear in the following order: : 0, p.
Using the 480i CT Cordless Handset
1 key
In the alphanumeric mode, the 1 digit key will access several special characters.
Characters will appear in the following order:
1@.:;=_,-`&()
As can be seen, these special characters accessible through the 1 key allow URI
and IP address data entry.
Note: To enter the dot/period in the IP address format, the star * key is used when in
numeric "123" editing mode. Alternatively, in text "abc" or "ABC" editing mode, use
the 1 key to access the ".".
17
Model / User Guide
Page 21
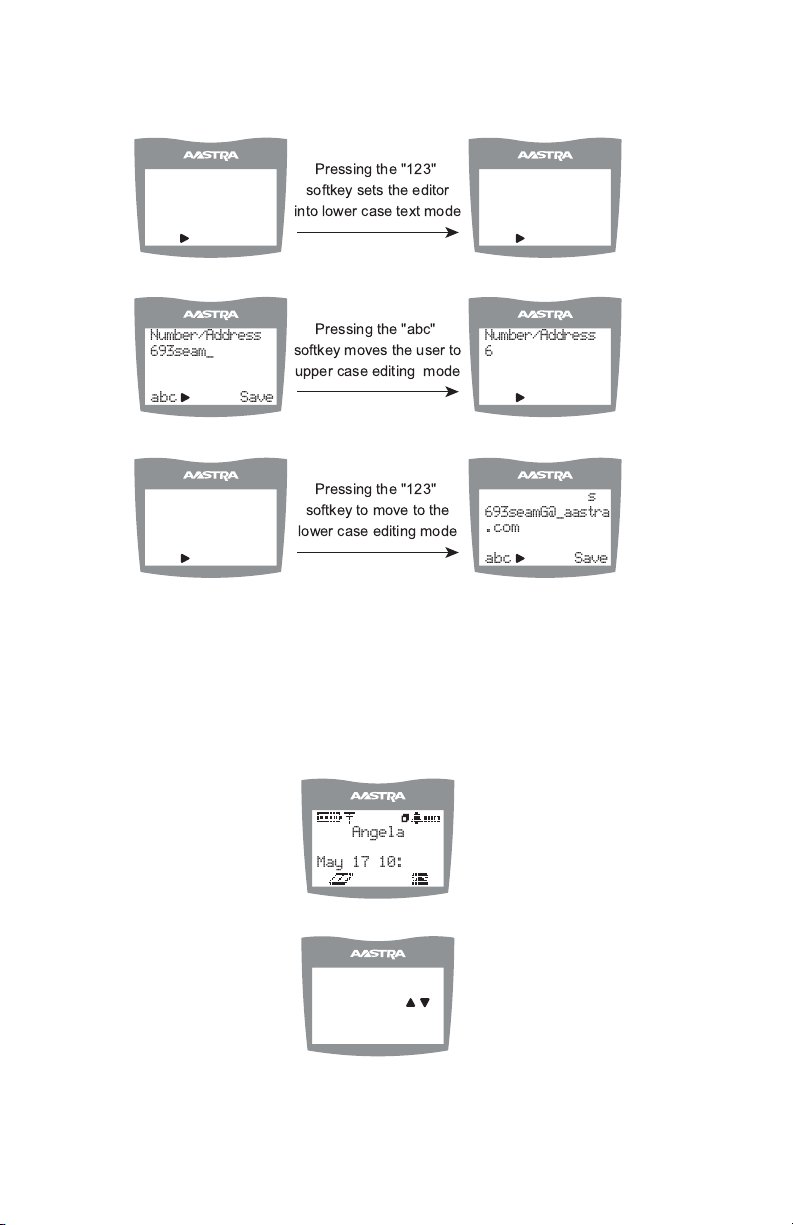
"123" — "abc" —"ABC" softkey
You can use the left soft key to toggle from numeric "123" editing mode to lower
case text "abc" editing mode, to upper case text "ABC" editing mode.
Using the 480i CT Cordless Handset
Number/Address
693_
123
Save
Switch from Numeric to Lower Case Alphanumeric Mode
Number/Address
693seam_
abc
Save
Continued Editing in Lower Case Text mode Then Switch to Upper Case Text Mode
Number/Address
693seamG@_
ABC
Save
Cycle Edit Mode Back to Lower Case and Finish Address Entry
Pressing the "123"
softkey sets the editor
into lower case text mode
Pressing the "abc"
softkey moves the user to
upper case editing mode
Pressing the "123"
softkey to move to the
lower case editing mode
Number/Address
693_
abc
Save
Number/Address
693seamG@_
ABC
Save
Number/Address
693seamG@_aastra
.com
abc
Save
Adding Record to Directory
The directory can store up to 50 names and numbers, which are displayed in
alphabetical order. If no name is entered, the entries are sorted by number, at the
beginning of the directory.
To add an item to the directory,
1. Press the √ soft key from the idle mode as shown below.
Angela
May 17 10:19am
2. Press the Add soft key.
1 item
Press first
letter or ´ ½
Add Delete
3. Enter the Number/Address information. Please refer to “Entering Characters
and Numbers” on page 17.
Model / User Guide
18
Page 22
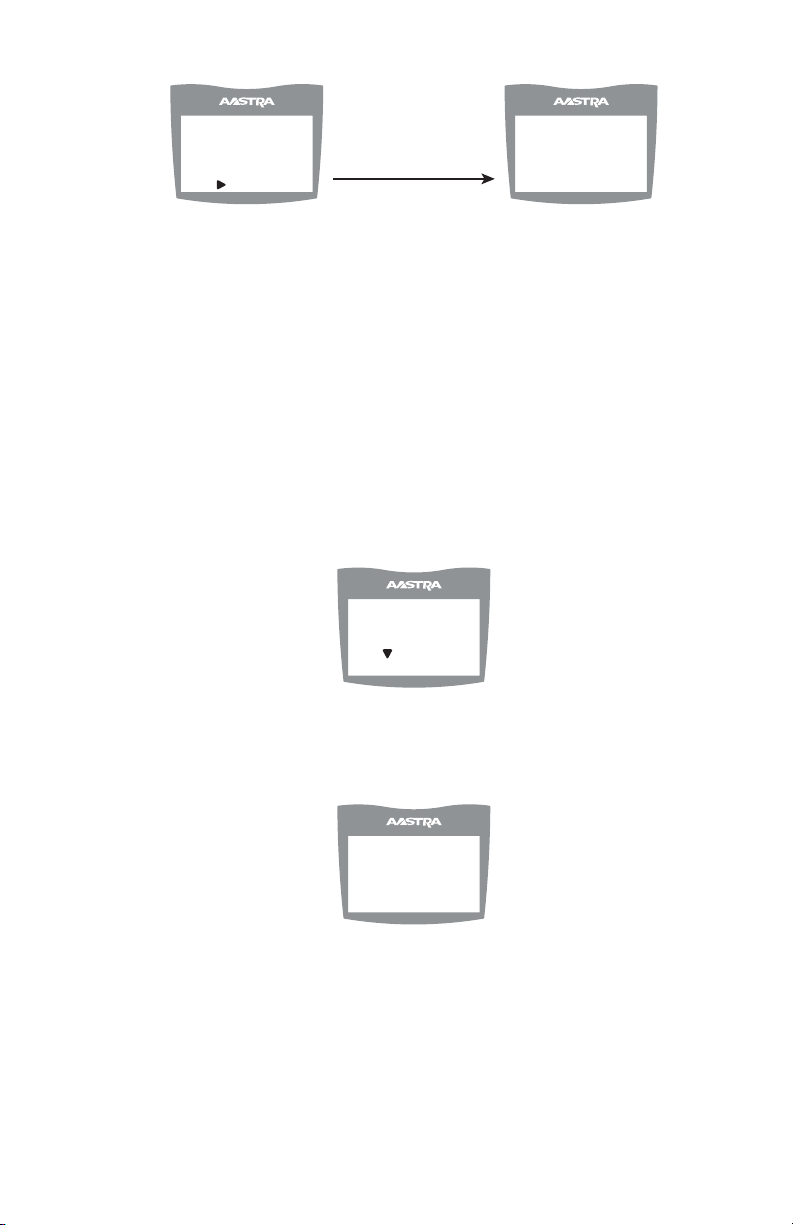
4. Press Save to advance to the name entry screen.
Number/Address
123abcABC@aastra
.com_
abc
Save
Pressing "Save"
softkey moves to the
name editing mode
Enter name
_
ChCase
Save
5. Enter a name for the Number/Address information. The name can have up to
15 characters, including spaces. Please refer to “Entering Characters and
Numbers” on page 17.
6. Press the Save softkey. The display will show Item saved.
Callers List – 480i CT Cordless Handset
The Callers list stores the last 50 calls received. Items are stored in chronological
order with new items being first in the list. Each call received is stored, no
collapsing of records, and can be deleted or saved to a directory. Oldest call
records are automatically removed from the list when the list is full and new
items are received.
The following figure shows the header screen. On this screen, there is the title, the
number of total items, the number of new items, instructions for viewing the
items and two soft keys — Exit and Delete. The exit key quits the list and the
delete key deletes the entire Callers list.
Caller List
x items
x New
Use or New
Add Delete
If there are no new items, then the x New line is not displayed. Once items are
viewed, they are marked as old and do not show up in the new item count or in
the new item scroll list.
Once in the list, items are displayed as shown in the next figure.
Using the 480i CT Cordless Handset
Item x New
Name
Number
Time of call
Options Line
The above screen shows the item number, the name and number of the caller, and
the time the call was received. Also shown are two soft keys — Options and Line.
Options allow the user to save to directory or delete the record.
19
Model / User Guide
Page 23
Dialing from Callers List
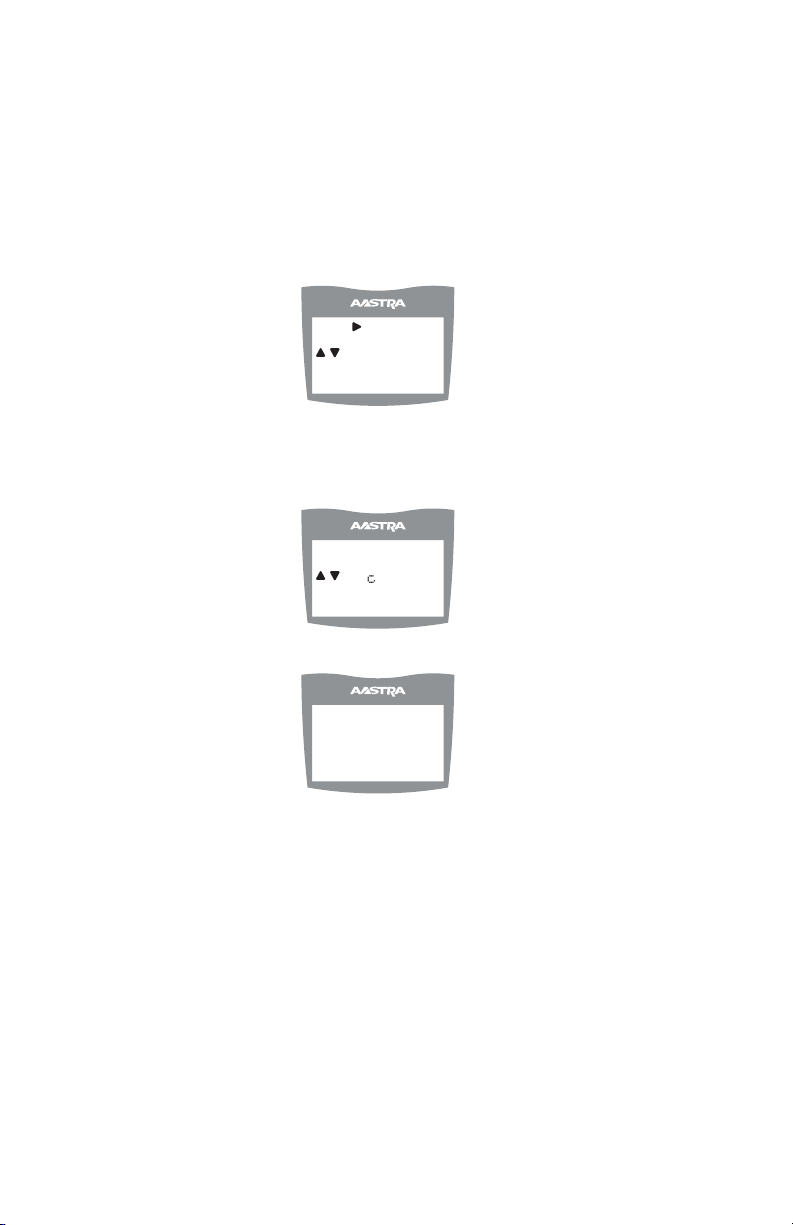
To dial the caller back, the Line soft key can be pressed and the user is taken to the
feature list where the configured lines can be chosen to place the call. The user
simply scrolls to the desired line and presses Select. The call will then be placed
on that line over the cordless link.
Saving Item to Directory
From the Options softkey of the Callers List, scroll to the Save to Directory item
and press the Select softkey. will be displayed upon successful saving to the
directory.
Save Directory
´ ½
= Scroll
Cancel Select
Deleting Item from Callers List
From the Options softkey of the Callers List, scroll to the Delete item and press
the Select softkey.
Delete
´ ½
= Scroll
Cancel Select
Using the 480i CT Cordless Handset
The user is prompted to confirm the delete action by pressing the Delete softkey.
Delete again to
erase this item
Cancel Delete
Model / User Guide
20
Page 24

Making Calls from 480i CT
Base Station
Dialling a Number
First, take the phone off-hook by lifting the handset, pressing the d/f
button or pressing a line/call appearance button. At the dial tone enter the
number you wish to call. If you are
unable to make calls within certain
area codes, check with your system
administrator for any toll restrictions
placed on your extension that may
restrict your access to long distance
area codes or dialling prefixes.
Tue May 17 10:19am
L1 Dial
> 201
Using Handsfree Speakerphone
The handsfree feature allows you to
speak to someone without using the
handset or headset. Your phone must
be in either the speaker or speaker/
headset audio mode.
• To dial using handsfree, first press
d and enter a number at the dial
tone.
• To answer a call on the 480i CT Base
Station using Handsfree, press d.
• If in speaker audio mode, press d
to switch between handsfree and
handset.
• If in speaker/headset audio mode,
Making Calls from 480i CT Base Station
press d to switch between handsfree and headset.
• When the handset is on hook, press
d to disconnect a handsfree call.
• When handsfree is on, the speaker
light turns on.
Using a Headset
The 480i CT accepts headsets through
the modular RJ22 jack on the back of
the phone. Contact your telephone
equipment retailer or distributor to
purchase a compatible headset.
Customers should read and observe
all safety recommendations
contained in headset operating
guides when using any headset.
Advanced Volume Controls for the
Headset Mic
On the 480i CT, there are 3 options for
the headset microphone volume.
To change this volume:
1. Press w.
2. Use
s to scroll down the list of
options to 7.Set Audio and press the
Show softkey, or you can press 7 to
jump directly to this option.
3. Press the Advanced softkey.
4. Use
s to scroll down the list or
press the Change softkey to go to the
next selection.
5. Press the Done softkey to save
changes and exit.
6. If you do not wish to save changes,
press the Cancel softkey.
Note: By default, the volume for the head-
set microphone is set to medium.
To Make and Receive Calls Using a
Headset:
1. Ensure that you have selected a
headset audio mode by accessing
the Options menu.
2. Plug the headset into the jack.
3. Press the d/f key to obtain a dial
tone or to answer an incoming call.
Depending on the audio mode
selected from the Options menu, a
dial tone or an incoming call will be
received on either the headset or the
handsfree speakerphone.
4. Press the kto end the call.
21
Model / User Guide
Page 25

Intercom (Yet to be Implemented)
To intercom another extension on the
system:
1. Press the |.
2. Enter the extension number of the
person you wish to intercom or the
BLF softkey for that extension.
3. After a beep tone, your phone will
automatically connect with the
remote extension and you can speak
through its speaker.
4. To cancel intercom, press kor
the Cancel softkey.
5. When you are finished speaking,
hang up the phone by placing the
handset back on-hook or by
pressing k or the line/call
appearance button for the active
call. When you hang up, the remote
phone will also hang up.
Redial
Press ∑ to automatically dial
the most recent number you dialled
from the phone.
Mute
Press a at any time to mute handset,
headset or hands-free. The speaker
light will flash slowly and you will
hear the caller, but they will not hear
you. Press a to toggle between mute
and un-mute.
Receiving Calls
When a call is ringing at your
extension, you will see the Inbound
Call Screen. The line/call appearance
light will flash quickly for the
incoming call.
Answering an Incoming Call
To answer the call:
• For handsfree operation, press the
Answer softkey or the line/call
appearance button for the incoming
call.
• Press d /f for handsfree or
headset operation.
The setting you have selected in the
Options List for Audio Mode will
determine whether the call goes to
handsfree or headset operation.
• Lift the handset for handset operation.
• When you answer the call, the
screen will change to the Connected
State menu. If you cannot answer
the call, the caller will go to voice
mail (if voice mail has been configured for your extension).
Handling Calls
When you are connected to a call, you
can use the softkeys or hard keys on
the phone to transfer, conference or
place a call on hold.
Placing a Call on Hold
When you place a call on hold, only
your phone can retrieve the call. To
place a call on hold:
1. Connect to the call (if not already
connected).
2. Press the Hold softkey
Tue May 17 10:19am 00:27
L1 Hold
>201
Keri March
Making Calls from 480i CT Base Station
Tue May 17 10:19am
L1 Ring
201
Keri March
The line/call appearance light will
begin to flash slowly. The screen will
display “Hold...” with the line number
the call is held on the phone.
Model / User Guide
22
Page 26

When on Hold
When you have been placed on hold,
you cannot hear any voice from the
caller. The call/line appearance light
for the line you are on will remain
solid to indicate that you are still
connected.
Tue May 17 10:19am 00:27
L1 Connected
>201
transfer. To do this, simply remain on
the line until the receiving party
answers the call. After consulting with
the receiving party, you can either
complete the transfer or cancel the
transfer to go back to the original call.
To transfer a call to another extension:
1. Connect to the call you wish to
transfer (if not already connected).
2. Press }.
Keri March
Tue May 17 10:19am 00:27
L2 Dial
>203
Karen Batz
Automatic Hold
When juggling between calls, you do
not have to press the hold button to go
from one call to the next.
The phone will automatically put
your current call on hold as soon as
you press a new line/call appearance
button.
Retrieving a Held Call
If you have more than 1 call on hold,
you can scroll through the held call
information by pressing
navigation keys. To reconnect to a call
press the line/call appearance button
where that call is being held. If you
press the call/line appearance button
again, you will disconnect from the
call.
3 and 4
Transferring Calls
Blind Transfer
A blind transfer is when you transfer a
Making Calls from 480i CT Base Station
call directly to another extension
without consulting with the person
receiving the call. To do this, simply
complete the transfer before the
receiving party answers the call.
Consultative Transfer
You also have the option to consult
with the person you are transferring
the call to, before you complete the
3. Press a line/call appearance button
followed by the extension number
of the person you wish to transfer
the call to.
4. If you do not wish to transfer the
call, press the line/call appearance
button again to abort the transfer.
This disconnects the new call,
leaving the original call on hold. To
go back to theoriginal call, press the
line/call appearance button for this
call.
5. To complete the transfer, you can
press } again, or disconnect
by placing the handset back on
hook, pressing kor pressing
the line/call appearance button for
the active call.
Conferencing Calls
The 480i CT phone system supports
up to 3 parties (including yourself) in
a conference call.
To create a conference call:
1. Connect to the first party you wish
to include in the conference (if not
already connected).
2. Press G.
23
Model / User Guide
Page 27

Tue May 17 10:19am 00:27
L2 Dial
>203
3. Press a line/call appearance button
followed by the extension number
of the person you wish to add to the
conference.
4. Wait for the new party to answer.
You can consult with the new party
first before adding them to the
conference.
5. If you do not wish to add the new
party to the conference, press the
line/call appearance button for this
call. This disconnects the new party,
leaving the original call on hold. To
go back to the original call, press the
line/call appearance button for this
call.
6. To add the new party to the
conference, press G again.
7. To drop the new party from the
conference, press G one
more time.
8. If you wish to exit the conference
leaving the other two parties
connected, disconnect by placing
the handset back on-hook or by
pressing k.
Picking up Calls
Press the line/call appearance button
for that call. If the phone is connected
to a call, pressing one of the line/call
appearance buttons will automatically
place this call on hold before opening
up a new line for the new call.
To pickup a call:
1. Press the line/call appearance
button for that call.
Tue May 17 10:19am 00:27
L2 Dial
>203
Karen Batz
Pickup
2. Press k if you do not wish
to pickup a call. This cancels the call
pickup procedure.
Ending Calls
To end a call, you first need to connect to
the call if not already connected. Press
k or the line/call appearance
button of the active call. If connected
through the handset, you can also place
the handset back on hook to end the
call.
Additional Features
Services
The Services key x on the 480i
CT can access enhanced features and
services provided by third parties.
Check with your system administrator
on how to configure this button.
Availability of this feature is
dependent on your phone system or
service provider.
The button gives you access to
additional services as they become
available in the future. Built through
the diverse web based language of
XML, such future services could range
from a Directory list or Call list, to
weather, stocks, or flight information,
etc.
Making Calls from 480i CT Base Station
Model / User Guide
24
Page 28

Making Calls from 480i CT Cordless Handset
Pre-dialling a Number
Press the v key to obtain dial tone and use the Keypad to dial the number. You
can also make a call by pre-dialling a number. Pre-dialling lets you view a number
before you dial. If the number is correct, press the v key to dial the number. If
the number is incorrect, use the  key or press down on the volume key to erase
digits from right to left. Calls can also be made directly from the Directory.
Using a Headset
The 480i CT cordless handset accepts headsets through the 2.5 mm audio jack on
the bottom of the phone. Contact your telephone equipment retailer or distributor
to purchase a compatible headset. Customers should read and observe all safety
recommendations contained in headset operating guides when using any headset.
Receiving Calls
When a call is ringing at your extension, you will see the Inbound Call screen.
Press the v key to answer an incoming call or lift the handset out of the
charging cradle.
Call Privacy
In the 480i CT multi-handset system, it is possible to connect several cordless
handsets together with each other or with the base as extensions to a call. This is
just like an analog system with extension phones going off hook to join a call in
progress. However, because this system is actually intended for use in an
enterprise environment, some method of call privacy is required.
All calls, base or handset, will begin in the "private" mode. In this mode, no
extensions will be allowed to join that handset or base call. There will be a user
interface provided to toggle between the "private" and "public" modes.
"Public" Feature Key
A feature key will be available in the feature list for the user to press to toggle
between the "private" and "public" modes for a call. Pressing the Public feature
key in the feature list anytime during a call will put the call into the public call
mode. When the call is in public call mode, the triangle indicator will light in front
of the Public label in the feature list. This will also cause that feature key to appear
on an available soft key but with a different label – Private. The user can then
press the Private soft key to toggle the call back to private or he can navigate into
the feature list and press the Public feature key. Either way, the triangle indicator
will clear and the call will be back in private mode. The figures of this section
demonstrate the UI.
Corey
Making Calls from 480i CT Cordless Handset
25
Model / User Guide
516-2681
00:00:00
Line 1
Private Call in Progress
<13>
<14>
Public
PgDown
Select
Feature List View with the Public
Key Selected but not Invoked
Page 29

Corey
516-2681
00:00:00
Private
Line 1
Public Call in Progress
Line 1
Line 2
Public
PgDown
Select
Feature List View with the Public
Key Invoked but not Selected
In the figure above, the left screen depicts a call that is public. The user can press
the Private soft key at any time to make the call private – i.e. no extensions
allowed to join. In the right screen, the right pointing triangle indicates the
current call is in public mode. The user could also select this feature key to return
the call to private.
Note: Any local caller on the call can convert the call. For instance, if one cordless caller is on
an external call, he can press the "Public" feature key to make the call public. At that
point up to three other handsets can join in on the call. If any of those joining handsets
presses the "Private" soft key, then the call is made private and no other users can join
the call unless the call was made public again.
Ending Calls
To end a call, you first need to connect to the call, if not already connected, and
press the ∫ key. You can also place the handset back on the charging cradle to
end the call.
Making Calls from 480i CT Cordless Handset
Model / User Guide
26
Page 30
Pairing and Unpairing
Cordless Handset to Base
Pairing Handset
All handsets must be paired to a Base
Station. This is performed from both
the base and the cordless handset.
Successful pairing will add the
handset name to the handset list on
the base and synchronize the handset
list from the base to the newly paired
handset. A total of 4 handsets can be
paired to a single 480i CT base.
Note: When performing the handset pairing,
it is recommended that thehandset be
within 3 feet of the 480i CT base.
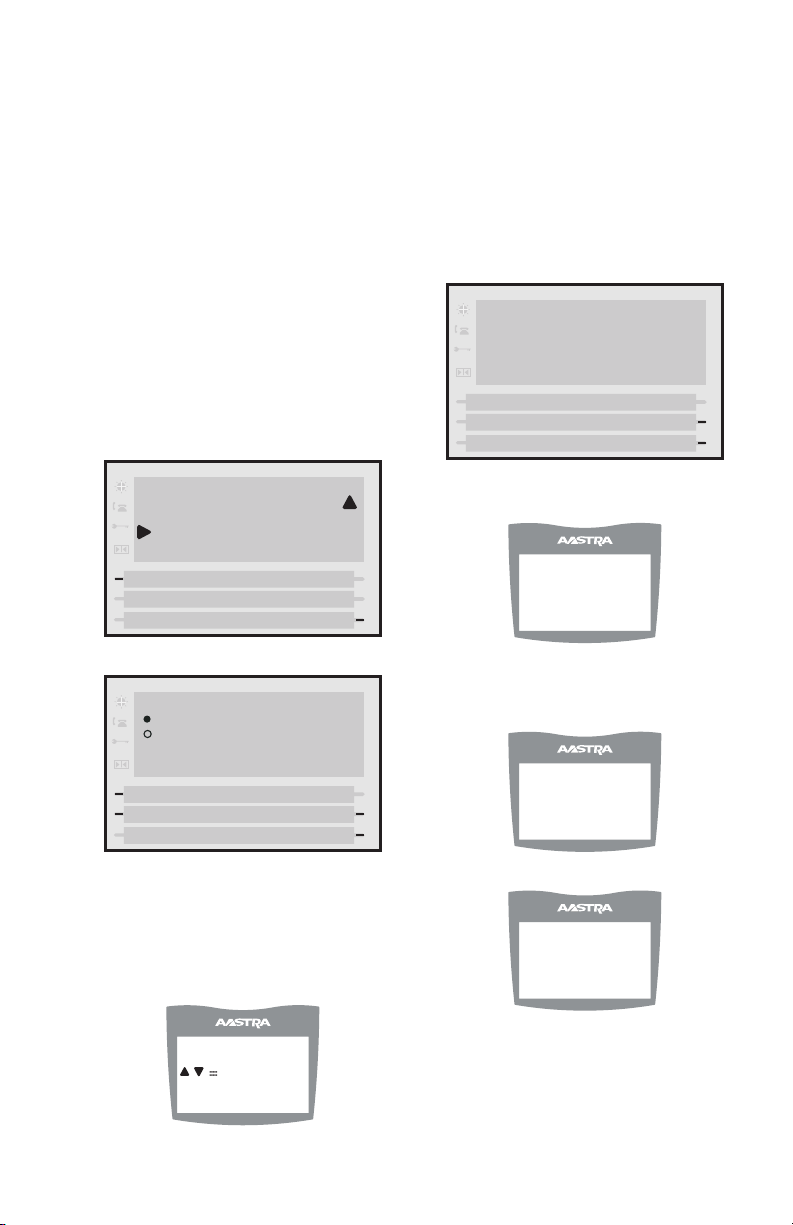
1. On the 480i CT base press w.
2. Select 11.Handset Pairing
Note: If the handset has already been
paired, the softkey will be labelled as
Remove instead of Pair.
Ensure the handset being paired is
within close proximity to the base. It is
recommended that the handset be
within 3 feet from the 480i CT base.
Note: It is recommended that both steps 6
and 7 be executed at the same time.
6. On the 480i CT base, select Done.
Options List
Attempting to pair...
Cancel
Done
Options List
9.SIP Settings
10.Phone Status
11.Handset Pairing
Show
3. Select Pair
Options List
Pair
Remove
Show
Select
Done
Cancel
7. On the 480i CT cordless handset,
press the softkey for Pair.
Attempting to
pair...
Cancel
Upon success or failure of pairing, one
of the following will be displayed on
the handset and base, respectively:
Pairing
successful
Done
Note: If there are already 4 handsets paired
to the base, you will not be able to
select the Pair option.
4. On the 480i CT cordless handset
press Â.
5. Select 7- Hset pairing
7 - Hset pairing
´ ½
= Scroll
Pair
Successful Pairing of Handset
Pairing failed
Try again
Cancel Pair
Failed Pairing of Handset
Pairing and Unpairing Cordless Handset to Base
27
Model / User Guide
Page 31

Pairing and Unpairing Cordless Handset to Base
Options List
Pairing failed
Try again
Cancel
Done
Pairing Failed Display
Options List
Pairing successful
Done
Pairing Success Display
Unpairing Handset
Unpairing of the handset can be done
from either the cordless handset or the
base. However, if the handset being
removed is out of range from the base,
the unpairing is only performed local
to the device where the removal
process was initiated.
If the unpairing is only successful
from the local device, the unpairing
procedure will need to be completed
from the other device.
Options List
Pair
Remove
Show
Select
Cancel
Done
4. Select Done. The following will be
displayed on the screen.
Options List
Attempting to remove
Wait...
Cancel
Done
Upon success or failure of unpairing,
one of the following screen will be
displayed on the base:
Options List
Removal failed
Try again
Cancel
Done
Failed Removal
1. On the 480i CT base press w.
2. Select 11.Handset Pairing
Options List
9.SIP Settings
10.Phone Status
11.Handset Pairing
Show
Done
3. Select Remove
Options List
Removal successful
Done
Successful Removal
5. If required, on the 480i CT cordless
handset press Â.
Model / User Guide
28
Page 32
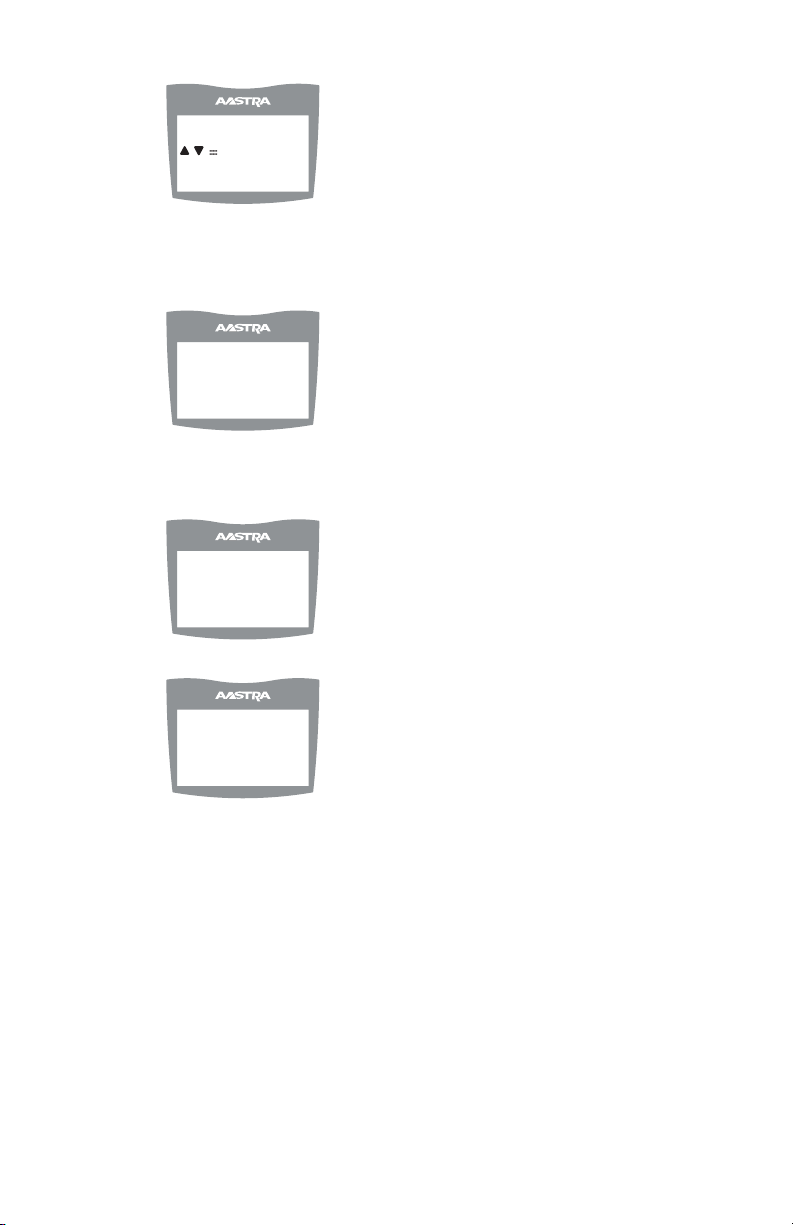
6. Select 7- Hset pairing
7 - Hset pairing
´ ½
= Scroll
Remove
Note: If the handset is not paired, the soft-
key will be labelled as Pair instead of
Remove.
7. Press the softkey for Remove.
Attempting to
remove...
Cancel
Upon success or failure of unpairing,
one of the following screen will be
displayed on the handset:
Removal
successful
Successful Removal Attempts
Removal failed
Try again
Cancel Remove
Failed Removal Attempts
Note: Unpairing of the handset will return
it to factory default state. All data
including the functions in the Feature key will be removed.
Pairing and Unpairing Cordless Handset to Base
29
Model / User Guide
Page 33

Troubleshooting
This section describes solutions to
some most commonly occurring
problems.
How to reset the 480i CT phone?
From the 480i CT Phone:
1. Press the £button to
enter the Options List
2. Select option 10. Phone Status to
enter the Phone Status options list
3. Select option 3. Reset Phone
4. Press the Reset softkey to reset the
phone
5. Press the Cancel softkey to
cancel the current operation
From the web client:
1. Click on the Reset sub-category
under the USER main category
2. Enter the administrator level user
name and password when
prompted
3. On the web page that just opened
click on the Reset button to reset the
phone
How to reset a user’s password?
If a 480i CT user has forgotten the
password the following steps can be
performed to reset the password.
From the web client:
1. Click on the Password sub-category
under the USER main category
2. Enter the administrator level user
password in the Current password
field. Enter the new password for
the user (the user’s name for whom
the password is being modified is
displayed beside the User Name
field on the current page). Re-enter
the password to confirm the new
password.
3. Click on the Set Password button to
complete the operation.
Troubleshooting
How to set the 480i CT phone to
factory default?
From the 480i CT Phone:
1. Press £ to enter the Options
List.
2. Select option 10. Phone Status to
enter the Phone Status Options list.
3. Select option 4. Factory Default .
4. Enter the administrator password
and press the Enter softkey.
5. Press the SetDefault softkey to
restore the 480i CT to the factory’s
default settings.
6. Press the Cancel softkey to cancel
the operation.
From the web client:
• Currently this feature is not avail-
able from the web client.
Model / User Guide
30
Page 34

Appendix A:
Parameter Settings
Note: The parameter settings in the
<mac>.cfg configuration file take
precedence over the parameter settings in the aastra.cfg. Any text following a number sign (#) on a line is
considered to be a comment, unless
the # is contained within doublequotes. Currently, boolean fields
used are 0 for false and 1 for true.
Network Settings:
This section consists of the network
setting parameters and are selfexplanatory.
dhcp
Flag to enable or disable DHCP.
(0: Disable, 1: Enable)
ip
IP address of the device
subnet mask
The network's subnet mask
default gateway
The network's default gateway.
dns1
dns2
Primary and secondary dns server's IP
addresses
tftp server
The IP address of the tftp server
Appendix A: Parameter Settings
sip nat ip
sip nat port
Currently we do not have nat support.
Phone can make calls but cannot receive
them.
sip registration time
Indicates in secs, how often the sip phone
should send a re-register request to the sip
server.
example:
sip registration time: 300
Time Server Settings:
The following section contains the
parameters to configure settings
specific to the time server
time server disabled
Should the time server be disabled? 0:
False, 1: True
example:
time server disabled: 0
time reserved
not used
dst config
flag to enable or disable time serving
(0: disable, 1: enable)
time server1
primary time server's IP address.
Can be an ntp too.
time server2
secondary time server's IP address.
Can be an ntp too.
time server3
tertiary time server's IP address.
Can be an ntp too.
time format
(0: 12hr, 1: 24hr)
date format
0: WWW MMM DD
1: DD-MMM-YY
2: YYYY-MM-DD
3: DD/MM/YYYY
4: DD/MM/YY
5: DD-MM-YY
6: MM/DD/YY
7: MMM DD
example:
date format: 5
time zone name
time zone code
31
Model / User Guide
Page 35

The following are the name of the time zones and their corresponding time zone codes
AD-Andorra CET
AG-Antigua AST
AI-Anguilla AST
AL-Tirane CET
AN-Curacao AST
AR-Buenos Aires ART
AS-Pago Pago BST
AT-Vienna CET
AU-Lord Howe LHS
AU-Tasmania EST
AU-Melbourne EST
AU-Sydney EST
AU-Broken Hill CST
AU-Brisbane EST
AU-Lindeman EST
AU-Adelaide CST
AU-Darwin CST
AU-Perth WST
AW-Aruba AST
BA-Sarajevo EET
BB-Barbados AST
BE-Brussels CET
BG-Sofia EET
BM-Bermuda AST
BO-La Paz BOT
BR-Noronha FNT
BR-Belem BRT
BR-Fortaleza BRT
BR-Recife BRT
BR-Araguaina BRS
BR-Maceio BRT
BR-Sao Paulo BRS
BR-Cuiaba AMS
BR-Porto Velho AMT
BR-Boa Vista AMT
BR-Manaus AMT
BR-Eirunepe ACT
BR-Rio Branco ACT
BS-Nassau EST
BY-Minsk EET
BZ-Belize CST
CA-Newfoundland NST
CA-Atlantic AST
CA-Eastern EST
CA-Saskatchewan EST
CA-Central CST
CA-Mountain MST
CA-Pacific PST
CA-Yukon PST
CH-Zurich CET
CK-Rarotonga CKS
CL-Santiago CLS
CL-Easter EAS
CN-China CST
CO-Bogota COS
CR-Costa Rica CST
CU-Havana CST
CY-Nicosia EES
CZ-Prague CET
DE-Berlin CET
DK-Copenhagen CET
DM-Dominica AST
DO-Santo Domingo AST
EE-Tallinn EET
ES-Madrid CET
ES-Canary WET
FI-Helsinki EET
FJ-Fiji NZT
FK-Stanley FKS
FO-Faeroe WET
FR-Paris CET
GB-London GMT
GB-Belfast GMT
GD-Grenada AST
GF-Cayenne GFT
GI-Gibraltar CET
GP-Guadeloupe AST
GR-Athens EET
GS-South Georgia GST
GT-Guatemala CST
GU-Guam CST
GY-Guyana
GYTHK-Hong Kong HKS
HN-Tegucigalpa CST
HR-Zagreb CET
HT-Port-au-PrinceEST
HU-Budapest CET
IE-Dublin GMT
IS-Reykjavik GMT
IT-Rome CET
JM-Jamaica EST
JP-Tokyo JST
KY-Cayman EST
LC-St Lucia AST
LI-Vaduz CET
Appendix A: Parameter Settings
Model / User Guide
32
Page 36

LT-Vilnius EET
LU-Luxembourg CET
LV-Riga EET
MC-Monaco CET
MD-Chisinau EET
MK-Skopje CET
MQ-Martinique AST
MS-Montserrat AST
MT-Malta CET
MX-Mexico City CST
MX-Cancun CST
MX-Merida CST
MX-Monterrey CST
MX-Mazatlan MST
MX-Chihuahua MST
MX-Hermosillo MST
MX-Tijuana PST
NI-Managua CST
NL-Amsterdam CET
NO-Oslo CET
NR-Nauru NRT
NU-Niue NUT
NZ-Auckland NZS
NZ-Chatham CHA
PA-Panama EST
PE-Lima PES
PL-Warsaw CET
PR-Puerto Rico AST
PT-Lisbon WET
PT-Madeira WET
PT-Azores AZO
PY-Asuncion PYS
Appendix A: Parameter Settings
RO-Bucharest EET
RU-Kaliningrad EET
RU-Moscow MSK
RU-Samara SAM
RU-Yekaterinburg YEK
RU-Omsk OMS
RU-Novosibirsk NOV
RU-Krasnoyarsk KRA
RU-Irkutsk IRK
RU-Yakutsk YAK
RU-Vladivostok VLA
RU-Sakhalin SAK
RU-Magadan MAG
RU-Kamchatka PET
RU-Anadyr ANA
SE-Stockholm CET
SG-Singapore SGT
SI-Ljubljana CET
SK-Bratislava CET
SM-San Marino CET
SR-Paramaribo SRT
SV-El Salvador CST
TR-Istanbul EET
TT-Port of Spain AST
TW-Taipei CST
UA-Kiev EET
US-Eastern EST
US-Central CST
US-Mountain MST
US-Pacific PST
US-Alaska AKS
US-Aleutian HAS
US-Hawaii HST
UY-Montevideo UYS
VA-Vatican CET
YU-Belgrade CET
example:
time zone name: US-Eastern
time zone code: EST
time zone minutes
The minutes that the zone is behind/
ahead(can be negative or positive integer)
example:
time zone minutes: 60
dst minutes
The minutes to which the daylight savings
time should be adjusted by. Should be a
positive integer.
The following are self-explanatory
and take integer values:
dst start relative date
dst start month
dst start day
dst start week
dst start hour
dst end relative date
dst end month
dst end day
dst end week
dst end hour
33
Model / User Guide
Page 37

SIP Settings:
The following section contains the
settings specific to SIP.
These parameters are self-explanatory and
should be
configured accordingly
sip proxy ip
sip proxy port
sip registrar ip
sip registrar port
sip line1 auth name
sip line1 password
sip line1 group name
sip line1 user name
sip line1 display name
sip line1 screen name
sip line2 auth name
sip line2 password
sip line2 group name
sip line2 user name
sip line2 display name
sip line2 screen name
sip line3 auth name
sip line3 password
sip line3 group name
sip line3 user name
sip line3 display name
sip line3 screen name
sip line4 auth name
sip line4 password
sip line4 group name
sip line4 user name
sip line4 display name
sip line4 screen name
sip line1 mode
sip line2 mode
sip line3 mode
sip line4 mode
sip dial plan
The regular expression used to configure
the dialplan.
example:
sip dial plan:
“011xxxxxxxxx|101xxxx1xxxxx
xxxxx|1[2-9]xxxxxxxxx|[29]xxxxxxxxx|xx+*|xx+#|*xx
|#xx+#”
Where,
0, 1, 2, 3, 4, 5, 6, 7, 8, 9:
is a Digit symbol
'x’: matches any digit symbol (wildcard),
‘+’: matches zero or more of the preceding
digit symbol or [] expression
[]: Symbol inclusive OR
‘-’: used only with [], represent a range of
acceptable symbols
‘*’, ‘#’ match the keypad symbols.
sip digit timeout
Represents the time in seconds to
configure the timeout between consecutive
key presses.
example:
sip digit timeout: 4
Softkey Settings:
The following section contains the
softkey settings specific to SIP. On the
480i CT phone with SIP seven softkeys
can be configured. These parameters
can be configured either in the
Aastra.cfg or the <mac>.cfg file. The
syntax is as follows:
softkeyN type: type
softkeyN label: string
softkeyN value: value
Where,
N: is the softkey number (1-7) on the
phone that is being configured, type: can
be any one of the following: line, blf
(blinking light field), voicemail,
forward or speeddial, and
Value: is the value of the soft key (depends
upon the softkey context)
Appendix A: Parameter Settings
Model / User Guide
34
Page 38

Examples:
#This example will configure the first soft
key and label the softkey
#”Dial” with a “O” icon before it. When
this softkey is pressed line #1 on the phone
will go off-hook and will be ready for a
number to be #dialled.
softkey1 type: line
softkey1 label: “Dial”
softkey1 value: 1
#This example will configure the second
softkey and label the softkey
#”L1/1234” with a phone icon before it.
This softkey shows the status #of Line 1
for the extension 1234.
#BLF status checking is not yet
implemented
#softkey2 type: blf
#softkey2 label: “L1/1234”
#softkey2 value: 1/1234
#This example will configure the third
softkey and label the softkey
#” VMail”. When this softkey is pressed
line 1 on the phone will go #off-hook and
will dial 89 (*89 is the number to access
the voicemail at the IP PBX).
softkey3 type: voicemail
softkey3 label: VMail
Appendix A: Parameter Settings
softkey3 value: *89
#This example will configure the fifth
softkey and label the softkey #”911”.
When this softkey is pressed line 1 on the
phone goes off-hook #and dials the number
911.
softkey5 type: speeddial
softkey5 label: “911”
softkey5 value: 911
#This example will configure the phone to
forward calls. Follow the #screen prompts
to configure call forwarding
to another device
#Call Forwarding functionality not
yet implemented
#softkey4 type: forward
#softkey4 label: FWD
#softkey4 value: anything
35
Model / User Guide
Page 39

Appendix B: Sample
configuration files
This section consists of the sample
configuration files necessary to
configure the 480i CT phones. The
general format is similar to
configuration files used by several
unix-based programs. Any text
following a number sign (#) on a line
is considered to be a comment, unless
the # is contained within doublequotes. Currently, Boolean fields use 0
for false and 1 for true.
aastra.cfg
# This file contains generic settings for all
phones.
time server disabled: 1
time server1: 131.107.1.10
dhcp: False
subnet mask: 255.255.255.0
default gateway: 192.168.0.1
tftp server: 192.168.0.129
#dns1: 192.168.0.5
sip proxy ip: 192.168.0.101
sip proxy port: 5060
sip registrar ip: 192.168.0.101
sip registrar port: 5060
#change this to suite your dial plan.
sip dial plan: “911|[2-9]xxxxxxxxx|
xx+*|xx+#|*xx|#xx+#”
softkey1 type: line
softkey1 label: “pickup”
softkey1 value: 1
softkey2 type: blf
softkey2 label: “L1/1234 Status”
softkey2 value: 1/1234
softkey3 type: voicemail
softkey3 label: “Vmail”
softkey3 value: *89
softkey4 type: speeddial
softkey4 label: “911”
softkey4 value: 911
<mac>.cfg
# This file contains specific settings for the
phone with the MAC
# address for which this file was named.
Settings which have already
# appeared in aastra.cfg will be overridden
by those in this file.
# Phone's IP address (may be necessary if
you are not using DHCP)
#ip: 192.168.0.200
#line info
#line 1
sip line1 auth name: 5857501515
sip line1 password: 12345
sip line1 user name: 5857501515
sip line1 display name:
Display-L1-5857501515
sip line1 screen name:
ScreenName-L1-5857501515
#line 2
sip line2 auth name: 5857501515
sip line2 password: 12345
sip line2 user name: 5857501515
sip line2 display name:
Display-L1-5857501515
sip line2 screen name:
ScreenName-L1-5857501515
#line 3
#Note: This line uses a different extension
number
sip line3 auth name: 7110
sip line3 password: 12345
sip line3 user name: 7110
sip line3 display name:
Display-L3-5857501515
sip line3 screen name:
ScreenName-L3-5857501515
#line 4
sip line4 auth name: 5857501515
sip line4 password: 12345
sip line4 user name: 5857501515
sip line4 display name:
Display-L4-5857501515
sip line4 screen name:
ScreenName-L4-5857501515
Appendix B: Sample configuration files
Model / User Guide
36
Page 40

Limited Warranty
Aastra Telecom warrants this product
against defects and malfunctions
during a one (1) year period from the
date of original purchase. If there is a
defect or malfunction, Aastra Telecom
shall, at its option, and as the exclusive
remedy, either repair or replace the
telephone set at no charge, if returned
within the warranty period.
If replacement parts are used in making
repairs, these parts may be refurbished,
or may contain refurbished materials.
If it is necessary to replace the
telephone set, it may be replaced with a
refurbished telephone of the same
design and color. If it should become
Limited Warranty
necessary to repair or replace a
defective or malfunctioning telephone
set under this warranty, the provisions
of this warranty shall apply to the
repaired or replaced telephone set until
the expiration of ninety (90) days from
the date of pick up, or the date of
shipment to you, of the repaired or
replacement set, or until the end of the
original warranty period, whichever is
later. Proof of the original purchase
date is to be provided with all
telephone sets returned for warranty
repairs.
Exclusions
Aastra Telecom does not warrant its
telephone sets to be compatible with
the equipment of any particular
telephone company. This warranty
does not extend to damage to products
resulting from improper installation or
operation, alteration, accident, neglect,
abuse, misuse, fire or natural causes
such as storms or floods, after the
telephone is in your possession.
Aastra Telecom shall not be liable for
any incidental or consequential
damages, including, but not limited to,
loss, damage or expense directly or
indirectly arising from the customers
use of or inability to use this telephone,
either separately or in combination
with other equipment. This paragraph,
however, shall not apply to
consequential damages for injury to the
person in the case of telephones used or
bought for use primarily for personal,
family or household purposes.
This warranty sets forth the entire
liability and obligations of Aastra
Telecom with respect to breach of
warranty, and the warranties set forth
or limited herein are the sole warranties
and are in lieu of all other warranties,
expressed or implied, including
warranties or fitness for particular
purpose and merchantability.
Warranty Repair Services
Should the set fail during the warranty
period;
In North America, please call
1-800-574-1611 for further information.
Outside North America, contact your
sales representative for return
instructions.
You will be responsible for shipping
charges, if any. When you return this
telephone for warranty service, you
must present proof of purchase.
After Warranty Service
Aastra Telecom offers ongoing repair
and support for this product. This
service provides repair or replacement
of your Aastra Telecom product, at
Aastra Telecom's option, for a fixed
charge. You are responsible for all
shipping charges. For further
information and shipping instructions;
In North America, contact our service
information number: 1-800-574-1611.
Outside N
sales representative.
Note: Repairs to this product may be made
orth America, contact your
only by the manufacturer and its
authorized agents, or by others
who are legally authorized. This
restriction applies during and after
the warranty period. Unauthorized
repair will void the warranty.
37
Model / User Guide
 Loading...