

Page 1

OpenPhone 27 Handset
User Guide
Page 2

NOTICE
The information contained in this document is believed to be accurate in all respects but is not
warranted by Mitel Networks™ Corporation (MITEL
®
). The information is subject to change
without notice and should not be construed in any way as a commitment by Mitel or any of its
affiliates or subsidiaries. Mitel and its affiliates and subsidiaries assume no responsibility for any
errors or omissions in this document. Revisions of this document or new editions of it may be
issued to incorporate such changes.
No part of this document can be reproduced or transmitted in any form or by any means electronic or mechanical - for any purpose without written permission from Mitel Networks
Corporation.
Mitel is a trademark of Mitel Networks Corporation.
Windows and Microsoft are trademarks of Microsoft Corporation.
Adobe Acrobat Reader is a registered trademark of Adobe Systems Incorporated.
Other product names mentioned in this document may be trademarks of their respective
companies and are hereby acknowledged.
Mitel 3300 ICP OpenPhone 27 Handset User Guide
IP-DECT Release 2.0
April, 2006
Page 3

Table of Contents
ABOUT YOUR HANDSET ...................................................................................1
About the Keys ..............................................................................................................1
Features and Functions.................................................................................................1
Contacting Emergency Services.................................................................................... 2
Important Note for Headset Users.................................................................................3
Tips for your Comfort and Safety...................................................................................3
About Feature Access Codes........................................................................................3
For Users on Resilient 3300 ICP Systems.....................................................................3
SETTING UP THE CHARGER.............................................................................4
Choosing a Location......................................................................................................4
Inserting and Removing the Battery Pack .....................................................................4
Connecting the Charger.................................................................................................5
Charging the Batteries...................................................................................................5
About Silent Charging....................................................................................................6
GETTING STARTED............................................................................................7
Powering the OP27 Phone On / Off............................................................................... 7
About the Display Indicators..........................................................................................7
About the Menus............................................................................................................8
CUSTOMIZING YOUR PHONE..........................................................................10
Changing the Language ..............................................................................................10
Setting the Volume ......................................................................................................10
Setting the Ringer........................................................................................................11
Setting Your Name ......................................................................................................11
Adjusting the Contrast .................................................................................................12
USING HANDSET FEATURES..........................................................................13
Setting the Optional Features......................................................................................13
Activating Key Lock .....................................................................................................13
Setting an Alarm..........................................................................................................14
Using the SOS Key......................................................................................................14
MAKING AND ANSWERING CALLS ................................................................16
Answering a Call..........................................................................................................16
Page i
Page 4

Handsfree Operation ...................................................................................................16
Using the System Phonebook .....................................................................................17
Using your Personal Phonebook.................................................................................17
Redial (External Numbers) ..........................................................................................19
Saved Number Redial (Internal or External)................................................................19
Speed Call - Personal..................................................................................................19
Auto-Answer................................................................................................................20
CALL HANDLING ..............................................................................................21
Hold .............................................................................................................................21
Transfer .......................................................................................................................21
Conference..................................................................................................................22
Swap............................................................................................................................22
CALL FORWARD...............................................................................................23
Callback.......................................................................................................................25
Messaging - Callback ..................................................................................................26
USING ADVANCED FEATURES.......................................................................28
Attendant Call Hold - Remote Retrieve........................................................................ 28
Account Codes ............................................................................................................28
Call Park......................................................................................................................28
Call Pickup...................................................................................................................29
Camp-on......................................................................................................................29
Do Not Disturb.............................................................................................................29
Override.......................................................................................................................30
Reminder.....................................................................................................................30
Group Paging / Meet Me Answer................................................................................. 30
Trunk Flash..................................................................................................................31
REGULATORY AAPPROVALS.........................................................................32
INDEX.................................................................................................................33
Page ii
Page 5
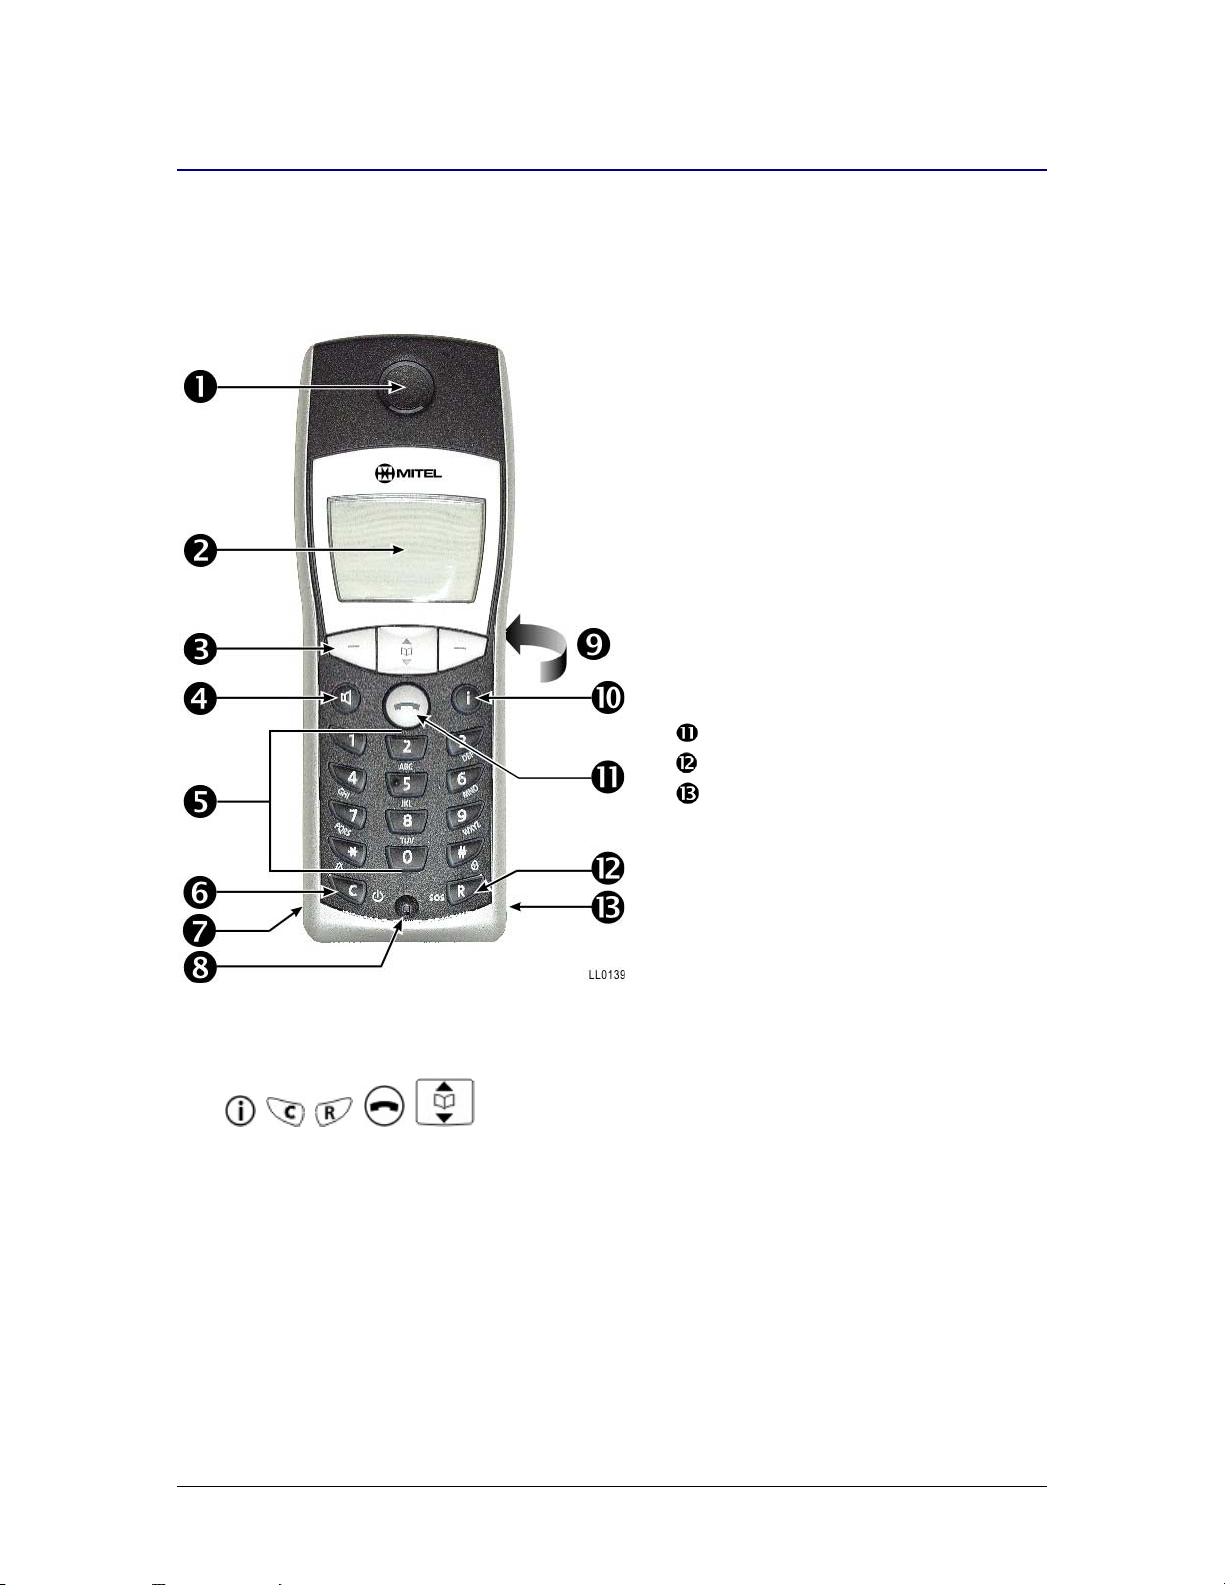
About Your Handset
The Mitel® OpenPhone 27 is a wireless telephone that operates with the Mitel 3300 Integrated
Communications Platform (ICP). It provides convenient softkey control of the system features, as
well as a variety of features that allow you to make calls quickly and easily.
The OpenPhone 27 (OP27) is shown below:
Receiver
n
Display
o
Softkeys
p
Loudspeaker key (illuminates
q
when active)
Keypad
r
Cancel
s
Headset connector
t
Microphone
u
Loudspeaker (on back of
v
handset)
Mode key
w
On/Off-hook key
Transfer/conference
Data connector for firmware
upgrade
About the Keys
The , , , , , # , and ∗ keys have different functions depending on the state
of the phone or the length of time that you press the key.
Short press = Press and release the key in less than 1 second.
Long press = Press and hold the key down for longer than 1 second and then release.
Features and Functions
The OP27 provides the following features and functions:
• Telephone Book: stores up to 100 entries, alphabetically sorted. Each entry can contain a
maximum of 16 characters for the name and 32 digits for the number. You can search, add,
edit, and delete the telephone book entries.
• Menu and Softkeys: menu-driven user interface with three softkeys for selecting functions.
Page 1
Page 6

• Key Lock: locks the keypad to prevent accidental dialing with a long press of the # key (Key
Lock can be activated automatically if enabled through the local menu.). Key Lock is
temporarily disabled when a call arrives. To unlock the keypad, press the
press #.
• Multiple Ringer Settings:
- 30 fixed melodies, with various ring tones
- full melody, single ringing burst or chirp for all incoming traffic
- enable or disable the ringer and trembler
• Selectable Volume: 7 levels.
• Auto Key Lock: disables the handset keys to prevent accidental dialing. If the Auto Key Lock
is enabled, the handset activates the key lock function automatically if you don’t press any
key for 1 minute in idle state.
• Key Click: enables or disables an audible click for each key press.
• Alarm Set: sets an alarm reminder in hour:minutes (24-hour format). Note that the 3300 ICP
system must be set to 24-hour clock for this feature to work.
• SOS Number: dials a pre-programmed emergency number with a long press of the SOS key
(available in idle mode only to prevent accidental usage).
• Auto Answer: automatically answers incoming calls that ring at the handset. You need a
headset connected to the handset to use this feature.
• Silent Charging: disables the OP27 while it is charging. Typically, you use this feature if your
Mitel IP Phone has been associated (programmed into a suite on the 3300 ICP) with your
OP27 phone. Then, while your phone is charging, calls to your extension will ring your Mitel
IP Phone. Note that Suite Services is a feature of the 3300 ICP. Check with your system
administrator to see if this feature is enabled on your system.
• Range Warning: provides 4 short beeps whenever you move out of range of the system.
When you are out of range of the system, your OpenPhone 27 handset will not function. If
you hear the 4 short beeps, move back into range by getting closer to a Radio Fixed Part
(RFP).
• Volume Setting: sets the volume of the handset earpiece, loudspeaker, and headset during
the call. You can only set the volume while on a call. To set the volume (7 levels), long press
softkey and then
the up or down arrow keys
• Time: displays the 3300 ICP system time.
• Contrast: adjust the contrast of the handset display.
• Languages: changes the display language. A maximum of 8 languages are supported:
Dutch, German, Italian, English (default is English), French, Spanish, Swedish, Finnish.
• Headset: supports a standard 2.5 mm jack to connect a headset (inline hook switch
supported).
.
Contacting Emergency Services
This handset, like any wireless phone, communicates over radio signals. As with any wireless
phone, you may not be able to establish a connection under all conditions. Therefore, you should
never rely solely on a wireless telephone for essential communication (for example, in medical
emergencies).You can program an emergency number into the SOS key on your handset (see
Using the SOS Key on page 15).
The Key Lock feature disables the handset keypad and prevents the accidental dialing of
numbers that could result in nuisance calls. It also prevents accidental calls to emergency
services numbers (for example 999, 911 or 112).
Page 2
Page 7

To enable or disable the key lock while in idle state:
• To enable long press the # key, to disable press the
Currently, mobile IP phones do not fully support Enhanced 911 (E911) operation. It is necessary
to keep the system administrator and the location database current when the phone is m oved, if
emergency services are required.
softkey and then press #.
Important Note for Headset Users
You can plug the optional headset into the jack on the OP27 handset and enable the auto-answer
feature through the OP27 local mode menu or the 3300 system option menu. For instructions on
enabling auto-answer, see Auto-Answer on page 20.
Tips for your Comfort and Safety
Don't cradle the handset!
Prolonged use of the handset can lead to neck, shoulder, or back discomfort, especially if you
cradle the handset between your ear and shoulder. If you use your phone a lot, you may find it
more comfortable to use a headset. See Auto-Answer on page 20 for instructions on how to
enable or disable headset auto-answer.
Protect your hearing
Your phone has a control for adjusting the volume of the handset receiver or headset. Because
continuous exposure to loud sounds can contribute to hearing loss, keep the volume at a
moderate level.
About Feature Access Codes
Use of some features requires you to dial access codes. The codes are flexible and may differ
from those used in this guide. Ask your System Administrator for a list of codes you should use.
For Users on Resilient 3300 ICP Systems
If during a call, you hear two beeps repeated every 20 seconds, it means that your phone is
switching to a secondary 3300 ICP system. The call continues, but the keys and features on your
phone stop working. The keys and most features begin working again after you hang up. Normal
operation resumes when your phone switches over to the standby or resilient system. If your
phone is idle and switched to the secondary system, you’ll see an asterisk on the display. The
asterisk remains until the OpenPhone 27 returns its connection to the primary 3300 ICP.
Page 3
Page 8

Setting up the Charger
Choosing a Location
Place the charger on a flat, even surface within 2.5 m of a 230 Vac mains connection. Do not
locate the charger in the following areas:
• damp areas
• areas with direct sunlight
• inadequately ventilated areas
• strong magnetic fields (keep the charger at least 0.5 m away from electrical devices, such as
fluorescent lamps, computers, radios, television sets, fax machines and other telephones)
• dusty environments
• areas subject to vibration, shock, or extreme temperature fluctuations
Keep the handset and accessories out of reach of small children.
Inserting and Removing the Battery Pack
Only use the following type of battery in your telephone:
Size: AAA
Type: Ni-MH rechargeable / 1.2 V
Capacity: 700 mAh
Mitel does not accept any responsibility for malfunction or damage if you use other types of
rechargeable or normal batteries.
To insert or remove the battery pack:
1. Insert the point of a pen into the hole in the bottom of the handset cover to release the pin;
then remove the cover and insert or remove the batteries.
2. While inserting batteries, ensure that you position the battery contacts correctly; otherwise,
your handset could be damaged.
Page 4
Page 9
Connecting the Charger
Connect the cable from the adapter plug into the base of the charger and then insert the adapter
plug into the mains socket.
Charging the Batteries
You can charge and discharge the batteries hundreds of times, but they will eventually be
depleted. When the operating time (that is, the call time and standby time) has become noticeably
shorter, replace the batteries. When charging batteries, you should adhere to the following
guidelines:
• Discharge the battery at intervals to achieve long operating times. To discharge the battery,
leave the handset on, but do not place it in the handset charger. Do not attempt to
discharge the battery using other methods.
• Charge the battery for six to seven hours before using your handset for the first time. The
maximum performance of the battery is only reached after three to five charging and
discharging cycles.
• Place your handset in the charger unit regularly in order to reach the optimum battery charge.
- Charging time: 6 to 7 hours from discharged to full capacity.
- Call time: up to 20 hours (fully charged).
- Standby time: up to 200 hours (fully charged).
• After you replace the batteries, the charge level icon will not be displayed until an entire
charge cycle is complete.
Caution: Only use the batteries as directed. Never use a damaged battery. Heat and cold
reduce the performance and the life of the battery. A handset with either a hot or a cold
battery can be temporarily out of operation, even if the battery is fully charged. Dispose of
used batteries in accordance with your local regulations. Never throw a battery into a fire.
An icon in the handset display shows the charge level of the battery.
Page 5
Page 10

Icon Battery Charge Level
dghfd
When the battery is nearly depleted, you will hear three short beeps repeated once a minute. If
you hear this warning signal while on a call, you have approximately 3 minutes left before the
handset will switch off.
80 to 100 %
60 to 80 %
40 to 60 %
20 to 40 %
0 to 20 %
Flashing; battery is almost discharged; warning signal sounds
About Silent Charging
Use Silent Charging if you don’t want calls to ring your OP27 phone while it is charging. Typically,
you use this feature if your Mitel IP Phone has been associated (programmed into a suite on the
3300 ICP) with your OP27 phone. Then, while your phone is charging, calls to your extension will
now only ring on your Mitel IP Phone.
If Silent Charging is active while the handset is in the charger, “Silent Charging” will appear in
display and the handset is disengaged from the system. When you remove the handset from the
charger, it is automatically engaged with the system and you can make and receive calls again.
Page 6
Page 11
Getting Started
Powering the OP27 Phone On / Off
To power on:
• Press
To power off:
• While in idle mode, press
About the Display Indicators
The OP27 phone provides visual indicators for the following features and functions:
Icon Description
while in the standby (Off) mode.
for at least 2 seconds.
Handset is operating in Resilient mode.
*
Handset mode is enabled. When you obtain dial tone, the icon appears
on the display.
Indicates the strength of the radio signal in use by your handset (four
levels).
Indicates the battery charge level (five levels).
Battery is empty. You will hear a battery-low warning alarm (3 beeps) in idle
state or conversation state once every minute. When you hear the warning
(Flashing)
;
alarm, you have approximately 3 minutes left before the handset will shut
down.
Loud speaker mode is enabled; when you obtain dial tone, the ; icon
appears on the display and the loudspeaker key turns on.
Ringer is disabled.
Keypad is locked. Press and then press # to unlock the keypad.
Alarm reminder is set.
Page 7
Page 12

About the Menus
You can activate and deactivate OP27 features from the menus:
System menu features
Long press
desired action. To exit the system menu, long press the
• Phonebook – look up and dial numbers from the system directory.
• Call Forwarding – forward your calls to another phone.
• Personal Keys – no function (for future use).
• Timed Reminder – set a reminder alarm.
• Advisory Message – display a message to other callers (for example, out of office).
• Do Not Disturb – prevent calls from reaching your handset.
• Auto Answer – have your handset automatically answer calls without ringing (for use with
headset).
• Night Service – set your handset as a night service answerpoint.
• Ringer Adjust – no function (use “Setting the Ringer” on page 11 instead).
• Set Password – set a password that protects your callback messages.
• Language – change the language of the system-generated prompts and messag es.
Local Settings features
Short press
To exit the Local Settings menu, press Esc.
• Message – check for callback messages
• Redial – redial last number dialed
• Local Mode – access features to customise your handset operation
In the Local Settings menu, press Esc to exit.
to access the following system menu features. Use the softkeys to select the
key.
to access Local Settings features. Use the softkeys to select the desired action.
Call handling menu features
While on a call, short press the
Local Settings menu:
• Microphone – mute the microphone.
• Hold – place a call on hold.
Local mode features
Short press
menu features. To backup a menu level, press Esc. To activate or deactivate a menu selection,
press OK.
• Key Lock – prevents accidental dialing by locking the keypad keys
• Ringer Settings
- Melody – choose from 30 melodies
- Type – select type of notification: full melody, single bar, or chirp
Page 8
, press to select Local Mode, and then click OK to access the Local Mode
key to access to the following additional features from the
Page 13

- Device – select buzzer or vibrator
- Volume – set ringer volume
• System
- Subscription – (system administrator use only)
- IPEI – (system administrator use only)
• Telephone Options
- Auto Key Lock – activates the key lock functionality automatically if you don’t press any
key for over 1 minute while in idle state.
- Key Click – provides an audible click each time a key is pressed
- Alarm – sets a reminder alarm
- SOS key – dials an emergency number
- Auto Answer – automatically answers calls without ringing (for use with headset)
- Silent Charging – disengages the handset from the system while charging
- Coverage Warning – provides four short beeps if your signal is weak
- User Name – allows you to program your name into the handset display (maximum of
16 characters)
- Language – sets the language of the local menus
- Contrast – allows you to set the display contrast
Page 9
Page 14

Customizing Your Phone
Changing the Language
To set the language of the handset display, you must change the language of the local menu
prompts and the system-generated messages. The local menu prompt s are available in English,
Dutch, German, Italian, French and Spanish. The default is English.
To change the language of the local menu:
1. Short press
2. Press
3. Press OK.
4. Press
5. Press OK.
6. Press
7. Press OK.
8. Press
9. Press OK. A check mark (
To change the language of the system messages:
1. Long press
2. Press No until Language? appears.
3. Press Yes.
4. Press Change.
5. Press No until the desired language appears.
6. Press Yes.
.
to select Local Mode.
to select Telephone Option.
to select Language.
until the desired language is highlighted.
) appears next to the selected language.
.
Setting the Volume
To adjust the volume of the earpiece, loudspeaker, and headset (if connected):
1. Press
2. Long press
3. Press
Page 10
.
. Volume appears on the display.
repeatedly to adjust the volume.
Page 15

Setting the Ringer
You can select from 30 different melodies with various ring tones, set full melody or chirp for all
incoming calls, enable or disable the buzzer, and enable or disable the vibrator.
To set the ringer options:
1. Short press
2. Press
3. Press OK.
4. Press
5. Press OK.
6. Set the following parameters:
- Melody – choose from 30 melodies
- Type – select type of notification: full melody, single bar, or chirp
- Device – buzzer or vibrator
- Volume – set volume for internal calls, external calls, VIP calls, and messages
A check mark (
7. Press Esc to exit Local Mode menu.
.
to select Local Mode.
to select Ringer Settings.
) appears next to the activated setting.
Setting Your Name
If your name hasn’t been programmed to appear on your handset display by your System
Administrator, you can program it yourself using the following procedure.
To set your name:
1. Short press
2. Press
3. Press OK.
4. Press
5. Press OK.
6. Press
7. Enter your name using the keypad keys (maximum of 16 characters).
- For each letter in the name, press the appropriate key on the keypad until the letter is
shown in the display; for example, if the letter C is required, press the digit 2 three
times. Use the
same key as the previous letter, press the
letter, press
- Long key press for the character within the editor switches from capitals to non-capitals
(same action switches back).
8. Press Esc.
.
to select Local Mode.
to select Telephone Option.
to select User Name.
softkeys to move the cursor. If the next letter in a name is on the
softkey before proceeding. To delete a
. To insert a space, press 0 twice.
Page 11
Page 16

Adjusting the Contrast
To adjust the contrast:
1. Short press
2. Press
3. Press OK.
4. Press
5. Press OK.
6. Press
7. Press OK.
8. Press
9. Press OK.
10. Press Esc.
.
to select Local Mode.
to select Telephone Option.
to select Contrast.
to select the desired contrast. There are seven levels. 1 is lightest, 7 is darkest.
Page 12
Page 17

Using Handset Features
Setting the Optional Features
To enable or disable the optional features:
1. Short press
2. Press
3. Press OK.
4. Press
5. Press OK.
6. Press
• Auto Key Lock - when enabled, this feature automatically locks the keypad if you don’t
press any key for one minute while the handset is idle. When Auto Key lock is enabled,
appears in the set display. To deactivate key lock, press the softkey and then
press the # key. If you power down your handset when Auto Key lock is enabled, the
feature will remain enabled when you power the handset on again.
• Key Click – provides an audible tone each time you press a key.
• Auto Answer – automatically answers calls that arrive at your handset without ringing.
The OP27 will ring once before answering the call. This feature also automatically
answers an incoming call when you remove the handset from the charger and
automatically releases a call when you replace the handset in the charger.
• Silent Charging – prevents calls from ringing your handset while charging (see About
Silent Charging on page 6 for more details).
• Coverage Warning – alerts you if the signal connection to your handset becomes weak.
The warning is 4 short beeps. The warning is louder in idle mode than it is in
conversation mode.
.
to select Local Mode.
to select Telephone Option.
to select the desired option:
7. Press OK. A
feature is disabled.
8. Press Esc.
appears next to the option to indicate that it is enabled. A – indicates that the
Activating Key Lock
You can lock your handset keypad to prevent yourself from accidentally dialing a call. The keypad
is temporarily enabled whenever a call comes in.
To lock your keypad:
• Long press the
To unlock your keypad:
• Press
# key while in idle state. Key Lock appears in the display.
and then press the # key.
Page 13
Page 18

Setting an Alarm
You can set an alarm to remind yourself of important meetings or appointments:
To set an alarm:
1. Short press
2. Press
3. Press OK.
4. Press
5. Press OK.
6. Press
7. Press OK.
8. Press OK.
9. Set the time in 24-hour format (hours:minutes). Note that you can only set an alarm if your
administrator has set the system time to 24-hour format. If set, the system time appears in
the display during idle state.
10. Press Esc repe atedly to return to the main display. A
an alarm is set.
The following conditions apply to alarms:
• If the handset is idle and an alarm occurs, ‘Alarm’ appears in the display with a melody
indication. If you are on a call, you will hear a soft ring in the speech path that will sound for a
maximum of 60 seconds.
• Alarm volume is the same as the internal ring tone volume.
• Incoming calls and message handling overrule alarm alerting and will deactivate the alarm.
• Powering the handset Off / On doesn’t affect the alarm setting; however, alarm alerts are not
provided when the handset is switched off.
.
to select Local Mode.
to select Telephone Option.
to select Alarm.
appears in the display to indicate that
To stop an alarm:
• Press any key to stop and deactivate an alarm.
Using the SOS Key
You can program an emergency number against the SOS key on your handset.
To program an SOS number:
1. Short press
2. Press
3. Press OK.
4. Press
5. Press OK.
Page 14
.
to select Local Mode.
to select Telephone Option.
Page 19

6. Press to select SOS Number.
7. Using the dialpad keys, enter the emergency number that you want to assign to the SOS key.
8. Press OK.
9. Press Esc.
To dial the SOS number:
• Long key-press
in the idle mode only (prevents accidental use).
Page 15
Page 20

Making and Answering Calls
To make a call:
1. Press
2. Dial the number.
To pre-dial the number:
1. Dial the number (press the softkey to delete errors in the number).
2. Press OK.
To use the redial feature:
1. Short press of the
2. Press
3. Press OK.
.
key
to select Redial.
Answering a Call
To answer a call:
1. Press
2. Press
back of the handset. While an incoming call is being signalled, you can temporarily switch off
the ring tone with a short press of the
.
; to use the loudspeaker feature. You will hear the caller through the speaker on the
key. The visual call signal is not affected.
Handsfree Operation
To use handsfree operation to make calls:
1. Press
2. Dial the number.
3. Set the handset down.
4. Communicate by using the speaker and the microphone.
To switch to handsfree operation during a call or to answer a ringing call in handsfree
mode:
1. Press
2. Set the handset down.
3. Communicate by using the speaker and the microphone.
4. To hang up press or .
;.
;.
Page 16
Page 21

Using the System Phonebook
You can access any number from the system phonebook by entering a name in the handset
display.
For each letter in the name, press the appropriate key on the keypad until the letter is shown in
the display; for example, if the letter C is required, press digit 2 three times. Use the Í soft key to
correct errors. If the next letter in a name is on the same key as the previous letter, press the Î
softkey before proceeding. If required, use the Î softkey to add a space between the first and
last name.
To use the system phonebook:
1. Press Phonebook.
2. Enter the name of the desired party.
For each letter in the name, press the appropriate key on the keypad until the letter is shown
in the display; for example, if the letter C is required, press digit 2 three times. Use the Í
softkey to correct errors. If the next letter in a name is on the same key as the previous letter,
press the Î softkey before proceeding. If required, use the Î softkey to add a space
between the first and last name.
3. Press the Lookup softkey.
4. If no match exists, edit the original entry.
5. If the name is not unique, press Next.
6. To make the call, press Call.
7. To edit the entry, press Retry.
8. To exit, long press the
key or press the key.
Using your Personal Phonebook
You can store up to 100 personal telephone entries in the OP27 phonebook. Each entry can be a
maximum of 16 characters in length for the name and 32 digits for the number.
To add a personal phonebook entry:
1. Press
2. Press New, or
Press Options and then press
3. Press OK.
4. Enter the number:
• Short press
• Long press
• Press 0 twice to insert a space.
• Short press
• Short press Esc to go back one menu.
• Long press Esc to return to the idle display.
5. Press OK when the number is complete.
(down arrow) to access the Phonebook menu.
to select New.
to delete a digit or character.
to remove the entire digit or character string.
to move the cursor one digit or character space.
Page 17
Page 22

6. Enter the name:
• For each letter in the name, press the appropriate key on the keypad until the letter is
shown in the display; for example, if the letter C is required, press digit 2 three times. Use
softkeys to correct errors. If the next letter in a name is on the same key as the
the
previous letter, press the
to add a space between the first and last name.
• Long key press for the character within the editor switches from capitals to non-capital s
(same action switches back).
7. Press OK.
8. If necessary, press Options and then press Edit to edit the name or number.
9. Press Esc.
To place a call using your personal phonebook:
softkeys before proceeding. If required, press the 0 key twice
1. Press
2. Press
3. Press
To search for an entry in your personal phonebook:
1. Press
2. Enter the name or number that you want to call (you can enter partial names or numbers).
After several seconds, the matching entry or entries will be displayed.
3. Press
4. Press OK.
5. Press
To delete a personal phonebook entry:
1. Press
(down arrow).
to select the desired entry.
to call the displayed number.
(down arrow).
to select the desired entry.
to call the displayed number.
(down arrow).
2. Press Options.
3. Press
4. Press OK.
Page 18
to select Delete.
Page 23

Redial (External Numbers)
Selecting redial will automatically dial the last number dialed:
To redial external numbers:
1. Short press of the
2. Press
3. Press OK.
4. Press
5. Press OK.
to select Redial.
to select the last number dialed.
key.
Saved Number Redial (Internal or External)
To save the last number that dialed:
1. Press
2. Dial the Save Last Number feature access code.
To redial a saved number:
1. Press
2. Dial the Repeat Last Number Saved feature access code.
.
.
Speed Call - Personal
To dial a stored personal speed call number:
1. Press
2. Dial the Personal Speed Call-Invoke feature access code.
3. Enter an index number between 00 and 09.
To store a personal speed call number:
1. Press
2. Dial the Personal Speed Call-Store feature access code.
3. Enter an index number.
4. Dial the number to be stored (press Hold between digits to create a pause during dialing press Hold more than once to lengthen the pause).
5. Press
.
.
.
Page 19
Page 24

Auto-Answer
This feature can only be used when a headset is attached to the OP27 handset.
To enable or disable auto-answer:
This is not the internal OP27 headset auto-answer feature.
1. Long press the
2. Press No until Auto Answer? appears.
3. To enable Auto-Answer, press TurnOn.
4. To disable Auto-Answer, press TurnOff.
To answer a call when you hear ringback:
• Communicate by using the speaker and the microphone.
To terminate a call:
• Press
then release the switch.
To enable or disable headset auto-answer:
• Choose the Auto-Answer feature from the local mode internal menu.
OR . If the headset has an on/off-hook switch wired into the headset cord,
key.
Page 20
Page 25

Call Handling
Hold
To place a call on Hold:
1. Short press the
2. Press
3. Press OK.
To retrieve a call from Hold:
1. Short press the
2. Press
3. Press OK. The caller that was on hold is retrieved.
To retrieve a call from Hold at another OP27 handset:
1. Press
2. Dial the Call Hold - Remote Retrieve Feature Access code.
3. Dial the number of the station that placed the call on Hold.
to obtain dial tone.
key.
to select Hold.
key.
to select Hold.
Transfer
To transfer an active call:
1. Press
2. Dial the number of the third party.
3. Do one of the following:
• To complete the Transfer, press Release.
• To announce the Transfer, wait for an answer, consult, and then press Release.
• To retrieve the call, press
To transfer an active call during headset operation:
1. Press .
2. Dial the number of the third party.
3. Press
.
.
to complete the transfer.
Page 21
Page 26

Conference
To form a conference when a two-party call is already in place, or to add another party to
an existing conference:
1. Press
2. Dial the number of the next party.
3. Wait for an answer.
4. Press
To leave a conference:
• Press
To split a conference and speak privately with the original party:
• Press Split.
.
.
.
Swap
To call another party when you are in an established two-party call:
1. Press
2. Dial the number.
To alternate between the two parties:
• Press Trade.
.
Page 22
Page 27

Call Forward
Call Forward lets you redirect incoming calls to an alternate number. Always redirects all
incoming calls regardless of the state of your phone. B-Int redirects internal calls when your
phone is busy, and B-Ext redirects external calls when your phone is busy. NA-Int redirects
internal calls after several rings if you don't answer, and NA-Ext redirects external calls after
several rings if you don't answer. It is common practice to set call forwarding to a voice mail
system that is internal to the 3300 system (ask your system administrator for details regarding the
voice mail system). You can also program Call Forwarding using the 3300 ICP Desktop Tool.
You will know if call forwarding is enabled by using the menus as described. If Call Forward is
enabled on an OpenPhone27, there is audible indication and an asterisk * will be shown next to
the number. If Call Forward is enabled, you will hear interrupted dial tone whenever you go off-
hook (by pressing the
indication.
To program Call Forward:
1. Long press the
2. Press No until “Call Forwarding?” appears.
3. Press Yes.
4. Press Next until the desired type of Call Forward appears (see above).
5. Press Review.
6. If a number is already programmed, press Change.
7. Press Program.
8. Do one of the following:
• Dial the destination number.
• For Call Forward I Am Here, dial your extension number.
9. Press Save.
10. Long press the
To turn Call Forward on and off (once it has been programmed):
key). However, if other Call Forwarding is enabled, there is no audible
key.
key.
1. Long press the
2. Press No until “Call Forwarding?” appears.
3. Press Yes.
4. Press Next until the desired type of Call Forward appears.
5. Press Review.
6. Press Change.
• To turn Call Forward on, press TurnOn. If Call Forward Always is enabled, you will hear
interrupted dial tone whenever you go off-hook (by pressing the
• To turn Call Forward off, press TurnOff.
7. Long press the
key.
key).
key.
Page 23
Page 28

To forward calls from a remote station to your current location (Call Forward – Remote):
1. Long press the
2. Press No until “Call Forwarding?” appears.
3. Press Yes.
4. Press Next until “I Am Here” appears.
5. Press Yes.
6. Dial the extension of the remote station.
7. Press Save.
To cancel Call Forward - Remote from the station that set the remote forwarding:
1. Press
2. Dial the Cancel Call Forwarding Follow Me – Remote feature access code.
3. Dial the extension of the remote station.
4. Press
To cancel Call Forward - Remote from the station that was forwarded:
1. Long press the
2. Press No until Call Forwarding? appears.
3. Press Yes.
.
.
key.
key.
4. Press Review.
5. Press Change.
6. Press TurnOff.
7. Long press the
To ensure that calls do not get forwarded again at the destination extension
(Call Forward - End Chaining):
1. Press
2. Dial the Call Forwarding - End Chaining feature access code.
3. Press
To again allow calls to be forwarded by the destination number:
1. Press
2. Dial the Cancel Call Forwarding - End Chaining feature access code.
3. Press
To force an incoming call to be forwarded (Call Forward – Forced):
• Press Forward. Pressing the forward key on an incoming call will redirect the call according
to your Call Forward NA settings.
.
.
.
.
key.
Page 24
Page 29

To override Call Forward and ring an extension (Call Forward – Override):
1. Press
2. Dial the Call Forward - Override feature access code.
3. Dial the extension number.
.
Callback
Callback lets you request that the system notify you when a busy extension or a busy external
line becomes idle, or when an unanswered station goes off-hook and then on-hook a gain.
To request a Callback when you reach a busy or unanswered station:
• Press Callback.
–or–
Dial the Callback - Setup feature access code.
To cancel a Callback:
1. Press
2. Dial the Callback Cancel Individual feature access code.
3. Dial the number of the called station.
4. Press
To cancel all Callbacks:
.
.
1. Press
2. Dial the Callback Cancel feature access code.
3. Press
.
.
Page 25
Page 30

Messaging - Callback
To leave a message waiting indication on a phone when you hear busy or ringback tone:
1. Short press of the
2. Press
3. Press OK.
To respond to a message waiting condition on your telephone:
"MESSAGES" appears in the display when you have callback messages waiting.
1. Short press of the
2. Press
3. Press OK.
4. If a password is required, dial your password and press Enter.
5. Press Yes.
6. Do one or all of the following (if desired):
• To display the time the message was sent, press More.
• To display the number of the caller, press More twice.
7. Do one of the following (if desired):
• To call the message sender, press Call.
• To delete the message, press Erase.
• To view the next message, press Message.
to select Message.
to select Message.
key.
key.
To check for messages from a remote station:
1. Long press the
2. Press No until Remote Msgs? appears.
3. Press Yes.
4. Dial your extension number.
5. Press Enter.
6. If a password is required, enter your password and press Enter.
7. Press Yes.
To set or change a password:
You can program a password to prevent access to your callback messages. If you set a
password, you will need to enter it in order to check your messages from another phone. To set
or change a password:
1. Long press the
2. Press No until “Set Password?” appears.
3. Press Yes.
key.
key.
Page 26
Page 31

4. Do one of the following:
• To enter a new password, enter your password (up to 7 digits, not including 0).
• To change or clear your password, enter your current password.
5. Press Enter.
6. Long press of the
key.
To clear a password:
1. Long press the
key.
2. Press No until “Set Password?” appears.
3. Press Yes.
4. Enter your current password.
5. Press Enter.
6. At the "New password" prompt, dial 0.
7. At the "Verification" prompt, dial 0.
8. Long press the
key.
For steps on how to cancel a Callback – Messaging indication that you have left on a set, see
Callback on page 25.
Page 27
Page 32

Using Advanced Features
Attendant Call Hold - Remote Retrieve
To retrieve a call placed on Hold by the attendant:
1. Press
2. Dial the Attendant Call Hold - Remote Retrieve feature access code.
3. Dial the console ID and the Hold Slot number.
.
Account Codes
To use Forced Account Codes:
1. Press
2. Dial the Account Code digits.
3. Do one of the following:
4. To submit the Account Code, press #.
5. To cancel, press ∗.
To enter an Account Code during a call:
1. Long press the
2. Press Yes.
3. Dial the Account Code digits.
4. Press Save.
.
key.
5. Do one of the following:
• For a verified account code, press Yes.
• For a non-verified account code, press No.
Call Park
The Call Park feature allows you to place a call in a special hold state. You, or someone else, can
then retrieve the call from any extension in the system. After parking the call, the system can
automatically connect you to paging equipment so that you can announce the call to the
requested party.
To park an active call:
1. Press
2. Dial the Call Park feature access code.
3. Dial the directory number on which to park the call.
4. To inform a user that a parked call is waiting, do one of the following:
• If automatic paging is enabled, announce the call and the directory number on which the
• If automatic paging is disabled, dial the Loudspeaking Paging feature access code,
.
call is parked.
followed by the Paging zone number (if required). Then, announce the call and the
directory number on which the call is parked.
Page 28
Page 33

To retrieve a parked call:
1. Press
2. Dial the Call Park - Retrieve feature access code.
3. Dial the directory number on which the call is parked.
4. If there are multiple calls parked on the number, dial the two-digit index number to retrieve a
specific call, or # to retrieve the longest parked call.
.
Call Pickup
To answer a call that is ringing at another station in your Pickup Group:
1. Press
2. Press Pickup.
To answer a call that is ringing at a station not in your Pickup Group:
1. Press
2. Dial the Directed Call Pickup feature access code.
3. Dial the number of the ringing station.
.
.
Camp-on
To Camp-on to a busy station:
• Press Wait.
To retrieve a call when you hear Camp-on tone:
• Press Trade.
Do Not Disturb
To activate or deactivate Do Not Disturb:
1. Long press the
2. Press
3. Press TurnOn or TurnOff.
To activate Do Not Disturb from a remote station:
1. Press
2. Dial the Do Not Disturb Remote feature access code.
3. Dial the number of the station to which Do Not Disturb is to apply.
4. Press
.
.
key.
to select Do Not Disturb.
Page 29
Page 34

To deactivate Do Not Disturb from a remote station:
1. Press
2. Dial the Do Not Disturb Cancel Remote feature access code.
3. Dial the number of the station with Do Not Disturb activated.
4. Press
.
.
Override
To use Override when you encounter busy or DND tone:
• Dial the Override Feature Access code.
Reminder
To program a Reminder:
1. Long press the
2. Press No until Timed Reminder? appears.
3. Press Yes.
4. Enter the time in 24-hour format.
5. Press Save.
To view, change, and/or cancel a pending reminder:
key.
1. Long press the
2. Press No until Timed Reminder? appears.
3. Press Yes.
4. Do one of the following:
• To change the reminder, press Change, enter the new time, and press Save.
• To cancel the reminder, press Clear.
• To exit without cancelling the reminder, long press the
To acknowledge a reminder when your phone rings once:
• Press Confirm.
key.
key.
Group Paging / Meet Me Answer
Group Paging allows you to page a group of phones through their built-in speakers. You can
belong to as many as three paging groups with one group designated as your "prime" group.
When you need to respond to a Group Page but don't know the identity or extension number of
the paging party, use the Meet Me Answer feature. You have up to 15 minutes after receiving the
page to use Meet Me Answer.
To make a Group Page:
1. Press
.
2. Dial the Direct Page feature access code.
Page 30
Page 35

• To page your prime page group, press #.
• To page a specific page group, dial the page group directory number.
3. Speak to the dialed party after the tone.
To respond to a Group Page by using Meet Me Answer:
1. Press
2. Dial the Meet Me Answer Feature Access code.
• To respond to a page from your prime page group, press #.
• To respond to a page from a specific page group, dial the page group directory number.
.
Trunk Flash
The Trunk Flash feature allows you to access Centrex features (if available) while you are talking
on an outside call.
To flash a trunk while talking on an outside call:
1. Press the
2. Dial the Trunk Single Flash or Trunk Double Flash Feature Access code.
3. Wait for dial tone.
4. Dial the Centrex feature access code.
key.
Page 31
Page 36

Regulatory Aapprovals
The CE marking affixed to this product indicates conformance to the R&TTE Directive 99/05/EC
(Radio and Telecommunications Terminal Equipment Directive).
For a copy of the complete Manufacturers Declaration of Conformity, please contact the
Regulatory Approvals Manager at the address below:
Mitel Networks Ltd.
Mitel Business Park
Portskewett, Monmouthshire
NP26 5YR
UK.
Page 32
Page 37

Index
2
230 Vac, 5
A
Accidental dialling, 3
Account codes, 30
Adapter, for charger, 6
Advanced features, 30
Alarm Set, 2
Approvals, 34
Attend Call Hold - Remote Retrieve, 30
Attendant, 30
Auto Answer, 2
Auto Key Lock, 2
B
Batteries
charging, 6
discharging, 6
disposal, 6
replacing, 5
Battery
manufacturer, 5
C
Call handling menu, 10
Call park, 30
Call pickup, 31
Call time, of handset, 6
Callback, 27
Campon, 31
Charger
connecting, 6
Charger, setting up, 5
Chirp, 2
Clearing a password, 29
Comfort and safety, 3
Contrast, 2
Coverage warning, 10
Customising your phone, 12
D
Display indictors, 8
Do not disturb, 31
Double flash, 33
E
Emergency services, 3
F
Features and functions, 1
Features, advanced, 30
Flash, 33
G
Group paging, 32
H
Handset
customising, 12
powering on/off, 8
visual indicators, 8
Headset, 2
Hearing, protecting, 4
I
Icons
battery level, 6
meaning, 8
Inserting, batteries, 5
IPEI, 10
K
Key Click, 2
Keys
functions, 1
L
Language, changing, 12
Languages, 2
Local mode
menu, 10
Local Settings menu, 10
Page 33
Page 38

OpenPhone 27 Handset User Guide
Long press
function, 1
M
Magnetic fields, 5
Mains socket, 6
Medical emergencies, 3
Meet me answer, 33
Melodies, 2
Menu
Call handling mode, 10
local mode, 10
Local Settings, 10
system features, 9
Menu and Softkeys, 2
Menu Lock, 2
Messaging, 28
Multiple Ringer Settings, 2
N
Nuisance calls, 3
O
OpenPhone 27
features, 1
figure, 1
menus, 9
powering on/off, 8
Override, 27, 32
P
Pack, battery, 5
Paging, 32
Password, for callback messages, 28
Pickup, 31
Powering on/off, 8
R
Range Warning, 2
Regulatory approvals, 34
Reminder, 32
Remote, checking messages, 28
S
Short press
description. See
Silent charging, 7
Silent Charging, 2
Single flash, 33
SOS key, 3
SOS Number, 2
Standby time, of batteries, 6
System administrator, 10
System menu, 9
T
Telephone Book, 2
Time and date, 2
Timed reminder, 32
Trembler, 2
Trunk flash, 33
Twinning, 7
V
Volume, 2
W
Warning, coverage, 10
Wireless telephone, 1
Page 34
 Loading...