

Page 1

6390 Analog Phone
QUICK START GUIDE
58014970 REV00
Page 2

NOTICE
The information contained in this document is believed to be accurate in all respects but is not warranted
by Mitel Networks™ Corporation (MITEL®). The information is subject to change without notice and should
not be construed in any way as a commitment by Mitel or any of its affiliates or subsidiaries. Mitel and its
affiliates and subsidiaries assume no responsibility for any errors or omissions in this document. Revisions
of this document or new editions of it may be issued to incorporate such changes.
No part of this document can be reproduced or transmitted in any form or by any means - electronic or
mechanical - for any purpose without written permission from Mitel Networks Corporation.
Trademarks
The trademarks, service marks, logos and graphics (collectively “Trademarks”) appearing on Mitel's
Internet sites or in its publications are registered and unregistered trademarks of Mitel Networks
Corporation (MNC) or its subsidiaries (collectively “Mitel”) or others. Use of the Trademarks is prohibited
without the express consent from Mitel. Please contact our legal department at [email protected] for
additional information. For a list of the worldwide Mitel Networks Corporation registered trademarks, please
refer to the website: http://www.mitel.com/trademarks.
®,™ Trademark of Mitel Networks Corporation
© Copyright 2016, Mitel Networks Corporation
6390 Analog Phone Quick Start Guide
58014970 REV00 - August 2016
All rights reserved
Page 3

Table of Contents
Welcome . . . . . . . . . . . . . . . . . . . . . . . . . . . . . . . . . . . . . . . . . . . . . . . . . . . . . . . . . . . . . . . . . . . . . . . . . 1
Phone features . . . . . . . . . . . . . . . . . . . . . . . . . . . . . . . . . . . . . . . . . . . . . . . . . . . . . . . . . . . . . . . . . . 1
Emergency service feature . . . . . . . . . . . . . . . . . . . . . . . . . . . . . . . . . . . . . . . . . . . . . . . . . . . . . . . . . 1
Unpacking the phone . . . . . . . . . . . . . . . . . . . . . . . . . . . . . . . . . . . . . . . . . . . . . . . . . . . . . . . . . . . . . 2
Installation and setup . . . . . . . . . . . . . . . . . . . . . . . . . . . . . . . . . . . . . . . . . . . . . . . . . . . . . . . . . . . . . 2
Supporting Documentation . . . . . . . . . . . . . . . . . . . . . . . . . . . . . . . . . . . . . . . . . . . . . . . . . . . . . . . . . 2
Phone keys . . . . . . . . . . . . . . . . . . . . . . . . . . . . . . . . . . . . . . . . . . . . . . . . . . . . . . . . . . . . . . . . . . . . . . . 3
Key panel . . . . . . . . . . . . . . . . . . . . . . . . . . . . . . . . . . . . . . . . . . . . . . . . . . . . . . . . . . . . . . . . . . . . . . 3
Key description . . . . . . . . . . . . . . . . . . . . . . . . . . . . . . . . . . . . . . . . . . . . . . . . . . . . . . . . . . . . . . . . . . 4
Making and receiving calls. . . . . . . . . . . . . . . . . . . . . . . . . . . . . . . . . . . . . . . . . . . . . . . . . . . . . . . . . . . . 6
Using the handset . . . . . . . . . . . . . . . . . . . . . . . . . . . . . . . . . . . . . . . . . . . . . . . . . . . . . . . . . . . . . . . . 6
Making a call using the handset . . . . . . . . . . . . . . . . . . . . . . . . . . . . . . . . . . . . . . . . . . . . . . . . . . 6
Answering an incoming call using the handset . . . . . . . . . . . . . . . . . . . . . . . . . . . . . . . . . . . . . . . 6
Switching to the handset while on a call . . . . . . . . . . . . . . . . . . . . . . . . . . . . . . . . . . . . . . . . . . . . 6
Using the speakerphone . . . . . . . . . . . . . . . . . . . . . . . . . . . . . . . . . . . . . . . . . . . . . . . . . . . . . . . . . . . 7
Making a call using the speakerphone . . . . . . . . . . . . . . . . . . . . . . . . . . . . . . . . . . . . . . . . . . . . . 7
Answering an incoming call using the speakerphone . . . . . . . . . . . . . . . . . . . . . . . . . . . . . . . . . . 7
Switching to the speakerphone while on a call . . . . . . . . . . . . . . . . . . . . . . . . . . . . . . . . . . . . . . . 7
Using a headset . . . . . . . . . . . . . . . . . . . . . . . . . . . . . . . . . . . . . . . . . . . . . . . . . . . . . . . . . . . . . . . . . 7
Making a call using a headset . . . . . . . . . . . . . . . . . . . . . . . . . . . . . . . . . . . . . . . . . . . . . . . . . . . . 8
Answering an incoming call using a headset . . . . . . . . . . . . . . . . . . . . . . . . . . . . . . . . . . . . . . . . . 8
Switching to a headset while on a call . . . . . . . . . . . . . . . . . . . . . . . . . . . . . . . . . . . . . . . . . . . . . . 8
Volume controls . . . . . . . . . . . . . . . . . . . . . . . . . . . . . . . . . . . . . . . . . . . . . . . . . . . . . . . . . . . . . . . . . 8
Adjusting the ringer volume . . . . . . . . . . . . . . . . . . . . . . . . . . . . . . . . . . . . . . . . . . . . . . . . . . . . . . 8
Adjusting the handset volume . . . . . . . . . . . . . . . . . . . . . . . . . . . . . . . . . . . . . . . . . . . . . . . . . . . . 8
Adjusting the speakerphone volume . . . . . . . . . . . . . . . . . . . . . . . . . . . . . . . . . . . . . . . . . . . . . . . 9
Adjusting the headset volume . . . . . . . . . . . . . . . . . . . . . . . . . . . . . . . . . . . . . . . . . . . . . . . . . . . . 9
Redialing a number . . . . . . . . . . . . . . . . . . . . . . . . . . . . . . . . . . . . . . . . . . . . . . . . . . . . . . . . . . . . . . . 9
Redialing a number . . . . . . . . . . . . . . . . . . . . . . . . . . . . . . . . . . . . . . . . . . . . . . . . . . . . . . . . . . . . 9
Handling calls . . . . . . . . . . . . . . . . . . . . . . . . . . . . . . . . . . . . . . . . . . . . . . . . . . . . . . . . . . . . . . . . . . . . 10
Placing a call on hold . . . . . . . . . . . . . . . . . . . . . . . . . . . . . . . . . . . . . . . . . . . . . . . . . . . . . . . . . . . . 10
When on hold . . . . . . . . . . . . . . . . . . . . . . . . . . . . . . . . . . . . . . . . . . . . . . . . . . . . . . . . . . . . . . . . 10
Retrieving a held call . . . . . . . . . . . . . . . . . . . . . . . . . . . . . . . . . . . . . . . . . . . . . . . . . . . . . . . . . . 10
Muting a call . . . . . . . . . . . . . . . . . . . . . . . . . . . . . . . . . . . . . . . . . . . . . . . . . . . . . . . . . . . . . . . . . . . 10
Using the Flash key . . . . . . . . . . . . . . . . . . . . . . . . . . . . . . . . . . . . . . . . . . . . . . . . . . . . . . . . . . . . . 11
Ending calls . . . . . . . . . . . . . . . . . . . . . . . . . . . . . . . . . . . . . . . . . . . . . . . . . . . . . . . . . . . . . . . . . . . . 11
Managing calls. . . . . . . . . . . . . . . . . . . . . . . . . . . . . . . . . . . . . . . . . . . . . . . . . . . . . . . . . . . . . . . . . . . . 12
Directory . . . . . . . . . . . . . . . . . . . . . . . . . . . . . . . . . . . . . . . . . . . . . . . . . . . . . . . . . . . . . . . . . . . . . . 12
Accessing the Directory . . . . . . . . . . . . . . . . . . . . . . . . . . . . . . . . . . . . . . . . . . . . . . . . . . . . . . . . 12
Adding a new Directory entry . . . . . . . . . . . . . . . . . . . . . . . . . . . . . . . . . . . . . . . . . . . . . . . . . . . . 12
iii
Page 4

6930 Analog Phone Quick Start Guide
Editing a Directory entry . . . . . . . . . . . . . . . . . . . . . . . . . . . . . . . . . . . . . . . . . . . . . . . . . . . . . . . 13
Deleting a Directory entry . . . . . . . . . . . . . . . . . . . . . . . . . . . . . . . . . . . . . . . . . . . . . . . . . . . . . . 14
Deleting all Directory entries . . . . . . . . . . . . . . . . . . . . . . . . . . . . . . . . . . . . . . . . . . . . . . . . . . . . 14
Redial List . . . . . . . . . . . . . . . . . . . . . . . . . . . . . . . . . . . . . . . . . . . . . . . . . . . . . . . . . . . . . . . . . . . . . 15
Accessing the Redial List . . . . . . . . . . . . . . . . . . . . . . . . . . . . . . . . . . . . . . . . . . . . . . . . . . . . . . 15
Redialing a number . . . . . . . . . . . . . . . . . . . . . . . . . . . . . . . . . . . . . . . . . . . . . . . . . . . . . . . . . . . 15
Deleting an entry from the Redial List . . . . . . . . . . . . . . . . . . . . . . . . . . . . . . . . . . . . . . . . . . . . . 15
Deleting all entries from the Redial List . . . . . . . . . . . . . . . . . . . . . . . . . . . . . . . . . . . . . . . . . . . . 16
Copying a Redial List entry to the Directory or a Memory key . . . . . . . . . . . . . . . . . . . . . . . . . . 16
Callers List . . . . . . . . . . . . . . . . . . . . . . . . . . . . . . . . . . . . . . . . . . . . . . . . . . . . . . . . . . . . . . . . . . . . 17
Accessing the Callers List . . . . . . . . . . . . . . . . . . . . . . . . . . . . . . . . . . . . . . . . . . . . . . . . . . . . . . 18
Dialing a Callers List entry . . . . . . . . . . . . . . . . . . . . . . . . . . . . . . . . . . . . . . . . . . . . . . . . . . . . . . 18
Editing the number of a Callers List entry before dialing . . . . . . . . . . . . . . . . . . . . . . . . . . . . . . . 18
Deleting a Callers List entry . . . . . . . . . . . . . . . . . . . . . . . . . . . . . . . . . . . . . . . . . . . . . . . . . . . . . 19
Deleting all Callers List entries . . . . . . . . . . . . . . . . . . . . . . . . . . . . . . . . . . . . . . . . . . . . . . . . . . 19
Memory keys . . . . . . . . . . . . . . . . . . . . . . . . . . . . . . . . . . . . . . . . . . . . . . . . . . . . . . . . . . . . . . . . . . . . . 21
Creating and editing Memory keys . . . . . . . . . . . . . . . . . . . . . . . . . . . . . . . . . . . . . . . . . . . . . . . . . . 21
Making calls from Memory keys . . . . . . . . . . . . . . . . . . . . . . . . . . . . . . . . . . . . . . . . . . . . . . . . . . . . 22
Making a regular memory key call . . . . . . . . . . . . . . . . . . . . . . . . . . . . . . . . . . . . . . . . . . . . . . . . 22
Pre-dialing a memory key . . . . . . . . . . . . . . . . . . . . . . . . . . . . . . . . . . . . . . . . . . . . . . . . . . . . . . 22
Deleting Memory keys . . . . . . . . . . . . . . . . . . . . . . . . . . . . . . . . . . . . . . . . . . . . . . . . . . . . . . . . . . . 22
Display messages and lights . . . . . . . . . . . . . . . . . . . . . . . . . . . . . . . . . . . . . . . . . . . . . . . . . . . . . . . . . 23
Display messages . . . . . . . . . . . . . . . . . . . . . . . . . . . . . . . . . . . . . . . . . . . . . . . . . . . . . . . . . . . . . . . 23
Lights . . . . . . . . . . . . . . . . . . . . . . . . . . . . . . . . . . . . . . . . . . . . . . . . . . . . . . . . . . . . . . . . . . . . . . . . 24
Customizing your phone . . . . . . . . . . . . . . . . . . . . . . . . . . . . . . . . . . . . . . . . . . . . . . . . . . . . . . . . . . . . 25
Using the Options List . . . . . . . . . . . . . . . . . . . . . . . . . . . . . . . . . . . . . . . . . . . . . . . . . . . . . . . . . . . . 25
Troubleshooting. . . . . . . . . . . . . . . . . . . . . . . . . . . . . . . . . . . . . . . . . . . . . . . . . . . . . . . . . . . . . . . . . . . 26
What are services and how do I use them? . . . . . . . . . . . . . . . . . . . . . . . . . . . . . . . . . . . . . . . . . . . 26
I’m having trouble with services I have subscribed to – how do I get help? . . . . . . . . . . . . . . . . . . . 26
Why is my display blank? . . . . . . . . . . . . . . . . . . . . . . . . . . . . . . . . . . . . . . . . . . . . . . . . . . . . . . . . . 26
Why can’t I get a dial tone? . . . . . . . . . . . . . . . . . . . . . . . . . . . . . . . . . . . . . . . . . . . . . . . . . . . . . . . 26
Why can’t I hear a caller or be heard? . . . . . . . . . . . . . . . . . . . . . . . . . . . . . . . . . . . . . . . . . . . . . . . 26
Why are incoming calls not identified on the display? . . . . . . . . . . . . . . . . . . . . . . . . . . . . . . . . . . . 26
Why are there no messages on the screen when a call waiting call comes in? . . . . . . . . . . . . . . . . 26
Why is the light not coming on with a new voice mail message? . . . . . . . . . . . . . . . . . . . . . . . . . . . 26
Why can’t I dial a number in the Callers List? . . . . . . . . . . . . . . . . . . . . . . . . . . . . . . . . . . . . . . . . . . 27
How do I set the time and date? . . . . . . . . . . . . . . . . . . . . . . . . . . . . . . . . . . . . . . . . . . . . . . . . . . . . 27
Can I turn the light on the screen off? . . . . . . . . . . . . . . . . . . . . . . . . . . . . . . . . . . . . . . . . . . . . . . . . 27
Why does the phone wobble? . . . . . . . . . . . . . . . . . . . . . . . . . . . . . . . . . . . . . . . . . . . . . . . . . . . . . 27
iv
Page 5

Welcome
Affordable and easy to use, the 6390 puts information and easy access to features right at
your fingertips. While it is as affordable as many other telephones, the 6390 is far from
ordinary. When it comes to making calls, the 6390’s modern design and large display screen
make a world of difference. Save up to 200 numbers in your Directory for fast, easy dialing.
Place calls without lifting the receiver. Subscribe to network services like Call Display and
Visual Call Waiting, and you will see the caller’s name and number before you answer. With
six “softkeys” that provide different options based on activity, the 6390 provides
step-by-step instructions and menus for ease of use. The 6390 is a telephone that offers
flawless performance in any environment.
Phone features
The 6390 has a host of powerful new features. Some of these features include:
• Large 8-line 3.5” backlit display.
• 6 programmable softkeys (4 pages of softkeys for a total of 20 functions).
• Press-and-hold memory key configuration feature.
Welcome
• 200-name and number Directory.
• 100-name and number Callers List.
• 15-name and number Redial List.
• English/French/Spanish language display prompts.
• Enhanced speakerphone for handsfree calls.
• Analog headset support.
• AC power adapter (included).
Emergency service feature
The 6390 will provide phone service during a power failure. However, only the dialpad, ringer, and
handset will function. If you are on a handset call during a power interruption, the 6390 will keep the
call, although the display will not work while the power is off. Handsfree calls will not be re-established
during a power interruption.
1
Page 6

6930 Analog Phone Quick Start Guide
Unpacking the phone
When you unpack your phone, you should ensure that you have all of the following items. If any part
is missing, contact the supplier of your phone.
Analog Cable
6390 Analog Phone
Installation and setup
Please refer to the 6390 Installation Guide included with your phone for basic installation and physical
setup information.
Supporting Documentation
To access phone and system-specific documentation:
1. In your browser, go to http://www.mitel.com.
2. Click Product Manuals under the Support section.
3. Select PDF Guides and Online Help under the End User Documents drop-down menu.
4. In the left-hand menu, navigate to Analog Phones.
Handset and Cord Two-Angle Stand Installation GuideAC Adapter
2
Page 7
Phone keys
Key panel
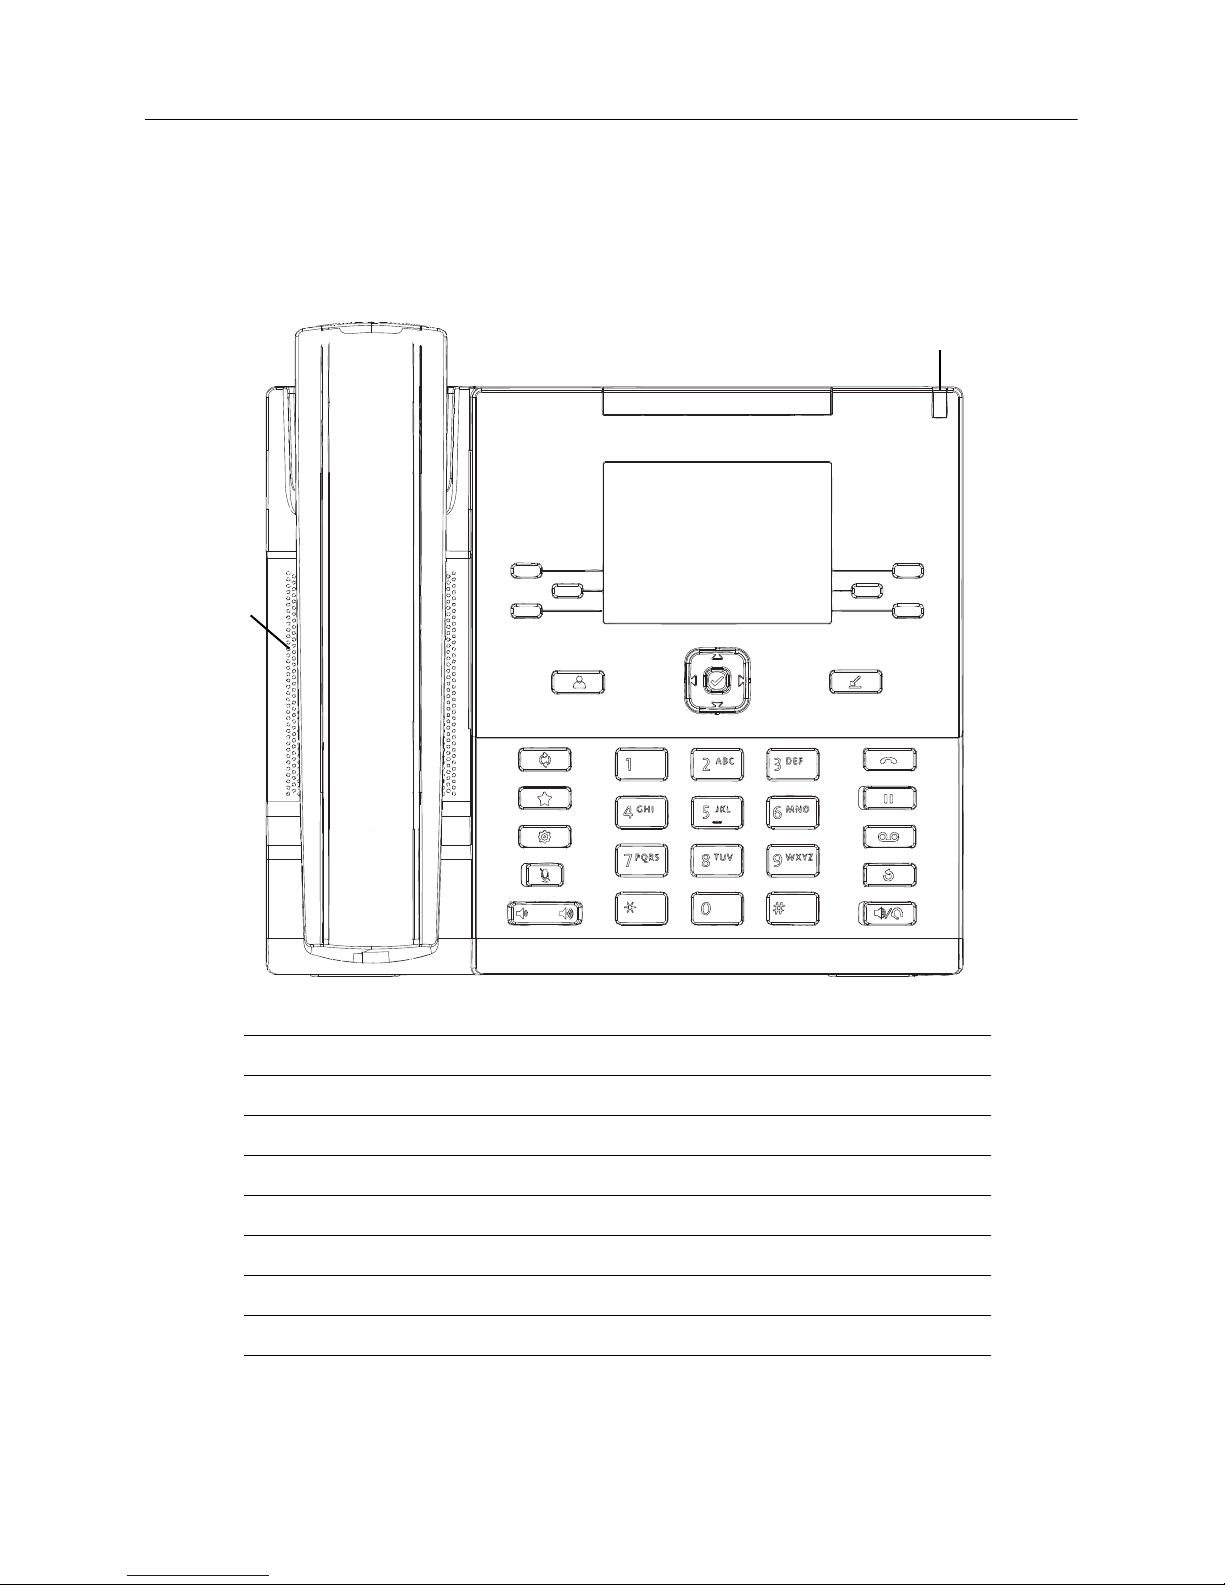
The following sections describe the various 6390 phone key functions and how they can help you
make and manage your calls and caller information.
Phone keys
6390 Handset
High Quality Speakerphone
Message Waiting Indicator (MWI)
Flash Key
Feature Key
Options Key
Mute Key
Hold Key
Voice Mail Key
Redial Key
Speaker/Headset Key
Directory
Navigation Keys/Select Button
Callers List Key
Volume Control
Dialpad
Goodbye Key
Programmable Softkeys
LCD Screen
3
Page 8
6930 Analog Phone Quick Start Guide
Key description
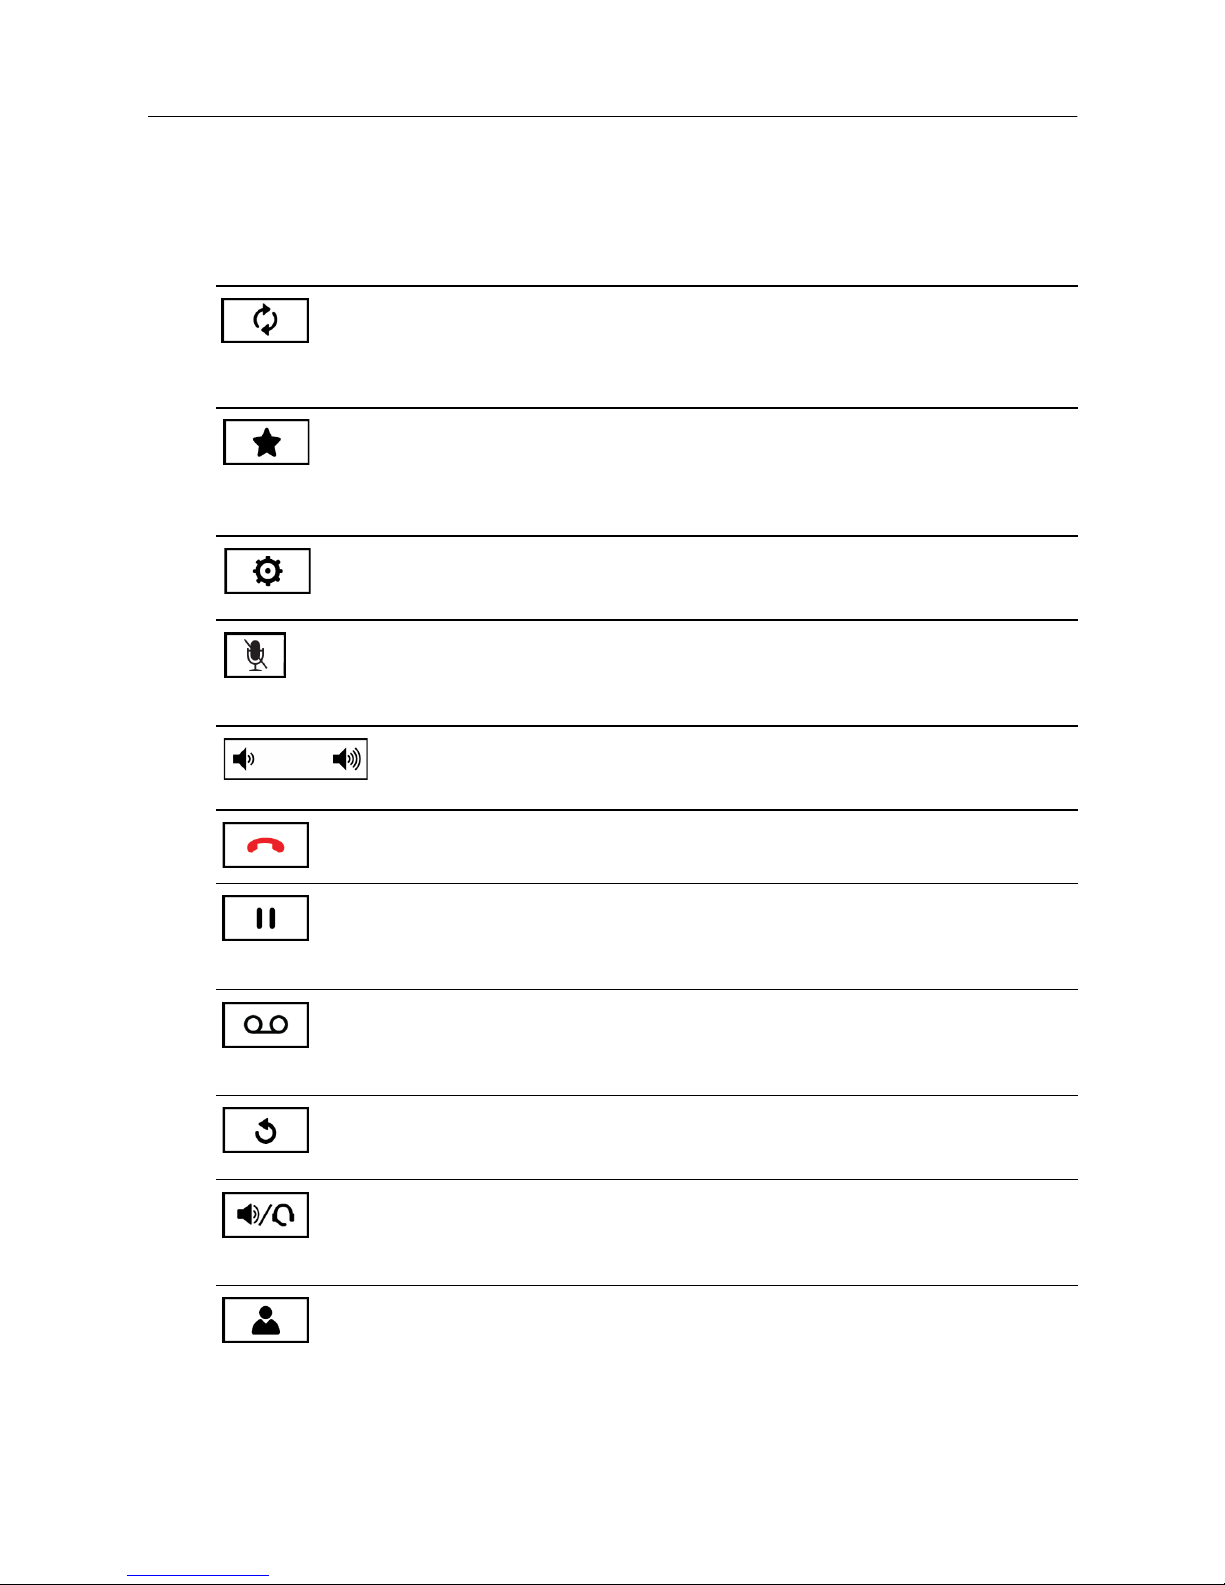
The following table describes the keys on the 6390:
Key Description
Flash key - Allows you to access your subscribed services, such as call waiting
and three-way calling. These services vary from area to area, so contact your
telephone service provider or PBX Administrator for instructions on using
available services with your 6390 phone. If the instructions say to press the
“hook-switch” or “receiver button,” press the Flash key.
Feature key - Provides access to advanced features such as Do Not Disturb
(DND), Voice Mail, and Call Forward.
For more information, see the 6390 Analog Phone User Guide, which can be
downloaded as per the instructions detailed in “Supporting Documentation” on
page 2.
Options key - Provides access to various basic and advanced options allowing
you to fully customize your phone.
For more information, see “Customizing your phone” on page 25.
Mute key - Mutes the microphone so that your caller cannot hear you (the light
indicator turns on and a message is displayed on screen when the microphone is
on mute).
For more information, see “Muting a call” on page 10.
Volume controls - Adjusts the volume for the ringer, handset, headset, and
speakerphone.
For more information, see “Volume controls” on page 8.
Goodbye key - Ends an active call. The Goodbye key also exits an open list,
such as the Options List, without saving changes.
Hold key - Places an active call on hold. To retrieve a held call, press the Hold
key again (the light indicator turns on and a message is displayed on screen when
a call is placed on hold).
For more information, see “Placing a call on hold” on page 10.
Voice mail key - Accesses the voice mail system (if configured).
For more information, see the 6390 Analog Phone User Guide, which can be
downloaded as per the instructions detailed in “Supporting Documentation” on
page 2.
Redial key - Accesses a list of the last 15 previously dialed numbers. Pressing
the Redial key twice redials the last dialed number.
For more information, see “Redial List” on page 15.
Speaker/Headset key - Transfers the active call to the speaker or headset,
allowing handsfree use of the phone.
For more information, see “Using the speakerphone” on page 7 and “Using a
headset” on page 7.
Directory key - Accesses a directory of up to 200 names and phone numbers.
For more information, see “Directory” on page 12.
4
Page 9
Key Description
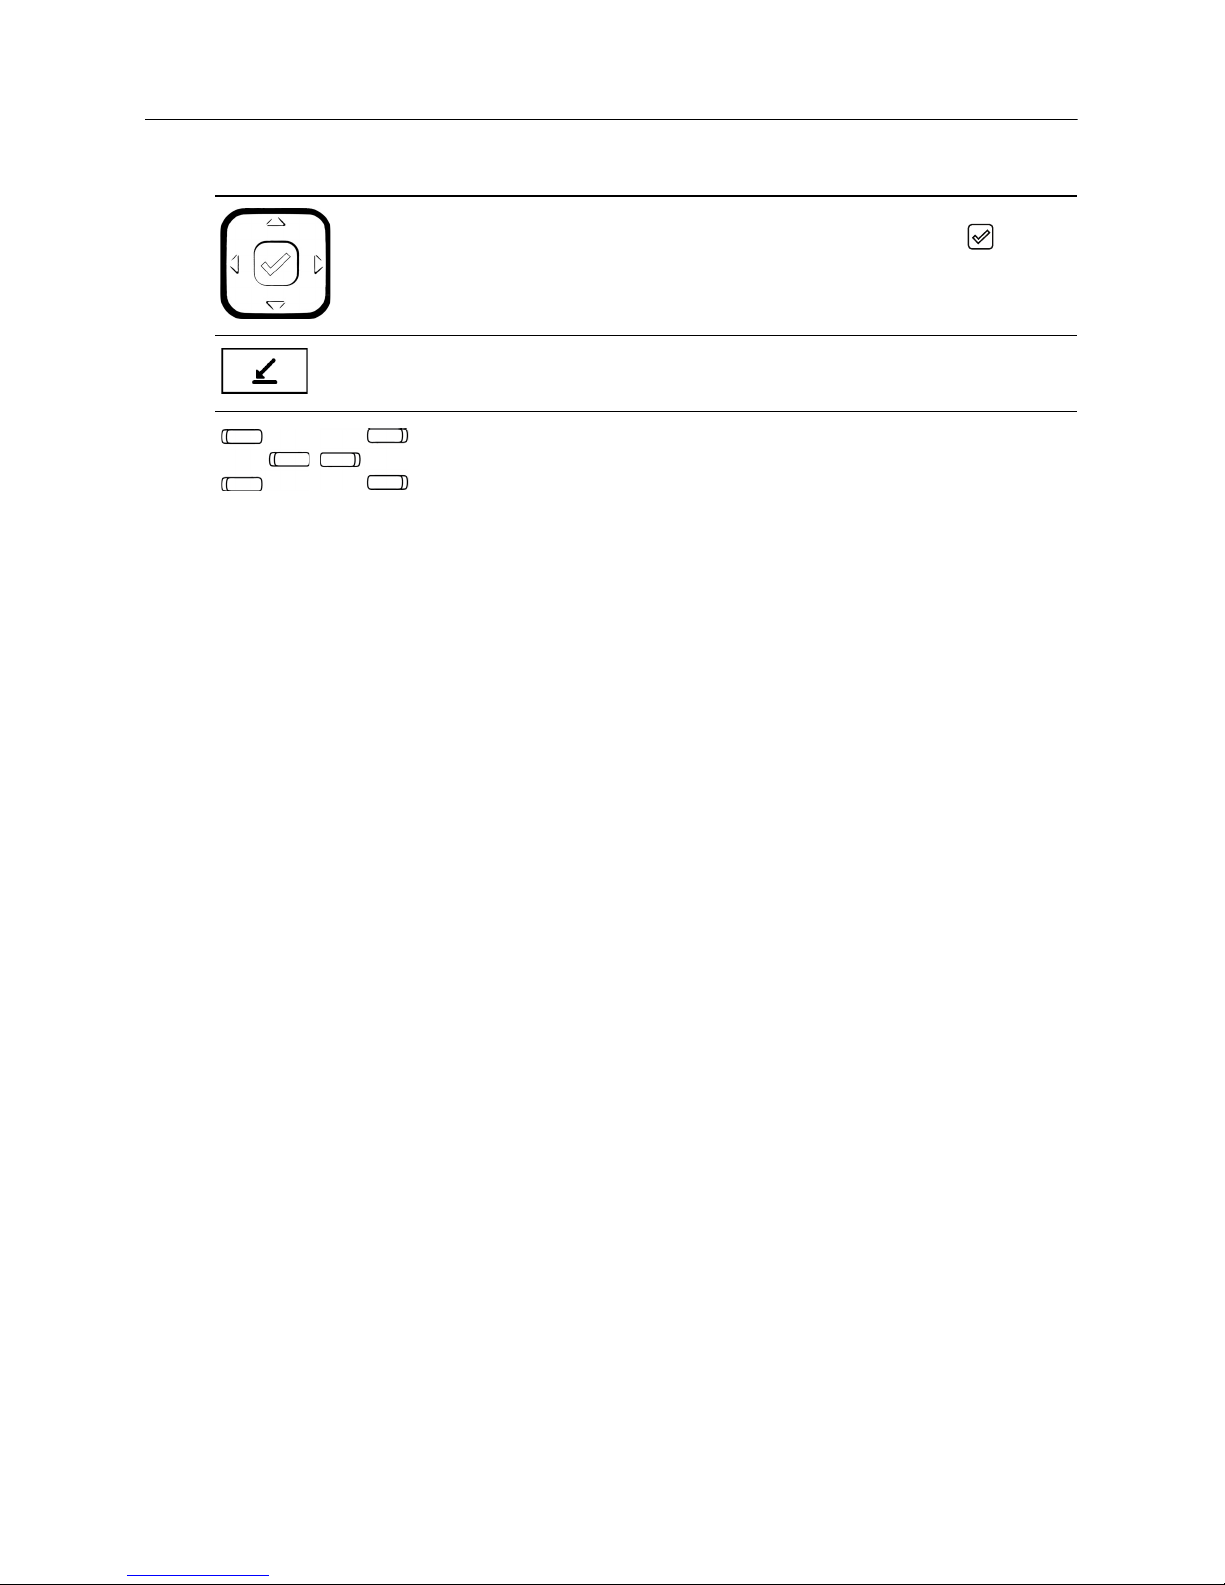
Navigation keys and select button - Multi-directional navigation keys allow you
to navigate through the phone’s user interface. Pressing the center button
selects/sets options.
Callers List key - Accesses a list of the last 100 calls received.
For more information, see “Callers List” on page 17.
Softkeys - Six contextual softkeys that allow you select commands displayed on
the screen. Five of the softkeys are also programmable and allow you to configure
up to 20 memory key entries.
For more information see “Memory keys” on page 21.
Phone keys
5
Page 10

6930 Analog Phone Quick Start Guide
Making and receiving calls
This section describes how to make and receive calls on your 6390 using your handset,
speakerphone, or headset.
Outgoing Call Screen
9O5-76O-5OOO
Timer OO:O1
Using the handset
Making a call using the handset
You can use the 6390 to make a regular call or you can pre-dial a phone number to ensure it is
correct before it is dialed out. Follow the procedures below to make a regular or pre-dialed call.
Making a regular call
1. Lift the handset.
2. At the dial tone, enter the number you wish to call using the dialpad.
Incoming Call Screen
John Smith
9O5-76O-5OOO
January 01 12:OOpm
More-
Pre-dialing a number
Note: Pre-dialing is only available if the Live Dialpad feature is disabled. Live dialpad can be
disabled through the Live dialpad option in the Options List.
1. Enter the number you wish to call using the dialpad.
2. Lift the handset or press the Dial softkey and then lift the handset.
Answering an incoming call using the handset
To answer an incoming call using the handset, lift the handset when the phone rings.
Note: If you subscribe to a Caller ID service, caller information will be sent from the telephone
service provider to your 6390 between the first and second ring. Therefore, if you want the number
of the incoming call to appear on the display and in the Callers List, you must wait until the Caller
ID information appears on the display before answering the phone.
Switching to the handset while on a call
When on an active call using a headset or the speakerphone, pick up the handset to switch to the
audio path to the handset.
6
Page 11

Using the speakerphone
The speakerphone feature allows you to speak to someone without using the handset or a headset.
Making a call using the speakerphone
Making a regular call
1. Press the key (press the key twice if a headset is attached to the phone).
2. At the dial tone, enter the number you wish to call using the dialpad.
Pre-dialing a number
Note: Pre-dialing is only available if the Live Dialpad feature is disabled. Live dialpad can be
disabled through the Live dialpad option in the Options List.
1. Enter the number you wish to call using the dialpad.
2. Press the key (press the key twice if a headset is attached to the phone) or press
the Dial softkey (and press the key if a headset is attached to the phone).
Answering an incoming call using the speakerphone
Making and receiving calls
To answer an incoming call using the speakerphone, press the key when the phone rings
(press the key twice if a headset is attached to the phone).
Note: If you subscribe to a Caller ID service, caller information will be sent from the telephone
service provider to your 6390 between the first and second ring. Therefore, if you want the number
of the incoming call to appear on the display and in the Callers List, you must wait until the Caller
ID information appears on the display before answering the phone.
Switching to the speakerphone while on a call
When on an active call using the handset, press the key to switch to the speakerphone (press
the key twice if a headset is attached to the phone) and hang up the handset.
When on an active call using a headset, press the key to switch to the speakerphone.
Using a headset
The 6390 accepts analog headsets through the RJ9 headset port on the back of the phone indicated
by the f (headset) icon.
Contact your phone equipment retailer or distributor to purchase a compatible headset. For headset
installation instructions, please refer to the 6390 Installation Guide provided with your phone.
Notes:
1. The RJ9 headset port is for headset use only. Plugging any other devices into this port may
cause damage to the phone and will void your warranty.
2. Customers should read and observe all safety recommendations contained in the respective
headset operating guides when using any headset.
7
Page 12

6930 Analog Phone Quick Start Guide
Making a call using a headset
Making a regular call
1. Press the key.
2. At the dial tone, enter the number you wish to call using the dialpad.
Pre-dialing a number
Note: Pre-dialing is only available if the Live Dialpad feature is disabled. Live dialpad can be
disabled through the Live dialpad option in the Options List.
1. Enter the number you wish to call using the dialpad.
2. Press the key or press the Dial softkey.
Answering an incoming call using a headset
To answer an incoming call using a headset, press the key when the phone rings.
Note: If you subscribe to a Caller ID service, caller information will be sent from the telephone
service provider to your 6390 between the first and second ring. Therefore, if you want the number
of the incoming call to appear on the display and in the Callers List, you must wait until the Caller
ID information appears on the display before answering the phone.
Switching to a headset while on a call
When on an active call using the handset, press the key to switch to the headset and hang
up the handset.
When on an active call using the speakerphone, press the key to switch to the headset.
Volume controls
You can adjust the volume of the ringer, handset, speakerphone, and headset by pressing the left
or right side of the key.
Adjusting the ringer volume
While the phone is idle or ringing, press the left or right side of the key to increase or
decrease the ringer volume.
Adjusting the handset volume
Lift the handset off hook, press the left or right side of the key to increase or decrease
the handset volume.
Note: To prevent hearing-related injuries, when you set the handset volume to its maximum level,
after placing the handset back on hook, the phone will automatically reset the handset volume to
its default level.
8
Page 13
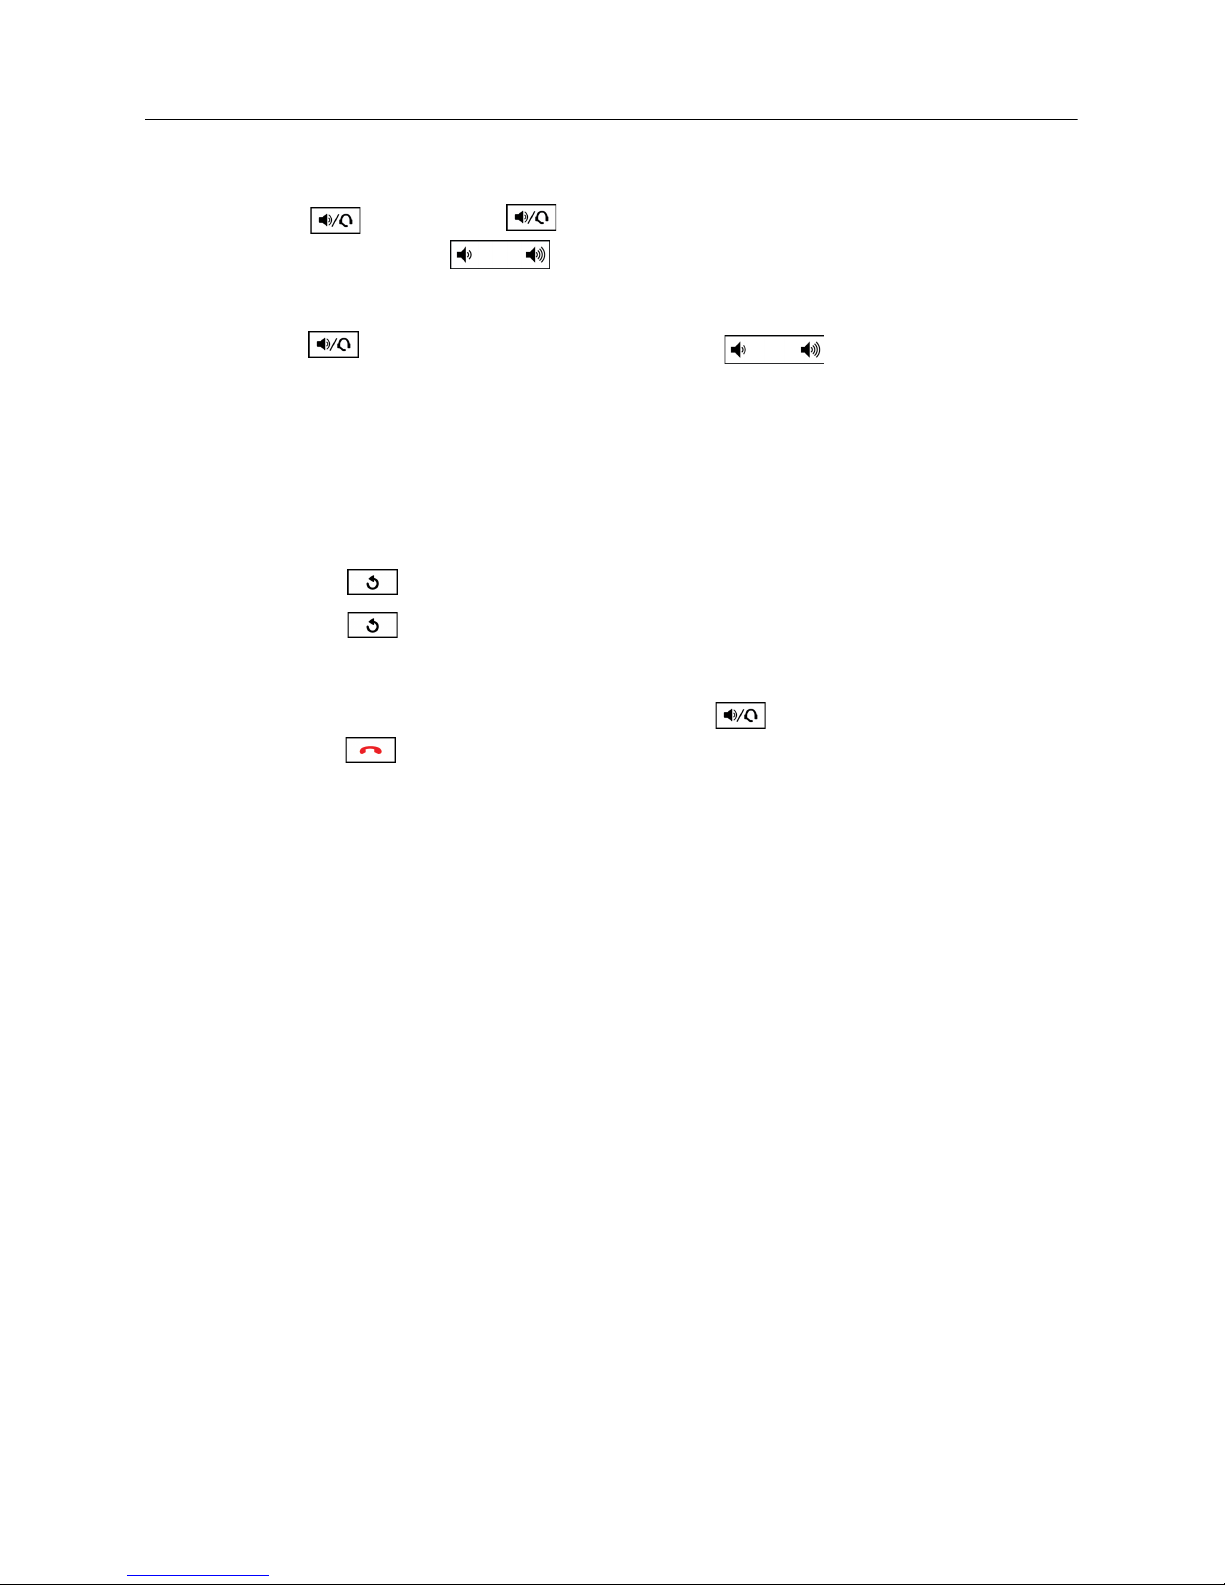
Adjusting the speakerphone volume
Press the key (press the key twice if a headset is attached to the phone) and press
the left or right side of the key to increase or decrease the speakerphone volume.
Adjusting the headset volume
Press the key and press the left or right side of the key to increase or decrease
the headset volume.
Redialing a number
The Redial List stores information for up to the last 15 numbers you called and can be used to redial
one of your previously called numbers.
Redialing a number
1. Press the key to access the Redial List.
2. Press the key again to automatically redial the last dialed number
or
Press the 5 and 2 (up and down) navigation keys to scroll through the list of entries.
Making and receiving calls
3. Press the Dial softkey, lift the handset, or press the key to dial the displayed number.
4. Press the key to cancel.
For information on how to manage the entries in your Redial List, see “Redial List” on page 15.
9
Page 14

6930 Analog Phone Quick Start Guide
Handling calls
When you are connected to a call, you can use the phone’s hard keys to place a call on hold, mute
your handset, headset, or speakerphone, and end calls. The Flash key can also be used access
additional call handling features based on your subscribed services.
Placing a call on hold
Connected Call Screen
John Smith
9O5-76O-5OOO
Timer O1:22
More-
You can place an active call on hold by pressing the key. When you place a call on hold, only
your phone can retrieve the call.
Note: After placing a call on hold, you can hang up the handset without losing the call. A call is
taken off hold automatically after 15 minutes. If the handset is on the phone, the call will be
disconnected. If the handset is off, the caller will be able to hear you again.
When on hold
If set up by your telephone service provider or PBX Administrator, music plays softly to let your caller
know that they are on hold.
On your phone, the timer continues to run and the MWI light flashes. Additionally, a “Call is on hold”
message displays on screen and the light beside the turns off if you are using a headset or
the speakerphone.
Retrieving a held call
To retrieve a held call, lift the handset or press the key again. You can also press the
key to retrieve a speakerphone call.
Muting a call
You can use the key to mute the handset, headset, or speakerphone. When you use the
key on your phone, you cannot be heard on the active call. To indicate muted calls, the light beside
the key turns on and a "Microphone muted" message displays on screen. To switch mute on or
off, press the key.
Note: If you place a muted call on hold, the phone automatically takes the call off mute when you
reconnect to the call.
10
Page 15

Using the Flash key
The key allows you to access your subscribed services such as call waiting, call transfer,
three-way calling, call park/pickup, and so on. These services vary from area to area, so contact
your telephone service provider or PBX Administrator for instructions on using the available services
with your 6390 phone. If the instructions say to press the “hook-switch” or “receiver button,” press
the key.
Ending calls
To end a call, you first need to connect to the call if not already connected (for example, if your call
is on hold). Press the key to end the call. If connected through the handset, you can also
place the handset back on hook to end the call.
Handling calls
11
Page 16
6930 Analog Phone Quick Start Guide
Managing calls
The 6390 has several features that make it easier to manage calls, keep track of your call history,
and organize your business and personal contacts.
These features include:
• Directory
• Redial List
• Callers List
Directory
The Directory is your personal phone book, conveniently stored within your phone. The 6390 stores
the numbers and names of up to 200 of your business associates, clients, contacts, and friends in
your Directory. You can view, add, edit, and delete entries using the Directory. You can also dial an
entry directly using the Directory.
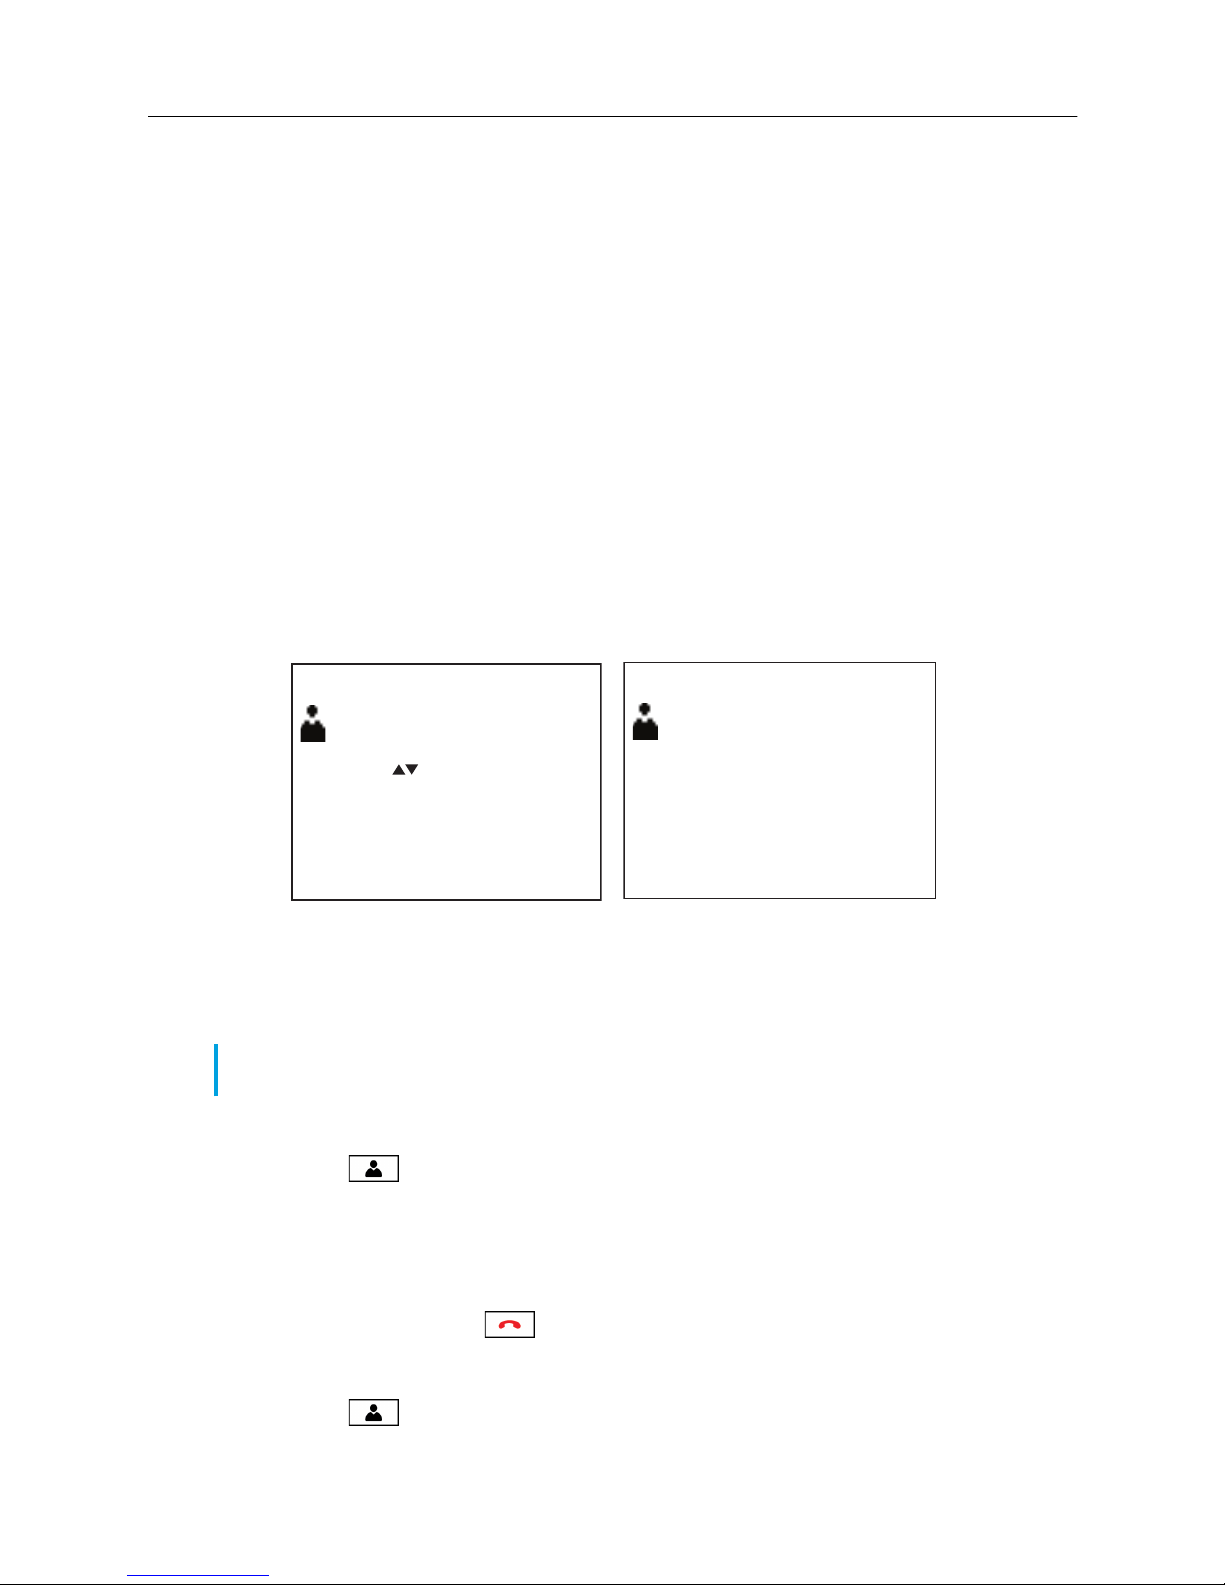
Directory Summary Screen
Directory
Directory Entry Screen
John Smith
01
82 items
9O5-76O-5OOO
Use to view
Press 1st letter
DeleteList-
-AddNew
Names are sorted alphabetically starting with their first character. If you want your Directory sorted
by the last name, enter the last name first. If you do not enter a name, the item is sorted by phone
number. The Directory entries with only a phone number are numerically sorted at the beginning of
the Directory.
Note: Based on the phone’s configuration, the ability to add, edit, and delete Directory entries
may not be available to some users.
Accessing the Directory
1. Press the key to access the Directory.
The number of entries are displayed.
Quit-
Ring tone 1
-Dial
-AddNew
Delete-
Change-
Quit-
2. Press the 5 and 2 (up and down) navigation keys to scroll through the list of entries or press a
dialpad key to see listings that start with that letter. For example, press 5 on the dialpad to see
entries that start with the letter “J” or press 5 twice to see entries that start with the letter “K”.
3. Press the Quit softkey or key to exit the Directory.
Adding a new Directory entry
1. Press the key to access the Directory.
12
Page 17

Managing calls
2. Press the AddNew softkey.
An “Enter Number>” prompt displays on screen.
3. Enter the desired number using the dialpad.
Note: Press the Backspace softkey to delete the last digit entered. Press the Pause softkey
to add a pause to the number. Press the key to add a flash to the number. Press the
Clear softkey to remove all the characters entered.
4. Press the Save softkey.
A “Press 1st letter to enter name>” prompt displays on screen.
5. Enter the desired name using the dialpad.
Note: Press the Backspace softkey to delete the last character entered or press the
NextSpace softkey to add a space after the last character entered. You can also press the
ChangeCase softkey to toggle the input characters to be upper or lower case. Press the Clear
softkey to remove all the characters entered.
6. Press the Save softkey.
An “Enter ring tone>” prompt displays on screen.
7. Press the Change softkey or the 5 and 2 (up and down) navigation keys to cycle through,
select, and listen to a sample of the ring tone.You can choose from a a total of 10 different ring
tones.
Note: This custom ring tone is applicable to the specific Directory entry and will be played
when an call is incoming from the number associated with the Directory entry. As this custom
ring tone feature is dependent on Caller ID information and Caller ID information usually arrives
between the first and second ring, the default ring tone will be played up until the Caller ID
information is received.
8. Press the Save softkey.
The entry is saved to the Directory
Editing a Directory entry
1. Press the key to access the Directory.
2. Press the 5 and 2 (up and down) navigation keys to scroll through the list of entries or press a
dialpad key to see listings that start with that letter. For example, press 5 on the dialpad to see
entries that start with the letter “J” or press 5 twice to see entries that start with the letter “K”.
3. Press the Change softkey.
An “Enter Number>” prompt displays on screen.
4. Edit the number as desired using the dialpad.
Note: Press the Backspace softkey to delete the last digit entered. Press the Pause softkey
to add a pause to the number. Press the key to add a flash to the number. Press the
Clear softkey to remove all the characters entered.
5. Press the Save softkey.
An “Enter Name>” prompt displays on screen.
13
Page 18

6930 Analog Phone Quick Start Guide
6. Edit the name as desired using the dialpad.
Note: Press the Backspace softkey to delete the last character entered or press the
NextSpace softkey to add a space after the last character entered. You can also press the
ChangeCase softkey to toggle the input characters to be upper or lower case. Press the Clear
softkey to remove all the characters entered.
7. Press the Save softkey.
An “Enter ring tone>” prompt displays on screen.
8. Press the Change softkey or the 5 and 2 (up and down) navigation keys to cycle through,
select, and listen to a sample of the ring tone. You can choose from a a total of 10 different ring
tones.
Note: This custom ring tone is applicable to the specific Directory entry and will be played
when an call is incoming from the number associated with the Directory entry. As this custom
ring tone feature is dependent on Caller ID information and Caller ID information usually arrives
between the first and second ring, the default ring tone will be played up until the Caller ID
information is received.
9. Press the Save softkey to save your changes.
Dialing from the Directory
1. Press the key to access the Directory.
2. Press the 5 and 2 (up and down) navigation keys to scroll through the list of entries or press a
dialpad key to see listings that start with that letter. For example, press 5 on the dialpad to see
entries that start with the letter “J” or press 5 twice to see entries that start with the letter “K”.
3. Press the Dial softkey, lift the handset, or press the key to dial the displayed number.
4. Press the key to cancel.
Deleting a Directory entry
1. Press the key to access the Directory.
2. Press the 5 and 2 (up and down) navigation keys to scroll through the list of entries or press a
dialpad key to see listings that start with that letter. For example, press 5 on the dialpad to see
entries that start with the letter “J” or press 5 twice to see entries that start with the letter “K”.
3. Press the Delete softkey.
A “Delete again to erase this item” prompt is displayed on screen.
4. Press the Delete softkey again.
The entry is deleted from the Directory.
Deleting all Directory entries
1. Press the key to access the Directory.
2. Press the DeleteList softkey.
A “Delete again to erase all items” prompt is displayed on screen.
14
Page 19
3. Press the Delete softkey.
All entries are deleted from the Directory.
Redial List
The Redial List stores information for up to the last 15 numbers you called. Your phone logs the
name/number of the called party and when you called. You can view and delete entries in the Redial
List as well as copy entries to the Directory or a memory key. You can also dial an entry directly
using the Redial List.
Managing calls
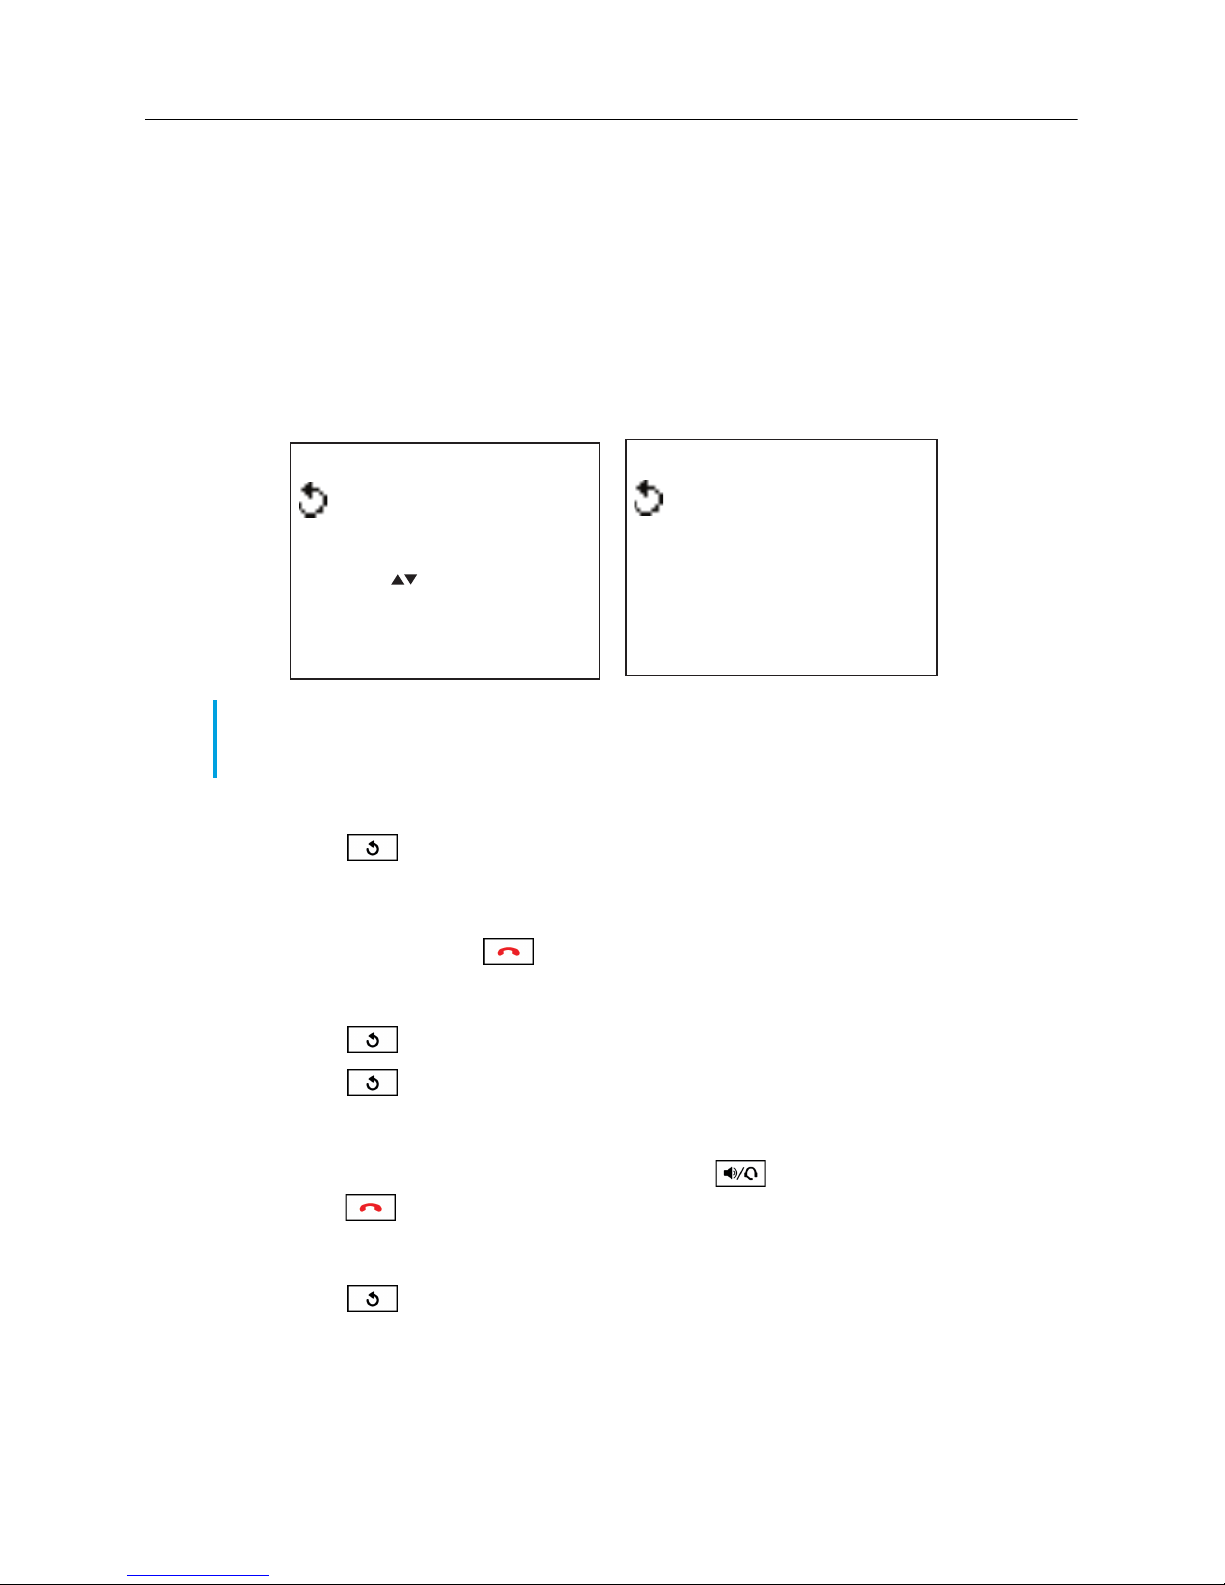
Redial List Summary Screen
Redial list
Redial List Entry Screen
John Smith
01
12 items
9O5-76O-5OOO
Use to view
DeleteList-
Quit-
Note: If the number dialed matches a Directory entry, the name is displayed in the Redial List. If
the number does not match a Directory entry then the first entry in the Redial List is displayed as
“Last number” and all others are displayed as “Redial number”.
Accessing the Redial List
1. Press the key to access the Redial List.
The number of entries are displayed.
2. Press the 5 and 2 (up and down) navigation keys to scroll through the list of entries.
3. Press the Quit softkey or key to exit the Redial List.
-Dial
-Copy
Delete-
Quit-
Redialing a number
1. Press the key to access the Redial List.
2. Press the key again to automatically redial the last dialed number
or
Press the 5 and 2 (up and down) navigation keys to scroll through the list of entries.
3. Press the Dial softkey, lift the handset, or press the key to dial the displayed number.
4. Press the key to cancel.
Deleting an entry from the Redial List
1. Press the key to access the Redial List.
2. Press the 5 and 2 (up and down) navigation keys to scroll through the list of entries.
3. Press the Delete softkey.
A “Delete again to erase this item" prompt is displayed on screen.
15
Page 20

6930 Analog Phone Quick Start Guide
4. Press the Delete softkey again.
The entry is deleted from the Redial List.
Deleting all entries from the Redial List
1. Press the key to access the Redial List.
2. Press the DeleteList softkey.
A “Delete again to erase all items” prompt is displayed on screen.
3. Press the Delete softkey.
All entries are deleted from the Redial List.
Copying a Redial List entry to the Directory or a Memory key
1. Press the key to access the Redial List.
2. Press the 5 and 2 (up and down) navigation keys to scroll through the list of entries.
3. Press the Copy softkey.
4. Press the Directory softkey to copy the entry to the Directory.
a. Edit the number as desired using the dialpad.
Note: Press the Backspace softkey to delete the last digit entered. Press the Pause softkey
to add a pause to the number. Press the key to add a flash to the number. Press the
Clear softkey to remove all the characters entered.
b. Press the Save softkey.
A “Press 1st letter to enter name>” prompt displays on screen.
c. Enter the name as desired using the dialpad.
Note: Press the Backspace softkey to delete the last character entered or press the
NextSpace softkey to add a space after the last character entered. You can also press the
ChangeCase softkey to toggle the input characters to be upper or lower case. Press the Clear
softkey to remove all the characters entered.
d. Press the Save softkey.
An “Enter ring tone>” prompt displays on screen.
e. Press the Change softkey or the 5 and 2 (up and down) navigation keys to cycle through,
select, and listen to a sample of the ring tone. You can choose from a a total of 10 different
ring tones.
Note: This custom ring tone is applicable to the specific Directory entry and will be played
when an call is incoming from the number associated with the Directory entry. As this custom
ring tone feature is dependent on Caller ID information and Caller ID information usually arrives
between the first and second ring, the default ring tone will be played up until the Caller ID
information is received.
f. Press the Save softkey to save your changes and copy the entry to the Directory.
or
16
Page 21
4. Press the Softkey softkey to copy the entry as a memory key.
a. Select the softkey to which the entry should be copied.
The softkey/memory key edit menu displays on screen.
b. Press the Label softkey.
Managing calls
c. Enter/edit the desired label using the dialpad (maximum 10 characters in length)
d. Press the Save softkey to save your changes.
e. Press the Number softkey.
f. Enter/edit the desired number using the dialpad (maximum 24 digits in length).
g. Press the Save softkey to save the number.
5. Press the Done softkey to save your changes and copy the entry to the selected softkey.
Callers List
The Callers List is a log of your incoming calls. The 6390 stores information for up to 200 incoming
calls in the Callers List. Your phone logs the number and name (if available) of the caller and when
they called. You can view and delete entries in the Callers List as wells as copy entries to the Directory
or a memory key. You can also dial an entry directly using the Callers List (with an option of editing
the number before dialing).
.
Note: Press the Backspace softkey to delete the last character entered or press the
NextSpace softkey to add a space after the last character entered. You can also press the
ChangeCase softkey to toggle the input characters to be upper or lower case. Press the Clear
softkey to remove all the characters entered.
The softkey/memory key edit menu displays on screen.
Note: Press the Backspace softkey to delete the last digit entered. Press the Pause softkey
to add a pause to the number. Press the key to add a flash to the number. Press the
Clear softkey to remove all the characters entered.
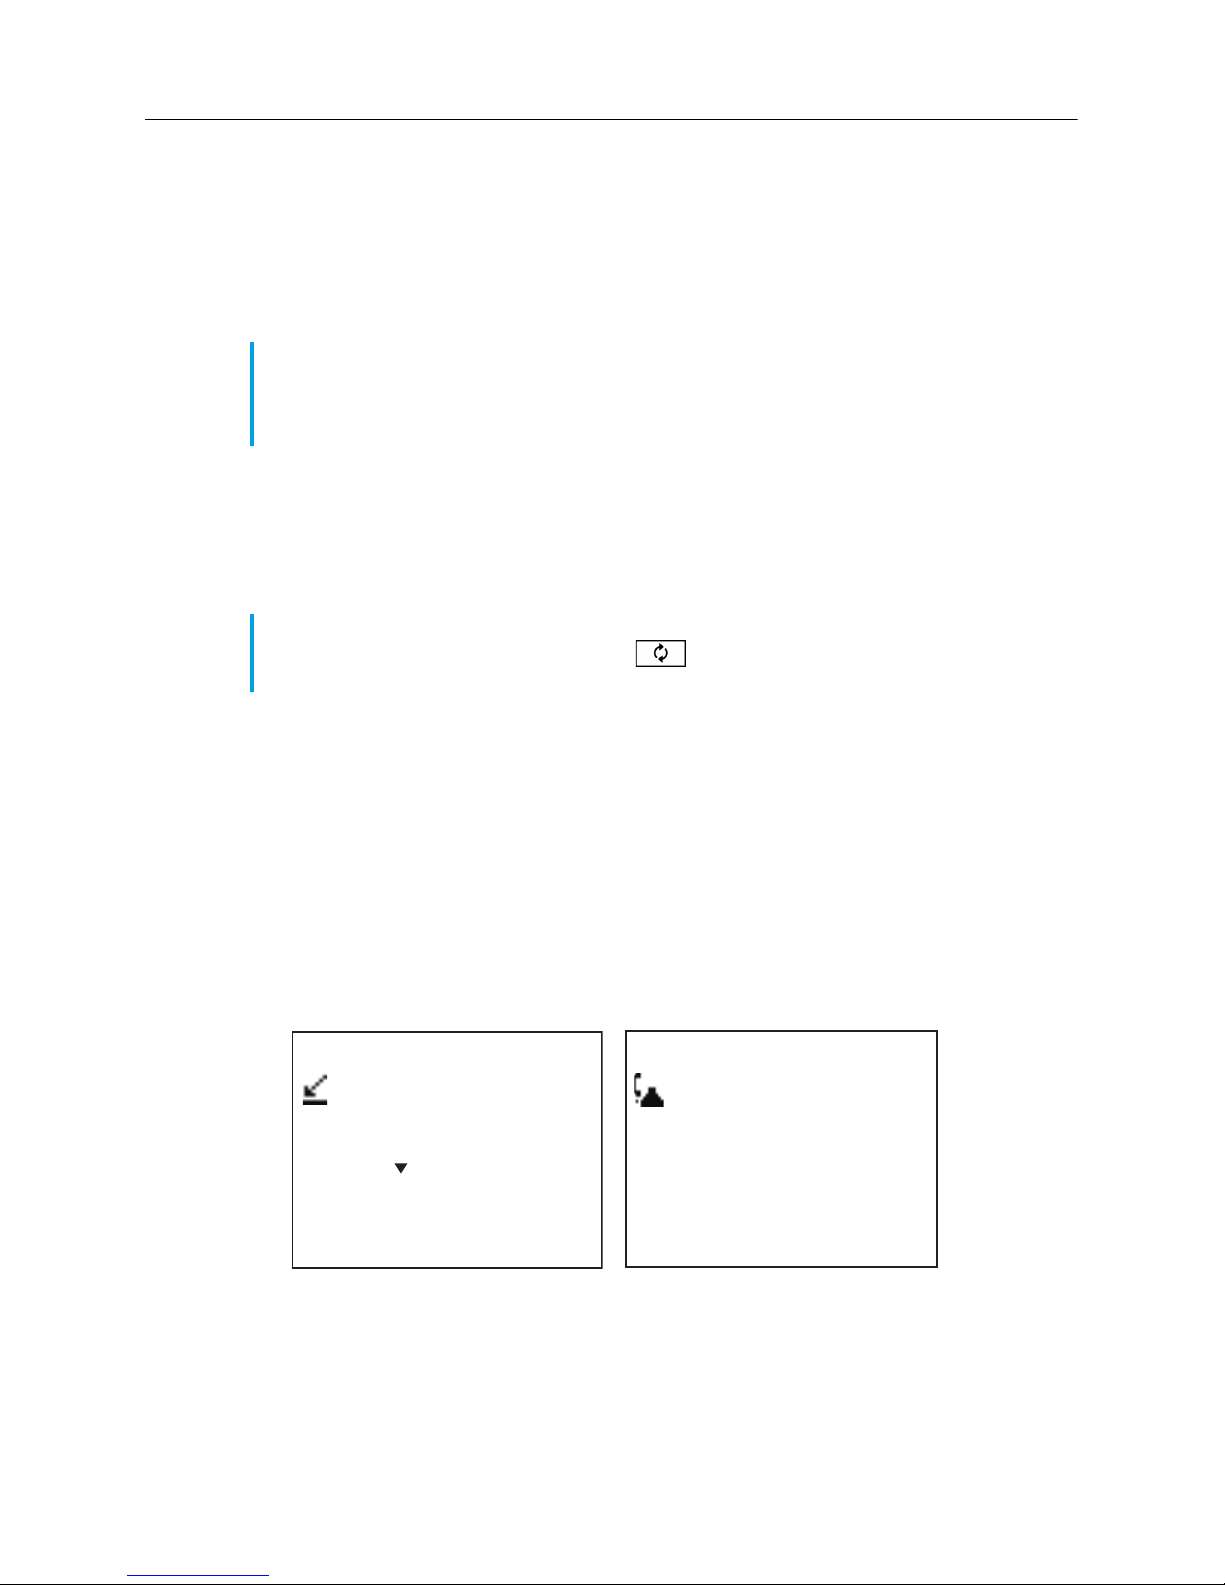
Callers List Summary Screen
Callers list
45 items
2 New callers
Use for New
-Resume
DeleteList-
Quit-
-Dial
-Copy
Callers List Entry Screen
John Smith
01
9O5-76O-5OOO
January 01 12:OOpm
Delete-
EditNum-
Quit-
17
Page 22

6930 Analog Phone Quick Start Guide
Various icons are used to convey additional information about Callers List entries. The following
table lists the icons used and their descriptions:
Icon Description
A checkmark indicates you returned the call from the Callers List. If applicable, this icon is
displayed before the name.
Indicates you answered the call when it came in.
Indicates you did not answer the call when it came in.
Indicates you were on another call when this call came in.
Accessing the Callers List
1. Press the key to access the Callers List.
The total number of entries are displayed as well as the number of new callers.
2. If there are any new callers, press the 2 (down) navigation key to scroll through the list of new
callers
or
If there are no new callers press the 5 and 2 (up and down) navigation keys to scroll through
the list of entries.
3. Press the Quit softkey or key to exit the Callers List.
Note: The phone retains in memory the last entry you viewed in the Callers List. Pressing the
Resume softkey allows you to resume viewing entries starting with the last viewed entry.
Dialing a Callers List entry
1. Press the key to access the Callers List.
2. If there are any new callers, press the 2 (down) navigation key to scroll through the list of new
callers
or
If there are no new callers press the 5 and 2 (up and down) navigation keys to scroll through
the list of entries.
3. Press the Dial softkey, lift the handset, or press the key to dial the displayed number.
4. Press the key to cancel.
Editing the number of a Callers List entry before dialing
Note: The Callers List does not save changes. If you plan to dial the number again, copy the
entry to the Directory or a Memory key and change it there.
1. Press the key to access the Callers List.
2. If there are any new callers, press the 2 (down) navigation key to scroll through the list of new
callers
or
If there are no new callers press the 5 and 2 (up and down) navigation keys to scroll through
the list of entries.
18
Page 23

3. Press the EditNum softkey.
Managing calls
4. Enter digits using the dialpad
Note: Press the 3 navigation key or Backspace softkey to delete the digit to the left of the
cursor. Press the 4 navigation key or Erase softkey to delete the digit to the right of the cursor.
Press the Pause softkey to add a pause to the number. Press the key to add a flash
to the number. Press the Clear softkey to remove all the characters entered.
5. Press the Dial softkey, lift the handset, or press the key to dial the displayed number.
.
Deleting a Callers List entry
1. Press the key to access the Callers List.
2. If there are any new callers, press the 2 (down) navigation key to scroll through the list of new
callers
or
If there are no new callers press the 5 and 2 (up and down) navigation keys to scroll through
the list of entries.
3. Press the Delete softkey.
A “Delete again to erase this item” prompt is displayed on screen.
4. Press the Delete softkey again.
The entry is deleted from the Callers List.
Deleting all Callers List entries
1. Press the key to access the Callers List.
2. Press the DeleteList softkey.
A “Delete again to erase all items” prompt is displayed on screen.
3. Press the Delete softkey.
All entries are deleted from the Callers List.
Copying a Callers List entry to the Directory or a Memory key
1. Press the key to access the Redial List.
2. If there are any new callers, press the 2 (down) navigation key to scroll through the list of new
callers
or
If there are no new callers press the 5 and 2 (up and down) navigation keys to scroll through
the list of entries.
3. Press the 5 and 2 (up and down) navigation keys to scroll through the list of entries.
4. Press the Copy softkey.
5. Press the Directory softkey to copy the entry to the Directory.
19
Page 24

6930 Analog Phone Quick Start Guide
a. Edit the number as desired using the dialpad.
Note: Press the Backspace softkey to delete the last digit entered. Press the Pause softkey
to add a pause to the number. Press the key to add a flash to the number. Press the
Clear softkey to remove all the characters entered.
b. Press the Save softkey.
A “Press 1st letter to enter name>” prompt displays on screen.
c. Enter the name as desired using the dialpad.
Note: Press the Backspace softkey to delete the last character entered or press the
NextSpace softkey to add a space after the last character entered. You can also press the
ChangeCase softkey to toggle the input characters to be upper or lower case. Press the Clear
softkey to remove all the characters entered.
d. Press the Save softkey.
An “Enter ring tone>” prompt displays on screen.
e. Press the Change softkey or the 5 and 2 (up and down) navigation keys to cycle through,
select, and listen to a sample of the ring tone. You can choose from a a total of 10 different
ring tones.
Note: This custom ring tone is applicable to the specific Directory entry and will be played
when an call is incoming from the number associated with the Directory entry. As this custom
ring tone feature is dependent on Caller ID information and Caller ID information usually arrives
between the first and second ring, the default ring tone will be played up until the Caller ID
information is received.
f. Press the Save softkey to save your changes and copy the entry to the Directory.
or
5. Press the Softkey softkey to copy the entry as a memory key.
a. Select the softkey to which the entry should be copied.
The softkey/memory key edit menu displays on screen.
b. Press the Label softkey.
c. Enter/edit the desired label using the dialpad (maximum 10 characters in length).
Note: Press the Backspace softkey to delete the last character entered or press the
NextSpace softkey to add a space after the last character entered. You can also press the
ChangeCase softkey to toggle the input characters to be upper or lower case. Press the Clear
softkey to remove all the characters entered.
d. Press the Save softkey to save your changes.
The softkey/memory key edit menu displays on screen.
e. Press the Number softkey.
20
Page 25
f. Enter/edit the desired number using the dialpad (maximum 24 digits in length).
Note: Press the Backspace softkey to delete the last digit entered. Press the Pause softkey
to add a pause to the number. Press the key to add a flash to the number. Press the
Clear softkey to remove all the characters entered.
g. Press the Save softkey to save the number.
6. Press the Done softkey to save your changes and copy the entry to the selected softkey.
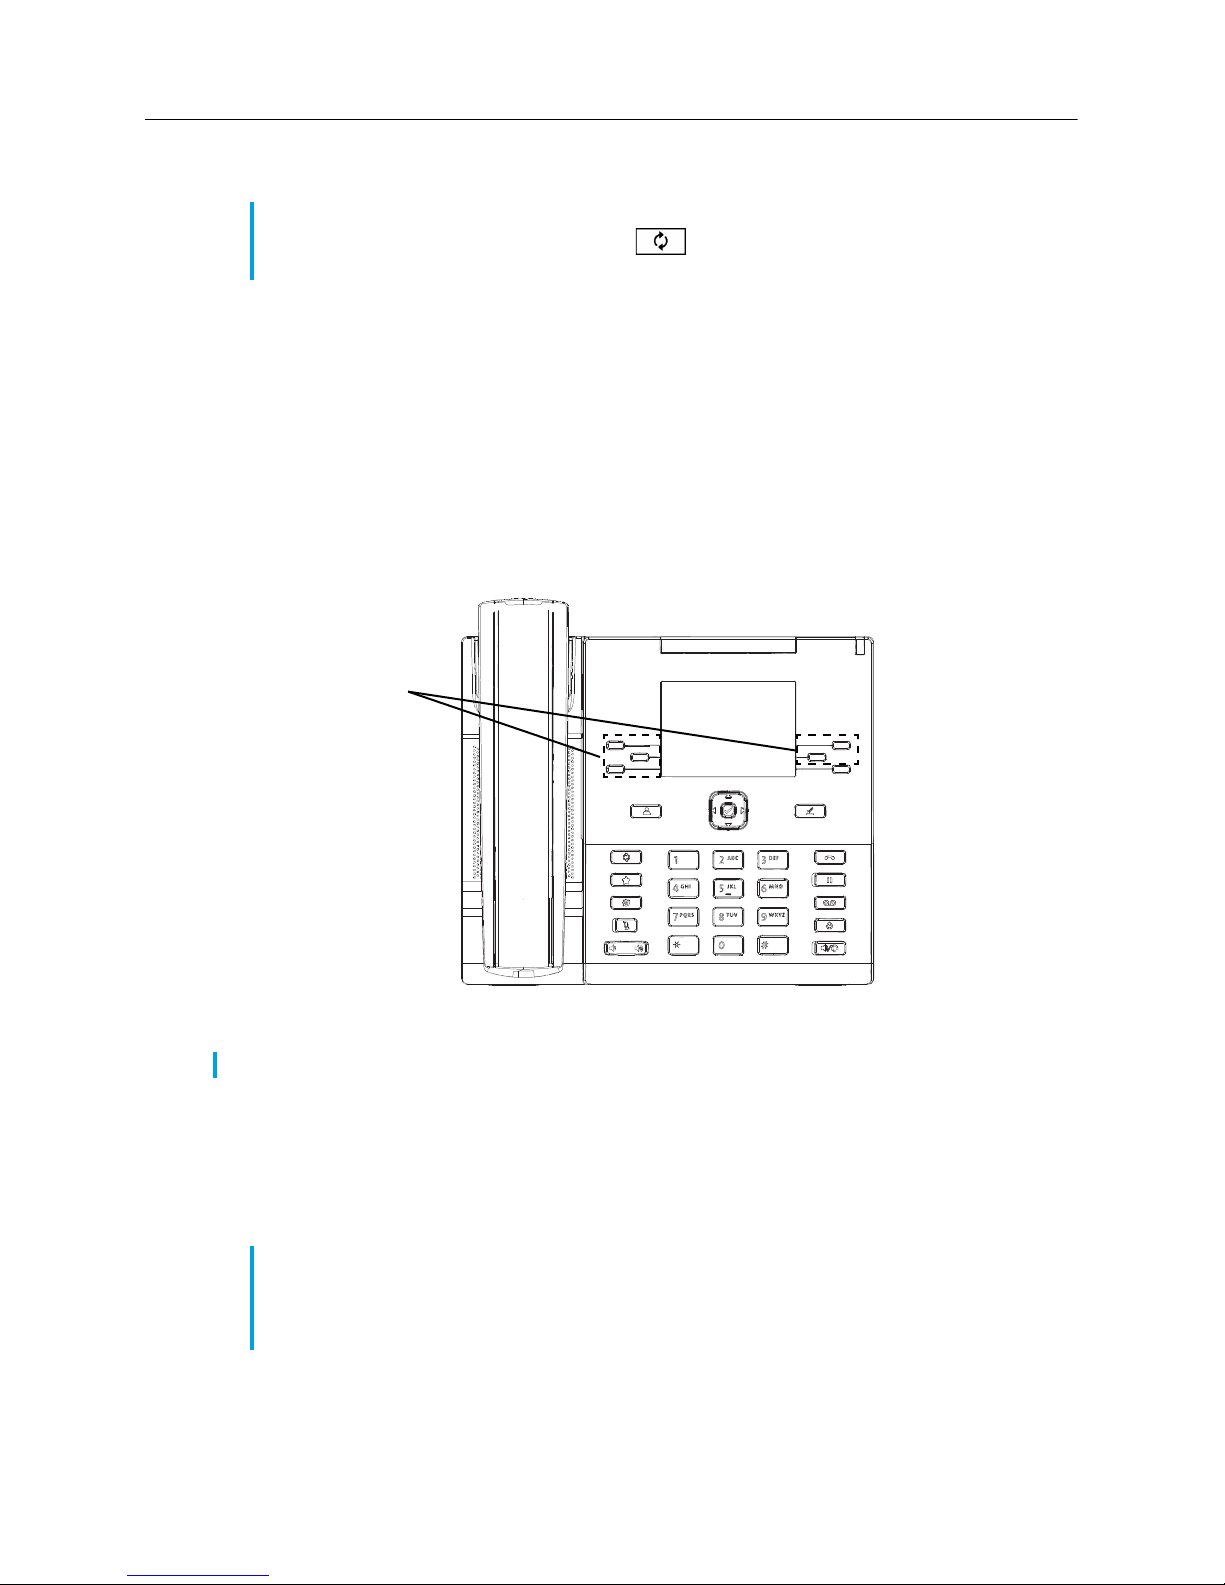
Memory keys
You can save the numbers and labels/names of your customers, business associates, or anyone
you call frequently by pressing and holding the memory keys (softkeys). A total of four memory key
pages are available with five keys each, allowing you to save up to 20 memory key entries. After
configuring a memory key, pressing the key automatically dials the configured number.
Memory keys
Memory keys
Creating and editing Memory keys
Note: To access different memory key pages on the idle screen, press the More softkey.
1. Press and hold the desired memory key for three seconds.
The softkey/memory key edit menu displays on screen.
2. Press the Label softkey.
3. Enter/edit the desired label using the dialpad (maximum 10 characters in length).
Note: Press the Backspace softkey to delete the last character entered or press the
NextSpace softkey to add a space after the last character entered. You can also press the
ChangeCase softkey to toggle the input characters to be upper or lower case. Press the Clear
softkey to remove all the characters entered.
4. Press the Save softkey to save your changes.
The softkey/memory key edit menu displays on screen.
21
Page 26

6930 Analog Phone Quick Start Guide
5. Press the Number softkey.
6. Enter/edit the desired number using the dialpad (maximum 24 digits in length).
Note: Press the Backspace softkey to delete the last digit entered. Press the Pause softkey
to add a pause to the number. Press the key to add a flash to the number. Press the
Clear softkey to remove all the characters entered.
7. Press the Save softkey to save the number.
8. Press the Done softkey to save your changes.
Making calls from Memory keys
Making a regular memory key call
1. Lift the handset or press the key to use the headset or speakerphone.
2. At the dial tone, press the desired memory key.
Pre-dialing a memory key
Note: Pre-dialing is only available if the Live Dialpad feature is disabled. Live dialpad can be
disabled through the Live dialpad option in the Options List.
1. Press the desired memory key.
2. Lift the handset or press the Dial softkey or the key to use the headset or speakerphone.
Deleting Memory keys
Note: To access different memory key pages on the idle screen, press the More softkey.
1. Press and hold the desired memory key for three seconds.
The softkey/memory key edit menu displays on screen.
2. Press the Label softkey.
3. Press the Clear softkey to delete the label.
4. Press the Save softkey to save your changes.
The softkey/memory key edit menu displays on screen.
5. Press the Number softkey.
6. Press the Clear softkey to delete the number.
7. Press the Save softkey.
8. Press the Done softkey to save your changes.
22
Page 27
Display messages and lights
Display messages
The 6390 displays instructions and information on screen in various situations for ease of use and
to ensure you are always aware of what state the phone is in and what features are being employed.
The following table lists the common messages displayed and what they mean:
Prompt Description
Extension in use The “Extension in use” message appears on screen and the MWI light turns on when
someone uses another telephone on the same line. This message may also appear
when the telephone is not properly connected to a phone line.
Call is on hold A call is on hold. Press the key or the key to speak with the caller.
Directory full The Directory has reached its maximum number of entries. If you wan to add entries,
you must first delete some.
Directory locked The Directory has been locked and you cannot edit, add, or delete Directory entries.
Message Waiting New messages are pending. Access your voice mail service to check the new
messages.
Display messages and lights
Ringer is off No audible ringing. To turn the ringer on again, adjust the volume using the
keys.
Unknown name Your telephone service provider is unable to provide the name of the caller.
Unknown number Your telephone service provider is unable to provide the number of the caller.
Private name The caller has requested that his/her name not be revealed.
Private number The caller has requested that his/her number not be revealed.
# New caller(s) Appears on screen to inform you that new calls have been added to the Callers List
since you last check it.
The message is displayed until you enter the Callers List. Once you enter the Callers
List the message will no longer be displayed on the idle screen, but the number of
missed calls will continue to be displayed in the Callers List screens until you view
all the missed calls.
CFD On The Call Forward feature is enabled. Press the key and the CFD Off softkey
to turn off the Call Forward feature.
Note: The CFD On and CFD Off softkeys may be defined differently as it is
based on the label defined in the Options > Preferences > Call Forward
menu.
DND On The Do Not Disturb feature is enabled. Press the key and the DND softkey
to turn off DND.
Note: If multiple idle alerts/messages are present, messages are displayed in sequence
approximately every two seconds.
23
Page 28
6930 Analog Phone Quick Start Guide
Lights
The 6390’s MWI light turns on and, in certain scenarios, flashes to indicate when something needs
your attention (for example, when the phone rings, when the extension is in use, when a call is on
hold, and so on).
The following table lists the scenarios when the MWI light turns on as well as describes any additional
behavior.
Scenario MWI Light Behavior
Incoming call MWI light flashes quickly.
Call is on hold MWI light flashes moderately.
Extension in use MWI light turns on continuously.
CFD On MWI light turns on continuously.
DND On MWI light turns on continuously.
Message Waiting MWI light flashes slowly.
In addition to the MWI, lights are located beside the Mute , Hold , and
Speaker/Headset keys that turn on when the feature is enabled.
Note: The LED beside the Speaker/Headset key is bi-color. Red indicates the call is on
speakerphone, while blue indicates the call is on the headset.
24
Page 29

Customizing your phone
You can customize your phone by pressing the key and accessing the Options List. The
Options List contains two categories of menus: Preferences and Configuration. The Preferences
menu allows you to adjust basic user preferences, while the Configuration menu allows you to set
more advanced configuration options. You can customize the following options using the phone’s UI:
Option number Option
1 Preferences
1. Time/Date
2. Time/Date format
3. Contrast
4. Ring tone
5. Screen text
6. Language
7. Live dialpad
8. Back light
9. Callers list
10. Voice mail
Customizing your phone
2 Configuration
Using the Options List
1. Press the key on the phone to enter the Options List.
2. Press the 5 and 2 (up and down) navigation keys to cycle through the different options.
3. Press the key, the Show softkey, or using the keypad press the number of the corresponding
option, to select an option.
Note: You can select Voice mail by pressing 0 respectively on the keypad.
4. Change the selected option if required.
5. Press the Done softkey to save any changes.
1. Clear msg. wtg.
2. Flash time
3. Pause time
4. Hold mode
5. Access code
6. Restrictions
7. Security codes
8. Call forward
6. Press the key at any time to exit without saving changes.
Note: For information on how to configure specific options, see the 6390 Analog Phone User
Guide, which can be downloaded as per the instructions detailed in “Supporting Documentation”
on page 2.
25
Page 30

6930 Analog Phone Quick Start Guide
Troubleshooting
What are services and how do I use them?
Services are provided by your telephone service provider or PBX Administrator, and include basic
features such as Caller ID. Services such as Call Forwarding and Voicemail can be accessed through
the key while other services such as call transferring and three-way calling can be accessed
using feature access codes and the key. Before using your services, you must activate them
by contacting your local telephone service provider or your PBX Administrator.
I’m having trouble with services I have subscribed to – how do I get help?
Usually your telephone service provider supplies a special number to call for activation of your
services. When you call this number, you must follow the recorded instructions carefully. This allows
the telephone service provider’s system to recognize your phone and customize it with the services
you have subscribed to. If you have any activation problems call your local telephone service provider.
Why is my display blank?
Ensure that the power adapter is fully plugged into the electrical outlet, and that the outlet is supplying
power (you can test this with another electrical device, such as a lamp).
Why can’t I get a dial tone?
Check for any loose connections and that the phone has been installed properly. For installation
instructions, please refer to the 6390 Installation Guide provided with your phone.
Why can’t I hear a caller or be heard?
Increase the handset or speaker volume. Make sure the handset cord is inserted securely into the
jack. If the light beside the is on, the call is muted; press the key to turn mute off.
Why are incoming calls not identified on the display?
Caller ID information usually arrives between the first and second ring. Let the phone ring at least
once before answering. Make sure you subscribe to caller ID services from your local telephone
service provider.
Why are there no messages on the screen when a call waiting call comes in?
You must subscribe to a call waiting identification service from your telephone service provider.
Why is the light not coming on with a new voice mail message?
You must subscribe to a visual message waiting service from your telephone service provider for
this function to work.
26
Page 31

Why can’t I dial a number in the Callers List?
You must subscribe to a Caller ID service for names and/or numbers to be recorded in the Callers
List. If the number of the caller is unknown or private, you cannot return the call. Alternatively, the
number may require an area code.
How do I set the time and date?
If you subscribe to a Caller ID service, the first incoming call will update the phone with the correct time
and date. Otherwise, use the Time/Date option in the Options List to manually set the time and date.
Can I turn the light on the screen off?
Yes, you can turn the back light on and off by using the Back light option in the Options List. The
contrast can also be configured if required.
Why does the phone wobble?
Make sure the cords are routed properly through the stand, as indicated in the 6390 Installation
Guide. Check that the stand has been properly snapped into place.
Troubleshooting
27
Page 32

 Loading...