

Page 1
R
R
21A10049
R
OVERHEAD AUDIO UNIT
Model 2879459
Page 2

NOTES
...............................................................................................................................
...............................................................................................................................
R
...............................................................................................................................
...............................................................................................................................
...............................................................................................................................
...............................................................................................................................
...............................................................................................................................
...............................................................................................................................
...............................................................................................................................
...............................................................................................................................
...............................................................................................................................
...............................................................................................................................
...............................................................................................................................
...............................................................................................................................
...............................................................................................................................
...............................................................................................................................
...............................................................................................................................
...............................................................................................................................
...............................................................................................................................
...............................................................................................................................
...............................................................................................................................
...............................................................................................................................
...............................................................................................................................
...............................................................................................................................
...............................................................................................................................
...............................................................................................................................
Page 3

APPENDICES
TROUBLESHOOTING
Resetting the unit
Should the overhead unit become unresponsive:
Remove power for5minutes and then reconnect.
CONTENTS
CONTENTS
USER INTERFACE AND CONTROLS ....................................................................... pg 2
Control Panel Layout ........................................................................................ pg 2
GETTING STARTED ...................................................................................................... pg 5
TUNER ............................................................................................................................. pg 8
AUXILIARY INPUT ....................................................................................................... pg 11
BLUETOOTH ................................................................................................................. pg 12
DRY BOX ......................................................................................................................... pg 13
OVERHEAD UNIT CONNECTIONS.............................................................................pg 15
Key Names ............................................................................................................ pg 2
ROTARY KNOB AND MENU KEY ............................................................................ pg 3
Rotary Knob Operation .................................................................................... pg 3
Menu Key Operation ......................................................................................... pg 3
Using the Rotary Knob and Menu Key ........................................................ pg 4
Powering the Unit On or O ........................................................................... pg 5
Input Source Screens ......................................................................................... pg 5
Adjusting Volume Level ................................................................................... pg 6
Muting Output .................................................................................................... pg 6
Adjusting Tone .................................................................................................... pg 7
Adjusting Screen Brightness .......................................................................... pg 7
Listening to the Tuner ...................................................................................... pg 8
Tuner Source Screens ....................................................................................... pg 8
Tuning Methods ................................................................................................. pg 9
Adding and Removing Presets ................................................................... pg 10
Listening to Auxiliary Input .......................................................................... pg 11
Auxiliary Source Screen ................................................................................. pg 11
Playing Content ................................................................................................ pg 12
Bluetooth Source Screen ............................................................................... pg 12
Controlling Bluetooth Playback .................................................................. pg 12
16
1
Page 4
USER INTERFACE AND CONTROLS
OVERHEAD UNIT CONNECTIONS
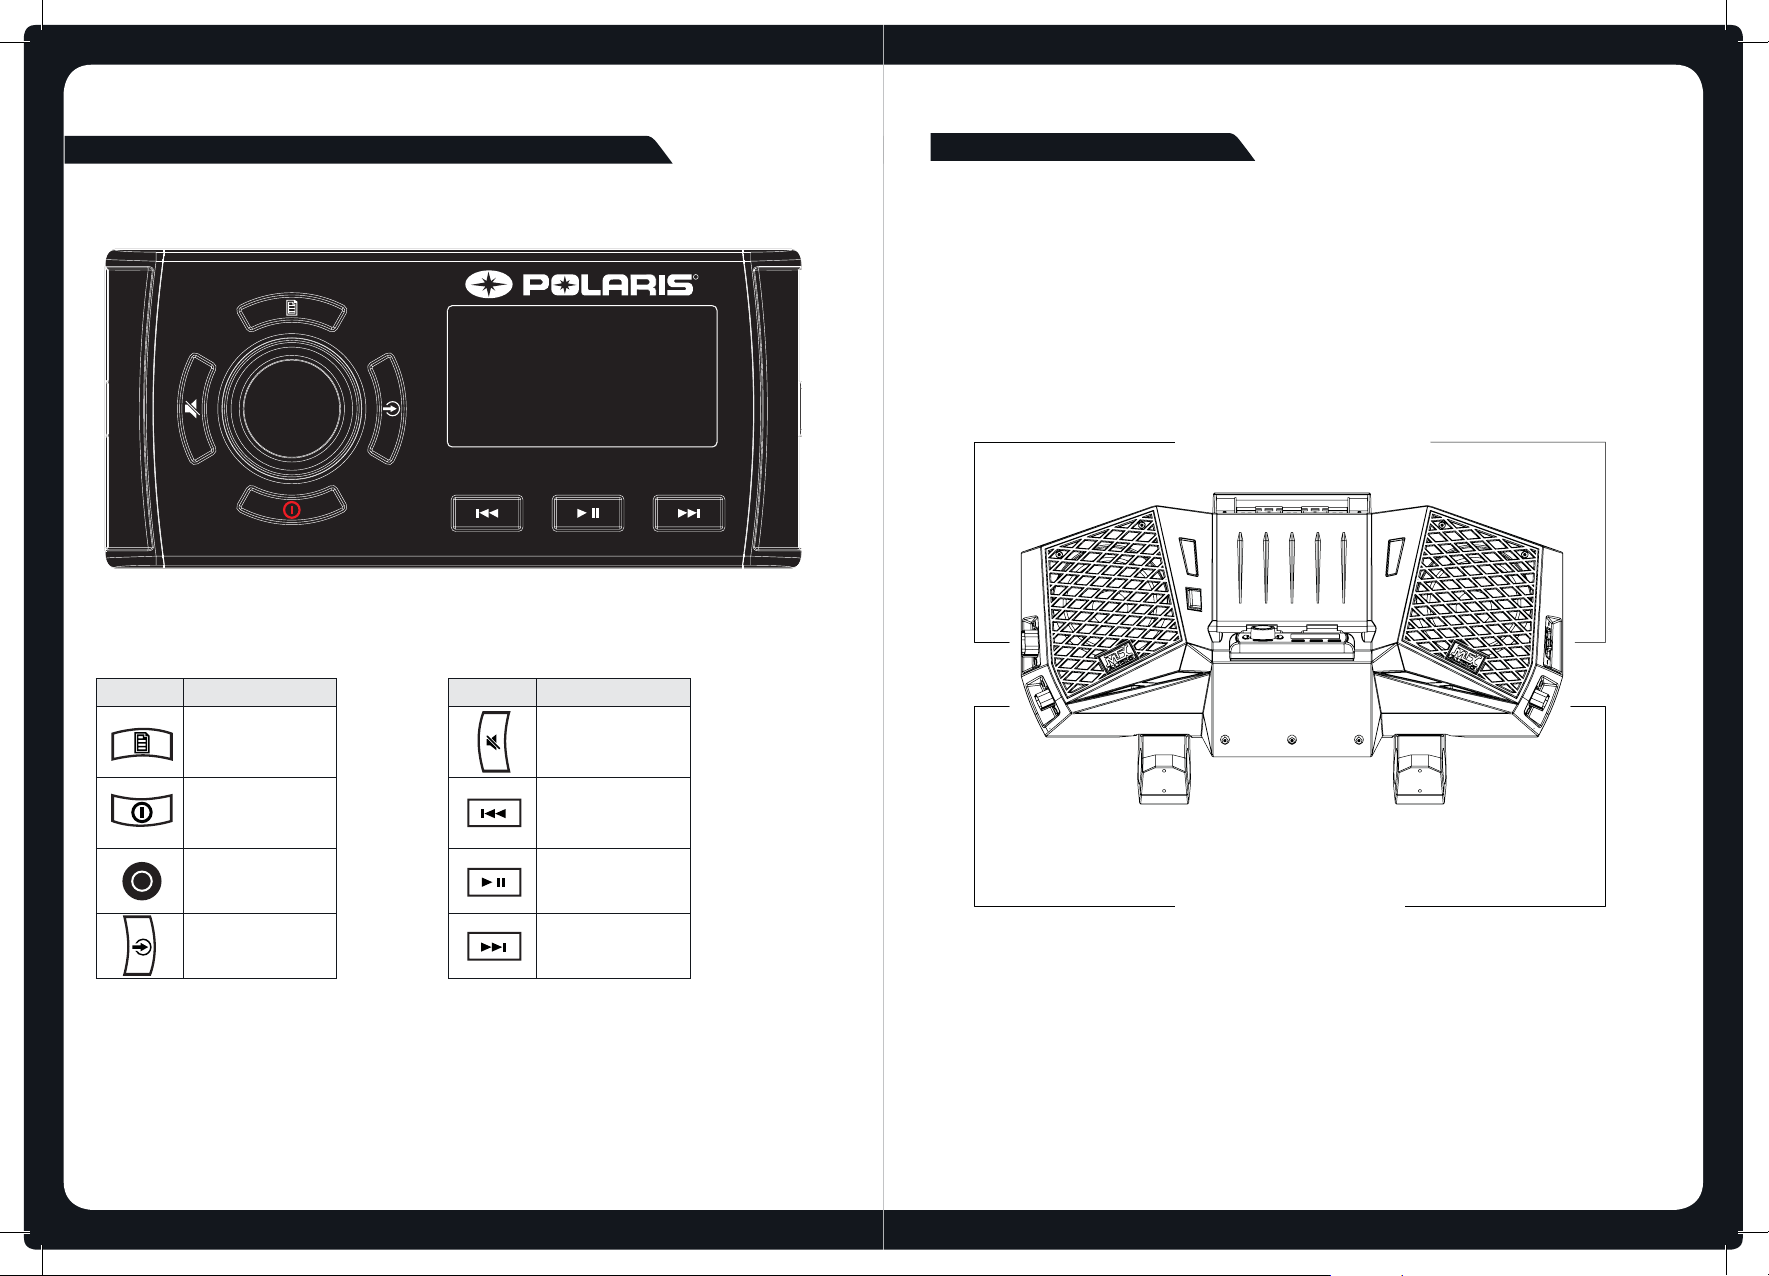
CONTROL PANEL LAYOUT
KEY NAMES
Key Name
MENU
Key Name
MUTE
CONNECTING THE OVERHEAD UNIT
The overhead unit has 4 connectors total; 2 inputs and 2 outputs. These are to be used
for connecting power, as well as, accessory items.
R
Rear Enclosure OUT
External Antenna IN
POWER
ROTARY KNOB
SOURCE
2
BACKWARD
PLAY / PAUSE
FORWARD
Subwoofer OUT
Vehicle Harness IN
15
Page 5

DRY BOX INSTRUCTION CONT.
STEP 4
Push the front of the latch up so that it
angles forward and grabs onto the
locking hook.
NOTE: The dry box will dip down slightly
at this point.
ROTARY KNOB AND MENU KEY
ROTARY KNOB OPERATION
You can use the rotary knob two ways to control the operation of the overhead unit:
1
2
Rotary turn
Press
STEP 5
Pull down on the latch with your palm,
while pushing up on the dry box with
your thumb.
The latch will snap closed and create a
very tight t.
MENU KEY OPERATION
You can use the Menu key to open or to exit from menus:
Menu key
Menu exit
Press the Menu key to open a menu.
In an open menu you can use the Menu key at any time to save
changes and exit:
• Press the Menu key to exit from the current menu level.
• Press and hold down the Menu key to exit from the menu
completely.
Time out feature: After a few seconds of inactivity, the menu exits and
any changes are saved automatically.
2828
14
3
Page 6

DRY BOX INSTRUCTIONS
USING THE ROTARY KNOB AND MENU KEY
You can use the rotary knob and Menu key to adjust levels and access menus.
ADJUSTING LEVELS
Use the rotary knob and Menu key to adjust levels on the overhead unit. For example, to adjust the
volume level:
20
Turn rotary knob
to open the Volume
screen
ACCESSING MENUS
Use the Menu key and rotary knob to access menus to change settings. For example, to access
the Settings menu while in Tuner or AUX mode.:
PRESETS >
SETTINGS >
Press Menu
key
The menu is
displayed
Turn rotary knob to
scroll the highlight.
Press rotary knob to
to select Settings
Turn rotary knob to
adjust the level.
menu.
TREBLE >
BASS >
BALANCE >
LCD CONTRAST >
LCD BRIGHTNESS >
The Settings
menu is
displayed
Press Menu to exit
(or leave to time
out). See “Menu
Key Operation” on
page 5.
Press Menu to
exit. See “Menu
Key Operation”
on page 5.
STEP 1
Ensure that all cables are secured in
the cable management area.
Push the dry box up to close it.
STEP 2
Keep the latch in the OPEN
position as you close the dry box.
MULTI-LEVEL MENUS
All of the menus on the overhead unit have more than one level. To access items in multi-level
menus:
• Turn the rotary knob to highlight a menu item, then
• Press the rotary knob to select the highlighted item.
• Repeat these steps as many times as necessary to reach the menu item you require.
t
In this manual, accessing a multi-level menu item is shown by listing the menu items in order,
as in the following example:
SETTINGS > TONE
The above example means: “turn and then press the rotary knob to select the Settings
menu” then “turn and then press the rotary knob to select the Tone menu”.
4
STEP 3
Push the dry box all the way up until it
will go no further.
Leave the latch in the OPEN position so
it clears the locking hook.
13
Page 7

BLUETOOTH
LISTENING TO BLUETOOTH INPUT
The overhead unit can accept audio from devices with Bluetooth .
To listen to input from a Bluetooh device:
GETTING STARTED
POWERING THE UNIT ON OR OFF
When you power on the overhead unit it will automatically start playing music from the most
recently selected input source.
Press the Input source key ( ) until the Bluetooth input source screen is displayed.
Continuing to press the key will display the input source screens for AM, FM and AUX
as described in the section “Input Source Screens” .
BLUETOOTH SOURCE SCREEN
The input source screen displayed when you select Bluetooth input as shown in Figure below.
BT
DISCONNECTED
Example of bluetooth source screen
The source screen will show disconnected until a device is paired.
To pair a device:
*Make sure source screen says disconnected.
*Search for “MTX AUDIO” on your Bluetooth enabled device.
*Once you have connected the source screen will say “connected” and you will also hear a
connection beep.
TO POWER THE UNIT ON OR OFF.
Momentarily press the Power key to power on the unit. As the unit starts up, a
splash screen is displayed for several seconds, followed by the input source screen
for the current input source.
Power
INPUT SOURCE SCREENS
AM/FM radio
Bluetooth
Auxiliary input.
Press the Input source key ( ) to step through the input source types in the following
order:
When the unit is on, momentarily press the Power key to power o the unit.
AM
FM
Bluetooth
Aux
When you select one of these sources, the overhead unit displays a source screen, similar to the
AM source screen shown in Figure 1 below. The title bar always shows the source name. Other
additional information varies depending on the source type you have selected.
SOURCE NAME
BLUETOOTH OPERATION
You can control your device from the overhead unit using the Back, Forward and Play/Pause
keys as shown on page 2.
12
FREQUENCY
DETCELES
Figure 1 – Example source screen (AM input selected)
TUNING
MODE
5
Page 8

ADJUSTING VOLUME LEVEL
AUXILIARY INPUT
To adjust the volume level:
Turn Rotary
Knob
The Volume
screen is
displayed
MUTING OUTPUT
To mute and unmute the volume:
• Press the Mute key to mute the audio output. The Mute icon is displayed over the
top of the current input source screen.
Mute
• Press the Mute key again to unmute the audio output. The volume returns to the
previously set level.
20
Turn Rotary Knob
to adjust.
Press Menu to exit.
See “Menu Key
Operation” on page 5.
LISTENING TO AUXILIARY INPUT
The overhead unit can accept audio from devices with an audio output .
To listen to input from an auxiliary device:
Press the Input source key ( ) until the AUX input source screen is displayed.
Continuing to press the key will display the input source screens for AM, FM and Bluetooth
as described in the section “Input Source Screens” .
AUXILIARY SOURCE SCREEN
The input source screen is displayed when you select auxiliary input, shown in Figure 4 below.
6
Figure 4 – Example of auxiliary input source screen
11
Page 9

ADDING AND REMOVING PRESETS
The overhead unit allows you to set up your favorite AM/FM stations as presets for easy recall.
Note: Up to 15 presets can be stored for each radio band.
When you are using the tuner, the Play / Pause, Forward, Backward, and Menu keys provide
special options to allow you to work with preset frequencies (AM/FM).
Rotary knob
Menu key
Play / Pause
Forward
Backward
To add a new preset:
Do one of the following.
1. Tune the overhead unit to the required frequency.
2. Press and hold down the Play / Pause key. The message: “Preset saved” is displayed
or
1. Press the Menu key.
2. Turn and then press the rotary knob to select Presets > Save current. The message: “Preset
saved” is displayed briey.
Note: New presets must be unique. If you try to create a preset for the same frequency as an
existing one, the unit displays the message “Previously saved”.
To remove one or more presets:
1. Press the Menu key.
2. Turn and then press the rotary knob to select Presets > Remove preset.
3. Do one of the following (there is now warning or conrmation prompt before deletion).
• Select Remove all presets and press the rotary knob to remove all current presets.
The message: “Presets removed” is displayed briey.
• Select a preset and press the rotary knob to remove the selected preset. The selected
preset is removed from the list.
4. Press the Menu key (or leave to time out) to exit.
ADJUSTING TONE
To change the bass or treble level:
TREBLE >
BASS >
BALANCE >
LCD CONTRAST >
LCD BRIGHTNESS >
Press Menu
key
Select:
Settings > Tone
The Tone menu is
displayed
Turn Rotary Knob
to adjust. Press
Rotary Knob
to select.
Press Menu to
exit. See “Menu
Key Operation”
ADJUSTING SCREEN BRIGHTNESS
Use the LCD menu to adjust the contrast or brightness of the screen display.
You can press the Menu key at any time (or leave to time out) to save the current brightness
level and exit.
To adjust the contrast or brightness of the display screen:
TREBLE >
BASS >
BALANCE >
LCD CONTRAST >
LCD BRIGHTNESS >
Press Menu
key
Select:
Settings > LCD
The LCD menu is
displayed
Turn rotary knob
to adjust. Press
rotary knob to
select.
Press Menu to
exit. See “Menu
Key Operation”
10
7
Page 10

TUNER
LISTENING TO THE TUNER
To select one of the available tuner bands :
Press the Input source key ( ) to select input from each of the following in turn:
• AM
• FM
The applicable input source screen is displayed for each band.
Continuing to press the key will display the input source screens for Bluetooth and
Auxiliary as described in the section “Input Source Screens” on page 5.
TUNER SOURCE SCREENS
AM/FM
An example of a typical tuner input source screen is shown in Figure 2 below.
SOURCE NAME
DETCELES
FREQUENCY
TUNING
MODE
TUNING METHODS
You can use three methods to tune the overhead unit: automatic, manual and preset.
Rotary knob
Menu key
Play / Pause
Forward
Backward
To tune to a required frequency, channel or preset:
Press the Play / Pause key to step through the available tuning methods for each band:
Tuning Metho d When tuning with this method…
Tuning Method When tuning with this method...
Auto
Auto • Press the Forward or Backward key to start searching for available
stations.
Note: The search stops when a station is found or when the unit has
scanned all available frequencies once.
Manual
Manual • Press the Forward or Backward key to step through the range of
Preset • Press the Forward or Backward key to step through available presets
Preset
frequencies one at a time.
(only available if there are two or more presets)
•
To tune to a specic preset:
a. Press the Menu key.
b. Press the rotary Knob to select Presets.
c. Turn the rotary knob to highlight the desired preset.
d. Press the rotary knob to tune to the highlighted preset.
e. Menu exit. See “Menu Key Operation”
For further details, see “
Adding and Removing Presets”.
Figure 2 – Example source screen (AM input selected)
8
9
Page 11

FCC Statement
This equipment has been tested and found to comply with the limits for a Class
B digital device, pursuant to part 15 of the FCC Rules. These limits are
designed to provide reasonable protection against harmful interference in a
residential installation. This equipment generates uses and can radiate radio
frequency energy and, if not installed and used in accordance with the
instructions, may cause harmful interference to radio communications.
However, there is no guarantee that interference will not occur in a particular
installation. If this equipment does cause harmful interference to radio or
television reception, which can be determined by turning the equipment off and
on, the user is encouraged to try to correct the interference by one or more of
the following measures:
—Reorient or relocate the receiving antenna.
—Increase the separation between the equipment and receiver.
—Connect the equipment into an outlet on a circuit different from that to which
the receiver is connected.
—Consult the dealer or an experienced radio/TV technician for help.
FCC Statement
This device complies with FCC radiation exposure limits set forth for an
uncontrolled environment.
This device complies with Part 15 of the FCC Rules. Operation is subject to the
following two conditions: (1) this device may not cause harmful interference,
and (2) this device must accept any interference received, including
interference that may cause undesired operation.
Caution!
Any changes or modifications not expressly approved by the party responsible
for compliance could void the user's authority to operate the equipment.
 Loading...