


VIDEOSCOPE SYSTEM
User Manual
X1000
©Medical Intubation Technology Corporation (Mitcorp).
All rights reserved. Design and specications are subject to change without prior notice. Actual product and accessories
may differ from illustrations. Errors and omissions excepted. Reproduction in any manner without written permission of
Mitcorp is strictly forbidden.
ESC
OK


TABLE OF CONTENTS
Introduction
System Overview.................................................................................................................5
Legal and Other Notices.......................................................................................................9
WEEE Noteice....................................................................................................................................9
CE Notice.......................................................................................................................................9
FCC Notice...........................................................................................................................10
RoHS Notice................................................................................................10
Contact information......................................................................................................10
Chemical Compatibility.................................................................................................................11
Safety Guide..........................................................................................................................11
Inspection and Capturing Functions
Steering the Probe..............................................................................................................12
Adjusting the Brightness..................................................................................................12
Zooming .................................................................................................................................12
Rotating and Inverting......................................................................................................12
Enhancing Image Edge (Clarity+).................................................................................13
Boost Image Brightness (Boost+)................................................................................13
Enhancing Image Contrast (Negative+)..................................................................14
Anti Reflection...............................................................................................14
Particle free...............................................................................................14
Capturing an Image / Freezing Live Image..............................................................15
Dual View Inspection......................................................................................15
Recording a Video............................................................................................16
Playback Functions
Browse / Album modes................................................................................................................16
Delete File..........................................................................................................................16
Add Note.................................................................................................................................17
Compare Stored Image with Live View.......................................................................17
Video Playback....................................................................................................................18
Menu and Settings
General Menu operation.........................................................................................................19
Image Functions........................................................................................................................19
Language Selection.....................................................................................................................20
Adjust Date and Time.........................................................................................................20
Adjust Auto Power Off Timer...................................................................................................21
SD Card Operation.........................................................................................................................21
USB Functions and AV Output
USB Functions.............................................................................................................................23
Maintenance
Changing Tube and Calibration............................................................................24
Upgrading Firmware................................................................................................25

Accessories
Insertion Tube Accessories...........................................................................................26
System Unit Accessories..............................................................................................................28
Specications
System Unit................................................................................................................................29
2way Articulation Tube...............................................................................................29

INTRODUCTION
SYSTEM OVERVIEW
System Unit
SNAP
RIGHT/BRIGHTER
LEFT / DIMMER
UP / ZOOM IN
SUN VISOR
STAND
RECORD
OK / MENU
DOWN / ZOOM OUT
POWER / ESC
ROTATE / MIRROR
LIGHT DIRECTION
POWER INDICATION
ESC
OK
5

SD CARD SLOT
AV OUT
USB
DC IN
RESET
INSERT TUBE CONNECTOR
THREADED HOLE FOR
TRIPOD MOUNT
6

ARTICULATION
CONTROL WHEEL
PROBE HEAD
WHEEL LOCK
SEALING NUT
CONNECTOR
DATE
TIME
LIGHT
DIRECTION
SD CARD
STATUS
BRIGHTNESS
INDICATOR
BATTERY
INDICATOR
REPEAT
RECORDING
INDICATOR
SNAP
INCREASE /DECREASE
BRIGHTNESS
BUTTON
LOCK
PROTECTION CAP
PROTECTIVE RING
FITTING RING
PROBE NECK
Insert Tube
Screen Display
7

Setting Up the System
1. Remove the Insert Tube and the system unit from the case.
2. Attach the to the system unit
• Connect the tail cord connector of the Insert Tube to the input
connector of the system unit, screw tight the sealing nut.
3. Power on the system by press and hold the for 3 seconds.
4. Insert the SD card
• Open the peripheral cover on the side of the system unit and insert the
SD card.
Capturing Images
1. Guide the probe to the inspection area.
2. Aim the camera
• Deflect the probe tip by rotating the control wheel.
3. Capture the image.
• Press to capture desired image.
• Hold to keep freezing the frame.
Recording Video
• Press to start recording video.
• Press again to stop recording.
Review Images or Videos
• Press to enter browse mode.
• Press to start playing recorded video.
Turn Off the System
• Press and hold for 3 seconds to turn off the system.
About the battery
Frequent operations
The system is powered by a non-interchangeable Li-Polymer battery, which provides
approximately 6 hours capacity while fully charged. It takes about 3 hours for the
battery to be fully charged from empty. The system must be charging at room
temperature for best charging capacity.
8

SD card
Capacity
Totol Images 31130 62259 124518 249037
Video Length 135 mins 270 mins 539 mins 1079 mins
LEGAL AND OTHER NOTICES
This Mitcorp product is warranted to be free from defects in material and workman
shop for 1 year from the date of purchase. Mitcorp agrees to repair or replace the
product, at its own option and at no charge. This warranty shall not apply to any
product, which has been subject to connect to a faulty accessories, alteration,
negligence, accident or to any product which has been installed other than in
accordance with these instructions.
Warranty is subject to void under unauthorized attempt to disassemble the system
unit, insert tubes or modification of any kinds, even attempted only, of the system.
Mitcorp will not be responsible for damages caused by following situations:
• Defaced, modied or removed serial number label or warranty seal
• Modications of components without Mitcorp’s authorization
• Damages caused by natural phenomena or uncontrollable forces, such as
lightning, ooding, re, earthquake…etc.
WEEE NOTICE
About the SD card usage
• The cross-out wheeled bin symbol indicates that according to the European
Directive 2002/96/EC on Waste Electrical and Electronic Equipment, this
product must be collected in a separated way instead of being disposed of
as unsorted municipal waste.
• Contact your local dealer for procedures of recycling this equipment.
The X1000 videoscope system uses SD card to storage captured images and videos.
The estimated total images and video length on a par with SD card capacity is shown
below:
4 GB 8 GB 16 GB 32 GB
9
CE NOTICE
The X1000 Videoscope System is in conformance with the following standards:
• 1999/5/EC Radio and Telecommunications Terminal Equipment Directive.
• 2004/108/EC Electromagnetic Compatibility Directive

RoHS NOTICE
The X1000 Videoscope System is in conformance with the requirements of the
European law on the Restriction of Hazardous Substances (RoHS) directive. This means
that our product is both lead-free and without the hazardous substances either in the
manufacturing process or in the nal product
CONTACT INFORMATION
Please contact the store you purchased for assistance if you have any question about
this product.
FCC NOTICE
This device complies with Part 15 of the FCC Rules. Operation is subject to the
following two conditions:
• This device may not cause harmful interference.
• This device must accept any interference received, including interference
that may cause undesired operation
Federal Communications Commission Statement
This equipment has been tested and found to comply with the limits for a Class A
digital device, pursuant to Part 15 of the FCC Rules. These limits are designed to
provide reasonable protection against harmful interference when the equipment is
operated in a commercial environment. This equipment generates, uses and can radiate
radio frequency energy and, if not installed and used in accordance with the instruction
manual, may cause harmful interference to radio communications. Operation of this
equipment in a residential area is likely to cause harmful interference in which case the
user will be required to correct the interference at his own expense.
FCC Caution: Any changes or modifications not expressly approved by the party
responsible for compliance could void the user's authority to operate this equipment.
This device complies with Industry Canada licence-exempt RSS standard(s). Operation
is subject to the following two conditions: (1) this device may not cause interference,
and (2) this device must accept any interference, including interference that may
cause undesired operation of the device.
Le présent appareil est conforme aux CNR d'Industrie Canada applicables aux appareils
radio exempts de licence. L'exploitation est autorisée aux deux conditions suivantes
: (1) l'appareil ne doit pas produire de brouillage, et (2) l'utilisateur de l'appareil doit
accepter tout brouillage radioélectrique subi, même si le brouillage est susceptible d'en
compromettre le fonctionnement.
10

CHEMICAL COMPATIBILITY
USER MUST PAY ATTENTION TO THE INFORMATION PROVIDED HERE TO
ENSURE SAFETY.
We suggest you read the following statements carefully before using the system.
SAFETY GUIDE
All insertion tubes made by Mitcorp passed following liquid immersion test:
• Water
• Engine oil
• Brake uid oil (DOT4)
• Unleaded Gasoline
• Diesel
• Transmission oil
WARNING
CAUTION
If this product is used without observing the information given
under this symbol, it might cause injuries or loss of life.
If this product is used without observing the information given
under this symbol, it might cause to this product.
WARNING
WARNING
WARNING
WARNING
CAUTION
HAZARD ENVIRONMENT
• Do not use this system in explosive environments such
as gasoline or alcohol storage tank.
FLAMMABLE GASES
• Do not use this system near ammable gases.
INDUSTRIAL USAGE ONLY
INTENSIVE LIGHT MAY CAUSE EYE INJURY
• Avoid looking at the probe head while LED is on.
CERTAIN SUBSTANCES MAY DAMAGE THE PROBE
• Please refer to Chemical Compatibility section on page
10 please contact the store you pruchased for unsure
chemical solutions for further information.
11

INSPECTION AND CAPTURING FUNCTIONS
When viewing in live image, you can zoom in and zoom out by pressing and . The
zoom ratio is linearly scale from 1.0x to 4.0x.
• Press zoom in
• Press zoom out
Sometimes you need to rotate the live image without twisting the probe, or flip live
image horizontally when work with reection mirrors
.
ZOOMING
ROTATING AND INVERTING
STEERING THE PROBE
Put the insert tube into the opening hole of the target, hold and steer in the inspection
area.
To articulate the probe neck, rotate the control wheel on the handset. Push aside the
stay latch to lock the deection angle.
12

In case of operating in very dark environment even the lengthened exposure
time doesn’t provide enough brightness, you can boost the live image brightness
significantly by turning on the Boost+ option. When this function is activated,noise
might occur during your inspection.
ENHANCING IMAGE EDGE(CLARITY+)
BOOST IMAGE BRIGHTNESS(BOOST+)
You can enhance the image edge by turning on the Clarity+ option (default is ON).
Slight noise might occur while this function is activated.
Main Menu → Function Menu → Clarity+ <On/Off>
Original
Original
Boost+
Clarity+
To Rotate
• Press
To Flip Horizontally
• Press and hold
13
[MediaInfo]
PICT0005.JPG
Format:JPEG
Size:78 KB
05/11
Styl e
Menu
Delete
2013/07/12 19:36:43
[MediaInfo]
PICT0006.JPG
Format:JPEG
Size:78 KB
2013/07/12 19:36:43 06/11
Styl e
Menu
Delete
14
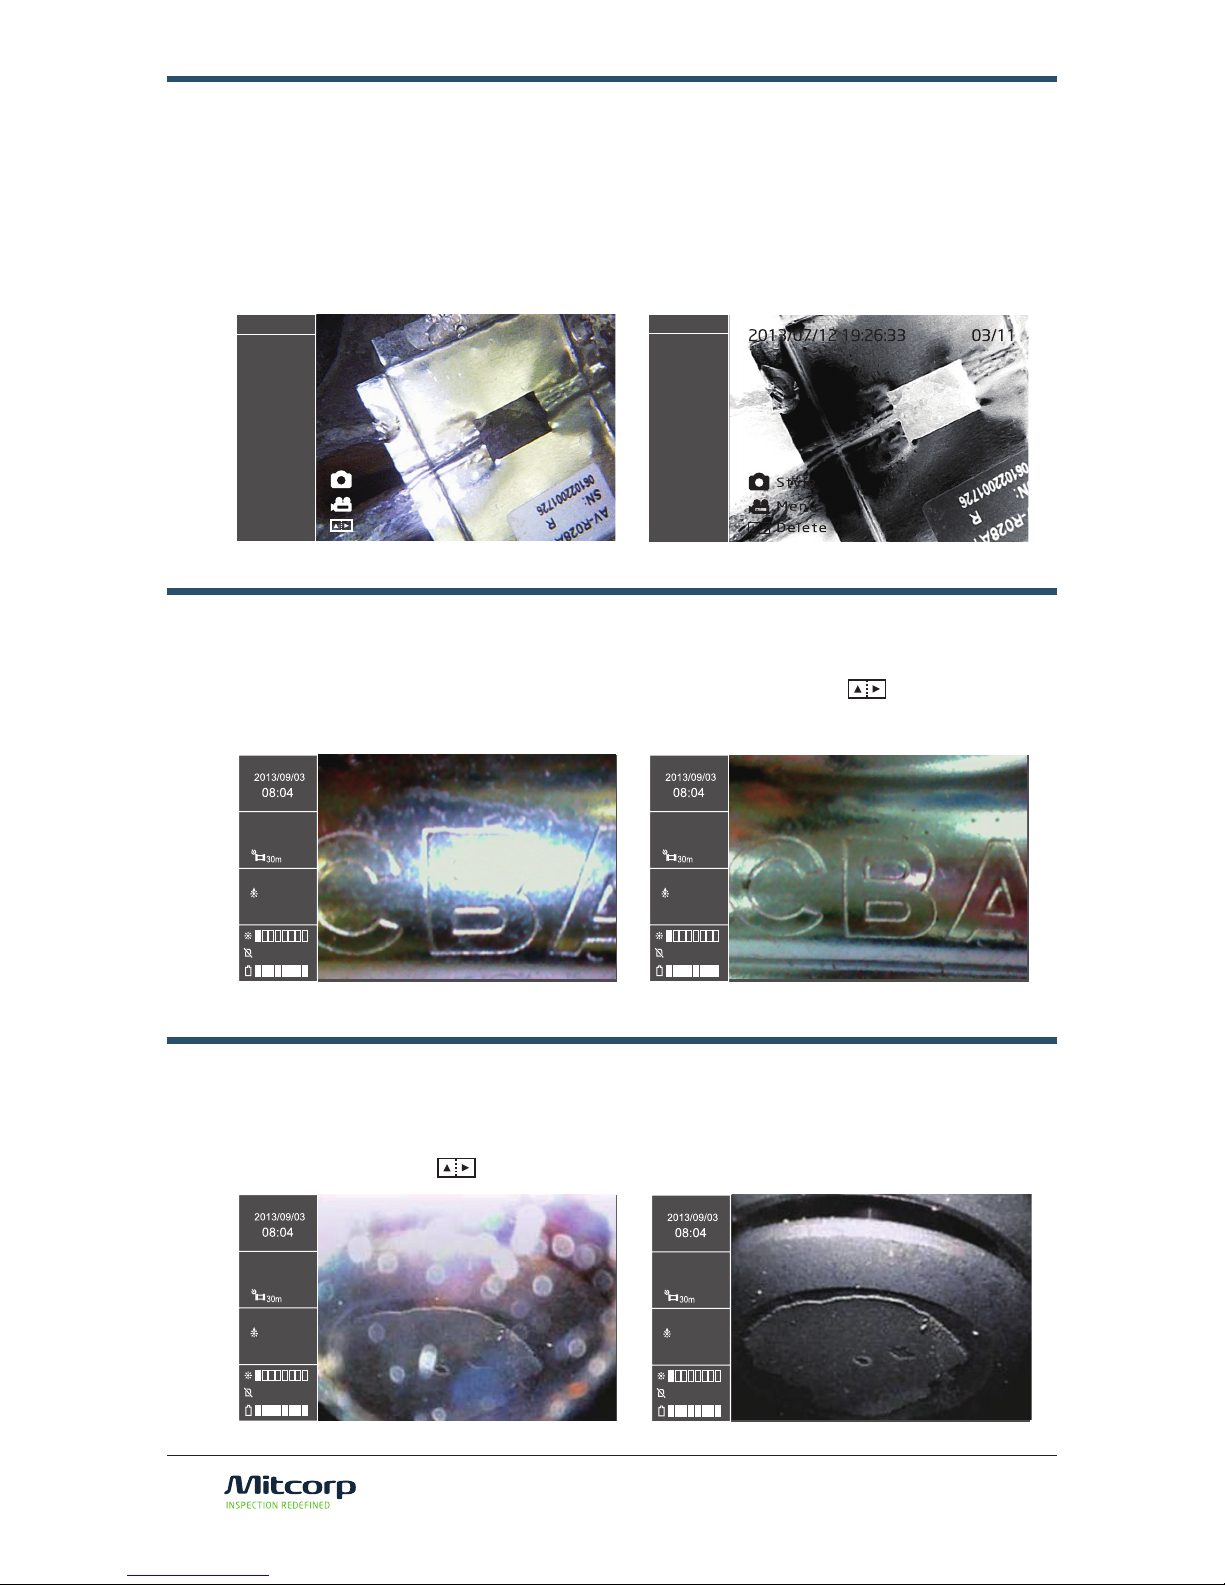
ENHANCING IMAGE CONTRAST (NEGATIVE+)
ANTI REFLECTION
PARTICLE FREE
When subtle details are not very obvious in low light environment, you can turn on
the Negative+ option. The Negative+ option inverts the live image luminance and
enhances the contrast, which will make the small details stand out for inspection.
Main Menu → Function Menu → Negative+ <On/Off>
While inspect in a shiny metal or mirror surface, you might press to reduce the
reection
When you using side view mirror on your inspection, you don’t need to wipe out the
dust on the mirror, press to get dust free images
Original
Original
Original
Negative+
Anti-Reection
Particle free
[MediaInfo]
PICT0003.JPG
Format:JPEG
Size:88 KB
[MediaInfo]
PICT0004.JPG
Format:JPEG
Size:88 KB
Style
Menu
Delete
2013/07/12 19:26:43 04/11

CAPTURING AN IMAGE / FREEZING LIVE IMAGE
When the current live image is the one interest you, you can capture the image by
pressing . The captured image le name will be shown on the information box on
the left sidebar. If is kept being held, the live image freeze until is released.
• Press Capture an image
• Press and hold Freezing live image
You can also capture image by pressing from
1. remote control
2. anticulation probe
15
DUAL VIEW INSPECTION
When you properly install dual view mirror adaptor, the screen will display front view
and side view simutaneously as below.
F S

16
Recording Operation
You can start recording a video anytime during inspection. Press once will start
the recording session while press again to stop it. The recorded video file name
will be shown on the information box. You can also record voice comment via built-in
microphone.
• Press Start recording video
• Press again Stop recording video
Note: Rotate / lp and all image manipulation functions are not available during recording.
RECORDING A VIDEO
Repeat Recording
Repeat recording is useful when you want to record videos repeatedly, and each clip
is sliced by a pre-dened time length. If the repeat recording function is disabled, the
recording operation will cease either when the button is pressed or by the time
video length reaches 30 minutes.
To enable repeat recording:
<MAIN MENU> <REPEAT RECORDING> <5 MINUTES> or <10 MIUTES> or <20
MINUTES> or <30 MINUTES>
To disable repeat recording:
<MAIN MENU> <REPEAT RECORDING> <OFF>

There are two types of multiple files presentation : browse mode and album mode.
In browse mode, 4 file thumbnails are shown in a filmstrip like sidebar, while the
current selection is displayed on the right. The album mode on the other hand, displays
thumbnails in 3 x 3 grids.
• Press in live preview mode enters the browse mode
• Press to change between the browse mode
and the album mode
• Press to enter single le
playback mode.
BROWSE / ALBUM MODES
DELETE FILE
Delete Single File
You can delete single file in the browse mode, the album mode or in the single file
playback mode.
• Move selection box to the image you want to erase and press button.
• Use to select <YES> and press to conrm.
Delete Multiple Files
It is possible to delete multiple les simultaneously.
• Move selection box to the le you intend to delete.
• Press to tag the le of current selection
• When all les intended to be deleted are tagged, press .
• Use to select <YES> and press to conrm
Single frame /Close-up Playback
While the browse mode or the album mode is convenient for skimming through
captured les. Close-up playback is only available in the single frame playback mode.
• Move selection box over an image. Pressing enters single frame playback
mode
• Press to change the close-up playback ratio.
• Use to move the ROI(region of interest).
6/11
PICT0007.JPG
2013/07/12
19:21:43
Format:JPEG
Size:60.1KB
PLAYBACK FUNCTIONS
17

ADD NOTE
Annotation is useful if you want to put comparison information or some comments on
the image. The X1000 videoscope system supports text annotation. The annotated
image will be automatically duplicated and saved.
To annotate:
• Move the selection box on top of the intended image, press to pop-up
the operation dialog, select <Annotate>.
• Use the virtual keypad to select character, pressing to input character.
• Press to conrm.
• Press to backspace.
• Press to select text from history.
COMPARE STORED IMAGE WITH LIVE VIEW
The side-by-side comparison of a still image with the live view allows user to clearly
verify the difference of an area between different times.
To compare:
• Move the selection box on top of the intended image, pressing
• The comparison window show on the live view, use to adjust the
image offset, pressing to confirm.
• Press to pop-up operation box, select <Window pos>, use to move
the window left or right, press to confirm.
• Press to pop-up operation box, select <Off> to close the comparison
window.
*You can adjust the stored image frame during your inspection on the screen.
18

Video Playback
The X1000 videoscope system supports various operation during video playback.
To playback a video:
• In browse mode or album mode, move selection box over a video.
• Press enters video playback mode
• Press pauses playback, press again to resume.
• Press to speed up playback, press to slow down.
• Press and hold for fast forward, press for fast rewind.
1/4
19

MENU AND SETTINGS
• Press in live view mode to enter main menu.
• Use to navigate between menu items.
• Press or to enter submenu.
• Press to back to upper tier.
GENERAL MENU OPERATION
IMAGE FUNCTIONS
<Clarity+>
<MAIN MENU> <FUNCTION> <CLARITY+>
• For more information about <CLARITY+>, refer to Enhancing Image Edge
(Clarity+).
<Boost+>
<MAIN MENU> <FUNCTION> <BOOST+>
• For more information about <BOOST+>, refer to Boost Image Brightness
(Boost+).
<Dual View>
<MAIN MENU> <FUNCTION> <DUAL VIEW+>
• For more information about <DUAL VIEW>, refer to Working with Dual View
Mirror .
<Negative+>
<MAIN MENU> <FUNCTION> <NEGATIVE+>
• For more information about <NEGATIVE+>, refer to Enhancing Image
Contrast (Negative+).
<Display Grid>
<MAIN MENU> <FUNCTION> <DISPLAY GRID>
• For more information about <Display Grid>, refer to Working with
Measurement Tool.
20

21
To change UI language:
<MAIN MENU> <SETTINGS> <LANGUAGE>
• Use to select desired language, press to conrm.
LANGUAGE SELECTION
To adjust system time:
<MAIN MENU> <SETTINGS> <DATE / TIME> <SYSTEM TIME>
• Use to navigate between elds.
• Use to adjust.
• Press to conrm.
To change time format:
<MAIN MENU> <SETTINGS> <DATE / TIME> <FORMAT >
• Use to navigate to <FORMAT> eld
• Use to change time format.
• Press to conrm.
To change timestamp setting:
<MAIN MENU> <DATE / TIME>
• Use to navigate to <TIMESTAMP> eld.
• Use to select <ON> or <OFF>
• Press to conrm.
ADJUST DATE AND TIME
To adjust the auto power off timer:
<MAIN MENU> <SETTINGS> <AUTO POWER OFF>
• Use to select between <5 MINUTES> <10 MINUTES> <15 MINUTES>
<30 MINUTES> or <OFF>.
• Press to conrm.
ADJUST AUTO POWER OFF TIMER

To check the SD Card status:
<MAIN MENU> <SD CARD STATUS>
To format the SD card:
<MAIN MENU> <SD CARD STATUS>
• Select <Format SD Card>, use select <YES>
To delete all les on the SD card:
<MAIN MENU> <SD CARD STATUS>
• Select <Erase All Files>, use select <YES>
SD CARD OPERATION
22

USB FUNCTIONS AND AV OUTPUT
USB FUNCTIONS
The USB interface is the de facto standard of PC connection. The X1000 videoscope
supports two USB modes: Reader Mode and Camera Mode.
USB Reader Mode
To use the USB reader function:
<MAIN MENU> <USB> <READER>
• Connect the system to a computer with the provided USB cable.
• Use to select <READER>, press
• The X1000 videoscope system appears as a mass storage device in
“My
Computer”.
• You can escape the USB reader mode by press .
USB Camera Mode
To use the USB camera function:
<MAIN MENU> <USB> <CAMERA>
• Connect the system to a computer with the provided USB cable.
• Use to select <CAMERA>, press
• Use the provided software to watch the live video on PC.
• You can escape the USB camera mode by press .
AV Output
The X1000 videoscope supports AV output to leverage the big screen of TV. (SDTV
only, HDTV not supported.)
To use the AV output:
• Connect the system to a SDTV with the provided AV cable.
• Use to select <NTSC> or <PAL> according to the TV, press .
• You can escape the AV output mode by press .
23

MAINTENANCE
CHANGING PROBE AND CALIBRATION
In case of probe is malfunctioned and need to be replaced with a new one, follow
below procedure to calibrate the probe to reach it’s fully performance.
To change the probe:
• Turn off the system.
• Screw loose the sealing nut, remove the malfunctioned probe from system.
• Connect the new probe , insure the indication point on both connector is
matched, screw tight the sealing nut.
To calibrate:
• Turn off the system
• Press and hold both and simultaneously to enter factory mode.
• Select <Calibration>, press .
-The calibration consists of two steps: bright scene calibration and dark
scene calibration.
1. Brightscene:aiming the camera to a bright scene until whole screen is
pure white. Press when ready. Holding still while calibrating. You
may lock the exposure value of a rather darker scene by press ,
this will help nding a bright scene.
2. Darkscene:aiming the camera to a dark scene until whole screen is
pure black. Press when ready. Holding still while calibrating. You
may lock the exposure value of a rather bright scene by press , this
will help nding a dark scene.
• When the calibration is done, restart the system.
24

25
There might be addition and/or modication of functions after initial release. We will
release updated version rmware for system upgade.
To check the current rmware version:
• Turn off the system
• Press and hold both and simultaneously to enter factory mode.
• Select <information>
• The rmware information will be displayed.
To update rmware:
• Turn off the system.
• Copy the rmware le to a SD card, then put inside the system.
• Press and hold both and simultaneously to power on and the system
will start updating procedure automatically.
• When rmware update is done, the X1000 videoscope system will power off
automatically.
UPGRADING FIRMWARE

ACCESSORIES
Working with Side View Mirror Adaptor
When there is no enough space for the probe neck to bend, the side view mirror comes
into play
To attach the side view mirror adaptor:
• Remove the protective ring from probe tip
• Screw tight the side view mirror adaptor
• Toggle the led illumination direction by press for best visual
performance.
Working with Dual View Mirror Adaptor
• Remove the protective ring from
probe tip
• Screw tight the dual view mirror
adaptor
INSERT TUBE ACCESSORIES
F S
26

Working with Holding Tube extender
The extender is a rigid thin pipe which helps the insertion tube to reach the area above
below eye level.
To attach the extender:
27

SYSTEM UNIT ASSCESSORIES
SUN VISOR
6.0 mm DUAL VIEW
PIN PROBE
5.5 mm 110° MIRROR
6.0 mm 70° MIRROR
REMOTE CONTROL
HAND STRAP
NECK STRAP
HOLDING TUBE
ESC
OK
28

29
SPECIFICATIONS
SYSTEM UNIT
2 WAY ARTICULATION TUBE
Features Description
LCD 7” LCD ( 800 x 480 )
Snapshot 640 * 480,jpeg
Recording 640 * 480 , MPEG4 (with audio)
Dimension 240 * 154 * 47mm
Weight 1.3kg (2.86 lb)
Dust & Water proof IP57 resistant
Drop height 1m
Battery Li-polymer (Non-Interchangeable)
6 hours capacity / 3 hours charge to full
Working temperature -10 ~ 60
℃
Storage temperature -20 ~ 80
℃
USB mass storage mode
webcam mode
Storage SD card , up to 32G
AV output NTSC / PAL
Audio input Built-in microphone
Audio output Headphone Jack
Brightness Adjust 8 + 1 (Boost) levels
UI Languages 28
Features Description
Probing head diameter 6.0mm
Tube length 2m
Articulation 2 way
Sensor VGA
LED Front / Side
Button Snapshot /LED + / LED -
Button lock
Lock up buttons function

30
NOTE


VER.1
 Loading...