

Page 1

Operation Guide
<Set-up Edition>
ALWAYS read this Operation Guide thoroughly before use. After reading, maintain it in good condition and
keep it together with the Operation Guide for your copier.
Page 2

Trademark Information
• Novell and NetWare are registered trademarks of Novell, Inc.
• IBM and IBM PC-AT are trademarks of International Business Machines Corporation.
• PowerPC is a trademark of International Business Machines Corporation of America and other corporations.
• Adobe and Acrobat are trademarks of Adobe Systems Incorporated.
• CompactFlash and CF are trademarks of SanDisk Corporation.
All other company and product names contained in this Operation Guide are trademarks or registered trademarks of their
respective companies. The designations ™ and ® will not be used in this Operation Guide.
All rights reserved. No part of this material may be reproduced or transmitted in any form or by any means, electronic or
mechanical, including photocopying, recording or by any information storage and retrieval system, without permission in
writing from the Publisher.
Legal Restriction On Copying
• It may be prohibited to copy copyrighted material without permission of the copyright owner.
• It is prohibited under any circumstances to copy domestic or foreign currencies.
• Copying other items may be prohibited.
i
Page 3

IBM PROGRAM LICENSE AGREEMENT
THE DEVICE YOU HAVE PURCHASED CONTAINS ONE OR MORE SOFTWARE PROGRAMS (“PROGRAMS”) WHICH BELONG TO
INTERNATIONAL BUSINESS MACHINES CORPORATION (“IBM”). THIS DOCUMENT DEFINES THE TERMS AND CONDITIONS
UNDER WHICH THE SOFTWARE IS BEING LICENSED TO YOU BY IBM. IF YOU DO NOT AGREE WITH THE TERMS AND
CONDITIONS OF THIS LICENSE, THEN WITHIN 14 DAYS AFTER YOUR ACQUISITION OF THE DEVICE YOU MAY RETURN THE
DEVICE FOR A FULL REFUND. IF YOU DO NOT SO RETURN THE DEVICE WITHIN THE 14 DAYS, THEN YOU WILL BE ASSUMED
TO HAVE AGREED TO THESE TERMS AND CONDITIONS.
The Programs are licensed not sold. IBM, or the applicable IBM country organization, grants you a license for the Programs only in the
country where you acquired the Programs. You obtain no rights other than those granted you under this license.
The term “Programs“ means the original and all whole or partial copies of it, including modified copies or portions merged into other
programs. IBM retains title to the Programs. IBM owns, or has licensed from the owner, copyrights in the Programs.
1. License
Under this license, you may use the Programs only with the device on which they are installed and transfer possession of the Programs
and the device to another party. If you transfer the Programs, you must transfer a copy of this license and any other documentation to
the other party. Your license is then terminated. The other party agrees to these terms and conditions by its first use of the Program.
You may not:
1) use, copy, modify, merge, or transfer copies of the Program except as provided in this license;
2) reverse assemble or reverse compile the Program; or
3) sublicense, rent, lease, or assign the Program.
2. Limited Warranty
The Programs are provided “AS IS.”
THERE ARE NO OTHER WARRANTIES COVERING THE PROGRAMS (OR CONDITIONS), EXPRESS OR IMPLIED, INCLUDING,
BUT NOT LIMITED TO, THE IMPLIED WARRANTIES OF MERCHANTABILITY AND FITNESS FOR A PARTICULAR PURPOSE.
Some jurisdictions do not allow the exclusion of implied warranties, so the above exclusion may not apply to you.
SUPPLEMENT TO AGREEMENT FOR SOFTWARE BUNDLING AND DISTRIBUTION FOR ALDC
3. Limitation of Remedies
IBM’s entire liability under this license is the following;
1) For any claim (including fundamental breach), in any form, related in any way to this license, IBM’s liability will
be for actual damages only and will be limited to the greater of;
a) the equivalent of U.S.$25,000 in your local currency; or
b) IBM’s then generally available license fee for the Program
This limitation will not apply to claims for bodily injury or damages to real or tangible personal property for which IBM is legally liable.
IBM will not be liable for any lost profits, lost savings, or any incidental damages or other economic consequential damages, even if
IBM, or its authorized supplier, has been advised of the possibility of such damages. IBM will not be liable for any damages claimed by
you based on any third party claim. This limitation of remedies also applies to any developer of Programs supplied to IBM. IBM’s and the
developer’s limitations of remedies are not cumulative. Such developer is an intended beneficiary of this Section. Some jurisdictions do
not allow these limitations or exclusions, so they may not apply to you.
4. General
You may terminate your license at any time. IBM may terminate your license if you fail to comply with the terms and conditions of this
license. In either event, you must destroy all your copies of the Program. You are responsible for payment of any taxes, including
personal property taxes, resulting from this license. Neither party may bring an action, regardless of form, more than two years after the
cause of action arose. If you acquired the Program in the United States, this license is governed by the laws of the State of New York. If
you acquired the Program in Canada, this license is governed by the laws of the Province of Ontario. Otherwise, this license is governed
by the laws of the country in which you acquired the Program.
ii
Page 4

About this Operation Guide
This Operation Guide <Set-up Edition> is meant to be read when the Printer Board is installed in your copier and the
copier is to be used as a local printer or network printer. It contains explanations on set-up procedures for using the
copier as a printer.
As the required set-up and configurations for the printer may differ depending upon the environment in use in the
connected computer, please read those sections related to your specific computer environment and perform the
appropriate set-up and configuration explained there.
The Operation Guide <Functions Edition> contains explanations on printing, performing certain settings and
configurations, and the procedures required at your computer.
About the On-Line Manual
The On-Line Manual for this Operation Guide is a PDF (Portable Document Format) file and is located on the CD-ROM
that is included with this product. The Adobe Acrobat Reader software is required in order to access the On-Line Manual.
The installer for Adobe Acrobat Reader is also included on the CD-ROM so the software can be installed onto your hard
disk from there.
iii
Page 5

Getting connected
When connecting the printer directly to your computer (with a parallel cable or serial cable)…
1 Connecting the printer directly to
PC
Parallel cable or serial cable
PC
CD-ROM
When connecting the printer to a network…
<Example connection>
Hub
your computer with a parallel
cable or serial cable .................
2
Installing the printer driver into your
Page 4
computer .... Refer to the Functions Edition
Network cable
PC
PC
1 Connecting a network cable
(100Base-TX, 10Base-T, etc.)
to the printer.............................
Page 5
2 Performing network (TCP/IP)
settings at the printer ...............
3
Installing the printer driver into your
Page 6
computer ... Refer to the Functions Edition
iv
CD-ROM
Page 6

Table of contents
1. Preparations .............................................................................................................2
1-1 Accessories................................................................................................................................................2
1-2 Required items ........................................................................................................................................... 2
1-3 Name of parts (main body) ........................................................................................................................ 2
1-4 Name of parts (operation panel) ................................................................................................................3
2. Set-up ........................................................................................................................ 4
2-1 Connecting the printer cable ......................................................................................................................4
2-2 Connecting the network cable ...................................................................................................................5
2-3 Installing the software ................................................................................................................................5
2-4 Network (TCP/IP) settings ......................................................................................................................... 6
3. Troubleshooting ....................................................................................................... 8
3-1 Canceling printing ......................................................................................................................................8
3-2 When an error message appears… .........................................................................................................9
3-3 Basic troubleshooting chart .....................................................................................................................13
4. Specifications ......................................................................................................... 14
1
Page 7

1. Preparations
1-1 Accessories
• CD-ROM x 2
• This Operation Guide
• Quick Reference Guide (for Networks)
1-2 Required items
• When connecting the printer directly to your computer: Parallel cable (IEEE1284 compliant, 1.5 m or shorter) or serial cable
• When connecting the printer to a network: Ethernet cable (100Base-TX or 10Base-T)
*When you use a 10Base-T or 100Base-TX cable, make sure it is a shielded cable.
*When you use a Parallel cable, make sure it is a shielded cable.
1-3 Name of parts (main body)
1 Memory Card (CompactFlash) slot
Insert the optional Memory Card (CompactFlash) here.
2 Parallel interface connector
When connecting the printer to your computer with a parallel
interface, connect a bi-directional parallel cable here.
3 Ethernet connector
When connecting the printer to a network, connect an
Ethernet cable here.
4 Serial interface connector
When connecting the printer to your computer with a serial
interface, connect a serial cable here.
5 Main switch
Turn this switch ON ( | ) first, prior to using the printer.
Always turn this switch OFF (O) when connecting the printer
cable, etc.
6 Operation panel
Use when performing settings, etc., at the printer itself.
2
Page 8

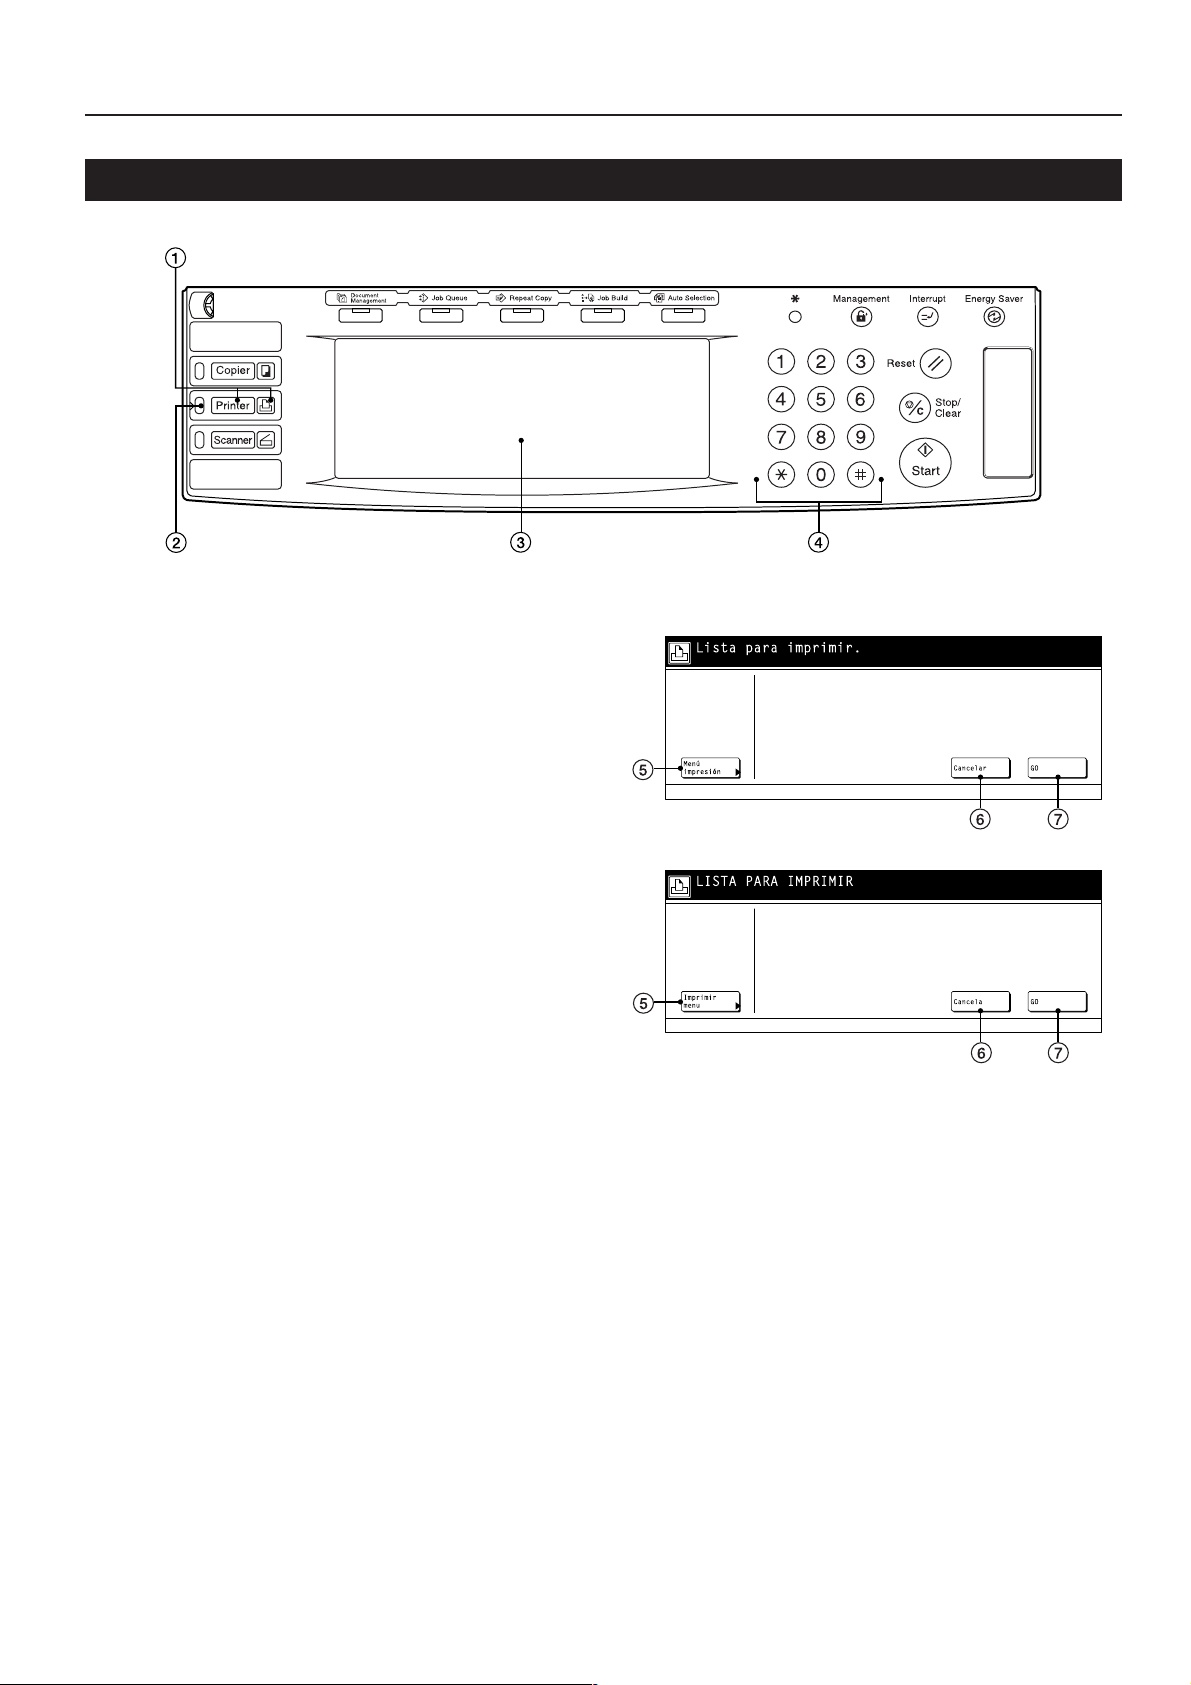
1-4 Name of parts (operation panel)
5
1 Printer key (indicator)
Press to switch to the printer mode. The indicator is lit when the
mode is engaged.
2 Status indicator
Flashes/lights to indicate printer status.
Lights green while receiving data.
Lights amber when a printing error has occurred.
Flashes amber when an error that does not interrupt printing has
occurred.
3 Touch panel
Displays printer status and keys for operating various functions.
4 Numeric keys
Use to set enter settings directly.
1. Preparations
● Touch panel in the printer mode
5 Printer Menu key
Press to set printer defaults.
6 Cancel key
Press to stop printing or to clear an error message.
7 GO key
Press to restart printing as well as to initiate form feeding. This
key is also used to toggle the printer between online and offline.
3
Page 9

2. Set-up
2-1 Connecting the printer cable
To connect the printer directly to your computer, use either a parallel
cable or serial cable.
CAUTION: ALWAYS turn the main switch to the printer OFF (O)
1
2
BEFORE connecting the printer cable.
Turn the main switch located on the left side of the printer
OFF (O) and then turn the power off to your computer as
well.
Connect the printer cable to the parallel interface connector
or serial interface connector located at the back of the right
side of the printer.
Connect the other end of the printer cable to the parallel
3
interface connector or serial interface connector on your
computer.
Turn the main switch to the printer back ON ( | ).
4
* For details on printer interface setup, see “Functions
Edition”.
4
Page 10

2. Set-up
2-2 Connecting the network cable
To connect the printer to a network, use an Ethernet cable (100BaseTX or 10Base-T).
Turn the main switch located on the left side of the printer
1
OFF (O).
Connect the network cable to the Ethernet connector at the
2
back of the right side of the printer.
2-3 Installing the software
Perform the following procedure to install into your computer the
printer driver and other software that is appropriate to the operating
system in use in that computer. For information on installing the
required software, refer to the Functions Edition.
Connect the other end of the network cable to your hub.
3
Turn the printer’s main switch back ON ( | ).
4
Make network settings. (See “Network settings” on page 6.)
5
5
Page 11

2. Set-up
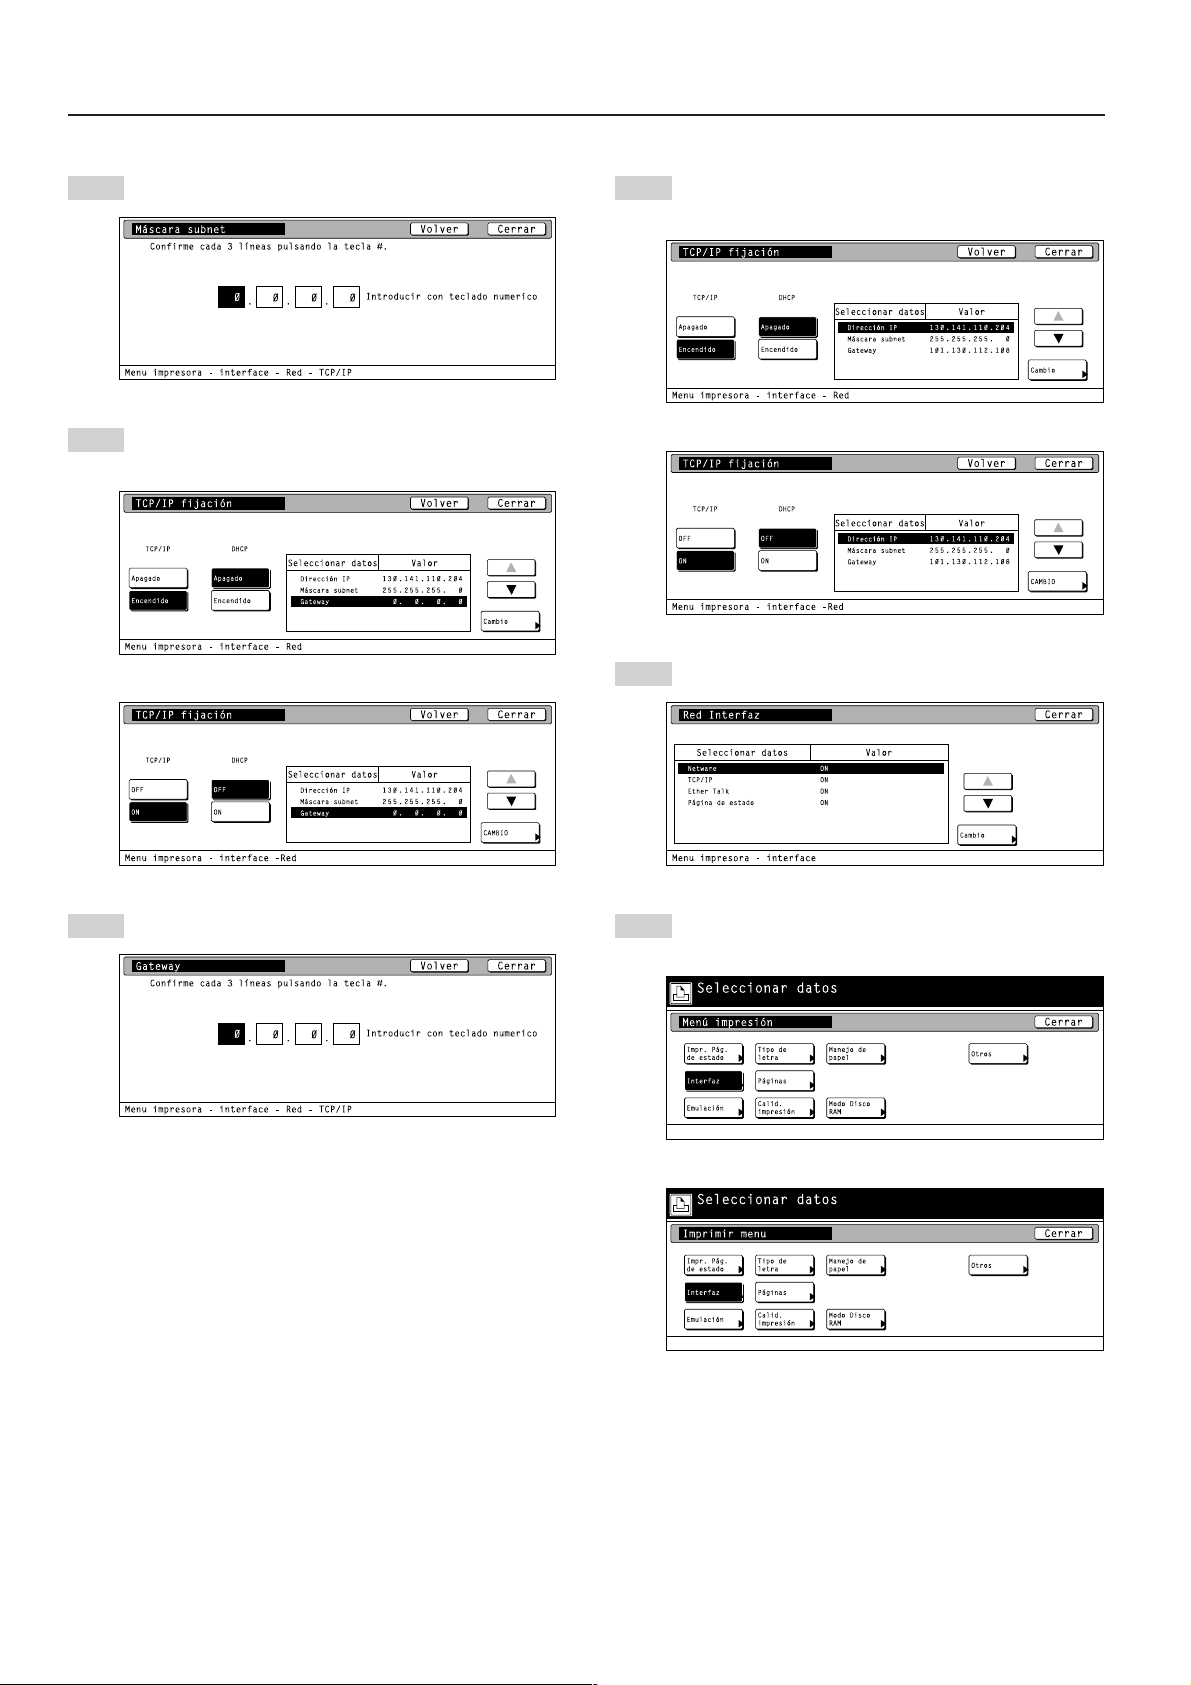
2-4 Network (TCP/IP) settings
To use the printer as a network printer, it is necessary to set an IP
address for the printer.
Notes
• The IP address that should be registered here will differ depending
upon your network environment. Check with your network
administrator BEFORE performing this setting.
• If you are using a DHCP server to automatically configure the IP
address, this setting will not be necessary because DHCP server
configuration is already enabled as the factory default setting.
* To cancel the setting midway through it, press the Stop/Clear key.
Press the Printer key. The printer will switch to the printer
1
mode.
Touch the “Printer Menu” key.
2
Use the “▲” and “▼” cursor keys to select “TCP/IP” and
5
then touch the “Change” key.
Select “ON” under the “TCP/IP” setting and “OFF” under the
6
“DHCP” setting.
Use the “▲” and “▼” cursor keys to select “IP Address” and
7
then touch the “Change” key.
Touch the “Interface” key.
3
Touch the “Network” key and then the “Detail” key.
4
Use the numeric keys to input the address. Input the first
8
block of 3 digits of the address in the highlighted area.
• Press the sharp (#) key to set the address after inputting
each block of 3 digits.
6
Page 12

2. Set-up
Enter the next 3 digits and press the sharp (#) key.
9
• To change an entered address, press the sharp (#) key to
select a 3-digit block and use the numeric keys to enter
the correct address.
Repeat the same procedure for the remaining blocks of the
10
address. Once the input of the IP address is completed,
touch the “Close” key. The display will return to the “TCP/IP”
screen.
• To cancel the entered address, touch the “Back” key. The
address that was shown before you entered a new
address will reappear.
Use the “▲” and “▼” cursor keys to select “Gateway” and
13
touch the “Change” key.
Enter the Gateway address in the same way you entered
14
the IP address in steps 8 to 10.
When you are finished making all of the network settings,
15
touch the “Close” key.
Use the “▲” and “▼” cursor keys to select “Subnet Mask”
11
and touch the “Change” key.
Enter the Subnet Mask address in the same way you
12
entered the IP address in steps 8 to 10.
Touch the “Close” key.
16
Touch the “Close” key. The printer will switch back to the
17
printer mode.
7
Page 13

3. Troubleshooting
3-1 Canceling printing
Perform the following procedure when you want to stop printing or you want to clear data.
While data is being processed, printing can be canceled on the
Press the “Cancel” key.
1
Inch specification
printer screen.
Touch the “CANCEL” key.
1
Metric specification
Select a printer interface and touch the “Confirm” key.
2
• To abort the cancel operation, touch the “Stop” key.
Printing will be canceled.
3
8
Page 14

3. Troubleshooting
3-2 When an error message appears…
If an error message appears on the operation panel, first check the following tables for cause of the trouble and then perform the corresponding
procedure. For more detailed information, refer to the Operation Guide for your copier as well as the Operation Guide for any optional equipment
that is installed in your machine.
Display message
Add paper in drawer.
XX size (XXX)
Set paper Press GO
Place paper in drawer.
PLACE PAPER IN PAPER DRAWER.
Add staples.
Call service.
Department code mismatch
offline
Procedure
The size or type of paper selected for printing does not match the size or type of paper in the
drawer. Replace the paper in the drawer with that of the correct size and type.
• If you want to switch to and print from a different drawer, select the desired drawer on the
touch panel and then touch the “GO” key.
• The following commands will be displayed in the printer mode.
GO: Force-prints onto the current size or type of paper.
Cancel: Cancels the printing operation completely.
This mode feeds a stack of multiple sheets one at a time. Every time you want to feed a
sheet, touch the “GO” key.
The drawer has run out of paper. Add paper.
The finisher (option) has run out of staples. Refer to the Operation Guide for the finisher and
replenish the staples.
Trouble has occurred within the printer. Contact your service representative or an authorized
service center.
The department code you entered does not match the registered one. Check the department
code that is registered in the printer driver.
Exceeded print quantity limit.
Exceeded pre-registered printing quantity.
Error in printer mode
RAM Disk error Press GO
The amount of printing accomplished has exceeded the acceptable capacity as set under
copy management. In order to print further, change the copy management setting in the
printer.
This message will appear when a printer error occurs and the machine is in a mode other
than the printer mode. Press the Printer key to switch to the print mode screen and the
corresponding error message will be displayed.
Code:##
Check the error code displayed in place of ## and refer to the following.
01: Format error. Turn power OFF and ON again.
02: The RAM disk mode is OFF. Turn it ON.
03: A write error has occurred. Turn OFF write protection.
04: The RAM disk does not have enough area to store the data. Delete any unnecessary
data to make more room.
05: The selected file could not be found. Check the file name and whether it is on the RAM
disk or not.
06: There is not enough system memory. Increase memory capacity.
98: Some of the data being collated was not read. Job data is corrupt.
9
Page 15

3. Troubleshooting
Display message
Memory card error Press GO
Hard disk error Press GO
Procedure
Code:##
Check the error code displayed in place of ## and refer to the following.
01: Format error. Reformat the memory card.
02: Memory card load error. Correctly load the memory card.
03: A write error has occurred. Turn OFF write protection.
04: The memory card does not have enough area to store the data. Delete any unnecessary
data to make more room.
05: The selected file could not be found. Check the file name and whether it is on the
memory card or not.
Code:##
Check the error code displayed in place of ## and refer to the following.
01: Format error. Reformat the hard disk.
02: Hard disk load error. Correctly load the hard disk.
03: A write error has occurred. Turn OFF write protection.
04: The hard disk does not have enough area to store the data. Delete any unnecessary
data to make more room.
05: The selected file could not be found. Check the file name and whether it is on the hard
disk or not.
06: There is not enough system memory. Increase memory capacity.
20: The hard disk is loaded in the wrong slot. Load the hard disk in the correct slot.
85: An illegal name has been used for the virtual tray. Rename the tray correctly.
86: The wrong password was used for the virtual mailbox. Input the correct password.
88: Some of the data in the virtual mailbox was not read. Job data is corrupt.
97: No more jobs can be saved. The limit has been reached. Increase the number of
storable jobs and available area.
98: Some of the data in the job was not read. Job data is corrupt.
KPDL error Press GO
Memory Card error Insert again
Code:##
The current print job cannot continue. A KPDL error report can be printed out from the Printer
Menu. Touching the “GO” key prints out the data that has already been processed. If auto
recovery time has been set, printing will resume automatically when the set time elapses.
For more information, see “KPDL Error Report print out (page 4-10)” and “Auto Continue
ON/OFF and Recovery Time (page 4-47)” in “Functions Edition”.
The Memory Card (CompactFlash) was removed during operation under the menu for
printer-related settings. Reinsert the Memory Card.
* BE SURE to turn the main switch OFF (O) BEFORE inserting the Memory Card.
10
Page 16

3. Troubleshooting
Display message
Insert the same memory card
Format error Memory card
Option interface error
File not found Press GO
Read fonts:Failed
Read macro:Failed
Warning low memory
Warning image adapt
Print overrun Press GO
Procedure
The Memory Card (CompactFlash) could not be detected during an operation in which the
printer was reading data from that card. Reinsert the Memory Card.
* BE SURE to turn the main switch OFF (O) BEFORE inserting the Memory Card.
Initialization of the Memory Card (CompactFlash) currently inserted is necessary.
Code:10
The optional interface board is loaded in the wrong slot. Turn power OFF and load the board
in the correct slot.
File error. Touch the “GO” key.
The printer failed to read the font data. Try to read the font data again.
The printer failed to read the macro. Try to read the macro again.
There is not enough memory. You can check how much printer memory there is by printing
out a status page. Delete any unnecessary font data and macros.
Because there is not enough memory, printing cannot be performed at the set resolution.
Either add more memory to the printer or change the resolution.
A data overrun error has occurred due to insufficient memory.
• Press the Printer key to switch to the printer mode. Following commands will be displayed.
GO: Continues printing.
Cancel: Cancels the printing operation completely.
• If auto recovery time has been set, printing will resume automatically when the set time
elapses.
• Once this error message is displayed, “Page Protect” will be turned “On” automatically.
Memory overflow Press GO
Virtual mailbox full
Interface occupied
The current print job could not be completed due to insufficient memory in the printer.
• Press the Printer key to switch to the printer mode. Following commands will be displayed.
GO: Continues printing. The data that has already been processed will be printed out and
the remaining portion of the print job will be printed onto the following page.
Cancel: Cancels the printing operation completely.
• If you are using a RAM disk, reduce the size of the RAM disk. If this error occurs often, it is
recommended that you install additional memory into the printer. For more detailed
information on adding memory, contact your service representative or an authorized
service center.
• If auto recovery time has been set, printing will resume automatically when the set time
elapses.
There is not enough area in the virtual mailbox. Print out data in the virtual mailbox.
The selected interface is currently is use. Wait for a while and then attempt the operation
again.
11
Page 17

3. Troubleshooting
Display message
Option ROM error Press GO
Format error Hard Disk
Check the waste punch box.
(Check Punch Hole box.)
Procedure
An error occurred when reading the optional ROM. Press the Printer key to switch to the
printer mode and then touch the “GO” key to clear the error.
Initialize the hard disk.
Either the waste punch box (Punch Hole box) is not correctly installed or it is full. Reposition
or empty it as necessary.
12
Page 18

3. Troubleshooting
3-3 Basic troubleshooting chart
If you experience trouble while you are using this machine as a printer, refer to the table below to perform minor adjustments. If trouble persists,
contact your service representative or an authorized service center.
* For information in regard to general mechanical trouble with the machine, refer to the Operation Guide for your copier.
Problem
Nothing is printed out
Text is not printed correctly
Print out is not correct
Check point
Is the power cord loose?
Is the power ON ( | ) to the printer?
Is the printer cable appropriate and
is it connected properly?
Did you connect the printer cable
AFTER you turned the power to the
printer ON?
Is the printer off-line? (Is the Status
indicator flashing amber?)
Is the printer cable appropriate and
is it connected properly?
Is the setting configuration in your
computer correct?
Procedure
Connect the power cord securely to a power
source.
Turn the main switch to the printer ON ( | ).
Be sure to use a compliant printer cable and
make sure it is connected properly.
Connect the printer cable BEFORE you turn
the power to the printer ON.
Perform the appropriate procedure to put the
printer on-line.
1 Press the Printer key to switch to the
printer mode.
2 Touch the “GO” key.
3 The Status indicator will go out.
Be sure to use a compliant printer cable and
make sure it is connected properly.
Confirm the settings in the printer driver as
well as in the software application in use.
Reference page
—
4
4
—
3
4
—
Is the emulation protocol setting
correct?
Check the emulation protocol setting.
—
13
Page 19

4. Specifications
CPU ................................................................... PowerPC 750 (400 MHz)
Printing Speed ................................................... 45 ppm copier: 45 pages/min (A4 [8 1/2" x 11"])
Printing Resolution .............................................Fast 1200 mode
Maximum Printing Size ...................................... A3 (11" x 17")
RAM Memory Capacity ...................................... Installed: 32 MB
Interface ............................................................. Parallel interface (IEEE 1284 compliant) x 1
Installed Fonts .................................................... PCL: 80
* Specifications are subject to change without notice.
55 ppm copier: 55 pages/min (A4 [8 1/2" x 11"])
With smoothing OFF: 600 dpi x 600 dpi
With smoothing ON: interpolated 2400 dpi x 600 dpi
Maximum: 256 MB (with an additional 256 MB of optional memory installed)
RS-232C serial interface x 1
Network interface x 1
KPDL: 136
14
Page 20
Guide de fonctionnement
<Édition Installation>
TOUJOURS lire entièrement ce Guide de fonctionnement avant d’utiliser l’appareil. Après l’avoir lu,
conservez ce guide dans de bonnes conditions avec le Guide de fonctionnement de votre copieur.
Page 21

Informations concernant les marques déposées
• Novell et NetWare sont des marques déposées de Novell, SA.
• IBM et IBM PC-AT sont des marques de fabrique d’International Business Machines Corporation.
• PowerPC est une marque de fabrique d’International Business Machines Corporation of America et autres sociétés
commerciales.
• Adobe et Acrobat sont des marques de fabrique d’Adobe Systems Incorporated.
• CompactFlash et CF sont des marques de fabrique de SanDisk Corporation.
Tous les autres noms de sociétés ou produits contenus dans ce Guide de fonctionnement sont des marques de fabrique
ou des marques déposées de leurs compagnies respectives. Les indications ™ et ® ne seront pas utilisées dans ce
Guide de fonctionnement.
Au sujet de ce Guide de fonctionnement
Ce Guide de fonctionnement <Édition Installation> doit être lu lorsque la plaquette imprimante est installée dans votre
copieur et que ce copieur doit être utilisé comme imprimante locale ou comme imprimante de réseau. Il contient des
explications concernant les procédures d’installation pour utiliser le copieur comme imprimante.
Le réglage des paramètres et la configuration de l’imprimante étant différents selon la configuration matérielle utilisée par
l’ordinateur connecté à l’appareil, veuillez lire les sections se rapportant spécifiquement à votre configuration matérielle
et effectuer les réglages et la configuration décrits dans ces sections.
Le Guide de fonctionnement <Functions Edition (Édition Fonctions)> contient des explications concernant l’impression,
l’exécution de certains réglages et configurations et les procédures devant être effectuées sur votre ordinateur.
Au sujet du Manuel d’assistance interactif
Le Manuel d’assistance interactif de ce Guide de fonctionnement est enregistré sous forme de fichier FDC (format de
document compatible) et se trouve dans le CD-ROM fourni avec ce produit. Le logiciel Adobe Acrobat Reader est
nécessaire pour avoir accès au Manuel d’assistance interactif. L’installateur de Adobe Acrobat Reader est également
fourni dans le CD-ROM permettant ainsi d’installer le logiciel dans votre disque dur.
Tous droits réservés. Aucune partie de ce document ne peut être reproduite ou transmise sous quelque forme ou par
quelque moyen que ce soit, électronique ou mécanique, tel que par photocopie, enregistrement ou par un système
quelconque de stockage et de rappel des informations, sans l’autorisation écrite de l’éditeur.
Limitations légales relatives à la copie
• Il peut être interdit de copier des documents protégés par des droits d’auteur sans l’autorisation préalable du
propriétaire des droits d’auteur.
• Il est absolument interdit de copier des billets de banque nationaux ou étrangers.
• La copie d’autres articles peut être interdite.
i
Page 22

Les connexions
Pour raccorder directement l’imprimante à votre ordinateur (avec un câble parallèle ou un câble sériel)…
1 Raccordez directement l’imprimante à
Câble parallèle ou un câble sériel
PC
CD-ROM
Pour raccorder l’imprimante à un réseau…
<Exemple de connexion>
Noyau
PC
votre ordinateur avec un câble parallèle
ou un câble sériel.....................
Page 4
2 Installation du pilote d’imprimante dans
votre ordinateur................. Reportez-vous
à “Functions Edition (Édition Fonctions)”
CD-ROM
Câble de réseau
PC
PC
1 Raccordez un câble de réseau
(100Base-TX, 10Base-T, etc.) à
l’imprimante .............................
Page 5
2 Exécution des réglages de réseau
(TCP/IP) dans l’imprimante......
Page 6
3 Installation du pilote d’imprimante dans
votre ordinateur.............. Reportez-vous à
“Functions Edition (Édition Fonctions)”
ii
Page 23

Table des matières
1. Préparatifs ................................................................................................................ 2
1-1 Accessoires ................................................................................................................................................ 2
1-2 Pièces nécessaires ....................................................................................................................................2
1-3 Nomenclature (corps principal) ..................................................................................................................2
1-4 Nomenclature (panneau de commande) ...................................................................................................3
2. Installation ................................................................................................................4
2-1 Raccordement du câble d’imprimante .......................................................................................................4
2-2 Raccordement du câble de réseau ............................................................................................................5
2-3 Installation du logiciel ................................................................................................................................. 5
2-4 Réglages de réseau (protocole TCP/IP) .................................................................................................... 6
3. Dépannage .............................................................................................................. 10
3-1 Annuler une impression ...........................................................................................................................10
3-2 Lorsqu’un message d’erreur apparaît… ................................................................................................ 11
3-3 Tableau de dépannage de base...............................................................................................................15
4. Spécifications ......................................................................................................... 16
1
Page 24

1. Préparatifs
1-1 Accessoires
• 2 CD-ROM
• Ce Guide de fonctionnement
• Guide de référence rapide (Pour les réseaux)
1-2 Pièces nécessaires
• Lorsque vous raccordez directement l’imprimante à votre ordinateur: câble parallèle (conforme à IEEE1284, long de 1,5 m ou moins) ou câble
sériel
• Lorsque vous raccordez l’imprimante à un réseau: câble Ethernet (100Base-TX ou 10Base-T)
* Lors de l’utilisation d’un câble100Base-TX ou 10Base-T, veiller à ce qu’il soit blindé.
* Lors de l’utilisation d’un câble parallèle veiller à ce qu’il soit blindé.
1-3 Nomenclature (corps principal)
1 Fente à carte mémoire (CompactFlash)
Insérez la carte mémoire en option (CompactFlash) dans
cette fente.
2 Connecteur d’interface parallèle
Lorsque vous raccordez l’imprimante à votre ordinateur à
l’aide d’une interface parallèle, raccordez ici un câble parallèle bidirectionnel.
3 Connecteur Ethernet
Lorsque vous raccordez l’imprimante à un réseau, raccordez
ici un câble Ethernet.
4 Connecteur d’interface sérielle
Lorsque vous raccordez l’imprimante à votre ordinateur à
l’aide d’une interface sérielle, raccordez ici le câble sériel.
5 Interrupteur principal
Mettez d’abord cet interrupteur sur marche ( | ) avant
d’utiliser l’imprimante. Mettez toujours cet interrupteur sur
arrêt (O) lorsque vous raccordez le câble d’imprimante, etc.
6 Panneau de commande
Utilisez ce panneau pour effectuer les réglages, etc., sur
l’imprimante même.
2
Page 25

1-4 Nomenclature (panneau de commande)
1. Préparatifs
1 Touche d’imprimante (témoin)
Appuyez sur cette touche pour commuter au mode d’imprimante.
Le témoin s’allume lorsque le mode est activé.
2 Témoin d’état
S’allume/clignote pour indiquer l’état de l’imprimante.
S’allume en vert pendant la réception de données.
S’allume en jaune lorsqu’une erreur d’impression s’est produite.
Clignote en jaune lorsqu’une erreur n’interrompant pas l’impression s’est produite.
3 Panneau à effleurement
Ce panneau affiche l’état de l’imprimante et les touches pour
opérer les différentes fonctions.
4 Touches numériques
Ces touches sont utilisées pour entrer directement les réglages.
(Pouces)
(Métrique)
● Panneau à effleurement dans le mode d’imprimante
5 Touche Menu Imprimante
Appuyez sur cette touche pour régler les réglages par défaut de
l’imprimante.
6 Touche Annulez (Annuler)
Appuyez sur cette touche pour arrêter l’impression ou pour libérer
un message d’erreur.
7 Touche Action
Appuyez sur cette touche pour redémarrer l’impression ainsi que
pour engager l’opération d’alimentation de formulaire. Cette
touche est également utilisée pour mettre l’imprimante en et hors
ligne.
3
Page 26

2. Installation
2-1 Raccordement du câble d’imprimante
Pour raccorder directement le câble d’imprimante à votre ordinateur,
utilisez un câble parallèle ou un câble sériel.
ATTENTION: TOUJOURS mettre l’interrupteur principal de l’impri-
1
2
mante sur arrêt (O) AVANT de raccorder le câble
d’imprimante.
Mettez l’interrupteur principal situé sur le côté gauche de
l’imprimante sur arrêt (O), puis mettez également l’alimentation de votre ordinateur sur arrêt.
Raccordez le câble d’imprimante au connecteur d’interface
parallèle ou au connecteur d’interface sérielle situé à
l’arrière du côté droit de l’imprimante.
Raccordez l’autre extrémité du câble d’imprimante au con-
3
necteur d’interface parallèle ou au connecteur d’interface
sérielle de votre ordinateur.
Remettez l’interrupteur principal de l’imprimante sur marche
4
( | ).
* Pour plus de détails sur la configuration de l’interface de
l’imprimante, reportez-vous à “Functions Edition (Édition
Fonctions)”.
4
Page 27

2. Installation
2-2 Raccordement du câble de
réseau
Pour raccorder l’imprimante à un réseau, utilisez un câble Ethernet
(100Base-TX ou 10Base-T).
Mettez l’interrupteur principal situé sur le côté gauche de
1
l’imprimante sur arrêt (O).
Raccordez le câble de réseau au connecteur Ethernet situé
2
à l’arrière du côté droit de l’imprimante.
2-3 Installation du logiciel
Exécutez la procédure suivante pour installer dans votre ordinateur
le pilote d’imprimante et autre logiciels conformes au système
d’exploitation utilisé par cet ordinateur. Pour plus de renseignements
concernant l’installation du logiciel requis, reportez-vous à “Functions
Edition (Édition Fonctions)”.
Raccordez l’autre extrémité du câble de réseau à votre
3
noyau.
Remettez l’interrupteur principal de l’imprimante sur marche
4
( | ).
Effectuez les réglages de réseau. (Reportez-vous à
5
“Réglages de réseau” à la page 6).
5
Page 28

2. Installation
2-4 Réglages de réseau (protocole TCP/IP)
Pour utiliser l’imprimante comme imprimante de réseau, il est nécessaire de régler une adresse IP pour l’imprimante.
Remarques
• L’adresse IP devant être enregistrée ici est différente en fonction
de l’environnement de votre réseau. Consultez l’administrateur de
votre réseau AVANT d’effectuer ce réglage.
• Si vous utilisez un serveur DHCP pour configurer automatiquement
l’adresse IP, ce réglage n’est pas nécessaire, la configuration du
serveur DHCP étant déjà activée comme réglage d’usine par
défaut.
* Pour annuler le réglage en cours, appuyez sur la touche arrêt/
libération.
Appuyez sur la touche d’imprimante. L’imprimante passe au
1
mode d’imprimante.
Effleurez la touche “Menu Imprimante”.
2
Effleurez la touche “Réseau” et la touche “Configutations”.
4
Utilisez les touches de curseur “▲” et “▼” pour sélectionner
5
“TCP/IP”, puis effleurez la touche “Change (CHANGER)”.
(Pouces)
(Métrique)
Effleurez la touche “Interface”.
3
(Pouces)
(Métrique)
Sélectionnez “Marche” sous le réglage “TCP/IP” et “Arrêt”
6
sous le réglage “DHCP”.
(Pouces)
(Métrique)
6
Page 29

2. Installation
Utilisez les touche de curseur “▲” et “▼” pour sélectionner
“IP Address”, puis effleurez la touche “Change (CHANGER)”.
(Pouces)
(Métrique)
Utilisez les touches numériques pour entrer l’adresse.
8
Entrez le premier bloc de 3 chiffres de l’adresse dans la
zone en surbrillance.
• Appuyez sur la touche dièse (#) pour régler l’adresse
après avoir entré chaque bloc de 3 chiffres.
(Pouces)
Entrez les 3 chiffres suivants et appuyez sur la touche dièse
97
(#).
• Pour changer une adresse entrée, appuyez sur la touche
dièse (#) pour sélectionner un bloc de 3 chiffres et utilisez
les touches numériques pour entrer l’adresse correcte.
(Pouces)
(Métrique)
Répétez la même procédure pour les blocs de l’adresse
10
restant. Une fois l’entrée de l’adresse IP terminée, effleurez
la touche “Fermer”. L’affichage retourne à l’écran “TCP/IP
réglage”.
• Pour annuler l’adresse entrée, effleurez la touche “Dos”.
L’adresse montrée avant que vous n’entriez une nouvelle
adresse réapparaît.
(Métrique)
(Pouces)
(Métrique)
7
Page 30

2. Installation
Utilisez les touches de curseur “▲” et “▼” pour sélectionner
11
“Subnet Mask” et effleurez la touche “Change (CHANGER)”.
(Pouces)
(Métrique)
Entrez l’adresse du Subnet mask de la façon dont vous
12
avez entré l’adresse IP dans les étapes 8 à 10.
(Pouces)
Entrez l’adresse de Gateway de la façon dont vous avez
14
entré l’adresse IP dans les étapes 8 à 10.
Lorsque vous avez fini d’effectuer tous les réglages de
15
réseau, effleurez la touche “Fermer”.
(Pouces)
(Métrique)
(Métrique)
Utilisez les touches de curseur “▲” et “▼” pour sélectionner
13
“Gateway” et effleurez la touche “Change (CHANGER)”
(Pouces)
(Métrique)
Effleurez la touche “Fermer”.
16
(Pouces)
(Métrique)
8
Page 31

Effleurez la touche “Fermer”. L’imprimante retourne au
17
mode d’imprimante.
(Pouces)
(Métrique)
2. Installation
9
Page 32

3. Dépannage
3-1 Annuler une impression
Exécutez la procédure suivante lorsque vous désirez arrêter l’impression ou lorsque vous désirez libérer les données.
Pendant que les données sont traitées, il est possible d’annuler
Appuyer sur la touche “Annulez (Annuler)”.
1
L’impression sera annulée.
(Pouces)
(Métrique)
I’impression sur l’écran de I’imprimante.
Effleurez la touche “Annulez (Annuler)”.
1
(Pouces)
(Métrique)
Sélectionnez une interface d’imprimante et effleurez la
2
touche “Confirmer”.
• Pour abandonner l’opération d’annulation, appuyez sur la
touche “Annulez (Annuler)”.
L’impression est annulée.
3
10
Page 33

3. Dépannage
3-2 Lorsqu’un message d’erreur apparaît…
Lorsqu’un message d’erreur apparaît sur le panneau de commande, consultez d’abord le tableau suivant pour trouver la cause du problème et
exécutez la procédure correspondante. Pour des informations plus détaillées, reportez-vous au Guide de fonctionnement de votre copieur ainsi
qu’au Guide de fonctionnement de tout autre appareil en option installé dans l’appareil.
Message affiché
Ajout. papier au tiroir.
Format xxx (xxx)
Ajouter papier dans le tiroir.
Format xxx (xxx)
Sélection Bac? Appuyer ACTION
Placer le papier. Appuyer sur GO
Ajout. papier au tiroir.
Ajouter papier dans le tiroir.
Veuillez ajouter des agrafes.
Ajouter des agrafes
Appelez technicien.
APPELER TECHNICIEN.
Procédure
Le format ou le type du papier sélectionné pour l’impression ne correspond pas au format ou
au type du papier dans le tiroir. Remplacez le papier du tiroir par celui du format et du type
corrects.
• Si vous désirez changer de tiroir et imprimer, sélectionnez le tiroir voulu sur le panneau à
effleurement, puis effleurez la touche “Action”.
• Les commandes suivantes sont affichées dans le mode d’imprimante.
Action: force l’impression sur le format ou le type de papier en cours.
Annulez (Annuler): annule l’opération d’impression entière.
S’affiche après avoir changé de tiroir. Effleurez la touche “Action”.
Ce mode alimente une pile de feuilles multiples une par une. Chaque fois que vous désirez
alimenter une feuille, effleurez la touche “Action”.
Le papier du tiroir est épuisé. Ajoutez du papier.
Les agrafes du finisseur (en option) sont épuisées. Reportez-vous au Guide de fonctionnement du finisseur et réapprovisionnez-le en agrafes.
Un problème s’est produit dans l’imprimante. Contactez votre technicien de service ou un
centre de service agréé.
Ce code n’est pas enregistré.
Dépasse la limite de quantité d’impressions.
Erreur en mode imprimante
RAM DISQUE Err App. ACTION.
Le code de département entré ne correspond pas à celui qui a été enregistré. Vérifiez le
code de département enregistré dans le pilote d’imprimante.
La quantité d’impressions effectuées a dépassé la capacité acceptable réglée par le gestionnaire de copie. Afin de continuer à imprimer, changez le réglage du gestionnaire de copie
dans l’imprimante.
Ce message apparaît lorsqu’une erreur d’imprimante se produit et que l’appareil est dans un
mode autre que le mode d’imprimante. Appuyez sur la touche d’imprimante pour passer à
l’écran du mode d’imprimante et le message d’erreur correspondant s’affiche.
Code: ##
Vérifier le code d’erreur affiché à la place de ## et reportez-vous à ce qui suit.
01: Erreur de formatage. Mettez l’alimentation sur arrêt et remettez-la sur marche.
02: Le mode du disque RAM est sur arrêt. Mettez-le sur marche.
03: Une erreur d’écriture s’est produite. Désactivez la protection contre l’écriture.
04: Il n’y a pas assez d’espace sur le disque RAM pour enregistrer les données. Supprimez
les données inutiles pour libérer plus d’espace.
05: Impossible de trouver le fichier sélectionné. Vérifiez le nom du fichier et s’il se trouve ou
non sur le disque RAM.
06: Il n’y a pas suffisamment de mémoire dans le système. Augmentez la capacité de la
mémoire.
98: Certaines des données collationnées n’ont pas été lues. Les données du travail sont
corrompues.
11
Page 34

3. Dépannage
Message affiché
Carte Mém.Err App. ACTION
Disque dur Err/Appuyez ACTION.
Procédure
Code: ##
Vérifier le code d’erreur affiché à la place de ## et reportez-vous à ce qui suit.
01: Erreur de formatage. Reformatez la carte mémoire.
02: Erreur de chargement de la carte mémoire. Chargez la carte mémoire correctement.
03: Une erreur d’écriture s’est produite. Désactivez la protection contre l’écriture.
04: La carte mémoire n’a pas suffisamment d’espace pour enregistrer les données.
Supprimez les données inutiles pour libérer plus d’espace.
05: Impossible de trouver le fichier sélectionné. Vérifiez le nom du fichier et s’il se trouve ou
non sur la carte mémoire.
Code: ##
Vérifier le code d’erreur affiché à la place de ## et reportez-vous à ce qui suit.
01: Erreur de formatage. Reformatez le disque dur.
02: Erreur de chargement du disque dur. Chargez le disque dur correctement.
03: Une erreur d’écriture s’est produite. Désactivez la protection contre l’écriture.
04: Le disque dur n’a pas suffisamment d’espace pour enregistrer les données. Supprimez
les données inutiles pour libérer plus d’espace.
05: Impossible de trouver le fichier sélectionné. Vérifiez le nom du fichier et s’il se trouve ou
non sur le disque dur.
06: Il n’y a pas suffisamment de mémoire dans le système. Augmentez la capacité de la
mémoire.
20: Le disque dur est chargé dans la mauvaise fente. Chargez le disque dur dans la fente
correcte.
85: Un nom illégal a été utilisé pour le plateau virtuel. Renommez correctement le plateau.
86: Un mot de passe incorrect a été utilisé pour la boîte à lettres virtuelle. Entrez le mot de
passe correct.
88: Certaines données de la boîte à lettres virtuelle n’ont pas été lues. Les données du
travail sont corrompues.
97: Impossible de sauvegarder plus de travaux. La limite est atteinte. Augmentez le nombre
de travaux pouvant être enregistrés et l’espace disponible.
98: Certaines des données du travail n’ont pas été lues. Les données du travail sont
corrompues.
Erreur KPDL/Appuyer sur CONT
Erreur de carte mémoire. Insérer de nouveau.
Code: ##
Impossible de poursuivre le travail d’impression en cours. Un rapport d’erreur KPDL peut
être imprimé depuis le Menu Imprimante. Effleurez la touche “Action” pour imprimer les
données qui ont déjà été traitées. Si la durée de recouvrement automatique a été réglée,
l’impression reprend automatiquement lorsque la durée réglée s’est écoulée. Pour plus de
renseignements, reportez-vous à “KPDL Error Report print out (Impression du rapport
d’erreur KPDL) (page 4-10)” et à “Auto Continue ON/OFF and Recovery Time (Marche/arrêt
de la poursuite automatique et Durée de recouvrement) (page 4-47)” dans “Functions Edition
(Édition Fonctions)”.
La carte mémoire (CompactFlash) a été enlevée pendant le fonctionnement sous le menu
des réglages de l’imprimante. Réinsérez la carte mémoire.
* VEILLEZ à bien mettre l’interrupteur principal sur arrêt (O) AVANT d’insérer la carte
mémoire.
12
Page 35

3. Dépannage
Message affiché
Insérer la même carte mémoire.
Erreur format Carte Mémoire
Erreur interface optionnelle
Fichier absent App. ACTION
Lecture fonte: Erreur
Lecture macro: Erreur
Attention: Mém. Insuffisante
Attention Perte données
Données d’imprimante: Dépassée Pres.
“Continue” pour reprise.
Procédure
Impossible de détecter la carte mémoire (CompactFlash) lors d’une opération pendant
laquelle l’imprimante lisait les données de cette carte. Réinsérez la carte mémoire.
* VEILLEZ à bien mettre l’interrupteur principal sur arrêt (O) AVANT d’insérer la carte
mémoire.
Initialisez la carte mémoire (CompactFlash) actuellement insérée.
Code: 10
La carte d’interface en option est chargée dans la mauvaise fente. Mettez l’alimentation sur
arrêt et chargez la carte dans la fente correcte.
Erreur de fichier. Effleurez la touche “Action”.
L’imprimante n’a pas pu lire les données de fonte. Réessayer de lire les données de fonte.
L’imprimante n’a pas pu lire le macro. Réessayer de lire le macro.
Il n’y a pas suffisamment de mémoire. Vous pouvez vérifier le montant de mémoire d’imprimante en imprimant une page d’état. Supprimez toutes les données de fontes et les macros
inutiles.
L’impression ne peut pas être exécutée à la résolution réglée à cause de l’insuffisance de la
mémoire. Ajoutez de la mémoire à l’imprimante ou changez la résolution.
Une erreur de dépassement des données s’est produite à cause d’une insuffisance de la
mémoire.
• Appuyez sur la touche d’imprimante pour passer au mode d’imprimante. Les commandes
suivantes s’affichent.
Action: poursuit l’impression.
Annulez (Annuler): annule l’opération d’impression entière.
• Si la durée de recouvrement automatique a été réglée, l’impression reprend
automatiquement lorsque la durée réglée s’est écoulée.
• Lorsque ce message s’affiche, “Protection de page” est automatiquement activé.
Dépassement de mémoire. Pres. “Continue”
pour reprise.
Boîte à lettres virtuelle pleine
Interface occupée
Le travail d’impression en cours n’a pas pu être terminé à cause d’une insuffisance de mém-
oire dans l’imprimante.
• Appuyez sur la touche d’imprimante pour passer au mode d’imprimante. Les commandes
suivantes s’affichent.
Action: poursuit l’impression. Les données déjà traitées sont imprimées et la partie du
travail d’impression restante est imprimée sur la page suivante.
Annulez (Annuler): annule l’opération d’impression entière.
• Si vous utilisez un disque RAM, réduisez la taille du disque RAM. Si cette erreur se produit
souvent, il vous est recommandé d’installer de la mémoire supplémentaire dans
l’imprimante. Pour des informations plus détaillées concernant l’ajout de mémoire,
contactez votre technicien de service ou un centre de service agréé.
• Si la durée de recouvrement automatique a été réglée, l’impression reprend automatiquement lorsque la durée réglée s’est écoulée.
Il n’y a pas suffisamment d’espace dans la boîte à lettres virtuelle. Imprimez les données
dans la boîte à lettres virtuelle.
L’interface sélectionnée est en cours d’utilisation. Attendez un moment et réessayez
l’opération.
13
Page 36

3. Dépannage
Message affiché
Erreur ROM opt. /Appuyer sur CONT
Erreur de format du disque dur
Vider le bac de perforation
Procédure
Une erreur s’est produite lors de la lecture du ROM en option. Appuyez sur la touche
d’imprimante pour passer au mode d’imprimante, puis effleurez la touche “Action” pour
libérer l’erreur.
Initialisez le disque dur.
Le bac des déchets de perforation n’est pas correctement installé ou il est plein.
Repositionnez-le ou videz-le selon le cas.
14
Page 37

3. Dépannage
3-3 Tableau de dépannage de base
Si des problèmes se produisent pendant que vous utilisez cet appareil, reportez-vous au tableau ci-dessous pour exécuter des ajustements
mineurs. Si le problème persiste, contactez votre technicien de service ou un centre de service agréé.
* Pour les informations concernant les problèmes mécaniques généraux de l’appareil, reportez-vous au Guide de fonctionnement de votre
copieur.
Problème
Rien ne s’imprime
Le texte n’est pas
correctement imprimé
Point à vérifier
Le cordon d’alimentation est-il
lâche?
L’alimentation de l’imprimante est-
elle sur marche ( | )?
Le câble d’imprimante est-il correct
et est-il correctement raccordé?
Avez-vous raccordé le câble
d’imprimante APRÈS avoir mis
l’alimentation de l’imprimante sur
marche?
L’imprimante est-elle hors ligne? (Le
témoin d’état clignote-t-il en jaune?)
Le câble d’imprimante est-il correct
et est-il correctement raccordé?
Procédure
Raccordez bien le cordon d’alimentation à
une source d’alimentation.
Mettez l’interrupteur principal de l’imprimante sur marche ( | ).
Veillez à bien utiliser un câble d’imprimante
conforme et veillez à ce qu’il soit correctement raccordé.
Raccordez le câble d’imprimante AVANT de
mettre l’alimentation de l’imprimante sur
marche.
Exécutez la procédure appropriée pour
mettre l’imprimante en ligne.
1 Appuyez sur la touche d’imprimante pour
passer au mode d’imprimante.
2 Effleurez la touche “Action”.
3 Le témoin d’état s’éteint.
Veillez à bien utiliser un câble d’imprimante
conforme et veillez à ce qu’il soit
correctement raccordé.
Page de référence
—
4
4
—
3
4
L’impression n’est pas correcte
Le réglage de la configuration est-il
correct dans l’ordinateur?
Le réglage du protocole d’émulation
est-il correct?
Confirmez les réglages dans le pilote
d’imprimante ainsi que dans le logiciel
d’application utilisé.
Vérifiez le réglage du protocole d’émulation.
—
—
15
Page 38

4. Spécifications
Unité centrale de traitement ...............................PowerPC 750 (400 MHz)
Vitesse d’impression ..........................................Copieur 45 ppm: 45 pages/minute (A4 [8-1/2 po. x 11 po.])
Résolution d’impression .....................................Mode Fast 1200
Format d’impression maximum ..........................A3 (11 po. x 17 po.)
Capacité en mémoire RAM ................................Installé: 32 Mo
Interface .............................................................Interface parallèle (Conforme à IEEE 1284) x 1
Fontes installées ................................................PCL: 80
* Les spécifications sont sujettes à changement sans préavis.
Copieur 55 ppm: 55 pages/minute (A4 [8-1/2 po. x 11 po.])
Avec lissage sur arrêt: 600 dpi x 600 dpi
Avec lissage sur marche: 2400 dpi x 600 dpi interpolé
Maximum: 256 Mo (avec 256 Mo additionnels de mémoire en option installés)
Interface sérielle RS-232C x 1
Interface de réseau x 1
KPDL: 136
16
Page 39

Guía de operación
<Edición para instalación>
Lea SIEMPRE completamente esta guía de operación antes de utilizar este aparato. Una vez leída,
manténgala en buen estado y guárdela junto con la guía de operación para su copiadora.
Page 40

Información de marcas
• Novell y NetWare son marcas registradas por Novell, Inc.
• IBM e IBM PC-AT son marcas comerciales de International Business Machines Corporation.
• PowerPC es una marca comercial de International Business Machines Corporation de América y otras empresas.
• Adobe y Acrobat son marcas comerciales de Adobe Systems Incorporated.
• CompactFlash y CF son marcas comerciales de SanDisk Corporation.
Todos los demás nombres de empresas y productos mencionados en esta guía de operación son marcas comerciales o
marcas registradas de sus respectivas empresas. Por consiguiente, las denominaciones ™ y ® no se emplearán en esta
guía de operación.
Acerca de esta guía de operación
Esta guía de operación <Edición de instalación> se debe leer para instalar la tarjeta de impresora en su copiadora, y la
copiadora se debe utilizar como una impresora local o impresora de red. Esta guía de operación incluye descripciones
sobre los procedimientos de instalación para utilizar la copiadora como una impresora.
Los ajustes y las configuraciones de la impresora pueden ser diferentes según el sistema y los programas utilizados en
su computadora conectada; lea las secciones correspondientes a su computadora específica y realice los ajustes y
configuraciones descritos en ellas.
La guía de operación <Functions Edition (Edición de funciones)> contiene explicaciones relacionadas con la impresión,
la realización de ciertos ajustes y configuraciones, y los procedimientos necesarios para su computadora.
Acerca del manual en línea
El manual en línea para esta guía de operación es un archivo PDF (Portable Document Format o formato de
documentos portátil) que se encuentra en el CD-ROM incluido con este producto. Para tener acceso al manual en línea
es necesario poseer el programa Adobe Acrobat Reader. El instalador para Adobe Acrobat Reader también se incluye en
el CD-ROM, y éste permite instalar el programa en su disco duro.
Todos los derechos reservados. Ninguna parte de este material puede reproducirse o transmitirse de ninguna forma o
por ningún medio, electrónico o mecánico, incluyendo el fotocopiado, grabación o en un sistema de memorización y
recuperación de la información, sin permiso por escrito del propietario de los derechos de autor.
Limitación legal sobre el copiado
• Puede estar prohibido la copia del material protegido por los derechos de autor, si no se ha recibido el permiso del
propietario de los derechos de autor.
• Está prohibido en todo caso la copia de billetes nacionales o extranjeros.
• Puede estar prohibida la copia de otros elementos.
i
Page 41

Conexión
Cuando conecte la impresora directamente a su computadora (con un cable paralelo o un cable serial)…
1 Conexión de la impresora directamente a
Computadora
su computadora con un cable paralelo o
Cable paralelo o cable serial
Computadora
CD-ROM
Cuando conecte la impresora a una red…
<Ejemplo de conexión>
Conexión de
terminales
Computadora
cable serial...........................
Página 4
2 Instalación del controlador de impresora
en su computadora .................... Consulte
“Functions Edition (Edición de funciones)”
1 Conexión de un cable de red
(100Base-TX, 10Base-T, etc.) a la
CD-ROM
Cable de red
Computadora
impresora .............................
Página 5
2 Realización de los ajustes de red
(TCP/IP) en la impresora .....
Página 6
3 Instalación del controlador de impresora
en su computadora .................... Consulte
“Functions Edition (Edición de funciones)”
ii
Page 42

Índice
1. Preparación .............................................................................................................. 2
2. Instalación ................................................................................................................ 4
3. Localización de averías ...........................................................................................9
1-1 Accesorios .................................................................................................................................................2
1-2 Items requeridos ........................................................................................................................................2
1-3 Nombre de las piezas (cuerpo principal) ...................................................................................................2
1-4 Nombre de las piezas (tablero de controles) .............................................................................................3
2-1 Conexión del cable de impresora ..............................................................................................................4
2-2 Conexión del cable de red .........................................................................................................................5
2-3 Instalación de los programas .....................................................................................................................5
2-4 Ajustes de red (TCP/IP) .............................................................................................................................6
3-1 Cancelación de la impresión ...................................................................................................................... 9
3-2 Cuando aparece un mensaje de error… ................................................................................................10
3-3 Tabla de localización de averías básicas.................................................................................................14
4. Especificaciones ....................................................................................................15
1
Page 43

1. Preparación
1-1 Accesorios
• 2 CD-ROM
• Esta guía de operación
• Guía de referencia rápida (para redes)
1-2 Items requeridos
• Cuando conecte directamente la impresora a su computadora: Cable paralelo (que cumpla con la norma IEEE 1284, de 1,5 m o menos) o cable
serial
• Cuando conecte la impresora a una red: Cable Ethernet (100Base-TX o 10Base-T)
* Cuando utilice un cable 100Base-TX o 10Base-T, asegúrese de que sea un cable blindado.
* Cuando utilice un cable paralelo asegúrese de que sea un cable blindado.
1-3 Nombre de las piezas (cuerpo principal)
1 Ranura de tarjeta de memoria (CompactFlash)
Inserte aquí la tarjeta de memoria opcional (CompactFlash).
2 Conector de interfaz paralela
Cuando conecte la impresora a su computadora mediante
una interfaz paralela, conecte aquí un cable paralelo
bidireccional.
3 Conector Ethernet
Cuando conecte la impresora a una red, conecte aquí un
cable Ethernet.
4 Conector de interfaz serial
Cuando conecte la impresora a su computadora con una
interfaz serial, conecte aquí un cable serial.
5 Interruptor principal
Conecte ( | ) primero este interruptor antes de utilizar la
impresora.
Desconecte (O) siempre este interruptor cuando conecte el
cable de impresora, etc.
6 Tablero de controles
Utilícelo cuando haga ajustes, etc. en la propia impresora.
2
Page 44
1-4 Nombre de las piezas (tablero de controles)
1. Preparación
1 Tecla de impresora (indicador)
Pulse esta tecla para cambiar al modo de la impresora. El
indicador se enciende cuando se activa este modo.
2 Indicador de estado
Parpadea/se enciende para indicar el estado de la impresora.
Se enciende en verde mientras se reciben datos.
Se enciende en ámbar cuando se ha producido un error de
impresión.
Parpadea en ámbar cuando se ha producido un error que no
interrumpe la impresión.
3 Panel táctil
Muestra el estado de la impresora y teclas para controlar varias
funciones.
4 Teclas numéricas
Utilice estas teclas para introducir directamente los ajustes
deseados.
(Pulgadas)
(Métria)
● Panel táctil en el modo de impresora
5 Tecla Menú impresión (Imprimir menú)
Pulse esta tecla para establecer los ajustes predeterminados de
la impresora.
6 Tecla Cancelar (Cancela)
Pulse esta tecla para detener la impresión o borrar un mensaje
de error.
7 Tecla GO
Pulse esta tecla para reiniciar la impresión y para iniciar la
alimentación de formularios. Esta tecla también se utiliza para
poner la impresora en línea y fuera de línea.
3
Page 45

2. Instalación
2-1 Conexión del cable de impresora
Para conectar directamente la impresora a su computadora, utilice
un cable paralelo o un cable serial.
PRECAUCIÓN: Desconecte (O) SIEMPRE el interruptor principal de
1
2
la impresora ANTES de conectar el cable de
impresora.
Desconecte (O) el interruptor principal ubicado en el lado
izquierdo de la impresora y luego desconecte también la
alimentación de su computadora.
Conecte el cable de impresora al conector de interfaz
paralela o al conector de interfaz serial ubicado en la parte
trasera del costado derecho de la impresora.
Conecte el otro extremo del cable de impresora al conector
3
de interfaz paralela o al conector de interfaz serial de su
computadora.
Conecte ( | ) el interruptor principal de la impresora.
4
* Para conocer detalles sobre la instalación de la interfaz
de impresora, consulte “Functions Edition (Edición de
funciones)”.
4
Page 46

2. Instalación
2-2 Conexión del cable de red
Para conectar la impresora a una red, utilice un cable Ethernet
(100Base-TX o 10Base-T).
Desconecte (O) el interruptor principal ubicado en el lado
1
izquierdo de la impresora.
Conecte el cable de red al conector Ethernet ubicado en la
2
parte trasera del costado derecho de la impresora.
2-3 Instalación de los programas
Realice el siguiente procedimiento para instalar en su computadora
el controlador de impresora y otros programas apropiados al sistema
operativo de esa computadora. Para conocer más detalles sobre la
instalación del programa necesario, consulte “Functions Edition
(Edición de funciones)”.
Conecte el otro extremo del cable de red a su conexión de
3
terminales.
Conecte ( | ) el interruptor principal de la impresora.
4
Haga los ajustes de red. (Consulte “Ajustes de red” en la
5
página 6.)
5
Page 47

2. Instalación
2-4 Ajustes de red (TCP/IP)
Para utilizar la impresora como una impresora de red se necesita
establecer una dirección IP para la impresora.
Notas
• La dirección IP que deba registrarse aquí será diferente depend-
iendo de la configuración de su red. Confirme con su administrador
de red ANTES de hacer este ajuste.
• Si está utilizando un servidor DHCP para configurar automática-
mente la dirección IP, este ajuste no será necesario porque la
configuración del servidor DHCP ya está activada como ajuste
predeterminado de fábrica.
* Para cancelar el ajuste sin haberlo terminado, pulse la tecla
parada/borrado.
Pulse la tecla de impresora. La impresora se pondrá en el
1
modo de impresora.
(Pulgadas)
(Métrica)
Toque la tecla “Interfaz”.
3
(Pulgadas)
(Métrica)
Toque la tecla “Red” y luego la tecla “Configuraciones”.
4
Toque la tecla “Menú impresión (Imprimir menú)”.
2
(Pulgadas)
(Métrica)
Utilice las teclas del cursor “▲” y “▼” para seleccionar
5
“TCP/IP” y luego toque la tecla “Cambio”.
6
Page 48

2. Instalación
Seleccione “Encendido (ON)” bajo el ajuste “TCP/IP” y
6
“Apagado (OFF)” bajo el ajuste “DHCP”.
(Pulgadas)
(Métrica)
Utilice las teclas del cursor “▲” y “▼” para seleccionar
7
“Dirección IP” y luego toque la tecla “Cambio”.
(Pulgadas)
Introduzca los 3 dígitos siguientes y pulse la tecla de
9
número (#).
• Para cambiar una dirección introducida, pulse la tecla de
número (#) para seleccionar un bloque de 3 dígitos y
utilice las teclas numéricas para introducir la dirección
correcta.
Repita el mismo procedimiento para los bloques restantes
10
de la dirección. Una vez completada la introducción de la
dirección IP, toque la tecla “Cerrar”. La visualización volverá
a ser la de la pantalla “TCP/IP fijación”.
• Para cancelar la dirección introducida, toque la tecla
“Vol ver”. La dirección que fue mostrada antes de
introducir la nueva dirección volverá a aparecer.
(Métrica)
Utilice las teclas numéricas para introducir la dirección.
8
Introduzca primero el primer bloque de 3 dígitos de la
dirección en el área resaltada.
• Pulse la tecla de número (#) para establecer la dirección
después de introducir cada bloque de 3 dígitos.
Utilice las teclas del cursor “▲” y “▼” para seleccionar
11
“Máscara subnet” y toque la tecla “Cambio”.
(Pulgadas)
(Métrica)
7
Page 49
2. Instalación
Introduzca la dirección de máscara subnet de igual forma
12
que introdujo la dirección IP en los pasos 8 a 10.
Utilice las teclas del cursor “▲” y “▼” para seleccionar
13
“Gateway” y toque la tecla “Cambio”.
(Pulgadas)
(Métrica)
Cuando termine de hacer todos los ajustes de red, toque la
15
tecla “Cerrar”.
(Pulgadas)
(Métrica)
Toque la tecla “Cerrar”.
16
Introduzca la dirección de Gateway de igual forma que
14
introdujo la dirección IP en los pasos 8 a 10.
Toque la tecla “Cerrar”. La impresora volverá al modo de
17
impresora.
(Pulgadas)
(Métrica)
8
Page 50

3. Localización de averías
3-1 Cancelación de la impresión
Realice el procedimiento indicado a continuación cuando quiera detener la impresión o cancelar los datos.
Presione la tecla “Cancelar (CANCELAR)”.
1
Se cancelará la impresión.
Cuando se están procesando los datos, se cancelará la
impresión en la pantalla de la impresora.
1
Toque la tecla “Cancelar (Cancela)”.
(Pulgadas)
(Métrica)
2
Seleccione una interfaz de impresora y toque la tecla
“Confirmar”.
• Para anular la operación de cancelación, toque la tecla
“Parar”.
3
La impresión se cancelará.
9
Page 51

3. Localización de averías
3-2 Cuando aparece un mensaje de error…
Si aparece un mensaje de error en el tablero de controles, verifique primero en la tabla siguiente las causas del problema y luego realice el
correspondiente procedimiento. Para obtener una información más detallada, consulte la guía de operación de su copiadora y también la guía de
operación de cualquier equipo opcional que se encuentre instalado en su aparato.
Mensaje visualizado
Añada papel en gaveta.
Ta ma ño XX (XXX)
Usa alternativo? Pulse GO
Coloque papel Pulse GO
Añada papel en gaveta.
Añadir grapas.
Llame para servicio.
LLAME AL SERVICIO TECNICO.
Este código no está registrado.
Procedimiento
El tamaño o el tipo de papel seleccionado para imprimir no coincide con el tamaño o tipo de
papel de la gaveta. Cambie el papel de la gaveta por otro del tamaño y tipo correctos.
• Si desea cambiar a una gaveta diferente e imprimir en el papel de esa gaveta, seleccione
la gaveta deseada en el panel táctil y luego toque la tecla “GO”.
• En el modo de impresora se visualizarán los comandos siguientes:
GO: Fuerza la impresión en el tamaño o tipo actual del papel.
Cancelar (Cancela): Cancela completamente la operación de impresión.
Se visualiza después de cambiar la gaveta. Toque la tecla “GO”.
Con este modo se alimentan una a una las hojas de una pila de múltiples hojas de papel.
Toque la tecla “GO” cada vez que quiera alimentar una hoja.
La gaveta no tiene papel. Añada papel.
El finalizador (opcional) se ha quedado sin grapas. Consulte la guía de operación del
finalizador y coloque grapas en su interior.
Se han producido problemas en la impresora. Póngase en contacto con su representante de
servicio o con un centro de servicio autorizado.
El código de departamento que usted introdujo no coincide con el registrado. Verifique el
código de departamento que está registrado en el controlador de impresora.
Supera límite de cantidad de impresión
Error en modo IMPRESORA
Err.Disco RAM Pulse GO
La cantidad de impresiones ha superado la capacidad aceptable establecida por la
administración de copias. Para imprimir más, cambie el ajuste de la administración de
copias en la impresora.
Este mensaje aparecerá cuando se produzca un error de impresora y el aparato esté en un
modo diferente del modo de la impresora. Pulse la tecla de impresora para cambiar a la
pantalla del modo de impresión y el mensaje de error correspondiente desaparecerá.
cód:##
Verifique el código de error visualizado en el lugar de ## y consulte lo siguiente:
01: Error de formato. Desconecte la alimentación y vuelva a conectarla.
02: El modo del disco RAM está desactivado. Actívelo.
03: Se ha producido un error de escritura. Desactive la protección de escritura.
04: El disco RAM no tiene espacio suficiente para guardar los datos. Borre los datos que no
sean necesarios para dejar más espacio en el disco.
05: No se pudo encontrar el archivo seleccionado. Verifique el nombre del archivo y si éste
está en el disco RAM o no.
06: El sistema no tiene memoria suficiente. Aumente la capacidad de memoria.
98: Algunos de los datos que están siendo colacionados no fueron leídos. Los datos del
trabajo están corrompidos.
10
Page 52

3. Localización de averías
Mensaje visualizado
TARJ.MEM.err Pulse GO
Err. Disco Duro/Pulse GO.
Procedimiento
cód:##
Verifique el código de error visualizado en el lugar de ## y consulte lo siguiente:
01: Error de formato. Vuelva a formatear la tarjeta de memoria.
02: Error de carga de tarjeta de memoria. Cargue correctamente la tarjeta de memoria.
03: Se ha producido un error de escritura. Desactive la protección de escritura.
04: La tarjeta de memoria no tiene espacio suficiente para guardar datos. Borre cualquier
dato que no sea necesario para dejar más espacio.
05: No se pudo encontrar el archivo seleccionado. Verifique el nombre del archivo y si éste
está en la tarjeta de memoria o no.
cód:##
Verifique el código de error visualizado en el lugar de ## y consulte lo siguiente:
01: Error de formato. Vuelva a formatear el disco duro.
02: Error de carga del disco duro. Cargue correctamente el disco duro.
03: Se ha producido un error de escritura. Desactive la protección de escritura.
04: El disco duro no tiene espacio suficiente para guardar datos. Borre cualquier dato que
no sea necesario para dejar más espacio.
05: No se pudo encontrar el archivo seleccionado. Verifique el nombre del archivo y si éste
está en el disco duro o no.
06: El sistema no tiene memoria suficiente. Aumente la capacidad de memoria.
20: El disco duro está cargado en la ranura equivocada. Cargue el disco duro en la ranura
correcta.
85: Se ha utilizado un nombre ilegal para la bandeja virtual. Nombre correctamente la
bandeja.
86: Se utilizó la contraseña equivocada para el buzón virtual. Introduzca la contraseña
correcta.
88: Algunos de los datos del buzón virtual no fueron leídos. Los datos del trabajo están
corrompidos.
97: No se pueden guardar más trabajos. Se ha alcanzado el límite. Aumente el número de
trabajos que pueden guardarse y el área disponible.
98: Algunos de los datos del trabajo no fueron leídos. Los datos del trabajo están
corrompidos.
Error KPDL/Pulse CONTINUAR
Error de tarjeta de memoria. Inserte
nuevamente.
Cód: ##
El trabajo de impresión actual no puede continuar. Desde el menú de impresora se puede
imprimir un informe de error KPDL. Al tocar la tecla “GO” se imprimen los datos que ya han
sido procesados. Si se ha establecido el tiempo de recuperación automática, la impresión se
reanudará automáticamente cuando transcurra el tiempo establecido. Para obtener más
información, consulte “KPDL Error Report print out (Impresión del informe de error KPDL)”
(página 4-10) y “Auto Continue ON/OFF and Recovery Time (Activación/Desactivación de
continuación automática)” (página 4-47) en “Functions Edition (Edición de funciones)”.
La tarjeta de memoria (CompactFlash) fue retirada durante la operación bajo el menú para
ajustes relacionados con la impresora. Vuelva a insertar la tarjeta de memoria.
* ASEGÚRESE de desconectar (O) el interruptor principal ANTES de insertar la tarjeta de
memoria.
11
Page 53

3. Localización de averías
Mensaje visualizado
Inserte la misma tarjeta de memoria.
Error formato TARJ.MEMORIA
Error Opcional interfaz
No hay archivo Pulse GO
Leer fuentes: Error
Leer macro: Error
Atención poca memoria
Advertencia adapt imagen
Procedimiento
La tarjeta de memoria (CompactFlash) no pudo ser detectada durante una operación en la
que la impresora estaba leyendo datos de esa tarjeta. Vuelva a insertar la tarjeta de
memoria.
• ASEGÚRESE de desconectar (O) el interruptor principal ANTES de insertar la tarjeta de
memoria.
Resulta necesario inicializar la tarjeta de memoria (CompactFlash) actualmente insertada.
cód: 10
La tarjeta de interfaz opcional está insertada en la ranura equivocada. Desconecte la
alimentación e introduzca la tarjeta en la ranura correcta.
Error de archivo. Toque la tecla “GO”.
La impresora falló al leer los datos de las fuentes. Intente leer de nuevo los datos de las
fuentes.
La impresora falló al leer el macro. Intente leer de nuevo el macro.
No hay suficiente memoria. Puede confirmar la memoria que le queda imprimiendo una
página de estado. Borre cualquier dato de fuentes y macro que no sea necesario.
Como no hay suficiente memoria, la impresión no se puede realizar con la resolución
establecida. Añada más memoria a la impresora o cambie la resolución.
Printer Data: Overrun. Pulse “Continue” para
reanud. tarea
Memoria desbordada. Pulse “Continue” para
reanudar
Buzón virtual lleno
Se ha producido un error de exceso de datos porque no hay memoria suficiente.
• Pulse la tecla de impresora para cambiar al modo de impresora. Se visualizarán los
comandos siguientes:
GO: La impresión continúa.
Cancelar (Cancela): Cancela completamente la operación de impresión.
• Si se ha establecido el tiempo de recuperación automática, la impresión se reanudará
automáticamente cuando transcurra el tiempo establecido.
• Una vez visualizado este mensaje de error, “Protección de página” se activará
automáticamente.
El trabajo de impresión actual no se pudo completar porque no hay memoria suficiente en la
impresora.
• Pulse la tecla de impresora para cambiar al modo de impresora. Se visualizarán los
comandos siguientes.
GO: La impresión continúa. Los datos que ya han sido procesados se imprimirán y la
parte restante del trabajo de impresión se imprimirá en la página siguiente.
Cancelar (Cancela): Cancela completamente la operación de impresión.
• Si está utilizando un disco RAM, reduzca el tamaño del disco RAM. Si se produce a
menudo este error, se le recomienda instalar más memoria en la impresora. Para obtener
una información más detallada sobre la adición de memoria, contacte a su representante
de servicio o a un centro de servicio autorizado.
• Si se ha establecido el tiempo de recuperación automática, la impresión se reanudará
automáticamente cuando transcurra el tiempo establecido.
No hay espacio suficiente en el buzón virtual. Imprima los datos del buzón virtual.
Interfaz ocupada
12
La interfaz seleccionada está siendo utilizada. Espere un rato e intente de nuevo la
operación.
Page 54

3. Localización de averías
Mensaje visualizado
Error Opc. ROM/Pulse CONTINUAR
Error de formato de disco duro
Inspeccione cinta de perforaciones.
Procedimiento
Se produjo un error al leer la ROM opcional. Pulse la tecla de impresora para cambiar al
modo de impresora y luego toque la tecla “GO” para cancelar el error.
Inicialice el disco duro.
La caja de restos de papel perforado no está instalada o está llena. Colóquela o vacíela
según sea necesario.
13
Page 55

3. Localización de averías
3-3 Tabla de localización de averías básicas
Si tiene problemas durante la utilización de este aparato como impresora, consulte la tabla siguiente antes de realizar pequeños ajustes. Si el
problema no desaparece, póngase en contacto con su representante de servicio o con un centro de servicio autorizado.
* Para obtener información sobre las averías mecánicas generales de su aparato, consulte la guía de operación de su copiadora.
Problema
No se imprime nada
El texto no se imprime
correctamente.
Punto de inspección
¿Está mal enchufado el cable de
alimentación?
¿Está conectada ( | ) la alimentación
de la impresora?
¿Es apropiado el cable de la
impresora? ¿Está conectado
correctamente?
¿Conectó el cable de impresora
DESPUÉS de conectar la
alimentación de la impresora?
¿Está fuera de línea la impresora?
(¿Parpadea en ámbar el indicador
de estado?)
¿Es apropiado el cable de la
impresora? ¿Está conectado
correctamente?
Procedimiento
Enchufe firmemente el cable de
alimentación en el tomacorriente.
Conecte ( | ) el interruptor principal de la
impresora.
Asegúrese de utilizar un cable de impresora
correcto y asegúrese de que esté bien
conectado.
Conecte el cable de impresora ANTES de
conectar la alimentación de la impresora.
Realice el procedimiento apropiado para
poner la impresora en línea.
1 Pulse la tecla de impresora para cambiar
al modo de impresora.
2 Toque la tecla “GO”.
3 El indicador de estado se apagará.
Asegúrese de utilizar un cable de impresora
correcto y asegúrese de que esté bien
conectado.
Página de referencia
—
4
4
—
3
4
La impresión no se hace
correctamente.
¿Es correcta la configuración de su
computadora?
¿Es correcto el ajuste del protocolo
de emulación?
Confirme los ajustes del controlador de
impresora y también los de la aplicación del
programa que se utiliza.
Compruebe el ajuste del protocolo de
emulación.
—
—
14
Page 56

4. Especificaciones
CPU ................................................................... PowerPC 750 (400 MHz)
Velocidad de impresión ...................................... Copiadora de 45 ppm: 245 páginas/min. [A4 (8 1/2" x 11")]
Resolución de impresión .................................... Modo Fast 1200
Ta ma ño máximo de impresión ........................... A3 (11" x 17")
Capacidad de memoria RAM .............................Instalada: 32 MB
Interfaz ...............................................................Una interfaz paralela (cumple con la norma IEEE 1284)
Fuentes instaladas .............................................PCL: 80
* Las especificaciones están sujetas a cambios sin previo aviso.
Copiadora de 55 ppm: 55 páginas/min. [A4 (8 1/2" x 11")]
Con suavización DESACTIVADA: 600 ppp x 600 ppp
Con suavización ACTIVADA: interpolado 2400 ppp x 600 ppp
Máxima: 256 MB (con una memoria opcional de 256 MB adicionales instalada)
Una interfaz serial RS-232C
Una interfaz de red
KPDL: 136
15
 Loading...