

Page 1

Chapter 1 PRODUCT INFORMATION
Page 2

Product Information
General
1.1 General
This chapter explains how to setup the feeder with the printer, the product features, and the
basic considerations and precautions that should be observed while following the procedures in
disassembly and service of the product.
Following the precautions under section 1.3.
page 10 will be very important to ensure safety in servicing.
For instructions on disassembly of the feeder, refer to 2.
Precautions concerning service and maintenance,
1-2
PF-7E
Page 3
Product Information
Feeder setup
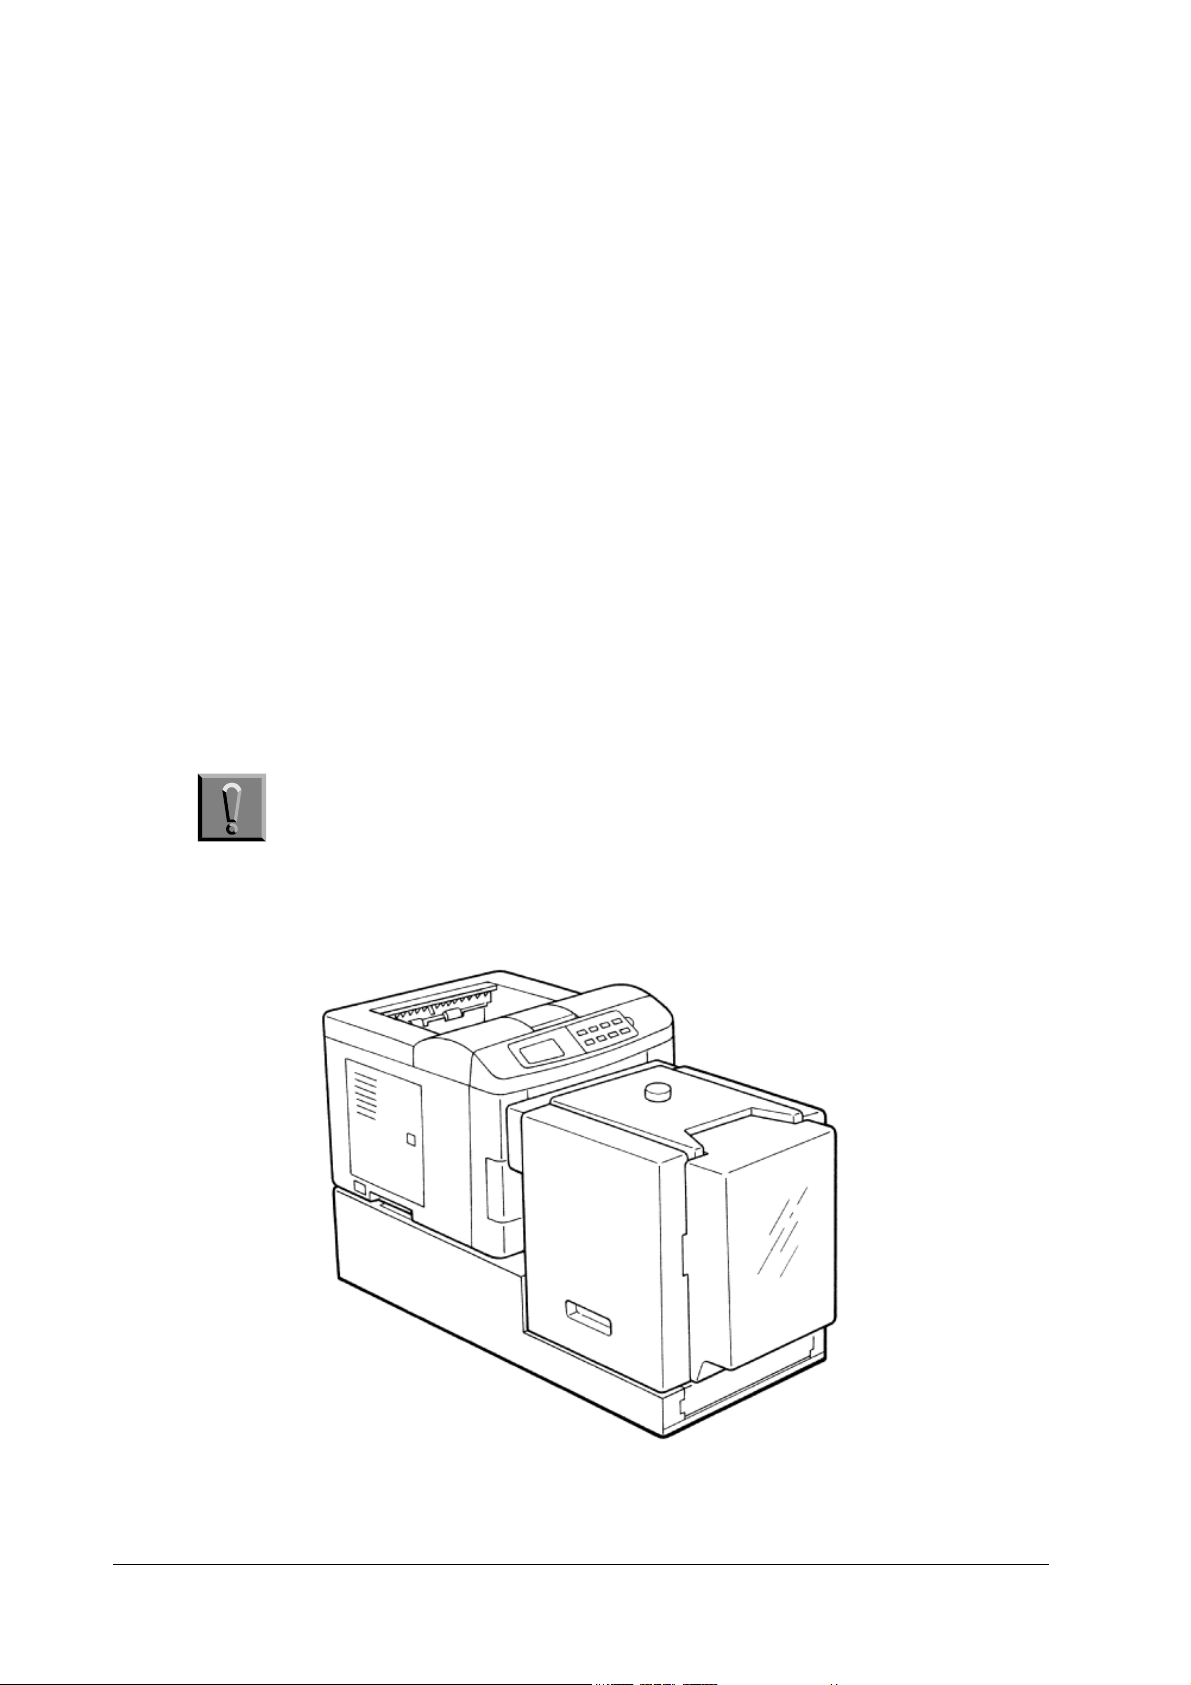
1.2 Feeder setup
Packing List
The optional paper feeder package contains each of the following items in the indicated quantities.
❐ Optional bulk paper feeder PF-7E, 1
❐ Instruction manual, 1
Option
The following option unit must be purchased separately in order to install the feeder with the
printer.
❐ Base unit PB-20
Setup
The PF-7E is set up by placing itself and the printer on the supplied base, inserting the
feeder’s paper output slot into the printer’s manual feed slot. Power for the paper feeder is supplied directly from the printer through connectors on the base.
Caution Before installing (or removing) the optional paper feeder, be sure to
Figure 1.1 Feeder setup
turn off the printer’s power.
PF-7E
1-3
Page 4
Product Information
Feeder setup
Choosing a Location
The feeder will work best if it is installed in a location that is:
❐ Level and well-supported: Place the base on a sturdy table or desk.
❐ Not exposed to sunlight or other bright light (not next to an uncurtained window).
❐ Well ventilated, not too hot or cold, and not too damp or dry: Temperature should be 10 to
32.5°C, ideally about 20°C (50 to 90°F, ideally about 68°F). Humidity should be 20 to
80%, ideally 65%.
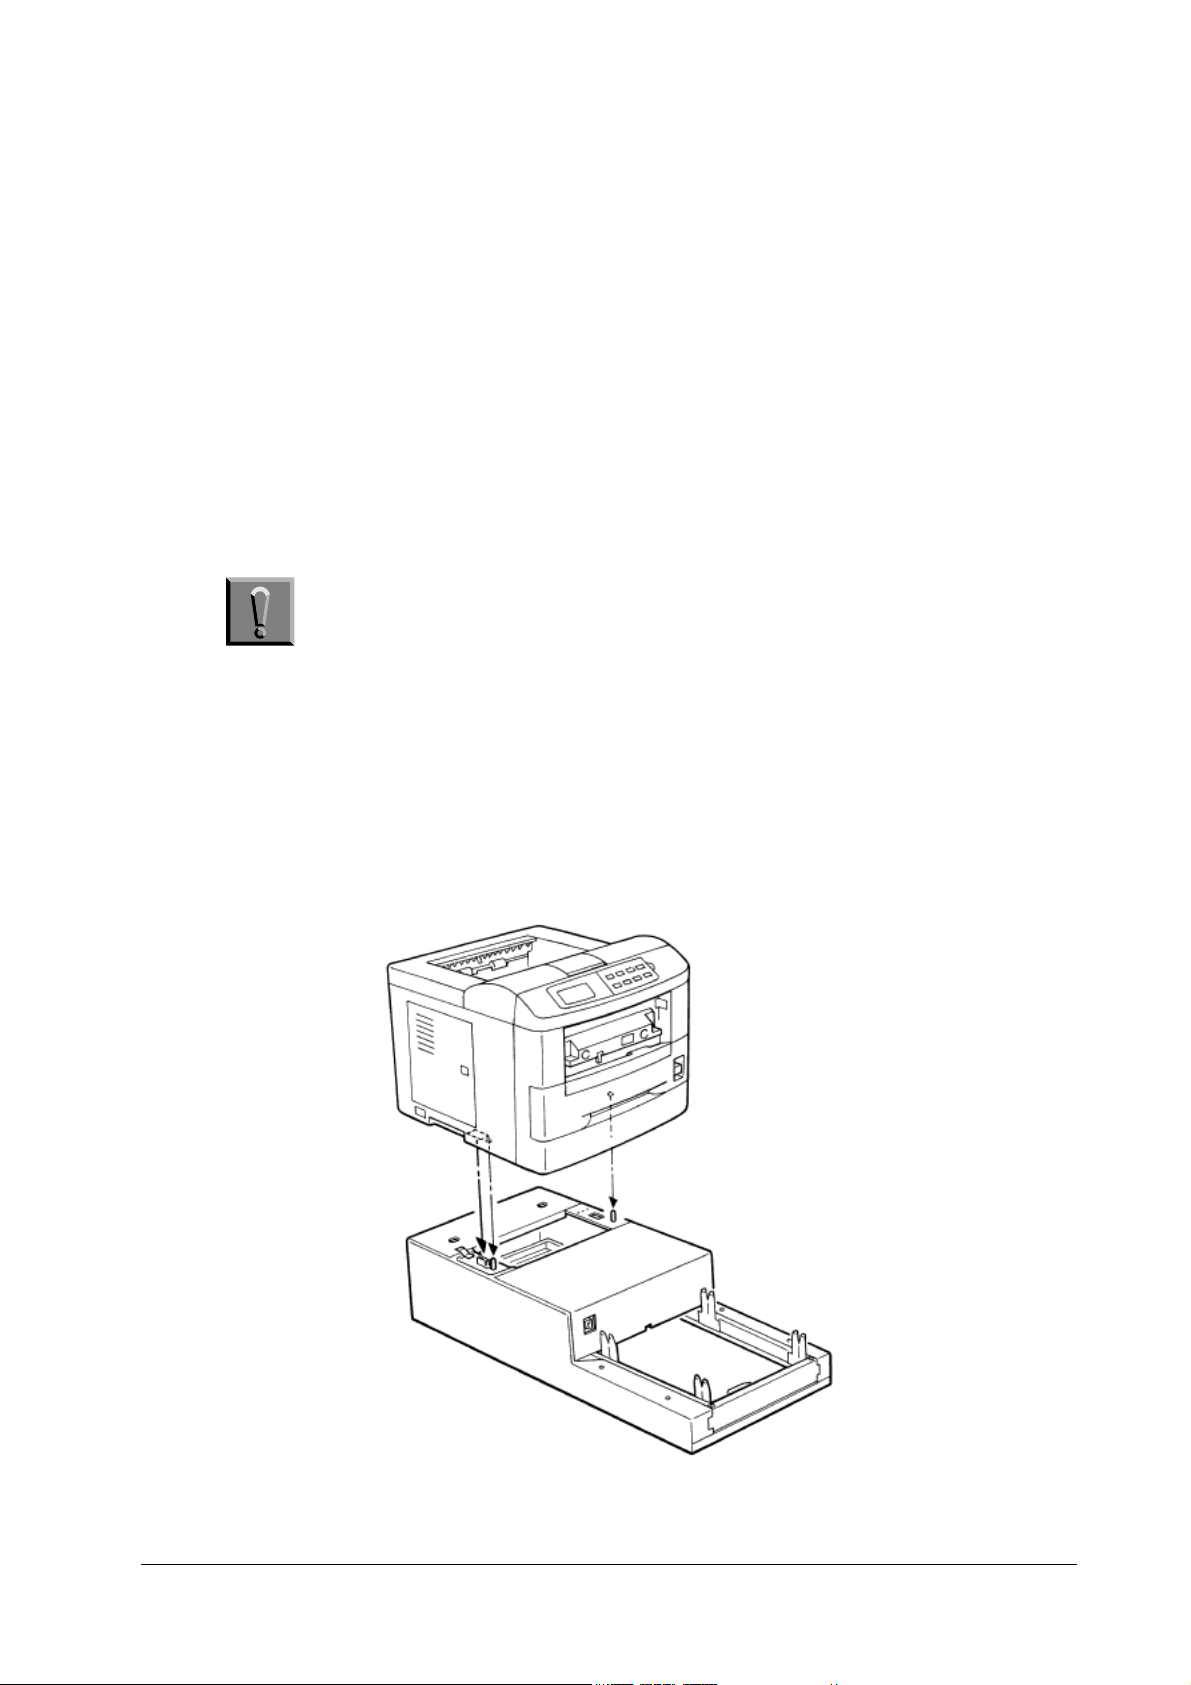
Installing the Base and the Printer
The printer is mounted on the upper deck of the base.
Place the base onto a firm, sturdy table or desk.
1
Note The table or desk must be larger than the base.
Align the positioning pins on the top of the base with the holes in the base of the printer,
2
then slowly and carefully lower the printer onto the base. Make sure that the connector on
the base fits squarely into the corresponding connector in the base of the printer. See figure 1.2.
Figure 1.2 Installing the printer onto the base
Installing the printer onto the base
below.
1-4
PF-7E
Page 5
Product Information
Feeder setup
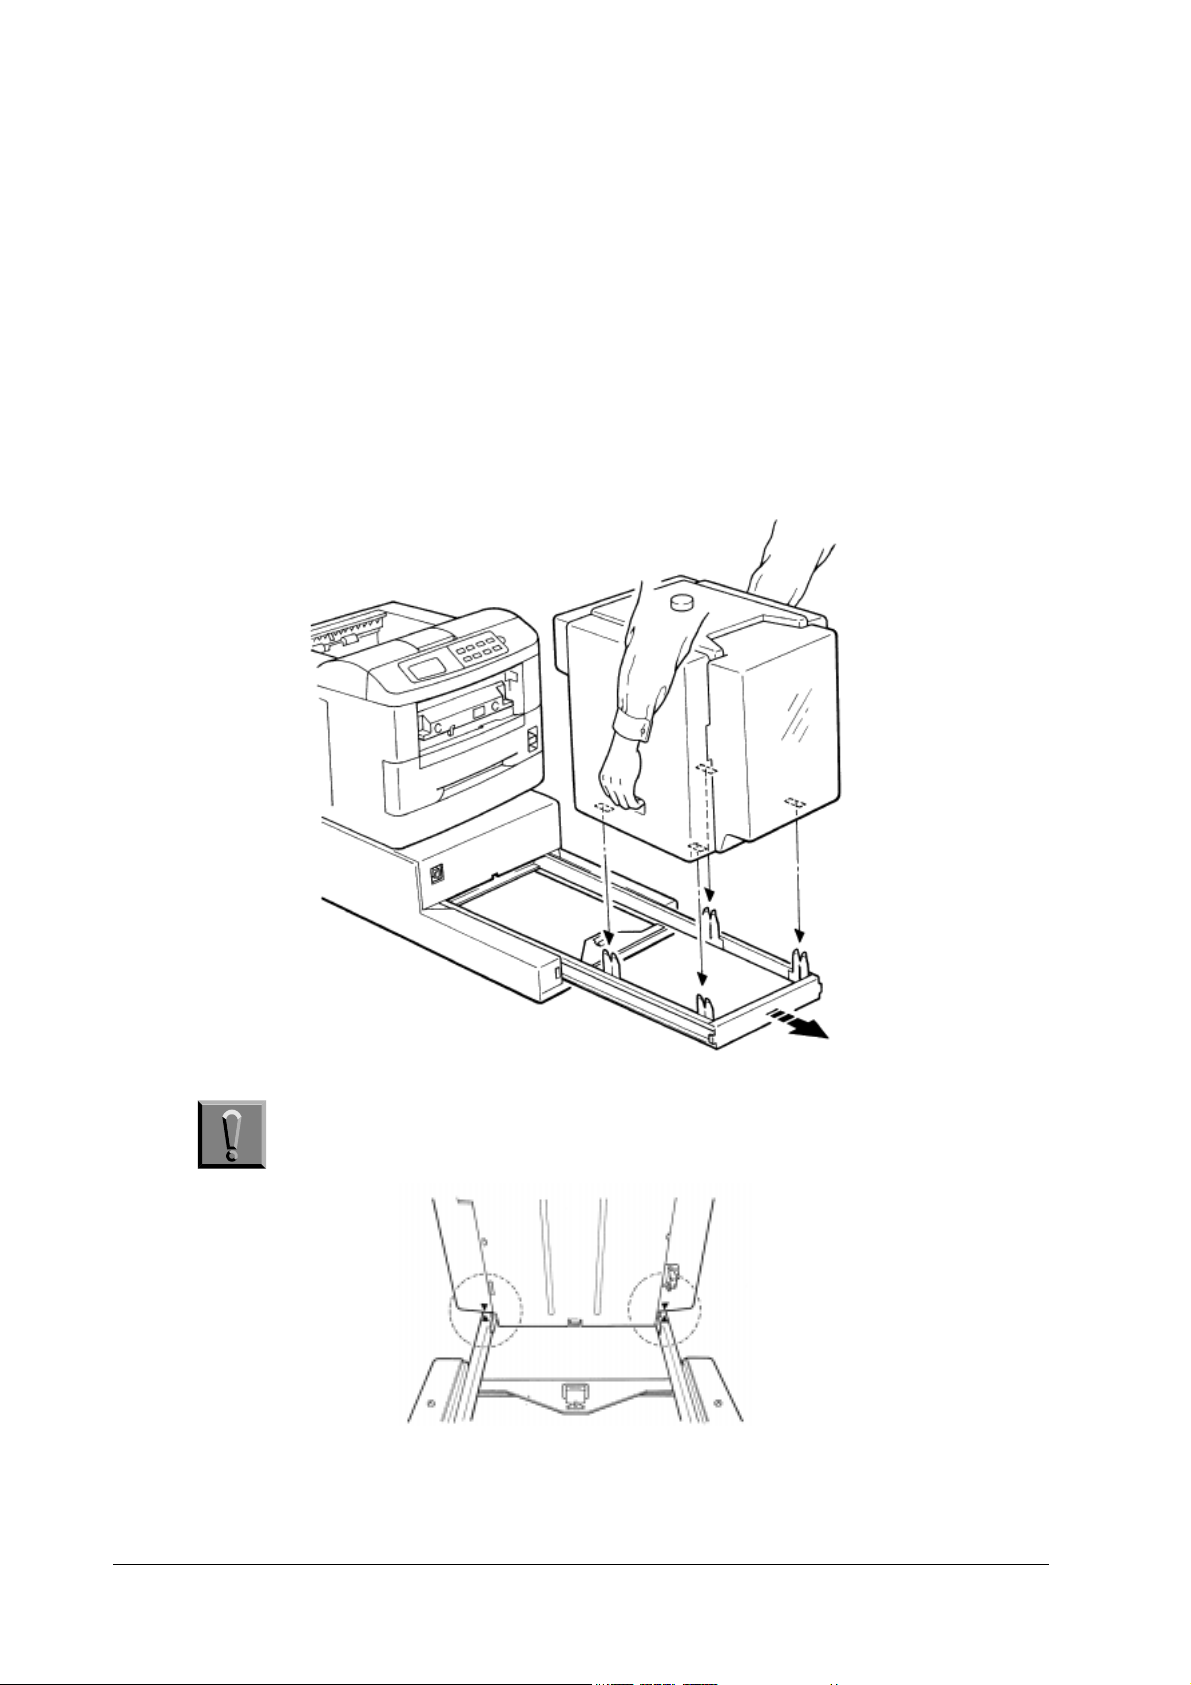
Figure 1.3 Seating the feeder on the rail
Installing the Paper Feeder
Mount the paper feeder onto the rail in the lower deck of the base. The rail is movable and
must be pulled out before installing the paper feeder.
Pull the rail fully out until it stops.
1
Grasp the feeder by the two handles in the side covers.
2
Facing the paper output slot of the feeder toward the printer, align the (four) positioning
3
tabs on the rail of the base with the holes in the base of the feeder. Then slowly and carefully lower the feeder onto the base.
PF-7E
Caution Ensure that the arrow marks on the rail are correctly aligned with the
arrow marks on the front side of the feeder before proceeding.
Slide the rail with the feeder mounted back toward the printer until the connector on the
4
front side of the feeder is fully connected to the connector on the base, holding the feeder
by the both hands.
1-5
Page 6

Product Information
Feeder setup
Caution When mounting the feeder to the printer, be careful to aviod pinch-
ing your fingers between the two.
Note Do not use the adjuster knob on the top of the feeder or the feeder
plastic cover as a handle for sliding the feeder.
Make sure that the output slot of the feeder is properly aligned with the manual feed slot on the
front side of the printer.
This completes setting up the feeder with the printer. Before using the feeder, plug the printer
to power and load paper in the paper feeder (explained in the following pages).
Operating the Optional Paper Feeder
This chapter describes how to load paper in the feeder and to select the feeder as the paper
source.
Caution When the tray is rising or descending, please observe the following
precautions.
❐ Keep your fingers out of the slot on the inner side of the feeder.
❐ While the tray is descending, keep your hands out from under the tray.
❐ Do not push down on the tray or pull it upward.
Loading Paper
Once the feeder has been installed in accordance with the instructions provided previously, you
can prepare to load paper. Before loading paper, you must adjust the side plates inside the
feeder to the actual width of the paper to be loaded.
1-6
PF-7E
Page 7

Product Information
Feeder setup
Figure 1.4 Adjusting the paper width
Note The legal-size paper is not usable with the paper feeder. For details on
paper size, see Paper Specifications later in this manual.
Turn printer power on. The paper feeder is turned on simultaneously.
1
Gently open the feeder’s tray cover. The paper tray will lower.
2
Make sure that the paper tray is lowerd and stopped. Then, while watching the side
3
plates inside the feeder, rotate the paper adjuster knob on top of the feeder clockwise.
Stop rotating the knob when the side plates have been set to their widest settings (outmost positions). See figure below.
PF-7E
Place several sheets of the paper you are going to use with the feeder on the center of the
4
paper tray.
Adjust the side plates by rotating the adjuster knob on top of the feeder counterclockwise
5
so that the left and right side edges of the paper are flush with the left and right side
plates.
Then, rotate the adjuster knob half a turn clockwise. This allows an approximately 1 mm
gap between each side of the paper stack and the side plate, which is needed to ensure the
proper paper feeding. See figure below.
1-7
Page 8

Product Information
Feeder setup
Note Make sure that the paper edges are evenly aligned on the center of
the tray and the front edge of the stack fully abuts on the feeder’s
inside panel.
Load up to 2,000 sheets of paper (four standard reams of packages of 75 g/m2 or 20 lb.
6
paper) onto the tray. Fan and flex each ream as you load it. Load the paper with the side
on which printing is done facing upward in the feeder.
Note Don’t put in more paper than the limit indicated on the inside of the
feeder. See figure below.
Close the cover. The tray will rise and a sheet will feed partially into the printer. The
7
printer indicates
Ready
Ready and the feeder is ready for operation.
ReadyReady
Loading Envelopes and Postcards
If you are loading postcards in the paper feeder, load them so that they are fed with the top
edge first. For envelopes, make sure that they are fed with the right or bottom edge first.
Direction of paper feed
Postcard
Envelopes
Loading Paper in the Printer’s Cassette
To gain access to the printer’s paper cassette for loading paper, etc., slide the paper feeder fully
backward from the printer. If you are using a Legal size cassette in the printer, you will need to
remove the paper feeder from the mounting base (rail).
Selecting Paper Feed from the Optional Paper Feeder
You can select paper feed from the optional paper feeder using the
FEED SELECT
key on the
printer’s control panel. You can also select it by including Prescribe’s CASS command in a file
that you send to the printer from the computer. Note that the optional paper feeder replaces
the printer’s manual feed tray.
1-8
PF-7E
Page 9

Product Information
Feeder setup
Selection from the Printer’s Control Panel
First, verify that the printer’s message display shows either Ready
1
Next, press the FEED SELECT
2
FEED SELECT key to change the source of paper feed. The source indica-
FEED SELECTFEED SELECT
Ready or Add paper
ReadyReady
Add paper.
Add paperAdd paper
tion toggles between the following sequences:
Cassette
Cassette
CassetteCassette
Manual feed
Manual feed
Manual feedManual feed
To select the paper feeder as the paper source, select Manual feed
Note When printing on special forms such as envelopes, labels, or thick
STACK SELECT
paper, use the printer’s
the face up tray.
STACK SELECT
STACK SELECTSTACK SELECT
Manual feed.
Manual feedManual feed
key to select paper output to
If paper is not loaded into the feeder, or the feeder is detached from the printer (on the rail
which, when pulled, detaches the feeder from the printer), the printer shows
Add paper
Add paper. Add
Add paperAdd paper
paper as explained on the previous pages.
Make sure that the printer is ready and on-line, then begin printing.
3
During printing using the paper feeder, the printer’s message display momentarily shows
Add paper
Add paper between pages. This is normal.
Add paperAdd paper
Note When used with the paper feeder, the printer may print in the position
which does not fully corresponds to the one the application software
requests.
Selection Using Prescribe’s CASS Command
Feed selection can be done using the CASS command of the Prescribe command language. To
switch paper feed to the option paper feeder, place the CASS command in a file or program as
follows.
!R! CASS 0; EXIT;
!R! CASS 0; EXIT;
!R! CASS 0; EXIT;!R! CASS 0; EXIT;
When the printer receives the CASS command, it automatically does a form feed operation.
Therefore, the CASS command should be sent either at the beginning of the file, or at the
beginning of an intermediate page.
The Prescribe FRPO R4 command changes the printer’s default (power-on) paper cassette
setting. To change the power-on paper source to the optional paper feeder, use the following
command sequence.
!R! FRPO R4, 0; EXIT;
!R! FRPO R4, 0; EXIT;
!R! FRPO R4, 0; EXIT;!R! FRPO R4, 0; EXIT;
PF-7E
1-9
Page 10

Product Information
Precautions concerning service and maintenance
1.3 Precautions concerning service and maintenance
Only a qualified technician should perform service on the equipment, who is familiar with fundamental safety countermeasures as dictated for all electronics technicians. Observe the following precautions during service and maintenance of the paper feeder. These are to prevent the
possible personal injuries to the technician and the damage to the equipment.
Precautions
Always observe the following precautions when maintaining or inspecting the paper feeder.
❐ When performing any maintenance or inspection procedure, first unplug the power cord.
Make sure that the printer power is turned off before replacing circuit boards or electrical
components in the paper feeder.
❐ To prevent electrostatic discharge damage to electrical circuits, be sure to wear an anti-
static band when handling the circuit boards.
❐ Be particularly careful when reconnecting the power after having repaired or replaced a
component that has the potential for causing an electric shock.
❐ If the paper feeder is to be transported or stored for a lengthy period of time, the unit
should be packed in its original packaging.
❐ If packed in their original packaging, these units can be stacked five high for up to six
months. They should not be stacked sideways or upside down, however.
❐ Store the paper feeder in a cool, dark, dry area. Avoid storage in dusty areas.
❐ Ship units out on a first in, first out basis.
Replacement parts
Be sure to use only Kyocera-recommended supplies and components. Kyocera assume no liability in the event of damage resulting from the use of unauthorized components.
Notes concerning paper storage
use of paper with a high moisture content in the paper feeder can adversely affect printing
quality through the occurrence of paper jams, wrinkling, and other difficulties. Observe the following paper handling precautions.
❐ Store paper in a dry place. Do not place paper directly on a damp floor.
❐ Do not stand paper on end for storage. Stack paper horizontally on a flat surface.
❐ After loading paper in the paper cassette, store any leftover paper in the original wrapping
or a plastic bag.
1-10
PF-7E
Page 11

Product Information
Specifications
1.4 Specifications
Table 1. 1 Specifications
Mechanical specifications
Item Specification
Applicable printers Kyocera Ecosys FS-1700 Series/Ecosys FS-3700 Series
Print speed with feed from PF-7EFS-1700 Series: 10 pages/minute (in copy mode); FS-3700 Series: 15 pages/
Effective paper size Width: 76 to 216 mm (3 to 8.5") × Height: 148 to 305 mm (5.8 to 12")
Paper capacity
Environmental requirements Temperature: 10 to 32.5°C, Humidity: 20 to 80% RH; Ideal conditions are
Noise Max. 54 dB(A) during paper feeding, Max. 60 dB(A) during moving tray
Dimensions Paper feeder 352 mm (13.9") H × 345 mm (13.6") W × 376 mm (14.8") D
Base 209 (8.2") H × 345 (13.6") W × 641 mm (25.2") D
Weight Paper feeder 7.5 kg (16.6 lbs.)
Base 6 kg (13.2 lbs.)
Power supply +24V/+5V supplied from printer through mount base
minute (in copy mode)
2,000 sheets maximum, 75 g/m
20°C/65% RH
2
(0.1 mm)
PF-7E
1-11
Page 12

Product Information
Paper specifications
1.5 Paper specifications
General Guidelines
The paper feeder is designed for use with various special types of print media such as adhesive-backed label, thick paper, envelopes, and post cards, it may not be used to print on paper
not satisfying the requirements below.
Note The manufacturer assumes no liability for problems that occur when
Selection of the right paper is important. The wrong paper can result in jams, misfeeds, curl,
poor print quality, and paper waste, and in extreme cases can damage the paper feeder and/or
the printer. The guidelines given below will increase the productivity of your office by ensuring
efficient, trouble-free printing and reducing wear and tear on the paper feeder and the printer.
Paper Specifications
paper not satisfying these requirements is used with the paper feeder.
The following table summarizes the basic paper specifications.
Table 1. 2 Paper specifications
Item Specification
We ig ht
Thickness 0.086 to 0.29 mm (3.4 to 11.5 mils)
Squareness of corners 90°±0.2
Curl Inream flat within 4 mm
Packaging Moisture-proof ream wrapping required
Moisture content 4 to 6%
Direction of grain Long grain
Pulp content 80% or more
Selecting the Right Paper
Printer printing is a process involving light beam, electrostatic discharge, toner, and heat. In
addition, as the paper passes through the printer it undergoes considerable sliding, bending,
and twisting motions. A high- quality printing paper matching the requirements withstands all
these stresses, enabling the paper feeder and the printer to turn out clean, crisp printed copy
consistently.
60 to 200 g/m
°
2
(16 to 53 lb./ream)
Remember that all paper is not the same. Some of the factors to consider when selecting paper
for use with the paper feeder are as follows:
Condition of the paper—Avoid using paper that is bent at the edges, curled, dirty, torn, or contaminated with lint, clay, or paper shreds.
Use of paper in these conditions can lead to illegible printing, misfeeding, and paper jams, and
can shorten the life of the paper feeder and the printer. In particular, avoid using paper with a
surface coating or other surface treatment. The paper should have as smooth and even a surface as possible.
Paper size—The minimum size of paper loadable in the paper feeder is 76 × 148 mm (3 × 5.8
inches). The maximum size is 216 × 305 mm (8.5 × 12 inches). The paper feeder can feed
1-12
PF-7E
Page 13

Product Information
Paper specifications
paper of any sizes between these sizes (shaded area in the figure below), including the standard
sizes of A4, B5, A5, letter-size, etc. The legal size paper is not usable with the paper feeder.
Since the printer does not recognize the size of the paper currently loaded in the option paper
feeder, it assumes that all paper fed from the paper feeder have the legal size (8-1/2 by 14
inches). You can use the SPSZ (Set Paper SiZe) command of the PRESCRIBE command language to tell the printer the size of the paper or envelope. Refer to the printer’s Prescribe II
Command reference in the CD-ROM supplied with the printer.
Smoothness—The paper should have a smooth, uncoated surface. Paper with a rough or sandy
surface can cause voids in the printed output. Paper that is too smooth, however, can cause
multiple feeding and fogging problems. (Fogging is a gray background effect.)
Basis weight—Basis weight is the weight of a standard quantity of paper. In the traditional
system the standard quantity is a ream consisting of 500 sheets measuring 17 × 22 inches
each. In the metric system the standard quantity is 1 square meter.
Paper that is too light or too heavy can cause misfeeding, jams, and premature wear of the
paper feeder and the printer. Uneven paper weight can cause multiple feeds, print defects, poor
toner fusing, blurring, and other print quality problems. The proper weight is 60 to 200 g/m
(16 to 53 lbs/ream).
2
Moisture content—Moisture content is defined as the percent ratio of moisture to the dry mass
of the paper. Moisture can affect the paper’s appearance, feedability, curl, electrostatic properties, and toner fusing characteristics.
The moisture content of the paper varies with the relative humidity in the room. When the relative humidity is high and the paper absorbs moisture, the paper edges expand, becoming wavy
in appearance. When the relative humidity is low and paper loses moisture, the edges shrink
and tighten, and print contrast may suffer.
Wavy or tight edges can cause misfeeding and alignment anomalies. The moisture content of
the paper should be 4% to 6%.
To ensure the proper moisture content it is important to store the paper in a controlled environment. Some tips on moisture control are:
❐ Store paper in a cool, dry location.
❐ Keep the paper in its wrapping as long as possible. Rewrap paper that is not in use.
❐ Store paper in its original carton. Place a pallet etc. under the carton to separate it from
the floor.
❐ After removing paper from storage, let it stand in the same room as the printer for 48
hours before use.
❐ Avoid leaving paper where it is exposed to heat, sunlight, or damp.
PF-7E
Paper Storage
When the paper feeder is not to be used for a long time of period, the paper must be removed
from the feeder and wrapped in moisture-proof paper for storage.
Envelopes and Postcards
When selecting envelopes and postcards, use the guidelines given below.
Envelopes—An envelope is a more complex objects than a single sheet of paper. For this reason,
it may not be possible to obtain consistent printing quality over the entire envelope surface.
Use the following guidelines to select the proper envelopes.
1-13
Page 14

Product Information
Paper specifications
❐ Envelopes should have the basis weight of 70 to 100g/m
4 plies of the paper that is used to construct the paper including all flaps and overlaps.
❐ Envelopes should have sharply-creased folds and accurately joined corner edges.
❐ Envelopes should have a smooth, uncoated surface. Envelopes that are too smooth, how-
ever, can give an adverse effect to the drum and fuser units inside the printer.
❐ Envelopes should have a straight grain orientation.
❐ Envelopes should have a pulp content of al least 80%, and should have a moisture content
of 4 to 6%.
Figure below shows some typical envelope types:
Figure 1.5 Types of envelopes
2
(0.16 to 0.22 lb./ream) and up to
This is the type of envelope best recommended
for use with the paper feeder.
Although tyis type of envelope generally feeds
normally, they are somewhat prone to jamming than above.
This type of envelope performs reliably, provided that envelopes are loaded so that the
bottom (sealed end) feeds into the printer first.
Avoid using this type of envelope made of double-ply paper.
Before printing on envelopes of any type, test printing performance. Avoid using any of the following kinds of envelopes even if the envelope meets the requirments above.
❐ Envelopes that have exposed adhesive surface, or having a peel-off sealing string for adhe-
sive surface. (Peeled-off sealing string inside the printer can cause a serious problem.)
❐ Envelopes with metal fasteners or tie strings.
1-14
PF-7E
Page 15

Product Information
Paper specifications
❐ Envelopes with transparent windows, holes, perforations, or cutouts.
❐ Envelopes made using paper, pigment, adhesive, or other material that will degenerate or
release hazardous gases when subjected to the heat that is generated in the printer.
❐ Envelopes that is bent, dirty, or redundant of paper dust.
Curly Envelopes
An envelope tends to curl excessively or become uneven in its thickeness since it is constructed
by paper which is folded, creased, and seamed in many parts, making the stack of envelopes on
the feeder tray unlevel. To avoid feeding problems, the unlevelness of the stack of envelopes on
the paper tray must be less than those specified in the following figures.
Figure 1.6 Curl limits for envelopes
Vertical curl must be less than 10 mm.
Thickness in bottom or top must be less
than 10 mm.
Horizontal curl must be less than 5 mm.
Thickness in right or left trails must be less
than 5 mm.
Reduce the envelopes, if necessary to keep the unlevelness of the stack of envelope within the
specified limit.
Post cards
The paper used in postcards should have a basis weight of 135 to 190 g/m
2
(0.3 to 0.42 lb./
ream) and uncoated. The paper should also satisfy the same conditions as white bond paper,
listed on table 1. 2 on page 1-12
.
PF-7E
Storage of Envelopes and Postcards
Store envelopes and postcards, making sure of the following hints.
1-15
Page 16

Product Information
Paper specifications
❐ Avoid leaving paper where it is exposed to sunlight.
❐ Store envelopes in a clean, dust-free environment.
❐ Temperature in the storage area should be maintained in the range from 50 to 95°F (10 to
35°C), and relative humidity should be kept between 20 and 80 %.
1-16
PF-7E
 Loading...