

Page 1

&KDSWHU#6 0$,17(1$1&(
&RQWHQWV
614 /LIH#H[SHFWDQF\#RI#PRGXOHV/#SDJH#605
615 7RQHU#FRQWDLQHU/#SDJH#606
7RQHU#FRQWDLQHU#UHSODFHPHQW/#SDJH#606
:DVWH#WRQHU#ERWWOH/#SDJH#607
7RQHU#VDYHU#PRGH#+(FR3ULQW,/#SDJH#607
616 &OHDQLQJ#WKH#SULQWHU/#SDJH#608
0DLQ#FKDUJHU#XQLW/#SDJH#608
3DSHU#)HHG#8QLW/#SDJH#60:
617 +DQGOLQJ#WKH#GHYHORSHU#XQLW/#SDJH#60<
5HPRYLQJ#WKH#GHYHORSHU#XQLW/#SDJH#60<
6KLSSLQJ#WKH#GHYHORSHU#XQLW/#SDJH#60<
618 ,QLWLDOL]LQJ#WKH#GHYHORSHU/#SDJH#6044
619 8SGDWLQJ#WKH#HQJLQH#ILUPZDUH/#SDJH#6045
)LUPZDUH#GDWD#IRUPDW/#SDJH#6045
'RZQORDGLQJ#HQJLQH#GDWD/#SDJH#6045
'RZQORDGLQJ#FRQWUROOHU#GDWD/#SDJH#6046
'RZQORDGLQJ#GDWD#IURP#D#PHPRU\#FDUG/#SDJH#6046
'RZQORDGLQJ#HUURUV/#SDJH#6047
61: 6HWWLQJ#WKH#SDSHU#W\SH/#SDJH#6048
0DNLQJ#VHWWLQJV/#SDJH#6049
3DSHU#W\SH#XVHU#VHWWLQJ/#SDJH#6049
Page 2

/LIH#H[SHFWDQF\#RI#PRGXOHV
614 /LIH#H[SHFWDQF\#RI#PRGXOHV
The table below shows the nominal life expectancy for modules. Detailed part information for
each module (except toner containers) can be found in chapter 7,
7DE O H#61#4## /LIH#H[SHFWDQF\#RI#PRGXOHV
.LW 0RGXOH /LIH 5HPDUNV
TK-20 Toner container 10,000 User replaceable
TK-20H Toner container 20,000 User replaceable
DK-25 Drum unit 300,000
DV-25 Developer unit 300,000
FK-25 Fuser kit 300,000
FE-25 Feed unit 300,000
MK-25 Refurbishment kit 300,000 Includes a DK-25, DV-25, FK-25, and a
3DUWV#&DWDORJ
feed-trans. unit
0DLQWHQDQFH
.
3-2
)609<33
Page 3
0DLQWHQDQFH
7RQHU#FRQWDLQHU
615 7RQHU#FRQWDLQHU
The toner container is the only consumable that the printer requests replacement during normal
operation (user-replaceable). The following toner container is available for use with model FS-
6900.
7DE O H#61#5## 7RQHU#FRQWDLQHU
0RGHO
TK-20 10, 000 One
TK-20H 20,000 One
a. Based on letter or A4 size pa pe r ; av e r ag e pr int density of 5%.
/LIH#LQ#SDJHV
D
1R1#RI#ZDVWH#WRQHU#ERWWOHV#LQFOXGHG
7RQHU#FRQWDLQHU#UHSODFHPHQW
The printer gives two steps of user attention as explained below. The first one is the warning
that the toner is almost run out. This is the earliest chance for the user to replace the toner container and clean various parts inside the printer (See section Cleaning the printer on page 3-5):
Toner low TK-20 Clean printer
If the user continues to use the printer, the printer will print approximately 50 pages (A4 or Letter size paper, 5 % average toner d ensity), eventu ally the ton er sup ply being ex hausted at which
point the printer will stop printing and th e following message will be displayed:
Replace Toner Clean printer
This instructs to install a new toner kit to bring the printer back in normal operation. Cleaning
various parts inside must be also done in this occasion (See section Cleaning the p rinter on page
3-5).
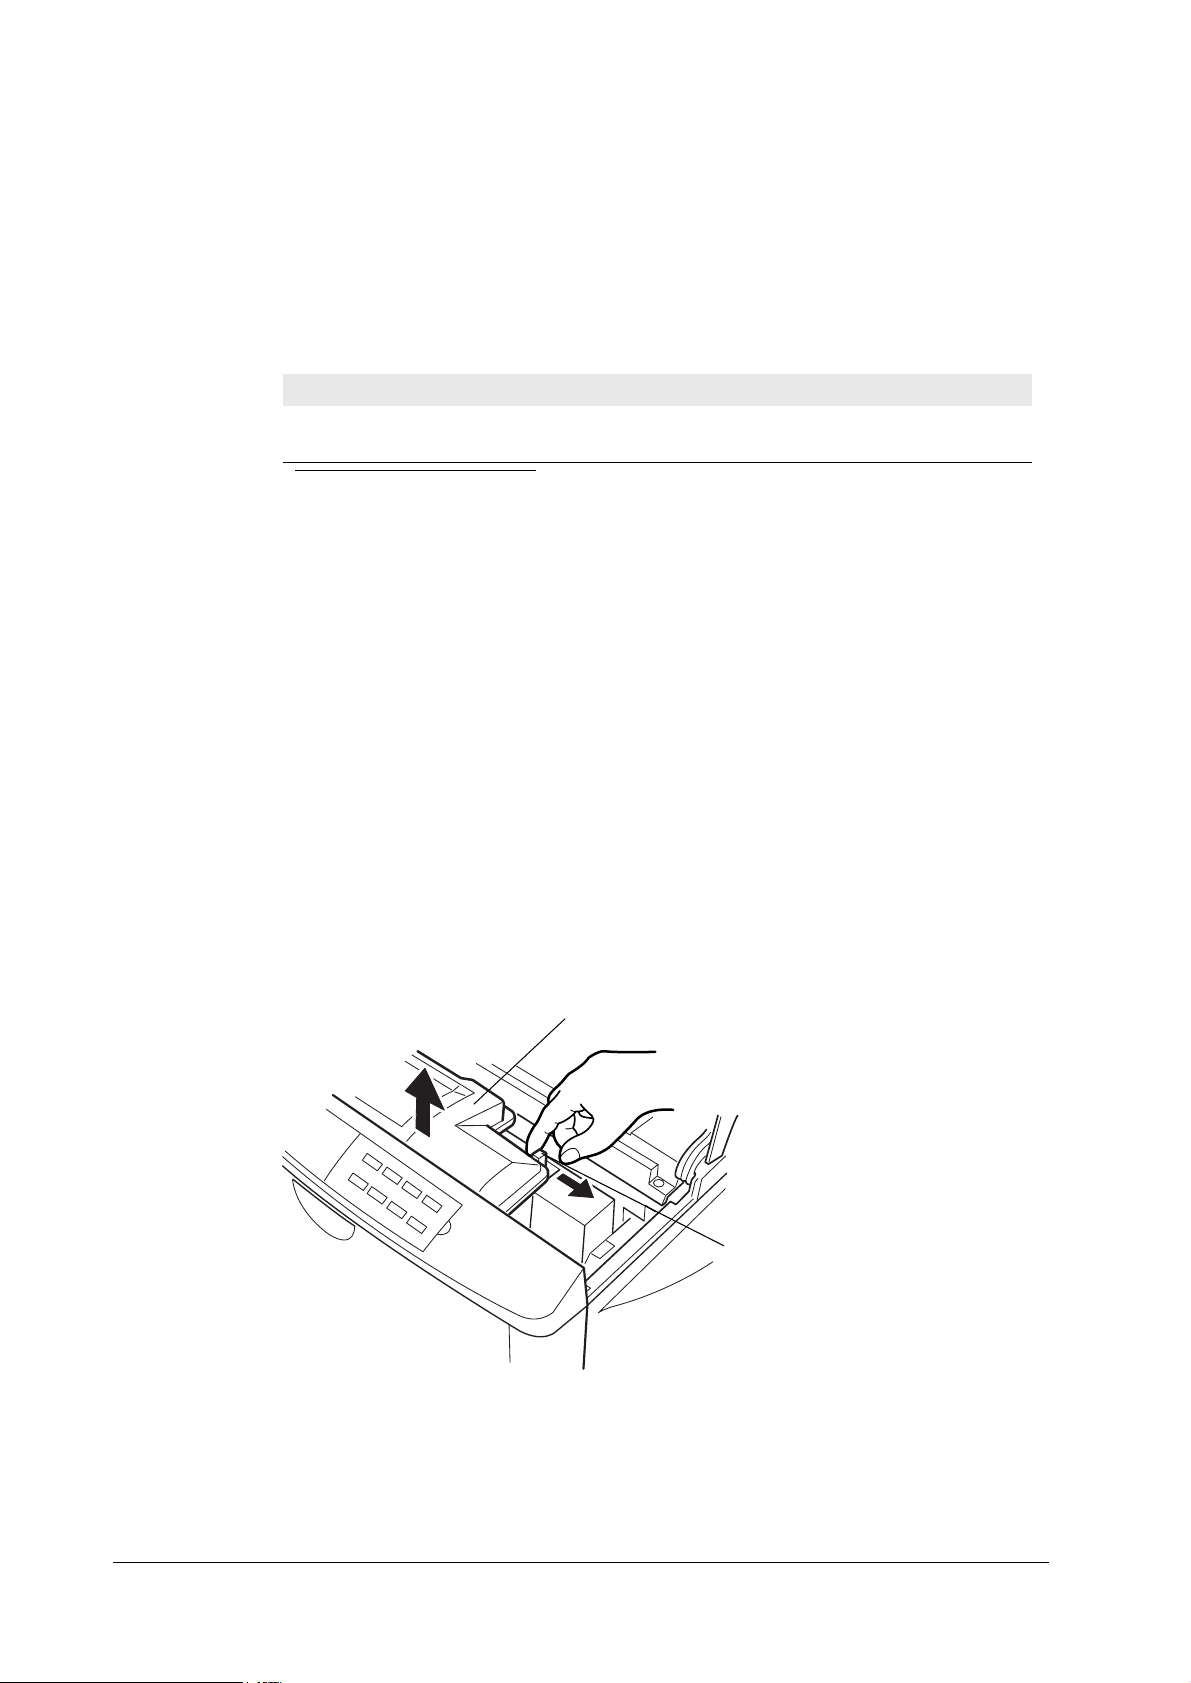
To replace the toner container, proceed as follows:
Pull the toner container release lever to right as shown.
)609<33
7RQHU#FRQWDLQHU
5HOHDVH#OHYHU
Then, refer to page 2-3,
,QVWDOOLQJ#WRQHU
, to install the new toner container. After installing the
new toner container, several parts in the printer must be cleaned as instructed on page 3-5,
&OHDQLQJ#WKH#SULQWHU
.
3-3
Page 4

0DLQWHQDQFH
7RQH U#FRQWDLQHU
If the toner container has been replaced when the message
Replace Toner Clean printer
was displayed, the message
Clean printer.. press CONTINUE
will be displayed after replacement. After cleaning the inside of the printer following the procedure shown below, press the
&217,18(
ready for printing.
The printer can get ready for printing after 15 to 30 seconds since the toner container is
replaced.
:DVWH#WRQHU#ERWWOH
Locate the new waste toner bottle in the toner kit, and install in the printer according to page 25,
:DVWH#WRQHU#ERWWOH
.
Note that the printer has a sensor that monitors the presence of the waste toner bottle. The
printer does not operate without a bottle installed.
key; the message will disapp ear and the pr int er will be
For the reference, the waste toner bottle can hold up to approx . 100 g of waste toner. The nominal amount of waste toner derived after 10,000 pages have been printed is 20 to 30 g (Letter or
A4 size paper; average toner density of 5 %).
7RQH U #VDYHU#PRGH#+(FR3ULQW,
The
EcoPrint
feature enables to reduce the amount of toner consumed on the page so as to save
printing costs by drastically extending th e toner container life. EcoPrint mode is factory-set to
off and turned on by the printerís front control panel (also accessible through the application
software with the assistance of the printer driver). See details in the Mode Select Menu roadmap
in chapter 2.
The
EcoPrint
setting has no effect on the print speed.
3-4
)609<33
Page 5
0DLQWHQDQFH
&OHDQLQJ#WKH#SULQWHU
616 &OHDQLQJ#WKH#SULQWHU
To avoid print quality problems, the following printer parts must be cleaned with every toner
container replacement.
0DLQ#FKDUJHU#XQLW
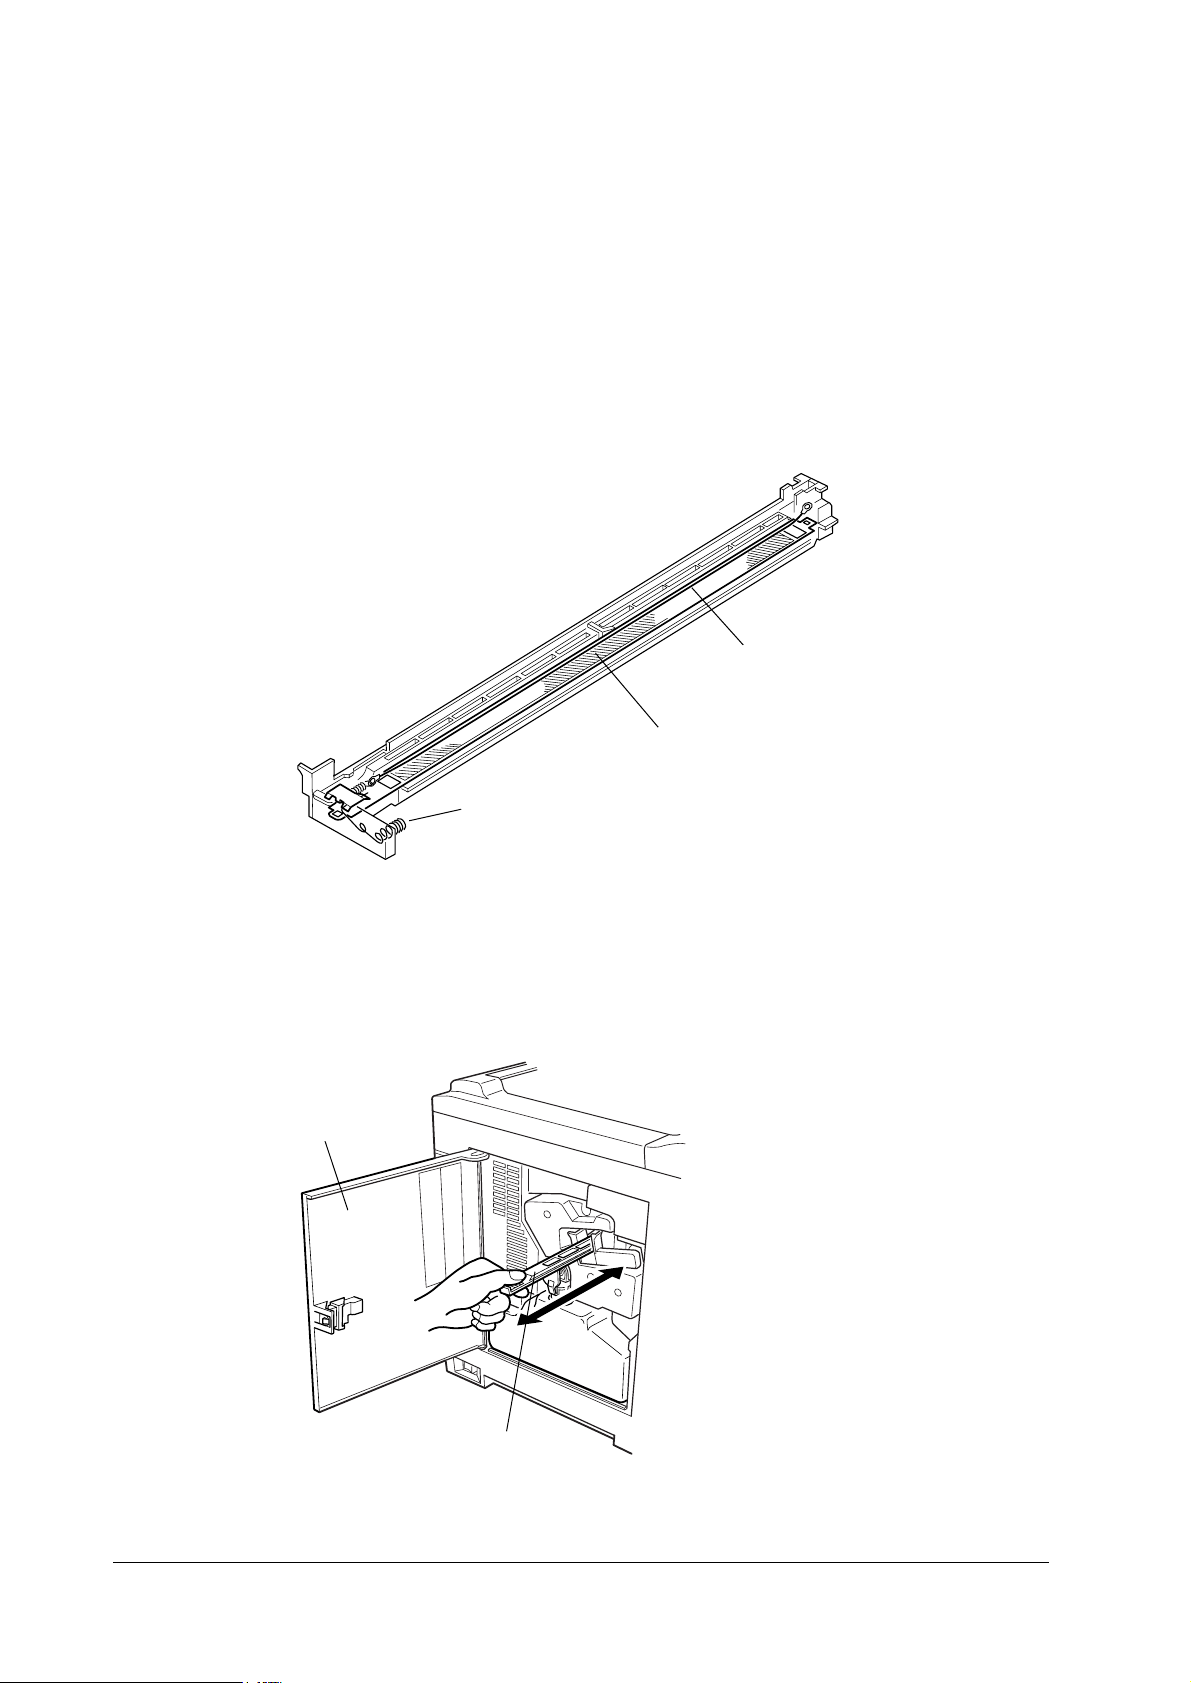
The main charger unit should be cleaned in its two parts—the wire and grid (See the picture
below.) - whenever the toner container is changed. Cleaning of the main charger can be done
without needing any tools thanks to its se lf-cleanin g system.
&KDUJHU#ZLUH
*ULG
+LJK0YROWDJH#WHUPLQDO
To clean the main charger, first open the drum access door. Pull the cleaning knob (green)
slowly in and out a few times. This pulls a cleaning pad in side the drum unit along the wire.
'UXP#DFFHVV#GRRU
)609<33
&OHDQLQJ#NQRE
+*UHHQ,
3-5
Page 6
&OHDQLQJ#WKH#SULQWHU
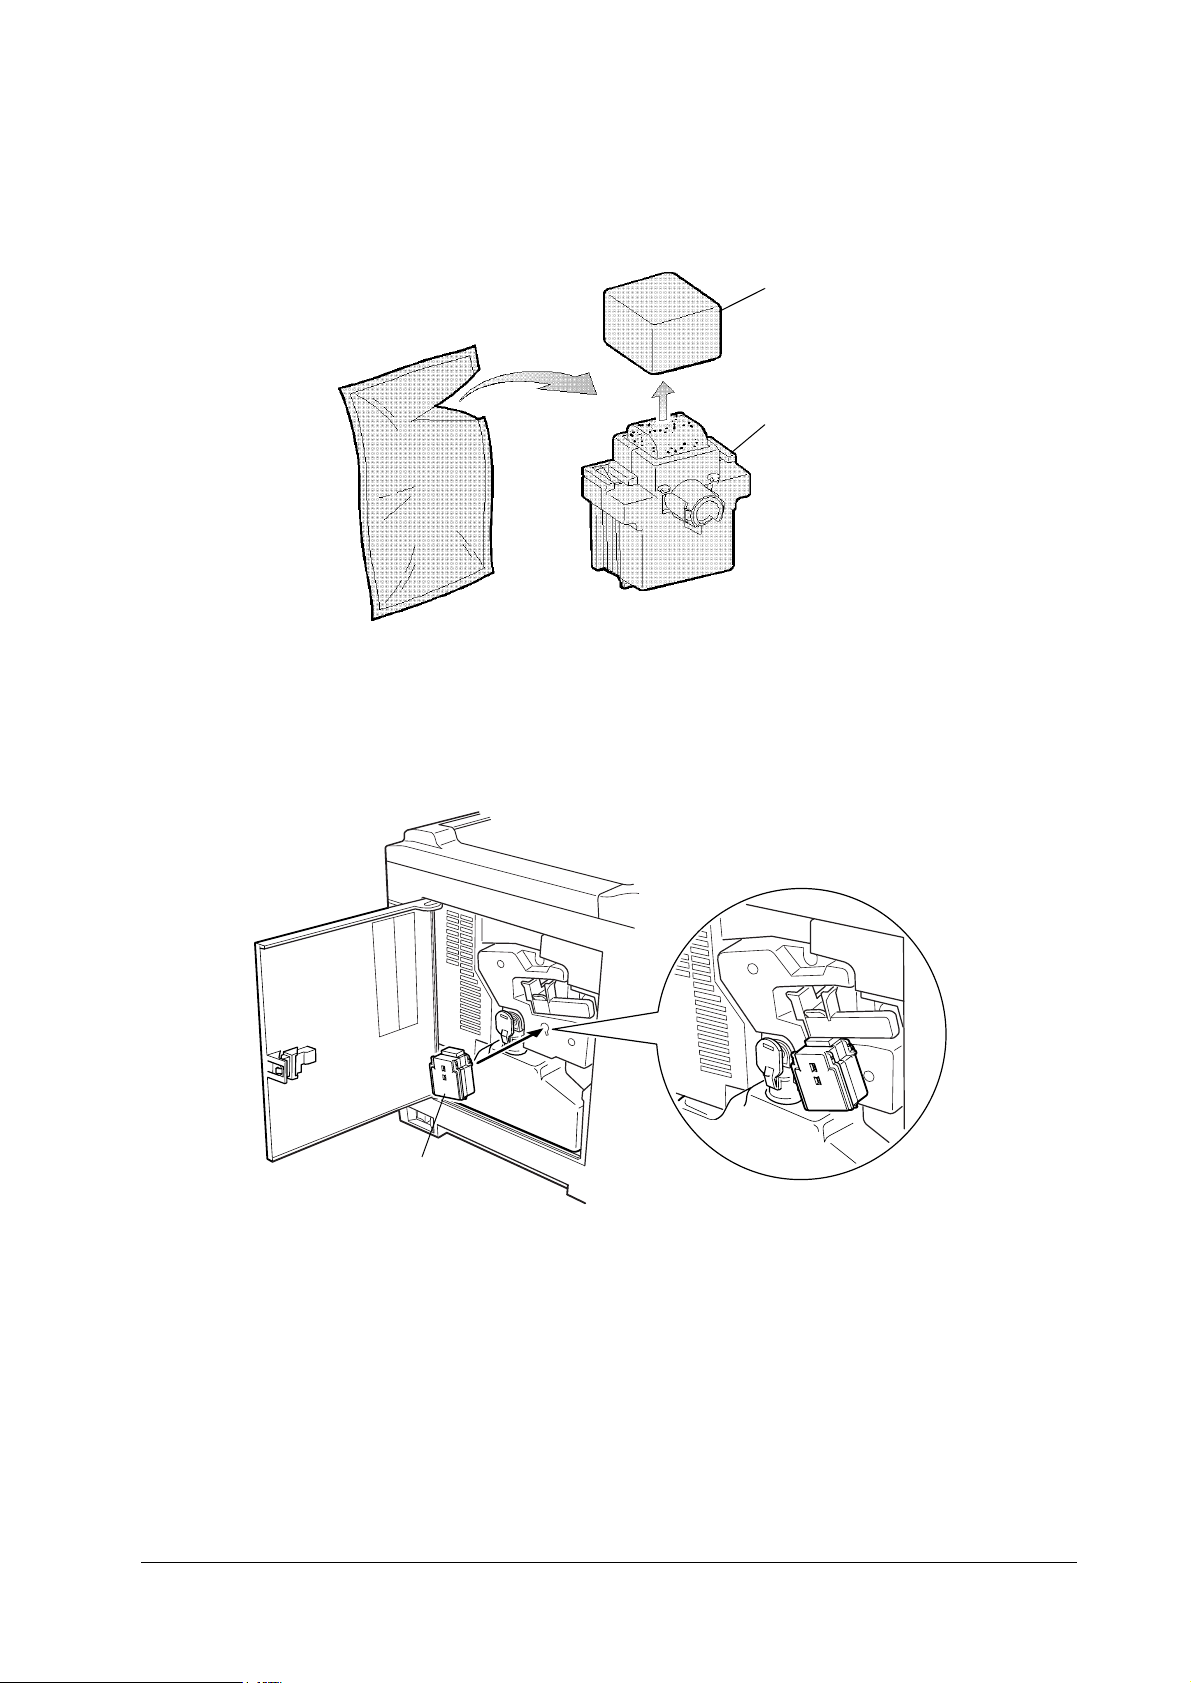
Then, clean the grid using the grid cleaner supplied with the toner kit.
Take the grid cleaner from protective bag in the new toner kit, and remove the cap.
&DS
➍
*ULG#FOHDQHU
➌
0DLQWHQDQFH
The grid cleaner pad is impregnated with water. Perform the following cleaning procedure
before the pad dries.
Attach the grid cleaner to the printer with the pad uppermost, as shown in the diagram below.
*ULG#FOHDQHU
When the grid cleaner is properly fit, grasp the green part of the main charger, lift it slightly, and
pull outwards. Repeat the above for approx. five times. The wet part of the grid cleaner cleans
the grid of the main charger unit (bottom).
3-6
)609<33
Page 7

0DLQWHQDQFH
&OHDQLQJ#WKH#SULQWHU
When cleaning is done, reseat the main chager unit in its original p os ition. Close the drum unit
access door.
3DSHU#)HHG#8QLW
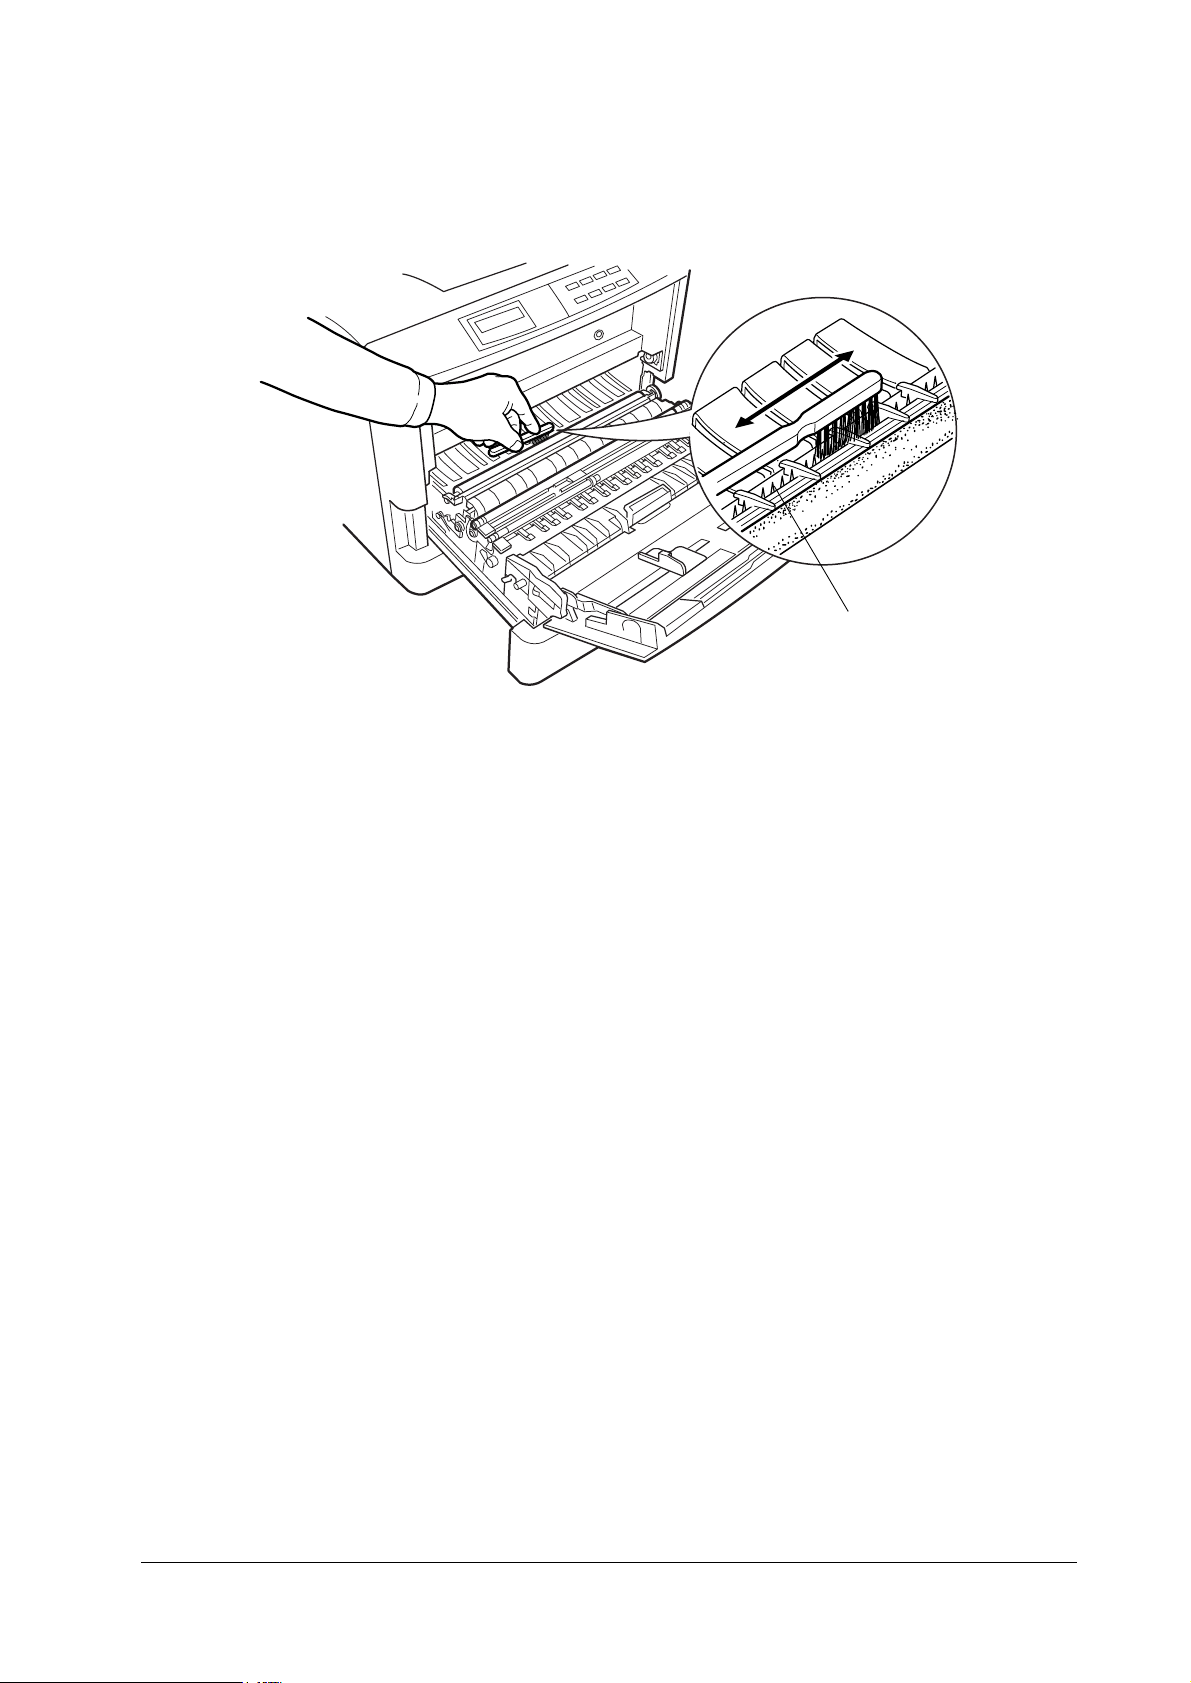
To avoid print quality problems due to paper dus t and debris, clean the paper feed unit in the
following manner.
Pull the paper feed unit release lever up and draw the paper feed unit all the way out until it
stops. Wipe the paper dust on the registration roller and the paper ramp using the wiper cloth
included in the toner kit.
&DXWLRQ 'R#QRW#WRXFK#WKH#WUDQVIHU#UROOHU#+EODFN#VSRQJH#UROOHU,#ZKHQ#ZLSLQJ#WKH#
SDSHU#UDPS1
5HJLVWUDWLRQ#UROOHU
)609<33
3-7
Page 8
0DLQWHQDQFH
&OHDQLQJ#WKH#SULQWHU
Take out the cleaning brush supplied with the printer. Clean the separation charger using the
brush.
6HSDUDWLRQ
FKDUJHU
3-8
)609<33
Page 9

0DLQWHQDQFH
+DQGOLQJ#WKH#GHYHORSHU#XQLW
617 +DQGOLQJ#WKH#GHYHORSHU#XQLW
This section provides instructions on how to handle the developer unit for removal and shipment.
When the printer has had the developer unit replaced with a new developer unit, it needs to initialize the developer unit before operation. To initialize the new developer unit, follow procedures described in
5HPRYLQJ#WKH#GHYHORSHU#XQLW
Detach the developer connector. Press the developer release levers frontwards. Remove the
developer unit by lifting it as shown below.
618#,QLWLDOL]LQJ#WKH#GHYHORSHU
, page 3-11.
'HYHORSHU
FRQQHFWRU
6KLSSLQJ#WKH#GHYHORSHU#XQLW
The printer is supplied with a developer container package that should be retained for future
shipment of the developer.
To pack the developer in the container package, first flap down the magnet roller protective
cover, then refer to the diagram below:
5HOHDVH
OHYHU
5HOHDVH
OHYHU
)609<33
0DJQHW#UROOHU
SURWHFW1#FRYHU
3-9
Page 10

+DQGOLQJ#WKH#GHYHORSHU#XQLW
Insert the developer into the container as shown below.
0DLQWHQDQFH
3-10
)609<33
Page 11

0DLQWHQDQFH
,QLWLDOL]LQJ#WKH#GHYHORSHU
618 ,QLWLDOL]LQJ#WKH#GHYHORSHU
The new developer unit is shipped from the fact ory with no toner cont ained. The dev el oper can
be automatically repleted with toner when a toner container is installed onto it and the printer is
turned on. However, because the toner reservoir in the developer has a large capacity, it requir es
a lengthy period of time until a substantial amount of toner has been fed to get the printer ready.
(A new developer needs approximately 200 g for triggering the sensor inside.)
A great many seconds of time for this is greatly deducted by using the service menu in the
printer’s mode select routine as accessed by its front control panel. Follow these steps to use this
feature, top to bottom (For details on using the front contro l panel keys, refer to the printer’s
User’s Manual).
Press
4
5
6
7
8
9
:
;
02'(
Press . until the message display displays
Press ➤.
Press . until the message display displays
Press ➤. The message display should display
Press
(17(5
Press
(17(5
Turn printer power off, then on.
.
Others>
>Service>
>>Developer
. The message display should display
.
.
.
.
>>Display?
.
When printer power is turned on again, the printer continually engages in this mode for a period
of approximately 10 minutes, after which the printer reverts to ready state.
)609<33
3-11
Page 12

8SGDWLQJ#WKH#HQJLQH#ILUPZDUH
619 8SGDWLQJ#WKH#HQJLQH#ILUPZDUH
The printer accepts update of the engine firmware and the controller firmware as well as the
localized front panel message data through the parallel interface. Updating using these data is
implemented by directly rewriting the flush memory in the printer’s engine or controller board.
The printer must be in the supervisor mode to update the engine firmware.
To update the firmwares, a PC running MS-DOS must be connected directly to the printer’s par allel interface.
Kyocera supplies three types of data for u pdating the engi ne firmware depen ding on the pur pose
of update. These are:
Engine firmware data
•
Controller (system) firmware da ta
•
Front panel message data
•
These data may be stored in a memory card for field use. To store ( write) data in a memory card ,
and reread them into the printer through the slot, refer to the printer’s
1RWH (DFK#VLQJOH#GDWD#PXVW#EH#ZULWWHQ#RQ#D#PHPRU\#FDUG1#'R#QRW#ZULWH#
PRUH#WKDQ#RQH#GDWD#RQ#D#PHPRU\#FDUG1
0DLQWHQDQFH
User’s Manual
.
#)LUPZDUH#GDWD#IRUPDW
The data is identified using the following naming syntax:
GH HQJLQH#GDWD
GV FRQWUROOHU#GDWD
GP FRQWURO#SDQHO#GDWD
93 )609<33
63 9HUVLRQ#RI#GDWD
GH93631GDW
'RZQORDGLQJ#HQJLQH#GDWD
The engine firmware data is downloaded by using the Prescribe BOOT command. To download
data from the parallel interface:
Turn printer power on. Make sure the printer is
4
At the DOS prompt, execute:
5
Note that the above sequence must not be followed by an EXIT; command. The display
should indicate
DOS COPY the data to download from the host computer. During do wnloading data, the
6
printer shows
Supervisor Mode
Downloading
!R! BOOT "SPR";
.
.
Ready
.
3-12
)609<33
Page 13

0DLQWHQDQFH
8SGDWLQJ#WKH#HQJLQH#ILUPZDUH
&DXWLRQ 'R#QRW#WXUQ#SULQWHU#SRZHU#RII#GXULQJ#GRZQORDGLQJ#GDWD1
Wait until the display reverts to
7
Turn power off, then on again. Check the display sh ows
8
Ready
.
. If not, refer to Download-
Ready
ing errors section that follows.
Confirm the status page shows the new engine version (See Appendix B, page B-2). If the message display indicates
Call service person Dn
(n=0, 1, ...), refer to section on Downloading
data from a memory card page 3-13.
'RZQORDGLQJ#FRQWUROOHU#GDWD
The controller firmware data is downloaded by using the Prescribe UPGR command. To download data from the parallel interface:
Turn printer power on. Make sure the printer is
4
At the DOS prompt, execute:
5
!R! UPGR "SYS";
Ready
.
Note that the above sequence must not be followed by an EXIT; command. The display
should indicate
DOS COPY the data to download from the host computer. During downloading data, the
6
printer shows
&DXWLRQ 'R#QRW#WXUQ#SULQWHU#SRZHU#RII#GXULQJ#GRZQORDGLQJ#GDWD1
Wait until the display reverts to
7
Turn power off, then on again. Check the display sh ows
8
Supervisor Mode
Downloading
.
.
Ready
.
. If not, refer to Download-
Ready
ing errors section that follows.
Confirm the status page shows the new engine version (See Appendix B, page B-2). If the message display indicates
Call service person Dn
(n=0, 1, ...), refer to section on Downloading
data from a memory card page 3-13.
'RZQORDGLQJ#GDWD#IURP#D#PHPRU\#FDUG
To download data written in a memory card to the printer:
Insert the memory card in the printer’s memory card slot (at the right side).
4
Turn printer power on. The printer automatically reads data in the memory card. While
5
reading data, the printer indicates
When the data is successfully read, the message display indicates
6
&DXWLRQ 'R#QRW#WXUQ#SULQWHU#SRZHU#RII#GXULQJ#GRZQORDGLQJ#GDWD1
Turn printer power off.
7
Remove the memory card from the printer.
8
Turn printer power on again. Check the display shows
9
Downloading
on the message display.
Supervisor mode
. If not, refer to Download-
Ready
.
ing errors section that follows.
Confirm the status page shows the new engine version (See Appendix B, page B-2). If the message display indicat es
Call service person Dn
(n=0, 1, ...), refer to section Downloading errors
below.
)609<33
3-13
Page 14

'RZQORDGLQJ#HUURUV
The following messages are indicated on the message display when an error occurred during
downloading data.
7DE O H#61#6## 'RZQORDGLQJ#HUURUV
(UURU#PHVVDJH 0HDQLQJ &RUUHFWLYH#DFWLRQ
Call service person D0
Checksum error
Call service person D1
Machine compa ti b i li ty error
Call service person D2
sion compatibility error
Call service person D3
error
—
—
—Ver-
—Data
8SGDWLQJ#WKH#HQJLQH#ILUPZDUH
Checksum error occurred during downloading. The
engine ROM is empty.
The data to be do w nloaded is not co mpatible with
the printer.
The version of the data does not match the current
engine version.
The data to be downloaded is corrupted. Obtain the correct data.
Turn printer power of f once, then on again. Try
downloading again.
Obtain correct da ta for the printer model.
Obtain the correct version of data.
0DLQWHQDQFH
3-14
)609<33
Page 15

0DLQWHQDQFH
6HWWLQJ#WKH#SDSHU#W\SH
61: 6HWWLQJ#WKH#SDSHU#W\SH
This printer is capable of printing under the optimum setting for the type of paper being used.
Setting the paper type for the paper source from the printer's control panel will cause the printer to
automatically print in the mode best suited to that type of paper. This allows you to easily achieve
high-quality printing results. A different paper type setting can be made for each paper source
including the multipurpose tray. Not only can preset paper types be selected, but it is also possible
for the user to d efine and select cu stomized paper types.
The following types of paper can be set. For detai ls on paper, please s ee printer’s
Appendix B
7DE O H#61#7## &DVVHWWH/#0HGLD#7\SH#DQG#&XVWRP#6HWWLQJV
Paper feed source
Paper Type
3ODLQ OO O
7UDQVSDUHQF\ O ××
3UHSULQWHG OO O
/DEHOV O ××
%RQG OO O
5HF\FOHG OO O
9HOOXP O ××
5RXJK OO O
/HWWHUKHDG OO O
&RORU OO O
3UHSXQFKHG OO O
(QYHORSH O ××
&DUGVWRFN O ××
&XVWRPý ú*OO O
.
MP tray Cassette
Duplex path
(MP tray available only
in Cassette mode)
User’s Manual
O: Can be stored ×: Cannot be stored
&DUGVWRFN reduces prin ting speed when the paper size used is le ss than A5 and is fed from
an MP tray set in cassette mode .
&XVWRP is a pape r type defined and registered b y the user. Up to eight types o f user settings may be defin ed.
A number from ì to å is used in place of the ú. For details on setting user types, please see
)609<33
3-15
page 3-16
.
Page 16

0DLQWHQDQFH
6HWWLQJ#WKH#SDSHU#W\SH
0DNLQJ#VHWWLQJV
The following descr ibes the procedure fo r setting the paper type using the Recycled type and Cassette as examples.
4
Display
ý3DSHUýKDQGOLQJý!
key. Then use the . and ² keys to display the
3DSHUý KDQGOLQJý ! !&DVVHWWHý W\SH
Pressing the
5
5HF\FOHG
!&DVVHWWHý W\SH
"ý 5HF\FOHG
Press the
Pressing the
6
&$1&(/
key will cause aý" to flash. Press the . and ² keys to display
(17(5
.
key if you want to cancel the setting. Theý" display will disappear.
key will cause theý" to disappear. Pressing the
(17(5
on the printer's Mode Select Menu and press the
ý&DVVHWWHýW\SH
ý ý 3ODLQ
.
ý
key will exit the
(;,7
setting.
Th e same procedure can be used to set the paper type for other paper sou rces.
3DSHU#W\SH#XVHU#VHWWLQJ
The following describes the procedure used to set a u ser-defined paper type for the printer. Eight
custom user settings may be registered. After having been set, an y of these may be called up when
setting the paper type for a paper source.
4
Display
ý3DSHUýKDQGOLQJý!
key. Then use the . and ² keys to display
3DSHUý KDQGOLQJý ! !7\SHý DGMXVWýýý!
Pressing the
5
the paper type (see
!7\SHý DGMXVW
"ý &XVWRPý ú
key will cause aý" to be displayed. Press the . and ² keys to select
(17(5
page 3-15
) that you want to customize and then press the
on the printer's Mode Select Menu and press the
ý!7\SHýDGMXVW
ý ý &XVWRPý ú
.
key.
(17(5
-1RWH#WKDW#LI#\RX#FKDQJH#WKH#VHWWLQJ#IRU#D#SDSHU#W\SH#RWKHU#WKDQý&XVWRPýì##
WKURXJKýå #WKH#SDSHU#W\SH#VHWWLQJ#IRU#HDFK#SDSHU#VRXUFH#VHW#WR#WKDW#SDSHU#W\SH#ZLOO#
EH#FKDQJHG1
-
3-16
)609<33
Page 17

0DLQWHQDQFH
6HWWLQJ#WKH#SDSHU#W\SH
Press the key after selecting the paper type you want to customize. Pressing the . and
4
keys will cycle through a display of the submenus given in the table below.
²
Submenus displayed Selection parameters Description
!!3DSHUý ZHLJKW /LJKWý õ7KLQô
1RUPDOý
+HDY\ý õ7KLFNô
([WUDý KHDY\
!!)XVHUý PRGH 9HLLXP
/RZ
0LGGOHý
+LJK
!!'XSOH[ý SDWK
(only when the paper t ype is
&XVWRPý ú
)
(QDEOHý
'LVDEOH
(default)
(default)
(default)
Sets the paper thicknes s
Light: vellum, Normal: 6 0~90 g/m
Heavy: 90~1 35 g/m
2
(MP tray: 90~200 g/m2),
2
,
Extra thick: Transparency and Card stock
Sets the temperature for the fuser unit
Selects duplex printing on /off when a n optional
duplexer is installed (setting activ e only for the
selected paper type)
Fuser
mode
Paper
weight
Vellum
Low
Middle
High
Light
(Thin)
Normal
Heavy
(Thick)
Extra
heavy
Display the submen u to be set and press the
key. Aý" will flash. Press the . and ² keys to
(17(5
select the desired parameter.
!!3DSHUý ZHLJKW
"ý 1RUPDO
Press the
5
&$1&(/
Pressing the
key if you want to cancel the setting. Theý" will disappear.
(17(5
(Example: Setup menu for Paper weight)
key will cause theý" to disappear. Pressing the
key will exit the
(;,7
setting.
The same procedure can be us ed to set the para meters on other s ubmenus.
Note that the setting status for paper weight used for each paper type is as given in the table below.
In addition, all paper type settings made using
shown in the table below using the
Plain
Trans-
parency
Pre-
printed
Labels
Bond
ý !5HVHWýW\SHý DGMXVW
Recycled
ý7\SHýDGMXVW
Paper Type
Vellum
Rough
Letter-
head
O
OOOOOO OOOOOOO
O
O O OO OOOOO O
O
O O
can be reset to the default values
menu.
Color
Pre-
punched
Envelope
Card
stock
Custom
)609<33
3-17
Page 18

This page left blank intentionally
0DLQWHQDQFH
6HWWLQJ#WKH#SDSHU#W\SH
3-18
)609<33
 Loading...