

Page 1
FS-5900C Service Manual
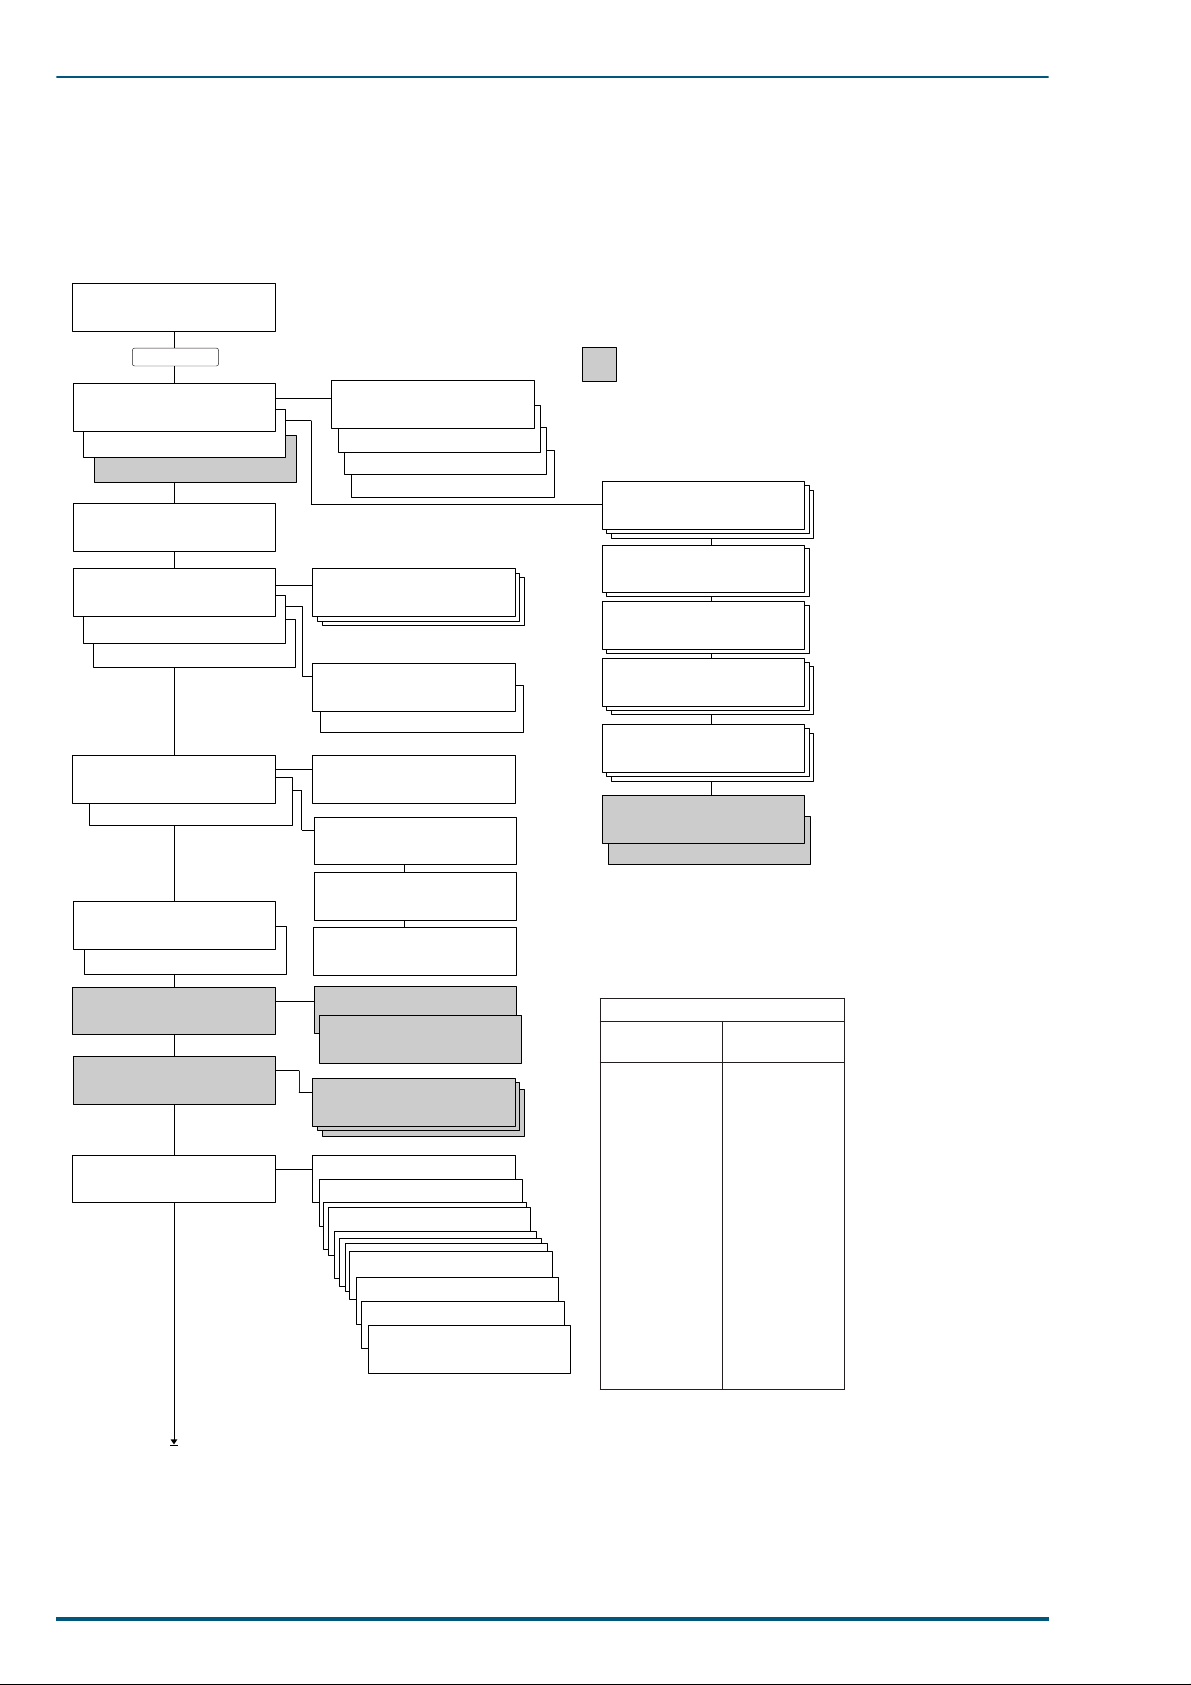
3. Mode Selection
This section explains the menu levels and options which can be set using the control panel MODE key. The
MODE key can be used to display all of the menus in the following diagram:
Ready
PAR 600 A4 001
MODE
Parallel
Serial
Option
Number of copies
PCL 5C
Emulation >
KPDL
KPDL (AUTO)
Font >
Bitmap
Scalable
Page orientation
Portrait
Landscape
Press the MODE key.
001
>Interface
>Emulation
(
>Parallel I/F
>Code set
ISO-6 ASCII
>
>Print KPDL errs
Off
*2
)
On
>Bitmap font
00001
>
>AudreyTwo-Regular
SWC
>Size
012.00 point (s)
>Pitch
Nibble (high)
High Speed
Normal
Auto
10.00 cpi
(
(*1)
*3
These items will not show unless the
printer is installed with the applicable
option unit/kit.
>Baud rate
9600
>Data bits
8
>Stop bits
1
>Parity
None
>Protocol
DTR (pos.)&XON
>Barcode mode
On
Off
)
*1:
Depending on the emulation selected,
*1
: Depending on the emulation selected,
the following code sets are available.
the following set >code sets are
available.
Opt. ROM >
HARD DISK >
RAM DISK mode >
Continued on next page
>Read data
>List of partitions
>Read data
(*4)
>RAM DISK size
>Read data
>Write data
>Delete data
>Print VMB data Tray:
>List of Partitions
>List of VMB
C5LCP
dnapamtiB
stnoFelbalacS
IICSA6-OSI
nedewS11-OSI
nailatI51-OSI
niapS71-OSI
yawroN06-OSI
ecnarF96-OSI
8-namoRPH
lageLSU
8-CPMBI
058-CPMBI
6nitaLOSI
.K.U4-OSI
8htaM
tnofiP
ynamreG12-OSI
1nitaL49-AMCE
)N/D(8-CPMBI
ISO Latin 9
stnoFelbalacS
ylnO
htamSP
txetSP
gnihsilbupSM
swodniW
tlabniW
potkseD
2nitaLOSI
5nitaLOSI
1nitaLswodniW
2nitaLswodniW
5nitaLswodniW
577-CP
2nitaL258-CP
4001-CP
hsikruT-CP
hsotnicaM
26
Page 2
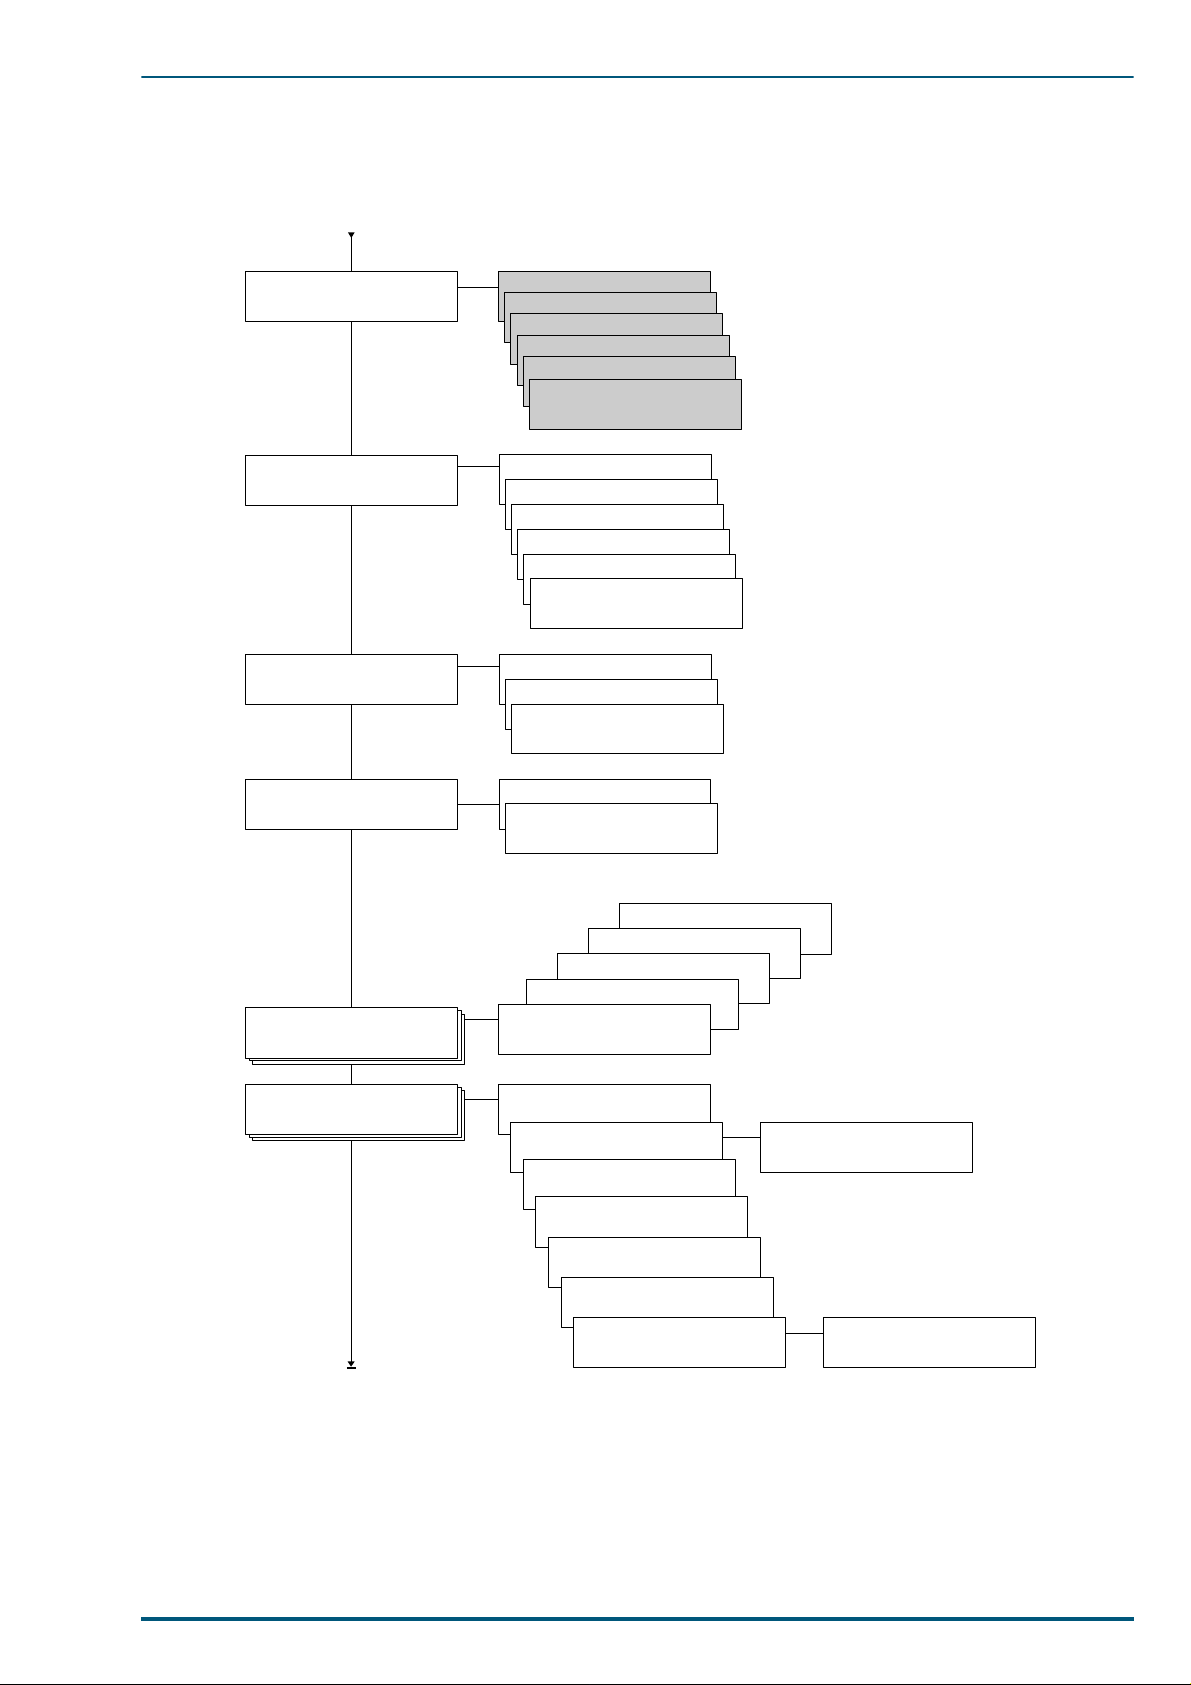
Continued from previous page
MEMORY CARD > >Read fonts
>Read data
>Write data
>Delete data
>Format
>List of Partitions
3. Mode Selection
Paper handling >
Colour mode >
Colour >
Matching
Colour >
Calibration
>MP tray mode
>MP tray size
>MP tray type
>Duplex mode
>Auto cassette
>Override A4/LT
>Monochrome
>Colour
>Quick Colour
>RGB Simulation
>Vivid mode
>Black
10
>Yellow
10
>Magenta
10
>Cyan
10
>Print Calibration Page
Life counters >
Continued on next page
>Total print
1234567
>TransferRoller >
1234567
>Imaging unit
1234567
>Fuser KIT
1234567
>Oil supply roll
1234567
>Main Charger
1234567
>Cleaning Pad >
1234567
>>Reset Transfer
roller ?
>>Reset Cleaning
Pad ?
27
Page 3

FS-5900C Service Manual
Continued from previous page
Others >
>MSG language
English
>Form Feed
Time out 030sec.
>Sleep timer
060 min
>Print HEX-DUMP
>List of
resident Fonts
>Printer Reset
>LF action
LF only
CR and LF
Ignore LF
>CR action
CR only
CR and LF
Ignore CR
*5
(
(*6)
)
>Ecoprint mode
Off
>Resolution
>Resource prot.
Off
*2:
The printer can be set to print error data
during KPDL em ulation. If thi s is set to 2Q,
error data will be printed if trouble occurs
during printing. This is set to
leaving the factory.
*3:
*4:
*5:
*6:
*7:
6L]H
The >
Courier
3LWFK
>
fonts.
The
played when an optional hard disk unit
is installe d.
Any value from 0 to 495 [seconds] in 5second increments. (The printer does not time out with
the value set to 0.)
Any value from 0 to 120 [minutes] in 5-minute increments.
For service purpose only.
menu is not available for the
LetterGothic
and
menu to scale these fixed
5$0#',6.#PRGH
2II
before
fonts. Use the
menu is not dis-
>Buzzer
Off
>Service >
On
Permanent
Perm / Temp
On
>>Print
Test page 2
>>Print
Test Page 1
>>TransferRoller
? Type X
>>Print
Status Page
(*7)
28
Page 4

3. Mode Selection
3.1 Navigating throug h the Menus
The menus are in the hierarchy as shown in the diagram above. Use the + and – keys to move between
menus in the same level (“vertically” in the table). The + key shows the next menu, while the – key shows
the previous one. Change levels by using the and keys. The key moves to lower levels (sub-menus),
while the key moves to higher levels.
2, 4, 6
3
5, 7
1, 8
To make change to a specific item, for example, the sleep mode timeout t ime, proceed as follows:
1. Press the MODE key .
The message display will show one of the first level menus (Level 1 in the table on pages 25 and 26)
depending on the previous selection.
2. Press + until Others > is shown on the display.
3. Press .
The message display will show one of the second level menus (Level 2 in the table on pages 25 and 26)
belonging to the Others menu above depending on the previous selection.
4. Press + until Sleep timer is shown on the display.
5. To change the timeout value, press ENTER.
If you want to abandon setting, press CANCEL, then press MODE.
6. Press + repeatedly to increase the time out time; press – repeatedly to decrease the timeout time until
the desired timeout time (in minutes) is displayed.
7. Press ENTER to confirm the new setting.
You can abandon the new setting by pressing CANCEL, then MODE.
8. To quit the mode selection sequence, press EXIT .
3.1.1 Display Information
Life Counters
Section menu Description
Imaging unit
Transfer Roller
Fuser Kit
Oil supply roll
Total print
A count of the total number of images fed since the Imaging unit was last replaced.
A count of the total number of pages fed since the Transfer Roller was last rep laced.
A count of the total number of pages fed since th e Fuser Kit was last replac ed.
A count of the total number of pages fed since the Oil supply roll was last replac ed.
A count of the total number of pages fed since the product is shipped.
29
 Loading...