

Page 1
2. Installation, Setup, and Repacking
2. Installation, Setup, and Repacking
2.1 Installation Requirements
2.1.1 Environment
Temperature Range: 10°C to 32.5°C [50°F to 90.5°F] (T emperature fluctuation: ±10°C per hour or less)
Humidity Range: 15% RH to 80% RH (Humidity fluctuation: ±20 °C per hour or less)
Weight: 51 kg (112 lbs.)
Precautions for installation
Place the unit on a stable, level surface.
Do not install the unit under the following conditions:
• Extremely high or low temperature
• Extremely high or low humidity
• Direct exposure to sunlight
• Areas of high dust concentration
• Areas of poor ventilation
• Areas exposed to chemical fumes
• Areas with extreme vibration
• Directly in air conditioning flow
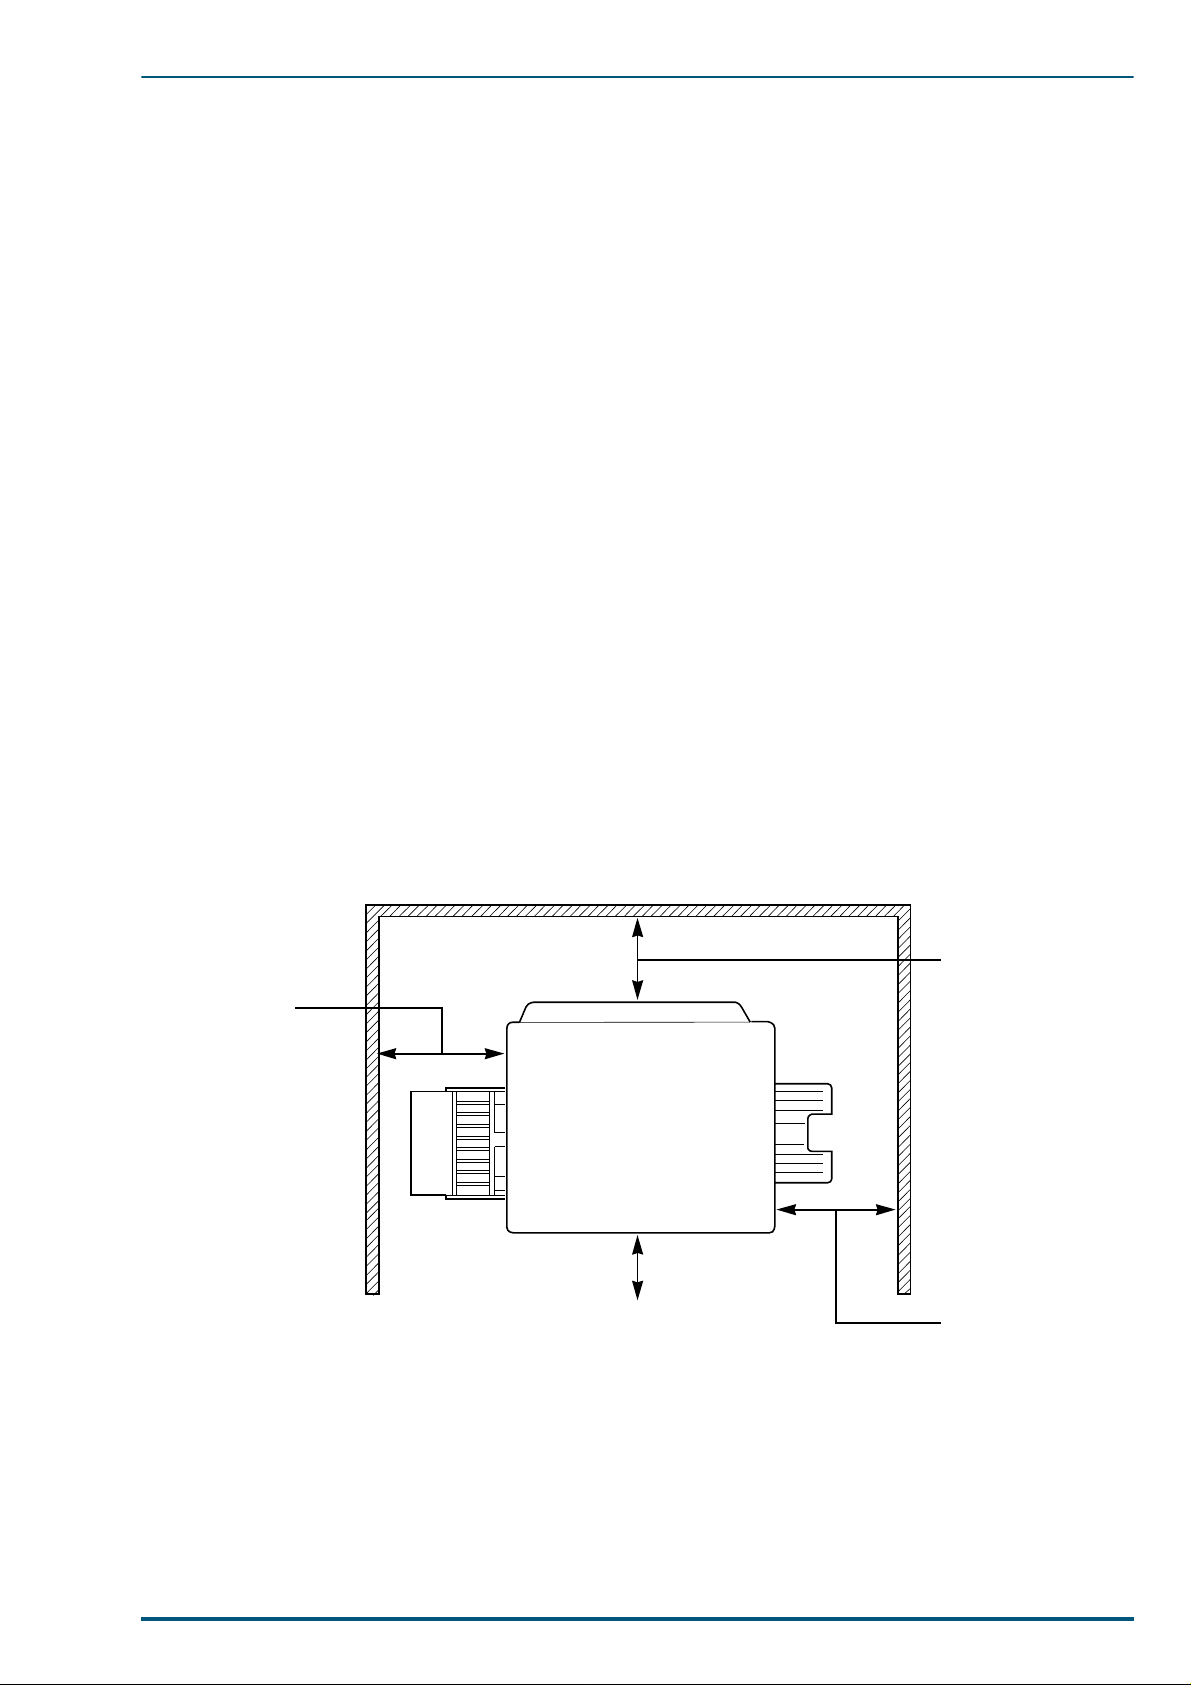
2.1.2 Minimum Space Requirements
Allow air flow around the printer to prevent overheating. The following minimum spaces are required:
Rear
35 cm (13.8")
Controller Board
45 cm (17.7")
Output
tray
Left Right
Multi-purpose Tray
Front cover
50 cm (19.7")60 cm (23.6")
13
Page 2

FS-5900C Service Manual
2.2 Setup
2.2.1 Removing the Packing Material
1. Remove the plastic bag from the printer.
2. Remove any adhesive tape that holds the output tray against the printer.
Note:
Do not throw away the packing materials. They may be required to ship or transport the printer in
the future. To provide optimum print quality , the unit must be kept upright and level during unpacking.
2.2.2 Installing the Optional Paper Feeder
Warning:
Warning:
1. Place the paper feeder on a solid table or cart selected for the printer.
2. Place the printer on top of the paper feeder. Always kee p the printer upright.
3. Make sure that the left and right alignment pins fit in the holes in the base of the printer.
The printer weighs about 51 kg (112 lbs.) and the paper feeder weighs about 14.4 kg (36.3 lbs.).
Observe standard precautions for lifting heavy objects.
The printer is not permanently attached to the paper feeder. When moving the printer, turn
the power off and remove the power cord, then move the pieces separately; moving the printer
incorrectly may damage it and may cause personal injury.
Alignment pins
(Left door side) (Cassette slots side)
2.2.3 Preparing the Imaging Unit
1. Open the front door.
Paper Feeder
14
Page 3
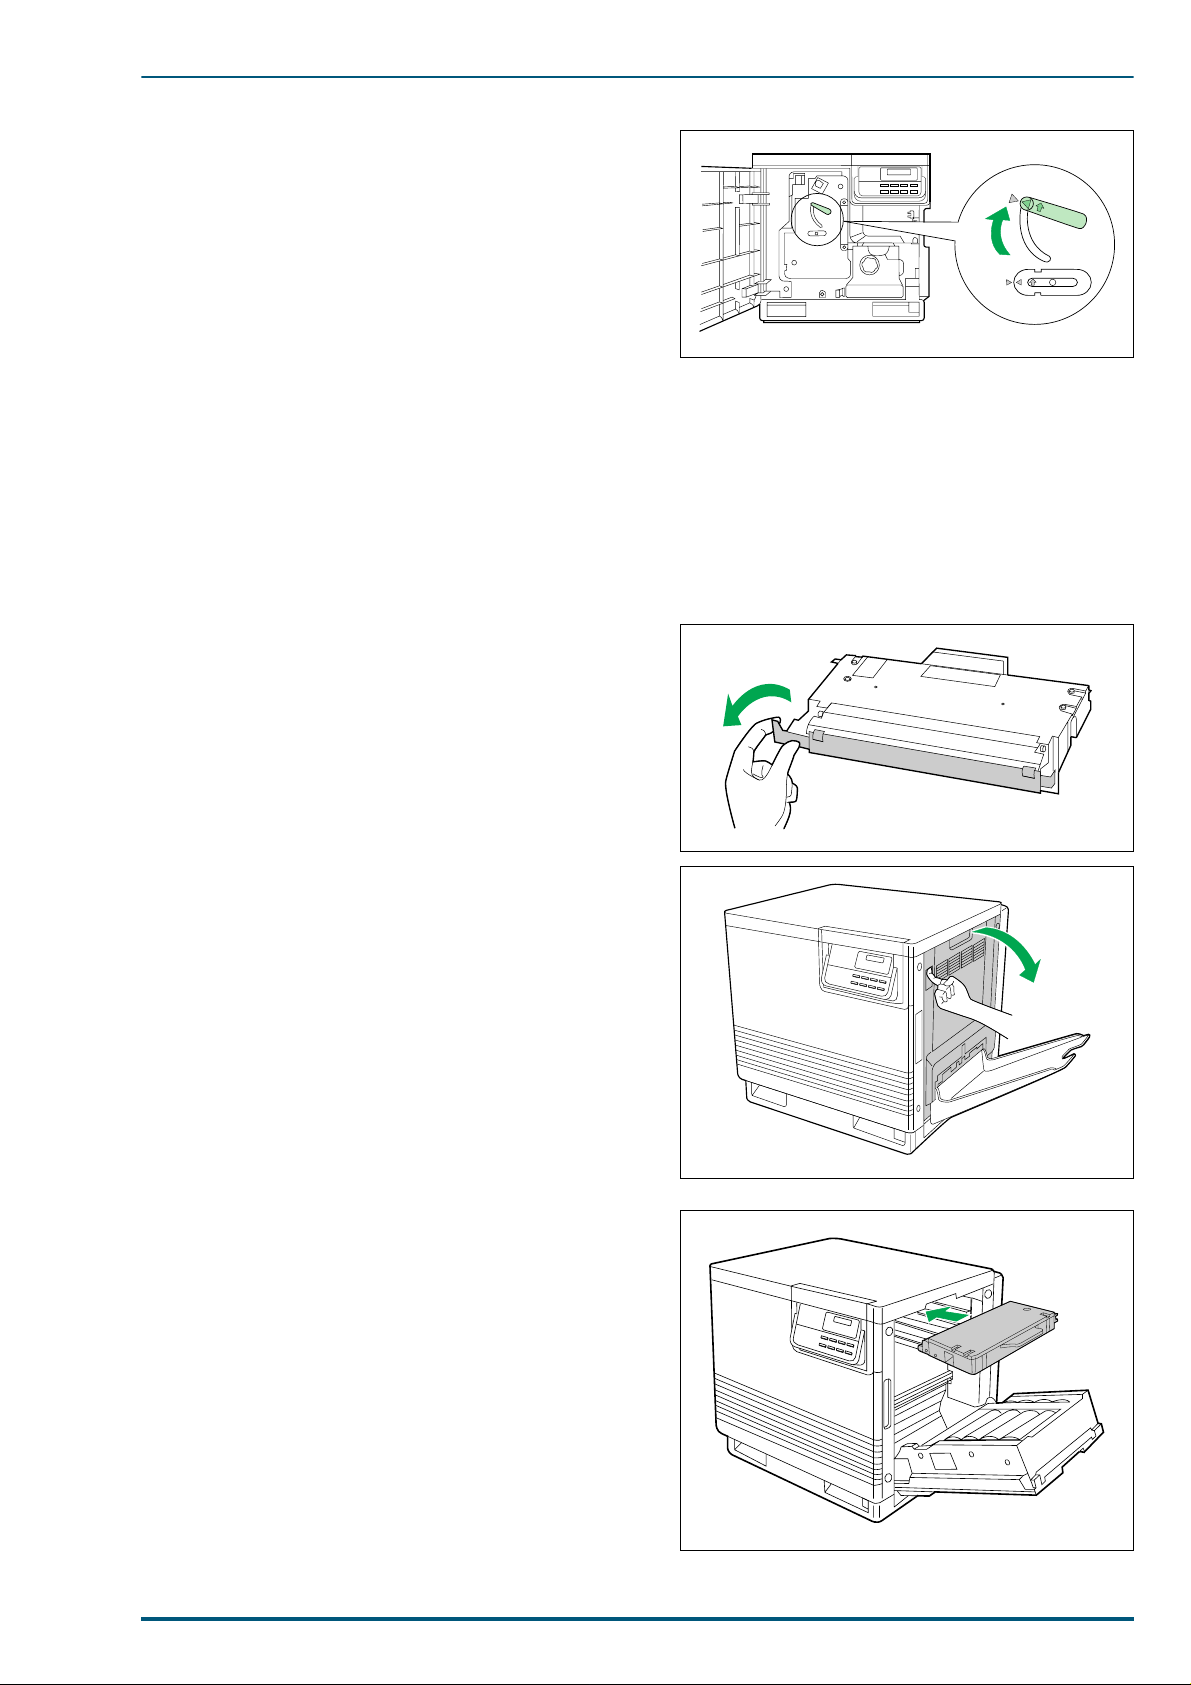
2. Turn the upper green lever clockwise until it stops
and the arrows are aligned. (This applies tension to
the internal belts).
3. Close the front cover.
2.2.4 I nstalling the Toner Developers
2. Installation, Setup, and Repacking
Note:
The toner developers shipped with the printer are starter developers. They are installed in exactly
the same manner as t h e standard developers; the only difference i s that the starter developers have
less toner. (Page life expectancy is 5,000 pages for all toner developers except black which has a life
expectancy of 6,000 pages.)
1. Remove the packaging from the toner developer.
2. Remove the shipp ing cover from the developer.
Caution:
Do not tilt the developer to avoid possible
toner spillage.
3. Open the printer’s right side door.
Caution:
Do not leave the right side door open for a
long time; the imaging unit inside is exposed
to light and will be damaged.
4. Insert the toner developer in the appropriately
labeled slot. From top to bottom, the developer order
is BLACK, CYAN, MAGENTA, and YELLOW.
15
Page 4
FS-5900C Service Manual
5. Repeat steps 1, 2 and 4 for each toner developer.
6. When all the toner developers have been installed,
close the right side door.
Note: Save all packing material for shipping purposes.
2.2.5 Adding Paper or Transparencies
The printer is shipped with one media cassette of either Letter or A4 paper size. The printer can also use
five different cassettes as follows:
Tray Size
A4 Paper 210 × 297 mm (8.27" × 11.7")
A4 Transparency 210 × 297 mm (8.27" × 11.7")
Letter Paper 8.5" 11" (216 × 279 mm)
Letter Transparency 8.5" × 11" (216 × 279 mm)
Legal paper 8.5" × 14" (216 × 356 mm)
Notes:• Make sure that correct media is loaded. Each cassette is designed and labeled for only paper or
transparency. If the wrong media type is loaded in a tray, an error message will be displayed
when printing is attempted.
• If the paper feeder is installed and the automatic tray switching feature (for example, for a large
print job) is used, make sure that all trays in the printer at any one time are the same media type
and size.
• To optimize the printer’s performance, always use clean, unused media.
• Be careful not to leave fingerprints on the media, which can result in a smudged print.
• Reusing media that has been fed through the printer (for exampl e, after jams or if the media is
ejected without being printed) can reduce the life of the consumables and paper path components.
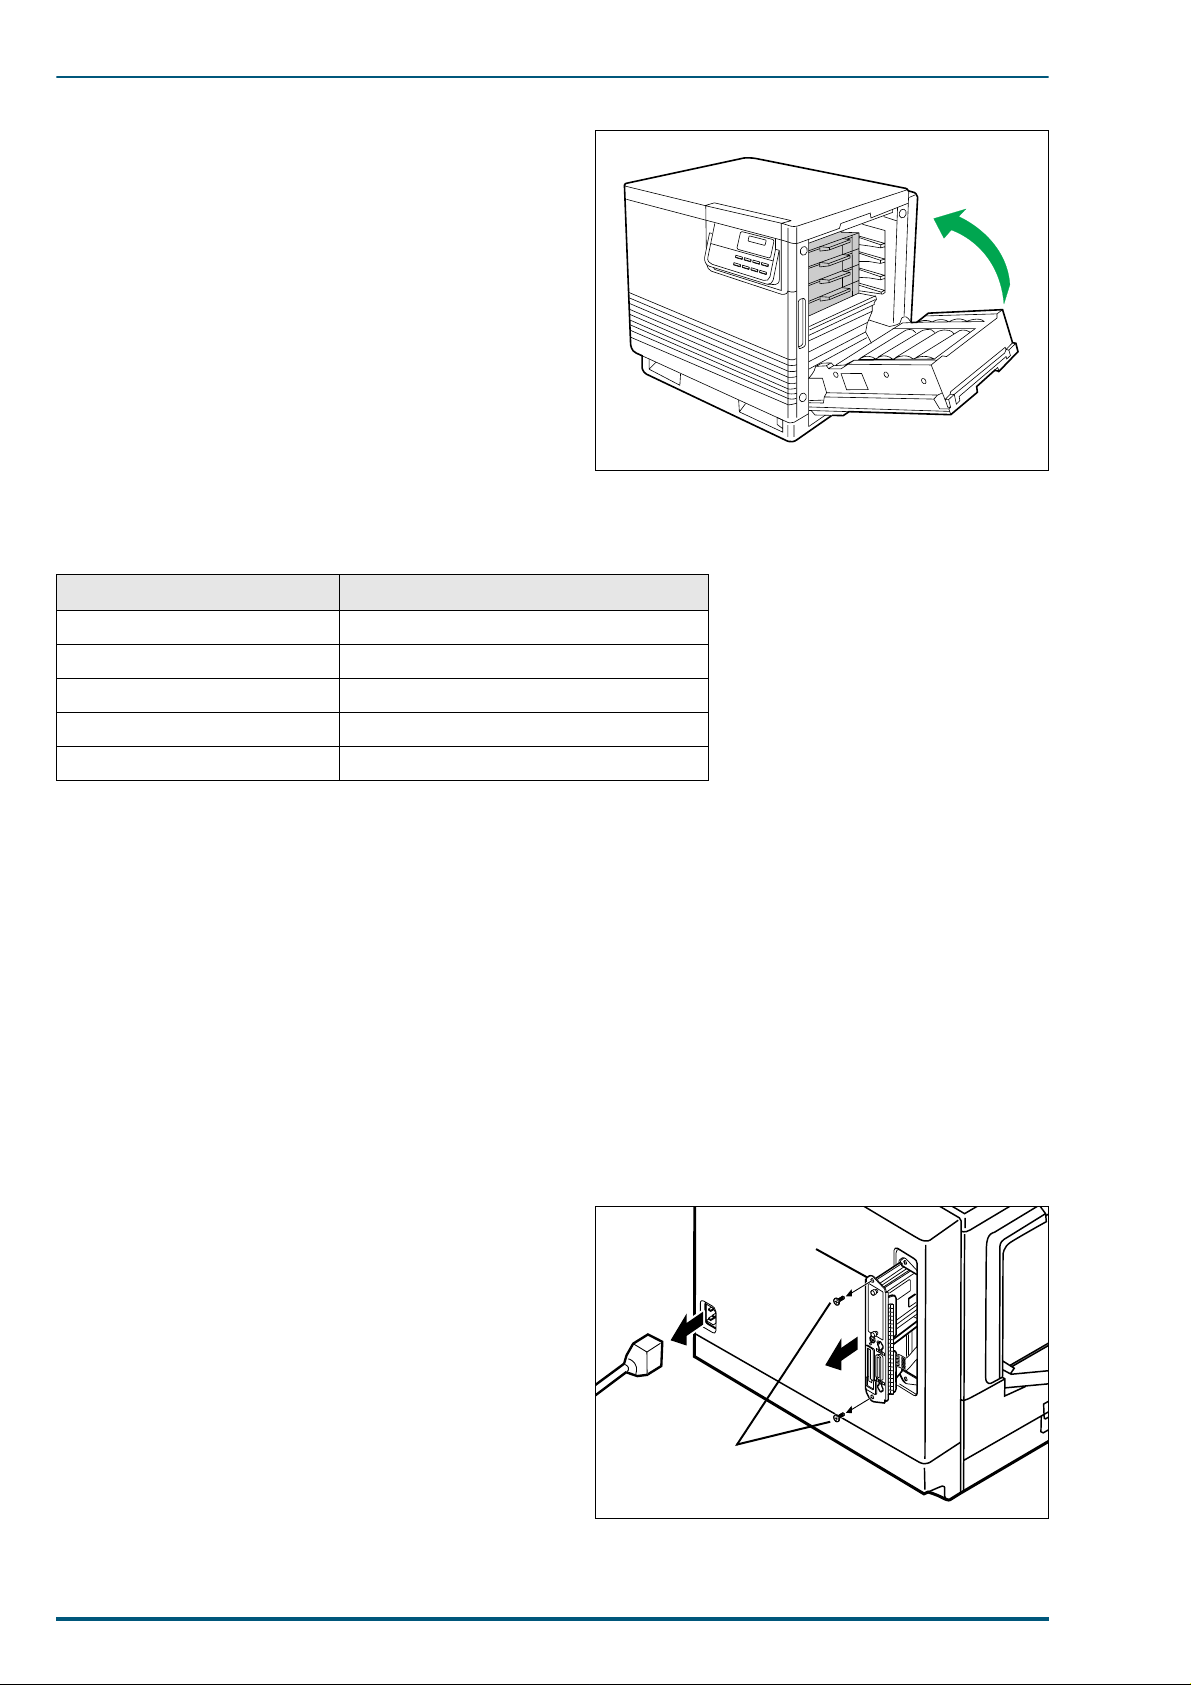
2.3 Installing RAM SIMMs (Option)
1. Turn off the printer. Do not unplug the printer; this preserves a ground path to dissipate static charges.
2. Remove the two screws from the controller board.
3. Pull out the controller board.
Controller Board
4. When installing a single RAM SIMM:
Insert a memory module in connector YS3 or YS4 and
tilt the module down until it locks in place. When the
SIMM is properly inserted, a tab on each end of the
connector slips into a hole on each end of the RAM
SIMM. Also, a pawl on each end of the connector
latches around each end of the RAM SIMM to lock it
in place. Go to step 6.
16
~AC IN
Screws
Page 5

5. When installing two RAM SIMMs:
YS4
YS3
Controller Board
a b
HOT SURFACE INSIDE
Insert the appropriate memory module in connector
YS3 and YS4 and tilt the module down until it locks
in place. When the SIMM is properly inserted, a tab
on each end of the connector slips into a hole on each
end of the RAM SIMM. Also, a pawl on each end of
the connector latches around each end of the RAM
SIMM to lock it in place.
6. Reinstall the controller board.
7. Reinstall the two screws.
2.4 Replacing the Fuser Unit
1. Remove the new fuser from its packaging; keep th e
fuser upright.
2. Installation, Setup, and Repacking
2. Open the front doo r. T urn the small green thumb-
screw counterclockwise to unlock the fuser.
Caution:
The fuser is hot; to avoid personal injury,
wait approximately 10 minutes for the fuser
to cool before touching it.
3. Grasping the green tab on the right, slide the fuser
out until the safety catch stops it. Press the green
lever on the left to release the safety catch.
17
Page 6

FS-5900C Service Manual
4. Hold the fuser as shown and slide it out of the
printer. Dispose of the fuser as normal office waste.
Caution: The fuser weighs approximately 3.2 kg (7.11
lbs.). Take care when handling it.
5. Insert the new fuser into the printer.
6. Turn the small green thumbscrew clockwise to lock
the fuser. Close the front door.
2.5 Replacing the Imaging Unit
1. Open the front door. Loosen the two thumbscrews by
turning them counterclockwise. Turn the lower green
lever 180° counterclockwise.
18
Page 7

2. Grasping the front gree n handle, slide the unit out
until it catches. Lift up the green handle on the left.
Pull the imaging unit out of the printer.
Caution: The imaging unit weighs approximately 6.5
kg (14.3 lbs.). Always use the handles when
lifting it.
3. If the imaging unit is to be reinstalled, cover it with
an empty box or place it in a dark cabinet to protect it
from light exposure. If the unit is to be discarded,
dispose of it as normal office waste.
Important:
Do not expose the imaging unit to light for more than
approximately 45 seconds, or irreversible damage may
result.
2. Installation, Setup, and Repacking
4. Remove the new imaging unit from the packaging.
The imaging unit is extremely light-sen sitive. Leave
the protective plastic sheet on the imaging unit
immediately before installin g it.
Note:
Save all packing material for future shipping purpose.
19
Page 8

FS-5900C Service Manual
5. Remove the used filter by pulling it forward. Dispose
of the filter as normal office waste. Insert the new
filter.
6. Turn the upper green lever clockwise until it stops.
Ozone Filter
7. Remove the protective plastic sheet.
Important:
• Do not touch the green surface. Fingerpri nts may affect
the print quality.
• Do not expose the imaging unit to light for more than
45 seconds, or irreversible damage may result.
8. Grasp the green handles and i nstall the new unit into
the printer. Release the left handle and push the unit
in until it stops.
Plastic Sheet
Handles
9. T urn the lower green lev er clockwise 180° to lock the
imaging unit. T ight en the t wo gree n t humbscrew s by
turning them clockwise. Close the front door.
20
Page 9

2. Installation, Setup, and Repacking
2.6 Repacking
Should the printer need to be transported or shipped, prepare the unit in the following manner:
Note:
It is highly recommended tha t users keep the ori ginal cart on and all packing ma terials. Observe the
following instructions when moving the printer:
Use the original carton and all of the original packing material.
•
Improper repacking of the printer may result in a service charge to repair the unit or a cleaning
•
charge to remove spilled toner.
Since the printer uses dry toner, extreme care must be taken when handling. The printer should
•
be handled in the upright (vertical) position.
Materials Required
Original printer, accessory cartons, and other packing materials
•
Newspaper or drop cloth
•
Shipping tape and scissors
•
1. Turn off the printer; remove the power cord and all interface cables.
2. Remove the media cassette(s) from the printer;
remove the media from the cassette(s).
3. Press down on a media cassette’s metal plate. Place the plastic shipping lock into the media cassette as
shown.
Metal Plate
Shipping Look
(1)
(2)
(3)
4. Reinsert the media cassette into the printer; use adhesive tape to secure the cassette to the printer.
5. If the other media casse ttes are in sta lle d, repa ck them for s hi pping or st orage in t heir ori gina l ship pi ng
boxes.
21
Page 10

FS-5900C Service Manual
6. Open the printer’s front door. Loosen the two thumb-
screws by turning them counterclockwise. Turn the
lower green lever 180° counterclockwise.
7. Grasping the front green handle, sli de the unit out
until it catches. Lift up the green handle on the left.
Pull the imaging unit out of the printer.
Caution: The imaging unit weighs approximat e ly 6.5
kg (14.3 lbs.). Always use the handles when
lifting it.
8. Wrap the imaging unit with a protective black plastic
sheet.
Important:
• Do not touch the green surface. Fingerpri nts may affect
print quality.
• Do not expose the imaging unit to light for more than
45 seconds, or irreversible damage may result.
9. Move the upper lever 90° counterclockwise; this is
necessary to protect the imaging unit during shipment.
Handles
Plastic Sheet
22
Page 11

10.Insert the imaging unit into the packaging.
Paper Feeder
Left Side Door
Cover
Tabs
Transfer Roller
2. Installation, Setup, and Repacking
11.Open the left side door. Using the green handles,
slide the paper feeder out.
12.Push in on green tabs to unlock the cover. Raise the
cover until it catches in the open position.
13.Rotate the transfer roller’s green handles up. Lift out
the transfer roller/waste bin.
23
Page 12

FS-5900C Service Manual
14.Rotate the handles down and wrap the transfer unit
with a piece of paper and adhesive tape.
Note: Do not touch or bump the roller as it can damage
the roller.
15. Install the plastic cover and insert the transfer unit
into a plastic bag and seal the end tightly. Install the
transfer unit into the packaging.
Note: Use the plastic cover that is attached to the new
TR-81 transfer unit.
16.Remove the four toner developers; install the protec-
tive cover for each developers; repack them for shipping or storage in their original shipping boxes.
Plastic Cover
Plastic Bag
17.Wipe off any loose toner in and around the printer.
Note: If a toner vacuum is available, it is the best tool
for cleaning spilled toner. Do not use a standard
office vacuum; the toner will not be retained by
typical vacuum dust collectors.
18.Close all printer doors and secure them with adhesive tape.
19.Raise the output tray and secure it to the printer
with adhesive tape. If a paper feeder is not installed,
go to Step 21.
20.If a paper feeder is installed:
Lift the printer up and away from the paper feeder.
Safety Caution:
The printer weighs approximately 41.4 kg (91.2 lbs.) and
the paper feeder weighs 14.4 kg (31.5 lbs.). Observe
standard precautions for lifting heavy objects.
24
Page 13

Repack the paper feeder in its origina l shipping box.
21.Repack any other accessories in the original shipping box.
22.Repack the printer in the original shipping box. Make
sure that the printer is upright and level when moving. See the diagram on this page.
2. Installation, Setup, and Repacking
25
 Loading...