

Page 1

User Manual
GPS PF11
Page 2

Thanks for using YF GPS PF11!
YF reserves the rights of final interpretation of the manual.
The manual content is subject to change without notice. Please accept our
apology for your inconvenience.
Please back up your data of the GPS navigator. YF assumes no responsibility for
any loss caused by data loss.
The manual might contain a few mistakes though it has been checked. If mistakes
are found, you are welcome to contact the YF customer service center.
Page 3

Please read the instructions in this manual and use only accessories of YF to
avoid unpredicted damage. Failure to follow the instructions will invalidate
warranty and might endanger personnel safety, for which YF assumes no
responsibility.
Data of navigation electronic maps might be inconsistent with actual t raffic signals
due to transportation development. Please follow traffic regulat ions and signs and
drive according to road situation. Operating the GPS navigator device while
driving might cause serious accidents. YF assumes no res ponsibility for accidents
and loss due to improper use.
For information of software update and upgrade, please go to our website
www.yftech.com
The pictures in the manual are subject to the material object.
.
Page 4

Welcome ................................................................ 1
Chapter I Beginning Use ......................................... 2
1.1 APPEARANCE ............................................................ 2
1.2 POWER SUPPLY & CHARGING ....................................... 2
1.3 BASIC USE ............................................................... 3
1.4 SYSTEM MAIN INTERFACE AND MAJOR FUNCTIONS ............. 5
Chapter II Navigation .............................................. 7
2.1 INSTRUCTION ............................................................ 7
2.2 OPERATION ............................................................... 7
2.3 THE PLAYER OF DVR .................................................. 10
Chapter III Function Operation ................................ 11
3.1 MUSIC PLAYER .......................................................... 11
3.2 VIDEO PLAYER ........................................................... 13
3.3 PHOTO BROWSER ...................................................... 15
3.4 E-BOOK READER ........................................................ 18
3.5 FLASH PLAY .............................................................. 22
3.6 THEME ..................................................................... 22
3.7 WALLPAPER .............................................................. 23
3.8 FAVORITES ............................................................... 24
3.9 EXPLORER ................................................................ 25
3.10 CALENDAR .............................................................. 26
3.12 SYSTEM RESOURCE .................................................. 27
3.13 CALCULATOR ........................................................... 27
Page 5

3.14
UNIT ...................................................................... 28
3.15 GPS INFO .............................................................. 28
3.17 VOLUME ................................................................. 29
3.18 BACKLIGHT ............................................................. 30
3.19 LANGUAGE .............................................................. 30
3.20 DATE& TIME ............................................................ 31
3.21 CALIBRATION ........................................................... 31
3.22 RESTORE FACTORY SETTING ...................................... 32
3.23 USB SETTING .......................................................... 33
3.24 SYSTEM INFO .......................................................... 35
3.25 NAVIGATION PATH ..................................................... 35
3.26 OTHELLO ................................................................ 35
3.27 BOXMAN ................................................................ 36
3.28 RUSSIA BLOCK ......................................................... 36
Appendix Troubleshooting ..................................... 37
4 FCC statement .................................................. 37
Page 6

Welcome
Thanks for using GPS PF11-5001. It is featured with navigation function , audio & video
play, photo browsing and e-book functions.
SiRF Atlas-Ⅴ CPU with high performance and low power consumption
Friendly user interface for simple operation
Power management for longer and more stable operation
Data transmission with computer via Mini USB
Quality reception, accurate positioning and satisfactory navigation service
Leisure friend with audio/video/amusement functions
You may use the GPS navigator anytime anywhere, for example while driving, walking or
cycling. Let its navigation and amusement functions enrich your life and work!
To realize the functions of GPS PF11-5001 and to understand the operation details, please
read the manual carefully.
You may see the following supplemental information in the manual.
[Note]: Explanation of relevant subjects
[Relevant Information]: Extra information of relevant subjects
[Attention]: Precautions or warnings of relevant subjects. Please pay attention to this
information and follow the instructions to avoid devastating influence on yourself and
others.
[*]: Optional function
This manual is applicable only to the GPS PF11-5001.
1
Page 7
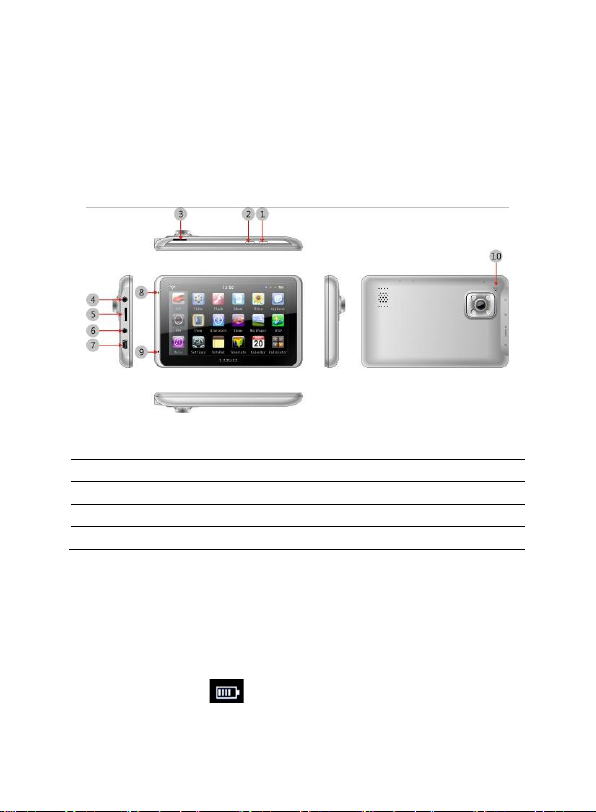
1. Lock Key
6. VIDEO-IN Port
2. Power key
7. MINI USB Port
3. T-Flash slot for DVR only
8. Indicator light
4. Earphone Port
9. Microphone
5. T-Flash Port
10. Reset key
Chapter I Beginning Use
This chapter introduces the basic operations of GPS PF11-5001.
1.1 Appearance
The product picture below is subject to the material object.
1.2 Power Supply & Charging
Charge the GPS navigator fully with the charger before first use.
1.2.1 Power Supply
The GPS PF08 can be powered by the built-in battery or external power supply.
When the GPS navigator is unconnected to the charger, it is powered by the Li-polymer
battery.
The battery capacity icon
battery capacity.
When the GPS navigator is connected to the charger, it is powered by external power and
in the system main interface shows current residual
2
Page 8

the battery is charged.
[Attention] The GPS navigator adopts internal non-removable Li-polymer battery. To avoid
battery rupture, explosion, release of hazardous substanc e or burn, do not unpac k, pier ce,
strike on or discard the battery in fire or water.
1.2.2 Charging by DC Charger
The GPS navigator must be charged with the DC charger before first use.
Plug the USB terminal of the DC charger into the USB port of the GPS navigator and the
other to the power socket to supply power and charge the GPS navigator.
[Note] The charging indicator light is red during charging. Do not unplug the charge until
the battery is fully charged and the indicator light turns green. Please charge t he GPS
navigator when the battery is low or used up.
1.2.3 Charging by Car Charger
Plug one terminal of the car charger into the USB port of the GPS navigator and the other
to the charging port to supply power and charge the GPS navigator.
[Note] To avoid damage due to current surge, plug in the car charger after the automobile
is started.
1.3 Basic Use
1.3.1 Powering on/off & Sleep
1.3.1.1 Powering on
Press the power key of the GPS navigator and let go after at least two seconds to power it
on.
[Note] Great humidity fluctuation may lead to short circuit of the GPS navigator. Power on
the navigator after it has accommodated to new environment.
1.3.1.2. Powering off & Sleep
Press the power key and let go after at least two seconds to power off the GPS navigator.
The following interface will be prompted. If
automatically resume the state before entering sleep mode when it is powered again.
is selected, the navigator will
3
Page 9

1.3.2 Restarting the System
When the system does not response, press the reset key on the back of the GPS
navigator to restart the system.
[Relevant Information] The following situations might lead to no response of the system.
1. Delay or pause in interface switching;
2. Failure of function activation with overlong execution;
3. Failure to power on/off the GPS navigator by pressing the power key.
[Note] Restarting the system by pressing the reset key will result in loss of unsaved data.
Please backup your data regularly.
1.3.3 Fixing the GPS Navigator with Mounting Kit
The mounting kit is composed of a back splint and a bracket. To use the GPS navigator in
an automobile, fix it on the dashboard under the front windshield.
[Note] Do not place the GPS navigator in positions obstructing the driver ’s vision. Do not
place it without fixing it or in the place of air bag or the area after the air bag is inflated.
1.3.4 Using T-FLASH Card
Copy mapping applications, map data and media files in a T-FLASH card. Insert the card
in the corresponding slot.
[Note]
1. Do not take out the T-FLASH card while a navigation program is being run or
a media file is being played.
2. To avoid drop or crash of the T-FLASH card, do not exert heavy pressure on
it or bend it.
3. Avoid using or storing the T-FLASH card in high temperature, high humidity
or direct sunlight.
4
Page 10
Function
Explanation
GPS
Tap to enable navigation function
DVR
Tap to enable DVR function
Tool
Calculator , Unit, system information, favorite, calendar ,GPS
information
Media
JPG,GIF,BMP and PNG files supported;
Photo rotation, zoom in/out and auto play supported
Keep the card away from liquid or corrosive substance.
4. Mind the direct ion while inserting the T-FLASH card to avoid damaging the
slot or the card.
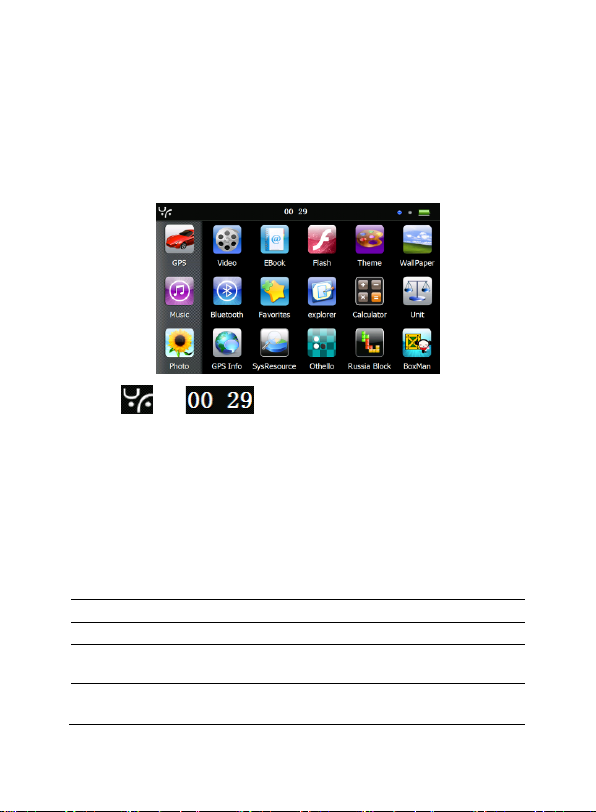
1.4 System Main Interface and Major Functions
Long press the power key on the top side of the GPS navigator to enter the syst em main
interface shown below.
The icon and are shortcuts to view system information and set
time & date for the device. For details, please refer to relevant chapter and section.
[Relevant Information]: In the above interface, the icon style is set as “left”, and the icons
at the left remain during page scrolling. To change the style of icon layout, refer to 3.6
Theme.
[Relevant Information]: To rearrange icons at will, tap on an icon and stay until a four-way
arrow appears at the upper left of it, and then drag the icon to a wanted place.
5
Page 11

Setting
Volume, back light, language, date& time, calibration, system info,
USB setting and Factory reset
Game
Othello, DuiDuiPeng, Russia Block
6
Page 12

Chapter II Navigation
Tap the icon in the system main interface to start the navigation program. For
detail usage, please refer to the electronic map instruction.
Due to transportation development, inconformity between products and
real traffic information will occur a period after product release. Please
drive according to road condition and abide by traffic regulations.
Navigation paths are for reference only, and the user may decide whether
to follow them.
High and crowded structures (such as inside of tunnels, space between
high buildings, underground car parks and under viaducts), weather
change or satellite signals turnoff may influence signal reception,
resulting in positioning failure, inaccurate positioning, nav igation f ailure or
system function abnormity.
With stereoscopic maps, instant animation, voice prompt and tex t pr ompt of t he navigat ion
system, you will appreciate its unique charm and enjoy a great trip.
Function of DV recorder (Drive video record)
This section introduces the usage of the DVR.
2.1 Instruction
1、The function of DVR need match with TF card
2、Requirement of TF card is 4 grade; Capacity should be 4G at least.
3、Format the TF by special form at 1
4、The player of DVR will create automatically after formatted
5、There are 3 lock manner (hand-driven lock, t op lock on device ,G-sensor lock) for
2.2 Operation
2.2.1 Interface of DVR。
setting
DVR’s video ,
st
time usage,, you can choose it under the format
Tap the icon in the system main interface to enter the DVR interface as follows:
7
Page 13
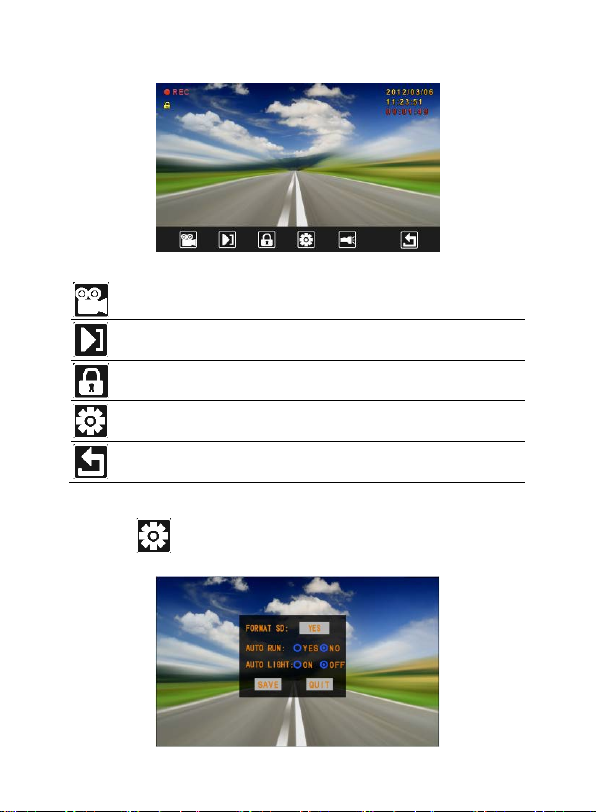
Turn
No/off
Tap to start-up& turn off video
Playback
Tap to player the recorded video
Lock
Tap to lock the recording video (Avoid erased during the period of
Setting
Tap to setting / format the TF card/ setting startup method of video
Return
Tap to quit the DVR interface(if you did not turn off video for quit, it
will still run behind)
cycling video)
2.2.2 Setting interface of DVR
Tap the icon
in the DVR main interface to enter the setting interface as follows:
8
Page 14

Formatting
Tap “confirm” to Format the TF,
Start video
running by
manually to turn on video.
Light
to turn no the light Tap
to turn off
Save
Tap to save current video
Quit
Tap to Quit setting interface
Previous
Play the previous video
manner
2.2.3 Playback interface of DVR
Tap the icon
in the DVR main interface to enter the player interface as follows:
Tap and Save, it will running
behind automatically when power on /Tap
and Save, it will
Tap
9
Page 15

Play/ Pause
Pause/continue playing
Stop
Stop playing the current video
Next
Play the previous video
Lock
Tap to lock & unlock current video
Return
Tap to return the main interface
2.3 The Player of DVR
The Player will create automatically after formatted, this file will
shown on the screen once open the TF card on computer, we can save picture,output the
vedio file and map information,when duble tap it.
10
Page 16

Icon
Name
Explanation
Close
Close the music player.
Minimize
Minimize the music player and return to the
system main interface.
Play
Continue playing the paused/ stopped music.
Pause
Make the playing music pause.
Stop
Stop playing the music.
Set play
sequence
Select sequence, random or cycle play.
Previous
Play the previous music.
Chapter III Function Operation
3.1 Music Player
The music player supports WMA9 and WAV files and also supports selection of play
sequence. To use the function, please first insert a flash card with music files inside.
1. Tap the music icon
interface as follows:
in the system main interface to enter the Music Play
11
Page 17

Icon
Name
Explanation
Next
Play the next music.
Volume
regulation
Drag it leftward/ rightward to turn down/ up the
volume.
Progress
regulation
Drag it leftward /rightward to play from a
previous/future moment.
Music list
Enter it to select music to play.
Time
Display the run time.
Equalizer
Enter the equalizer.
Icon
Name
Explanation
Close
Close the Music List.
Scroll bar
Drag it upward/ downward to view all music.
Add one
Add a piece of music on the left list to the play list on the right.
2. Tap in the Music Play interface to enter the Music list as follows:
12
Page 18

Icon
Name
Explanation
Add all
Add all the music on the left list to the play list on the right.
Delete one
Select one piece of music in the play list and tap the icon to delete
it.
Delete all
Delete all the music in the play list.
3 Tap in the Music Play interface to enter the Equalizer Setting interface as
follows:
Tick in on the upper left of the above interface, and then tap to select a
music type or “User” from the drop-down menu.
The music types include Pop, Rock, Metal, Dance, Electronic, Country, Jazz, Oldies,
Blues, Nostalgia, Opera and speech. If “User” is selected, you may drag the slider at w ill
to set the equalizer. After setting, tap
interface.
Note: If your memory card contains corresponding lyric files for the music being played,
lyrics will be displayed in the lyric window right at the Music Play interface. Double tap the
lyrics window to view the lyrics in full screen. Under full screen mode, double tap the
screen to return to normal-sized interface.
to save and return to the Music Play
3.2 Video Player
The video player supports WMV, ASF and AVI files, full-screen play, progres s selection
and file selection.
13
Page 19

Icon
Name
Explanation
Close
Close the video player.
Previous
video
Play the previous video.
Play
Continue playing the paused/ stopped video
Next video
Play the next video.
Stop
Stop the video
Video folder
Enter it to select a video to play.
Progress
Drag the sliding block leftward to play from a
previous moment or rightward for a coming
moment.
Volume
regulation
Drag it leftward /rightward to turn down / up the
volume.
Time
Display the play time and the video duration.
To use the function, please first insert a flash card with video files inside.
1. Tap
in the system main inter face to enter the video player interface as follows:
file.
regulation
2. Tap in the Video Player interface to enter the video folder as follows:
14
Page 20

Icon
Name
Explanation
Close
Close the video folder.
Scroll bar
Drag the sliding block upward/ downward to view
Video name&
format
Video name and its format
Select a video file from the above video folder interface and then tap on it to start playing.
3.3 Photo Browser
The photo browser supports JPG, GIF, BMP and PNG f iles, photo rotation, zoom in/ out
and auto play.
To use the function, please first insert a flash card with photos inside.
1. Tap the photo icon
interface as follows.
in the syst em main interface to enter the photo browser
all the files
under the folder.
15
Page 21

Icon
Name
Explanation
Previous
View the preview photo in the folder.
Next
View the next photo in the folder.
Zoom in
Scale up current photo.
Zoom out
Scale down current photo.
Rotate
Rotate current photo 90°clockwise.
Auto play
Cycle play all the photos in the folder from current photo.
Folder
Enter the photo folder to select a photo.
Close
Close the browser and return to the system main interface.
2. Tap in the browser interface to enter the photo folder as follows:
16
Page 22

Icon
Name
Explanation
Close
Close the current folder.
Return
Return to the previous folder.
Scroll bar
Drag the sliding block to view all the photos.
3. Tap to enter aut o play interface as shown below. Drag the slider at the
bottom of the screen to regulate play speed (1-10 seconds), and then tap on the screen to
hide the slide (or the slide will be hidden automatically); tap on the screen to show the
slide. Double tap on the screen to stop playing and return to the browsing interface.
17
Page 23

Icon
Name
Explanation
Text name&
format
Current file name and format
Close
Close the reader.
3.4 E-book reader
The reader supports text files in .txt format, page turn and folder selection.
To use the function, please first insert a flash card with text files inside.
1. Tap the e-book icon
follows.
in the system main interface t o enter the reader interface as
18
Page 24

Icon
Name
Explanation
Scroll bar
Drag the sliding block upward/ downward to
Folder
Enter the e-book folder to select an e-book to
read.
Previous
Read the previous page.
Next
Read the next page.
Setting
Select a text theme, font, word size and bold
type.
New
bookmark
Select partial text and tap the icon to create a
bookmark.
Bookmark list
Enter the bookmark list to select or delete a
bookmark.
Page/ total
pages
Current page/ total pages
view all content of the e-book.
2. In the reader interface, double tap the screen t o enter to the full screen reading mode
as follows:
In the full mode reading interface, tap the upper part of the page to read the previous page,
while tap on the lower part of the page to read the next page; tap
to quit.
19
Page 25

Icon
Name
Explanation
Close
Exit the setting interface.
Save
Save the settings.
Theme
Tap to select a theme f or the e-book.
Font
Tap to select a font f or t he e-book.
Bold
Tap to enable bold type. Tap it again to cancel.
3. Tap in the e-book reader interface to enter the setting interface as follows:
4. Tap in the e-book reader interface to enter the e-book folder as follows.
20
Page 26

Icon
Name
Explanation
Close
Close current folder
Return
Return to the previous folder.
Scroll bar
Drag the sliding block upward/ downward to view all text
File name&
The file name and its format.
files.
format
5. To create a bookmark, locate a page by taping or or dragging the
scroll bar in the reader interface and drag to select the text content.
when it is on and a dialog will popup as follows:
Tap
Tap “OK” to finish creating a bookmark or tap “Cancel” to quit the dialog.
6. Tap
below.
to view created bookmar ks in the interface of Bookmark List as shown
21
Page 27
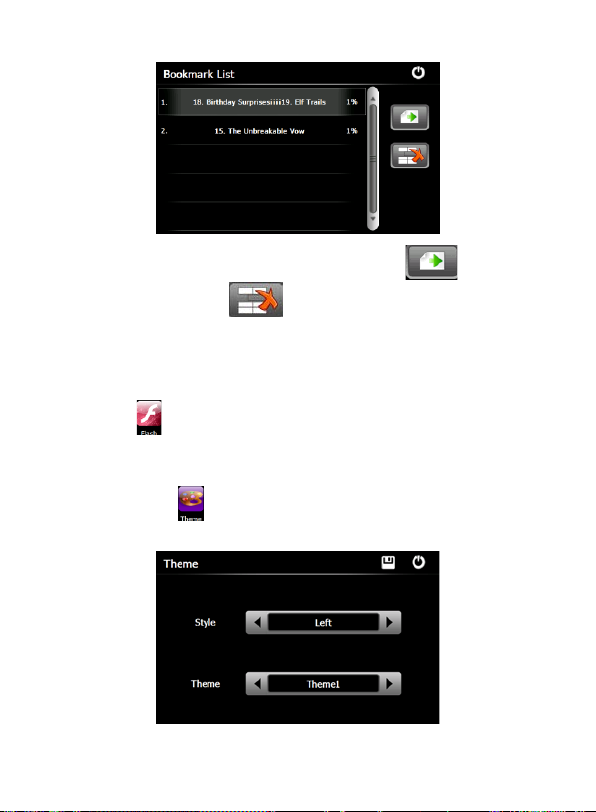
Drag the scroll bar and select a bookmark on the left list. Tap to go to t he
page with the bookmark or tap
to delete the bookmark.
3.5 Flash Play
The flash player supports .swf files, full-screen play, progress adjustment and file select.
To use the function, please first insert a flash card with video files inside.
Tap the icon
For detailed operation, refer to 3.2 Video Player.
in the system m ain interface to enter the flash play interface.
3.6 Theme
Tap the Theme icon to enter the following interface to set a style and theme for the
system interface:
22
Page 28

Tap / to select a mode (from “Empty”, “Left” or “Bottom”) or a theme (5 kinds of
themes in total), and tap
and the Theme as “3”, and tap
to save the setting. For example, set the Mode as “Bottom”
to get the following system interface effect.
3.7 Wallpaper
Tap the Wallpaper icon to enter the following interface:
1. Set wallpaper with built-in wallpaper:
Select built-in wallpaper from the above interface, and tap
effect.
to get the following
23
Page 29

2. Set wallpaper with external image:
Insert a T-flash card with images inside into the device, and tap “Browse” to select an
image as follows:
Double tap on an image to add it to the “Wallpaper Setting” list, and then select the image
and tap
[Note]: The built-in wallpapers cannot be deleted, while t he added images can be deleted.
To delete images, select an added image from the “Wallpaper Setting” interface and then
tap
3.8 Favorites
to set it as the wallpaper.
.
Tap in the system main interface to enter the Favorite interface as shown below.
24
Page 30

Tap in the above interfac e to open the directory where the application to be added
is, and then double tap the application to add it to the Favorite.
To delete applications from the Favorite, select the application in the above interface and
.
tap
[Note]: While deleting the application, the shortc uts instead of application itself will be
deleted.
3.9 Explorer
Tap the icon in the system main interface to popup the following dialog box
indicating whether to enter the WINCE system:
25
Page 31

Tap「OK」to enter the WINCE system as shown below while tap「Cancel」to return to the
system main interface.
In the above interface, double tap the icon “GPS” and select “Yes” in the dialog box
popped up to return to the GPS main interface.
Note: push the Reset button at the left side of the navigator can also exit Explorer and
restart up the system.
3.10 Calendar
Tap the icon in the system main interface to enter the Calendar setting int erface
as follows.
26
Page 32

3.12 System Resource
Tap the icon in the system main interface to enter the following interface:
You may check the capacity of the memory, SD card and flash, or
tap
to clear the memory.
3.13 Calculator
Tap in the system main interface to enter the calculator inter face as follows:
27
Page 33

3.14 Unit
Tap in the system main interface to enter the unit converter interface as follow s :
3.15 GPS Info
Tap in the system main interface to view the GPS information as shown below.
28
Page 34

Close
Exit the volume setting.
Save
Tap to save the settings
Volume
Ten volume grades (from mute to
maximum) available. Tap to decrease
the volume by grade.
To reset the GPS satellite receiver, tap to prompt a dialog as below.
Tap OK to reset the GPS satellite or tap Cancel to exit.
3.17 Volume
Tap in the system main interface to enter the volume setting interface as shown
below.
29
Page 35

Sounds for
taps
Tap it to enable the function. Tap it again
to disable the function.
Power-on
on
music or disable it.
Close
Exit the backlight setting.
Save
Tap to save the settings
Backlight
Drag leftward to turn down or rightward to
turn up the backlight.
Auto off
Auto backlight shutoff after service stop for a
period. The options are always On, 10s, 30s,
to view
the options in cycle or select one.
music
Tap or to select power-
3.18 Backlight
Backlight setting includes backlight brightness adjustment and latency of backlight off.
Tap
in the system main interf ace to enter the backlight setting interface as follows.
1m, 2m and 3m. Tap or
3.19 Language
Tap in the system main interface to enter the language setting interface as follows.
30
Page 36

Tap or t o s elec t a system language and tap to save the selec tion.
3.20 Date& Time
Tap in the system main interface to enter the Date &Time setting interface as
follows.
Date & Time setting includes system date setting, time setting and time zone setting.
◆ Setting the system date and time
In the above interface, tap
[Note]: Time format options are 12-hour and 24-hour. You may select one of t hem.
◆ Setting the system time zone
In the above interface, tap
or to set the year, month, day, hour and minute.
or t o s elec t a time zone.
3.21 Calibration
Tap in the system main interface to prompt the calibration dialog as follows.
31
Page 37

Tap OK to execute calibration or Cancel to cancel calibration and go back to the system
main interface.
Tap OK, and t he following calibration interface is prompted. Click the center of cross
cursor with the touch pen and the cursor shifts from the center, upper left, lower left, upper
right and lower right to finish the calibration and the inter face will be closed automatically
to go back to the system main interface.
3.22 Restore Factory Setting
Tap in the system main interface to restore the factory setting. The following dialog
will be prompted.
32
Page 38

◆
Tap OK to restore the default setting or Cancel to return to the system main interface.
3.23 USB setting
Connect the GPS navigator to PC via the MINI USB port to transmit data, or back up data
from the navigator data to PC.
The GPS navigator provides MASS STORAGE and MS STORAGE modes. Select one in
the USB setting.
MASS STORAGE
1. Have the GPS navigator in operation status and the SD card plugged in the slot;
2. Tap
in the system main inter face to enter USB Option as follows.
Select MASS STORAGE and tap to save it.
3. Connect the MINI USB terminal of the USB cord to the MINI USB port of the GPS
navigator and the standard USB terminal to the USB Host port of PC. Then, the com puter
will recognize the navigator and prompt the following interface.
33
Page 39

◆
To disc onnec t the navigator from PC and enter charging mode, you may tab .
4. After communication, unplug the MINI USB cable.
MS ACTIVESYNC
1. Tap in the system main interface to enter USB Option interface. Select MASS
ACTIVESYNC and tap
2. Install the application Mobile Device in a drive of PC. T hen the following icon will
appear in the drive selection.
3. Connect the MINI USB terminal of the USB cable to the MINI USB port of the GPS
navigator and the standard USB terminal to the USB Host port of PC.
4. After the PC finds new hardware, double click the Mobile Device drive in the selection
area to enter the memory of GPS navigator for data transmission.
5. After transmission, unplug the USB cable.
[Attention] For data safety, please back up your system data in external storage. Our
company has no responsibility for lost or damage of system data.
[Note] If MASS STORAGE is selected while the GPS navigator is connected with P C,
other operations will be suspended.
[Attention] The following operations will stop suspend the communication of the system
and PC and unsaved data will be lost.
1. Unplugging the MINI USB cable;
2. Powering off the GPS navigator;
3. Resetting the system;
4. Tap the on c los e button on the top right.
to save the sett ing.
34
Page 40

3.24 System Info
Tap in the system main interface to view the system information as follows.
The system information interface display information on hardware version, software
version, platform identity, device identity and SD card identity.
3.25 Navigation Path
Tap the "Nav Path" icon and enter into the following display interface:
1) Select the Auto Run Navigation, the device will run the Navigation software
automatically when tapping the GPS icon on the main menu.
2) Tap
3.26 Othello
to select to run the navigation.exe files manually.
Tap in the system main interface to enter the interface as follows.
35
Page 41

3.27 BoxMan
Tap in the system main interface to enter the interface as f ollow s .
3.28 Russia Block
Tap in the system main interface to enter the interface as follows.
36
Page 42

Fault
Reason
Solution
Startup failure
Low battery
Supply external power and charge the
battery.
System down
Reset the GPS navigator.
Sudden power cut
Low battery
Supply external power and charge the
battery.
No/ vague display
Low backlight
Turn up the backlight.
Backlight off
Tap the screen with the touch pen.
Incorrect tapping
response
Touch screen not
calibrated
Recalibrate the screen.
No sounds
Low volume
Turn up the volume.
Poor contact of
earphone
Connect the earphone.
Communication with
PC
Poor USB
connection
Connect the USB cable.
GPS signals reception
failure
Weak GPS satellite
signal
About 3 minutes are needed for low
intensity of local GPS satellite signal.
Loss of map data
Accidental deletion
Contact your agent or distributor.
Input a new password after recovering the
GPS data.
Appendix Troubleshooting
Please carry out the following operations in case of abnormal operation of the GPS
navigator. For further problems, please contact our customer service center.
4 FCC statement
1. This device complies with Part 15 of the FCC Rules.
Operation is subject to the fol l owing two conditions:
(1) This device may not cause harmful interference, and
37
Page 43

(2) This device must accept any interference received, including
interference that may cause undesired operation.
2. Changes or modifications not expressly approved by the party
responsible for compliance could void the user’s authority to operate the
equipment.
NOTE: This equipment has been tested and found to comply with the limits
for a Class B digital device, pursuant to Part 15 of the FCC Rules. These
limits are designed to provide reasonable protection against harmful
interference in a residential installati on. This equi pment generat es, uses an d
can radiate radio frequency energy and, if not installed and used in
accordance with the ins tructions, may cause harmful int erference to radio
communications. However, there is no guaran tee that interference will not
occur in a particular installation.
If this equipment does cause harmful interference to radio or television
reception, which can be determined by turning the equipment off and on,
the user is encouraged to try to cor rect the interference by o ne or more of
the following measures:
-- Reorient or relocate the receiving antenna.
-- Increase the separation between the equipment and receiver.
-- Connect the equipment i nto an outlet on a circuit different from that to
which the receiver is connected.
-- Consult the dealer or an experienced radio/TV technician for help.
FCC Radiation Exposure Statement:
The device has been evaluated to meet general RF exposure requirement.
The device can be used in portable exposure condition without RF striction.
38
 Loading...