


N635
User Manual

Revision: R00 (December 2019)
Trademark
All brand and product names are trademarks or registered trademarks of their respective companies.
Disclaimer
ifications and documents are subject to change without notice.
Spec
Note
Not all models are available in all regions. Not all features are available on all models.
Depending on the specific model purchased, the colour and look of your device and accessories may not
exactly match the graphics shown in this document. The screenshots and other presentations shown in
this document are for reference only.

Table of Contents
Device Basics ................................................................................................................... 4
Getting to Know Your Device ................................................................................ 4
Installing and Charging the Battery Pack .............................................................. 4
Using a Micro-SIM Card ........................................................................................ 6
Using a Memory Card............................................................................................ 6
Turning the Device On and Off .............................................................................. 7
Turning On .................................................................................................. 7
Sleep Mode ................................................................................................. 7
Aeroplane Mode ......................................................................................... 8
Restarting the Device ................................................................................. 8
Turning Off .................................................................................................. 8
Shutting Down ............................................................................................ 8
Getting Started ................................................................................................................. 9
Using the Touch Screen ........................................................................................ 9
Home Screen ....................................................................................................... 10
Your Apps ............................................................................................................ 10
Customising Your Device ............................................................................................... 11
Cellular Data Connection..................................................................................... 11
Wireless Network Connection ............................................................................. 11
Connecting to a Wireless Network ............................................................ 11
Removing a Remembered Network .......................................................... 12
Bluetooth ............................................................................................................. 12
Pairing with Another Bluetooth Device ..................................................... 12
Disconnecting a Bluetooth Connection ..................................................... 12
Reference ....................................................................................................................... 13
Caring for the Device ........................................................................................... 13
Regulatory Information ........................................................................................ 13
FCC .......................................................................................................... 14
IC .............................................................................................................. 14
CE ............................................................................................................. 15
RF Exposure Information (SAR) ............................................................... 16
WEEE ....................................................................................................... 16
Bluetooth ................................................................................................... 16
Safety Precautions .............................................................................................. 16
About Charging ......................................................................................... 16
About the Charger .................................................................................... 17
About the Battery ...................................................................................... 17

Device Basics
Getting to Know Your Device
Front-Side View
Rear-Side View
NFC sensor*
❶
Front camera lens
❷
Light sensor
❸
Power button
❹
Volume buttons
❺
Touch screen
❻
Microphone
❼
*For selected models only
Rear camera lens
❶
Flash
❷
Microphone
❸
Screw hole for cradle
❹
Socket for cradle
❺
Dock connector
❻
Speaker
❼
Accessory screw hole
❽
Right-Side View
Micro-SIM card slot*
❶
Memory card slot
❷
*To use cellular services, you must have a
subscription to the function with a mobile
phone network service.
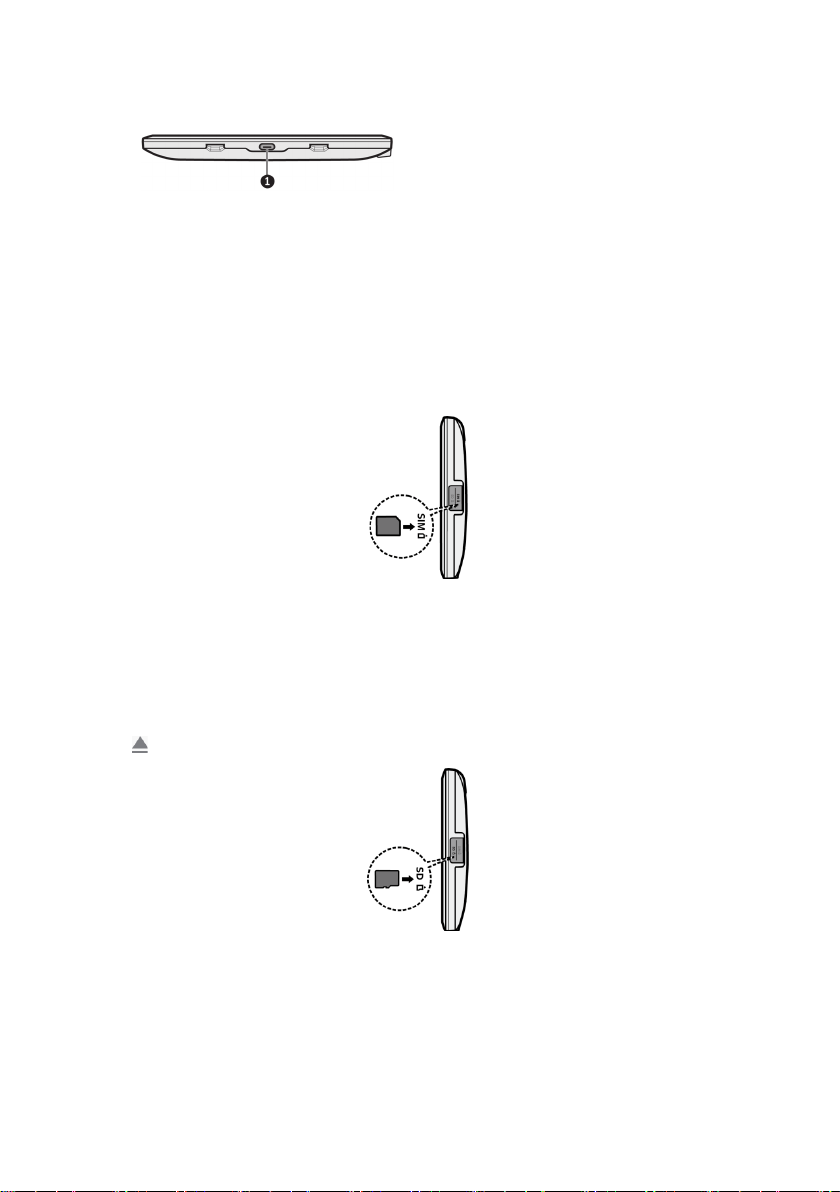
Bottom-Side View
U
SB Type C connector
❶
Using a Micro-SIM Card
The device uses a Micro-SIM card.
Open the cover on the right side of the device to locate the Micro-SIM card slot. With its label side facing
the rear side of the device, hold the Micro-SIM card by the edges and gently insert it into the slot. Note that
inserting the card in the reverse direction may cause damage.
To remove a card, gently push the top edge of the card inwards to release it, and pull it out of the slot.
Using a Memory Card
Open the cover on the right side of the device to locate the memory card slot. With its label side facing the
rear side of the device, hold the MicroSD card by the edges and gently insert it into the slot. Note that
inserting the card in the reverse direction may cause damage.
To remove a MicroSD card, first unmount it from the device by tapping Settings on the Home screen
Storage . Then gently push the top edge of the card inwards to release it, and pull it
out of the slot.
Do not apply pressure to the center of the memory card.
Inserting the card in the reverse direction may cause damage.
The manufacturer does not guarantee the product's compatibilities with the storage cards from all manufacturers.
If you encounter access problems with your memory card, please visit the website
https://www.sdcard.org/downloads/formatter_4/ and use the "SD Memory Card Formatter 5.0 for SD/SDHC/SDXC" tool to
format your memory card.

Turning the Device On and Off
Use the USB cable to connect to a power source to power the device.
The device’s battery is designed as a backup power source for short-term use only in the event when the
vehicle's power system is not available. It is not to be used as a sole source of power for prolonged
periods. Connect the device to an external power source whenever you can.
Turning On
1. The device turns on automatically when it is powered. Wait for the boot screen to display.
2. The Home screen will display and the device is in Lock mode by default. Drag the Lock icon ( )
upwards to unlock. The device is ready for use.
Sleep Mode
Your device will automatically switch off the screen after 1 minute (by default) of inactivity. You can
manually switch off the screen by pressing the Power button briefly.
To resume the screen, press the Power button briefly and then unlock the device by dragging the Lock
icon ( ) upwards.
Aeroplane Mode
When you are in an aeroplane or in the area where data transferring is not allowed, enable Aeroplane
mode. You will be able to use many of your device's applications, but all wireless radios, including wireless
networks and Bluetooth, on the device are turned off – it cannot send or receive data.
To enable Aeroplane mode: tap Settings on the Home screen Network & internet Advanced, and
tap the Aeroplane mode switch to turn it on. The icon in the status bar indicates that Aeroplane mode
is on.
You can enable WIFI and Bluetooth in Aeroplane mode.
To disable Aeroplane mode: tap Settings on the Home screen Network & internet Advanced, and
tap the Aeroplane mode switch to turn it off.
Restarting the Device
You may need to reset the device when the device is running slower or improperly. Press and hold the
Power button to display the options menu and tap Restart to restart the device.
Turning Off
To turn off the device, press and hold the Power button to display the options menu and tap Power off.

Shutting Down
If the device stops responding, you may need to shut down the device by pressing and holding the Power
button for 8 seconds.

Getting Started
Using the Touch Screen
To operate your device, touch the screen with your finger. You can perform the following actions:
Tap: Touch the screen once with your finger to open items or select on-screen buttons or options.
Tap and hold: Tap and hold on the desired item to open the pop-up menu that contains the available
options for the item.
Drag: Tap and hold on the item and then move it to the target position without releasing your finger.
Slide/Swipe: Drag your finger vertically or horizontally across the screen.
Drag to the left/right to switch to the next/previous item on the list.
Drag to the top/bottom to scroll up/down the screen.
Not all slide gestures are applicable to all applications.
Two-finger gestures: Move your fingers apart or together on the screen to zoom in or out while
ing a picture or a web page.
view
Not all two-finger gestures are applicable to all applications.

Home Screen
The Home sc
reen is your starting place for tasks, providing quick access to frequently used applications
and settings.
To display the app list, swipe up from the bottom of the screen with one finger.
To display the Home screen, tap at any time.
Status bar
Desktop
Folder
Home
button
Shortcut/
widget
Favourites tray
Google, Google Play, YouTube and other marks are trademarks of Google LLC.
Your Apps
To see all your apps, slide up from the bottom of the Home screen with one finger to open the app drawer.
You can place an app icon on any of the screens on the desktop. Tap and hold the app icon, slide your
finger, and lift your finger to drop the icon into the desired screen.
To view information about an app from the app drawer, tap and hold the icon, slide your finger toward the
top of the screen, and drop the icon over App info.

Customising Your Device
You can easily customise the device for personal settings through the Settings menu, such as
personalising the Home screen, changing the display and sound settings, configuration the connection
settings, and more.
To access the Settings menu, slide up from the bottom of the Home screen and tap Settings.
Cellular Data Connection
This feature is not available on all models.
To use cellular services, you must have a subscription to the function with a mobile phone network service.
In most cases, the settings of the cellular services are installed automatically.
To turn on or off the cellular services:
1. Slide up from the bottom of the Home screen and tap Settings.
2. Tap Network & internet Data usage.
3. Tap the Mobile data switch to turn it on or off.
If you are on a limited data allowance, you can monitor the data usage on the device.
1. Slide up from the bottom of the Home screen and tap Settings.
2. Tap Network & internet Data usage.
Turn off the cellular services when not in use to save battery power.
Wireless Network Connection
To use wireless local area networks (WIFI) on your device, you need access to a wireless access point
(AP) or "hotspot."
The coverage of the WIFI signal can be up to 300 feet (100 metres). However, it varies greatly due to the type of
infrastructure, and other objects through which the signal passes.
Connecting to a Wireless Network
1. Slide up from the bottom of the Home screen and tap Settings.
2. Tap Network & internet WIFI.
3. Tap the WIFI switch to turn it on. The device will automatically scan for available wireless networks.
4. Tap a wireless network to connect.
5. If you select an open network, you will be automatically connected to the network. If you select a
secured network, enter the key and then tap CONNECT.
6. When your device is connected to a wireless network, the WIFI icon ( ) will appear in the status
bar.
The next time your device connects to a previously accessed secured wireless network, you will not be
prompted to enter the key again, unless you reset the network settings or reset your device to its factory
default settings.

Turn off the WIFI function when not in use to save battery power.
Removing a Remembered Network
1. Slide up from the bottom of the Home screen and tap Settings.
2. Tap Network & internet WIFI.
3. Tap and hold the network to remove on the list, and select FORGET.
Bluetooth
Bluetooth is a short-range wireless communications technology that allows Bluetooth-enabled devices to
exchange information over a distance of about 30 feet (10 metres) without requiring a physical connection.
Pairing with Another Bluetooth Device
1. Make sure that the Bluetooth function of the other device is turned on.
2. Slide up from the bottom of the Home screen and tap Settings.
3. Tap Connected devices Pair new device.
4. The device will automatically scan for available Bluetooth devices.
5. Tap the desired device from the list to initiate pairing.
6. Make sure that the same passkey is displayed on your device and the other device, and then tap
PAIR.
Turn off the Bluetooth function when not in use to save battery power.
Disconnecting a Bluetooth Connection
1. Slide up from the bottom of the Home screen and tap Settings.
2. Tap Connected devices.
3. Tap the desired paired device.
4. When prompted to disconnect, tap OK.

Reference
Caring for the Device
Taking good care of your device will ensure trouble-free operation and reduce the risk of damage to your
device.
Keep your device away from excessive moisture and extreme temperatures.
Avoid exposing your device to direct sunlight or strong ultraviolet light for extended periods of time.
Do not place anything on top of your device or drop objects on your device.
Do not drop your device or subject it to severe shock.
Do not subject your device to sudden and severe temperature changes. This could cause moisture
condensation inside the unit, which could damage your device. In the event of moisture condensation,
allow the device to dry out completely before use.
The screen surface can easily be scratched. Avoid touching it with sharp objects. Non-adhesive
generic screen protectors designed specifically for use on portable devices with LCD panels may be
used to help protect the screen from minor scratches.
Never clean your device with it powered on. Use a soft, lint-free cloth to wipe the screen and the
exterior of your device.
Do not use paper towels to clean the screen.
Never attempt to disassemble, repair or make any modifications to your device. Disassembly,
modification or any attempt at repair could cause damage to your device and even bodily injury or
property damage and will void any warranty.
Keep your device and its accessories out of the reach of small children or animals.
Do not store or carry flammable liquids, gases or explosive materials in the same compartment as
your device, its parts or accessories.
To discourage theft, do not leave the device and accessories in plain view in an unattended vehicle.
Do not leave the device and its accessories in a vehicle in direct sunlight. Overheating may damage
the device.
The device (excluding accessories) is protected again splashes, water and dust. When tested under
controlled laboratory conditions, the device is compliant with the IP67 rating of the IEC 60529
standard. The manufacturer guarantees this grade provided all jack covers are properly and securely
closed. Immersion in water or water-pressure such as washing the unit with running water may cause
damage to the unit and voids warranty. Normal wear might decrease resistance. The device should
not be operated in water.
Regulatory Information
For regulatory identification purposes, the series is assigned a model number of N635.
Marking labels located on the exterior of your device indicate the regulations that your model complies with.
Please check the marking labels on your device and refer to the corresponding statements in this chapter.
Some notices apply to specific models only.
5GHz band (W52,W53): Indoor use only

FCC
Federal Communication Commission Interference Statement
This equipment has been tested and found to comply with the limits for a Class B digital device pursuant to
Part 15 of the FCC Rules. These limits are designed to provide reasonable protection against harmful
interference in a residential installation. This equipment generates, uses, and can radiate radio frequency
energy and, if not installed and used in accordance with the instructions, may cause harmful interference
to radio communications. However, there is no guarantee that interference will not occur in a particular
installation. If this equipment does cause harmful interference to radio or television reception, which can
be determined by turning the equipment off and on, the user is encouraged to try to correct the
interference by one or more of the following measures:
Reorient or relocate the receiving antenna.
Increase the separation between the equipment and receiver.
Connect the equipment into an outlet on a circuit different from that to which the receiver is
connected.
Consult the dealer or an experienced radio/TV technician for help.
Any changes or modifications not expressly approved by the manufacturer could void the user's authority
to operate the equipment.
This device complies with part 15 of the FCC Rules. Operation is subject to the following two conditions: (1)
This device may not cause harmful interference, and (2) this device must accept any interference received,
including interference that may cause undesired operation.
Please note:
The use of a non-shielded interface cable with this equipment is prohibited.
IC
Canadian Department Of Communications
CAN ICES-3(B)/NMB-3(B)
Radio Interference Regulations Class B Compliance Notice
This Class B digital apparatus meets all requirements of the Canada Interference-Causing equipment
regulations.
Cet appareil numérique de Classe B respecte toutes les exigences du Règlement Canadien sur le
matériel brouileur.
This device complies with Industry Canada's licence-exempt RSSs. Operation is subject to the following
two conditions:
(1) This device may not cause interference; and
(2) This device must accept any interference, including interference that may cause undesired operation of
the device.
Le présent appareil est conforme aux CNR d'Industrie Canada applicables aux appareils radio exempts de
licence. L'exploitation est autorisée aux deux conditions suivantes:
(1) l'appareil ne doit pas produire de brouillage, et
(2) l'utilisateur de l'appareil doit accepter tout brouillage radioélectrique subi, même si le brouillage est
susceptible d'en compromettre le fonctionnement."

The device could automatically discontinue transmission in case of absence of information to transmit, or
operational failure. Note that this is not intended to prohibit transmission of control or signaling information
or the use of repetitive codes where required by the technology.
The device for operation in the band 5150–5250 MHz is only for indoor use to reduce the potential for
harmful interference to co-channel mobile satellite systems.
High-power radars are allocated as primary users (i.e. priority users) of the bands 5250–5350 MHz and
5650–5850 MHz and that these radars could cause interference and/or damage to LE-LAN devices.
L'appareil peut interrompre automatiquement la transmission en cas d'absence d'informations à
transmettre ou de panne opérationnelle. Notez que ceci n'est pas destiné à interdire la transmission
d'informations de contrôle ou de signalisation ou l'utilisation de codes répétitifs lorsque cela est requis par
la technologie.
Le dispositif utilisé dans la bande 5150-5250 MHz est réservé à une utilisation en intérieur afin de réduire
le risque de brouillage préjudiciable aux systèmes mobiles par satellite dans le même canal.
CE
WWAN:33dBm
BT:10.5dBm
WiFi 2.4G:16dBm
WiFi 5G:15dBm
NFC:-3.29 dBuA/m@ 10m
Products with the CE marking comply with Radio Equipment Directive (Directive 2014/53/EU) - issued by
the Commission of the European Community.
Compliance with these directives implies conformity to the following European Standards:
EN 62311
EN 62209-2
EN 50566
EN 301 489-1/-3/-17/-19/-52
EN 55032
EN 55035
EN 61000-3-2
EN 61000-3-3
EN 300 328: BT/WLAN 2.4 GHz
EN 301 893: WLAN 5 GHz
EN 300 330: RFID/NFC
EN 303 413: GPS
EN 301 511: GSM 900/1800
EN 301 908-1/-13
IEC 62368-1:2014 (Second Edition)
The device is restricted to indoor use only when operating in the 5150 to 5350 MHz frequency range.

AT BE BG HR CY CZ DK
EE FI FR DE EL HU IE
IT LV LT LU MT NL PL
PT RO SK SI ES SE UK
The DoC letter will be added to the end of the manual.
RF Exposure Information (SAR)
This device has been tested and meets applicable limits for Radio Frequency (RF) exposure. Specific
Absorption Rate (SAR) refers to the rate at which the body absorbs RF energy. SAR limits are 1.6 Watts
per kilogram (over a volume containing a mass of 1 gram of tissue) in countries that follow the United
States FCC limit and 2.0 W/kg (averaged over 10 grams of tissue) in countries that follow the Council of
the European Union limit. Tests for SAR are conducted using standard operating positions with the device
transmitting at its highest certified power level in all tested frequency bands. To reduce exposure to RF
energy, use a hands-free accessory or other similar option to keep this device away from your head and
body. Carry this device at least 10 mm away from your body to ensure exposure levels remain at or below
the as-tested levels. Choose the belt clips, holsters, or other similar body-worn accessories which do not
contain metallic components to support operation in this manner. Cases with metal parts may change the
RF performance of the device, including its compliance with RF exposure guidelines, in a manner that has
not been tested or certified, and use such accessories should be avoided.
WEEE
This symbol means that according to local laws and regulations your product and/or its battery shall be
disposed of separately from household waste. When this product reaches its end of life, take it to a
collection point designated by local authorities. Proper recycling of your product will protect human health
and the environment.
Bluetooth
Safety Precautions
When using the device, note that the ambient temperature should be below 45ºC (113ºF).
To prevent possible hearing damage, do not listen at high volume levels for long periods of time.
About Charging
Use only the charger supplied with your device. Use of another type of charger will result in
malfunction and/or danger.
This product is intended to be supplied by a LISTED Power Unit marked with "LPS", "Limited Power
Source" and output rated + 5 V dc / 2.0 A.
Use a specified battery in the equipment.

About the Charger
Do not use the charger in a high moisture environment. Never touch the charger when your hands or
feet are wet.
Allow adequate ventilation around the charger when using it to operate the device or charge the
battery. Do not cover the charger with paper or other objects that will reduce cooling. Do not use the
charger while it is inside a carrying case.
Connect the charger to a proper power source. The voltage requirements are found on the product
case and/or packaging.
Do not use the charger if the cord becomes damaged.
Do not attempt to service the unit. There are no serviceable parts inside. Replace the unit if it is
damaged or exposed to excess moisture.
About the Battery
Use a specified battery in the equipment.
CAUTION: This unit contains a Lithium Ion battery. The battery can burst or explode, releasing
hazardous chemicals. To reduce the risk of fire or burns, do not disassemble, crush, puncture, or
dispose of in fire or water.
Important instructions (for service personnel only)
Caution: Risk of explosion if battery is replaced by an incorrect type. Dispose of used batteries
according to the instructions.
Replace only with the same or equivalent type recommended by the manufacturer.
The battery must be recycled or disposed of properly.
Use the battery only in the specified equipment.
USA Contact Information
Magellan
279 E Arrow Highway San Dimas, CA 91773 USA
+1 909-394-5000
http://www.magellangps.com
 Loading...