


N536/N536A/N536B
User Manual

Revision: R01
(July, 2018)
Trademark
All brand and product names are trademarks or registered trademarks of their respective companies.
Disclaimer
Specications and documents are subject to change without notice.
Note
Not all models are available in all regions.
Not all features are available on all models.
Depending on the specic model purchased, the colour and look of your device and accessories may not exactly
match the graphics shown in this document. The screenshots and other presentations shown in this document are
for reference only.
2 3

Table of Contents
1 Device Basics ............................................................................. 6
Getting to Know Your Device ..................................................................................6
Front and Back .................................................................................................6
Left and Right ...................................................................................................6
Top and Bottom ................................................................................................6
Installing the Micro-SIM Card, Memory Card and Battery ......................................7
Charging the Battery ...............................................................................................8
Extending the Battery Life ................................................................................9
Turning the Device On and Off ...............................................................................9
Turning On .......................................................................................................9
Sleep Mode ....................................................................................................10
Airplane Mode ................................................................................................10
Using the Hot-Swap Function ........................................................................10
Restarting the Device .....................................................................................11
Turning Off .....................................................................................................11
Shutting Down ................................................................................................11
Connecting the Device to a Computer ..................................................................11
2 Getting Started ......................................................................... 12
Using the Touch Screen........................................................................................12
Rotating the Screen ..............................................................................................13
Home Screen ........................................................................................................13
Status Bar ......................................................................................................13
Desktop ..........................................................................................................14
Google Search Bar .........................................................................................14
Application Shortcuts and Widgets ................................................................14
Favourites Tray ..............................................................................................15
Grouping Shortcuts in a Folder ......................................................................15
Changing the Wallpaper .................................................................................15
Customising the Home Screen Settings ........................................................15
Navigation Buttons ...............................................................................................16
Quick Settings ......................................................................................................16
Your Apps .............................................................................................................16
App Permissions ............................................................................................16
App Links .......................................................................................................17
Battery Optimization for Apps .........................................................................17
Stopping an App or a Service from Running ..................................................17
Using the Keyboard ..............................................................................................17
Changing the Keyboard and Input Methods ...................................................17
Basic Editing ..................................................................................................18
Adding Your Email Accounts .................................................................................18
Removing an Account ....................................................................................19
3 Connectivity ............................................................................. 20
Cellular Data Connection ......................................................................................20
Wireless Network Connection ..............................................................................20
Connecting to a Wireless Network .................................................................20
Removing a Remembered Network ...............................................................20
Bluetooth ..............................................................................................................20
Pairing with Another Bluetooth Device ...........................................................21
Disconnecting a Bluetooth Connection ..........................................................21
Changing the Bluetooth Name of the Device .................................................21

Removing a Paired Device .............................................................................21
Connecting to the Internet Using Bluetooth ...................................................21
NFC ......................................................................................................................21
Turning NFC On and Off ................................................................................21
Transferring Data Using NFC .........................................................................22
4 Applications ............................................................................. 23
BCR Reader .........................................................................................................23
BCR Settings ........................................................................................................23
Browser ................................................................................................................23
Calculator .............................................................................................................24
Calendar ...............................................................................................................24
Camera .................................................................................................................24
Taking a Photo ...............................................................................................24
Recording a Video ..........................................................................................25
Camera Settings ............................................................................................25
Clock .....................................................................................................................25
Contacts ...............................................................................................................26
Importing/Exporting Contacts .........................................................................26
Adding a Contact ............................................................................................27
Finding a Contact ...........................................................................................27
Editing a Contact ............................................................................................27
Managing a Contact .......................................................................................27
Adding a Contact to Favourites ......................................................................27
Managing a Group .........................................................................................27
Downloads ............................................................................................................28
Email .....................................................................................................................28
Checking Your Email ......................................................................................28
Sending an Email Message ...........................................................................28
Responding to an Email Message .................................................................29
Managing Your Email Messages ....................................................................29
Searching Email Messages ............................................................................29
File Manager .........................................................................................................29
Gallery ..................................................................................................................30
Albums ...........................................................................................................30
Photos ............................................................................................................30
Videos ............................................................................................................31
MiDM Client ..........................................................................................................32
Music ....................................................................................................................32
Playback Controls ..........................................................................................33
Search ..................................................................................................................33
Sound Recorder ...................................................................................................33
Videos ...................................................................................................................33
5 Personalizing Your Device ...................................................... 34
Settings Menu .......................................................................................................34
Wireless and Networks Settings ....................................................................34
Device Settings ..............................................................................................35
Personal Settings ...........................................................................................36
System Settings .............................................................................................37
6 Reference .................................................................................. 39
Troubleshooting ....................................................................................................39
Caring for the Device ............................................................................................39
Regulatory Information .........................................................................................40
FCC ................................................................................................................40
4 5

IC ....................................................................................................................41
CE ..................................................................................................................41
RF Exposure Information (SAR) ....................................................................42
WEEE .............................................................................................................42
Bluetooth ........................................................................................................42
Safety Precautions ...............................................................................................42

1 Device Basics
Getting to Know Your Device
Front and Back
❶❷❸❹ ❺❻ ❼
⓯⓰⓱
Left and Right
❷
❺
❽❾ ❿⓫ ⓬ ⓭
❿⓮
❶
❷
❸
❶
Front camera lens*
❷
Charge indicator
❸
Light sensor
❹
Proximity sensor
❺
Notication indicator
❻
Touch screen
❼
NFC sensor*
❽
Microphone
❾
Speaker
❿
Lanyard holder
⓫
Battery cover latch
⓬
Rear camera lens*
⓭
Flash*
⓮
Battery cover
⓯
Recent Apps
⓰
Home
⓱
Back
*For selected models only
❶
Headphone jack
❷
Barcode reader button*
❸
Power button
❹
Socket for device charger
❺
Volume buttons
❹
❹
Top and Bottom
❶
❷❸
6 7
❶
Barcode reader*
❷
Microphone
❸
Dock connector
*For selected models only
Installing the Micro-SIM Card, Memory Card and Battery
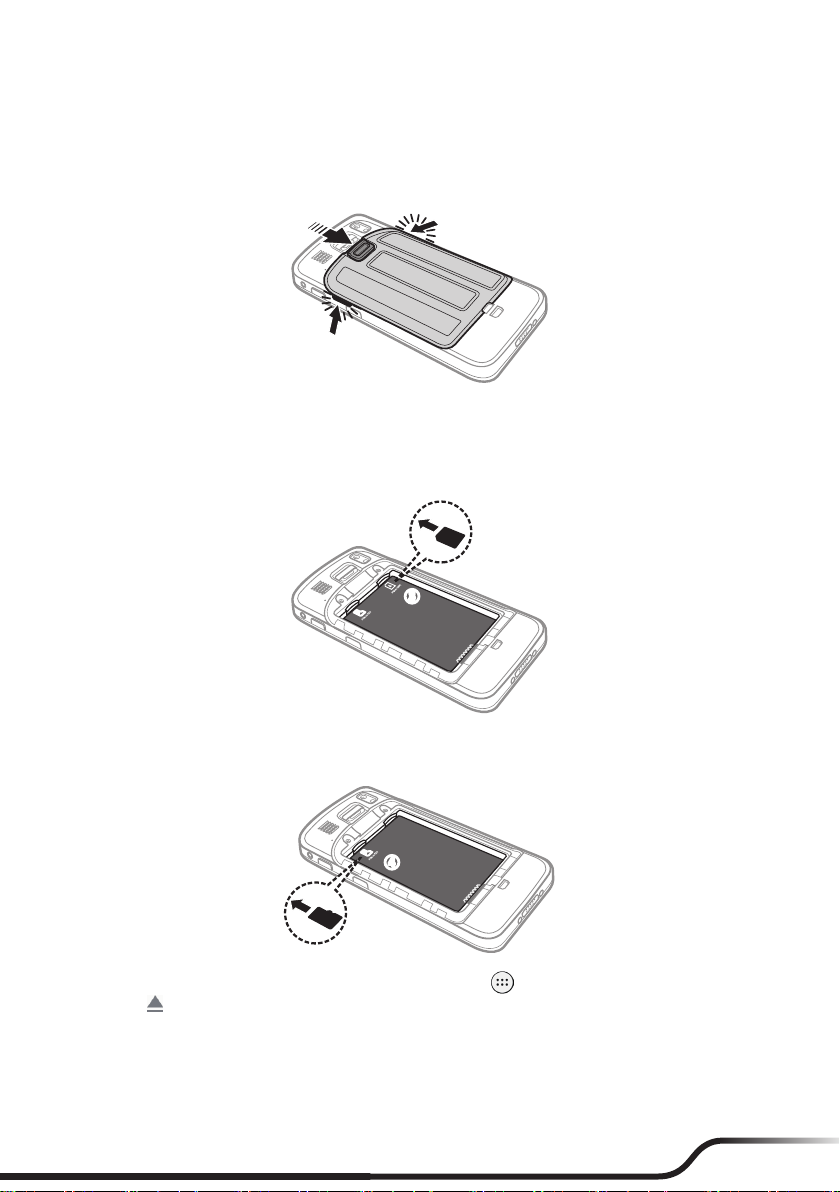
1. Slide the battery cover latch downward to unlock the battery cover (❶).
2. Using the small opening (beside the power button) as the release point (
side, and then remove the cover.
❶
❷
3. Depending on your model, your device may come with a Micro-SIM card slot that allows you to install a
Micro-SIM card and use cellular services.
Locate the Micro-SIM card slot inside the battery compartment. Noting the card orientation, hold the card
by the edges and gently insert it into the slot (
❷
❸
).
❸
❷
), pry the cover open along the
4. Locate the memory card slot inside the battery compartment. Noting the card orientation, hold the card
(MicroSD) by the edges and gently insert it into the slot (❹).
❹
To remove a card, rst unmount it from the device by tapping on the desktop Settings Storage &
USB
L
L
L
L
. Then gently push the top edge of the card inwards to release it, and pull it out of the slot.
Do not apply pressure to the center of the memory card.
Inserting the card in the reverse direction may cause damage.
The manufacturer does not guarantee the product's compatibilities with the storage cards from all manufacturers.
If you encounter access problems with your memory card, please visit the website https://www.sdcard.org/downloads/formatter_4/
and use the "SD Memory Card Formatter 5.0 for SD/SDHC/SDXC" tool to format your memory card.
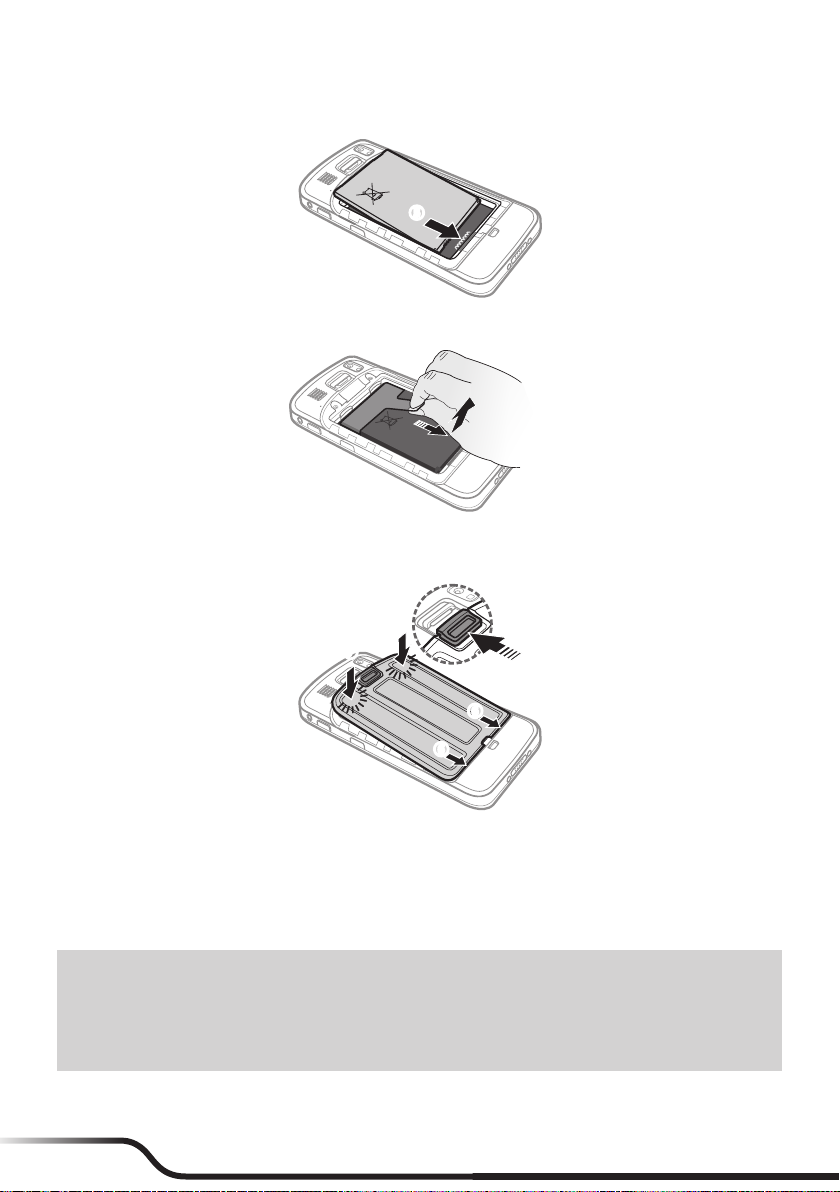
5. With the label side facing up, match the battery's contact points, insert the battery at an angle, and then t it
into the compartment (❺).
❺
To remove the battery, pull the plastic tab at an angle downward and lift the battery out of the compartment.
6. Place the battery cover back on (❻), lightly press the edges of the cover (❼), and then slide the battery
❽
cover latch upward (
) to lock the battery cover.
❼
❼
❽
❻
❻
Charging the Battery
Use only the charger supplied with your device. Use of another type of charger will result in malfunction and/or danger.
L
When charging the battery for the very rst time, you should charge it for at least 8 hours (using the AC charger)
with your device turned off.
CAUTION: For optimal performance of the lithium battery:
• Do not charge the battery where the temperature is high (for example, in direct sunlight).
• There is no need to fully discharge the battery.
• When storing the device for a long period of time, be sure to charge the device at least once every two weeks. Over discharge of the
device can affect the performance.
• Failure to follow the battery usage instructions could cause damage to your device, battery and even bodily injury or property
damage, and will void any warranty.
1. Push the clip outwards (❶), insert the plug to the AC charger and then push the clip inwards to lock the
plug in place (❷).
8 9
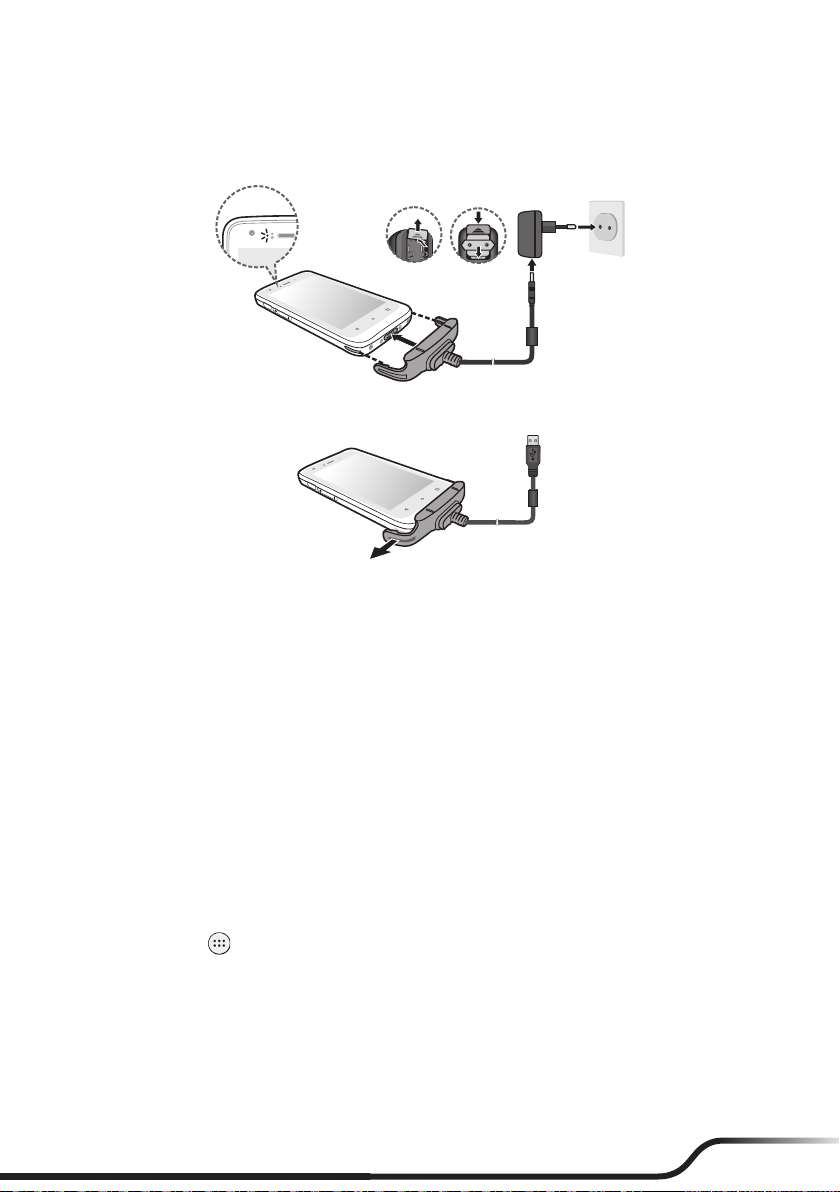
The look of the charger plug varies depending on your region.
L
2. Attach the charging cable to the device by lining up the connector on the holder to the dock connector on
the bottom of the device (❸). Make sure that the holder slides into the sockets on the device properly.
3. Plug the USB end of the power cord to the AC charger (
4. To detach the device from the charging cable, gently pry away one side of the holder.
When handling the holder of the charging cable, do not use force.
L
The charge indicator glows red when charging is in progress. When the battery is fully charged, the indicator
turns green.
❹
), and plug the AC charger to a wall outlet (❺).
❶ ❷
❸
❺
❹
Extending the Battery Life
There are various ways to improve the device's battery life.
• Always fully charge the battery.
• Turn on Battery saver.
• Turn off unnecessary sounds, such as touch sounds.
• Close an app when you are not using it.
• Use a shorter timeout setting of the screen.
• Lower the brightness level of the screen.
• Turn off Bluetooth when you are not using it.
• Prevent the device from constantly scanning for available wireless networks.
• Enable Airplane mode to turn off all wireless transmission functions.
To change settings, tap
on the desktop Settings.
Turning the Device On and Off
Turning On
1. Press and hold the Power button for about 2 seconds to turn on your device. Wait for the boot screen to
display.
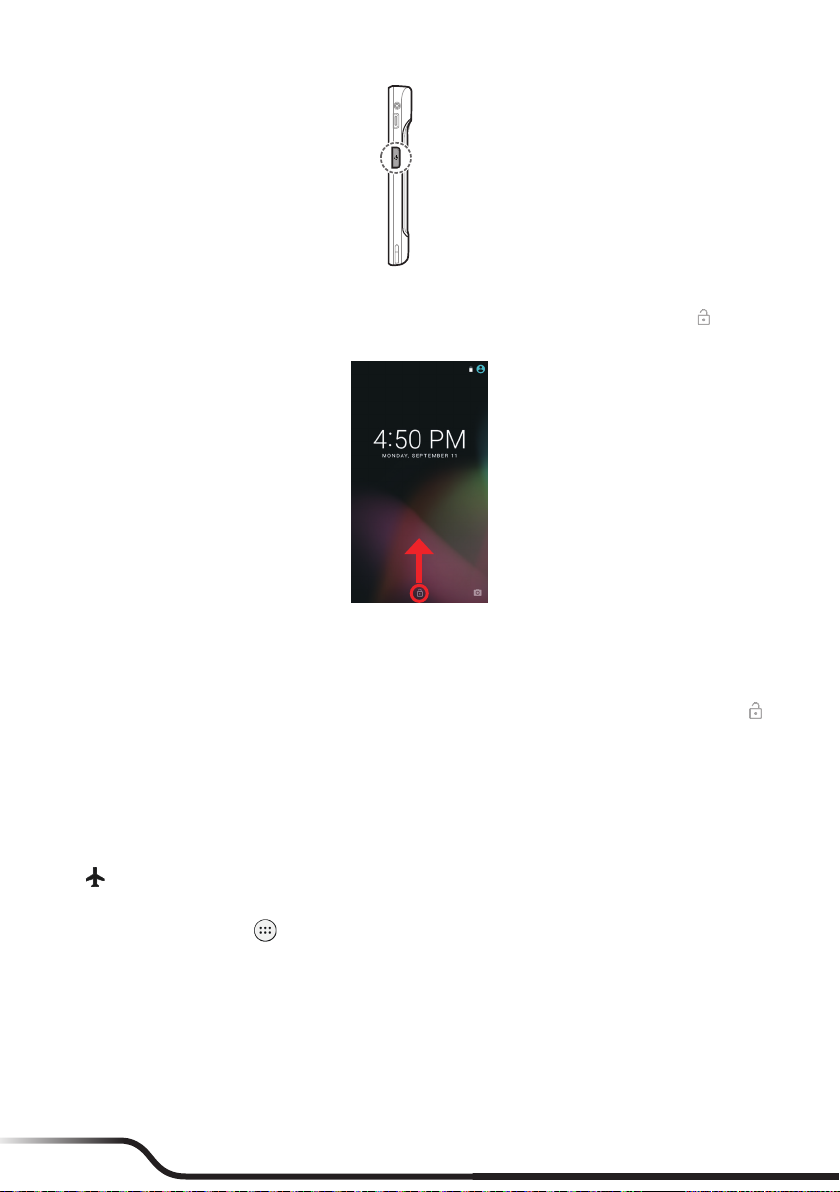
2
SEC
The battery may not be fully charged when you use the device for the rst time. Charge the battery rst.
L
2. The Home screen will display and the device is in Lock mode by default. Drag the Lock icon ( ) upwards
to unlock. The device is ready for use.
Sleep Mode
Your device will automatically switch off the screen after 1 minute (by default) of inactivity. You can manually
switch off the screen by pressing the power button briey.
To resume the screen, press the Power button briey and then unlock the device by dragging the Lock icon (
upwards.
)
Airplane Mode
When you are in an airplane or in the area where data transferring is not allowed, enable Airplane mode. You
will be able to use many of your device's applications, but all wireless radios, including wireless networks and
Bluetooth, on the device are turned off – it cannot send or receive data.
To enable Airplane mode: press and hold the Power button to display the options menu and tap Airplane mode.
The
icon in the status bar indicates that Airplane mode is on.
You can enable WIFI and Bluetooth in Airplane mode.
L
To disable Airplane mode: tap on the desktop Settings More in Wireless & networks, and tap the
Airplane mode switch to turn it off.
Using the Hot-Swap Function
The device supports the hot-swap function, allowing you to change the battery without having to turn off the
device.
1. Press and hold the power button for 2 seconds to display the options menu, and then select Hot swap
battery.
10 11
If you have not used the device for a long time, you are advised not to use the Hot swap battery function until after 3 hours of
L
powering on the device.
2. Wait until the notication indicator on the top-right corner of the front side turns green.
Restarting the Device
You may need to reset the device when the device is running slower or improperly. Press and hold the Power
button to display the options menu and tap Reboot to restart the device.
Turning Off
To turn off the device, press and hold the Power button to display the options menu and tap Power off.
Shutting Down
If the device stops responding, you may need to shut down the device by pressing and holding the Power button
for 8 seconds.
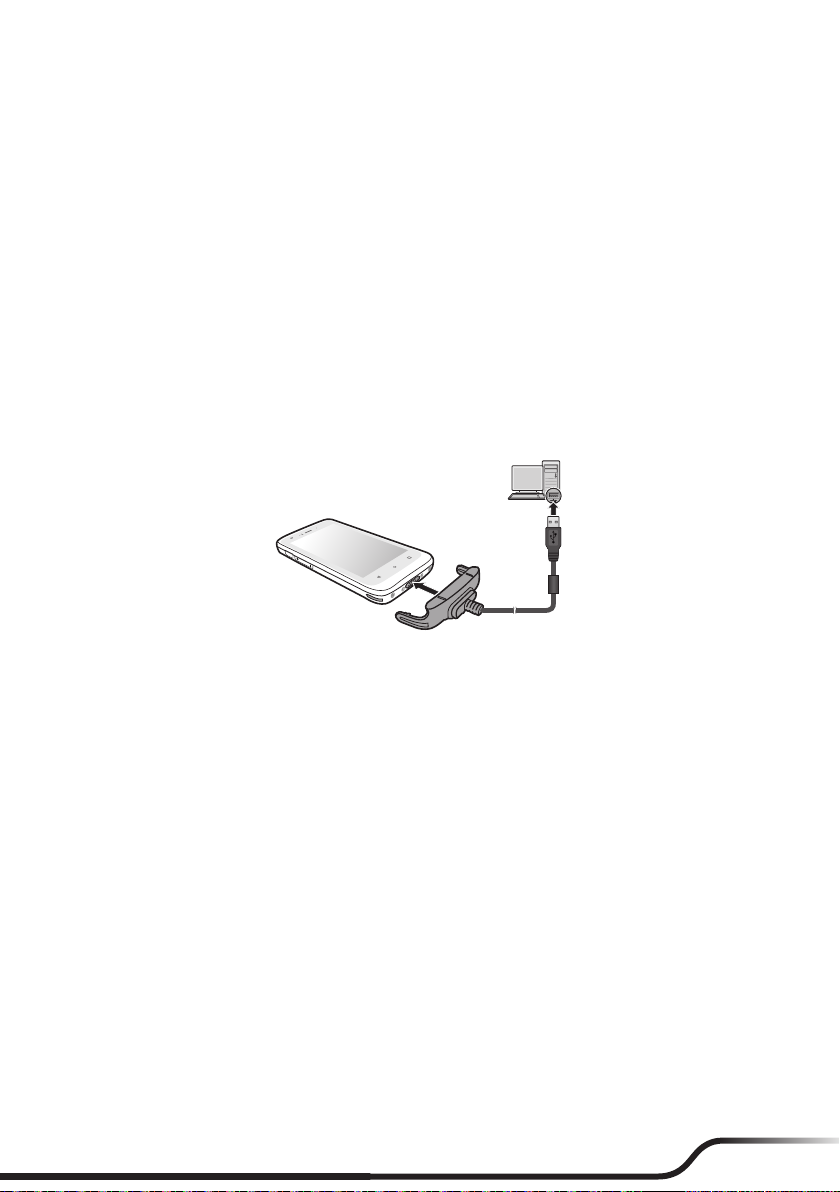
Connecting the Device to a Computer
To connect the device to a computer, use the device charger to connect the two devices.
When you connect the device to your computer for the rst time, allow the USB driver of the device to be installed properly on your computer.
L
2 Getting Started
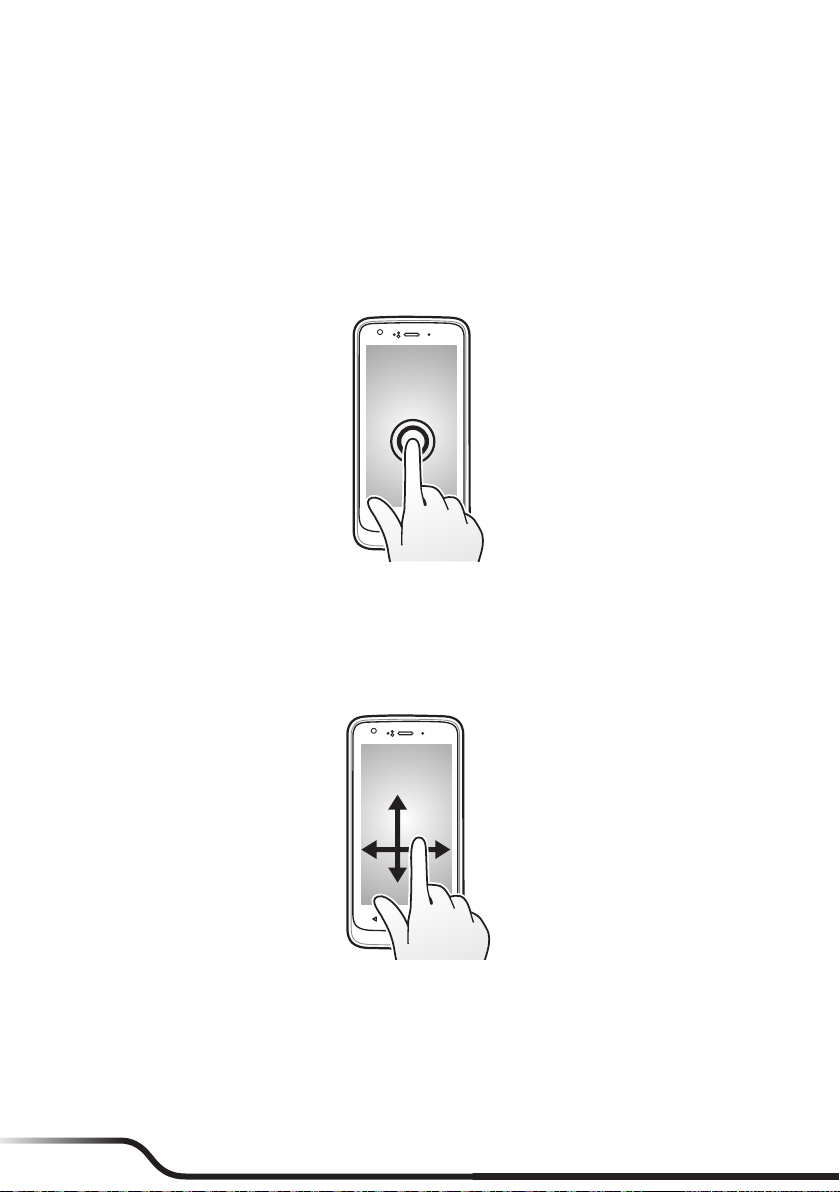
Using the Touch Screen
To operate your device, touch the screen with your nger. You can perform the following actions:
• Tap: Touch the screen once with your nger to open items or select on-screen buttons or options.
• Tap and hold: Tap and hold on the desired item to open the pop-up menu that contains the available
options for the item.
• Drag: Tap and hold on the item and then move it to the target position without releasing your nger.
• Slide/Swipe: Drag your nger vertically or horizontally across the screen.
• Drag to the left/right to switch to the next/previous item on the list.
• Drag to the top/bottom to scroll up/down the screen.
Not all slide gestures are applicable to all applications.
L
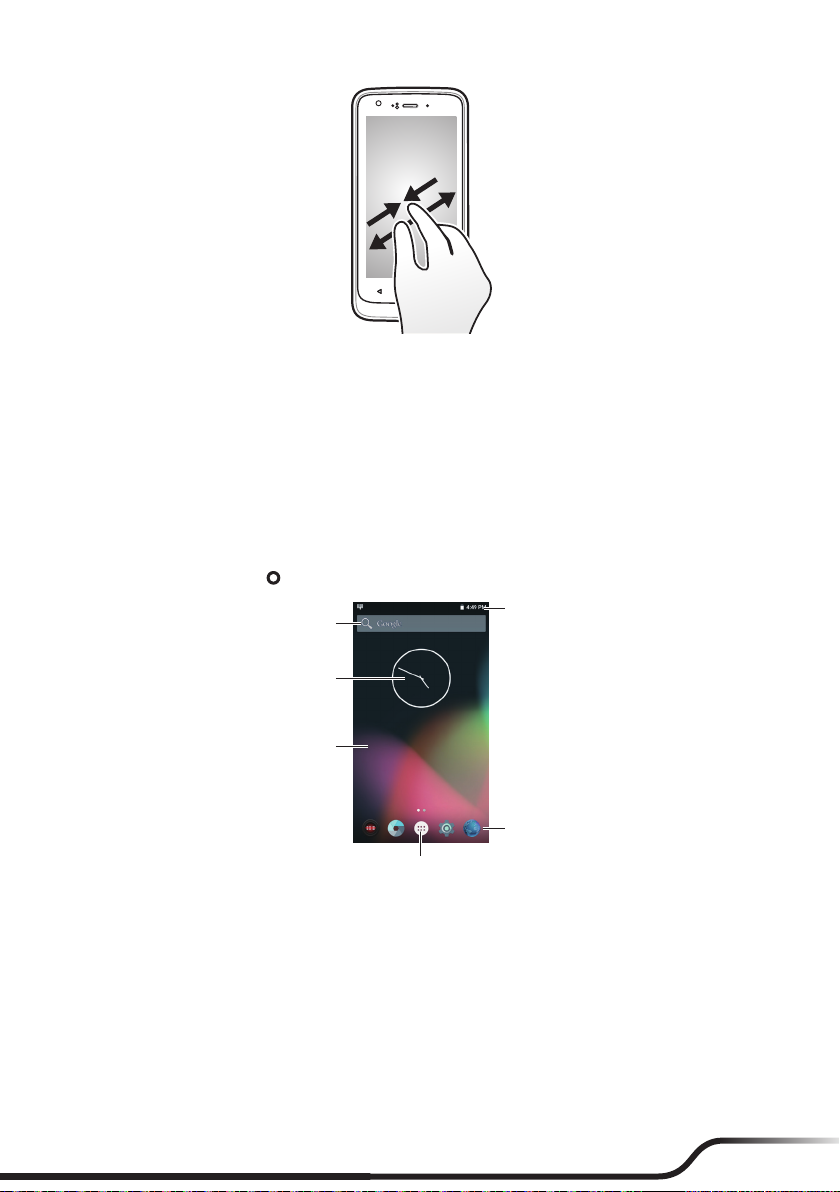
• Two-nger gestures: Move your ngers apart or together on the screen to zoom in or out while viewing a
picture or a web page.
Not all two-nger gestures are applicable to all applications.
L
12 13
Rotating the Screen
For most applications, you can automatically change the screen orientation, from portrait to landscape and vice
versa, by turning the device sideways.
Rotating the screen is not applicable to all applications.
L
Home Screen
The Home screen is your starting place for tasks, providing quick access to frequently used applications and
settings.
To display the Home screen, tap
Status Bar
The status bar is at the very top of the screen, displaying system status icons and notication icons.
Depending on your use of the device, some icons are not always shown in the status bar.
L
System status icons
The system status icons are displayed on the right side of the status bar. They provide the information about your
device's status, including the connection status, signal strength, battery power, the time, and more.
Notication icons
The notication icons are displayed on the left side of the status bar. They report the arrival of new emails,
calendar events, and other notications.
at any time.
Search
Shortcut/widget
Desktop
Status bar
Favourites tray
All Apps button

When you see notication icons displayed in the status bar, you can open the Notications panel to view the
detailed descriptions. To open the Notications panel, slide down from the top of the screen with one nger.
From the Notications panel, do one of the following:
• Tap a notication to open the related application.
• Tap
to clear all notications.
Desktop
The desktop includes the Home screen and the extended screens, providing useful information about notications
and device status. It also allows you to add an access to your favourite application shortcuts/widgets on the Home
screen and the extended screens.
Slide left or right to switch between the screens.
To add an extended screen:
1. Tap and hold anywhere on the Home screen or an extended screen.
2. Tap NEW HOME to add a new extended screen.
An extended screen will be removed automatically when all shortcuts and widgets on it are moved or removed.
L
Google Search Bar
The Google search bar is provided on the Home screen by default, allowing you to search the web, or
applications, contacts and music stored on your device.
Application Shortcuts and Widgets
The application shortcuts and the widgets, such as the clock and Google search bar, can be placed on either the
Home screen or any of the extended screens.
To add a shortcut:
1. Go to the screen where you want to place the shortcut.
2. Tap
3. Tap and hold the desired app until the Home screen appears, slide it into place, and lift your nger.
To add a widget:
1. Go to the screen where you want to place the widget.
2. Tap and hold anywhere on the desktop, and select WIDGETS.
3. Slide left and right to explore the available widgets.
4. Tap and hold the desired widget until the Home screen appears, slide it into place, and lift your nger.
14 15
on the desktop.

To move a shortcut or widget to another position:
1. Tap and hold the icon, and slide your nger to the new position.
• To move between the screens on the desktop, slide toward the edge of the screen.
• To bump another icon out of the way, slide your nger slowly into it.
2. Lift your nger.
To remove a shortcut or widget from the desktop (without removing it permanently from the device), tap and
hold the icon, slide your nger toward the top of the screen, and drop it over Remove.
Favourites Tray
You can use the Favourites tray at the bottom of the desktop to quickly access the apps.
You can edit the apps in the Favourites tray: simply tap and hold an icon and move it in or out of the Favourites
tray or the desktop.
Grouping Shortcuts in a Folder
You can group the shortcuts to apps or settings on the desktop and the Favourites tray into a folder.
1. Tap and hold a shortcut, and then drag it over to another shortcut. A folder will be created automatically.
2. Tap to open the folder.
• To add another shortcut to the folder, tap and hold the shortcut, and drag it over to the folder.
• To remove a shortcut from the folder, tap and hold the shortcut, and drag it out of the folder.
3. To rename the folder, tap the title bar of the folder, and enter the desired folder name.
4. To delete the folder, tap and hold the folder, slide your nger toward the top of the screen, and drop it over
Remove.
Changing the Wallpaper
1. Tap and hold anywhere on the desktop, and select WALLPAPERS.
2. Slide right and left at the bottom of the screen and select a wallpaper image, or tap Pick image to select an
image from your device.
3. Tap Set wallpaper.
Customising the Home Screen Settings
Tap and hold anywhere on the desktop, and tap to access the Home screen settings. To close the settings, tap
.
Home screen settings:
• Search bar: Show or hide the Google search bar on the Home screen.
• Scroll effect: Set the scrolling effect for the screens on the desktop.
• Icon labels: Show or hide the names of the icons.
• Scroll wallpaper: Set if you want the wallpaper to move along with the screens on the desktop.
• Grid size: Set the grid size for the icons on the desktop.
Drawer settings (for customising the app drawer when you tap
• Layout: Set if you want to scroll the app drawer horizontally or vertically.
• Scroll effect: When the horizontal layout is selected, you can set the scrolling effect for the screens on the
desktop.
• Sorting mode: When the horizontal layout is selected, you can sort the apps by the name, use count or date.
• Icon labels: Show or hide the names of the icons.
on the desktop):

App settings:
• Larger icons: Set if you want to use larger icons on the desktop.
• Small text size: Set if you want to use smaller text for the icons on the desktop.
Navigation Buttons
Three navigation buttons are located at the bottom of the screen:
•
: The Back button opens the previous screen you were working in. (You cannot go back further once you
return to the Home screen.)
•
: The Home button returns to the desktop. Tap again to return to the Home screen.
•
: The Recent Apps button opens a list of thumbnail images of the screens you have worked with recently.
Tap one to open it. To remove a screen from the list, slide it left or right, or tap the X.
Some screens in apps and Settings have a menu icon
. Tap to access additional options.
Quick Settings
Some frequently used settings can be found in Quick Settings. To open Quick Settings, simply slide down from
the top of the screen with two ngers or twice with one nger. Tap an icon to change its setting.
• WLAN: Turn the wireless network on or off, or open the WLAN settings menu.
• Bluetooth: Turn Bluetooth on or off, or open the Bluetooth settings menu.
• Do not disturb: Set how and when to receive notications.
• Airplane mode: Turn the Airplane mode on or off.
• Auto-rotate: Set the device's orientation to automatically rotate or lock in the portrait mode.
Your Apps
To see all your apps, tap in the Favorites tray on the desktop to open the app drawer.
You can place an app icon on any of the screens on the desktop. Tap and hold the app icon, slide your nger, and
lift your nger to drop the icon into the desired screen.
To view information about an app from the app drawer, tap and hold the icon, slide your nger toward the top of
the screen, and drop the icon over App info.
App Permissions
When you use some apps for the rst time, you will be prompted to grant permissions for the apps to access
certain data or features. To grant a permission, tap Allow; to reject a permission, tap Deny.
16 17

You can customize the permission settings of your apps in Settings:
1. Tap
2. Tap the desired option: App permissions, App links, Draw over other apps, or Modify system settings.
3. Select an app to customize permission settings.
4. To reset the permission settings, tap
on the desktop Settings Apps .
Reset app preferences.
App Links
You can set the default app to handle a link or feature.
1. Tap
2. Tap App links.
3. Select an app, tap Open supported links and change the setting.
on the desktop Settings Apps .
Battery Optimization for Apps
You can prolong the battery standby time by performing battery optimization for your apps.
1. Tap
2. Tap Battery optimization.
3. Tap Not optimized All apps.
4. Select an app, tap Optimize Done.
on the desktop Settings Apps .
Stopping an App or a Service from Running
1. Tap on the desktop Settings Apps.
2. Tap an app or a service, and tap FORCE STOP OK.
Using the Keyboard
When you select a eld that requires text or numbers, the on-screen keyboard will automatically display. You can
use the on-screen keyboard to enter text, numbers, symbols, etc.
Some apps open the keyboard automatically. In others, tap where you want to type to open the keyboard.
As you type, suggestions for completing each word appear above the keyboard.
To close the keyboard, tap
.
Changing the Keyboard and Input Methods
To change the keyboard and input methods:
1. Tap
2. Tap Current Keyboard CHOOSE KEYBOARDS to see available keyboards.
3. Tap the switch of the desired keyboard to turn it on.
4. Tap Current Keyboard and select the keyboard that you want to use as the main input method.
5. To customise the settings for a keyboard, tap it in the Keyboard & input methods section.
on the desktop Settings Language & input. The keyboards that you can use are listed in the
Keyboard & input methods section.
To hide a keyboard, tap its switch to turn it off.
Tap
. The new keyboard is now listed in the Keyboard & input methods section.

Basic Editing
To change where you want to type:
• Tap the cursor, and tap and drag the tab below the cursor to the new position.
To select text:
1. Tap and hold (or double-tap) within the text.
2. The nearest word highlights, with a tab at each end of the selection. Drag the tabs to change the selection.
To delete text:
• Tap
To cut, copy or paste text:
1. Select the text you want to cut or copy, and tap CUT or COPY.
2. Tap where you want to paste the text, and tap PASTE.
To type capital letters:
• To type one capital letter, tap
• To type multiple capital letters, tap and hold (or double-tap)
• To quickly change the capitalisation of a word you have already typed, select it and tap the
• To type lowercase letters, tap
To type a symbol:
1. Tap
2. To view additional symbols, tap
3. Tap
To type an accented characters (not applicable to all apps):
• Tap and hold the letter. When the suggestions appear above the keyboard, slide to the desired accented
To use emoji (not applicable to all apps):
1. Tap and hold
2. Slide left or right to view and select the desired emoji.
3. Tap
to delete the characters before the cursor or selected text.
once to turn it to .
to turn it to (caps lock is turned on).
/ / .
/ once to turn it to .
.
.
to return to the keyboard.
character and lift your nger.
. When appears on the keyboard, slide to and lift your nger. You will see the
emoji symbols.
to return to the keyboard.
Adding Your Email Accounts
This requires the Internet connection.
L
You need to set up an account on your device to use the Calendar and Email apps. You can set up multiple
accounts.
1. Tap
2. Tap Add account.
3. Select the type of account that you want to add.
4. Follow the on-screen instructions to add the account.
By default, the auto-sync function of your account is enabled. To manually sync your account, tap
on the account list screen.
18 19
on the desktop Settings Accounts.
Sync now

Removing an Account
When you remove an account that you have added to your device, everything associated with that account,
including email, contacts, calendar events and settings, is also deleted.
1. Tap
2. Select the account to remove.
3. Tap the account email address.
4. Tap
on the desktop Settings Accounts.
Remove account REMOVE ACCOUNT.

3 Connectivity
Cellular Data Connection
This feature is not available on all models.
L
To use cellular services, you must have a subscription to the function with a mobile phone network service. In
most cases, the settings of the cellular services are installed automatically.
To turn on or off the cellular services:
1. Tap
2. Tap the Cellular data switch to turn it on or off.
If you are on a limited data allowance, you can monitor the data usage on the device by tapping
desktop Settings Data usage.
Turn off the cellular services when not in use to save battery power.
L
L
For optimal performances, you may need to change the modem interface setting. For more information, see "Modem Interface" on Page 34.
Wireless Network Connection
To use wireless local area networks (WLAN) on your device, you need access to a wireless access point (AP) or
"hotspot."
The coverage of the WLAN signal can be up to 300 feet (100 metres). However, it varies greatly due to the type of infrastructure, and other
L
objects through which the signal passes.
Connecting to a Wireless Network
3. Tap on the desktop Settings WLAN.
4. Tap the WLAN switch to turn it on. The device will automatically scan for available wireless networks.
5. Tap a wireless network to connect.
6. If you select an open network, you will be automatically connected to the network.
7. When your device is connected to a wireless network, the WLAN icon (
The next time your device connects to a previously accessed secured wireless network, you will not be prompted
to enter the key again, unless you reset the network settings or reset your device to its factory default settings.
Turn off the WLAN function when not in use to save battery power.
L
on the desktop Settings Data usage.
If the wireless network you are looking for is not on the list, tap
If you select a secured network, enter the key and then tap CONNECT.
Refresh to start a new scan.
on the
) will appear in the status bar.
Removing a Remembered Network
1. Tap on the desktop Settings WLAN.
2. Tap and hold the network to remove on the list, and select Forget network.
Bluetooth
Bluetooth is a short-range wireless communications technology that allows Bluetooth-enabled devices to
exchange information over a distance of about 30 feet (10 metres) without requiring a physical connection.
20 21

Pairing with Another Bluetooth Device
1. Make sure that the Bluetooth function of the other device is turned on.
2. Tap
3. Tap the Bluetooth switch to turn it on.
4. Tap the desired device from the list to initiate pairing.
5. Make sure that the same passkey is displayed on your device and the other device, and then tap PAIR.
Turn off the Bluetooth function when not in use to save battery power.
L
on the desktop Settings Bluetooth.
The device is visible to nearby devices when the Bluetooth function is turned on.
The device will automatically scan for available Bluetooth devices.
If the Bluetooth device you are looking for is not on the list, tap
Refresh to start a new scan.
Disconnecting a Bluetooth Connection
1. Tap on the desktop Settings Bluetooth.
2. Tap the desired paired device.
3. When prompted to disconnect, tap OK.
Changing the Bluetooth Name of the Device
1. Tap on the desktop Settings Bluetooth.
2. Tap the Bluetooth switch to turn it on.
3. Tap
Rename this device, enter a new name, and tap RENAME.
Removing a Paired Device
1. Tap on the desktop Settings Bluetooth.
2. Tap the Bluetooth switch to turn it on.
3. Tap
next to the desired paired device, and tap FORGET.
Connecting to the Internet Using Bluetooth
1. Make sure that the Bluetooth tethering function of the paired device is turned on.
2. Tap
3. Tap the Bluetooth switch to turn it on.
4. Tap
on the desktop Settings Bluetooth.
next to the desired paired device, select the checkbox for Internet access, and tap OK.
On the paired device, make sure that the Internet connection sharing checkbox is selected in the Bluetooth
connection settings with your device, and tap OK.
NFC
This feature is not available on all models.
L
Your device supports the Near Field Communication (NFC) feature that allows you to easily transfer data to an
NFC-compatible device. The NFC area is located at the upper side of the front of the device.
Turning NFC On and Off
1. Tap on the desktop Settings More NFC.
2. Tap the NFC switch to turn it on or off. The device will automatically scan for available wireless networks.

Transferring Data Using NFC
1. Access the data you want to share, access the share options, and tap Android Beam.
2. Touch the screen of your device.
3. Hold the upper front side of your device close to the NFC sensor of the other device (within the range of
4 cm).
4. Pay attention to and accept the beam notication on the other device.
22 PB

4 Applications
From the desktop, tap the All Apps button to see all your apps.
BCR Reader
This feature is not available on all models.
L
By using the barcode reader, your device will be able to read the information contained in a barcode.
1. Make sure that the barcode reader is enabled: tap
Settings switch to turn it on.
2. Tap
3. Position your device close to the barcode (within the range of 5 – 10 cm), and point the barcode reader to
4. Tap the scan button on the screen to start scanning. Hold your device steadily until the scan is complete and
on the desktop BCR Reader.
the barcode.
the information is displayed on the screen.
on the desktop BCR Settings, and tap the BCR
BCR Settings
To congure the barcode reader, tap on the desktop BCR Settings, or tap from the barcode reader
screen.
• Decoder: You can set up the barcode reader functions.
• Symbology: You can select the supported barcode types.
• Indication: You can set how you want to be notied of the reading result.
• Information: This contains the software information of the barcode reader.
Browser
This feature requires the Internet connection.
L
Open Browser to start surng the web. Browser is fully optimised and comes with advanced functionalities,
allowing you to enjoy Internet browsing on your device.
1. Tap
2. On the browser screen, tap the URL eld and enter the web page address.
on the desktop Browser.
As you enter the address, the matching web pages/addresses will be displayed on the screen. If you nd the
web page you want, simply tap the address. Otherwise, continue entering the web page address.
23

3. When done, tap .
4. To open a new tab, tap
5. To access the bookmarks, tap
.
.
Calculator
Calculator helps you calculate simple math problems and complex mathematical functions.
on the desktop Calculator.
Tap
The screen displays the basic panel. To open the advanced panel, slide the green panel from the right edge to the
left.
Calendar
You must sign in to an account to use Calendar.
L
Syncing calendar events requires the Internet connection.
L
Use Calendar to view and edit your schedule.
1. Tap
2. Tap
3. On the event details screen, enter the information for the event.
4. Set the event reminder if necessary. You can set multiple reminders.
5. When nished, and tap DONE.
To change the calendar view, tap the date eld on the top-left of the screen and select Day, Week, Month or
Agenda.
To read the event details, tap the event on the calendar.
• To edit the details, tap
• To delete the event, tap
• To email all parties in a meeting invitation, tap Email guests, select a quick response or write your own
on the desktop Calendar.
New event.
.
.
response.
Camera
Use Camera to take and share photos and videos.
Taking a Photo
1. Tap on the desktop Camera.
If you are in the Video mode, slide your nger from the left edge to the right, and tap
Photo mode.
2. Frame your subject.
• To focus on a certain part of the image, tap it.
• To zoom in or out, use the two-nger gestures.
3. Tap
24
to access the quick settings in the Photo mode:
• Self-timer
• Grid
: Set the countdown time before taking a photo.
: Display or hide the grid line that can be helpful in photo composition.
to switch to the

• HDR : When enabled, the HDR (High Dynamic Range) feature can create a clear photo with a
better ratio of light to dark.
• Flash
• Switching camera
4. Tap
The photo displays as a thumbnail in the lower-right corner momentarily. Tap the thumbnail to view the
photo.
: Turn the ash on or off.
: Tap to switch between the front and rear cameras.
below the image area to take the picture.
Recording a Video
1. Tap on the desktop Camera.
2. Slide your nger from the left edge to the right, and tap
3. Frame your subject.
• To focus on a certain part of the image, tap it.
• To zoom in or out, use the two-nger gestures.
4. Tap
5. Tap
6. To stop recording, tap
to access the quick settings in the Video mode:
• Grid
• Flash
• Switching camera
The video displays as a thumbnail in the lower-right corner momentarily. Tap the thumbnail to play the
video.
: Display or hide the grid line that can be helpful in photo composition.
: Turn the ash on or off.
: Tap to switch between the front and rear cameras.
to start recording.
.
to switch to the Video mode.
Camera Settings
To access the camera settings, slide your nger from the left edge to the right, and tap .
• Resolution & quality
• Back camera photo: Set the photo resolution of the rear camera.
• Front camera photo: Set the photo resolution of the front camera.
• Back camera video: Set the video resolution of the rear camera.
• Front camera video: Set the video resolution of the front camera.
• Advanced
• Manual exposure: When enabled, you can tap
exposure level to adjust the brightness of the image.
• Antibanding: Allow the camera to avoid problems caused by articial light sources that are not
constant.
in the quick settings in the Photo mode to set the
Clock
Clock displays the current date and time. It also lets you set alarm clocks, and works as a world clock, timer and
stopwatch.
on the desktop Clock.
Tap
25

Tap to change the clock settings.
• Clock
• Tap to add and show the clocks of other cities.
• Alarm Clock
• Tap an alarm item to turn it on and set details of the alarm.
• Tao the switch of an alarm item to turn it on or off.
• Tap
• Countdown Timer
• Tap the numbers to set the time interval.
• Tap
• Tap
• Tap
• Tap
• Tap
• Stopwatch
• Tap to start counting.
• Tap
• Tap
• Tap
• Tap
to add a new alarm.
to start the countdown.
to pause the countdown.
to reset the timer.
to set a new timer. Multiple timers can run at the same time.
to delete a timer.
to pause counting.
to mark a lap.
to reset the stopwatch.
to share
Contacts
Contacts lists all contacts that are stored on the device and in your online accounts.
on the desktop Contacts. The app displays the contacts list in the ALL CONTACTS tab.
Tap
• To set up your contact information, tap Set up my prole.
• If you want to lter the contacts list by account, tap
desired contact account, and tap OK.
• To change the sorting method of the contacts list, tap
• To change the format of the contacts' names, tap
Importing/Exporting Contacts
You can import contacts to the device, or export contacts for backup.
1. Tap
2. Tap
3. To import contacts, select Import from .vcf le. Then select the desired .vcf le.
26
on the desktop Contacts.
Import/Export.
To export contacts, select Export to .vcf le. Select the desired contacts, tap OK. Select the storage
destination, edit the lename, and tap SAVE.
Contacts to display, select Customise, select a
Sort by.
Name format.

Adding a Contact
1. Tap on the desktop Contacts.
2. To create a new contact, tap
3. To save the new contact locally on the device: when prompted, tap KEEP LOCALLY.
To save the new contact to an account for online backup: when prompted, tap OK to save the new contact
to the current account, or tap ADD NEW ACCOUNT to create a new account to save the new contact.
4. Enter the information of the new contact in the elds.
5. Tap
to save the contact.
.
Finding a Contact
1. Tap on the desktop Contacts.
2. Tap
3. Enter information in the Find contacts box: the rst few letters of the contact name, the rst few numbers of
.
the phone number, the rst few letters of the email address, or the rst few letters of the company name.
Editing a Contact
1. Tap on the desktop Contacts.
2. Tap ADD NEW ACCOUNT, tap the desired contact and tap
3. Enter the new information.
4. Tap
to save the changes.
.
Managing a Contact
1. Tap on the desktop Contacts.
2. Tap ADD NEW ACCOUNT, tap the desired contact and tap
• Tap Delete to delete the contact.
• Tap Share to share the contact information with others.
• Tap Place on Home screen to add a shortcut of the contact on the desktop.
to do the following:
Adding a Contact to Favourites
You can save the contacts that you frequently use to Favourites for quick access. Tap the Favourites tab to
view the Favourites list. The contacts that you access most frequently are automatically added to the Frequently
contacted group.
1. Tap
2. Tap ADD NEW ACCOUNT, and tap the desired contact to view the detailed information.
3. Tap
4. To remove the contact from Favourites, tap
on the desktop Contacts.
to turn it to .
to turn it to .
Managing a Group
You can organise contacts into a group to quickly contact all parties in the group. You need an account to create
groups.
1. Tap
2. Tap GROUPS, tap the desired contact to view the detailed information.
on the desktop Contacts.
27

3. Tap Add Group.
4. Enter the name of the group.
5. Add the contacts to the group by entering the contact's name or tapping
Tap
to remove a contact.
6. Tap
To edit a group, tap the group in the GROUPS list, tap
changes.
To delete a group, tap the group in the GROUPS list, tap
To move a contact to another group, tap the group in the GROUPS list, tap
the contacts to move, tap OK, and select the destination group.
to save the changes.
Edit. Make the changes and then tap to save the
Delete OK.
to select from the contacts list.
Move group members. Select
Downloads
Downloads includes les that you have downloaded from emails or the Internet.
on the desktop Downloads. You can:
Tap
• Tap an item to open it.
• To share a le with others, tap and hold the le, and tap
• To delete a le, tap and hold the le, and tap
• To copy a le to another location, tap and hold the le, tap
• To change the sorting method of the les, tap
• To change the viewing mode, tap
Grid view or List view.
.
By name, By date modied or By size.
.
Copy to..., and select the le destination.
Email
This feature requires the Internet connection.
L
You need to set up an email account before using the Email app. For more information, see the "Adding Your
Email Accounts" section.
Checking Your Email
Tap on the desktop Email. The screen displays the inbox of one of your email accounts. You can:
• Tap an email message to read.
• To display email messages in another email folder, tap
• To switch to another email account, tap
• To view the email messages from all your email accounts, tap
• To change the settings of an email account, select the account and tap
and tap the desired account.
Sending an Email Message
1. Tap on the desktop Email.
2. Select the desired email account.
3. Tap
4. Enter the email address of the recipient.
.
• To add more recipients, tap + in To.
• To add more recipients in a carbon copy (Cc) or blind carbon copy (Bcc), tap ∨ in To + in Cc or
Bcc.
and tap the folder you want to view.
Combined view.
Settings.
28

5. Enter the email subject and then your message.
6. To add an attachment, tap
7. Tap
to send the message.
To save the message and send it later, tap
and select a le.
Save draft. The message will be saved in the Drafts folder.
Responding to an Email Message
1. Tap on the desktop Email.
2. Select the desired email account.
3. Tap the desired email message.
4. To reply to the sender, tap
To reply to all recipients, tap
To forward the message to another recipient, tap
.
Reply all.
Forward.
Managing Your Email Messages
• To move a message that you are reading to another folder, tap Move to, and select a folder.
• To delete a message that you are reading, tap
You can select a message by tapping and holding it on the messages list.
L
.
Searching Email Messages
1. Tap on the desktop Email.
2. Select the desired email account.
3. Tap
4. Enter the words you want to search for in the search box.
5. Tap
6. On the results list, tap the desired message to view.
.
.
File Manager
File Manager allows you to browse a list of folders/les that are stored in the memory card and the internal
storage of the device. You can open a le from File Manager by launching the associated application on your
device (for example, viewing a picture le by Gallery).
You can also efciently manage your les using File Manager.
on the desktop File Manager. The screen of le categories displays. You can do the following:
Tap
• To change the storage location:
• To access les on the memory card (if installed), tap
of your card).
• To access les in the internal storage of the device, tap
• To browse all types of les, tap All.
To browse les of a specic type, tap the desired category. The screen displays the list of the search results.
• To change the view style, tap > to do the following:
• To change the sorting method of the les, tap
(descending), By date (ascending) or By date (descending).
• To change the list view style, tap
Icons, Simple or Details.
BOOKMARKS SD card (or the name
BOOKMARKS Internal storage.
By name (ascending), By name
29

Tap < to close the view options.
• You can access the editing and management options by tapping and holding a le/holder or by tapping
• Add shortcut • Open with
• Add to bookmarks • Print
• Compute checksum • Properties
• Create copy • Refresh
• Delete • Rename
• Deselect all • Select
• New le • Select all
• New folder • Send
• Open • Set as home
• Open parent
• To search for a le by keyword, tap
• To change the settings, tap
.
.
.
Gallery
You can browse all the images and videos that are on your device and the memory card in Gallery.
on the desktop Gallery. By default, the screen displays the Timeline view with all photos and videos.
Tap
Albums
To view photos and videos by albums, tap Albums. Tap an album to view the photos and videos in a
chronological order.
From the album list, you can do the following:
• Tap a photo or video in an album to view it.
• Tap
• To
• To change the viewing mode, tap
• To share an album/a photo, tap and hold an album/a photo until the check mark appears. Tap to select other
• To delete an album/a photo, tap and hold an album/a photo until the check mark appears. Tap to select other
• To select all albums/photos, tap and hold an album/a photo until the check mark appears. Then tap
Photos
When viewing a photo, you can do the following:
• To share the photo via email, NFC (Android Beam) or Bluetooth, tap
• To delete the photo, tap
• To view all photos in the album in a slideshow, tap
• To set the photo as the wallpaper of the Home screen or the assigned photo for one of your contacts, tap
• To view the information of the photo, tap
to switch to the Camera app.
to view all photos in an album in a slideshow.
Grid view or List view.
albums/photos. Tap
albums/photos. Tap
Select all.
Set picture as Wallpaper or Contact photo.
to share via email or NFC (Android Beam), or tap to share via Bluetooth.
to delete the selected albums/photos.
.
Details.
.
Slideshow.
30

• To save the photo as a PDF le, tap Print . Select the storage directory, conrm or modify the
lename, and tap SAVE.
Editing Photos
When viewing a photo, tap
You can do the following:
• To adjust the color of the photo, tap Color and select the desired effect.
• To add a photo frame to the photo, tap Frames and select the desired photo frame.
• To crop the photo, tap Crop Crop.
• To move the crop frame, tap and hold inside the frame, and drag it to the desired position.
• To resize the crop frame, tap and drag the edges or the corners of the frame inward or outward.
• To straighten a crooked photo, tap Crop Straighten. Tap and drag the crop frame until you have the
desired effect.
• To rotate the photo, tap Crop Rotate to rotate it 90 degrees clockwise.
• To ip the photo, tap Crop Mirror for a vertical ip; tap again for a horizontal ip; tap again for a
vertical ip.
• To draw on the photo, rst select a color to use. Tap one of the colors at the bottom of the screen, or tap
select a desired color and set its transparency effect. Tap
• To adjust the exposure of the photo, tap Exposure and select the desired effect.
• To add a beautifying effect to the photo, tap Beautify and select the desired effect.
When editing is nished, tap
• To clear your drawing, tap
• To view the information of the edited photo, tap
• To export the edited photo, tap
to save the settings.
• To save the edited photo as a PDF le, tap
the lename, and tap SAVE.
When done, tap Done to save the edited photo as a copy.
. Select Gallery as the photo editing app.
to save the color settings.
. You can do the following:
Reset.
Information.
Export. You can resize the photo and set the export quality. Tap Done
Print . Select the storage directory, conrm or modify
Videos
To view only videos, tap Videos. The videos are listed in a chronological order.
You can do the following:
• Tap a video.
• To view the information of the video, tap
• Tap
• Tap
• To change the viewing mode, tap
• To share a video, tap and hold a video until the check mark appears. Tap to select other videos. Tap
share via email or NFC (Android Beam), or tap
• To delete a video, tap and hold a video until the check mark appears. Tap to select other videos. Tap
delete the selected videos.
• To select all videos, tap and hold a video until the check mark appears. Then tap
to view it.
to switch to the Camera app.
Grid view or List view.
Details.
to
to share via Bluetooth.
to
Select all.
to
31

On the playback screen, you can do the following:
• To share the video via email, NFC (Android Beam) or Bluetooth, tap
• To pause the playback, tap
• To fast backward (rewind)/forward 3 seconds, tap
• To change the viewing mode, tap
full screen.
• To stop the playback, tap
• Tap
Editing Videos
Tap a video on the video list. You can do the following:
• To mute the video, tap
• To trim the video, tap
to access more options:
• Audio effects: When enabled, you can customize the sound settings.
• Loop/Single: Play the video repeatedly/once.
• Stereo/Single track: Set the audio mode.
• Input URL: Enter a URL address for streaming.
• Streaming Settings: Customize the settings for streaming.
• Previous/Next: Play the previous/next video.
• Settings: Change the time for each fast backward/forward step.
• Speaker ON/OFF: Turn off/on the speakerphone mode.
end. Tap
to preview it. Tap Done to save the trimmed video as a copy.
. To resume the playback, tap .
/ .
to view in t-height full screen, in crop screen, or in t-width
.
Mute. The muted video is saved as a copy.
Trim. Drag the trim sliders to the part where you want the video to begin and
MiDM Client
.
MiDM is an Android Mobile Device Management (MDM) solution for remote management and control of
Android devices. You can use it to update Android mobile devices, install or uninstall apps on Android mobile
devices, etc.
For more information, refer to the MiDM documentation.
Music
Before using the Music app, have the audio les ready either on the device or on a memory card.
Not all music le formats are supported by the Music app.
L
Tap on the desktop Music.
By default, the screen displays the Songs list. To lter audio les by category, tap
Playlists.
You can do the following:
• To start playback, tap a le from the list, Shufe All or
• To view the Now playing screen, tap the current playback area at the bottom of the playlist.
• Tap
32
next to the desired le on the list to do the following:
• Play: Play the le.
• Add to playlist: Add the current le to the current or a new playlist.
• Delete: Delete the le permanently from the device or the memory card.
.
Artist, Albums or

• Use as phone ringtone: Set the current le as the phone ringtone.
• Share: Share the le via Bluetooth, NFC (Android Beam) or email.
• Details: View the information of the le.
• To search for a le by keyword, tap
• To customize the sound settings, tap
.
Snapdragon Audio+.
Playback Controls
On the playback screen, you can do the following:
• To pause the playback, tap
• To play the previous/next le, tap
• To play by random sequence, tap
• Tap
• To view the current playlist, tap
• Tap
to cycle through the repeat modes. : playing by sequence; : repeating the current le.
to access more options:
• Add to playlist: Add the current le to the current or a new playlist.
• Use as phone ringtone: Set the current le as the phone ringtone.
• Equalizer: When enabled, you can customize the sound settings in Snapdragon Audio+.
• Delete: Delete the le permanently from the device or the memory card.
. To resume the playback, tap .
/ .
. Tap again to disable the feature.
.
Search
The Search feature enables you to search the web, or applications, contacts and music stored on your device.
Simply enter words in the Google search bar.
Sound Recorder
Sound Recorder is useful for quickly recording messages or thoughts at any time.
on the desktop Sound Recorder.
Tap
1. To record a message, tap
2. To pause recording, tap
3. To stop recording, tap
4. To save the message, tap Done. Otherwise tap Discard.
After the message is saved, you can access the le by using Music or File Manager to search and play it.
Tap
to change the settings:
• Tap File type to change the format of the recorded messages.
• Tap Storage location to change the location of the recorded messages to the device or the memory card.
, hold the device near your mouth, and start recording.
. To resume recording, tap .
. You can preview the message by tapping .
Videos
See "Videos" in the "Gallery" section for information.
33

5 Personalizing Your Device
You can easily customise the device for personal settings through the Settings menu, such as personalizing the
Home screen, changing the display and sound settings, conguration the connection settings, and more.
Settings Menu
To access the Settings menu, do one of the following:
• Tap
• Slide down from the top of the screen with two ngers or twice with one nger to open Quick Settings, and
Not all features are available on all models.
L
Wireless and Networks Settings
WLAN
See the "Wireless Network Connection" section in the "Connectivity" chapter for information.
Bluetooth
See the "Bluetooth" section in the "Connectivity" chapter for information.
Data usage
You can monitor the data usage on the device. This is useful if you are on a limited data allowance.
Airplane mode
See the "Airplane Mode" section in the "Device Basics" chapter for information.
NFC
See the "NFC" section in the "Connectivity" chapter for information.
WIFI Calling Settings
When enabled, this "VoIP" feature helps improve the connection to make and receive calls and text messages,
and audio quality over a WIFI network.
Android Beam
See the "NFC" section in the "Connectivity" chapter for information.
VPN
You can use a virtual private network (VPN) to access the Internet with more security and privacy. A VPN may
also get around regional restrictions.
To set up a VPN connection, tap +, enter the details of the VPN and tap SAVE. Tap the VPN to connect, enter the
required username and password, select the checkbox for Save account information, and tap CONNECT.
If you want to access the Internet via a VPN only, tap
Cellular networks
• You can change the mobile network settings, such as turning on or off data services when roaming,
• Modem Interface: the interface options include USB and UART. For optimal performances:
on the desktop Settings.
.
tap
Always-on VPN.
selecting a network mode, selecting Internet settings, or selecting a network manually.
• USB: Use this option when the device is using the mobile network, but is not connected to the cradle
or computer. Restart the device for the change to take effect.
• UART: Use this option when the device is using the mobile network and is connected to the cradle or
computer. Restart the device for the change to take effect.
34 35

Mobile plan
You may be able to access the website to view the mobile plan of your service provider. (This feature may not be
supported on all models.)
Emergency broadcasts
The emergency alerts feature can warn you about dangerous weather conditions, natural disasters, AMBER
alerts, etc.
Device Settings
Display
• Brightness level: Move the slider to adjust the brightness level of the device.
• Adaptive brightness: When enabled, this can automatically optimize the brightness level of the device
based on the available light around you.
• Wallpaper: Change the wallpaper of the desktop.
• Sleep: Change the screen time-out setting.
• Daydream: Set the screensaver when the device is charging or docked.
• Font size: Select the desired font size.
• When device is rotated: To set the screen to rotate automatically based on the device orientation, select
Rotate the contents of the screen. Otherwise, select Stay in current orientation.
Sensors
• Touch: Tap Calibration to calibrate the touch screen if the touch screen is not working properly.
Sound & notication
• Move the slider to adjust the sound level for media playback, alarms and ringtones.
• If you want the device to vibrate besides playing a ringtone when there is an incoming call, enable Also
vibrate for calls.
• Do not disturb: Set how and when to receive notications.
• You can set the ringtones for incoming calls and notications.
• Tap Other sounds to enable or disable Dial pad tones, Screen locking sounds, Charging sounds, Touch
sounds and Vibrate on touch. You can also set the sound mode for emergency alerts.
• When device is locked: Set how to display notications when the device is locked.
• App notications: Set the notication settings individually for apps. (The setting under When device is
locked will always take precedence over the setting for an individual app.)
• Notication access: View the apps that can access your notications.
• Do Not Disturb access: View the apps that can override the Do not disturb setting.
Apps
You can manage the permission settings, default links and battery optimization for the apps. See the "Modem
Interface: the interface options include USB and UART. For optimal performances:" section in the "Getting
Started" chapter for information.
Storage & USB
The storage options of you device include the device internal storage and a removable memory card (if inserted).
You can view the storage status in Storage & USB.
• Internal storage: This is used for personal settings and data, and downloaded or transferred contents. Tap
this item to view more information and options.
• Portable storage: You can move media les or apps to a memory card to free up space in the internal
storage. Tap this item to view more information and options.
• To unmount the memory card, tap
before removing the card from the device.

• To format the memory card, tap the card name Settings Format. Note that all data will be
erased from the card when you format it.
• You can use and format a new memory card as the device's internal storage. Tap the card name
Settings Format as internal. Follow the on-screen instructions to complete the procedure. Note
that if this card is not to be used as internal storage any longer, move all data to the device's internal
storage before reformatting the card.
Battery
You can view the percentage and time of the remaining battery power since the last full charge.
You can turn on the Battery saver feature to help conserve the battery power. Tap
turn on or off Battery saver, or set when to turn it on automatically.
For information on battery optimization for apps, see the "Modem Interface: the interface options include USB
and UART. For optimal performances:" section in the "Getting Started" chapter.
Memory
The memory (RAM) of the device is used to handle the system and running apps. It is not used as storage space.
You can view the memory status in Memory.
Users
You can share the device with others by creating a separate user space for each person. Each user can have their
own settings, Home screens, etc.
You can also have someone use the device temporarily as a guest user instead of a regular user.
To add a new user:
1. Tap
2. Tap SET UP NOW. The device will switch to the lock screen. Unlock the screen to use the device as the
3. To select a user, slide down from the top of the screen with two ngers or twice with one nger to open
To remove a user:
1. Tap
2. If you are the owner of the device, tap
on the desktop Settings Users Add user OK.
new user.
Quick Settings, tap
on the desktop Settings Users.
If you are not the owner of the device, tap
and select the desired user.
next to the user's name, and tap Remove user.
Delete New user from this device.
Battery saver. You can
Personal Settings
Security
• Screen lock: Set the lock setting when the screen enters the sleep mode or when you press the power
button. This can protect your personal information.
When using Pattern as the screen lock, you can customize the settings in Make pattern visible,
Automatically lock and Power button instantly locks.
When using Password and PIN as the screen lock, you can customize the settings in Automatically lock
and Power button instantly locks.
• Lock screen message: Set the message to display on the lock screen.
• Encrypt phone: When the device is encrypted, the data on the device cannot be read by an unauthorized
party.
• Make passwords visible: When enabled, the characters of your passwords will not be hidden behind
asterisks.
• Device administrators: View or activate/deactivate device administrators.
36 37

• Unknown sources: Enable this feature if you want to install an app from an unknown source.
• Storage type: Display the storage type.
• Trusted credentials: Most certicates are installed automatically for the purpose of identifying your device
for security. Tap to display the trusted certicates installed on the device.
• Install from SD card: Use this feature if you want to manually install a certicate.
• Clear credentials: Use this feature if you want to remove all certicates that you have installed (not
including the permanent system certicates).
• Trust agents: View or activate/deactivate security services to bypass the lock screen. To use this feature,
you need to set the screen lock.
• Screen pinning: When enabled, you can lock the screen to a specic app, which can prevent prying from
someone else while using your device and accidental key presses.
To use screen pinning:
1. Enable Screen pinning in Settings Security.
2. Open the screen you want to pin.
3. Tap
4. Swipe up and then tap
5. To unpin the screen, tap and hold
• Apps with usage access: Manage what apps have access to app-usage data on your device
Accounts
You can set up multiple accounts on the device. For information on managing your accounts, see the "Modem
Interface: the interface options include USB and UART. For optimal performances:" section in the "Getting
Started" chapter.
Language & input
• Language: Change the display language.
• Spell checker: When enabled, you can tap on a misspelled word to get a list of suggested replacements.
• Personal dictionary: Add your own words to your personal dictionary so that your device remembers
them.
• Current Keyboard: Change the keyboard language.
• Android Keyboard (AOSP): Change the keyboard settings.
• Text-to-speech output: Customise the text-to-speech settings.
• Pointer speed: Change the speed of scrolling.
Backup & reset
• Network settings reset: Reset the settings for mobile data, WIFI or Bluetooth when you encounter
connection problems.
• Factory data reset: Delete all data and settings from the device. Back up your data before performing a
factory data reset.
(Recent Apps button) on the device.
.
and at the same time.
System Settings
Date & time
You can change the date and time of your device.
Accessibility
There may not be accessibility services installed on your device.
• Captions: Enable or disable the closed captions.
• Magnication gestures: When this item is enabled, you can zoom or magnify by triple-tapping the screen.

• Large text: Enable this item to make the screen easier to see.
• High contrast text: Enable this item to make text easier to read by turning colored text to black or white.
• Power button ends call: When this item is enabled, you can end a call easily by simply pressing the
device's power button.
• Auto-rotate screen: When this item is enabled, the screen rotates automatically based on the device
orientation.
• Speak passwords: When this item is enabled, password characters are announced audibly when optional
accessibility services are enabled.
• Accessibility shortcut: When this item is enabled, you can enable optional accessibility services quickly.
• Text-to-speech output: Customise the text-to-speech settings.
• Touch & hold delay: Change the delay level for a touch on the screen to become a touch and hold.
• Colour inversion: Exchange colour values of the screen.
• Colour correction: When this item is enabled, the colours displayed on the screen are adjusted for people
with difculties distinguishing colours.
Printing
There may not be printing services installed on your device.
About phone
You can view the device and software information, and check for available system updates.
38 PB

6 Reference
Troubleshooting
For initial support, contact your IT department or your local authorised dealer.
Power does not switch on when using battery power.
The remaining battery power may be too low to run your device. Charge the battery.
Screen responds slowly.
Make sure that your device is not running out of battery power. If the problem still persists, restart your device.
Screen freezes.
Restart your device.
Screen is hard to read.
Make sure that the backlight of the display is set to a high-enough brightness.
Cannot establish a connection with a computer.
• Make sure that your device and your computer are both switched on before trying to establish a connection.
• Make sure that the cable is securely plugged into the USB port on your computer and on your device.
Connect the USB cable directly to your computer—do not run the cable through a USB hub.
• Restart your device before connecting the cable. Always disconnect your device before you restart your
computer.
Caring for the Device
Taking good care of your device will ensure trouble-free operation and reduce the risk of damage to your device.
• Keep your device away from excessive moisture and extreme temperatures.
• Avoid exposing your device to direct sunlight or strong ultraviolet light for extended periods of time.
• Do not place anything on top of your device or drop objects on your device.
• Do not drop your device or subject it to severe shock.
• Do not subject your device to sudden and severe temperature changes. This could cause moisture
condensation inside the unit, which could damage your device. In the event of moisture condensation, allow
the device to dry out completely before use.
• The screen surface can easily be scratched. Avoid touching it with sharp objects. Non-adhesive generic
screen protectors designed specically for use on portable devices with LCD panels may be used to help
protect the screen from minor scratches.
• Never clean your device with it powered on. Use a soft, lint-free cloth to wipe the screen and the exterior of
your device.
• Do not use paper towels to clean the screen.
• Never attempt to disassemble, repair or make any modications to your device. Disassembly, modication
or any attempt at repair could cause damage to your device and even bodily injury or property damage and
will void any warranty.
• Keep your device and its accessories out of the reach of small children or animals.
• Do not store or carry ammable liquids, gases or explosive materials in the same compartment as your
device, its parts or accessories.
• To discourage theft, do not leave the device and accessories in plain view in an unattended vehicle.

• Do not leave the device and its accessories in a vehicle in direct sunlight. Overheating may damage the
device.
• The device (excluding accessories) is protected again splashes, water and dust. When tested under
controlled laboratory conditions, the device is compliant with the IP67 rating of the IEC 60529 standard.
The manufacturer guarantees this grade provided all jack covers are properly and securely closed.
Immersion in water or water-pressure such as washing the unit with running water may cause damage to
the unit and voids warranty. Normal wear might decrease resistance. The device should not be operated in
water.
Regulatory Information
For regulatory identication purposes, A500 series is assigned a model number of N536/N536A/N536B.
Marking labels located on the exterior of your device indicate the regulations that your model complies with.
Please check the marking labels on your device and refer to the corresponding statements in this chapter. Some
notices apply to specic models only.
Maximum radio frequency (RF) power for Europe:
BT 8.9 dBm
BLE 0.1 dBm
2.4G_11b 17.9 dBm
2.4G_11g 18.3 dBm
2.4G_11n20 17.6 dBm
5G_11a 19.02 dBm
5G_11n20 19.07 dBm
5G_11n40 19.06 dBm
GSM900 32 dBm
GSM1800 28.95 dBm
LTE Band3 22.48 dBm
LTE Band7 20.76 dBm
LTE Band 20 21.98 dBm
RFID -9.88 dBuA/m@10m
Bluetooth 2402-2480 MHz
WLAN 2.4 GHz 2412-2472 MHz
WLAN 5G Hz 5180-5240 MHz /
NFC 13.553-13.567 MHz
FCC
5260-5320 MHz /
5500-5700 MHz
Federal Communication Commission Interference Statement
This equipment has been tested and found to comply with the limits for a Class B digital device pursuant to Part
15 of the FCC Rules. These limits are designed to provide reasonable protection against harmful interference
in a residential installation. This equipment generates, uses, and can radiate radio frequency energy and, if not
installed and used in accordance with the instructions, may cause harmful interference to radio communications.
However, there is no guarantee that interference will not occur in a particular installation. If this equipment does
cause harmful interference to radio or television reception, which can be determined by turning the equipment
off and on, the user is encouraged to try to correct the interference by one or more of the following measures:
• Reorient or relocate the receiving antenna.
• Increase the separation between the equipment and receiver.
• Connect the equipment into an outlet on a circuit different from that to which the receiver is connected.
40 41

• Consult the dealer or an experienced radio/TV technician for help.
Any changes or modications not expressly approved by the manufacturer could void the user's authority to
operate the equipment.
This device complies with part 15 of the FCC Rules. Operation is subject to the following two conditions: (1)
This device may not cause harmful interference, and (2) this device must accept any interference received,
including interference that may cause undesired operation.
Please note:
The use of a non-shielded interface cable with this equipment is prohibited.
IC
Canadian Department Of Communications
CAN ICES-3(B)/NMB-3(B)
Radio Interference Regulations Class B Compliance Notice
This Class B digital apparatus meets all requirements of the Canada Interference-Causing equipment regulations.
Cet appareil numérique de Classe B respecte toutes les exigences du Règlement Canadien sur le matériel
brouileur.
This device complies with Industry Canada's licence-exempt RSSs. Operation is subject to the following two
conditions:
(1) This device may not cause interference; and
(2) This device must accept any interference, including interference that may cause undesired operation of the
device.
Le présent appareil est conforme aux CNR d'Industrie Canada applicables aux appareils radio exempts de
licence. L'exploitation est autorisée aux deux conditions suivantes:
(1) l'appareil ne doit pas produire de brouillage, et
(2) l'utilisateur de l'appareil doit accepter tout brouillage radioélectrique subi, même si le brouillage est
susceptible d'en compromettre le fonctionnement."
The device could automatically discontinue transmission in case of absence of information to transmit, or
operational failure. Note that this is not intended to prohibit transmission of control or signaling information or
the use of repetitive codes where required by the technology.
The device for operation in the band 5150–5250 MHz is only for indoor use to reduce the potential for harmful
interference to co-channel mobile satellite systems.
High-power radars are allocated as primary users (i.e. priority users) of the bands 5250–5350 MHz and 5650–
5850 MHz and that these radars could cause interference and/or damage to LE-LAN devices.
Cet équipement doit être installé et utilisé avec un minimum de 10 mm de distance entre la source de
rayonnement et votre corps.
CE
Products with the CE marking comply with Radio Equipment Directive (Directive 2014/53/EU) - issued by the
Commission of the European Community.
Compliance with these directives implies conformity to the following European Standards:
• EN301489-1: Electronic compatibility and Radio spectrum Matters (ERM), ElectroMagnetic Compatibility
(EMC) standard for radio equipment and services; Part 1: Common technical requirements
• EN301489-3: Electronic compatibility and Radio spectrum Matters (ERM), ElectroMagnetic Compatibility
(EMC) standard for radio equipment and services; Part 3: Specic conditions for Short-Range Devices
(SRD) operating on frequencies between 9 kHz and 246 GHz
• EN55032: Electromagnetic compatibility of multimedia equipment-Emission requirements
• EN55035: Immunity characteristics

• EN61000-3-2: Limits for harmonic current emissions
• EN61000-3-3: Limitation of voltage uctuation and icker in low-voltage
• EN 300328: BT/WLAN 2.4 GHz
• EN 300330: RFID/NFC
• EN301893: WLAN 5 GHz
• EN301511: WWAN GSM
• EN301908-1: WWAN LTE
• EN301908-13: WWAN LTE
• IEC 60950-1:2005
IEC 60950-1:2005/AMD1:2009
IEC 60950-1:2005/AMD2:2013
(EN 60950-1:2006 +A11:2009 + A1:2010 + A12:2011 + A2:2013)
The device is restricted to indoor use only when operating in the 5150 to 5350 MHz frequency range.
AT BE BG HR CY CZ DK
EE FI FR DE EL HU IE
IT LV LT LU MT NL PL
PT RO SK SI ES SE UK
RF Exposure Information (SAR)
This device has been tested and meets applicable limits for Radio Frequency (RF) exposure. Specic Absorption
Rate (SAR) refers to the rate at which the body absorbs RF energy. SAR limits are 1.6 Watts per kilogram (over
a volume containing a mass of 1 gram of tissue) in countries that follow the United States FCC limit and 2.0 W/
kg (averaged over 10 grams of tissue) in countries that follow the Council of the European Union limit. Tests for
SAR are conducted using standard operating positions with the device transmitting at its highest certied power
level in all tested frequency bands. To reduce exposure to RF energy, use a hands-free accessory or other similar
option to keep this device away from your head and body. Carry this device at least 10 mm away from your body
to ensure exposure levels remain at or below the as-tested levels. Choose the belt clips, holsters, or other similar
body-worn accessories which do not contain metallic components to support operation in this manner. Cases with
metal parts may change the RF performance of the device, including its compliance with RF exposure guidelines,
in a manner that has not been tested or certied, and use such accessories should be avoided.
WEEE
This symbol means that according to local laws and regulations your product shall be disposed of separately
from household waste. When this product reaches its end of life, take it to a collection point designated by local
authorities. Proper recycling of your product will protect human health and the environment.
Bluetooth
DID: D033925
Safety Precautions
• When using the device, note that the ambient temperature should be below 45ºC (113ºF).
• To prevent possible hearing damage, do not listen at high volume levels for long periods of time.
About Charging
• Use only the charger supplied with your device. Use of another type of charger will result in malfunction
and/or danger.
42 43

• This product is intended to be supplied by a LISTED Power Unit marked with "LPS", "Limited Power
Source" and output rated + 5 V dc / 2.0 A.
• Use a specied battery in the equipment.
About the Charger
• Do not use the charger in a high moisture environment. Never touch the charger when your hands or feet
are wet.
• Allow adequate ventilation around the charger when using it to operate the device or charge the battery. Do
not cover the charger with paper or other objects that will reduce cooling. Do not use the charger while it is
inside a carrying case.
• Connect the charger to a proper power source. The voltage requirements are found on the product case and/
or packaging.
• Do not use the charger if the cord becomes damaged.
• Do not attempt to service the unit. There are no serviceable parts inside. Replace the unit if it is damaged or
exposed to excess moisture.
About the Battery
• Use a specied battery in the equipment.
• CAUTION: This unit contains a Lithium Ion battery. The battery can burst or explode, releasing hazardous
chemicals. To reduce the risk of re or burns, do not disassemble, crush, puncture, or dispose of in re or
water.
• Important instructions (for service personnel only)
• Caution: Risk of explosion if battery is replaced by an incorrect type. Dispose of used batteries
according to the instructions.
• Replace only with the same or equivalent type recommended by the manufacturer.
• The battery must be recycled or disposed of properly.
• Use the battery only in the specied equipment.
USA Contact Information
Magellan
279 E Arrow Highway San Dimas, CA 91773 USA
+1 909-394-5000
http://www.magellangps.com
 Loading...