

Page 1

User’s Manual
Page 2

Revision: R00
(2008/7)
Trademarks
Microsoft, Windows, the Windows logo, Windows Media, Outlook and
ActiveSync are registered trademarks or trademarks of Microsoft
Corporation in the United States and/or other countries. Microsoft products
are licensed to OEMs by Microsoft Licensing, Inc., a wholly owned
subsidiary of Microsoft Corporation. The Bluetooth word mark and logos
are owned by the Bluetooth SIG, Inc. All brand and product names are
trademarks or registered trademarks of their respective companies.
Note
The information in this manual is subject to change without notice.
Page 3

Table of Contents
Preface ............................................................................................ ix
Regulatory Information.................................................................. xi
1 Getting Started.......................................................................1-1
1.1 Identifying Hardware Components..................................1-1
Front Components........................................................... 1-1
Back Components...........................................................1-3
Left-Side Components..................................................... 1-4
Right-Side Components ..................................................1-5
Top Components.............................................................1-6
Bottom Components........................................................ 1-6
1.2 Installing the SIM Card and Battery.................................1-7
1.3 Charging the Battery ....................................................... 1-8
1.4 Turning the Device On and Off...................................... 1-10
Turning On for the First Time ........................................1-10
Entering the Suspend Mode..........................................1-10
Turning Off .................................................................... 1-11
1.5 Installing Microsoft ActiveSync......................................1-12
1.6 Using Your Device in a Vehicle.....................................1-14
Using the Car Holder.....................................................1-14
Connecting the Car Charger..........................................1-14
1.7 Expanding Your Device.................................................1-15
Using a Micro SD Card.................................................. 1-15
2 Basic Skills.............................................................................2-1
2.1 Using the Stylus .............................................................. 2-1
2.2 Using the Scroll Bar......................................................... 2-2
i
Page 4

2.3 Today Screen...................................................................2-2
Landscape View...............................................................2-3
2.4 Navigation Bar and Toolbar .............................................2-4
2.5 Quick Launch Bar.............................................................2-5
2.6 Mio Menu .........................................................................2-6
Customizing Program Icons.............................................2-7
2.7 Running Programs...........................................................2-7
2.8 Shortcut Menus................................................................2-8
2.9 Notifications......................................................................2-8
2.10 Entering Information.........................................................2-9
Entering Text Using the Input Panel ................................2-9
MioKeyboard..................................................................2-10
Writing on the Screen.....................................................2-12
Drawing on the Screen...................................................2-12
Recording a Message....................................................2-13
Using My Text................................................................2-14
2.11 Securing Your Device ....................................................2-16
Locking the Keypad........................................................2-16
Locking the Device.........................................................2-16
Locking the Phone .........................................................2-17
3 Using the Phone.....................................................................3-1
3.1 About Your Phone............................................................3-1
Before You Start...............................................................3-1
3.2 Turning On and Off the Phone Function..........................3-2
Turning Off the Phone......................................................3-2
Turning On the Phone......................................................3-2
Starting Microsoft Phone..................................................3-3
Phone Status Icons..........................................................3-3
3.3 Making a Call ...................................................................3-4
Dialing a Call....................................................................3-4
Making a Call Using a Recently Connected Number.......3-4
Making a Call from Contacts............................................3-5
Making a Call from the Call History List...........................3-6
3.4 Answering a Call..............................................................3-6
Rejecting a Call................................................................3-6
Ending a Call....................................................................3-7
3.5 Adjusting the In-Call Volume............................................3-7
Adjusting the Phone Volume ............................................3-7
ii
Page 5

Muting a Call....................................................................3-8
Using Speakerphone.......................................................3-8
3.6 Managing More than One Call.........................................3-8
Holding a Call to Take a Second Call.............................. 3-9
Rejecting the Second Call...............................................3-9
Holding a Call to Make a Second Call.............................3-9
Swapping between Calls.................................................3-9
Setting up a Conference Call.........................................3-10
3.7 Taking a Note During a Call ..........................................3-11
3.8 Using Call History..........................................................3-11
Viewing Call History.......................................................3-12
Managing Call History ...................................................3-12
Adding an Entry to Contacts Using Call History............3-13
3.9 Using Speed Dial........................................................... 3-13
Creating a Speed Dial Entry..........................................3-13
Editing or Deleting a Speed Dial Entry..........................3-14
3.10 Managing Phone Numbers............................................ 3-14
Transferring from Microsoft Contacts............................3-14
Transferring from SIM Card ........................................... 3-15
3.11 Customizing Your Phone............................................... 3-15
Changing Phone Settings.............................................. 3-15
Changing Services Settings ..........................................3-16
Changing Network Settings...........................................3-16
Changing the PIN2 Code...............................................3-17
3.12 Cell Broadcast...............................................................3-17
3.13 Additional Phone Operations.........................................3-18
Checking Your Voice Mail .............................................3-18
Making an Emergency Call............................................3-18
Dialing an International Call...........................................3-19
4 Managing Your Device.......................................................... 4-1
4.1 Managing Power..............................................................4-1
Low Battery Signals and Actions.....................................4-1
Power Management ........................................................4-2
Power-Saving Tips ..........................................................4-3
4.2 Managing Memory........................................................... 4-4
Main Memory................................................................... 4-4
Mio Recovery .................................................................. 4-4
Storage Card...................................................................4-4
iii
Page 6

Smart Quit........................................................................4-4
4.3 Customizing Your Device.................................................4-5
4.4 Finding and Organizing Information.................................4-9
5 Microsoft Pocket Outlook......................................................5-1
5.1 Calendar: Scheduling Appointments and Meetings.........5-1
Creating an Appointment .................................................5-2
Using the Calendar Summary Screen..............................5-3
5.2 Contacts: Tracking Friends and Colleagues....................5-4
Creating a Contact...........................................................5-5
Using the Contacts Summary Screen..............................5-6
5.3 Tasks: Keeping a To Do List............................................5-7
Creating a Task................................................................5-8
Using the Tasks Summary Screen...................................5-9
5.4 Notes: Capturing Thoughts and Ideas ...........................5-10
Creating a Note..............................................................5-11
5.5 Messaging: Sending and Receiving E-mail Messages..5-12
Downloading Messages.................................................5-12
E-mail Direct Push .........................................................5-13
Setting up an E-mail Account.........................................5-13
Composing and Sending an E-mail and SMS Message5-13
Composing and Sending a MMS Message....................5-14
Receiving and Viewing an MMS Message.....................5-17
Receiving Attachments ..................................................5-17
6 More Programs.......................................................................6-1
6.1 ActiveSync .......................................................................6-1
Synchronizing Data..........................................................6-2
Synchronizing Directly with Exchange Server..................6-3
6.2 Word Mobile.....................................................................6-4
Creating a Document.......................................................6-4
Opening a Document.......................................................6-5
6.3 Excel Mobile.....................................................................6-6
Creating a Workbook .......................................................6-6
Opening a Workbook .......................................................6-7
6.4 PowerPoint Mobile...........................................................6-8
6.5 Windows Live...................................................................6-9
Signing in to Windows Live..............................................6-9
iv
Page 7

6.6 Windows Media Player Mobile ......................................6-11
6.7 Pictures & Videos..........................................................6-12
Viewing Pictures and Launching Video Clips................6-12
Navigating by Pictures................................................... 6-13
6.8 Calculator ......................................................................6-14
6.9 Internet Sharing.............................................................6-15
USB Connection............................................................6-15
Bluetooth Connection....................................................6-16
7 Camera....................................................................................7-1
7.1 Introduction...................................................................... 7-1
7.2 Taking Pictures................................................................ 7-2
Taking Continuous Pictures.............................................7-3
Adding the GPS Stamp into the Picture ..........................7-3
Camera Settings.............................................................. 7-4
7.3 Recording Video Clips.....................................................7-6
Video Settings .................................................................7-7
7.4 Viewing Mode..................................................................7-8
7.5 Editing Pictures ............................................................... 7-9
7.6 Sending Pictures ...........................................................7-10
8 Mio Programs.........................................................................8-1
8.1 Emergency Locator .........................................................8-1
Creating an SMS Recipient.............................................8-1
Sending an Emergency Message....................................8-2
Customizing Your Emergency Message .........................8-2
8.2 Mio SMS Locator.............................................................8-3
8.3 Quick GPS Position.........................................................8-4
8.4 Contact Guard.................................................................8-4
Setting the Password.......................................................8-5
Setting the List................................................................. 8-5
Setting the Items..............................................................8-6
8.5 Mio Blacklist .................................................................... 8-6
Setting the List................................................................. 8-6
Setting the Items..............................................................8-7
Changing the Filter Settings............................................8-7
8.6 SIM Manager...................................................................8-7
SIM Contacts...................................................................8-7
v
Page 8

SMS Messages................................................................8-8
8.7 MioCalc............................................................................8-9
Starting and Exiting MioCalc............................................8-9
Using the Calculator Mode ...............................................8-9
Using the Currency Mode ..............................................8-10
Using the Metrology Mode.............................................8-11
8.8 SDDialer.........................................................................8-12
Creating a Voice Tag .....................................................8-13
Using a Voice Tag..........................................................8-14
8.9 World Time.....................................................................8-14
Starting and Exiting World Time.....................................8-14
Changing the Clock Style ...............................................8-15
Selecting Cities ..............................................................8-15
Adjusting the Time .........................................................8-16
Synchronizing GMT........................................................8-16
9 Add-On Programs ..................................................................9-1
9.1 Installing Programs ..........................................................9-1
9.2 Mundu Radio....................................................................9-2
Listening to Internet Radio...............................................9-2
9.3 Mobile Assistant...............................................................9-3
RingTone..........................................................................9-4
Image...............................................................................9-6
SIM Contacts....................................................................9-8
SMS Manager................................................................9-10
Data Backup...................................................................9-11
File Explorer...................................................................9-12
Network Settings............................................................9-12
10 Getting Connected ...............................................................10-1
10.1 Connection Settings.......................................................10-1
GPRS/EDGE Connection...............................................10-1
Wireless Network Connection........................................10-2
10.2 Using the Bluetooth Function.........................................10-4
Turning On and Off the Bluetooth Function ...................10-4
Sending Files via the Bluetooth Function.......................10-5
Creating a Bluetooth Partnership...................................10-5
10.3 Using Internet Explorer Mobile.......................................10-7
vi
Page 9

Browsing the Internet .................................................... 10-7
Adding a Favorite ..........................................................10-8
11 Troubleshooting and Maintenance .................................... 11-1
11.1 Resetting Your Device................................................... 11-1
11.2 Restoring Factory Default State.................................... 11-2
11.3 Troubleshooting.............................................................11-3
Power Problems............................................................11-3
Memory Problems .........................................................11-3
Screen Problems...........................................................11-4
Connection Problems....................................................11-6
11.4 Taking Care of Your Device.......................................... 11-7
General Guidelines........................................................ 11-7
Phone Guidelines..........................................................11-8
Travel Guidelines...........................................................11-9
I Index ........................................................................................I-1
vii
Page 10

Page 11

Welcome
Preface
Congratulations on purchasing this product with the phone and navigation
features. This product is a Microsoft
device. Due to the size and capabilities of the device, you can keep your most
important business and personal information up-to-date and close at hand.
Microsoft
you to synchronize the information on your desktop computer or Microsoft
Exchange Server with the device.
®
ActiveSync® 4.5 increases the power of your device by allowing
NOTE: This product is a quad-band device. However, not all regions support
quad-band services.
®
Windows Mobile™ Version 6-based
ix
Page 12

Where to Find Information
If you cannot find information in this manual, refer to the following table to
acquire the specific information:
For information on See this source
First time startup Quick Start Guide
Using the phone function Chapter 3 of this manual
Using the programs on the program disc Chapter 9 of this manual
Section 6.1 of this manual Microsoft ActiveSync
ActiveSync Help on your desktop
computer
Last-minute updates and detailed
technical information
Product web site: www.mio-tech.com
Microsoft web site:
www.microsoft.com
x
Page 13

Regulatory Information
NOTE: Marking labels located on the exterior of your device indicate the regulations
that your model complies with. Please check the marking labels on your device and
refer to the corresponding statements in this chapter. Some notices apply to specific
models only.
Regulations Statements
NOTE: For regulatory identification purposes, the device is assigned a model number
of N169.
USA Notice
Federal Communications Commission Radio Frequency
Interference Statement
NOTE:
This equipment has been tested and found to comply with the limits for a
Class B digital device pursuant to Part 15 of the FCC Rules. These limits are
designed to provide reasonable protection against harmful interference in a
residential installation. This equipment generates, uses, and can radiate radio
frequency energy and, if not installed and used in accordance with the
instructions, may cause harmful interference to radio communications.
However, there is no guarantee that interference will not occur in a particular
installation. If this equipment does cause harmful interference to radio or
television reception, which can be determined by turning the equipment off
and on, the user is encouraged to try to correct the interference by one or
more of the following measures:
Reorient or relocate the receiving antenna.
Increase the separation between the equipment and receiver.
xi
Page 14

Connect the equipment into an outlet on a circuit different from that to
which the receiver is connected.
Consult the dealer or an experienced radio/TV technician for help.
This device complies with Part 15 of the FCC Rules. Operation is subject to
the following two conditions: (1) This device may not cause harmful
interference, and (2) this device must accept any interference received,
including interference that may cause undesired operation.
Any changes or modifications not expressly approved by the manufacturer
could void the user’s authority to operate the equipment.
IMPORTANT NOTE:
FCC Radiation Exposure Statement:
For body worn operation, this phone has been tested and meets the FCC RF
exposure guidelines for use with an accessory that contains no metal and the
positions the handset a minimum of 1.5 cm from the body. Use of other
enhancements may not ensure compliance with FCC RF exposure
guidelines. If you do no t use a body-worn accessory and are not holding the
phone at the ear, position the handset a minimum of 1.5 cm from your body
when the phone is switched on.
About the Radio Frequency Exposure
This product is a low-power radio transmitter and receiver. When it is turned
on, it receives and also sends out radio frequency (RF) signals. Specific
Absorption Rate (SAR) is the unit of measurement for the amount of radio
frequency energy absorbed by the body.
The highest SAR values for this product (the limit is 1.6 W/kg) are as
follows:
When tested for use: 1.48 W/kg for GSM850, 0.772 W/kg for PCS1900,
0.016 W/kg for WLAN Head SAR.
When worn on the body: 1.52 W/kg for GSM850, 0.649 W/kg for
PCS1900, 0.01 W/kg for WLAN Body SAR.
To reduce the effects of the radio frequency energy on the human body, use
the phone feature with care. For example, make short calls as possible as you
can.
xii
Page 15

European Notice
Products with the CE marking comply with Radio & Telecommunication
Terminal Equipment Directive (R&TTE) (1999/5/EEC) and the Low
Voltage Directive (2006/95/EC) – as amended by Directive 93/68/ECC issued by the Commission of the European Community.
Compliance with these directives implies conformity to the following
European Standards:
1999/5/EEC Radio & Telecommunication Terminal Equipment
Directive (R&TTE)
EN 301 511 / EN 300 328
Specific Absorption Rate (SAR)
Standard: EN 50360, EN 50361, EN 50392
2006/95/EC Low Voltage Directive (LVD)
IEC 60950-1:2001
The manufacturer cannot be held responsible for modifications made by the
User and the consequences thereof, which may alter the conformity of the
product with the CE Marking.
Hereby, Mio Technology Limited, declares that this N169 is in compliance
with the essential requirements and other relevant provisions of Directive
1999/5/EC.
This CE marking is valid for EU non-harmonized telecommunications
products.
This equipment may be operated in:
AT BE BG CH CY CZ DE DK
EE ES FI FR GB GR HU IE
IT IS LI LT LU LV MT NL
NO PL PT RO SE SI SK TR
Products with 2.4–GHz Wireless LAN Devices
This section provides information about the following topics:
France
xiii
Page 16

L'utilisation de cet equipement (2.4GHz wireless LAN) est soumise à
certaines restrictions: cet equipement peut être utilisé à l'interieur d'un
batiment en utilisant toutes les frequences de 2400 a 2483.5MHz (Chaine
1–13). Pour une utilisation en environnement exterieur, vous devez utiliser
les frequences comprises entre 2454 a 2483.5–MHz (Chaine 10–13). Pour
les dernières restrictions, voir http://www.art-telecom.fr.
For 2.4–GHz wireless LAN operation of this product, certain restrictions
apply. This equipment may use the entire–2400–MHz to 2483.5–MHz
frequency band (channels 1 through 13) for indoor applications. For outdoor
use, the 2454–MHz to 2483.5–MHz frequency band (channels 10 through
13) may not be used. For the latest requirements, see
http://www.art-telecom.fr.
Italy
E’necessaria una concessione ministeriale anche per l’uso del prodotto.
Verifici per favore con il proprio distributore o direttamente presso la
Direzione Generale Pianificazione e Gestione Frequenze. License required
for use. Verify with your dealer or directly with the General Direction for
Frequency Planning and Management (Direzione Generale Pianificazione e
Gestione Frequenze).
Bluetooth
Bluetooth QD ID B012914
Safety Precautions
Prolonged listening of music in maximum volume can damage the ears.
The use of headphones other than those recommended/supplied can
cause hearing impairment due to excessive sound pressure.
DO NOT use the flash/flashlight close to or direct on human (especially
children) or animal eyes. Exposure to the intense light emitted from the
flash may damage eyesight.
xiv
Page 17

About the AC Adapter
CAUTION: Use only the AC adapter supplied with your device. Use of
another type of AC adapter will result in malfunction and/or danger.
This product is intended to be supplied by a LISTED Power Unit marked
with “LPS,” “Limited Power Source” and output rated + 5 V dc / 1.0 A
maximum.
Do not use the adapter in a high moisture environment. Never touch the
adapter when your hands or feet are wet.
Allow adequate ventilation around the adapter. Avoid locations with
restricted airflow.
Connect the adapter to a proper power source. The voltage and
grounding requirements are found on the product case and/or packaging.
Do not use the adapter if the cord becomes damaged.
Do not attempt to service the unit. There are no serviceable parts inside.
Replace the unit if it is damaged or exposed to excess moisture.
About the Battery
CAUTION: Risk of explosion if battery replaced by an incorrect type.
Dispose of used batteries according to the instructions.
Replace only with the same or equivalent type recommended by the
manufacturer.
Do not mutilate, puncture, or dispose of battery in fire. The battery can
burst or explode, releasing hazardous chemicals.
Do not use knifes, screwdrivers or other metallic tools to handle and
extract the battery out of the device.
Use the specified charger only.
About the Electrostatic Discharge
Electrostatic discharges can interfere with the normal functioning of the
electronic devices. Your equipment can behave abnormally owing to such an
event, resulting in the possible data corruption or loss of unsaved data. To
recover from this, reset your equipment.
xv
Page 18

To avoid losing data due to electrostatic discharges or other types of events,
it is recommended that you regularly save and backup data.
xvi
Page 19

1 Getting Started
This chapter introduces you to the external components of your device, and
guides you through the process of setting up your device for use.
1.1 Identifying Hardware Components
The illustrations below introduce you to the various buttons, connectors,
ports and features of your device.
Front Components
Getting Started 1-1
Page 20

Ref Component Description
Wi-Fi/Bluetooth
Indicator
Charge/Notification
Indicator
Earpiece
Touch Screen
End Button
Scroll Bar
Talk Button
Flashing in green indicates that the Wi-Fi function
is turned on.
Flashing in blue indicates that the Bluetooth
function is turned on.
Glowing in amber indicates that battery charging
is in progress.
Glowing in green indicates that the battery is fully
charged.
Flashing in green indicates that a mobile phone
network is available.
Flashing in amber informs you of scheduled
appointments, alarms and reminders.
Serves as the phone earpiece during a call.
Displays the output of your device. Tap the screen
with the stylus to select menu commands or enter
information.
Ends or rejects a call.
Returns to the Today screen from another program.
Moves up or down in the menu by dragging up or
down.
Dials or answers a call.
Press during a call to put the call on hold.
1-2 Getting Started
Page 21

Back Components
Ref Component Description
Camera Lens
Speaker
Getting Started 1-3
Takes still pictures or records video clips.
Plays back music, sounds and voice.
Page 22

Left-Side Components
Ref Component Description
Lock Key
GPS Button
Locks the on-screen and device buttons to prevent
accidental keypresses.
Starts the optional navigation program.
1-4 Getting Started
Page 23

Right-Side Components
Ref Component Description
Volume Control
Reset Button
Camera Button
Stylus
Getting Started 1-5
Adjusts the volume by pressing the upper or lower
button.
Silences the ring of an incoming call immediately.
Restarts your device.
Starts the camera program to take pictures or record
video clips.
Tap on the touch screen to make selections and enter
information. Pull the stylus out of its slot to use and
store it in the slot when not in use.
Page 24

Top Components
Ref Component Description
Power Button
GPS Antenna
Turns on and off the device.
Receives signals from the GPS satellites overhead.
Bottom Components
Ref Component Description
Mini-USB
Connector
Microphone
Hand Strip
Hole
Connects to the AC adapter or USB cable.
Receives sound and voice to record voice.
Serves as the mouthpiece during a call. (Avoid c overing
the microphone during a call for a better sound quality.)
Hand strip attaches to this opening.
1-6 Getting Started
Page 25

1.2 Installing the SIM Card and Battery
After applying for an account with a mobile phone service provider, you will
be provided a SIM (Subscriber Identification Module) card. This card
contains your mobile phone account details, contacts that can be stored and
any additional services to which you have subscribed.
You must install a SIM card before you can use the phone feature.
1. Slide the back cover slightly, and then lift it off the device from the
bottom edge.
2. The SIM card holder is on the bottom right corner. Slide the SIM card
into the holder (note the orientation of the card). Make sure that the SIM
card fits properly into the slot.
3. With the CE logo on its label facing outside, match the battery’s
projected parts with the holes in the battery compartment, insert the
battery at an angle, and then fit it into the compartment.
DO NOT use screwdrivers or metallic tool edges to extract the battery
from the device as they may damage and irreversibly alter the battery’s
behavior.
4. Replace the back cover.
Getting Started 1-7
Page 26

1.3 Charging the Battery
Fully charge the battery before starting to use the device for the first time.
When charging the battery for the very first time, charge it for at least 8
hours.
1. Plug the converter to the AC adapter (
).
2. Connect the DC end of the AC adapter to the Mini-USB connector of the
device (
(
).
), and plug the other end of the AC adapter into a wall outlet
3. The charge indicator glows in amber when charging is in progress. Do
not disconnect the device from AC power until the battery is fully
charged, as indicated by the red indicator turning into green. This will
take a couple of hours.
Whenever possible, keep the device connected to the AC adapter and a
power source. Doing so keeps the battery charged.
NOTE:
The look of the converter varies depending on the region of your purchase.
Your device can also be charged when it is connected to a desktop computer via the
USB cable.
1-8 Getting Started
Page 27

CAUTION: For optimal performance of the lithium battery, take note of the following:
The environment temperature for charging should be 0~40°C.
When a battery is fully discharged due to a long period of usage or idleness,
connect the device to AC power for charging, and wait for at least 5 minutes before
turning it on.
Do not charge the battery where the temperature is high (e.g. in direct sunlight).
There is no need to fully discharge the battery before charging. You can charge the
battery before it is discharged.
If you will not use the product for a long period of time, be sure to fully charge the
battery at least once every two weeks. Over discharge of the battery can affect the
charging performance.
Getting Started 1-9
Page 28

1.4 Turning the Device On and Off
Turning On for the First Time
1. Make sure that the device is connected to AC power or the battery has
power.
2. Press and hold the Power button for 3 seconds to turn on your device.
The backlight of the keypad will glow, and the setup wizard will appear
on the screen.
3. Follow the on-screen instructions to complete the setup wizard.
4. If a SIM card has been inserted, and the service provider (or you) has set
the PIN, you will be prompted to enter the PIN. Enter the PIN and tap
Enter.
If a SIM card has not been inserted yet, a message of an invalid or
missing SIM card will appear on the screen. You can tap
continue the startup procedure.
5. You will then see the Today screen.
If a SIM card has been inserted, the device will start to search the mobile
phone network and the service provider’s name will be displayed on the
screen.
Cancel to
6. The system will detect the data on your SIM card and prompt you to
automatically install the GPRS settings. Tap
Yes to proceed.
Entering the Suspend Mode
By default, the device will automatically suspend after 1 minute of inactivity
when operating on battery power. You can press the Power button to resume
the device.
In the suspend mode, if a SIM card is inserted, the charge indicator will flash
in green, indicating that the device is inside the mobile phone network. The
device will automatically resume upon an incoming call, and ring (or vibrate,
depending on your setting) and display the caller’s phone number and name
on the screen.
1-10 Getting Started
Page 29

To change these settings, tap
Power Advanced.
NOTE: The device will not enter the suspend mode when using the navigation
program (for selected models only). In such cases, the device’s standby time will
decrease without using external power. Therefore, you are advised to exit the
navigation program properly when the program is not needed any more.
Settings Personal Mio Settings
Turning Off
If you are not using the device, press and hold the Power button for 3 seconds
to turn the device off.
Getting Started 1-11
Page 30

1.5 Installing Microsoft ActiveSync
NOTE: If you use Windows Vista, you do not need to install Microsoft ActiveSync on
your computer. Your synchronization settings will be managed through the Windows
Mobile Device Center. For information on the Windows Mobile Center, see the
Windows Vista Help or documentation.
You can use Microsoft ActiveSync technology to synchronize information
on your desktop computer and/or a Microsoft Exchange Server with the
information on the device. ActiveSync compares the information on the
device with the information on the desktop computer and/or the server and
updates all locations, keeping you up-to-date with the most recent
information.
ActiveSync is already installed on the device. You need to install
ActiveSync 4.5 on your desktop computer using the supplied Getting Started
Disc or from the Microsoft web site (www.microsoft.com).
CAUTION:
Before installation, make sure that you have Microsoft Outlook installed on your
desktop computer.
Connect the device to the computer AFTER ActiveSync in installed.
In some specific cases, the device may experience connection problems when it is
connected to a Windows computer running ActiveSync. The problems may be
caused by the interoperability with desktop firewall applications, applications that
manage network traffic, or LAN configuration tools. To resolve the problems, tap
Settings Connections USB to PC, clear the Enable advanced network
functionality check box, and then tap ok. If the problem persists, please refer to
Follow the procedure below:
the support section of the Mio Technology website (www.mio-tech.com).
1. Turn on your desktop computer.
2. Insert the supplied Getting Started Disc into the CD-ROM drive of your
desktop computer.
3. On the first screen, select the desired language and click Next.
4. Click Setup and Installation.
5. Make sure that the ActiveSync item is selected. Click Install.
1-12 Getting Started
Page 31

6. Click Accept and the installation will start. The installation may take
some time. Please be patient.
7. After the installation is complete, click Close to quit the “Installation
Wizard.”
8. Connect the device to the desktop computer: connect the mini-USB end
of the USB cable to the device, and the other end to a USB port on your
desktop computer.
To PC
9. The “Add New Hardware Wizard” should automatically install the USB
driver.
10. Follow the on-screen instructions to establish a partnership and
synchronize the device with your desktop computer.
11. Click Finish.
After your first synchronization, the data you have stored on your desktop
computer such as Calendar, Contacts and Tasks is copied to the device. You
are now ready to take it along with you when you go.
NOTE: If you have set a device password, you will need to enter this password on the
desktop computer for the ActiveSync connection. See “Locking the Device” in section
2.11 for information.
Getting Started 1-13
Page 32

1.6 Using Your Device in a Vehicle
Using the Car Holder
Use the car holder to fix your device in a vehicle. (See a separate document
for installation instructions.) Make sure that the GPS antenna has a clear
view of the sky.
Connecting the Car Charger
CAUTION: To protect your device against sudden surges in current, connect the car
charger only after the car engine has been started.
The car charger supplies power to the device. Connect one end of the car
charger to the power connector of the device and the other end to the
cigarette lighter in the car.
1-14 Getting Started
Page 33

1.7 Expanding Your Device
Using a Micro SD Card
Your device has a Micro SD slot where you can insert an optional Micro SD
storage card, or SDIO wireless network card. With the removable memory,
you can store or backup your data and exchange data with other devices.
To use a Micro SD card:
1. Slide the back cover slightly, and then lift it off the device from the
bottom edge.
2. The Micro SD slot is on the bottom left corner. Insert the card into the
slot, with the connector pointing to the slot and its label facing outside.
3. To remove a card, first make sure that no application is accessing the
card. Then slightly push the top edge of the card to release it and pull it
out of the slot.
4. Replace the back cover.
NOTE:
A storage card is also called a memory card.
Make sure that no foreign objects enter the slot.
Before using a SDIO card, first install its supplied driver on the device and then
restart the device. Doing so ensures that the device can recognize the card
correctly.
Mio Technology does not guarantee the product’s compatibilities with the Micro SD
cards from all manufacturers.
Getting Started 1-15
Page 34

Page 35

2 Basic Skills
This chapter familiarizes you with the basic operations of the device such as
using the stylus, scroll bar, Today screen, menus, and programs. You will
also know how to enter information and lock the device.
2.1 Using the Stylus
Use the stylus to navigate and select objects on the screen.
Pull the stylus out of the slot and extend it for ease of use. Store it in the slot
when not in use.
Tap
Touch the screen once with the
stylus to open items and select
options.
Drag
Hold the stylus on the screen and
drag across the screen to select text
and images. Drag in a list to select
multiple items.
Tap and hold
Tap and hold the stylus on an item to
see a list of actions available for that
item. On the shortcut menu that
appears, tap the action you want to
perform.
Basic Skills 2-1
Page 36

2.2 Using the Scroll Bar
With the scroll bar, you can scroll within a menu and
activate the selected item. This is particularly useful for
one-hand operation.
To scroll up or backward within a menu, rotate the
scroll bar upward and then release it.
To scroll down or forward within a menu, rotate the
scroll bar downward and then release it.
To activate the selected item, press the center of the
dial.
2.3 Today Screen
When you turn on the device for the first time each day, you will see the
Today screen. The Today screen is accessible from anywhere by tapping
and then
The Today screen shows your upcoming appointments, active tasks, and
information about e-mail messages. Along the top of the Today screen you
will see the volume icon, the clock, and connectivity indicators. You can tap
a section of the Today screen to open the program that is associated with that
section.
Today.
2-2 Basic Skills
Page 37

r
Tap to change date and time.
Tap to turn on or off the
phone, Wi-Fi and Bluetooth
Quick Launch Ba
Tap to view the connection status.
functions.
Left soft key
Tap to view the phone status.
Tap to change volume or
mute all sounds.
Your day at a glance.
Tap an item to access
associated program so that
you can view or change
information.
Right soft key
NOTE: You can customize what is displayed on the Today screen by tapping
Settings Personal Today.
Landscape View
You can use the device in a
landscape manner.
To change the screen view, tap
Settings System Screen.
Basic Skills 2-3
Page 38

2.4 Navigation Bar and Toolbar
The Navigation bar is located at the top of the screen. It displays the active
program and current time and allows you to switch programs and close
screens.
The Navigation bar and Start menu:
Tap to select a program.
Tap to quickly select a program you
have recently used.
Tap to see additional programs.
Tap to customize the device.
Use the toolbar at the bottom of the screen to perform tasks in programs. The
toolbar includes a left soft key, a right soft key, and the Input panel button in
between. The right soft key is usually
programs.
Menu while the left soft key varies with
An example of the toolbar:
Right Soft Key Left Soft Key
Input panel button
2-4 Basic Skills
Page 39

2.5 Quick Launch Bar
You can use the Quick Launch Bar on the Today screen to quickly switch to
specific programs.
By default, you can use the Quick Launch Bar to access the following
programs (from left to right):
Mio Menu (See section 2.6.)
Call History (See section 3.8.)
Pictures & Videos (See section 6.7.)
Battery
On the Quick Launch Bar, Mio Menu is not
an adjustable item. You can tap the
button to customize up to 8 items to be
displayed on the Quick Launch Bar.
First cancel the item not to be displayed, and
then select the desired item. You can tap
Move Up and Move Down to adjust the
displayed positions of the items.
When finished, tap
ok to save the setting.
Basic Skills 2-5
Page 40

2.6 Mio Menu
You can access Mio Menu by tapping
on the Quick Launch Bar.
Mio Menu displays the program icons. The
selected program icon is highlighted. When
tapping an icon, you can start a program or
open a folder to access its content.
The table below explains the icons and their corresponding program names:
Icon Description
Messaging
Contacts
Call History
Calendar
Multimedia
This folder includes Camera, Windows Media, Pictures & Videos
and Games.
Tools
This folder includes Clock&Alarm, File Explorer, Calculator,
MioCalc, Search, World Time, Mio Blacklist and Contact Guard.
Business
This folder includes My Documents, Calendar, Notes, Word
Mobile, Excel Mobile, PowerPoint Mobile and Tasks.
2-6 Basic Skills
Page 41

Icon Description
Connections
This folder includes CellBroadcast, Mio SMS Locator, Emergency
Locator, Quick GPS Position, Bluetooth, ActiveSync and GPRS
Settings.
Internet
This folder includes Messenger and Internet Explorer.
To exit the Mio Menu, tap the Menu soft key Exit.
Customizing Program Icons
In addition to the pre-defined items on the Mio Menu main page, you can
also assign more programs in the Mio Menu.
1. On the Mio Menu main page, tap the
More soft key to access the second page.
2. Select the desired icon location.
3. Tap the
Menu soft key Assign Shortcut.
4. The screen displays the list of the
programs that you have installed. Select
the desired program and tap the
Select
soft key.
NOTE: To delete the program icon that you
have assigned, select the icon and tap the
Menu soft key Unassign Shortcut.
2.7 Running Programs
You can switch from one program to another without closing any program.
To run a program, tap
from the Start menu.
To access additional programs, tap
icon.
Basic Skills 2-7
at the left-top corner of the screen and select
Programs and tap the program
Page 42

You can press a program button on the front of the device. The icons on
the buttons identify the default programs they are associated with.
From the Quick Launch Bar on the Today screen or the Mio Menu, tap
the program icon.
2.8 Shortcut Menus
With shortcut menus, you can quickly choose an action for an item. The
actions in the shortcut menus vary from program to program. To access a
shortcut menu, tap and hold the stylus on the name of the item that you want
to perform the action on. When the menu appears, lift the stylus and tap the
action you want to perform. Or tap anywhere outside the menu to close the
menu without performing an action.
Tap and hold to display
the shortcut menu.
Lift the stylus and tap
the action you want.
Tap outside the menu to close it
without performing an action.
2.9 Notifications
Your device reminds you in a variety of ways when you have something to
do. For example, if you have set up an appointment in Calendar, a task with a
due date in Tasks or an alarm in Clock, you will be notified in any of the
following ways:
A message appears on the screen.
2-8 Basic Skills
Page 43

A sound, which you can specify, is played.
The notification indicator flashes in amber.
To choose reminder types and sounds for the device, tap
Personal Sounds & Notifications.
Settings
2.10 Entering Information
You have several options for entering new information:
Use the Input panel to enter typed text, either by using the on-screen
keyboard or other input methods.
Write directly on the screen.
Draw pictures on the screen.
Speak into the microphone to record a message.
Entering Text Using the Input Panel
Use the Input panel to enter information in any program on the device. You
can type using the on-screen keyboard. The characters appear as typed text
on the screen.
To show or hide the Input panel, tap the
to the Input panel button to see your choices.
Input panel button. Tap the arrow next
Select an input method.
Tap to see your choices.
NOTE: You can also press and hold the Asterisk key (
Basic Skills 2-9
Input panel button
) to change the input mode.
Page 44
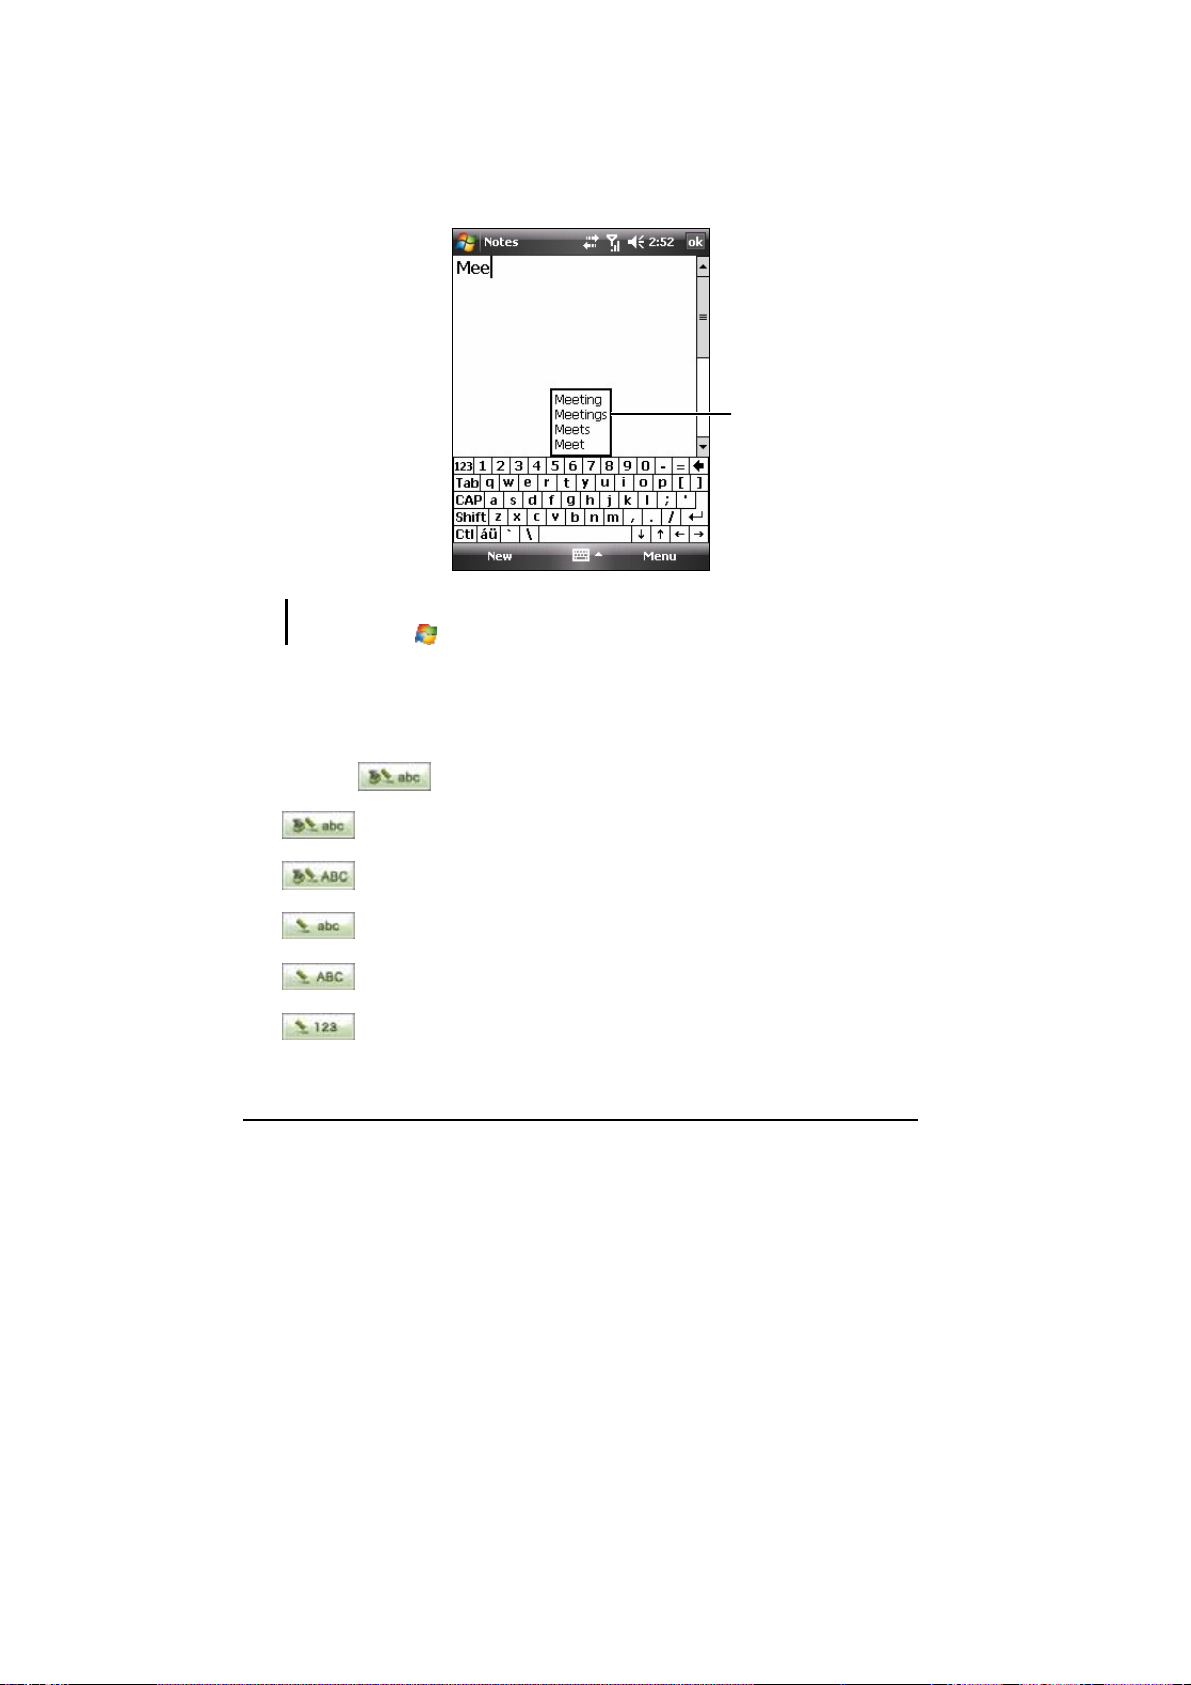
When you use the Input panel, the device anticipates the word you are typing
or writing and displays it above the Input panel. When you tap the displayed
word, it is inserted into your text at the insertion point. The more you use the
device, the more words it learns to anticipate.
Tap here if this is the
right word.
NOTE: To change word suggestion options, such as the number of words suggested
at one time, tap
Settings Personal Input Word Completion.
MioKeyboard
MioKeyboard uses the T9 and Multipress input modes.
You can tap
T9 text input mode, lowercase
T9 text input mode, uppercase
Multipress text input mode, lowercase
Multipress text input mode, uppercase
numeric mode
2-10 Basic Skills
to change the input mode.
Page 45

To enter symbols, tap to open the symbol list. Tap to close
the symbol list.
NOTE: You can press the Asterisk key ( ) to switch between the MioKeyboard input
modes.
T9 Input Mode
To form a word in the T9 input mode, simply press the number keys that
contain the letters you want. As you enter letters, T9 analyzes your
keypresses and attempts to complete the word.
To enter the word “shoe”:
1. Switch to the T9 text input
mode.
2. Press
7 4 6 3. (Press a
key only once for each letter.)
3. The screen displays available
words. Tap the desired word, or
press and hold the
corresponding number key
(such as
available words, tap
NOTE:
To open the list of frequently-used symbols in the T9 input mode, press the number
T9 is the product of Tegic.
1). To view more
or .
key 1.
Multipress Input Mode
To enter a letter in the Multipress input mode, press the number key on
which the letter appears. To enter the first letter on the number key, press the
key once. To enter the second letter, press the key twice, and so on.
Switch to the Multipress text input mode. For example:
To enter the letter “s,” press 7777.
To enter the word “hat,” press 44, 2, 8.
Basic Skills 2-11
Page 46

NOTE: To enter a frequently-used symbol in the Multipress input mode, repeatedly
press the number key 1 until the symbol appears.
Writing on the Screen
In any program that accepts writing, such as the Notes program, you can use
your stylus to write directly on the screen. Write the way you do on paper.
You can edit and format what you have written and convert the information
to text later.
To write on the screen, tap
action displays lines on the screen to help you write.
NOTE: Not all programs support the drawing mode.
Menu Draw to switch to t he drawing mode. This
Drawing on the Screen
You can draw on the screen in the same way that you write on the screen.
The difference between writing and drawing on the screen is how you select
items and how they can be edited. For example, selected drawings can be
resized, while writing cannot.
1. Tap
Menu Draw to enable drawing mode. A check (√) appears before
the command.
2-12 Basic Skills
Page 47

2. To create a drawing, cross three ruled lines on your first stroke. A
drawing box appears.
3. Subsequent strokes in or touching the drawing box become part of the
drawing. Drawings that do not cross three ruled lines will be treated as
writing.
The drawing box indicates
the boundaries of the
drawing.
NOTE: You may want to change the zoom level so that you can more easily work on or
view your drawing. Tap Menu Zoom and then choose a zoom level.
Recording a Message
In any program where you can write or draw on the screen, you can also
quickly capture thoughts, reminders and phone numbers by recording a
message. In the Notes program, you can either create a stand-alone recording
or include a recording in a written note. If you want to include the recording
in a note, open the note first. In the Messaging program, you can add a
recording to an e-mail message.
To create a recording:
1. Hold the device’s microphone near your m outh or other source of sound .
2. Tap the
the speaker is not muted, a beep indicates that the device is recording.
Basic Skills 2-13
Record button on the Recording toolbar to start recording. If
Page 48

3. To stop recording, tap the Stop button on the Recording toolbar. Two
beeps will sound. The new recording appears in the note list or as an
embedded icon.
To play a recording, tap it in the list or tap its icon in the note.
Indicates an
embedded recording.
Recording toolbar
Using My Text
When using Messaging, use My Text to quickly insert preset or frequently
used messages into the text entry area. To insert a message, tap
and then tap a message.
Text
Menu My
Tap to select a
prewritten message.
2-14 Basic Skills
Page 49

NOTE: After inserting a My Text message, you can add text to it before you send the
message.
To edit a My Text message, tap Menu My Text Edit My Text Messages.
Select the message you wish to edit and make desired changes.
Basic Skills 2-15
Page 50

2.11 Securing Your Device
You can customize the level of security you want to have on the device by
locking the keypad, the entire device, or the phone.
Locking the Keypad
The keypad lock turns off the keypad functionality. This is a helpful feature
if, for example, the device is turned on and in your pocket, and you want to
prevent accidental keypresses and unintentional phone calls.
To lock the keypad:
1. Tap
2. Select
3. Tap
any tapping of the screen or pressing of the buttons.
Tap to lock
the keypad.
4. To unlock, tap
Settings Personal Today Items.
Device Lock, and tap ok to save the setting.
Device unlocked on the Today screen. Your device will not respond to
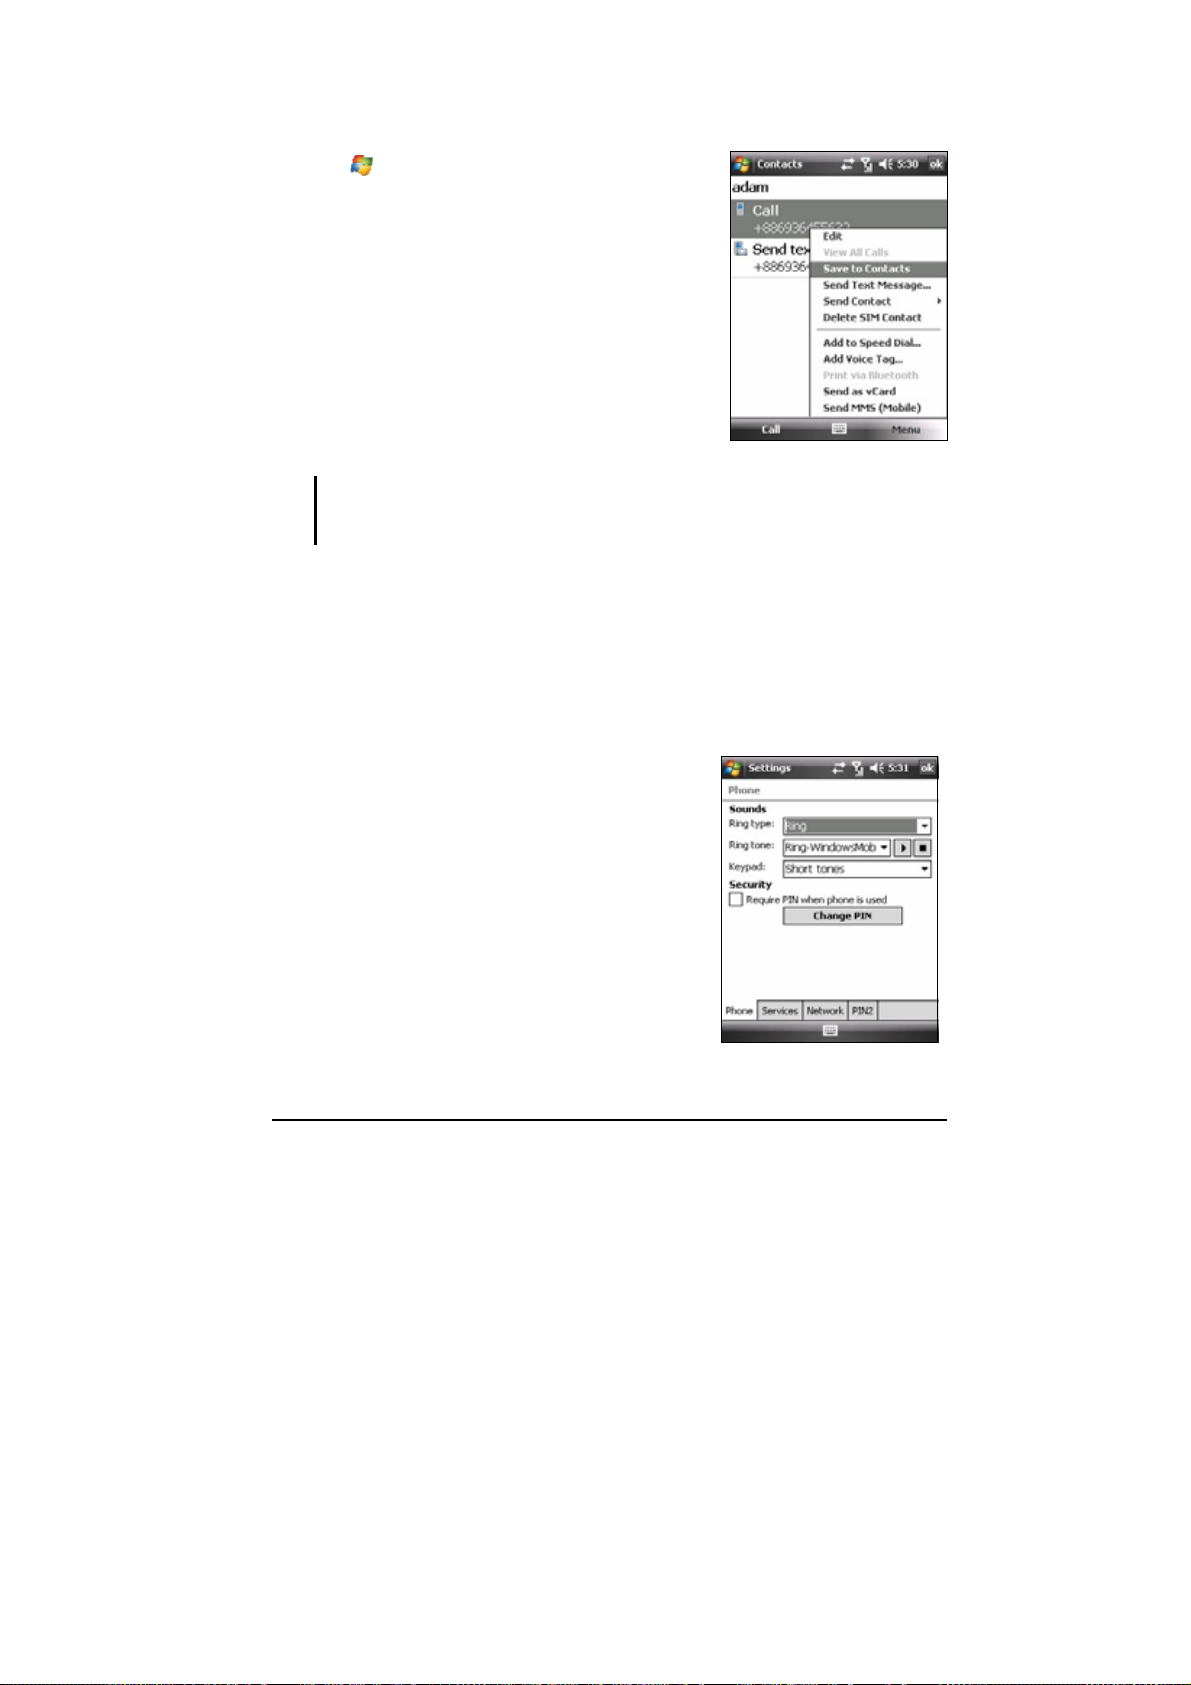
Unlock (left soft key) Unlock.
Locking the Device
Tap to
unlock.
Locking the device prevents access to personal data. You can help keep your
data more secure by requiring a password every time the device is turned on.
2-16 Basic Skills
Page 51

1. Tap Settings Personal Lock.
2. Tap to select
Prompt if device unused for,
and in the box to the right select a desired
period of time.
3. Select the password type.
4. Enter the password you want to use to
access the device when it is locked, and
then confirm the password.
5. Tap
ok to save the setting.
The next time the device is turned on, you will be prompted to enter your
password. You also need to enter this password on the desktop computer for
the ActiveSync connection.
NOTE: If you forget your password, you must clear memory before you can access the
device. See section 11.2.
Locking the Phone
You can protect your phone from unauthorized use by assigning a type of
password called a PIN (personal identification number). Your first PIN will
be given to you by your mobile phone service provider.
1. Press the Talk button to start Phone.
2. Tap the
3. On the
when phone is used.
4. Enter the PIN, and tap
Menu soft key Options.
Phone tab, tap to select Require PIN
Enter.
5. To change the PIN at any time, tap
Change PIN.
6. Tap
Basic Skills 2-17
ok to save the setting.
NOTE: Emergency calls can be placed at any
time without requiring a PIN.
Page 52

Page 53

3 Using the Phone
This chapter explains how to make and receive phone calls, track your calls,
manage your calls and phone numbers more efficiently, and how to
customize the phone functions.
3.1 About Your Phone
Your device includes an integrated GSM (Global System for Mobile
Communications) 850/900/1800/1900 MHz / EDGE (Enhanced Data GSM
Environment) / GPRS (general packet radio service) phone.
The integrated phone in the device can also be used to connect the device to
an ISP (Internet Service Provider) or work network so you can browse the
Web and read e-mail. You can connect to the Internet or work network over
GPRS/EDGE, using Cellular Line, or using the modem specified by your
mobile phone service provider.
Before You Start
To use the phone, you need to first set up an account with a GSM/GPRS
mobile phone service provider. The functions available to you depend on the
services offered by your service provider and your type of subscription.
Your service provider will provide you with a SIM card. This card contains
your mobile phone account details and rights, contacts that can be stored and
any additional services to which you have subscribed. You must install a
SIM card before you can make or receive phone calls or use wireless data
services. (For information on installing a SIM card, see “Installing the SIM
Card and Battery” in section 1.2.)
Using the Phone 3-1
Page 54

3.2 Turning On and Off the Phone Function
You turn the phone on or off independently of the device. The phone is
turned on by default.
You can turn off the phone if needed (for example, on the airplane). After
turning off the phone, you can still use other functions such as Camera,
Calendar, games, Windows Media Player Mobile, etc.
Turning Off the Phone
1. Tap the Wireless Manager section on
the Today screen.
– Or –
Tap the connection icon on the
Navigation bar and tap
Wireless Manager.
2. Tap
The Wireless Manager section on the Today
screen displays
flight mode is turned on.
Phone.
Phone off, indicating that the
Turning On the Phone
1. Tap the Wireless Manager section on
the Today screen.
– Or –
Tap the connection icon on the
Navigation bar and tap
2. Tap
The Wireless Manager section on the Today
screen displays your service provider’s
name, indicating that the flight mode is
turned off.
Phone.
3-2 Using the Phone
Wireless Manager.
Page 55

Starting Microsoft Phone
Start Phone by pressing the Talk button on the device.
You can use other programs on the device during a call. To quickly switch
back to Phone, press the Talk button.
Phone Status Icons
Icons will be displayed on the navigation bar to indicate the status of the
phone functions. They are listed below.
Icon Meaning Description
Phone off
(flight mode)
Signal strength
Call in progress
Missed call Tap this icon to view the call(s) you missed.
Call on hold
GPRS available
GPRS in use
EDGE available
EDGE in use
New message Tap this icon to view unread messages.
Missing SIM card
Tap this icon to view the phone status.
The number of the vertical bars in the icon
indicates the strength of the signal.
The phone is dialing or you are talking on
the phone. Tap this icon to quickly switch
back to the Phone keypad if you are using
other programs during a call.
This icon indicates you are putting a call on
hold.
This icon indicates the GPRS connection is
available for use.
This icon indicates the GPRS connection is
being used.
This icon indicates the EDGE connection is
available for use.
This icon indicates the EDGE connection is
being used.
This icon indicates that no SIM card is
installed and you cannot use the phone
function.
Using the Phone 3-3
Page 56

3.3 Making a Call
There are several ways you can make a call. The easiest way is to dial the
phone number on the numeric keypad.
Dialing a Call
1. When on the Today screen: enter the
phone number or the first few letters
of the contact’s name by using the
numeric keypad on the device.
When using programs other than
Phone: press the Talk button on the
device to start Phone. Then enter the
phone number or the first few letters
of the contact’s name by using the
numeric keypad on the device.
2. The program searches Contacts, Call History, and Speed Dial to find a
matching name and/or number. When you see the name of the person to
call listed, select it and the desired phone number, and press the Talk
button to make the call.
NOTE:
If you enter a wrong number, you can press the back button to erase individual
numbers one at a time, or you can delete all numbers that have been keyed in by
pressing and holding the back button.
If you are making an international call, press and hold the 0 key until the + sign
appears. The + sign replaces the international prefix (00) of the country from where
you are calling.
Making a Call Using a Recently Connected Number
To make a call using a recently connected number:
When on the Phone screen: press the Talk button.
When using programs other than Phone: press the Talk button twice.
3-4 Using the Phone
Page 57

Making a Call from Contacts
Microsoft Contacts displays your contact information stored both in the
device’s memory and your SIM card.
1. Tap
Contacts, or tap the Contacts soft key on the Today screen.
2. Do one of the following to call someone from the contact list:
Tap the contact to call. Then tap the
number to call; or move to the
number to call and then tap the
Call
soft key or press the Talk button.
Tap and hold the contact to call, and
then tap the number to call on the
shortcut menu.
NOTE: For information on Contacts, see
section 5.2.
Using the Phone 3-5
Page 58

Making a Call from the Call History List
The Call History list displays the calls you made, received, and missed.
1. Press the Talk button on the device to
start Phone.
2. Tap
3. Do one of the following to call someone
from the Call History list:
Move to the number to call and then
tap the
button.
Tap and hold the contact to call, and
then tap
.
Call soft key or press the Talk
Call on the shortcut menu.
3.4 Answering a Call
When an incoming call is received, the
device rings or vibrates according to the
options you have set for the phone. The name
and number of the caller are displayed on the
pop-up window. If the name of the caller is
not in your contact list, only the caller’s
phone number is displayed.
To answer an incoming call, tap
the pop-up window or press the Talk button.
Answer on
Rejecting a Call
To reject an incoming call, tap Ignore on the pop-up window or press the End
button. If you have voice mail, the call will be sent to your voice mail,
depending on your service provider.
3-6 Using the Phone
Page 59

Ending a Call
To end a call, tap End or press the End button.
3.5 Adjusting the In-Call Volume
Adjusting the Phone Volume
To adjust the volume during a call, tap the
icon on the navigation bar to select a volume
level.
CAUTION: Never raise the sound volume level
too high when using earphones. An excessive
sound volume level could cause damage to
your hearing.
Using the Phone 3-7
Page 60

Muting a Call
During a call, you can mute your microphone
so that the person with whom you are
speaking cannot hear you, but you can still
hear him or her.
On the Phone keypad, tap
mute function. The
upper-right corner.
To turn off the mute function, tap
Mute to turn on the
will appear on the
Unmute.
Using Speakerphone
You can turn on the speakerphone to use the
device as a hands-free solution.
On the Phone keypad, tap
on the speakerphone function. The
appear on the navigation bar.
To turn off the speakerphone function, tap
Speaker Off.
Speaker On to turn
will
3.6 Managing More than One Call
NOTE: You may need to register for the “call waiting” service with your service
provider and set the device accordingly. The exact number of people you can talk at
the same time depends on your service provider.
During a call, you can make or take a second call while putting the current
call on hold. Then, you can choose to swap between the two callers or set up
a conference call between all three parties.
3-8 Using the Phone
Page 61

Holding a Call to Take a Second Call
1. If there is another incoming call when you are talking on the device, a
pop-up window appears to notify you.
2. Tap the
second call.
3. To end the second call and go back to the first, tap
button.
Answer soft key to place the first call on hold, and answer the
End or press the End
Rejecting the Second Call
To reject the second call and keep your current call in progress, tap Ignore.
Note not to press the End button; doing so will end the current call.
Holding a Call to Make a Second Call
1. During a call, tap Hold to place the first call on hold.
2. Dial a second number or the first few letters of the second contact’s
name by using the numeric keypad on the device. Then press the Talk
button to connect. Wait for it to be picked up.
3. To end the second call and go back to the first, tap
button.
End or press the End
Swapping between Calls
When you have put a call on hold and made
or taken another call as described earlier, you
can swap between the two calls by tapping
Swap.
Using the Phone 3-9
Page 62

Setting up a Conference Call
NOTE: You may need to consult your service provider for the availability and
subscription of the conference call function.
1. When you have put a call on hold and
made or taken another call as described
earlier, you can set up conference calling
by tapping the
Conference.
2. To add additional people to your
conference, tap
number and press the Talk button to
connect. Wait for it to be picked up.
Then tap the
3. If you want to talk to one of the parties
privately during the call, tap the
soft key
Menu soft key
Hold. Dial a second
Menu soft key Conference.
Menu
Private.
Select a number, and tap Private.
To include everyone in the call again, tap
Menu soft key Conference.
the
3-10 Using the Phone
Page 63

3.7 Taking a Note During a Call
You can take a note during a call.
1. Tap
2. Enter your note and tap
To access a note you created during a call:
1. Press the Talk button on the device to
2. Tap
3. The
You can also tap
and access the note in the Calls folder.
Note.
ok.
start Phone.
.
icon indicates that the phone call
entry contains a note. Tap and hold the
name or number for that entry, and tap
View Note on the shortcut menu.
Programs Notes,
3.8 Using Call History
Call History provides the time and duration of all incoming, outgoing, and
missed calls, and a summary of total calls. Call History also provides easy
access to any notes taken during a call.
To access Call History:
1. Press the Talk button on the device to start Phone.
2. Tap
Using the Phone 3-11
.
Page 64

Viewing Call History
You can tap the Menu soft key Filter to change the Call History view (All
Calls by default).
All Calls displays all calls made to and
from the device in a chronological order.
Missed ( ) displays only calls that
were not answered.
Outgoing ( ) displays only calls
made from the device.
Incoming ( ) displays only calls
made to the device.
To see the time, date and duration of a call,
tap the item on the list to view details.
To clear all items on the list, tap the
key
Delete All Calls.
Menu soft
Managing Call History
You can tap the Menu soft key Call Timers to manage Call History.
All Calls displays the statistics,
including total number of calls and total
time. The All Calls counter cannot be
reset.
Recent Cellular Calls displays the total
number of calls and total time since last
time the call history was reset.
3-12 Using the Phone
Page 65

Adding an Entry to Contacts Using Call History
You can add a phone number in the Call History to Outlook Contacts.
1. Tap and hold the entry you wish to
transfer, and tap
shortcut menu.
Save to Contacts on the
2. Tap
3. Tap the
<New Contact>, enter the contact’s
name, and select the proper number type.
Save soft key to save the entry.
3.9 Using Speed Dial
You can create speed dials for frequently-called phone numbers so you can
dial a number with a single tap. Speed dials can only be created for numbers
stored in Contacts.
Creating a Speed Dial Entry
1. Press the Talk button on the device to
start Phone.
2. Tap
3. Tap the
.
Menu soft key New.
4. Tap the desired contact.
5. In
Number, select the phone number for
which you want to create a speed dial.
6. In
Location, select the speed dial number
to use.
7. Tap
Using the Phone 3-13
ok to save the setting.
Page 66

NOTE: The first speed dial location is reserved for your voice mail.
Editing or Deleting a Speed Dial Entry
1. Press the Talk button on the device to start Phone.
2. Tap
3. Tap and hold the desired entry, and tap
menu.
4. Tap the
.
Edit or Delete on the shortcut
ok soft key to save the changes, or tap Delete to delete the entry.
3.10 Managing Phone Numbers
Phone numbers can be stored in various places on the device. Therefore, you
can add, access and transfer phone numbers in a number of ways.
Transferring from Microsoft Contacts
1. Tap Contacts, or tap the Contacts
soft key on the Today screen.
2. Tap the desired entry on the contact list.
3. Move to the phone number to copy, and
tap the
4. Accept or edit the details. When
finished, tap the
For more information on using Contacts, see
section 5.2.
Menu soft key Save to SIM.
ok soft key.
3-14 Using the Phone
Page 67
Transferring from SIM Card
1. Tap Contacts, or tap the Contacts
soft key on the Today screen.
2. Tap the desired SIM card entry on the
contact list.
3. Tap the
Contacts
4. Accept or edit the details. When
finished, tap the
For more information on using Contacts,
see section 5.2.
Menu soft key Save to
.
ok soft key.
NOTE: If you want to copy all SIM card contacts to the device, on the contact list tap
the Menu soft key Copy All SIM Contacts. Note that doing so will result in
repeated SIM card contact appearance on the contact list if the SIM card is inserted.
3.11 Customizing Your Phone
To access the Phone Settings, press the Talk button on the device to start
Phone, and tap the
Changing Phone Settings
Tap the Phone tab.
You can customize phone settings, such as
the ring type and ring tone to be used for
incoming calls, and the keypad tone to be
used when entering phone numbers. You can
also protect your phone from unauthorized
use.
Menu soft key Options.
Using the Phone 3-15
Page 68

NOTE:
To use custom .mp3, .wav, .mmf or .mid files as ring tones for incoming calls, use
ActiveSync on your desktop computer to copy the files to the \Application
Data\Sounds folder on the device or to the inserted storage card. Then, select the
sound from the Ring Tone list. (For information on copying files to the device, see
ActiveSync Help on your desktop computer.)
Emergency calls can be placed at any time without requiring a PIN.
Changing Services Settings
Tap the Services tab.
You can access and configure settings for the
phone services you subscribed to through your
mobile phone service provider. For example, you
may want to block certain types of incoming
and/or outgoing calls, forward incoming calls to
a different phone number based on your
situation, be notified of incoming calls when you
are already in a call, or let others know your
identity when making calls. Services available to
you depend on your service provider and the type
of your subscription.
To view your services settings, tap a service and then tap
Get Settings.
Changing Network Settings
Tap the Network tab.
You can view available wireless networks,
determine the order in which your phone
accesses another network if the current one is
unavailable, and specify whether you want to
change networks manually or automatically.
The current network will remain active until
you change it, lose your signal, or change
your SIM card.
3-16 Using the Phone
Page 69

Changing the PIN2 Code
Tap the PIN2 tab.
You might be prompted to enter the PIN2 code
for specific functions (such as the pre-paid
card’s charging counters). Consult your mobile
phone operator to check if your SIM card
supports PIN2-related functions and services.
To change the PIN2 code, tap Change PIN2,
and then follow the on-screen instructions to
enter old and new PIN2 codes.
3.12 Cell Broadcast
NOTE: Not all mobile phone operators are providing cell-broadcast information.
Please consult your mobile phone operator for the availability of such services.
Cell Broadcast is an add-on service provided by your service provider,
allowing you to receive a variety of information such as weather forecast,
stock, and traffic. For available topic numbers, consult your service provider.
1. Tap
Settings
2. Select
3. Tap
Using the Phone 3-17
Settings Personal Mio
Cell Broadcast.
Enable Cell Broadcast.
Channel Setting.
Page 70

4. Select Receive Channel List.
5. Select the language for the messages.
Only messages in the selected language
will be shown. You can also select to
display messages in all languages.
6. You can add, delete or edit message
channels.
7. Tap
ok to save the setting.
3.13 Additional Phone Operations
Checking Your Voice Mail
The first position in your speed dial list defaults as your voice mailbox.
When you insert your SIM card, the device automatically detects your voice
mailbox number and sets it to the first position in your speed dial list.
To retrieve your voice mail:
1. Press the Talk button on the device to start Phone.
2. Do one of the following:
Tap , and tap the first position.
Press and hold number key 1.
Making an Emergency Call
You can use the device to dial the international emergency number 112. This
number can normally be used to make an emergency call in any country with
or without a SIM card inserted, as long as you are within a mobile phone
service network.
Some mobile phone service providers may require that a SIM card be
inserted, and in some cases that the PIN be entered.
3-18 Using the Phone
Page 71

There may be other emergency numbers available. Your mobile phone
service provider may save additional local emergency numbers in the SIM
card.
Dialing an International Call
When you are manually dialing a number, press and hold number key 0 until
the + sign appears. The + sign replaces the international prefix (00) of the
country from where you are calling.
Enter the full phone number you want to dial including country code, area
code (without the leading area code zero) and local phone number.
Using the Phone 3-19
Page 72

Page 73

4 Managing Your Device
This chapter tells you how to effectively manage power, memory, settings
and data of the device.
4.1 Managing Power
A fully charged battery should provide power for up to 8 hours of use. The
operating time of a fully charged battery depends on how you are using the
device. Some functions, such as using GPS navigation, multimedia or phone
features and operating a Micro SD card, may consume the battery power
considerably.
Low Battery Signals and Actions
CAUTION:
When the battery runs out of power completely, the device turns off automatically.
Charge the battery or replace the old battery immediately. Replacing the battery
needs to be finished in 5 minutes to make sure of the correct system time.
When you charge the battery upon a warning of low power, you should charge for at
least 30 minutes before unplugging the AC adapter. The device may not be able to
turn on during the first few minutes of the charging until the battery power reaches
You can monitor the battery power by tapping
Mio Settings
When the battery power is low, the device will pop up a warning message.
You should save your data and charge the battery immediately upon a
warning of low power; otherwise the device will turn off automatically. You
need to connect the device to external AC power for charging before you can
use it again.
Managing Your Device 4-1
the protection point of the system.
Settings Personal
Power. The remaining power is displayed on a status bar.
Page 74

Power Management
Supplied with the device is a tool called “eUtility.” This tool helps you
effectively manage power to prolong the battery’s operating time.
Tap
Settings Personal Mio Settings eUtility.
System
This page displays the program and hardware information such as operating
system, firmware version and Bluetooth module MAC address. It does not
contain any adjustable items.
Power
You can change the settings of the items based on your needs. You can also
select the events for waking up the device.
Wi-Fi
You can select the mode of Wi-Fi signal reception.
Auto This option prolongs the battery’s operating time.
Superior Performance This options allows for best Wi-Fi signal
reception.
Format
The device has a Mio Recovery memory space for storing data files. If you
wish to erase all data stored in Mio Recovery, you can use the
Recovery Partition
function.
Format Mio
4-2 Managing Your Device
Page 75

Power-Saving Tips
Follow these suggestions to maximize the battery’s operating time,
particularly when you are relying solely on the battery power for extended
time periods.
Suspend or turn off the device frequently.
By default, the screen backlight will automatically turn off and the
device will also suspend when it has been idle for a period of time. You
can shorten the length of the idle time using
Mio Settings
Power Advanced to set up.
Press and hold the Power button for 3 seconds to turn off the device
when it is not in use, even for a short time.
Turn off functions not needed or adjust settings.
Lower the volume.
Do not enable sounds or light flashing except for the most necessary
notifications. Tap
Settings Personal Sounds & Notifications
to set up.
Remove the Micro SD card, if installed, from the slot if you are not
using it.
Avoid power-consuming situations such as:
Settings Personal
When connecting the device to your desktop computer (Your device
will not auto-suspend while it is connected.)
When using a Micro SD card
When monitoring Bluetooth transfers (Although you can set the
device to constantly monitor the Bluetooth transfers sent from other
Bluetooth devices, doing so will quickly drain your battery.)
When playing sound or music, or recording
Intense use of e-mail Direct Push
Intense use of always-on connected web services
Managing Your Device 4-3
Page 76

4.2 Managing Memory
Main Memory
Files, settings and data that you add to your device are stored in the main
memory of your device.
Mio Recovery
The device has a Mio Recovery memory space for storing data files. Files
stored in Mio Recovery can appear in a folder called
under
My Device in the File Explorer application.
Data stored in Mio Recovery will be saved, even if your device loses power.
Storage Card
You can buy a Micro SD storage card for backup, storage, and archives, or to
transfer large files to other devices. Files stored on a storage card appear in a
folder called
application.
Data stored on a storage card will be saved, even if your device loses power.
Storage Card, listed under My Device in the File Explorer
Mio Recovery, listed
Smart Quit
You can change the status when closing a program using Smart Quit.
Tap
include:
When closing applications, minimize and keep in memory
When closing applications, quit and release from memory
4-4 Managing Your Device
Settings Personal Mio Settings Smart Quit. The options
Page 77

4.3 Customizing Your Device
CAUTION: Incorrect settings may cause your system to malfunction. Make sure that
you fully understand the function of a certain item before any adjustment.
You can customize the settings of the device to your own preferences. Tap
Settings. You can tap any of the icons on the Personal, System or
Connections tabs for the options. The items you can customize are described
as follows:
Item Description
Personal
Buttons
Input
Lock
Menus
Mio Settings
To assigns programs to hardware buttons and
set the repeat rate of the up/down control.
To set up items related to the input methods
and voice recording format.
To set a password for security. (See “Locking
the Device” in section 2.11 for more
information.)
To customize what appears on the Start menu.
To access several useful Mio programs:
Backlight
To adjust the brightness level of the
display and to set the automatic turnoff
for power saving purposes.
Cell Broadcast
To receive a variety of information such
as weather forecast, stock, and traffic
from your mobile phone servi ce provi der.
(See section 3.12 for information.)
eUtility
To effectively manage power to prolong
the battery’s operating time. (See section
4.1 for information.)
Managing Your Device 4-5
Page 78

Item Description
Flashlight
To use the flash as a flashlight. By
default, you can press the GPS button to
activate the flashlight, even when the
device is locked.
The flashlight lasts for 10 seconds for
each activation. To turn off the flashlight
within 10 seconds, press the power
button. Press the power button again to
resume the backlight.
Use the flash with special care (see the
“Safety Precautions” section on page xii
for information.)
GPS Settings
To configure the GPS hardware settings
and manage the GPS module.
Power
To show the remaining batt ery po wer a nd
to set the time for the device to enter the
suspend mode automatically.
Voice Speed Dial
To record voice tags so that you can di al a
phone number or start a program simply
by pronouncing the voice tag that has
been attached to it. (See section 8.8 for
information.)
Smart Quit
To set the status when closing a program.
(See section 4.2 for information.)
Owner
To enter your personal information.
Information
Phone
To customize the phone function. (See
section 3.11 for more information.)
Sounds &
Notifications
Today
To set the conditions and types of the sounds,
system volume and ways of notifications.
To select the information you want displayed
on the Today screen and to select a desired
theme for the background.
4-6 Managing Your Device
Page 79

Item Description
System
About
Certificates
Clock & Alarms
Customer
Feedback
Encryption
Error Reporting
Memory
Regional Settings
Remove
Programs
To show the hardware information of the
device and to define the device name that the
device uses for identifying itself to other
computers.
Certificates help establish your identity when
you are logging onto a secured network, such
as a corporate network. Certificates also help
establish the identity of other computers, such
as servers, with which you connect. This
helps prevent unauthorized users from
accessing the device and information.
To change the time and date and t o set alarms.
To set if you want to send your feedback on
using the Windows Mobile software.
To set if you want to encrypt files placed on
storage cards. The encrypted files will be
readable only on this device.
To enable or disable error reporting. Error
Reporting sends information needed by
technical support groups to diagnose a
program error for a device running Windows
Mobile software.
To view the allocation between storage and
program memory, to view the memory on the
storage card (if installed) and to manually
stop a program if it becomes unstable or
program memory is low.
To specify the region of your location and the
formats of the number, currency, time and
date.
To remove programs you added to the
memory of the device.
Managing Your Device 4-7
Page 80

Item Description
Connections
Screen
Windows Update
Beam
Bluetooth
Connections
USB to PC
Wi-Fi
Wireless
Manager
To set the orientation of the screen to portrait
or landscape.
To adjust the touch screen for accurate screen
taps.
To enable the ClearType feature for easier
reading of text in programs that support
ClearType.
To adjust the text size to see more content or
increase the readability in many programs.
To set how you want the device to check for
important updates.
To send and receive information and files
using the Bluetooth function. (See section
10.2 for more information.)
To set up or change the Bl uetooth co nnection.
(See section 10.2 for more information.)
To set up or change connection information.
(See section 10.1 for more information.)
To help with problems connecting
ActiveSync by clearing Enable advanced
network functionality.
To configure the Wi-Fi module.
To change the status of the phone, Wi-Fi and
Bluetooth functions. (See section 3.2, 10.1
and 10.2 for more information.)
4-8 Managing Your Device
Page 81

4.4 Finding and Organizing Information
The Search feature on the device helps you quickly locate information.
To find a file, tap
find, select a data type and then tap the
NOTE: To quickly find information that is taking up storage space on the device, select
Larger than 64 KB under Type.
You can also use the File Explorer to find files on the device and to organize
these files into folders. Tap
Network Tools Search. Enter the text you want to
Search soft key to start the search.
Programs File Explorer.
Managing Your Device 4-9
Page 82

Page 83

Microsoft Pocket
5 Microsoft Pocket Outlook
This chapter tells you how to use Microsoft Pocket Outlook that includes
Calendar, Contacts, Tasks, Notes, and Messaging. You can use these
programs individually or together. For example, e-mail addresses stored in
Contacts can be used to address e-mail messages in Messaging.
Outlook
5.1 Calendar: Scheduling Appointments and
Meetings
Use Calendar to schedule appointments, including meetings and other events.
You can check your appointments in one of several views (Agenda, Day,
Week, Month and Year), and set Calendar to remind you of appointments with
a sound or other methods. Appointments for the day can be displayed on the
Today screen.
Tap
Calendar.
Tap to go to today.
Tap to display or edit the
appointment details.
Tap to switch to another view.
Microsoft Pocket Outlook 5-1
Page 84

NOTE: You can customize the Calendar display (for example, change the first day of
the week), by tapping the Menu soft key Options.
Creating an Appointment
1. In Day or Week view, tap the desired date and time for the appointment.
2. Tap the
Menu soft key New Appointment.
Tap to return to the calendar (the
appointment is saved automatically).
Tap to choose from predefined text.
Tap to choose from previously
entered locations.
Tap to select a time.
Tap to select a date.
3. Using the Input panel, tap first to select the field, and then enter a
description and a location. (See section 2.10 for information on entering
text.)
4. Enter other desired information. You will need to hide the Input panel to
see all available fields.
5. Tap
For more information, tap
ok to save and return to Calendar.
Help.
5-2 Microsoft Pocket Outlook
Page 85

Using the Calendar Summary Screen
When you tap an appointment in Calendar, a summary screen is displayed.
To change the appointment, tap the
Menu soft key Edit.
View appointment details.
View notes.
NOTE: If you receive a meeting request, you can tap the Reply soft key to send an
e-mail to the meeting host.
Microsoft Pocket Outlook 5-3
Page 86

5.2 Contacts: Tracking Friends and Colleagues
Contacts maintains a list of your friends and colleagues so that you can easily
find the information you are looking for, whether you are at home or on the
road.
Tap
Contacts, or tap the Contacts soft key on the Today screen.
Tap and enter part of a name
or number to quickly find a
contact in the list.
Tap an alphabet
group to scroll the
contact list.
NOTE: To change the way information is displayed in the list, tap the Menu soft key
Options.
5-4 Microsoft Pocket Outlook
Page 87
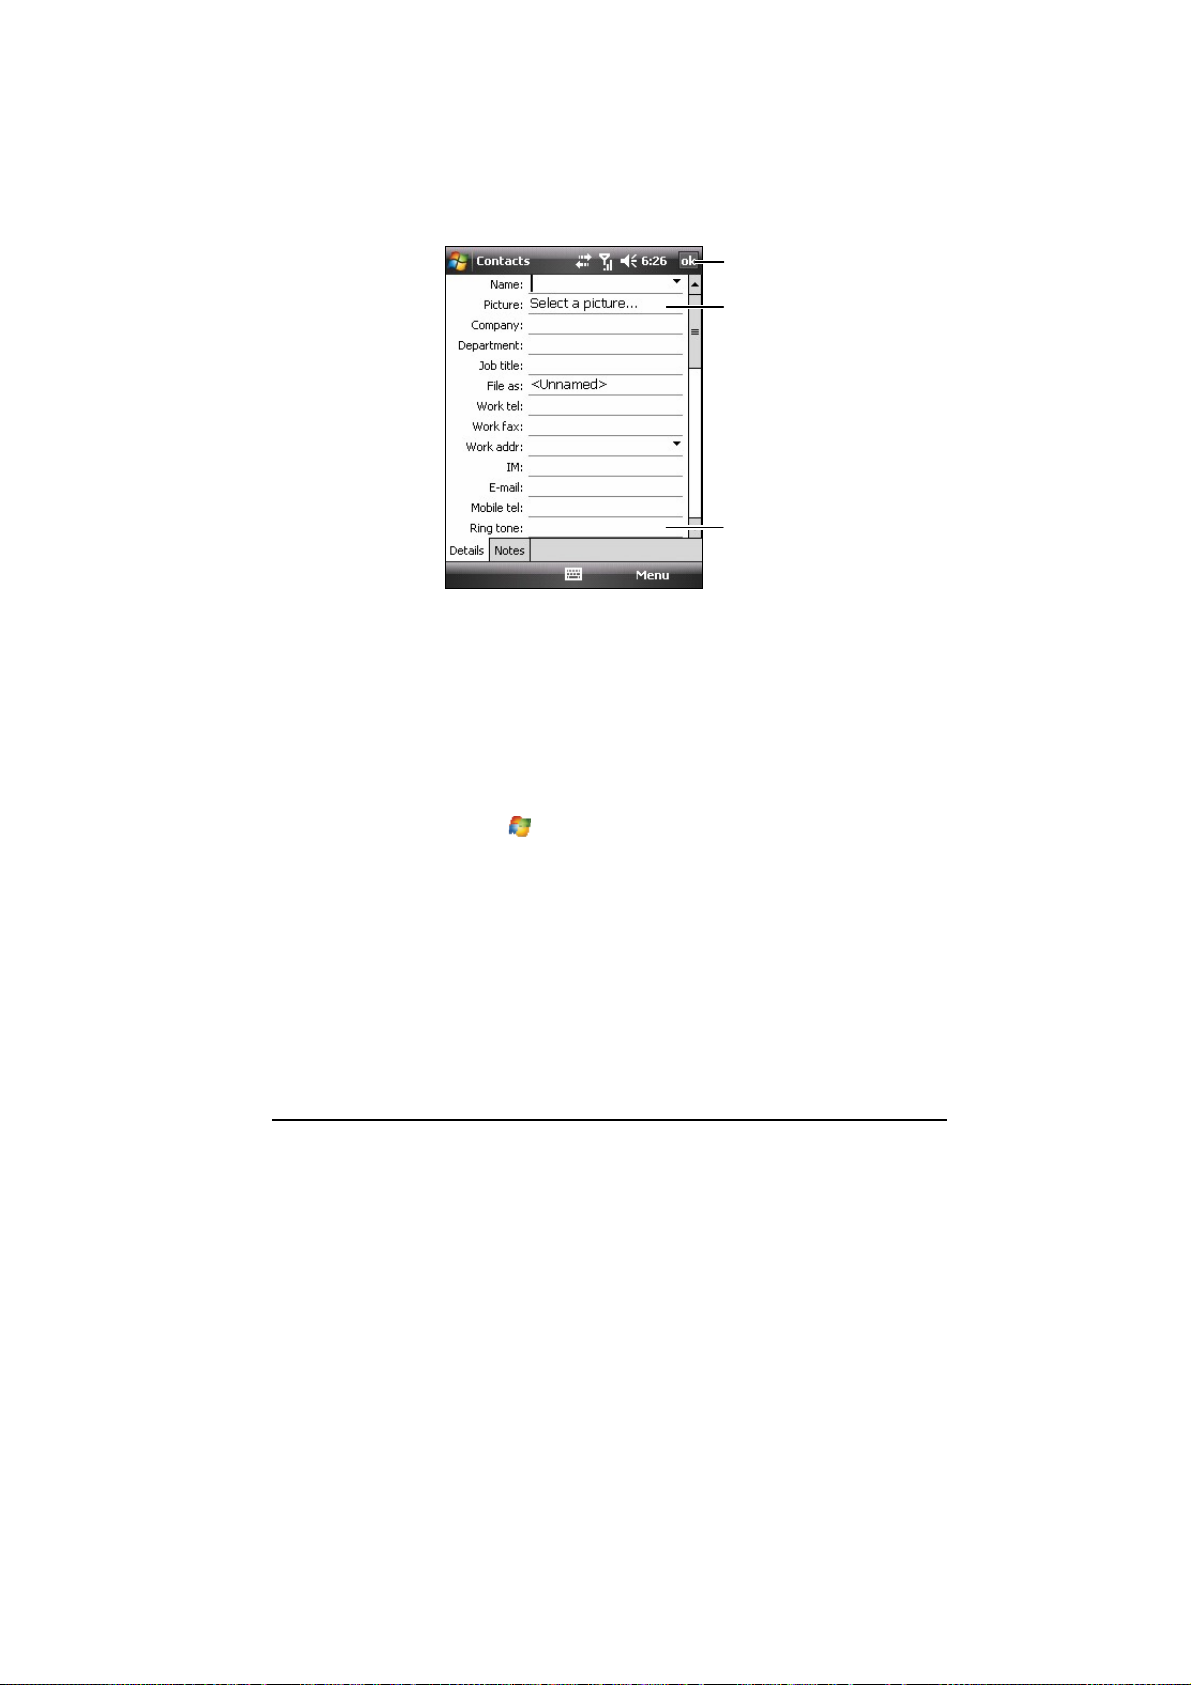
Creating a Contact
1. In Contacts, tap the New soft key.
2. Select if you want to create an Outlook or SIM contact.
Tap to return to the contact list (the
contact is saved automatically).
Tap to assign a picture for the
contact.
Tap to assign a ring tone for the
contact.
You can only set the contact’s name and phone number for a SIM
contact.
3. Using the Input panel, enter a name and other contact information. You
will need to scroll down to see all available fields. (See section 2.10 for
information on entering text.)
4. Tap
For more information, tap
Microsoft Pocket Outlook 5-5
ok to save and return to the contact list.
Help.
Page 88

Using the Contacts Summary Screen
A
When you tap a contact in the contact list, a summary screen is displayed. To
change the contact information, tap the
Menu soft key Edit.
ssigned picture for the contact
View contact details.
5-6 Microsoft Pocket Outlook
Page 89

5.3 Tasks: Keeping a To Do List
Use Tasks to keep track of what you have to do.
Programs Tasks.
Tap
Tap to display or edit the
task details.
Microsoft Pocket Outlook 5-7
Page 90

Creating a Task
1. In Tasks, tap the Menu soft key New Task.
Tap to return to the task list (the
task is saved automatically).
Tap to choose from
predefined subjects.
2. Using the Input panel, enter a description. (See section 2.10 for
information on entering text.)
3. You can enter a start date and due date or enter other information by first
tapping the field. If the Input panel is open, you will need to hide it to see
all available fields.
4. Tap
For more information, tap
ok to save and return to the task list.
Help.
5-8 Microsoft Pocket Outlook
Page 91

Using the Tasks Summary Screen
When you tap a task in the task list, a summary screen is displayed. To
change the task, tap the
Edit soft key.
Tap to show and hide additional
summary information.
View notes.
Microsoft Pocket Outlook 5-9
Page 92

5.4 Notes: Capturing Thoughts and Ideas
Quickly capture thoughts, reminders, ideas, drawings and phone numbers
with Notes. You can create a written note or an audio recording. You can
also include a recording in a note.
Tap
Programs Notes.
Tap to change the sort
order of the list.
Tap to open a note or play a
recording.
Tap to create a new note.
5-10 Microsoft Pocket Outlook
Page 93

Creating a Note
1. In Notes, tap the New soft key.
2. Create your note by writing, drawing, typing, or recording. For more
information about using the Input panel, writing, and drawing on the
screen and creating recordings, see section 2.10.
Tap to return to the note list (the note is
saved automatically).
3. Tap
For more information, tap
Microsoft Pocket Outlook 5-11
ok to save and return to the note list.
Help.
Page 94

5.5 Messaging: Sending and Receiving E-mail
Messages
You can work with e-mail, SMS and MMS messages from Messaging.
Messaging. The account selection screen appears.
Tap
Downloading Messages
The manner in which you download messages depends on the type of
account you have:
Text Messages SMS messages are automatically received when your
Outlook E-mail To send and receive e-mail for an Outlook E-mail
ISP E-mail To send and receive e-mail for an e-mail account that you
phone is turned on. When your phone is turned off (in flight mode),
messages are held by your service provider until the next time your
phone is turned on.
account, begin synchronization through ActiveSync. (This item appears
only if you have set to synchronize e-mail in ActiveSync. For more
information, see section 6.1.)
have with an Internet Service Provider (ISP) or that you access using a
VPN server connection (typically a work account), download messages
through a remote e-mail server. (This item appears only if you have set
up an ISP e-mail account. See the later section for information.)
MMS MMS messages are automatically received when your phone is
turned on. When your phone is turned off (in flight mode), messages are
held by your service provider until the next time your phone is turned on.
Windows Live To send and received e-mail for a Hotmail e-mail
account, download messages through a remote e-mail server. (This item
appears only if you have signed in to Windows Live. For information on
Windows Live, see section 6.5.)
NOTE: By default, messages you send are saved in the Sent folder on the device to
help conserve memory. If you want to conserve memory and do not want to keep
copies of sent messages, in the messaging list, tap the Menu soft key Tools
Options Message, and cancel the Keep copies of sent items in Sent folder
check box.
5-12 Microsoft Pocket Outlook
Page 95

E-mail Direct Push
Your device incorporates the Messaging & Security Feature Pack (MSFP).
When connected to the Exchange Server that supports Microsoft Exchange
2003 Service Pack 2 (or later), the device receives real-time notifications of
new e-mails via the Direct Push technology. New e-mails are automatically
downloaded to the device from the Exchange Server; you do not need to
check or download e-mails manually.
Before using the Direct Push feature, you need to set up a synchronization
relationship between the device and Exchange Server and complete the
initial synchronization. (See “Synchronizing Directly with the Exchange
Server” in section 6.1 for more information.)
Setting up an E-mail Account
You need to set up an e-mail account that you have with an Internet service
provider (ISP) or an account that you access using a VPN server connection
(typically a work account) before you can send and receive mail.
1. Tap
2. Tap
3. Follow the on-screen instructions to complete the setup.
Messaging.
New E-mail Account on the account selection screen.
Composing and Sending an E-mail and SMS Message
1. Tap Messaging.
2. Tap the desired account on the account selection screen.
3. Tap the
4. Enter the e-mail address or text message address of one or more
recipients, separating them with a semicolon. To access addresses and
phone numbers from Contacts, tap
Microsoft Pocket Outlook 5-13
Menu soft key New.
To.
Page 96

5. Enter your message and subject. To quickly add common messages, tap
the
Menu soft key My Text, and tap a desired message.
6. To add an attachment to the E-mail message, tap the
Menu soft key
Insert, and tap the item you want to attach: Picture, Voice Note, or File. Then
select the file you want to attach or record a voice note. Embedded
objects cannot be attached to messages.
7. Tap the
Send soft key.
NOTE:
If you are working offline, e-mail messages are moved to the Outbox folder and will
be sent the next time you connect.
SMS messages cannot be sent or received when a GPRS/EDGE or ActiveSync
connection is in use.
Composing and Sending a MMS Message
NOTE:
You need to subscribe to the GPRS/EDGE and MMS services with your mobile
phone operator before you can send and receive MMS messages.
Depending on the service that you subscribe to, you may not be able to send and
1. Make sure you have installed proper GPRS settings. (See section 10.1
2. Tap
receive MMS messages to users using a different mobile phone network.
for information on the GPRS connection.)
Messaging.
3. Tap
MMS on the account selection screen.
5-14 Microsoft Pocket Outlook
Page 97

4. Verify your MMS settings.
Tap the
the MMS setting of your service provider is selected, and then tap
Menu soft key Tools Options MMS Servers. Make sure
ok to
save the setting.
5. Tap the
6. Tap
Menu soft key New.
Custom to start a new message.
7. Enter the mobile phone number of one or more recipients, separating
them with a semicolon. To access phone numbers from the contact list,
To and make your selection.
tap
Tap to show the Cc
and Bcc fields.
8. Enter the subject.
9. To add a picture or video clip, tap
Insert picture/video and select the
desired picture or video clip.
You can also tap
to take a new picture or to record a new video
clip.
10. Tap
11. To add an audio file, tap
Microsoft Pocket Outlook 5-15
Insert text here to enter your message. To quickly add common
messages, tap
To insert a smiley in the text, tap
tap
.
and then tap a desired message from My Text.
; to insert a Favorites link in the text,
Insert audio and select the desired audio file.
Page 98

To add a recording, tap . Tap Record to start recording. To stop
recording, tap
Done when the playback finishes. The recording (AMR format) is now
Stop. Tap Play to play the recording you just made. Tap
inserted in the message.
12. To add a new page, tap
. To delete a page, tap the Menu soft key
Slides Delete Slide.
13. To insert an attachment, tap the
Menu soft key Attachment Menu soft
key, and select a type: a contact card, appointment or file. Then select the
desired item.
14. Before sending the message, you can preview it by tapping
15. Tap the
Send soft key.
NOTE:
The MMS program supports audio files of the WAV format. However, depending on
mobile phone specifications, the recipient of your message may not support the
WAV format.
To delete the selected picture/video clip/audio/text message, tap and hold the
selection and tap Remove or Clear.
To adjust the size limit of one message, on the message list tap the Menu soft key
Tools Options MMS Servers. Then tap the MMS setting of your
service provider. Change the setting in Sending size limitation and then tap the ok
soft key to save the setting.
Some mobile operators limit the maximum upper size of an MMS message. Please
contact your mobile phone operator to check if such MMS message size limit is set.
MMS messages cannot be sent or received when an ActiveSync connection is in
use.
.
5-16 Microsoft Pocket Outlook
Page 99

Receiving and Viewing an MMS Message
When you receive an MMS message, the
program will automatically starts the GPRS
connection and the
the navigation bar to notify you. The new
MMS message will be stored in the MMS
Inbox folder.
icon will appear on
1. Tap
MMS message area on the Today screen
(for example:
2. On the message list, tap the desired
message to view.
3. The program will start to download and
play the selected message. If there is
more than one page in the message, the
program will automatically turn the
pages. To play in full screen, tap
To replay the message, tap
Messaging; or tap the unread
MMS: 1 Unread).
.
.
Receiving Attachments
An attachment sent with an e-mail message or downloaded from the server
appears below the subject of the message. Tapping the attachment opens the
attachment if it has been fully downloaded or marks it for download the next
time you send and receive e-mail. You can also download attachments
automatically with your messages if you have an Outlook E-mail or IMAP4
e-mail account.
Microsoft Pocket Outlook 5-17
Page 100

 Loading...