

Page 1

Mio C710
Mio DigiWalker
User’s Manual
Trademarks
All brand and product names are trademarks or registered trademarks of their
respective companies.
Note
The information in this manual is subject to change without notice.
Page 2

Page 3

Table of Contents
1 Getting Started................................................................................ 1
1.1 Performing the Initial Start Up .............................................................. 1
1.2 Connecting to AC Power and Charging the Battery............................. 2
1.3 Using Your Device in a Vehicle............................................................ 3
Using the Car Holder ............................................................................ 3
Connecting the Car Charger ................................................................ 4
1.4 Understanding Hardware Features ...................................................... 5
Front Components................................................................................ 5
Back Components ................................................................................ 6
Top Components .................................................................................. 7
Bottom Components............................................................................. 7
2 Basic Skills......................................................................................9
2.1 Turning On and Off Your Device.......................................................... 9
2.2 Operating Your Device ......................................................................... 9
2.3 Using a SD/MMC Card....................................................................... 10
3 Bluetooth and Dialer..................................................................... 11
3.1 Using Bluetooth .................................................................................. 11
Exploring Bluetooth Devices .............................................................. 12
Transferring Files via Bluetooth ......................................................... 13
Using ActiveSync via Bluetooth ......................................................... 15
Using Intercom via Bluetooth ............................................................. 15
Partnering with a Hands-free Device ................................................. 16
Configuring Bluetooth Settings........................................................... 18
Using My Shortcuts ............................................................................ 20
Viewing Active Connections............................................................... 21
3.2 Dialer .................................................................................................. 23
Connecting a Bluetooth Mobile Phone............................................... 23
Placing a Call ..................................................................................... 24
Operations During a Call .................................................................... 26
Receiving a Call ................................................................................. 27
Miscellaneous Buttons ....................................................................... 28
iii
Page 4

4 Regulatory Information.................................................................31
4.1 Regulations Statements ..................................................................... 31
Class B Regulations ........................................................................... 31
European Notice................................................................................. 33
4.2 Safety Precautions ............................................................................. 34
About Charging................................................................................... 34
About the AC Adapter ........................................................................ 34
About the Battery ................................................................................ 35
iv
Page 5

Before You Begin
Precautions and Notices
For your own safety, do not operate the controls of the product while driving.
Use this product prudently. The product is intended to be used only as a
navigation aid. It is not for precise measurement of direction, distance,
location or topography.
The calculated route is for reference only. It is the user’s responsibility to
follow the traffic signs and local regulations along the roads.
When you get off the car, do not leave your device on the dashboard that is
subject to direct sunlight. The overheating of the battery can cause
malfunction and/or danger.
GPS is operated by the United States government, which is solely responsible
for the performance of GPS. Any change to the GPS system can affect the
accuracy of all GPS equipments.
GPS satellite signals cannot pass through solid materials (except glass). When
you are inside a tunnel or building, GPS positioning is not available.
A minimum of 4 GPS satellite signals is needed to determine current GPS
position. Signal reception can be affected by situations such as bad weather or
dense overhead obstacles (e.g. trees and tall buildings).
Other wireless devices in the vehicle might interfere with the reception of
satellite signals and cause the reception to be unstable.
v
Page 6

A car holder is needed when using the device in a car. Be sure to place the
device in an appropriate place, so as not to obstruct the driver’s view, or
deployment of airbags.
Do not mount where the driver’s
field of vision is blocked.
Do not place unsecured
on the dashboard.
Do not mount in front of
airbag panels.
Do not mount in front of an
airbag field of deployment.
vi
Page 7
1 Getting Started
This chapter tells you step by step how to perform the initial startup and introduces
the components of your device.
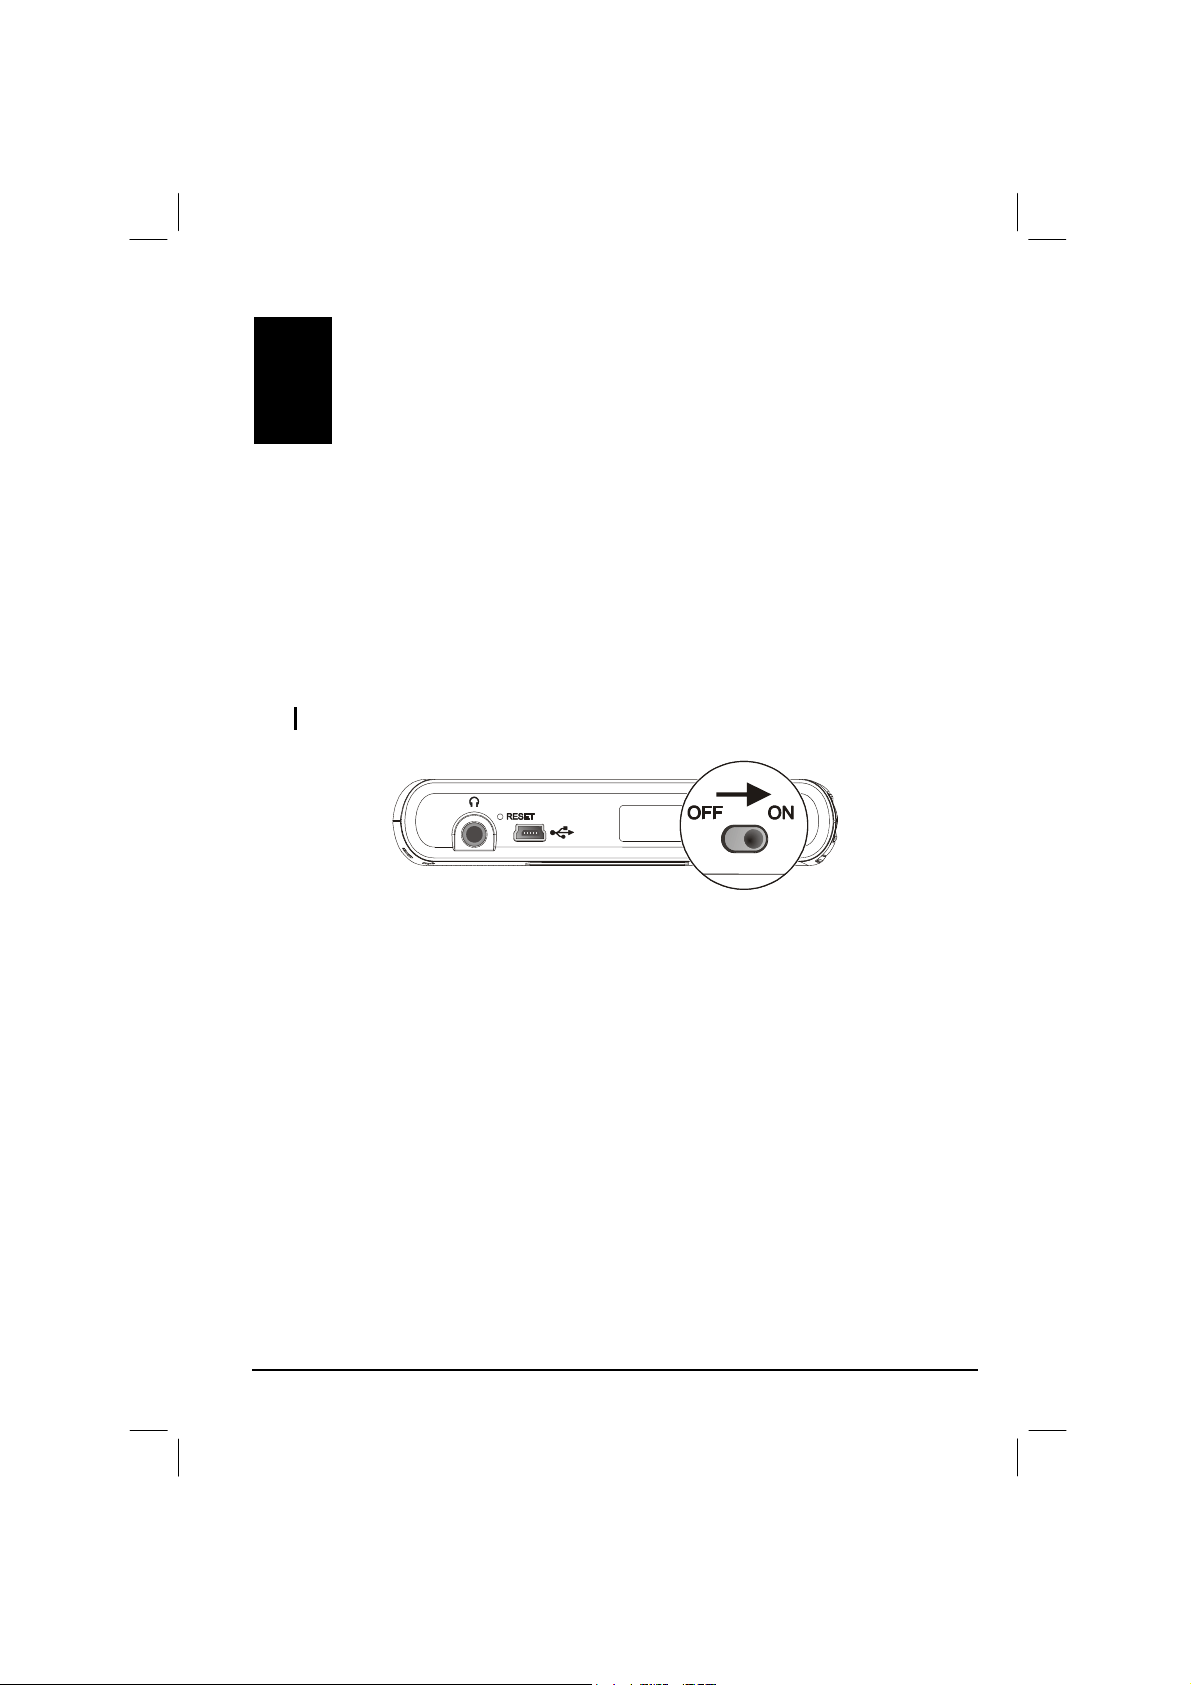
1.1 Performing the Initial Start Up
1. Use a pointed pen to slide the ON/OFF switch to the ON position.
CAUTION: Always leave the ON/OFF switch in the ON position for normal operation.
2. Your device turns on and asks you to select your language. Using your
fingertip, select a language from the pull-down menu and tap
3. The Home screen appears. You can now use your device.
OK.
1
Page 8
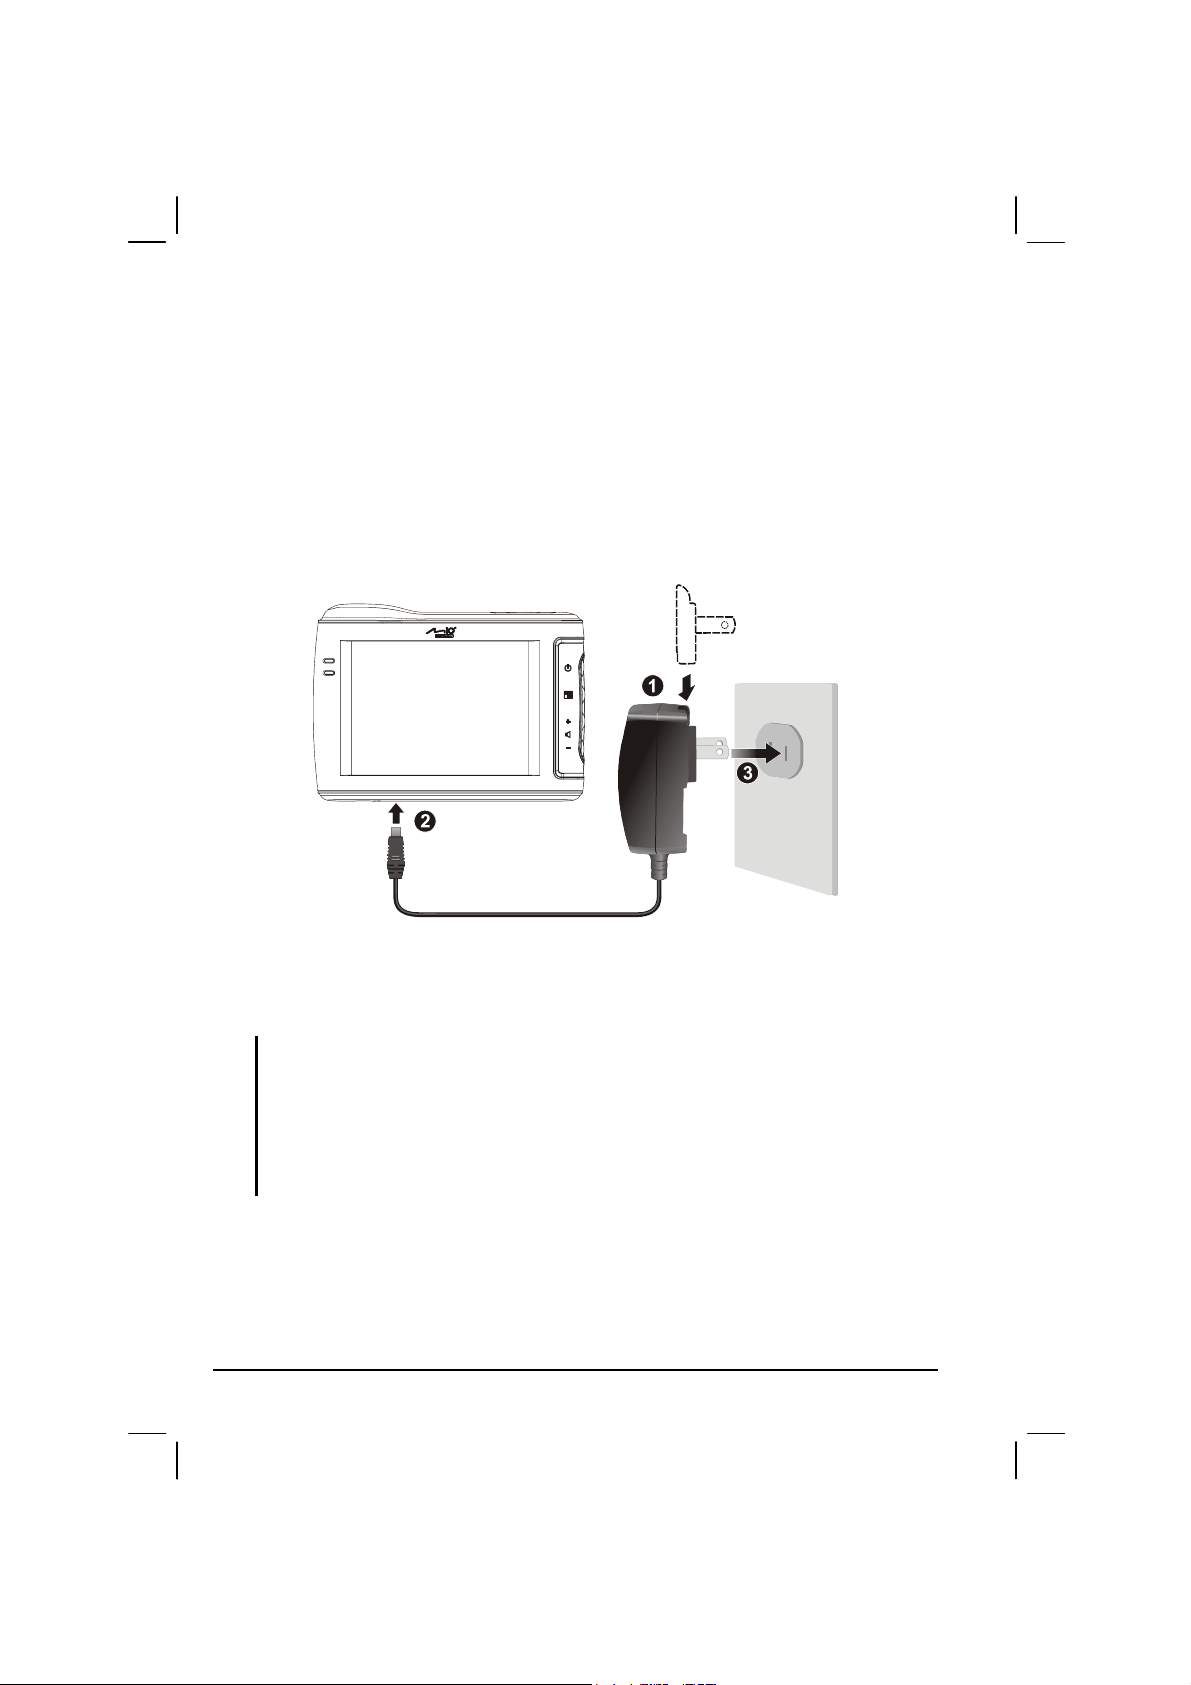
1.2 Connecting to AC Power and Charging the
Battery
Fully charge the battery before using your device for the first time.
1. Slide and click the connector converter onto the AC adapter.
2. Connect the adapter cable to the bottom of your device.
3. Plug the AC adapter into a wall outlet.
The charge indicator glows amber when charging is in progress. Do not disconnect
your device from AC power until the battery is fully charged, when the charge
indicator turns green. This will take a couple of hours.
NOTE:
When charging the battery for the very first time, you should charge it for at least 8 hours.
Do not immediately turn on your device after connecting the AC adapter to charge a
power-depleted battery. If you need to turn on the device again, wait for at least one
minute.
Depending on your region of purchase, the connector converter may not look exactly the
same as the picture shown.
2
Page 9

1.3 Using Your Device in a Vehicle
A car holder and a car charger are supplied with your device.
Using the Car Holder
CAUTION:
Select an appropriate location for the car holder. Never place the holder where the driver’s
field of vision is blocked.
If the car’s windshield is tinted with a reflective coating, an external antenna (optional) may
be needed to route the antenna to the top of the car through a window. When closing the
car window, be careful not to pinch the antenna cable. (Cars with an anti-jam window
design may automatically leave adequate space as needed.)
The car holder consists of a bracket and a flexible window mount. Use the car
holder to fix your device in a vehicle.
1. Assemble the bracket and the window mount.
2. Clean the windshield where you will apply the suction cup.
3. Attach the suction cup firmly to the windshield and press the locking tab to
secure the cup.
4. Carefully fit the device into the bracket.
NOTE: Depending upon the specific model purchased, the car holder supplied with your
device may not look exactly the same as the picture shown.
3
Page 10
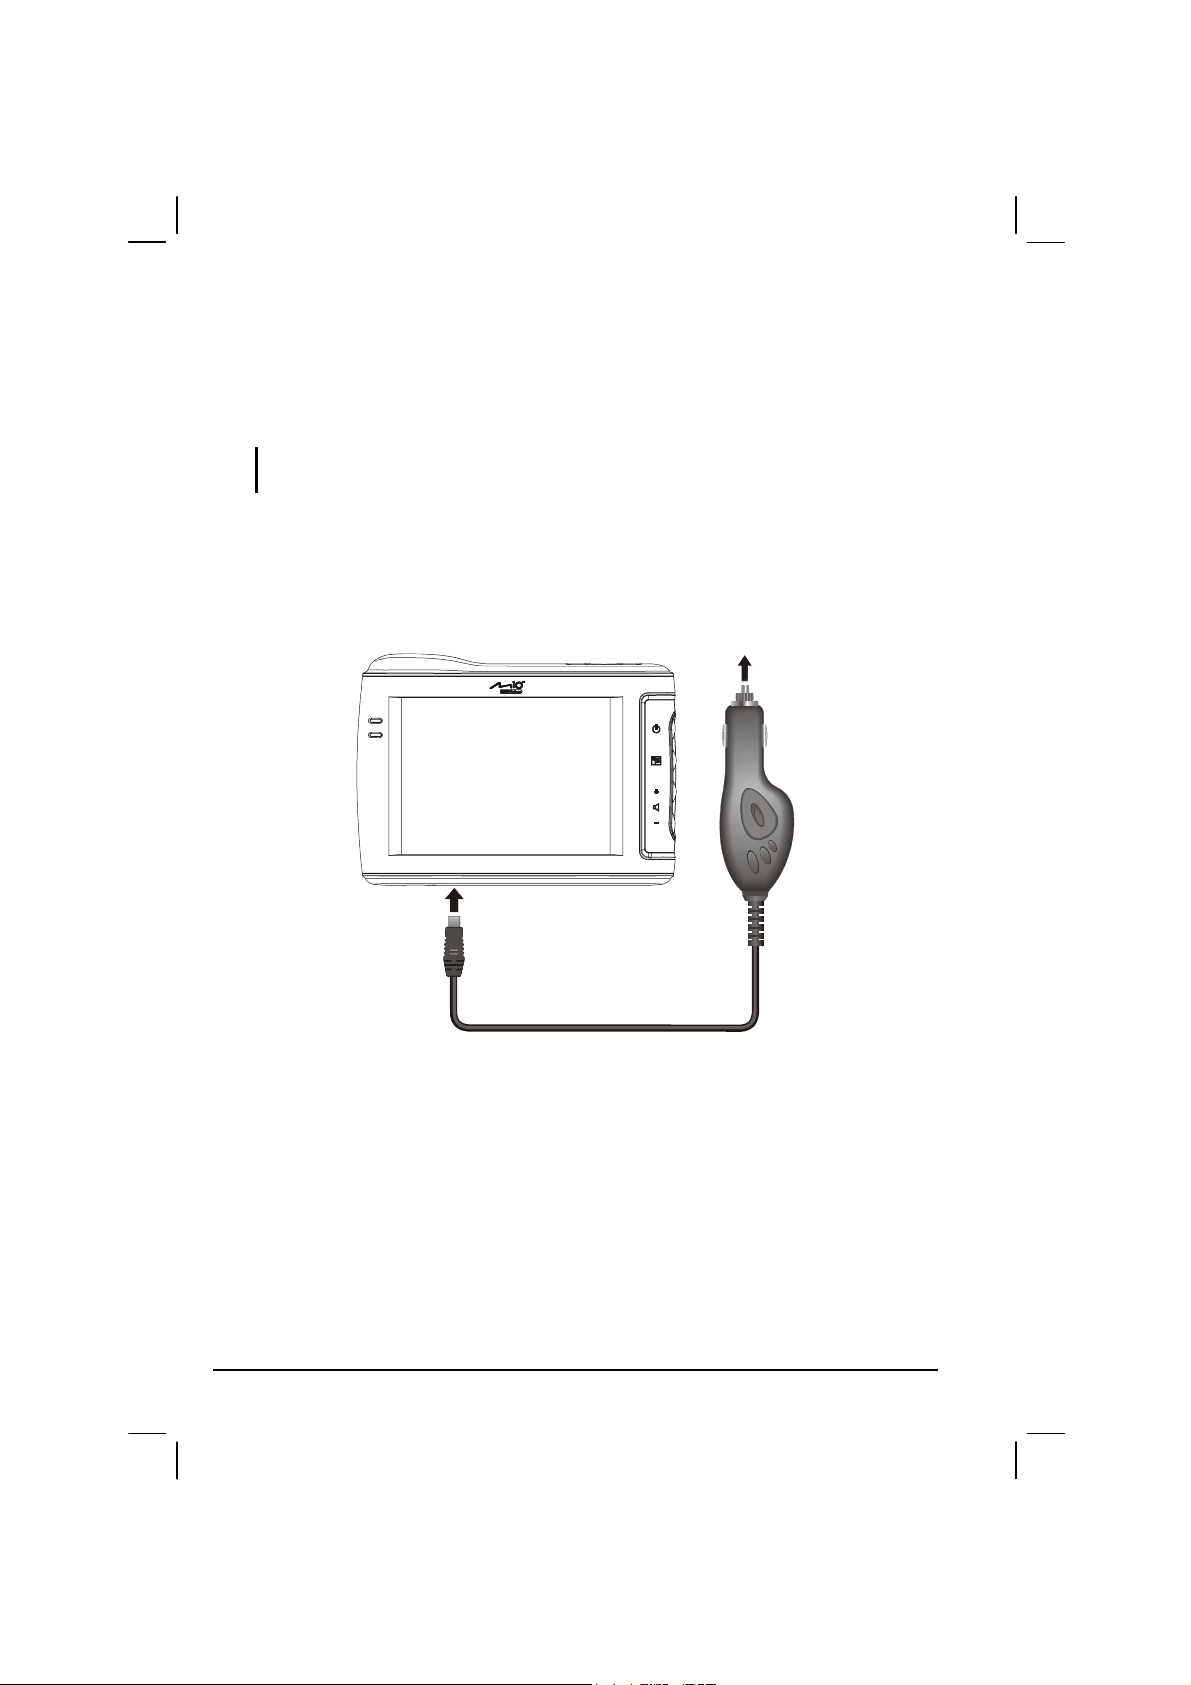
Connecting the Car Charger
The car charger supplies power to your device when you are using the device in a
car.
CAUTION: To protect your device against sudden surges in current, connect the car charger
only after the car engine has been started.
1. Connect one end of the car charger to the power connector of your device.
2. Connect the other end to the cigarette lighter in the car to power and charge
your device. The indicator on the car charger lights in green to indicate that
power is being supplied to your device.
4
Page 11
1.4 Understanding Hardware Features
NOTE: Depending upon the specific model purchased, the color of your device may not exactly
match the device shown in this manual.
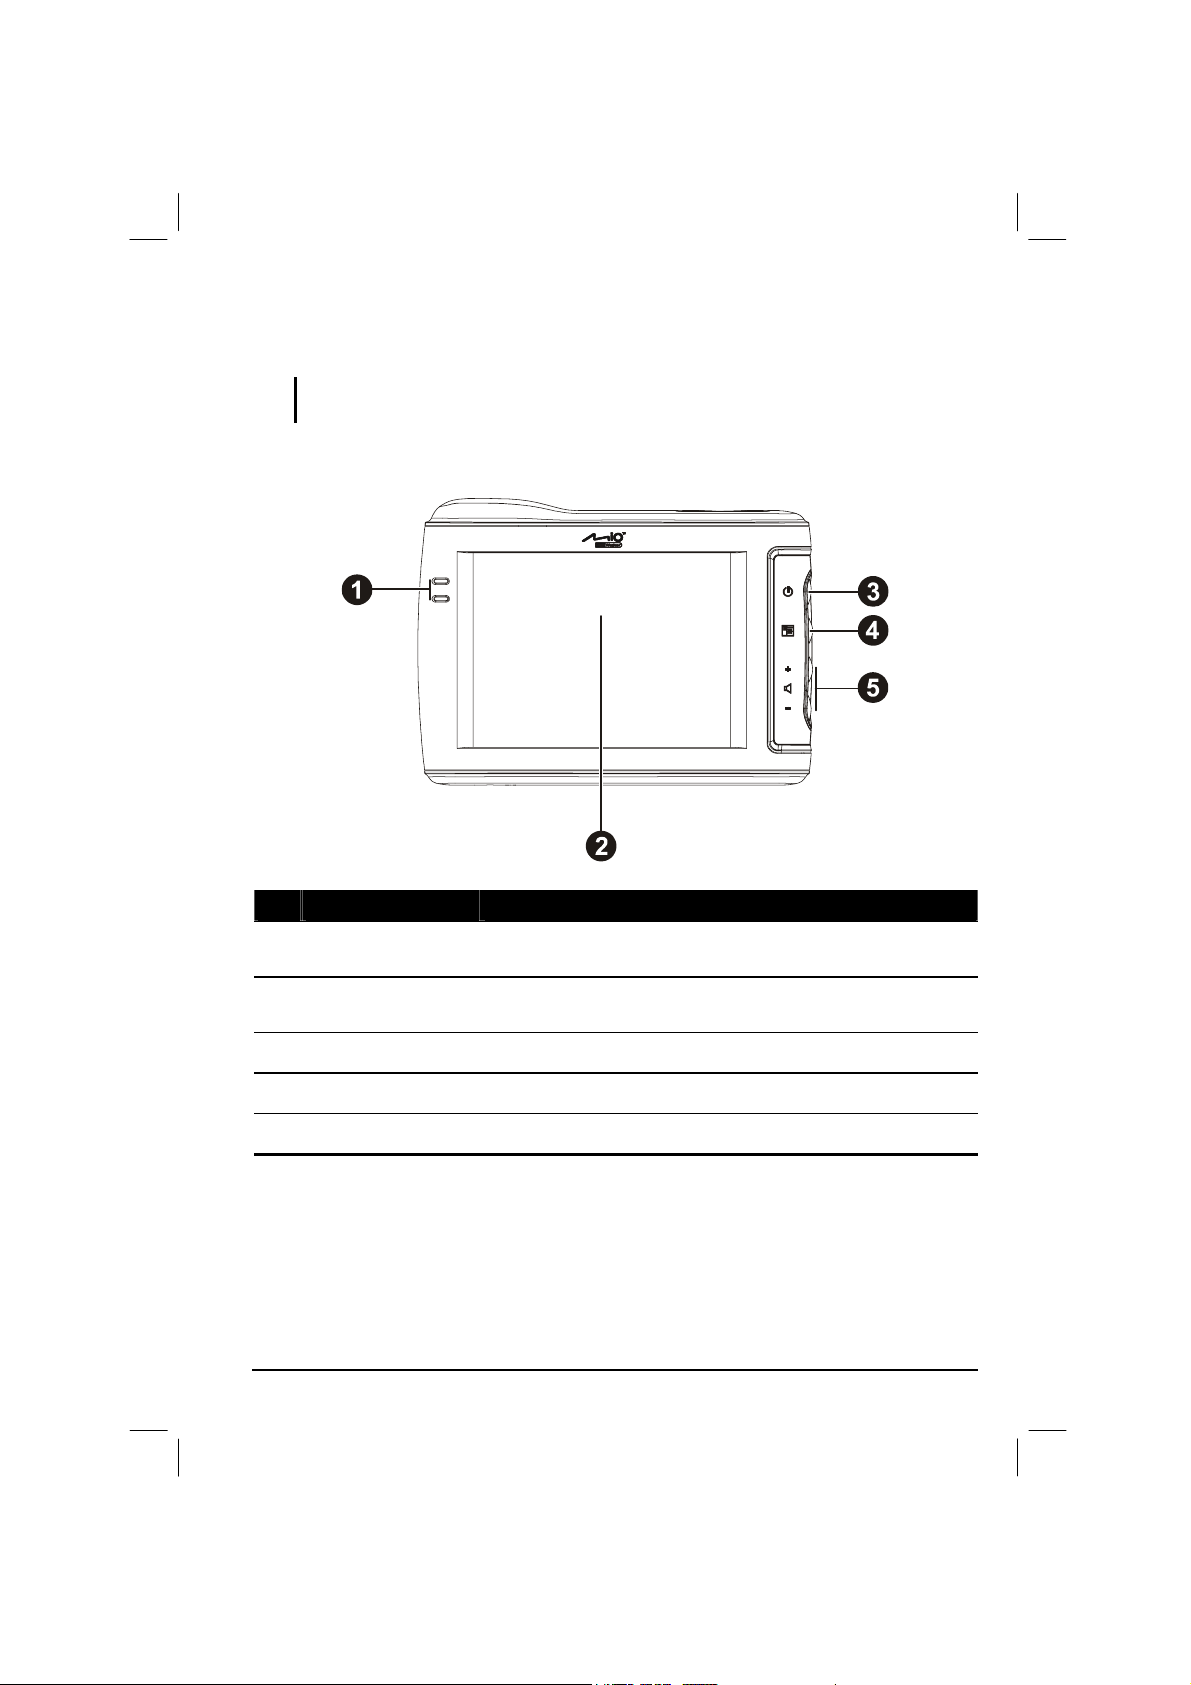
Front Components
Ref Component Description
Touch Screen
Charge Indicator
Power Button
Program Button
Volume Control
Displays the output of your device. Tap the screen with your
fingertip to select menu commands or enter information.
Glows bright amber to indicate that the battery is charging,
and turns green when the battery is fully charged.
Turns on and off the device.
Opens a pre-defined application program.
Adjusts the volume level of your device.
5
Page 12
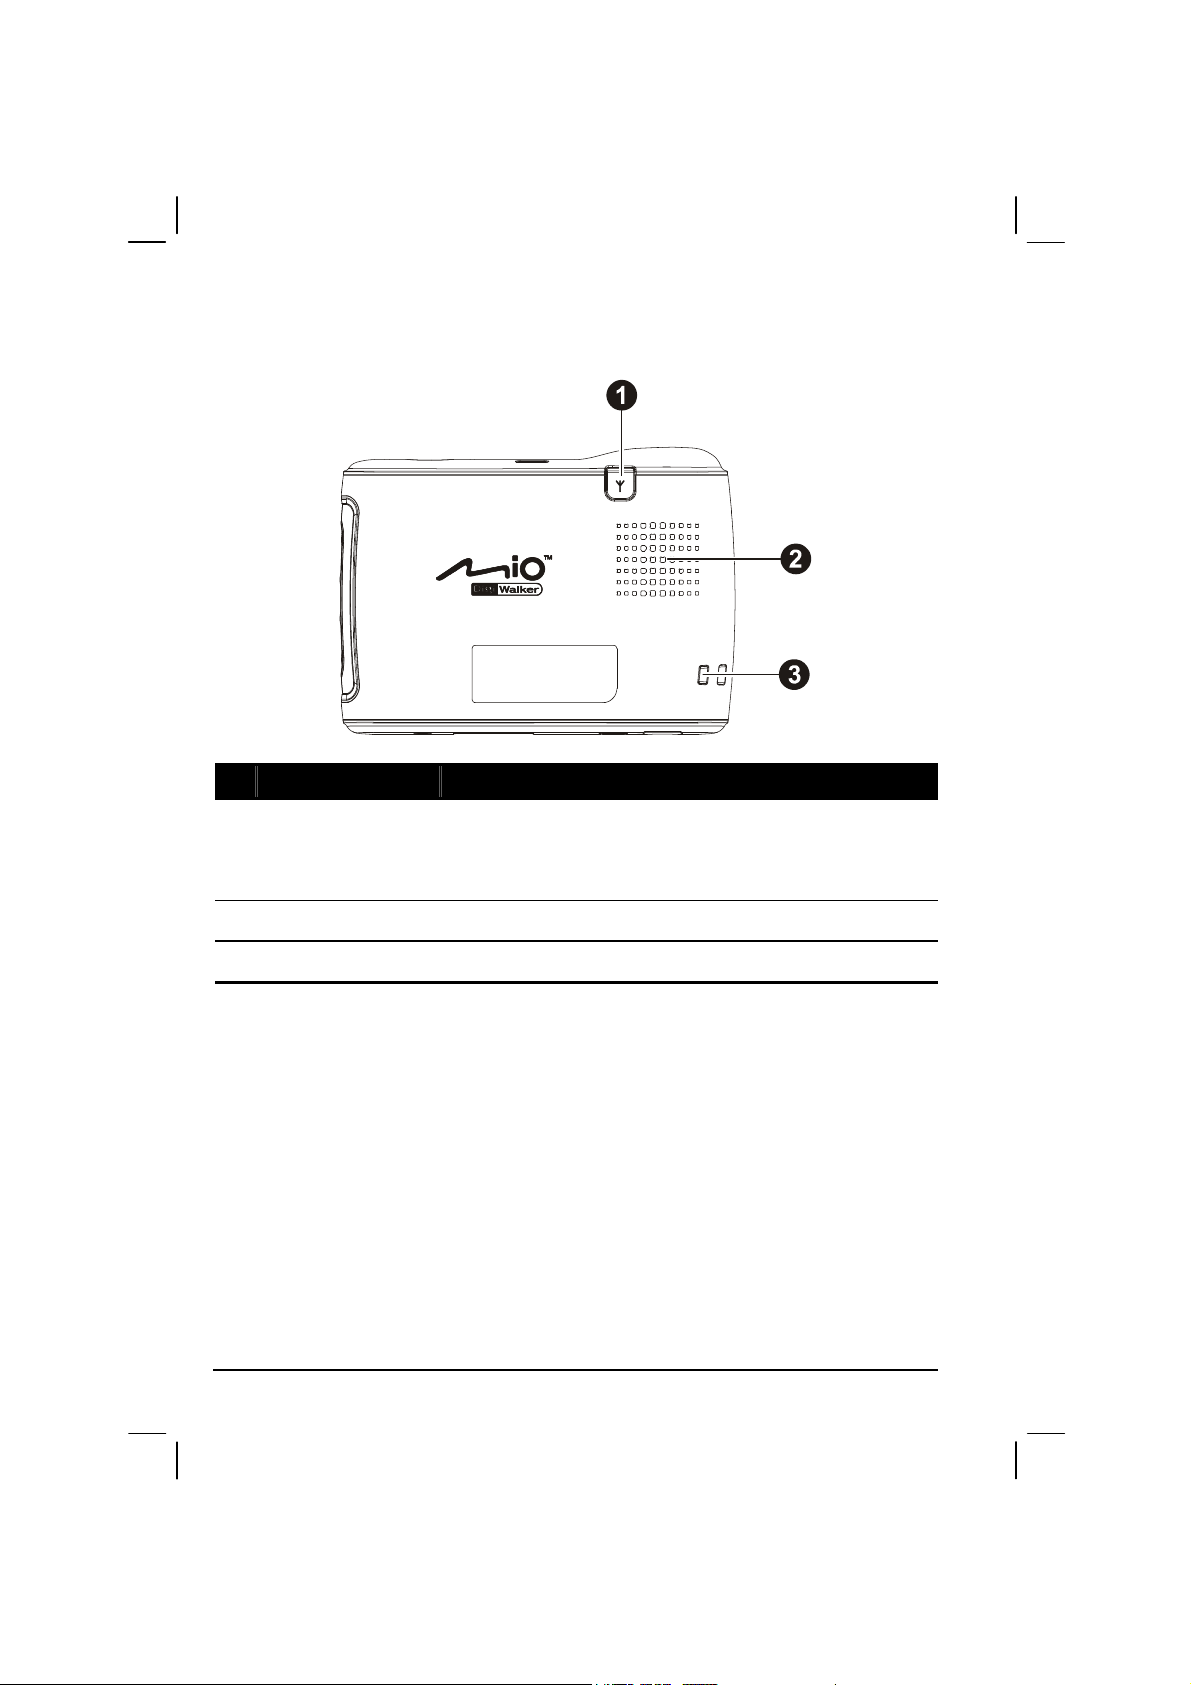
Back Components
Ref Component Description
External Antenna
Connector
Speaker
Hand String Hole
This connector (under rubber dust cover) allows use of an
optional external antenna with magnetic mount, which may
be positioned on top of the car for better signal reception in
areas with poor reception.
Sends out music, sounds and voice.
Hand string attaches to this hole.
6
Page 13
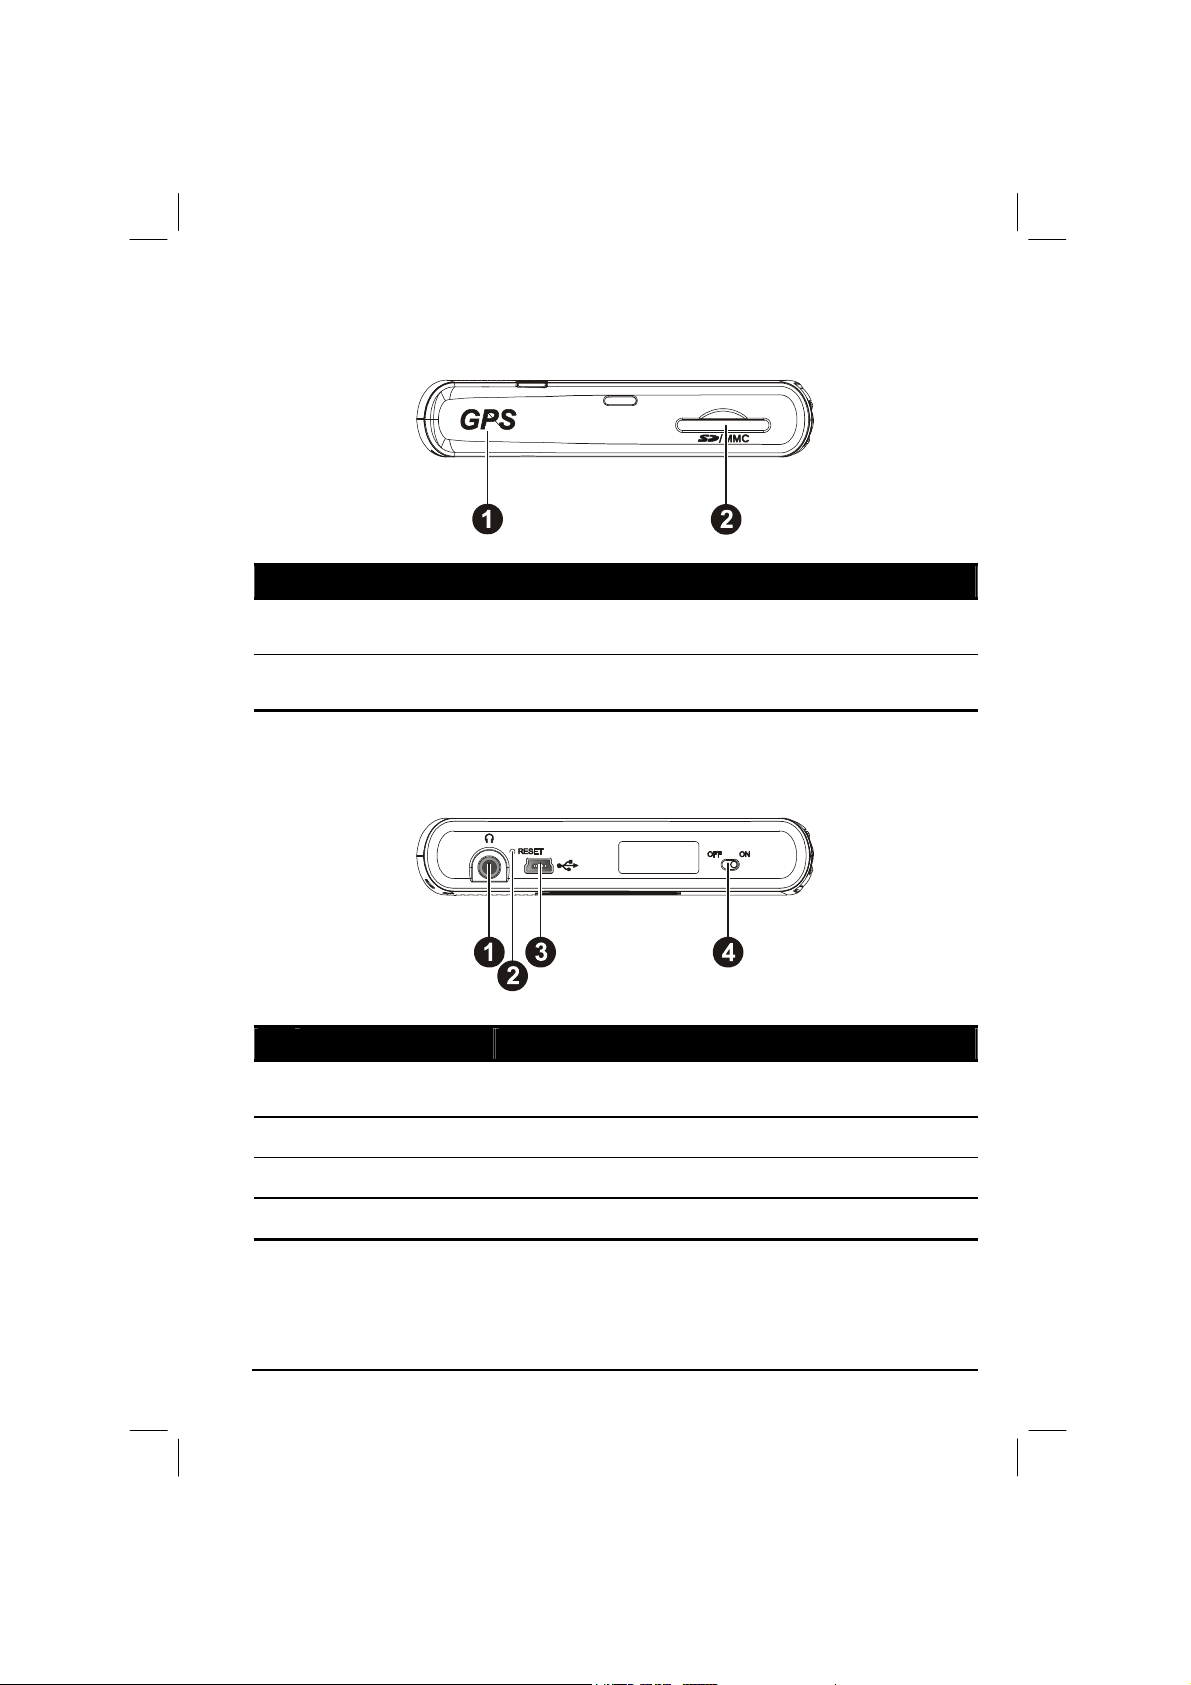
Top Components
Ref Component Description
GPS antenna
SD/MMC Slot
Receives signals from the GPS satellites overhead. Make sure
that it has a clear view of the sky.
Accepts a SD (Secure Digital) or MMC (MultiMediaCard) card
for accessing data such as MP3 music.
Bottom Components
Ref Component Description
Headphone
Connector
Reset Button
Mini-USB Connector
ON/OFF Switch
Connects to stereo headphones.
Restarts your device (soft reset).
Connects to the AC adapter or USB cable.
The main power/battery cutoff switch.
7
Page 14

Page 15

2 Basic Skills
This chapter familiarizes you with the basic operations of your device such as
using the Home screen and the hardware components.
2.1 Turning On and Off Your Device
Use the power button on the side of your device to turn on and off your device.
When you press the power button to turn off the unit, your device actually enters a
suspend state and the system stops operating. Once you turn on the system again, it
resumes.
2.2 Operating Your Device
The first time you turn on your device, the Home screen appears. The Home screen
is your starting place for various tasks. Use your fingertip to tap a button to start an
application or open another menu screen.
You can do the following actions:
Tap
Touch the screen once with your fingertip to open items or select options.
Drag
Hold your fingertip on the screen and drag up/down/left/right or across the
screen.
Tap and hold
Tap and hold your fingertip until an action is complete, or a result or menu is
shown.
9
Page 16

2.3 Using a SD/MMC Card
Your device has a SD/MMC slot where you can insert an optional Secure Digital
or MultiMediaCard storage card.
NOTE:
Make sure that no foreign objects enter the slot.
Keep a SD or MMC card in a well-protected box to avoid dust and humidity when you are
not using it.
To use a SD/MMC card, insert it into the slot, with the connector pointing to the
slot and its label facing the front of the device.
To remove a card, first make sure that no application is accessing the card, then
slightly push the top edge of the card to release it and pull it out of the slot.
10
Page 17

3 Bluetooth and Dialer
3.1 Using Bluetooth
Your device incorporates Bluetooth capability. Bluetooth is a short-range wireless
communications technology. Devices with Bluetooth capabilities can exchange
information over a distance of about 10 meters (30 feet) without requiring a
physical connection.
A Bluetooth program called BlueSoleil is built into your device. The program
includes eight Bluetooth application profiles: Headset, HandFree, Intercom, PAN,
DUN, SPP, OPP, and FTP.
The
function is enabled. Tap the Bluetooth icon
shown below. From this menu, you can turn Bluetooth radio on and off. When you
turn off Bluetooth radio, the icon changes to
Bluetooth Manager.
icon at the lower right corner of the screen indicates that the Bluetooth
to open the Bluetooth menu as
. To manage Bluetooth, tap
NOTE:
To use the service of a remote Bluetooth device, make sure that the remote device is in
discoverable mode.
Tapping Bluetooth HF Phone in the Bluetooth menu starts the Dialer program.)
11
Page 18

Exploring Bluetooth Devices
1. Tap the Bluetooth icon
2. Tap
3. Tap the target device to pop up the function menu.
Explore a Bluetooth Device. You can tap the Refresh button
nearby devices.
and tap
Bluetooth Manager.
to search
4. Tap
Browse Service to browse the services of the target device. The screen
displays the services provided by the target device.
12
Page 19

5. Tap the service you want to use and tap
Pair Device to connect.
Transferring Files via Bluetooth
You can transfer files between your device and a remote Bluetooth device.
1. Tap the Bluetooth icon
2. Tap
Transfer Files via Bluetooth. You can tap the Refresh button
nearby devices.
and tap
Bluetooth Manager.
to search
13
Page 20

3. Tap the target device to establish a FTP (File Transfer Profile) connection.
4. The File Explorer window appears. To access the remote or local device, use
the buttons at the bottom of the screen.
5. Tap and hold on an item to display the shortcut menu. You can use
download/upload and delete operations.
Local device Remote device
14
Page 21

Using ActiveSync via Bluetooth
You can use ActiveSync via Bluetooth.
1. Tap the Bluetooth icon
2. Tap
3. Tap the target device to pop up the function menu and tap
ActiveSync via Bluetooth. You can tap the Refresh button
devices.
ActiveSync connection.
and tap
Bluetooth Manager.
to search nearby
Partner to start
Using Intercom via Bluetooth
You can use your device as an intercom to talk with other Bluetooth-enabled
intercoms.
4. Tap the Bluetooth icon
and tap
15
Bluetooth Manager.
Page 22

5. Tap Intercom via Bluetooth. You can tap the Refresh button
devices.
6. Tap the target device to establish an ICP connection.
to search nearby
7. A dialog box will appear on your device and the recipient’s device. The
recipient can choose to answer or ignore your call.
Partnering with a Hands-free Device
You can use your device as a hands-free device for a mobile phone.
1. Tap the Bluetooth icon
2. Tap
Partner with a Hands-free Device. You can tap the Refresh button
nearby devices.
16
and tap
Bluetooth Manager.
to search
Page 23

3. Tap the target device to partner with it.
4. Enter the passkey requested and tap
OK.
17
Page 24

Configuring Bluetooth Settings
Tap the Bluetooth icon
and tap
Bluetooth Manager Tools Bluetooth Settings.
There is a total of eight pages to configure the Bluetooth server’s and client’s
attributes.
Page Descriptions
General
This page lets you edit local device information.
18
Paired Device
This page lets you view paired devices.
Page 25

Page Descriptions
Serial Port
This page lets you configure the SPP attributes
such as security and COM port.
File Transfer
This page lets you configure the FTP attributes
such as security, shared folder, and read/write
option.
Object Exchange
This page lets you configure the OPP attributes
such as security and business card location.
Dial-up Network
This page lets you configure the DUN attributes
such as security, COM port, and baud rate.
19
Page 26

Page Descriptions
Personal Network
This page lets you configure the PAN attributes
such as security.
Hands-free
This page lets you configure the hands-free
device attributes such as functionality and
security.
Using My Shortcuts
Once you have established a Bluetooth connection with a remote device, it will be
saved as a shortcut. My Shortcuts allows you to conveniently use the same service
again by tapping the particular shortcut item.
1. Tap the Bluetooth icon
2. Tap
My Shortcuts.
20
and tap
Bluetooth Manager.
Page 27

3. Tap and hold the desired item. Tap
Connect to establish a connection again.
Viewing Active Connections
To view active outgoing and incoming connections:
1. Tap the Bluetooth icon
2. Tap
Tools Active Connections.
and tap
Bluetooth Manager.
21
Page 28

3. When you tap and hold an item, you can disconnect it or view the status of the
connection.
22
Page 29

3.2 Dialer
The Dialer program allows you to use your device as a hands-free device for a
Bluetooth-enabled mobile phone. You can tap your device to place and receive
calls instead of pressing the phone’s keypad.
Connecting a Bluetooth Mobile Phone
1. Start the Dialer program.
2. By default, your device will switch to Pair Mode and wait for the pairing
action from your mobile phone for 60 seconds. The connection will be
established as long as you initiate the pairing process on your mobile phone
within this period.
Your Pocket PC will also connect the Bluetooth headset service, if available.
3. You will see the Dialer main screen after the pairing is completed. The status
bar at the bottom shows the name of the mobile phone connected.
When you next run the Dialer program, your device will automatically pair with
the available one of the last connected mobile phones.
NOTE:
Your device must be in Pair Mode for the mobile phone to discover. If you need to manually
set your device to Pair Mode, tap Pair Mode in the main screen.
Up to 8 sets of paired mobile phones can be stored. A 9th paired mobile phone will replace
the oldest one.
23
Page 30

Placing a Call
After pairing with your mobile phone, you can place a call using any of the four
buttons (
Tap the Keypad button on the main screen and you can enter the telephone number
Keypad, Contacts, Call History, and Redial) on the main screen.
Keypad
with the onscreen keypad. After entering the telephone number, tap
to place
the call.
NOTE:
To delete the last digit entered, tap the Backspace button.
The other two buttons allow you to switch to Contacts and Call History screens.
Contacts
Tap the Contacts button on the main screen and you can access the phone numbers
(including mobile telephone, work telephone, and home telephone) stored in
Microsoft Contacts from the Dialer program.
To call the default telephone number of a contact, tap the contact in the list and tap
to place the call.
You can scroll up and down in the list with the arrow buttons or directly scroll to a
group with the alphabetical index.
24
Page 31

If there is more than one telephone number for a contact, tapping the contact opens
the detailed screen where you can select a number.
Call History
Tap the Call History button on the main screen to display the recent incoming,
outgoing, or missed calls together with information such as date, time, and
duration of each call.
Tap the respective button (incoming , outgoing , or missed
) to view the last 20 calls of the selected type.
With an item selected, you can tap
or
To clear all items in the current list, tap
to save the phone number to Contacts.
to dial the number,
.
25
to delete the item,
Page 32

Redial
Tap the Redial button on the main screen to dial the last number you called or
received.
Operations During a Call
During a call, four functions are available:
If you need to input other numbers, such as an extension number, tap to
open the keypad and tap the desired digits. The keypad will close when you tap
the button again or when there has been no input for 5 seconds.
Tap to mute your sound so that the other party cannot hear you. To end
the mute mode, tap the same button again.
Tap to end the call.
26
Page 33

Tap to switch the call to your mobile phone. To switch back to your
device, tap the same button again.
Receiving a Call
When you have a call after pairing with your mobile phone, you will see the
“Incoming Call” screen.
To accept the call, tap .
To reject the call, tap .
To mute the ring tone before receiving or rejecting, tap .
27
Page 34

Miscellaneous Buttons
In addition to buttons for placing a call, there are Connect, Pair Mode, Others, and Exit
buttons on the main screen as described below.
Connect
By tapping the Connect button on the main screen, you can manually search the last
paired mobile phones for an available connection.
Pair Mode
By tapping the Pair Mode button on the main screen, you can manually set your
device to Pair Mode. Within the duration of 60 seconds, you can initiate the pairing
process on your mobile phone to discover your device as a car kit.
28
Page 35

Others
By tapping the Others button on the main screen, you can run the BlueSoleil
program. (See section 6.3 for information on BlueSoleil.)
Exit
To close the Dialer screen, tap the Exit button on the main screen.
29
Page 36

Page 37

4 Regulatory Information
NOTE: Marking labels located on the exterior of your device indicate the regulations that your
model complies with. Please check the marking labels on your device and refer to the
corresponding statements in this chapter. Some notices apply to specific models only.
4.1 Regulations Statements
Class B Regulations
USA
Federal Communications Commission Radio Frequency Interference Statement
NOTE:
This equipment has been tested and found to comply with the limits for a Class B
digital device pursuant to Part 15 of the FCC Rules. These limits are designed to
provide reasonable protection against harmful interference in a residential
installation. This equipment generates, uses, and can radiate radio frequency
energy and, if not installed and used in accordance with the instructions, may cause
harmful interference to radio communications. However, there is no guarantee that
interference will not occur in a particular installation. If this equipment does cause
harmful interference to radio or television reception, which can be determined by
turning the equipment off and on, the user is encouraged to try to correct the
interference by one or more of the following measures:
Reorient or relocate the receiving antenna.
Increase the separation between the equipment and receiver.
31
Page 38

Connect the equipment into an outlet on a circuit different from that to which
the receiver is connected.
Consult the dealer or an experienced radio/TV technician for help.
Any changes or modifications not expressly approved by the manufacturer could
void the user’s authority to operate the equipment.
Please note:
The use of a non-shielded interface cable with this equipment is prohibited.
This device complies with Part 15 of the FCC Rules. Operation is subject to the
following two conditions:
(1) This device may not cause harmful interference.
(2) This device must accept any interference received, including interference that
maycause undesired operation.
Any changes or modifications (including the antennas) made to this device that are
not expressly approved by themanufacturer may void the user’s authority to operate
the equipment.
FCC RF Radiation Exposure Statement:
1. This Transmitter must not be co-located or operating in conjunction with any
other antenna or transmitter.
2. This equipment complies with FCC RF radiation exposure limits set forth for an
uncontrolled environment. To maintain compliance with FCC RF exposure
compliance requirements, avoid direct contact to the transmitting antenna during
transmitting.
3. Any changes or modifications (including the antennas) made to this device that are
not expressly approved by the manufacturer may void the user’s authority to operate
the equipment.
FCC RF Radiation Exposure Statement: This equipment complies with FCC RF
radiation exposure limits set forth for an uncontrolled environment. This device and
its antenna must not be co-located or operating in conjunction with any other
antenna or transmitter.
32
Page 39

Canada
Canadian Department Of Communications
Radio Interference Regulations Class B Compliance Notice
This Class B digital apparatus meets all requirements of the Canada
Interference-Causing equipment regulations.
Cet appareil numérique de Classe B respecte toutes les exigences du Règlement
Canadien sur le matériel brouileur.
European Notice
Products with the CE marking comply with Radio & Telecommunication Terminal
Equipment Directive (R&TTE) (1999/5/EEC), the Electromagnetic Compatibility
Directive (89/336/EEC) and the Low Voltage Directive (73/23/EEC) – as
amended by Directive 93/68/ECC - issued by the Commission of the European
Community.
Compliance with these directives implies conformity to the following European
Standards:
EN300328 Electromagnetic compatibility and Radio spectrum matters
(ERM); Wideband transmission systems; Data transmission equipment
operating in the 2.4GHz ISM band and using wide band modulation
techniques; Harmonized EN covering essential requirements under article
3.2 of the R&TTE Directive
EN301489-1: Electronic compatibility and Radio spectrum Matters (ERM),
ElectroMagnetic Compatibility (EMC) standard for radio equipment and services;
Part 1: Common technical requirements
EN301489-3: Electronic compatibility and Radio spectrum Matters (ERM),
ElectroMagnetic Compatibility (EMC) standard for radio equipment and services;
Part 3: Specific conditions for Short-Range Devices (SRD) operating on
frequencies between 9 kHz and 40 GHz
EN55022: Radio disturbance characteristics
EN55024: Immunity characteristics
EN6100-3-2: Limits for harmonic current emissions
EN6100-3-3: Limitation of voltage fluctuation and flicker in low-voltage
supply system
EN60950 / IEC 60950: Product Safety
33
Page 40

The manufacturer cannot be held responsible for modifications made by the User
and the consequences thereof, which may alter the conformity of the product with
the CE Marking.
4.2 Safety Precautions
About Charging
Use only the AC adapter (PHIHONG, PSC05R-050 or ADP-5FH) supplied
with your device. Use of another type of AC adapter will result in malfunction
and/or danger.
Use only the car charger (ATECH, CT-P168SDS-A2.3) supplied with your
device. Use of another type of car charger will result in malfunction and/or
danger.
This product is intended to be supplied by a LISTED Power Unit marked with
“LPS”, “Limited Power Source” and output rated + 5 V dc / 1.0 A”.
Use a specified battery in the equipment.
About the AC Adapter
Do not use the adapter in a high moisture environment. Never touch the
adapter when your hands or feet are wet.
Allow adequate ventilation around the adapter when using it to operate the
device or charge the battery. Do not cover the AC adapter with paper or other
objects that will reduce cooling. Do not use the AC adapter while it is inside a
carrying case.
Connect the adapter to a proper power source. The voltage requirements are
found on the product case and/or packaging.
Do not use the adapter if the cord becomes damaged.
Do not attempt to service the unit. There are no serviceable parts inside.
Replace the unit if it is damaged or exposed to excess moisture.
34
Page 41

About the Battery
Use a specified charger approved by the manufacturer.
CAUTION: This unit contains a non-replaceable internal Lithium Ion battery. The battery can
burst or explode, releasing hazardous chemicals. To reduce the risk of fire or burns, do not
disassemble, crush, puncture, or dispose of in fire or water.
Important instructions (for service personnel only)
Caution: Risk of explosion if battery is replaced by an incorrect type.
Dispose of used batteries according to the instructions.
Replace only with the same or equivalent type recommended by the
manufacturer.
The battery must be recycled or disposed of properly.
Use the battery only in the specified equipment.
根據交通部 低功率管理辦法 規定:
第十二條 經型式認證合格之低功率射頻電機,非經許可,公司、商號或
使用者均不得擅自變更頻率、加大功率或變更原設計之特性及功能。
第十四條 低功率射頻電機之使用不得影響飛航安全及干擾合法通信;經
發現有干擾現象時,應立即停用,並改善至無干擾時方得繼續使用。
前項合法通信,指依電信規定作業之無線電信。低功率射頻電機須忍受
合法通信或工業、科學及醫療用電波輻射性電機設備之干擾。
35
 Loading...