

Page 1

1
S5555
Version 1.0
Copyright
Copyright © 2018 MiTAC International Corporation. All rights reserved. No part of
this manual may be reproduced or translated without prior written consent from
MiTAC International Corporation.
Trademark
All registered and unregistered trademarks and company names contained in this
manual are property of their respective owners including, but not limited to the
following.
TYAN® is a trademark of MiTAC International Corporation.
Intel® is a trademark of Intel® Corporation.
AMI, AMI BIOS are trademarks of AMI Technologies.
Microsoft®, Windows® are trademarks of Microsoft Corporation.
Winbond® is a trademark of Winbond Electronics Corporation.
Notice
Information contained in this document is furnished by MiTAC International
Corporation and has been reviewed for accuracy and reliability prior to printing.
MiTAC assumes no liability whatsoever, and disclaims any express or implied
warranty, relating to sale and/or use of TYAN® products including liability or
warranties relating to fitness for a particular purpose or merchantability. MiTAC
retains the right to make changes to product descriptions and/or specifications at
any time, without notice. In no event will MiTAC be held liable for any direct or
indirect, incidental or consequential damage, loss of use, loss of data or other
malady resulting from errors or inaccuracies of information contained in this
document.
http://www.tyan.com
Page 2

2
Contents
S5555 ............................................................................................................ 1
Before you begin… .................................................................................... 3
Chapter 1: Instruction ................................................................................ 4
1.1 Congratulations ................................................................................. 4
1.2 Hardware Specifications .................................................................... 4
1.3 Software Specifications ..................................................................... 7
Chapter 2: Board Installation ..................................................................... 8
2.1 Board Image ...................................................................................... 9
2.2 Block Diagram ................................................................................. 10
2.3 Motherboard Mechanical Drawing ................................................... 11
2.4 Board Parts, Jumpers and Connectors ........................................... 12
2.5 Installing the Processor and Heatsink ............................................. 18
2.7 Tips on Installing Motherboard in Chassis ...................................... 22
2.8 Installing the Memory ...................................................................... 24
2.9 Attaching Drive Cables .................................................................... 29
2.10 Installing Add-In Cards .................................................................. 30
2.11 Connecting External Devices ........................................................ 31
2.12 Installing the Power Supply ........................................................... 33
2.13 Finishing Up ................................................................................... 33
Chapter 3: BIOS Setup ............................................................................. 34
3.1 About the BIOS ................................................................................ 34
3.2 Main Menu ....................................................................................... 36
3.3 Advanced Menu ............................................................................... 37
3.4 Chipset Menu .................................................................................. 68
3.5 Security ............................................................................................ 74
3.6 Boot ................................................................................................. 81
3.7 Save & Exit ...................................................................................... 84
Chapter 4: Diagnostics ............................................................................. 86
4.1 Flash Utility ...................................................................................... 86
4.2 AMIBIOS Post Code (Aptio) ............................................................ 87
Appendix I: Fan and Temp Sensors ....................................................... 94
Glossary ..................................................................................................... 97
Technical Support .................................................................................. 103
http://www.tyan.com
Page 3
3
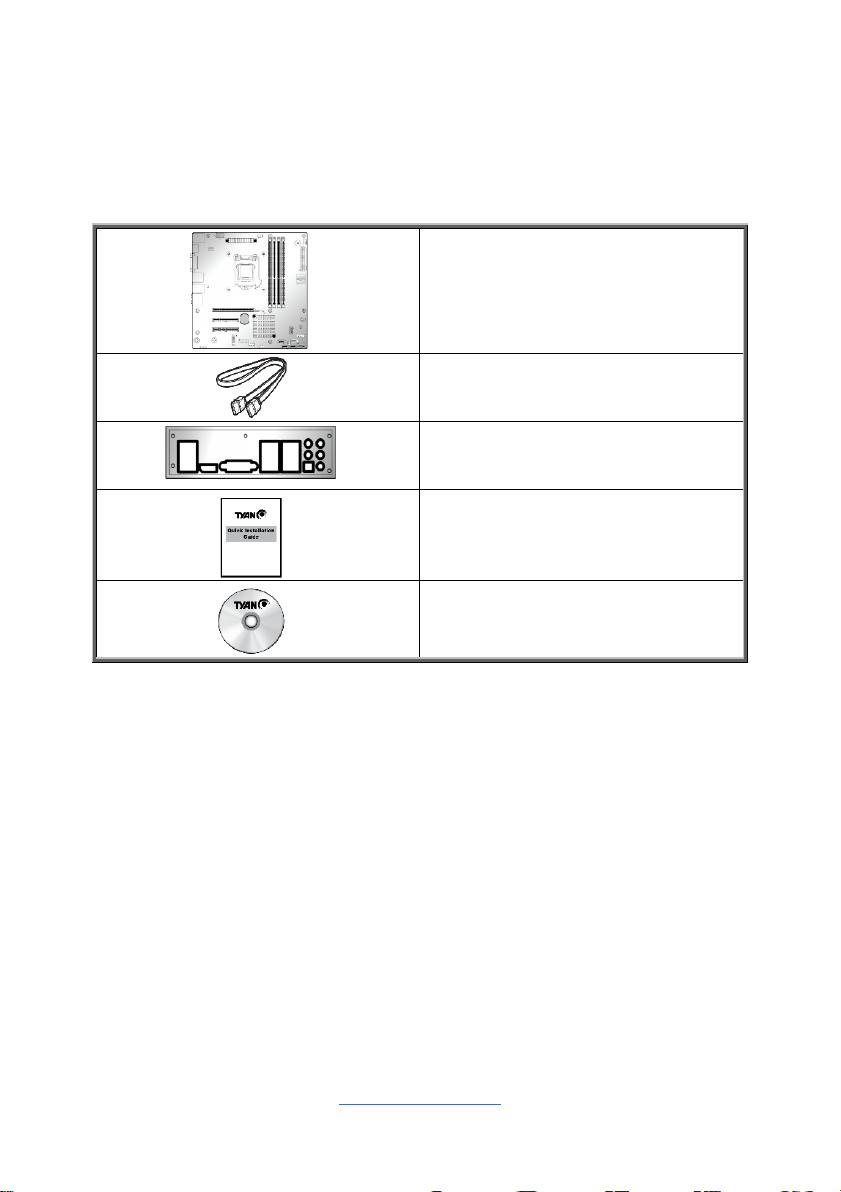
S5555 Motherboard x 1
SATA Single Cable x 2
Rear IO shielding x 1
1 x S5555 Quick Installation Guide
1 x TYAN® Driver CD
Before you begin…
Check the box contents!
The retail motherboard package should contain the following:
IMPORTANT NOTE:
1. Sales samples may not come with any of the accessories listed above.
If you have ordered a sales sample and you are missing any of the above items,
please contact your sales representative to help order accessories.
http://www.tyan.com
Page 4

4
Chapter 1: Instruction
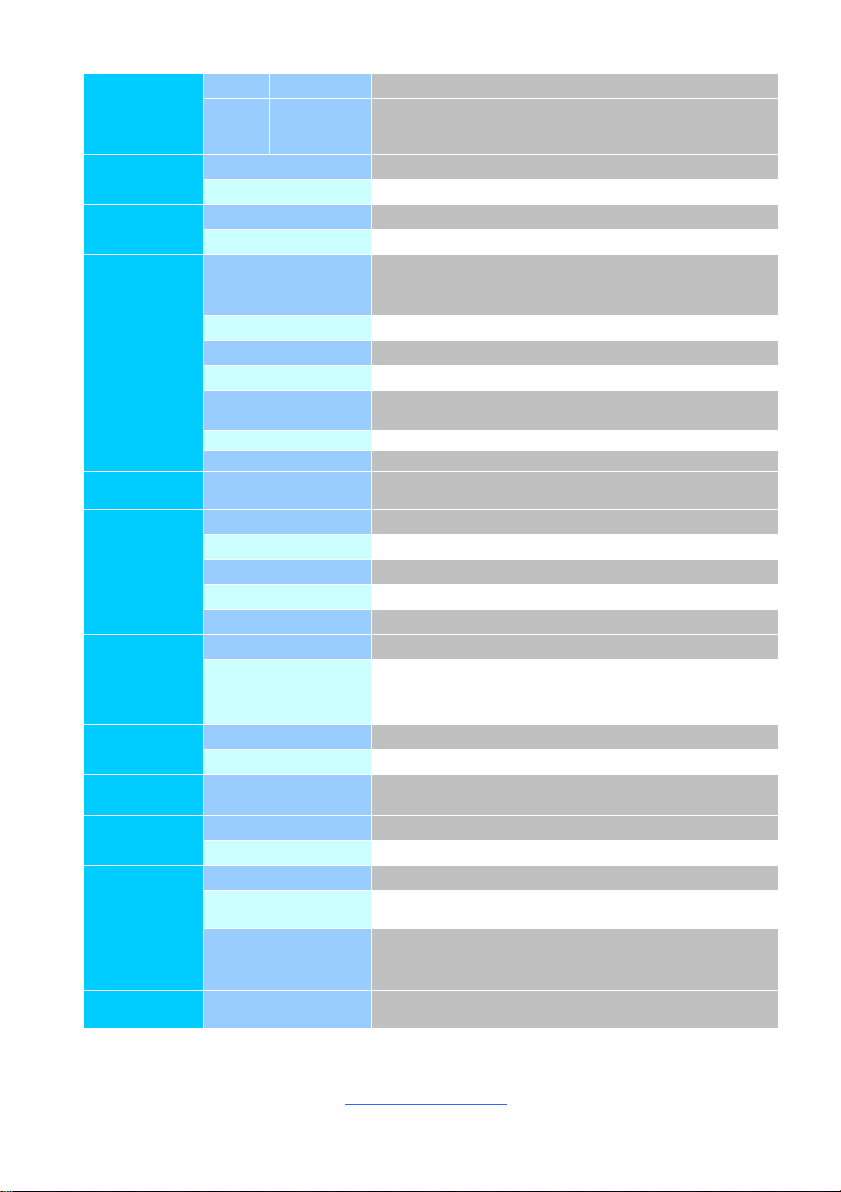
S5555AG2NR Specifications
Processor
Supported CPU
Series
8th Gen. Intel Core i7/i5/i3 Processors
Q'ty / Socket Type
(1) LGA1151
Thermal Design
Power (TDP)
wattage
Max up to 95W
Chipset
PCH / PCI-E Switch
Intel® Q370
Memory
Supported DIMM
Qty
(4) DIMM slots
DIMM Type / Speed
UDIMM DDR4 2666/2400/2133
Capacity
Up to 64GB
*Follow latest Intel DDR4 Memory POR
Memory channel
2 Channels
Memory voltage
1.2V
Expansion
Slots
PCI-E
(1) PCI-E Gen3 x16 slot
(2) PCI-E Gen3 x8 slots (w/ x4 link)
LAN
Port Q'ty
(2) GbE ports
Controller
Intel® I210-AT
PHY
Intel® I219-LM (Intel AMT support)
SATA
Connector
(4) SATA + (2) SATA-DOM
Controller
Intel® Q370
Storage
Speed
6.0 Gb/s
1.1 Congratulations
You have purchased the powerful TYAN® S5555 motherboard, based on the Intel®
C246/H310/Q370 chipset (Cannon lake-PCH). The S5555 is designed to support
Intel® Coffee lake E-series and i3/i5/i7 series Processors, and support UDIMM w/
ECC 2666 up to 64 GB DDR4 memory. Leveraging advanced technology from Intel®,
the S5555 is capable of offering scalable 32 and 64-bit computing, high-bandwidth
memory design, and lightning-fast PCI-E bus implementation.
The S5555 not only empowers you in today’s demanding IT environment but also
offers a smooth path for future application upgradeability. All of these rich feature
sets provide the S5555 with the power and flexibility to meet demanding
requirements for today’s IT environments.
Remember to visit the TYAN® website at http://www.tyan.com. There you can find all
the information on all TYAN® products as well as all the supporting documentation,
FAQs, Drivers and BIOS upgrades.
1.2 Hardware Specifications
http://www.tyan.com
Page 5
5
RAID
RAID 0/1/10/5 (Intel® RSTe)
NVMe
Connector
(M.2)
(1) 2280/2242 (by PCI-E interface)
Graphic
Connector type
(1) DVI-D, (2) Display port 1.2
Chipset
Intel® Processor Graphics(pGFX)
Audio
Chipset
Realtek® ALC892-CG
Feature
7.1 ch
Input
/Output
USB
(2) USB 2.0 ports (at rear)
(4) USB3.1 Gen2 ports (at rear)
(2) USB 2.0 header
(2) USB 3.1 Gen 1 header
COM
(2) headers
RJ-45
(2) GbE ports
DVI
(1) DVI-D connector
Audio
(1) 2x5-pin header
(1) 5 holes Audio Jack+SPDIF fiber connector
SATA
(4) SATA-III connectors + (2) SATA-DOM
Display port
(2) Display ports 1.2
TPM
(Optional)
TPM Support
Please refer to our TPM supported list.
System
Monitoring
AMT Feature
Support Power on/ Power off/ Restart at remote side
Chipset
NCT6683D-T
Fan
Total (4) 4-pin headers
Temperature
Monitors temperature for CPU & system environment
Others
Watchdog timer support
BIOS
Brand / ROM size
AMI / 32MB
Feature
Hardware Monitor, PXE boot support, ACPI sleeping states
S3,S4,S5, User Configurable FAN PWM Duty Cycle, Console
Redirection, ACPI 6.1, SMBIOS 3.1/PnP/Wake on LAN
Form Factor
Form Factor
Micro ATX
Board Dimension
9.6" x 9.6" (243.8 x 243.8mm)
Operating
System
OS supported list
Please refer to our Intel OS supported list.
Regulation
FCC (SDoC)
Class B
CE (DoC)
Class B
Operating
Environment
Operating Temp.
0° C ~ 55° C (32° F~ 131° F)
Non-operating
Temp.
- 40° C ~ 70° C (-40° F ~ 158° F)
In/Non-operating
Humidity
90%, non-condensing at 35° C
Non-operating Relative Humidity: 10% to 95% (non-condensing)
RoHS
RoHS 6/6
Complaint
Yes
http://www.tyan.com
Page 6
6
Operating
System
OS supported list
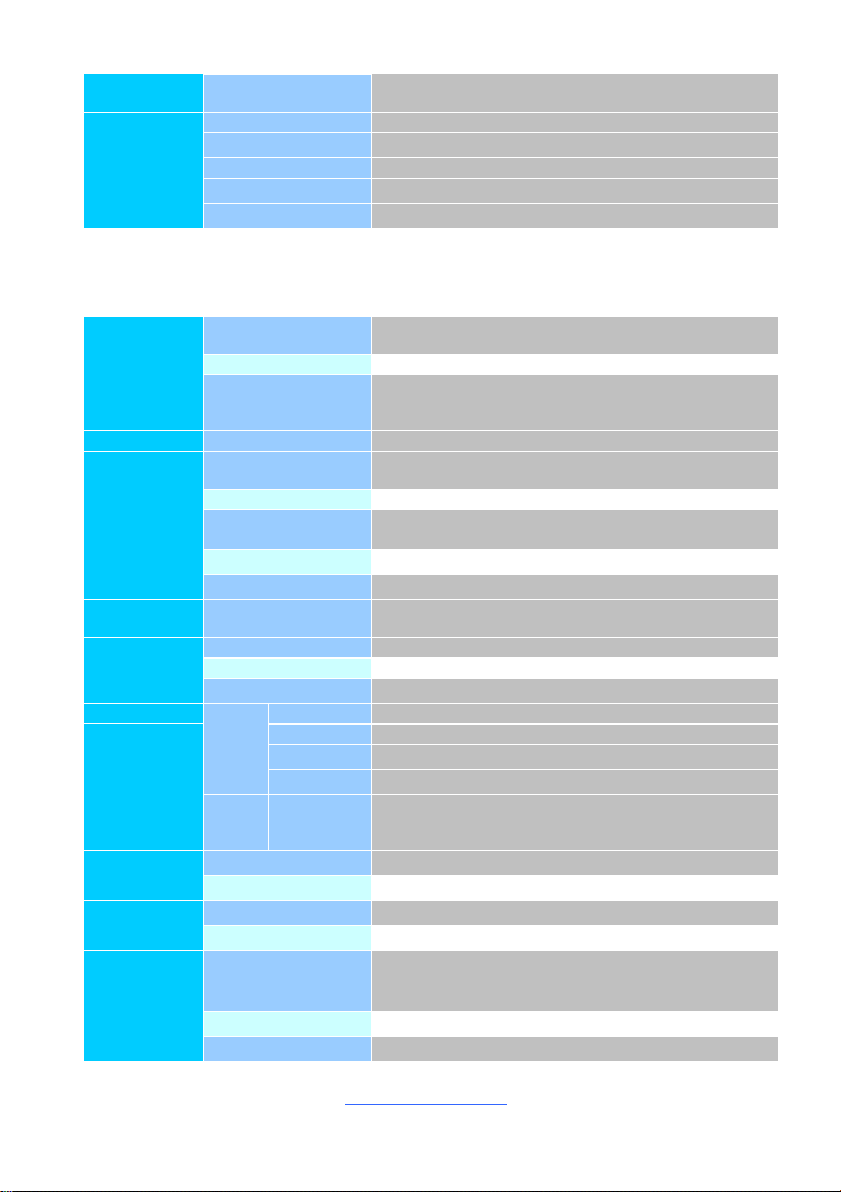
Please refer to our AVL support lists.
Package
Contains
Motherboard
(1) S5555AG2NR Motherboard
SATA Single Cable
(2) SATA Single Cable
Rear IO shielding
(1) Rear IO shielding
Manual
(1) Quick Installation Guide
Installation CD
(1) TYAN Device Driver CD
S5555AG2NR-HE Specifications
Processor
Supported CPU
Series
Intel Xeon E-2100 series processors
Q'ty / Socket Type
(1) LGA1151
Thermal Design
Power (TDP)
wattage
Max up to 95W
Chipset
PCH / PCI-E Switch
Intel® C246
Memory
Supported DIMM
Qty
(4) DIMM slots
DIMM Type / Speed
UDIMM ECC DDR4 2666/2400/2133
Capacity
Up to 64GB
*Follow latest Intel DDR4 Memory POR
Memory channel
2 Channels
Memory voltage
1.2V
Expansion
Slots
PCI-E
(1) PCI-E Gen3 x16 slot
(2) PCI-E Gen3 x8 slots (w/ x4 link)
LAN
Port Q'ty
(2) GbE ports
Controller
Intel® I210-AT
PHY
Intel® I219-LM (Intel AMT support)
SATA
Connector
(4) SATA + (2) SATA-DOM
Controller
Intel® C246
Storage
Speed
6.0 Gb/s
RAID
RAID 0/1/10/5 (Intel® RSTe)
NVMe
Connector
(M.2)
(1) 2280/2242 (by PCI-E interface)
Graphic
Connector type
(1) DVI-D, (2) Display port 1.2
Chipset
Intel® Processor Graphics(pGFX)
Audio
Chipset
Realtek® ALC892-CG
Feature
7.1 ch
Input
/Output
USB
(2) USB 2.0 ports (at rear)
(4) USB3.1 Gen2 ports (at rear)
(2) USB 2.0 header
(2) USB 3.1 Gen 1 header
COM
(2) header
RJ-45
(2) GbE ports
http://www.tyan.com
Page 7
7
DVI
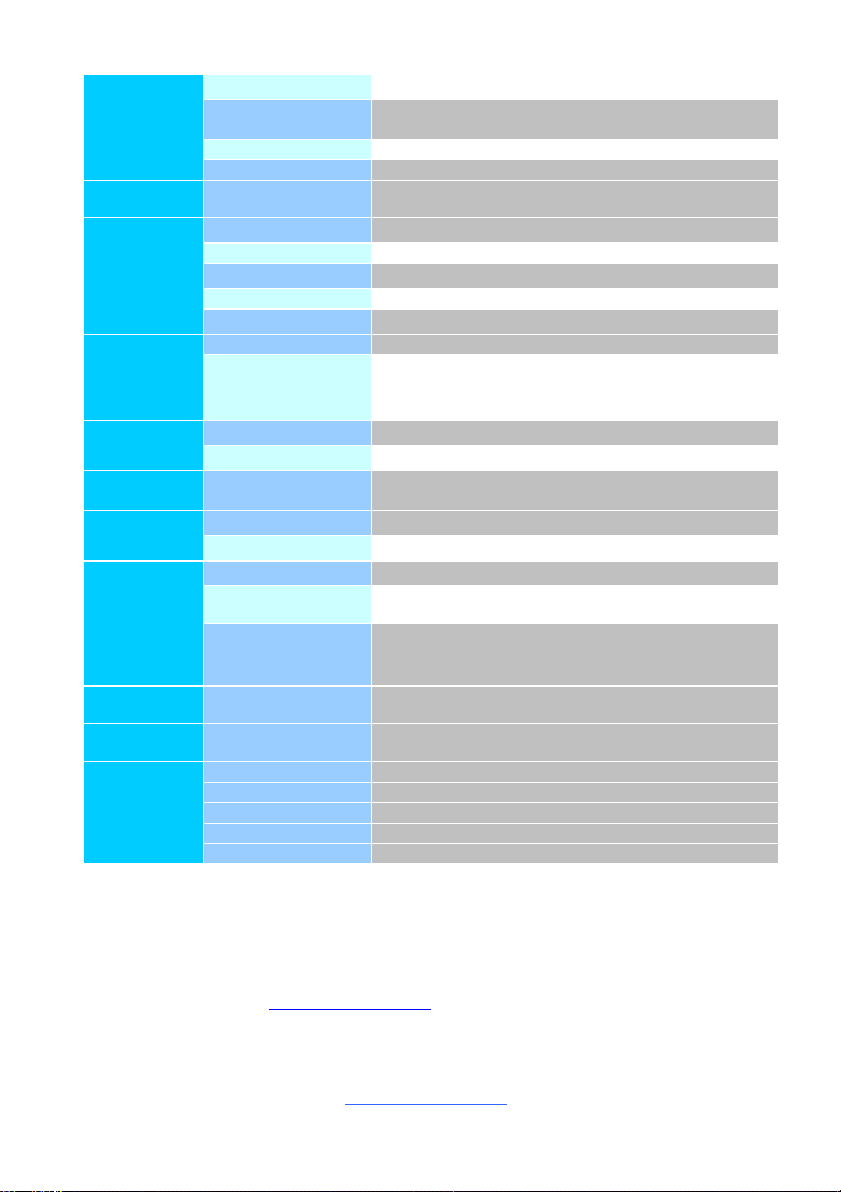
(1) DVI-D connector
Audio
(1) 2x5-pin header
(1) 5 holes Audio Jack+SPDIF fiber connector
SATA
(4) SATA-III connectors + (2) SATA-DOM
Display port
(2) Display ports 1.2
TPM
(Optional)
TPM Support
Please refer to our TPM supported list.
System
Monitoring
AMT Feature
Support Power on/ Power off/ Restart at remote side
Chipset
NCT6683D-T
Fan
Total (4) 4-pin headers
Temperature
Monitors temperature for CPU & system environment
Others
Watchdog timer support
BIOS
Brand / ROM size
AMI / 32MB
Feature
Hardware Monitor, PXE boot support, ACPI sleeping states
S3,S4,S5, User Configurable FAN PWM Duty Cycle, Console
Redirection, ACPI 6.1, SMBIOS 3.1/PnP/Wake on LAN
Form Factor
Form Factor
Micro ATX
Board Dimension
9.6" x 9.6" (243.8 x 243.8mm)
Operating
System
OS supported list
Please refer to our Intel OS supported list.
Regulation
FCC (SDoC)
Class B
CE (DoC)
Class B
Operating
Environment
Operating Temp.
Operating Temp. 0° C ~ 55° C (32° F~ 131° F)
Non-operating
Temp.
- 40° C ~ 70° C (-40° F ~ 158° F)
In/Non-operating
Humidity
90%, non-condensing at 35° C
Non-operating Relative Humidity: 10% to 95% (non-condensing)
RoHS
RoHS 6/6
Complaint
Yes
Operating
System
OS supported list
Please refer to our AVL support lists.
Package
Contains
Motherboard
(1) S5555AG2NR-HE Motherboard
SATA Single Cable
(2) SATA Single Cable
Rear IO shielding
(1) Rear IO shielding
Manual
(1) Quick Installation Guide
Installation CD
(1) TYAN Device Driver CD
1.3 Software Specifications
For the latest AST2500 User’s Guide and OS (operation system) support, please visit
the Tyan’s Web site at http://www.tyan.com for the latest information
http://www.tyan.com
Page 8
8
Chapter 2: Board Installation
Caution!
1. To avoid damaging the motherboard and associated
components, do not use torque force greater than
5~7kgf/cm (4.35~6.09 lb/in) on each mounting screw
for motherboard installation.
2. Do not apply power to the board if it has been
damaged.
You are now ready to install your motherboard.
How to install our products right… the first time
The first thing you should do is read this user’s manual. It contains important
information that will make configuration and setup much easier. Here are some
precautions you should take when installing your motherboard:
(1) Ground yourself properly before removing your motherboard from the
antistatic bag. Unplug the power from your computer power supply and
then touch a safely grounded object to release static charge (i.e. power
supply case). For the safest conditions, MiTAC recommends wearing a
static safety wrist strap.
(2) Hold the motherboard by its edges and do not touch the bottom of the
board, or flex the board in any way.
(3) Avoid touching the motherboard components, IC chips, connectors,
memory modules, and leads.
(4) Place the motherboard on a grounded antistatic surface or on the antistatic
bag that the board was shipped in.
(5) Inspect the board for damage.
The following pages include details on how to install your motherboard into your
chassis, as well as installing the processor, memory, disk drives and cables.
http://www.tyan.com
Page 9
9
2.1 Board Image
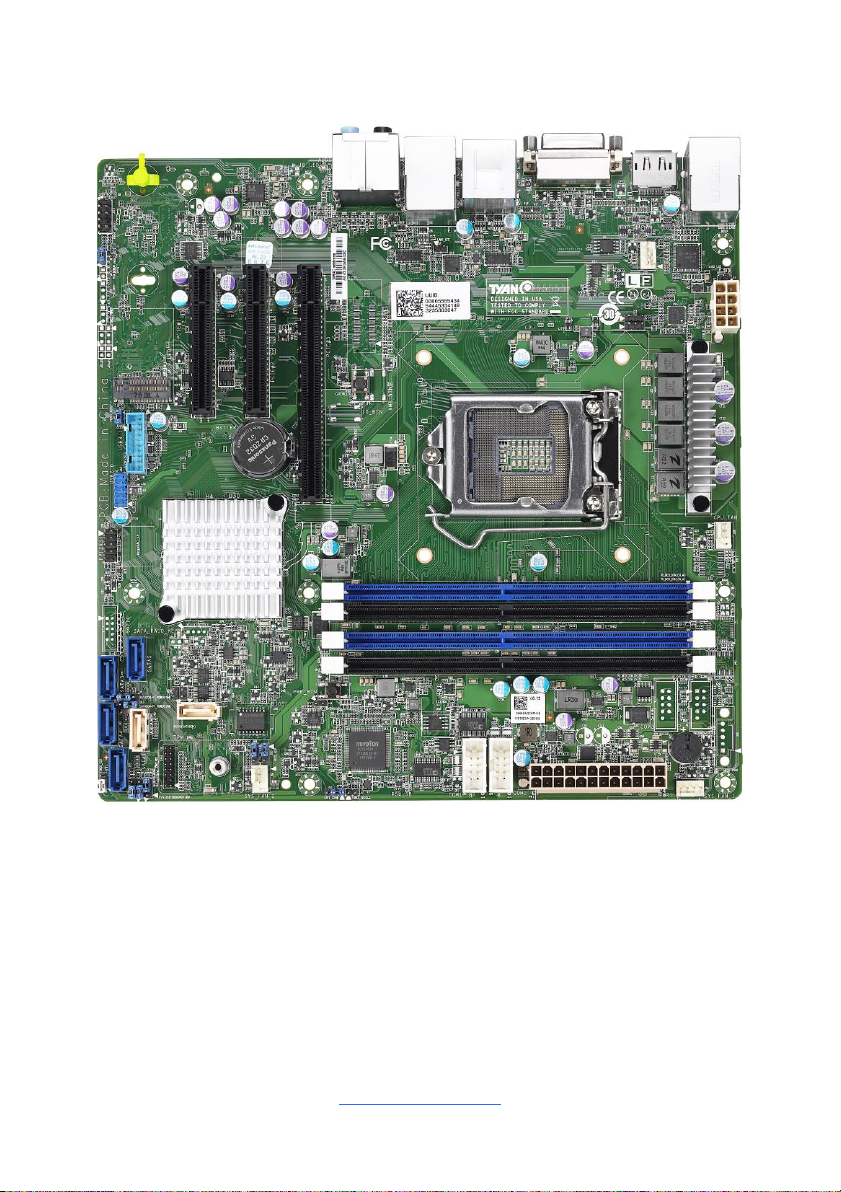
S5555AG2NR
This picture is representative of the latest board revision available at the time of
publishing. The board you receive may not look exactly like the above picture.
http://www.tyan.com
Page 10
10
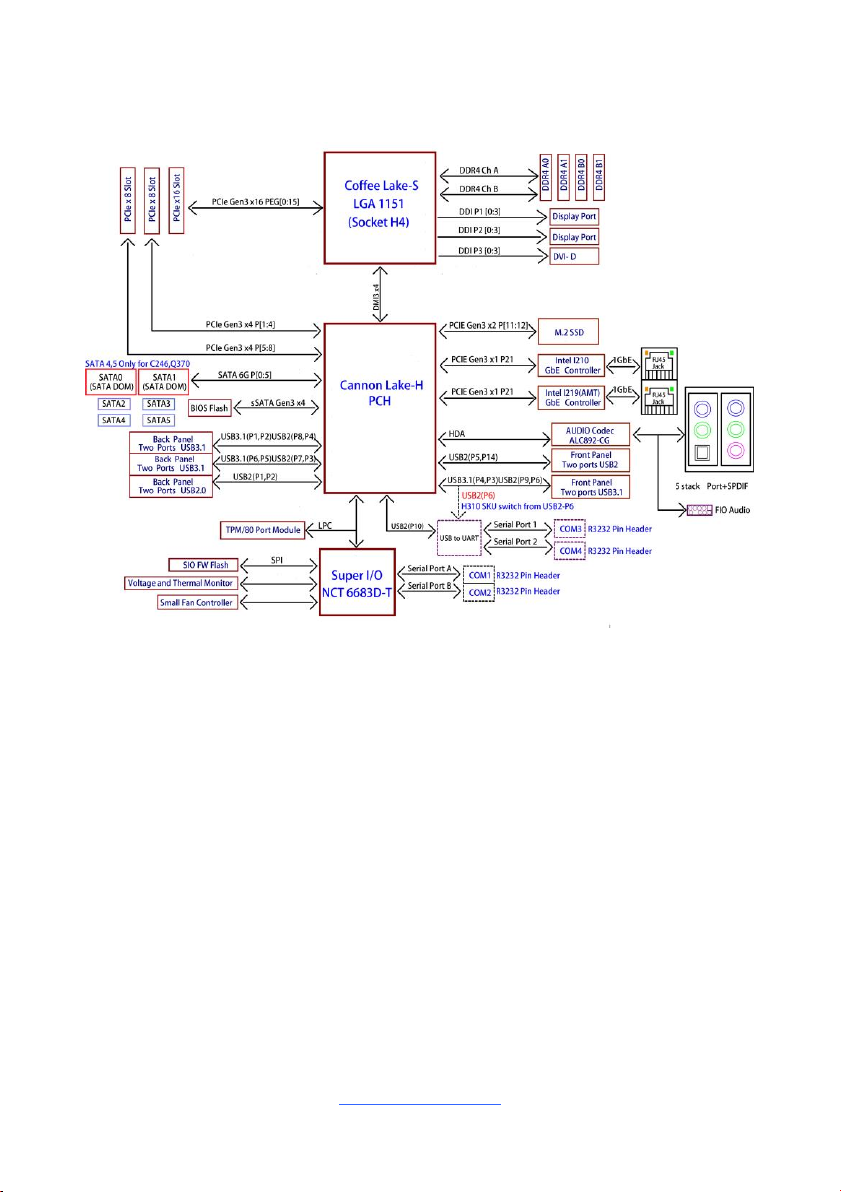
2.2 Block Diagram
S5555 Block Diagram
http://www.tyan.com
Page 11
11
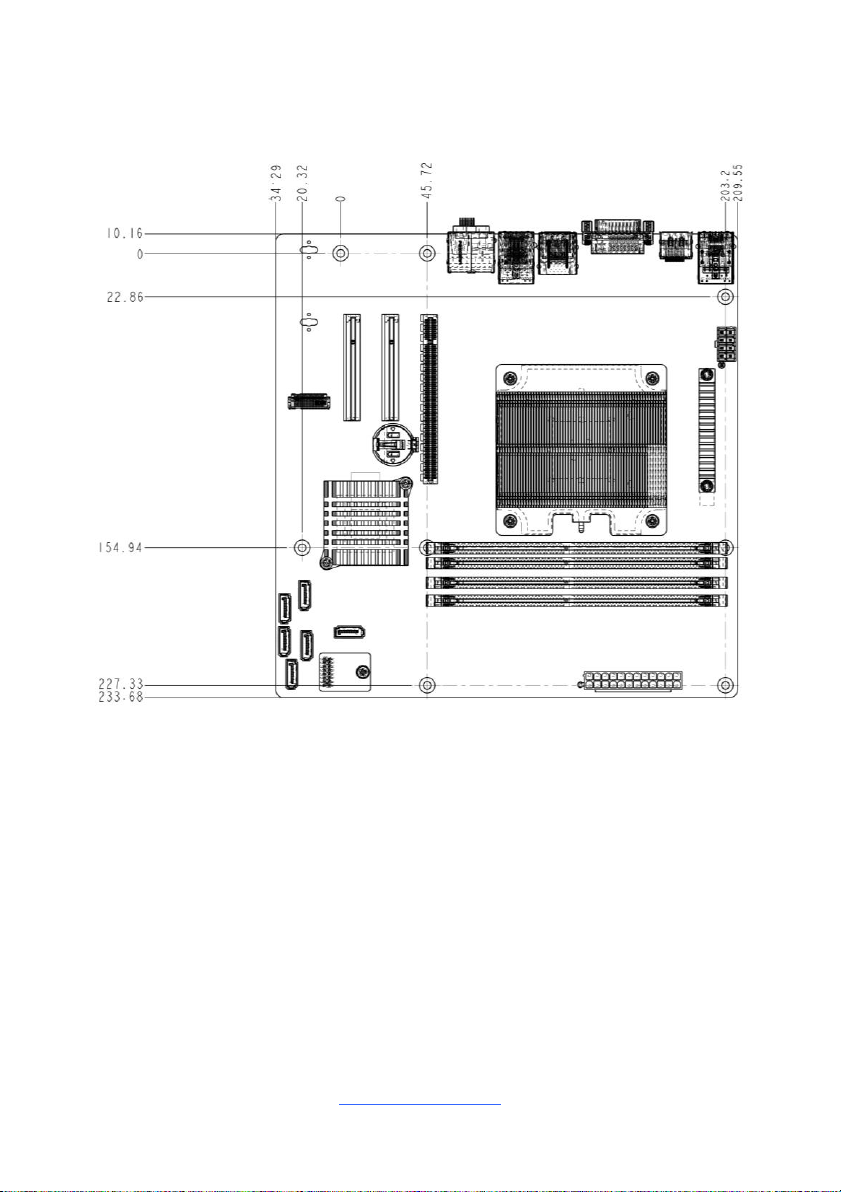
2.3 Motherboard Mechanical Drawing
http://www.tyan.com
Page 12
12
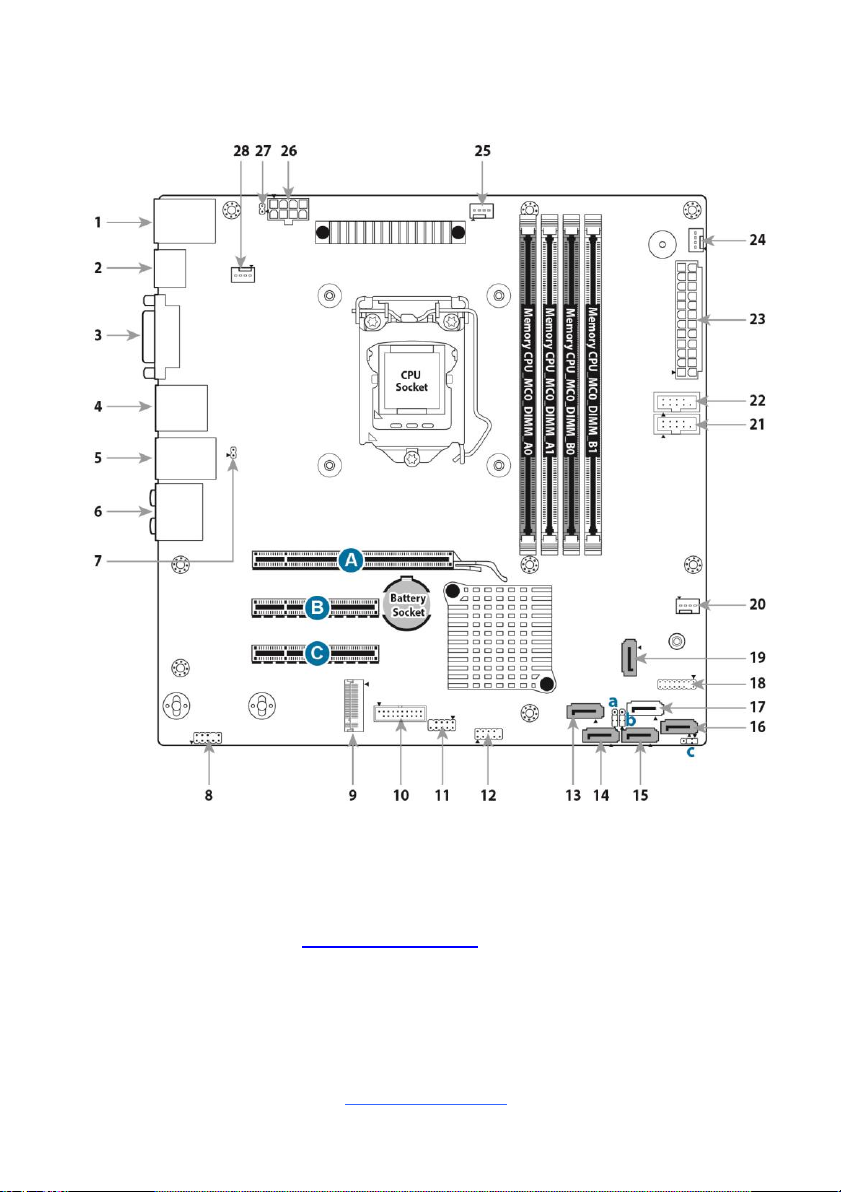
2.4 Board Parts, Jumpers and Connectors
This diagram is representative of the latest board revision available at the time of
publishing. The board you receive may not look exactly like the above diagram. The
DIMM slot numbers shown above can be used as a reference when reviewing the
DIMM population guidelines shown later in the manual. For the latest board revision,
please visit our web site at http://www.tyan.com.
http://www.tyan.com
Page 13
13
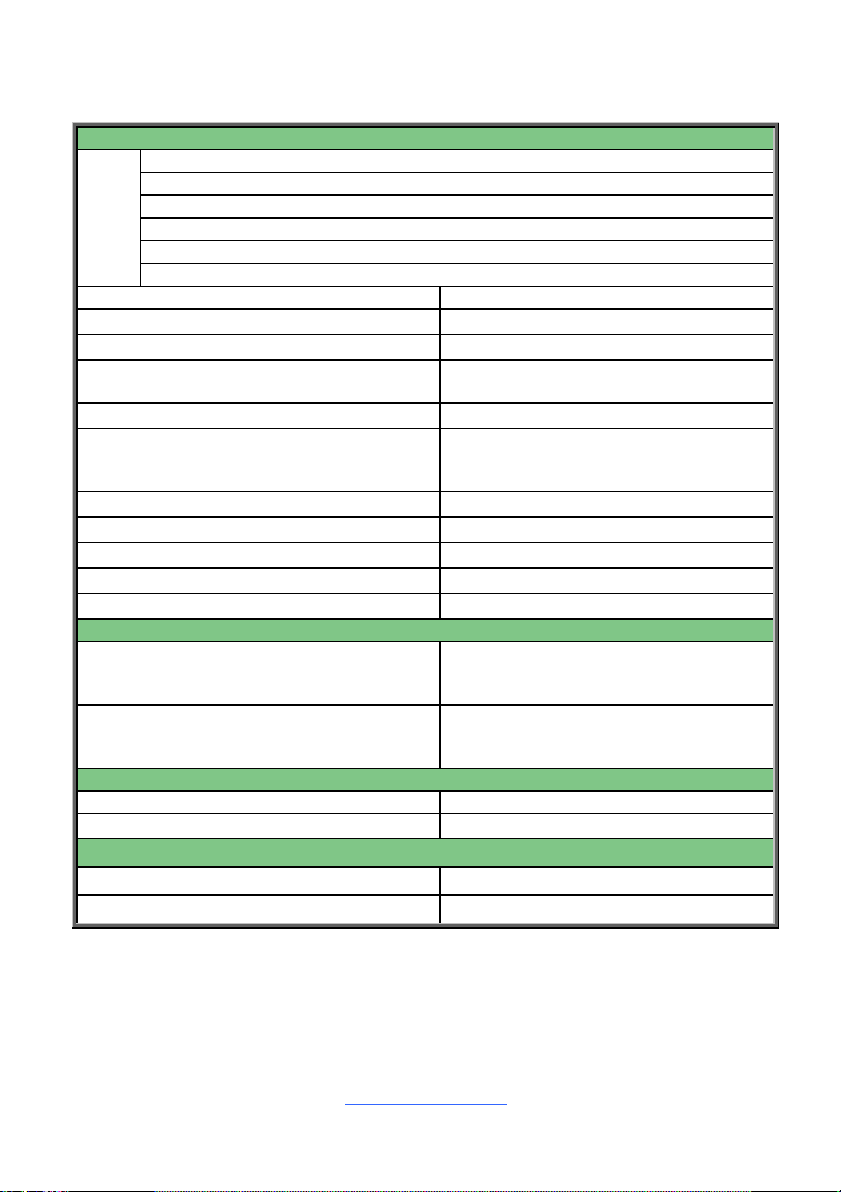
Motherboard Components
Connectors
IO
Ports
1. RJ45 LAN port(i210)+USB2.0 port (J3)
2. Display Port#2 (J6)
3. VIDEO-DVI-D (J1)
4. USB3.1Port x2 (J4)+Display Port#1(J5)
5. RJ45 LAN port (i219)+USB3.1Port (J7)
6. Audio x5 + SPDIF OUT x1 (J2)
7. LAN LED Header (i219)(J8)
18. TYAN Module Header (DBG_HD1)
8. Front Audio x 2 Header(J64)
19. SATA 2 (SATA-DOM)(J46)
9. M.2 (PCIE) Connector (NGFF1)
20. SYS_FAN_2 (J54)
10. FPB USB2.0/ USB3.1*2 Connector
(J63)
21. COM Port 1 (J51)
11. FPB USB2.0*2 Connector(J65)
22. COM Port 2 (J52)
12. Front Panel Header (Power Button/
Reset Button / HDD Active LED/ Power ON
LED) (J29)
23. ATX Power Connector 24P (PW1)
13. SATA 5 (J37)
24. SYS_FAN_1 (J56)
14. SATA 3 (J39)
25. CPU0_FAN (J28)
15. SATA 4 (J47)
26. ATX Power Connector 8P (PW2)
16. SATA 1 (J55)
27. LAN LED Header (I210)(J15)
17. SATA 0 (SATA-DOM) (J48)
28. SYS_ FAN_3 (J10)
Headers/Jumpers
a. SATA-DOM power rail option for Pin1
(Optional for different type SATA-DOM
module) (J38)
c. Clear CMOS Jumper (Load BIOS
Default Set Up)(J60)
b. SATA-DOM power rail option for Pin7
(Optional for different type SATA-DOM
module) (J43)
PCIE Slots
A. PCIE 3.0 Slot x16 (J14)
C. PCIE 3.0 Slot x8 (J12)
B. PCIE 3.0 Slot x8 (J13)
Memory Slots
E. Memory CPU_MC0_DIMM_A0 (J30)
F. Memory CPU_MC0_DIMM_A1 (J31)
G. Memory CPU_MC0_DIMM_B0 (J34)
H. Memory CPU_MC0_DIMM_B1(J36)
http://www.tyan.com
Page 14

14
CPU0 FAN/ SYS FAN1~3: 4-pin CPU Fan Connector(J28, J56, J54, J10)
Pin 1 2 3 4
Signal
GND
VCC12
FAN_TACH
PWM
Use this header to connect the cooling fan to your motherboard to
keep the system stable and reliable.
Note: A 4-pin fan is required for fan support 4pin Control
Signal
Pin
Pin
Signal
SATA_LED_PWR
1
2
GRN_BLNK_HRD
SATA_LED_D_N
3
4
YLW_BLNK_HRD
GND
5
6
PWRBT_N_R
FP_RST_R_N
7
8
GND
FP PWR
9
10
7
1
Name
TYPE
S1
GND
S2
TXP
S3
TXN
S4
GND
S5
RXN
S6
RXP
S7
GND
Connects to the Serial ATA ready drives via the Serial ATA
cable.
7
1
Name
TYPE
S1
GND
S2
TXP
S3
TXN
S4
GND
S5
RXN
S6
RXP
S7
P5V
Connects to the Serial ATA ready drives via the Serial ATA
cable.
FPIO1: Front Panel Header
SATA1/SATA3/SATA4 SATA5/: SATA Connectors (J55, J39, J47, J37)
SATA0/SATA2: SATA DOM Connectors (J48, J46)
http://www.tyan.com
Page 15
15
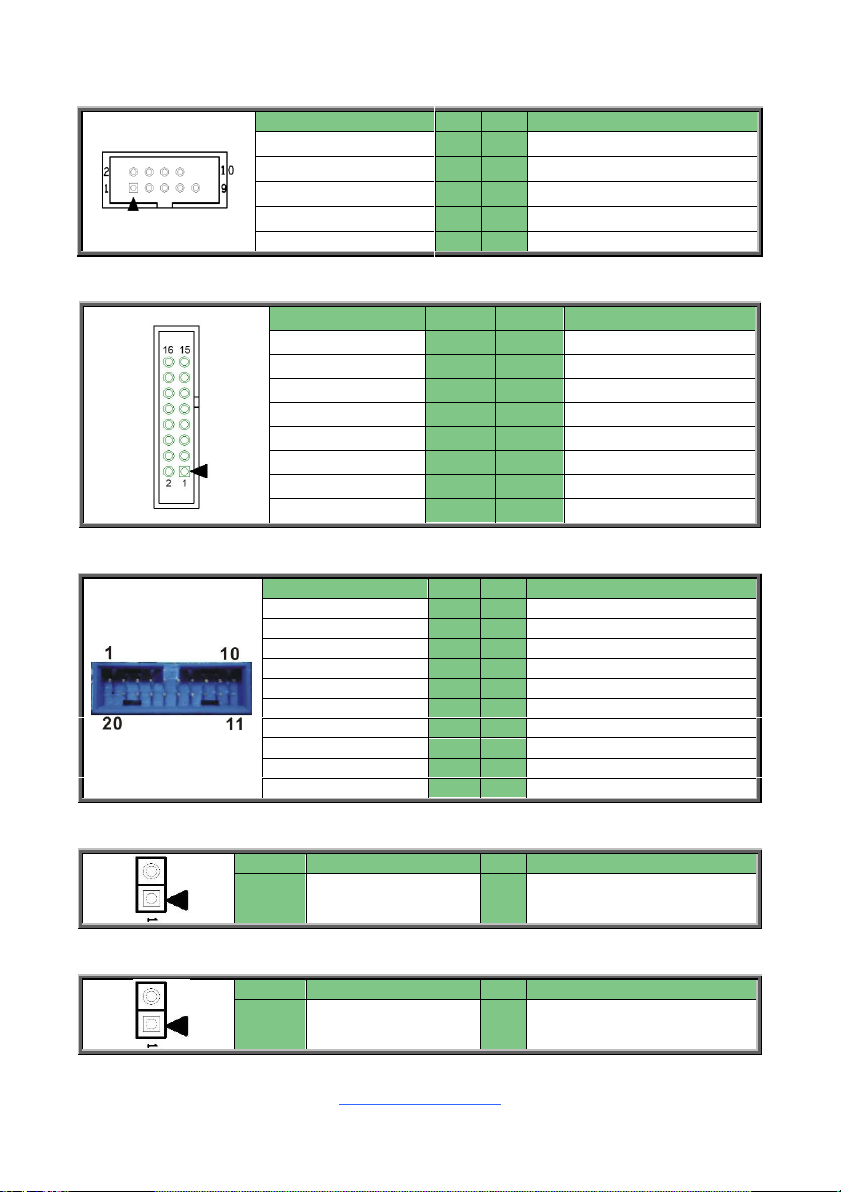
COM Port 1/ COM Port 2: Internal Serial Port Header Pin-out (J51,J52)
Signal
Pin
Pin
Signal
SPA_DCD
1
2
SPA_DSR
SPA_SIN_N
3
4
SPA_RTS
SPA_OUT_N
5
6
SPA_CTS
SPA_DTR
7
8
SPA_RI
GND
9
Signal
Pin
Pin
Signal
P3V3
1
2
FRAME_N
LAD0
3
4
KEY
LAD1
5
6
PLT_RST_N
LAD2
7
8
GND
LAD3
9
10
CLK_33M
DBG_SERIRQ
11
12
GND
DBG_PRES_N
13
14
VCC3_AUX
P3V3(NI) / GND
15
16
RST_ESPI_RESET_N
Signal
Pin
Pin
Signal
+5V
1
2
P0_RX_N
P0_RX_P
3
4
GND
P0_TX_N
5
6
P0_TX_P
GND
7
8
P0_N
P0_P
9
10
OC_N
P1_P
11
12
P1_N
GND
13
14
P1_TX_P
P1_TX_N
15
16
GND
P1_RX_P
17
18
P1_RX_N
+5V
19
20
Key
Pin
Signal
Pin
Signal
1
LAN_i219_LED+
2
LAN_i219_LED-
Pin
Signal
Pin
Signal
1
LAN_i210_LED+
2
LAN_i210_LED-
DBG_HD1: TYAN Module Header(J62)
J63: Front USB2.0/ USB3.1*2 Connector
J8: LAN LED Header (i219)
J15: LAN LED Header (I210)
http://www.tyan.com
Page 16
16
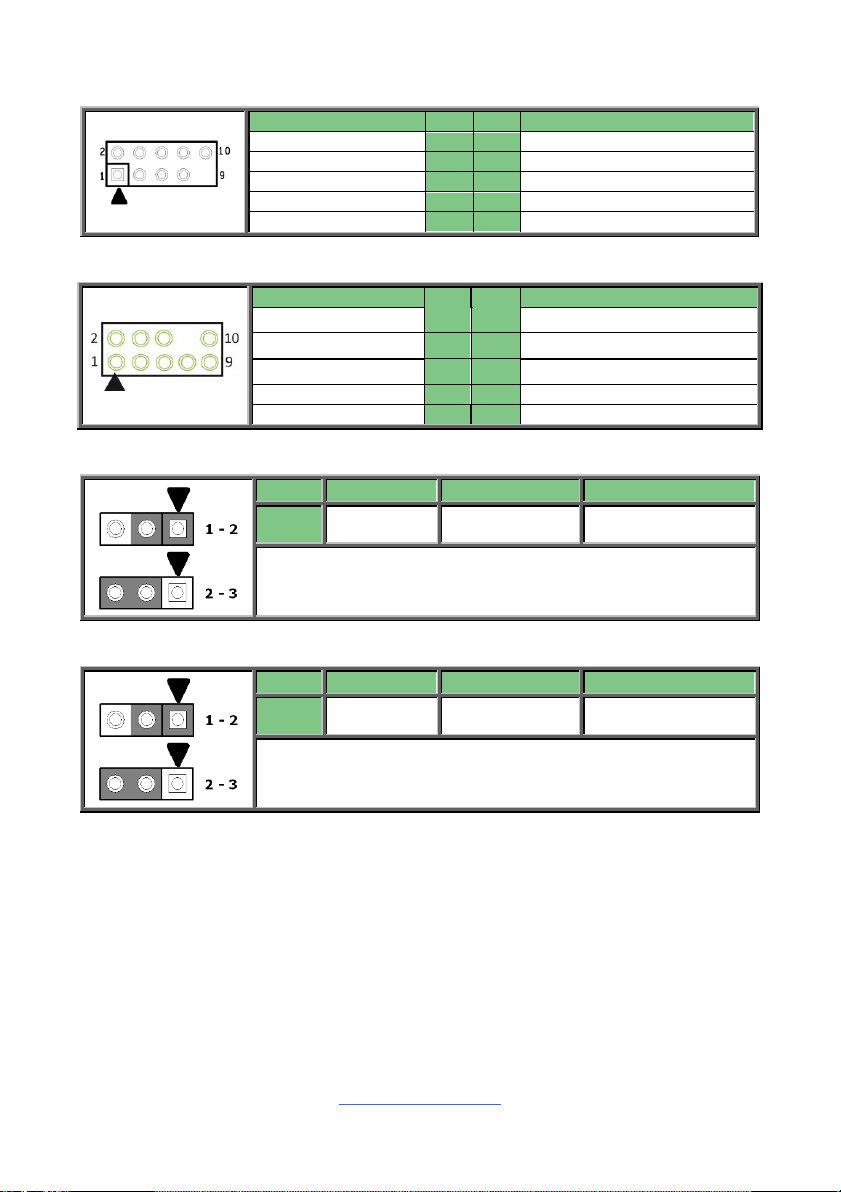
J65: USB2.0*2 Connector
Signal
Pin
Pin
Signal
+5V
1
2
+5V
USB DATA1-
3
4
USB DATA2-
USBDATA1+
5
6
USB DATA2+
GND
7
8
GND
KEY
9
10
GND
Signal
Pin
Pin
Signal
MIC2-L
1
2
GND
MIC2-R
3
4
FP_Present
LINE2-R
5
6
MIC2-JD
GND
7
8
Key
LINE2_L
9
10
LINE2-JD
Pin
1 2 3
Signal
5V
SATA-DOM P1
GND
Pin 1-2 Closed: P5V(Default)
Pin 2-3 Closed: GND
Pin
1 2 3
Signal
5V
SATA-DOM P7
GND
Pin 1-2 Closed: P5V(Default)
Pin 2-3 Closed: GND
J64: Front Audio x 2 Header
J38: SATA-DOM power rail option for Pin1
J43: SATA-DOM power rail option for Pin7
http://www.tyan.com
Page 17
17
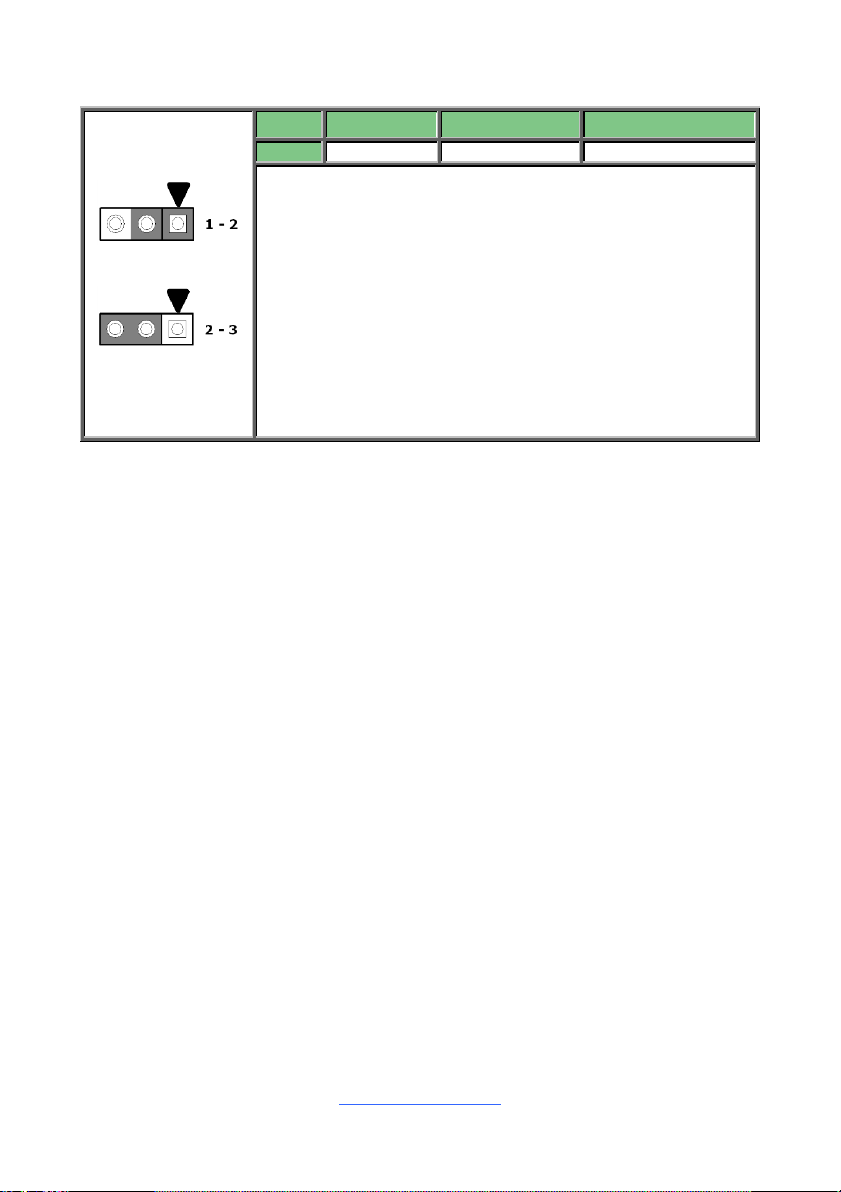
J60: Clear CMOS Jumper
Normal (Default)
Clear CMOS
Pin
1 2 3
Signal
VBAT
RTCRST#
GND
You can reset the CMOS settings by using this jumper.
This can be useful if you have forgotten your system/setup
password, or need to clear the system BIOS setting.
1. Power off system and disconnect power connectors from
the motherboard.
2. Remove the jumper from Pin_1 and Pin_2 (Default
setting).
3. Move the jumper cap to close Pin_2 and Pin_3 for
several seconds to Clear CMOS.
4. Put jumper cap back to Pin_1 and Pin_2 (Default setting).
5. Reconnect power connectors to the motherboard and
power on system.
http://www.tyan.com
Page 18
18
2.5 Installing the Processor and Heatsink
NOTE: MiTAC is not liable for damage as a result of operating an
unsupported configuration.
The types of processors supported by the S5555 are listed in the 1.2 Hardware
Specifications section on page 4. Check our website at http://www.tyan.com for
the latest list of validated Intel® processors for this specific motherboard.
Processor Installation (Single Socket LGA1151 for Intel Coffee lake CPU)
Follow the steps below to install the processors and heat sinks.
Please note that the illustrations are based on LGA1151 socket which may not look
exactly like the motherboard you purchased. Therefore, the illustrations should be
held for your reference only.
NOTE: Please save and replace the flip CPU protection cap when returning for
service.
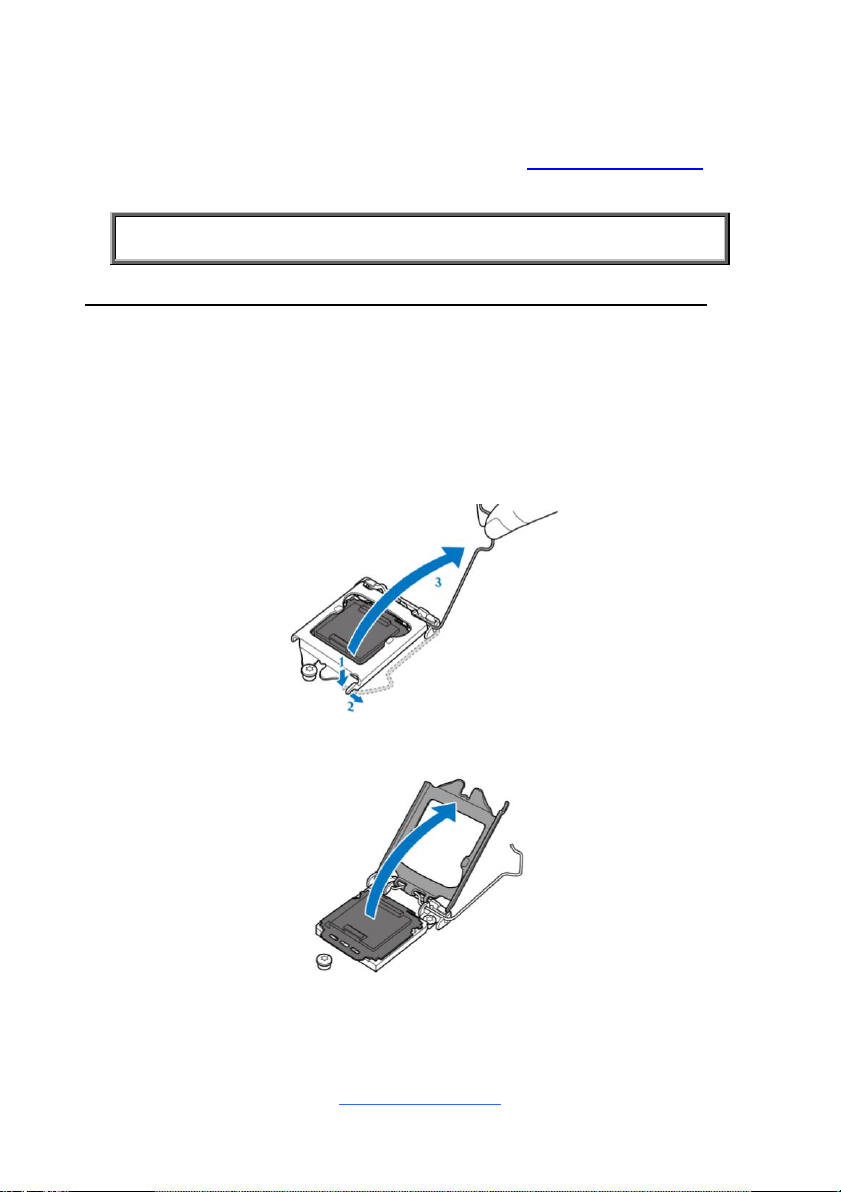
1. Press to unlock the lever and open the CPU socket cover.
2. Open the socket cover to a fully position.
http://www.tyan.com
Page 19
19
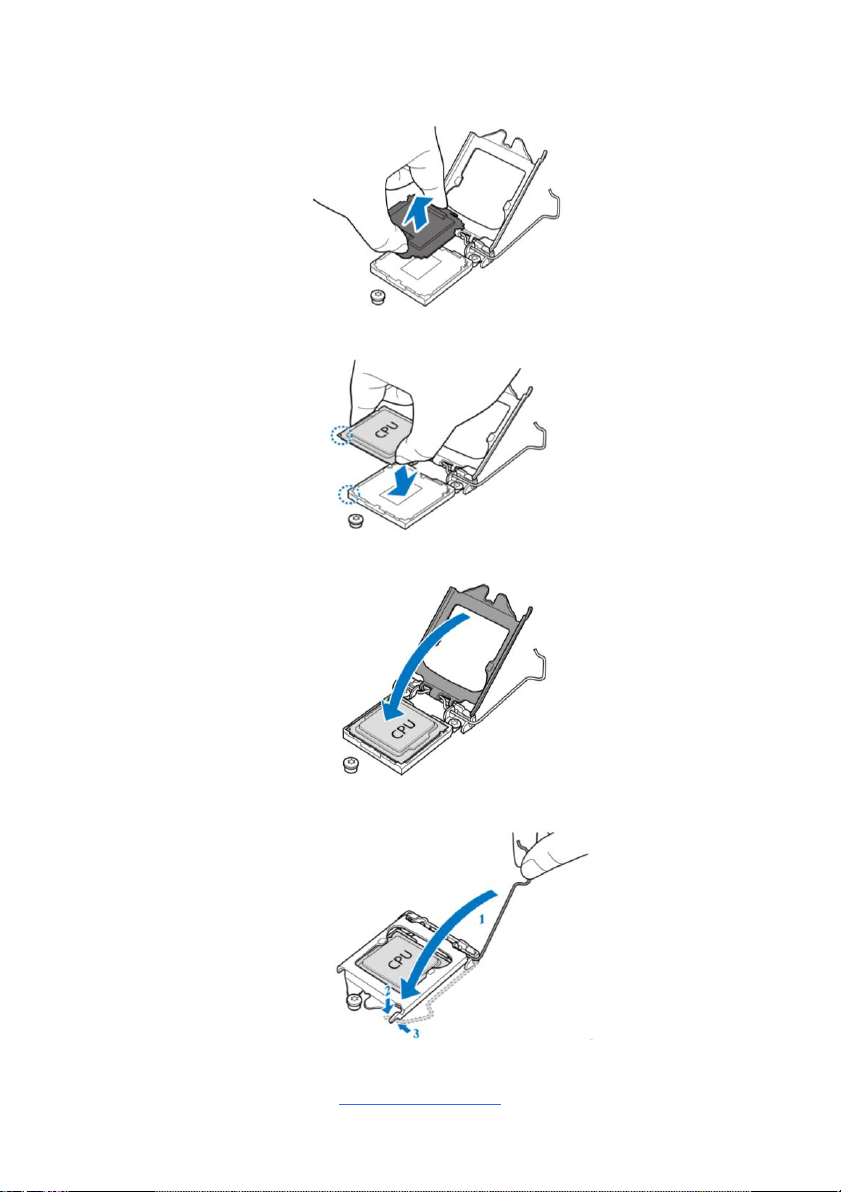
3. Remove the socket protection cap. NOTE: Save and replace the socket cover
if the processor is removed from its socket.
4. Install the processor and make sure the golden arrow is in the right direction.
5. Close the CPU socket cover.
6. Close the socket lever.
http://www.tyan.com
Page 20
20
Heat sink Installation
After installing the processor, you will need to proceed to install the heat sink. The
CPU heat sink will ensure that the processor do not overheat and continue to
operate at maximum performance for as long as you own them. An overheated
processor is dangerous to the motherboard. The processors will overheat within
seconds, enter thermal protection, and shut down if heatsinks are not installed.
Caution:Take caution of the air flow must be in the direction which paralleled with
memories.
For the safest method of installation and information on choosing the appropriate
heat sink, using heat sinks validated by Intel®. Please refer to the Intel® website:
http://www.intel.com
The following diagram illustrates how to install the heatsink on the Intel® Coffee lake
Socket LGA1151:
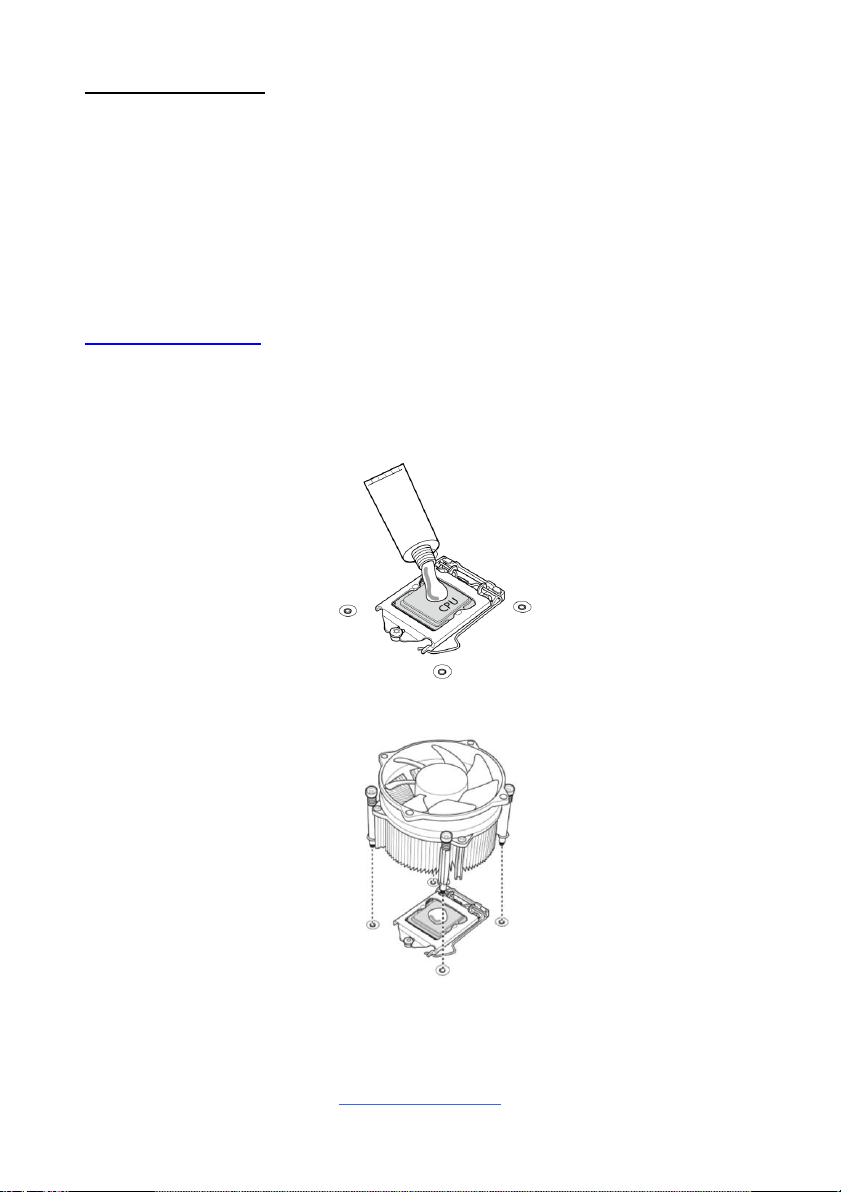
1. Apply the thermal grease.
2. Place the heat sink on top of the CPU.
http://www.tyan.com
Page 21
21
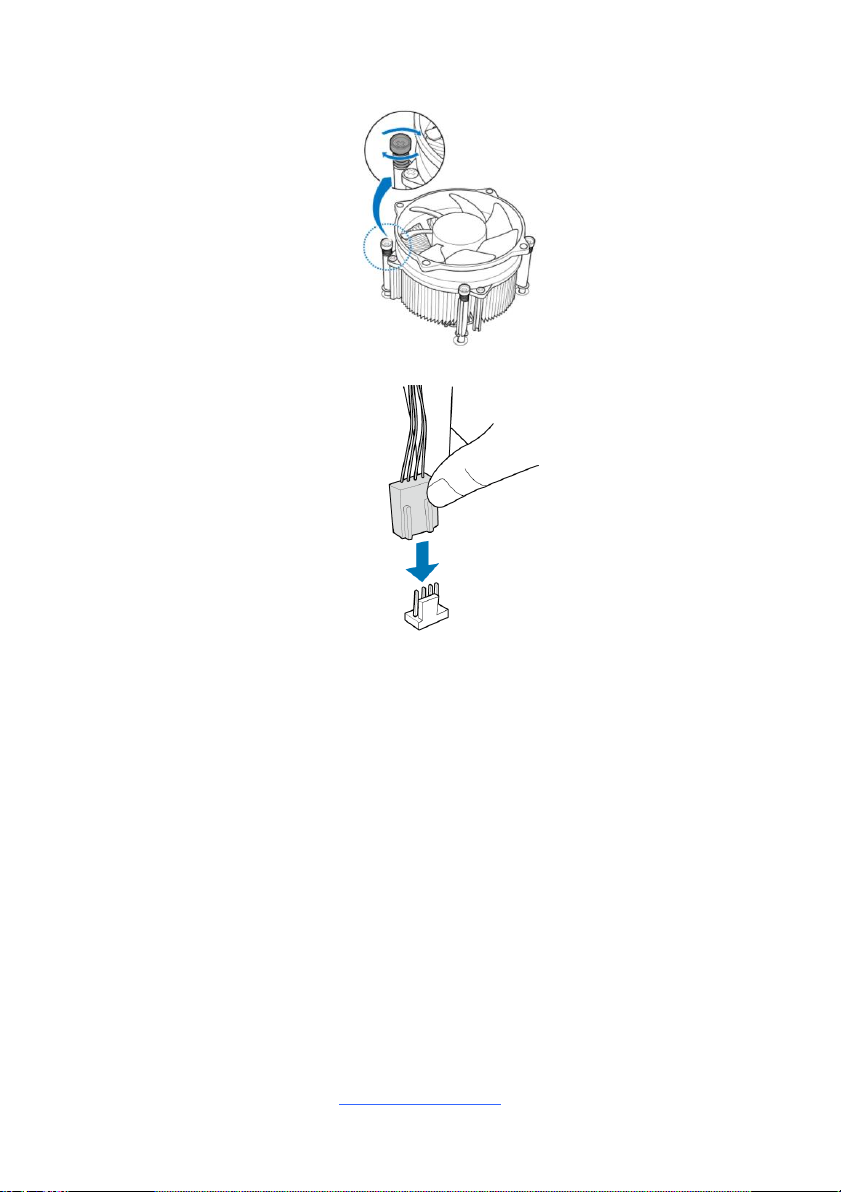
3. Secure the heatsink screws.
4. Connect the heatsink fan cable.
http://www.tyan.com
Page 22
22
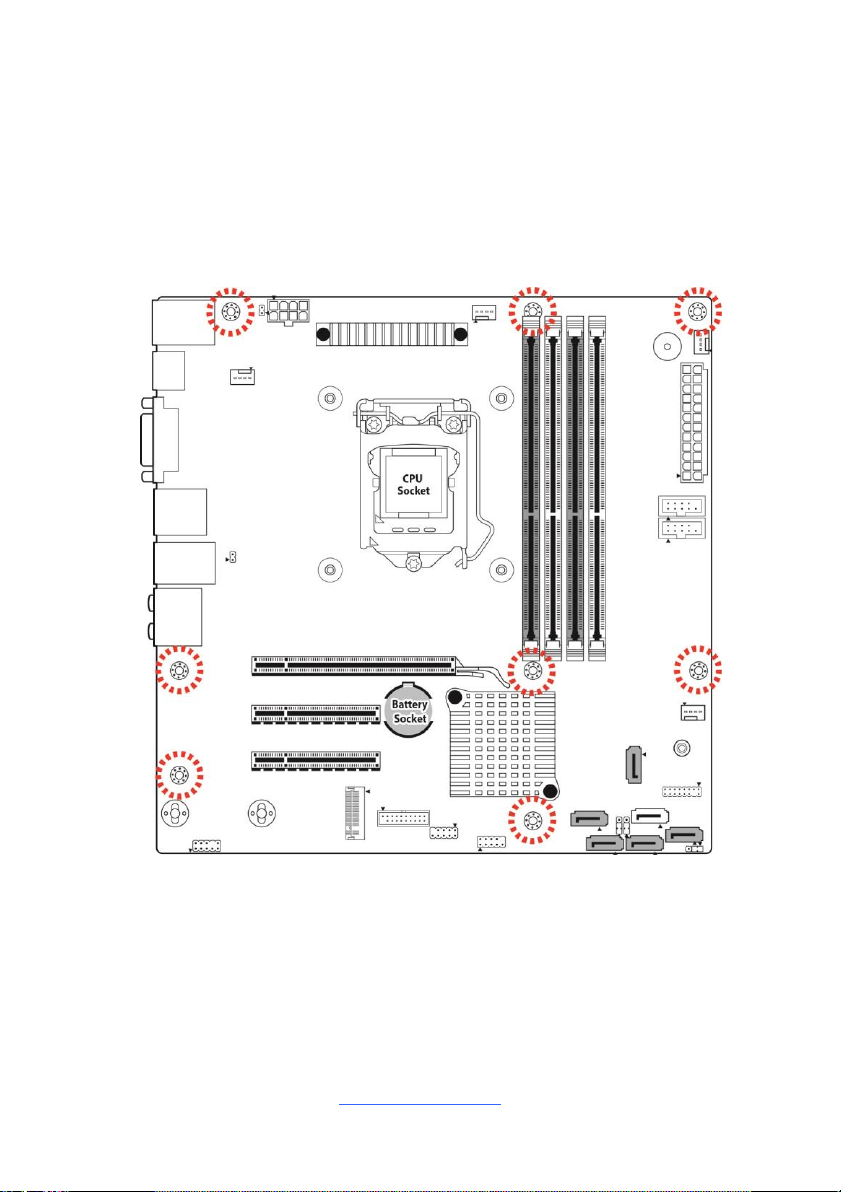
2.7 Tips on Installing Motherboard in Chassis
Before installing your motherboard, make sure your chassis has the necessary
motherboard support studs installed. These studs are usually metal and are gold in
color. Usually, the chassis manufacturer will pre-install the support studs. If you are
unsure of stud placement, simply lay the motherboard inside the chassis and align
the screw holes of the motherboard to the studs inside the case. If there are any
studs missing, you will know right away since the motherboard will not be able to be
securely installed.
Note: Be especially careful to look for extra stand-offs. If there are any stand-offs
present that are not aligned with a mounting hole on the motherboard, it will likely
short components on the back of the motherboard when installed. This will cause
malfunction and/or damage to your motherboard.
http://www.tyan.com
Page 23
23
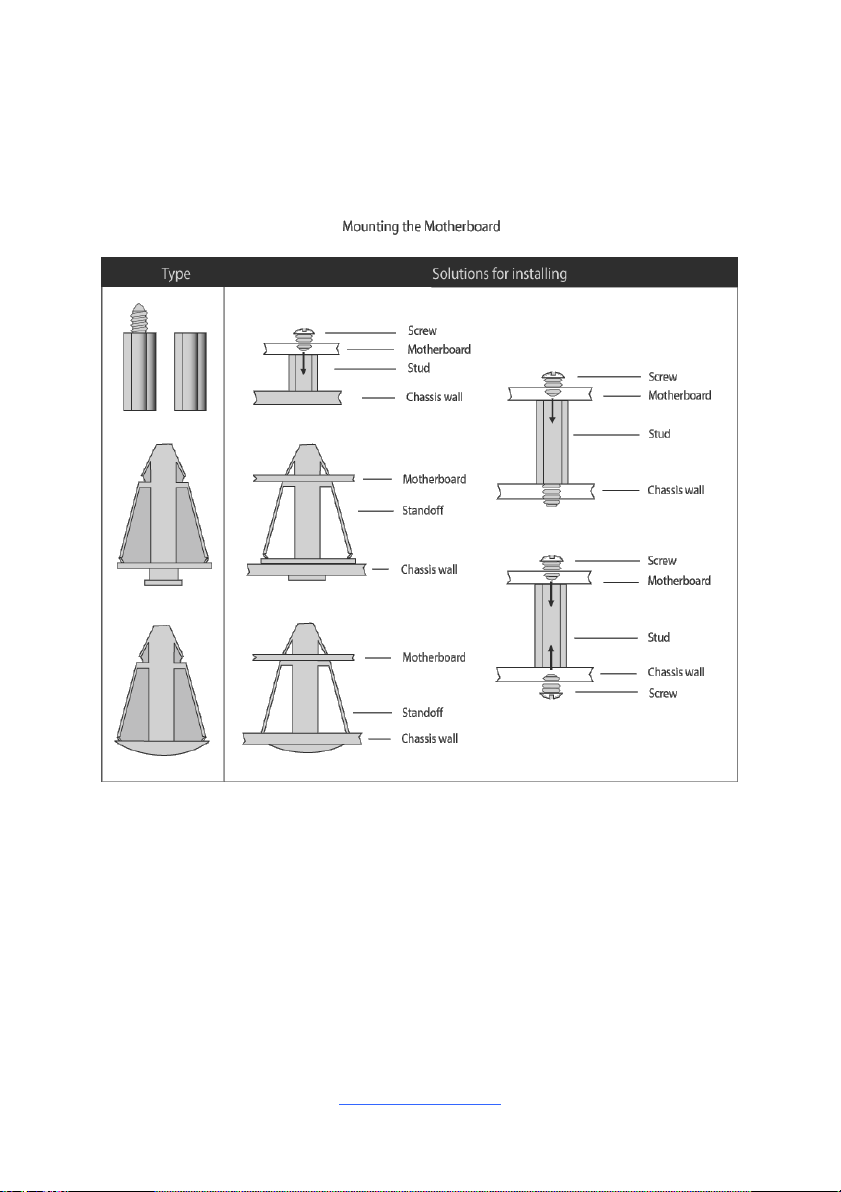
Some chassis include plastic studs instead of metal. Although the plastic studs are
usable, MiTAC recommends using metal studs with screws that will fasten the
motherboard more securely in place.
Below is a chart detailing what the most common motherboard studs look like and
how they should be installed.
http://www.tyan.com
Page 24

24
2.8 Installing the Memory
Before installing memory, ensure that the memory you have is compatible with the
motherboard and processor. Check the TYAN Web site at http://www.tyan.com for
details of the type of memory recommended for your motherboard.
Support (4)U-DDR4 288-pin DIMM slots
Support UDIMM DDR4 (ECC and Non-ECC).
Support (2) memory channels per CPU
Support UDIMM w/ ECC 2666 up to 64 GB
http://www.tyan.com
Page 25

25
Recommended Memory Population Table (Single CPU)
Single CPU Installed
(CPU0 only)
Quantity of
memory installed
1 2 3
4
P0_MC0_DIM_CH_A0
√
√
P0_MC0_DIM_CH_A1
√ √ √
√
P0_MC0_DIM_CH_B0
√
P0_MC0_DIM_CH_B1
√ √
√
NOTE:
1. √ indicates a populated DIMM slot.
2. Use paired memory installation for max performance.
3. Populate the same DIMM type in each channel, specifically
- Use the same DIMM size
- Use the same # of ranks per DIMM
4. Always install with DIMM_A1&B1 Slot first, following the
alphabetical order.
http://www.tyan.com
Page 26
26
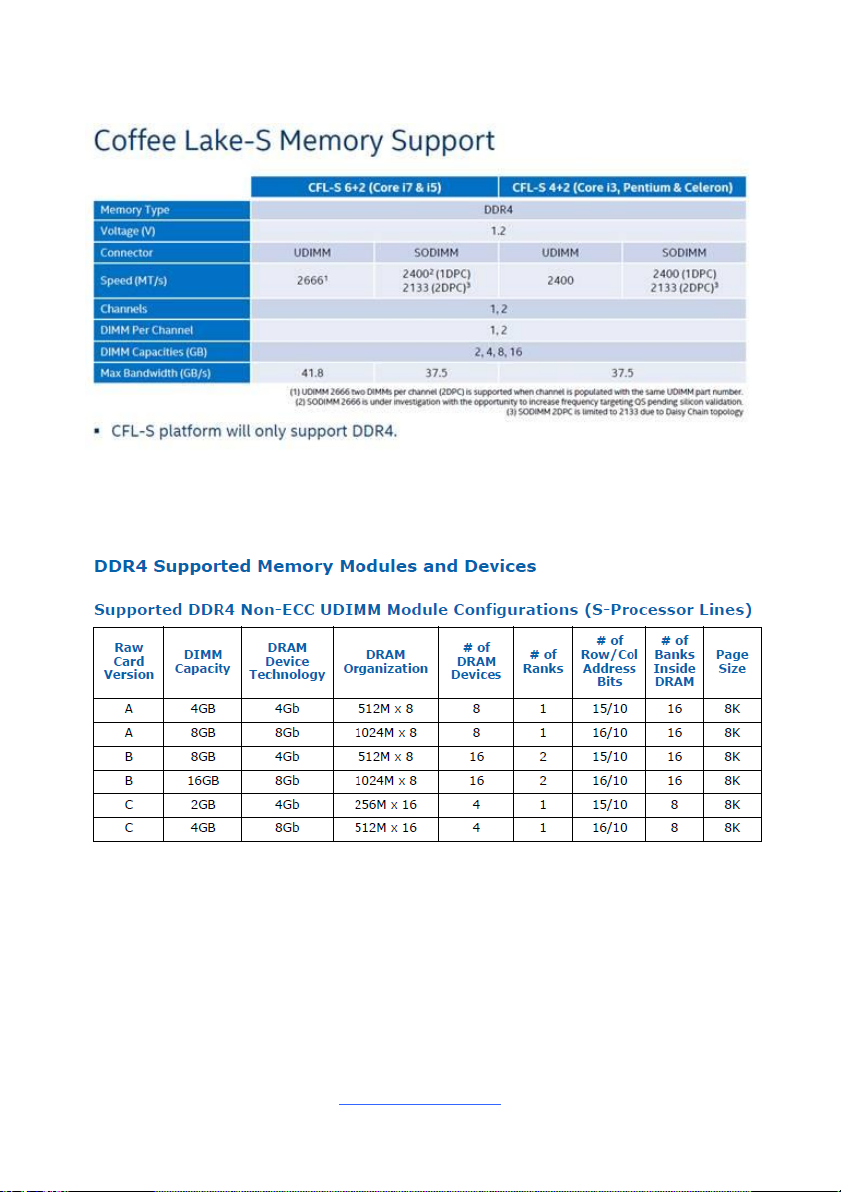
Intel Xeon Coffee lake Processors Families Support
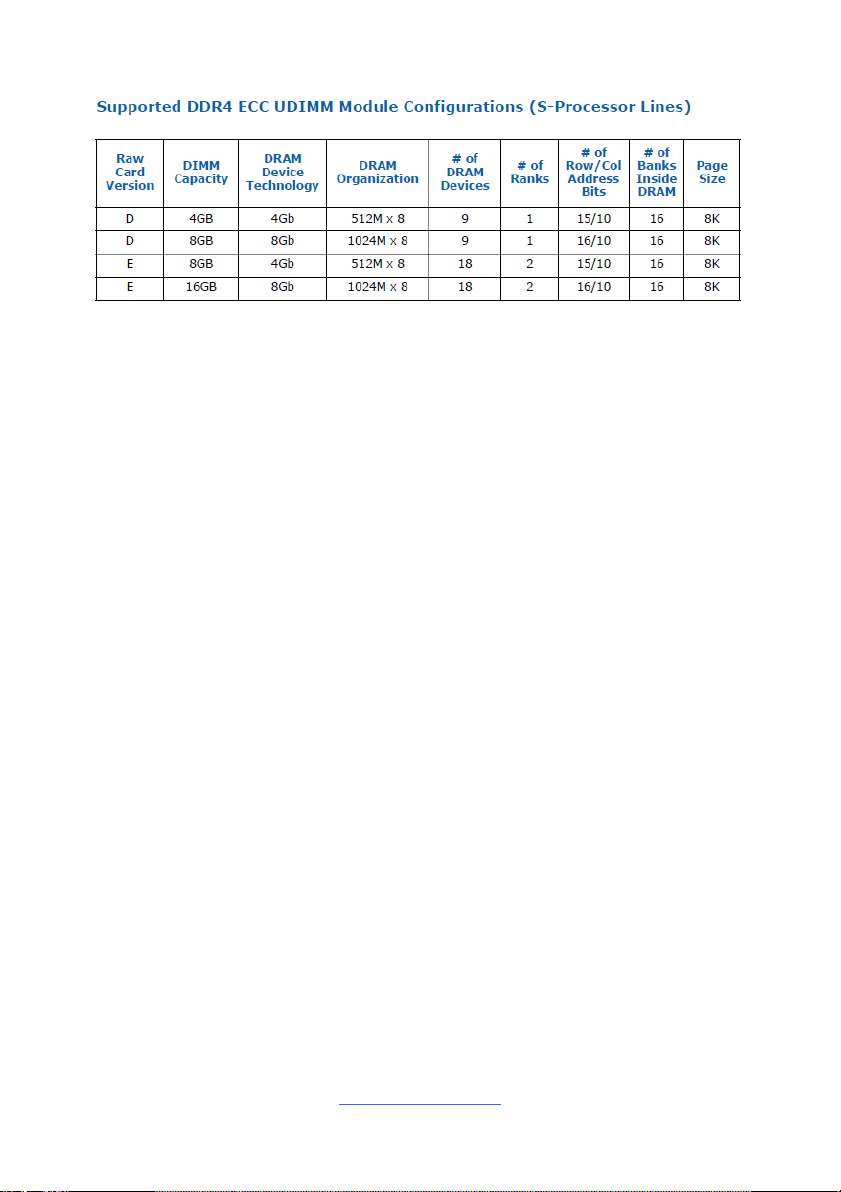
NOTE 1: 1DPC => One dimm per channel
NOTE 2: 2DPC => Two dimm per channel
(S5555AG2NR support as following)
Physical Ranks are used to calculate DIMM Capacity.
Supported DRAM Densities are 2Gb, 4Gb, 8Gb,16Gb.
http://www.tyan.com
Page 27
27
(S5555AG2NR-HE support as following)
Physical Ranks are used to calculate DIMM Capacity.
Supported DRAM Densities are 4Gb, 8Gb,16Gb.
http://www.tyan.com
Page 28
28
Memory Installation Procedure
Follow these instructions to install memory modules into the S5555.
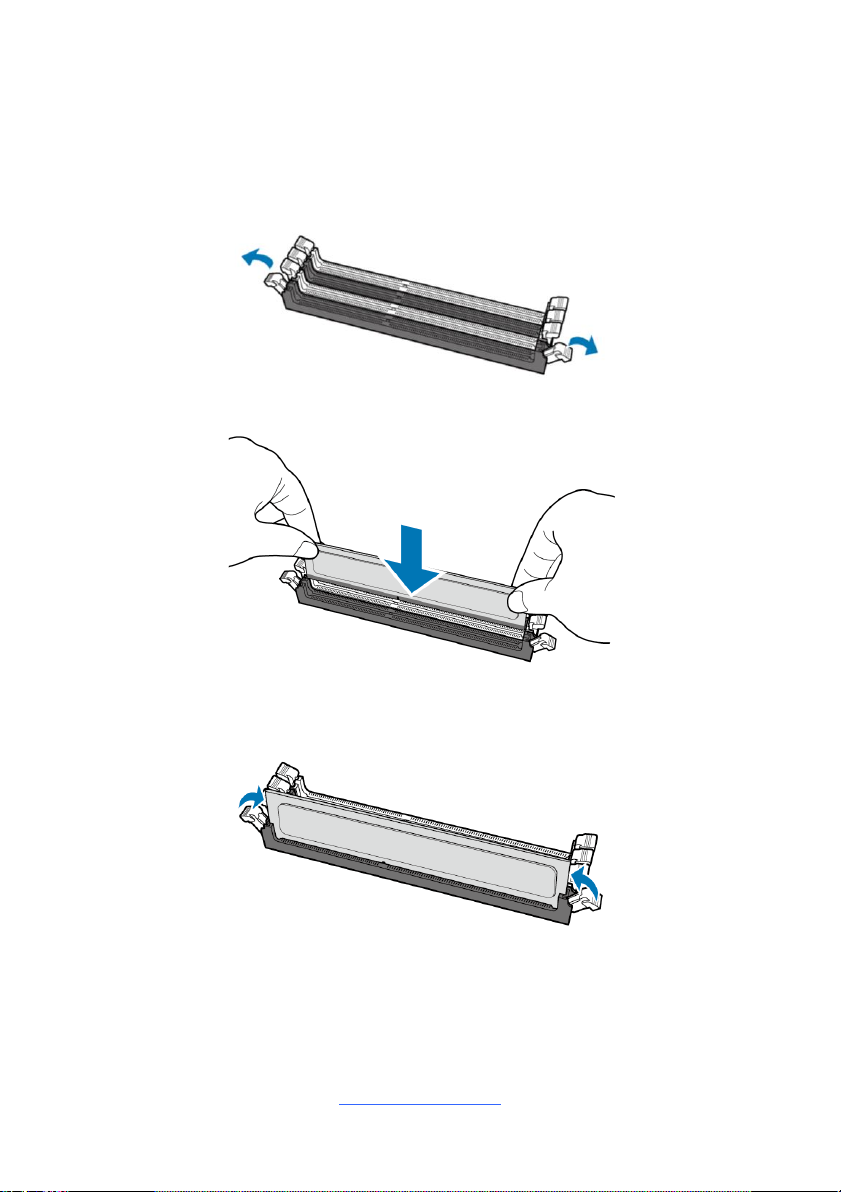
1. Unlock a DIMM socket by Press the retaining clip outwardly in the following
illustration.
2. Align the memory module with the socket,such that the DIMM NOTCH match
the KEY SLOT on the socket.
3. Seat the module firmly into the socket by gently pressing down until it sits
flush with the socket. The locking levers pop up into place.
http://www.tyan.com
Page 29
29
2.9 Attaching Drive Cables
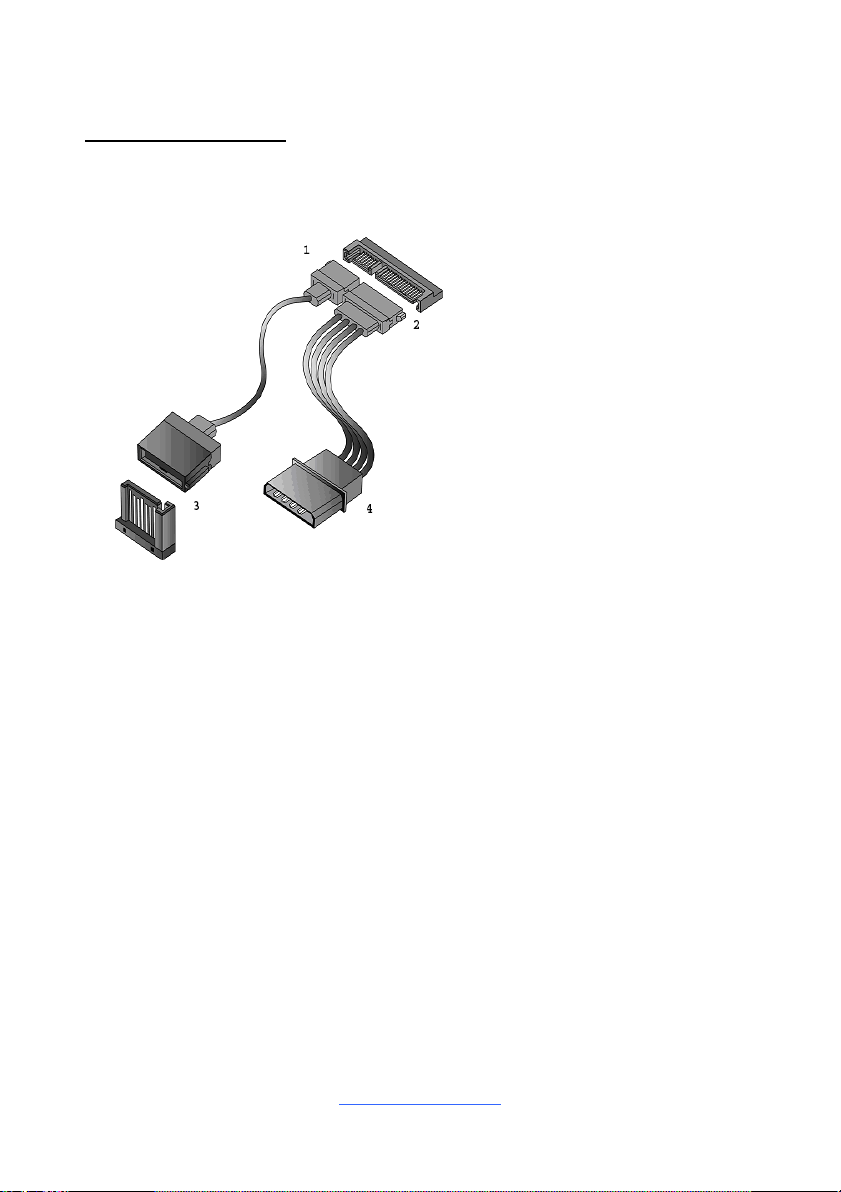
1. SATA drive cable
connection
2. SATA drive power connection
3. SATA cable motherboard
connector
4. SATA drive power adapter
Attaching SATA Cables
The following illustrates how to make a SATA Cable connection. If you are in need
of SATA/SAS cables or power adapters please contact your local sales
representative.
http://www.tyan.com
Page 30
30
2.10 Installing Add-In Cards
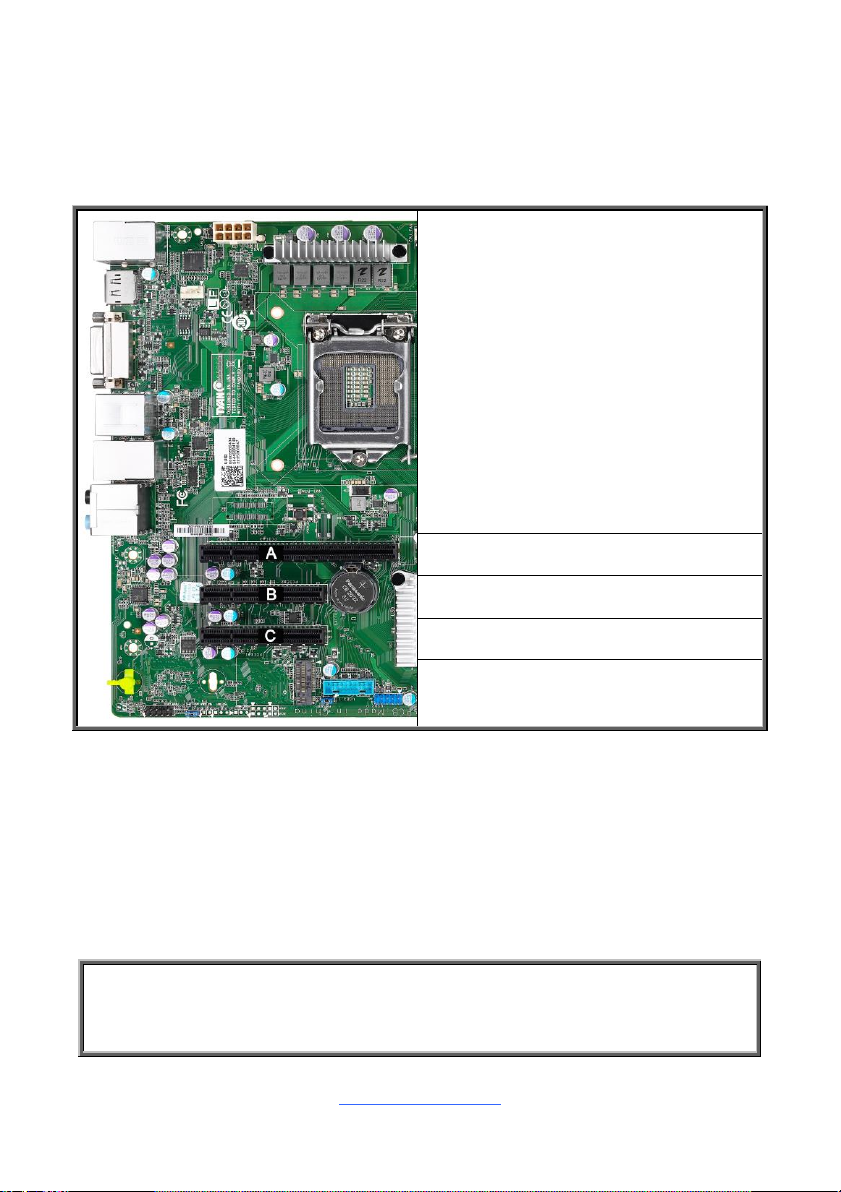
A: PCIE3.0 SLOT x16 (J14)
B: PCIE3.0 SLOT x8 (J13)
C: PCIE3.0 SLOT x8 (J12)
NOTE: You must always unplug the power connector from the motherboard
before performing system hardware changes to avoid damaging the board or
expansion device.
Before installing add-in cards, it’s helpful to know if they are fully compatible with
your motherboard. For this reason, we’ve provided the diagrams below, showing
the slots that may appear on your motherboard.
Simply find the appropriate slot for your add-in card and insert the card firmly. Do
not force any add-in cards into any slots if they do not seat in place. It is better to try
another slot or return the faulty card rather than damaging both the motherboard
and the add-in card.
TIP: It’s a good practice to install add-in cards in a staggered manner rather than
making them directly adjacent to each other. Doing so allows air to circulate within
the chassis more easily, thus improving cooling for all installed devices.
http://www.tyan.com
Page 31
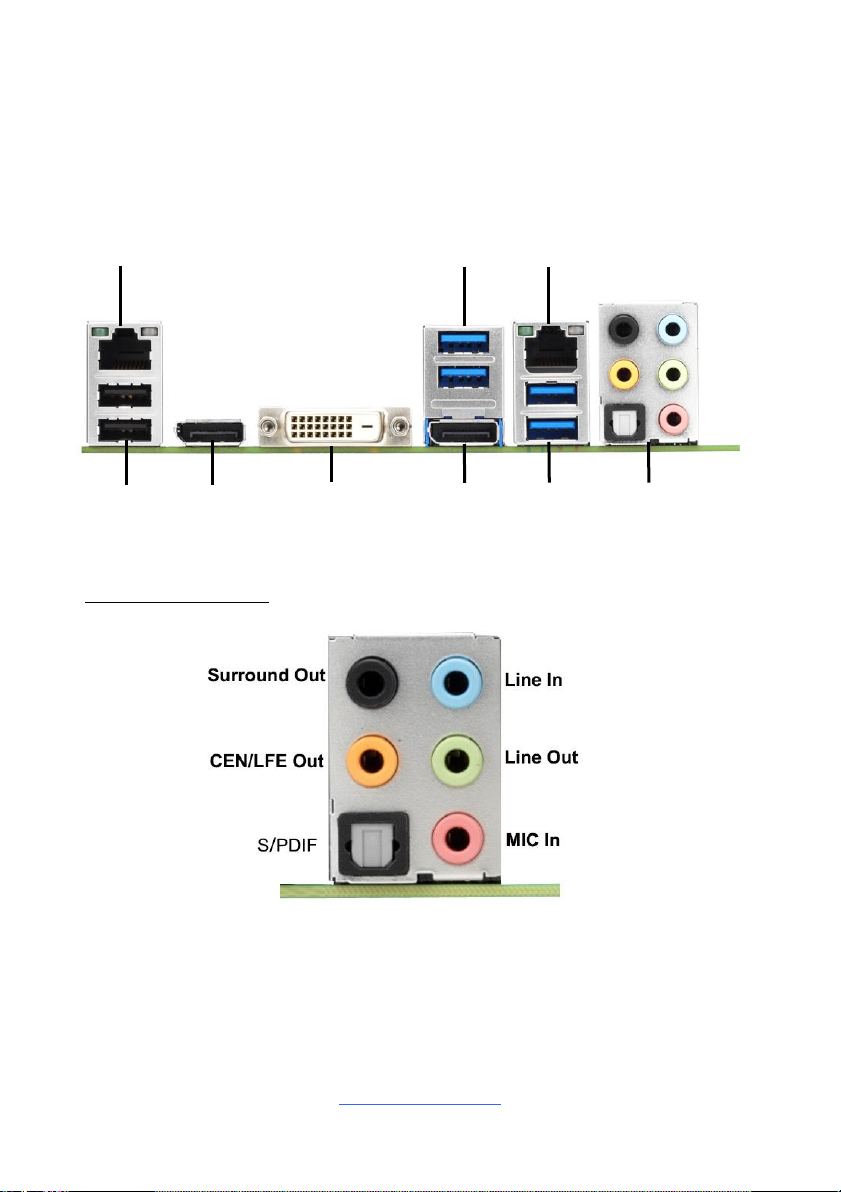
31
DVI-D
Display
AUDIO Jack
with S/PDIF
USB 3.1
LAN2
Display
Port 1
USB2.0
LAN1
USB3.1
2.11 Connecting External Devices
Connecting external devices to the motherboard is an easy task. The motherboard
supports a number of different interfaces through connecting peripherals. See the
following diagrams for the details.
Audio Jack Definition
http://www.tyan.com
Page 32
32
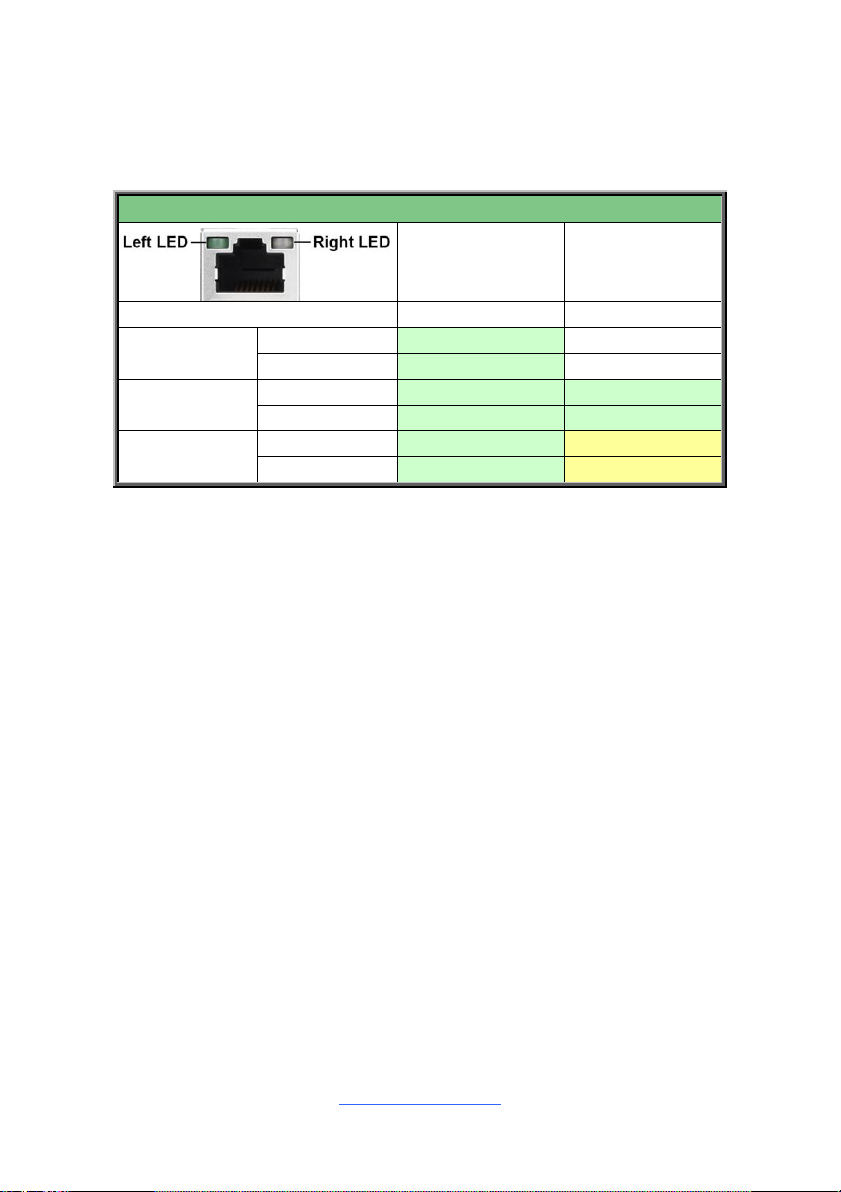
Onboard LAN LED Color Definition
I210 1Gbps/ I219 AMT Ethernet port Link/Activity LED Scheme
Left LED(LED2)
(Link/Activity)
Right LED(LED1)
(Speed)
No Link
OFF
OFF
10 Gbps
Link
Green Solid On
OFF
Active
Green Blinking
OFF
100 Gbps
Link
Green Solid On
Green Solid On
Active
Green Blinking
Green Solid On
1Gbps
Link
Green Solid On
Amber Solid On
Active
Green Blinking
Amber Solid On
The Two (2) onboard Ethernet ports have green and Yellow LEDs to indicate LAN
status. The chart below illustrates the different LED states.
http://www.tyan.com
Page 33
33
2.12 Installing the Power Supply
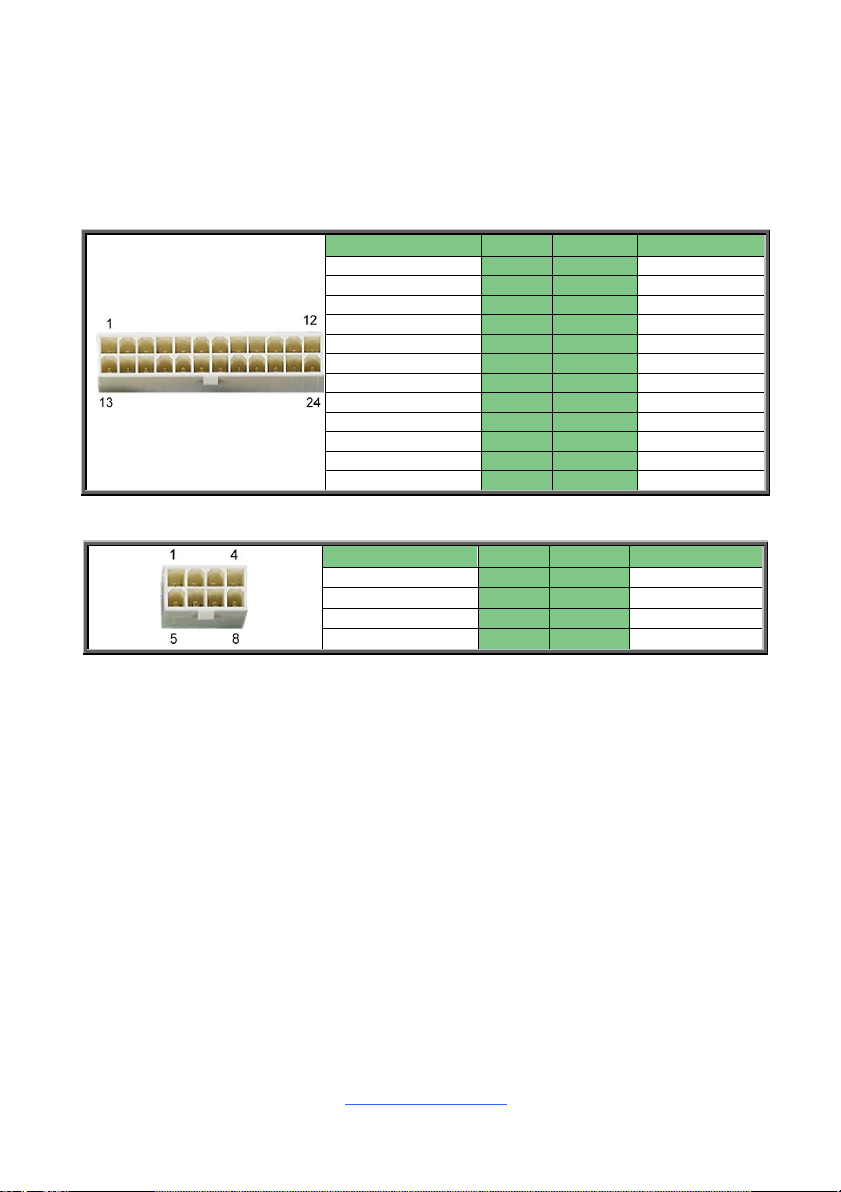
Signal
Pin
Pin
Signal
+3.3V 1 13
+3.3V
+3.3V 2 14
-12V
GND 3 15
GND
+5V
4
16
PS-ON#
GND 5 17
GND
+5V 6 18
GND
GND 7 19
GND
PWR_OK
8
20
NC
5VSB 9 21
+5V
+12V
10
22
+5V
+12V
11
23
+5V
+3.3V
12
24
GND
Signal
Pin
Pin
Signal
GND
1
5
+12V
GND
2
6
+12V
GND
3
7
+12V
GND
4
8
+12V
There are Two (2) power connectors on your S5555 motherboard. The S5555
supports EPS 12V power supply.
PWR1: ATX 24-Pin Power Connector Pin-out
PWR2: 8-pin CPU and Memory Power Connector Pin-out
2.13 Finishing Up
Congratulations on making it this far! You have finished setting up the hardware
aspect of your computer. Before closing up your chassis, make sure that all cables
and wires are connected properly, especially SATA cables and most importantly,
jumpers. You may have difficulty powering on your system if the motherboard
jumpers are not set correctly.
In the rare circumstance that you have experienced difficulty, you can find help by
asking your vendor for assistance. If they are not available for assistance, please find
setup information and documentation online at our website or by calling your vendor’s
support line.
http://www.tyan.com
Page 34

34
Chapter 3: BIOS Setup
Key
Function
↑↓
Move cursor
<Enter>
Execute command or select submenu
<->/<+>
Select the previous or next value/setting of the field
<ESC>
Exit current menu
<F1>
General help
<F2>
Previous values
<F3>
Load the Optimal default configuration values of the
menu
<F4>
Save and exit
<K>
Scroll help area upwards
<M>
Scroll help area downwards
<PgUp> / <PgDn>
Move cursor to next/previous page
3.1 About the BIOS
The BIOS is the basic input/output system, the firmware on the motherboard that
enables your hardware to interface with your software. The BIOS determines what a
computer can do without accessing programs from a disk. The BIOS contains all
the code required to control the keyboard, display screen, disk drives, serial
communications, and a number of miscellaneous functions. This chapter describes
the various BIOS settings that can be used to configure your system.
The BIOS section of this manual is subject to change without notice and is provided
for reference purposes only. The settings and configurations of the BIOS are
current at the time of print and are subject to change, and therefore may not match
exactly what is displayed on screen.
This section describes the BIOS setup program. The setup program lets you modify
basic configuration settings. The settings are then stored in a dedicated, batterybacked memory (called NVRAM) that retains the information even when the power
is turned off.
To start the BIOS setup utility:
1. Turn on or reboot your system.
2. Press <F2> or <Del> during POST (<Tab> on remote console) to start the
BIOS setup utility.
3.1.1 Setup Basics
The table below shows how to navigate in the setup program using the keyboard.
http://www.tyan.com
Page 35

35
3.1.2 Getting Help
NOTE: The following pages provide the details of BIOS menu. Please be aware that
the BIOS menus are continually changing due to continual BIOS updates over the
product lifespan of the motherboard. The BIOS menus provided are current as of
the date when this manual was written. Please visit TYAN’s website at
http://www.tyan.com for information on BIOS updates available for this specific
motherboard.
Pressing [F1] will display a small help window that describes the appropriate
keys to use and the possible selections for the highlighted item. To exit the Help
Window, press [ESC] or the [Enter] key again.
3.1.3 In Case of Problems
If you have trouble booting your computer after making and saving the changes with
the BIOS setup program, you can restart the computer by holding the power button
down until the computer shuts off (usually within 4 seconds); resetting by pressing
CTRL-ALT-DEL; or clearing the CMOS.
The best advice is to only alter settings that you thoroughly understand. In particular,
do not change settings in the Chipset section unless you are absolutely sure of
what you are doing. The Chipset defaults have been carefully chosen either by
MiTAC or your system manufacturer for best performance and reliability. Even a
seemingly small change to the Chipset setup options may cause the system to
become unstable or unusable.
3.1.4 Setup Variations
Not all systems have the same BIOS setup layout or options. While the basic look
and function of the BIOS setup remains more or less the same for most systems,
the appearance of your Setup screen may differ from the charts shown in this
section. Each system design and chipset combination requires a custom
configuration. In addition, the final appearance of the Setup program depends on
the system designer. Your system designer may decide that certain items should
not be available for user configuration, and remove them from the BIOS setup
program.
http://www.tyan.com
Page 36
36
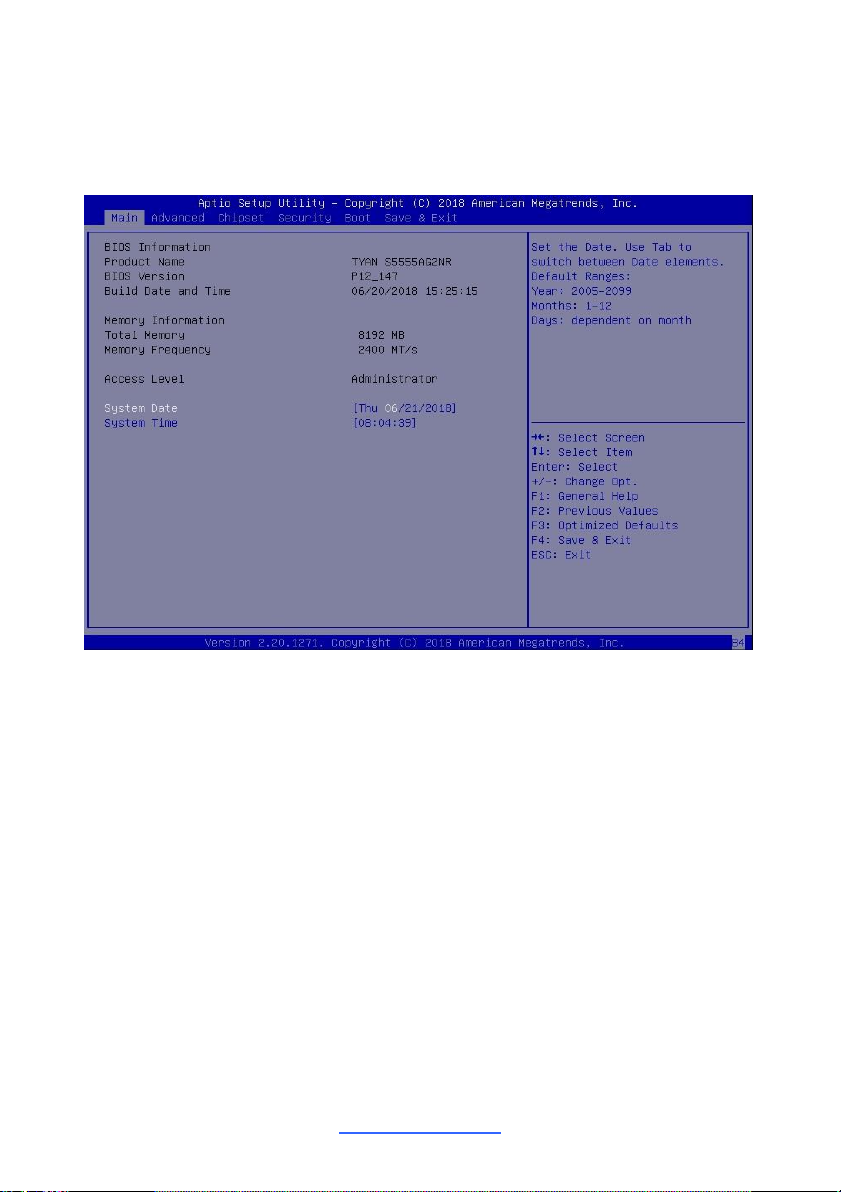
3.2 Main Menu
In this section, you can alter general features such as the date and time. Note that
the options listed below are for options that can directly be changed within the Main
Setup screen.
BIOS Information
It displays BIOS related information.
Product Name
It displays the product Name
Platform Information
It displays Platform information.
Memory Information
This displays the total memory size.
System Date
Adjust the system date.
MM (Months): DD (Days): YYYY (Years)
System Time
Adjust the system clock.
HH (24 hours format): MM (Minutes): SS (Seconds)
http://www.tyan.com
Page 37
37
3.3 Advanced Menu
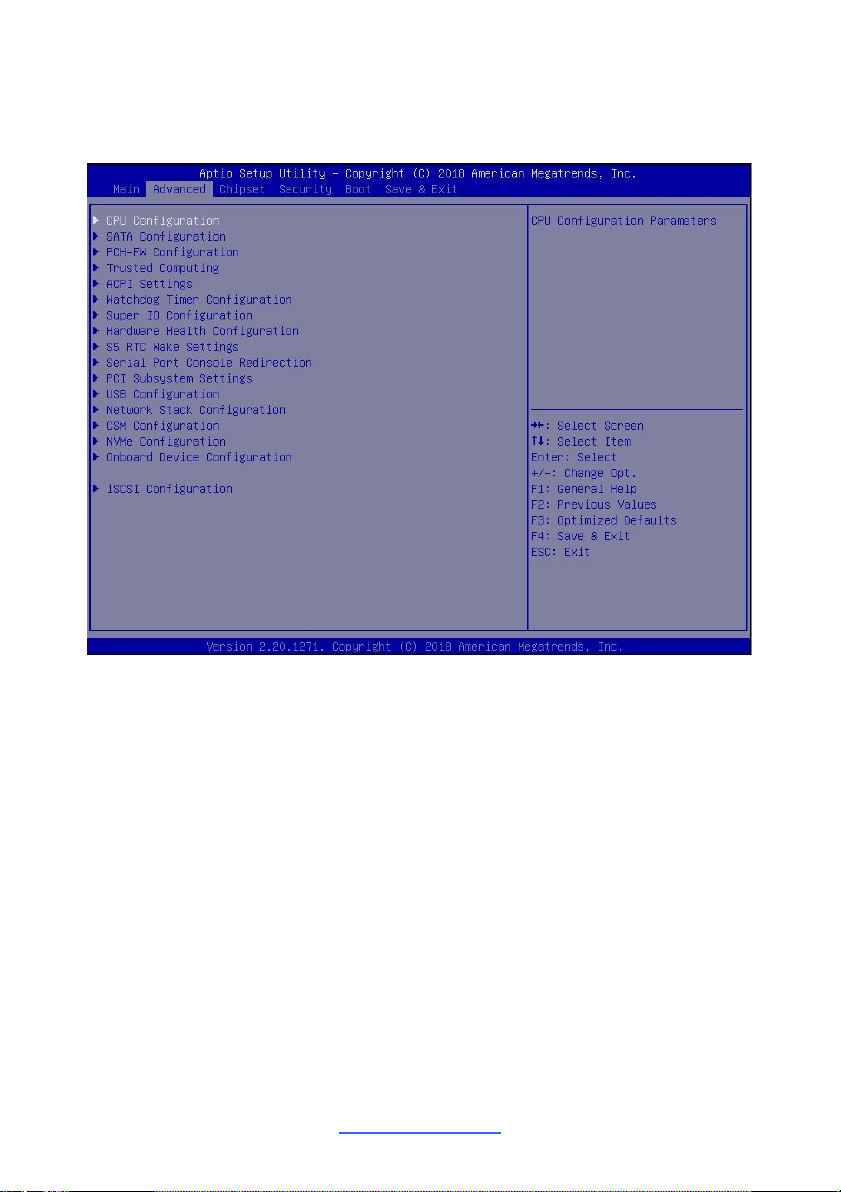
This section facilitates configuring advanced BIOS options for your system.
CPU Configuration
CPU Configuration parameters
SATA Configuration
SATA Device Option Settings
PCH-FW Configuration
Configure Management Engine Technology Parameters
Intel® Virtual RAID on CPU
This formset allows the user to manage Intel® Virtual RAID on CPU
Trusted Computing
Trusted Computing settings.
ACPI Settings
System ACPI Parameters.
Watchdog Timer Configuration
Watchdog Configuration
http://www.tyan.com
Page 38

38
Super IO Configuration
System Super IO Chip Parameters
Hardware Health Configuration
Hardware Health Configuration
S5 RTC Wake Settings
S5 RTC Wake Settings
Serial Port Console Redirection
Serial Port Console Redirection
PCI Subsystem Settings
PCI, PCI-X and PCI Express Settings
USB Configuration
USB Configuration Parameters.
Network Stack Configuration
Network Stack Settings
CSM Configuration
CSM Configuration, Enable/Disable Option ROM execution setting, etc
NVMe Configuration
NVMe Device Option Settings
Onboard Device Configuration
Onboard Device and Function Configuration.
iSCSI Configuration
Configure the iSCSI parameters
http://www.tyan.com
Page 39
39
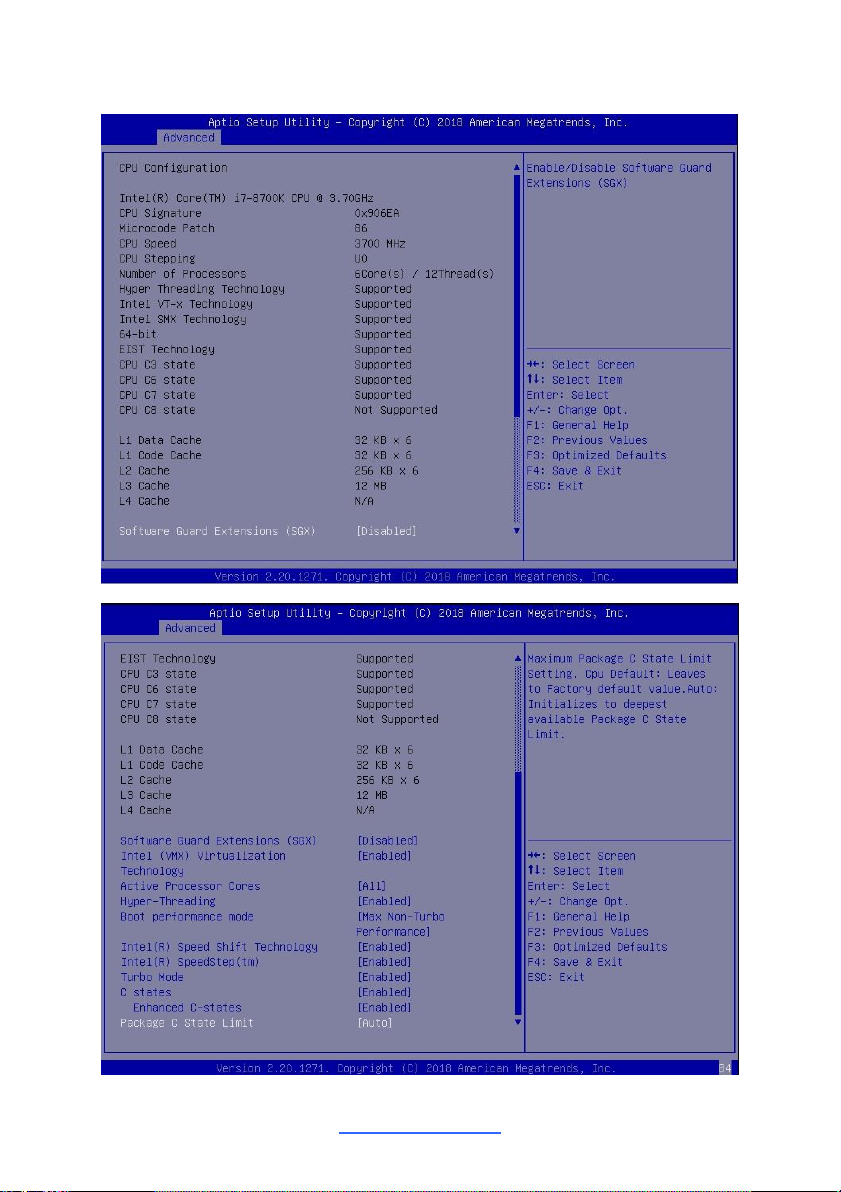
3.3.1 CPU Configuration
http://www.tyan.com
Page 40

40
Software Guard Extensions (SGX)
Enable/ Disable Software Guard Extensions (SGX)
Disabled / Enabled/ Software controlled
Intel (VMX) Virtualization Technology
When enabled, a VMM can utilize the additional hardware capabilities provided by
Vanderpool Technology.
Disabled / Enabled
Active Processor Cores
Number of cores to enable in each processor package.
All / 1 / 2 / 3 / 4 / 5
Hyper- threading
Enabled for Windows XP and Linux(OS optimized for Hyper-Threading Technology)
and Disabled for other OS (OS not optimized for Hyper-Threading Technology).
Disabled / Enabled
Boot performance Mode
Select the performance state that the BIOS will set starting from reset vector.
Max Battery / Max Non-Turbo Performance / Turbo
Performance
Intel(R) Speed Shift Technology
Enable/ Disable Intel(R) Speed Shift Technology support. Enabling will expose the
OPPC v2 interface to allow for hardware controlled P- states.
Disabled / Enabled
Intel(R) SpeedStep(tm)
Allows more than two frequency ranges to be supported.
Disabled / Enabled
Turbo Mode
Enable/Disable processor Turbo Mode (requires Intel Speed Step or Intel Speed
shift to be available and enabled).
Disabled / Enabled
C states
Enable/Disable CPU Power Management. Allows CPU to go to C states when it’s
not 100% utilized. When enabled, CPU will switch to minimum speed. When all
cores enter C-State.
Disabled / Enabled
http://www.tyan.com
Page 41

41
Enhanced C-states
Enable/Disable C1E. When enabled, CPU will switch to minimum speed when all
cores enter C-state.
Disabled / Enabled
Package C State Limit
Maximum Package C State Limit Setting. Cpu Default: Leaves to Factory default
value. Auto: Initializes to deepest available Package C State Limit.
Auto / Cpu Default / C8 / C7 / C6 / C3 / C2 / C0/C1
http://www.tyan.com
Page 42
42
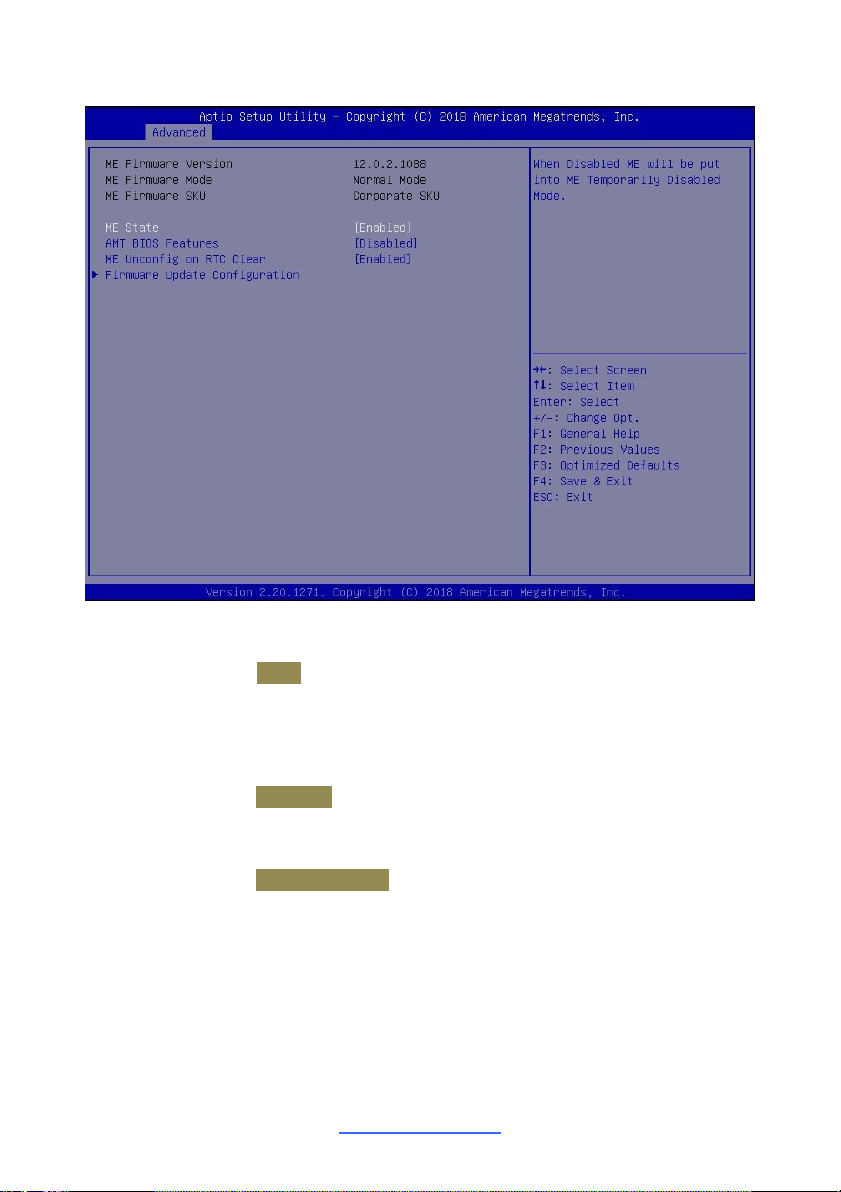
3.3.2 SATA Configuration
SATA Mode Selection
Determines how SATA controller(s) operate.
AHCI / RAID
Serial ATA Port 0/1/2/3/4/5
Hot Plug
Designates this port as Hot Pluggable.
Disabled / Enabled
SATA Device Type
Identify the SATA port is connected to Solid State Drive or Hard Dish Drive.
Hard Disk Drive / Solid State Drive
http://www.tyan.com
Page 43
43
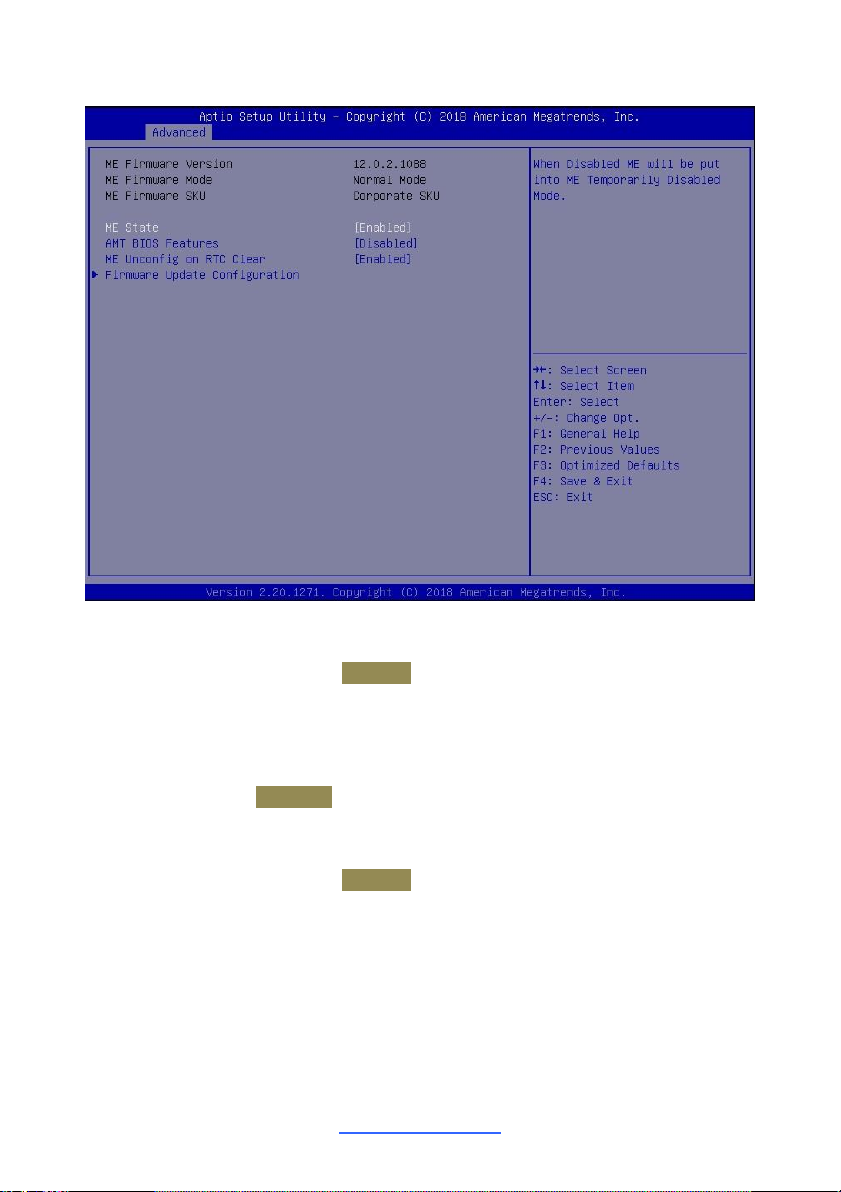
3.3.3 PCH-FW Configuration
ME State
When Disabled ME will be not into ME Temporarily Disabled Mode.
Disabled / Enabled
AMT BIOS Features
When disabled AMT BIOS Features are no longer supported and user is no longer
able to access MEBx Setup. Note: This option does not disable Manageability
Features in FW.
Disabled / Enabled
ME Unconfig on RTC Clear
When Disabled ME will not be unconfigured on RTC Clear
Disabled / Enabled
http://www.tyan.com
Page 44
44
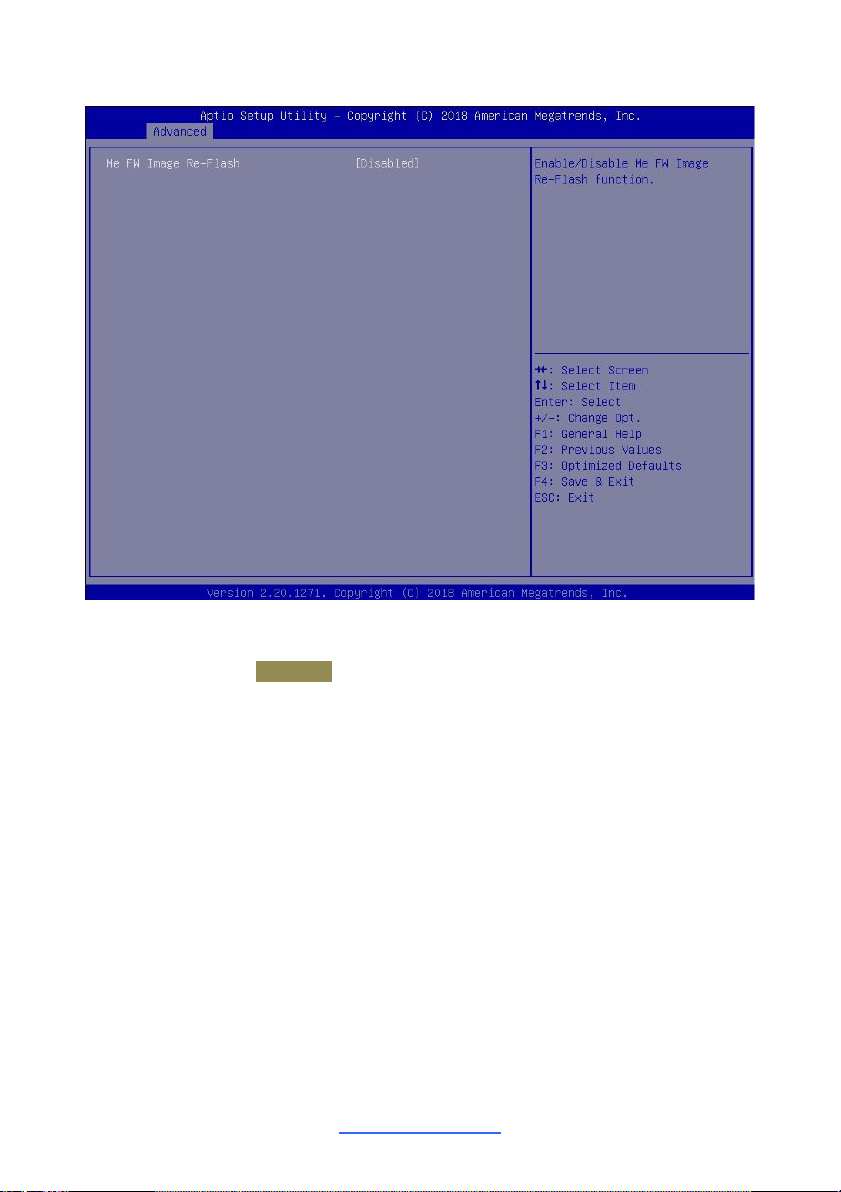
3.3.3.1 Firmware Update Configuration
Me FW Image Re-Flash
Enable/Disable Me FW Image Re- Flash function.
Disabled / Enabled
http://www.tyan.com
Page 45
45
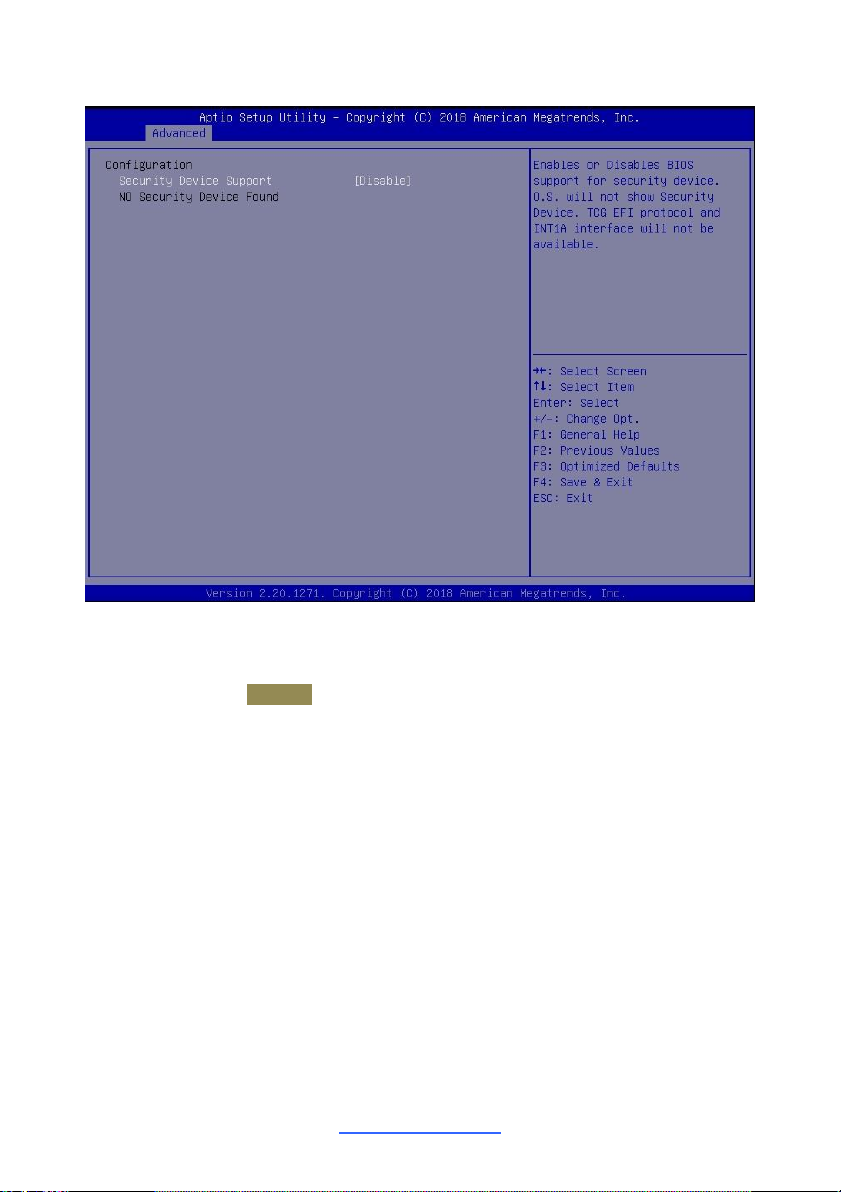
3.3.4 Trusted Computing
Security Device Support
Enable or disable BIOS support for security device. O.S. will not show Security
Device. TCG EFI protocol and INT1A interface will not be available.
Disable / Enable
http://www.tyan.com
Page 46
46
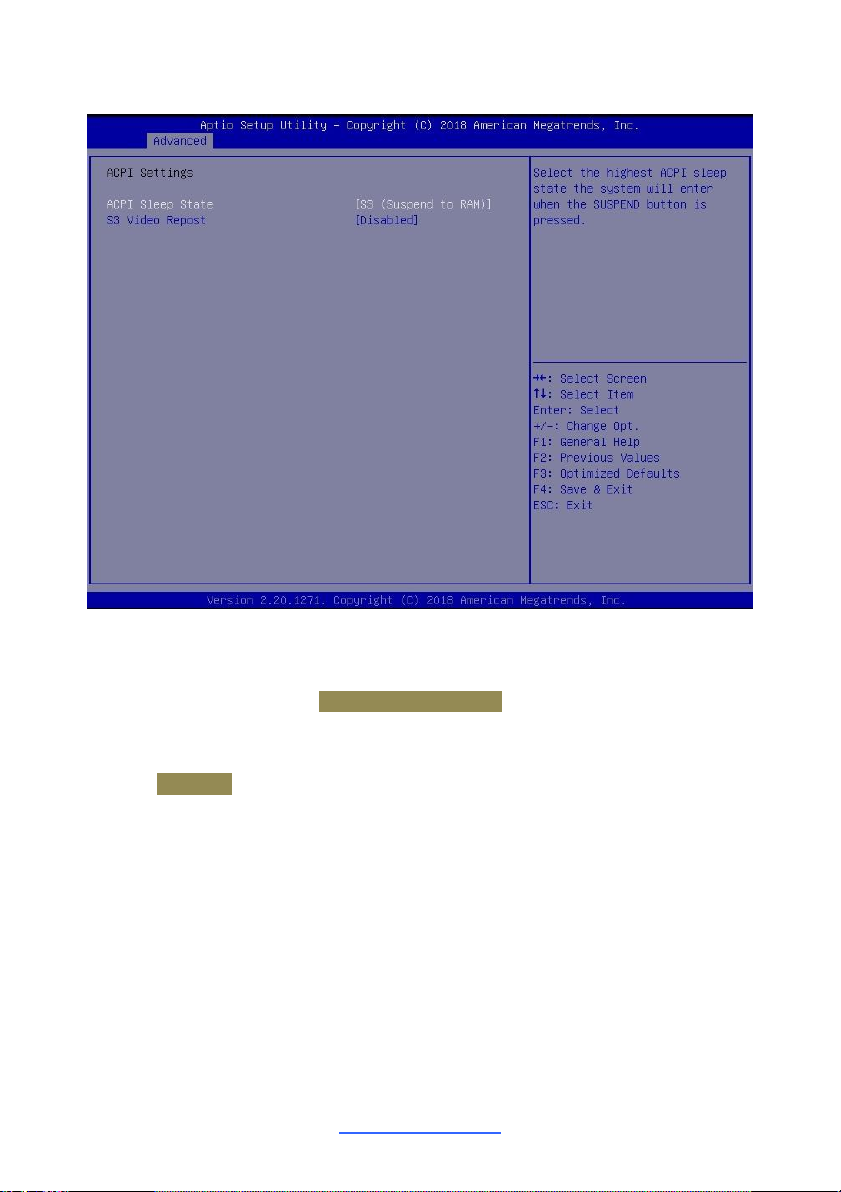
3.3.5 ACPI Settings
ACPI Sleep State
Select the highest ACPI sleep state the system will enter when the SUSPEND
button is pressed.
Suspend Disabled / S3 (Suspend to RAM)
S3 Video Repost
Enables or disables S3 Video Repost.
Disabled / Enabled
http://www.tyan.com
Page 47
47
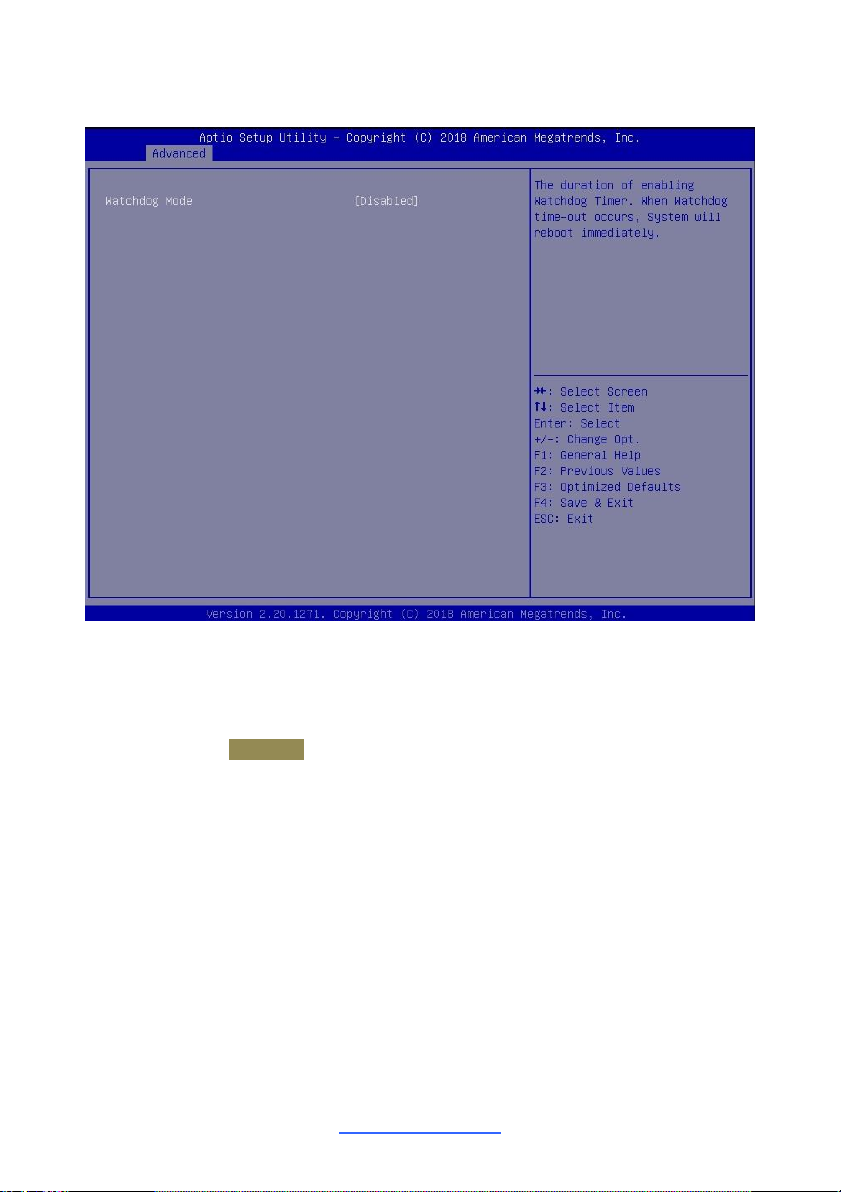
3.3.6 Watchdog Timer Configuration
Watchdog Mode
The duration of enabling Watchdog Timer. When Watchdog time-out occurs,
System will roboot immediately.
Disabled / POST / OS / Power ON
http://www.tyan.com
Page 48
48
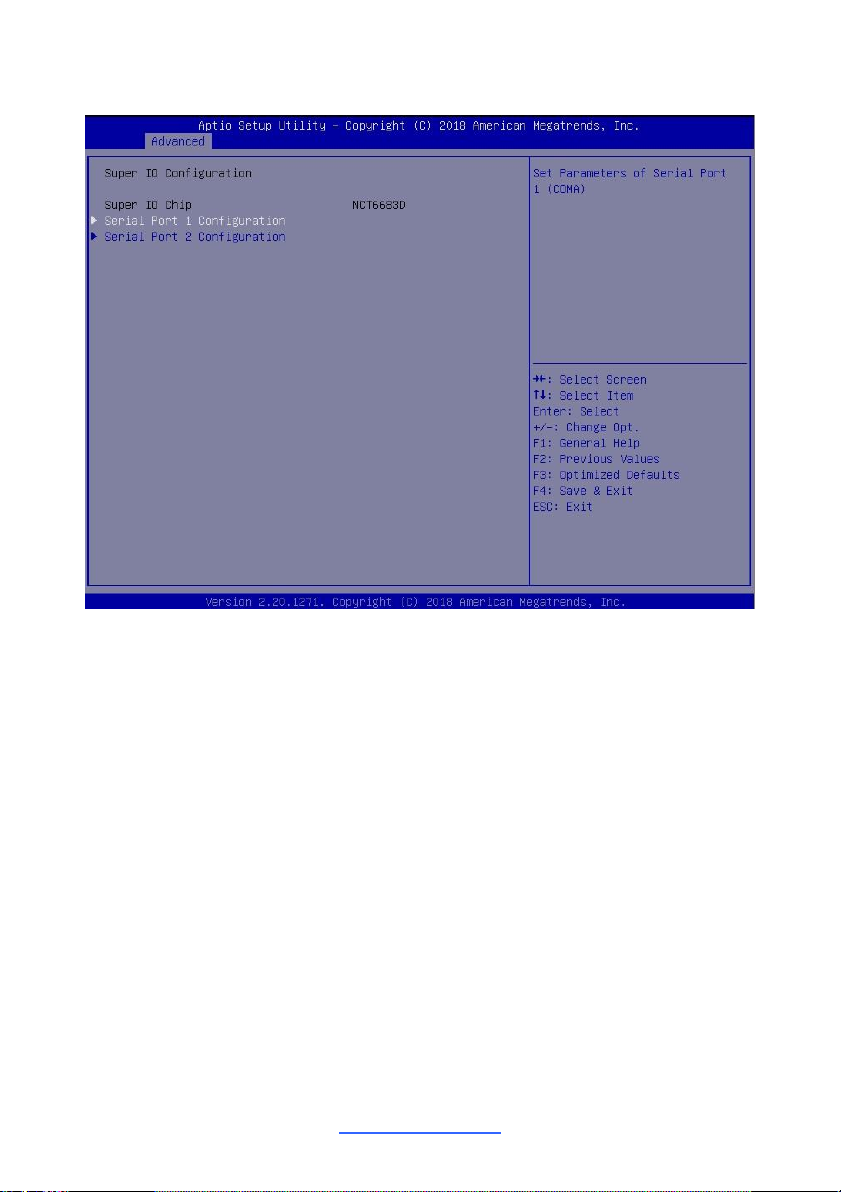
3.3.7 Super IO Configuration
Serial Port 1 Configuration
Set Parameters of Serial Port 1 (COMA)
Serial Port 2 Configuration
Set Parameters of Serial Port 2 (COMB)
http://www.tyan.com
Page 49
49
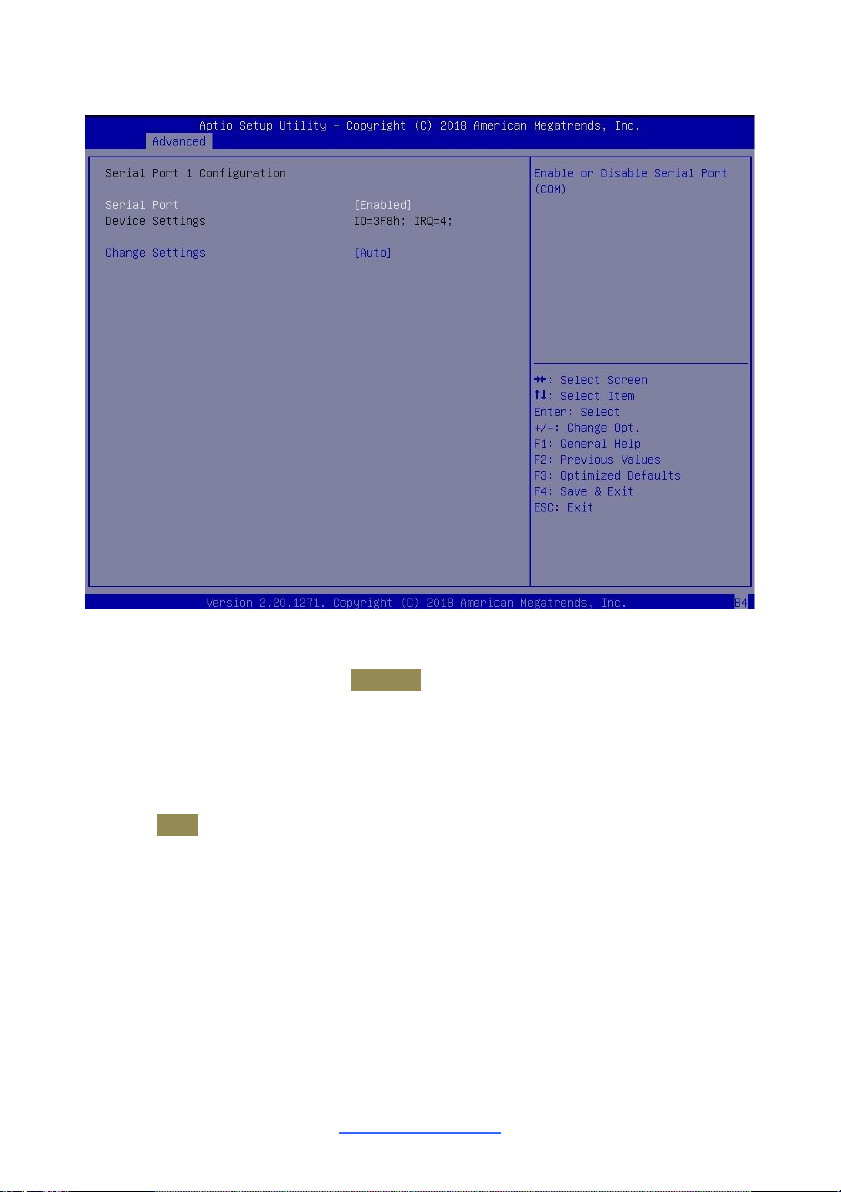
3.3.7.1 Serial Port 1 Configuration
Serial Port
Enable or Disable Serial Port (COM)
Disabled / Enabled
Device Settings
Read only.
Change Settings
Select an optimal setting for Super IO Device.
Auto / IO=3F8h; IRQ=4;
/ IO=3F8h, IRQ=3, 4, 5, 6, 7, 9, 10, 11, 12;
/ IO=2F8h; IRQ=3, 4, 5, 6, 7, 9, 10, 11, 12;
/ IO=3E8h, IRQ=3, 4, 5, 6, 7, 9, 10, 11, 12;
/ IO=2E8h, IRQ=3, 4, 5, 6, 7, 9, 10, 11, 12;
http://www.tyan.com
Page 50
50
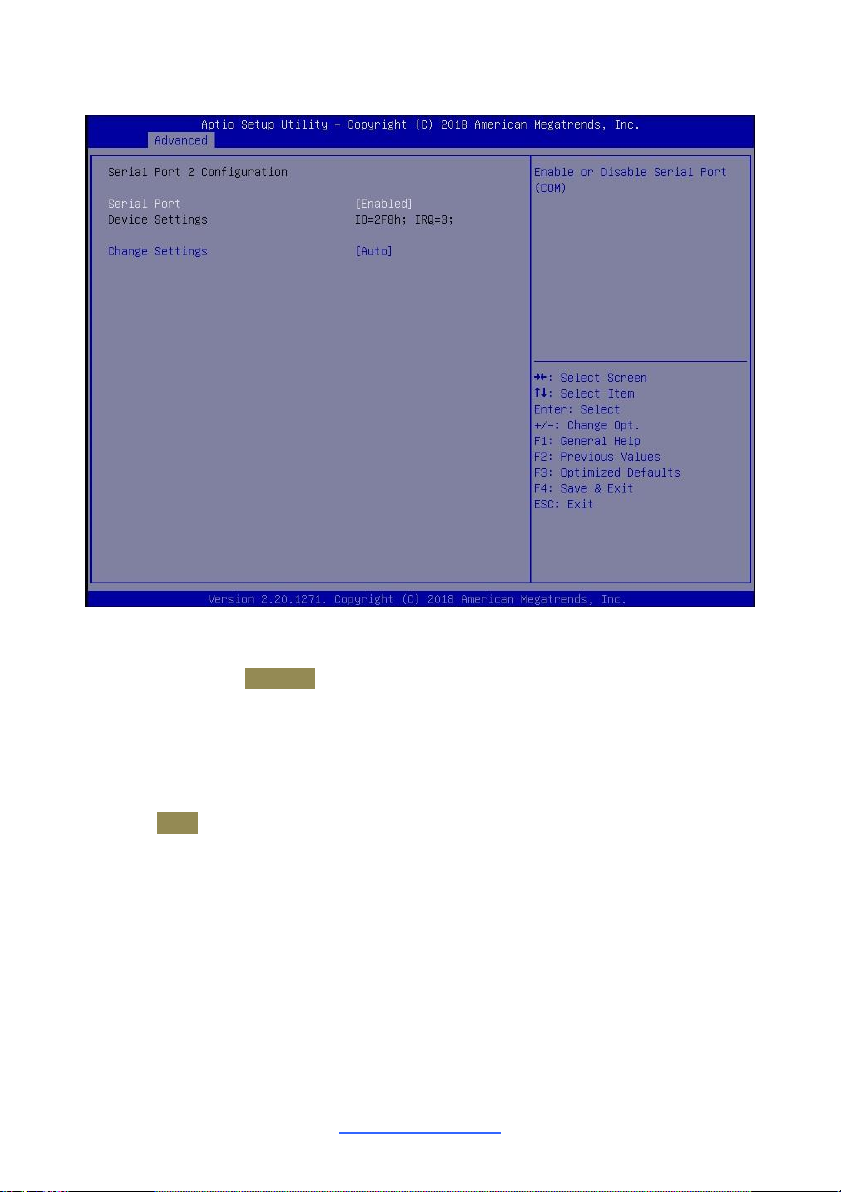
3.3.7.2 Serial Port 2 Configuration
Serial Port
Enable or Disable Serial Port (COM)
Disabled / Enabled
Device Settings
Read only.
Change Settings
Select an optimal setting for Super IO Device.
Auto / IO=2F8h; IRQ=3;
/ IO=3F8h, IRQ=3, 4, 5, 6, 7, 9, 10, 11, 12;
/ IO=2F8h; IRQ=3, 4, 5, 6, 7, 9, 10, 11, 12;
/ IO=3E8h, IRQ=3, 4, 5, 6, 7, 9, 10, 11, 12;
/ IO=2E8h, IRQ=3, 4, 5, 6, 7, 9, 10, 11, 12;
http://www.tyan.com
Page 51
51
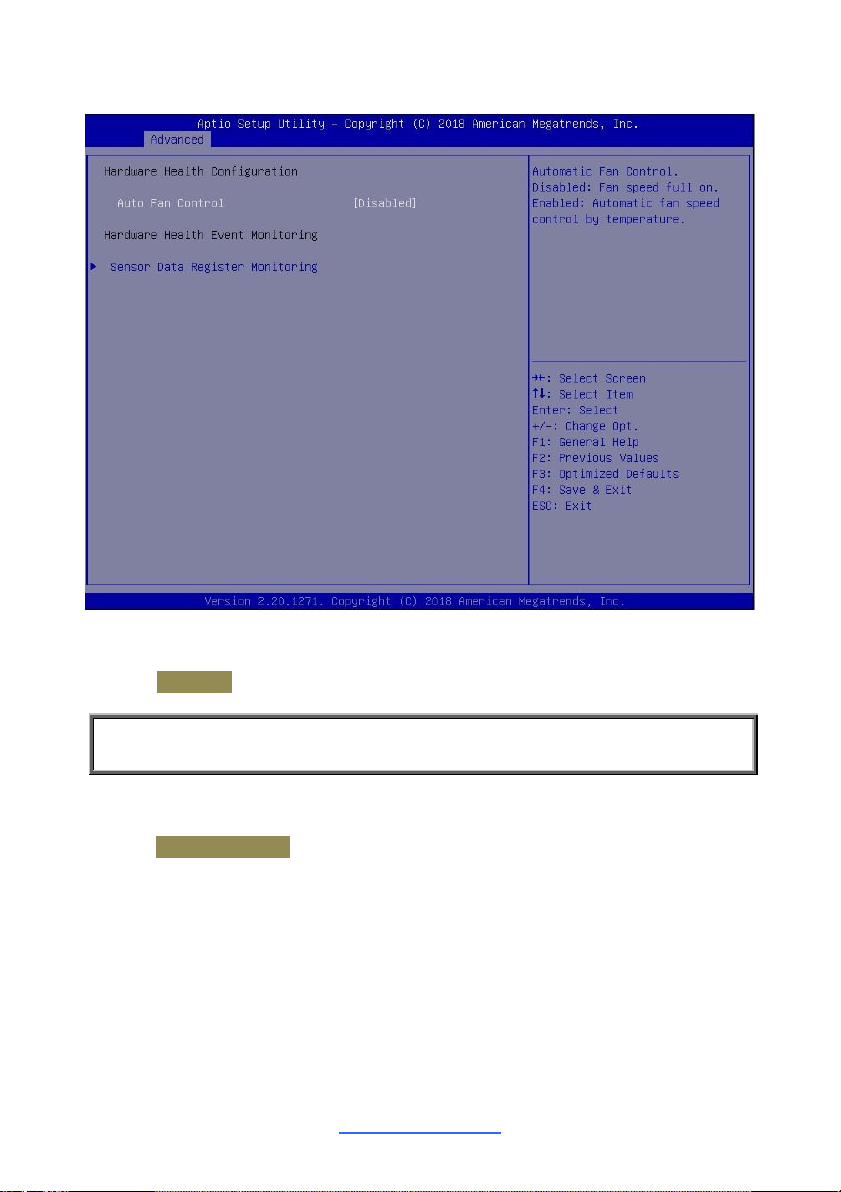
3.3.8 Hardware Health Configuration
NOTE: Auto Fan Control must be set to [Enabled] PWM Minimal Duty Cycle
menu will appear.
Auto Fan Control
Auto Fan Control help.
Disabled / Enabled
PWM Minimal Duty Cycle
Duty Cycle control range
15% Duty Cycle / 30% Duty Cycle / 45% Duty Cycle
http://www.tyan.com
Page 52
52
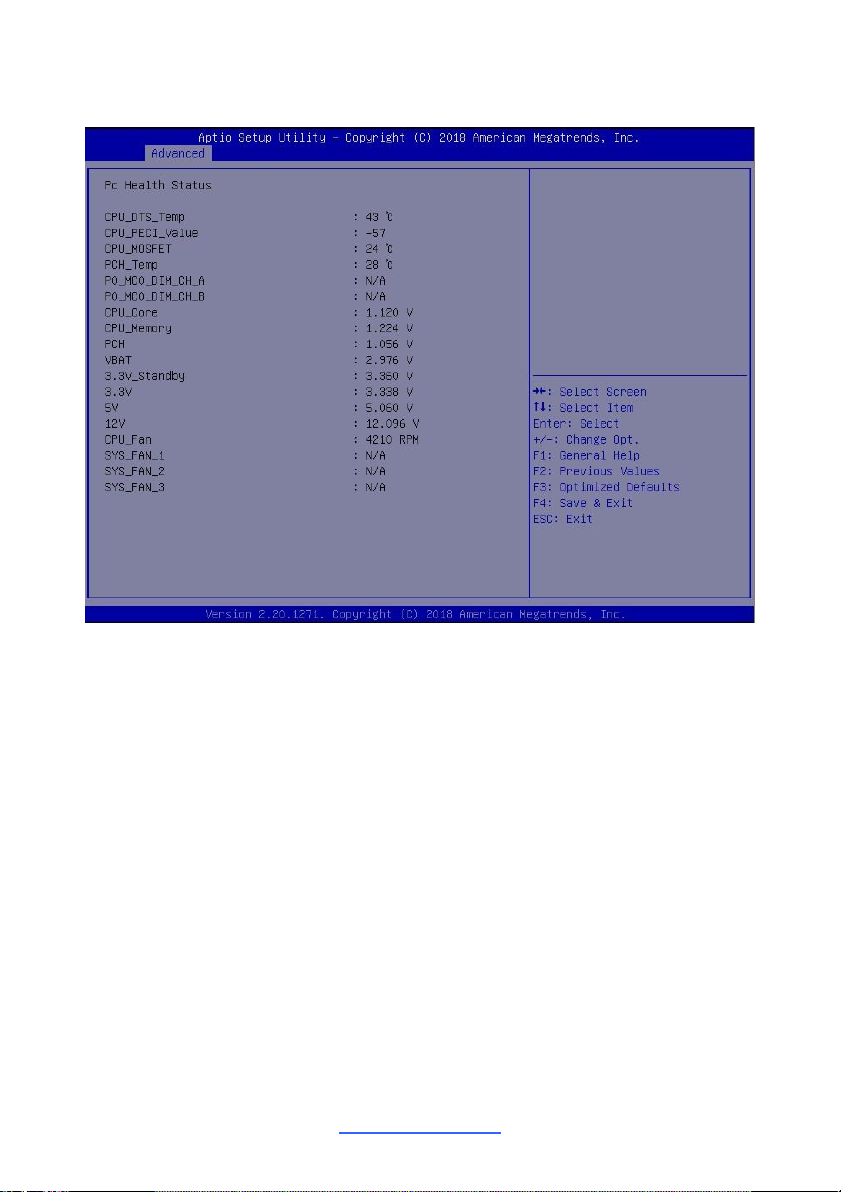
3.3.8.1 Sensor Data Register Monitoring
http://www.tyan.com
Page 53
53
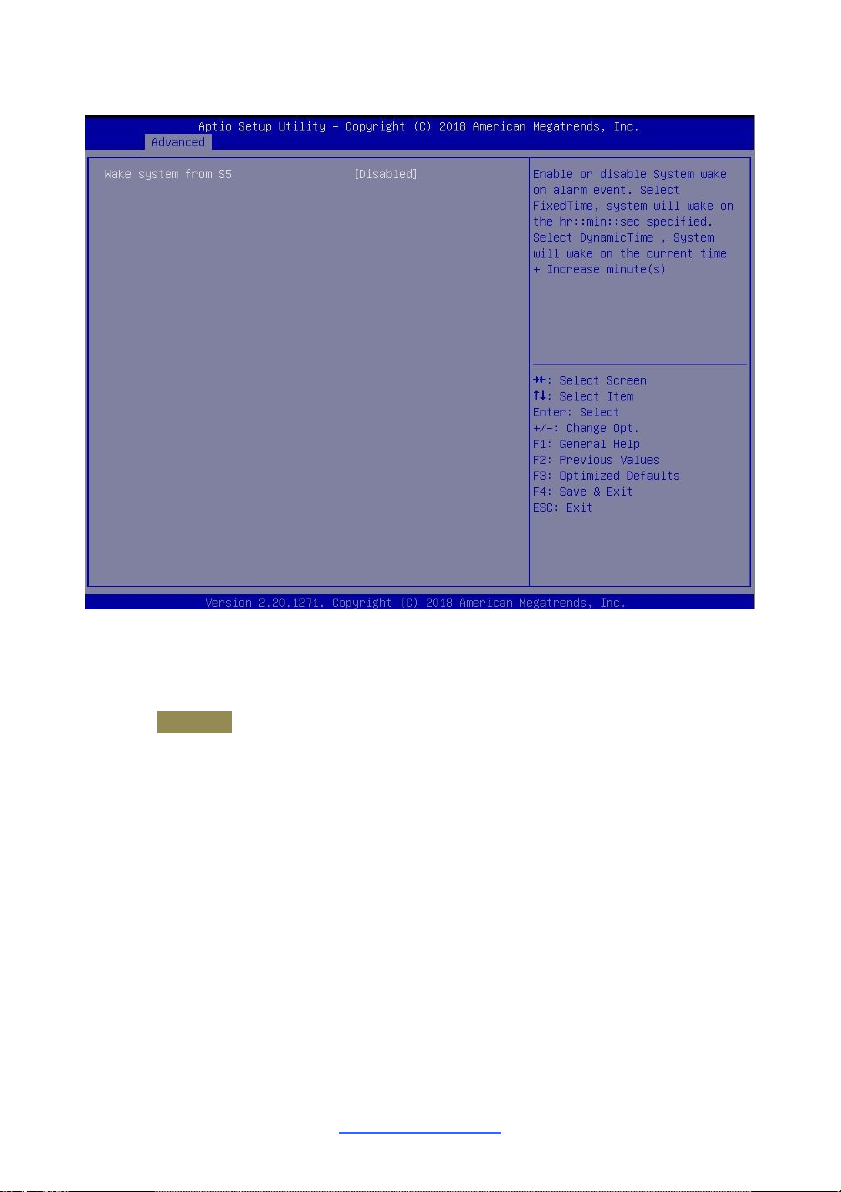
3.3.9 S5 RTC Wake Settings
Wake system from S5
Enable or disable system wake on alarm event. Select Fixed time, system will wake
on the hr::min::sec specified. Select dynamic time, system will wake on the current
time+ increase minute(s)
Disabled / Fixed time / Dynamic time
http://www.tyan.com
Page 54
54
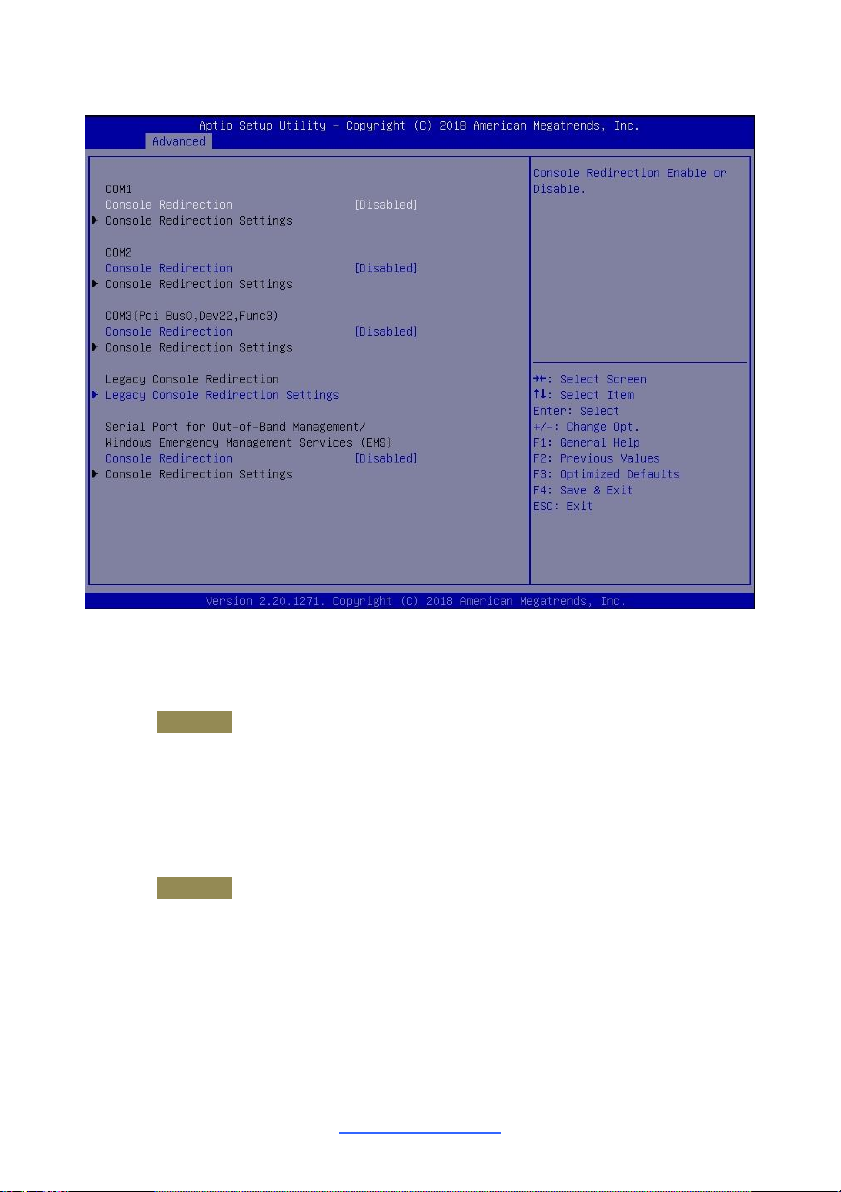
3.3.10 Serial Port Console Redirection
COM1/COM2/COM3(Pci Bus0,Dev22,Func3)
Console Redirection
Console redirection enable or disable.
Disabled / Enabled
Legacy Console Redirection
Legacy Console Redirection Settings
Serial Port for Out-Of-Band Management/Windows Emergency Services (EMS)
Console Redirection
Console redirection enable or disable.
Disabled / Enabled
Console Redirection Settings
The settings specify how the host computer (which the user is using) will exchange
data. Both computers should have the same or compatible settings.
NOTE: Console Redirection Settings menu only appear when Console
Redirection was set to [Enabled].
http://www.tyan.com
Page 55
55
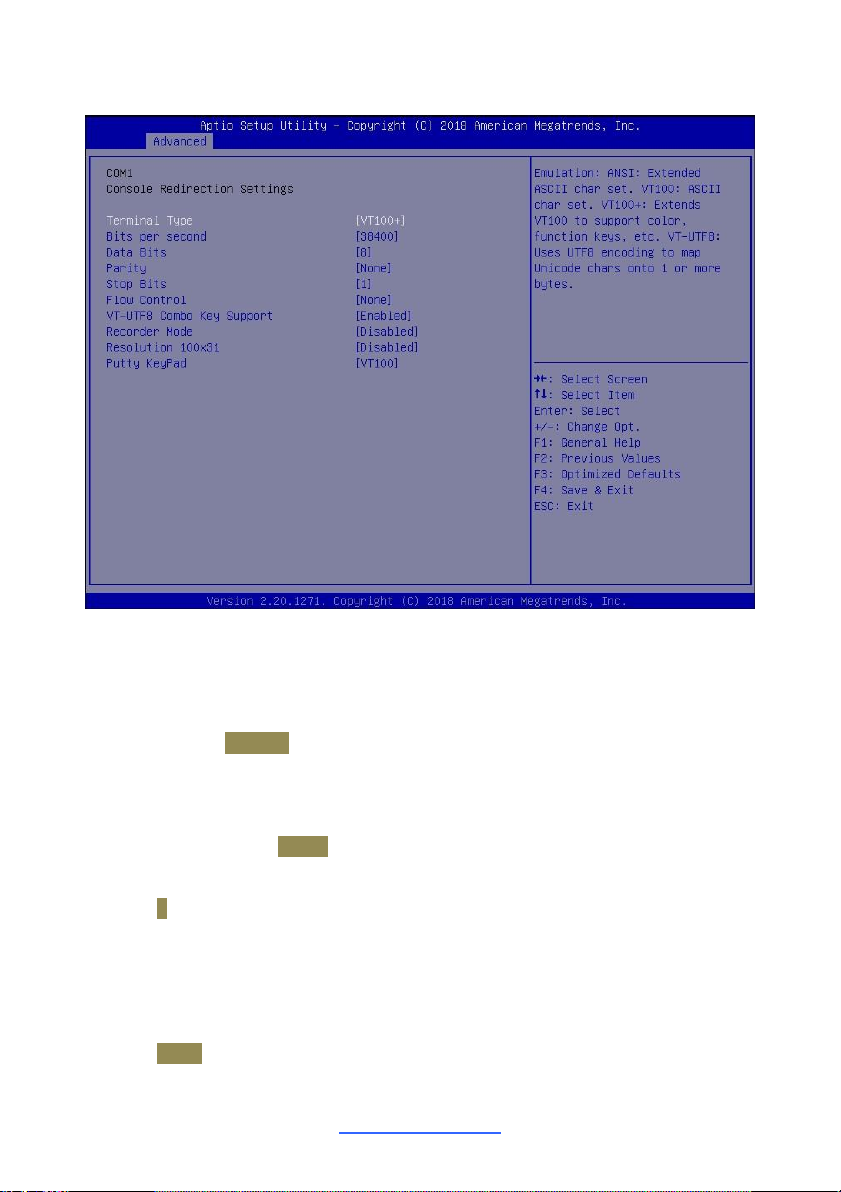
3.3.10.1 Console Redirection Settings
Terminal Type
Emulation: ANSI: Extended ASCII char set.
VT100: ASCII char set.
VT100+: Extends VT100 to support color function keys, etc.
VT-UTF8: Uses UTF8 encoding to map Unicode chars onto 1 or more bytes.
VT100 / VT100+ / VT-UTF8 / ANSI
Bits per Second
Select serial port transmission speed. The speed must be matched on the other
side. Long or noisy lines may require lower speeds.
9600 / 19200 / 38400 / 57600 / 115200
Data Bits
8 / 7
Parity
A parity bit can be sent with the data bits to detect some transmission errors. Even:
parity bit is 0 if the num of 1’s in the data bits is even. Odd: parity bit is 0 if the num
of 1’s in the data bits is odd. Mark: parity bit is always 1. Space: parity bit is always
0. Mark and Space parity do not allow for error detection.
None / Even / Odd / Mark / Space
http://www.tyan.com
Page 56

56
Stop Bits
Stop bits indicate the end of a serial data packet. (A start bit indicates the
beginning). The standard setting is 1 stop bit. Communication with slow devices
may require more than 1 stop bit.
1 / 2
Flow Control
Flow Control can prevent data loss from buffer overflow. When sending data, if the
receiving buffers are full, a ‘stop’ signal can be sent to stop the data flow. Once the
buffers are empty, a ‘start’ signal can be sent to re-start the flow. Hardware flow
control uses two wires to send start/stop signal.
None / Hardware RTS/CTS
VT-UTF8 Combo Key Support
Enable VT-UTF8 Combination Key Support for ANSI/VT100 terminals.
Disabled / Enabled
Recorder Mode
With this mode enabled only text will be sent. This is to capture Terminal data.
Disabled / Enabled
Resolution 100x31
Enable or disable extended terminal resolution.
Disabled / Enabled
Putty KeyPad
Select FunctionKey and KeyPad on Putty.
VT100 / LINUX / XTERMR6 / SCO / ESCN / VT400
http://www.tyan.com
Page 57
57
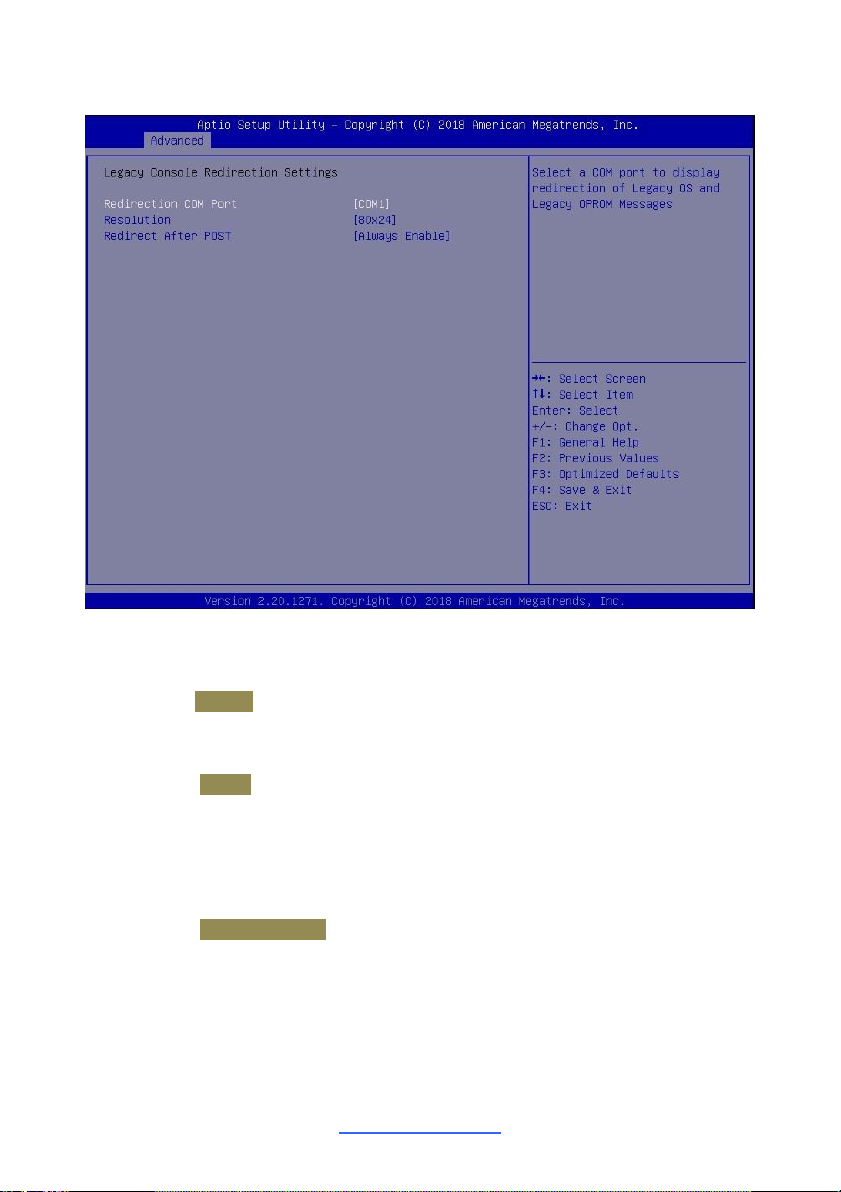
3.3.10.2 Legacy Console Redirection Settings
Legacy Serial Redirected Port
Select a COM port to display redirection of Legacy OS and Legacy OPROM
Messages
COM1 / COM2 / COM3(Pci Bus0,Dev22,Func3)
Resolution
On Legacy OS, the Number of Rows and Columns supported redirection
80x24 / 80x25
Redirect After POST
When Bootloader is selected then Legacy Console Redirection is disabled before
booting to legacy OS. When Always Enable is selected, then Legacy Console
Redirection is enabled for legacy OS. Default setting for this option is set to Always
Enable.
Always Enable / Bootloader
http://www.tyan.com
Page 58
58
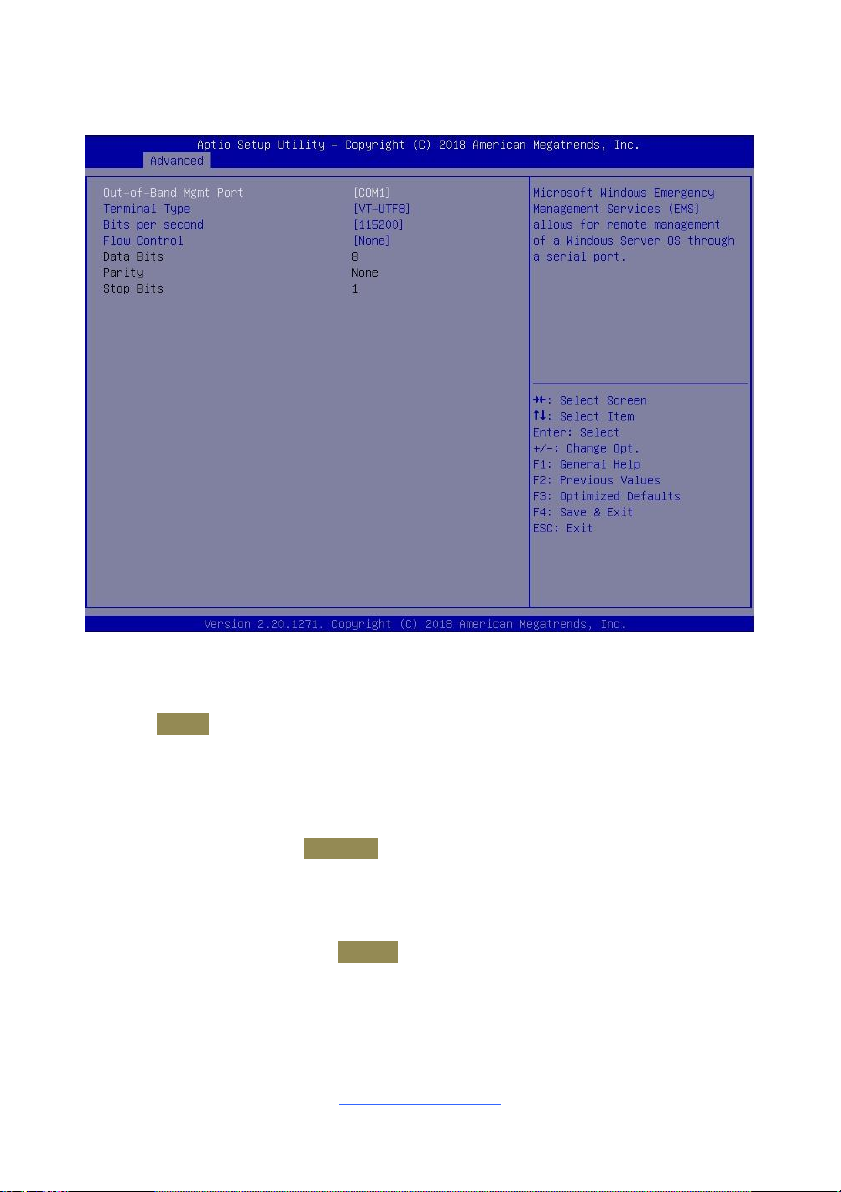
3.3.10.3 Serial Port for Out-Of-Band Management/Windows Emergency
Services (EMS) Console Redirection Settings
Out-of Band Mgmt Port
Microsoft Windows Emergency Management Services (EMS) allows for remote
management of a Windows Server OS through a serial port.
COM1 / COM2 / COM3(Pci Bus0,Dev22,Func3)
Terminal Type
VT-UTF8 is the preferred terminal type for out-of-band management. The next best
choice is VT100+ and then VT100. See above, in Console Redirection Settings
page, for more Help with Terminal Type/Emulation.
VT100 / VT100+ / VT-UTF8 / ANSI
Bits per Second
Select serial port transmission speed. The speed must be matched on the other
side. Long or noisy lines may require lower speeds.
9600 / 19200 / 57600/ 115200
http://www.tyan.com
Page 59

59
Flow Control
Flow Control can prevent data loss from buffer overflow. When sending data, if the
receiving buffers are full, a ‘stop’ signal can be sent to stop the data flow. Once the
buffers are empty, a ‘start’ signal can be sent to restart the flow. Hardware flow
control uses two wires to send start/stop signal.
None / Hardware RTS/CTS
Data Bits / Parity / Stop Bits
Read only.
http://www.tyan.com
Page 60
60
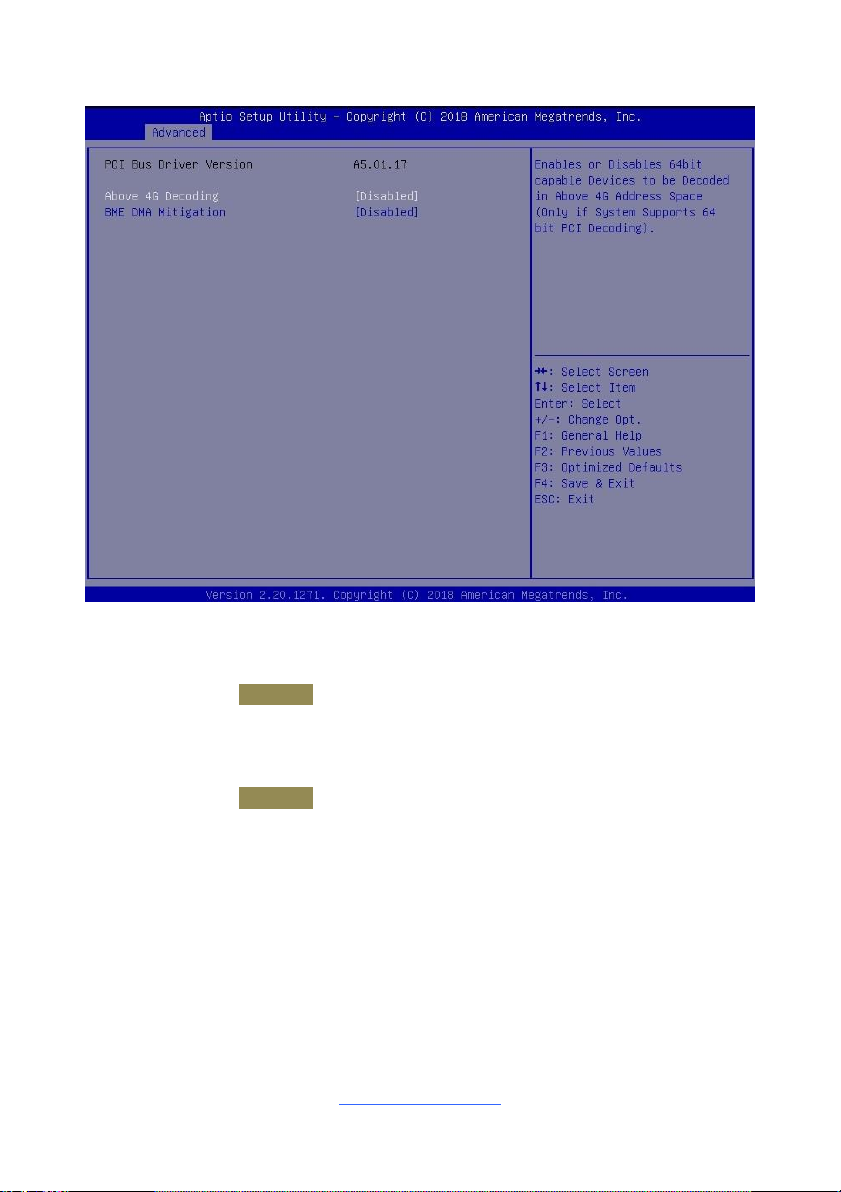
3.3.11 PCI Subsystem Settings
Above 4G Decoding
Enables or Disables 64bit capable Devices to be decoded in Above 4G Address
Space(Only if System supports 64 bit PCI decoding).
Enabled / Disabled
SR-IOV Support
If system has SR-IOV capable PCIe devices, this option Enable or Disable Single
root IO virtualization Support
Enabled / Disabled
http://www.tyan.com
Page 61
61
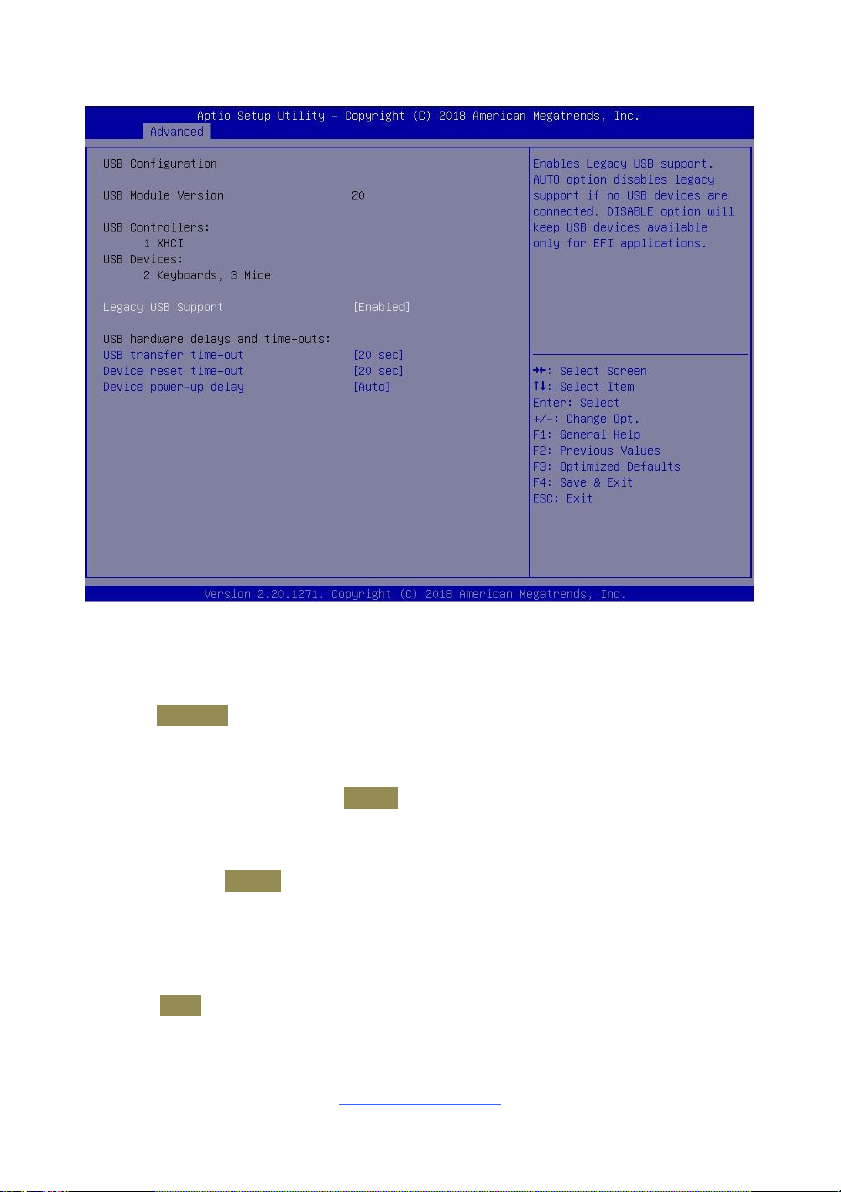
3.3.12 USB Configuration
Legacy USB Support
Enables USB legacy support. AUTO option disables legacy support if no USB
devices are connected. DISABLE option will keep USB devices available only for
EFI applications.
Enabled / Disabled / Auto
USB transfer time-out
The time-out value for Control, Bulk and Interrupt transfers.
1 sec / 5 sec / 10 sec / 20 sec
Device reset time-out
USB mass storage device Start Unit command time-out.
10 sec / 20 sec / 30 sec / 40 sec
Device power-up delay
Maximum time the device will take before it properly reports itself to the Host
Controller. AUTO uses default value: for a Root port it is 100 ms, for a Hub port the
delay is taken from Hub descriptor.
Auto / Manual
http://www.tyan.com
Page 62
62
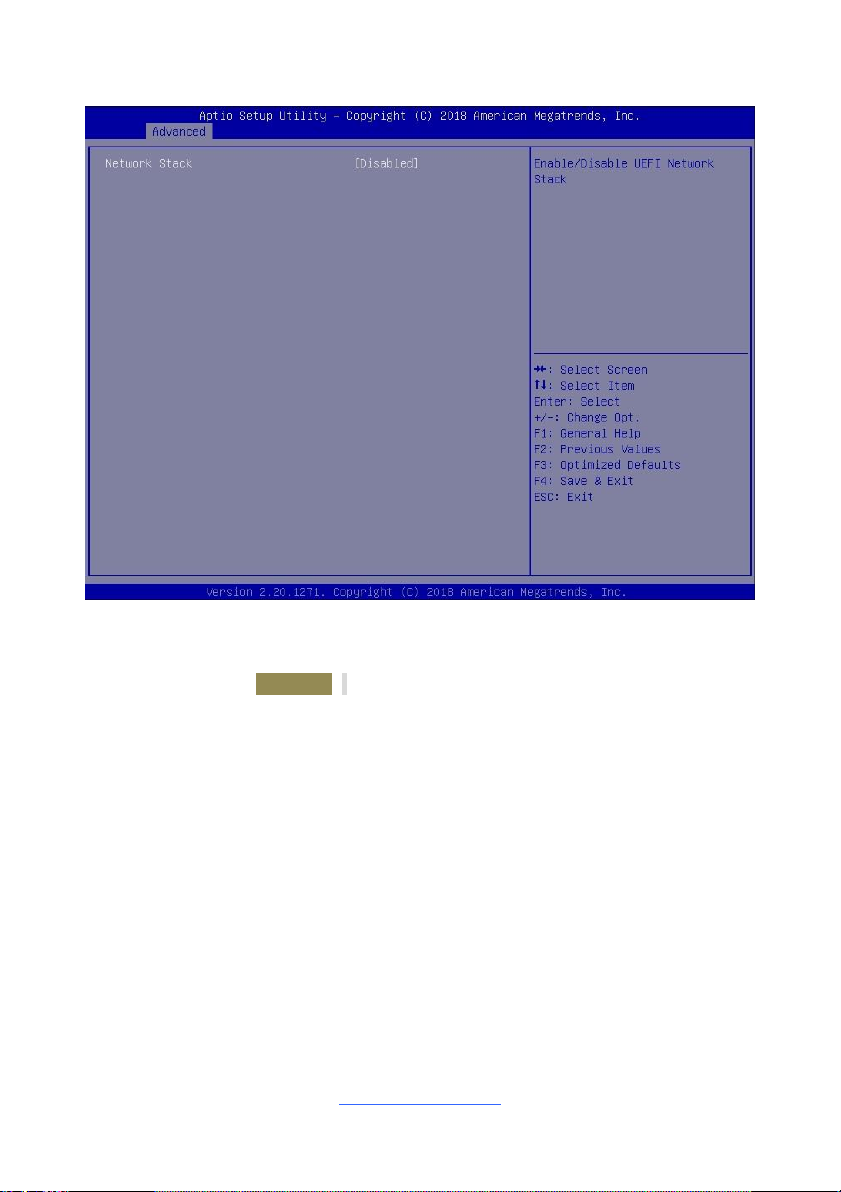
3.3.13 Network Stack Configuration
Network Stack
Enable / Disable UEFI Network Stack.
Disabled / Enabled
http://www.tyan.com
Page 63
63
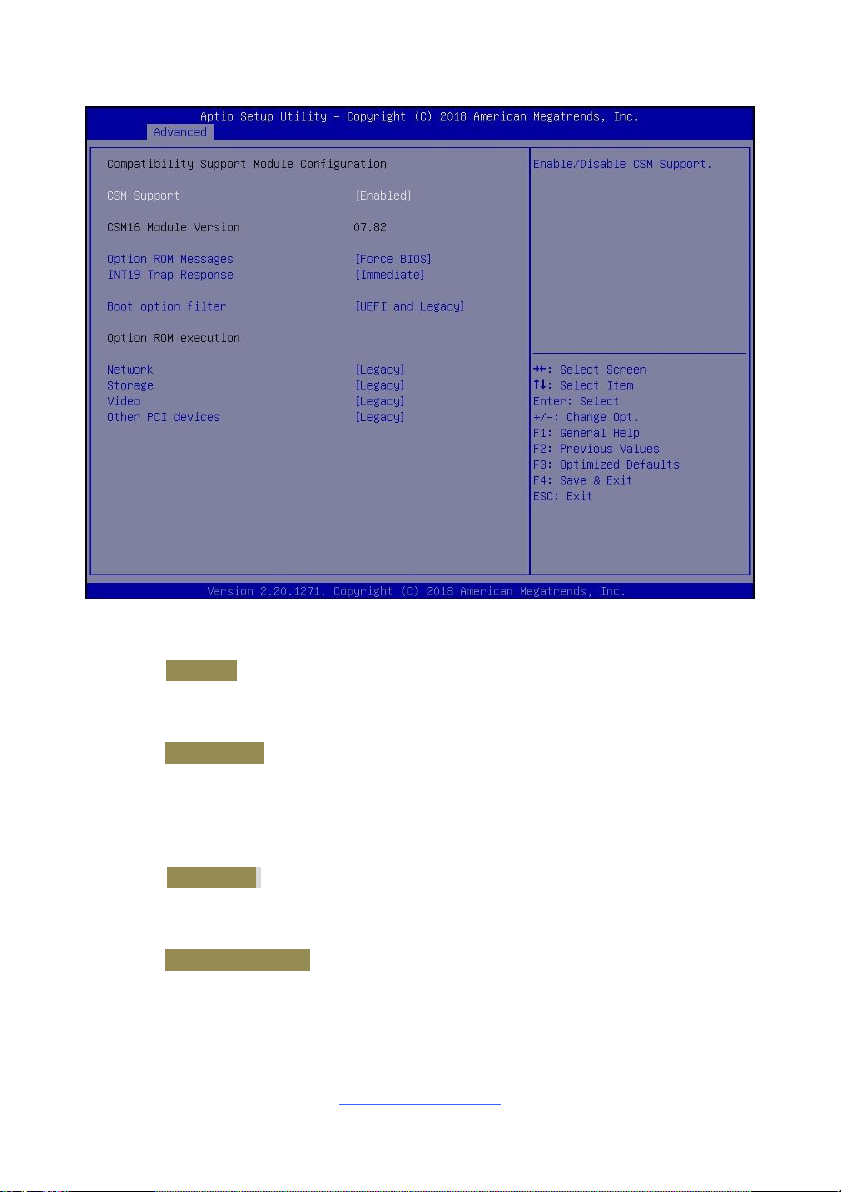
3.3.14 CSM Configuration
CSM support
Enable/Disable CSM Support
Enabled / Disabled
Option ROM Messages
Set display mode for Option ROM
Force BIOS / Keep Current
INT19 Trap Resource
BIOS reaction on INT19 trapping by option ROM:
IMMEDIATE - execute the trap right away; POSTPONED – execute the trap during
legacy boot.
Immediate / Postponed
Boot option filter
This option controls Legacy/UEFI ROMs priority
UEFI and Legacy / Legacy only / UEFI only
http://www.tyan.com
Page 64

64
Network
Controls the execution of UEFI and legacy PXE OpROM
Do not launch / UEFI / legacy
Storage
Controls the execution of UEFI and legacy PXE OpROM
Do not launch / UEFI / legacy
Video
Controls the execution of UEFI and legacy PXE OpROM
Do not launch / UEFI / legacy
Other PCI devices
Determines OpRom execution policy for devices other than Network, Storage, or
Video
Do not launch / UEFI / legacy
http://www.tyan.com
Page 65
65
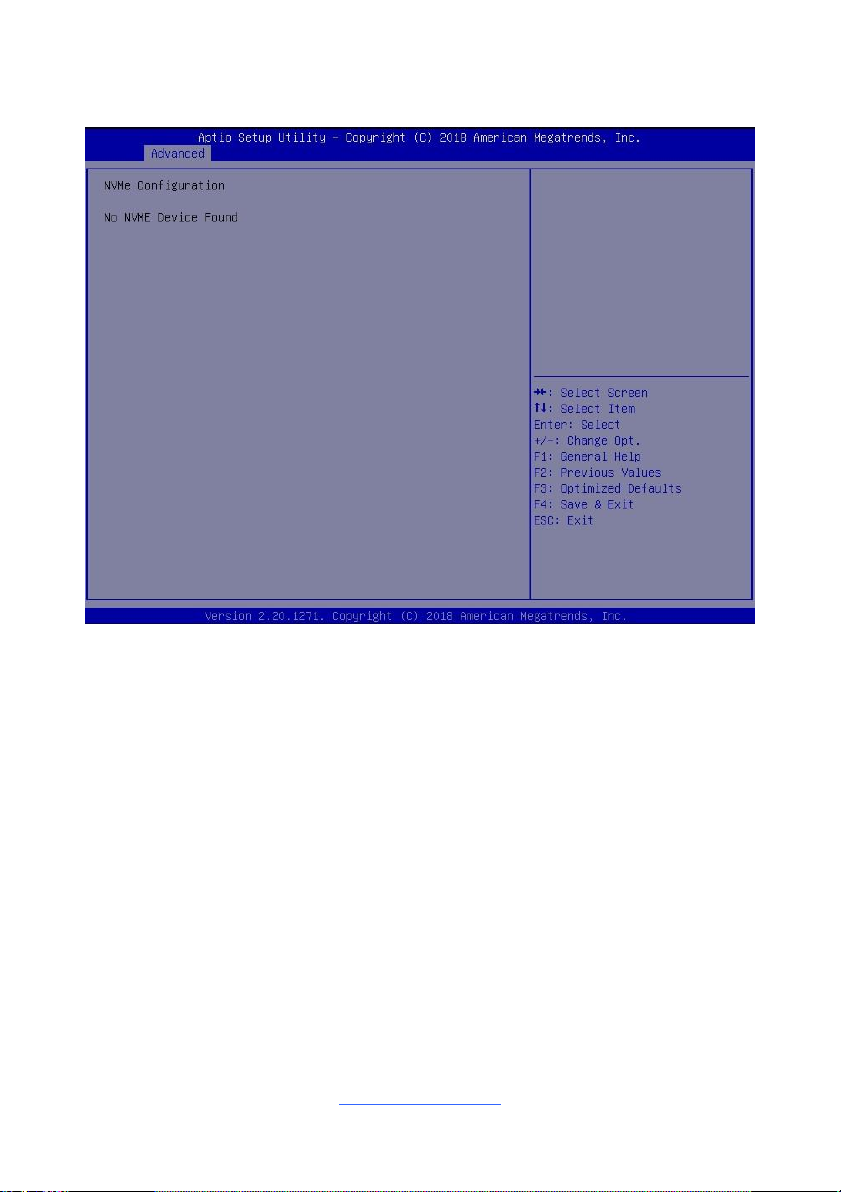
3.3.15 NVMe Configuration
No NVMe Device Found
http://www.tyan.com
Page 66
66
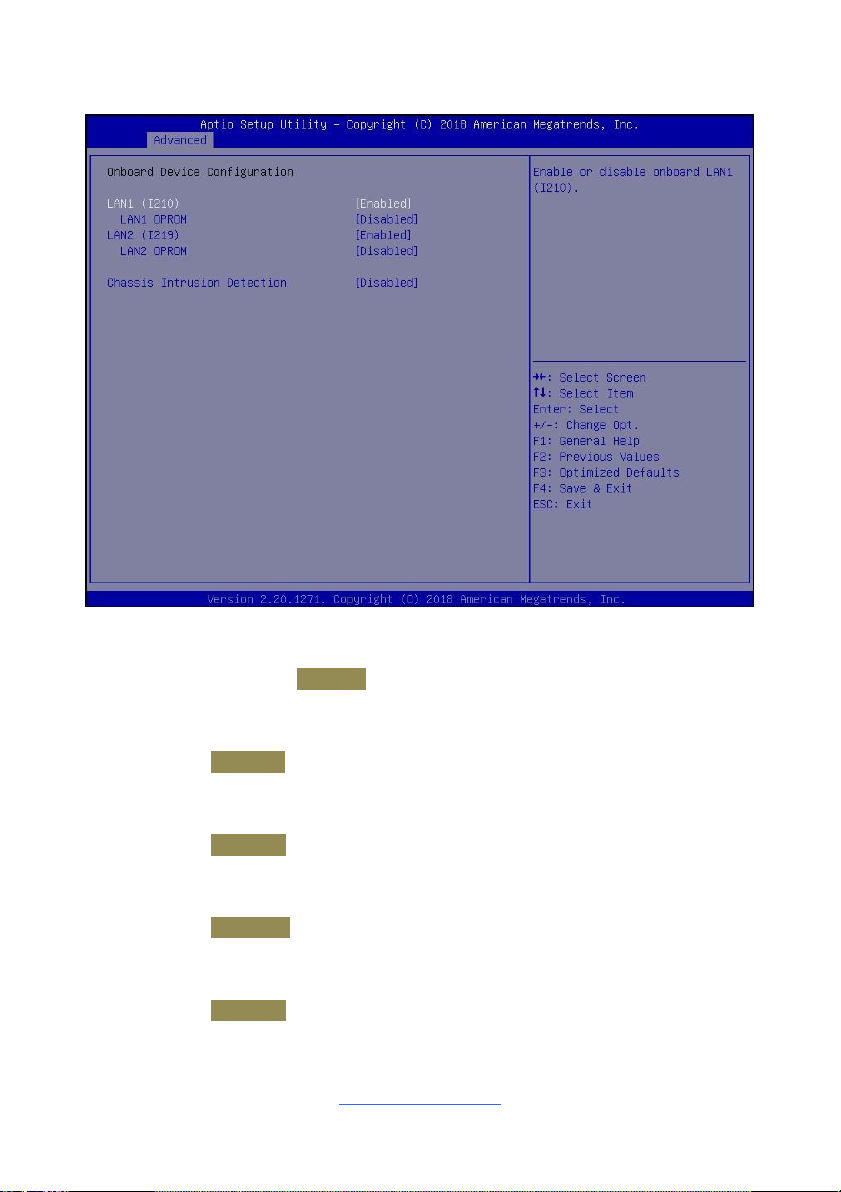
3.3.16 Onboard Device Configuration
LAN1(I210)
Enable or disable onboard LAN1(I210).
Disabled / Enabled
LAN1 OPROM
Enable or disable onboard LAN1 OPROM.
Disabled / PXE / iSCSI
LAN2 (I219)
Enable or disable onboard LAN2 (I219)
Disabled / Enabled
LAN2 OPROM
Enable or disable onboard LAN2 OPROM
Disabled / PXE
Chassis Intrusion Detection
Enabled: When a chassis open event is detected, the BIOS will record the event.
Disabled / Enabled
http://www.tyan.com
Page 67
67
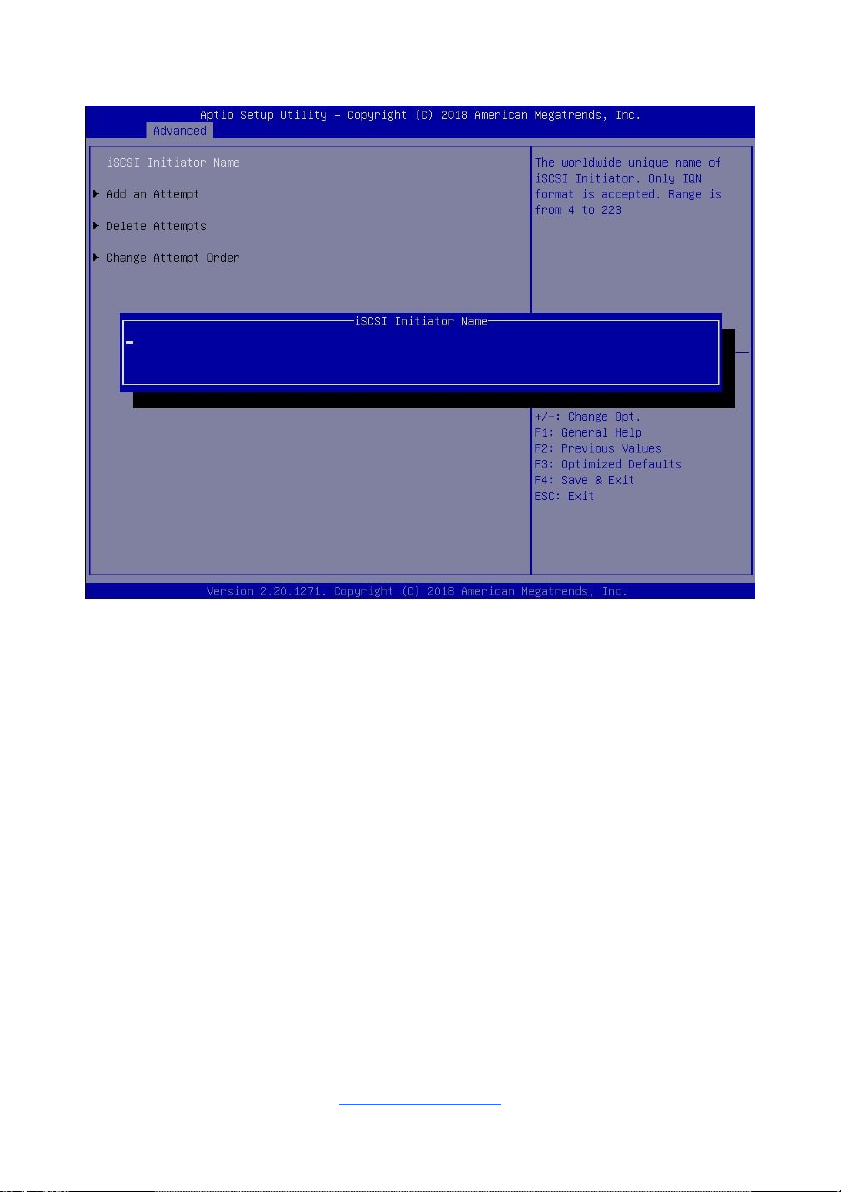
3.3.17 iSCSI Configuration
iSCSI Name
The worldwide unique name of iSCSI Initiator. Only IQN format is accepted. Range
is from 4 to 223.
Press enter to input a iSCSI Initiator Name
http://www.tyan.com
Page 68
68
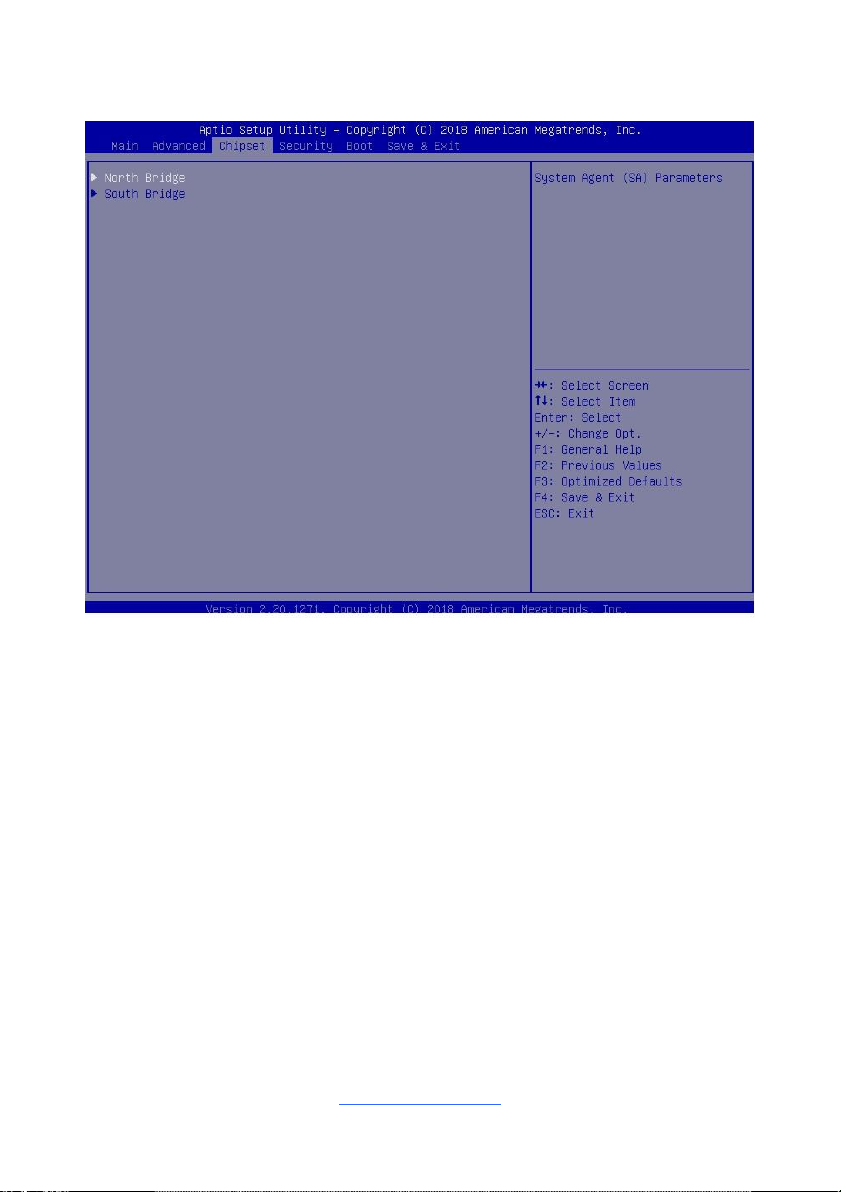
3.4 Chipset Menu
North Bridge
System Agent (SA) Parameters.
South Bridge
PCH Parameters
http://www.tyan.com
Page 69
69
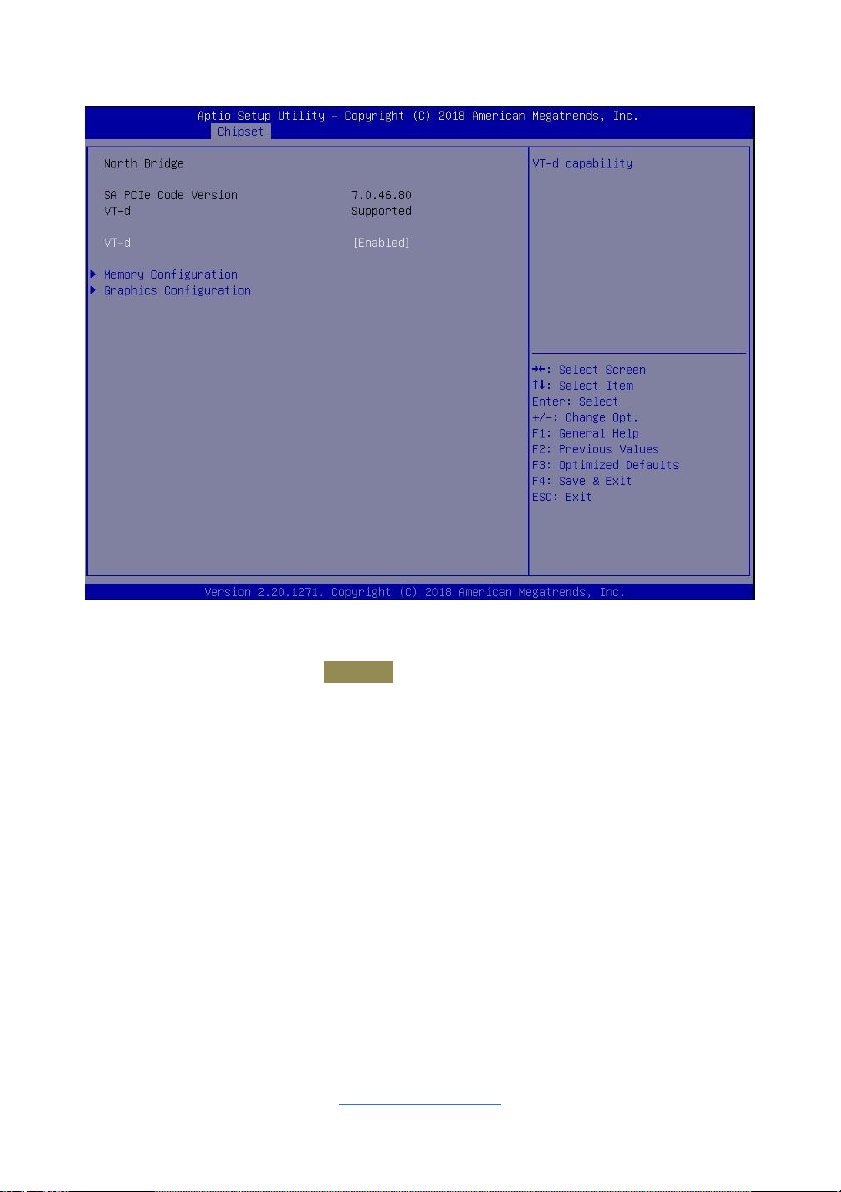
3.4.1 North Bridge Configuration
VT-d
VT-d capability
Disabled / Enabled
Memory Configuration
Memory Configuration Parameters
Graphics Configuration
Graphics Configuration
http://www.tyan.com
Page 70
70
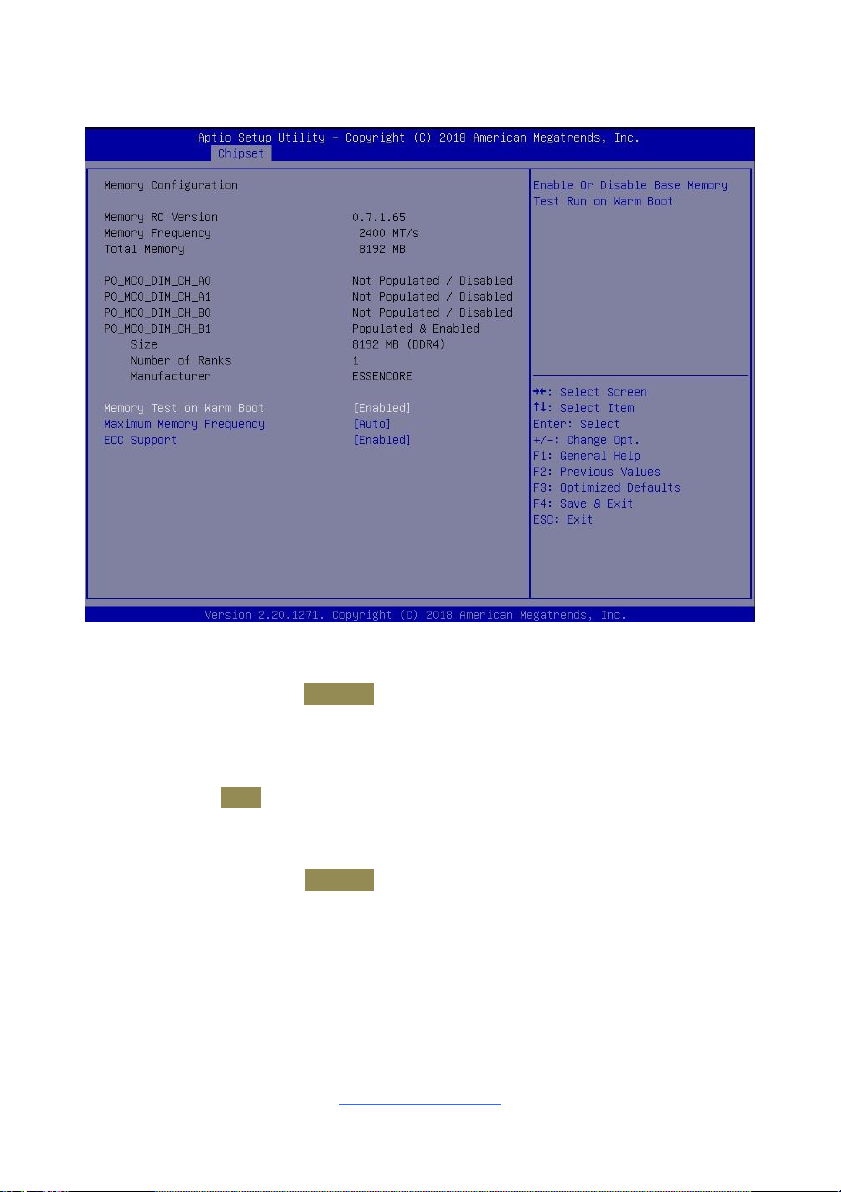
3.4.1.1 Memory Configuration
Memory Test on Warm Boot
Enable Or Disable Base Memory Test Run on Warm Boot
Disabled / Enabled
Maximum Memory Frequency
Maximum Memory Frequency Selections in Mhz. Valid values should match the
refclk, i.e. divide by 133 or 100
Auto / 2133 / 2400 / 2667
ECC Support
Enable/ disable DDR Ecc Support
Disabled / Enabled
http://www.tyan.com
Page 71
71
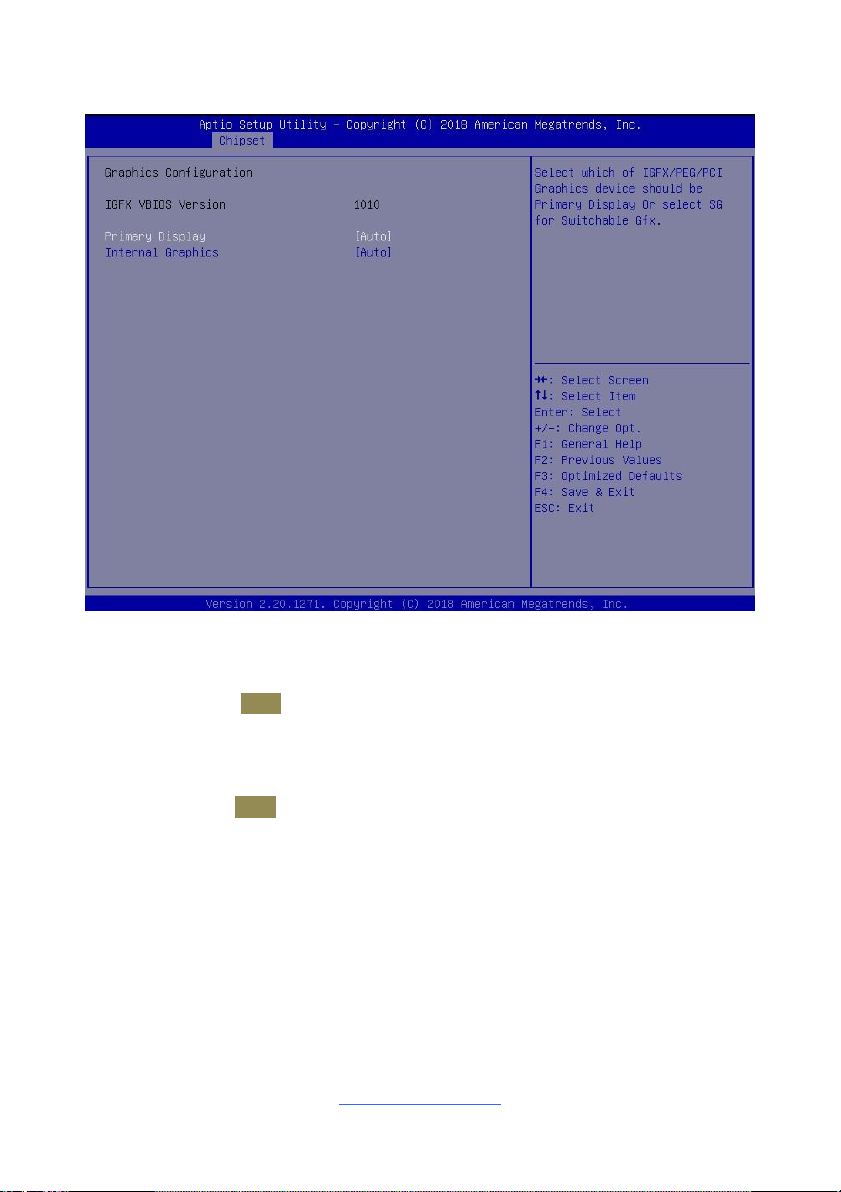
3.4.1.2 Graphics Configuration
Primary Display
Select which of IGFX/PEG/ PCI Graphics device should be Primary Display or
select SG for Switchable Gfx.
Auto / IGFX / PEG / PCI
Internal Graphics
Keep IGFX enabled based on the setup options.
Auto / Disabled / Enabled
http://www.tyan.com
Page 72
72
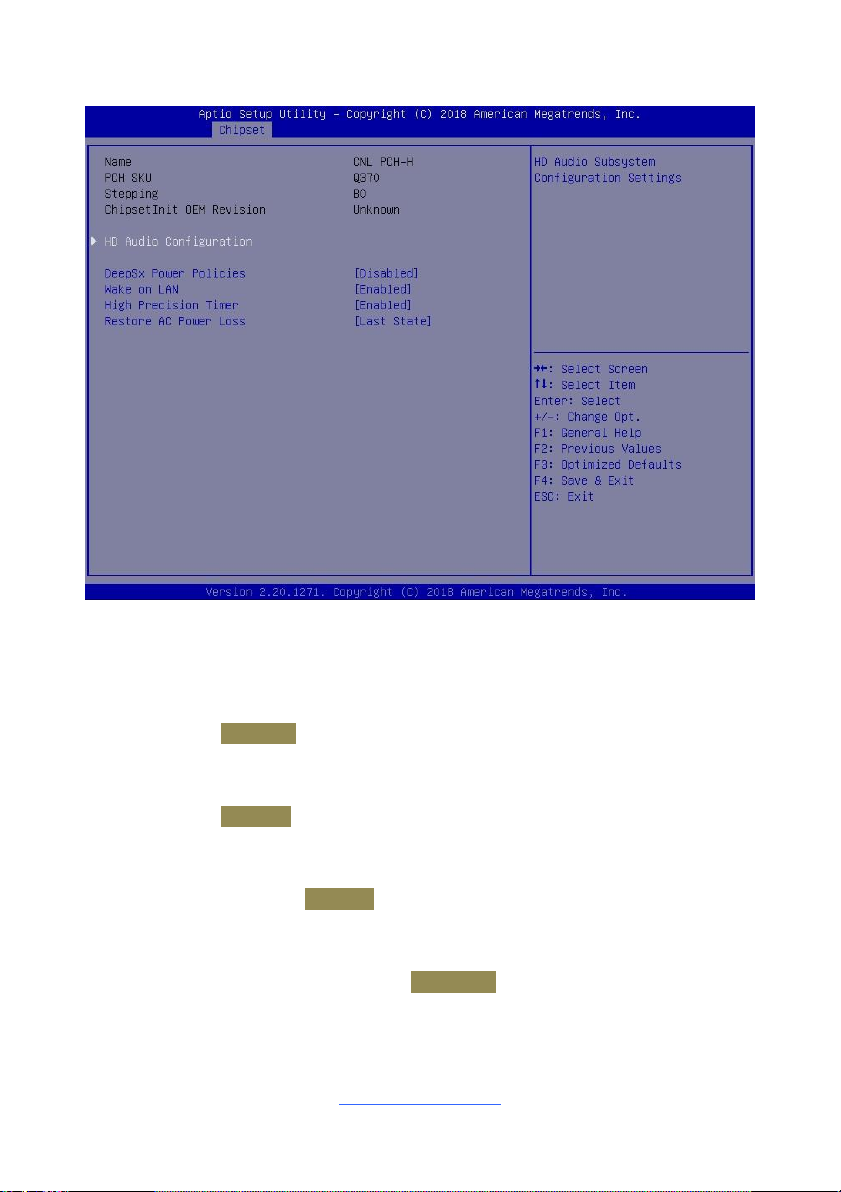
3.4.2 South Bridge Configuration
HD Audio Configuration
HD Audio Subsystem Configuration Settings
DeepSx Power
Configure the DeepSx Mode configuration.
Disabled / Enabled in S4-S5
Wake on LAN
Enable/Disable integrated LAN to wake the system.
Enabled / Disabled
High Precision Timer
Enable or Disable the High Precision Event Timer
Disabled / Enabled
Restore AC Power Loss
Select AC power state when power is re-applied after a power failure.
Power Off / Power On / Last State
http://www.tyan.com
Page 73
73
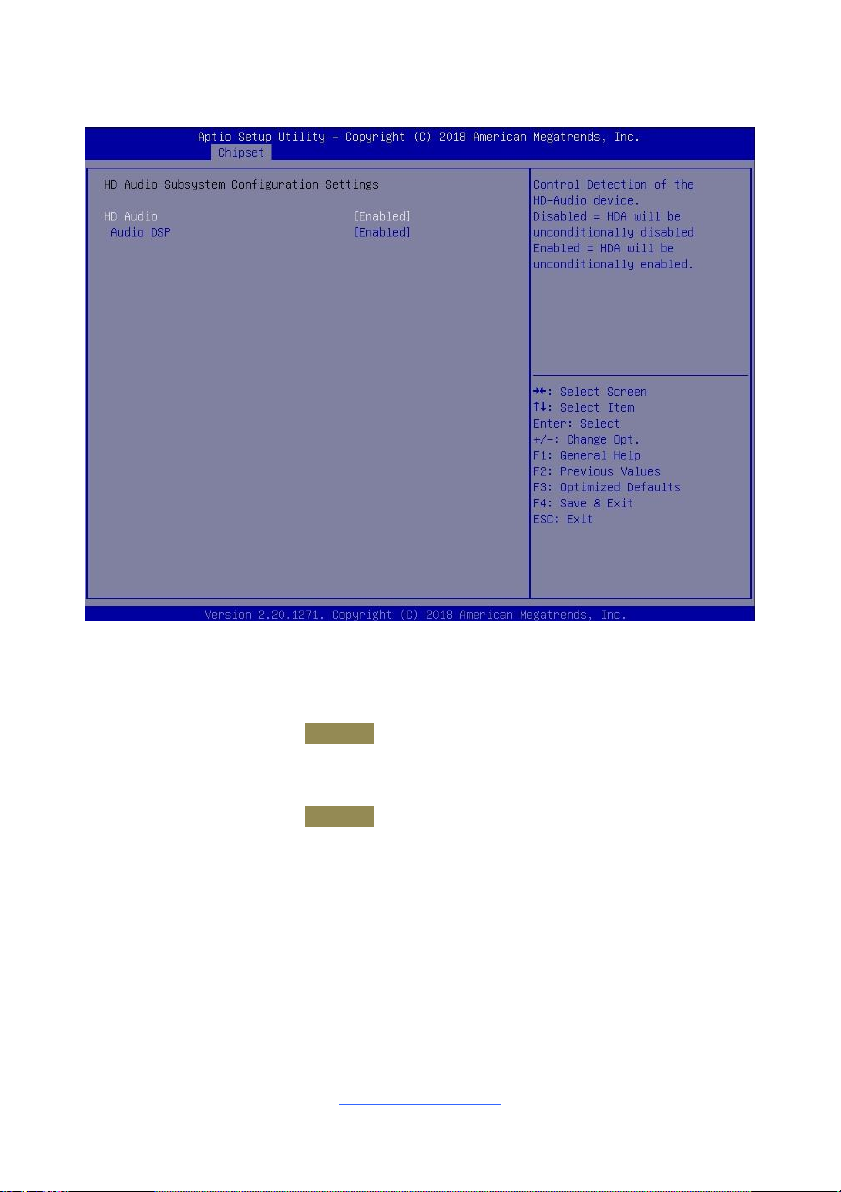
3.4.2.1 HD Audio Configuration
HD Audio
Control Detection of the HD- Audio device.
Disabled = HAD will be unconditionally disabled
Enabled = HAD will be unconditionally enabled.
Disabled / Enabled
Audio DSP
Enable/Disable Audio DSP.
Disabled / Enabled
http://www.tyan.com
Page 74
74
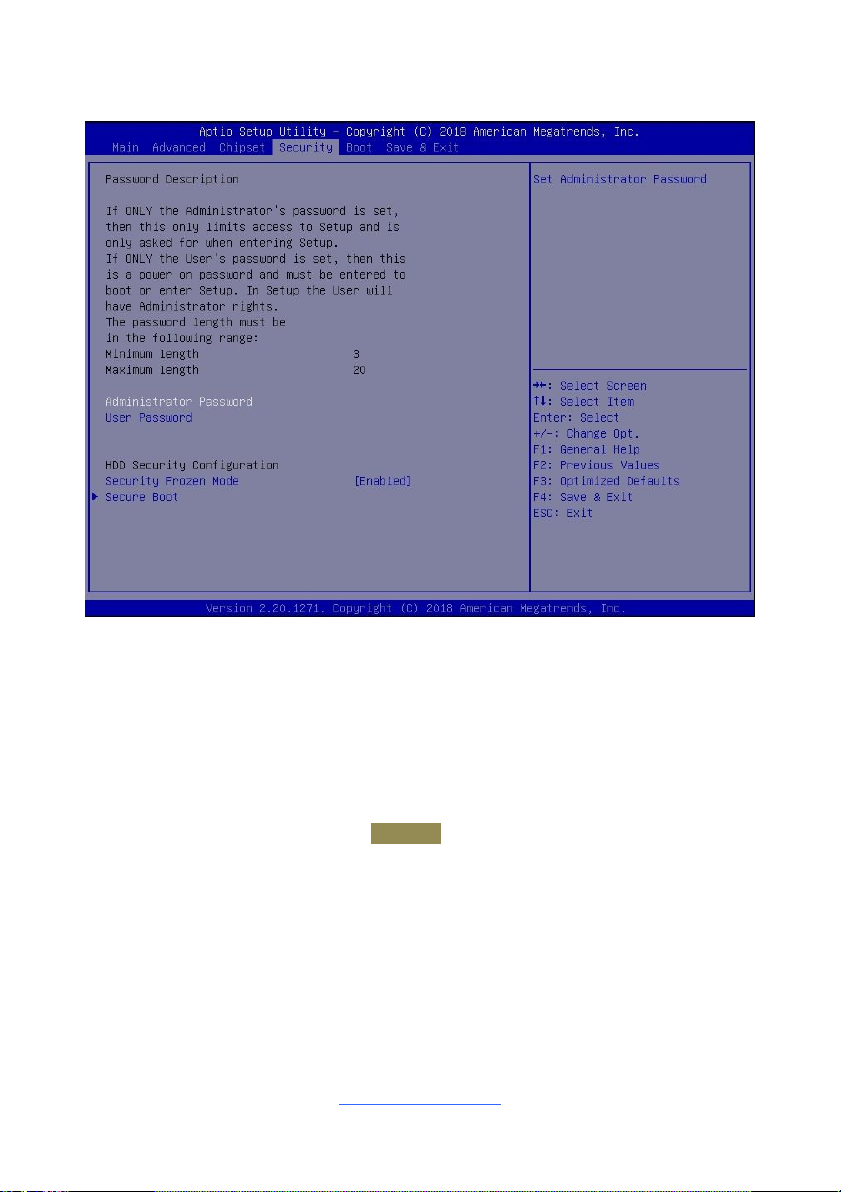
3.5 Security
Administrator Password
Set Administrator Password.
User Password
Set User Password.
Security Frozen Mode
Enable or disable HDD security freeze lock.
Disable to support secure erase function.
Disabled / Enabled
Secure Boot
Customizable Secure Boot settings
http://www.tyan.com
Page 75
75
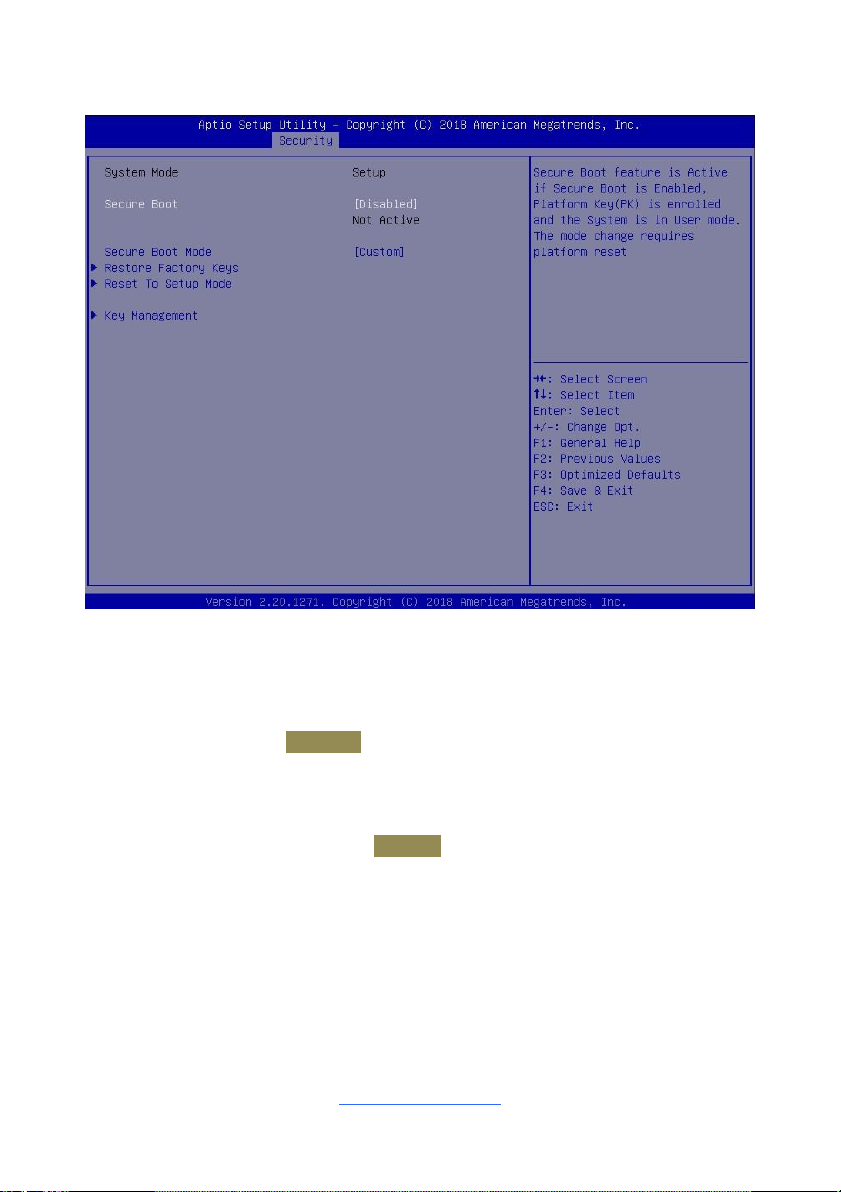
3.5.1 Secure Boot Configuration Submenu
Secure Boot
Secure Boot feature is Active if Secure Boot is Enabled, Platform Key
(PK) is enrolled and the System is in User mode. The mode change requires
platform reset
Disabled / Enabled
Secure Boot Mode
Secure Boot mode selector. ’Custom’ mode enables users to change Image
execution policy and manage secure boot keys.
Standard / Custom
http://www.tyan.com
Page 76
76
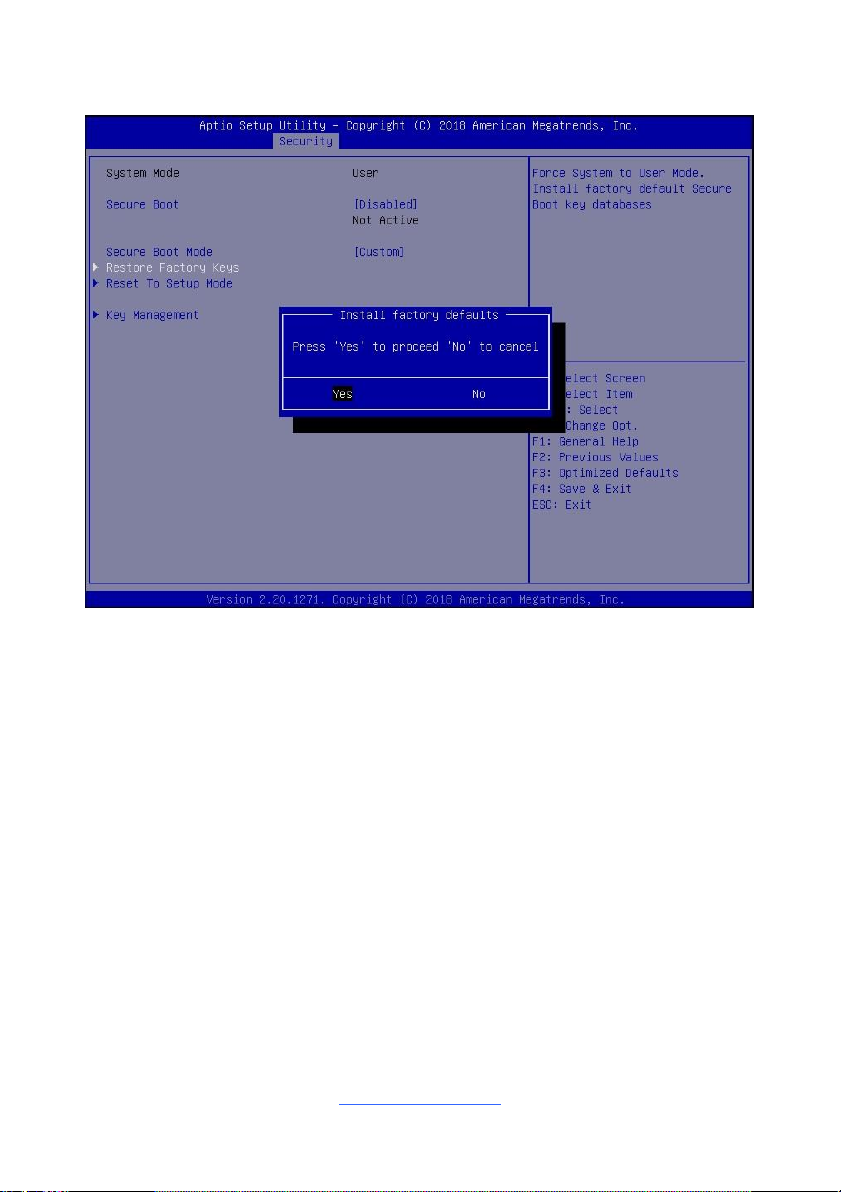
3.5.1.1 Restore Factory Keys Submenu
Restore Factory Keys
Force System to User Mode. Install factory default Secure Boot Key databases.
When Press ‘Yes’ to proceed
When Press ‘No’ to cancel
http://www.tyan.com
Page 77
77
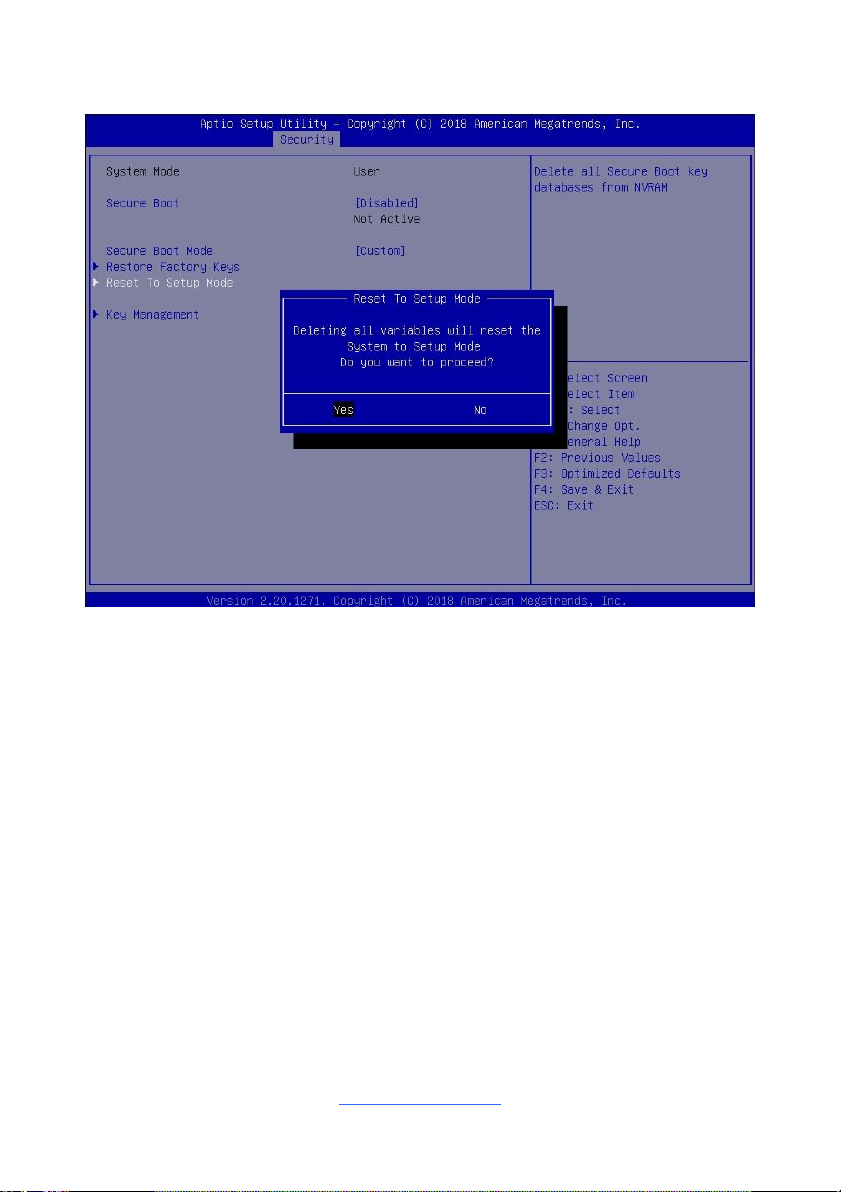
3.5.1.2 Reset To Setup Mode Submenu
Reset To Setup Mode
Delete all Secure Boot key databases from NVRAM
Deleting all variables will reset the System to setup Mode
When Press ‘Yes’ to proceed
When Press ‘No’ to cancel
Key Management
Enables experienced users to modify Secure Boot variables
http://www.tyan.com
Page 78
78
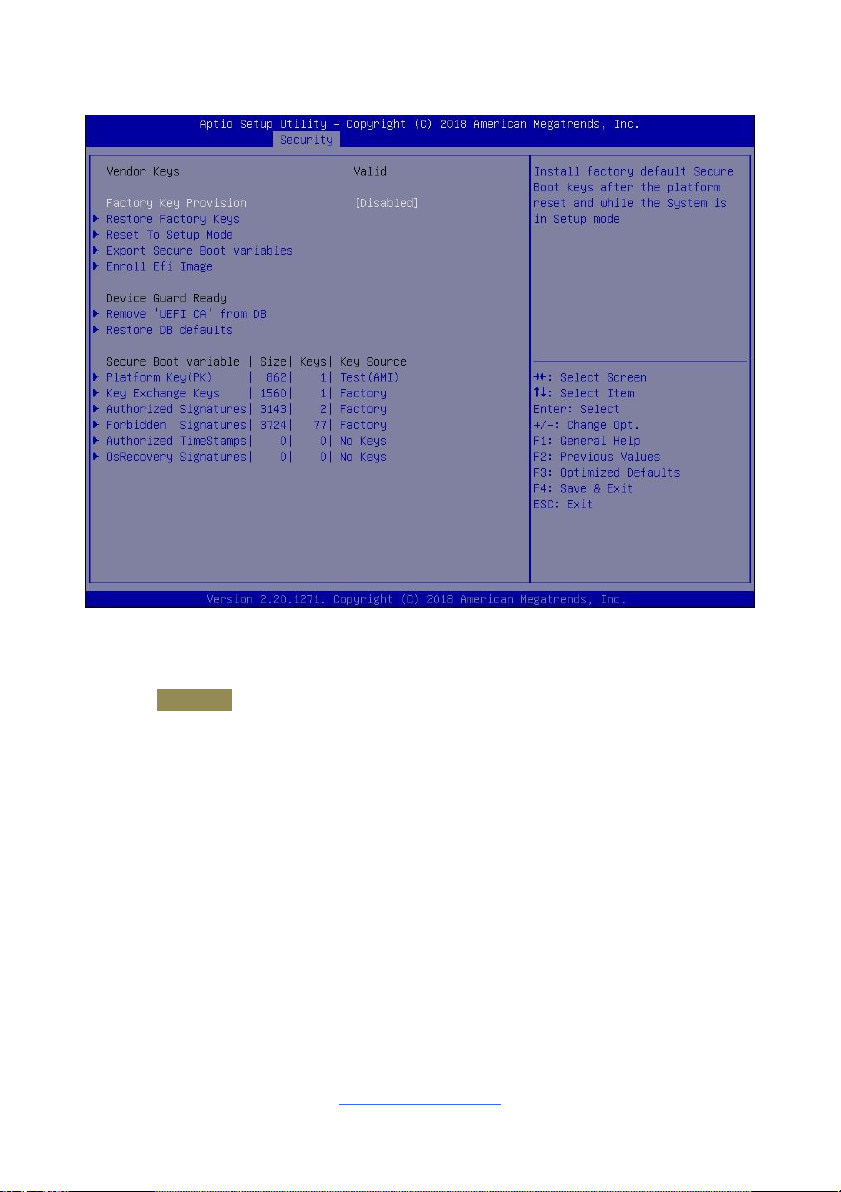
3.5.2 Key Management
Factory Keys Provision
Install factory default Secure Boot Keys after the platform reset and while the
System is in Setup Mode.
Disabled / Enabled
Restore Factory Keys
Force System to User Mode. Install Factory Default Secure Boot Key databases.
Reset To Setup Mode
Delete all Secure Boot Key databases from NVRAM
Export Secure Boot variables
Copy NVRAM content of Secure Boot variables to files in a root folder on a file
system device
Enroll Efi Image
Allow the image to run in Secure Boot mode. Enroll SHA256 Hash certificate of a
PE image into Authorized Signature Database(db)
http://www.tyan.com
Page 79

79
Remove ‘UEFI CA’ from DB
Device Guard ready system must not list ‘ Microsoft’ UEFI CA’ Certificate in
Authorized Signature database (db)
Restore DB defaults
Restore DB variable to Factory defaults
Platform Key (PK)
Enroll Factory Defaults or load certificates from a file:
1. Public Key Certificate in:
a) EFI_SIGNATURE_LIST
b) EFI_CERT_X509 (DER encoded)
c) EFI_CERT_RSA2048 (bin)
d) EFI_CERT_SHA256,384,512
2. Authenticated UEFI Variable
3. EFI PE/COFF Image(SHA256)
Key Source:
Default, External, Mixed, Test
Set New
Key Exchange Keys
Enroll Factory Defaults or load certificates from a file:
1. Public Key Certificate in:
a) EFI_SIGNATURE_LIST
b) EFI_CERT_X509 (DER encoded)
c) EFI_CERT_RSA2048 (bin)
d) EFI_CERT_SHA256,384,512
2. Authenticated UEFI Variable
3. EFI PE/COFF Image(SHA256)
Key Source:
Default, External, Mixed, Test
Authorized Signatures
Enroll Factory Defaults or load certificates from a file:
1. Public Key Certificate in:
a) EFI_SIGNATURE_LIST
b) EFI_CERT_X509 (DER encoded)
c) EFI_CERT_RSA2048 (bin)
d) EFI_CERT_SHA256,384,512
2. Authenticated UEFI Variable
3. EFI PE/COFF Image(SHA256)
Key Source:
Default, External, Mixed, Test
Forbidden Signatures
Enroll Factory Defaults or load certificates from a file:
1. Public Key Certificate in:
http://www.tyan.com
Page 80

80
a) EFI_SIGNATURE_LIST
b) EFI_CERT_X509 (DER encoded)
c) EFI_CERT_RSA2048 (bin)
d) EFI_CERT_SHA256,384,512
2. Authenticated UEFI Variable
3. EFI PE/COFF Image(SHA256)
Key Source:
Default, External, Mixed, Test
Authorized TimeStamps
Enroll Factory Defaults or load certificates from a file:
1. Public Key Certificate in:
a) EFI_SIGNATURE_LIST
b) EFI_CERT_X509 (DER encoded)
c) EFI_CERT_RSA2048 (bin)
d) EFI_CERT_SHA256,384,512
2. Authenticated UEFI Variable
3. EFI PE/COFF Image(SHA256)
Key Source:
Default, External, Mixed, Test
OsRecovery Signatures
Enroll Factory Defaults or load certificates from a file:
1. Public Key Certificate in:
a) EFI_SIGNATURE_LIST
b) EFI_CERT_X509 (DER encoded)
c) EFI_CERT_RSA2048 (bin)
d) EFI_CERT_SHA256,384,512
2. Authenticated UEFI Variable
3. EFI PE/COFF Image(SHA256)
Key Source:
Default, External, Mixed, Test
http://www.tyan.com
Page 81
81
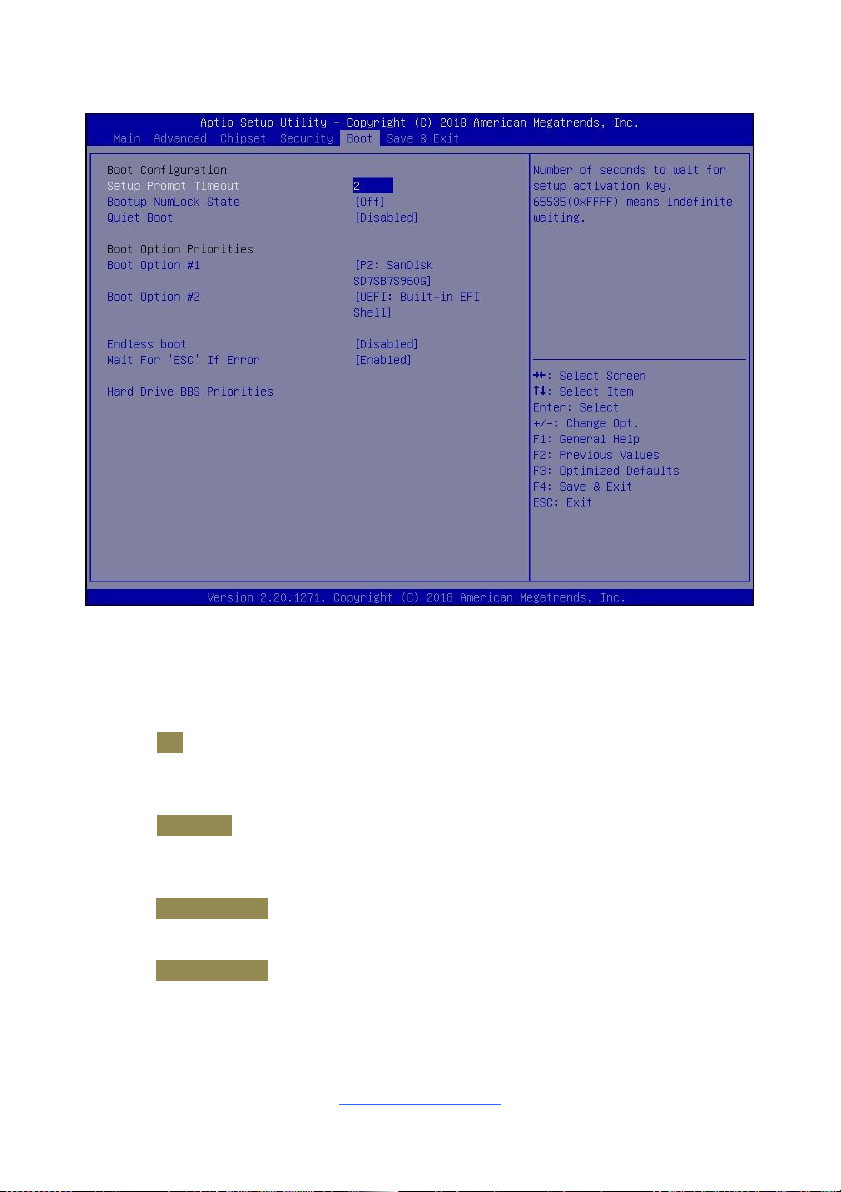
3.6 Boot
Setup Prompt Timeout
Number of seconds to wait for setup activation key.
65535 (0xFFFF) means indefinite waiting.
Bootup NumLock State
Select the keyboard NumLock state.
Off / On
Quiet Boot
Enable or disable Quiet Boot option.
Disabled / Enabled
Boot Option #1
Sets the system boot order
Device Name / Disabled
Boot Option #2
Device Name / Disabled
Endless boot
Restart the INT19 boot process automatically if all IPL devices fail to boot.
http://www.tyan.com
Page 82

82
Wait for “ESC” if Error
Wait for ESC stop when BIOS has error appeared.
Disabled / Enabled
Hard Drive BBS Priorities
Set the order of the Legacy devices in this group
http://www.tyan.com
Page 83
83
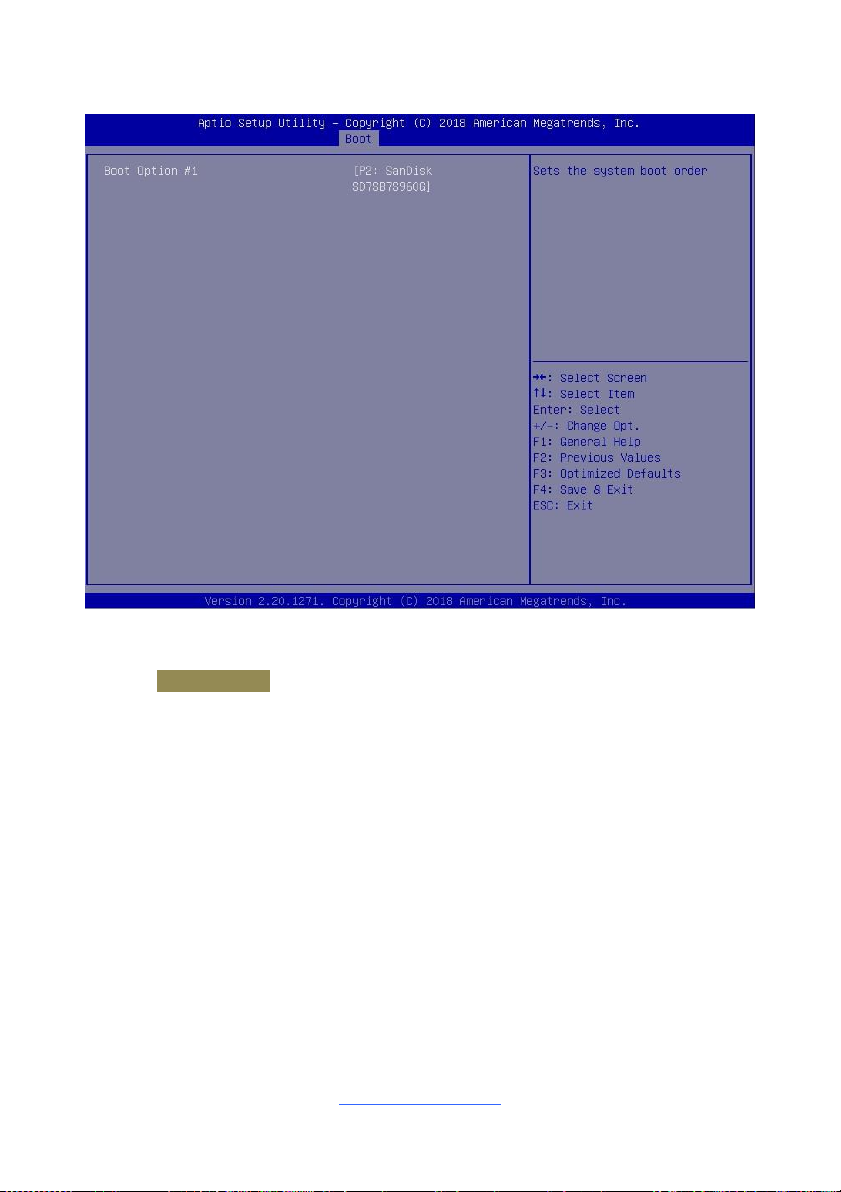
3.6.1 Hard Drive BBS Priorities Configuration
Boot Option #1
Sets the system boot order.
Device Name / Disabled
http://www.tyan.com
Page 84
84
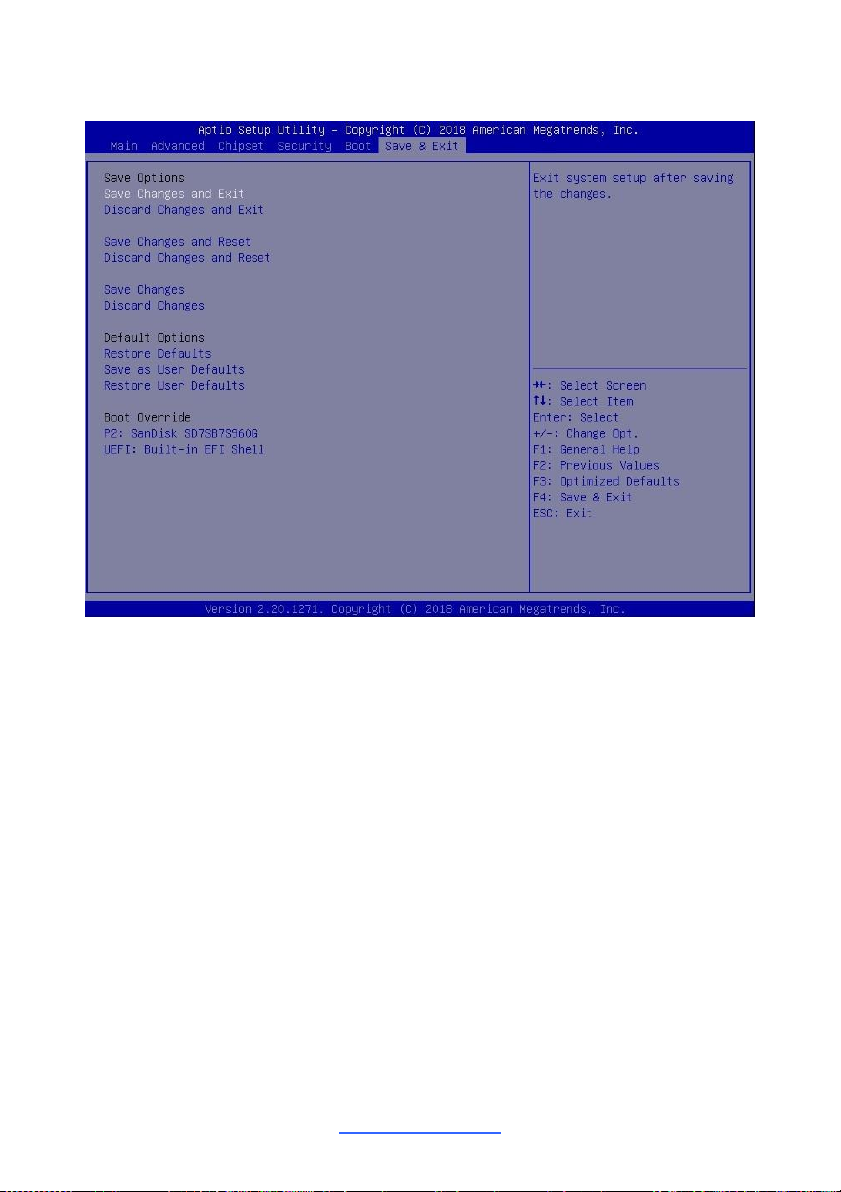
3.7 Save & Exit
Save Changes and Exit
Exit system setup after saving the changes.
Discard Changes and Exit
Exit system setup without saving any changes.
Save Changes and Reset
Reset the system after saving the changes.
Discard Changes and Reset
Reset system setup without saving any changes.
Save Changes
Save changes done so far to any of the setup options.
Discard Changes
Discard changes done so far to any of the setup options.
Restore Defaults
Restore/Load Default values for all the setup options.
http://www.tyan.com
Page 85

85
Save as User Defaults
Save the changes done so far as User Defaults.
Restore User Defaults
Restore the User Defaults to all the setup options.
Boot Override
Device Name
http://www.tyan.com
Page 86

86
Chapter 4: Diagnostics
NOTE: Please be aware that by flashing your BIOS, you agree that in the
event of a BIOS flash failure, you must contact your dealer for a replacement
BIOS. There are no exceptions. TYAN does not have a policy for replacing
BIOS chips directly with end users. In no event will TYAN be held responsible
for damages done by the end user.
NOTE: if you experience problems with setting up your system, always check the
following things in the following order:
Memory, Video, CPU
By checking these items, you will most likely find out what the problem might have
been when setting up your system. For more information on troubleshooting, check
the TYAN website at http://www.tyan.com.
4.1 Flash Utility
Every BIOS file is unique for the motherboard it was designed for. For Flash
Utilities, BIOS downloads, and information on how to properly use the Flash Utility
with your motherboard, please check the TYAN web site at http://www.tyan.com
http://www.tyan.com
Page 87
87
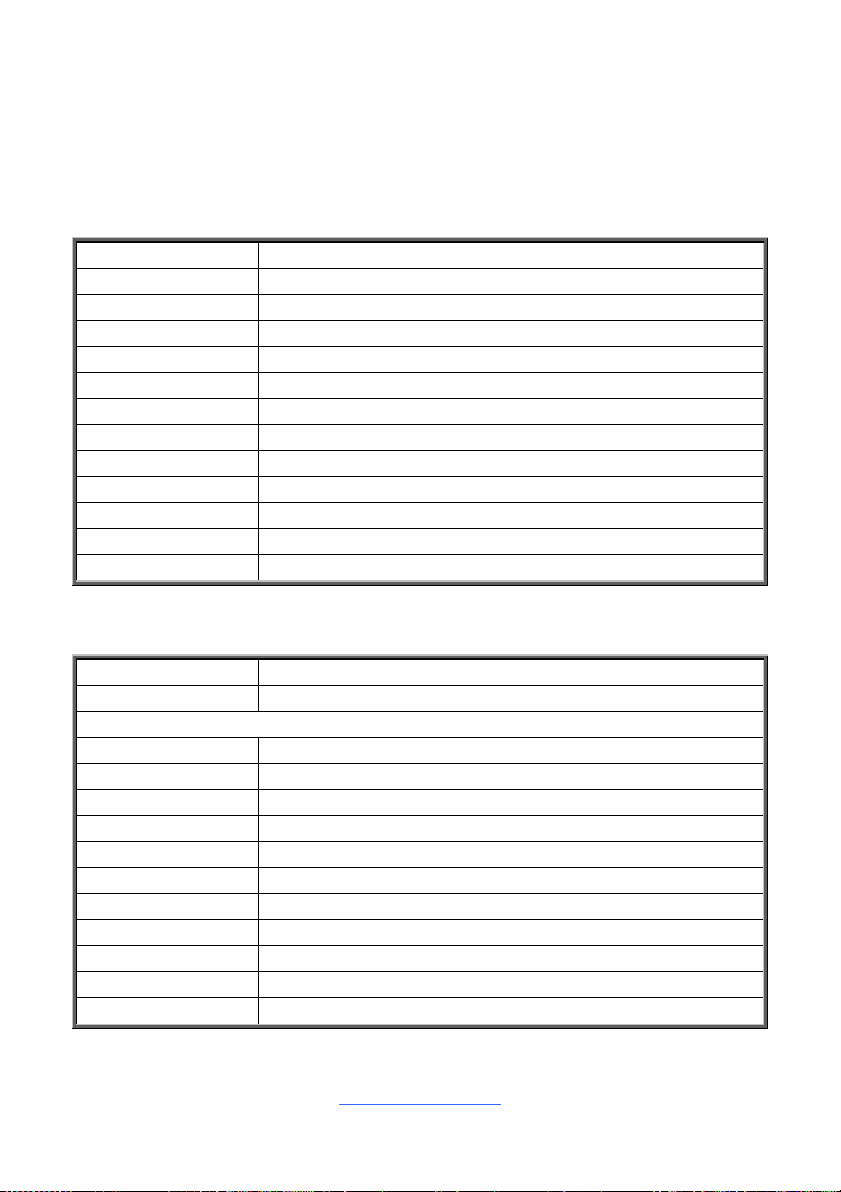
4.2 AMIBIOS Post Code (Aptio)
Status Code Range
Description
0x01 – 0x0B
SEC execution
0x0C – 0x0F
Sec errors
0x10 – 0x2F
PEI execution up to and including memory detection
0x30 – 0x4F
PEI execution after memory detection
0x50 – 0x5F
PEI errors
0x60 – 0x8F
DXE execution up to BDS
0x90 – 0xCF
BDS execution
0xD0 – 0xDF
DXE errors
0xE0 – 0xE8
S3 Resume (PEI)
0xE9 – 0xEF
S3 Resume errors (PEI)
0xF0 – 0xF8
Recovery (PEI)
0xF9 – 0xFF
Recovery errors (PEI)
Status Code
Description
0x00
Note used
Progress Codes
0x01
Power on. Reset type detection (soft/hard).
0x02
AP initialization before microcode loading
0x03
North Bridge initialization before microcode loading
0x04
South Bridge initialization before microcode loading
0x05
OEM initialization before microcode loading
0x06
Microcode loading
0x07
AP initialization after microcode loading
0x08
North Bridge initialization after microcode loading
0x09
South Bridge initialization after microcode loading
0x0A
OEM initialization after microcode loading
0x0B
Cache initialization
The POST code checkpoints are the largest set of checkpoints during the BIOS preboot process. The following table describes the type of checkpoints that may occur
during the POST portion of the BIOS:
Checkpoint Ranges
Standard Checkpoints
SEC Phase
http://www.tyan.com
Page 88

88
SEC Error Codes
0x0C – 0x0D
Reserved for future AMI SEC error codes
0x0E
Microcode not found
0x0F
Microcode not found
Status Code
Description
Progress Codes
0x10
PCI Core is started
0x11
Pre-memory CPU initialization is started
0x12
Pre-memory CPU initialization (CPU module specific)
0x13
Pre-memory CPU initialization (CPU module specific)
0x14
Pre-memory CPU initialization (CPU module specific)
0x15
Pre-memory North Bridge initialization is started
0x16
Pre-Memory North Bridge initialization (North Bridge module
specific)
0x17
Pre-memory North Bridge initialization (North Bridge module
specific)
0x18
Pre-Memory North Bridge initialization (North Bridge module
specific)
0x19
Pre-memory South Bridge initialization is started
0x1A
Pre-Memory South Bridge initialization (South Bridge module
specific)
0x1B
Pre-memory South Bridge initialization (South Bridge module
specific)
0x1C
Pre-Memory South Bridge initialization (South Bridge module
specific)
0x1D – 0x2A
OEM pre-memory initialization codes
0x2B
Memory initialization. Serial Presence Detect (SPD) data reading
0x2C
Memory initialization. Memory presence detection
0x2D
Memory initialization. Programming memory timing information
0x2E
Memory initialization. Configuring memory
0x2F
Memory initialization (other)
0x30
Reserved for ASL (see ASL Status Codes section below)
0x31
Memory Installed
0x32
CPU post-memory initialization is started.
0x33
CPU post-memory initialization. Cache initialization
0x34
CPU post-memory initialization. Application Processor(s) (AP)
initialization
SEC Phase
None
PEI Phase
http://www.tyan.com
Page 89

89
Status Code
Description
0x35
CPU post-memory initialization. Boot Strap Processor (BSP)
selection
0x36
CPU post-memory initialization. System Management Mode (SMM)
initialization
0x37
Post-Memory North Bridge initialization is started.
0x38
Post-Memory North Bridge initialization (North Bridge module
specific)
0x39
Post-Memory North Bridge initialization (North Bridge module
specific)
0x3A
Post-Memory North Bridge initialization (North Bridge module
specific)
0x3B
Post-Memory South Bridge initialization is started
0x3C
Post-Memory South Bridge initialization (South Bridge module
specific)
0x3D
Post-Memory South Bridge initialization (South Bridge module
specific)
0x3E
Post-Memory South Bridge initialization (South Bridge module
specific)
0x3F – 0x4E
OEM post memory initialization codes
0x4F
DXE PIL is started
PCI Error Codes
0x50
Memory initialization error. Invalid memory type or incompatible
memory speed
0x51
Memory initialization error. SPD reading has failed.
0x52
Memory initialization error. Invalid memory size or memory modules
do not match.
0x53
Memory initialization error. No usable memory detected
0x54
Unspecified memory initialization error
0x55
Memory not installed
0x56
Invalid CPU type or speed
0x57
CPU mismatch
0x58
CPU self test failed or possible CPU cache error
0x59
CPU microcode is not found or microcode update is failed.
0x5A
Internal CPU error
0x5B
Reset PPI is not available.
0x5C – 0x5F
Reserved for future AMI error codes
S3 Resume Progress Codes
0xE0
S3 Resume is started (S3 Resume PPI is called by the DXE IPL).
0xE1
S3 Boot Script execution
0xE2
Video repost
0xE3
OS S3 wake vector call
0xE4 – 0xE7
Reserved for future AMI progress codes
http://www.tyan.com
Page 90
90
Status Code
Description
S3 Resume Error Codes
0xE8
S3 Resume failed
0xE9
S3 Resume PPI not found
0xEA
S3 Resume Boot Script error
0xEB
S3 OS wake error
0xEC – 0xEF
Reserved for future AMI error codes
Recovery Progress Codes
0xF0
Recovery condition triggered by firmware (Auto recovery)
0xF1
Recovery condition triggered by user (forced recovery)
0xF2
Recovery process started
0xF3
Recovery firmware image is found.
0xF4
Recovery firmware image is loaded.
0xF5 – 0xF7
Reserved for future AMI progress codes
Recovery Error Codes
0xF8
Recovery PPI is not available.
0xF9
Recovery capsule is not found.
0xFA
Invalid recovery capsule
0xFB – 0xFF
Reserved for future AMI error codes
# of Beeps
Description
Progress Codes
1
Memory not installed
1
Memory was installed twice (installPEIMemory routine in PEI Core
called twice).
2
Recovery started
3
DXEIPL was not found.
3
DXE Core Firmware Volume was not found.
4
Recovery failed
4
S3 Resume failed
7
Reset PPI is not available.
Status Code
Description
0x60
DXE Core is started.
0x61
NVRAM initialization
0x62
Installation of the South Bridge Runtime Services
PEI Beep Codes
DXE Phase
http://www.tyan.com
Page 91

91
Status Code
Description
0x63
CPU DXE initialization is started.
0x64
CPU DXE initialization (CPU module specific)
0x65
CPU DXE initialization (CPU module specific)
0x66
CPU DXE initialization (CPU module specific)
0x67
CPU DXE initialization (CPU module specific)
0x68
PCI host bridge initialization
0x69
North Bridge DXE initialization is started.
0x6A
North Bridge DXE SMM initialization is started.
0x6B
North Bridge DXE initialization (North Bridge module specific)
0x6C
North Bridge DXE initialization (North Bridge module specific)
0x6D
North Bridge DXE initialization (North Bridge module specific)
0x6E
North Bridge DXE initialization (North Bridge module specific)
0x6F
North Bridge DXE initialization (North Bridge module specific)
0x70
South Bridge DXE initialization is started.
0x71
South Bridge DXE SMM initialization is started.
0x72
South Bridge devices initialization
0x73
South Bridge DXE initialization (South Bridge module specific)
0x74
South Bridge DXE initialization (South Bridge module specific)
0x75
South Bridge DXE initialization (South Bridge module specific)
0x76
South Bridge DXE initialization (South Bridge module specific)
0x77
South Bridge DXE initialization (South Bridge module specific)
0x78
ACPI module initialization
0x79
CSM initialization
0x7A – 0x7F
Reserved for future AMI DXE codes
0x80 – 0x8F
OEM DXE initialization codes
0x90
Boot Device Selection (BDS) phase is started
0x91
Driver connecting is started
0x92
PCI Bus initialization is started
0x93
PCI Bus Hot Plug Controller initialization
0x94
PCI Bus Enumeration
0x95
PCI BUS Request Resources
0x96
PCI Bus Assign Resources
0x97
Console output devices connect
0x98
Console Input devices connect
0x99
Super IO initialization
0x9A
USB initialization is started.
http://www.tyan.com
Page 92

92
Status Code
Description
0x9B
USB Reset
0x9C
USB Detect
0x9D
USB Enable
0x9E -0x9F
Reserved for future AMI codes
0xA0
IDE initialization is started
0xA1
IDE Reset
0xA2
IDE Detect
0xA3
IDE Enable
0xA4
SCSI initialization is started.
0xA5
SCSI Reset
0xA6
SCSI Detect
0xA7
SCSI Enable
0xA8
Setup Verifying Password
0xA9
Start of Setup
0xAA
Reserved for ASL (see ASL Status Codes section below)
0xAB
Setup Input Wait
0xAC
Reserved for ASL (see ASL Status Codes section below)
0xAD
Ready To Boot event
0xAE
Legacy Boot event
0xAF
Exit Boot Services event
0xB0
Runtime Set Virtual Address MAP Begin
0xB1
Runtime Set Virtual Address MAP End
0xB2
Legacy Option ROM initialization
0xB3
System Reset
0xB4
USB hot plug
0xB5
PCI bus hot plug
0xB6
Clean-up of NVRAM
0xB7
Configuration Reset (reset of NVRAM settings)
0xB8 – 0xBF
Reserved for future AMI codes
0xC0 – 0xCF
OEM BDS initialization codes
DXE Error Codes
0xD0
CPU initialization error
0xD1
North Bridge initialization error
0xD2
South Bridge initialization error
0xD3
Some of the Architectural Protocols are not available
0xD4
PCI resource allocation error. Out of Resources
http://www.tyan.com
Page 93

93
Status Code
Description
0xD5
No Space for Legacy Option ROM
0xD6
No Console Output Devices are found.
0xD7
No Console Input Devices are found.
0xD8
Invalid password
0xD9
Error loading Boot Option (LoadImage returned error)
0xDA
Boot Option is failed (StartImage returned error).
0xDB
Flash update is failed.
0xDC
Reset protocol is not available.
# of Beeps
Description
1
Invalid password
4
Some of the Architectural Protocols are not available.
5
No Console Output Devices are found.
5
No Console Input Devices are found.
6
Flash update is failed.
7
Reset protocol is not available.
8
Platform PCI resource requirements cannot be met.
Status Code
Description
0x01
System is entering S1 sleep state.
0x02
System is entering S2 sleep state.
0x03
System is entering S3 sleep state.
0x04
System is entering S4 sleep state.
0x05
System is entering S5 sleep state.
0x10
System is waking up from the S1 sleep state.
0x20
System is waking up from the S2 sleep state.
0x30
System is waking up from the S3 sleep state.
0x40
System is waking up from the S4 sleep state.
0xAC
System has transitioned into ACPI mode. Interrupt controller is in
APIC mode.
0xAA
System has transitioned into ACPI mode. Interrupt controller is in
APIC mode.
DXE Beep Codes
ACPI/ASL Checkpoints
http://www.tyan.com
Page 94
94
Appendix I: Fan and Temp Sensors
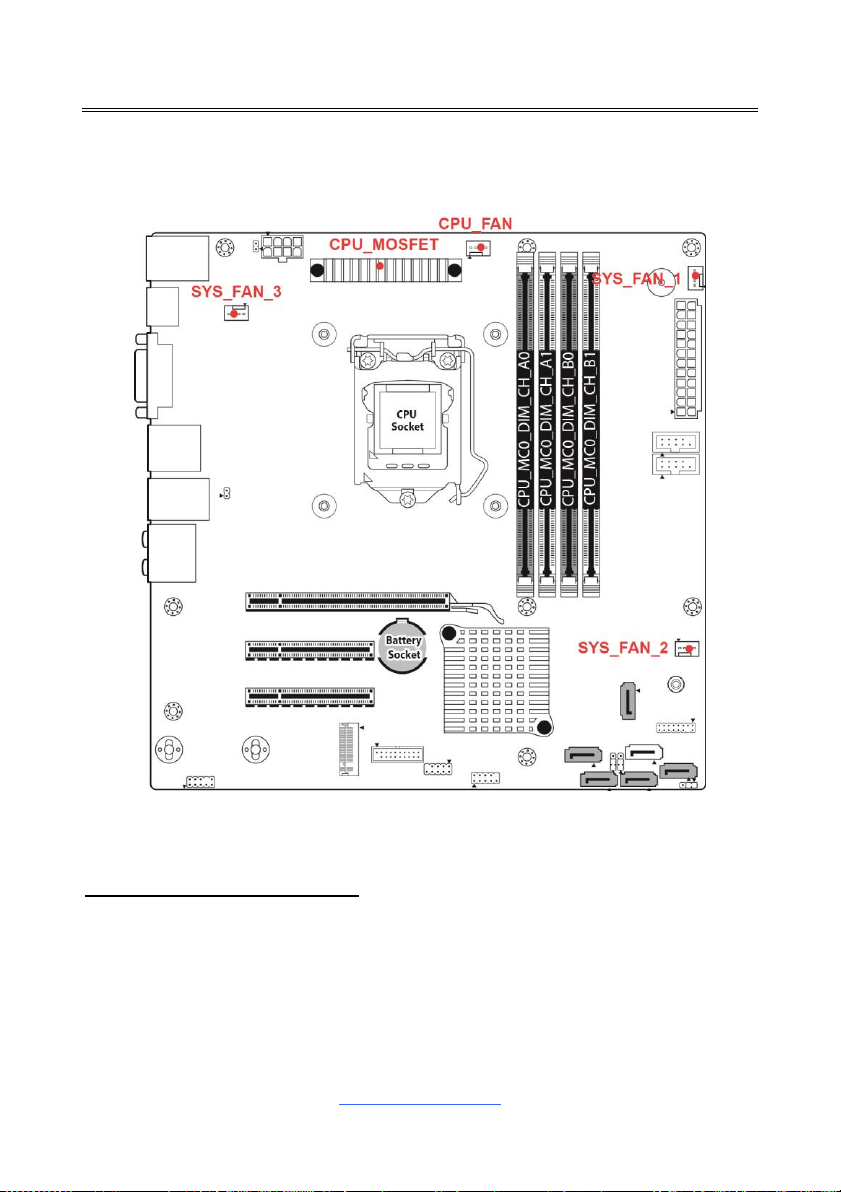
This section aims to help readers identify the locations of some specific FAN and
Temp Sensors on the motherboard. A table of BIOS Temp sensor name
explanation is also included for readers’ reference.
NOTE: The red dot indicates the sensor.
Fan and Temp Sensor Location:
1. Fan Sensor: It is located in the third pin of the fan connector, which detects
the fan speed (rpm)
2. Temp Sensor: CPU_MOSFET. They detect the system temperature around.
NOTE: The system temperature is measured in a scale defined by Intel, not
in Fahrenheit or Celsius.
http://www.tyan.com
Page 95
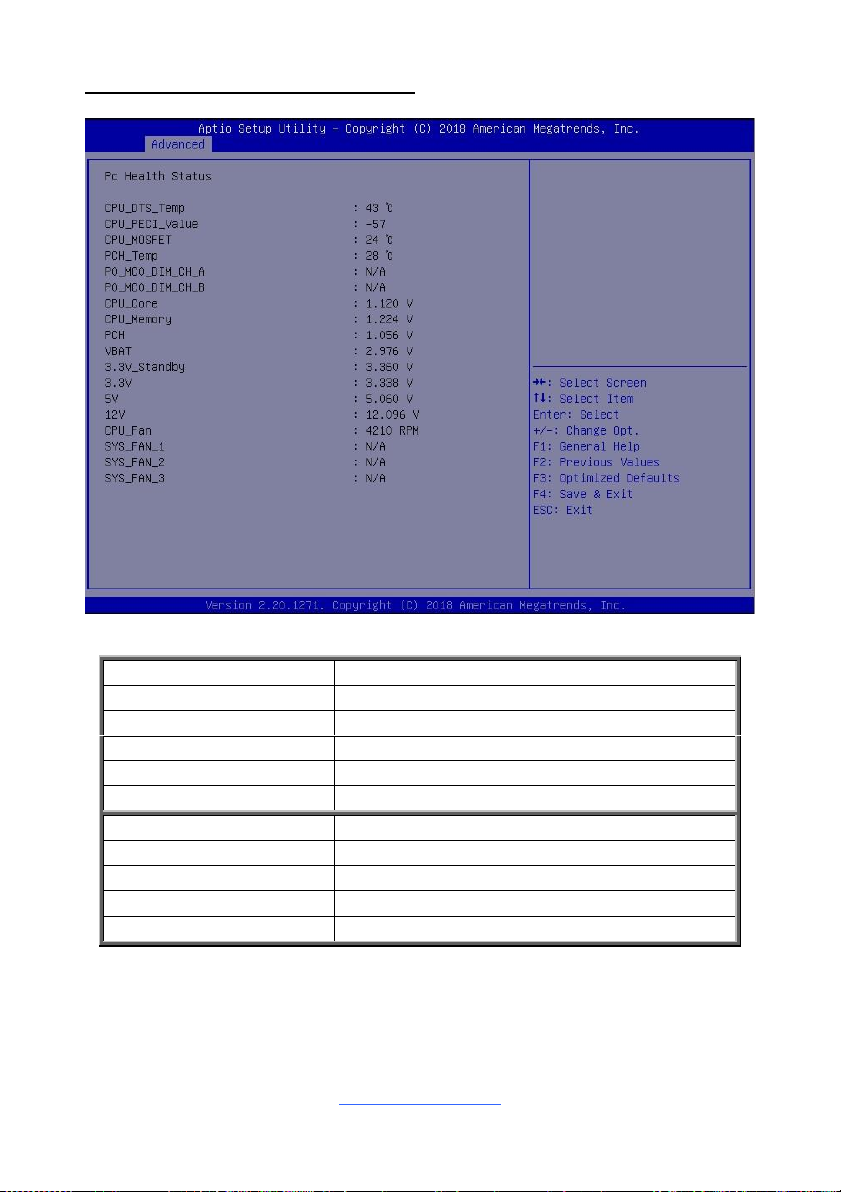
95
BIOS Temp Sensor Name Explanation:
CPU_DTS_Temp
Temperature of the CPU_DTS
CPU_PECI_Value
Temperature of the CPU_PECI_Value
CPU_MOSFET
Temperature of the CPU MOSFET
PCH_Temp
Temperature of the PCH
P0_MC0_DIM_CH_A
The highest temperature of CPU DIMM channel A slot
P0_MC0_DIM_CH_B
The highest temperature of CPU DIMM channel B slot
BIOS FAN Sensor
Name Explanation
CPU_FAN
Fan speed of CPU_FAN
SYS_FAN_1
Fan speed of SYS_FAN_1
SYS_FAN_2
Fan speed of SYS_FAN_2
SYS_FAN_3
Fan speed of SYS_FAN_3
http://www.tyan.com
Page 96

96
NOTE
http://www.tyan.com
Page 97

97
Glossary
ACPI (Advanced Configuration and Power Interface): a power management
specification that allows the operating system to control the amount of power
distributed to the computer’s devices. Devices not in use can be turned off, reducing
unnecessary power expenditure.
AGP (Accelerated Graphics Port): a PCI-based interface which was designed
specifically for demands of 3D graphics applications. The 32-bit AGP channel
directly links the graphics controller to the main memory. While the channel runs
only at 66 MHz, it supports data transmission during both the rising and falling ends
of the clock cycle, yielding an effective speed of 133 MHz.
ATAPI (AT Attachment Packet Interface): also known as IDE or ATA; a drive
implementation that includes the disk controller on the device itself. It allows CDROMs and tape drives to be configured as master or slave devices, just like HDDs.
ATX: the form factor designed to replace the AT form factor. It improves on the AT
design by rotating the board 90 degrees, so that the IDE connectors are closer to
the drive bays, and the CPU is closer to the power supply and cooling fan. The
keyboard, mouse, USB, serial, and parallel ports are built-in.
Bandwidth: refers to carrying capacity. The greater the bandwidth, the more data
the bus, phone line, or other electrical path can carry. Greater bandwidth results in
greater speed.
BBS (BIOS Boot Specification): a feature within the BIOS that creates, prioritizes,
and maintains a list of all Initial Program Load (IPL) devices, and then stores that
list in NVRAM. IPL devices have the ability to load and execute an OS, as well as
provide the ability to return to the BIOS if the OS load process fails. At that point,
the next IPL device is called upon to attempt loading of the OS.
BIOS (Basic Input/Output System): the program that resides in the ROM chip,
which provides the basic instructions for controlling your computer’s hardware. Both
the operating system and application software use BIOS routines to ensure
compatibility.
Buffer: a portion of RAM which is used to temporarily store data; usually from an
application though it is also used when printing and in most keyboard drivers. The
CPU can manipulate data in a buffer before copying it to a disk drive. While this
improves system performance (reading to or writing from a disk drive a single time
is much faster than doing so repeatedly) there is the possibility of losing your data
should the system crash. Information in a buffer is temporarily stored, not
permanently saved.
http://www.tyan.com
Page 98

98
Bus: a data pathway. The term is used especially to refer to the connection
between the processor and system memory, and between the processor and PCI or
ISA local buses.
Bus mastering: allows peripheral devices and IDEs to access the system memory
without going through the CPU (similar to DMA channels).
Cache: a temporary storage area for data that will be needed often by an
application. Using a cache lowers data access times since the information is stored
in SRAM instead of slower DRAM. Note that the cache is also much smaller than
your regular memory: a typical cache size is 512KB, while you may have as much
as 4GB of regular memory.
Closed and open jumpers: jumpers and jumper pins are active when they are “on”
or “closed”, and inactive when they are “off” or “open”.
CMOS (Complementary Metal-Oxide Semiconductors): chips that hold the basic
startup information for the BIOS.
COM port: another name for the serial port, which is called as such because it
transmits the eight bits of a byte of data along one wire, and receives data on
another single wire (that is, the data is transmitted in serial form, one bit after
another). Parallel ports transmit the bits of a byte on eight different wires at the
same time (that is, in parallel form, eight bits at the same time).
DDR (Double Data Rate): a technology designed to double the clock speed of the
memory. It activates output on both the rising and falling edge of the system clock
rather than on just the rising edge, potentially doubling output.
DIMM (Dual In-line Memory Module): faster and more capacious form of RAM
than SIMMs, and do not need to be installed in pairs.
DIMM bank: sometimes called DIMM socket because the physical slot and the
logical unit are the same. That is, one DIMM module fits into one DIMM socket,
which is capable of acting as a memory bank.
DMA (Direct Memory Access): channels that are similar to IRQs. DMA channels
allow hardware devices (like soundcards or keyboards) to access the main memory
without involving the CPU. This frees up CPU resources for other tasks. As with
IRQs, it is vital that you do not double up devices on a single line. Plug-n-Play
devices will take care of this for you.
http://www.tyan.com
Page 99

99
DRAM (Dynamic RAM): widely available, very affordable form of RAM which
looses data if it is not recharged regularly (every few milliseconds). This refresh
requirement makes DRAM three to ten times slower than non-recharged RAM such
as SRAM.
ECC (Error Correction Code or Error Checking and Correcting): allows data to
be checked for errors during run-time. Errors can subsequently be corrected at the
same time that they’re found.
EEPROM (Electrically Erasable Programmable ROM): also called Flash BIOS, it
is a ROM chip which can, unlike normal ROM, be updated. This allows you to keep
up with changes in the BIOS programs without having to buy a new chip. TYAN
®
’s
BIOS updates can be found at http://www.tyan.com
ESCD (Extended System Configuration Data): a format for storing information
about Plug-n-Play devices in the system BIOS. This information helps properly
configure the system each time it boots.
Firmware: low-level software that controls the system hardware.
Form factor: an industry term for the size, shape, power supply type, and external
connector type of the Personal Computer Board (PCB) or motherboard. The
standard form factors are the AT and ATX.
Global timer: onboard hardware timer, such as the Real-Time Clock (RTC).
HDD: stands for Hard Disk Drive, a type of fixed drive.
H-SYNC: controls the horizontal synchronization/properties of the monitor.
HyperTransportTM: a high speed, low latency, scalable point-to-point link for
interconnecting ICs on boards. It can be significantly faster than a PCI bus for an
equivalent number of pins. It provides the bandwidth and flexibility critical for today's
networking and computing platforms while retaining the fundamental programming
model of PCI.
IC (Integrated Circuit): the formal name for the computer chip.
IDE (Integrated Device/Drive Electronics): a simple, self-contained HDD interface.
It can handle drives up to 8.4 GB in size. Almost all IDEs sold now are in fact
Enhanced IDEs (EIDEs), with maximum capacity determined by the hardware
controller.
IDE INT (IDE Interrupt): Hardware interrupt signal that goes to the IDE.
http://www.tyan.com
Page 100

100
I/O (Input/Output): the connection between your computer and another piece of
hardware (mouse, keyboard, etc.)
IRQ (Interrupt Request): an electronic request that runs from a hardware device to
the CPU. The interrupt controller assigns priorities to incoming requests and
delivers them to the CPU. It is important that there is only one device hooked up to
each IRQ line; doubling up devices on IRQ lines can lock up your system. Plug-nPlay operating systems can take care of these details for you.
Latency: the amount of time that one part of a system spends waiting for another
part to catch up. This occurs most commonly when the system sends data out to a
peripheral device and has to wait for the peripheral to spread (peripherals tend to
be slower than onboard system components).
NVRAM: ROM and EEPROM are both examples of Non-Volatile RAM, memory that
holds its data without power. DRAM, in contrast, is volatile.
Parallel port: transmits the bits of a byte on eight different wires at the same time.
PCI (Peripheral Component Interconnect): a 32 or 64-bit local bus (data pathway)
which is faster than the ISA bus. Local buses are those which operate within a
single system (as opposed to a network bus, which connects multiple systems).
PCI PIO (PCI Programmable Input/Output) modes: the data transfer modes used
by IDE drives. These modes use the CPU for data transfer (in contrast, DMA
channels do not). PCI refers to the type of bus used by these modes to
communicate with the CPU.
PCI-to-PCI Bridge: allows you to connect multiple PCI devices onto one PCI slot.
Pipeline burst SRAM: a fast secondary cache. It is used as a secondary cache
because SRAM is slower than SDRAM, but usually larger. Data is cached first to
the faster primary cache, and then, when the primary cache is full, to the slower
secondary cache.
PnP (Plug-n-Play): a design standard that has become ascendant in the industry.
Plug-n-Play devices require little set-up to use. Devices and operating systems that
are not Plug-n-Play require you to reconfigure your system each time you add or
change any part of your hardware.
PXE (Preboot Execution Environment): one of four components that together
make up the Wired for Management 2.0 baseline specification. PXE was
designed to define a standard set of preboot protocol services within a client with
the goal of allowing networked-based booting to boot using industry standard
protocols.
http://www.tyan.com
 Loading...