

Page 1
1
1
Getting Started
This chapter introduces you to the external components of your Pocket PC and
guides you through the process of setting up your Pocket PC for use.
1.1 Hardware Features
The illustrations below introduce you to the various buttons, connectors, ports
and features of your Pocket PC.
Front Components
Page 2
2
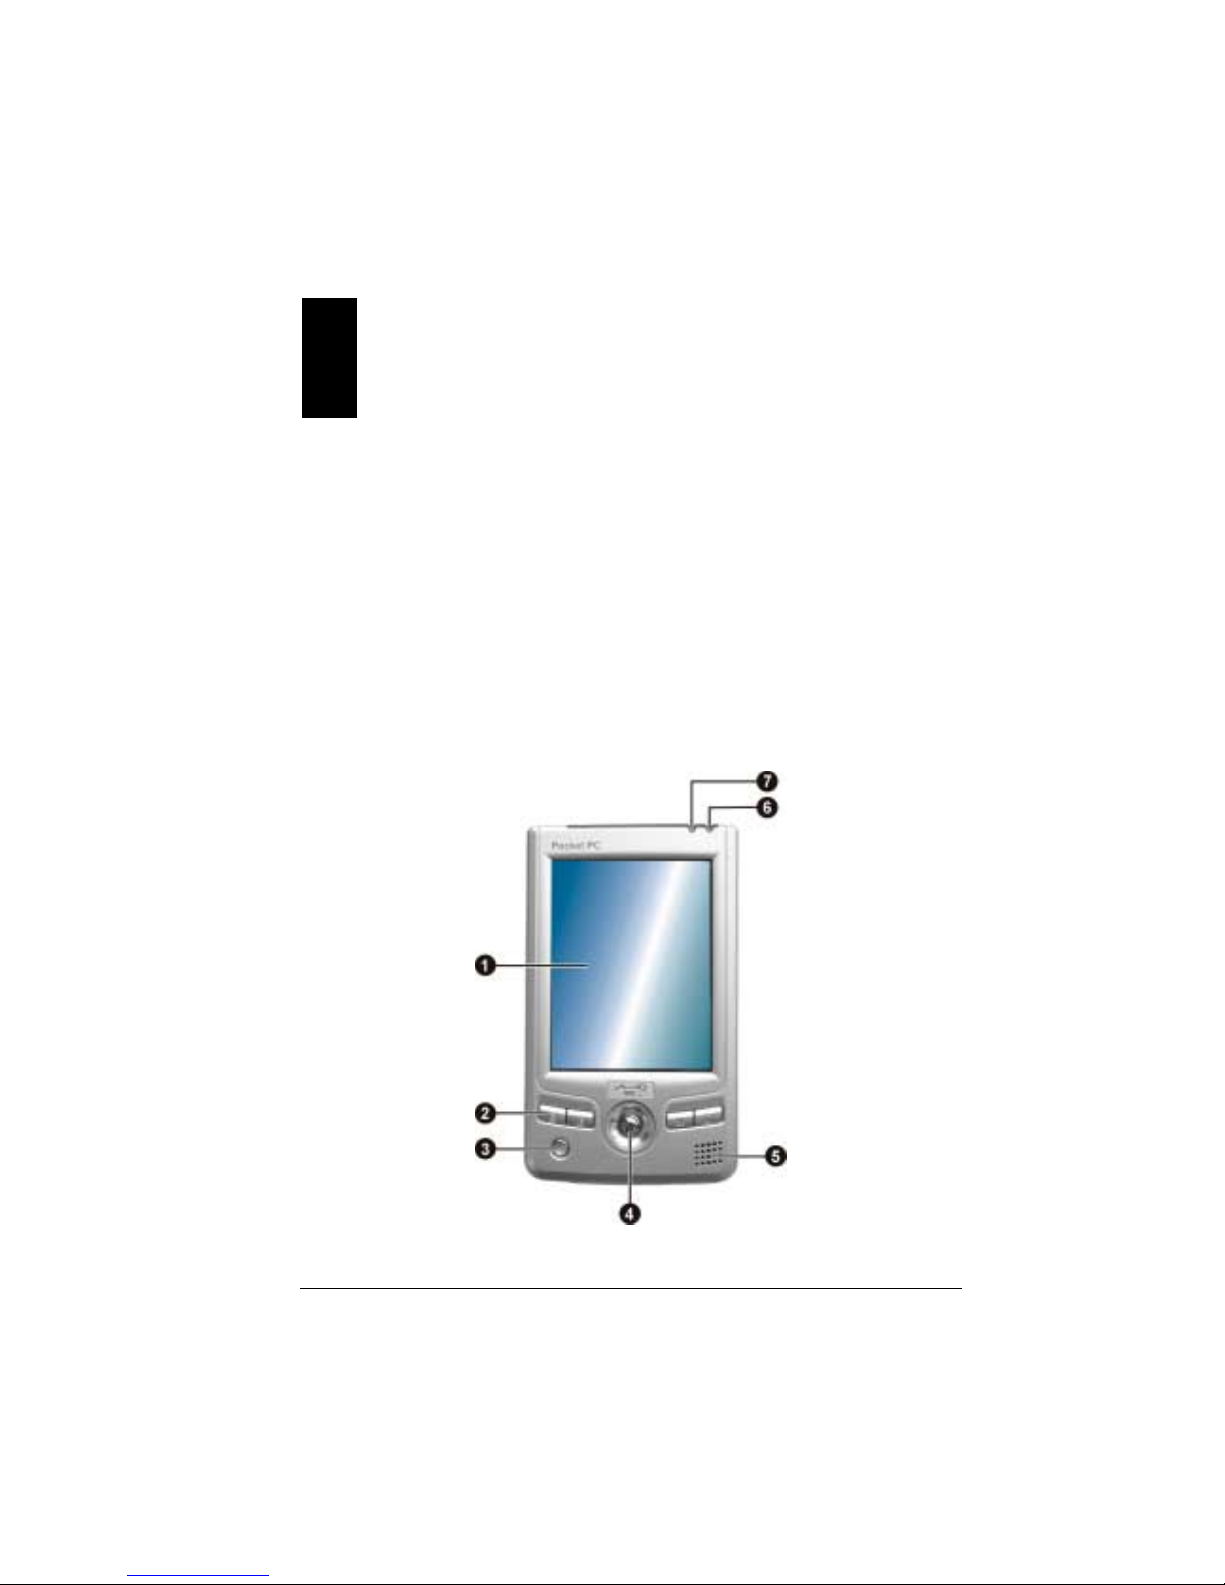
Ref Component Description
!
Touch Screen
Displays the output of your Pocket PC. Tap the screen with
the stylus to select menu commands or enter information.
"
Program Buttons
Each of the four buttons p rovides a quick way to run a
specific program. By default, they are
Notes,
Contacts, Calendar and Tasks buttons. The bu tt ons
are customizable.
#
Power Button
Turns your Pocket PC on or off by pressing briefly.
Moves up, down, left or rig ht by pushing th e button t oward
the corresponding direction.
$
Navigation
Button
Selects by pressing.
%
Speaker
Sends out music or audible reminders and alerts.
&
Notification
Indicator
Flashes in red to inform you of scheduled appointments,
alarms and reminders.
'
Charge Indicator
Glows in amber to indicate that battery charging is in
progress and in green when the battery is fully charged.
Back Components
Page 3

3
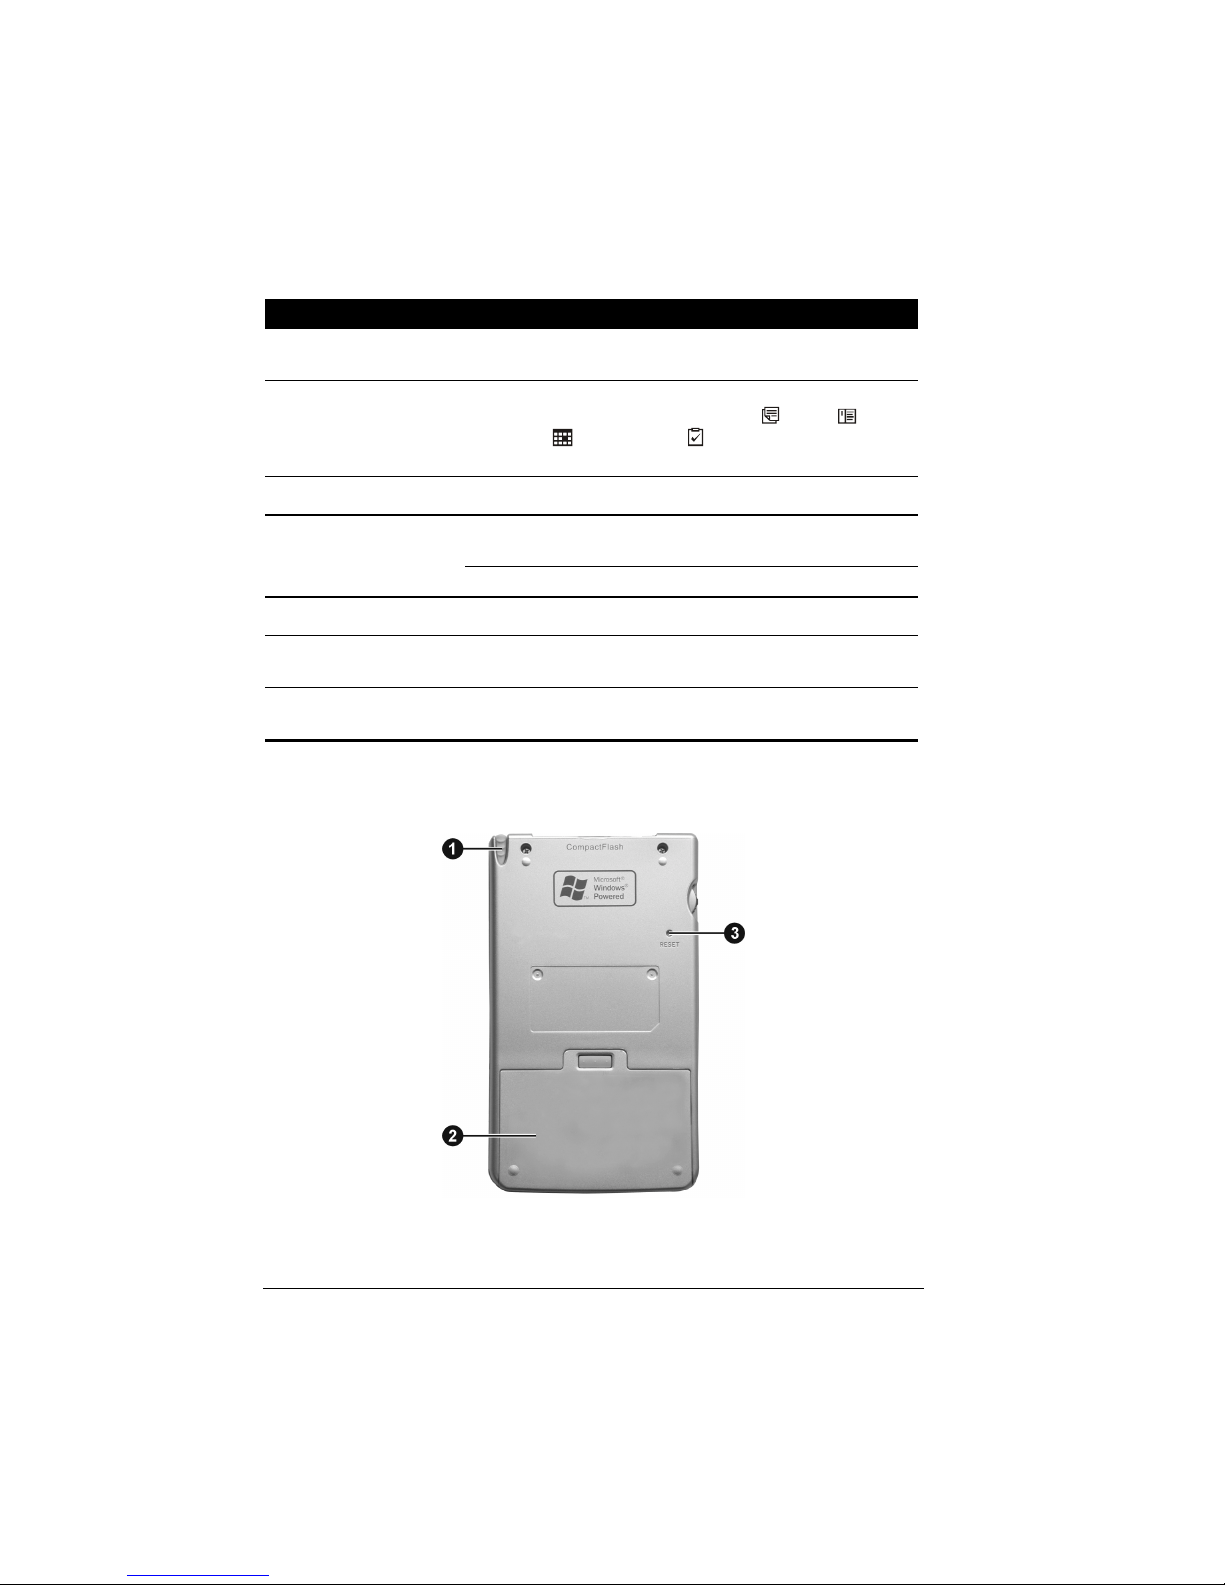
Ref Component Description
!
Stylus
Tap on the touch screen to make selections and enter
information. Pull the stylus out of its slot to use and store it
in the slot when not in use.
"
Battery
Supplies power to your Pocket PC when external power is
not available.
#
Reset Button
Restarts your Pocket PC.
Left-Side Components
Ref Component Description
!
Scroll Button
Scrolls up and down.
"
Record Button
Records voice notes by pressing and holding.
#
SD/MMC Slot
Accepts an optional SD (Secure Digital) or MMC
(MultiMediaCard) card for removable storage.
$
Power Connector
Connects to the AC adapter if you are not using the cradle.
Page 4
4
Top Components
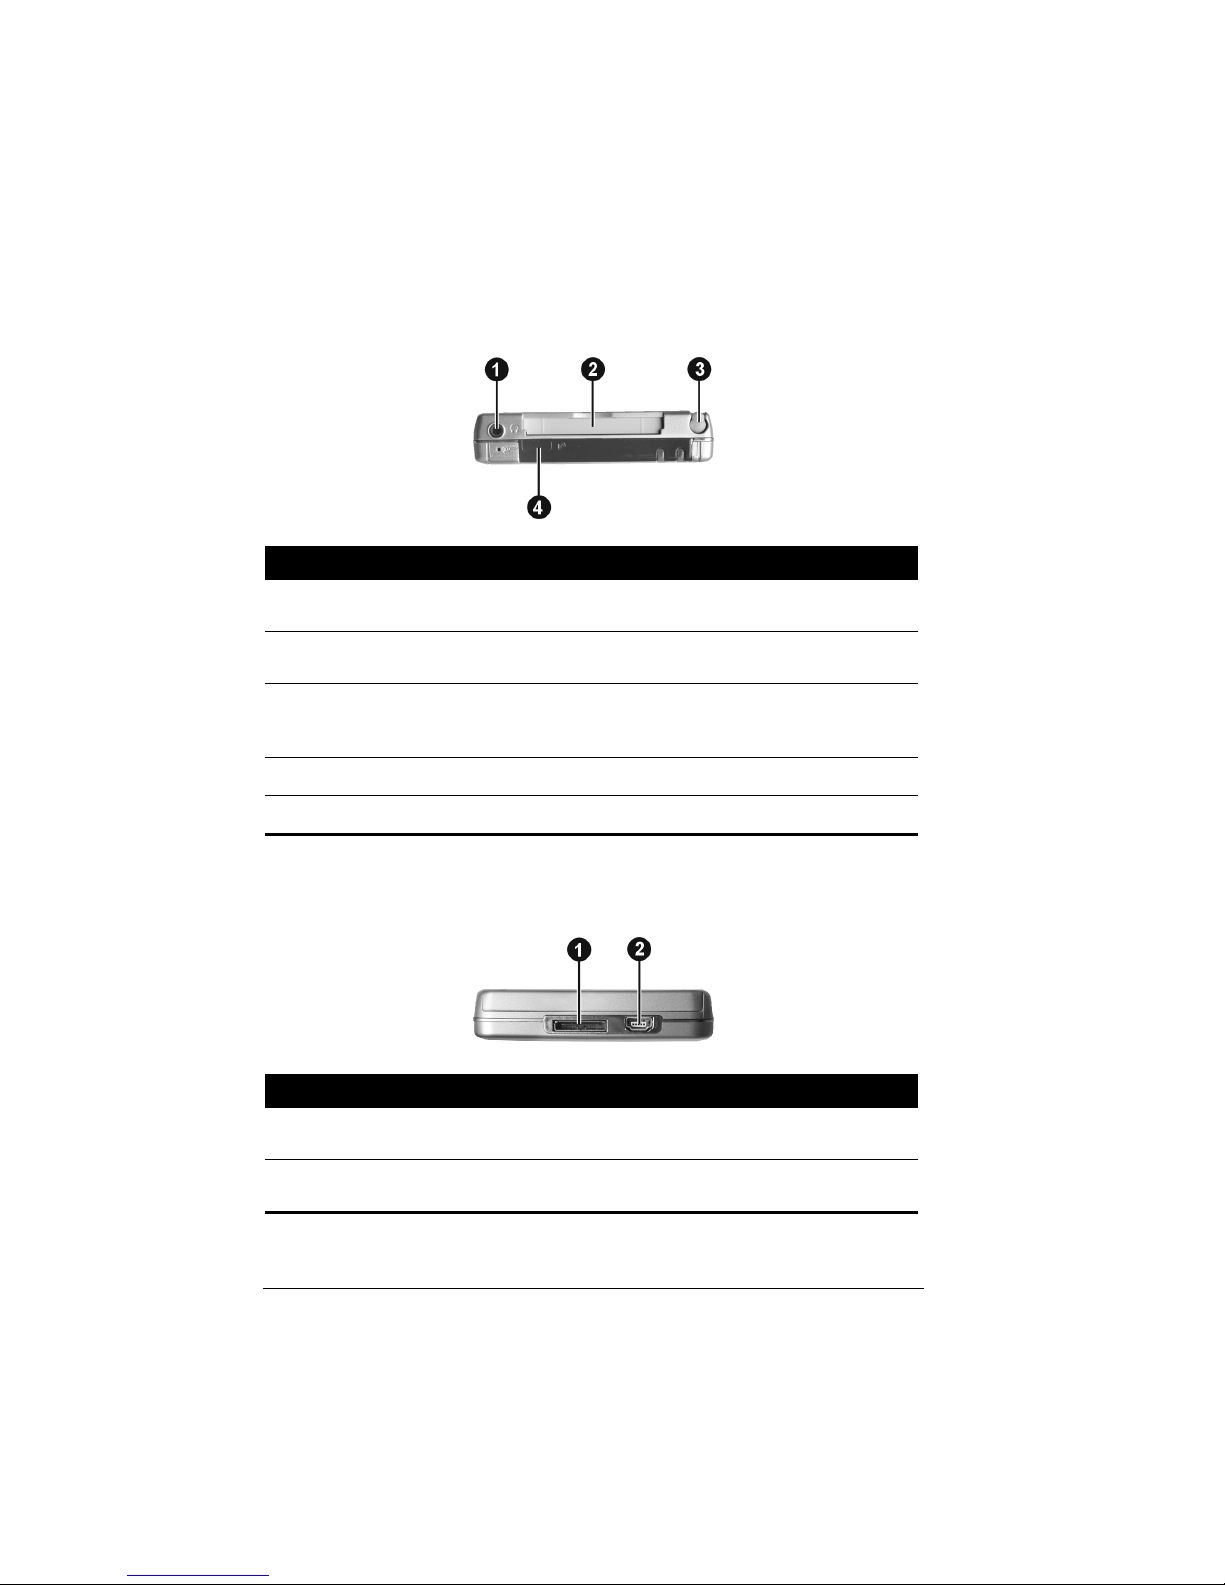
Ref Component Description
!
Headphone
Connector
Connects to a pair of stereo headphones.
"
CompactFlash
Card Slot
Accepts a CompactFlash card.
#
Stylus
Tap on the touch screen to make selections and enter
information. Pull the stylus out of its slot to use and store it
in the slot when not in use.
$
IR Port
Beams files to other mobile devices.
%
Microphone
Receives sound and voice to record voice notes.
Bottom Components
Ref Component Description
!
ActiveSync
Connector
Connects to your desktop compute for synchronizing
data.
"
Mini-USB
Connector
Connects to a USB device through a converter.
Page 5
5
1.2 Setting Up Your Pocket PC for Use
Performing Initial Startup
Initial startup includes installing the battery, setting the backup battery switch
and completing the Welcome Wizard.
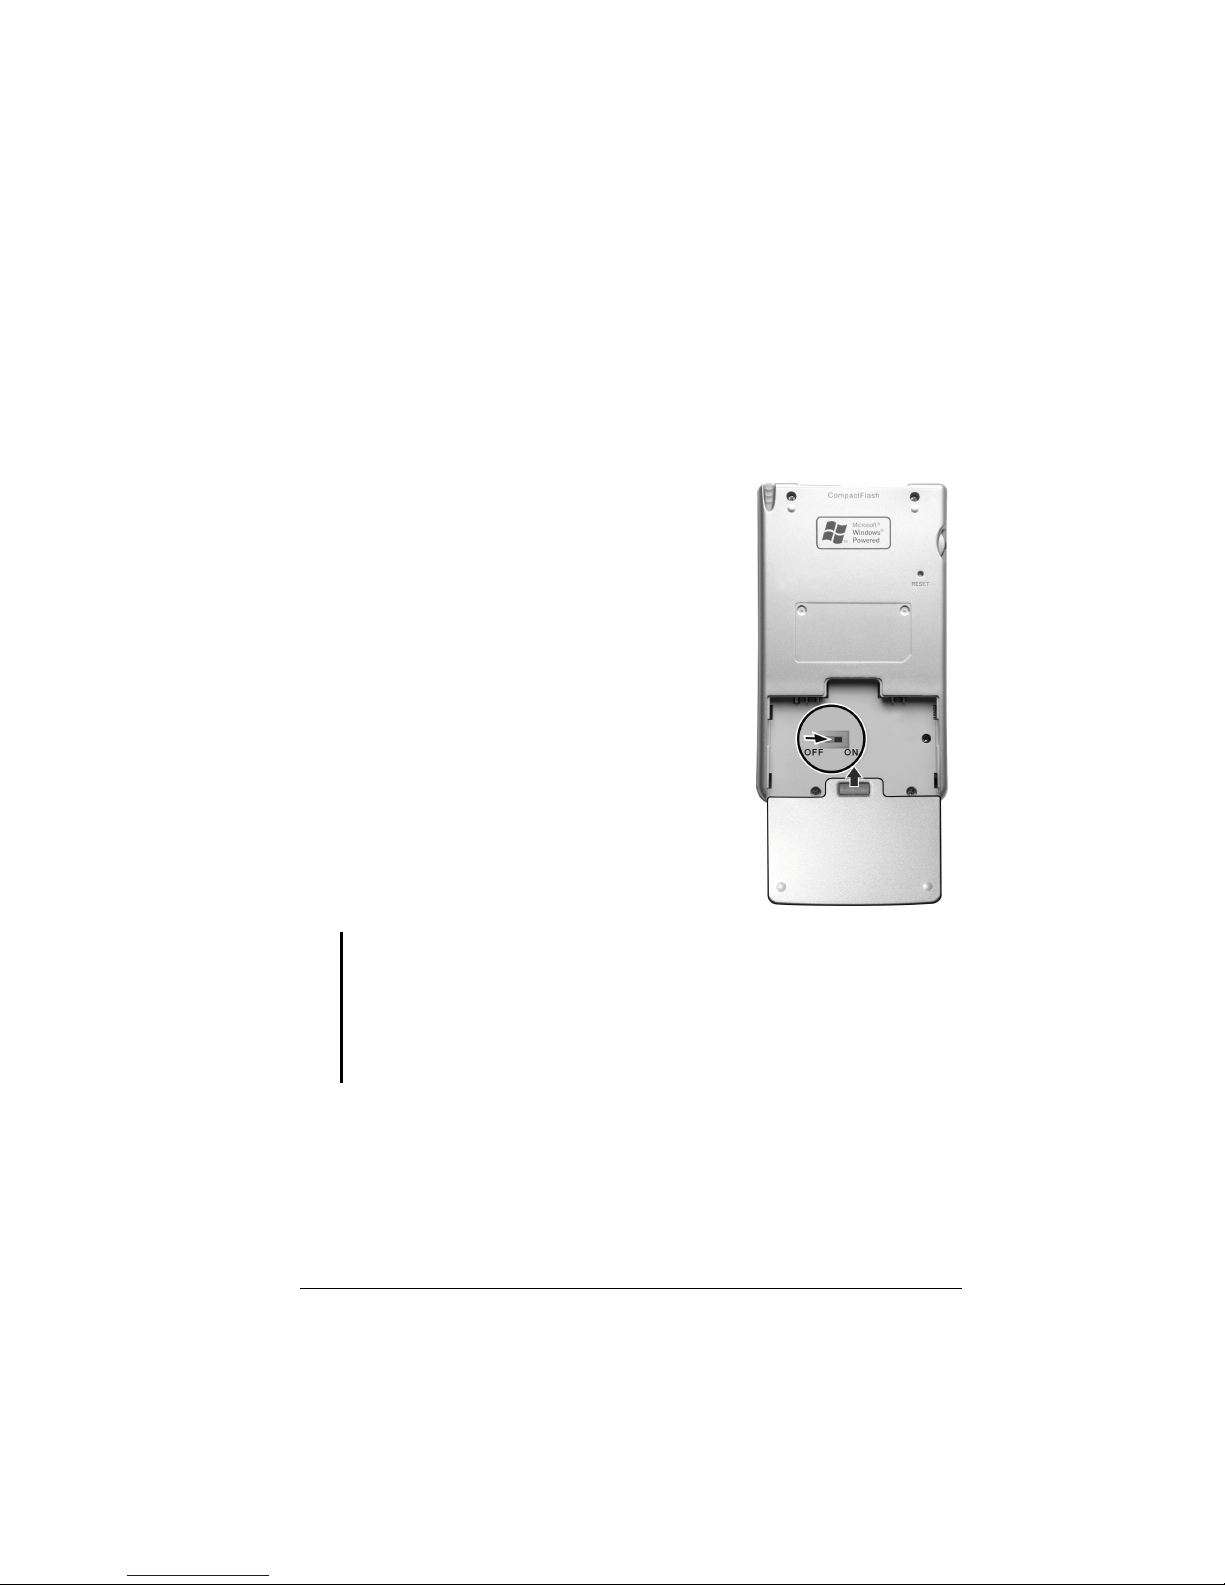
1. The backup battery switch should be set to the
ON (right) position for normal operation. Pull
out the stylus and use it to sl ide the batte ry switch
to the ON (right) position.
2. Insert the battery into the battery com partment.
The battery lock should click into place.
CAUTION:
(
Always leave the backup battery switch in the ON position unless you need to perform a
hard reset. A hard reset will cause the memory of your Pocket PC to be cleared.
(
If you keep the backup battery switch in the OFF position, you can still use the Pocket
PC. However, once you remove the battery or reset your Pocket PC, the Pocket PC will
restore the factory default factory state and all data stored in RAM (including the files
and programs you added) will be lost.
3. Replace the battery door and slide the battery lock to the lock position.
4. The red notification indicator on your Pocket PC will flash for
approximately 30 seconds. Then your Pocket PC will automatically turn on
and display the Welcome screen.
Page 6
6
5. To begin the Welcome Wizard, tap the scre en with the stylus and fo llow the
onscreen instructions to complete the We lcome Wizard. The wizard
presents a brief orientation to Microsoft® Windows® for Pocket PC, helps
you align the touch screen and prompts you to select your city and time
zone.
Connecting to AC Power and Charging the Battery
Fully charge the battery before starting to use your Pocket PC for the first time.
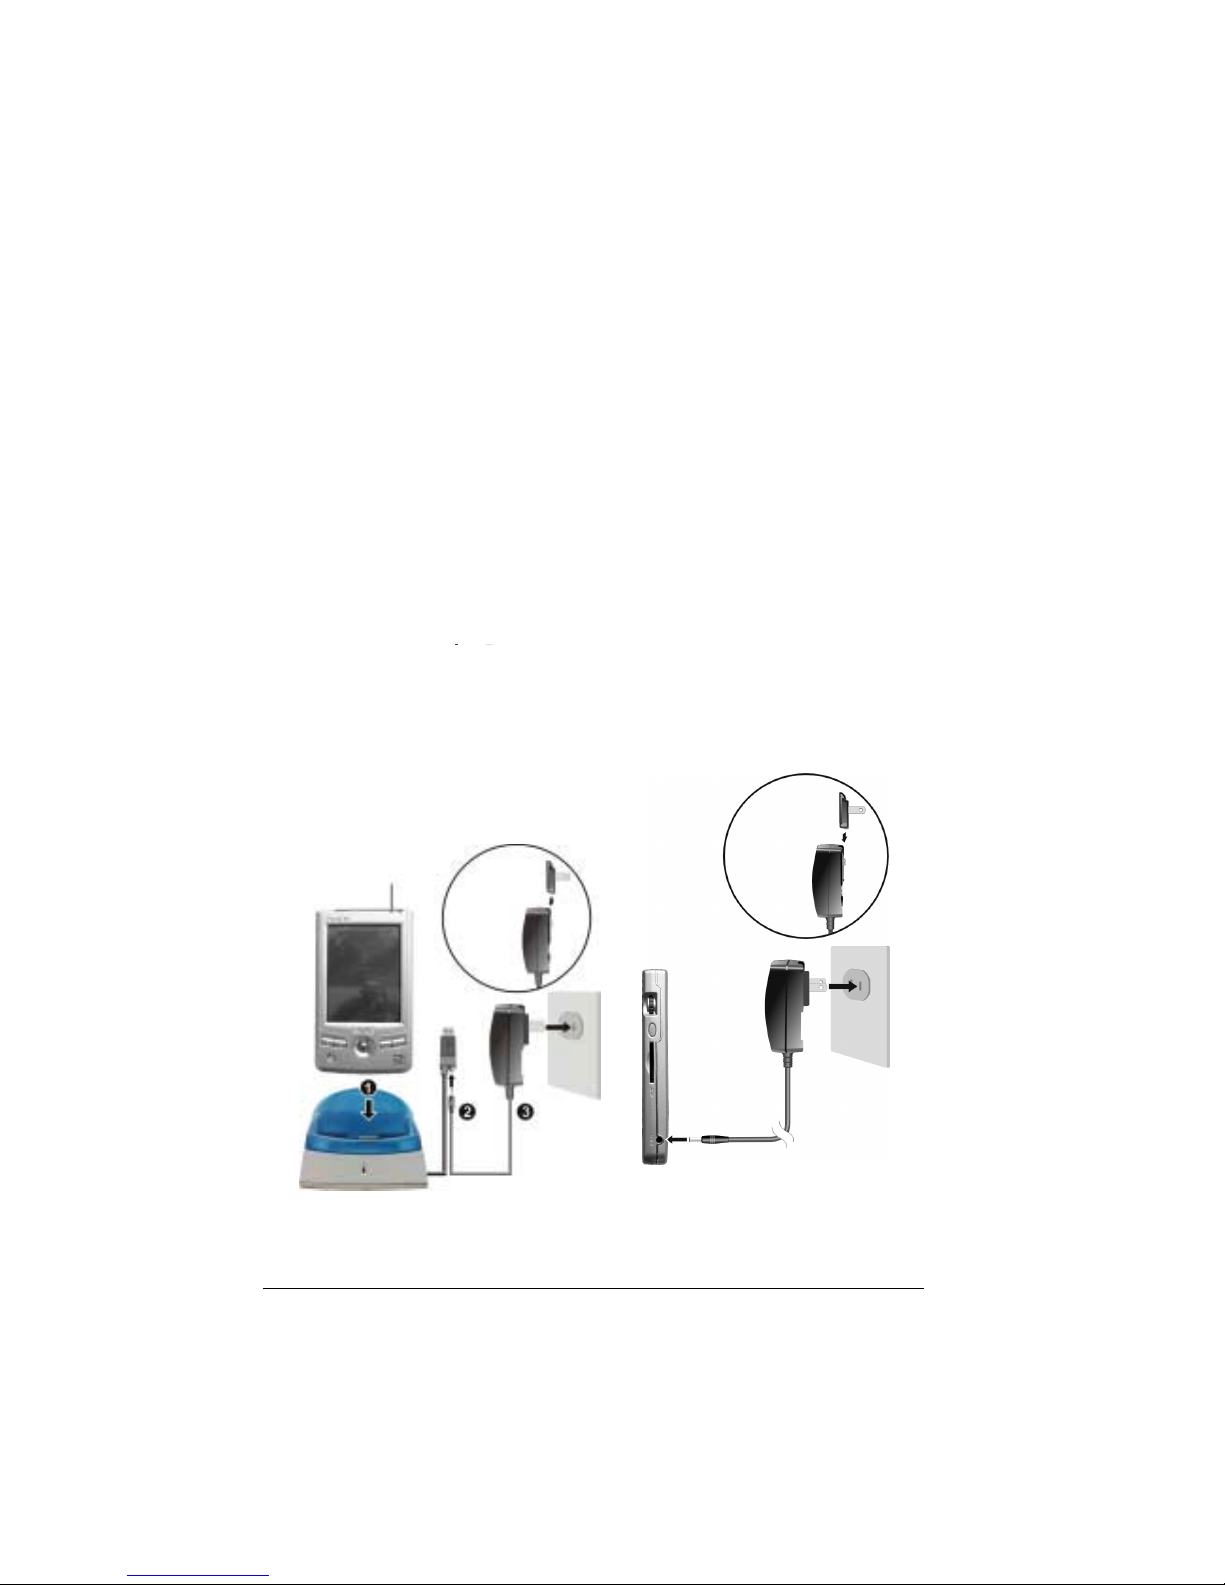
1. Plug the converter to the AC adapter.
2. Connect to AC power. You can connect either with or without the cradle.
With the cradle
!
Slide your Pocket PC into the
cradle.
"
Connect the appropriate end of
the AC adapter to the power
connector on the cradle cable.
#
Plug the other end of the AC
adapter into a wall outlet.
Without the cradle
Connect the appropriate end of
the AC adapter to the power
connector on the bottom of your
Pocket PC and the other end into
a wall outlet.
Charge
Indicator
Converter
Converter
Page 7

7
3. The charge indicator glows amber when charging is in progress. Do not
disconnect your Pocket PC from AC power until the battery is fully
charged, as indicated by the amber indicator turning into green. This will
take a couple of hours.
Whenever possible, keep your Pocket PC connected to the AC adapter and a
power source. Doing so keeps the battery charged.
CAUTION: You must maintain a continuous power supply to your Pocket PC to retain
your data, including any files, programs or settings that you added to your Pocket PC. If the
battery completely runs out of power, you lose your data.
1.3 Turning Your Pocket PC On and Off
After the initial startup, your Pocket PC enters a suspend state when you turn it
off and resumes when you turn it on.
Turning Off to Suspend
You suspend your Pocket PC by brie fly pressing the power but ton on the sid e of
your Pocket PC.
By default, your Pocket PC will also automatically suspend after 30 seconds of
inactivity when operating on battery power. (To change the se settings, t ap
)
Settings
)
System
tab )
Power
icon.)
Turning On to Resume
You resume your Pocket PC by briefly pressing the power button.
You can also press one of the program buttons to resume.
Page 8

8
1.4 Installing Microsoft ActiveSync
A key component of your Pocket PC is the Microsoft ActiveSync program.
With Microsoft ActiveSync, you can synchronize the information on your
desktop computer with the inform ation on your Pocket PC and update both with
the most recent information.
ActiveSync is already installed on your Pocket PC. You need to install
ActiveSync on your desktop computer. Follow the procedure below:
CAUTION:
(
Before installation, make sure that you have Microsoft Outlook installed on your desktop
computer. If you do not have Outlook or your version of Outlook is earlier than the
version provided on the Companion CD, install Outlook from the Companion CD.
(
Do not connect your Pocket PC to your desktop computer before ActiveSync is
installed.
1. Turn on your desktop computer.
2. Insert the Companion CD into the CD-ROM drive of your desktop
computer.
3. Click the arrow on the first screen to enter the main screen and click
Start
Here
.
4. In the “Start Here” screen, click
Install ActiveSync 3.7
on the left column.
5. In the “Install ActiveSync 3.7” screen, click
Install
to start installation.
6. In the “File Download” screen, click
Run this program from its current location
.
7. Follow the onscreen instructions to install ActiveSync.
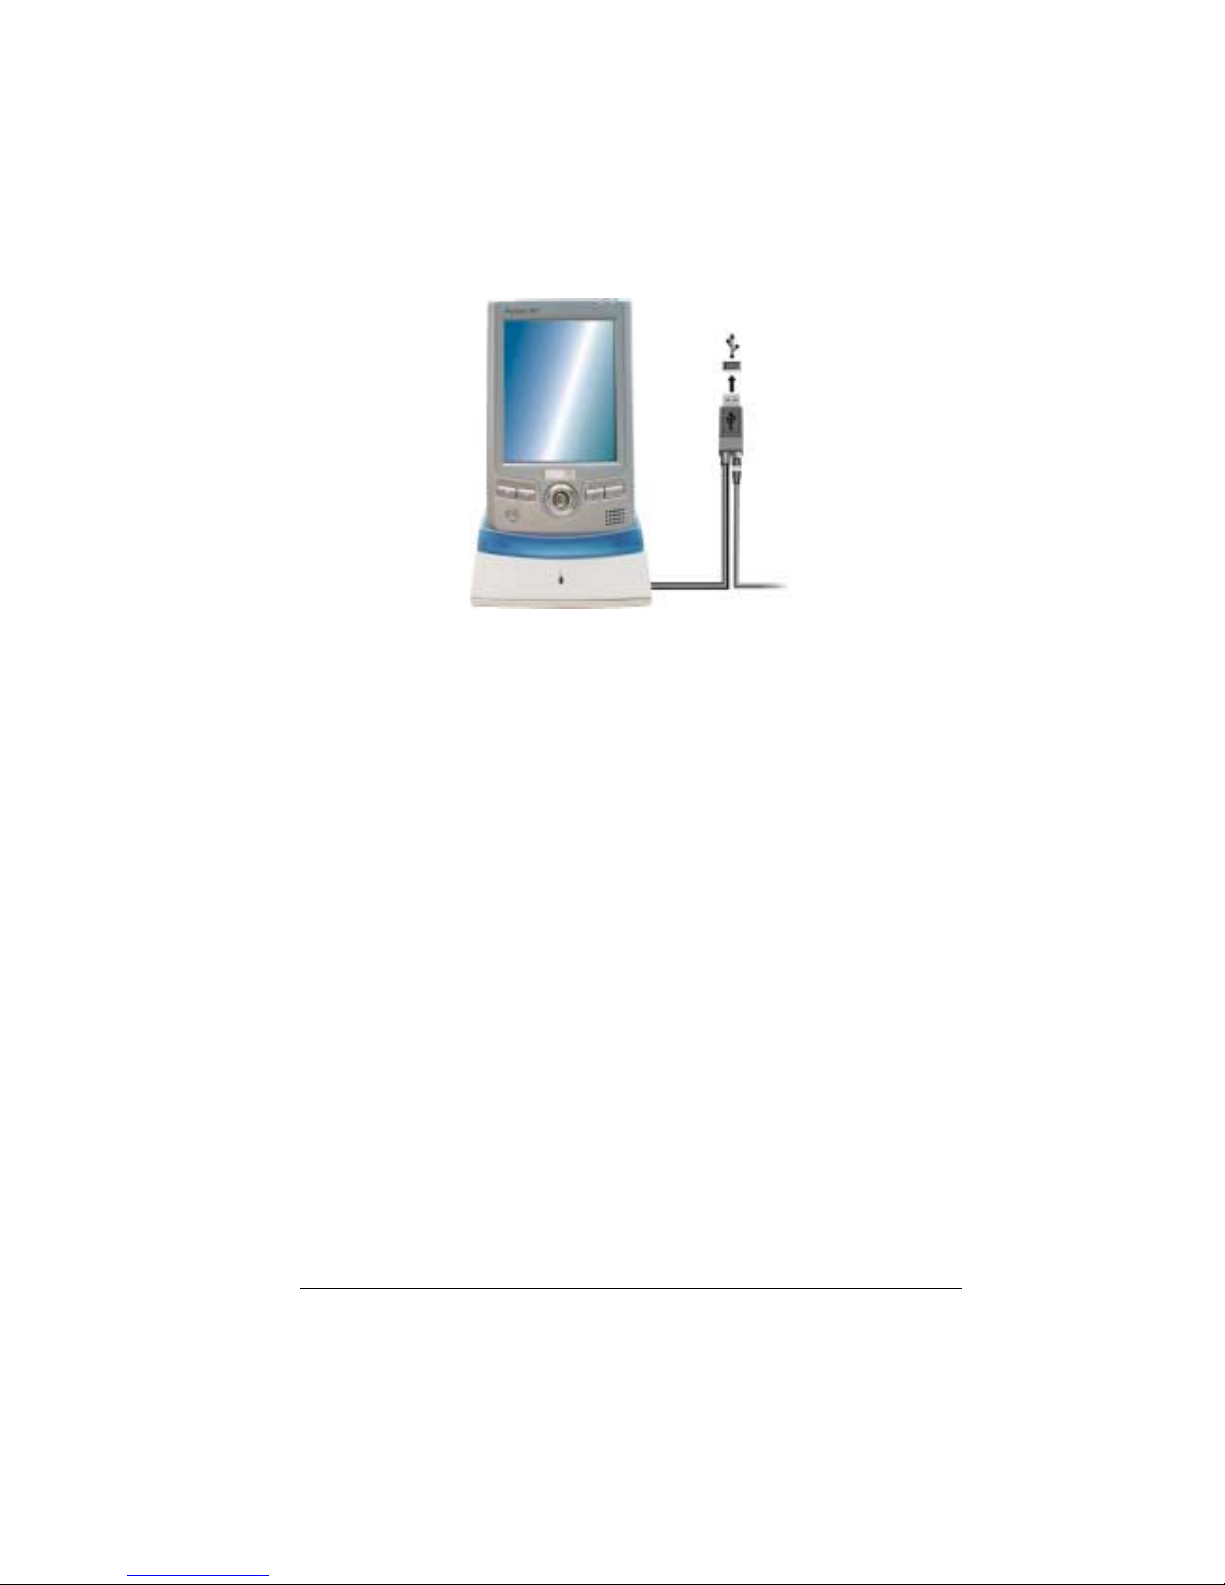
8. When prompted, connect your Pocket PC to your desktop computer. Slide
your Pocket PC into the cradle. Connect the cradle cable to a USB port on
your desktop computer.
Page 9
9
9. When the “Add New Hardware Wizard” asks for the driver, click
Browse
and specify the CD-ROM drive containing the Companion CD.
10. Follow the onscreen instructions to establish a partnership and synchronize
your Pocket PC with your desktop computer.
After your first synchronization, the data you have stored on your desktop
computer such as Calendar, Contacts and Tasks is copied to your Pocket PC.
You are now ready to take it along with you when you go.
For more information on ActiveSync, see section 6.2.
Desktop
compute
r
Page 10

10
1.5 Expanding Your Pocket PC
Using a SD/MMC Card
Your Pocket PC has a SD/MMC slot where you can insert an optional Secure
Digital or MultiMediaCard memory card (also called storage card). With the
removable memory, you can store or backup your data and exchange data with
other devices.
NOTE:
(
Make sure that no foreign objects enter the slot.
(
Keep a SD or MMC card in a well-protected box to avoid
dust and humidity when you are not using it.
To use a SD/MMC card, insert it into the slot, with the
connector pointing to the slot and its label facing the
front of the Pocket PC. Follow the instructions supplied
with the card for more information.
To remove a card, first make sure that no application is
accessing the card, then slightly push the top edg e of the
card to release it and pull it out of the slot.
Using a CompactFlash Card
Your Pocket PC has a CompactFlash card slot where you
can insert a Com pactFla sh c ard p rov idi ng func tions such as
memory, storage, modem and network.
To use a SD/MMC card, insert it into the slot, with the
connector pointing to the slot and its label facing the front
of the Pocket PC. Follow the instructions supplied with the
card for more information.
Page 11
11
2
Troubleshooting and
Maintenance
This chapter gives solutions to common Pocket PC problems you may
encounter. It also provides guidelines on taking care of your Pocket PC.
NOTE: If you encounter a problem you cannot solve, contact your dealer for assistance.
2.1 Resetting Your Pocket PC
CAUTION: Resetting will cause unsaved data to be lost.
Resetting your Pocket PC is similar to restarting your desktop computer. It
restarts the operating system, but you will lose any unsaved data.
Occasionally, you may need to reset your Pocket PC; for example, you should
reset:
(
After you restore data from your desktop
computer.
(
When your Pocket PC stops responding;
in other words, it appear s to be “fr ozen” or
“locked up.”
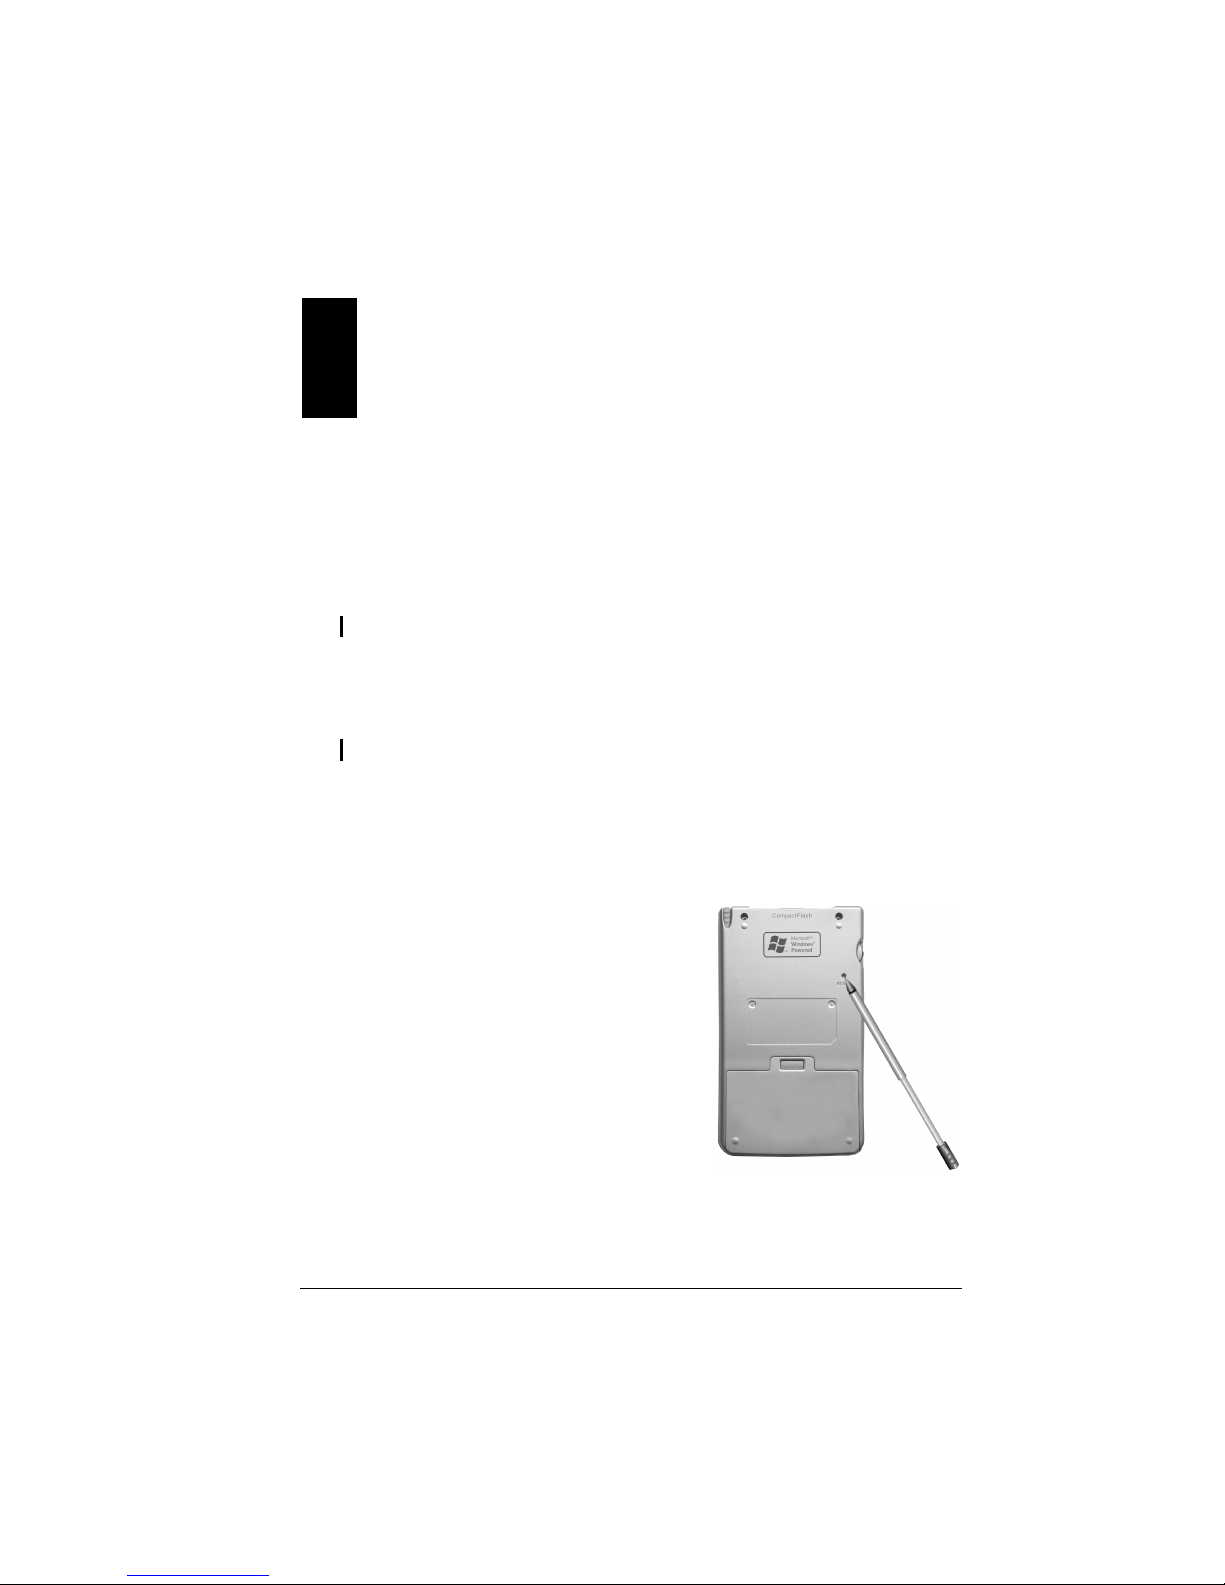
Follow this procedure to reset y our Pocket PC :
1. Remove the SD/MMC card or
CompactFlash card (if installed).
2. Use the stylus to press the reset button on
the back of your Pocket PC.
Troubleshooting and
Maintenance
Page 12

12
2.2 Restoring Factory Default State
In some cases, you may need to restore your Pocket PC to the factory default
state by clearing the memory (RAM) from your Pocket PC. For example, you
should clear the memory:
(
When your Pocket PC does not respond after being reset.
(
When you forget your password.
Clearing the memory means all data you have entered in RAM, including all
files, system settings and addit ional programs y ou have installed, will be erase d.
(Programs installed to ROM at the factory are not affected.)
CAUTION:
(
To ensure the integrity of your data should it be necessary to clear the memory, you’re
advised to regularly back up your data to your desktop computer (using ActiveSync) or
to a memory card (using the backup application). For more information on backing up
data, see section 3.5.
(
Do not slide the battery switch unless it is necessary.
Follow this procedure to clear the memory from your Pocket PC:
1. Backup your information if necessary.
2. Disconnect all cables, including the AC adapter, from your Pocket PC.
3. Stop all running programs by tapping
)
Settings
)
System
tab )
Memory
icon )
Running Programs
tab )
Stop All
.
4. Remove the battery.
5. Use the stylus to slide the battery switch to the OFF (up) position.
6. Wait for 1 minute and then slide the switch back to the ON (down) positi on.
7. The red notification indicator on your Pocket PC will flash for
approximately 30 seconds. Then your Pocket PC will automatically turn on
and display the Welcome screen.
8. To begin the Welcome Wizard, tap the scre en with the stylus and fo llow the
onscreen instructions to complete the We lcome Wizard.
9. Reestablish a partnership with your desktop computer.
Page 13

13
10. You may also want to restore data to y our Pock et PC from y our most re cent
backup file.
NOTE: If the battery completely runs out of power and is not charged in time, you will get
the same result as you restore the factory default state.
2.3 Power Problems
Power does not turn on when using battery power
(
The remaining battery power may be too low to run your Pocket PC.
Connect the AC adapte r to your Pock et PC an d to extern al AC power. Then,
turn on your Pocket PC.
(
If your Pocket PC indicates a low battery level just after it has been fully
charged, calibrate the battery. (See “Charging the Battery” in section 1.3.)
Battery runs out of power quickly
(
You might be using your Pocket PC in ways that drain power quickly. (See
“Power-Saving Tips” in section 3.1 for more information.)
2.4 Memory Problems
If a warning message of not enough memory appears due to the memory
allocation problem, try the following to free memory on your Pocket PC.
CAUTION: Be discreet when you delete files. Deleting files of which the function is
unknown can cause programs or features to malfunction. It is appropriate to make a
backup before deleting files.
(
Delete files you no longer need. Tap
)
Programs
)
File Explorer
. Tap and
hold the file you wish to delete and then tap
Delete
on the pop-up menu. To
find your largest files, tap
)
Find
. In the
Type
list, tap
Larger than 64KB
)
Go
.
(
Remove programs you no longer need. Tap
)
Settings
)
System
tab )
Remove Programs
. Tap the program you want to rem ove and then tap
Remove
.
(
In Internet Explorer options, delete all files and clear history. In Internet
Explorer, tap
Tools
)
Options
. Tap
Delete Files
and
Clear History
.
Page 14

14
(
If you are copying files from a computer or device to your Pocket PC, try
adjusting the slider in the M emory setting. Tap
)
Settings
)
System
tab
)
Memory
icon. Check if you can manually move the slider before copying
files. The maximum storage memory that your Pocket PC can allocate is
around 20MB. This means that you cannot save files larger than 20MB to
the RAM of your Pocket PC.
(
Stop programs you are not currently using. In most cases, programs
automatically stop to free needed memory. How ever, in some situations, such
as when confirmation dialog boxes are waiting for a user response, the
program may not be able to automatically stop. To check the state o f y our
active programs, tap
)
Settings
)
System
tab )
Memory
icon )
Running
Programs
tab. Tap the program you want to view and then tap
Activate
. Close
any open windows or messages and return the program to list view. I f this
does not work, you can stop the program manually. First, make sure that y our
work is saved by closing open items and returning the prog ram to list v iew.
Then, stop the program by tapping
Stop
or
Stop All
on the
Running Programs
tab.
(
Reset your Pocket PC as described in section 7.1.
If you have a memory card, m ove data to the memory card as described
below.
(
Tap
)
Programs )
))
)
File Explorer
. Tap and hold the file you want to move
and tap
Cut
. Browse to My Docum ents folder in the mem ory card folder, tap
Edit )
))
)
Paste
. Files stored in folders other than My Documents or stored in
subfolders within subfolders in My Documents may not show up in the list
view of some programs. When using Notes, Pocket Word Pocket or Excel,
you can also move files by opening the item and tapping
Tools
or
Edit
then
Rename/Move
.
(
Move email attachments. In Inbox, tap
Tools
)
Options )
))
)
Storage
tab and
select
Store attachments on memory card
. All attachments are moved to the
memory card and new attachments are automatically stored on the memory
card.
(
Set programs such as Notes, Pocket Word and Pocket Excel to
automatically save new items on the m em ory card. I n the program , tap
Tools
)
Options
.
Page 15

15
2.5 Screen Problems
Screen is off
If the screen does not respond even after you press the power button, try the
following in order until the problem is solved:
(
Connect the AC adapter to your Pocket PC and to external AC power.
(
Reset your Pocket PC as described in section 7.1.
Screen responds slowly
(
Make sure that your Pocket PC is not running out of battery power or
running many active programs. If the problem still exi sts, res e t your Pocket
PC as described in section 7.1.
Screen freezes
(
Reset your Pocket PC as described in section 7.1.
Screen is hard to read
(
Make sure that the backlight of the display is on.
(
Move to a location with enough light.
(
If you’re having a hard time reading a document on the screen , try ad justing
the zoom percentage or text size.
* In Notes, tap
Tools
and select a zoom percentage.
* In Pocket Word and Pocket Excel, tap
View
)
Zoom
and select a zoom
percentage.
* In Pocket Internet Explorer, tap
View
)
Text Size
and select a size.
* In Calendar, Contacts and Tasks, tap
Tools
)
Options
and select
User
large font
.
Inaccurate response to stylus taps
(
Realign the touch screen. Tap
)
Settings
)
System
tab )
Align Screen
icon. If you cannot correctly tap your selection, turn off the Pocket PC.
Press in the scroll dial and, while k eeping it pre ssed, pre ss the power button
to turn on the Pocket PC. You can then start to align the touch screen.
Page 16

16
2.6 Connection Problems
Cradle Connection Problems
(
Make sure that your Pocket PC is properly seated on the cradle.
(
Make sure that you hav e installed the correc t vers ion of ActiveSy nc on your
desktop computer. Install the version A ctiveSy nc included wi th your P ocket
PC.
(
Make sure that your Pocket PC and your desktop computer are both turned
on before establishing the connection.
(
Make sure that the cable is securely plugged into the USB port on your
desktop computer. Connect the USB cable directly to your desktop
computer—do not run the cable through a USB hub.
(
Make sure that the USB connection is enabled in ActiveSync on your
desktop computer. If the USB connection is already enabled, disable the
USB connection, close the Connection Settings window and then reopen
and re-enable the USB connection.
(
Reset your Pocket PC before connecting the cable. (See section 7.1.)
Always disconnect your Pocket PC before you restart your desktop
computer.
(
Connect only one Pocket PC or personal digital assistant to your desktop
computer at a time.
(
Make sure that you do not have any other active connections. Tap
and
tap
Today
. Tap or at the bottom of the screen and then tap
Disconnect
.
Infrared Connection Problems
(
Transfer only one file, or no more than 25 contact cards, at a time.
(
Position the IR ports so that they line up in a distance less than 20 cm (8
inches) but more than 5 cm (2 inches) apart.
(
Make sure that there are no obstacles between the two IR ports.
Page 17

17
(
Adjust the room lighting. Some types of light interfere with IR
communications. Try moving to a different location or turning off some
lights.
Modem Connection Problems
Unable to dial out
(
Do not install your Pocket PC in the cradle. You cannot dial out if your
Pocket PC has an active connection with your desktop computer.
(
Make sure that the telephone line is connected correctly.
(
Make sure that the telephone line is analog. Do not connect a modem to a
digital telephone line unless it is specifically designed for use with a digital
line.
(
Make sure that the modem is waiting for a dial tone. Tap
)
Settings
)
Connections
tab )
Connections
icon. Select the netwo rk set ting s you want to
use and tap
Modify
. Select your connection and tap
Next
twice. Make sure that
Wait for dial tone before dialing
is enabled.
(
International calls m ay require m ore time to g et throug h. Tap
)
Settings
))))
Connections
tab )
Connections
icon. Select the network sett ings y ou want
to use and tap
Modify
. Select your connection and tap
Next
twice. Increase the
time for
Cancel the call if not connected within
or disable this item.
Able to dial out but unable to ma ke a proper connection
(
Make sure that the network you are trying to connect supports the Pointto-Point Protocol (PPP). Your ISP or network administrator can verify this.
(
Make sure that your dialing location is correct. Tap
)
Settings
)
Connections
tab )
Connections
icon. Tap
Dialing Locations
tab and
select the location you are dialing from and confirm that the settings are
appropriate for that location.
Page 18

18
(
Make sure that the phone number you are trying to reach is correct. Tap
)
Settings
)
Connections
tab )
Connections
icon. Select
the network settings you want to use and tap
Modify
. Select your connection
and tap
Next
to double-check the phone number.
Modem connection is unreli abl e
(
Make sure that the modem card is installed properly.
(
Make sure that the telephone line is connected correctly.
(
Disable call waiting. Tap
)
Settings
)
Connections
tab )
Connections
icon )
Dialing Locations
tab and enable
Disable call waiting
. Select
the disable code specified by your telephone company from the drop-down
list.
2.7 Taking Care of Your Pocket PC
Taking good care of your Pocket PC will ensure trouble-free operation and
reduce the risk of damage to your Pocket PC.
General Guidelines
(
Keep your Pocket PC away from excessive moisture and extreme
temperatures.
(
Avoid exposing your Pocket PC to d ir ec t sun lig ht o r s tro ng ult rav iole t light
for extended periods of time.
(
Do not place anything on top of your Pocket PC or drop objects on top of
your Pocket PC.
Page 19

19
(
Do not drop your Pocket PC or subject it to severe shock.
(
Store your Pocket PC in a protective cover when not in use.
(
Do not subject your Pocket PC to sudden and severe temperature changes.
This could cause moisture condensation inside the unit that could damage
your Pocket PC. In the event of moisture condensation, allow you Pocket
PC to dry out completely.
(
Take care not to sit on your Pocket PC when it is located in the back pocket
of trousers, etc.
(
Do not carry your Pocket PC with a card inserted. This can result in the
damage or loss of the card.
(
The screen surface is easily scratched. Use only the stylus to tap on the
screen. Avoid touching it with your fing ers, pens, pencils or any other sha rp
objects.
(
Never clean your Pocket PC with its power on. Use a soft, lint-free cloth
moistened with water to wipe t he screen and the exte rior of y our Pocket PC.
(
Do not use paper towels to clean the screen.
(
Never attempt to disassemble, repair or make any modifications to your
Pocket PC. Disassembly, modification or any attempt at repair could cause
damage to your Pocket PC and even bodily injury or property damage.
(
Do not store or carry flammable liquids, gases or explosive materials in the
same compartment as your Pocket PC, its parts or accessories.
Travel Guidelines
(
Before traveling with your Pocket PC, back up your data. As an added
precaution, bring along a backup copy.
(
Remove the SD/MMC card, if installed, from the slot.
(
Turn off your Pocket PC and disconnect all external devices.
(
Make sure that the battery is fully charged.
(
Take the AC adapter with you. Use the AC ad apter as the pow er sour ce and
as a battery-recharger.
Page 20

20
(
Keep your Pocket PC inside its protective cover when you are not using it
on the road.
(
Hand-carry your Pocket PC in a protective cover. Do not check it in as
luggage.
(
If you plan to travel abroad with your Pock et PC, consult y our dealer fo r the
appropriate AC adapter for use in your country of destination.
(
If you plan to make modem connections abroad, make sure that you have
the correct modem and cable for your country of destination.
Page 21

21
A
Regulatory Information
NOTE: Marking labels located on the exterior of your device indicate the regulations that
your model complies with. Please check the marking labels on your device and refer to the
corresponding statements in this chapter. Some notices apply to specific models only.
A.1 Class B Regulations
USA
Federal Communications Commission Radio Frequency Interference Statement
NOTE:
This equipment has been tested and found to comply with the limits for a Class
B digital device pursuant t o Part 15 of the FCC Rules. Thes e limits are de signed
to provide reasonable protection against harmful interference in a residential
installation. This equipment generates, uses, and can radiate radio frequency
energy and, if not installed and used in accordance with the instructions, may
cause harmful interference to radio communications. However, there is no
guarantee that interference will not occur in a particular installation. If this
equipment does cause harmful interference to radio or television reception,
which can be determined by turning the equipment off and on, the user is
encouraged to try to correct the interference by one or more of the following
measures:
(
Reorient or relocate the receiving antenna.
(
Increase the separation between the equipment and receiver.
Page 22

22
(
Connect the equipment into an outlet on a circuit different from that to
which the receiver is connected.
(
Consult the dealer or an experienced radio/TV technician for help.
This device complies with Part 15 of the FCC rules. Operation is subject to
The following two condition: (1) This device may not cause harmful interference, and (2) this device must accept any interference received, including
Interference that may cause undesired operation.
FCC Caution: Any changes or modifications not expressly approved by the
party responsible for compliance could void the user’s authority to operate the
equipment.
Important Note:
FCC Radiation Exposure Statement:
This equipment complies with FCC radiation exposure limits set forth for an
uncontrolled environment. And users must follow the specific operating
instructions for satisfying RF exposure compliance.
This transmitter must not be operated in conjunction with any
other antenna or transmitter.
Canada
Canadian Department Of Communications
Radio Interference Regulations Class B Compliance Notice
This Class B digital apparatus meets all requirements of the Canada
Interference-Causing equipment regulations.
Cet appareil numérique de Class e B r especte t oute s les exig ences d u Règ lement
Canadien sur le matériel brouileur.
A.2 European Notice
Products with the CE marking comply with both the Electromagnetic
Compatibility Directive (89/336/EEC) and the Low Voltage Directive
(73/23/EEC) – as amended by Directive 93/68 /ECC - issued by the Comm ission
of the European Community.
Page 23

23
Compliance with these directiv es implies con formity to the following Eu ropean
Standards:
EN55022: Radio disturbance characteristics
EN55024: Immunity characteristics
EN6100-3-2: Limits for harmonic current emissions
EN6100-3-3: Limitation of voltage fluctuation and flicker in low-voltage
supply system
EN60950 : Product Safety
The manufacturer cannot be held responsible for modifications made by the
User and the consequences thereof, which may alter the conformity of the
product with the CE Marking.
A.3 Japanese Notice
A.4 About the AC Adapter
The AC adapter is desig ned to ensu re your per sonal sa fety and to be comp atible
with this equipment. Please follow these guidelines:
(
Use only the AC adapter (DELTA, ADP-10SB series) Pocket PC. Use of
another type of AC adapter will result in malfunction and/or danger.
この装置は、情報処理装置等電波障害自主規制
協議会(VCCI)の基準に基づく第二種情報技術
装置です。この装置は、家庭環境で使用するこ
とを目的としていますが、この装置がラヅオや
テレビヅョン受信機に近接して使用されると、
受信障害を引き起こすことがあります。
取り扱い説明書に従つて正しい取り扱いをして
下さい。
Page 24

24
(
This product is intended to be supplied by a LISTED Power Unit marked
with “LPS”, “Limited Power Source” and output rated + 5 V dc / 2 A”.
(
Do not use the adapter in a high moisture environment. Never touch the
adapter when your hands or feet are wet.
(
Allow adequate ventilation around the adapter when using it to operate the
device or charge the battery. Do not cover the AC adapter with paper or
other objects that will reduce coo ling. Do not use the AC adapter while it is
inside a carrying case.
(
Connect the adapter to a proper power source. The voltage and grounding
requirements are found on the product case and/or packaging.
(
Do not use the adapter if the cord becomes damaged.
(
Do not attempt to service the unit. There are no serviceable parts inside.
Replace the unit if it is damaged or exposed to excess moisture.
A.5 About the Battery
(
Caution: Risk of explosion if battery is replaced by an incorrect type.
Dispose of used batteries according to the instruct ion s.
(
Replace only with the same or equivalent type recommended by the
manufacturer.
(
Do not mutilate, puncture, or di spose of battery in fire. The battery can burst
or explode, releasing hazardous chemicals.
(
Use specified charger only.
A.6 About the Infrared LED
The IR port located on the top side of the Pocket PC is evaluated as a Class 1
LED (Light-Emitting Diode) device according to International Standard
IEC 60 825-1 (EN60825-1) requirements.
CLASS 1 LED PRODUCT
Page 25

25
A.7 About the Electrostatic Discharge
Electrostatic discharges can interfere with the normal functioning of the
electronic devices. Your equipment can behave abnormally owing to such an
event, resulting in the possible data corruption or loss of unsaved data. To
recover from this, reset your equipment.
To avoid losing data due to elect rostatic discharges or oth er types of ev ents, it is
recommended that you regularly save and backup data.
Page 26

26
About Bluetooth
Bluetooth is a short-range wireless communications technology. Devices with
Bluetooth capabilities can exchange information over a distance of about 10
meters (30 feet) without requiring a physical connection.
Unlike infrared, you don’t need to line up the devices to beam
information with Bluetooth. The devices only need to be within a range
of about 10 meters. You can even beam information to a device in a
different room, as long as it within range.
Microsoft Pocket PC 2003 software allows you to use Bluetooth in the
following ways:
•
Beam information, such as files, appointm ents, tasks, and cont act cards,
between devices that have Bluetooth capabilities. For example, if you
and a co-worker each have a dev ice with Blu etooth, you can be am item s
between your devices, such as files, contact cards, appointments, tasks,
and so forth.
•
Create a dial-up modem connection between your device and a
Bluetooth phone. You can then use the Bluetooth phone as a modem.
Your device might include additional Bluetooth features. For more
information, see the documentation included with your device.
About Bluetooth Modes
Bluetooth operates in three different modes:
•
On. The Bluetooth radio is turned on and you can use Bluetooth
features.
•
Off. The Bluetooth radio is turned off. In this mode, you can neither
send nor receive information by using Bluetooth. You might want to
turn the radio off at times in order to conserve battery power, or in
Page 27

27
situations where radio use is prohibited, such as on airplanes and in
hospitals.
•
Discoverable. The Bluetooth radio is turned on, and all of the other
Bluetooth devices within range (about 10 meters) can detect your
device and attempt to beam information to it, establish a bond, or use a
Bluetooth service. In this mode, other devices can detect your device
whether or not a bond has been created; however, in order to receive a
beam from another device, you must accept it on your device, as
described in Receiving a Bluetooth Beam.
For more information about changing the Bluetooth mode, see Turning
On and Off Bluetooth and Making Your Device Discoverable.
About Bonds
A bond is a relationship that you create between your Pocket PC and
another Bluetooth device in order to help exchange information in a
secure manner. Creating a bond involves entering the same PIN on the
two devices you want to bond. Once a bond is created, the devices need
only have their Bluetooth radios turned on to exchange information; they
do not need to be in discoverable mode. For instructions on creating a
bond, see Create a Bond. For more information about modes, see About
Bluetooth Modes.
You need only create a bond once between two devices. Thereafter, they
recognize the bond and are able to exchange information without your
entering a PIN again. For more information about exchanging
information with other devices, see Beaming Informa tion With Bluetooth
and Receiving a Bluetooth Beam.
Turning On and Off Bluetooth
1. Tap > Settings > Connections tab.
2. Tap Bluetooth.
3. Select On or Off.
Page 28

28
The Bluetooth radio is turned on or off according to your
selection.
By default the Bluetooth radio is turned off. If you turn it on, and then turn
off your device, the Bluetooth radio also turns off. When you turn on your
device again, the Bluetooth radio turns on automatically.
Making Your Device Discoverable
1. Tap > Settings > Connections tab.
2. Tap Bluetooth.
3. Select Discoverable.
Other Bluetooth devices can now detect your device and attempt
to beam information to it, establish a bond, or use a Bluetooth
service. Note that to receive beamed information, you must
accept it on your device.
Selecting Discoverable also turns on your Bluetooth radio.
If you no longer want your device to be discoverable, tap Off to turn off the
radio or On to leave the radio on, but not allow detection by other devices.
Beaming Information with Bluetooth
1. Tap and hold an item to beam, such as an appointment in Calendar, a
task in Tasks, a contact card in Contacts, or a file in File Manager.
2. Tap Beam [type of item].
3. Tap the device to which you want to send the beam.
The item is beamed to the device you selected.
Page 29

29
If the device that you want to beam to doesn't appear in the list, make sure
that it is turned on, in discoverable mode, and within 10 meters (30 feet) of
your device. Also, make sure that your Bluetooth radio is turned on.
Receiving a Bluetooth Beam
1. Make sure that your device is configured to receive incoming beams.
2. Make sure that your device is within 10 meters (about 30 feet) of the
device beaming the information and that Bluetoo th is in discov er able
mode.
3. When prompted to receive an incoming beam, tap Yes.
The information is received on your device.
Using a Bluetooth Phone as a Modem
You can use a phone that has Bluetoo th capabilitie s as a modem for your device.
To do this, you create a Bluetooth modem connection on your device and then
send information to the phone by using Bluetooth. The phone relays the
information over the phone line and then sends back to your device any
information that you had requested over the connection.
Once you create a modem connection to the Bluetooth phone, you can
reuse it whenever you want to use the phone as a modem.
1. Make sure that the Bluetooth phone is turned on, that your device's and
the phone's Bluetooth rad ios are turned on, and th at your d ev ice and th e
phone are within 10 meters (30 feet) of one another.
2. If you have not already done so, cre ate a Bluetooth phone conn ection by
following steps 3 through 16. Otherwise, skip to step 17.
3. Tap
> Settings > Connections tab.
4. Tap Connections > Add a new modem connection.
5. Enter a name for the connection.
Page 30

30
6. In the Select a modem list, tap Bluetooth > Next.
7. Make sure that the phone is discoverable. Some phones may also need
to be pairable in order to accept a bonding request. For more
information, see your phone documentation .
8. If the phone appears in the My Connections list, sk ip to step 14. If not,
tap New and follow the remaining steps.
9. In the list, tap the phone and then Next.
10. In PIN, enter a PIN of between 1 and 16 characters, and tap Next.
11. Enter the same PIN on the phone.
12. If you want, in Name, edit the name of the phone.
13. Tap Finish.
14. In the My Connections list, tap the phone, and then Next.
15. Enter the phone number to dial for this connection and tap Next.
16. In User name, Password, and Domain, enter the logon information for
this connection and tap Finish.
17. Start using the program that uses the Bluetooth phone connection; for
example Inbox to send and receive e-mail, or Internet Explorer to
browse the Web.
Create a Bond
You can create a bond between your device and another device that has
Bluetooth. Once you do this , Blu eto oth d oesn't need to be in dis coverable mode
in order for you to beam information between the two devices; the Bluetooth
radio only needs to be turned on.
1. Make sure that the two dev ice s a re w ith in 10 meters of one another and
that Bluetooth is in discoverable mode on both devices.
2. Tap
> Settings > Connections tab.
Page 31

31
3. Tap Bluetooth > Bonded Devices tab > New. Your device searches for
other Bluetooth devices and displays them in the list.
4. Tap the name of the other device, and then Next.
5. In PIN, enter a PIN of between 1 and 16 characters and tap Next.
6. Enter the same PIN on the other device.
7. If you want, in Name, edit the name of the other device. You may use
any name.
8. Tap Finish.
Select a Device
•
In the list, tap the device with which you want to create a bond.
If the device doesn't appear in the list, make sure that it is turned on, in
discoverable mode, and within 10 meters (30 feet) of your device. Also,
make sure that your device's Bluetooth radio is turned on.
Enter a PIN
•
In PIN, enter a PIN of between 1 and 16 characters, and then tap Next.
You must enter the same PIN on both devices.
Correct the PIN
•
The same PIN must be entered on both devices. Verify the correct
number, enter it in PIN, and then tap Next.
Enter a Name
1. If you want, in Name, edit the name of the device with which you are
creating a bond. You may use any name.
2. Tap Finish.
Page 32

32
Accept a Bond
1. Make sure that Bluetooth is turned on and in discoverable mode.
2. When prompted to bond with the other device, tap Yes.
3. In PIN, enter a PIN of between 1 and 16 characters, and tap Next. You
must enter the same PIN that was entered on the device requesting the
bond.
4. If you want, in Name, edit the name of the device requesting the bond.
5. Tap Finish.
The bond is created. You can now exchange information with the
other device.
Rename a Bond
1. Tap > Settings > Connections tab.
2. Tap Bluetooth > Bonded Devices tab.
3. Tap the bond to rename.
4. In Name, enter a new name for the bond.
5. Tap Finish.
Delete a Bond
1. Tap > Settings > Connections tab.
2. Tap Bluetooth > Bonded Devices tab.
3. Tap and hold the bond to delete.
4. Tap Delete.
Page 33

33
About WLAN
Create a Wireless Connec t ion to a Network
A wireless network can be added either when the network is detected, or
manually by entering settings informatio n.
1.
Install the wireless network card on your Pocket PC. For instructions on
installing and using the wireless network card, see the owner’s manual
for the card.
Page 34

34
2.
To manually enter information, tap and
Settings
. Tap
Connections, Connections
tab,
Network Card
and
Wireless
tab.
Then, tap A
dd new
. If the network was detected, step one is not
necessary.
3.
In the
General
tab, enter a network name. If the network was detected,
the network name is automatically entered and cannot be changed.
4.
From
Connects to
, select what your network connects to,
Work
or
the
Internet
.
5.
To connect to an ad-hoc connection, select This is a device-tocomputer (ad-hoc) connection.
To start the connection, use one of the programs listed in the preceding
section. Once connected, you can perform the same activities as listed in
the preceding section.
NOTE: Though your Pocket PC incorporates Bluetooth and wireless LAN
functions, you cannot use both functions at the same time.
 Loading...