

Page 1

15EX-TA
15EX-TA
TESTING TECHNOLOGY DEPARTMENT / TSSC
TESTING TECHNOLOGY DEPARTMENT / TSSC
BY
BY
::::
::::
Richard Wang
Richard Wang
JUN. 2001
JUN. 2001
SERVICE MANUAL & TROUBLESHOOTING GUIDE FOR
SERVICE MANUAL & TROUBLESHOOTING GUIDE FOR
SERVICE MANUAL & TROUBLESHOOTING GUIDE FOR
Page 2

LCD MONITOR 15EX
LCD MONITOR 15EX--
TA MAINTENANCE
TA MAINTENANCE
1
1.
1. 1515EXEX--
TA Product Specification
TA Product Specification
----------------------------------------------------------------
----------------------------------------------------------------
----------------------
----------------------
1.1 Scope---------------------------------------------------------------------------------------------------------------------------------------
1.2 Main Characteristics-------------------------------------------------------------------------------------------------------------------
1.3 Hardware System Block Diagram---------------------------------------------------------------------------------------------------
1.4 Power Supply ( AC - Adapter )------------------------------------------------------------------------------------------------------
2. System Assembly & Disassembly
2. System Assembly & Disassembly
----------------------------------------------------------------
----------------------------------------------------------------
---------------------
---------------------
2.1 System View------------------------------------------------------------------------------------------------------------------------------
2.2 System Disassembly---------------------------------------------------------------------------------------------------------------------
3. Definition & Location Of Connectors / Jumpers
3. Definition & Location Of Connectors / Jumpers
----------------------------------------------------------------
--------------------------------------------------------------------
3.1 15EX-TA Interface Board-------------------------------------------------------------------------------------------------------------
3.2 Power Jack Board-----------------------------------------------------------------------------------------------------------------------
3
3.3 Invertor Board---------------------------------------------------------------------------------------------------------------------------
3.4 Phone Jack Board-----------------------------------------------------------------------------------------------------------------------
3.5 Key Switch Board-----------------------------------------------------------------------------------------------------------------------
3.6 Relation Of All Components----------------------------------------------------------------------------------------------------------
4.
4.
Definition & Location Of Major Components
Definition & Location Of Major Components
----------------------------------------------------------------
----------------------------------------------------------------
-----
-----
5. Pin Description Of Major Components
5. Pin Description Of Major Components
----------------------------------------------------------------
----------------------------------------------------------------
-------------
-------------
5.1 gmZAN1 Flat Panel Controller IC---------------------------------------------------------------------------------------------------
6. 15EX
6. 15EX--
TA System Block Diagram
TA System Block Diagram
----------------------------------------------------------------
----------------------------------------------------------------
---------------------
---------------------
6.1 System Block Diagram-----------------------------------------------------------------------------------------------------------------
6.2 15EX-TA Interface Board Block Diagram-----------------------------------------------------------------------------------------
CONTENTS
CONTENTS
3
3
4
15
16
17
17
20
27
27
28
28
28
29
30
31
32
32
39
39
40
Page 3

LCD MONITOR 15EX
LCD MONITOR 15EX--
TA MAINTENANCE
TA MAINTENANCE
2
7.
7.
Trouble Shooting
Trouble Shooting
----------------------------------------------------------------
----------------------------------------------------------------
-----------------------------------------
-----------------------------------------
7.1 No Power----------------------------------------------------------------------------------------------------------------------------------
7.2 No Display ( System Fail ) Or Display Abnormal---------------------------------------------------------------------------------
7.3 OSD Function Or Display Abnormal------------------------------------------------------------------------------------------------
7.4 No Back light-----------------------------------------------------------------------------------------------------------------------------
7.5 PC Can’t Detect LCD Monitor Type------------------------------------------------------------------------------------------------
7.6 LCD Monitor Audio Function Abnormal------------------------------------------------------------------------------------------
8. Spare Parts List
8. Spare Parts List
----------------------------------------------------------------
----------------------------------------------------------------
-------------------------------------------
-------------------------------------------
9. System Explode View
9. System Explode View
----------------------------------------------------------------
----------------------------------------------------------------
------------------------------------
------------------------------------
10. Circuit Diagram
10. Circuit Diagram
----------------------------------------------------------------
----------------------------------------------------------------
-----------------------------------------
-----------------------------------------
11. Reference
11. Reference
----------------------------------------------------------------
----------------------------------------------------------------
--------------------------------------------------
--------------------------------------------------
CONTENTS
CONTENTS
41
42
46
48
50
52
54
56
61
64
74
Page 4

LCD MONITOR 15EX
LCD MONITOR 15EX--
TA MAINTENANCE
TA MAINTENANCE
3
1. 15EX-TA PRODUCT SPECIFICATION
1.1. SCOPE
The MiTAC 15EX-TA (TFT with analog signal input) is a high resolution (max. resolution 1024 X 768) color LCD monitor
which uses 15” high contrast TFT-LCD panel.
This monitor supplies user with following features:
On screen display adjustment function
Multi-sync process
DPMS power saving function
VESA standard compatible ME design
Swivel function of display panel
Plug & Play (DDC1/2B) function
Auto Brightness Adjustment.
Audio amplifier(optional)
Earphone output(optional)
Microphone input(optional)
Page 5
LCD MONITOR 15EX
LCD MONITOR 15EX--
TA MAINTENANCE
TA MAINTENANCE
4
1.2 MAIN CHARACTERISTICS
1.2.1 LCD PANEL:
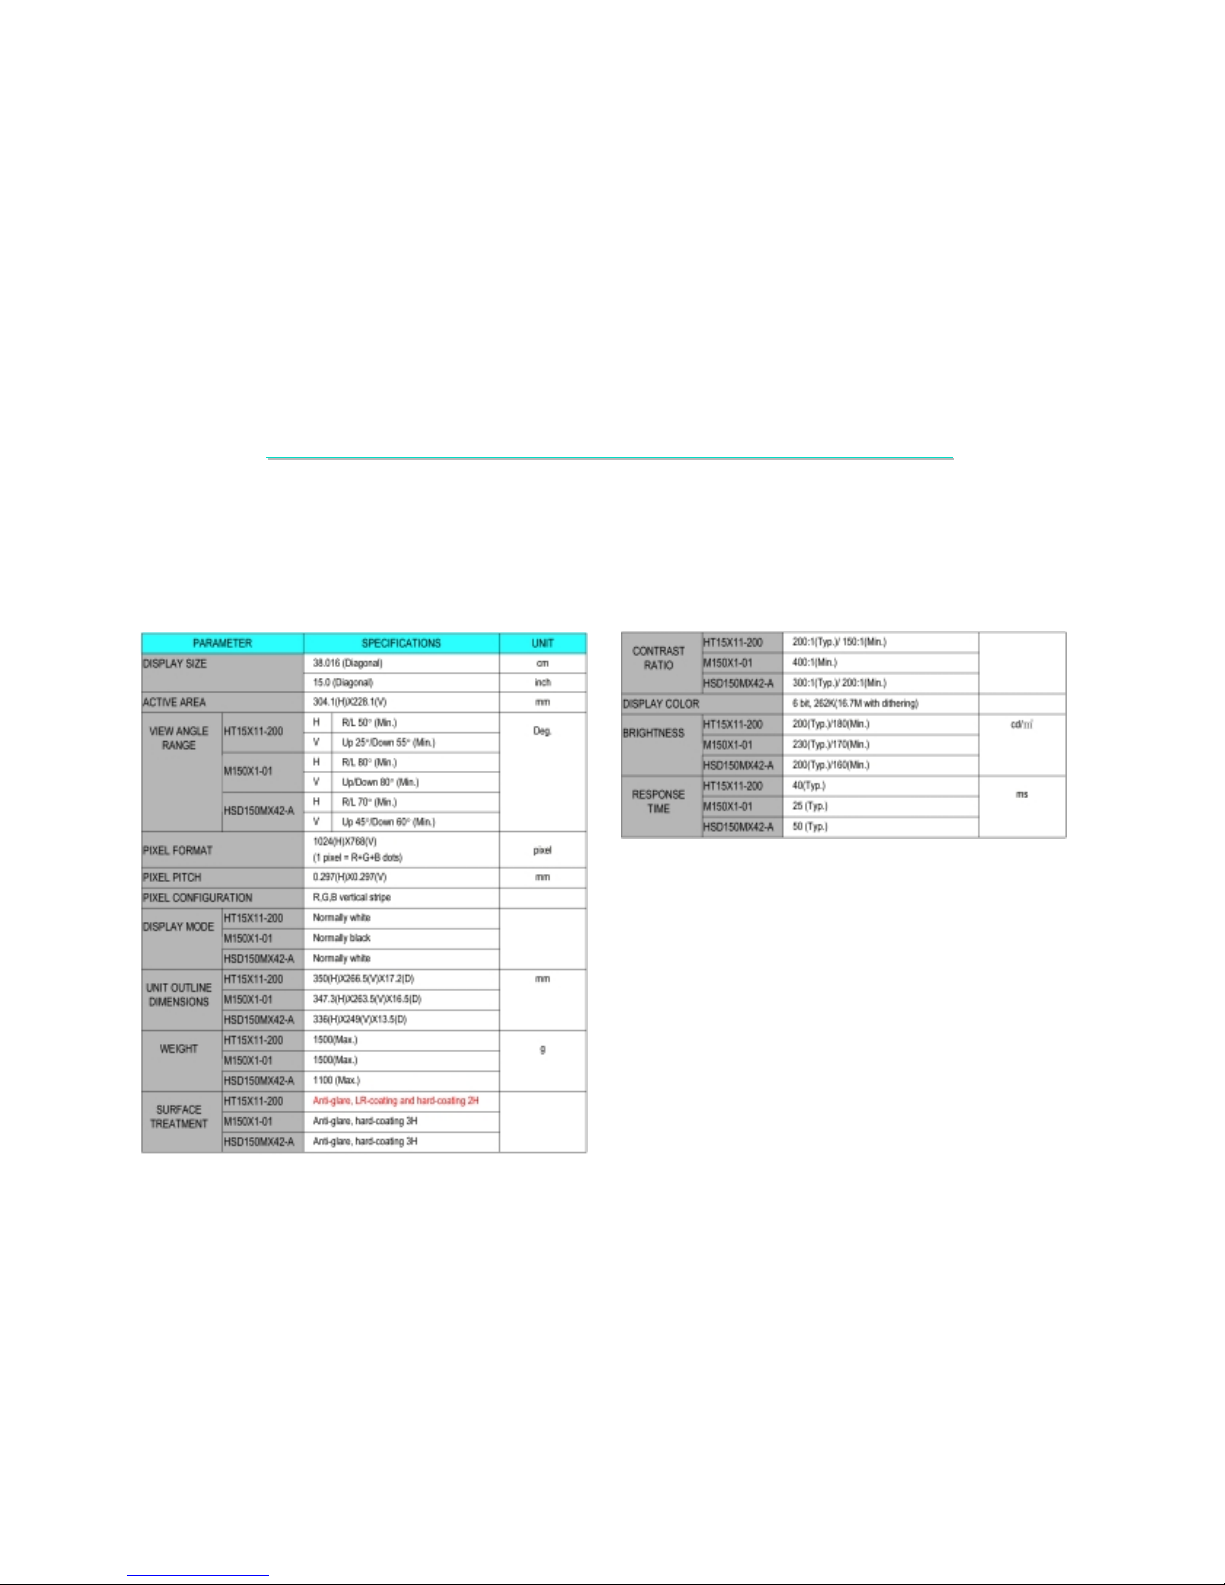
LCD panel: 15” color TFT-LCD
Model no.: (1) HYUNDAI HT15X11-200; (2) CHI MEI M150X1-01; (3) HANNSTAR HSD150MX42-A
Page 6

LCD MONITOR 15EX
LCD MONITOR 15EX--
TA MAINTENANCE
TA MAINTENANCE
5
1.2.2 SIGNAL INPUT CABLE:
High density 15 pins “D” type, male connector cable.
1.2.3 VIDEO SIGNAL:
Max. 80 MHz bandwidth
Input video voltage range: 0.6~0.95 Vp-p, typ.: 0.7 Vp-p
Impedance: 75Ω±5% / 50 pF(max.)
1.2.4 SCAN FREQUENCY:
Horizontal frequency: 24.8 ~ 60 kHz
Vertical frequency: 56 ~ 75 Hz
Polarity (positive or negative): 3V ~ 5V
Input impedance: 470 (min.)/ 1000 pF(max.)
1.2.5 MULTI-SYNC PROCESS:
Separate SYNC is acceptable.
1.2.6 VESA STANDARD WALL MOUNTING.
1.2.7 SWIVEL:
Up/Down: 25º/-3º
1.2.8 PLUG & PLAY:
DDC1/DDC2B
Page 7
LCD MONITOR 15EX
LCD MONITOR 15EX--
TA MAINTENANCE
TA MAINTENANCE
6
1.2.9 EXTERNAL CONTROLLER & OUTLET:
LCD control key: MENU, SELECT, - , + , BRIGHTNESS, POWER.
1.2.10 AC INPUT POWER:
Max. 264 Vac/50 Hz, Min. 90 Vac/60 Hz
Normal 100 ~ 240 Vac/60 ~ 50 Hz
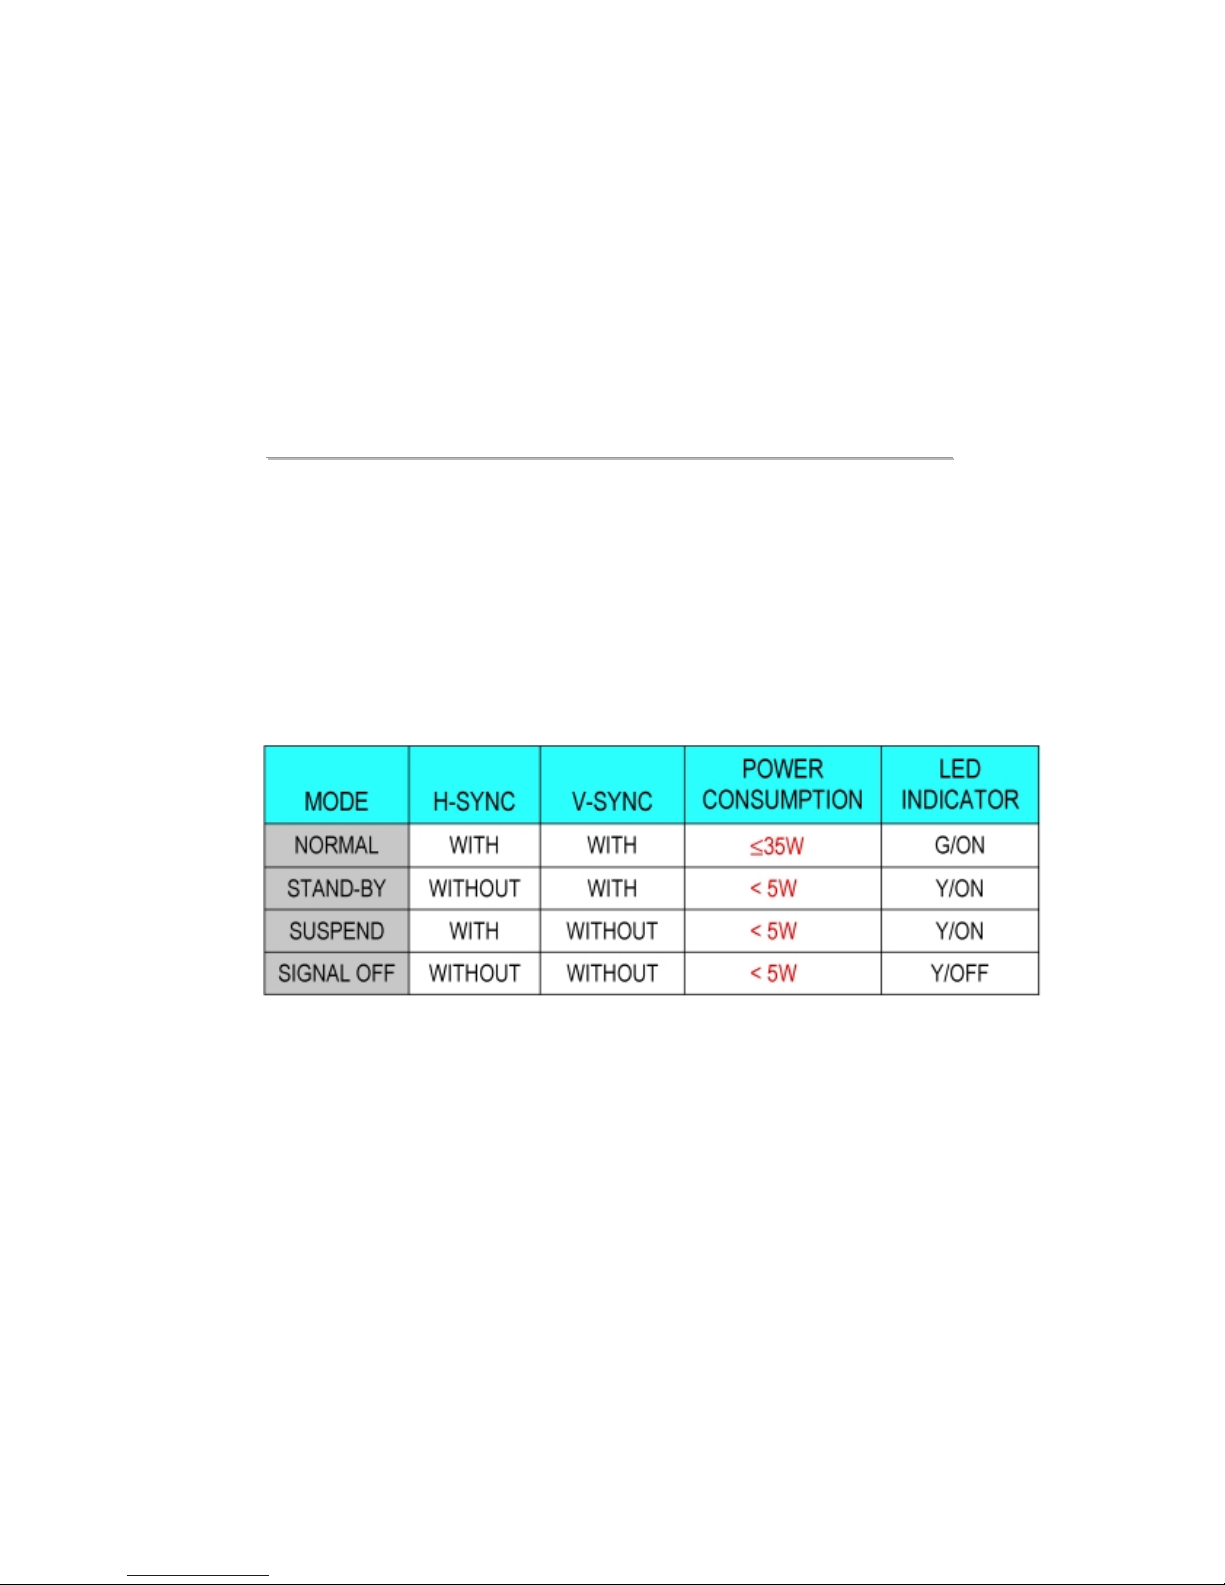
1.2.11 POWER SAVING FUNCTION & INDICATOR COMPLY WITH VESA
DPMS
1.2.12 Auto Brightness Adjustment:
Push Hot Key to select function.
Page 8
LCD MONITOR 15EX
LCD MONITOR 15EX--
TA MAINTENANCE
TA MAINTENANCE
7
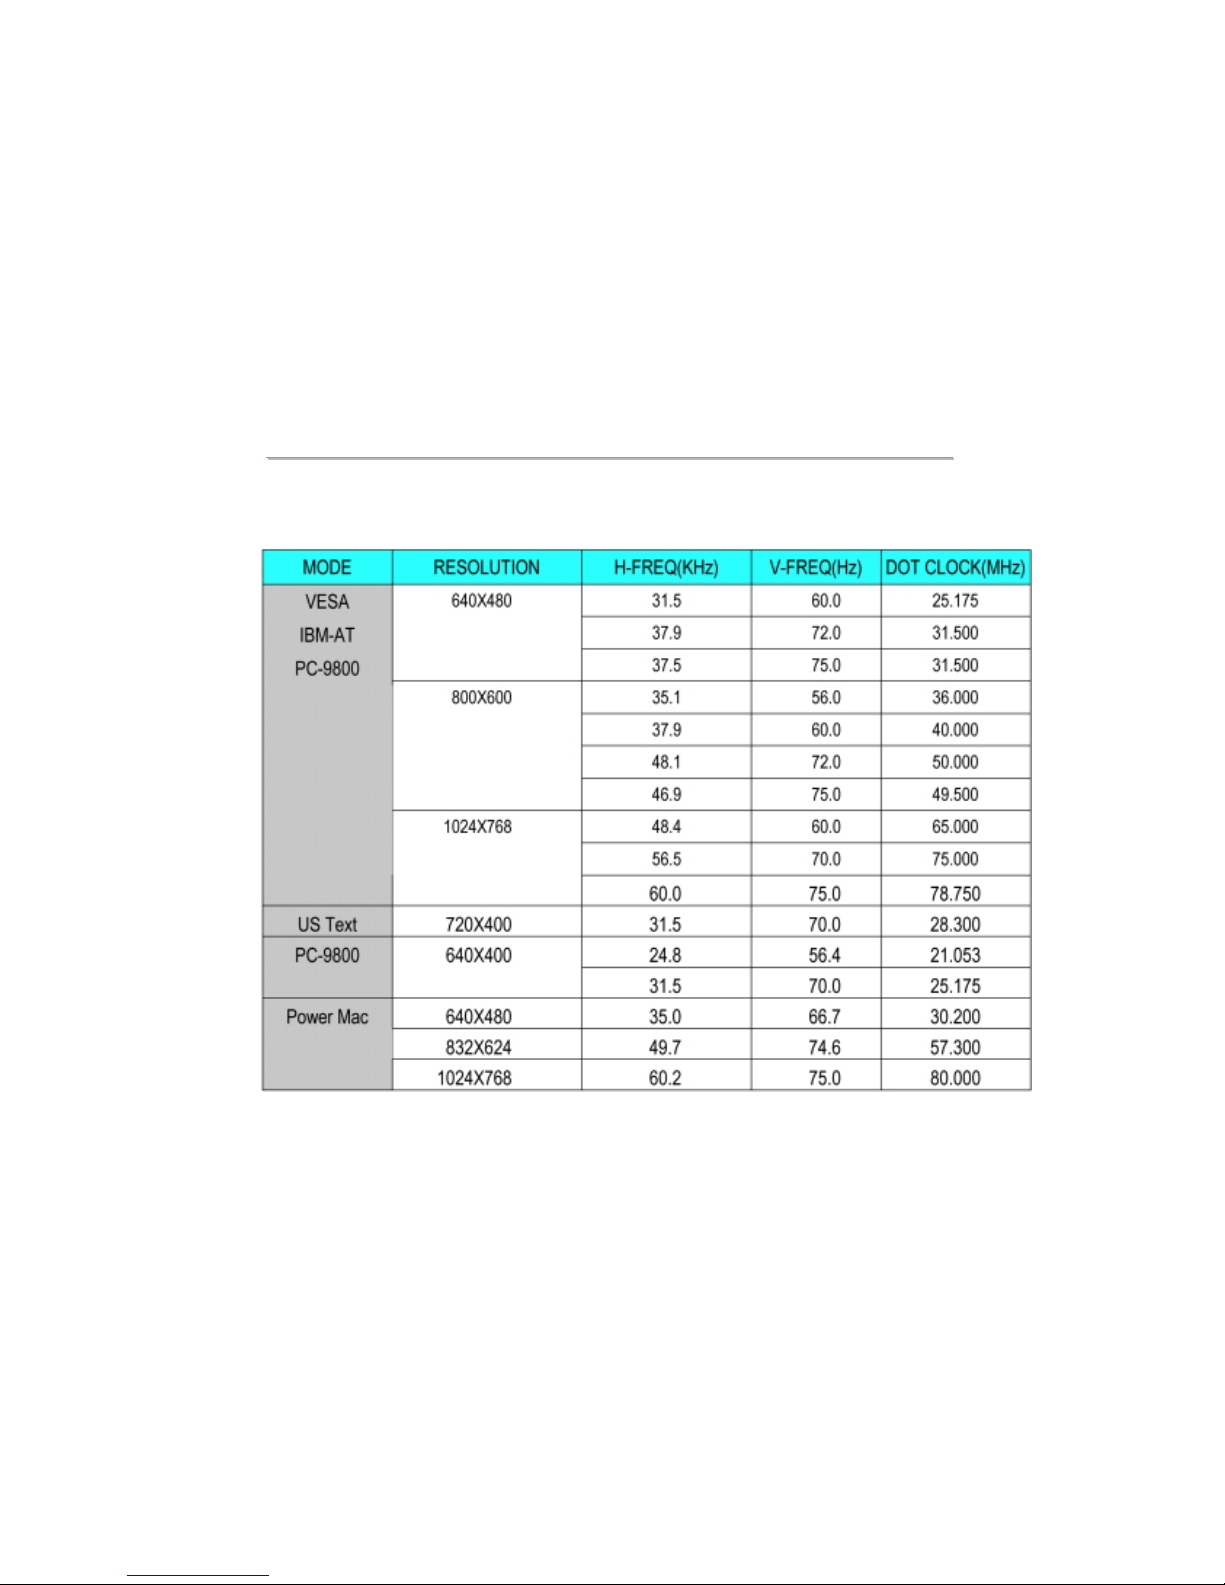
1.2.13 COMPATIBLE TIMING CHART:
Page 9
LCD MONITOR 15EX
LCD MONITOR 15EX--
TA MAINTENANCE
TA MAINTENANCE
8
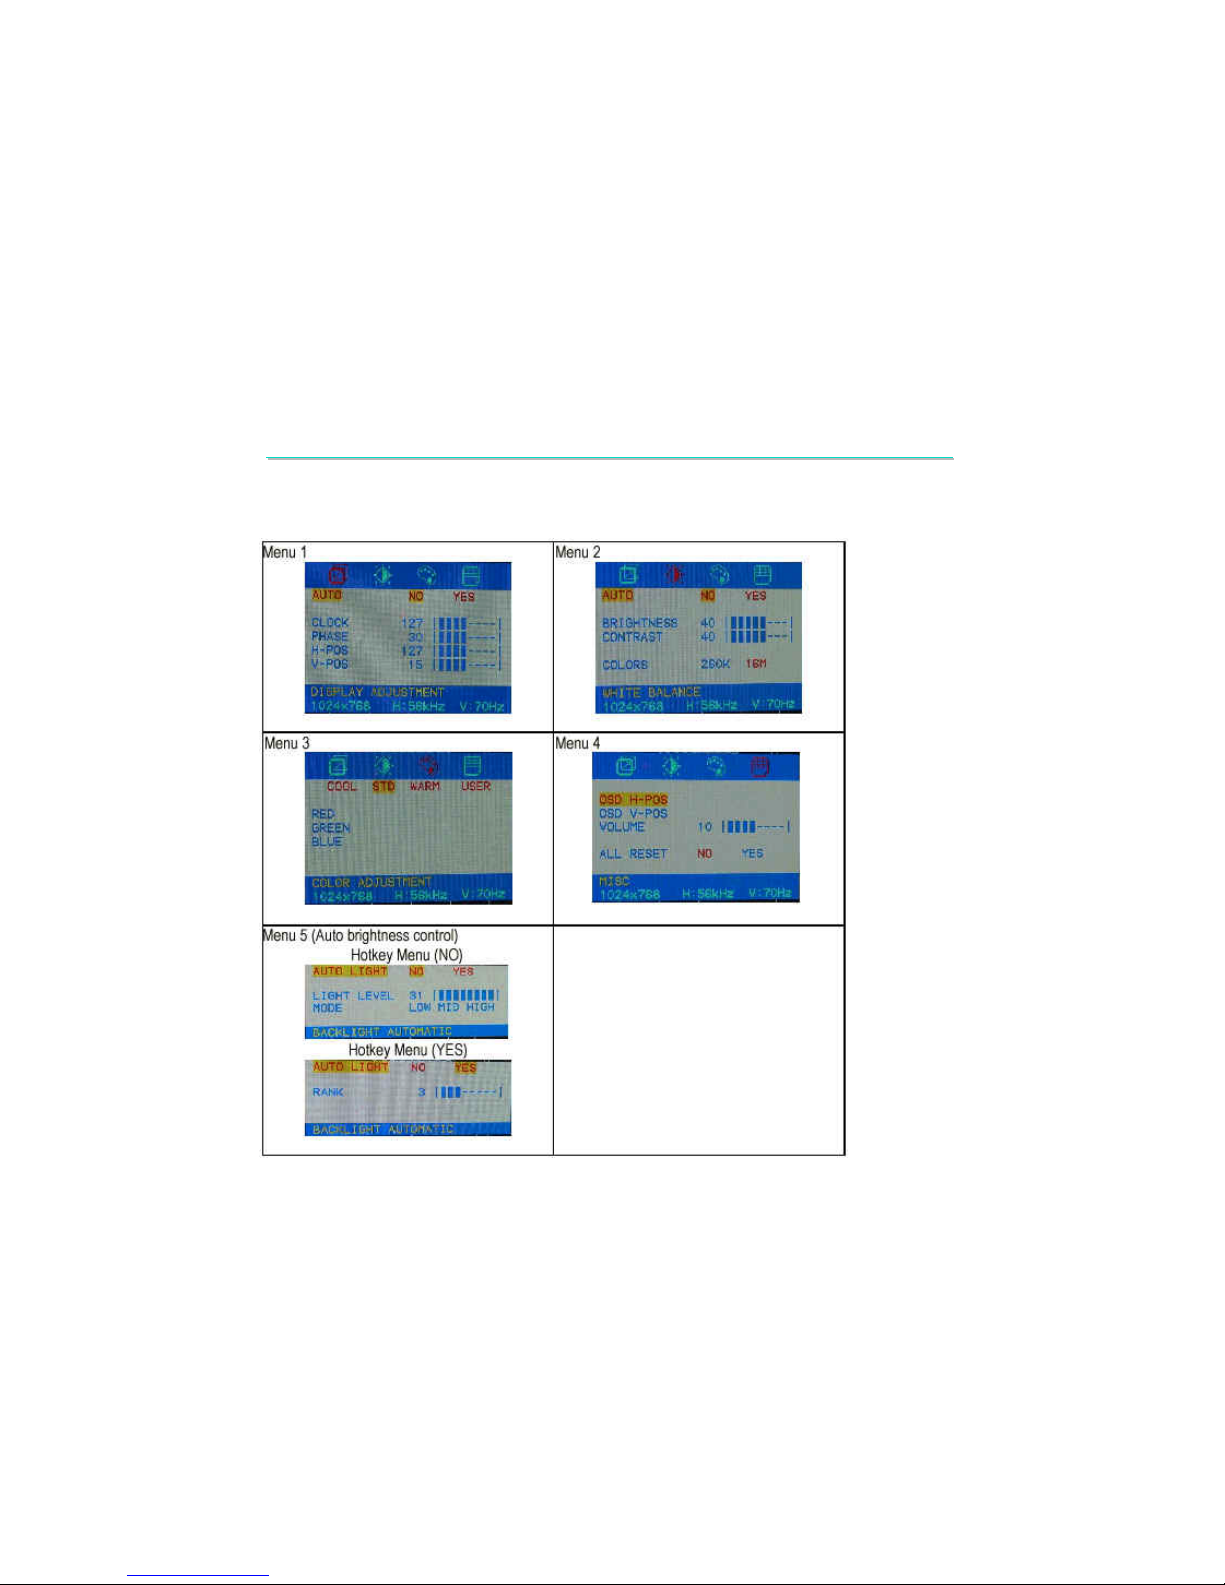
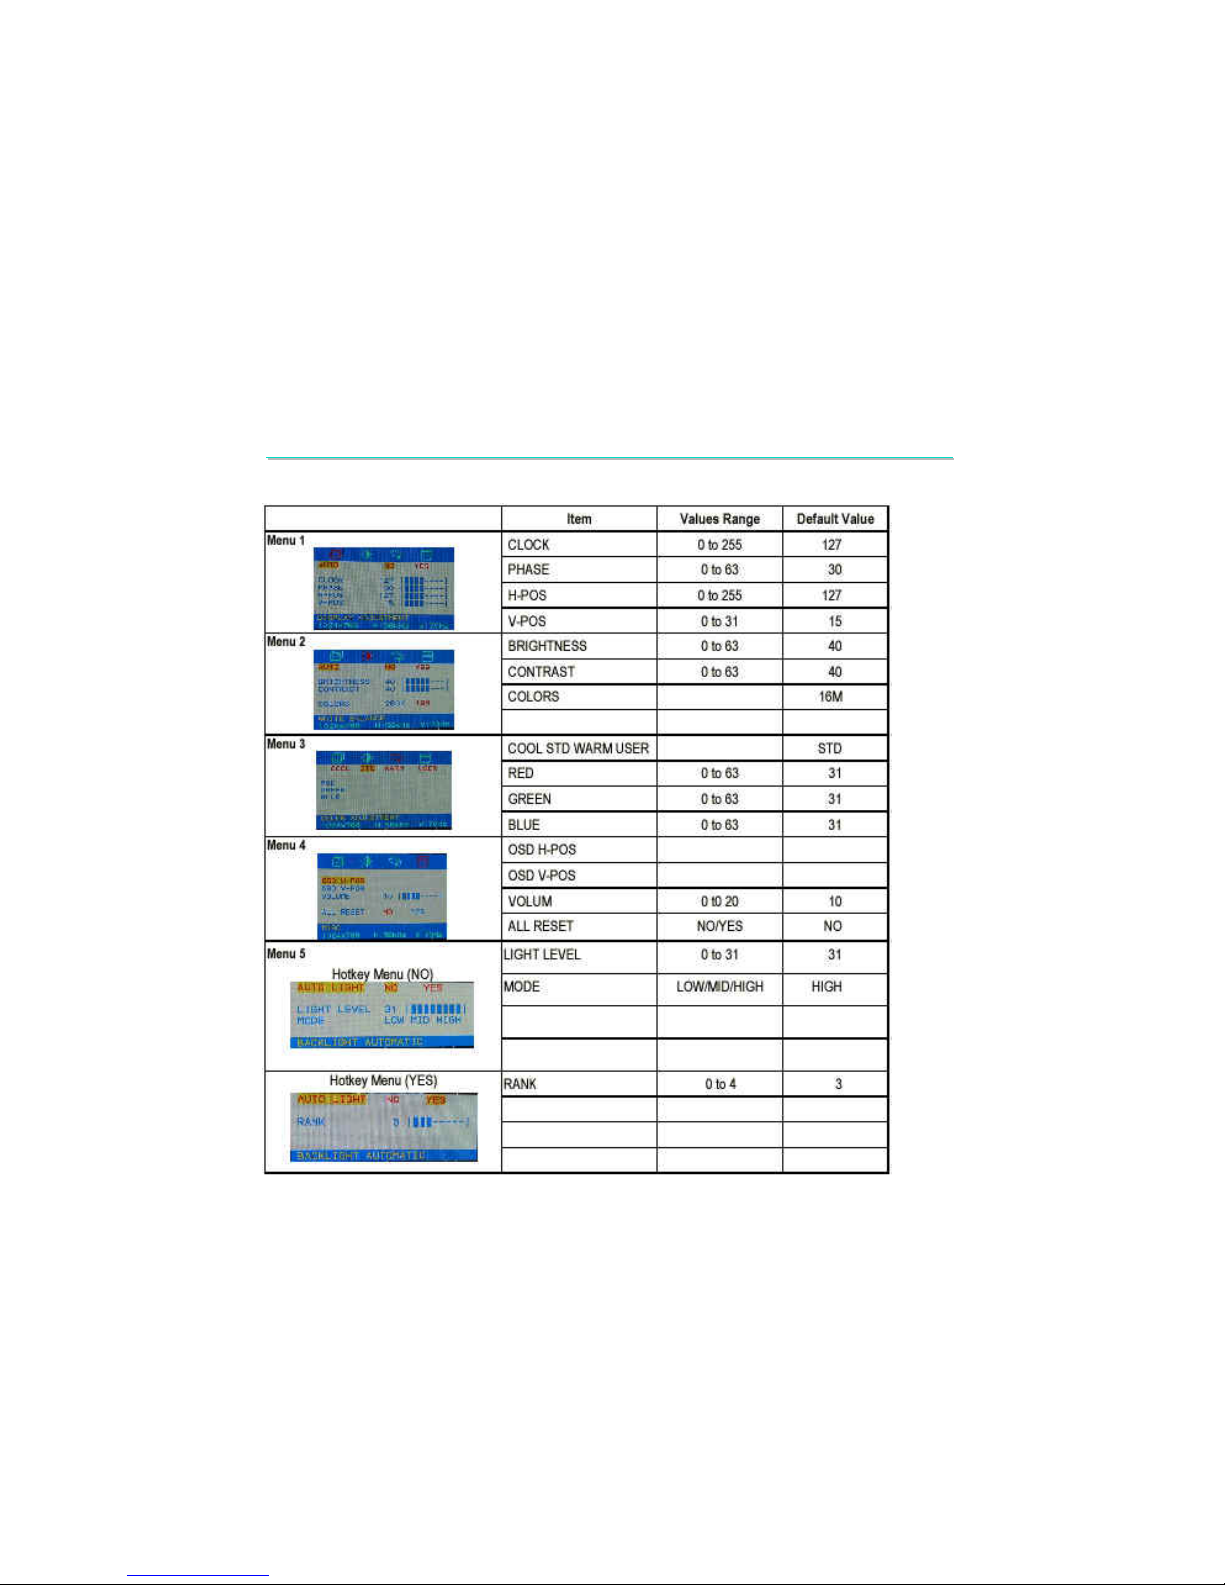
1.2.14 : MAIN OSD MENU
Page 10
LCD MONITOR 15EX
LCD MONITOR 15EX--
TA MAINTENANCE
TA MAINTENANCE
9
Page 11
LCD MONITOR 15EX
LCD MONITOR 15EX--
TA MAINTENANCE
TA MAINTENANCE
10
Key definition :
Menu, Select, Left (Decrease, ←), Right (Increase,→ ) and Power 5 keys.
Select Key : Only one shot of Select Key is available. (Continuous pressing is not available.)
←, → Key : Continuous pressing is available.
Key Operation :
Pushing "Menu" key, the OSD window will pop out. The default value will focus on the first icon.
Keep pushing "Menu" key, the highlight will go to next item. The sequence is "DISP ADJUSTMENT"menu
→ "WHITE BALANCE" menu → "COLOR ADJUSTMENT" menu → "MISC" menu.
The different icon will come out different OSD items. Using "Select" key can choose different item. The
"Decrease" and "Increase" keys will change the value for that item which is selected by "Select“ key.
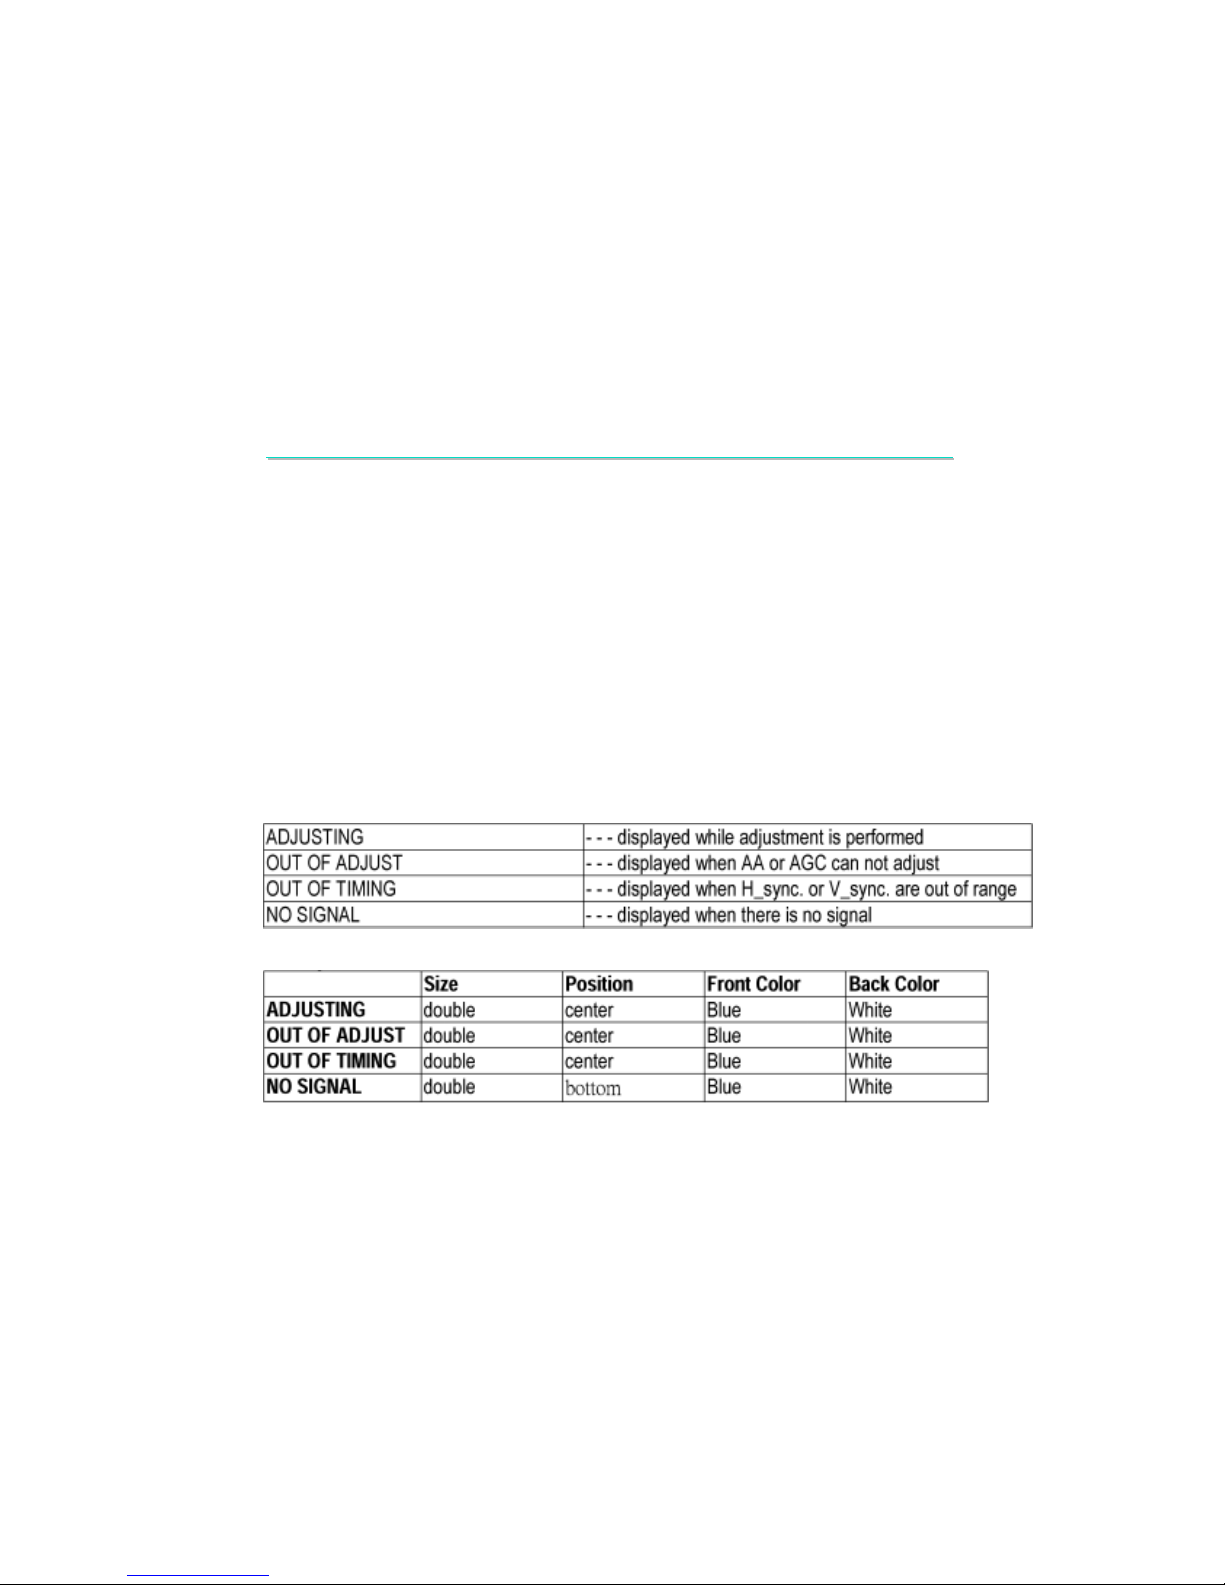
Display Message :
Message :
Page 12
LCD MONITOR 15EX
LCD MONITOR 15EX--
TA MAINTENANCE
TA MAINTENANCE
11
ADJUSTING
NO SIGNAL
(SCREEN)
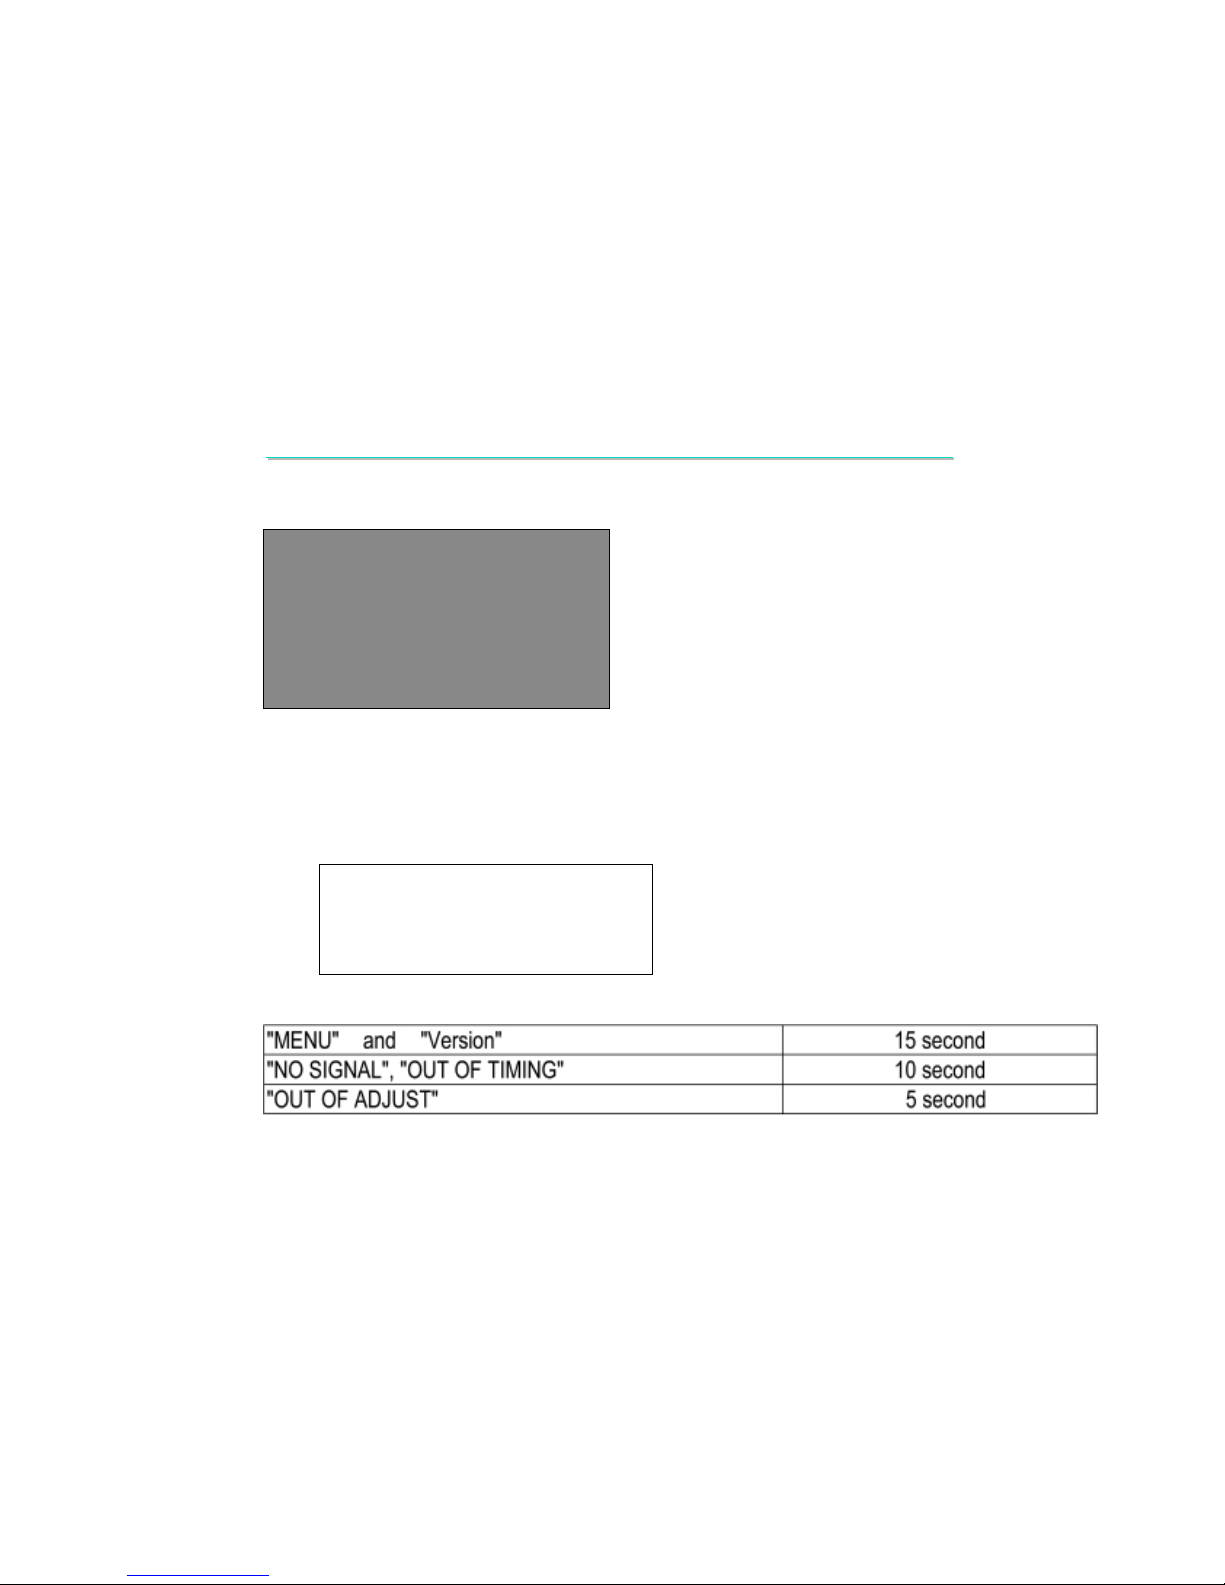
Message Displayed Position :
Secret Key Operation :
AGING : "Menu" + "Select" + "Right(->)" and "Power" ON
VERSION : "Menu" + "Left(<-)" + "Right(->)" and "Power" ON
Version Displayed Position :
MODEL NAME : T15EX
VERSION : R00
CKS : DC12
OSD OFF time :
OSD Value: Each OSD value is memorized on EEPROM.
Page 13
LCD MONITOR 15EX
LCD MONITOR 15EX--
TA MAINTENANCE
TA MAINTENANCE
12
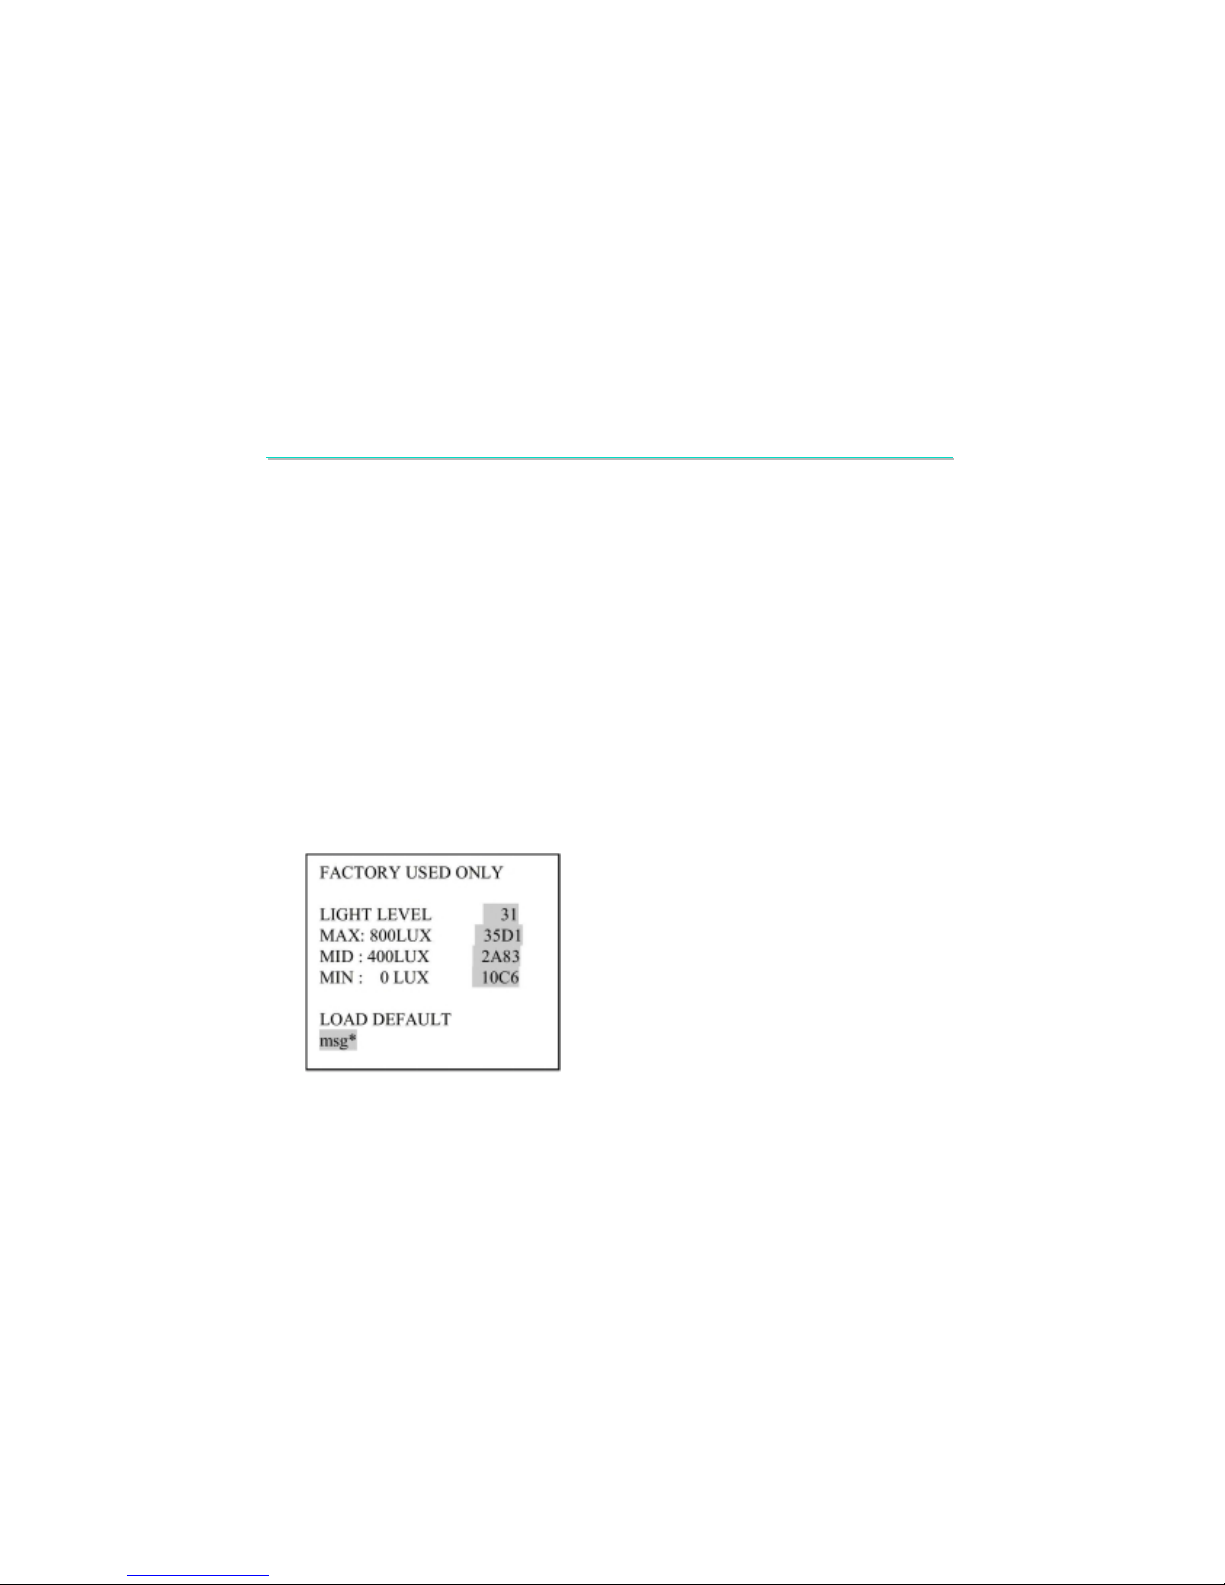
1.2.15 : AUTO BRIGHTNESS OSDAuto: Backlight (Sensor Board) Calibrate
Menu
Press “Menu Key + Hot Key + Power Key” will enter the “FACTORY USED ONLY” menu.
Press “Select Key” to select the item.
Press “Menu Key” to execute the function.
Press “Power Key” to exit.
This menu will set the auto backlight rank to 0 and turn on the auto mode.
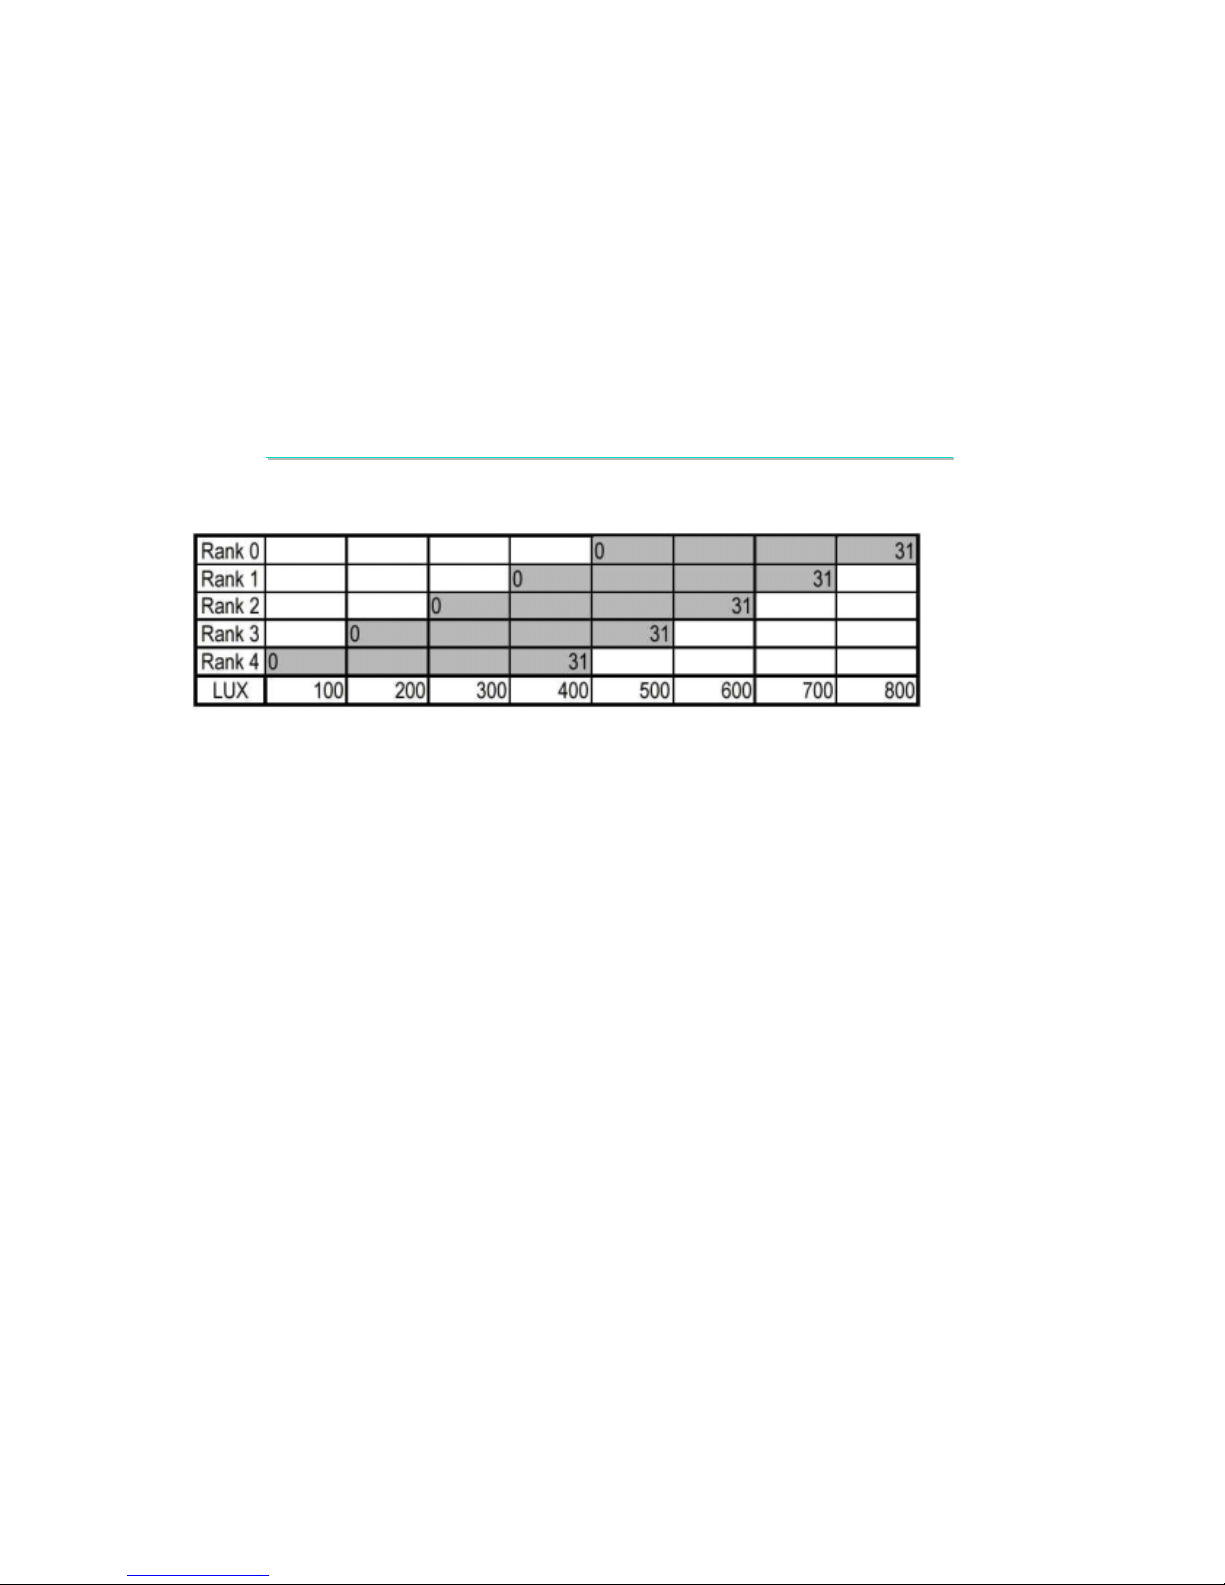
800LUX light will be mapped to LIGHT LEVEL value 31 automatically and 400LUX light will be mapped to
LIGHT LEVEL value 0 automatically.
When exit this menu “All Reset” will be done.
Page 14

LCD MONITOR 15EX
LCD MONITOR 15EX--
TA MAINTENANCE
TA MAINTENANCE
13
<Operation>
LIGHT LEVEL item: The number is response the LIGHT LEVEL value anytime. (Number range: 0~31)
Press “select key” will go to next item.
MAX: 800LUX item: This will set the maximum value for program. (HEX Number)
Put the 800Lux light to sensor board, and press “menu key” to start set value procedure. (When
it’s running, the number is flashing until the procedure end.)
Press “menu key” will run this procedure again.
Press “select key” will go to next item.
MID: 400LUX item: This will set the middle value for program. (HEX Number)
Put the 400Lux light to sensor board, and press “menu key” to start set value procedure. (When
it’s running the number is flashing until the procedure end.)
Press “menu key” will run this procedure again.
Press “select key” will go to next item.
MIN: 0 LUX item: This will set the minimum value for program. (HEX Number)
Put the 0Lux light to sensor board, and press “menu key” to start set value procedure. (When it’s
running the number is flashing until the procedure end.)
Press “menu key” will run this procedure again.
Press “select key” will go to next item.
LOAD DEFAULT item: This will load default value for program.
Press “menu key” to execute this procedure.
msg* item: This will show the Warning or Error.
When (MAX-MID)<2048 it will show “Warning: small range”. If it’s happen please check the sensor
board output frequency range at 0Lux, 400Lux and 800Lux, and restart set MAX, MID, MIN value again.
When (MAX-MID)<1750 it will show “ERROR”. If it’s happen please analysis the sensor board.
EXIT: Press “Power Key”, then it will exit the “FACTORY USED ONLY” and “All Reset” will be done.
Note: Normal case the value relation is MAX>MID>MIN, and (MAX-MID) should over 2048.
Page 15
LCD MONITOR 15EX
LCD MONITOR 15EX--
TA MAINTENANCE
TA MAINTENANCE
14
Relation with LUX from Rank 0 to Rank 4.
Note : 0~31 is LIGHT LEVEL.
Page 16
LCD MONITOR 15EX
LCD MONITOR 15EX--
TA MAINTENANCE
TA MAINTENANCE
15
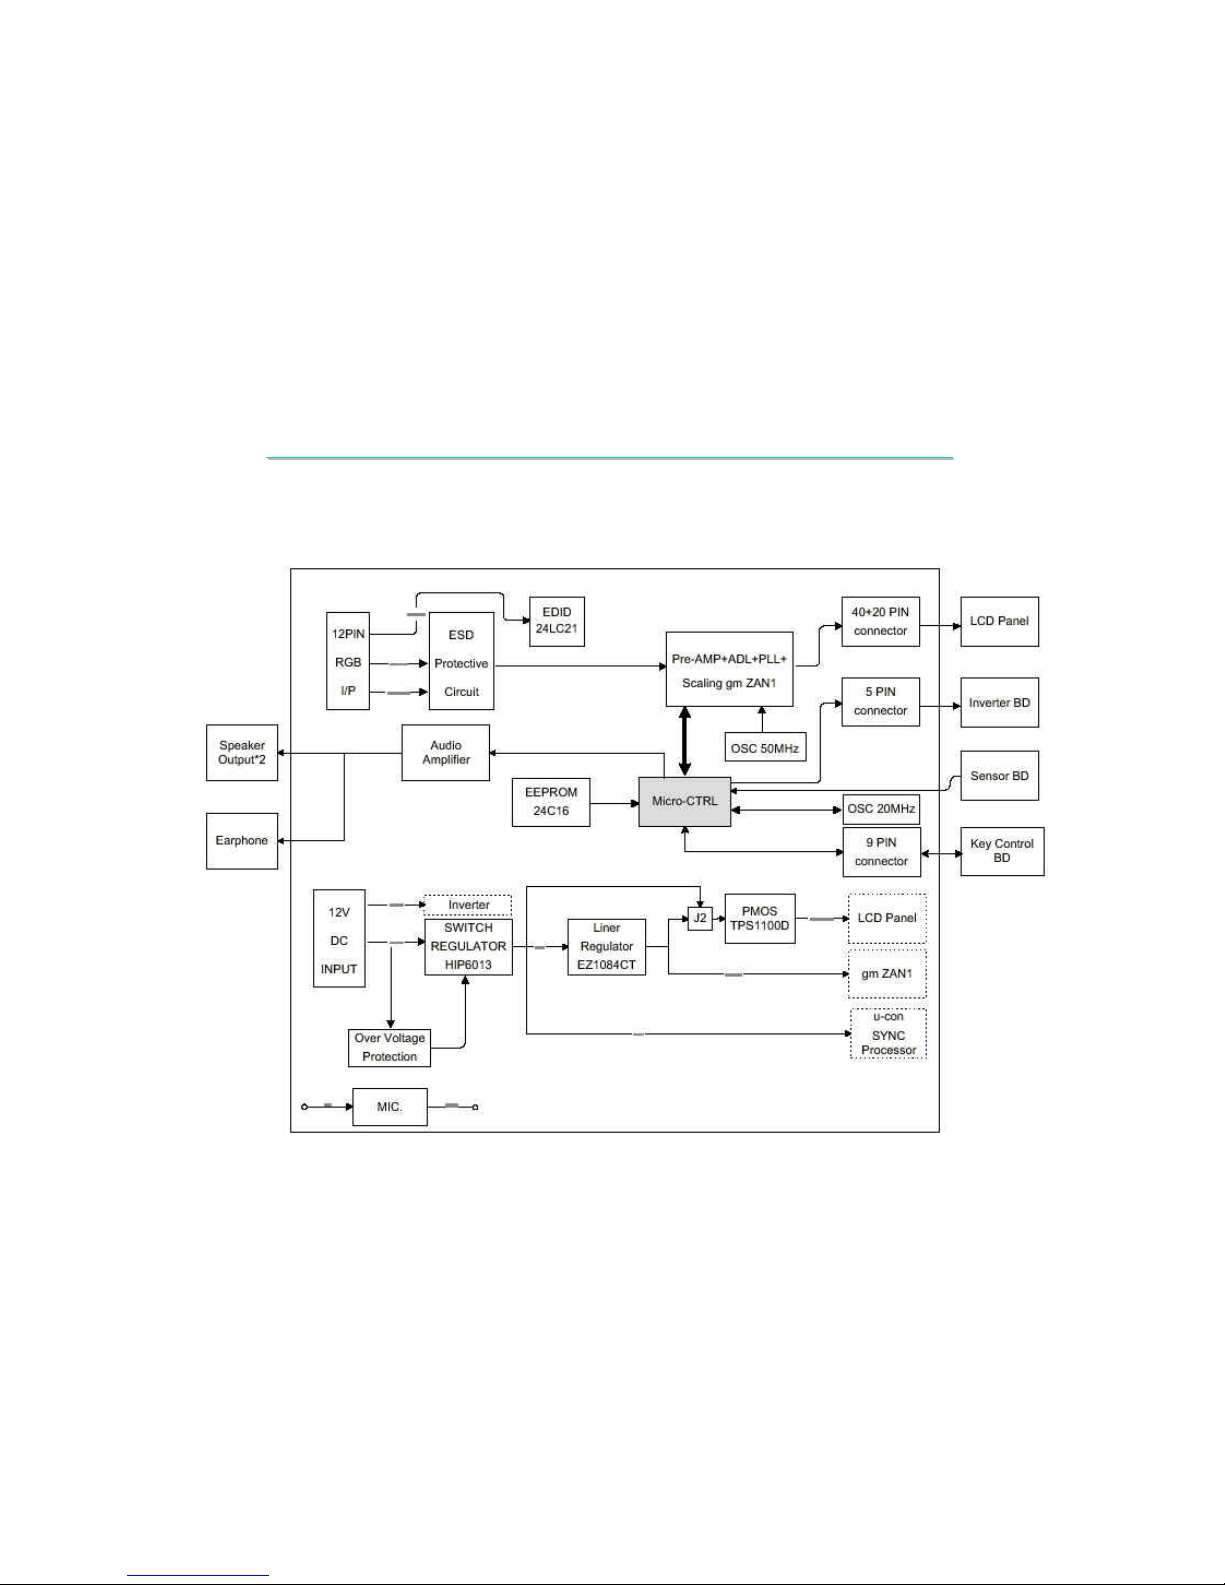
1.3. HARDWARE SYSTEM BLOCK DIAGRAM
Page 17
LCD MONITOR 15EX
LCD MONITOR 15EX--
TA MAINTENANCE
TA MAINTENANCE
16
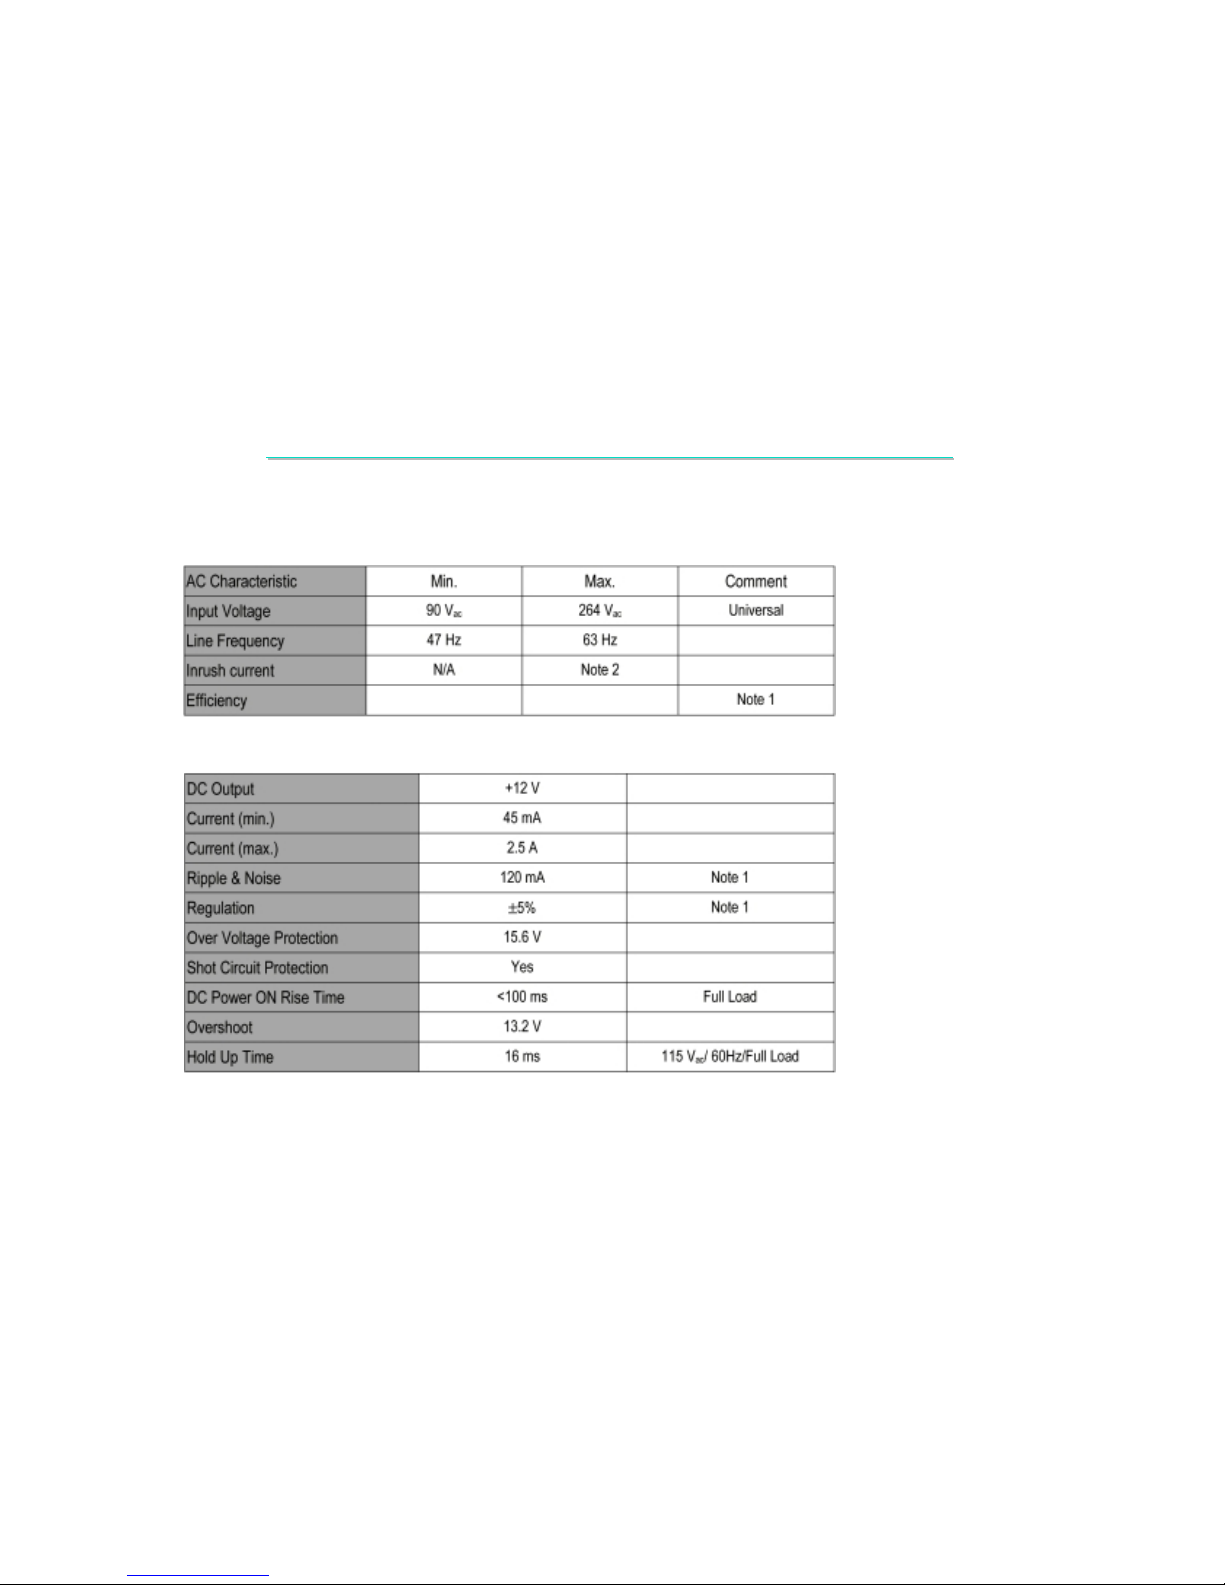
1.4 POWER SUPPLY (AC-ADAPTER)
Model name: CAPI-208-98010M
Note 1: 68%(min.) at full load, 115Vac/60Hz
Note 2: No max. limits but in hot start shall no damage & Fuse could not open.
Note 1: The ripple and regulation shall be maintained in the SPEC for all combinations of below condition:
min. & max. output current.
min. & max. AC input voltage.
min. & max. AC input frequency.
Page 18
LCD MONITOR 15EX
LCD MONITOR 15EX--
TA MAINTENANCE
TA MAINTENANCE
17
2.
2.
System Assembly & Disassembly
System Assembly & Disassembly
2.1 System View
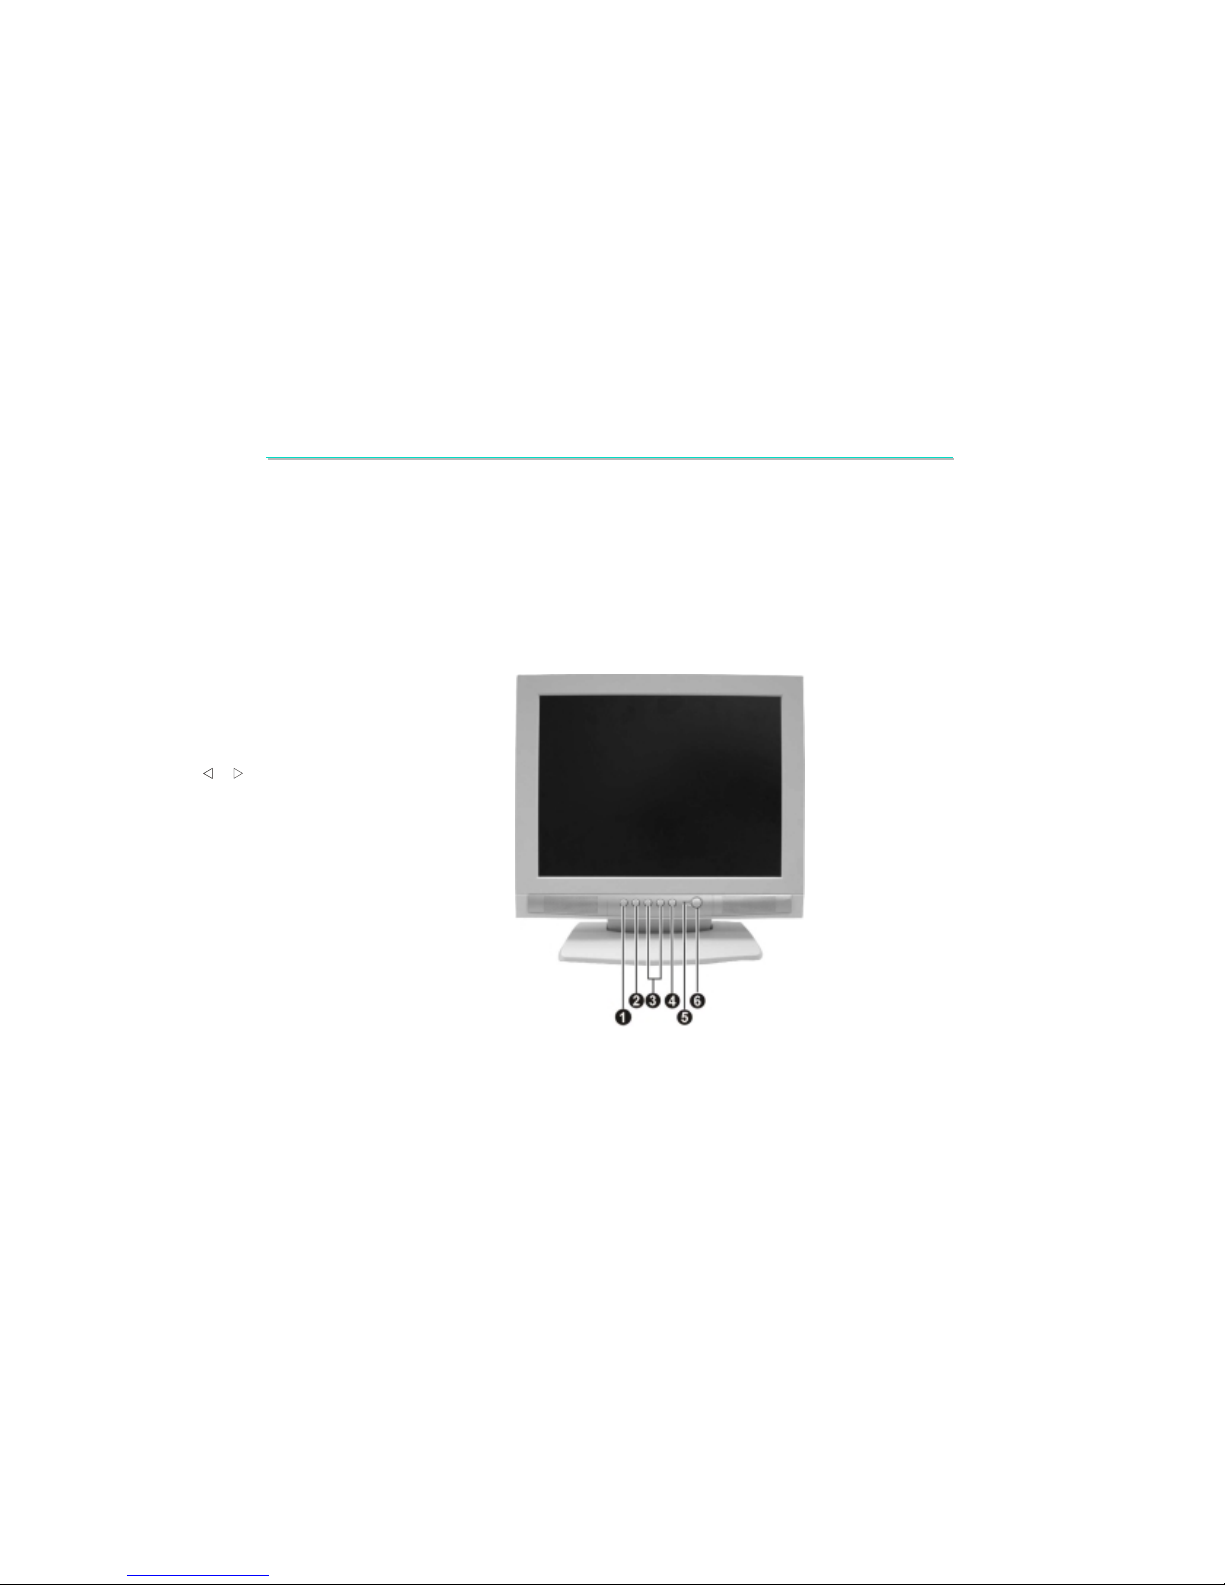
2.1.1 Front View
Menu Button
Select Button
/ Buttons
Auto Adjustment Button
Power Indicator
Power Button
Page 19
LCD MONITOR 15EX
LCD MONITOR 15EX--
TA MAINTENANCE
TA MAINTENANCE
18
2.
2.
System Assembly & Disassembly
System Assembly & Disassembly
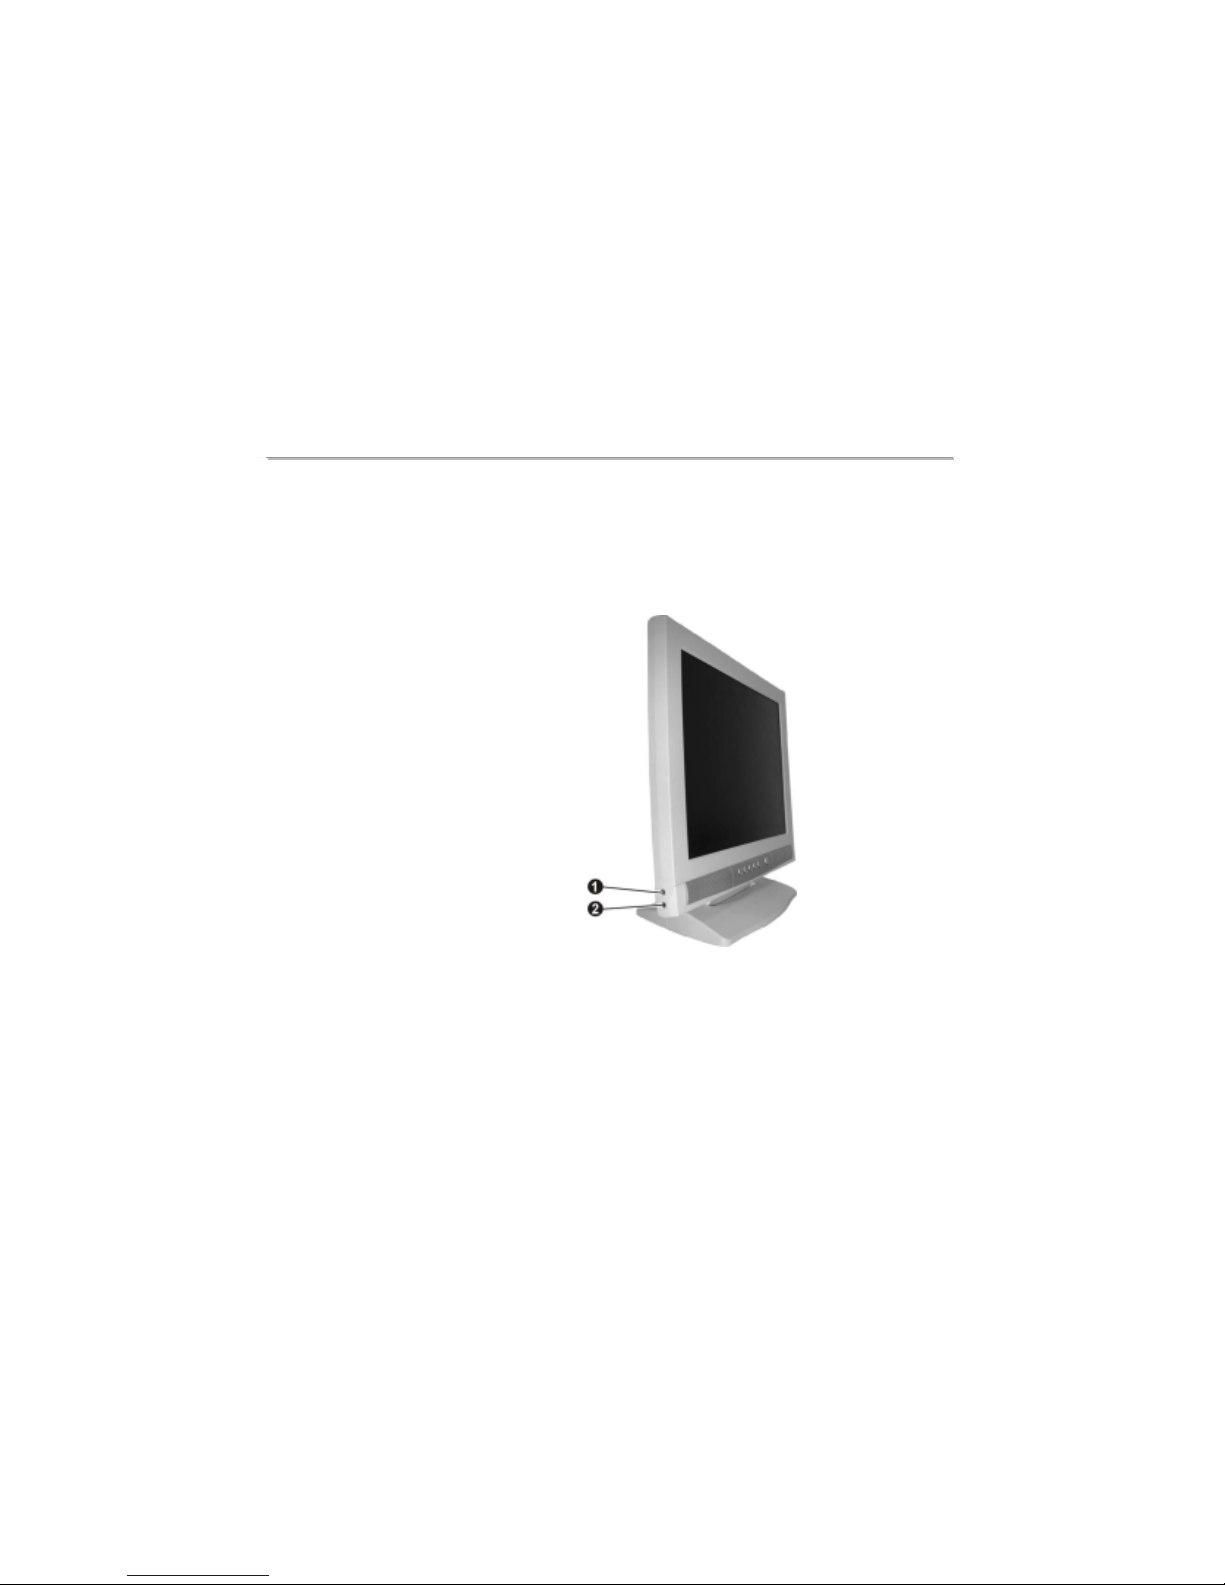
2.1.2 Side View
Microphone Input Connector
Headphone Output Connector
Page 20
LCD MONITOR 15EX
LCD MONITOR 15EX--
TA MAINTENANCE
TA MAINTENANCE
19
2.
2.
System Assembly & Disassembly
System Assembly & Disassembly
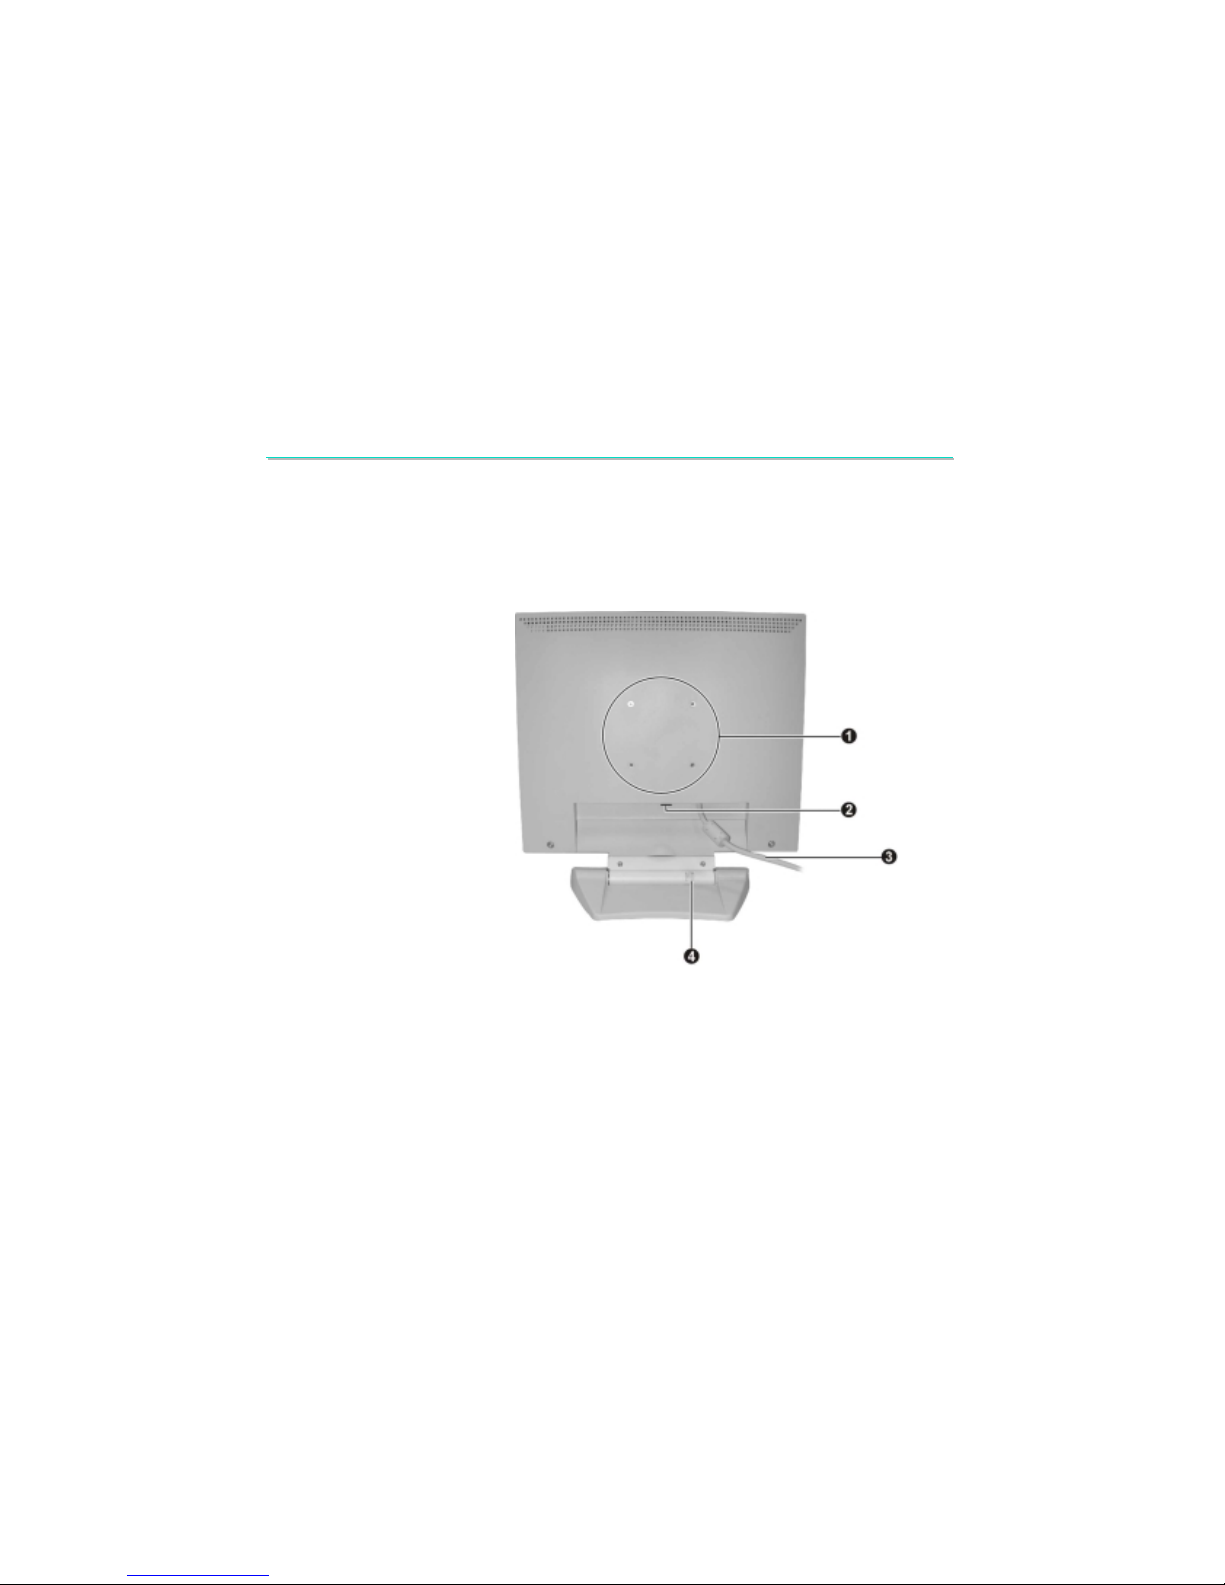
2.1.3 Rear View
VESA Mounting Holes
Power Connector
Signal Cable
Latch
Page 21

LCD MONITOR 15EX
LCD MONITOR 15EX--
TA MAINTENANCE
TA MAINTENANCE
20
2.
2.
System Assembly & Disassembly
System Assembly & Disassembly
2.2 System Disassembly
The section discusses at length each major component for disassembly/reassembly and show
corresponding illustrations.
CAUTION: Before you start to install/replace these modules, 1) Turn off the power button
on the rear panel of the monitor; 2) Disconnect the power cord from the electrical outlet and
then from the monitor.
NOTE: During disassembly, 1) Label each cable as you disconnect it, noting its position and
routing; 2) Keep all the screws.
Page 22

LCD MONITOR 15EX
LCD MONITOR 15EX--
TA MAINTENANCE
TA MAINTENANCE
21
2.
2.
System Assembly & Disassembly
System Assembly & Disassembly
2.2.1 LCD Panel
Disassembly
1. Remove the screw cover on the rear side of the monitor. (Figure 2-1)
2. Remove three screws. (Figure 2-2)
Figure 2-1 Figure 2-2
Page 23
LCD MONITOR 15EX
LCD MONITOR 15EX--
TA MAINTENANCE
TA MAINTENANCE
22
2.
2.
System Assembly & Disassembly
System Assembly & Disassembly
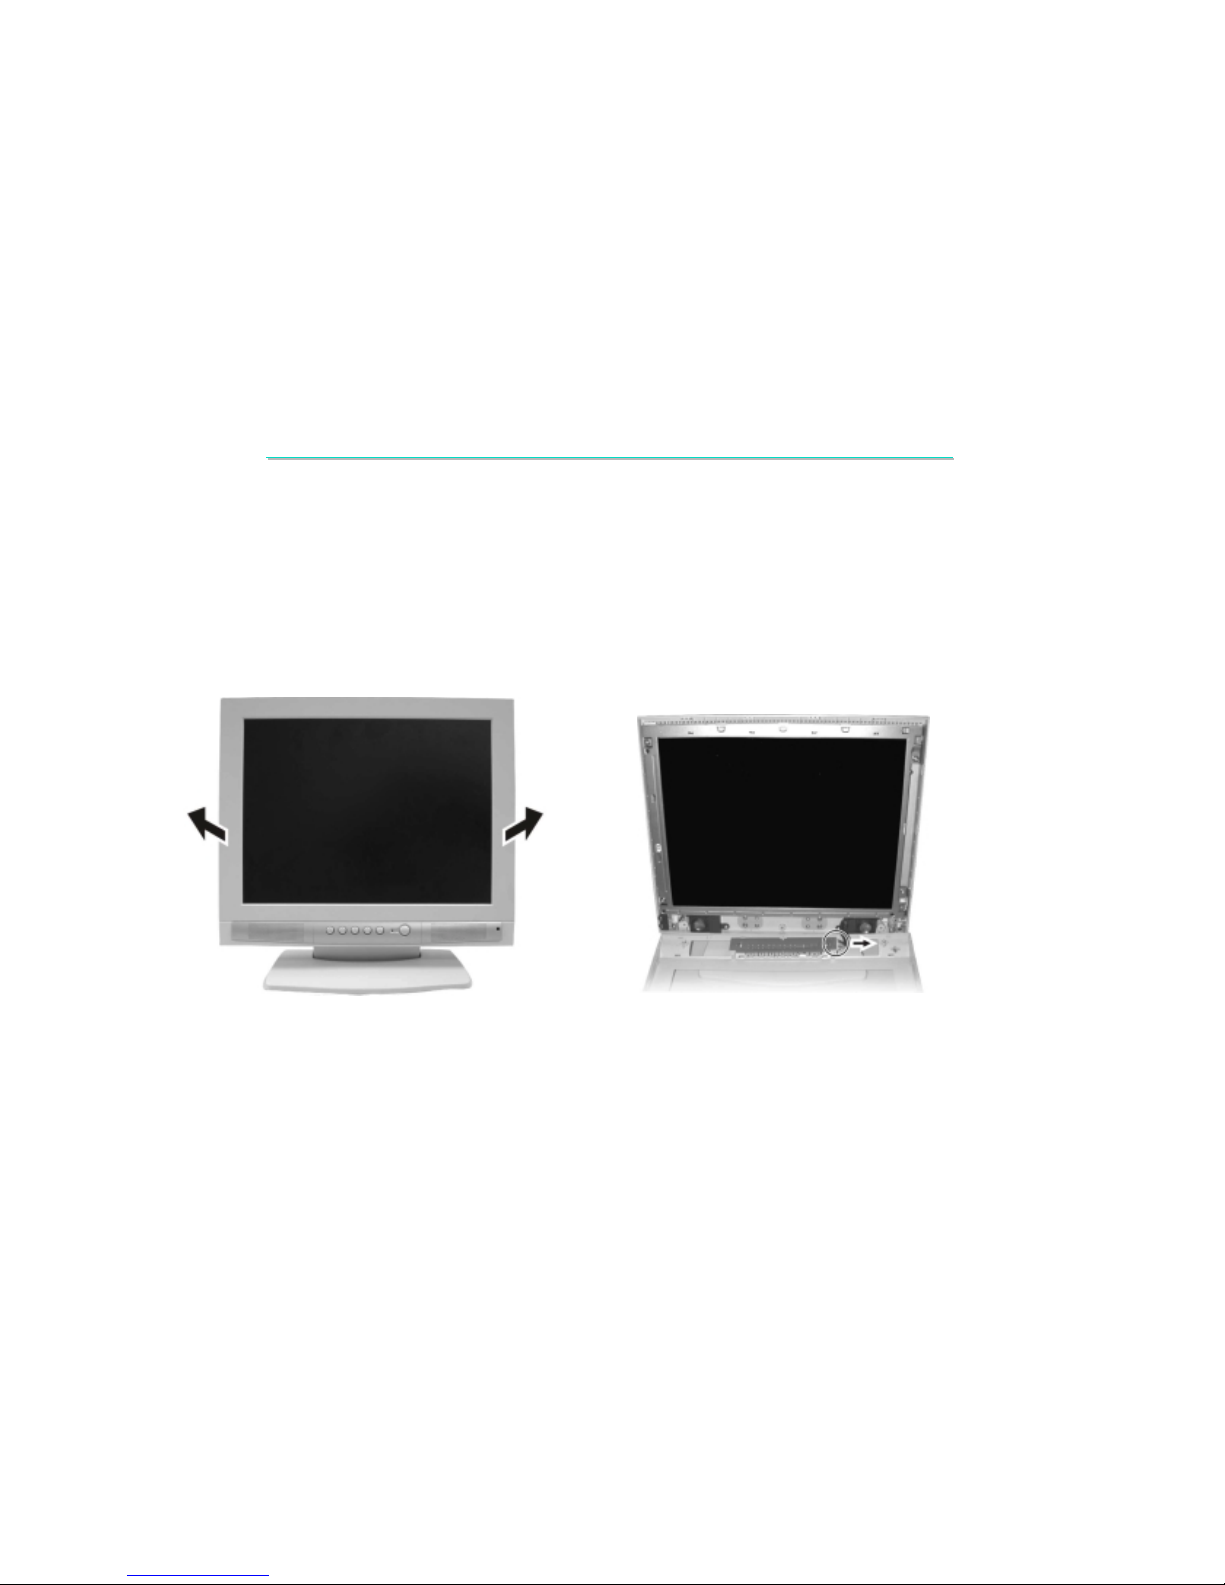
3. To detach the LCD frame, first lift the lower edge and then separate it from the housing. (Figure 2-3)
4. Disconnect the cable connected to the LCD frame. (Figure 2-4)
Figure 2-3 Figure 2-4
Page 24
LCD MONITOR 15EX
LCD MONITOR 15EX--
TA MAINTENANCE
TA MAINTENANCE
23
2.
2.
System Assembly & Disassembly
System Assembly & Disassembly
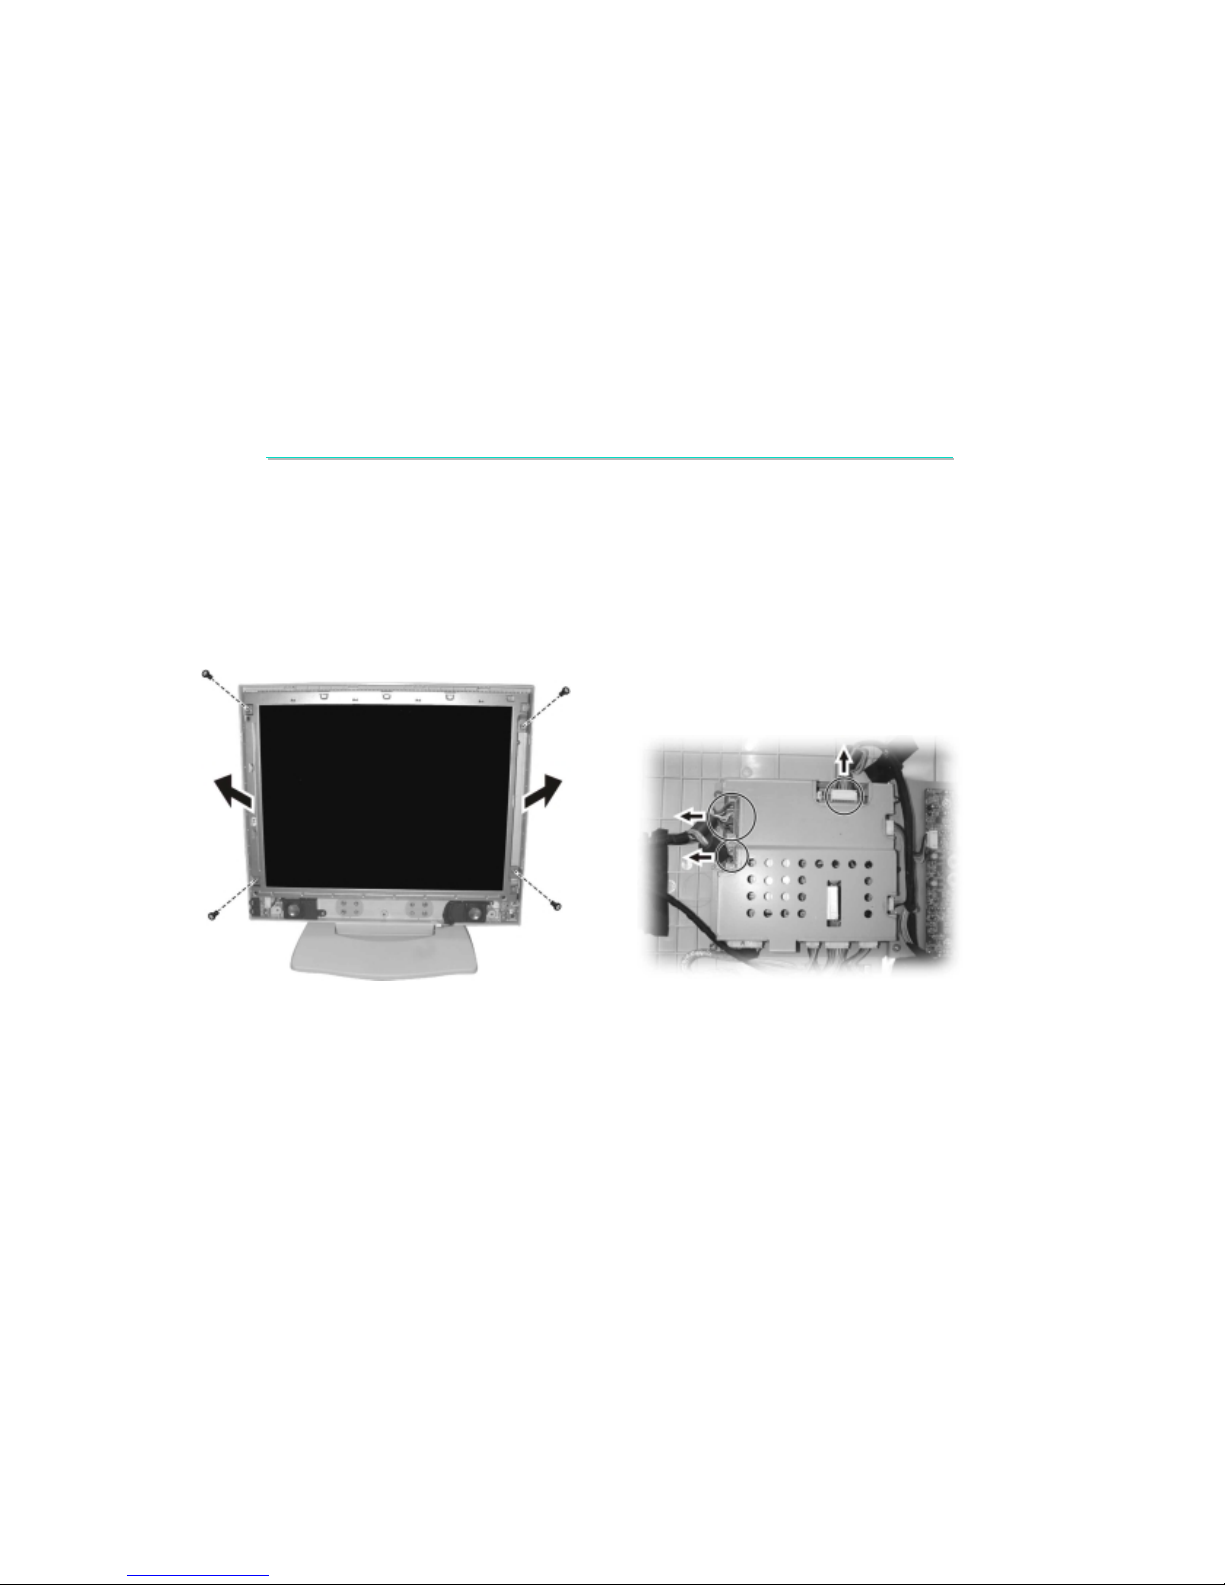
5. Remove four screws, then lift up the LCD panel slightly. (Figure 2-5)
6. Disconnect three cables connected to the LCD panel. (Figure 2-6)
Figure 2-5 Figure 2-6
Reassembly
1. Reconnect the cables to the LCD panel, then fit the LCD panel into place and secure with four screws.
2. Reconnect the cable to the LCD frame, then fit the LCD frame back to the housing.
3. Secure three screws on the rear side of the monitor and replace the screw cover.
Page 25
LCD MONITOR 15EX
LCD MONITOR 15EX--
TA MAINTENANCE
TA MAINTENANCE
24
2.
2.
System Assembly & Disassembly
System Assembly & Disassembly
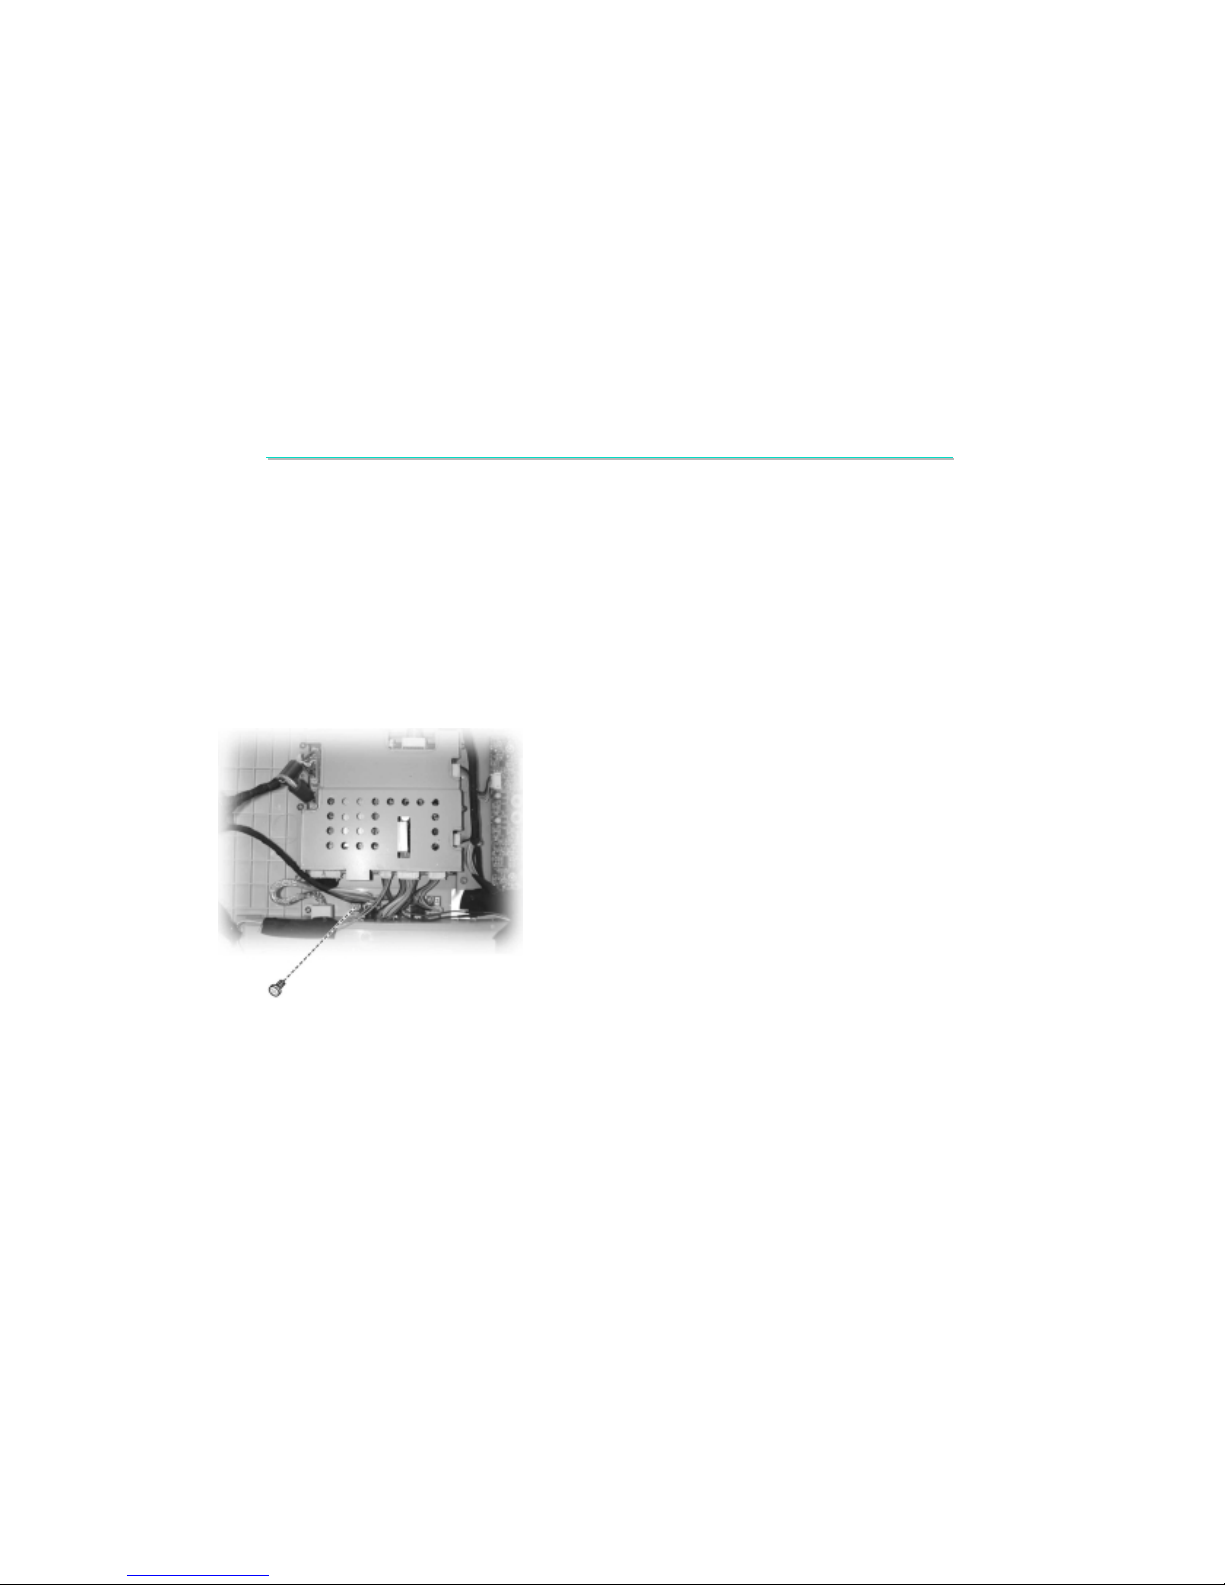
2.2.2 Power Connector Board
Disassembly
1. Detach the LCD panel. (See section 2.2.1)
2. Remove one screw locking the connector board, then you can lift up the connector board. (Figure 2-7)
Figure 2-7
Reassembly
1. Fit the connector board into place and secure with one screw.
2. Reassemble the LCD panel.
Page 26
LCD MONITOR 15EX
LCD MONITOR 15EX--
TA MAINTENANCE
TA MAINTENANCE
25
2.
2.
System Assembly & Disassembly
System Assembly & Disassembly
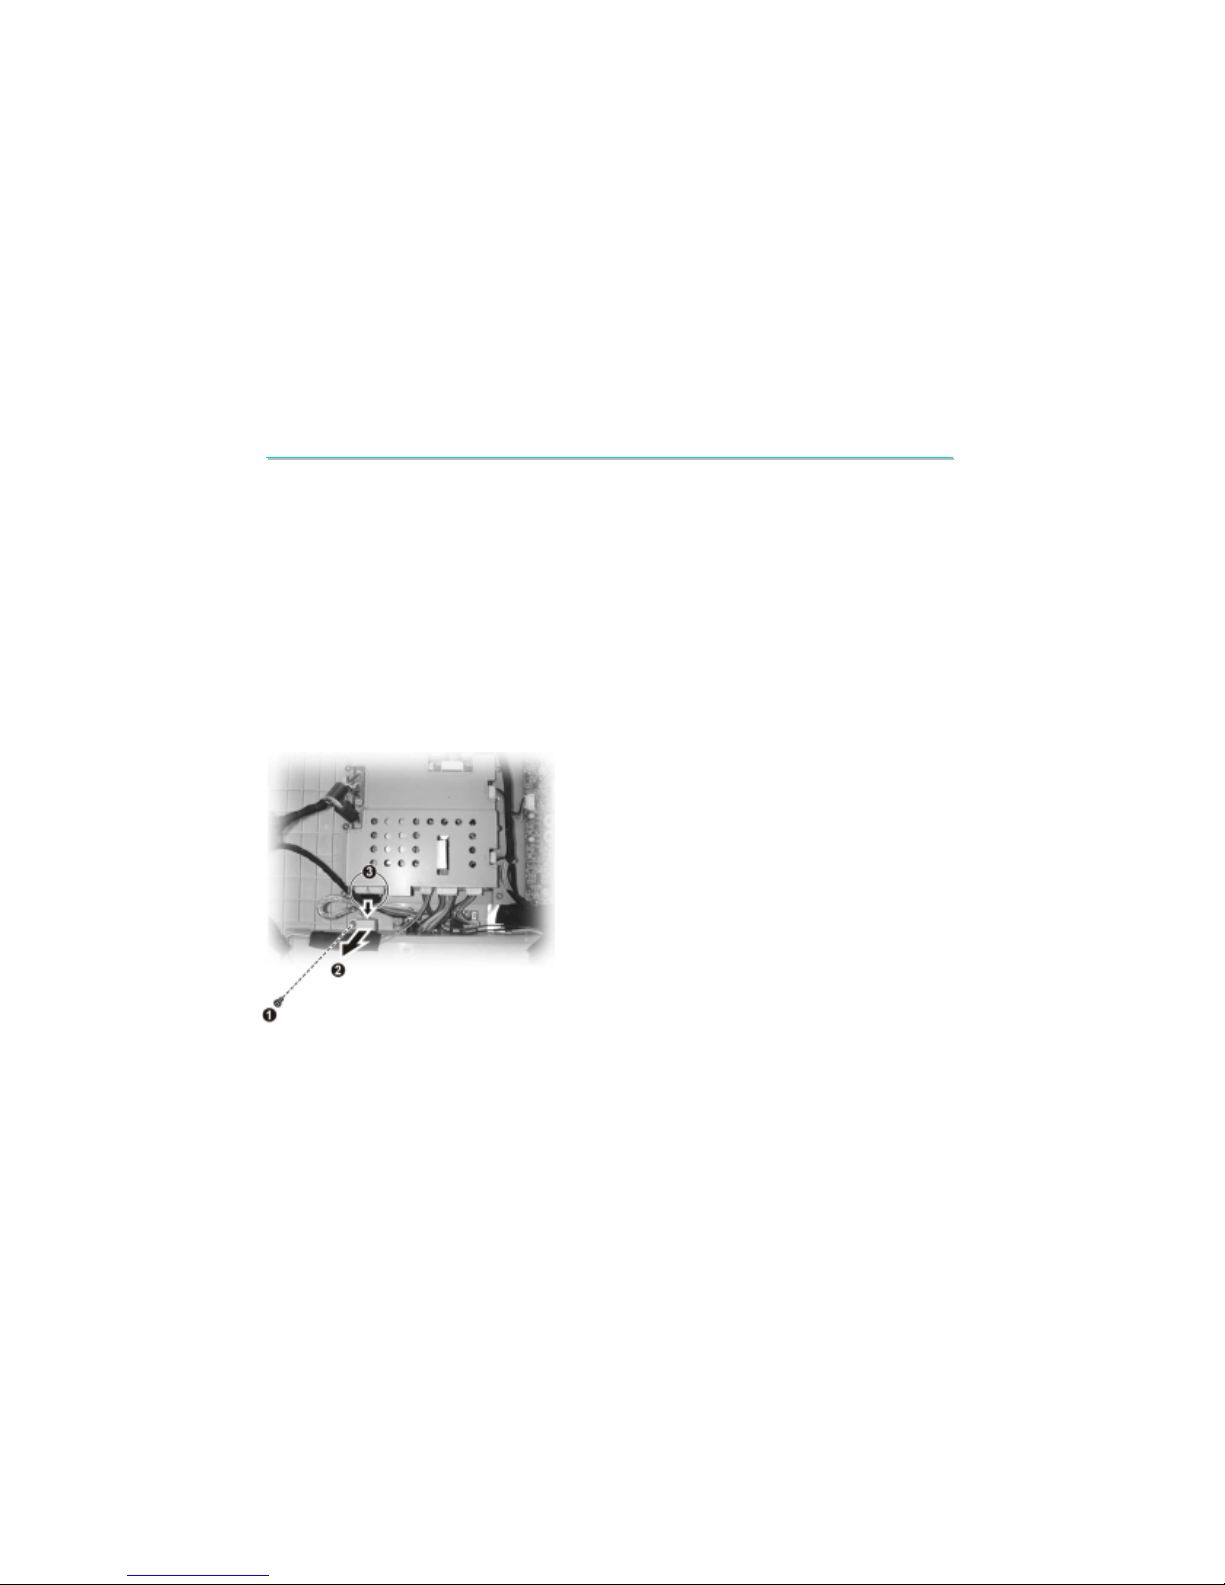
2.2.3 Signal Cable
Disassembly
1. Detach the LCD panel. (See section 2.2.1)
2. Remove one screw locking the cover () and lift it up (), then you can pull out
the signal cable (). (Figure 2-8)
Figure 2-8
Reassembly
1. Replace the signal cable, fit the cover into place and secure with one screw.
2. Reassemble the LCD panel.
Page 27
LCD MONITOR 15EX
LCD MONITOR 15EX--
TA MAINTENANCE
TA MAINTENANCE
26
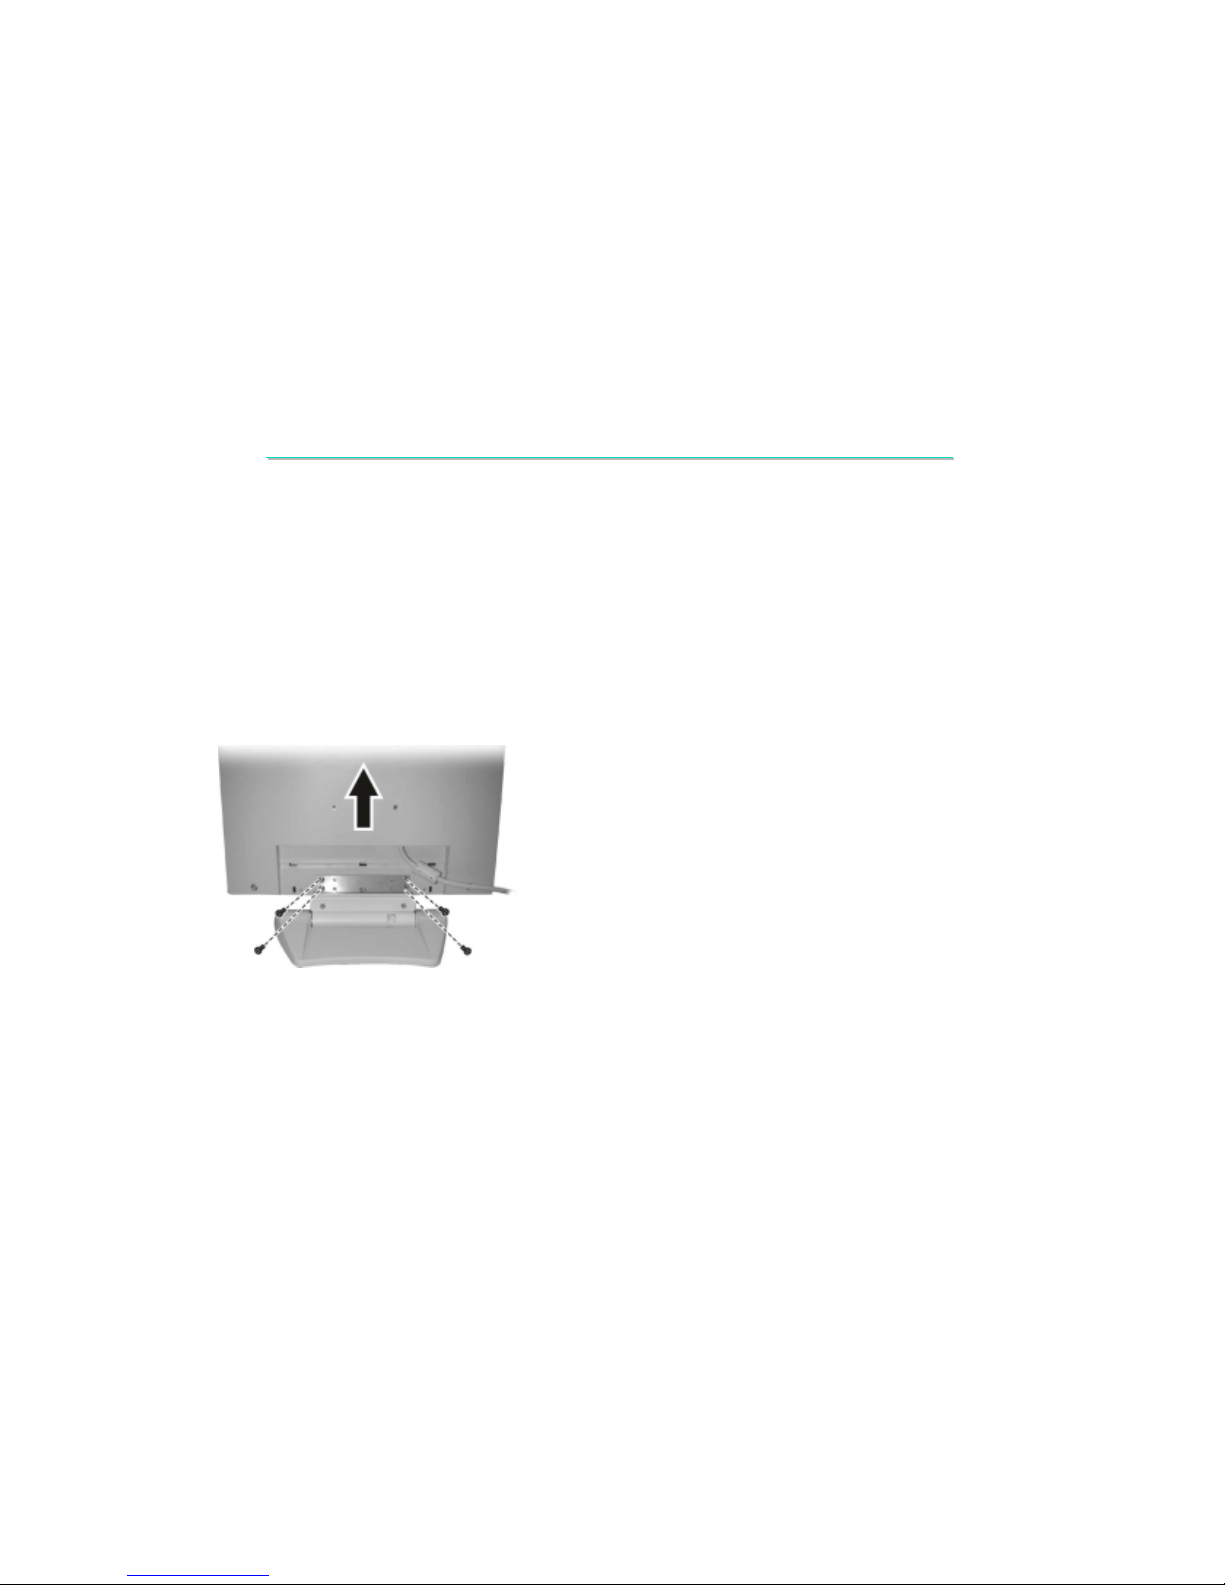
2.2.4 Base Unit
Disassembly
1. Remove the screw cover on the rear side of the monitor.
2. Remove four screws locking the base unit, and then lift the LCD panel up (see figure 2-9).
Figure 2-9
Reassembly
1. Replace the base unit and secure with four screws.
2. Replace the screw cover.
2.
2.
System Assembly & Disassembly
System Assembly & Disassembly
Page 28
LCD MONITOR 15EX
LCD MONITOR 15EX--
TA MAINTENANCE
TA MAINTENANCE
27
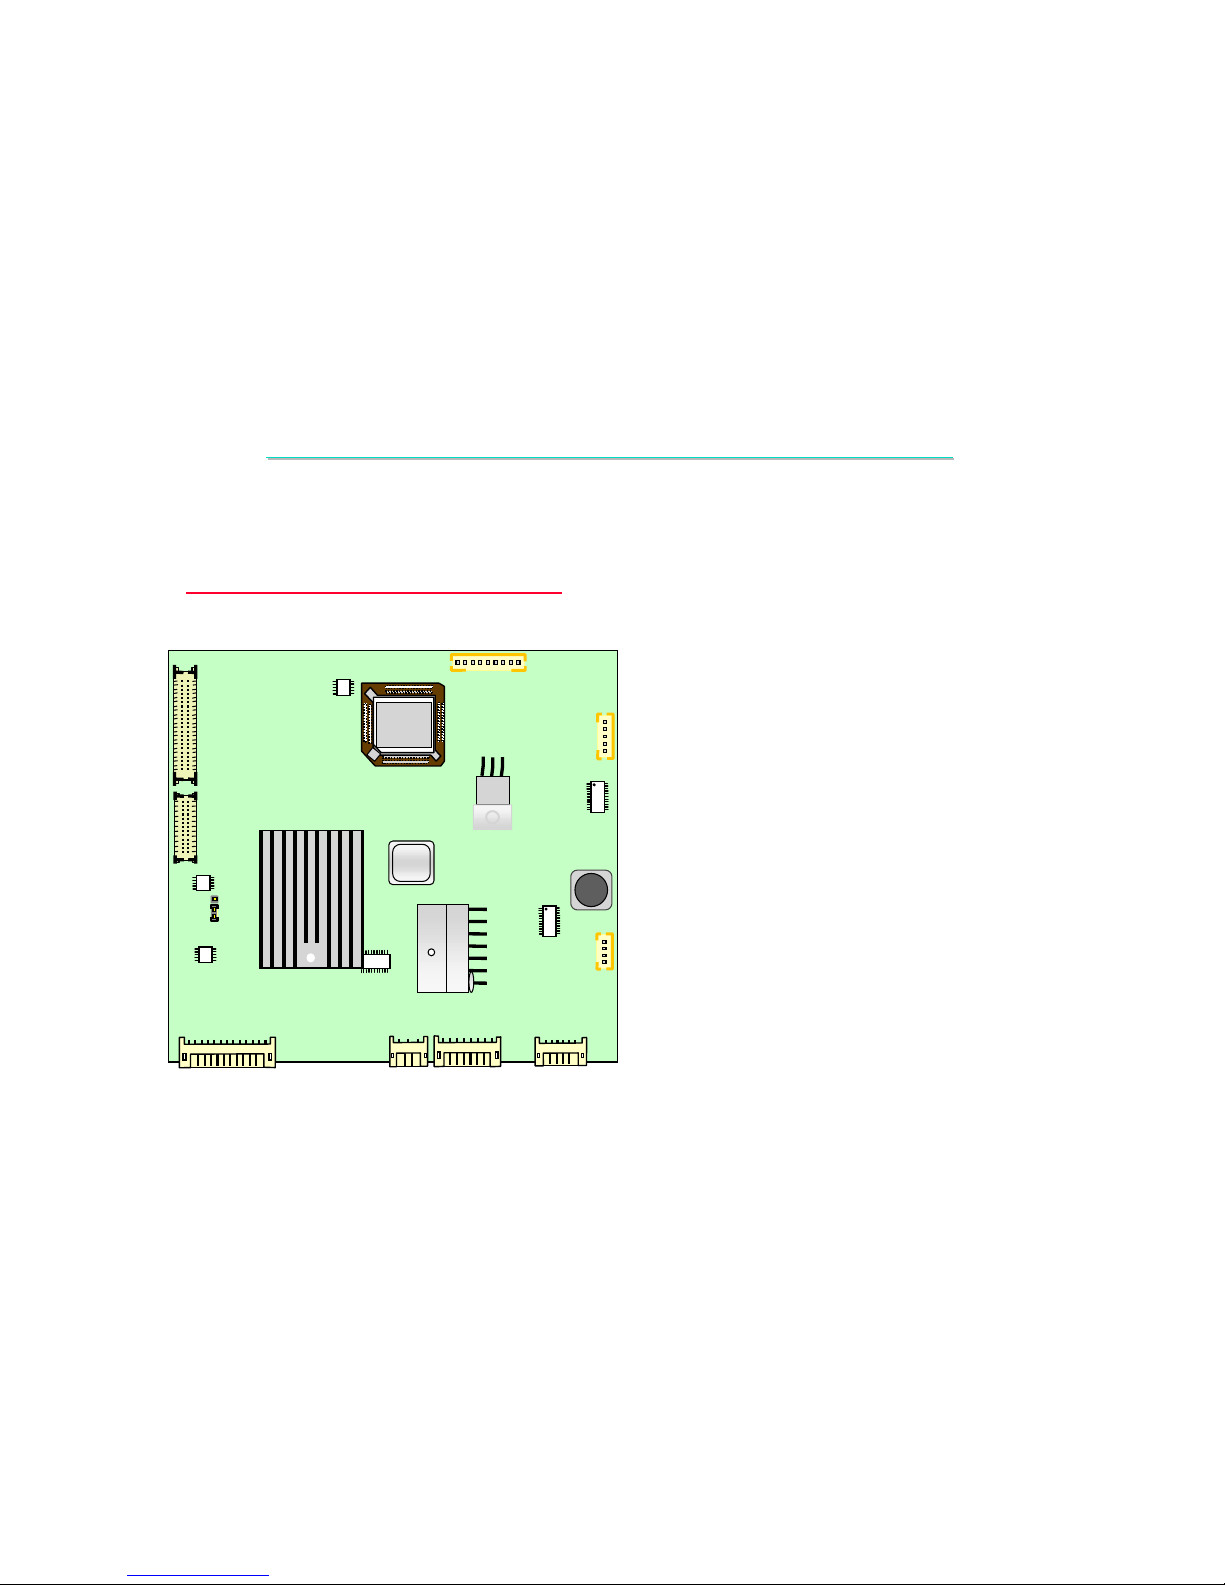
3.1 15EX-TA Interface Board
J1 : VGA Input Cable Connector.
J1 : VGA Input Cable Connector.
J2 : Panel VDD Selector.
J2 : Panel VDD Selector.
J3 : 40 Pins To LCD Module Connector.
J3 : 40 Pins To LCD Module Connector.
J4 : 20 Pins To LCD Module Connector.
J4 : 20 Pins To LCD Module Connector.
JP1 : To Power Jack Board Connector.
JP1 : To Power Jack Board Connector.
JP2 : To Key Switch Board Connector.
JP2 : To Key Switch Board Connector.
JP4 : To Sensor Board Connector. ( N/A )
JP4 : To Sensor Board Connector. ( N/A )
JP5 : To Inverter Board Connector.
JP5 : To Inverter Board Connector.
JP6 : To Speaker Unit Connector.
JP6 : To Speaker Unit Connector.
JP7 : To Power Jack Board Phone Jack Connector.
JP7 : To Power Jack Board Phone Jack Connector.
3.
3.
Definition & Location Of Connectors & Jumpers
Definition & Location Of Connectors & Jumpers
J3
J4
J2
J1
JP1
JP7
JP6
JP4
JP5
JP2
Page 29
LCD MONITOR 15EX
LCD MONITOR 15EX--
TA MAINTENANCE
TA MAINTENANCE
28
3.
3.
Definition & Location Of Connectors & Jumpers
Definition & Location Of Connectors & Jumpers
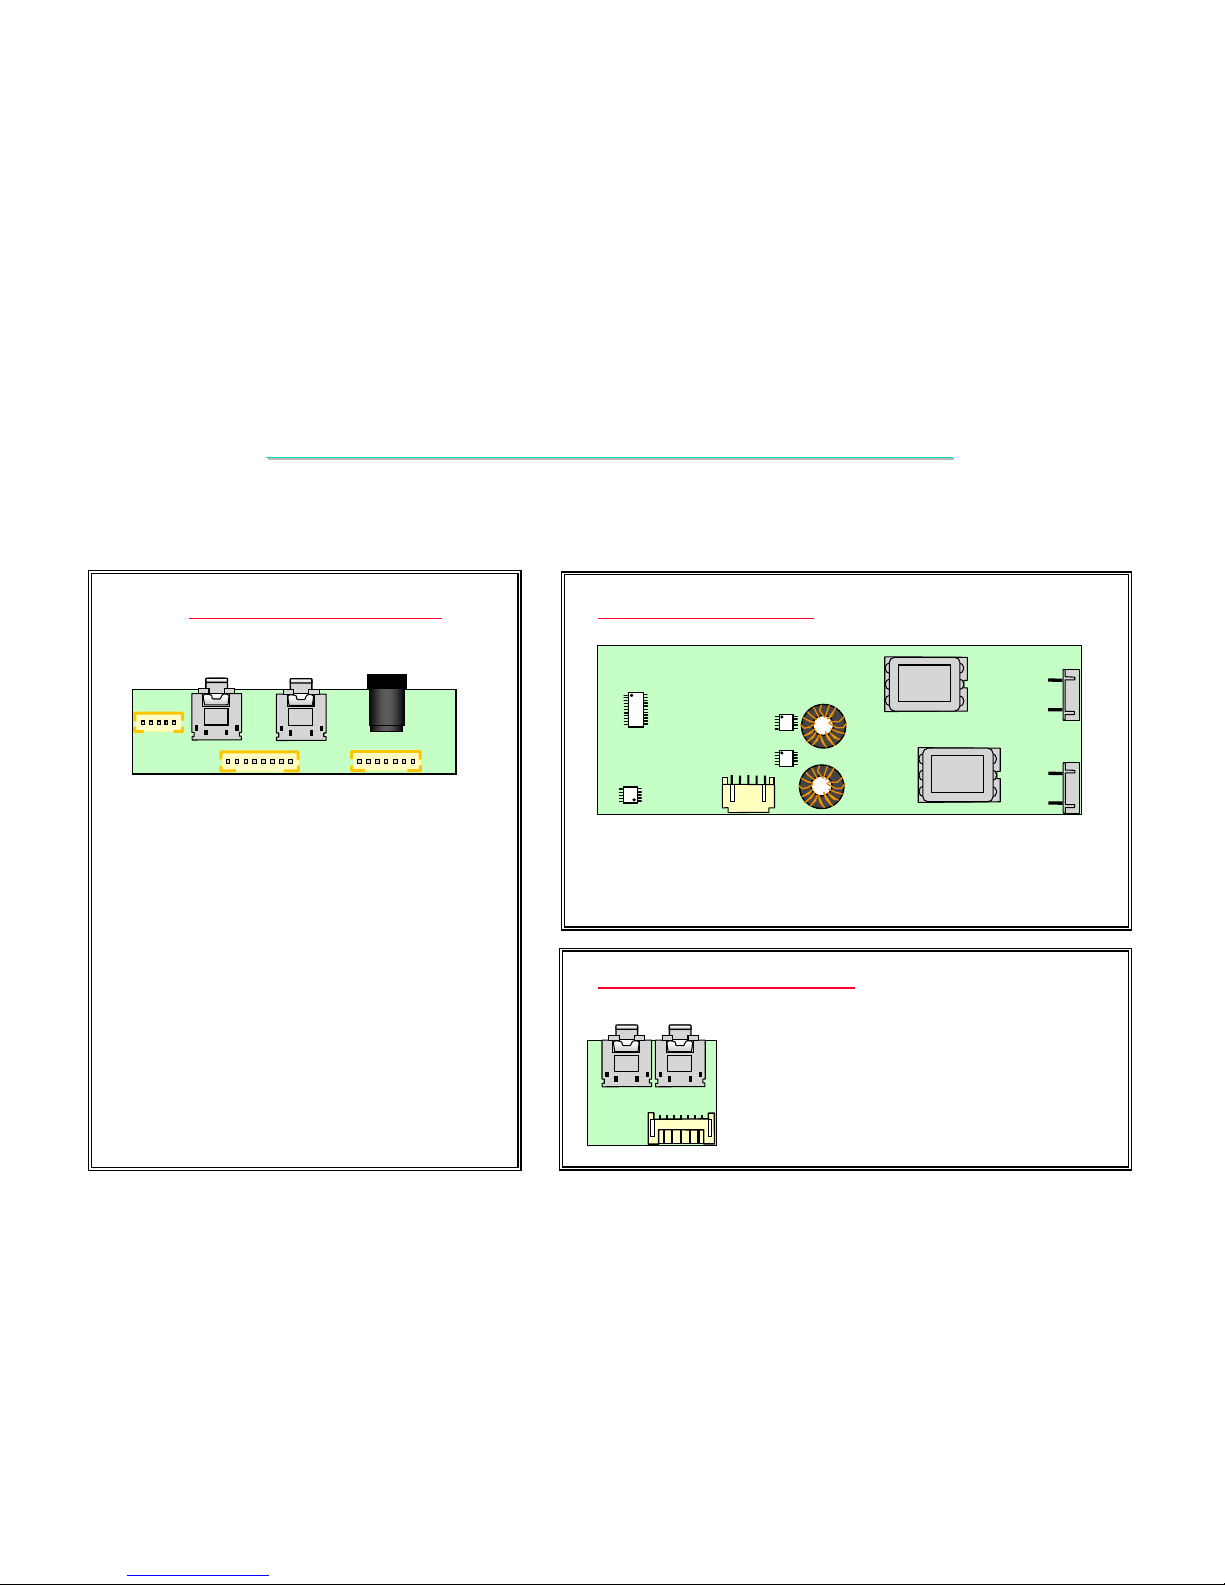
3.3 Invertor Board
CN1 : Inverter Board To Interface Board Connector.
CN1 : Inverter Board To Interface Board Connector.
CN2,CN3: Inverter BD to LCD panel Connector.
CN2,CN3: Inverter BD to LCD panel Connector.
U2
U1
T1
T2
CN1
CN3
CN2
3.2 Power Jack Board
J1 : Audio In Phone Jack Connector.
J1 : Audio In Phone Jack Connector.
J2 : To Phone Jack Board C onnector.
J2 : To Phone Jack Board C onnector.
J3 : MIC_OUT Phone Jack Connector.
J3 : MIC_OUT Phone Jack Connector.
JP1 : To Interface Board Connector.
JP1 : To Interface Board Connector.
JP2 : Power Adaptor Connector.
JP2 : Power Adaptor Connector.
JP3 : Power Adaptor To
JP3 : Power Adaptor To
Interface Board Connector.
Interface Board Connector.
J3
J1
JP2
J2
JP3
JP1
J3
J2
J1
3.4 Phone Jack Board
J1 : EAR_PHONE_OUT Connector.
J1 : EAR_PHONE_OUT Connector.
J2 : To Power Jack Board Connector.
J2 : To Power Jack Board Connector.
J3 : MIC_IN Connector.
J3 : MIC_IN Connector.
Page 30
LCD MONITOR 15EX
LCD MONITOR 15EX--
TA MAINTENANCE
TA MAINTENANCE
29
3.
3.
Definition & Location Of Connectors & Jumpers
Definition & Location Of Connectors & Jumpers
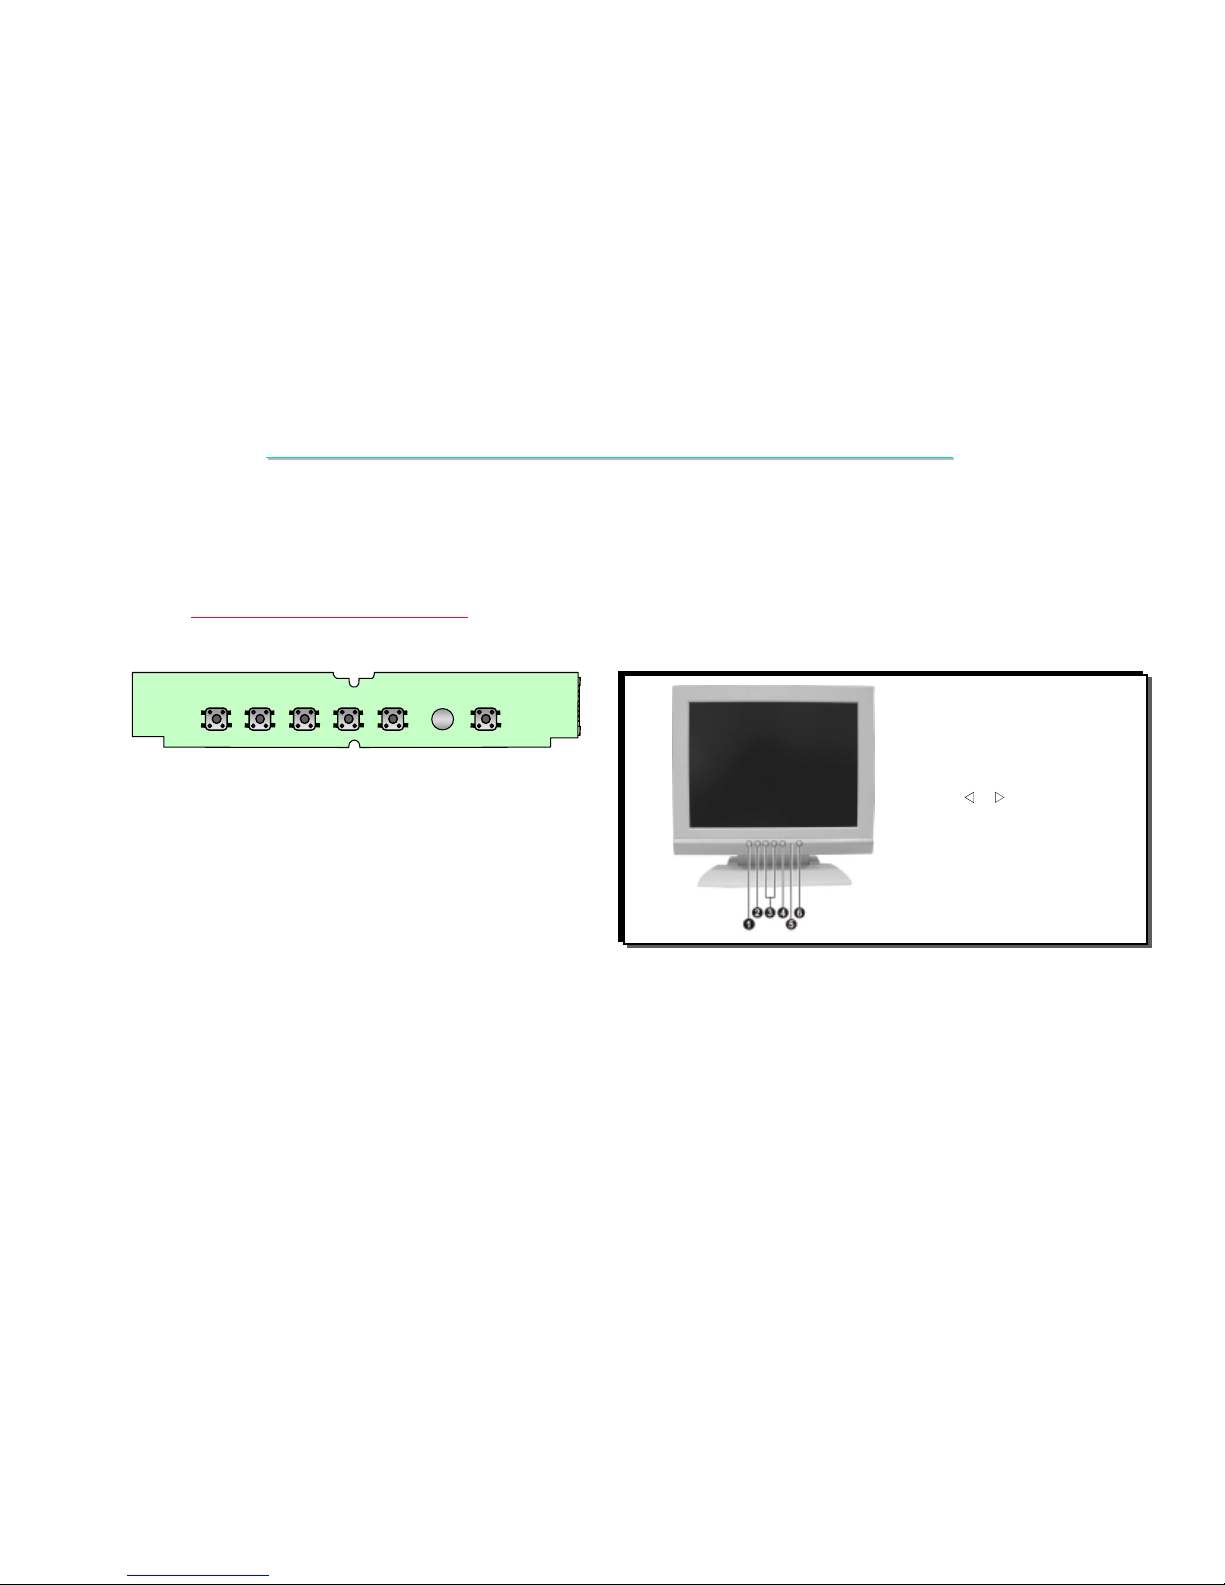
3.5 Key Switch Board
SW1 : Power Button.
SW1 : Power Button.
SW2,SW5 : Adjust Button.
SW2,SW5 : Adjust Button.
SW3,SW4 : OSD Select Button.
SW3,SW4 : OSD Select Button.
SW6 : Auto Button.
SW6 : Auto Button.
D1 : Power Indicator.
D1 : Power Indicator.
SW1SW6SW4SW3SW2SW5 D1
JP1
Menu Buttons
Select Buttons
/ Button
Auto Button
Power Indicator
Power Button
Page 31
LCD MONITOR 15EX
LCD MONITOR 15EX--
TA MAINTENANCE
TA MAINTENANCE
30
3.
3.
Definition & Location Of Connectors & Jumpers
Definition & Location Of Connectors & Jumpers
AC SOURCE
AC Adapter
Key SW BD
CONN
Power Jack BD
CONN
External VGA
CONN
40 Pins
LCD
CONN
20 Pins
LCD
CONN
Inverter BD
CONN
Speaker
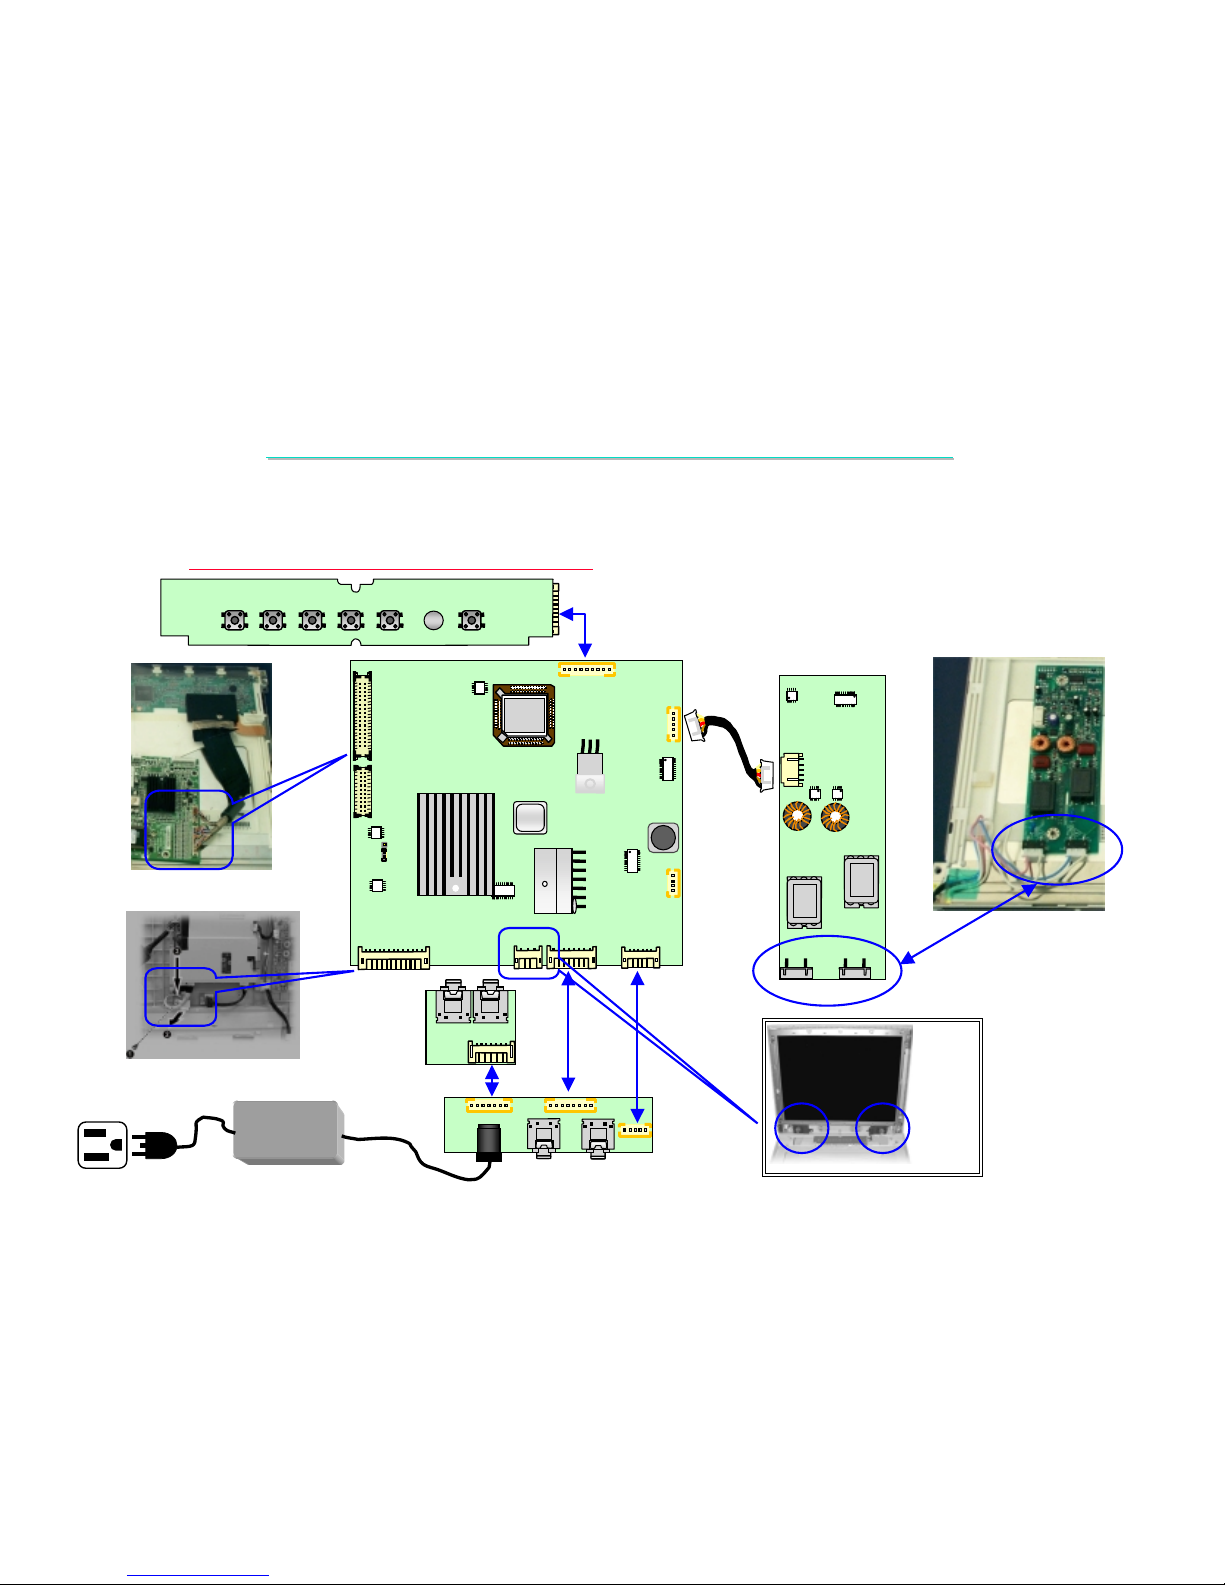
3.6 Relation Of All Components
Page 32
LCD MONITOR 15EX
LCD MONITOR 15EX--
TA MAINTENANCE
TA MAINTENANCE
31
4.
4.
Definition & Location Of Major Components
Definition & Location Of Major Components
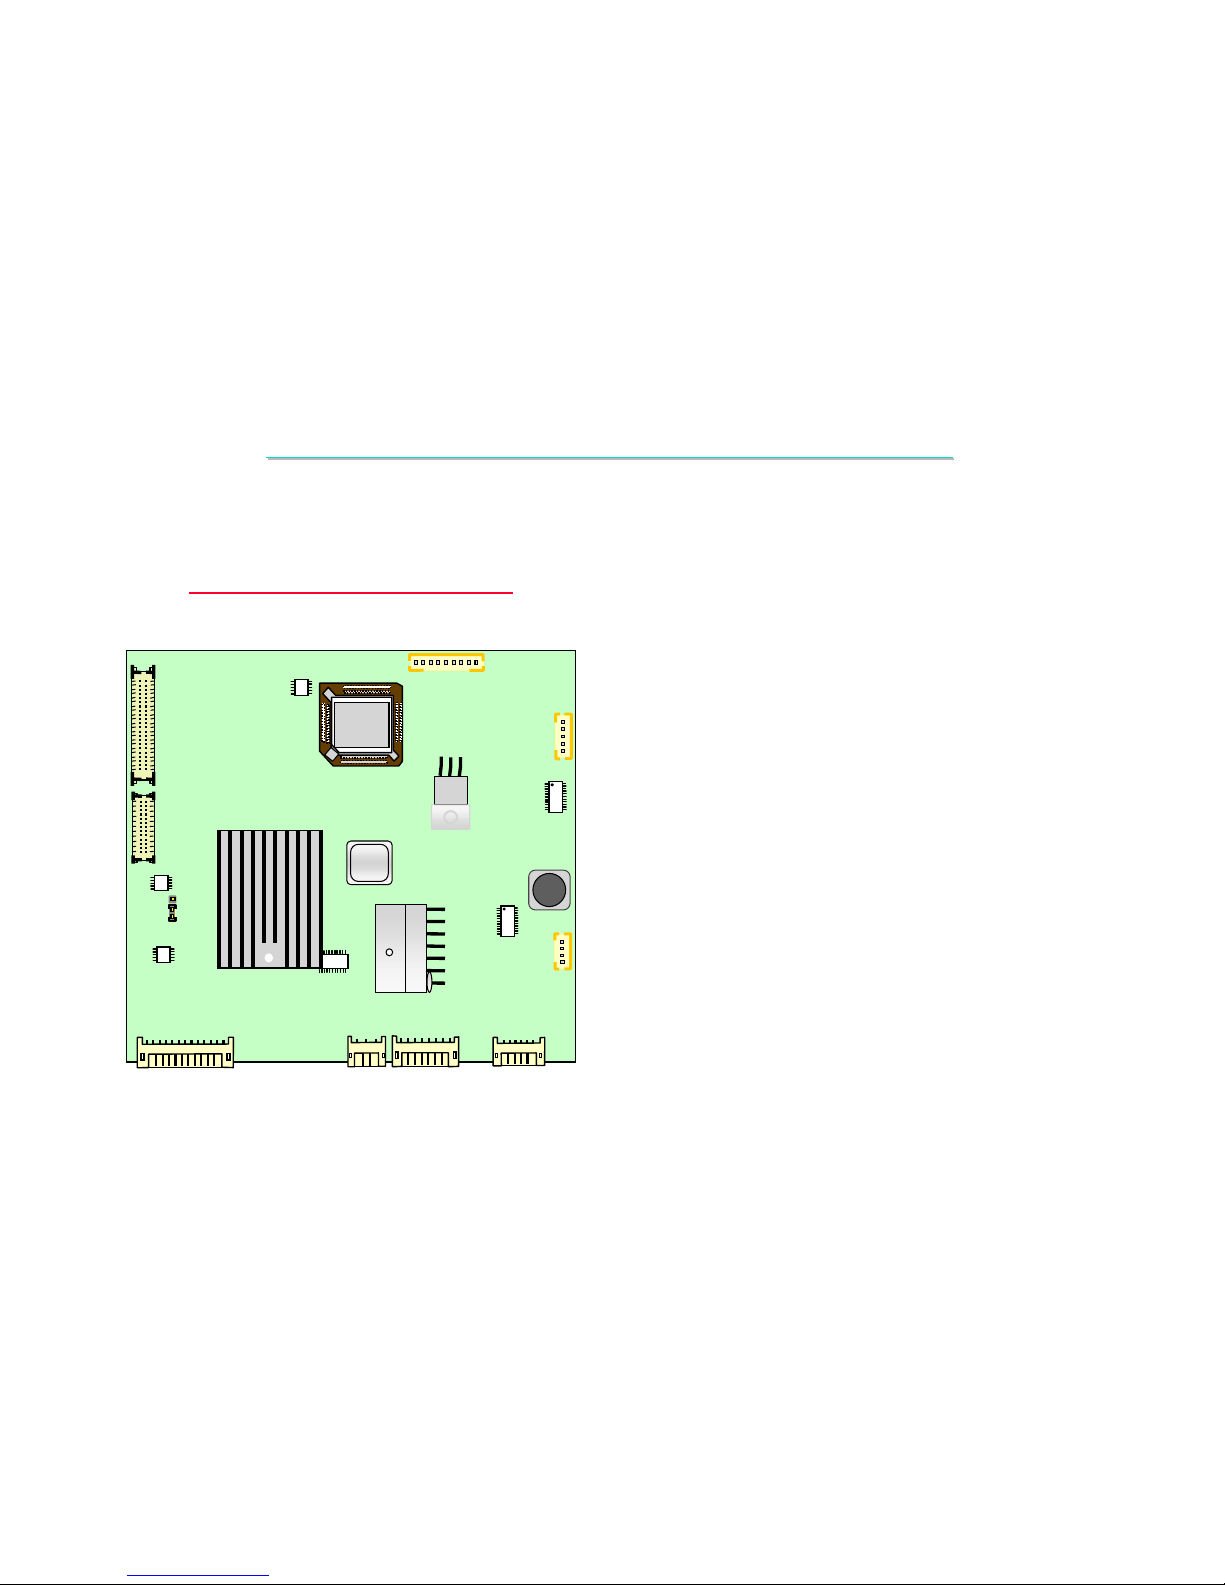
15EX-TA Interface Board
U1 : gmZAN1 Flat Panel Monitor Controller IC.
U1 : gmZAN1 Flat Panel Monitor Controller IC.
U2 : 74F14 Hex Schmitt Trigger Inverters.
U2 : 74F14 Hex Schmitt Trigger Inverters.
U3 : M52347 (N/A).
U3 : M52347 (N/A).
U5 : 24C21 EDID.
U5 : 24C21 EDID.
U6 : HIP6013 Switch R e gulator.
U6 : HIP6013 Switch R e gulator.
U7 : EZ1084CT Linear Regul ator.
U7 : EZ1084CT Linear Regul ator.
U10 : 24LC16B Configuration Data.
U10 : 24LC16B Configuration Data.
U11 : M6759
U11 : M6759
Micom
Micom. .
U12 : TDA7057AQ Audio Amplifier.
U12 : TDA7057AQ Audio Amplifier.
U14 : 74HCT74 Dual D
U14 : 74HCT74 Dual D--
type Flip
type Flip--
Flop.
Flop.
U8
U5
U2
U6
U14
U7
U1
U11
U10
U12
Page 33

LCD MONITOR 15EX
LCD MONITOR 15EX--
TA MAINTENANCE
TA MAINTENANCE
32
5.
5.
Pin Description Of Major Components
Pin Description Of Major Components
5.1 gmZAN1 Flat Panel Controller IC
5.1 gmZAN1 Flat Panel Controller IC
Features
Features
The gmZAN1 device utilizes Genesis
The gmZAN1 device utilizes Genesis’’
patented third
patented third--
generation Advanced Image Magnification technology
generation Advanced Image Magnification technology
as well as a proven integrated ADC/PLL to provide excellent imag
as well as a proven integrated ADC/PLL to provide excellent imag
e quality within a cost
e quality within a cost--
effective SVGA /
effective SVGA /
XGA LCD monitor solution.
XGA LCD monitor solution.
As a pin
As a pin--
compatible replacement for the gmB120, the gmZAN1 incorporates a
compatible replacement for the gmB120, the gmZAN1 incorporates a
ll of the gmB120 features
ll of the gmB120 features
plus many enhanced features; including 10
plus many enhanced features; including 10--
bit gamma correction, Adaptive Contrast Enhancement (ACE)
bit gamma correction, Adaptive Contrast Enhancement (ACE)
filtering, Sync On Green (SOG), and an enhanced OSD.
filtering, Sync On Green (SOG), and an enhanced OSD.
Features
Features
~ ~ Fully integrated 135MHz 8
Fully integrated 135MHz 8--
bit triple
bit triple--
ADC, PLL, and pre
ADC, PLL, and pre--
amplifier
amplifier
~ gmZ2 scaling algorithm featuring new Adaptive
~ gmZ2 scaling algorithm featuring new Adaptive
Contrast Enhancement (ACE)
Contrast Enhancement (ACE)
~ ~ OnOn--chip programmable OSD engine
chip programmable OSD engine
~ ~ Integrated
Integrated
PLLs
PLLs
~ ~ 1010--bit programmable gamma correction
bit programmable gamma correction
~ ~ Host interface with 1 or 4 data bits
Host interface with 1 or 4 data bits
~ ~ Pin
Pin--
compatible with gmB120
compatible with gmB120
Integrated Analog Front End
Integrated Analog Front End
~ Integrated 8
~ Integrated 8--
bit triple ADC
bit triple ADC
~ Up to 135MHz sampling rates
~ Up to 135MHz sampling rates
~ ~ No additional components needed
No additional components needed
~ ~ All color depths up to 24
All color depths up to 24--
bits/pixel are supported
bits/pixel are supported
High
High--
Quality Advanced Scaling
Quality Advanced Scaling
~ Fully programmable zoom
~ Fully programmable zoom
~ Independent horizontal / vertical zoom
~ Independent horizontal / vertical zoom
~ ~ Enhanced and adaptive scaling algorithm for optimal image qualit
Enhanced and adaptive scaling algorithm for optimal image qualityy
~ ~ Recovery Mode / Native Mode
Recovery Mode / Native Mode
Page 34

LCD MONITOR 15EX
LCD MONITOR 15EX--
TA MAINTENANCE
TA MAINTENANCE
33
Input Format
Input Format
~ ~ Analog RGB up to XGA 85Hz
Analog RGB up to XGA 85Hz
~ Support for Sync On Green (SOG)
~ Support for Sync On Green (SOG)
~ ~ Support for composite sync modes
Support for composite sync modes
Output Format
Output Format
~ Support for 8 or 6
~ Support for 8 or 6--
bit panels (with high quality dithering)
bit panels (with high quality dithering)
~ One or two pixel output format
~ One or two pixel output format
Built In High
Built In High--
Speed Clock Generator
Speed Clock Generator
~ ~ Fully programmable timing parameters
Fully programmable timing parameters
~ On
~ On--
chip
chip
PLLs
PLLs
generate clocks for the on
generate clocks for the on--
chip ADC and pixel clock from a single reference
chip ADC and pixel clock from a single reference
oscillator
oscillator
Auto
Auto--
Configuration / Auto
Configuration / Auto--
Detection
Detection
~ ~ Phase and image positioning
Phase and image positioning
~ Input format detection
~ Input format detection
Operating Modes
Operating Modes
~ ~ Bypass mode with no filtering
Bypass mode with no filtering
~ Multiple zoom modes:
~ Multiple zoom modes:
--with filtering
with filtering
--with adaptive (ACE) filtering
with adaptive (ACE) filtering
Integrated On
Integrated On--
Screen Display
Screen Display
~ On
~ On--
chip character RAM and ROM for better customization
chip character RAM and ROM for better customization
~ External OSD supported for greater flexibility
~ External OSD supported for greater flexibility
~ ~ Supports both landscape and portrait fonts
Supports both landscape and portrait fonts
~ ~ Many other font capabilities including: blinking, overlay and tr
Many other font capabilities including: blinking, overlay and tr
ansparency
ansparency
Package
Package
~ ~ Cooperate with
Cooperate with ““
SiS
SiS
Video Bridge
Video Bridge ””
to Support
to Support
Applications
Applications
~ ~ Multi
Multi--
synchronous LCD monitors
synchronous LCD monitors
~ ~ Other fixed
Other fixed--
resolution
resolution
pixelated
pixelated
display devices
display devices
Page 35
LCD MONITOR 15EX
LCD MONITOR 15EX--
TA MAINTENANCE
TA MAINTENANCE
34
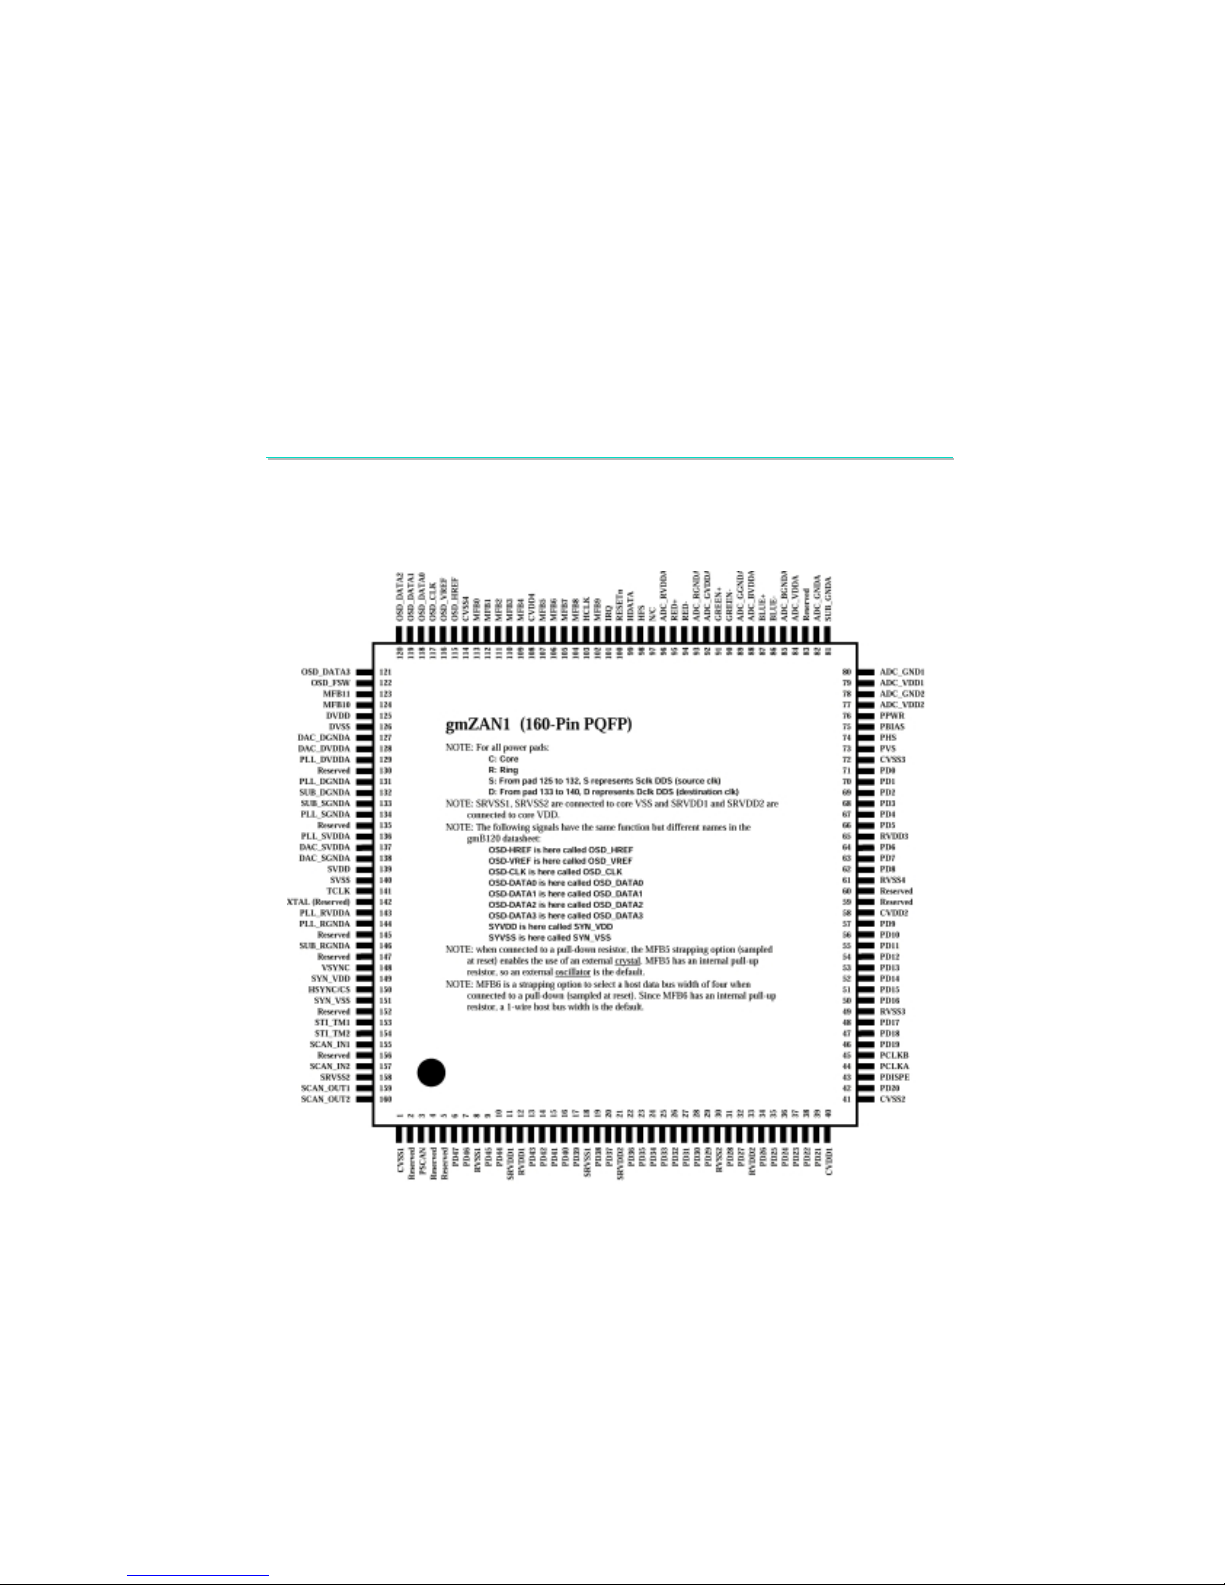
Figure 1. gmZAN1 Pin Diagram
5.1
5.1
gmZAN1 Flat Panel Controller IC
gmZAN1 Flat Panel Controller IC
Page 36
LCD MONITOR 15EX
LCD MONITOR 15EX--
TA MAINTENANCE
TA MAINTENANCE
35
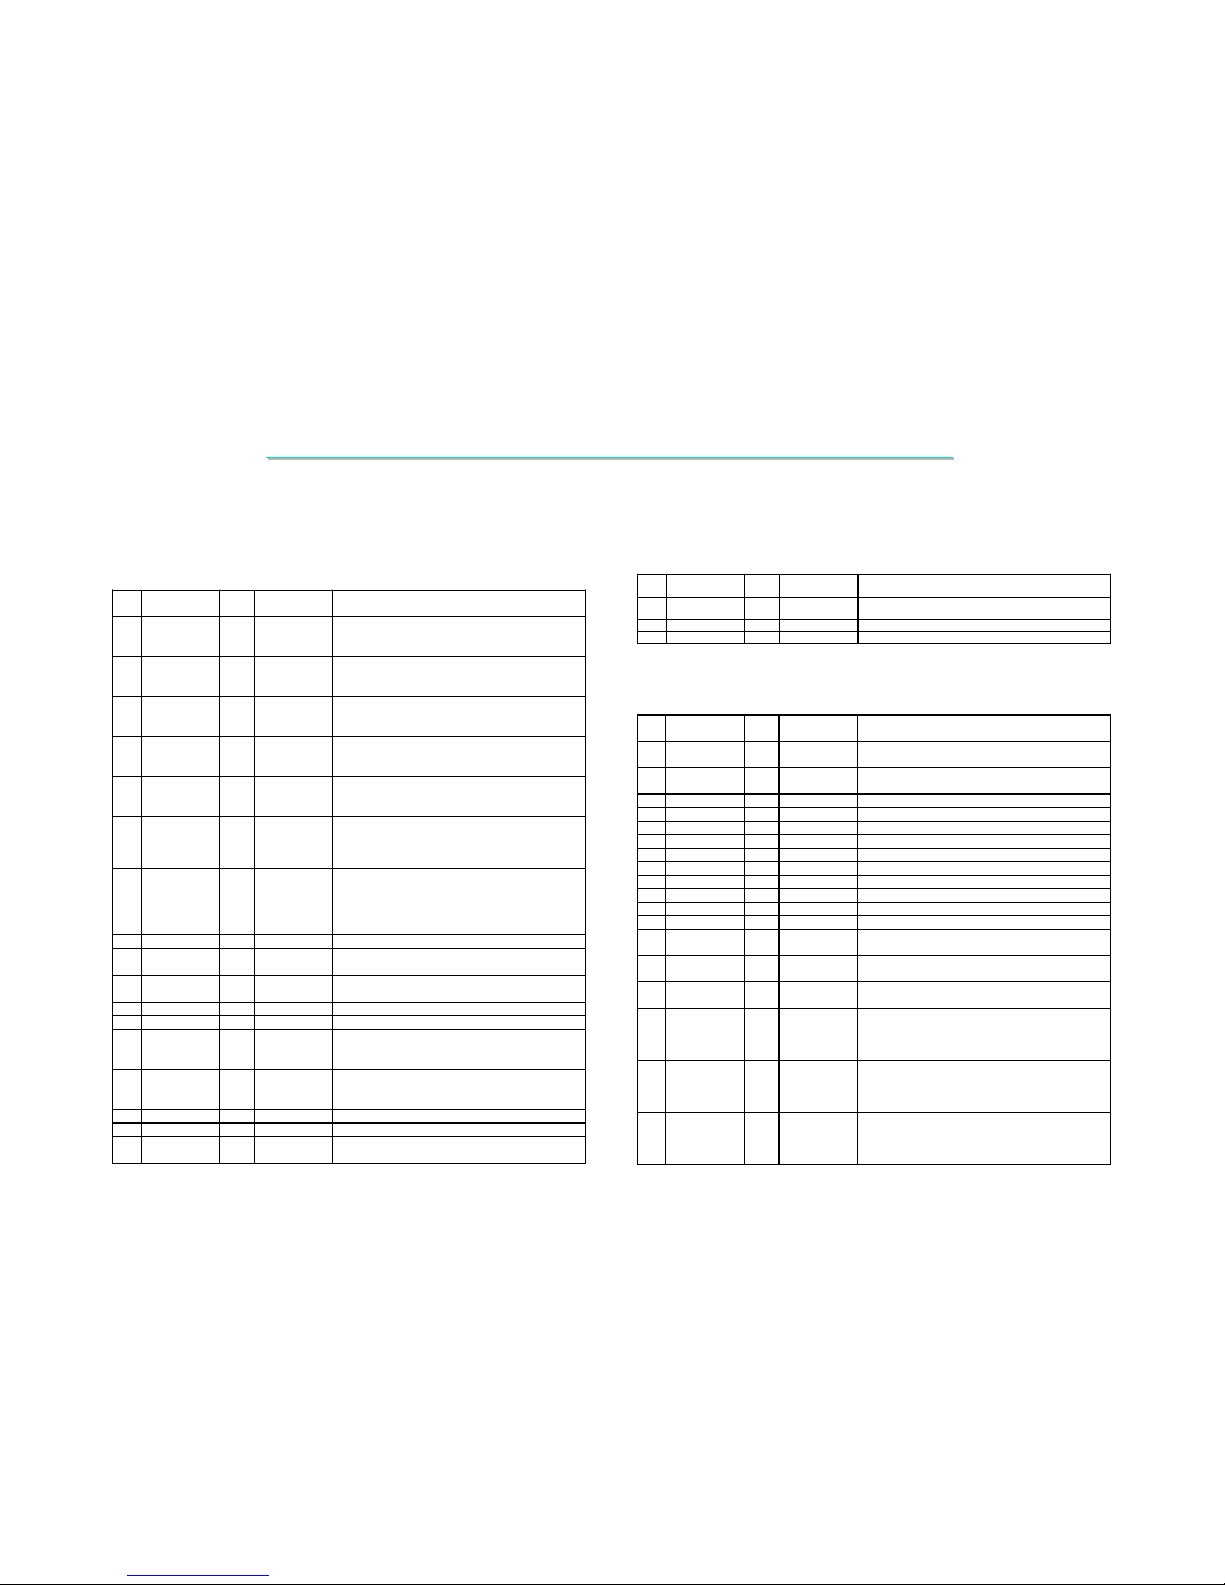
Unless otherwise stated, unused input pins must be tied to ground, and unused output pins left open.
Analog-to-Digital Converter.
Pin Name I/O Drive Current
(@10pF)
Description
77 ADC_VDD2 Digital power for ADC encoding logic. Must be
bypassed with 0.1 uF capacitor to pin 78
(ADC_GND2)
78 ADC_GND2 Digital GND for ADC encoding logic. Must be
directly connected to the digital system ground
plane.
79 ADC_VDD1 Digital power for ADC clocking circuit. Must be
bypassed with 0.1 uF capacitor to pin 80
(ACD_GND1)
80 ADC_GND1 Digital GND for ADC clocking circuit. Must be
directly connected to the digital system ground
plane.
81 SUB_GNDA Dedicated pin for substrate guard ring that protects
the ADC reference system. Must be directly
connected to the analog system ground plane.
82 ADC_GNDA Analog ground for ADC analog blocks that are
shared by all three channels. Includes bandgap
reference, master biasing and full scale adjust. Must
be directly connected to analog system ground plane.
84 ADC_VDDA Analog power for ADC analog blocks that are shared
by all three channels. Includes bandgap reference,
master biasing and full scale adjust. Must be
bypassed with 0.1 uF capacitor to pin 82
(ADC_GNDA).
83 Reserved For internal testing purpose only. Do not connect.
85 ADC_BGNDA Analog ground for the blue channel. Must be directly
connected to the analog system ground plane.
88 ADC_BVDDA Analog power for the blue channel. Must be
bypassed with 0.1 uF capacitor to pin 85 (BGNDA).
86 BLUE- In Negative analog input for the Blue channel.
87 BLUE+ In Positive analog input for the Blue channel.
89 ADC_GGNDA Analog ground for the green channel . Must be
directly connected to the analog system ground
plane.
92 ADC_GVDDA Analog power for the green channe. Must be
bypassed with 0.1 uF capacitor to pin
89 (ADC_GGNDA).
90 GREEN- In Negative analog input for the Green channel.
91 GREEN+ In Positive analog input for the Green channel.
93 ADC_RGNDA Analog ground for the red channel. Must be directly
connected to the analog system ground plane.
Analog-to-Digital Converter
Pin Name I/O Drive Current
(@10pF)
Description
96 ADC_RVDDA Analog power for the red channel. Must be bypassed
with 0.1 uF capacitor to pin 93 (ADC_RGNDA).
94 RED- In Negative analog input for the Red channel.
95 RE D+ In Positive analo g input for the Red channel.
Host Interface (HIF) / External On-Screen Display
Pin Name I/O Drive Current
(@10pF)
Description
98 HFS In Host Frame Sync. Frames the packet on the serial
channel.
103 HCLK In Clock signal input for the 3-wire serial
communication.
99 HDATA in/out 4 mA Data signal for the 3-wire serial communication
100 RESETn In Resets the gmZAN1 chip to a known state when low.
101 IRQ out 4 mA Interrupt request output
115 OSD-HREF out 4 mA HSYNC output for an external OSD controller chip.
116 OSD-VREF out 4 mA VSYNC output for an external OSD controller chip.
117 OSD-Clk out 8 mA Clock output for an external OSD controller chip.
118 OSD-Data0 in Data input 0 from an external O SD controller.
119 OSD-Data1 in Data input 1 from an external O SD controller.
120 OSD-Data2 in Data input 2 from an external O SD controller.
121 OSD-Data3 in Data input 3 from an external O SD controller.
122 OSD-FSW in External OSD window display enable. Displays data
from external OSD con troller when high.
123 M FB11 in/out 8 mA Multi-Function B us 11. One of twelve multi-function
signals MFB[11:0].
124 M FB10 in/out 8 mA Multi-Function B us 10. One of twelve multi-function
signals MFB[11:0].
102 M FB9 in/out 8 mA Multi-Function Bus 9. One of twelve m ulti-function
signals MFB[11:0].
Also used as HDATA3 in a 4-bit host interface
configuration.
104 M FB8 in/out 8 mA Multi-Function Bus 8. One of twelve m ulti-function
signals MFB[11:0].
Also used as HDATA2 in a 4-bit host interface
configuration.
105 M FB7 in/out 8 mA Multi-Function Bus 7. One of twelve m ulti-function
signals MFB[11:0].
Also used as HDATA1 in a 4-bit host interface
configuration.
5.
5.
Pin Description Of Major Components
Pin Description Of Major Components
5.1 gmZAN1 Flat Panel Controller IC
5.1 gmZAN1 Flat Panel Controller IC --11
Page 37
LCD MONITOR 15EX
LCD MONITOR 15EX--
TA MAINTENANCE
TA MAINTENANCE
36
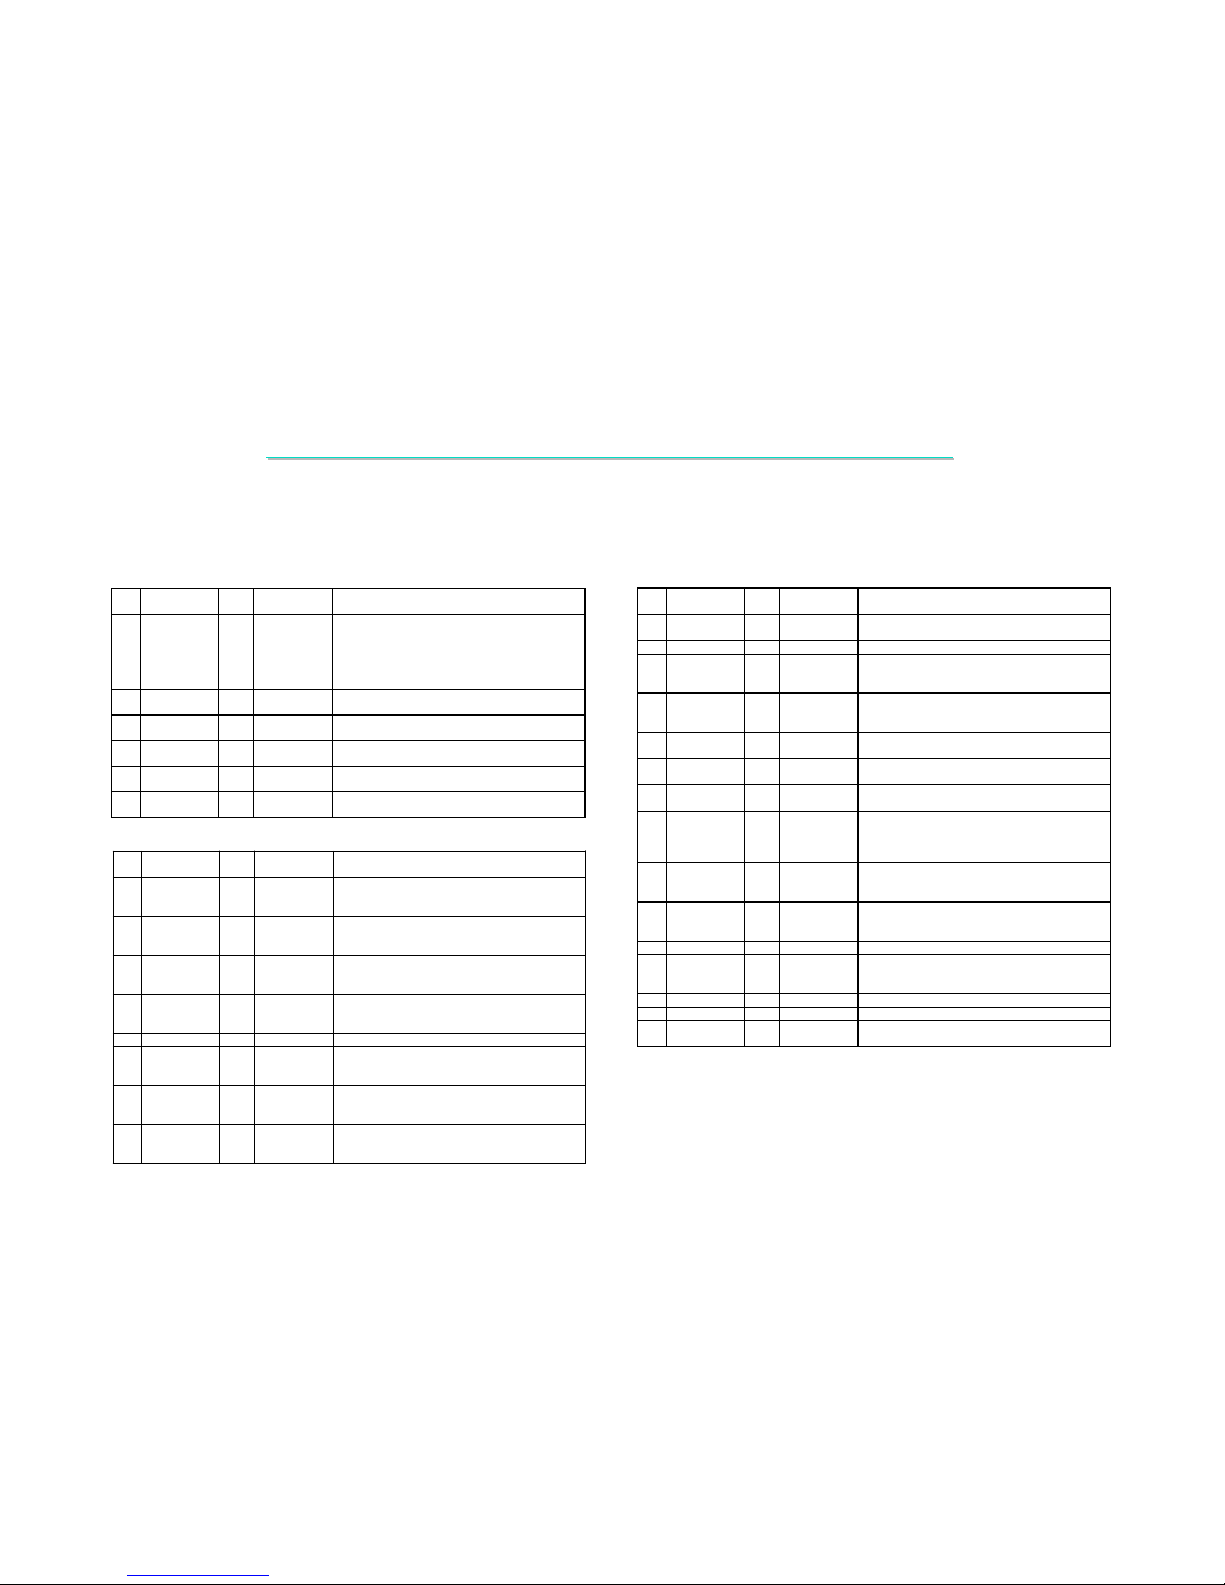
Host Interface (HIF) / External On-Screen Display
Pin Name I/O Drive Current
(@10pF)
Description
107 MFB5 in/out 8 mA Multi-Fu nction Bus 5 . One of twelve multi-function
signals MFB[11:0].
Internally pulled up. When externally pu lled down
(sampled at reset) the chip uses an external crystal
resonator across pins 141 and 142, instead of an
oscillator.
109 MFB4 in/out 8 mA Multi-Fu nction Bus 4 . One of twelve multi-function
signals MFB[11:0].
110 MFB3 in/out 8 mA Multi-Fu nction Bus 3 . One of twelve multi-function
signals MFB[11:0].
111 MFB2 in/out 8 mA Multi-Fu nction Bus 2 . One of twelve multi-function
signals MFB[11:0].
112 MFB1 in/out 8 mA Multi-Fu nction Bus 1 . One of twelve multi-function
signals MFB[11:0].
113 MFB0 in/out 8 mA Multi-Fu nction Bus 0 . One of twelve multi-function
signals MFB[11:0].
Clock Recovery / Time Base Conversion
Pin Name I/O Drive Current
(@10pF)
Description
125 DVDD Digital power for Destination DDS (direct digital
synthesizer). Must be bypassed with a 0.1 uF
capacitor to digital ground plane.
127 DAC_DGNDA Analog ground for Destination DDS DAC. Must be
directly connected to the analog system ground
plane.
128 DAC_DVDDA Analog power for Destination DDS DAC. Must be
bypassed with a 0.1 uF capacitor to pin 127
(DAC_DGNDA)
129 PLL_DVDDA Analog power for the Destination DDS PLL. Must
be bypassed with a 0.1 uF capacitor to pin 131
(PLL_DGNDA)
130 Reserved For testing purposes only. Do not connect.
131 PLL_DGNDA Analog ground for the Destination DDS PLL. Must
be directly connected to the analog system ground
plane.
132 SUB_DGNDA Dedicated pin for the substrate guard ring that
protects the Destination DDS. Must be directly
connected to the analog system ground plane.
133 SUB_SGNDA Dedicated pin for the substrate guard ring that
protects the Source DDS. Must be directly connected
to the analog system ground plane.
Pin Name I/O Drive Current
(@10pF)
Description
134 PLL_SGNDA Analog ground for the Source DDS PLL. Must be
directly connected to the analog system ground.
135 Reserved For testing purposes only. Do not connect.
136 PLL_SVDDA Analog power for the Source DDS PLL. Must be
bypassed with a 0.1 uF capacitor to pin 134
(PLL_SGNDA)
137 DAC_SVDDA Analog power for the Source DDS DAC. Must be
bypassed with a 0.1 uF capacitor to pin 138
(DAC_SGNDA)
138 DAC_SGNDA Analog ground for the Source DDS DAC. Must be
directly connected to the analog system ground.
139 SVDD Digital power for the Source DDS. Must be bypassed
with a 0.1 uF capacitor to digital ground plane.
141 TCLK in Reference clock (TCLK) input from the 50 Mhz
crystal oscillator.
142 X TAL out If using an external osc illator, leave this pin floating.
If using an external crystal,
connect crystal between TCLK (141) and XTAL
(142). See MFB5 (pin 107).
143 PLL_RVDDA Analog power for the Reference DDS PLL. Must be
bypassed with a 0.1 uF capacitor to pin 144
(PLL_RGNDA)
144 PLL_RGNDA Analog ground for the Reference DDS PLL. Must be
directly connected to the analog system ground
plane.
145 Reserved For testing purposes only. Do not connect.
146 SUB_RGNDA Dedicated pin for the substrate guard ring that
protects the Reference DDS. Must be directly
connected to the analog system ground plane.
148 VSYNC in CRT Vsync input. TTL Schmitt trigger input.
149 SYN_VDD Digital power for CRT Sync input
150 HSYNC/
CSYNC
in CR T Hsync or CRT composite sync input. TTL
Schmitt trigger input.
5.
5.
Pin Description Of Major Components
Pin Description Of Major Components
5.1 gmZAN1 Flat Panel Controller IC
5.1 gmZAN1 Flat Panel Controller IC --22
Page 38
LCD MONITOR 15EX
LCD MONITOR 15EX--
TA MAINTENANCE
TA MAINTENANCE
37
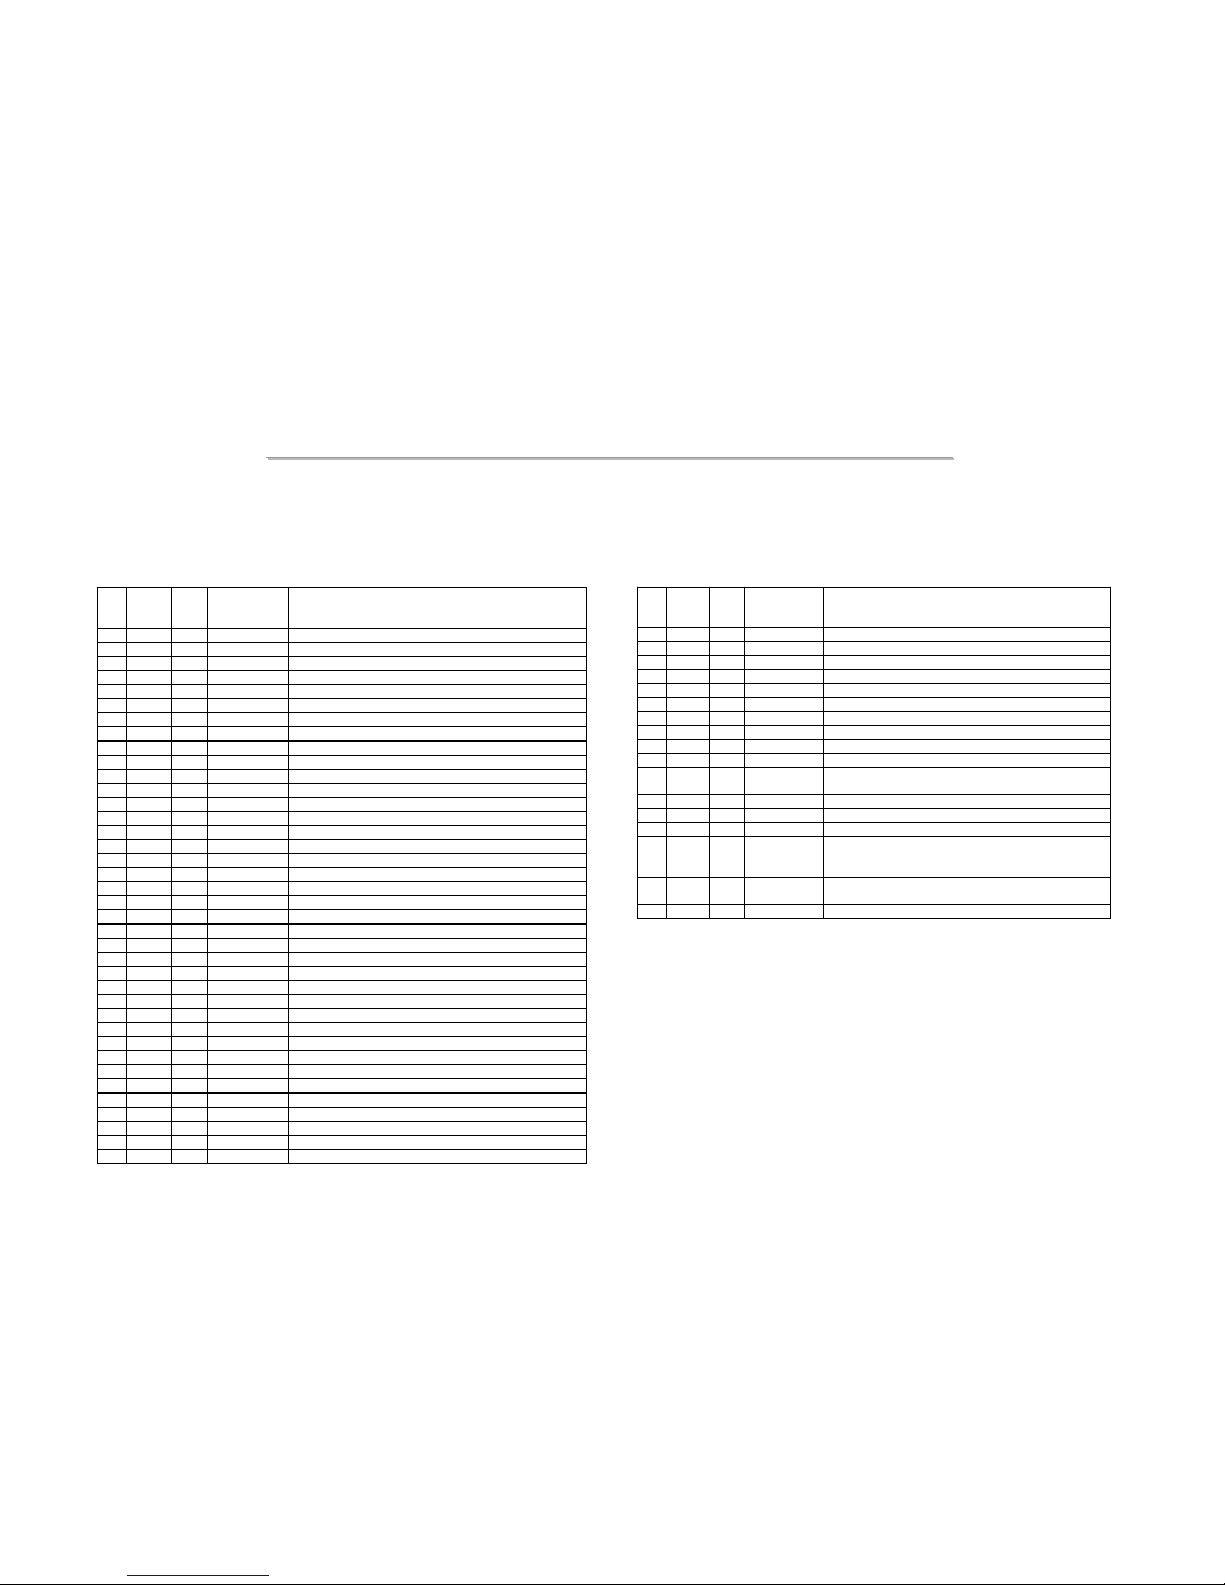
TFT Panel Interface
Pin Name I/O Drive Current
(@10pF)
Description
2pxl/clk 2pxl/clk 1pxl/clk 1pxl/clk
8-bit 6-bit 8-bit 6-bit TFT
6 PD47 out 2 mA ~ 20 mA OB1 - - 7 PD46 out 2 mA ~ 20 mA OB0 - - -
9 PD45 out 2 mA ~ 20 mA OG1 - - 10 PD44 out 2 mA ~ 20 mA OG0 - - 13 PD43 out 2 mA ~ 20 mA OR1 - - 14 PD42 out 2 mA ~ 20 mA OR0 - - 15 PD41 out 2 mA ~ 20 mA EB1 - B1 16 PD40 out 2 mA ~ 20 mA EB0 - B0 17 PD39 out 2 mA ~ 20 mA EG1 - G1 19 PD38 out 2 mA ~ 20 mA EG0 - G0 20 PD37 out 2 mA ~ 20 mA ER1 - R1 22 PD36 out 2 mA ~ 20 mA ER0 - R0 23 PD35 out 2 mA ~ 20 mA OB7 OB5 - 24 PD34 out 2 mA ~ 20 mA OB6 OB4 - 25 PD33 out 2 mA ~ 20 mA OB5 OB3 - 26 PD32 out 2 mA ~ 20 mA OB4 OB2 - 27 PD31 out 2 mA ~ 20 mA OB3 OB1 - 28 PD30 out 2 mA ~ 20 mA OB2 OB0 - 29 PD29 out 2 mA ~ 20 mA OG7 OG5 - 31 PD28 out 2 mA ~ 20 mA OG6 OG4 - 32 PD27 out 2 mA ~ 20 mA OG5 OG3 - 34 PD26 out 2 mA ~ 20 mA OG4 OG2 - 35 PD25 out 2 mA ~ 20 mA OG3 OG1 - 36 PD24 out 2 mA ~ 20 mA OG2 OG0 - 37 PD23 out 2 mA ~ 20 mA OR7 OR5 - 38 PD22 out 2 mA ~ 20 mA OR6 OR4 - 39 PD21 out 2 mA ~ 20 mA OR5 OR3 - 42 PD20 out 2 mA ~ 20 mA OR4 OR2 - 46 PD19 out 2 mA ~ 20 mA OR3 OR1 - 47 PD18 out 2 mA ~ 20 mA OR2 OR0 - 48 PD17 out 2 mA ~ 20 mA EB7 EB5 B7 B5
50 PD16 out 2 mA ~ 20 mA EB6 EB4 B6 B4
51 PD15 out 2 mA ~ 20 mA EB5 EB3 B5 B3
52 PD14 out 2 mA ~ 20 mA EB4 EB2 B4 B2
53 PD13 out 2 mA ~ 20 mA EB3 EB1 B3 B1
54 PD12 out 2 mA ~ 20 mA EB2 EB0 B2 B0
55 PD11 out 2 mA ~ 20 mA EG7 EG5 G7 G5
56 PD10 out 2 mA ~ 20 mA EG6 EG4 G6 G4
Pin Name I/O Drive Current
(@10pF)
Description
2pxl/clk 2pxl/clk 1pxl/clk 1pxl/clk
8-bit 6-bit 8-bit 6-bit TFT
57 PD9 out 2 mA ~ 20 mA EG5 EG3 G5 G3
62 PD8 out 2 mA ~ 20 mA EG4 EG2 G4 G2
63 PD7 out 2 mA ~ 20 mA EG3 EG1 G3 G1
64 PD6 out 2 mA ~ 20 mA EG2 EG0 G2 G0
66 PD5 out 2 mA ~ 20 mA ER7 EG5 R7 R5
67 PD4 out 2 mA ~ 20 mA ER6 ER4 R6 R4
68 PD3 out 2 mA ~ 20 mA ER5 ER3 R5 R3
69 PD2 out 2 mA ~ 20 mA ER4 ER2 R4 R2
70 PD1 out 2 mA ~ 20 mA ER3 ER1 R3 R1
71 PD0 out 2 mA ~ 20 mA ER2 ER0 R2 R0
43 PDispE out 2 mA ~ 20 mA This output provides a panel display enable signal that is
active when flat panel data is valid.
74 PHS out 2 mA ~ 20 mA This output provides the panel line clock signal.
73 PVS out 2 mA ~ 20 mA This output provides the frame start signal.
44 PCLKA out 2 mA ~ 20 mA This output is used to drive the flat panel shift clock.
45 PCLKB out 2 mA ~ 20 mA Same as PCLKA above.
The polarity and the phase of this signal are independently
programmable.
75 Pbias out 8 mA This output is used to turn on / off the panel bias power or
controls back-light.
76 Ppwr out 8 mA This output is used to control the power to a flat panel.
NOTE: Drive current of the panel output pins are programmable.
5.
5.
Pin Description Of Major Components
Pin Description Of Major Components
5.1 gmZAN1 Flat Panel Controller IC
5.1 gmZAN1 Flat Panel Controller IC --33
Page 39
LCD MONITOR 15EX
LCD MONITOR 15EX--
TA MAINTENANCE
TA MAINTENANCE
38
Test Pins
Pin Name I/O Drive Current Description
3 PSCAN in Enable automatic PCB assem bly test. When this input is
pulled high, the automatic PCB assembly test mode is
entered. An internal pull-down resistor drives this input
low for normal operation.
155 SCAN_IN1 in Scan in put 1 used for automatic PCB assembly testing.
157 SCAN_IN2 in Scan in put 2 used for automatic PCB assembly testing.
159 SCAN_OU
T1
out Scan output 1 used for automatic PCB assembly tes ting.
160 SCAN_OU
T2
out Scan output 2 used for automatic PCB assembly tes ting.
153 Reserved
154 Reserved
VDD / VSS for Core Circuitry, Host Interface, and Panel/Memory Interface
Pins Description
65, 40, 33, 12 PVDD4 ~ PVDD1 for panel / memory interface.
Connect to +3.3V.
Must be the same voltage as the CVDD’s.
149, 108, 58, 21, 11 SRVDD2-1, CVDD4, CVDD2-1 for core circuitry.
Connect to +3.3V.
Must be the same voltage as the PVDD’s.
158, 151, 140, 126, 1 14, 72, 61, 49, 41, 30,
18, 8, 1
Digital grounds for core circuitry and pane l / memory
interface.
5.
5.
Pin Description Of Major Components
Pin Description Of Major Components
5.1 gmZAN1 Flat Panel Controller IC
5.1 gmZAN1 Flat Panel Controller IC --44
Page 40
LCD MONITOR 15EX
LCD MONITOR 15EX--
TA MAINTENANCE
TA MAINTENANCE
39
6. 15
6. 15
EX
EX--
TA System Block Diagram
TA System Block Diagram
6
6
.1 System Block diagram
.1 System Block diagram
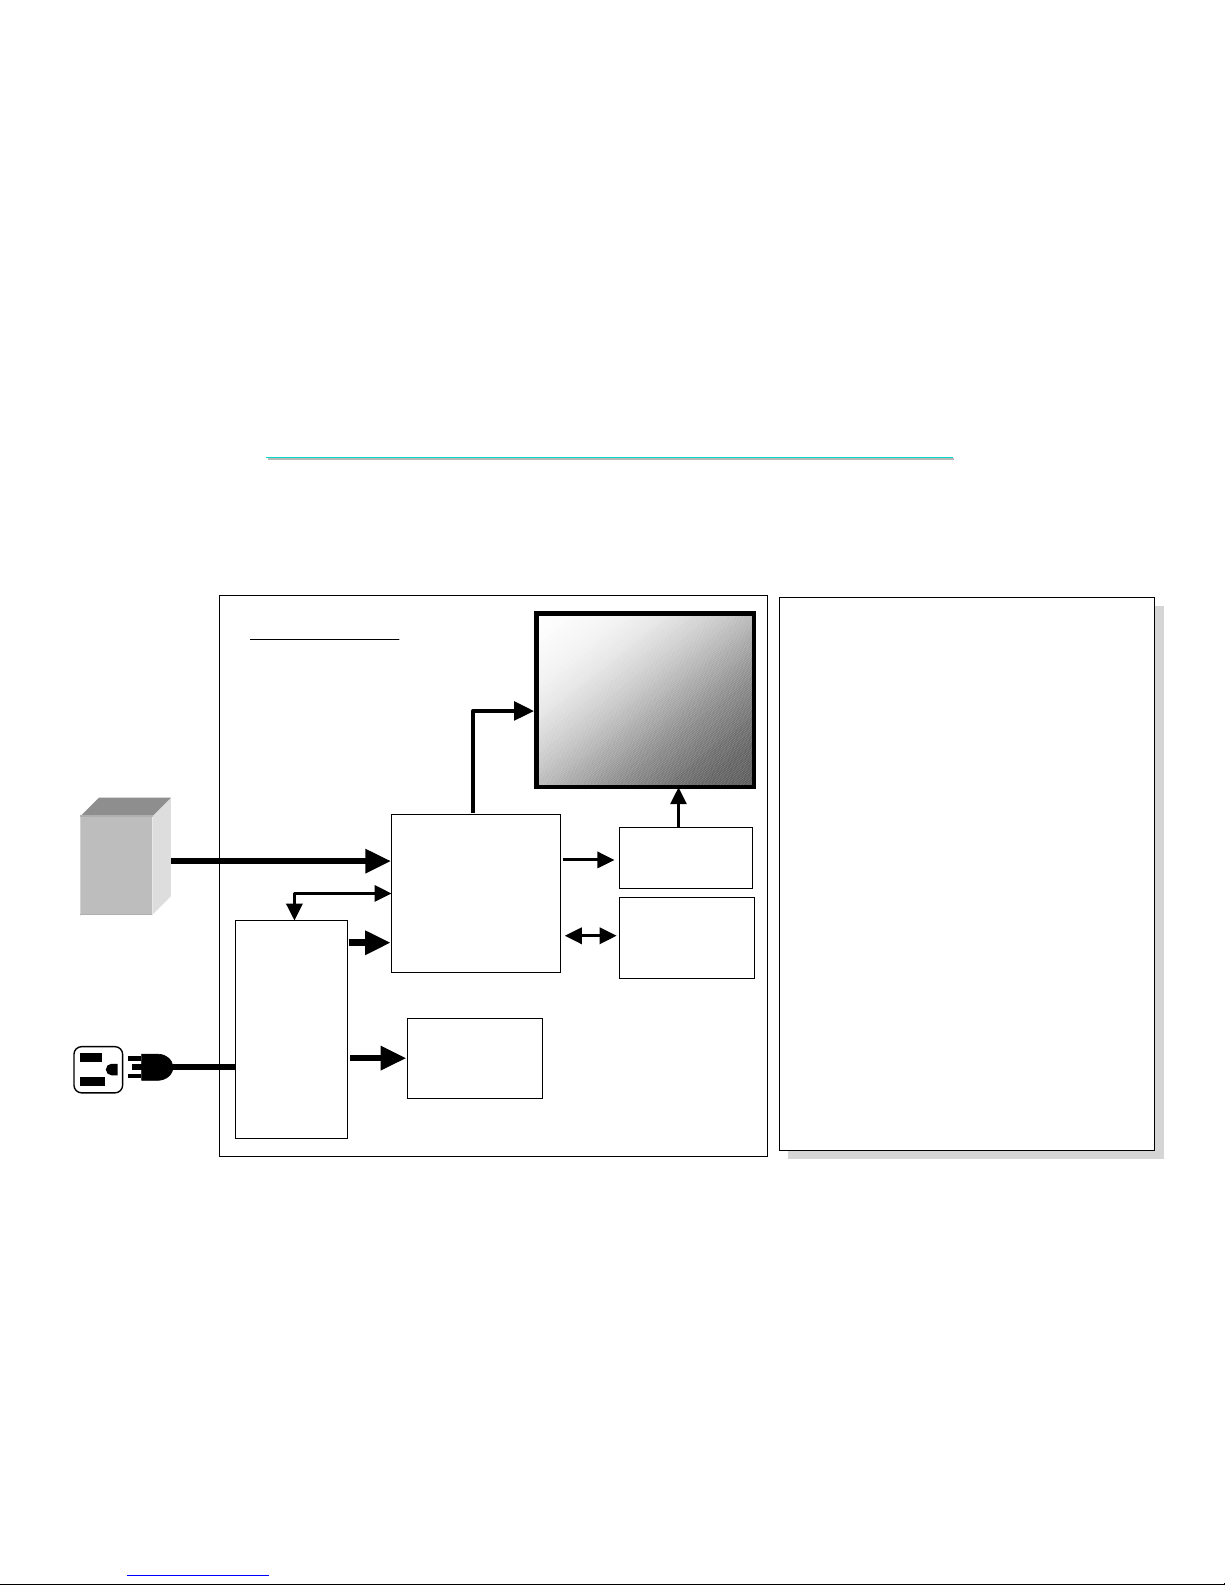
PC
AC SOURCE
12V
DC Input
Power Jack
Board
Key Switch
Board
15EX
INTERFACE
BOARD
Inverter Bd.
AC source : LCD monitor power in.
15EX INTERFACE BOARD
: (Interface Board).Receive
PC VGA signals transfer to
LCD signals , control inverter
BD backlight up/down.
Power Jack Board : AC power Transfer to
DC and provide system power
and Audio_IN & MIC_OUT
function.
Phone Jack Board : Provide EAR_Phone_Out
& MIC_IN function.
KEY SWITCH BOARD : Indicate system
state and Adj panel brightness.
LCD Panel : Display panel.
Invertor Board : LCD Panel Back-light.
LCD MONITOR
LCD MONITOR
LCD PANEL
Analog Signals
VGA Input
Phone Jack
Board
Page 41
LCD MONITOR 15EX
LCD MONITOR 15EX--
TA MAINTENANCE
TA MAINTENANCE
40
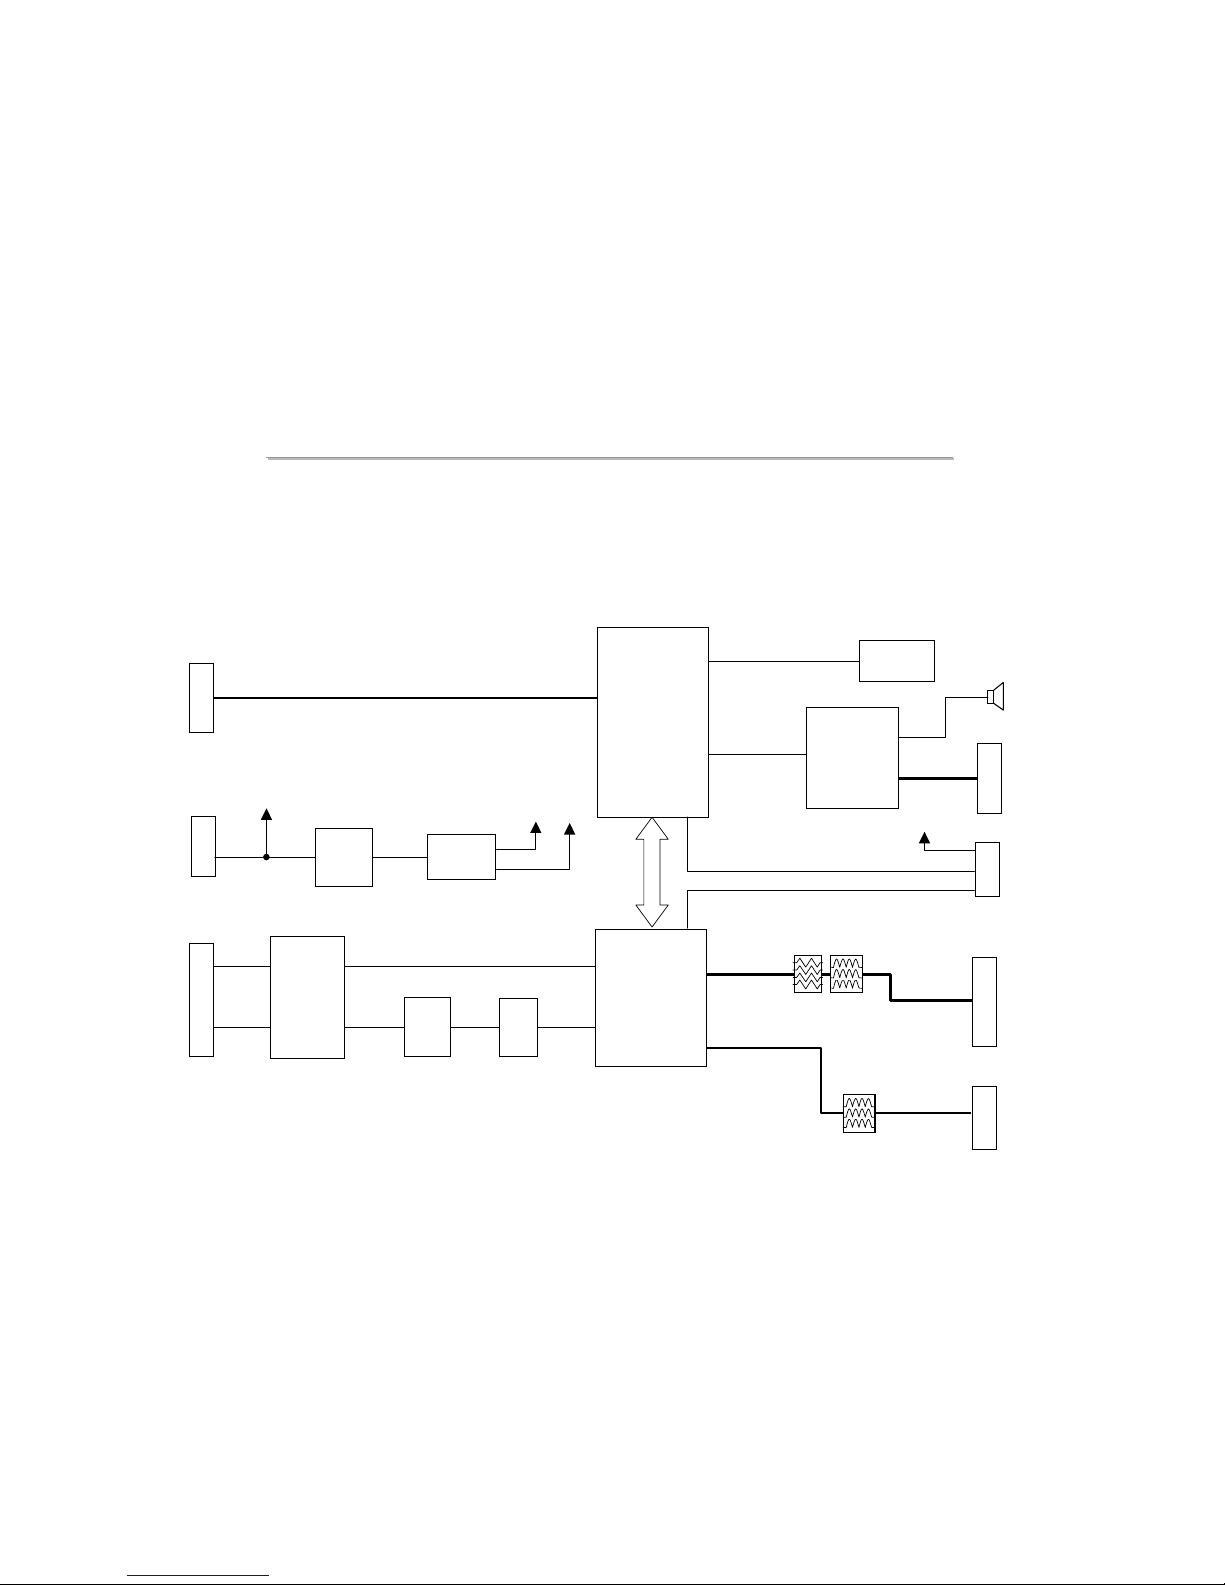
U11
M6759
Micro-CTRL
JP2
Key-Switch
Board
Connector
U10
24LC16B
SCL
SDA
KEY_MENU#
KEY_SE LECT#
KEY_UP#
KEY_DOWN#
HOT_KEY
SOFT_PWR#
LED_AM BER
LED_GREEN
JP1
To DC
Jack-Board
Connector
U7
EZ1084CT
U6
HIP6013
12VIN
+5V +3.3V
JP5
To Inverter
Connector
12VIN
BRI_PWM
EN_BL#
6. 15
6. 15
EX
EX--
TA Block Diagram
TA Block Diagram
6
6
.2 15EX
.2 15EX--
TA Interface Board Block diagram
TA Interface Board Block diagram
J1
External
VGA
Analog
RGB
U1
gmZAN1
Flat Panel
Monitor
Controller IC
ESD
Protective
Circuit
VGA_R
VGA_G
VGA_B
RED+
GREEN+
BLUE+
VS_VGA
HS_VGA
H_IN
V_IN
U3
M52347
HSYNC
VSYNC
U2
74F14
J3
To Panel Connector
( 40 Pins )
J4
To Panel Connector
( 20 Pins )
E_R[2:7]
E_G[2:7]
E_B[2:7]
O_R[2:7]
O_G[2:7]
O_B[2:7]
ER[0:5]
EG[0:5]
EB[0:5]
OR[0:5]
OG[0:5]
OB[0:5]
LCD_C LK
DE
V_SYNC
H_SYNC
U12
TDA7057AQ
Audio
Amplifier
AUDIO_PWR
AUDIO_PWM
JP7
To DC JACK BD
To Speaker Unit
Page 42

LCD MONITOR 15EX
LCD MONITOR 15EX--
TA MAINTENANCE
TA MAINTENANCE
41
7.1
7.1
No Power
No Power
7.2 No Display( System Fail ) Or Display Abnormal
7.2 No Display( System Fail ) Or Display Abnormal
7.3 OSD Function Or Display Abnormal
7.3 OSD Function Or Display Abnormal
7.4 No Back Light
7.4 No Back Light
7.5 PC Can
7.5 PC Can’’
t Detect LCD Monitor Type
t Detect LCD Monitor Type
7.6 LCD Monitor Audio Function Abnormal
7.6 LCD Monitor Audio Function Abnormal
7.
7.
Troubleshooting
Troubleshooting
Page 43
LCD MONITOR 15EX
LCD MONITOR 15EX--
TA MAINTENANCE
TA MAINTENANCE
42
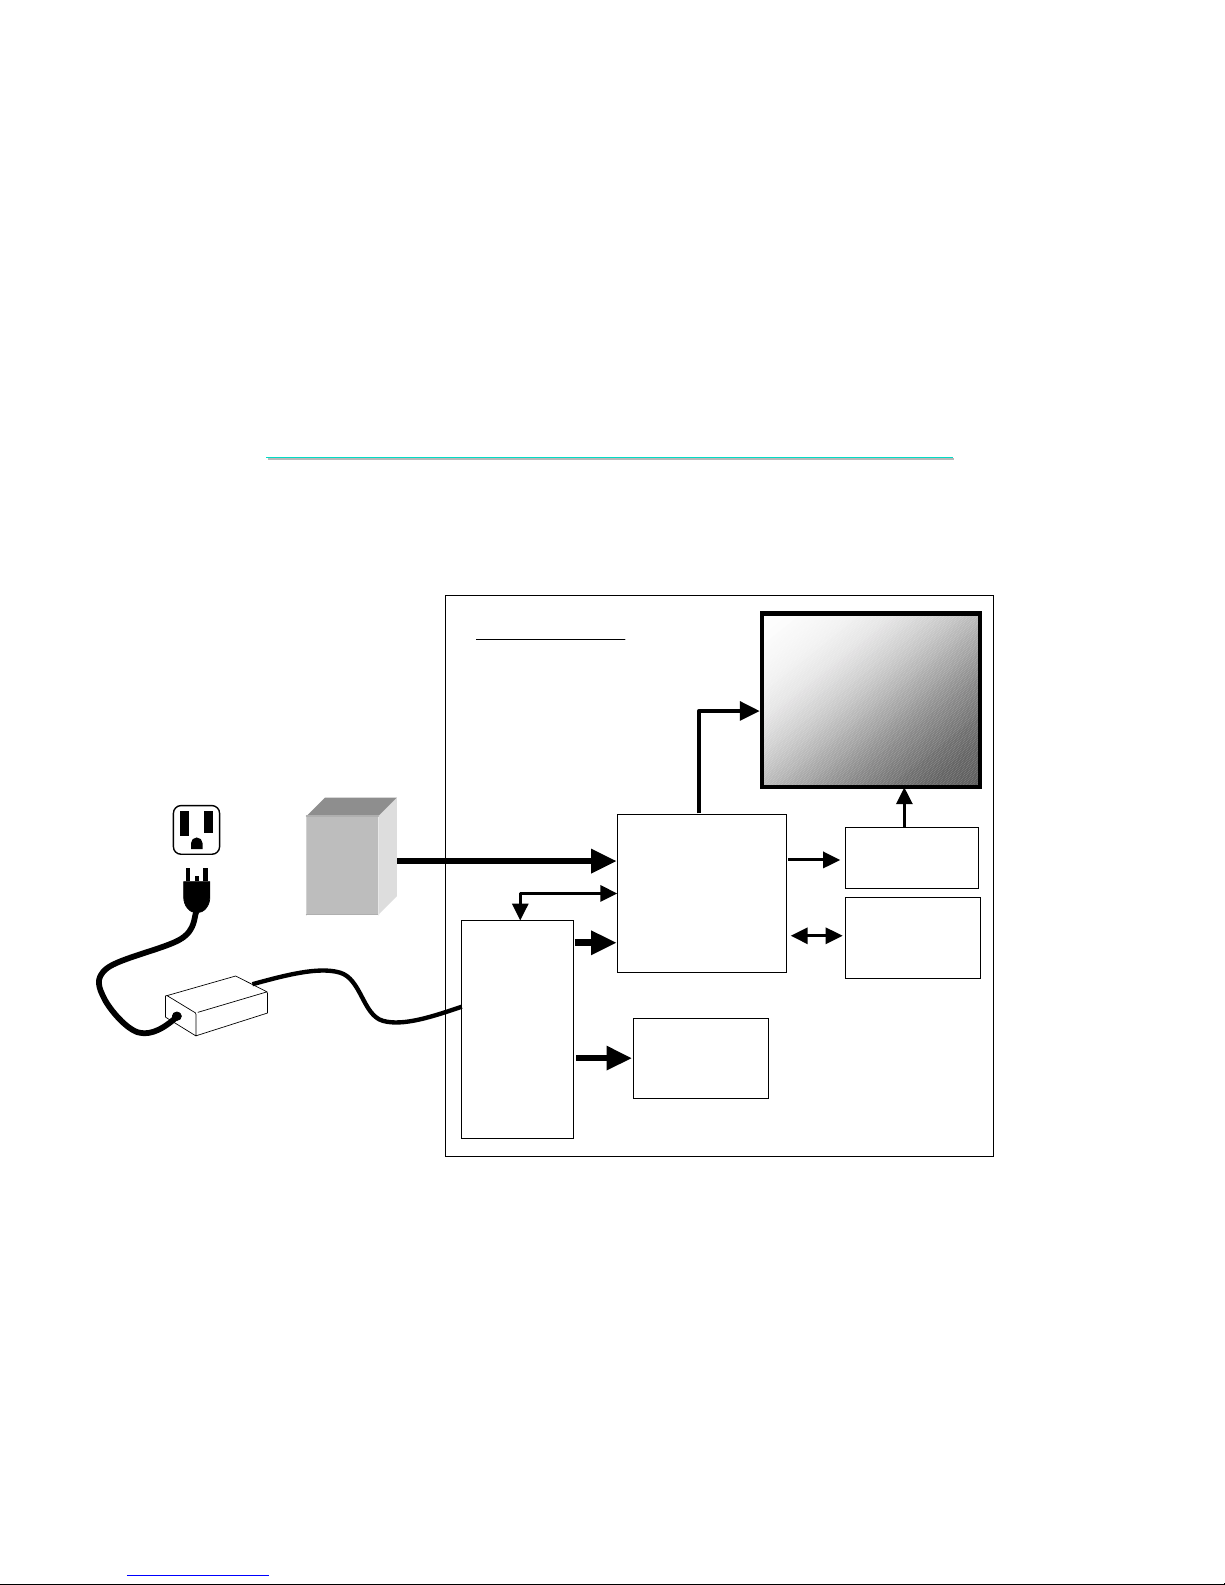
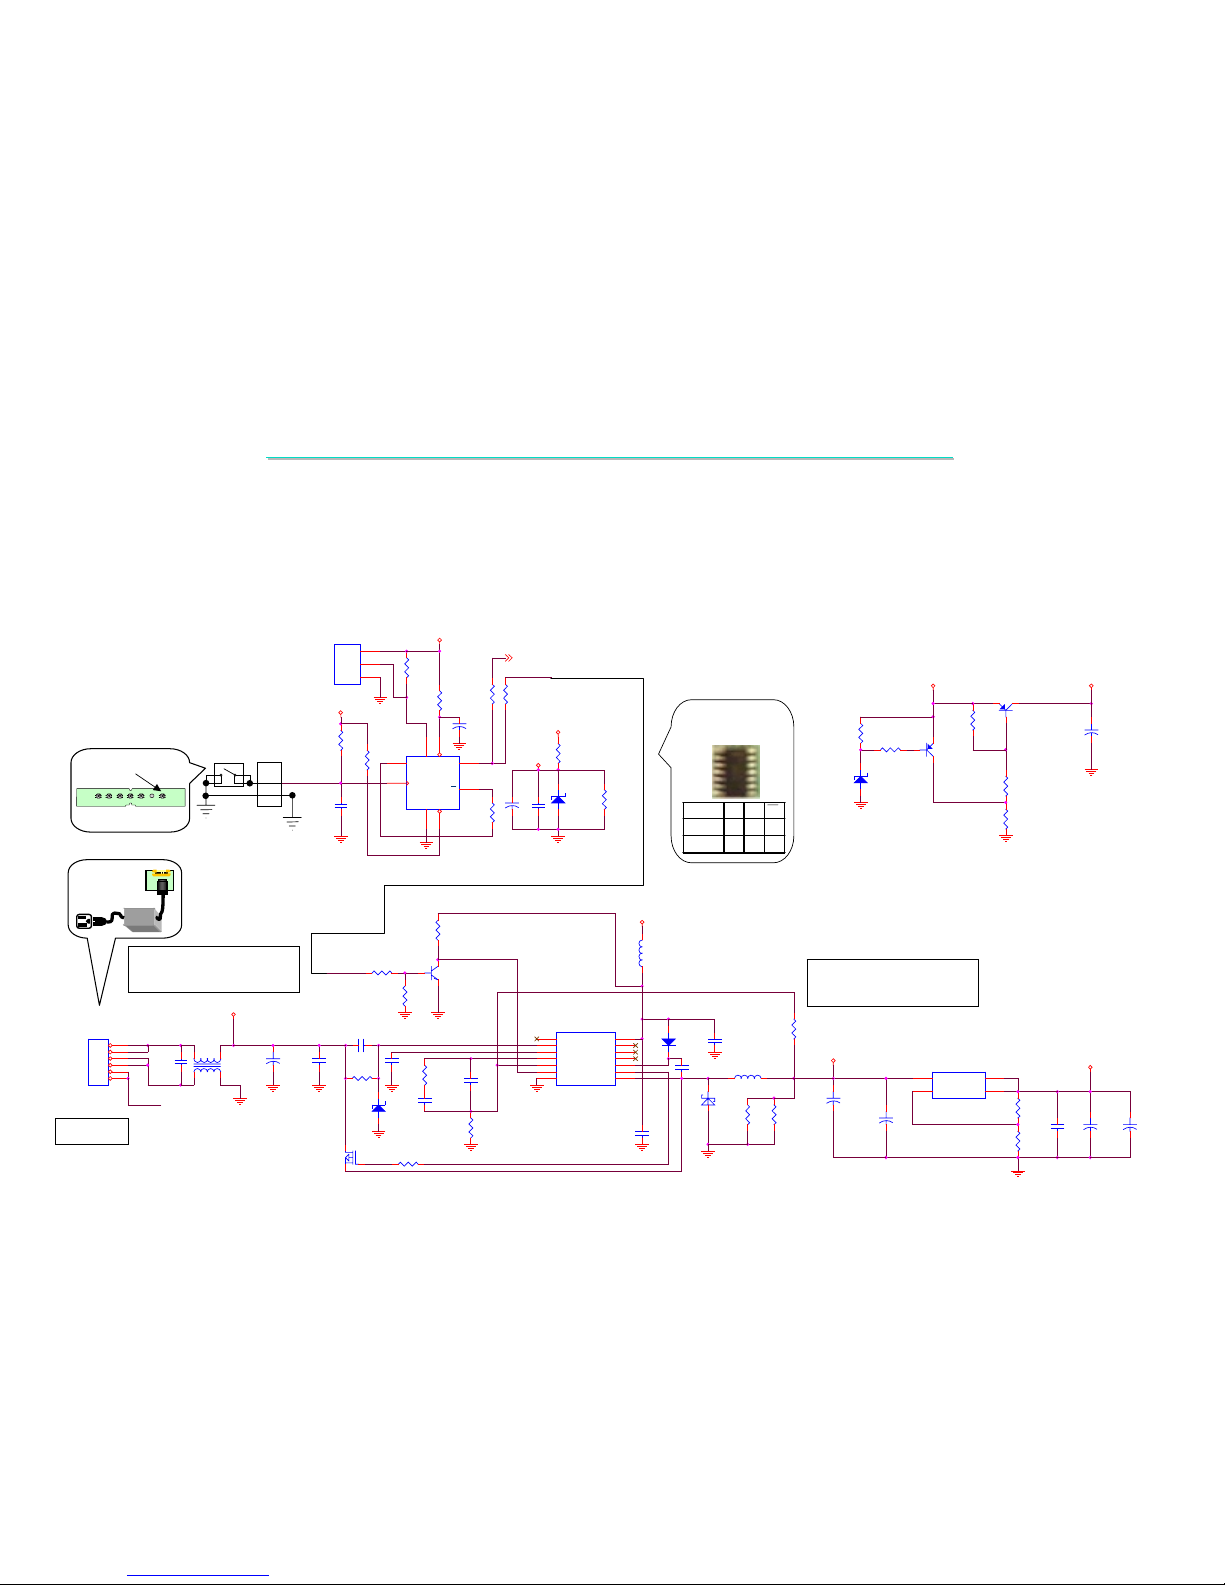
Symptom:
Symptom:
When the power switch is turned on, nothing happens,power indica
When the power switch is turned on, nothing happens,power indica
tor is not light up
tor is not light up
.
.
7.1
7.1
No Power
No Power
PC
12V
DC Input
Power Jack
Board
Key Switch
Board
15EX
INTERFACE
BOARD
Inverter Bd.
LCD MONITOR
LCD MONITOR
LCD PANEL
Analog Signals
VGA Input
Phone Jack
Board
AC SOURCE
Page 44
LCD MONITOR 15EX
LCD MONITOR 15EX--
TA MAINTENANCE
TA MAINTENANCE
43
7.1
7.1
No Power
No Power
12VIN VDD_12
GND
GND
GND
Q5
MMBT3906L
B
E
C
R74
10K 0603
1 2
R73
100K
0603
12
R76
10K
0603
12
R75
1K
0603
12
Q4 MMBT3906L
B
E C
R72
100K
0603
12
D12
RLZ15A
A K
+
C82
100uF/25V
CPWX8.3
12
OVER VOTAGE PROTECTION
+3.3V
VDD_12
+5V
GND GND
GND
GNDGND
12VIN
GND
GND
GND GND
GND
GND
GND
GND
+5V
POWER_ON#
+5V
R110
47K
0603
1 2
R71
22
0603
1 2
CHOKE1
COM_CHOKE_4A
142
3C70
0.1uF
JP1
PH_6
1
2
3
4
5
6
+
C69
330uF/16V
12
C80
1uF
16V
0805
12
C76
0.01uF
12
Q3
HUF75307D
G
DS
C67
1000P
0805
1 2
B22
500z/100M
3216
1 2
R65
499
12
R62
2.94K
12
R63
40.2K
0805
12
+
C79
470uF/16V
12
C68
1uF
16V
0805
12
R69
1K
0805
12
L1 4.7UH/8A
CHOKE_ETQP_CDRH125
1 2
U6
HIP6013
1
2
3
4
5
6
7 8
9
10
11
12
13
14
RT
OCSET
SS
COMP
FB
EN
GND PHASE
UGATE
BOOT
NC3
NC2
NC1
VCC
C81
1uF
16V
0805
12
C74
33P
12
+
C75
470uF/16V
12
C72
0.1uF
12
R70
165
0603
1%
12
U7
EZ1084CT
3
1
2
4
VIN
GND
VOUT0
VOUT1
+
C77
10uF/16V
CPWX4.3
12
+
C78
10uF/16V
CPWX4.3
12
R67
100
0603
1%
12
D9
1N4148
MLL34B
AK
R111
10K
0603
1 2
C73
0.1uF
12
Q14
2sc1623
B
E
C
R109
10K
0805
5%
1 2
R64
4.99K
0805
1%
1 2
R66
499
12
C71
1uF
0805
12
D10
SR34
D11
RLZ15A
A K
POWER CONN.
12V-->5V
5V-->3.3V
TO DC JACK BD
12V
12V
GND
GND
1%
1%1%
1%
5V
5V
1,2 SHORT FOR 12V ADAPTOR
2,3 SHORT OR OPEN FOR 12V/5V I/P
2,3 SHORT OR OPEN FOR 12V/5V I/P
1,2 SHORT FOR 12V ADAPTOR
+5VP
+5VP
+5VP
VDD_12
GND
GNDGND
GND
GND
AUDIO_PWR
SOFT_PWR#
SWPSW
POWER_ON#
R119
NC
0603
12
D14
RLZ5.1
A K
C158
100n
R113
NC
0603
12
R115
10K
C155
10uF/16V
R118
10K
U14A
74AHCT74
2
3
5
6
14
4
7
1
D
CLK
Q
Q
VCC
PR
GND
CL
R116
10K
C156
100P
U13
KIA7045
E
B
C
RSTN
VCC
GND
C157
10u/16V
R112
470
0603
12
R117
510R/0805
R114
0
R120
47K
0603
12
POWER SWITCH
POWER BOARD 12V TO 5V
Power BTN
JP2
6
9
CLK D Q Q
↑
HHL
↑
LLH
U14
74AHCT74
Symptom:
Symptom:
When the power switch is turned on, nothing happens, power indic
When the power switch is turned on, nothing happens, power indic
ator is not light up
ator is not light up
.
.
Key Switch BD
Page 45
LCD MONITOR 15EX
LCD MONITOR 15EX--
TA MAINTENANCE
TA MAINTENANCE
44
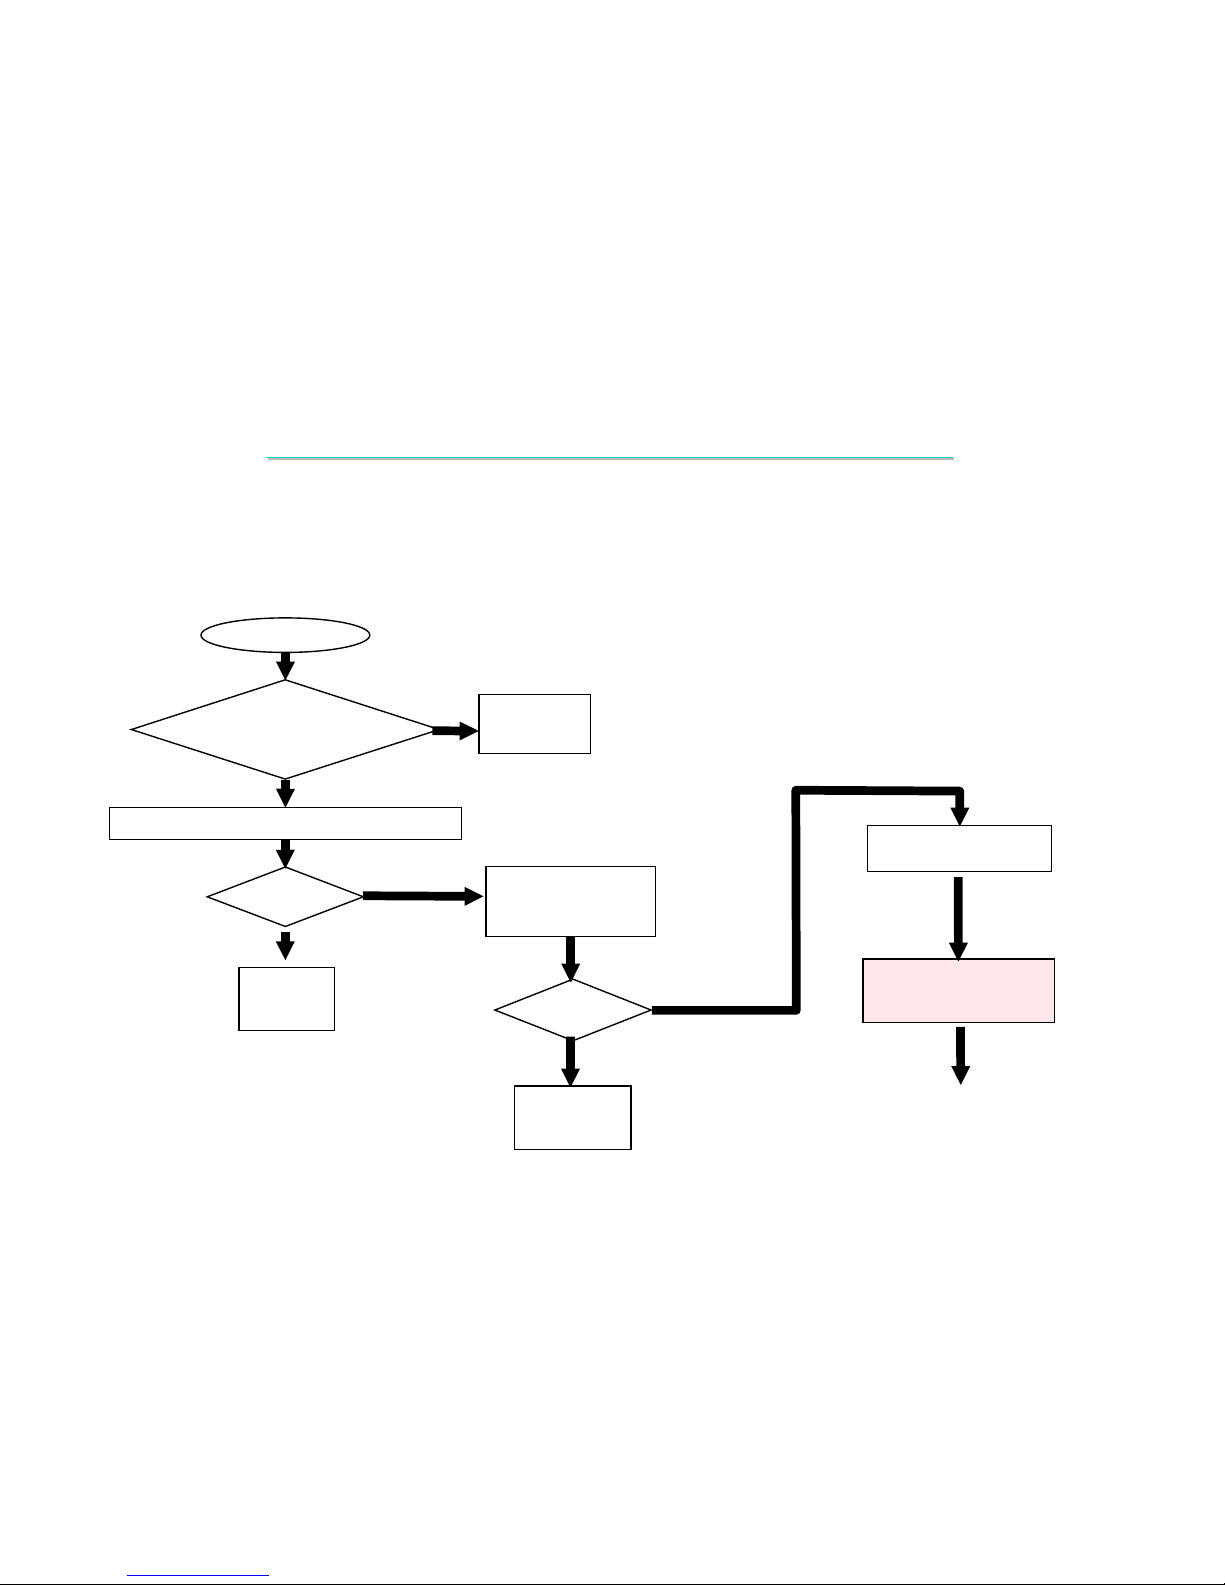
7.1
7.1
No Power
No Power
Symptom:
Symptom:
When the power switch is turned on, nothing happens, power indic
When the power switch is turned on, nothing happens, power indic
ator is not light up
ator is not light up
.
.
Board
Board--
level
level
Troubleshooting
Troubleshooting
Replace
Replace
15EX-TA Interface Board
No power
No power
Connect
AC adaptor.
Replace the
faulty AC
Adaptor.
Power
Power
OK?
OK?
No
No
Yes
Yes
No
No
Try another known good AC adapter.
Yes
Yes
Power
Power
OK?
OK?
Yes
Yes
Is the
LCD monitor connected
to power (AC adaptor)?
No
No
Replace faulty
internal
POWER BD.
Try another know good
Internal POWER BD.
To be continued
Next Page.
Page 46
LCD MONITOR 15EX
LCD MONITOR 15EX--
TA MAINTENANCE
TA MAINTENANCE
45
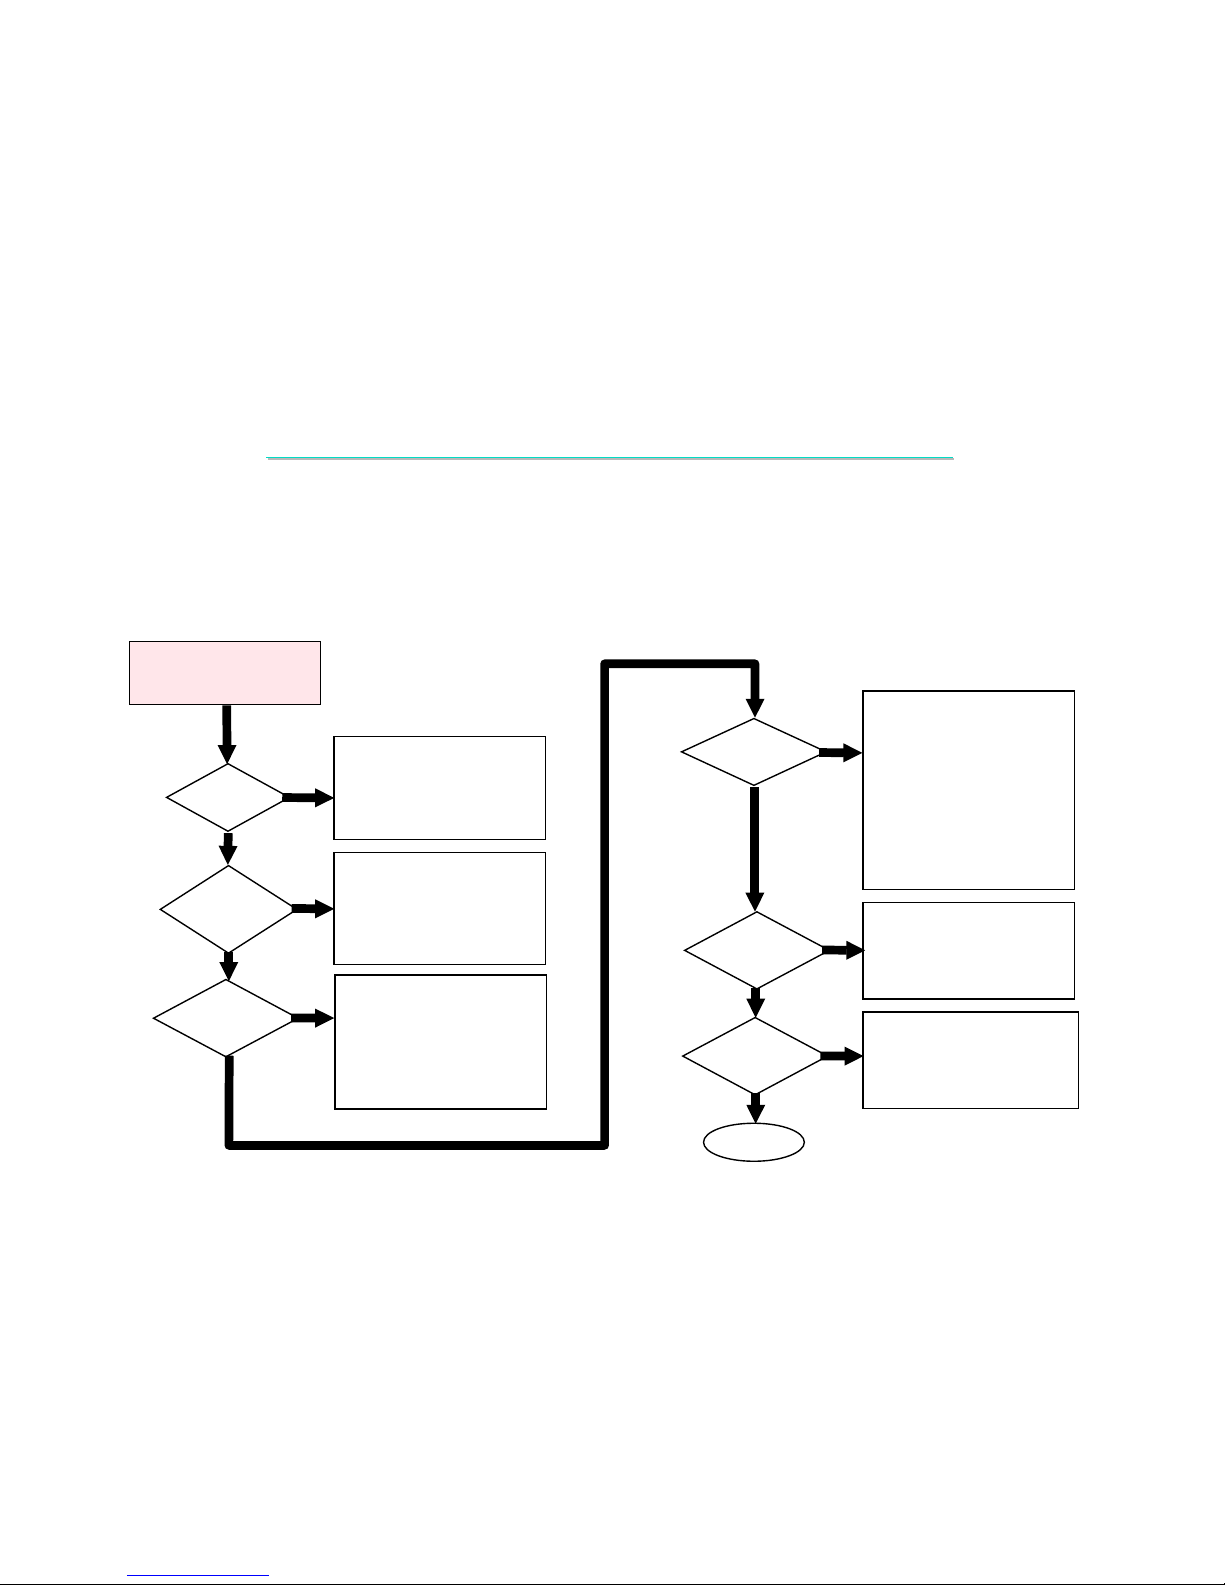
7.1
7.1
No Power
No Power
Symptom:
Symptom:
When the power switch is turned on, nothing happens, power indic
When the power switch is turned on, nothing happens, power indic
ator is not light up
ator is not light up
.
.
12VIN
OK?
No
Check following parts and signals:
PARTS: SIGNAL:
JP1
CHOKE1
POWER BD
12VIN
VDD_12
OK?
No
Yes
VDD_12 TO +5VP
OK?
No
Check following parts and signals:
PARTS: SIGNAL:
D14 R117
U14 R120
R112 R115
R116 R119
C157 C158
VDD_12
+5VP
Yes
End
Check following parts and signals:
PARTS: SIGNAL:
Q4 Q5
D12 B22
R72 ~ R76
12VIN
VDD_12
Yes
+5V
OK?
No
Check following parts and signals:
PARTS: SIGNAL:
U6 C67
R64 D11
Q3 R71
R63 R69
C74 C76
D9 D10
R65 R66
R62
SW BD
12VIN
+5VP
VDD_12
+5V
15EX-TA Interface Board
Board
Board--
level Troubleshooting
level Troubleshooting
+3.3V
OK?
No
Check following parts and signals:
PARTS: SIGNAL:
U7
R67 R70
C75 C77~C80
+5V
+3.3V
Check following parts and signals:
PARTS: SIGNAL:
U8 Q6
R77 R78
VCC_LCD
VCC_LCD
OK?
No
Page 47
LCD MONITOR 15EX
LCD MONITOR 15EX--
TA MAINTENANCE
TA MAINTENANCE
46
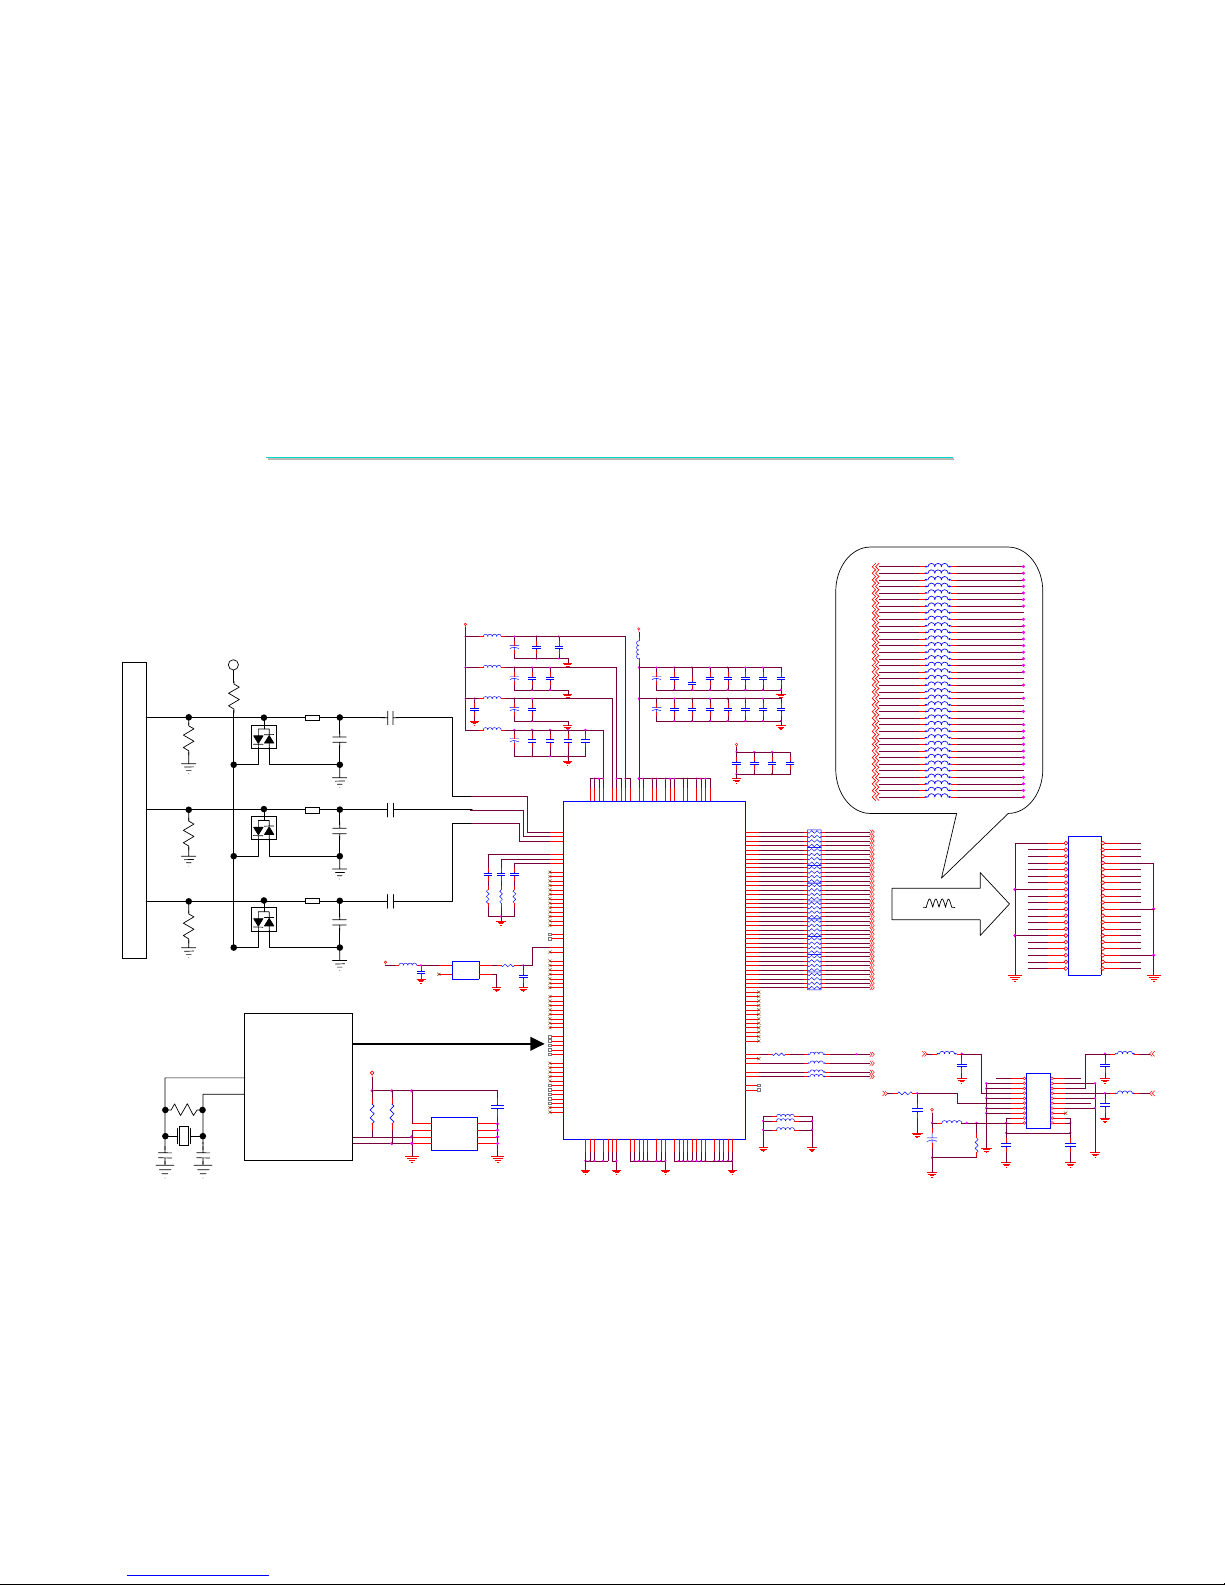
7.2
7.2
No Display( System Fail ) Or Display Abnormal
No Display( System Fail ) Or Display Abnormal
Symptom:
Symptom:
The LCD no display,but power and back light is good.or show abno
The LCD no display,but power and back light is good.or show abno
rmal picture.
rmal picture.
ADC_GNDA
ADC_GNDA
ADC_GNDA
+3.3V
+3.3V
GND
GND
GND
GND
GND
GND
GND
GND GND GND
GND
+3.3V
ADC_GNDA
GND
GND
GND
+3.3V
DE
V_SYNC
H_SYNC
LCD_CLK
O_B2
O_B3
O_B4
O_B6
O_B7
O_B5
O_G2
O_G3
O_G6
O_G4
O_G5
O_G7
O_R2
O_R6
O_R4
O_R3
O_R5
O_R7
E_B2
E_B3
E_B4
E_B6
E_B7
E_B5
E_G2
E_G3
E_G6
E_G4
E_G5
E_G7
E_R7
E_R5
E_R6
E_R3
E_R4
E_R2
E_R2
E_R3
E_R5
E_R4
E_G2
E_G3
E_R7
E_R6
E_G7
E_G4
E_G6
E_G5
O_R7
O_G2
O_G3
O_G5
O_G4
O_B2
O_B3
O_G7
O_G6
O_B7
O_B4
O_B6
O_B5
PD27
PD19
PD15
PD7BLUE-
DVDDA
PD10
PD2
GREEN+
PD34
PD28
PD17
PD6
PD31
BLUE+
PD26
PD24
PD3
PD21
PD8
GREEN-
VCC_3.3V
PD22
PD16
VDDA
RED+
SVDDA
PD13
RED-
PD14
PD4
PD35
PD33
PD11
PD9
PD1
PD32
PD29
PD18
PD30
PD25
PD5
PD20
PD23
PD0
PD12
RVDDA
E_B5
E_B4
O_R4
E_B6
O_R2
E_B2
E_B7
O_R3
O_R5
O_R6
E_B3
U1
gmZAN1
1
2
3
4
5
6
7
8
9
10
11
12
13
14
15
16
17
18
19
20
21
22
23
24
25
26
27
28
29
30
31
32
33
34
35
36
37
38
39
40
41
42
43
44
45
46
47
48
49
50
51
52
53
54
55
56
57
58
59
60
61
62
63
64
65
66
67
68
69
70
71
72
73
74
75
76
777879
808182
83
84
85
86
87
88
89
90
91
92
93
94
95
96
97
98
99
100
101
102
103
108
114
115
116
117
118
119
120
121
122
123
124
125
126
127 128
129
130
131
132
133
134
135
136
137
138
139
140
141
142
143
145
146
147
148
149
150
151
152
153
154
155
156
157
158
159
160
113
112
111
110
109
107
106
105
104
144
CVSS1
RESERVED
PSCAN
RESERVED
RESERVED
PD47
PD46
RVSS1
PD45
PD44
SRVDD1
RVDD1
PD43
PD42
PD41
PD40
PD39
SRVSS1
PD38
PD37
SRVDD2
PD36
PD35
PD34
PD33
PD32
PD31
PD30
PD29
RVSS2
PD28
PD27
RVDD2
PD26
PD25
PD24
PD23
PD22
PD21
CVDD1
CVSS2
PD20
PDISPE
PCLKA
PCLKB
PD19
PD18
PD17
RVSS3
PD16
PD15
PD14
PD13
PD12
PD11
PD10
PD9
CVDD2
RESERVED
RESERVED
RVSS4
PD8
PD7
PD6
RVDD3
PD5
PD4
PD3
PD2
PD1
PD0
CVSS3
PVS
PHS
PBIAS
PPWR
ADC_VDD2
ADC_GND2
ADC_VDD1
ADC_GND1
SUB_GNDA
ADC_GNDA
RESERVED
ADC_VDDA
ADC_BGNDA
BLUE-
BLUE+
ADC_BVDDA
ADC_GGNDA
GREEN-
GREEN+
ADC_GVDDA
ADC_RGNDA
RED-
RED+
ADC_RVDDA
N/C
HFS
HDATA
RESETn
IRQ
MFB9
HCLK
CVDD4
CVSS4
OSD_HREF
OSD_VREF
OSD_CLK
OSD_DATA0
OSD_DATA1
OSD_DATA2
OSD_DATA3
OSD_FSW
MFB11
MFB10
DVDD
DVSS
DAC_DGNDA DAC_DVDDA
PLL_DVDDA
RESERVED
PLL_DGNDA
SUB_DGNDA
SUB_SGNDA
PLL_SGNDA
RESERVED
PLL_SVDDA
DAC_SVDDA
DAC_SGNDA
SVDD
SVSS
TCLK
XTAL/RESERVED
PLL_RVDDA
RESERVED
SUB_RGNDA
RESERVED
VSYNC
SYN_VDD
HSYNC/CS
SYN_VSS
RESERVED
STI_TM1
STI_TM2
SCAN_IN1
RESERVED
SCAN_IN2
SRVSS2
SCAN_OUT1
SCAN_OUT2
MFB0
MFB1
MFB2
MFB3
MFB4
MFB5
MFB6
MFB7
MFB8
PLL_RGNDA
C13
0.1uF
C21
22uF/16V
10V
C22
0.1uF
C10
0.1uF
C23
0.1uF
C49
15P
R20 10
C25
0.1uF
C24
0.1uF
C15
0.1uF
C8
22uF/16V
10V
C9
0.1uF
C11
0.1uF
C12
0.1uF
B14 120z/100M1 2
B17 120z/100M1 2
B16 120z/100M1 2
B18 120z/100M1 2
C26
0.1uF
C14
0.1uF
C165
0.1uF
B83 220Z/100M
R11
100
C46
0.01uF
R12
100
R35 0
C47
0.01uF
R10
100
B20 0
B19 0
B21 0
C28
0.1uF
C18
1000P
C27
0.1uF
C2
0.1uF
B12 220Z/100M
C20
0.1uF
B10 220Z/100M
C7
0.1uF
C5
22uF/16V
C19
22uF/16V
C3
0.1uF
C35
0.1uF
C37
0.1uF
C36
0.1uF
C39
0.1uF
C38
0.1uF
C1
22uF/16V
C6
0.1uF
B8 220Z/100M
C33
0.1uF
C34
0.1uF
C32
0.1uF
B2 220Z/100M
C31
22uF/16V
RP3 33
8 1
7 2
6 3
5 4
RP2 33
8 1
7 2
6 3
5 4
RP1 33
8 1
7 2
6 3
5 4
RP8 33
8 1
7 2
6 3
5 4
RP6 33
8 1
7 2
6 3
5 4
RP5 33
8 1
7 2
6 3
5 4
RP4 33
8 1
7 2
6 3
5 4
RP10 33
8 1
7 2
6 3
5 4
RP7 33
8 1
7 2
6 3
5 4
B5
220Z/100M
X1
OSC50MHz
815
4
VDD
E/D
OUT
GND
C45
0.01uF
INPUT AC
COUPLING
DIGITAL
SUPPLY
DECOUPLING
ANALOG SUPPLY
DECOUPLING
E_B5
E_B2
O_B5
E_G3
E_G7
O_G2
O_B2
E_R7
O_R5
O_B3
E_B7
E_G4
O_R6
O_G4
O_B4
E_R6
O_R2
O_G7
E_B3
O_G5
E_R5
E_R2
O_R3
O_G6
O_B6
E_G2
E_B6
O_R4
O_G3
O_B7
E_G6
E_G5
E_B4
O_R7
E_R4
E_R3
OB5
OB4
OB0
OG5
OG1
OG0
OR3
OR1
EB4
EB2
OG3
EB3
OR2
EG2
EG4
ER3
EB0
ER5
EG1
EG0
EG3
ER4
EG5
OR4
OR0
OR5
OG4
OG2
OB1
OB2
OB3
ER0
ER2
ER1
EB1
EB5
B50 120z/100M1 2
B51 120z/100M1 2
B48 120z/100M1 2
B56 120z/100M1 2
B52 120z/100M1 2
B64 120z/100M1 2
B57 120z/100M1 2
B58 120z/100M1 2
B55 120z/100M1 2
B63 120z/100M1 2
B62 120z/100M1 2
B59 120z/100M1 2
B60 120z/100M1 2
B61 120z/100M1 2
B69 120z/100M1 2
B66 120z/100M1 2
B65 120z/100M1 2
B77 120z/100M1 2
B70 120z/100M1 2
B71 120z/100M1 2
B67 120z/100M1 2
B76 120z/100M1 2
B75 120z/100M1 2
B72 120z/100M1 2
B73 120z/100M1 2
B74 120z/100M1 2
B39 120z/100M1 2
B43 120z/100M1 2
B42 120z/100M1 2
B41 120z/100M1 2
B40 120z/100M1 2
B49 120z/100M1 2
B47 120z/100M1 2
B45 120z/100M1 2
B44 120z/100M1 2
B54 120z/100M1 2
J3
To Panel
Connector
( 40 Pins )
J4
To Panel
Connector
( 20 Pins )
GND GND
EB2
ER4
ER2
ER0
OB5
OB3
OB1
EB3
OG4
EB1
EG4
EG2EG1
OG2
EG0
OG0
ER5
ER3
ER1
OR5
OB4
EG3
OR3
OB2
OB0
EB0
OR1
OG5
OG3
OG1
OR4
EG5
OR2
OR0
GND
GND
GND
GND
GND
GND
J3
12
34
56
78
910
11 12
13 14
15 16
17 18
19 20
21 22
23 24
25 26
27 28
29 30
31 32
33 34
35 36
37 38
39 40
GND
GND GND
GND
GND
VCC_LCD
GND GND
GND
GND
V_SYNC
DE
H_SYNC
LCD_CLK
CLK
EB4 EB5
CLK
GND
GND GND
GND GND
GNDGND
GND
B38
120z/100M
1 2
C120
33P
12
C118
100P
12
C122
10P
12
R97 0
B68
500z/100M
12
+
C123
10uF/16V
CPWX4.3
12
R51
120
1/2W-AX
12
C126
0.1uF
12
C125
0.1uF
12
B46
120z/100M
1 2
C119
33P
12
J4
12
34
56
78
910
11 12
13 14
15 16
17 18
19 20
B53 120z/100M
1 2
+5V
GNDGND
SCL
SDA
R84
10K
R83
10K
U10
24LC16B
1
2
3
45
6
7
8
A0
A1
A2
VSSSI
SCK
WP
VCC
C94
0.1uF
PARAMETER
EEPROM
U11
M6759
21
20MHz
C97
22P
Y2
C96
22P
20
R53
HFS
HCLK
HDATA[0: 3]
J1
VGA
Analog
RGB
11
9
7
C42
0.01uF
D2
BAV99LT1
21
3
C17
10P
D3
BAV99LT1
21
3
C30
10P
D4
BAV99LT1
21
3
C41
10P
+5V
R1
10K
R2
75
VGA_R
VGA_G
VGA_B
C43
0.01uF
C44
0.01uF
B9
100
B11
100
B13
100
RED+
GREEN+
BLUE+
R3
75
R4
75
U1
Flat Panel Monitor
Controller IC
Page 48
LCD MONITOR 15EX
LCD MONITOR 15EX--
TA MAINTENANCE
TA MAINTENANCE
47
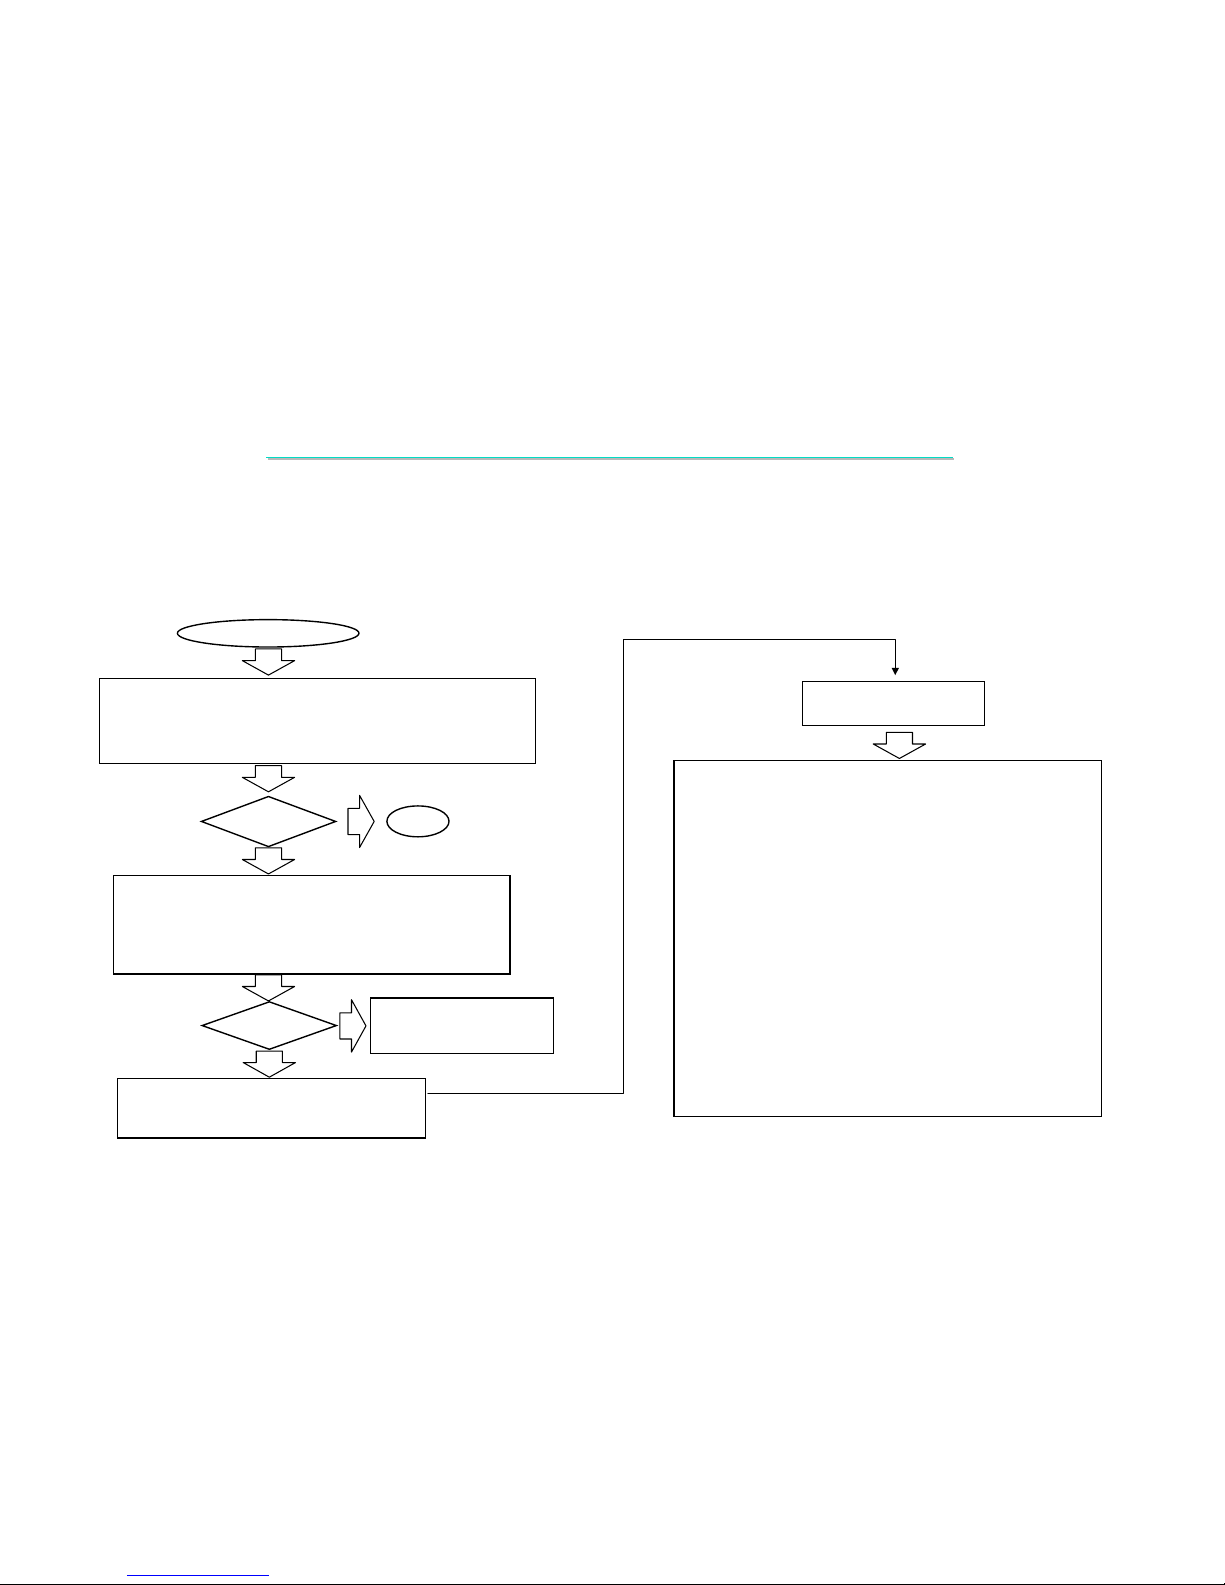
7.2
7.2
No Display( System Fail ) Or Display Abnormal
No Display( System Fail ) Or Display Abnormal
Symptom:
Symptom:
The LCD no display,but power and back light is good.or show abno
The LCD no display,but power and back light is good.or show abno
rmal picture.
rmal picture.
Picture abnormal
Picture abnormal
Is Picture
OK?
NO
YES
END
Replace following parts one at a time and test after each
replacement until find out which part caused the problem
1. PC to monitor cable
2. LCD module
3. 15EX-TA Interface Board to inverter BD cable
Is Picture
OK?
YES
NO
Replace 15EX-TA Interface Board or go
into board level Trouble-shooting.
To find out which part is
causing the problem.
1. Make sure the PC VGA adapter is good.
2. Check the VGA cable is connected to PC properly.
3. Make sure the power adaptor & power BD is good.
4. Make sure all cable and PCB connect properly.
Board-level
Troubleshooting
Check the following parts for cold solder or one of the
following parts on the mother-board may be defective,
use an oscilloscope to check the following signal or
replace the parts one at a time and test after each
replacement.
Signals:
J1 U1
X1 Y2
U11 U10
J3 J4
R1~R4 D2~D4
B9 B11
B13 RP1~RP10
B39~B77 R97
R83~R84
INVERTER BD
VGA_R VGA_G
VGA_B HFS
HCLK HDATA[0:3]
SCL SDA
E_R[2:7] E_G[2:7]
E_B[2:7] O_R[2:7]
O_G[2:7] O_B[2:7]
H_SYNC V_SYNC
LCD_CLK DE
Parts:
Page 49
LCD MONITOR 15EX
LCD MONITOR 15EX--
TA MAINTENANCE
TA MAINTENANCE
48
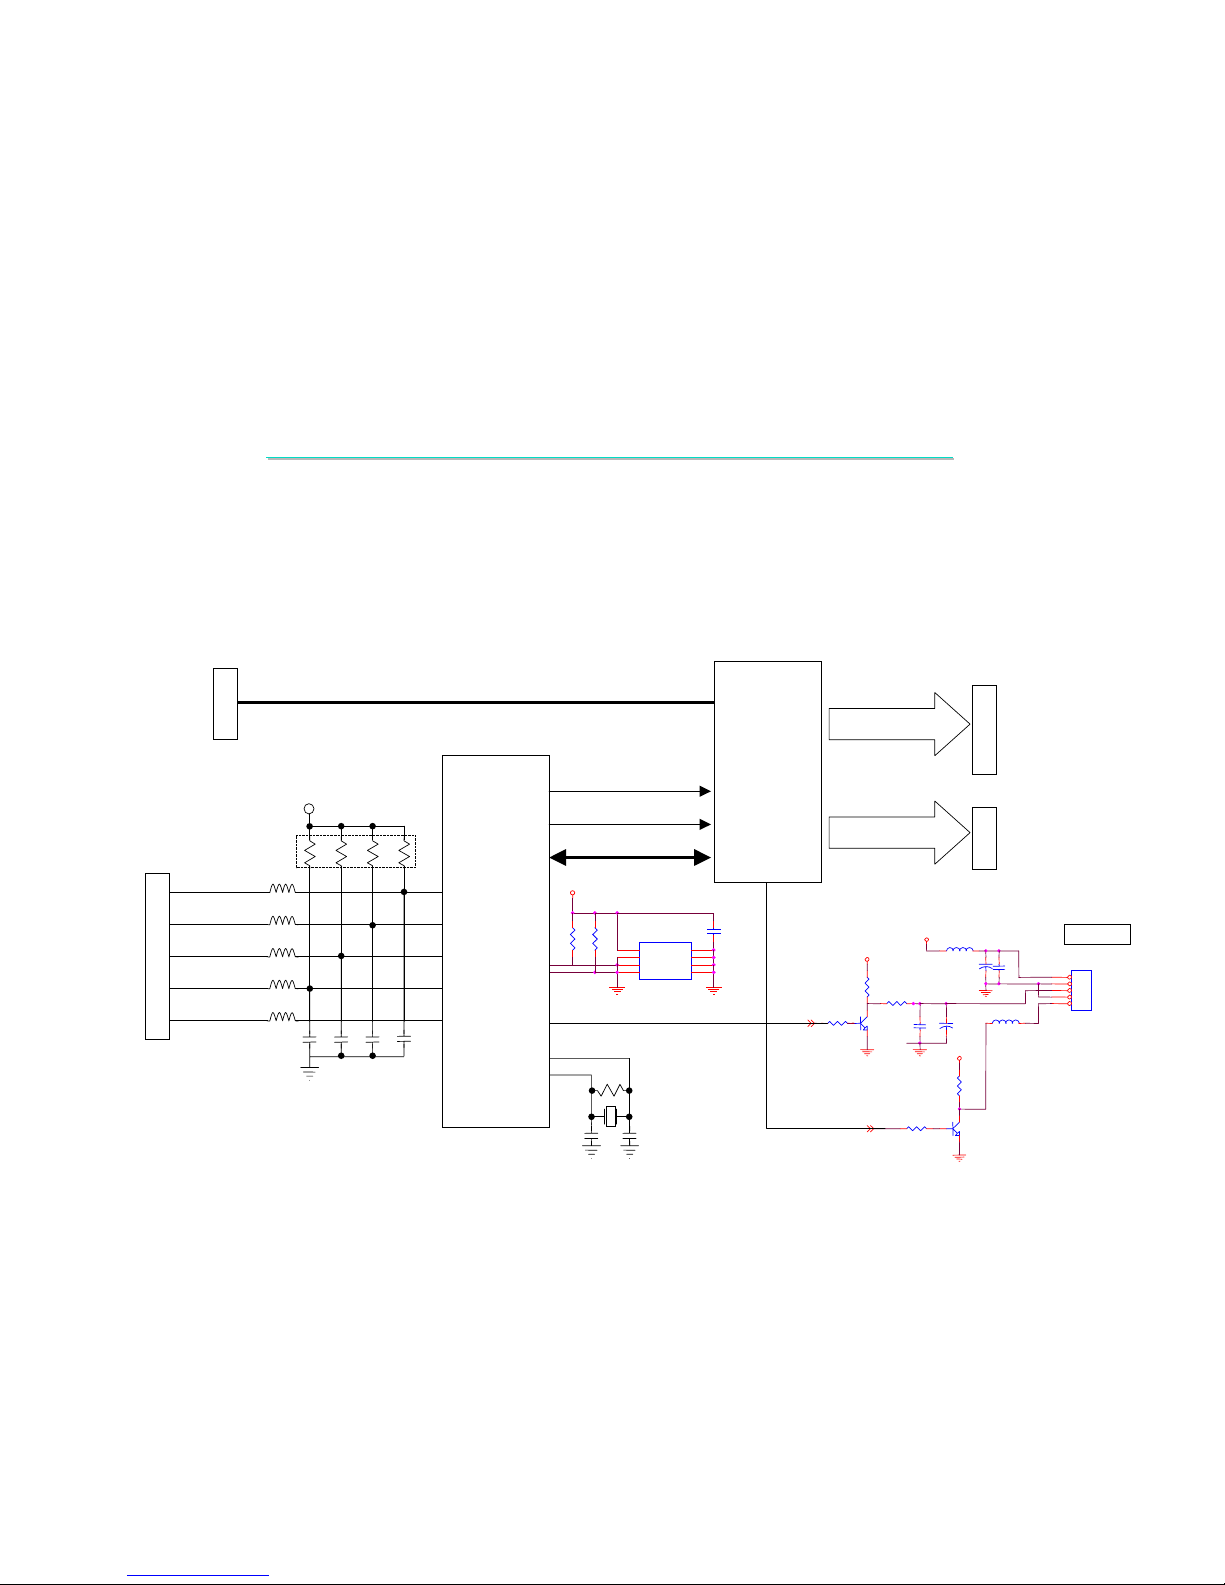
7.3
7.3
OSD Function Or Display Abnormal
OSD Function Or Display Abnormal
Symptom:
Symptom:
When you pressed the LCD OSD ( On Screen Display ) button,but no
When you pressed the LCD OSD ( On Screen Display ) button,but no
OSD display or the function can not be adjusted.
OSD display or the function can not be adjusted.
+5V
GNDGND
SCL
SDA
R84
10K
R83
10K
U10
24LC16B
1
2
3
45
6
7
8
A0
A1
A2
VSSSI
SCK
WP
VCC
C94
0.1uF
PARAMETER
EEPROM
U11
M6759
21
20MHz
C97
22P
Y2
C96
22P
20
R53
HDATA[0: 3]
U1
gmZAN1
J3
To Panel
Connector
( 40 Pins )
J4
To Panel
Connector
( 20 Pins )
JP5
To Inverter
Connector
12VIN
GND
GND
GND
+5V
GND
+5V
BRI_PWM
EN_BL#
R100 5.6K
B79 300z/100M
Q12
MMBT3904L
C149
100uF/25V
CPWX8.3
Q11
MMBT3904L
R101
4.7K
R103
1K
R104
4.7K
R99
3K
C148
0.1uF
C146
0.1uF
C145
100uF/25V
CPWX8.3
B78 500z/100M
JP5
PH_5P
1
2
3
4
5
TO INVERTER
12V
GND
GND
BRT_RANGE
ON/OFF
HFS
HCLK
BRI_PWM
EN_BL#
J1
External
VGA
Analog
RGB
VGA_R
VGA_G
VGA_B
B24
B25
B26
B27
B28
KEY_MENU#
KEY_SE LECT#
KEY_UP#
KEY_DOWN#
HOT_KEY
JP2
Key-Switch
Board
Connector
1
2
3
4
5
C89
33P
C90
33P
C91
33P
C92
33P
+5V
RP12
4.7K
1827364
5
Page 50
LCD MONITOR 15EX
LCD MONITOR 15EX--
TA MAINTENANCE
TA MAINTENANCE
49
7.3
7.3
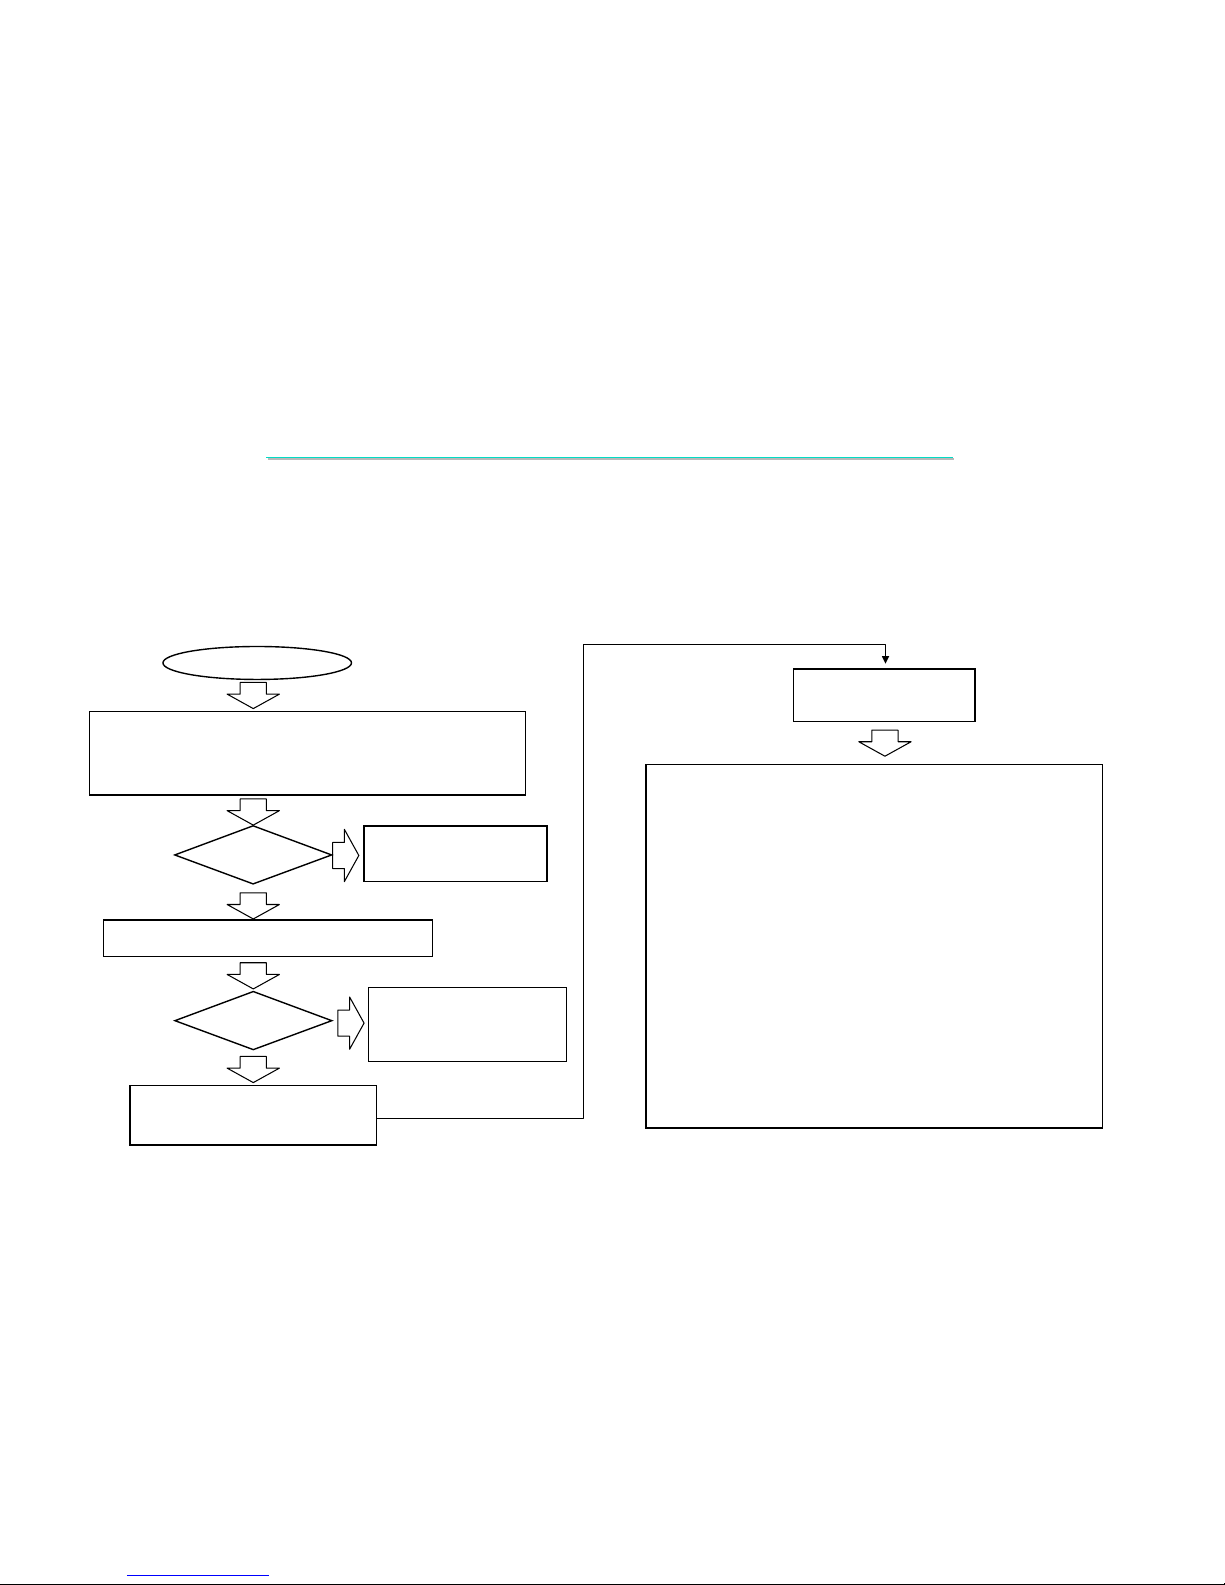
OSD Function Or Display Abnormal
OSD Function Or Display Abnormal
Symptom:
Symptom:
When you pressed the LCD OSD ( On Screen Display ) button,but no
When you pressed the LCD OSD ( On Screen Display ) button,but no
OSD display or the function can not be adjusted.
OSD display or the function can not be adjusted.
OSD is abnormal
OSD is abnormal
Board-level
Troubleshooting
YES
NO
Replace 15EX-TA Interface BD or
go into board level Trouble-shooting.
Replace Key SW BD and
To find out which part is
causing the problem.
OSD function
OK?
NO
YES
Try another known good Key SW BD .
1.Make sure that Key SW BD and 15EX-TA Interface Board
is connected properly.
2. Check the Key SW BD and Interface Board’s cable is good.
Check the following parts for cold solder or one of the following
parts on the mother-board may be defective, use an oscilloscope
to check the following signal or replace the parts one at a time
and test after each replacement.
Parts: Signals:
J1,JP2
RP12
U1
U11
Y2
B24~B28
C89~C92
Key SW BD
KEY_MENU#
KEY_SELECT#
KEY_UP#
KEY_DOWN#
HOT_KEY
HFS
HCLK
HDATA[0:3]
SCL
SDA
BRI_PWM
To find out which part is
causing the problem.
OSD function
OK?
Page 51
LCD MONITOR 15EX
LCD MONITOR 15EX--
TA MAINTENANCE
TA MAINTENANCE
50
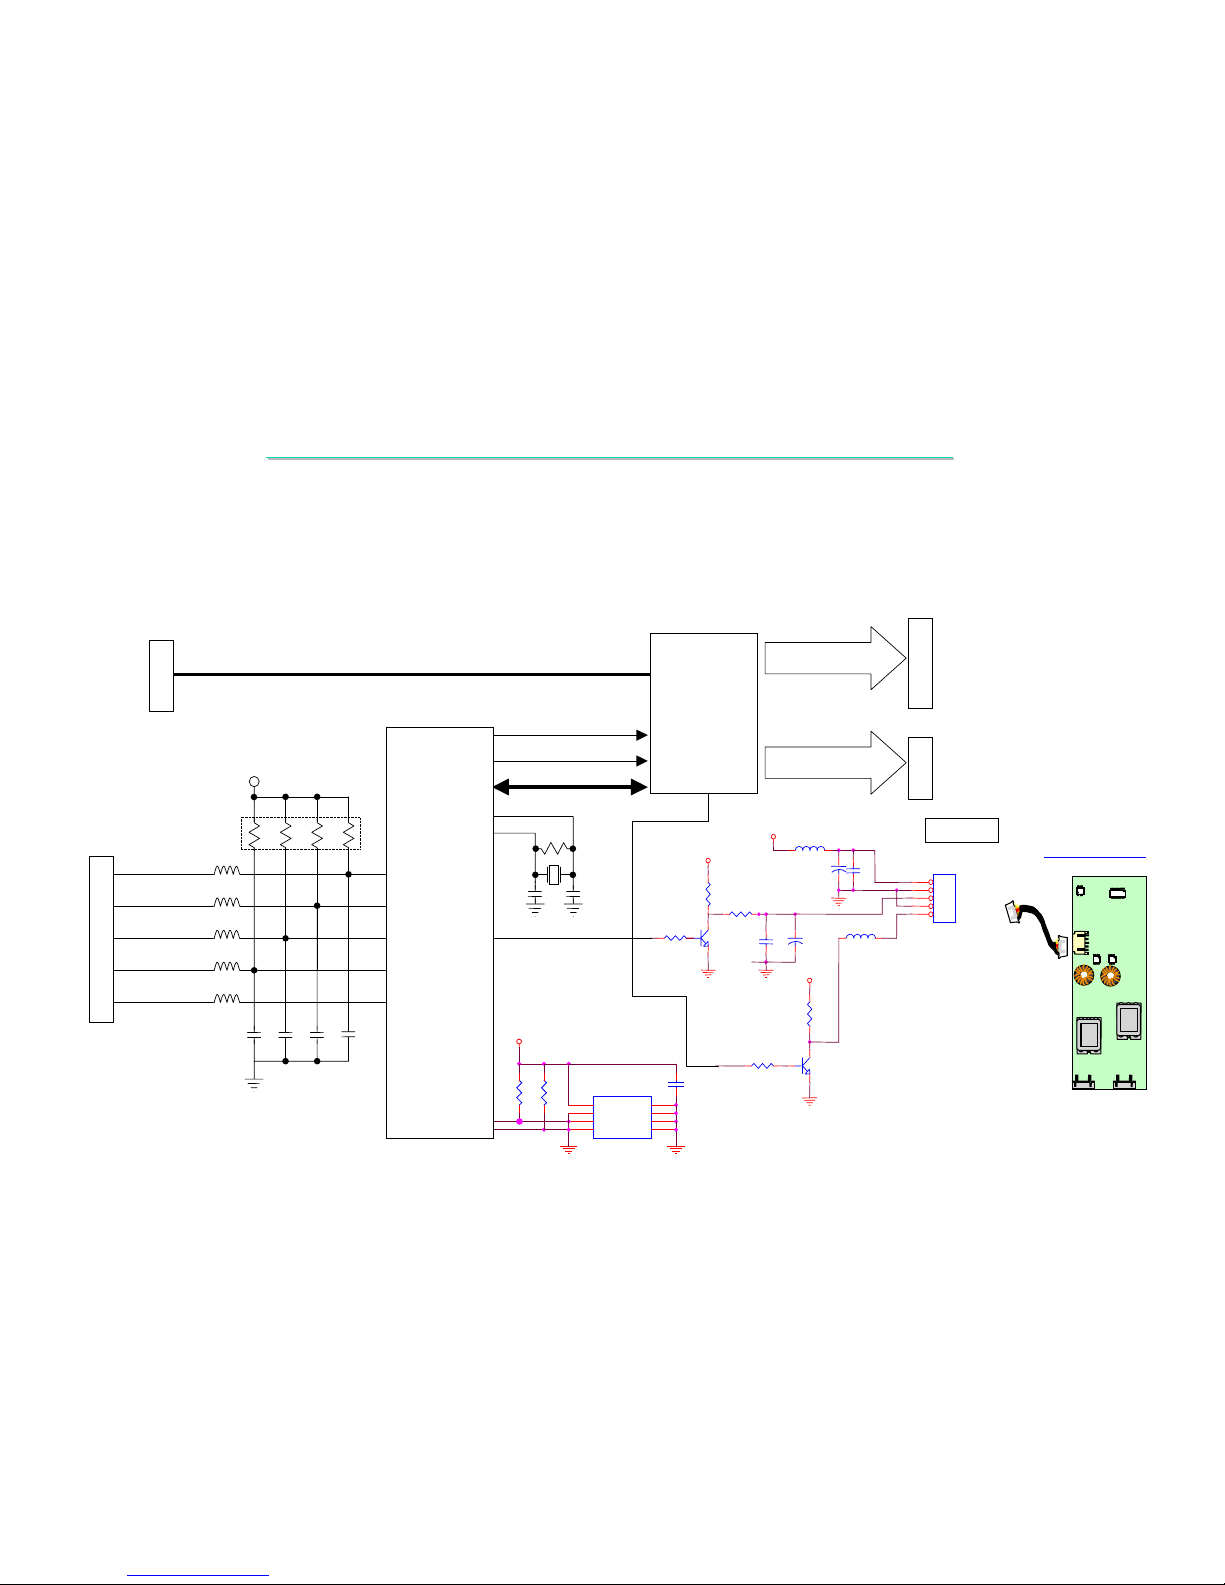
7.4
7.4
No Back Light
No Back Light
Symptom:
Symptom:
The LCD Display is good but too dim,or the backlight can
The LCD Display is good but too dim,or the backlight can’’
t be adjusted.
t be adjusted.
12VIN
GND
GND
GND
+5V
GND
+5V
EN_BL#
R100 5.6K
B79 300z/100M
Q12
MMBT3904L
C149
100uF/25V
CPWX8.3
Q11
MMBT3904L
R101 4.7K
R103
1K
R104
4.7K
R99
3K
C148
0.1uF
C146
0.1uF
C145
100uF/25V
CPWX8.3
B78 500z/100M
PH_5P
1
2
3
4
5
TO INVERTER
12V
GND
GND
BRT_RANGE
ON/OFF
21
20MHz
C97
22P
Y2
C96
22P
20
R53
HDATA[0: 3]
U1
gmZAN1
J3
To Panel
Connector
( 40 Pins )
J4
To Panel
Connector
( 20 Pins )
HFS
HCLK
J1
External
VGA
Analog
RGB
VGA_R
VGA_G
VGA_B
+5V
B24
B25
B26
B27
B28
KEY_MENU#
KEY_SE LECT#
KEY_UP#
KEY_DOWN#
HOT_KEY
JP2
Key-Switch
Board
Connector
1
2
3
4
5
C89
33P
C90
33P
C91
33P
C92
33P
RP12
4.7K
1827364
5
JP5
To Inverter
Connector
BRI_PWM
EN_BL#
U11
M6759
Inverter BD
+5V
GNDGND
SCL
SDA
R84
10K
R83
10K
U10
24LC16B
1
2
3
45
6
7
8
A0
A1
A2
VSSSI
SCK
WP
VCC
C94
0.1uF
PARAMETER
EEPROM
Page 52
LCD MONITOR 15EX
LCD MONITOR 15EX--
TA MAINTENANCE
TA MAINTENANCE
51
7.4
7.4
No Backlight
No Backlight
Symptom:
Symptom:
The LCD Display is good but too dim,or the backlight can
The LCD Display is good but too dim,or the backlight can’’
t be adjusted.
t be adjusted.
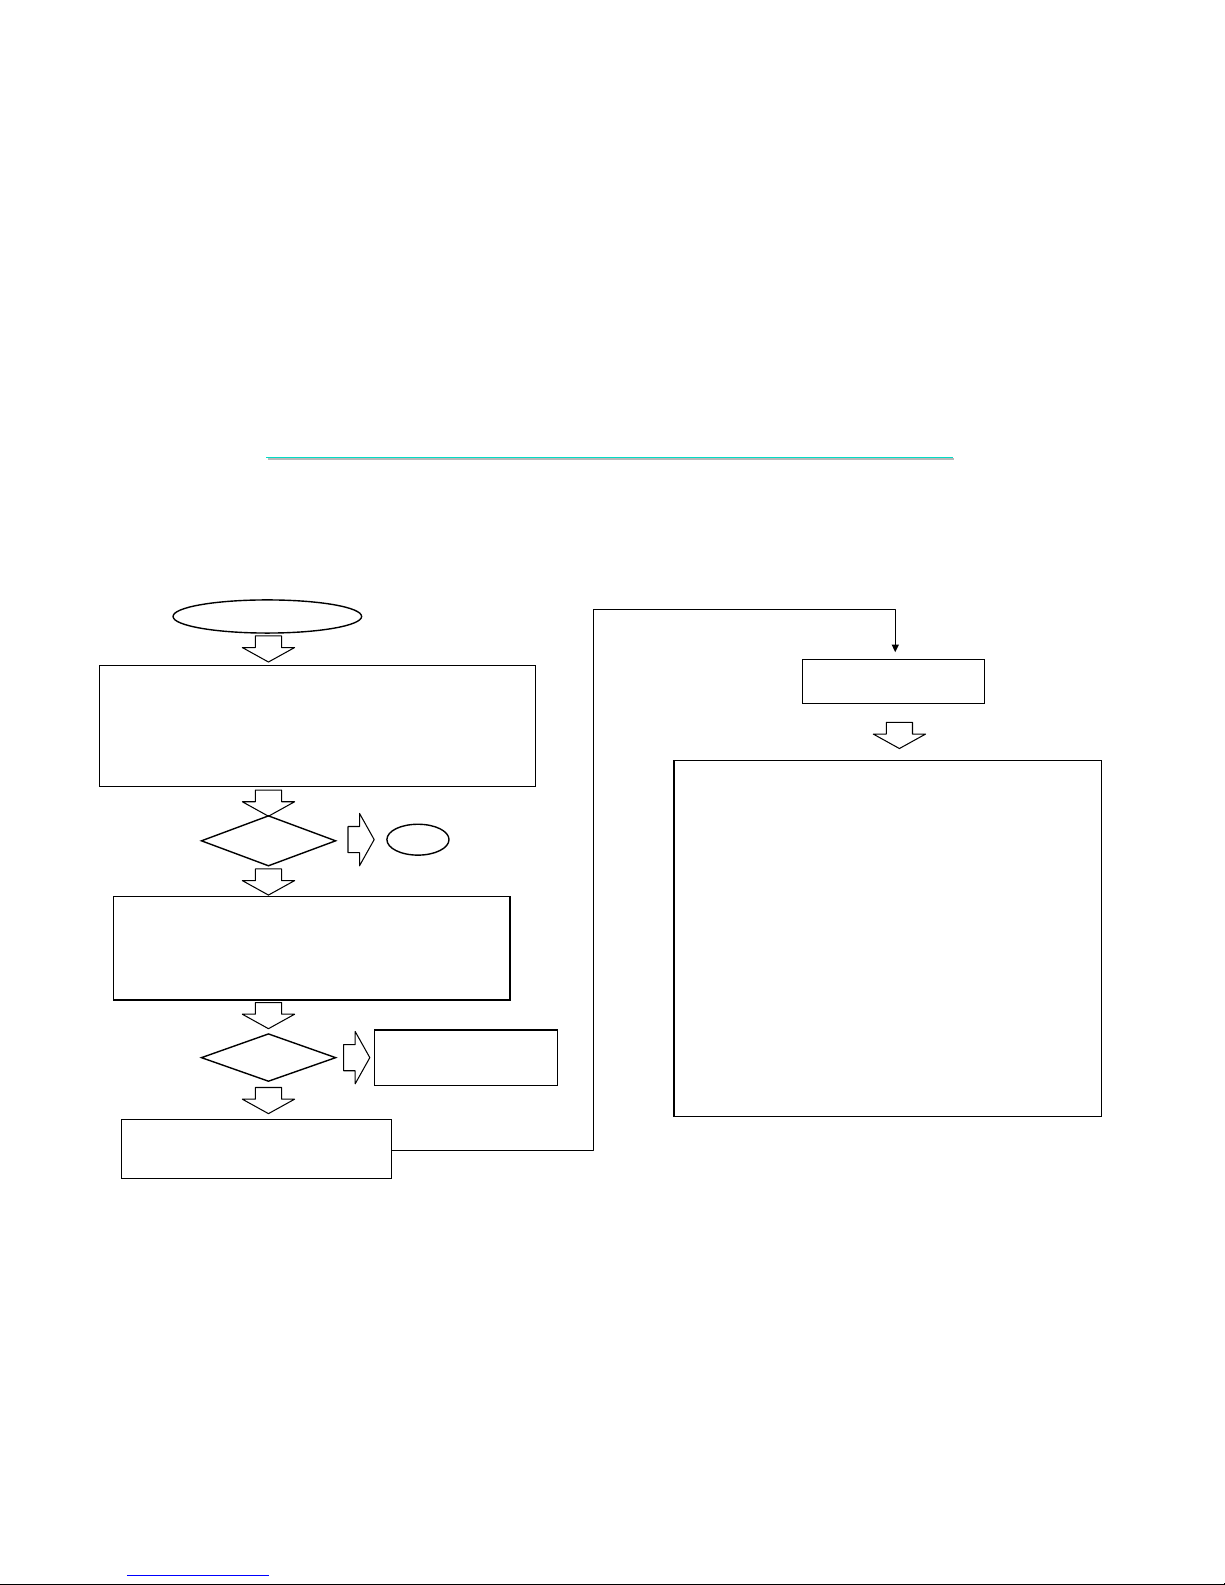
LCD No Backlight
LCD No Backlight
Board-level
Troubleshooting
Backlight
OK?
YES
NO
Replace 15EX-TA Interface Board or
go into board level Trouble-shooting.
To find out which part is
causing the problem.
Backlight
OK?
NO
YES
END
Replace following parts one at a time and test after each
replacement until find out which part caused the problem
1. LCD module
2. Inverter BD
3. 15EX-TA Interface Board to inverter BD cable
Check the following parts for cold solder or one of the
following parts on the mother-board may be defective,
use an oscilloscope to check the following signal or
replace the parts one at a time and test after each
replacement.
1. Make sure that AC power cord and adapter is connected to
outlet properly.
2. Check the power switch is on.
3. Check the VGA cable is connected to PC properly.
4. Make sure the power BD is good.
5. Make sure all cable and PCB connect properly.
Signals:
JP5
B78,B79
U1,U11
C145,C146
C148,C149
Q11,Q12
R99~R101
R103,R104
INVERTER BD
12VIN
+5V
BRI_PWM
EN_BL#
SCL
SDA
Parts:
Page 53
LCD MONITOR 15EX
LCD MONITOR 15EX--
TA MAINTENANCE
TA MAINTENANCE
52
7.5
7.5
PC Can
PC Can’’
t Detect LCD Monitor Type.
t Detect LCD Monitor Type.
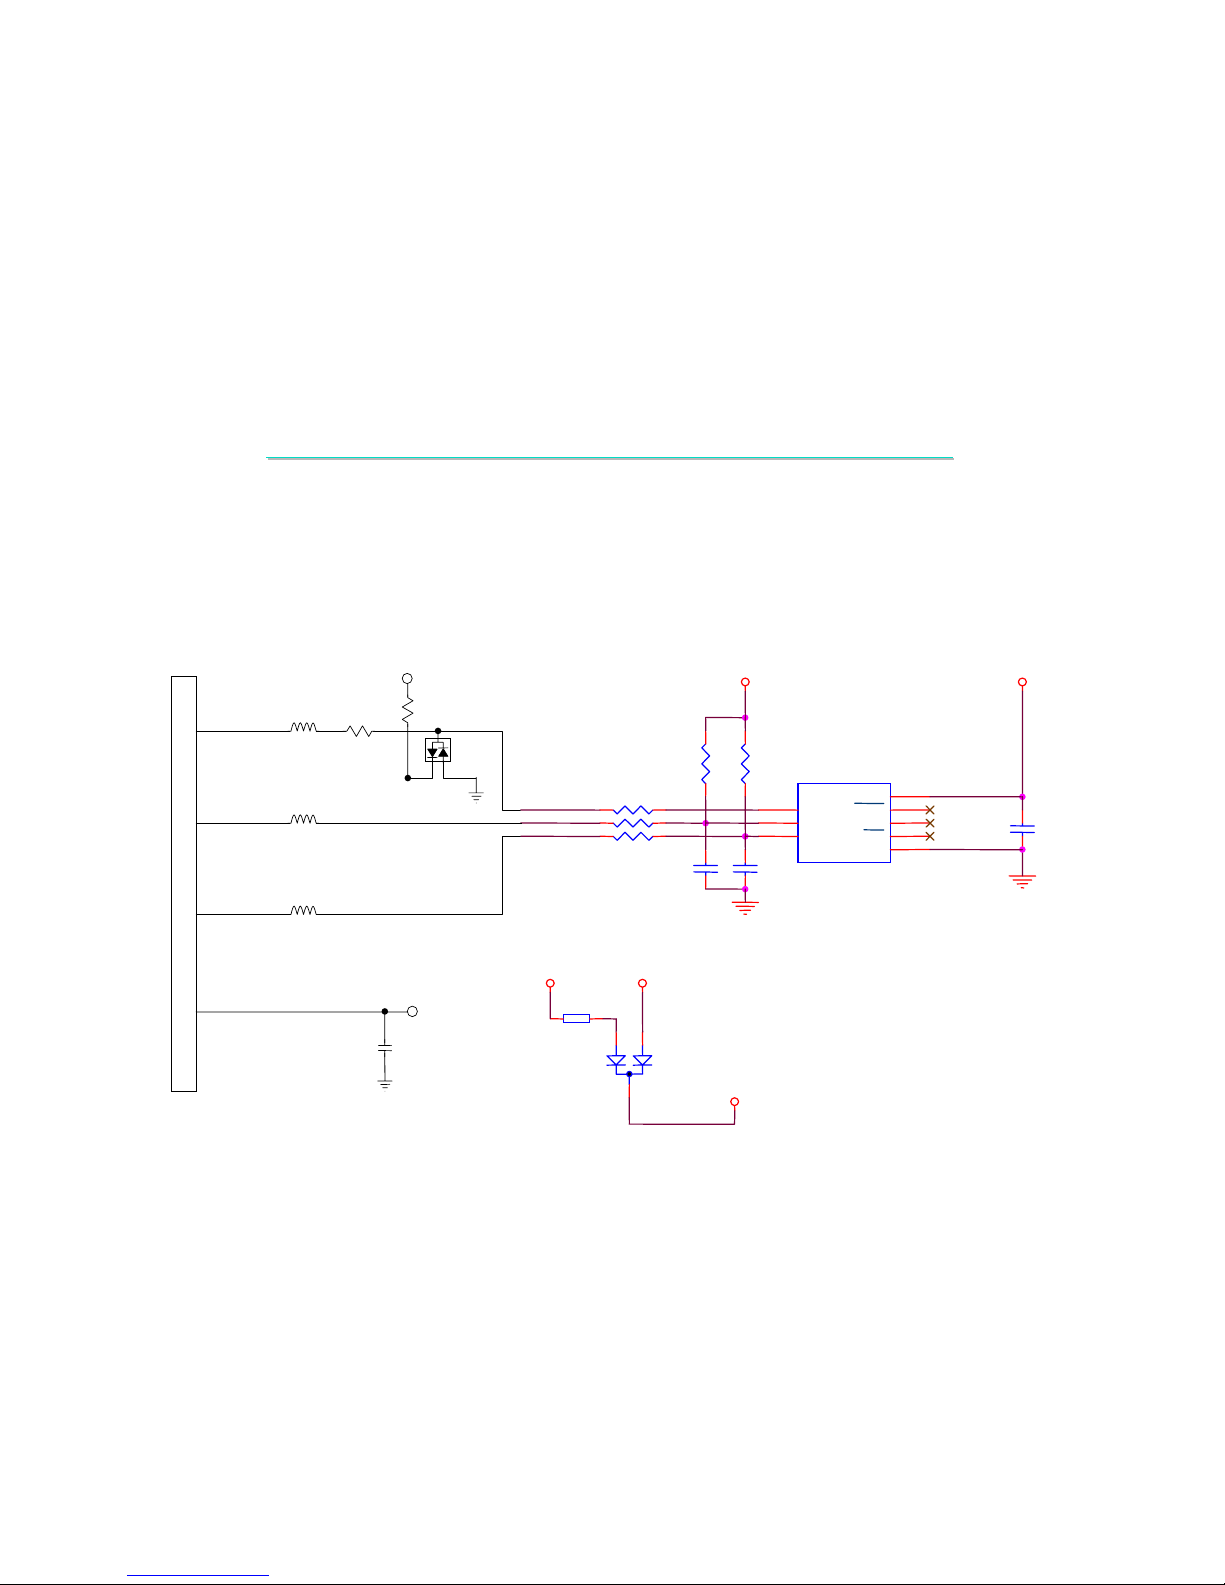
Symptom:
Symptom:
The PC PNP Operation System Can
The PC PNP Operation System Can’’
t Detect The LCD Monitor Type.
t Detect The LCD Monitor Type.
GND
VCC_FROM_PC
GND
VCC_FROM_PC
DDC_SCL
VSYNC
DDC_SDA
R57 100
R56 100
R58 100
R55
47K
R54
47K
C64
0.1uF
C66
47P
U5 24C21
8
1
2
3
4
7
6
5
VCC
TEST
NC
WP
VSS
VCLK
SCL
SDA
C65
47P
J1
VGA
Analog
RGB
4
1
2
3
VS_VGA
DDC_SCL
DDC_SDA
R1
10K
+5V
D5
BAV99LT1
VSYNC
B6
120Z/100M
B3
120Z/100M
B4
120Z/100M
R5
100
+5VDDC+5V
VCC_FROM_PC
D1
BAV70LT1
1
2
3
B1
DDC+5V
C163
0.1U
Page 54
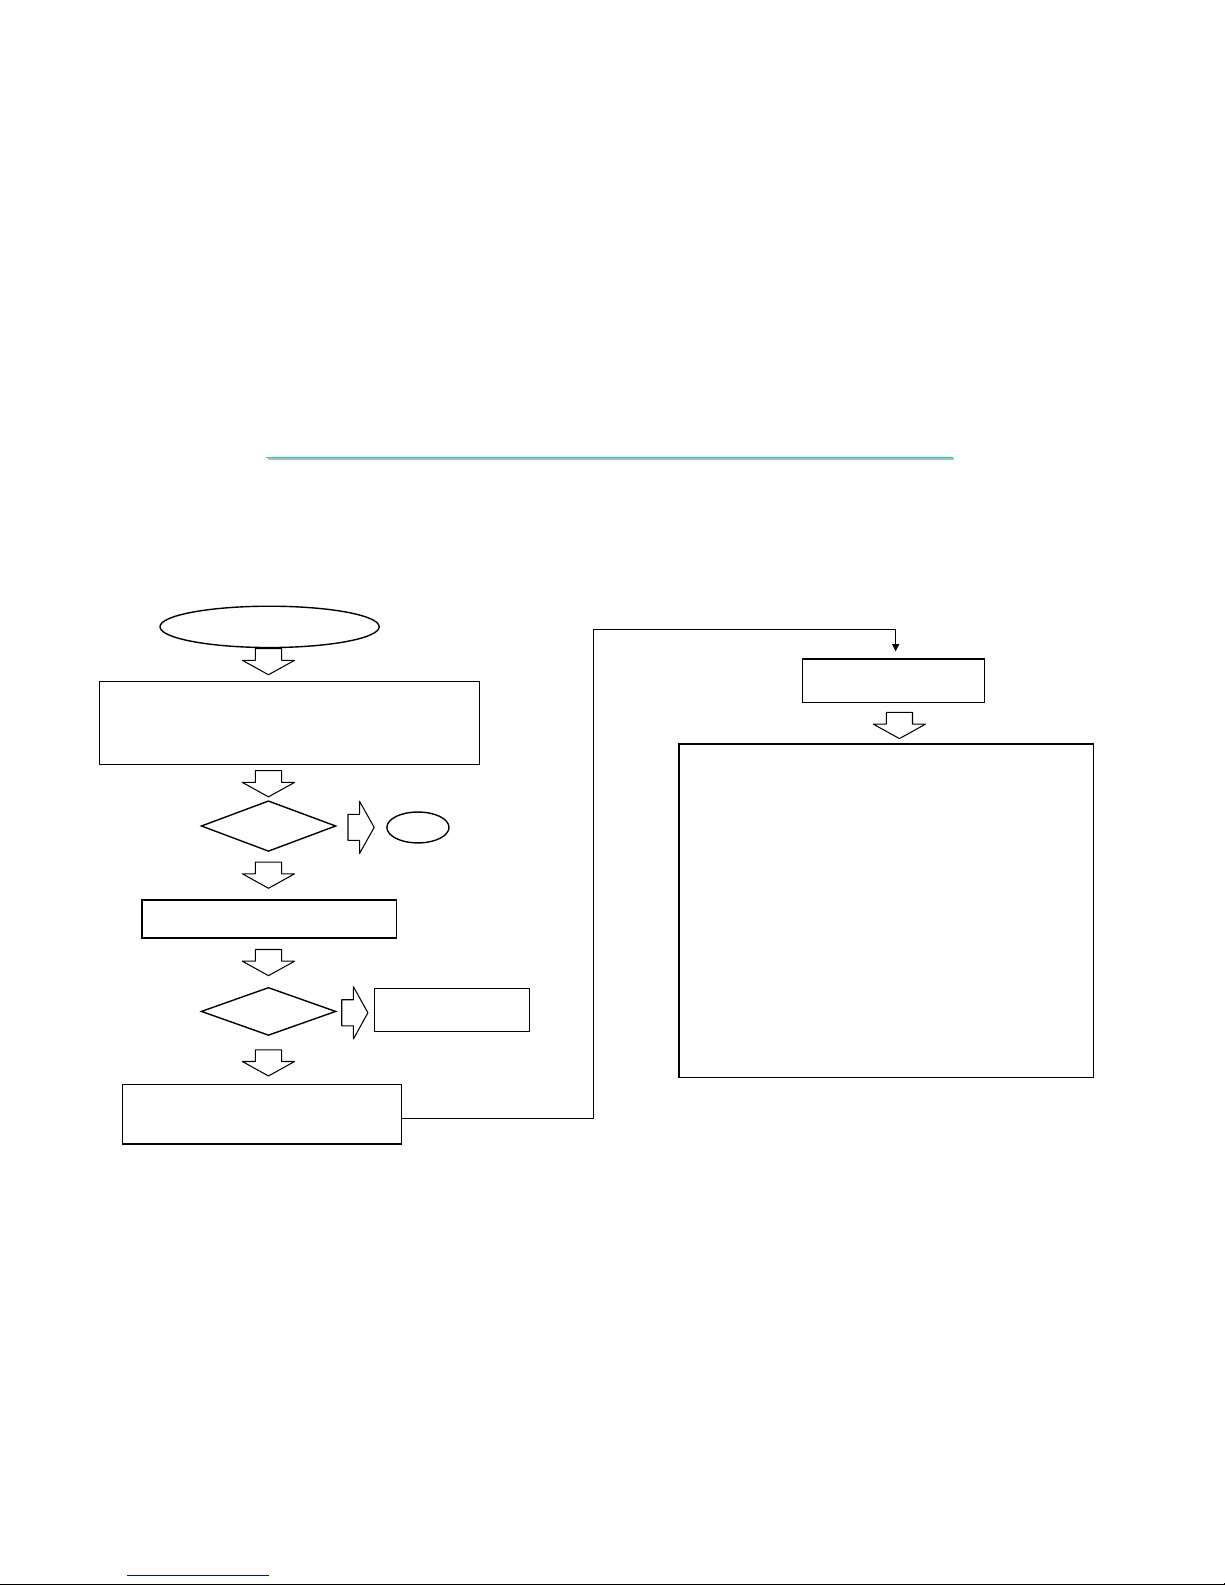
LCD MONITOR 15EX
LCD MONITOR 15EX--
TA MAINTENANCE
TA MAINTENANCE
53
7.5
7.5
PC Can
PC Can’’
t Detect LCD Monitor Type.
t Detect LCD Monitor Type.
Symptom:
Symptom:
The PC PNP Operation System Can
The PC PNP Operation System Can’’
t Detect The LCD Monitor Type.
t Detect The LCD Monitor Type.
LCD Detected Abnormal
LCD Detected Abnormal
Board-level
Troubleshooting
Is it
OK?
YES
NO
Replace faulty cable.
Is it
OK?
NO
YES
END
Replace PC to monitor cable.
Check the following parts for cold solder or one of the
following parts on the mother-board may be defective,
use an oscilloscope to check the following signal or
replace the parts one at a time and test after each
replacement.
1. Make sure the PC VGA adapter is good.
2. Check the VGA cable is connected to PC properly.
3. Make sure all cable and PCB connect properly.
Signals:
J1
U5
R54~R58
C64~C66
B3,B4,B6
R5,D5
B1,D1
VSYNC
DDC_SCL
DDC_SDA
DDC+5V
+5V
VCC_FROM_PC
Parts:
Replace 15EX-TA Interface Board or
go into board level Trouble-shooting.
Page 55
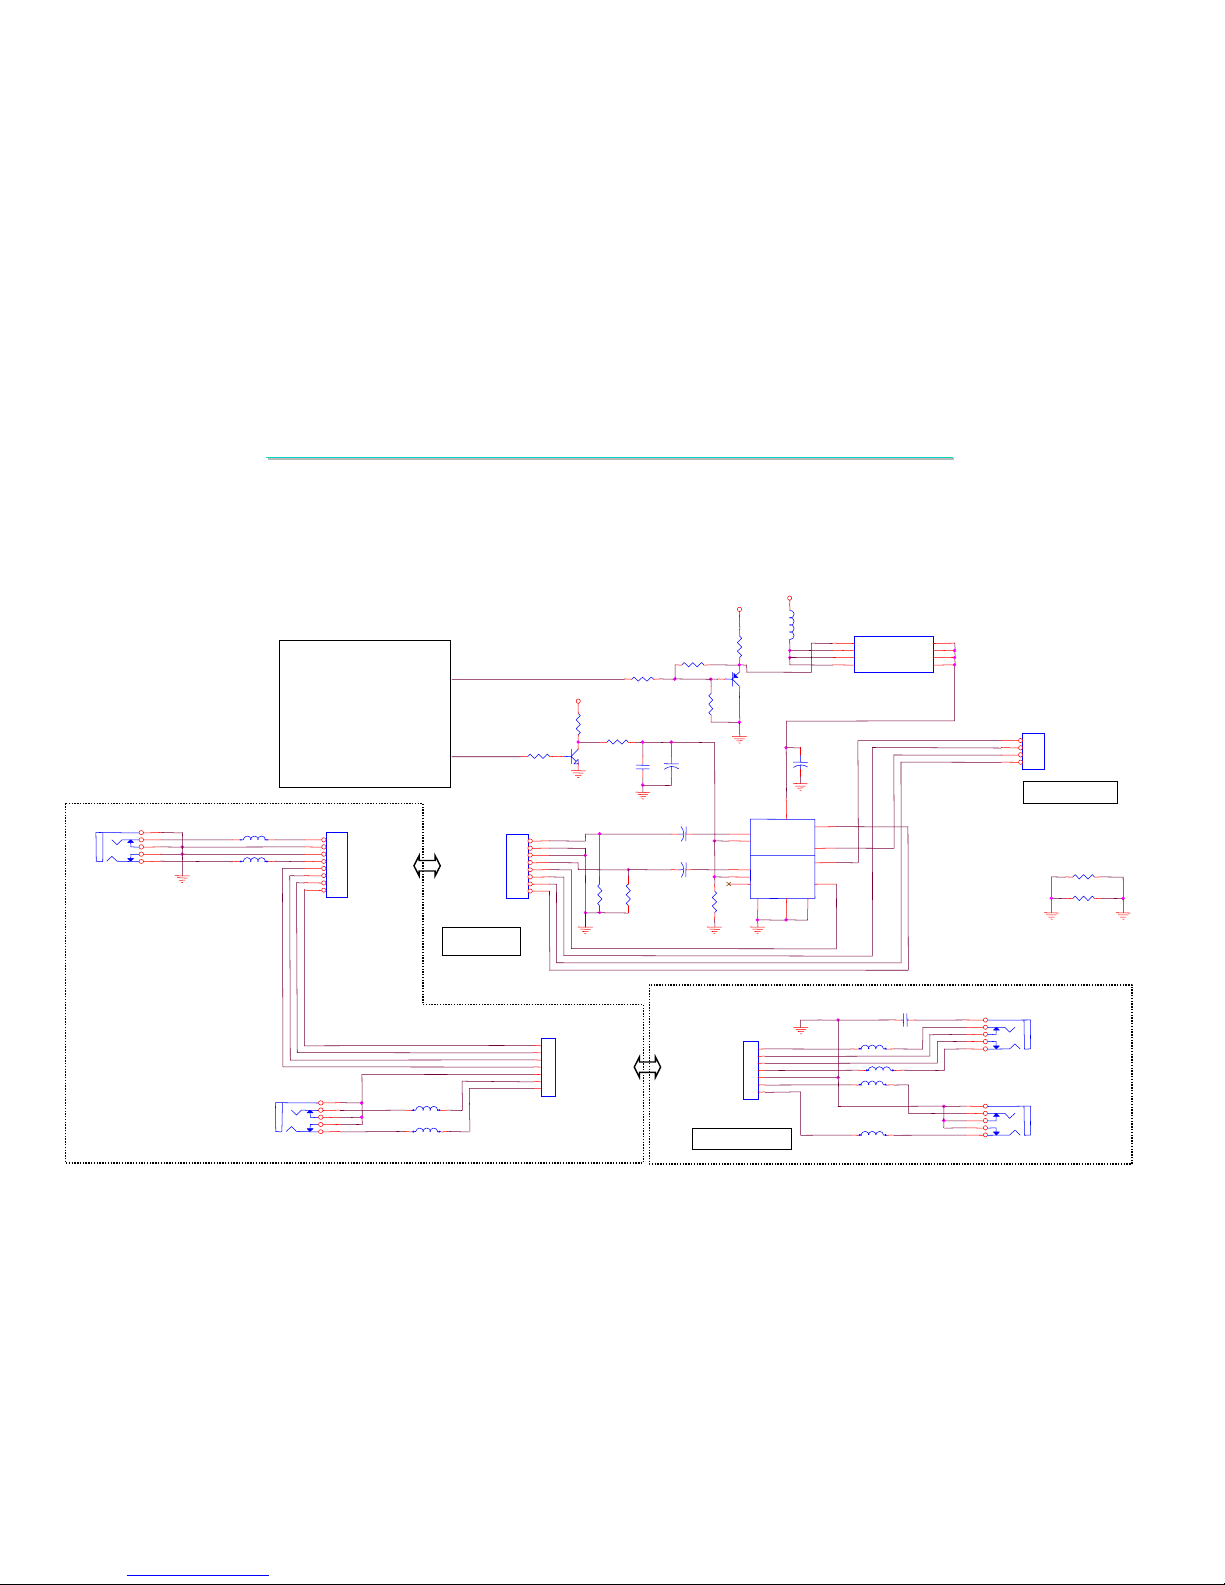
LCD MONITOR 15EX
LCD MONITOR 15EX--
TA MAINTENANCE
TA MAINTENANCE
54
7.6
7.6
LCD Monitor Audio Function Abnormal.
LCD Monitor Audio Function Abnormal.
Symptom:
Symptom:
The External Speaker or MIC Audio Function is Abnormal.
The External Speaker or MIC Audio Function is Abnormal.
AUDIO_GND
AUDIO_GND
AUDIO_GND
AUDIO_GND
GND
AUDIO_GND
AUDIO_IN_L
SPK_L-
EAR_PHONE_R+
SPK_L+
AUDIO_IN_R
EAR_PHONE_L+
SPK_R+
EAR_PHONE_L-
EAR_PHONE_R-
SPK_R-
JP7
8HEADER
1
2
3
4
5
6
7
8
R108
10K
C154
1U/16V/NA
CPWX4.3
C153
1U/16V/NA
CPWX4.3
I/P1
I/P2
DC1
DC2
NC
GND GND GND
SP1+
SP2+
SP1-
SP2-
U12
3
1
5
7
2
6
12
9
8
10
11
13
4
R14
0
1 2
R13
0
1 2
JP6
HEADER_4
1
2
3
4
+
C152
330uF/16V
R126
5K1
R125
5K1
AUDIO_GND
100uF/25V
CPWX8.3AUDIO_GND
AUDIO_PWM
R107
10K
MMBT3904L
C150
0.1uF
R106
10K
C151
+5V
Q13
R105
1K
AUDIO IN
TDA7057AQ
EAR_PHONE_L+
EAR_PHONE_L-
EAR_PHONE_R-
EAR_PHONE_R+
AUDIO_IN_L
AUDIO_IN_R
GND
GND
TO DC JACK BD
TO SPEAKER UNIT
SPK_RSPK_R+
SPK_LSPK_L+
L
R
12VIN
VDD_12
AUDIO_PWR
L2
500Z/100M
R124
47K
MMBT3906L
U15
TPS1100D
1
2
3
4 5
6
7
8
SOURCE1
SOURCE2
SOURCE3
GATE DRAIN
DRAIN1
DRAIN2
DRAIN3
GND
R123
10K
2
Q15
B
E
C
R61
NC
R15
10K
MIC_OUT_R
EAR_PHONE_L+
EAR_PHONE_L-
EAR_PHONE_R-
EAR_PHONE_R+
MIC_OUT_L
GND
J3
PHONEJACK
5
4
3
2
1
B3
J2
CON7
1
2
3
4
5
6
7
B4
MIC_OUT
MIC_OUT_R
MIC_OUT_L
GND
EAR_PHONE_R+
EAR_PHONE_R-
EAR_PHONE_L-
EAR_PHONE_L+
8HEADER
GND
AUDIO_IN_L
AUDIO_IN_R
B1
B2
J1
PHONEJACK
5
4
3
2
1
AUDIO_IN
JP1
1
2
3
4
5
6
7
8
AUDIO_IN_R
AUDIO_IN_L
GND
GND
EAR_PHONE_R+
EAR_PHONE_L+
EAR_PHONE_L-
EAR_PHONE_R-
MIC_IN_R
EAR_PHONE_LGND
EAR_PHONE_RMIC_IN_L
EAR_PHONE_L+
EAR_PHONE_R+
J2
CON7
1
2
3
4
5
6
7
B2
120z/100M
B1
B4
B3
J3
PHONEJACK
5
4
3
2
1
J1
PHONEJACK
5
4
3
2
1
C1
0.1uF
MIC_IN
EAR_PHONE_OUT
MIC_IN_R
MIC_IN_L
GND
EAR_PHONE_R+
EAR_PHONE_R-
EAR_PHONE_L-
EAR_PHONE_L+
TO POWER JACK BD
U11
M6759
Micro-CTRL
Power Jack Board
Phone Jack Board
15EX Interface Board
Page 56
LCD MONITOR 15EX
LCD MONITOR 15EX--
TA MAINTENANCE
TA MAINTENANCE
55
LCD Detected Abnormal
LCD Detected Abnormal
Board-level
Troubleshooting
Is it
OK?
YES
NO
Replace faulty cable.
Is it
OK?
NO
YES
END
Replace & check Audio Input cable.Replace Power
Jack BD or Phone Jack BD one at a time to find out
which part is causing the problem
Check the following parts for cold solder or one of the following parts on the
mother-board may be defective,
use an oscilloscope to check the following signal or replace the parts one at a
time and test after each replacement.
1. Make sure the PC VGA adapter is good.
2. Check the Audio Input Signal is working properly.
3. Make sure all cable and PCB connect properly.
Replace 15EX-TA Interface Board or
go into board level Trouble-shooting.
7.6
7.6
LCD Monitor Audio Function Abnormal.
LCD Monitor Audio Function Abnormal.
Symptom:
Symptom:
The External Speaker or MIC Audio Function is Abnormal.
The External Speaker or MIC Audio Function is Abnormal.
Signals:
U15,U12
JP6,JP7
U11,L2
Q15,R124
Q13,R107
R106,R123
AUDIO_PWR
AUDIO_PWM
SPK_RSPK_R+
SPK_LSPK_L+
AUDIO_IN_L
AUDIO_IN_R
EAR_PHONE_R
EAR_PHONE_L
Parts: Signals:
JP1,J1
J2,B1
B2,B3
B4,J3
AUDIO_IN_L
AUDIO_IN_R
EAR_PHONE_R
EAR_PHONE_L
Parts: Signals:
J1,J2
J3,B1
B2,B3
B4,C1
EAR_PHONE_R
EAR_PHONE_L
MIC_IN_L
MIC_IN_R
Parts:
15EX Interface Board Power Jack Board Phone Jack Board
Page 57
LCD MONITOR 15EX
LCD MONITOR 15EX--
TA MAINTENANCE
TA MAINTENANCE
56
8.
8.
Spare Parts List ( 1 )
Spare Parts List ( 1 )
Part Number Description Location(s)
64421239200 5 A C AD PT A SSY ; 48W ,12 V/ 4A , 15EX
63431514000 1 A L UMINUM SHEET ; 1 5A 1, 50A X
63441512000 8 A RM FRON T; 15A X
63441512000 9 A RM REAR; 1 5A X
63441513002 2 BASE FRONT;15EX
63421513000 4 BASE METAL ;1 5EX
63441513002 3 BASE REA R; 15EX
64201513000 1 BASE/ A RM ASSY; T50EX-TA/ 1RN -Z Z1-A-GSX
63441513002 6 BEZ EL COVER; 15 EX
62211501500 1 BIN D ER;L -T YPE,4 LA YER,W 55*H5 5*L 1950
221600050077 BINDER;L-TYPE,W 55*W55*L1130MM
622115065006 BINDER;L-TYPE,W55*W55*L750MM,LM15CX
64221513005 2 CABL E A SSY; A UD IO, 1. 5M, LI ME,15 EX
64221513005 3 CABLE ASSY ; MICROP H ONE,1. 5M, P I NK,15EX
642215130051 CABLE ASSY;SIGNAL,D15/PHR12,SR,15EX
627207510341 CAP; .01U ,50V ,10%,0603,X7R,SMT C42,C43,C44,C45,C46,C
4
272072473401 CAP; .047U,16V ,10%,0603,X7R,SMT C1
627207268341 CAP; .068U,16V ,10%,0603,X7R,SMT C4,C5
272072104702 CAP; .1U , 16V,+80-20%,0603,Y 5V,SMT C2,C4
62720731047 1 CAP; . 1U , 25V , + 80-20% , 0 603, Y5V C1
62720731047 1 CAP; . 1U , 25V , + 80-20% , 0 603, Y5V C10, C11, C12, C125, C126,
62720751023 1 CA P; 10 00 P,5 0V ,5% , 0 603 , NPO,SMT C18
272005102401 CAP;1000P,CR,50V,10%,0805,X7R
627207510031 CAP; 10P ,50V , 5% ,0603,N PO,SMT C122,C17,C30,C41
Part Number Description Location(s)
27207515030 1 CAP; 15 P ,CR,5 0V , 5% , 0603, NP O , SMT C49
27200310570 1 CAP; 1U , CR,25V ,+ 80 % -20%,0 805, Y5V C153,C154,C68 ,C71, C80,
62720752203 1 CAP; 22 P ,50 V , 5% ,06 03, N PO C96,C97
62720753303 1 CAP; 33 P ,50 V , 5% ,06 03, N PO, SMT C11 9,C12 0, C57,C74, C86,
631202839477 CAP; 470U , M,16V,AL U, 105'C,D10*12.5,KY C152,C69,C75,C7963120
2
627207547031 CAP; 47P ,50V , 5% ,0603,N PO,SMT C100,C101,C102,C103,C
1
622115132001 CARTON;N-B,15EX
631130010001 CDS;150V/90mW,CELL(4K~11Kohm),9001 R8
62730050000 1 CHOKE COIL ; 5U H, 4A ,4 . 5TS,10* 8*5MM
361200001015 CLEANNER;APEA RANCE,PRC
63310085000 9 CON ; DC POWE R JA CK,MA ,D 2. 0 JP 2
629100012001 CON;HDR,MA,1 0P *2,1.25MM,ST,SMT,HRS J4
629100014001 CON;HDR,MA,2 0P *2,1.25MM,ST,SMT,HRS J3
331030003007 CON;HDR,MA,3P *1, . 1,ST,P L 5.842,GOLD,(9 J2
633100110033 CON;HDR,MA,4 P*1,2MM,ST JP1
633100110033 CON;HDR,MA,4 P*1,2MM,ST JP4
633100110034 CON;HDR,MA,5 P*1,2MM,ST JP3
633100110034 CON;HDR,MA,5 P*1,2MM,ST JP5
633100110036 CON;HDR,MA,7 P*1,2MM,ST J2
633100110037 CON;HDR,MA,8 P*1,2MM,ST JP1
633100110038 CON;HDR,MA,9 P*1,2MM,ST JP2
633100121201 CON;HDR,SHROUD,MA,12P*1,2MM,R/A J1
633100120401 CON;HDR,SHROUD,MA ,4P*1,2MM,R/A JP6
633100120601 CON;HDR,SHROUD,MA ,6P*1,2MM,R/A JP1
Page 58
LCD MONITOR 15EX
LCD MONITOR 15EX--
TA MAINTENANCE
TA MAINTENANCE
57
8.
8.
Spare Parts List ( 2 )
Spare Parts List ( 2 )
Part Number Description Location(s)
633100120701 CON;HDR,SHROUD,MA ,7P*1,2MM,R/A J2
633100120801 CON;HDR,SHROUD,MA ,8P*1,2MM,R/A JP7
633100120901 CON;HDR,SHROUD,MA ,9P*1,2MM,R/A JP1
63310085001 0 CON;PHONE JA CK,D 3. 5,5 P,H5 . 0MM J1,J 3
63310085001 0 CON;PHONE JA CK,D 3. 5,5 P,H5 . 0MM J1,J 3
63401513000 6 CONTROL COV ER A SSY ; 15E X
63441513000 3 CONTROL COV ER;15EX
28810070100 2 DIODE;BAV 70LT1,70V,225MW,SOT-23 D1
288100099001 DIODE;BAV99,70V ,450MA,SOT-23 D2,D3,D4,D5,D6
628810414801 DIODE;LL4148,MELF,SMT D9
28810001500 1 DIODE;RL Z15A,ZENER,13.89V ,5%,SMT D11,D12
288100051001 DIODE;RL Z 5. 1B, ZEN ER,5 .1V , 5% ,SMT D 14
628810003401 DIODE;SR34, V RRM40V,3A,DO-214AA,SMT D10,D15
63441512002 4 DOU BL E LOCK; 15A X
62726031075 1 EC;1 00U , 25V, 2 0% , D 8*6. 5, 85 'C,SMT C145, C149, C151, C82
62726021065 1 E C;1 0U , 16 V , 2 0%, D4* 5. 3 , 8 5'C,SMT C3
62726021065 1 E C;1 0U , 16 V , 2 0%, D4* 5. 3 , 8 5'C,SMT C123,C155,C4,C52,C77,
C
62726032275 1 EC;2 20U , 25V , 20 % , D8 *10. 5, 85 'C,SMT C166,C167
272602226501 EC;22U ,16V ,M,5*5.5,-40+85',SMT C1,C19,C21,C31,C5,C8,C
62221512000 3 EN D CAP; CABL E,1 5A X
62221512000 1 EN D CAP; L, 1 5A X
62221512000 2 EN D CAP; R, 15A X
64811513000 1 F/ W A SSY ;2 421, DDC, SO8, 15EX, HA NN -STA R
64811513000 2 F/ W A SSY ;MX10FMA XD, PLCC44, 15EX, HSD
Part Number Description Location(s)
627300130010 FERRITE CHIP;120OHM/100MHZ,1608,10%,S B1,B2,B3,B4
627300130010 FERRITE CHIP;120OHM/100MHZ,1608,10%,S B1,B2,B3,B4
627300130010 FERRITE CHIP;120OHM/100MHZ,1608,10%,S B14,B16,B17,B18,B3,B3
8
27300015000 1 FERRITE CHI P ; 22 0OHM/ 100MHZ,20 12, 20 0mA L3,L 4
273000150001 FERRITE CHIP;220OHM/100MHZ,2012,200mA B10,B12,B2,B33,B34,B5,
B
273000130017 FERRITE CHIP;300OHM/100MHZ,1608,SMT B24,B25,B26,B27,B28,B
2
627300110001 FERRITE CHIP;500OHM/100MHZ,3216,SMT B1,B22,B68,B78,L2,R13,
R
627300150002 FERRITE CHIP;600OHM/100MHZ,2012,SMT L3,L4,L5,L6
55110320001 3 FL OPP Y DISKETTE;3. 5",1 . 44MB,2HD
62450001001 2 FL OW CA RD; LCD, W HITE, PRC
63350001002 1 FUSE;16V/5 A,REG50 0,RESETTABLE,DIP F1
63431513000 1 HEATSINK ;A, AMP LIFIER,15E X U12
634315130002 HEATSINK;B,ZN 1,15EX U1
63441512001 1 HI N GE COVER; 15A X
63421512001 9 HI N GE P L A TE MET A L ; 15A X
634215120009 HINGE;15AX
63421512101 8 I/ O PORT METAL ; 15EX
29100061004 4 I C SOCKET;44P, PLCC,T I N,W / O PEGS,SMT U11
62815740140 1 IC; 74 F14,HE X IN V ERTER, SO,14P U2
62826740740 1 IC;74HCT74,D-FLIP/FLOP,SO,14P U14
62834150800 2 IC;EEPROM,AT24C16 ,2048*8, SOIC,8P,1501 U10
628341508001 IC;EEPROM,AT 24C21,1024,SOIC,8P,1501A/ U 5
326301084004 IC;EZ1084CT,VOL REG,5A,TO220,SEMTEC U7
62845000010 1 IC; GMZAN1,XG A SCAL ER, PQFP,16 0P U1
Page 59
LCD MONITOR 15EX
LCD MONITOR 15EX--
TA MAINTENANCE
TA MAINTENANCE
58
8.
8.
Spare Parts List ( 3 )
Spare Parts List ( 3 )
Part Number Description Location(s)
28630601300 1 IC; HI P 6 013, BUCK PWM CT L R, SOIC,14P U 6
628630704201 IC;KIA7042F,4.2V,DETECTOR,SOT-89 U13,U9
28610035801 2 I C; L M358,DUA L O P/A MP, SO 8P U1
62841000100 1 I C;MX10FMA XD QC,8 BIT MICRO CTLR, PL CC44 U11
62813007140 1 IC; N C7S14, HS IN V ERTER,SOT23, 5P U16
632200705701 IC;T DA 7057 A Q, BT L AU DI O A MP , 13P U12
62863011000 1 IC; TPS1100,P-MOSFET, PWM CTRL, SO-8P
627300990005 INDUCTOR;47uH,10%,2.5A,TPRH1207,SMT
63441513000 4 KEY FRAME; 15EX
24266190000 8 L A BEL; 3.5 ",EN,A L L COMMON
242600000372 LABEL ;8.3*5 MM
24269050007 8 L A BEL; BAR CODE, 32*16MM, MD4
24269050007 8 L A BEL; BAR CODE, 32*16MM, MD4
62420001002 0 L A BEL; BAR CODE, M1420 COMMON
62420001002 0 L A BEL; BAR CODE, M1420 COMMON
24201040000 4 LABEL;BAREBONE,MENHIR
242600000379 LABEL ;BLANK,14*14MM
624215130001 LABEL ;RATING,N-B,15EX
62421508001 5 LABEL;TCO-99, 22MM,1510E,15 UX
63421515101 6 L CD BRACKET ; L , HA N NST AR -2,15EX
634215151015 LCD BRACKET; R, HA N NST A R-2,15EX
641300020057 LCD;HSD150MX42-A,15",TFT,HANNSTAR
634615080009 LED HOLDER; L ED-9,1511 A, 50U X R8
63461512000 2 L ED HOL DER; S/W BD,L ED-5*3,50 A X D1
Part Number Description Location(s)
633400010307 LED;ROUND,D5MM,H8.6MM,P2.54,GRN/YEL D1
634415130027 LENS;LED,15EX
624315130002 MANUAL ;GN,N-B,15EX
63310091020 1 MI NI JU MP; 2P*1,2.54MM,H = 6MM,OP EN J 2
631445000401 OSC;50MHZ,50PPM,TTL,162-50000-1011 X1
64401512020 1 PACKI N G KI T ; CONT A I N ER, 15A X
64401513000 2 PACKI N G KI T ; T50 EX-T A/ 1 RN -Z Z 1 -A-GSS
622115125002 PALLET;A,WOODEN,1330*1030MM,15AX
622115125003 PALLET;B,WOODEN,900*1030MM,15AX
64301513000 2 PANEL A SSY ;T50 EX-T A /1RN-ZZ1-A-GSS
63401513000 1 PANEL FRONT ASSY; N-B,15EX
63441512300 1 PANEL FRONT;15EX
63401513000 4 PA N EL REA R A SSY; MP T, 15E X
63441512300 2 PA N EL REA R;1 5EX
62211512500 4 PARTITION ;A, 1330*1030MM,15 AX
62211512500 5 PARTITION ;B,900*1030MM,15AX
622115125001 PARTITION ;CABLE/ADAPTER,15AX
64121513000 1 PCB ASSY; INV BD, HA N NST A R, 15EX-T A
62220001002 0 PE BAG ;350 *240, A CCESSORY, L CD MT R
62220001003 5 PE BAG ;L L-T155A E, T=0 .04MM, 50RX
62220003000 2 PE FILM; SKIN , PA CKIN G, PRC
634415120025 PUSH-BUTTON; 15AX
64001513001 0 PW A;PWA-15EX-TA/ I / F ASSY,HA NN-STAR
64001513000 1 PWA;PWA -T 5 0EX-T A / IN TERFA CE BD
Page 60
LCD MONITOR 15EX
LCD MONITOR 15EX--
TA MAINTENANCE
TA MAINTENANCE
59
8.
8.
Spare Parts List ( 4 )
Spare Parts List ( 4 )
Part Number Description Location(s)
64001513000 2 PWA;PWA -T 5 0EX-T A / IN TERFA CE BD,SMT
64001513000 6 PW A;PWA -T50EX-T A / PHO NE JA CK BD
64001513000 7 PW A;PWA -T50EX-T A / PHO NE JA CK BD, SMT
64001513000 4 PWA ; PWA-T5 0EX-T A /POW ER J ACK BD
64001513000 5 PWA ; PWA-T5 0EX-T A /POW ER J ACK BD, SMT
64001513000 8 PWA;PWA -T 5 0EX-T A / SEN SOR BD
64001513000 9 PWA;PWA -T 5 0EX-T A / SEN SOR BD,SMT
64001513000 3 PWA;PWA -T 5 0EX-T A / SW BD
642200210005 PW R CORD ; 2 50V / 10A ,PLUG/ CON,VDE
62710710000 1 RES;0 , 1/ 16W , 0603, SMT C1
62710710000 1 RES;0 , 1/ 16W , 0603, SMT R114,R121, R 129, R130, R
2
62710020003 1 RES;0 , 1/ 8W ,5 % , 08 05, SMT C2,C3
27101200030 1 RES;0 , 1/ 8W , 5% ,120 6, SMT B19,B20,B21
62710711003 1 RES;10 ,1/ 16 W, 5% ,0 603 ,SMT
62710711013 1 RES;10 0 , 1/ 16W, 5% , 060 3,SMT B11,B13,B9, R10, R11 ,R1
2
27107110430 2 RES;10 0K , 1/1 6W , 5% , 06 03, SMT R3,R6
62710711043 1 RES;10 0K , 1/1 6W , 5% , 06 03, SMT R72,R7 3
27107110330 2 RES;10 K , 1/16 W, 5% , 0603, SMT R1,R11,R4
62710711033 1 RES;10 K , 1/16 W, 5% , 0603, SMT R1,R106,R107,R1 09, R11
6
62710341313 1 RES;13 0 , 1/ 2W , 5% ,2 010 ,SMT R51
62710711533 1 RES;15 K , 1/16 W, 5% , 0603, SMT R87,R91
27107116501 1 RES;16 5 , 1/ 16W, 1% , 060 3,SMT R70
27100210230 1 RES;1K ,1/ 10W , 5% ,0 805, SMT R69
62710711023 1 RES;1K ,1/ 16W , 5% ,0 603, SMT R103,R105, R112, R128 , R
7
Part Number Description Location(s)
62710711053 1 RES;1M , 1/ 16W , 5% ,060 3, SMT R53
627107129411 RES;2.94K,1/16W,1% ,0603,SMT R62
27107122130 2 RES;22 ,1/ 16 W, 5% ,0 603 ,SMT R127, R36 ,R 71
27107120210 2 RES;2K ,1/ 16W , 1% ,0 603, SMT R131
27107120230 1 RES;2K ,1/ 16W , 5% ,0 603, SMT R2,R4REMARK D
E
62710713025 1 RES;3K ,1/ 16W , . 5%,0 603, SMT R5
62710713025 1 RES;3K ,1/ 16W , . 5%,0 603, SMT R99
62710714723 1 RES;4. 7 K ,1/ 16 W, 5% , 0603, SMT R101,R104,R118, R52, R7
9
62710024991 1 RES;4. 9 9K,1 /8 W , 1% , 0805, SMT R64
62710024022 1 RES;40 . 2K,1 /8 W , 1% , 0805, SMT R63
27107147130 2 RES;47 0 , 1/ 16W, 5% , 060 3,SMT R68,R80, R88 ,R93
27107147430 1 RES;47 0K , 1/1 6W , 5% , 06 03, SMT R82
62710714733 1 RES;47 K , 1/16 W, 5% , 0603, SMT R108,R110,R120, R124, R
5
27107149901 1 RES;49 9 , 1/ 16W, 1% , 060 3,SMT R65,R66
62710715123 1 RES;5. 1 K ,1/ 16 W, 5% , 0603, SMT R125,R126
27107156230 1 RES;5. 6 K ,1/ 16 W, 5% , 0603, SMT R100
27100251130 1 RES;51 0 , 1/ 10W, 5% , 080 5,SMT R117
27107151330 1 RES;51 K , 1/16 W, 5% , 0603, SMT R10,R2,R7,R9
27107175030 2 RES;75 ,1/ 16 W, 5% ,0 603 ,SMT R2, R3, R4
27161133030 1 RP; 33*4 ,8P , 1/ 16W ,5 % ,06 12, SMT RP1,RP10,R P2, RP3,RP4,
R
271611472301 RP; 4.7K*4,8P ,1/16W,5% ,0612,SMT RP11,RP12,RP13,RP14,
R
63451512000 1 RU BBER P A D; 15A X
65651151300 1 S/ W ; 3. 5" DISK, INF & A DJUST , 1 5EX
637110301039 SCREW;M3L4,K(+),NI W,NYLOK
Page 61
LCD MONITOR 15EX
LCD MONITOR 15EX--
TA MAINTENANCE
TA MAINTENANCE
60
8.
8.
Spare Parts List ( 5 )
Spare Parts List ( 5 )
Part Number Description Location(s)
637110301037 SCREW;M3L6,K(+),NI W,NYLOK
637110301028 SCREW;M3L8,BIN(+),NIW
371103010808 SCREW;M3L8,FLN G /PAN(+),NIW/NLK
637110301041 SCREW;M3L8,FLT(+),NIW
637110401005 SCREW;M4,L8,FLT(+),ZNW,NYLOK
637110401011 SCREW;M4L6,K(+),NI W,NYLOK
637110401010 SCREW;M4L8,K(+),NI W,NYLOK
634215150002 SHIELDIN G MEATL A ; EPSON ,1 5EX2
63441512000 7 SIGNAL CA BLE COV ER; 15 A X
64221513007 1 SPEAKER A SSY; 2. 5W , 3. 1V ,1 5EX
633700150006 SW;TACTIL E,12V/50MA,1P,H4.3MM SW1,SW2,SW3,SW4,SW5
,
22500002000 1 TAPE;1/2", LIMPID,20YARD/REEL, PRC
62220000000 7 TA PE;A C04, FOR CG, COMMON
62221510500 1 TA PE; NITTO 7290 , SHA RP, 50V X
628822112401 TRANS;2SB1124S/T,PNP,SMD Q4
62882753070 1 TRANS; HUF75307,N-MOSFET,T O 252,SMT Q3
288203904002 TRANS;MMBT3904,40V,200mA,SOT23, MUSTAN Q1
288203904010 TRANS;MMBT3904L,NPN,Tr35NS,TO236AB Q10,Q11,Q12,Q13,Q14,
Q
28820390601 8 TRANS; MMBT3906L,PNP,Tr 35NS,TO236AB Q5,Q6,Q8,Q9
63731030200 5 T-SCREW;B,M3,L8,FLT(+),1,NIW
637310301001 T-SCREW;B,M3L8,TRS(+),0,ZNC
373203010602 T-SCREW;P,M3L6,PAN(+),0 ,NIW
63421513000 3 V ESA METAL ;1 5EX
64221513000 1 W IRE A SSY; 1 007, #26,4P, 200MM,SEN SOR, 15
Part Number Description Location(s)
64221513000 5 W IRE A SSY; 100 7, #26,5P,5 0MM,INV,1 5EX
64221513000 2 W IRE A SSY; 1 007, #26,6P/5 P,45 MM,PWR, 15E
64221513000 7 W IRE A SSY; 100 7, #26,7P,PHO N E, 200 MM,15E
64221513000 3 W IRE A SSY; 1 007, #26,8P, 40MM,PW R, 15EX
64221513000 4 W IRE A SSY; 1 007, #26,9P, 400MM,SW, 15 EX
64221513001 0 W IRE A SSY; GROU ND,BRA ID, 40 MM,15EX
64221513001 1 W IRE A SSY; GROU ND,BRA ID, 5MM, 15EX
64221513000 6 W IRE A SSY; I /F TO PANEL, HA NN -ST AR, 15 EX
63441510002 1 W IRE MOU N T; FW-2C-3M,50VX
633200010001 WIRE;PACKIN G,FLA T ,PRC
63141200040 2 XTAL;20MHZ,30PPM,20PF,HC-49/S,DIP
Page 62
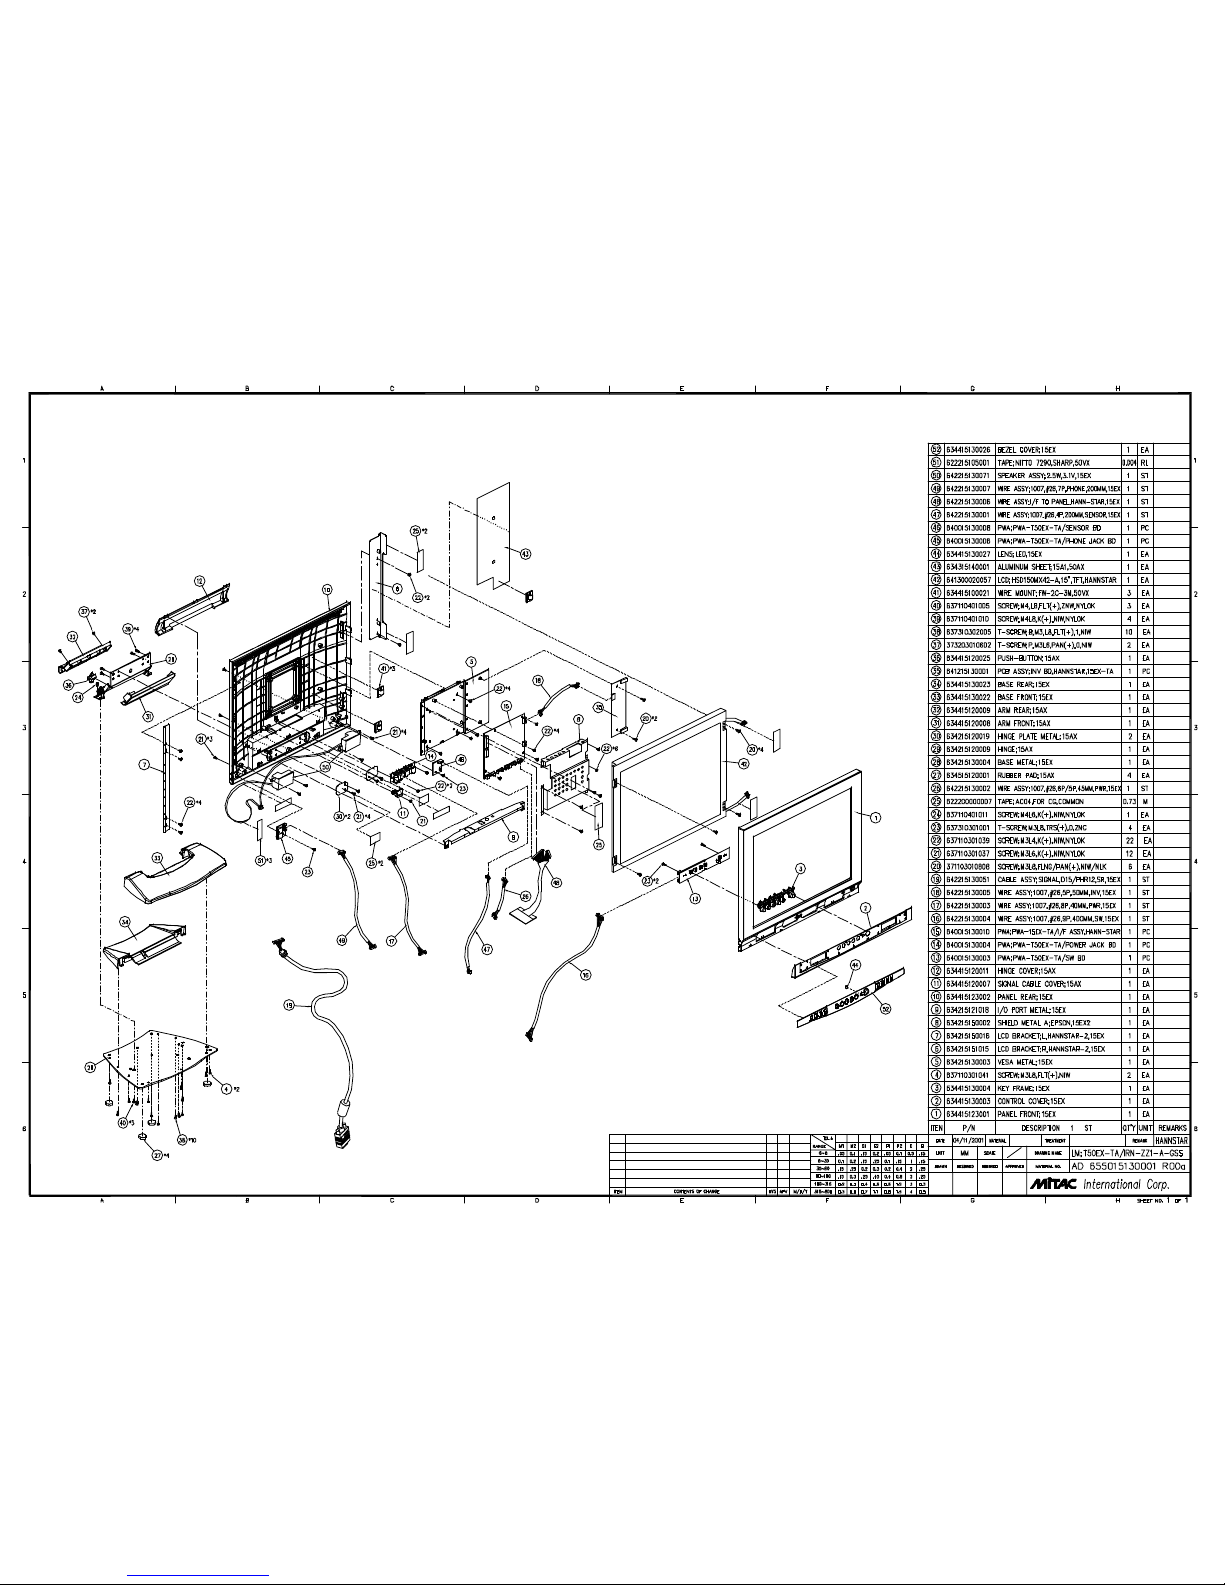
Page 63
A
A
B
B
C
C
D
D
E
E
5 5
4 4
3 3
2 2
1 1
DRAWN APPROVEDCHEAKEDDESIGNED
15AX2 INTERFACE BD
DRAWING DESCRIPTION
SHEET DESCRIPTION
2
3
4
GMZAN1
POWER/MCU
OUTPUT
R00--->R01
R00--->R01
R00--->R01
1.Connect A_GND to ADC_GND---->error.
2.Delete C47&C49 22P and Y1 50MHz---->function Bug
1.Change C83 from 22uF/25V to 10uF/16V/ R89 from 220K ohm to 47K ohm/ R90 from 4.7K ohm to 470K ohm--->RESET
3.Add R21 33 ohm /C44 33P/X1 50Mhz
2.Add Q12 MMBT3904L/R108 from 0 ohm to 10K ohm--->Bri_ctrl circuit
7.Change U10 pin15(SOFT_PWR#) and pin16(AUTO_BRI_CTRL)---> F/W request
8.LED_GREEN connect to LED_GERRN--->error.
1.Add Q13 MMBT3904L / R121 4.7k ohm / R120 5.6K ohm ---->Pwm driver not enough.
2.Change R105 from 4.53K ohm to 1K ohm ---> modify integrator volue.
3.Mirror JP6 ,and change pin2 and pin3 function---->same as 1510A.
4.Change B3/B4/B6/B7 from 0 ohm to 120z/100Mhz---->EMI
5.Del R38/R39/R42/R43/R45 33 ohm---->EMI
7.Change C16/C28/C35 from 10P to 15P---->EMI
8.Add C17/C29/C36 15P---->EMI
9.Add C149 1000P---->EMI
6.Add B69/B70/B71/B72/B73 120z/100MHz ---->EMI
10.Change B65/B66/B67 from 220Z/100MHz to 0 ohm 1206---->EMI
11.Change R25/R40 from 510 ohm to 100 ohm--->function Bug
12.Add R122 0 ohm---->EMI
3.Add B74/B75/B76/B77/B78 300z/100MHz(273000130017)--->EMI
4.Change B21/B22/B23/B24/B68/B25/B26/B27 from 120z/100MHz to 300z/100MHz--->EMI
5.Change U9 from DIP8 to SO8 ---->EE
6.Del R109 0 ohm
9.Add R123 0 ohm---->Bypass
4.Add B79 300z/100MHz ---->EMI
5.Add C89 33P---->Stable function
6.Change R103 from 22 ohm to 4.99 ohm 1% and C91 from 22P to 10P---->EMI
7.Add C100 100uF/25V--->Material the same
13.Change U5 from DIP to SO8---->Material issue.
10.Change Q9/Q10 from MM3904L to MMBT3906L--->Decrease power lose
11.Del R96/R99 0 ohm---->No need
12.Change R97/R98 0 ohm to NA---->No need
8.Change R107 from 15K ohm to 4.7K ohm and R106 from 470 ohm to 1K ohm ---> Function Stable
14.Del R31/R32/R36/R37/R53/R54/R55 0 ohm ---->No need
ALPHA.HSU ALPHA.HSU ALPHA.HSU ALPHA.HSU
10/05/00'
PCB ;630015120101
PCBA;640015120101
15AX2 INTERFACE BD
00
!!!!""""####$$$$%%%%&&&&''''(((())))****
B
15
Title
Size Document Number Rev
Date: Sheet
of
Page 64
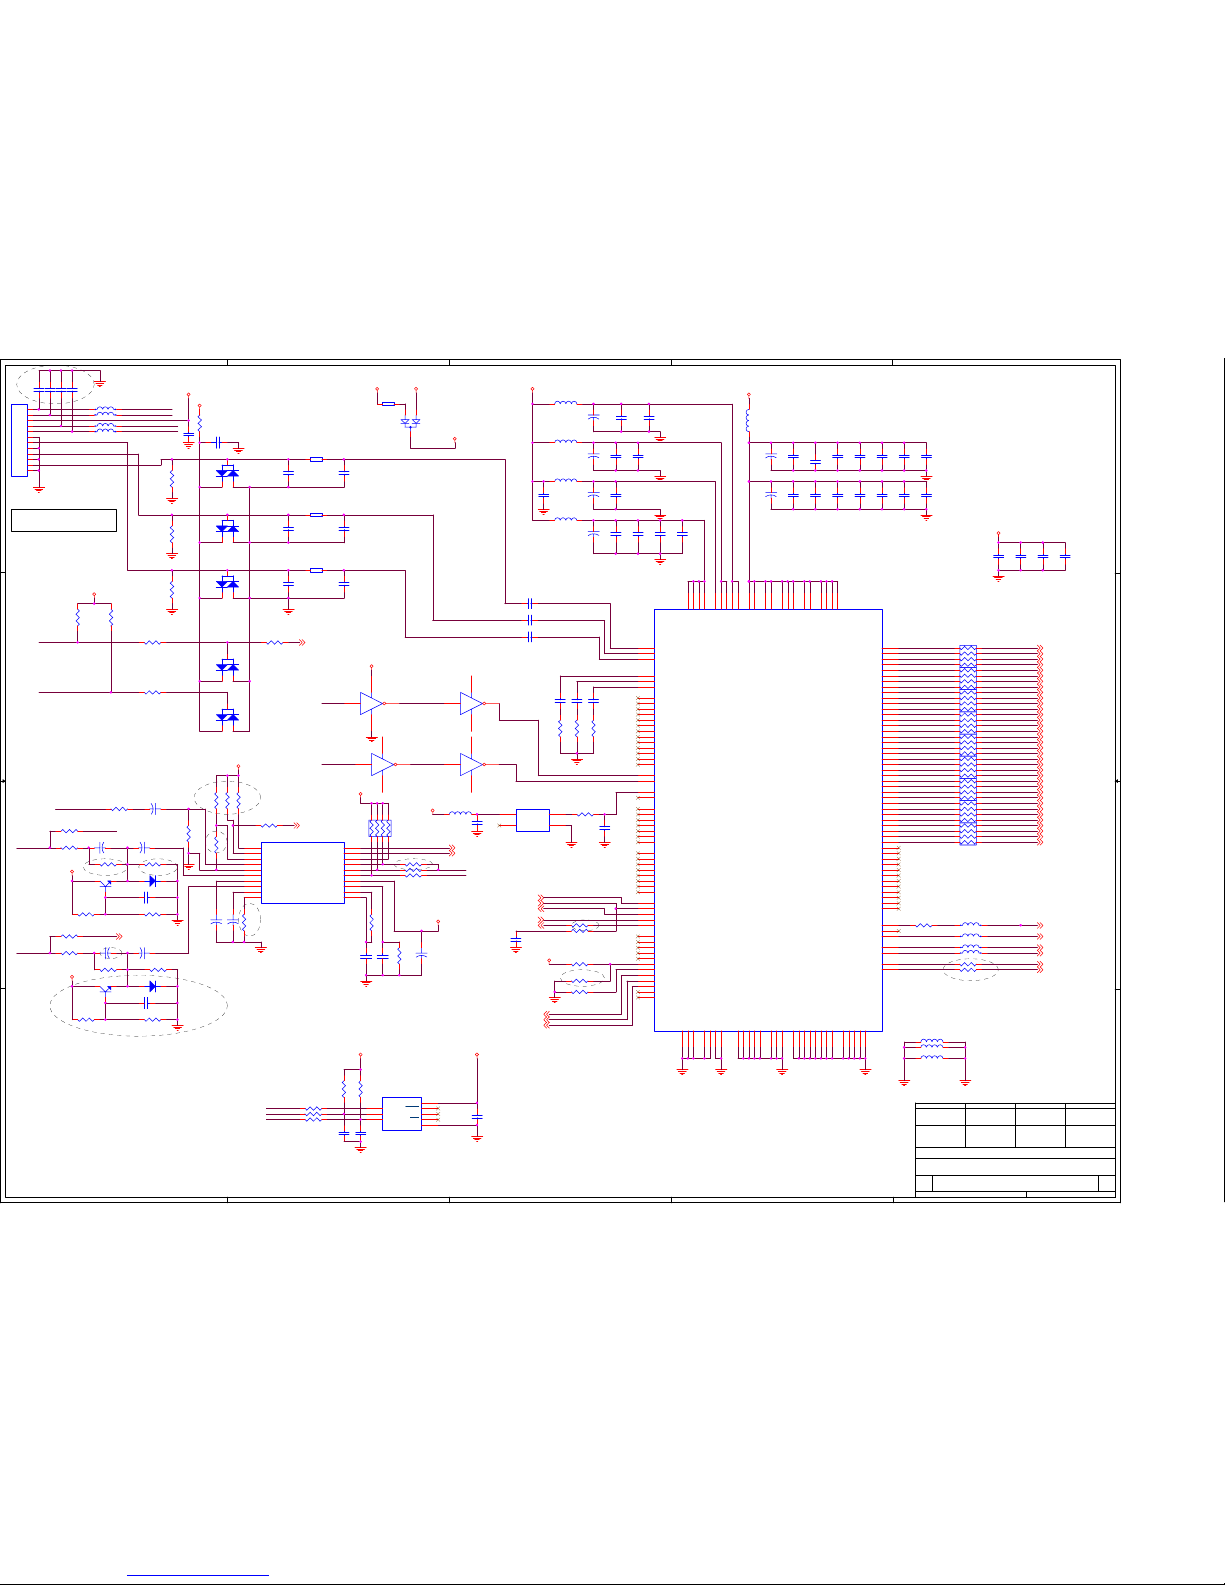
5
5
4
4
3
3
2
2
1
1
D D
C C
B B
A A
INPUT AC
COUPLING
ANALOG AND DIGITAL GROUNDS MUST BE
INTERCONNECTED AT A SINGLE POINT
NOTE:
DIGITAL
SUPPLY
DECOUPLING
ANALOG SUPPLY
DECOUPLING
DESIGNED APPR OVEDCHEAKEDDRAWN
PCB ;630015130002
PCBA;640015130001
01/12/01'
TO EXTERNAL SIGNAL CABLE
V+
H+
DDC+5V
ALPHA.HSU ALPHA.HSU ALPHA.HSU ALPHA.HSU
15EX-TA;INTERFACE BD
01
!!!!""""####$$$$%%%%&&&&''''(((())))****
C
25
Title
Size Document Number Rev
Date: Sheet
of
E_R2
E_R3
E_R5
E_R4
E_G2
E_G3
E_R7
E_R6
E_G7
E_G4
E_G6
E_G5
O_R7
O_G2
O_G3
O_G5
O_G4
O_B2
O_B3
O_G7
O_G6
O_B7
O_B4
O_B6
O_B5
G_IN
R_IN
DDC_SCL
VSYNC
DDC_SDA
V_IN
VSYNC
H_IN
HSYNC
G_IN
V_IN
HSYNC
VSYNC
B_IN
PD27
PD19
PD15
PD7BLUE-
DVDDA
PD10
PD2
GREEN+
PD34
PD28
PD17
PD6
PD31
BLUE+
PD26
PD24
PD3
PD21
PD8
GREEN-
VCC_3.3V
PD22
PD16
VDDA
RED+
SVDDA
PD13
RED-
PD14
PD4
PD35
PD33
PD11
PD9
PD1
PD32
PD29
PD18
PD30
PD25
PD5
PD20
PD23
PD0
PD12
RVDDA
E_B5
E_B4
O_R4
E_B6
O_R2
E_B2
E_B7
O_R3
O_R5
O_R6
E_B3
H_IN
VGA_B
HS_VGA
DDC_SCL
DDC_SDA
VS_VGA
VGA_G
VS_VGA
VGA_R
EN_LCD
HS_VGA
H_IN
V_IN
HDATA0
IRQ
DE
V_SYNC
H_SYNC
EN_BL#
LCD_CLK
HFS
HCLK
RESET#
HDATA1
HDATA2
HDATA3
H_POLARITY
V_POLARITY
V_IN
O_B2
O_B3
O_B4
O_B6
O_B7
O_B5
O_G2
O_G3
O_G6
O_G4
O_G5
O_G7
O_R2
O_R6
O_R4
O_R3
O_R5
O_R7
E_B2
E_B3
E_B4
E_B6
E_B7
E_B5
E_G2
E_G3
E_G6
E_G4
E_G5
E_G7
E_R7
E_R5
E_R6
E_R3
E_R4
E_R2
EN_LCD
V_STATE
V_STATE
ADC_GNDA
ADC_GNDA
ADC_GNDA
+5V
ADC_GNDA
+3.3V
ADC_GNDA
ADC_GNDA
ADC_GNDA
+5VDDC+5V
+5V
+3.3V
VCC_FROM_P C
GND
GND
GND
GND
GND
GND
GND
GND
GND
VCC_FROM_P C
GND
VCC_FROM_PC
GND
GND
GND
+5V
+5V
+5V
+5V
GND
GND
GND GND GND
GND
+3.3V
ADC_GNDA
GND
ADC_GNDA
ADC_GNDA
DDC+5V
GND
GND
ADC_GNDA
ADC_GNDA
GND
+3.3V
GND
+5V
+5V
+5V
U1
gmZAN1
1
2
3
4
5
6
7
8
9
10
11
12
13
14
15
16
17
18
19
20
21
22
23
24
25
26
27
28
29
30
31
32
33
34
35
36
37
38
39
40
41
42
43
44
45
46
47
48
49
50
51
52
53
54
55
56
57
58
59
60
61
62
63
64
65
66
67
68
69
70
71
72
73
74
75
76
777879
808182
83
84
85
86
87
88
89
90
91
92
93
94
95
96
97
98
99
100
101
102
103
108
114
115
116
117
118
119
120
121
122
123
124
125
126
127 128
129
130
131
132
133
134
135
136
137
138
139
140
141
142
143
145
146
147
148
149
150
151
152
153
154
155
156
157
158
159
160
113
112
111
110
109
107
106
105
104
144
CVSS1
RESERVED
PSCAN
RESERVED
RESERVED
PD47
PD46
RVSS1
PD45
PD44
SRVDD1
RVDD1
PD43
PD42
PD41
PD40
PD39
SRVSS1
PD38
PD37
SRVDD2
PD36
PD35
PD34
PD33
PD32
PD31
PD30
PD29
RVSS2
PD28
PD27
RVDD2
PD26
PD25
PD24
PD23
PD22
PD21
CVDD1
CVSS2
PD20
PDISPE
PCLKA
PCLKB
PD19
PD18
PD17
RVSS3
PD16
PD15
PD14
PD13
PD12
PD11
PD10
PD9
CVDD2
RESERVED
RESERVED
RVSS4
PD8
PD7
PD6
RVDD3
PD5
PD4
PD3
PD2
PD1
PD0
CVSS3
PVS
PHS
PBIAS
PPWR
ADC_VDD2
ADC_GND2
ADC_VDD1
ADC_GND1
SUB_GNDA
ADC_GNDA
RESERVED
ADC_VDDA
ADC_BGNDA
BLUE-
BLUE+
ADC_BVDDA
ADC_GGNDA
GREEN-
GREEN+
ADC_GVDDA
ADC_RGNDA
RED-
RED+
ADC_RVDDA
N/C
HFS
HDATA
RESETn
IRQ
MFB9
HCLK
CVDD4
CVSS4
OSD_HREF
OSD_VREF
OSD_CLK
OSD_DATA0
OSD_DATA1
OSD_DATA2
OSD_DATA3
OSD_FSW
MFB11
MFB10
DVDD
DVSS
DAC_DGNDA DAC_DVDDA
PLL_DVDDA
RESERVED
PLL_DGNDA
SUB_DGNDA
SUB_SGNDA
PLL_SGNDA
RESERVED
PLL_SVDDA
DAC_SVDDA
DAC_SGNDA
SVDD
SVSS
TCLK
XTAL/RESERVED
PLL_RVDDA
RESERVED
SUB_RGNDA
RESERVED
VSYNC
SYN_VDD
HSYNC/CS
SYN_VSS
RESERVED
STI_TM1
STI_TM2
SCAN_IN1
RESERVED
SCAN_IN2
SRVSS2
SCAN_OUT1
SCAN_OUT2
MFB0
MFB1
MFB2
MFB3
MFB4
MFB5
MFB6
MFB7
MFB8
PLL_RGNDA
R31
3K
R21
NC
1 2
R30
18K
Q1 MMBT3904L
B
EC
C54 0.01uF
1 2
D7
1N4148
A K
R24 100
R18
NA
1 2
R17
NA
1 2
R16
4.7K
1 2
R48
3K_NA
R23
NA
1 2
C13
0.1uF
+
C50
4.7uF/16V
1 2
C21
22uF/16V
10V
+
C4
10uF/16V
C163
0.1U
+
C51
4.7uF/16V
12
C22
0.1uF
C10
0.1uF
C23
0.1uF
R22
56K
1 2
C49
15P
R20 10
R2
75
B3 120z/100M
1 2
B7 120z/100M
1 2
C25
0.1uF
C24
0.1uF
B6 120z/100M
1 2
C15
0.1uF
B4 120z/100M
1 2
U3
M52347
12
1110
9
8
7
6
5
4
3
2
1
13
14
15
17
18
19
20
16
V S/S OUT
V S/S INV TIME GATESW
V DET
V IN
COM/H.DET
COM/H.IN
GND
G.IN
CLAMP.SW
V.STATE
H.STATE
VD
HD+
HD-
CLAMP O/P
H POL
V POL
CLAMP TIME
VCC
C8
22uF/16V
10V
U2E
74F14
SO14
11 10
147
U2D
74F14
SO14
9 8
147
U2C
74F14
SO14
5 6
147
C9
0.1uF
R32
NA
1 2
C11
0.1uF
C12
0.1uF
B14 120z/100M
1 2
B17 120z/100M
1 2
B16 120z/100M
1 2
D5
BAV99LT1
R47
18K_NA
B18 120z/100M
1 2
R38 100
C26
0.1uF
C14
0.1uF
C43 0.01uF
C165
0.1uF
B83 220Z/100M
R11
100
C46
0.01uF
C44 0.01uF
R12
100
R35 0
C47
0.01uF
R25 NA
R42 NC
R34 0/NA
R41 NC
R26 NA
R43 33/NA
R40 33/NA
+
C48
1uF/16V
12
R33
43K
1 2
R36 22
C61
100P
1 2
+
C58
4.7uF/16V
1 2
R39
4.3K
1 2
C62
220P
1 2
R10
100
D6
BAV99LT1
+
C59
4.7uF/16V
12
B20 0
B19 0
B21 0
+
C60
47uF/16V
12
C28
0.1uF
C18
1000P
C27
0.1uF
C63 0.01uF_NA
1 2
R57 100
R56 100
C57
33P
R58 100
C160
15P_NA
C159
15P_NA
R46 10K
C162
15P_NA
R45 10K/NA
C161
15P_NA
R44 10K
R50
NC
0603
12
R49
NC
0603
12
C2
0.1uF
B12 220Z/100M
C16
NC
C17
10P
R55
47K
C20
0.1uF
B11
100
B10 220Z/100M
B13
100
C29
NC
C30
10P
R54
47K
B9
100
C40
NC
C7
0.1uF
C41
10P
C5
22uF/16V
C19
22uF/16V
C3
0.1uF
+
C55
0.47uF/16V
12
+
C56
10uF/16V
12
C35
0.1uF
J1
PH_12P
1
2
3
4
5
6
7
8
9
10
11
12
C64
0.1uF
C66
47P
U5 24C21
8
1
2
3
4
7
6
5
VCC
TEST
NC
WP
VSS
VCLK
SCL
SDA
C65
47P
R4
75
R3
75
C37
0.1uF
U2B
74F14
SO14
3 4
147
C36
0.1uF
RP9
4.7K*4
8 1
7 2
6 3
5 4
C39
0.1uF
C38
0.1uF
R5 100
R8
NC
R6 100
R29 0
12
C1
22uF/16V
C6
0.1uF
R27 0
12
R28 NC
12
D8 1N4148_NA
A K
Q2 MMBT3904L_NA
B
EC
D1
BAV70LT1
1
2
3
R7
NC
B8 220Z/100M
C33
0.1uF
C34
0.1uF
C32
0.1uF
B2 220Z/100M
C31
22uF/16V
D2
BAV99LT1
RP3 33
8 1
7 2
6 3
5 4
RP2 33
8 1
7 2
6 3
5 4
RP1 33
8 1
7 2
6 3
5 4
R37
NC
1 2
D4
BAV99LT1
D3
BAV99LT1
RP8 33
8 1
7 2
6 3
5 4
RP6 33
8 1
7 2
6 3
5 4
RP5 33
8 1
7 2
6 3
5 4
RP4 33
8 1
7 2
6 3
5 4
RP10 33
8 1
7 2
6 3
5 4
RP7 33
8 1
7 2
6 3
5 4
R1
10K
R19 100
B1 500z/100M
1 2
B5
220Z/100M
C42 0.01uF
X1
OSC50MHz
815
4
VDD
E/D
OUT
GND
C45
0.01uF
Page 65
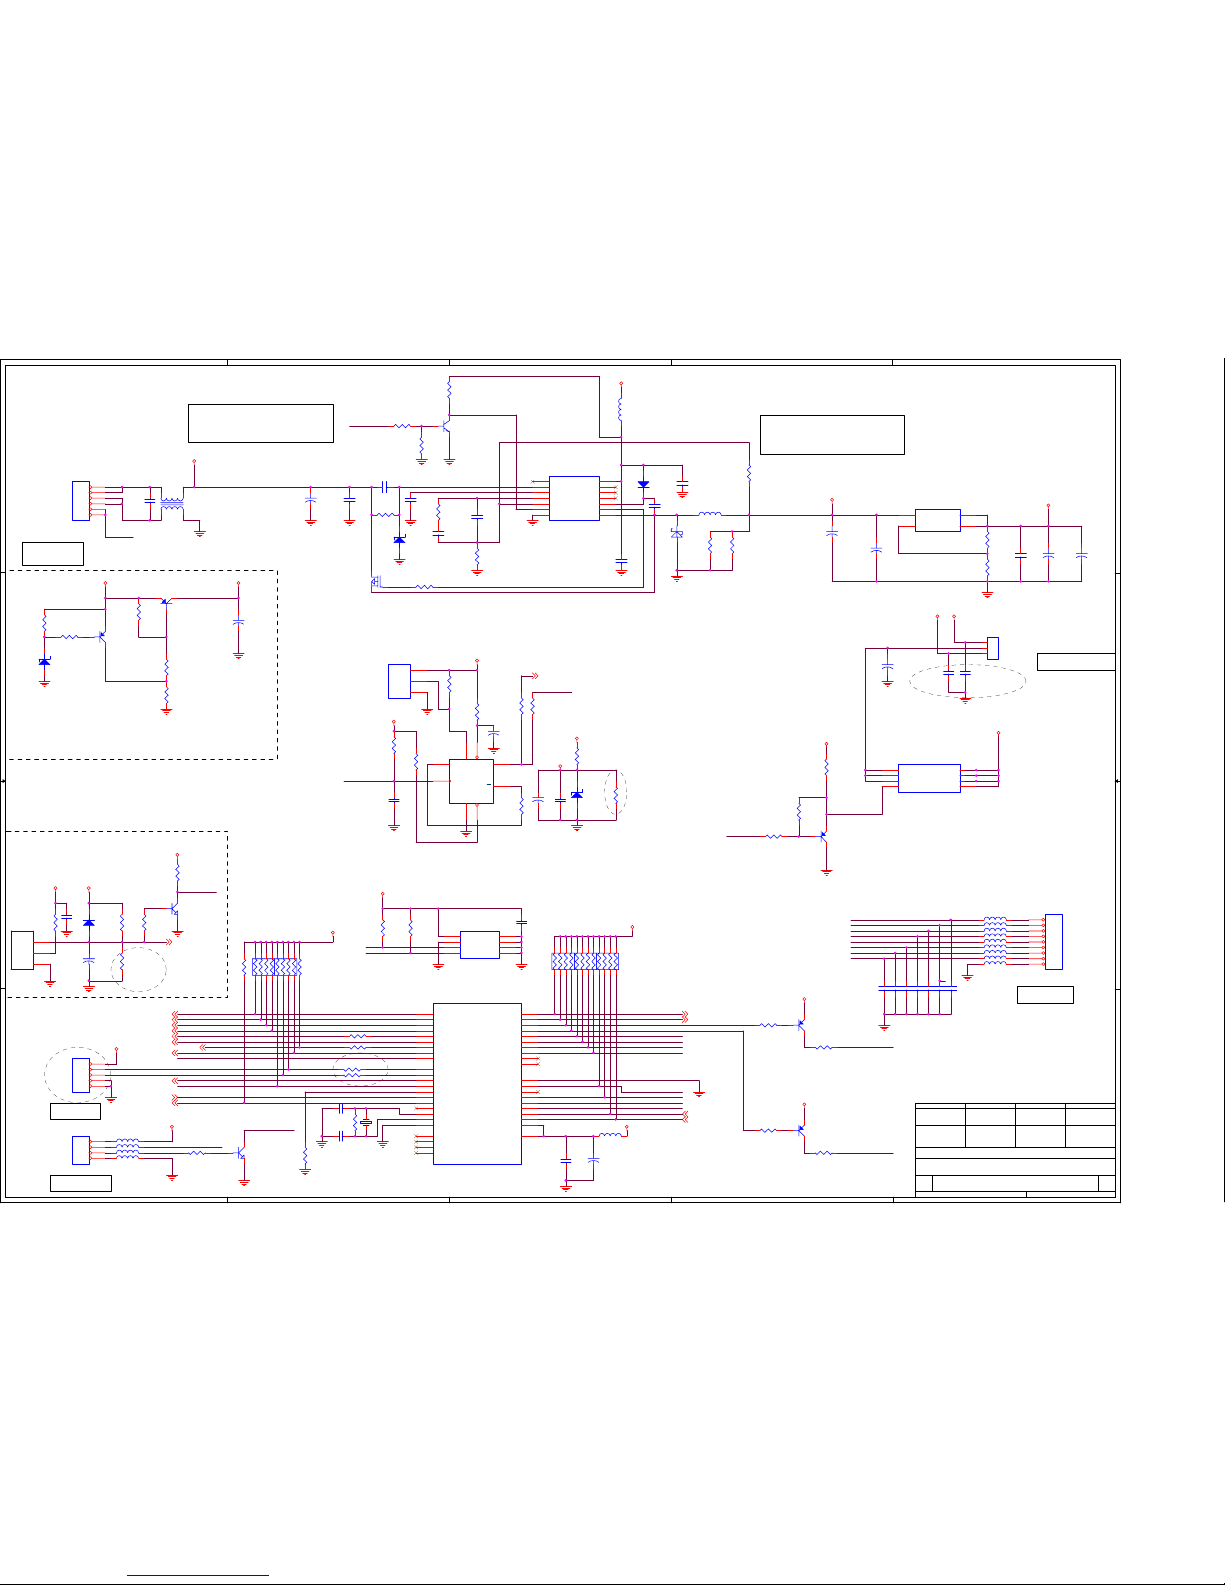
5
5
4
4
3
3
2
2
1
1
D D
C C
B B
A A
PARAMETER
EEPROM
POWER CONN.
OVER VOTAGE PROTECTION
12V-->5V
5V-->3.3V
RESET
LCD POWER
DESIGNED CHEAKEDDRAWN
ALPHA.HSU
APPROVED
15EX-TA;INTERFACE BD
01/12/01'
ALPHA.HSU ALPHA.HSU ALPHA.HSU
TO DEBUG PORT
TO SENSOR BD
TO KEY SW BD
TO DC JACK BD
PANEL VDD SELECTOR
12V
12V
GND
GND
ACTIVE H
HANNSTAR/HSD150MX42-- 3.3V--->1,2 SHORT
KEY_MENU#
KEY_SELECT#
KEY_UP#
KEY_DOWN#
HOT_KEY#
SOFT_PWR#
GND
LED_AMBER
LED_GREEN
5V
AUTO_BRI_DETECT
AUTO_BRI_CTRL
GND
1%
1%1%
1%
POWER SWITCH
POWER BOARD 12V TO 5V
5V
5V
1,2 SHORT FOR 12V ADAPTOR
2,3 SHORT OR OPEN FOR 12V/5V I/P
2,3 SHORT OR OPEN FOR 12V/5V I/P
1,2 SHORT FOR 12V ADAPTOR
PCB ;630015130002
PCBA;640015130001
01
!!!!""""####$$$$%%%%&&&&''''(((())))****
C
35
Title
Size Document Number Rev
Date: Sheet
of
SCL
SDA
RESET
LED_GREEN#
KEY_MENU#
EN_BL#
KEY_SELECT#
KEY_UP#
KEY_DOWN#
EN_LCD
RESET
KEY_SELECT#
KEY_MENU#
SOFT_PWR#
KEY_DOWN#
SDA
SCL
HOT_KEY
HOT_KEY
AUTO_BRI_CTRL
KEY_UP#
LED_GREEN
LED_GREEN
LED_AMBER
LED_AMBER#
+5V
LED_AMBER
AUDIO_PWM
EN_LCD
AUTO_BRI_DETECT
POWER_ON#
SOFT_PWR#
SWPSW
POWER_ON#
AUTO_BRI_CTRL
+5V
AUTO_BRI_DETECT
HDATA0
RESET#
IRQ
HFS
HDATA1
HDATA2
HDATA3
HCLK
BRI_PWM
H_POLARITY
V_POLARITY
V_STATE
AUDIO_PWM
EN_BL#
EN_LCD
AUDIO_PWR
AUDIO_PWR
+3.3V
VCC_LCD
12VIN VDD_12
VDD_12
+3.3V
+5V
+5V
+5V
+5V
GNDGND
+5V
GND
GND
+5V
GND GND
GND
GND
GND
+5V
GND
+5V
GND
GND
GND
GND
GND
GND
+5V
GND
GND
GND
+5V
GND
GND
GND
+5V
+5V
+5V
GND
GNDGND
+5VP
+5VP
+5VP
GND
12VIN
VDD_12
GND
GND
GND GND
GND
GND
GND
GND
GND
GNDGND
+5V
GND
GND
GND
R110
47K
0603
1 2
R71
22
0603
1 2
CHOKE1
COM_CHOKE_4A
142
3
C70
0.1uF
R127 22
R92 10K
RP11
4.7K*4
8 1
7 2
6 3
5 4
Q9
MMBT3906L
B
E
C
R119
NC
0603
12
Q8
MMBT3906L
B
E
C
RP13
4.7K*4
8 1
7 2
6 3
5 4
RP12
4.7K*4
8 1
7 2
6 3
5 4
R88 470
D14
RLZ5.1
A K
R87
15K
Q5
MMBT3906L
B
E
C
C158
100n
B35 300z/100M
1 2
R9
4.7K
12
D13
1N4148/NA
A K
C95
10uf/16V
R81
47K
JP1
PH_6
1
2
3
4
5
6
+
C69
330uF/16V
12
R113
NC
0603
12
R93 470
R91
15K
R115
10K
C155
10uF/16V
R118
10K
C80
1uF
16V
0805
12
U14A
74AHCT74
2
3
5
6
14
4
7
1
D
CLK
Q
Q
VCC
PR
GND
CL
R116
10K
C76
0.01uF
12
B36 300z/100M
1 2
C156
100P
R74
10K 0603
1 2
Q3
HUF75307D
G
DS
C67
1000P
0805
1 2
B22
500z/100M
3216
1 2
Q10
MMBT3904L
R65
499
12
R62
2.94K
12
R63
40.2K
0805
12
Q7
MMBT3904L
GND
OUT
VCC
U9
KIA7042
3
1
2
U13
KIA7045
E
B
C
RSTN
VCC
GND
R80
470
J2
3PX1/.1/MA/GOLD
1
2
3
1
2
3
JP4
HEADER_4
1
2
3
4
+
C79
470uF/16V
12
C157
10u/16V
C68
1uF
16V
0805
12
R69
1K
0805
12
R82
470K
R77
10K
1 2
R79
4.7K
B37 300z/100M
1 2
L1 4.7UH/8A
CHOKE_ETQP_CDRH125
1 2
U6
HIP6013
1
2
3
4
5
6
7 8
9
10
11
12
13
14
RT
OCSET
SS
COMP
FB
EN
GND PHASE
UGATE
BOOT
NC3
NC2
NC1
VCC
C81
1uF
16V
0805
12
C74
33P
12
+
C75
470uF/16V
12
R53
1M
12
R89 0/NA
R90 0/NA
U10
24LC16B
1
2
3
45
6
7
8
A0
A1
A2
VSSSI
SCK
WP
VCC
R84
10K
R73
100K
0603
12
R83
10K
C94
0.1uF
C98
0.1uF
R78 47K
R76
10K
0603
12
R75
1K
0603
12
C72
0.1uF
12
C93
0.1uF
U11
M6759
2
3
4
5
6
7
8
9
10
11
13
14
15
16
17
18
19
20
21
22
24
25
26
27
28
29
30
31
32
33
35
36
37
38
39
40
41
42
43
44
1
12
23
34
P1.0/T2
P1.1/T2EX
P1.2/ECI
P1.3/CEX0
P1.4/CEX1
P1.5/CEX2
P1.6/CEX3/WAIT#
P1.7/CEX4/A17/W
RST
P3.0/RXD
P3.1/TXD
P3.2/INT0#
P3.3/INT1#
P3.4/T0
P3.5/T1
P3.6/WR#
P3.7/RD#/A16
XTAL2
XTAL1
VSS
A8/P2.0
A9/P2.1
A10/P2.2
A11/P2.3
A12/P2.4
A13/P2.5
A14/P2.6
A15/P2.7
PSEN#
ALE/PROG#
EA#/VPP
AD7/P0.7
AD6/P0.6
AD5/P0.5
AD4/P0.4
AD3/P0.3
AD2/P0.2
AD1/P0.1
AD0/P0.0
VCC
NIC
NIC
NIC
NIC
R70
165
0603
1%
12
C99
22uF/16V
U7
EZ1084CT
3
1
2
4
VIN
GND
VOUT0
VOUT1
+
C77
10uF/16V
CPWX4.3
12
+
C78
10uF/16V
CPWX4.3
12
Q4 MMBT3906L
B
E C
R67
100
0603
1%
12
D9
1N4148
MLL34B
AK
R72
100K
0603
12
C86
33P
12
C87
33P
12
R111
10K
0603
1 2
R112
470
0603
12
R117
510R/0805
C73
0.1uF
12
R59 0
1 2
R52
4K7
0603
12
RP14
4.7K*4
8 1
7 2
6 3
5 4
+
C83
10uF/16V
CPWX4.3
12
RP15
4.7K*4
8 1
7 2
6 3
5 4
Q14
2sc1623
B
E
C
R109
10K
0805
5%
1 2
R64
4.99K
0805
1%
1 2
D12
RLZ15A
A K
R85
100K/NA
Q6
MMBT3906L
B
E
C
R66
499
12
R121
0
C71
1uF
0805
12
JP3
PH_5
1
2
3
4
5
D10
SR34
JP2
PH_9
1
2
3
4
5
6
7
8
9
R114
0
B25 300z/100M
1 2
B26 300z/100M
1 2
B27 300z/100M
1 2
B33
220z/100M
1 2
B29 300z/100M
1 2
+
C82
100uF/25V
CPWX8.3
12
B30 300z/100M
1 2
B31 300z/100M
1 2
B28 300z/100M
1 2
B32 300z/100M
1 2
B24 300z/100M
1 2
C97
22P
D11
RLZ15A
A K
U8
TPS1100D
1
2
3
4 5
6
7
8
SOURCE1
SOURCE2
SOURCE3
GATE DRAIN
DRAIN1
DRAIN2
DRAIN3
Y2
20MHz/22P
C96
22P
C84
0.1U/20V/NA
R60
NC
0603
12
C85
0.1U/20V/NA
C89
33P
12
C88
33P
12
R120
47K
0603
12
C92
33P
12
C91
33P
12
C90
33P
12
B34
500Z
1 2
Page 66
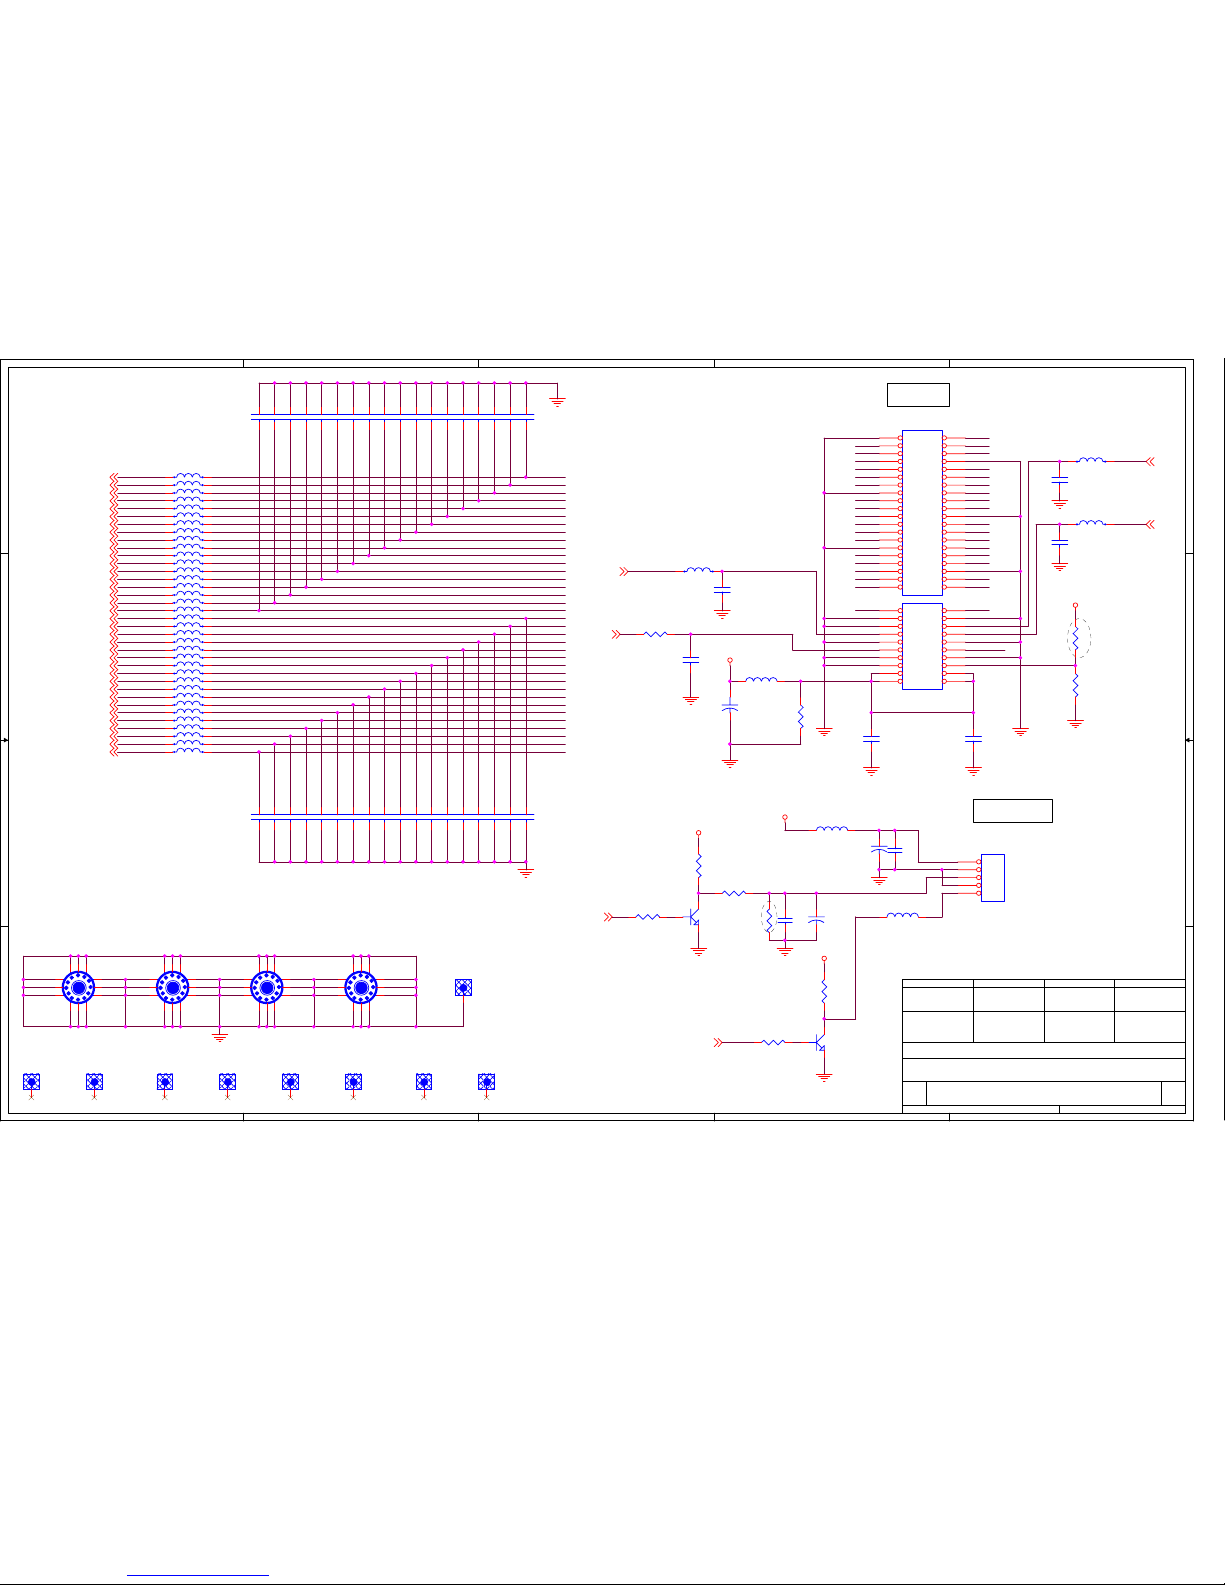
5
5
4
4
3
3
2
2
1
1
D D
C C
B B
A A
APPROVEDCHEAKEDDRAWN DESIGNED
ALPHA.HSU ALPHA.HSU ALPHA.HSU ALPHA.HSU
01/12/01'
TO PANEL
TO INVERTER
12V
GND
GND
BRT_RANGE
ON/OFF
HANNSTAR
SHARP,HYUNDAI
PCB ;630015130002
PCBA;640015130001
15EX-TA;INTERFACE BD
01
!!!!""""####$$$$%%%%&&&&''''(((())))****
B
45
Title
Size Document Number Rev
Date: Sheet
of
EB2
ER4
ER2
ER0
CLK
EB4
OB5
OB3
OB1
EB5
EB3
OG4
EB1
EG4
EG2EG1
OG2
EG0
OG0
ER5
ER3
ER1
OR5
OB4
EG3
OR3
OB2
OB0
EB0
OR1
OG5
OG3
OG1
OR4
EG5
OR2
OR0
H_SYNC
CLK
OB5
OB4
OB0
OG5
OG1
OG0
OR3
OR1
EB4
EB2
OG3
EB3
OR2
EG2
EG4
ER3
EB0
ER5
EG1
EG0
EG3
ER4
EG5
OR4
EB1
OR0
OR5
OG4
OG2
OB1
OB2
OB3
ER0
ER2
GND
GND
GND
GND
GND
GND
GND
GND
GND
GND
GND
GND
GND
GND
ER1
EB5
LCD_CLK
H_SYNC
V_SYNC
DE
EN_BL#
E_B5
E_B2
O_B5
E_G3
E_G7
O_G2
O_B2
E_R7
O_R5
O_B3
E_B7
E_G4
O_R6
O_G4
O_B4
E_R6
O_R2
O_G7
E_B3
O_G5
E_R5
E_R2
O_R3
O_G6
O_B6
E_G2
E_B6
O_R4
O_G3
O_B7
E_G6
E_G5
E_B4
O_R7
BRI_PWM
E_R4
E_R3
VCC_LCD
GND
GND GND
GND
GND
GND
VCC_LCD
GND
GND
GND
GND
GND
12VIN
GND
GND
GND
+5V
GND
GND
GND
+5V
R102
1K_NA
B53 120z/100M
1 2
R100 5.6K
B50 120z/100M
1 2
C112
33P
12
B51 120z/100M
1 2
B38
120z/100M
1 2
C117
33P
12
B48 120z/100M
1 2
C120
33P
12
C118
100P
12
C122
10P
12
B79 300z/100M
1 2
FD7
FIDUCIAL-MARK
1
FD8
FIDUCIAL-MARK
1
FD4
FIDUCIAL-MARK
1
FD3
FIDUCIAL-MARK
1
FD2
FIDUCIAL-MARK
1
FD1
FIDUCIAL-MARK
1
Q12
MMBT3904L
R97 0
B68
500z/100M
12
C149
100uF/25V
CPWX8.3
12
J3
12
34
56
78
910
11 12
13 14
15 16
17 18
19 20
21 22
23 24
25 26
27 28
29 30
31 32
33 34
35 36
37 38
39 40
MTG3
ID3.2/OD8.0
4
5
6
7
9
10
123
8
11
12
MTG2
ID3.2/OD8.0
4
5
6
7
9
10
123
8
11
12
B56 120z/100M
1 2
B54 120z/100M
1 2
B52 120z/100M
1 2
B64 120z/100M
1 2
B57 120z/100M
1 2
B58 120z/100M
1 2
B55 120z/100M
1 2
Q11
MMBT3904L
B63 120z/100M
1 2
R101 4.7K
B62 120z/100M
1 2
B59 120z/100M
1 2
B60 120z/100M
1 2
B61 120z/100M
1 2
MTG4
ID3.2/OD8.0
4
5
6
7
9
10
123
8
11
12
B69 120z/100M
1 2
B66 120z/100M
1 2
B65 120z/100M
1 2
B77 120z/100M
1 2
+
C123
10uF/16V
CPWX4.3
12
B70 120z/100M
1 2
B71 120z/100M
1 2
B67 120z/100M
1 2
B76 120z/100M
1 2
B75 120z/100M
1 2
B72 120z/100M
1 2
B73 120z/100M
1 2
B74 120z/100M
1 2
J4
12
34
56
78
910
11 12
13 14
15 16
17 18
19 20
R103
1K
R104
4.7K
R99
3K
C148
0.1uF
12
C146
0.1uF
C145
100uF/25V
CPWX8.3
12
FD6
FIDUCIAL-MARK
1
FD5
FIDUCIAL-MARK
1
TP1
TP1
1
R98
100
R95
NA
B78 500z/100M
1 2
C129
33P
12
C128
33P
12
C127
33P
12
C133
33P
12
C132
33P
12
C131
33P
12
C130
33P
12
C137
33P
12
C135
33P
12
C136
33P
12
C134
33P
12
R51
120
1/2W-AX
12
C142
33P
12
C140
33P
12
C139
33P
12
C138
33P
12
C144
33P
12
C143
33P
12
C141
33P
12
MTG1
ID3.2/OD8.0
4
5
6
7
9
10
123
8
11
12
JP5
PH_5P
1
2
3
4
5
C126
0.1uF
12
C125
0.1uF
12
B46
120z/100M
1 2
C119
33P
12
C102
33P
12
C103
33P
12
C101
33P
12
C100
33P
12
B39 120z/100M
1 2
C110
33P
12
C111
33P
12
C105
33P
12
C104
33P
12
C107
33P
12
B43 120z/100M
1 2
C109
33P
12
B42 120z/100M
1 2
B41 120z/100M
1 2
C108
33P
12
B40 120z/100M
1 2
C106
33P
12
C115
33P
12
B49 120z/100M
1 2
C116
33P
12
B47 120z/100M
1 2
C114
33P
12
B45 120z/100M
1 2
C113
33P
12
B44 120z/100M
1 2
Page 67
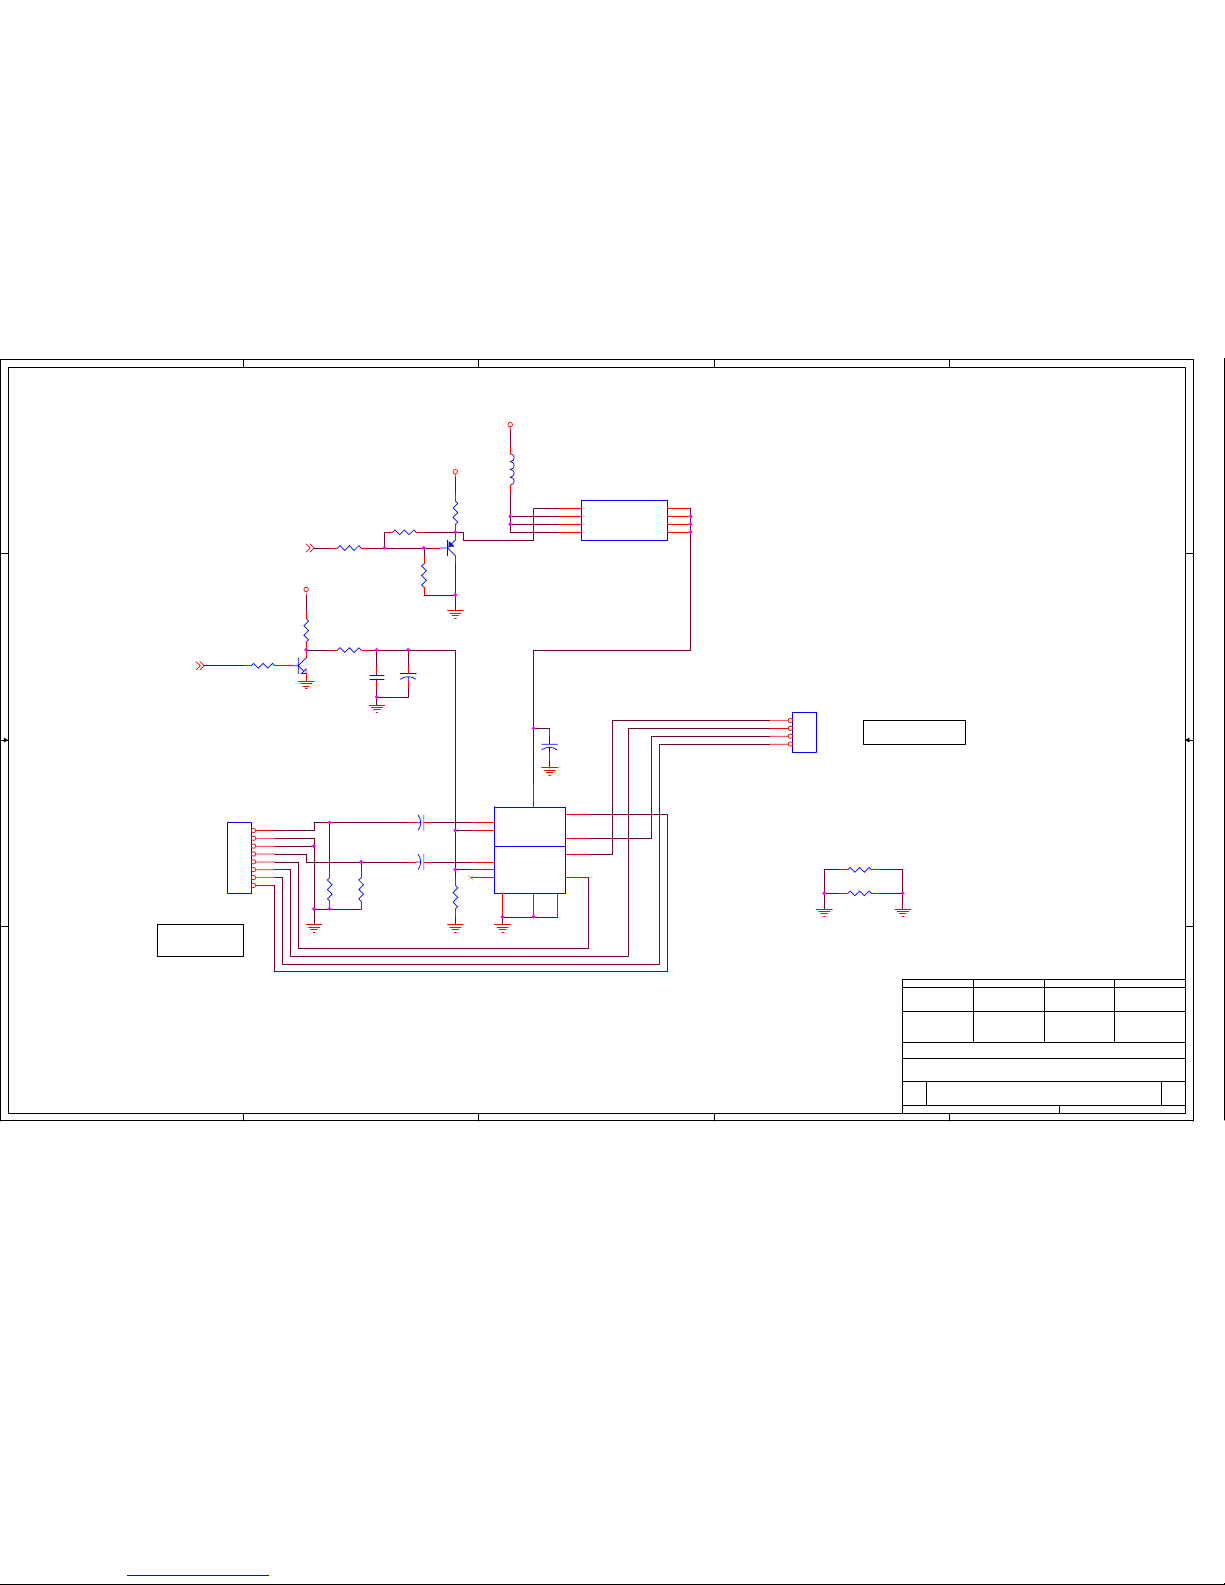
5
5
4
4
3
3
2
2
1
1
D D
C C
B B
A A
Alpha.Hsu
AUDIO IN
TDA7057AQ
Alpha.Hsu
CHEAKEDDESIGNEDDRAWN
Alpha.Hsu Alpha.Hsu
APPROVED
01/12/01' 5
EAR_PHONE_L+
EAR_PHONE_L-
EAR_PHONE_R-
EAR_PHONE_R+
AUDIO_IN_L
AUDIO_IN_R
GND
GND
TO DC JACK BD
TO SPEAKER UNIT
SPK_RSPK_R+
SPK_LSPK_L+
L
R
PCB ;630015130002
PCBA;640015130001
15EX-TA;INTERFACE BD
01
!!!!""""####$$$$%%%%&&&&''''(((())))****
B
5
Title
Size Document Number Rev
Date: Sheet
of
AUDIO_IN_L
SPK_L-
AUDIO_PWM
EAR_PHONE_R+
SPK_L+
AUDIO_IN_R
EAR_PHONE_L+
SPK_R+
EAR_PHONE_L-
EAR_PHONE_R-
SPK_R-
AUDIO_PWM
AUDIO_PWR
+5V
AUDIO_GND
AUDIO_GND
AUDIO_GND
AUDIO_GND
GND
AUDIO_GND
AUDIO_GND
GND
AUDIO_GND
12VIN
VDD_12
JP7
8HEADER
1
2
3
4
5
6
7
8
R108
10K
L2
500Z/100M
12
C154
1U/16V/NA
CPWX4.3
12
C153
1U/16V/NA
CPWX4.3
12
R107
10K
Q13
MMBT3904L
C150
0.1uF
12
R106
10K
R105
1K
I/P1
I/P2
DC1
DC2
NC
GND GND GND
SP1+
SP2+
SP1-
SP2-
U12
3
1
5
7
2
6
12
9
8
10
11
13
4
R14
0
1 2
R13
0
1 2
JP6
HEADER_4
1
2
3
4
+
C152
330uF/16V
12
R123
10K
12
R124 47K
Q15
MMBT3906L
B
E
C
R61
NC
1 2
U15
TPS1100D
1
2
3
4 5
6
7
8
SOURCE1
SOURCE2
SOURCE3
GATE DRAIN
DRAIN1
DRAIN2
DRAIN3
R15
10K
12
C151
100uF/25V
CPWX8.3
12
R126
5K1
R125
5K1
Page 68
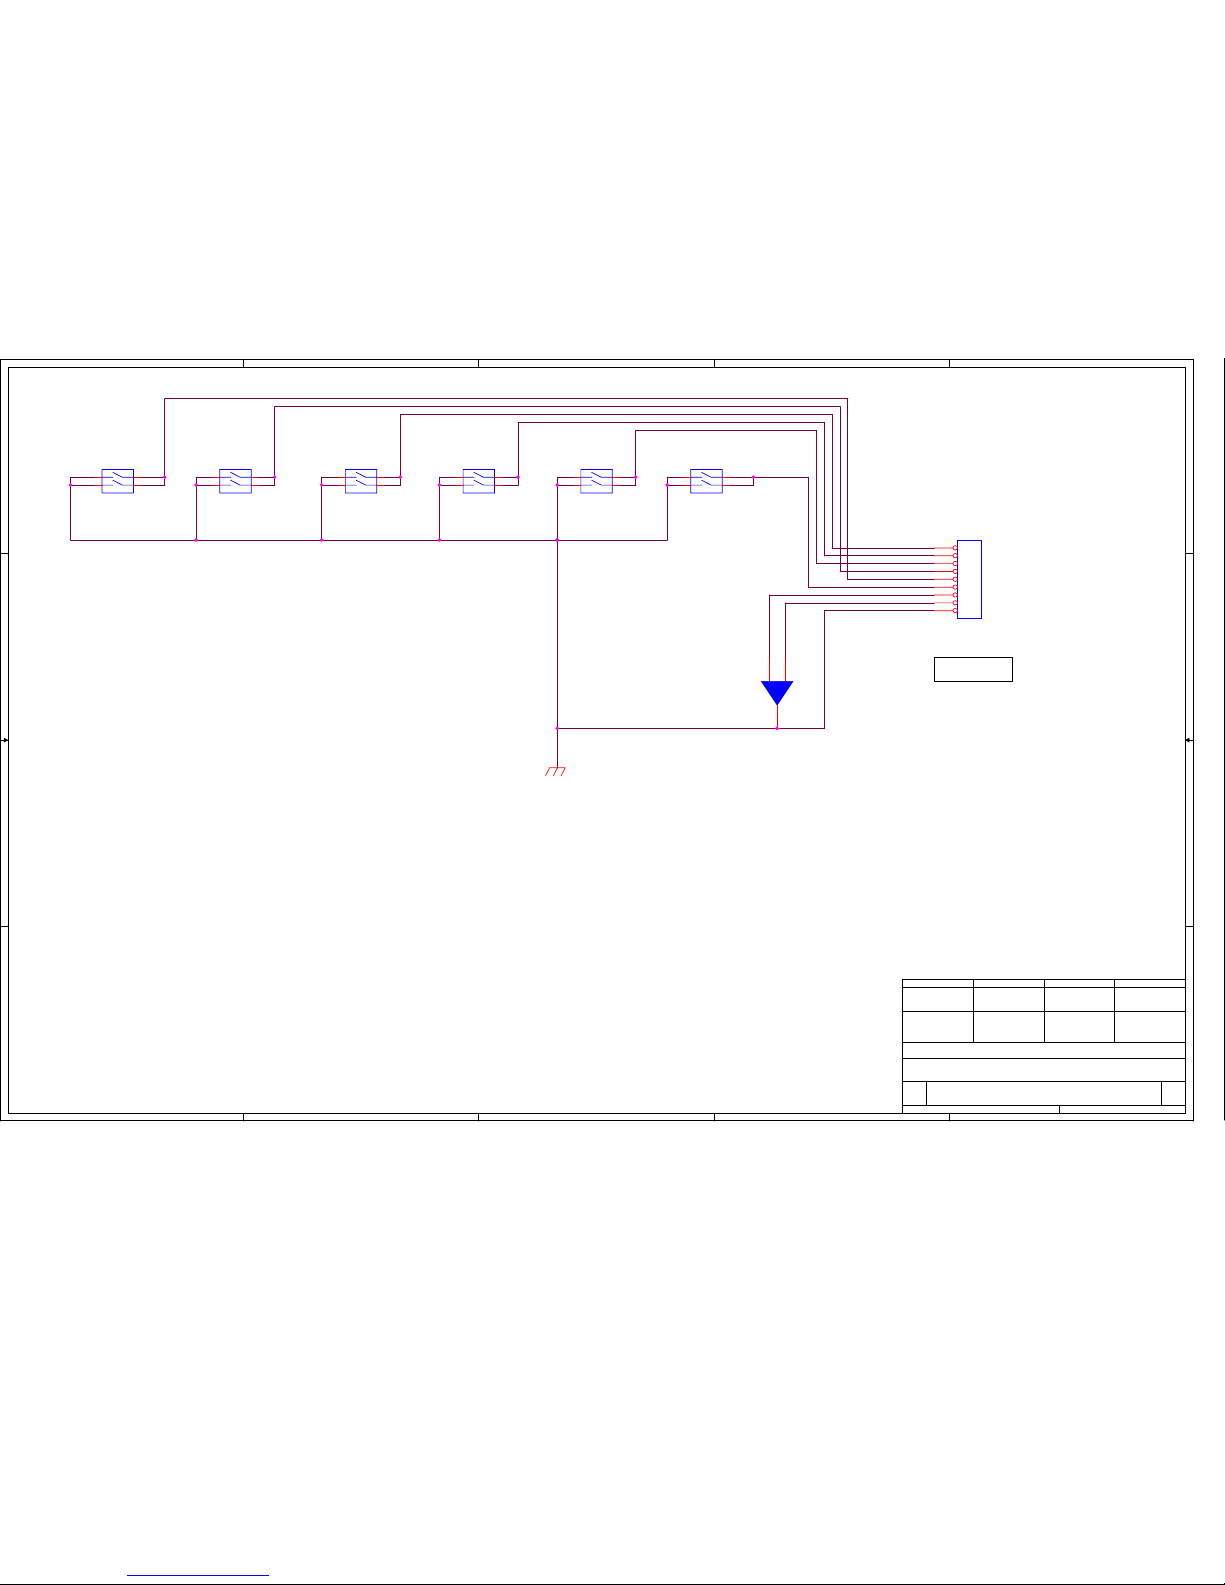
5
5
4
4
3
3
2
2
1
1
D D
C C
B B
A A
APPROVED
Alpha.Hsu
CHEAKED
Alpha.Hsu
01/12/01'
DESIGNED
Alpha.HsuAlpha.Hsu
DRAWN
PCB ;630015130003
PCBA;640015130003
KEY_MENU#
KEY_SELECT#
KEY_UP#
KEY_DOWN#
HOT_KEY
SOFT_PWR#
LED_AMBER
LED_GREEN
GND
TO INTERFACE BD
15EX-TA ;KEY SW BD
01
!!!!""""####$$$$%%%%&&&&''''(((())))****
B
11
Title
Size Document Number Rev
Date: Sheet
of
KEY_MENU#
KEY_SELECT#
KEY_UP#
KEY_DOWN#
HOT_KEY
SOFT_PWR#
LED_AMBER
LED_GREEN
GND
D1
LED
1
3
2
Gr
Re
G
SW6
HOT_KEY
1
2
4
3
SW3
SELECT
1
2
4
3
SW4
MENU
1
2
4
3
SW5
DOWN
1
2
4
3
SW1
SW
1
2
4
3
SW2
UP
1
2
4
3
JP1
PH_9
1
2
3
4
5
6
7
8
9
Page 69
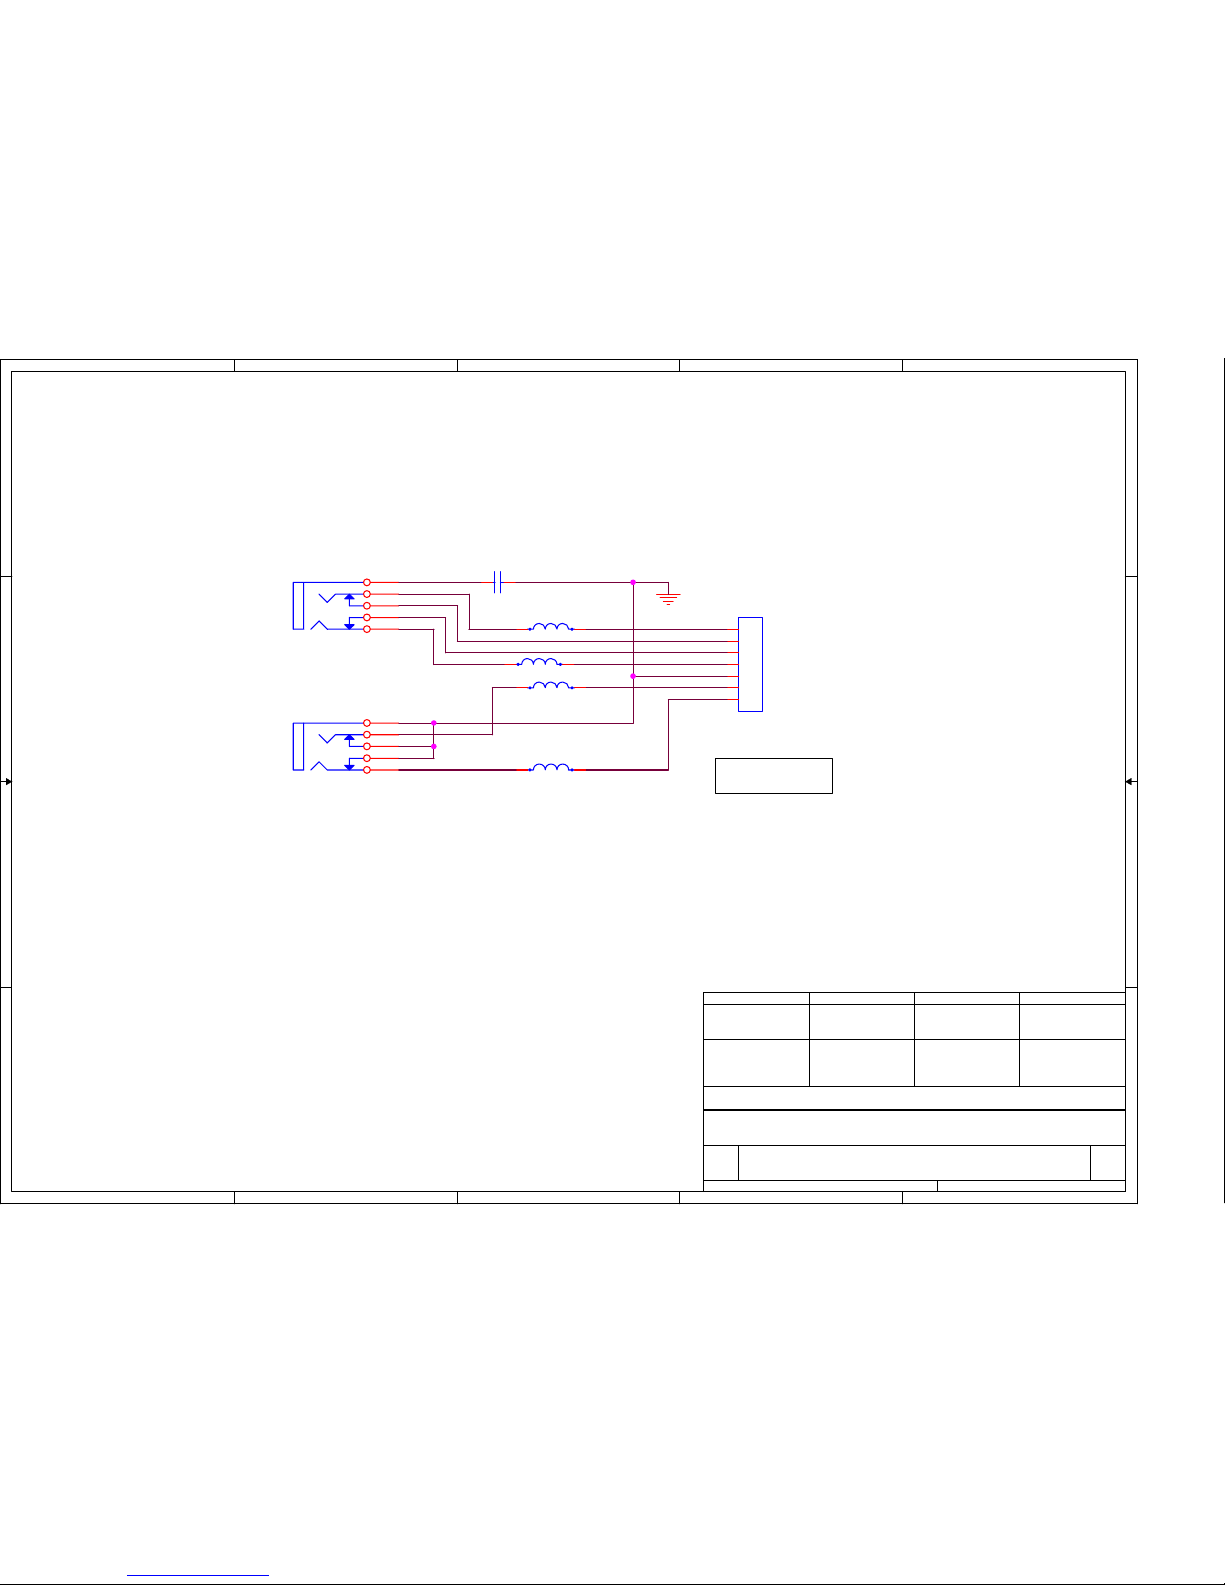
5
5
4
4
3
3
2
2
1
1
D D
C C
B B
A A
MIC_IN
EAR_PHONE_OUT
01/12/01'
APPROVED
Alpha.Hsu
CHEAKED
Alpha.Hsu
DESIGNED
Alpha.HsuAlpha.Hsu
DRAWN
MIC_IN_R
MIC_IN_L
GND
EAR_PHONE_R+
EAR_PHONE_R-
EAR_PHONE_L-
EAR_PHONE_L+
PCB ;630015130006
PCBA;640015130006
TO POWER JACK BD
15EX-TA ;PHONE JACK BD
01
!!!!""""####$$$$%%%%&&&&''''(((())))****
A
11
Title
Size Document Number Rev
Date: Sheet of
MIC_IN_R
EAR_PHONE_L-
GND
EAR_PHONE_R-
MIC_IN_L
EAR_PHONE_L+
EAR_PHONE_R+
J2
CON7
1
2
3
4
5
6
7
B2 120z/100M
1 2
B1 120z/100M
1 2
B4 120z/100M
1 2
B3 120z/100M
1 2
J3
PHONEJACK
5
4
3
2
1
J1
PHONEJACK
5
4
3
2
1
C1
0.1uF
1 2
Page 70
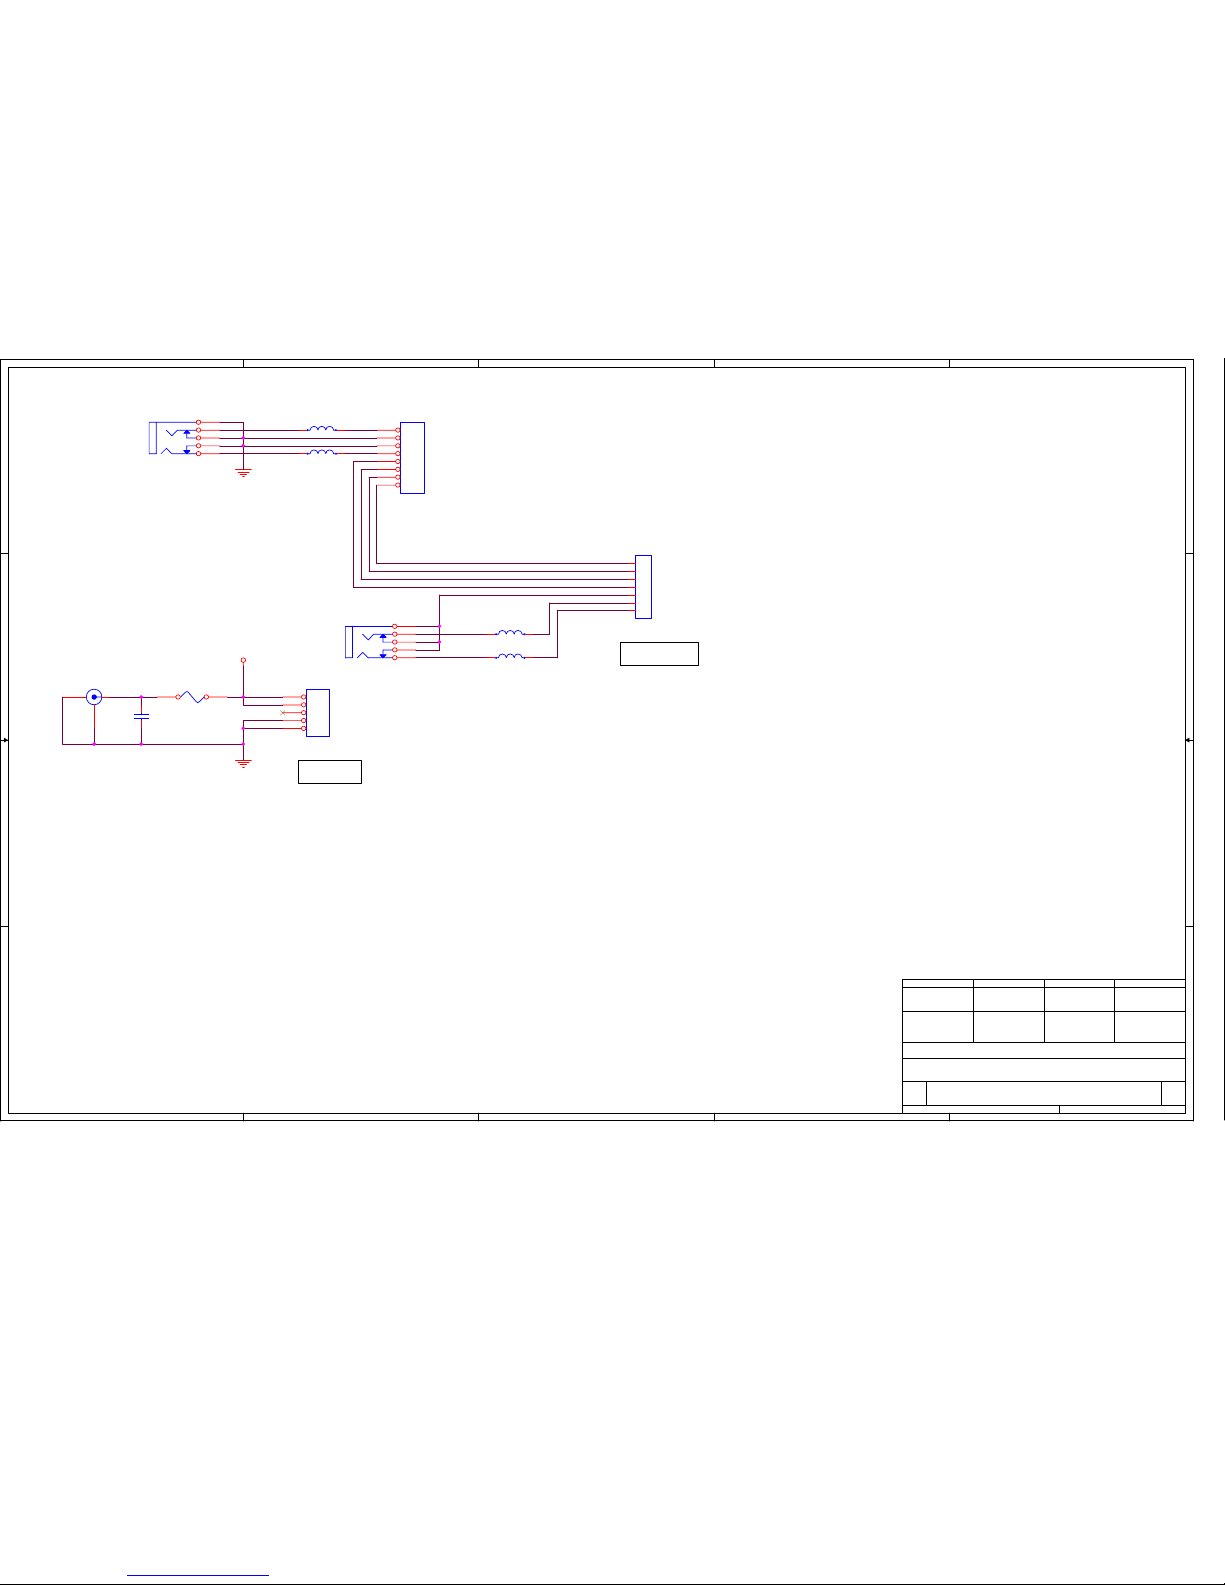
5
5
4
4
3
3
2
2
1
1
D D
C C
B B
A A
AUDIO_IN
MIC_OUT
CHEAKED
Alpha.Hsu
APPROVED
Alpha.Hsu
DESIGNED
Alpha.Hsu Alpha.Hsu
DRAWN
10/05/00'
MIC_OUT_R
MIC_OUT_L
GND
EAR_PHONE_R+
EAR_PHONE_R-
EAR_PHONE_L-
EAR_PHONE_L+
AUDIO_IN_R
AUDIO_IN_L
GND
GND
PCB ;630015130004
PCBA; 640015130004
EAR_PHONE_R+
EAR_PHONE_L+
EAR_PHONE_L-
EAR_PHONE_R-
TO INTERFACE BD
TO PHONE JACK BD
12V
12V
NC
GND
GND
15EX-TA; POWER JACK BD
01
!!!!""""####$$$$%%%%&&&&''''(((())))****
B
11
Title
Size Document Number Rev
Date: Sheet
of
MIC_OUT_R
AUDIO_IN_L
AUDIO_IN_R
EAR_PHONE_L+
EAR_PHONE_LEAR_PHONE_REAR_PHONE_R+
MIC_OUT_L
GND
12VIN
GND
GND
B1 120z/100M
1 2
JP1
8HEADER
1
2
3
4
5
6
7
8
B2 120z/100M
1 2
J3
PHONEJACK
5
4
3
2
1
C1
0.1uF
B3 120z/100M
1 2
J2
CON7
1
2
3
4
5
6
7
B4 120z/100M
1 2
F1 RGE500
JP3
PH_5P
1
2
3
4
5
J1
PHONEJACK
5
4
3
2
1
JP2
POWER_JACK20_B
213
Page 71
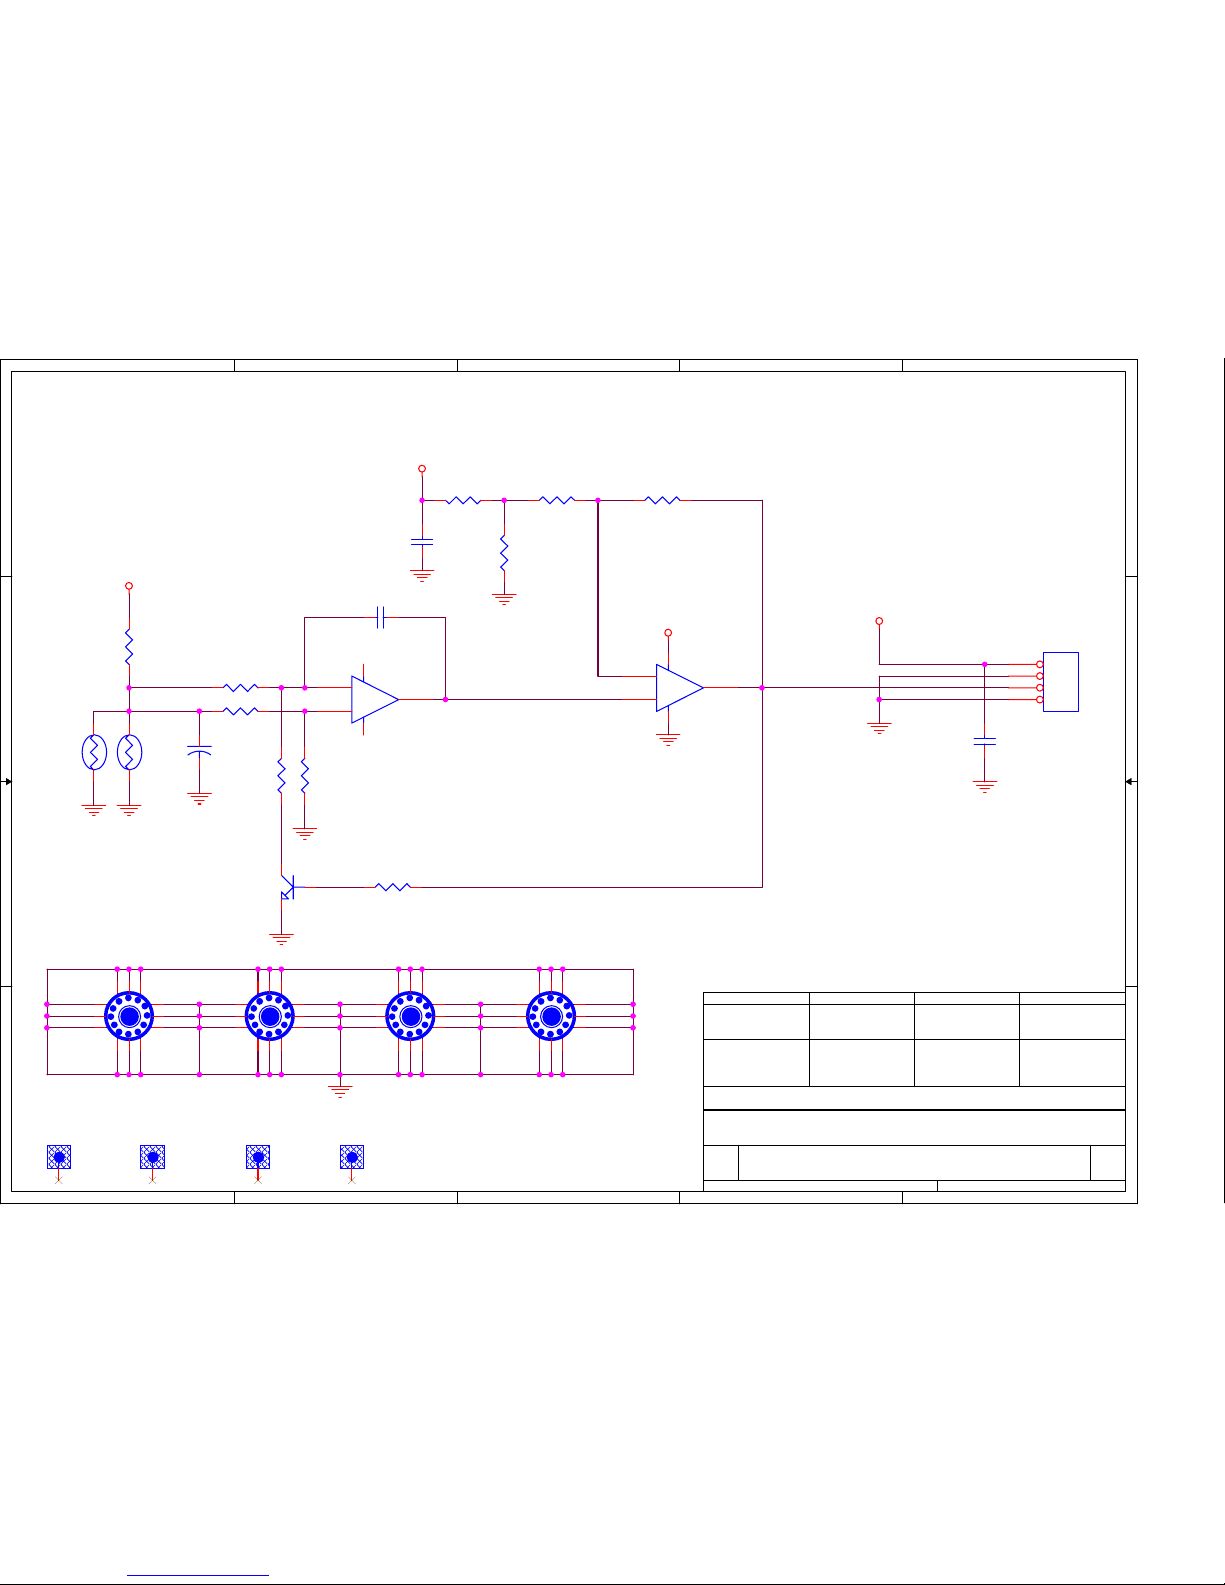
5
5
4
4
3
3
2
2
1
1
D D
C C
B B
A A
DESIGNED CHEAKEDDRAWN APPROVED
ALPHA.HSU ALPHA.HSU ALPHA.HSU ALPHA.HSU
10/05/00'
PCB;630015130005
PCBA;640015130008
15EX-TA;SENSOR_BOARD
01
!!!!""""####$$$$%%%%&&&&''''(((())))****
A
11
Title
Size Document Number Rev
Date: Sheet of
AUTO_BRI_CTRL
GND
+5V
GND
GND
+5V
GND
+5V
GND
GND
+5V
GND
GND
GND
GND
GND
R12
LS1001/NC
FD4
FIDUCIAL-MARK
1
FD3
FIDUCIAL-MARK
1
FD2
FIDUCIAL-MARK
1
FD1
FIDUCIAL-MARK
1
Q1
MMBT3904L
C2
0.1uF
C1 0.047uF
C4
0.1uF
MTG3
ID3.2/OD8.0
4
5
6
7
9
10
123
8
11
12
MTG2
ID3.2/OD8.0
4
5
6
7
9
10
123
8
11
12
MTG4
ID3.2/OD8.0
4
5
6
7
9
10
123
8
11
12
R5
3K
JP1
HEADER_4
1
2
3
4
R9
50K
R7 51K
R10
51K
R6 100K
R11
10K
C3
10u/16V
+
-
U1B
LM358
SO8
5
6
7
8 4
R2 51K
R4
10K
R1 10K R3 100K
+
-
U1A
LM358
SO8
3
2
1
84
MTG1
ID3.2/OD8.0
4
5
6
7
9
10
123
8
11
12
R8
9001
Page 72

LCD MONITOR 15EX
LCD MONITOR 15EX--
TA MAINTENANCE
TA MAINTENANCE
61
REFERENCE MATERIAL
“ 15EX-TA ENGINEERING SPECIFICATION ” Jeff.Lee / Mitac
“ gmZAN1 DATA SHEET ” Genesis Microchip Co.
“ THE HM15EX-TA PRODUCT SPEC “ Jeff.Lee / Mitac
Page 73

Sponsoring Editor : Shoestring Tsai
Author : Richard.Wang
Assistant Editor : Kelly Chia ng
Publisher : MITAC INTERNATIONAL CORP.
Address : 4F, NO.18, PU-DING ROAD, HSINCHU, TAIWAN, R.O.C.
TEL : 886-3- 5645850 Fax : 886-3- 5781245
First Edition : Jun. 2001
E-mail : Jesse.Jan @ mic.com.tw
SERVICE MANUAL & TROUBLESHOOTING GUIDE FOR
15EX-TA
SERVICE MANUAL & TROUBLESHOOTING GUIDE FOR
SERVICE MANUAL & TROUBLESHOOTING GUIDE FOR
15EX-TA
 Loading...