

Page 1
R
EcoLAN 1000E
INSTRUCTION HANDBOOK
Network Connectivity
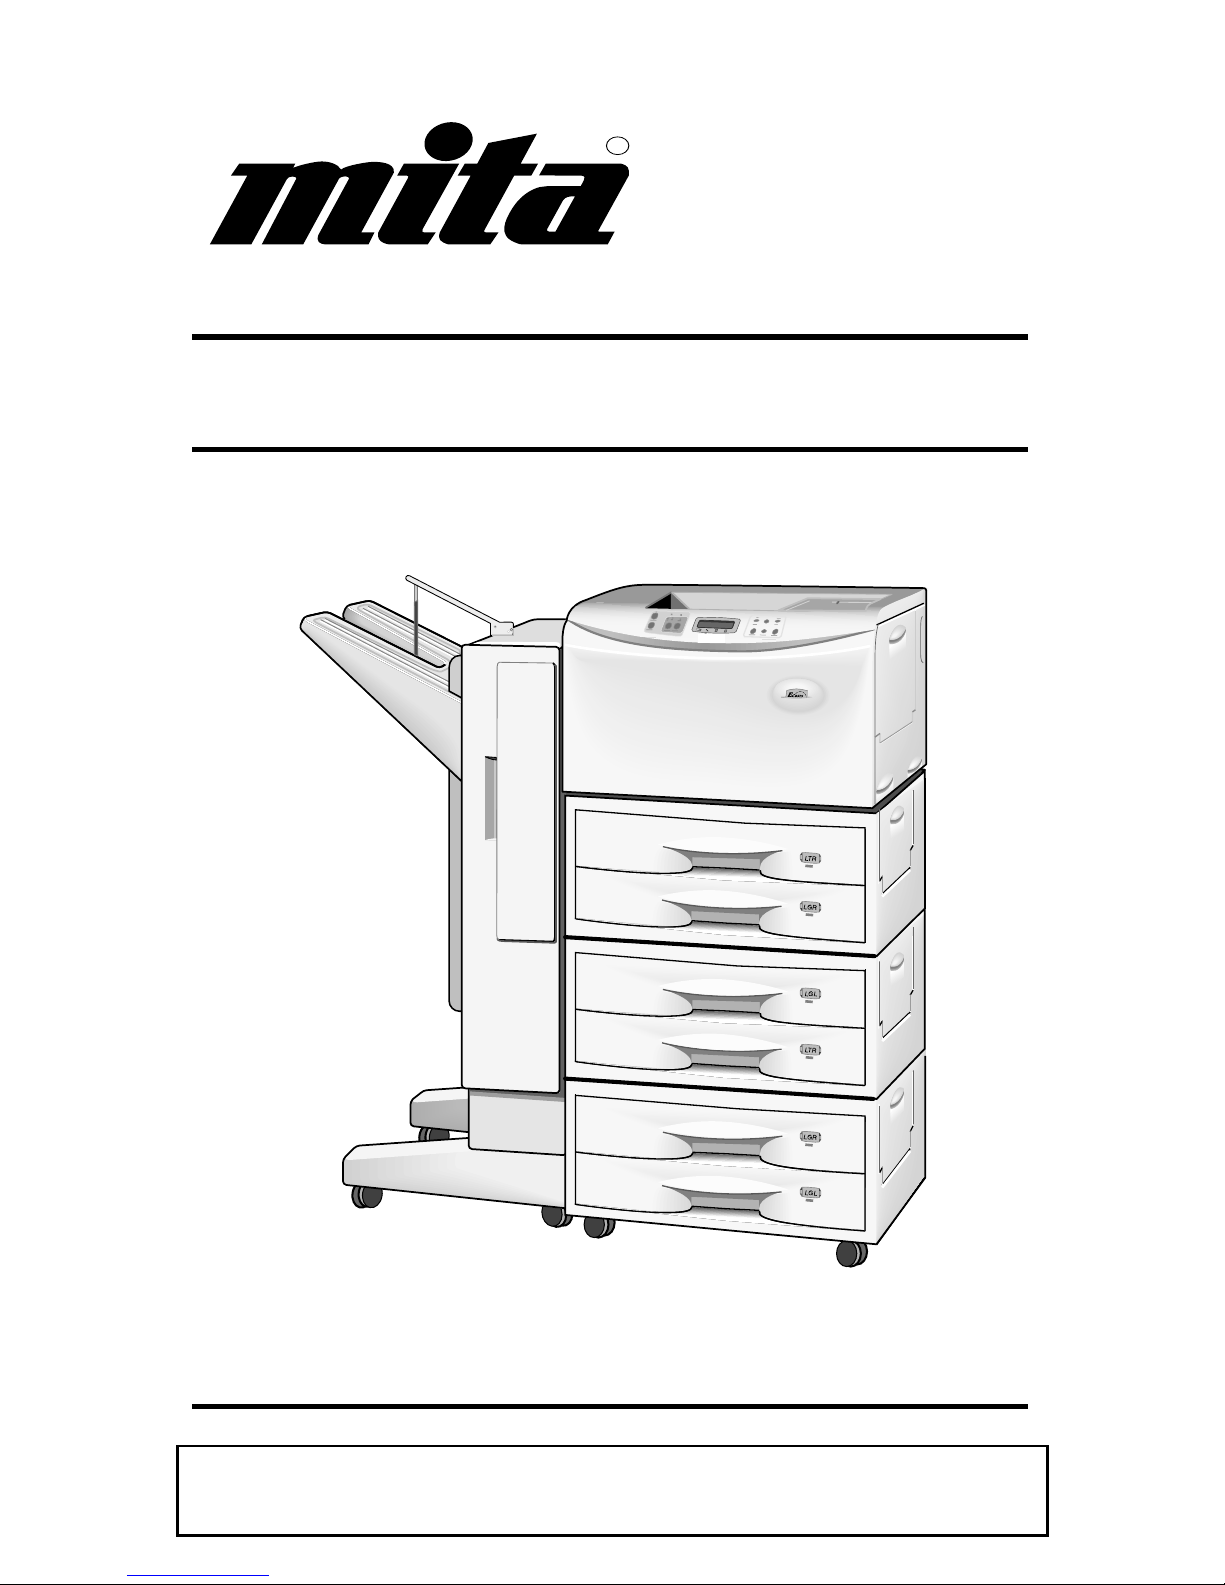
for the DP-2800 Printer
Always read this Quick Configuration Guide thourghly before use. After reading,
maintain it in good condition and keep it together with the Quick Configuration
Guide for your Laser Printer.
Page 2
Preface
Thank You
Thank you for choosing the award winning Mita network printing products. We are
sure you will appreciate the high performance and low cost of ownership that are the
hallmarks of Mita products.
Always read the Instruction Handbook thourghly before use.
After reading, maintain it in good condition and keep it together with the Instruction Handbook for your Laser Printer.
Refer to the Instruction Handbook for your Laser Printer for information on the service representative for this product.
To ensure safe and correct usage, be sure to read the cautions on safety described in the Instruction Handbook of the
Laser Printer before using the machine.
Please contact your service representative to order a replacement if the safety warnings in the handbook are illegable or if
the handbook itself is missing. (fee required).
Trademarks
Kyocera® is a registered trademark of Kyocera Corporation.
Novell® and NetWare® are registered trademarks of Novell, Incorporated.
Microsoft® and Windows® are registered trademarks of Microsoft Corporation.
Macintosh® and AppleTalk® are registered trademarks of Apple Computer, Inc.
PostScript® and Acrobat® are regist ered trademarks of Adobe Syst ems, Incorporated.
Ethernet® is a registered trademark of Xerox Corporation.
HP UNIX® is a trademark of Hewlett Packard Corporation.
SCO UNIX® is a trademark of The Santa Cruz Operation, Inc.
SUN® and Solaris® are trademarks of SUN Microsystems, Inc.
ULTRIX® is a trademark of Digital Equipment Corporation.
All other products referenced are trademarks or registered trademarks of their
respective companies.
FCC Notice:
This equipment complies with Part 15 of FCC Rules. Operation is subject to the
following two conditions: (1) this device may not cause harmful interference, and (2)
this device must accept any interference received, including interference that may
cause undesired operation.
-1
Page 3

Chapter 1 Introduction
1.1 What’s in Your Package ................................................................Introduction 1-2
1.2 Hardware/NOSRequirements ........................................................Introduction 1-3
Chapter 2 Hardware Installation
2.1 EcoLAN 1000E Hardware Installation ..........................Hardware Installation 2-1
2.2 Connect the network cabling and turn on the printer. ....Hardware Installation 2-5
2.2.1 Install the 1000E into the printer's I/O slot. ........... Hardware Installation 2-5
Contents
Chapter 3 Using the Management Access Program or a
Standard Web Browser
3.1 Where to Place the MAP Utility ............................................ Using MAP 3-1
3.2 How to Install MAP in Windows........................................... Using MAP 3-1
3.3 Using the MAP Program........................................................ Using MAP 3-2
3.3.1 Extensive On-Line Help................................................. Using MAP 3-2
3.4 Web IP Browser...................................................................... Using MAP 3-3
3.4.1 Extensive On-Line Help Using MAP 3-3
Table of Contents iii
Page 4

Chapter 4 NetWare Configuration
4.1 Configuring NetWare 2.15 and 3.1x .......................... NetWare Configuration 4-1
4.1.1 Start PCONSOLE and Select File Server........... NetWare Configuration 4-2
4.1.2 Create Print Queues............................................. NetWare Configuration 4-2
4.1.3 Enter the Print Server Name................................ NetWare Configuration 4-3
4.1.4 Configure the Print Server................................... NetWare Configuration 4-4
4.1.5 Assign Print Queues to the Printer...................... NetWare Configuration 4-5
4.1.6 Set Up Notify Options for the Printer (Optional) NetWare Configuration 4-6
4.1.7 Installing the EcoLAN 1000E on Multiple File
Servers................................................................. NetWare Configuration 4-7
4.1.8 Primary File Server ............................................. NetWare Configuration 4-8
4.1.9 Preferred File Servers.......................................... NetWare Configuration 4-8
4.2 Configuring NetWare 4.x — Bindery Emulation ........ NetWare Configuration 4-9
4.2.1 Confirm Bindery Context.................................... NetWare Configuration 4-9
4.2.2 Configure in Bindery Mode with PCONSOLE . NetWare Configuration 4-10
4.3 Configuring the EcoLAN 1000E in NetWare
Directory Services ..................................................... NetWare Configuration 4-12
4.3.1 Create Printer Object......................................... NetWare Configuration 4-13
4.3.2 Create Print Server Object................................. NetWare Configuration 4-14
4.3.3 Create Print Queue Object................................. NetWare Configuration 4-15
4.3.4 Assign Printer Object ........................................ NetWare Configuration 4-16
4.3.5 Assign Print Server Object................................ NetWare Configuration 4-18
4.3.6 Check Assignments........................................... NetWare Configuration 4-19
4.3.7 Set Up and Reset the Printer ............................. NetWare Configuration 4-20
4.4 EcoLAN 1000E Configuration .................................. NetWare Configuration 4-21
4.5 Using the Novell PCONSOLE Utility ...................... NetWare Configuration 4-22
4.6.1 Changing the File Server................................... NetWare Configuration 4-23
4.6.2 Changing Print Queues...................................... NetWare Configuration 4-23
4.6.3 How to Set Up Notify........................................ NetWare Configuration 4-24
Chapter 5 Windows Peer-to-Peer Printing
5.1 Introduction and Preparation ...........................Windows Peer-to-Peer Printing 5-1
5.2 Installation and Operation ...............................Windows Peer-to-Peer Printing 5-2
Table of Contents iv
Page 5

Chapter 6 EcoLAN 1000E and the Macintosh Computer
6.1 Using theDP-2800 Macintosh Installer .......................... Macintosh Computer 6-1
6.2 Setting the Printer’s Default Emulation ..........................M acintosh Computer 6-2
6.3 Renaming the Printer .......................................................Macintosh Computer 6-3
6.4 Chooser Setup and Selecting Installed Options...............Macintosh Computer 6-4
6.5 Using the DP-2800 Driver ...............................................Macintosh Computer 6-6
6.6 Using the DP-2800 Utility ...............................................Macintosh Computer 6-9
6.6.1 General Printer Options......................................... Macintosh Computer 6-10
6.7 Using the KyoManage Utility .......................................Macintosh Computer 6-13
Chapter 7 TCP/IP Configuration
7.1 Installation in a Windows Environment .........................TCP/IP Configuration 7-1
7.1.1 Windows for Workgroups....................................... TCP/IP Configuration 7-2
7.1.1.1 Installing TCP/IP........................................... TCP/IP Configuration 7-2
7.1.1.2 Loading the lpr Spooler................................. TCP/IP Configuration 7-2
7.1.1.3 Setting up the EcoLAN 1000E...................... TCP/IP Configuration 7-2
7.1.1.4 Assigning IP Address with ARP ................... TCP/IP Configuration 7-3
7.1.1.5 Assigning IP Address with BOOTP Lite....... TCP/IP Configuration 7-4
7.1.1.6 Setting up IP Parameters ............................... TCP/IP Configuration 7-5
7.1.1.7 Loading the lpr Spooler................................. TCP/IP Configuration 7-5
7.1.1.8 Creating an lpr Queue on the Workstation.... TCP/IP Configuration 7-5
7.1.2 Microsoft Windows 95 TCP/IP Configuration 7-6
7.1.2.1 Setting up the EcoLAN 1000E with
Windows 95................................................... TCP/IP Configuration 7-6
7.1.2.2 Assigning IP Address with ARP................... TCP/IP Configuration 7-6
7.1.2.3 Assigning IP Address with ntBOOTP .......... TCP/IP Configuration 7-7
7.1.2.4 Setting up IP and lpr Parameters .................. TCP/IP Configuration 7-8
7.1.2.5 Setting up lpr on the Workstation.................. TCP/IP Configuration 7-8
7.1.3 Windows NT Instructions....................................... TCP/IP Configuration 7-9
7.1.3.1 Setting Up the EcoLAN 1000E..................... TCP/IP Configuration 7-9
7.1.3.2 Assigning IP Address with ARP ................... TCP/IP Configuration 7-9
7.1.3.3 Assigning IP Address with ntBOOTP......... TCP/IP Configuration 7-10
7.1.3.4 Setting up IP and lpr Parameters................. TCP/IP Configuration 7-11
Table of Contents v
Page 6

Chapter 7 TCP/IP Configuration (continued)
7.1.3.5 Setting up lpr on the Workstation................ TCP/IP Configuration 7-12
7.2 FTP Printing......................................................... TCP/IP Configuration 7-12
7.2.1 FTP Printing Using Netscape...................... TCP/IP Configuration 7-13
7.2.2 ASCII to PostScript (A2PS) Method........... TCP/IP Configuration 7-13
7.2.3 Drag and Drop Method................................ TCP/IP Configuration 7-14
7.2.4 FTP Client ........................................ ........... TCP/IP Configuration 7-14
7. 3 UNIX Printing ..............................................................TCP/IP Configuration 7-15
7.3.1 Configuring the IP Address on the EcoLAN 1000E TCP/IP Configuration 7-16
7.3.1.1 Using BOOTP ........................................... .. TCP/IP Configuration 7-17
7.3.1.2 Using rarp.................................................... TCP/IP Configuration 7-19
7.3.1.3 Using ping ................................................... TCP/IP Configuration 7-20
7.3.2 lpd Printing........................................................... TCP/IP Configuration 7-21
7.3.2.1 Setting Up a BSD Remote Printer to Use lpd TCP/IP Configuration 7-21
7.2.2.2 Setting Up an AIX Version 2.5 Remote
Printer to Use lpd......................................... TCP/IP Configuration 7-22
7. 3.2.3 Setting Up an AIX 4.0 System.................... TCP/IP Configuration 7-23
7.3.2.4 Setting Up an HP/UX Remote Printer to
Use lpd ........................................................ TCP/IP Configuration 7-23
7.3.2.5 Setting Up an AS/400 Systems to Use lpd.. TCP/IP Configuration 7-24
7.3.2.6 Setting Up a DEC ULTRIX 4.3 RISC or
OSF1/ALPHA Remote Printer.................... TCP/IP Configuration 7-24
7.3.2.7 Setting Up a SCO UNIX Remote Print er to
Use lpd......................................................... TCP/IP Configuration 7-25
7.3.2.8 Setting Up System V Release 4 and Solaris
2.X to Use lpd.............................................. TCP/IP Configuration 7-26
7.3.3 Installing TCP/IP for EcoLAN 1000E If Not
Running lpd......................................................... TCP/IP Configuration 7-28
7.3.3.1 Loading the Software .................................. TCP/IP Configuration 7-28
7.3.3.2 Script Selection of Filters............................ TCP/IP Configuration 7-29
7.3.3.3 Manual Selection of Filters ......................... TCP/IP Configuration 7-30
7.3.3.4 Installing and Printing on Ver. 1 Solaris and
OSF1 Systems ............................................. TCP/IP Configuration 7-30
Table of Contents vi
Page 7

Chapter 7 TCP/IP Configuration (continued)
7.3.3.5 Installing & Printing on an DEC ULTRIX
4.3 System................................................... TCP/IP Configuration 7-31
7.3.3.6 Installing and Printing on the HP/UX
System ......................................................... TCP/IP Configuration 7-32
7.3.3.7 Installing and Printing on a System V .....................................................
(Solaris Ver. 2)/System V Rel. 4
386-based Machine...................................... TCP/IP Configuration 7-34
7.3.3.8 Installing & Printing on a SCO UNIX System TCP/IP Configuration 7-36
7.3.3.9 Installing and Printing on an AIX RISC
System/6000 ............................................... TCP/IP Configuration 7-37
7.4 Running Telnet ............................................................TCP/IP Configuration 7-40
7.4.1 Making Connection and Main Menu ................... TCP/IP Configuration 7-40
7.4.2 Configure IP Parameters....................................... TCP/IP Configuration 7-41
7.4.3 Select Printer Languages...................................... TCP/IP Configuration 7-42
7.4.4 Enable/Disable Network Protocols ...................... TCP/IP Configuration 7-43
7.4.5 Restore Factory Defaults...................................... TCP/IP Configuration 7-43
7.4.6 Change Password ................................................. TCP/IP Configuration 7-43
7.5.7 Exit Telnet............................................................ TCP/IP Configuration 7-44
Chapter 8 Operation and Troubleshooting
8.1 LED Status Indicator .......................................Operation and Troubleshooting 8-1
8.2 Status Report ...................................................Operation and Troubleshooting 8-2
8.3 Resetting the Print Server to Factory Default .Operation and Troubleshooting 8-4
8.4 How to Diagnose Problems .............................Operation and Troubleshooting 8-5
8.5 Troubleshooting Checklists .............................Operation and Troubleshooting 8-6
8.5.1 Troubleshooting Network Hardware
Connections............................................. Operation and Troubleshooting 8-6
8.5.2 Troubleshooting NetWare Protocol......... Operation and Troubleshooting 8-6
8.5.2.1 NetWare Checklist........................... Operation and Troubleshooting 8-6
8.5.2.2 File Server Checklist....................... Operation and Troubleshooting 8-7
8.5.2.3 Workstation Checklist..................... Operation and Troubleshooting 8-7
Table of Contents vii
Page 8

Chapter 8 Operation and Troubleshooting (continued)
8.5.2.4 EcoLAN 1000E Configuration Checklist
..........................................................Operation and Troubleshooting 8-7
8.5.2.5 Printer Server/File Server/Printer Checklist
..........................................................Operation and Troubleshooting 8-8
8.5.2.6 Workstation to EcoLAN 1000E Connection
Checklist.......................................... Operation and Troubleshooting 8-8
8.5.2.7 EcoLAN 1000E Loses Its File Server
Connection....................................... Operation and Troubleshooting 8-9
8.5.2.8 Unable to Print from a Different Context
..........................................................Operation and Troubleshooting 8-9
8.5.3 Troubleshooting AppleTalk Protocol...... Operation and Troubleshooting 8-9
Appendix A Jumper Settings
A.2 Ethernet Jumpers ....................................................................Jumper Settings A-3
A.3 Reset to Factory Default (JP12) .............................................Jumper Settings A-5
A.4 Non-Persistant IP (JP8) .......................................................... Jumper Settings A-5
Appendix B Specifications
B.1 EcoLAN 1000E ..........................................................................Specifications B-1
B.2 10BaseT/UTP Cables .................................................................Specifications B-2
Appendix C NIC MIB Definition
Index
Table of Contents viii
Page 9

1
Introduction
The EcoLAN 1000E is a Netw ork I nterf ac e Contr oller that you i nstal l int o compa tible
printers to provide Ethernet network connectivity. The EcoLAN 1000E has the
following features:
• Automatic selection of 10Base2 (Thinnet) or 10BaseT Ethernet connection (for
Ethernet cards with both type of connections).
• Fully transparent AppleTalk printing support for the Macintosh, including support
for binary PostScript printing.
• Peer-to-Peer (serverless) discovery and printing from Windows 95 or Windows NT
(4.0 or higher) workstations, without a Novell file server present and without using
IP.
• Novell NetWare PSERVER on both bindery based and Novell Directory Services
(NDS).
• lpr/lpd over TCP/IP for UNIX platforms and Microsoft Windows.
• Raw sockets support over selectable TCP/IP port with filters for selected UNIX
environments.
• IP and IPX SNMP support of MIB-2 and DPI proprietary NIC MIB.
• SNMP support of standard MIB and the Mita private MIB.
• Flash memory to allow field upgrades, with caqpability for either IPX/SPX or
TCP/IP (FTP) download of executable code.
• Integral HTTP Server to allow monitoring and management of your EcoLAN
1000E from a standard IP Web Browser program.
• Management Access Prog ram (MAP) to al lo w Windows-based HTML view ing for
monitoring and management of your EcoLAN 1000E.
• FTP printing to allow users to print directly from their IP browser or other FTP
client.
• FTP download al lo w users in the TCP/I P en vironmen t the abili ty of flash upgrad ing
their EcoLAN 1000E.
• Supports RS232/422 serial connections.
Introduction 1-1
Page 10

1.1 What’s in Your Package
The EcoLAN 1000E contains the following:
• EcoLAN 1000E Card
• This manual
• Three 3 1/2" diskettes which contain the following:
– Management Access Program (MAP) Diskette
- Windows Setup Utilities Diskette
– TCP/IP Ut ility Diske tte
The MAP diskette also contains the ASN.1 coded SNMP MIB for the Network
Interface Card (NIC). This MIB can be loaded into a standard SNMP console to
provide SNMP access to all NIC parameters. The MIB is included in this manual as
Appendix C, NIC MIB Definition.
The Windows Setup utilities diskette contains the IPX Peer-to-Peer redirector and
DOS formatted versions of the BOOTP Lite and ntBOOTP Lite programs for
Windows (to assist entering IP parameters in a Windows environment).
The diskettes may c ontai n a README file containing t he lat est i nformat ion abou t the
installation and operation. Check for these files before going any further with
installation.
Instructions and software t o pe rf orm f l ash downloads are provide d wi th any update or
upgrade package and are not included in this manual.
Introduction 1-2
Page 11

1.2 Hardware/NOSRequirements
The EcoLAN 1000E hardware and software require the following:
Novell NetWare Version 2.15, 3.1x, or 4.x.
Macintosh System 7 and 8.
Version of Protocol or
NOS
Software
UNIX, Windows, or LAN Server systems supporting lpr
over TCP/IP.
DEC ULTRIX 4.3 or 4.4, DEC OSF/1 2.0 or 3.0, Solaris
1.1.3 or 2.3, (SUN OS 4.1.3 or 5.3),
System V Release 4, HP-UX 9.01, IBM AIX 3.2.5, or SCO
UNIX 2 for DPI TCP/IP port 10001.
Novell NetWare printing requires NetWare Capture,
NPRINT and PCONSOLE (later than 1.0) utilities.
The MAP utility requires Windows 3.1; Windows for
Workgroups 3.11; Windows NT 3.5 or later; or Windows 95.
AppleTalk printing requires printer PPD appropriate to the
printer.
TCP/IP setup and maintenance may be done with Telnet.
Monitoring and maintenance with HTTP requires a suitable
internet Web Browser program supporting HTML.
Support for 10 megabit Ethernet networks: either 10Base2
(also known as ThinWire or Thinnet) or 10BaseT (twisted
pair) cables and hardware.
Hardware
3 1/2" diskette drive on the workstation to accept Windows
or UNIX utilities.
Introduction 1-3
Page 12
Hard ware Installatio n
2.1 EcoLAN 1000E Hardware Installation
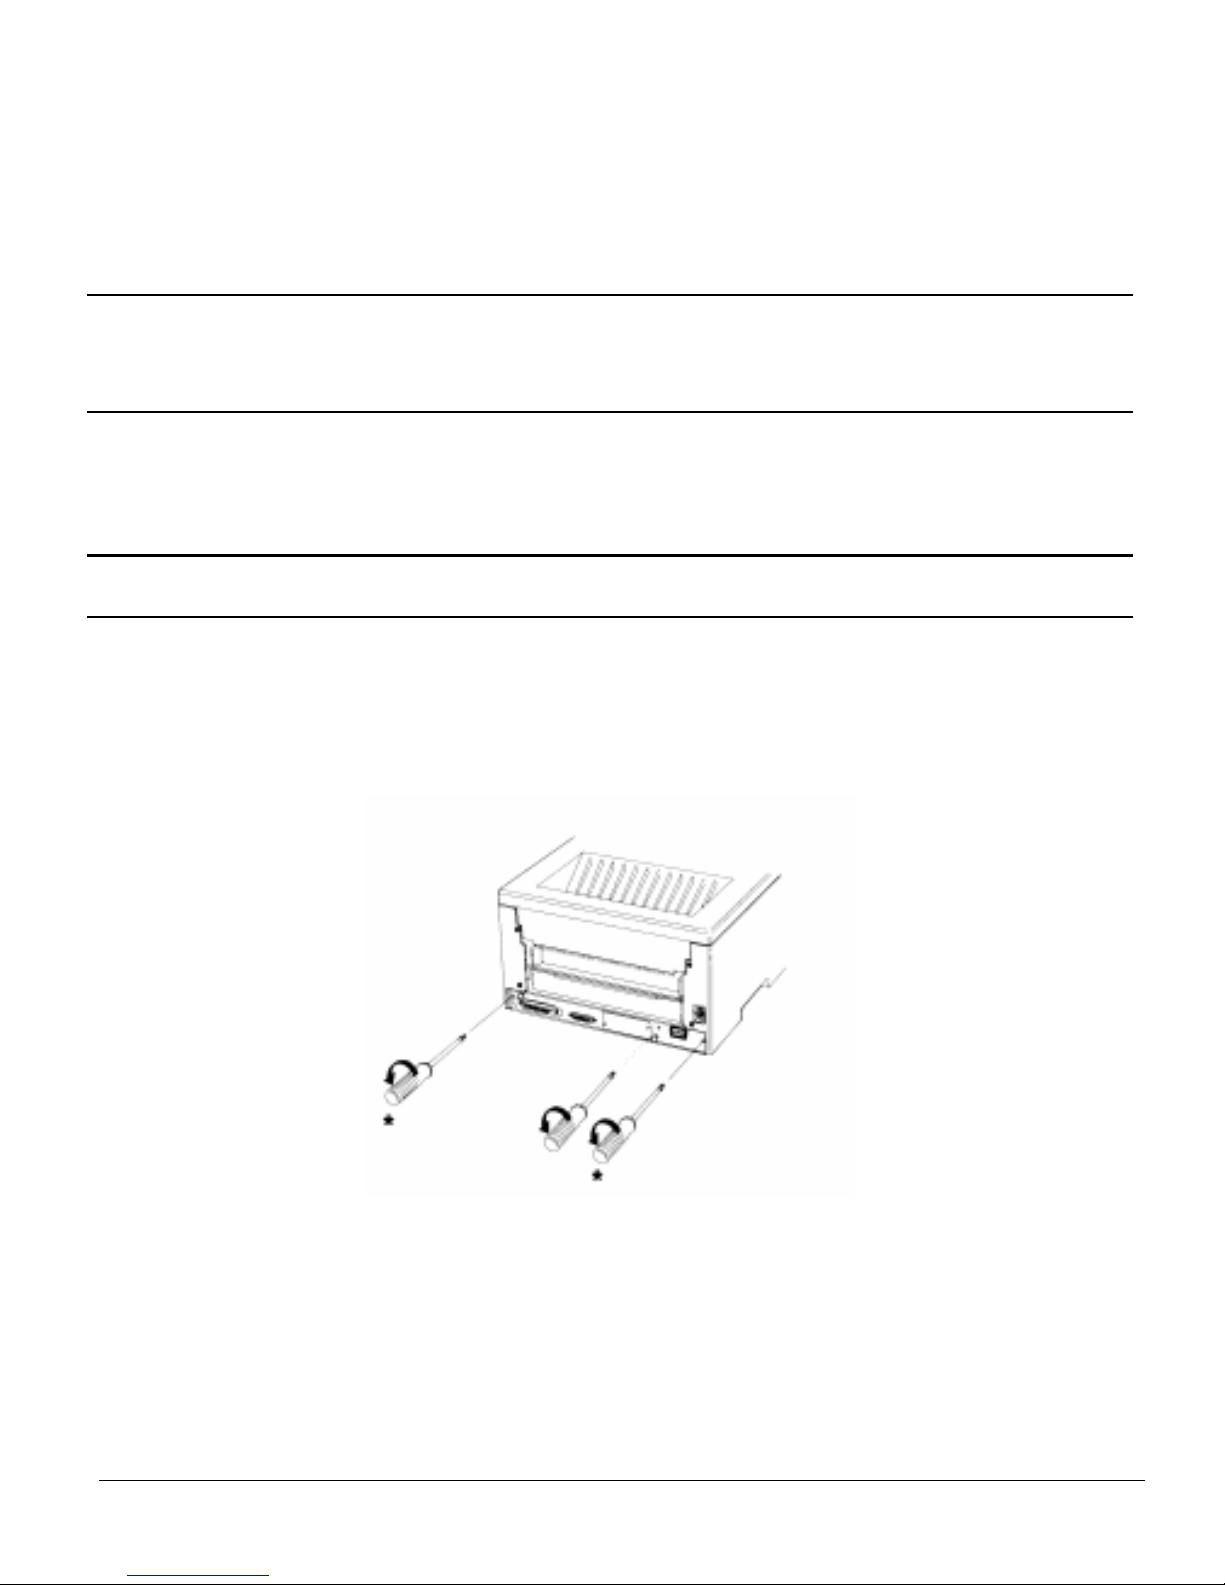
Install the 1000E into the printer's I/O slot. Follow the illustrations to install the 1000E
into the printer.
Note: Instructions for installation on the DP-2800 are on the following pages.
A. DP-2800 - Unscrew three screws from the back panel (*some units have two
screws, see asterisk in illu stration below) and slide out the main board.
2
Hardware Installation 2-1
Page 13
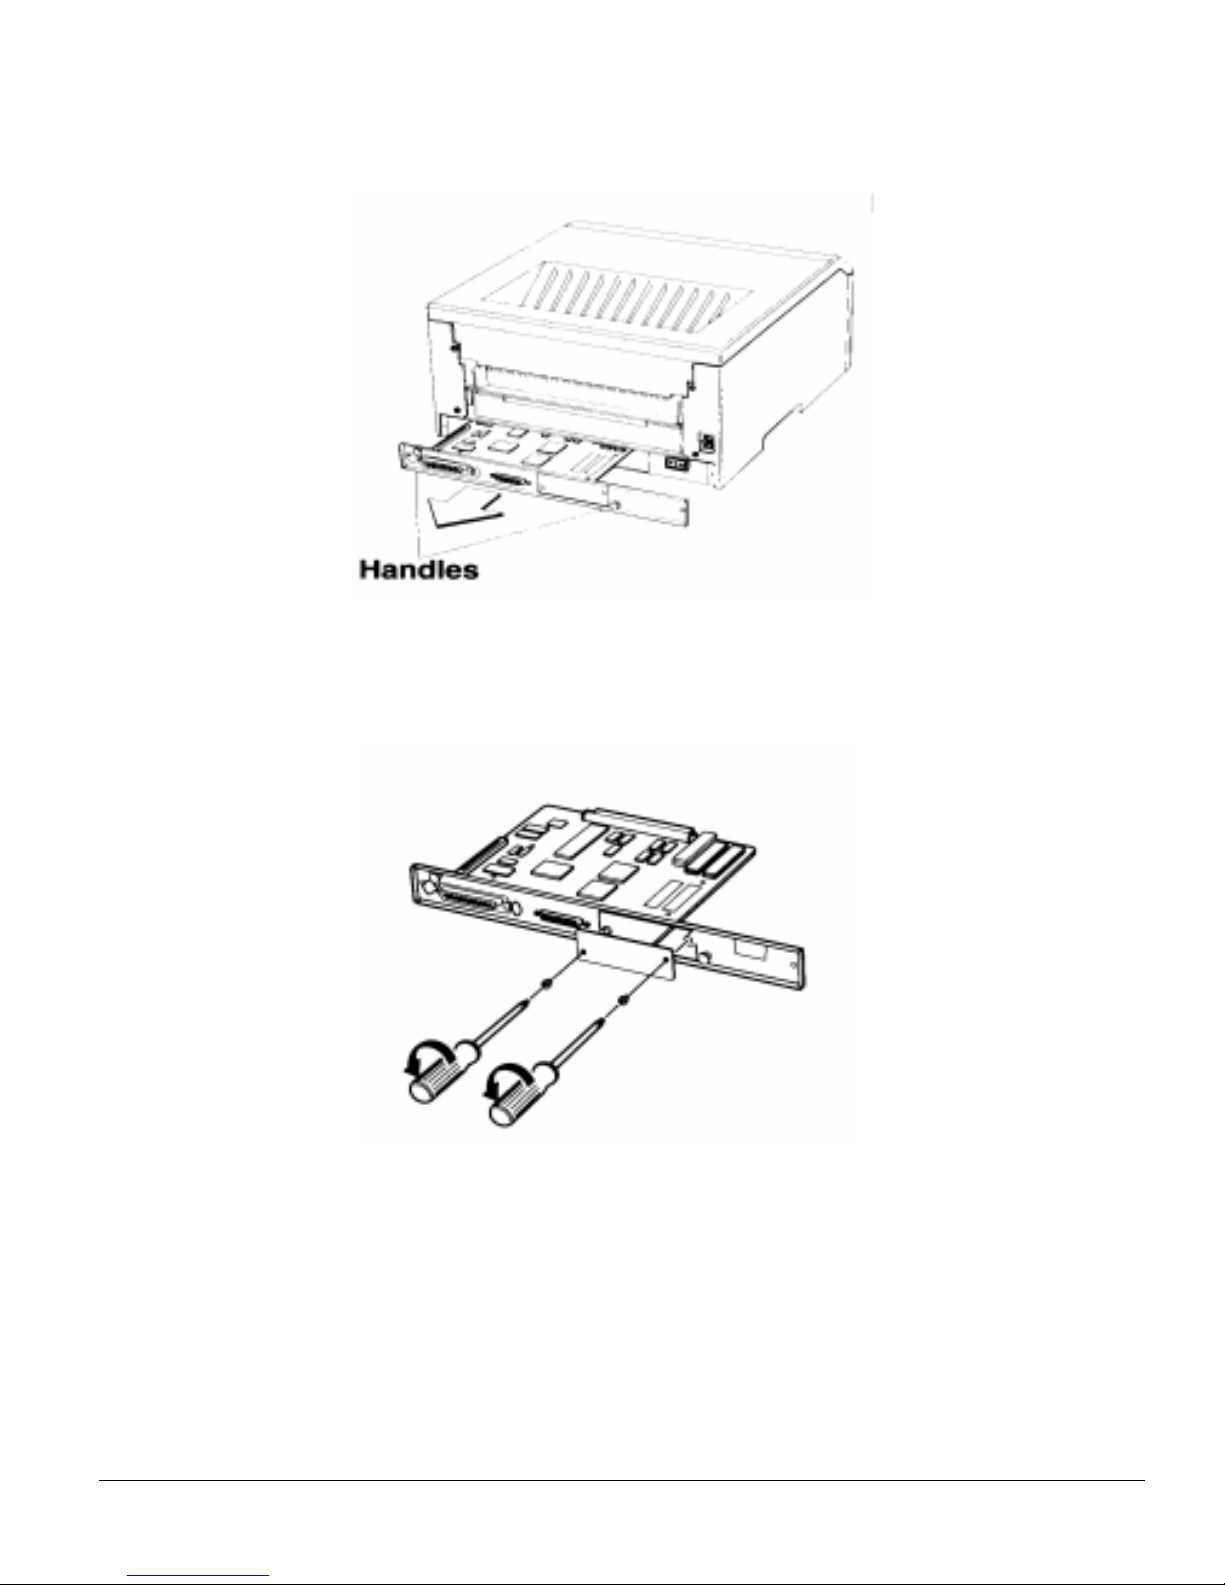
B. Remove the optional interface slot cover by removing its two screws.
Hardware Installation 2-2
Page 14
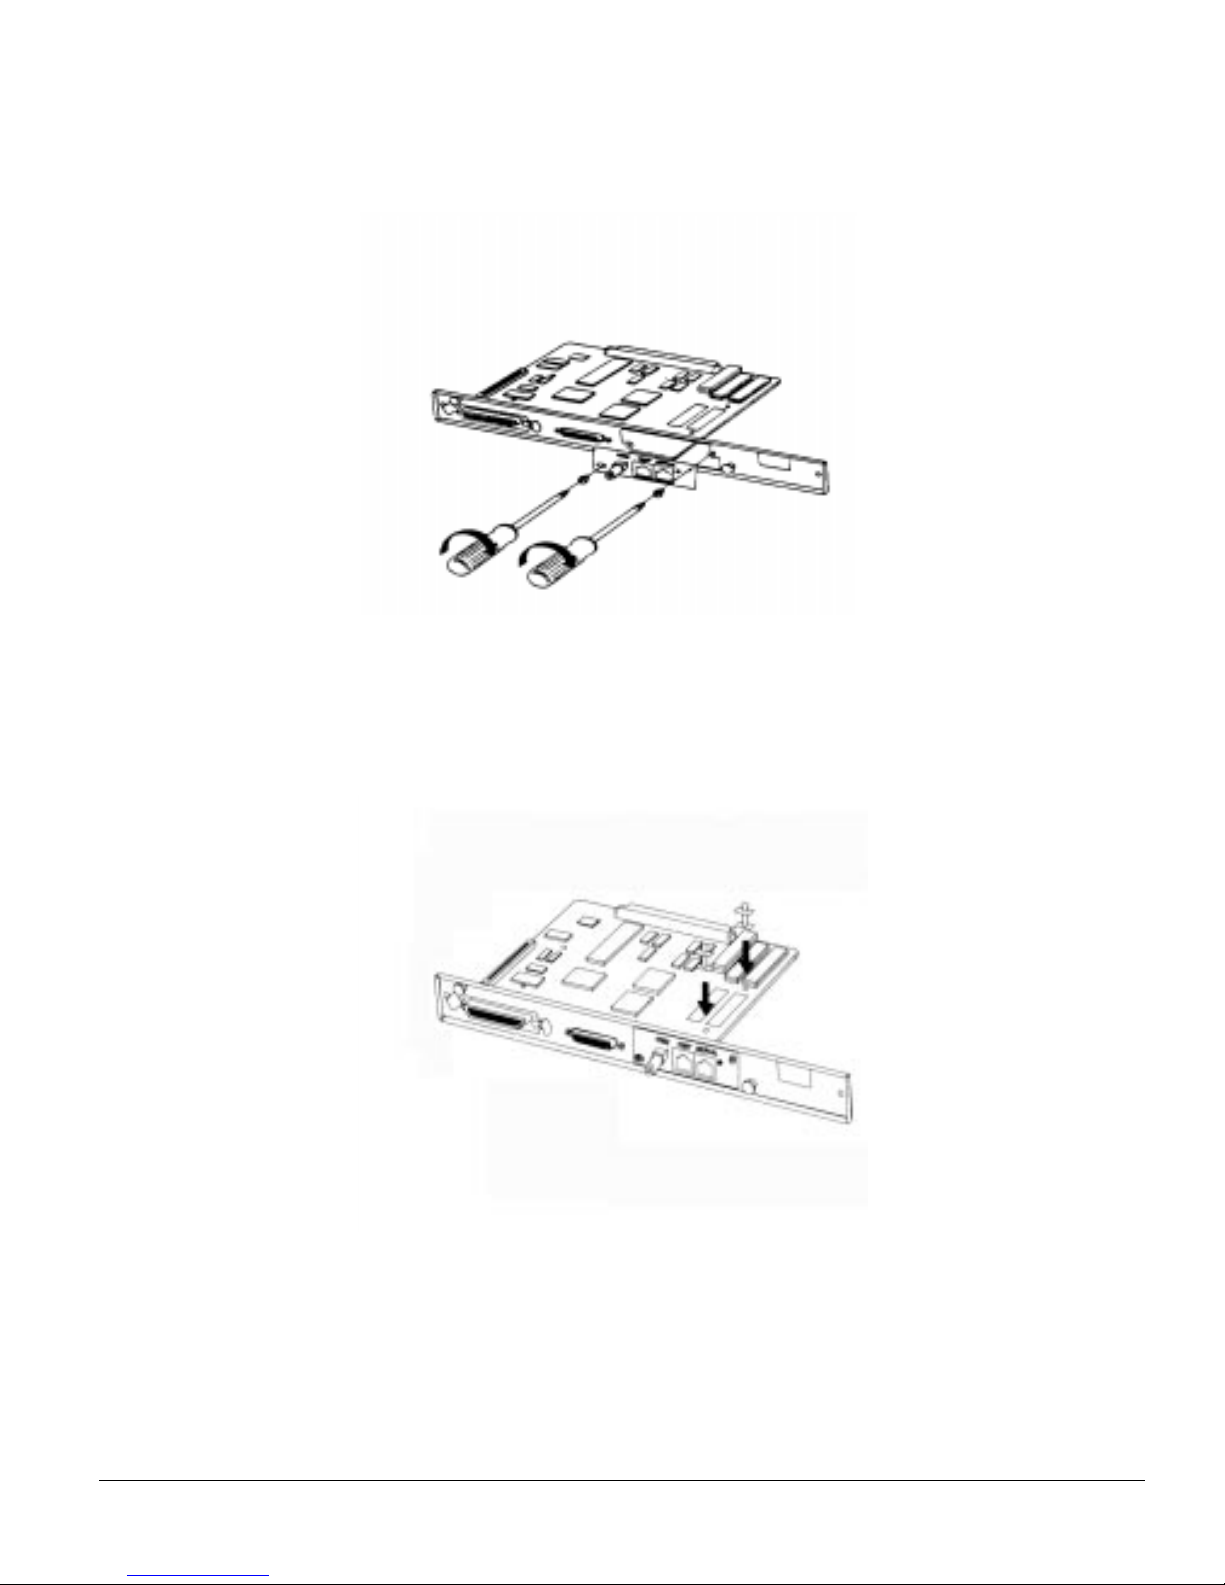
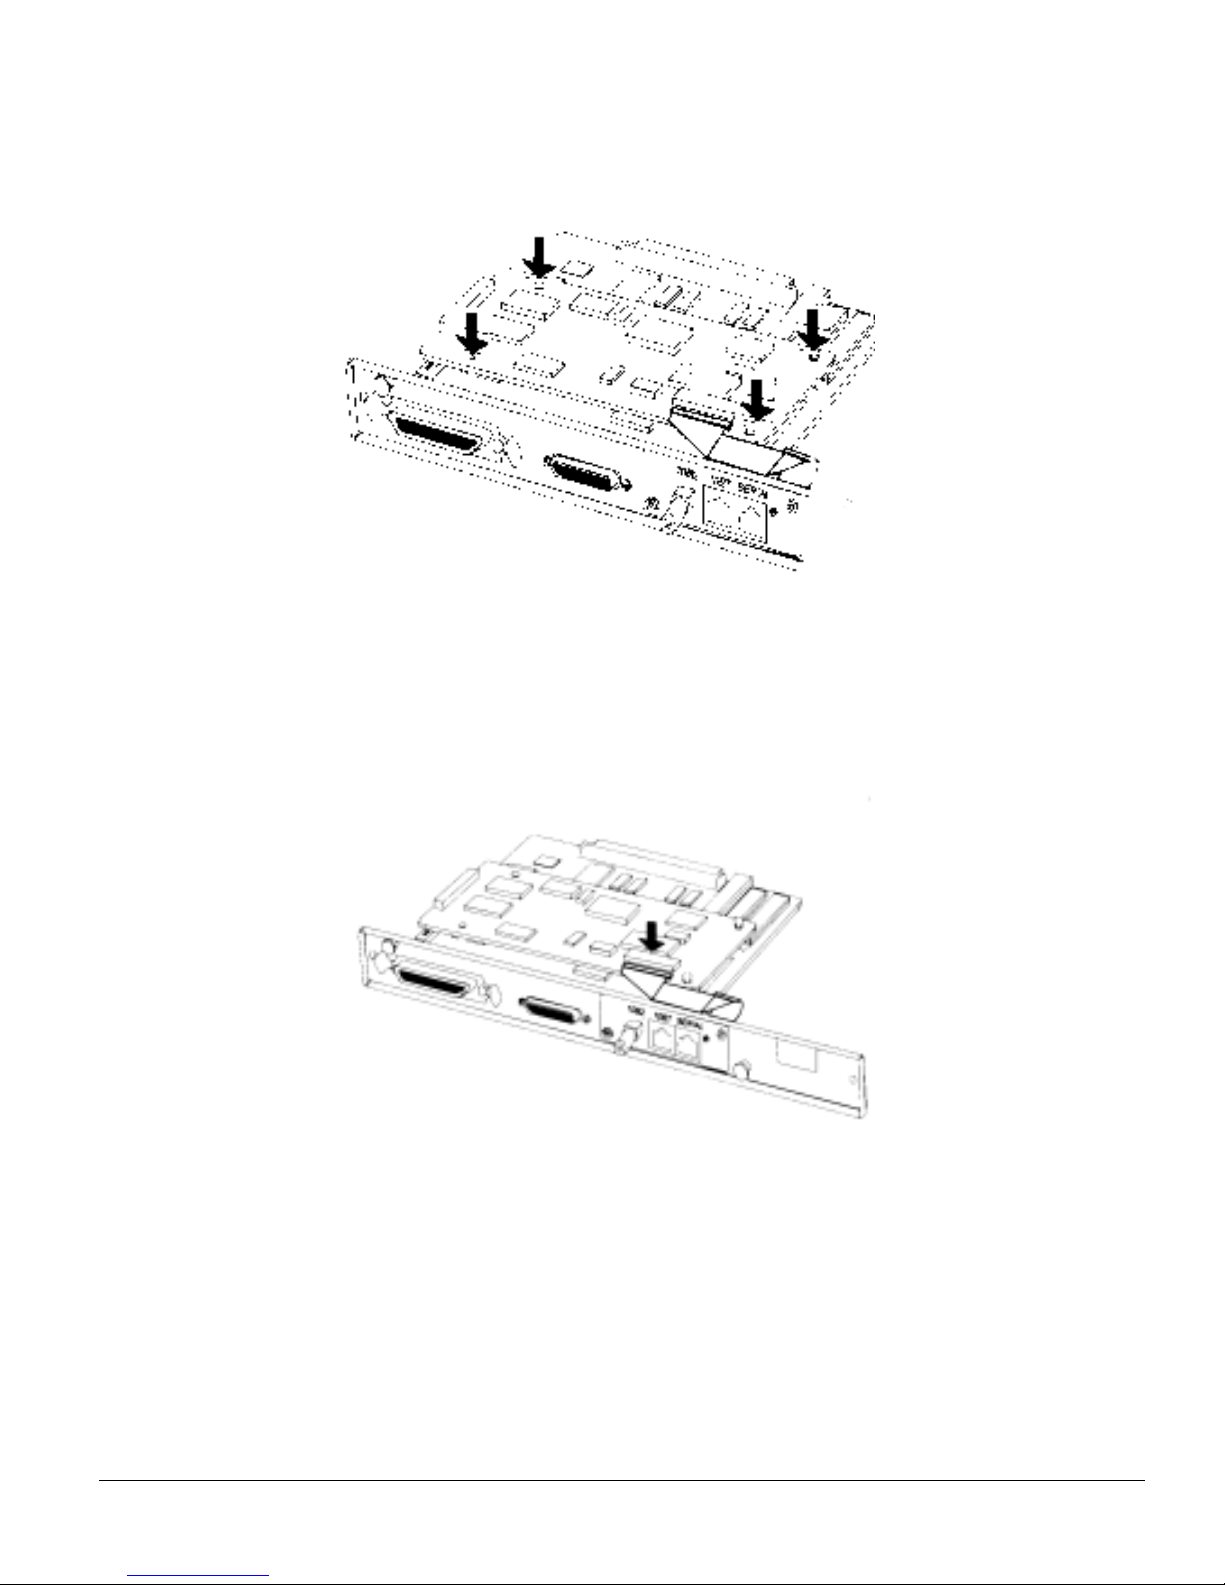
C. Attach the connector bracket to the rear panel.
D. Press TWO spacers into the holes on the main board.
Hardware Installation 2-3
Page 15
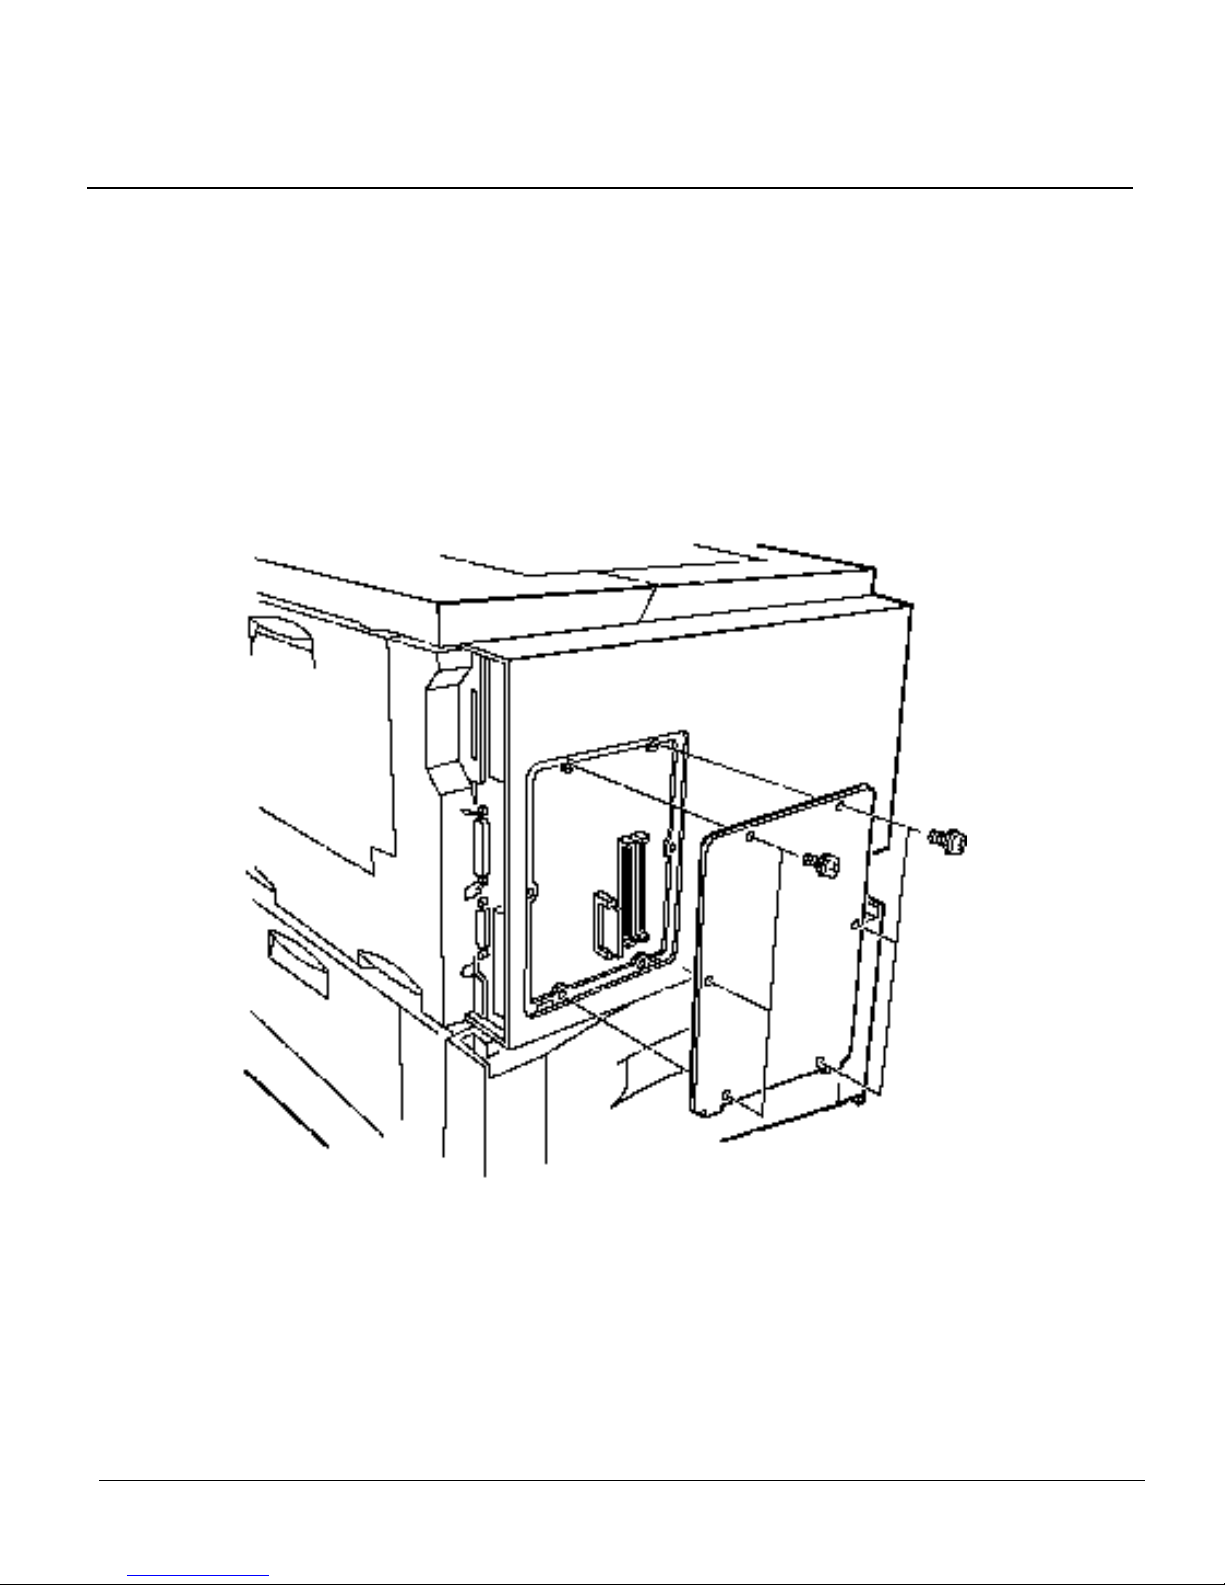
E. Mount the 1000E interface board on the main board.
F. Connect the connector cable to the socket on the 1000E as shown below.
G. Perform Step A in reverse. Slide the main board into the printer, push it in firmly
to ensure the board is properly seated, and fasten it to the printer with the screws
removed in Step A.
Hardware Installation 2-4
Page 16
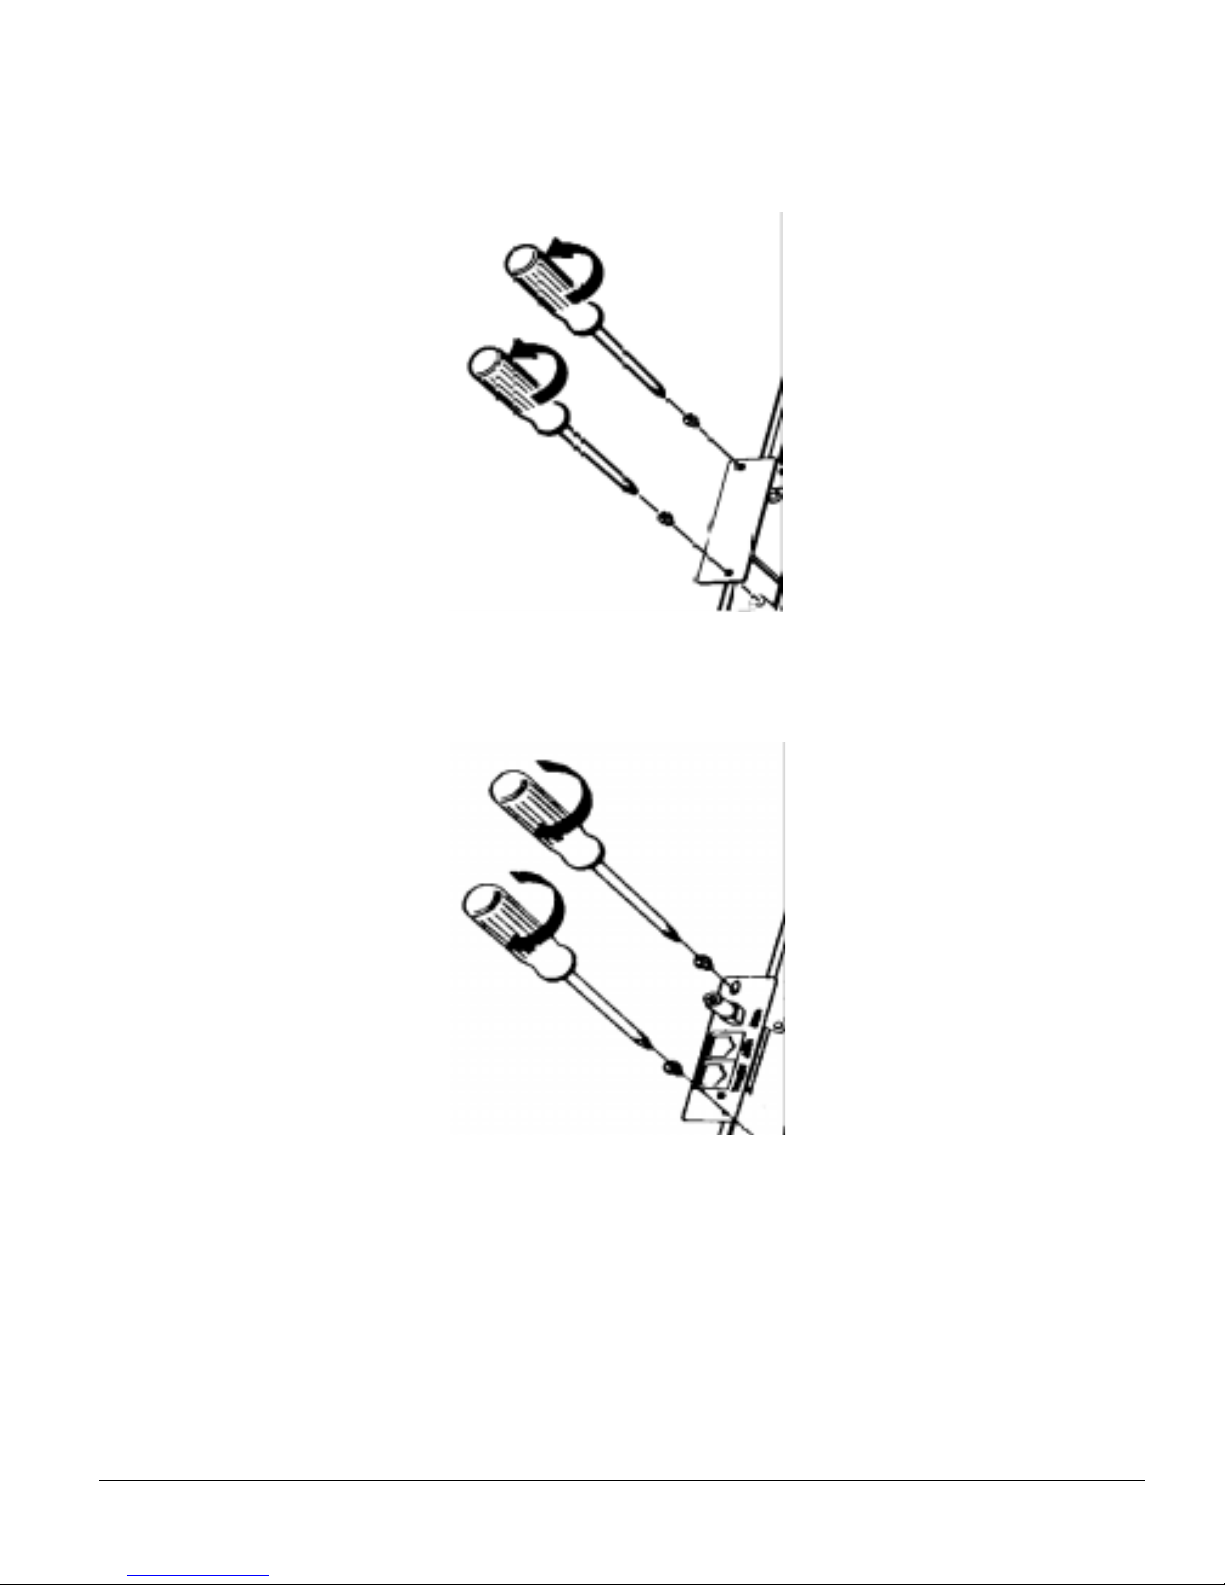
2.2 Connect the network cabling and turn on the printer.
Connect the proper cable to the interface. Turn the printer on. Follow the appropriate
setup instructions for the your specific operating system later in this guide.
2.2.1 Install the 1000E into the printer's I/O slot.
Follow the illustrations to install the 1000E into the DP-2800.
A. Unscrew the six screws from the back panel to access the main board.
Hardware Installation 2-5
Page 17
B. Remove the optional interface slot cover by removing its two screws.
C. Attach the connector bracket to the rear panel.
Hardware Installation 2-6
Page 18
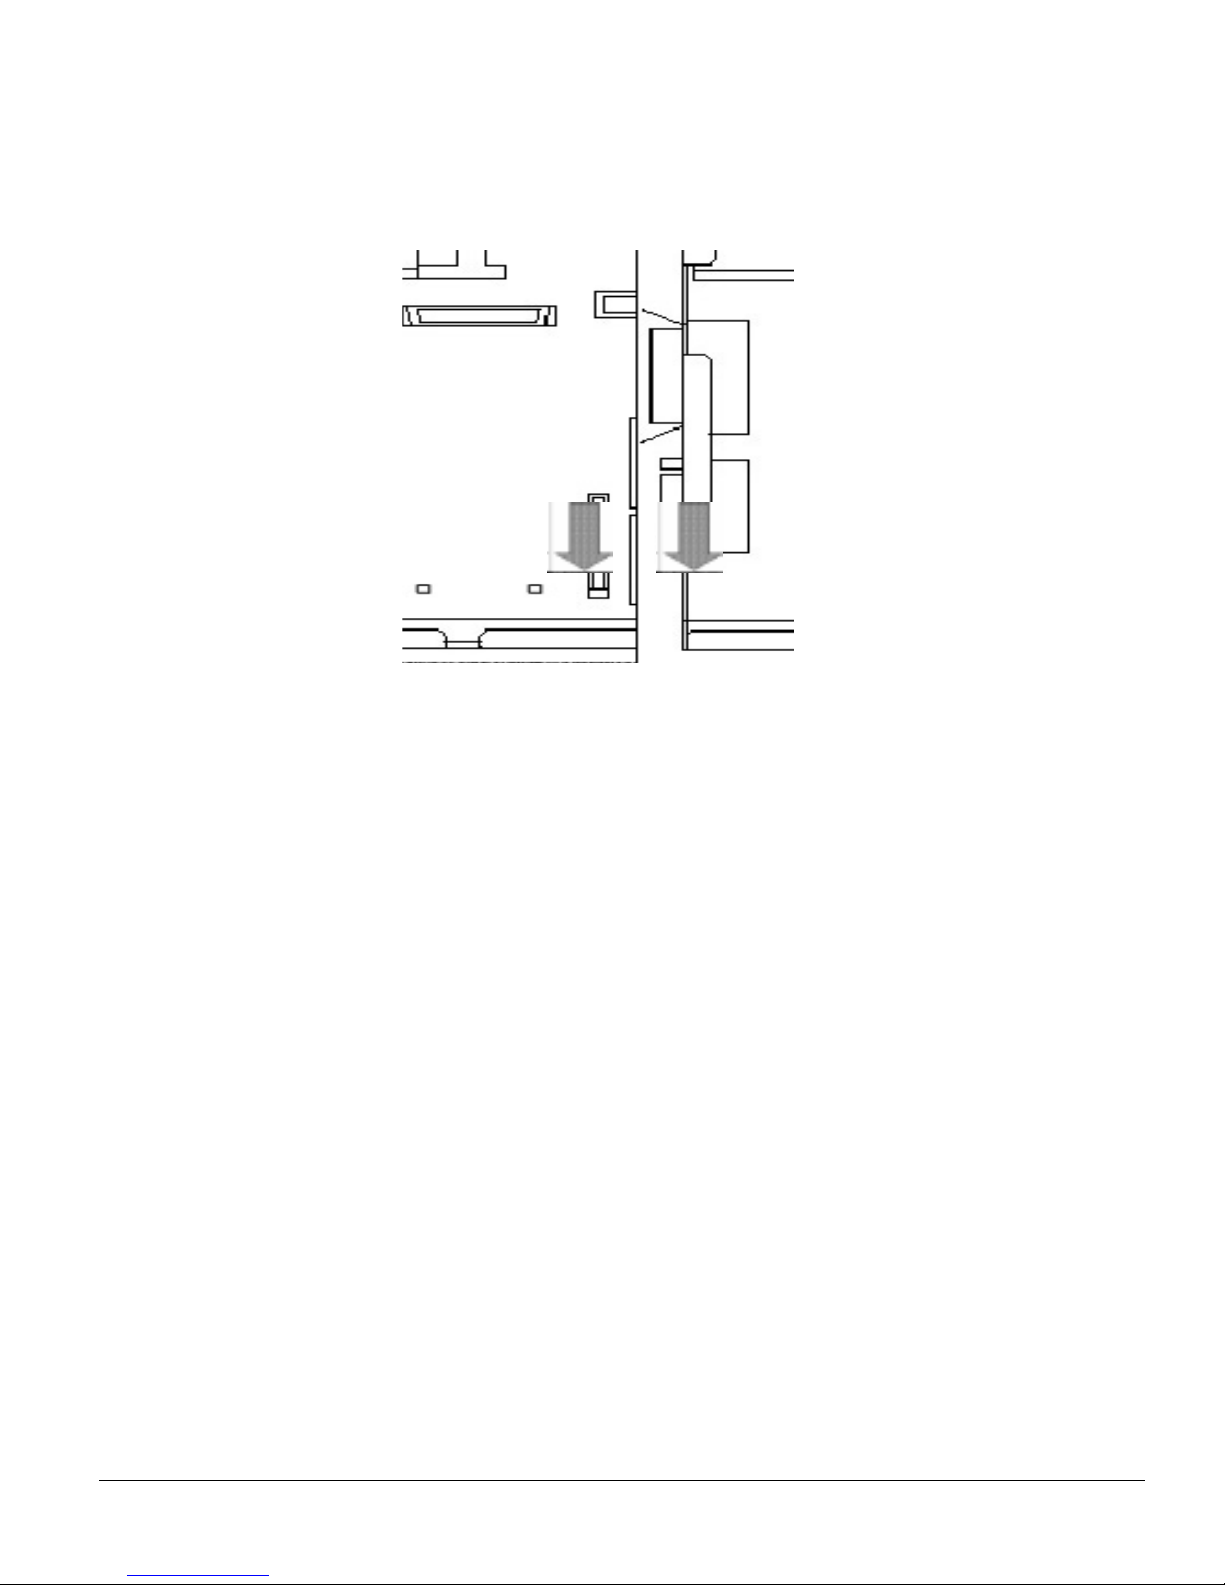
D. Press TWO spacers into the holes on the main board.
Hardware Installation 2-7
Page 19
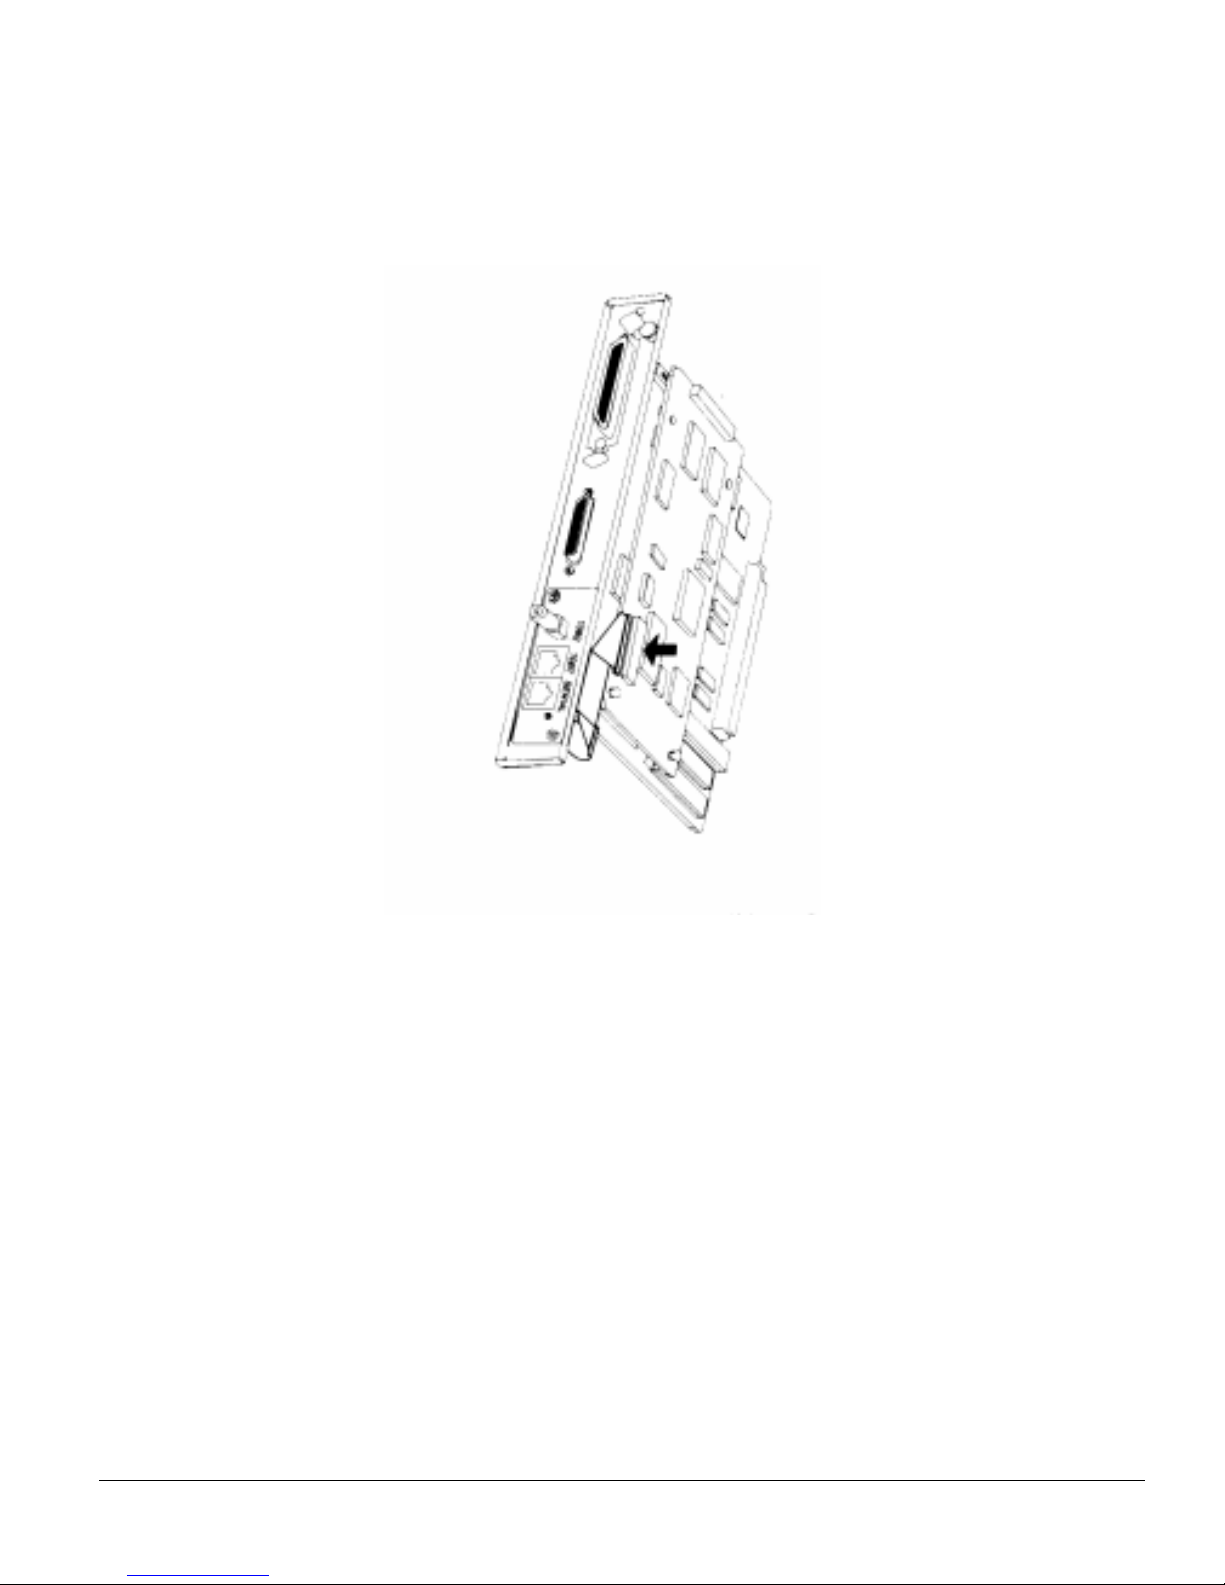
E. Mount the 1000E in terf ace board o n the main board. Then, co nnect t he con nector
cable to the socke t on the 1000E as sho wn bel ow. Ensure that the cable is inser ted
with the colored edge facing down.
F. Perform Step A in reverse. Put the back plate back in place and fasten it to the
printer with the screws removed in Step A..
Hardware Installation 2-8
Page 20

3
Using the Management Access Program or a
Standard Web Bro wser
The Management Access Program (MAP) is a Windows-based HTML viewer
program linked wit h a pr opr ie tary bi-directi ona l IPX c han nel pr ogr am t o a ll ow access
to the EcoLAN 1000E’s HTML-based monitoring and maintenance capabilities. An
IP Web Browser also provides access to this capability. Either program allows you to:
• Configure your network protocols for the EcoLAN 1000E.
• Reset the EcoLAN 1000E remotely to either clear an error condition, or return the
print server to its factory default settings.
• Troubleshoot problems in the EcoLAN 1000E.
• Enable or disable the status sheet printout.
• Access a context-sensitive help menu that fully explains how to use each
Management Access Program feature.
Note: To be able to change parameter values with the Management Access Program or
the Web Browser, you must know the EcoLAN 1000E management password.
The factory default password is “sysadm”.
3.1 Where to Place the MAP Utility
The utility can be installed on any workstation hard drive or network drive.
3.2 How to Install MAP in Windows
The Management Access Program must be installed from Windows, it CANNOT be
installed from DOS. Use the following procedures to install:
1. Start Windows on your PC or workstation.
2. Insert the supplied PC diskette into the A: or B: drive.
3. For Windows 3.x, bring up the Windows Program Manager, select the File menu.
Using the Management Access Program or a Standard Web Browser 3-1
Page 21

4. Select RUN from the menu.
5. For Windows 95 type interfaces, select RUN from the Start menu.
6. At RUN, type A:\SETUP.EXE or B:\SETUP.EXE and click on the OK butto n.
7. Read the information on the MAP setup program screen.
Click Cancel to quit setup and then close any programs you have running.
Click Next to continue with the setup program.
8. Identify a path for the program. The path default is C:\MAP. You can change the
path or use the default. The installation begins.
When the installation is complete, remove the diskette from the disk drive.
3.3 Using the MAP Program
When you click on the Manageme nt Access Program in W indows t o start the prog ram,
the program will prompt you with a list of print servers listed by their SAP
identifi cation. Se lect the print s erve r you wan t to acce ss. The pr ogram will setup a l ink
to the print server and obtain HTML code describing the home page.
To get the EcoLAN 1000E name (if different from the SAP ID), do the following:
1. Select a Print Server from the Server list.
2. Select Show Detail under the Options menu.
To get detailed information for all EcoLAN 1000E’s, do the following:
1. Select Show All under the Options menu.
Because this oper ation req uires th at each Ec oLAN 1000E be acc essed, it may tak e
a long time to complete if there are many EcoLAN 1000E.
3.3.1 Extensive On-Line Help
When using the MAP program, there is an extensive on-line help system which fully
explains al l of t he progr am’ s featur es and me nus. The on -lin e help is conte xt-sens iti ve.
Using the Management Access Program or a Standard Web Browser 3-2
Page 22

3.4 Web IP Browser
Once you have assigned an IP address to your EcoLAN 1000E, you may use an IP
browser, such as Netscape, to access the HTTP Server and the HTML code allowing
EcoLAN 1000E monitoring and maintenance. To access the HTTP Server screens
from your browser, do the following:
1. Open up your browser by clicking on its icon.
2. For the URL, type in the IP address of the EcoLAN 1000E. The HTTP Server
screens should appear. If you have problems, check to mak e sure yo u are using th e
correct IP address.
3.4.1 Extensive On-Line Help
The HTTP Server in cl udes hel p t ext for each s cr een . Jus t cli ck on t he wo rd “Help” on
the HTTP Server screen.
Using the Management Access Program or a Standard Web Browser 3-3
Page 23

Using the Management Access Program or a Standard Web Browser 3-4
Page 24

4
NetWare Configuration
Use this chapter if you will be printing from a Novell NetWare NOS. This chapter is
divided into the following sections:
• Configuring NetWare 2.15 and 3.1x describes how to configure the EcoLAN
1000E for use with Versions 2.15 or 3.1x. Use PCONSOLE to set up the print
server function.
• Configuring NetWare 4.x in Bindery Emulation describes how to configure the
EcoLAN 1000E for use with Version 4.x — Binder y Servic es. Use PCONSOLE to
set up the print server function.
• Configuring NetWare Directory Services describes how to configure the
EcoLAN 1000E for use with Version 4. x Directo ry Services . Use NWADMIN to set
up the print server function.
• EcoLAN 1000E Setup Parameters describes the parameters accessible via MAP
or an IP Browser used to configure the EcoLAN 1000E for NetWare.
• Using NetWare Utilities explains how to use standard Novell NetWare utilities to
make changes to the configuration of the EcoLAN 1000E function.
4.1 Configuring NetWare 2.15 and 3.1x
Before configuring NetWare, you must determine if the EcoLAN 1000E has its
desired name. If you change the name, use MAP or an IP Browser to ch ange th e name.
The following steps are the general procedure for configuring the EcoLAN 1000E.
You must have supervisor privileges to do this configuration. These steps are covered
in detail in the following paragraphs:
1. Start PCONSOLE and select the file server you want to use.
2. Create the print queues.
3. Specify the <EcoLAN 1000E> as a print server.
4. Configure the EcoLAN 1000E and printer.
NetWare Configuration 4-1
Page 25

5. Assign the print queues.
6. Set up the NOTIFY options.
7. Repeat the procedure for other file servers.
When you are finished, turn the printer off and on again. The printer creates a status
report that indicates the fileservers to which the unit is attached and the queues which
it services.
Before you begin:
• Verify that you have supervisor privile ge s on t he file servers on which the EcoLAN
1000E print server is to be entered.
• Verify that your version of PCONSOLE is later than 1.0.
4.1.1 Start PCONSOLE and Select File Server
Follow these steps to start PCONSOLE:
1. Log in to the network, type PCONSOLE and press ENTER .
2. Choose Change Current File Server from the Available Options menu. A list of
file servers is displayed.
3. Select the file server on which you want to install the print server and press
ENTER. If the name of the file server you want is not displayed, press the INS
key to get a list of file servers.
4. Log in to the file server.
5. Press the ESC key to return to the Available Options menu.
4.1.2 Create Print Queues
The print server must be assigned to at least one print queue on the file server.
• If the print que ue that you w ant t he < EcoLAN 100 0E> to ser vice a lr eady e xis ts, and
you know the name of this queue, go to 4.1.3 Enter the Print Server Name .
• If you do not know the name of the queue, or it does not exist, use the following
procedure:
1. Choose Print Queue Information from the Available Options menu, and press
ENTER. A list of existing queues is displayed.
2. To create a new queue, pre ss INS. Ente r the name o f the queu e and pres s ENTER.
You do not need to enter any more information at this time.
3. Press the ESC key to return to the Available Options menu.
NetWare Configuration 4-2
Page 26
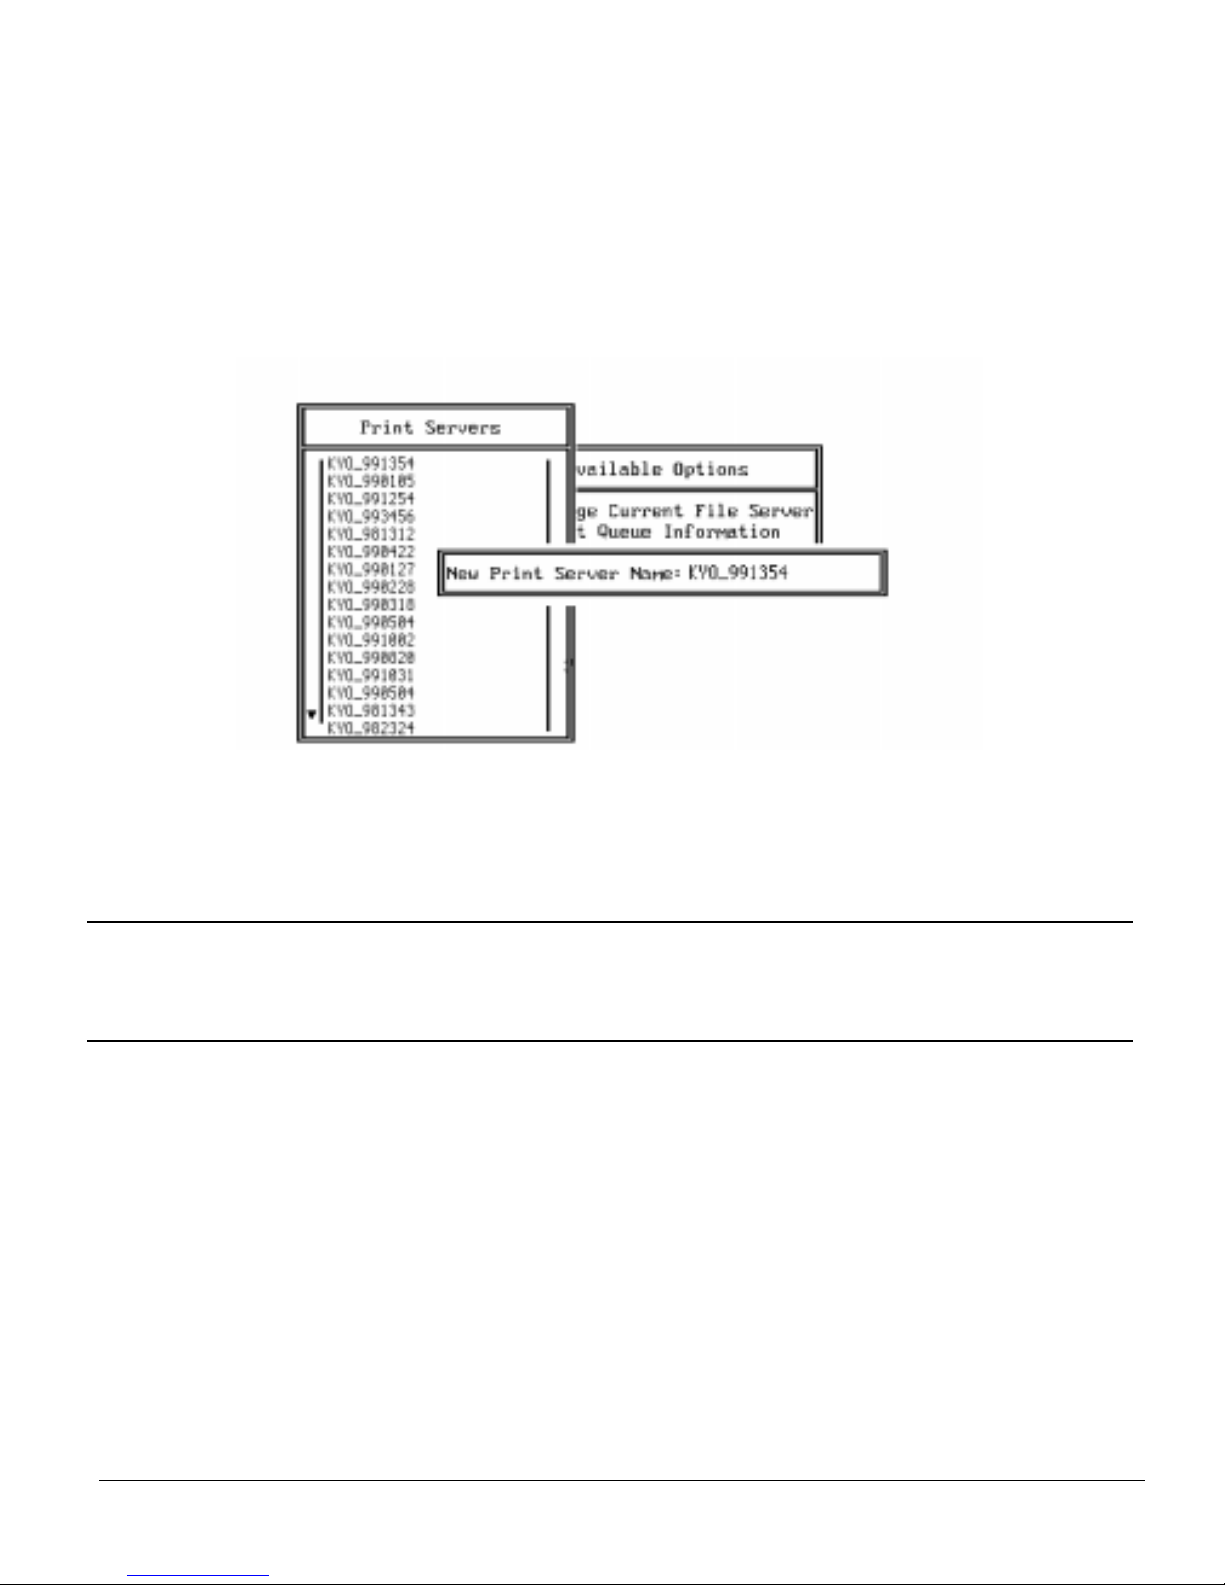
4.1.3 Enter the Print Server Name
A print server takes the print jobs from queu es and sends them to the printer. Use this
procedure to specify the name of the print server:
1. Choose Print Server Information from the Available Options menu, and press
ENTER. A list of existing print servers is displayed.
2. Press the INS
key. The New Print Server Name box is displayed.
Type the name of the print server into the entry box. The Novell print server name
is printed under Novell NetWare information on the status sheet.
Note: If desired, this name can be changed using MAP or Web Browser utilities. The
screen example shows how to enter th e print server name for a print server with a
serial number of KYO_991354.
3. Press ENTER to add the print server name to the Print Servers list.
NetWare Configuration 4-3
Page 27
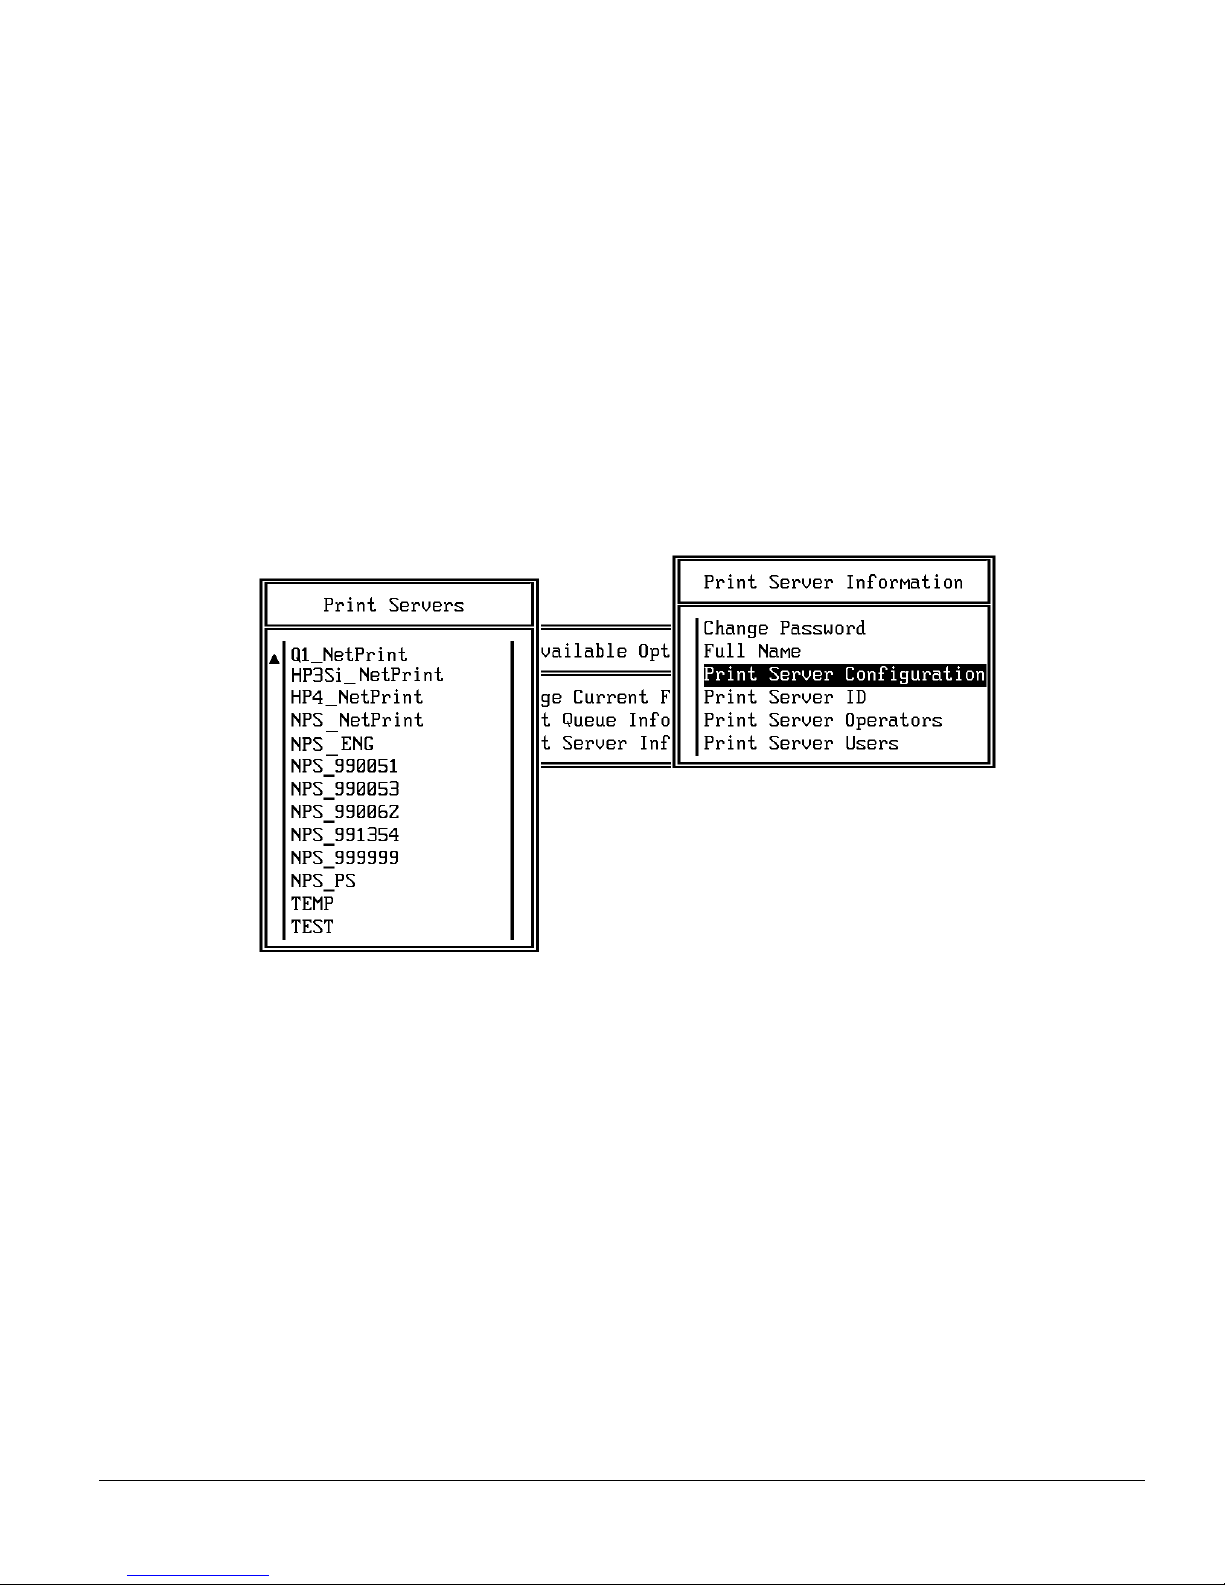
4.1.4 Configure the Print Server
Use the following procedures to configure the Print Server’s function:
1. Choose the print server name from the Print Servers list and press ENTER.
The Print Server Information menu appears.
2. Choose Print Server Configuration from the menu and press ENTER.
3. Choose Printer Configur ation from the menu and press ENTER. The
Configured Printers menu appears. Since this is a new Print Server entry, all
printers are labeled "Not Installed".
4. Choose the printer and press ENTER. The Printer 0 Configur ation screen
appears with a title o f Printer 0, as shown in the fo llowing example.
5. If you choose to, change default in the Name field on this form to something that
helps you identify the printer, for example, LASER_PRINTER. The print server
uses this name in its message back to the users on the Notify list. Select Name,
enter a name, and then press ENTER.
6. Select Type and press ENTER. A list of printer types is displayed. Choose
Remote
Other/Unknown and press ENTER. This creates default entries in the other
fields. These defaults are usually optimal, so do not change them without specific
knowledge of the effects.
7. Press the ESC key. At the prompt, choose to save your changes.
8. Press the ESC key to return to the Print Server Configuration menu.
NetWare Configuration 4-4
Page 28
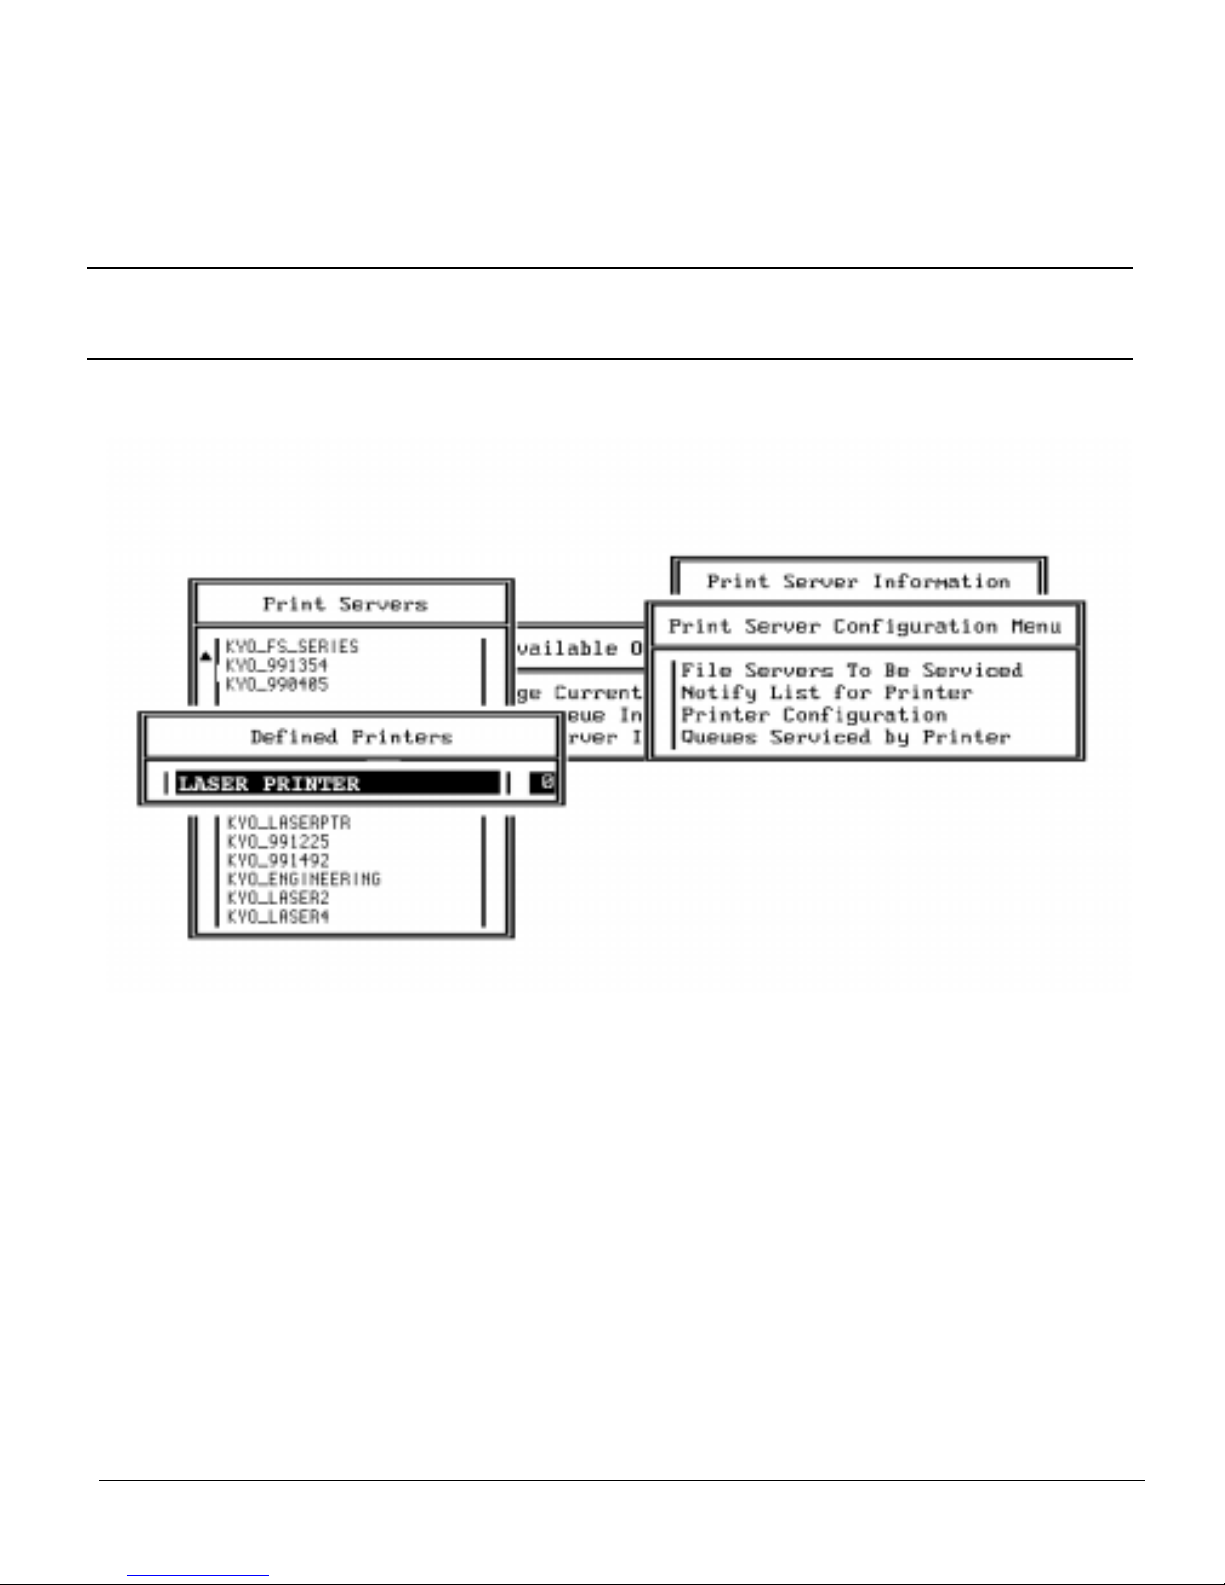
4.1.5 Assign Print Queues to the Printer
When you assign queues to the defined printer, you authorize the print server to
service these queues.
Note: Do not assign t he s ame queue to two different pr int servers. If a queue is assign ed
to multiple print servers , print jobs may not go to the intended printer.
1. Choose Queues Serviced By Printer from the Print Server Configuration menu.
2. Select the printer name from the list of defined printers.
3. Press INS to display the Available Queues list for the printer.
NetWare Configuration 4-5
Page 29
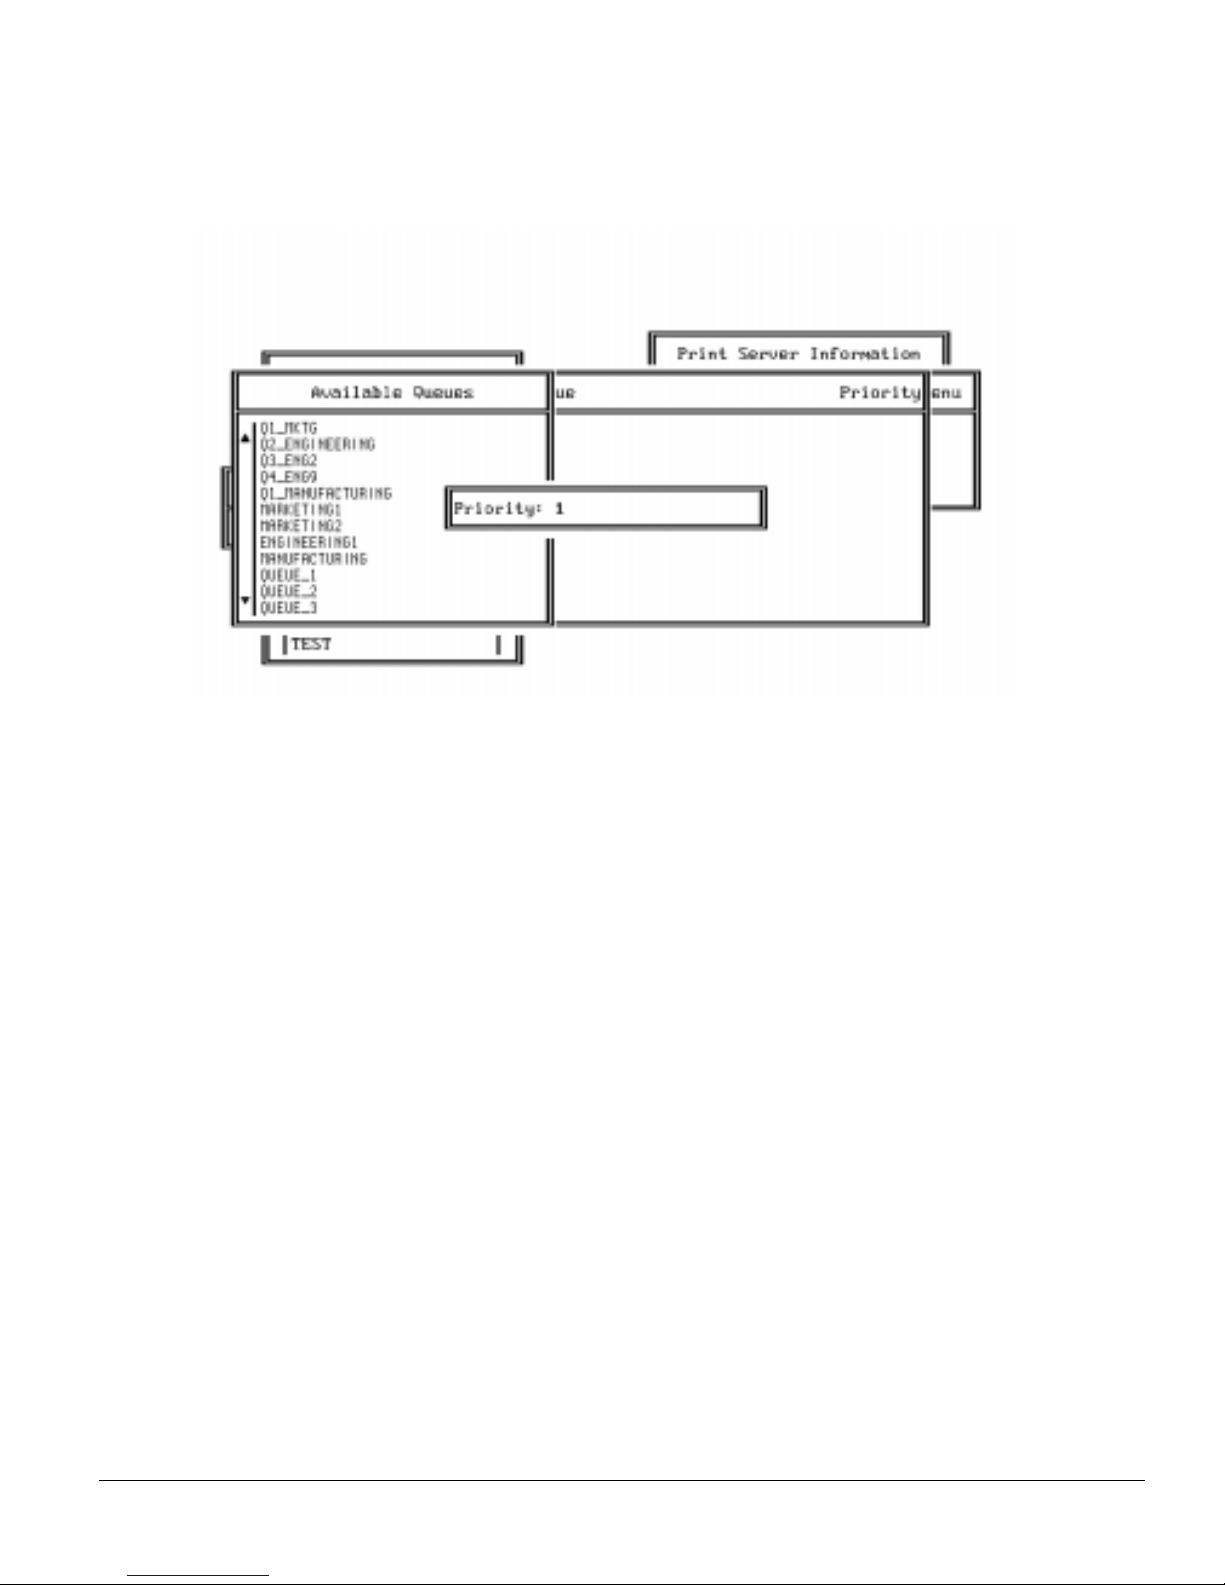
4. Select the queue you want and then assign a priority level from 1 to 10. It is
recommended that you accept t he defaul t prio rity le v el. Pre ss ENTER. The que ue
appears on the list fo r the printer.
Press the INS key again to assign additional queues.
5. When you f inish assi gning qu eues, press t he ESC k e y and t hen sa v e your c hanges.
Continue to press the ESC ke y to ret urn to th e Print Se rv er Confi guratio n menu. If
you want to set Notify options, go to Section. 4.1.6. If you are finished, continue
to press the ESC key and then save your changes.
4.1.6 Set Up Notify Options for the Printer
To enable the print server to notify users or user groups if a problem occurs with the
printer, set up the Notify options. The print server supports the enhanced NOTIFY
options for printers, including informing users when the printer:
• Is off-line, jammed, opened, or out of paper
• Requires a manual paper feed or a form change
• Has had an engine failure
1. Choose Notify List for Printer on the Print Server Configuration menu.
(Optional)
NetWare Configuration 4-6
Page 30
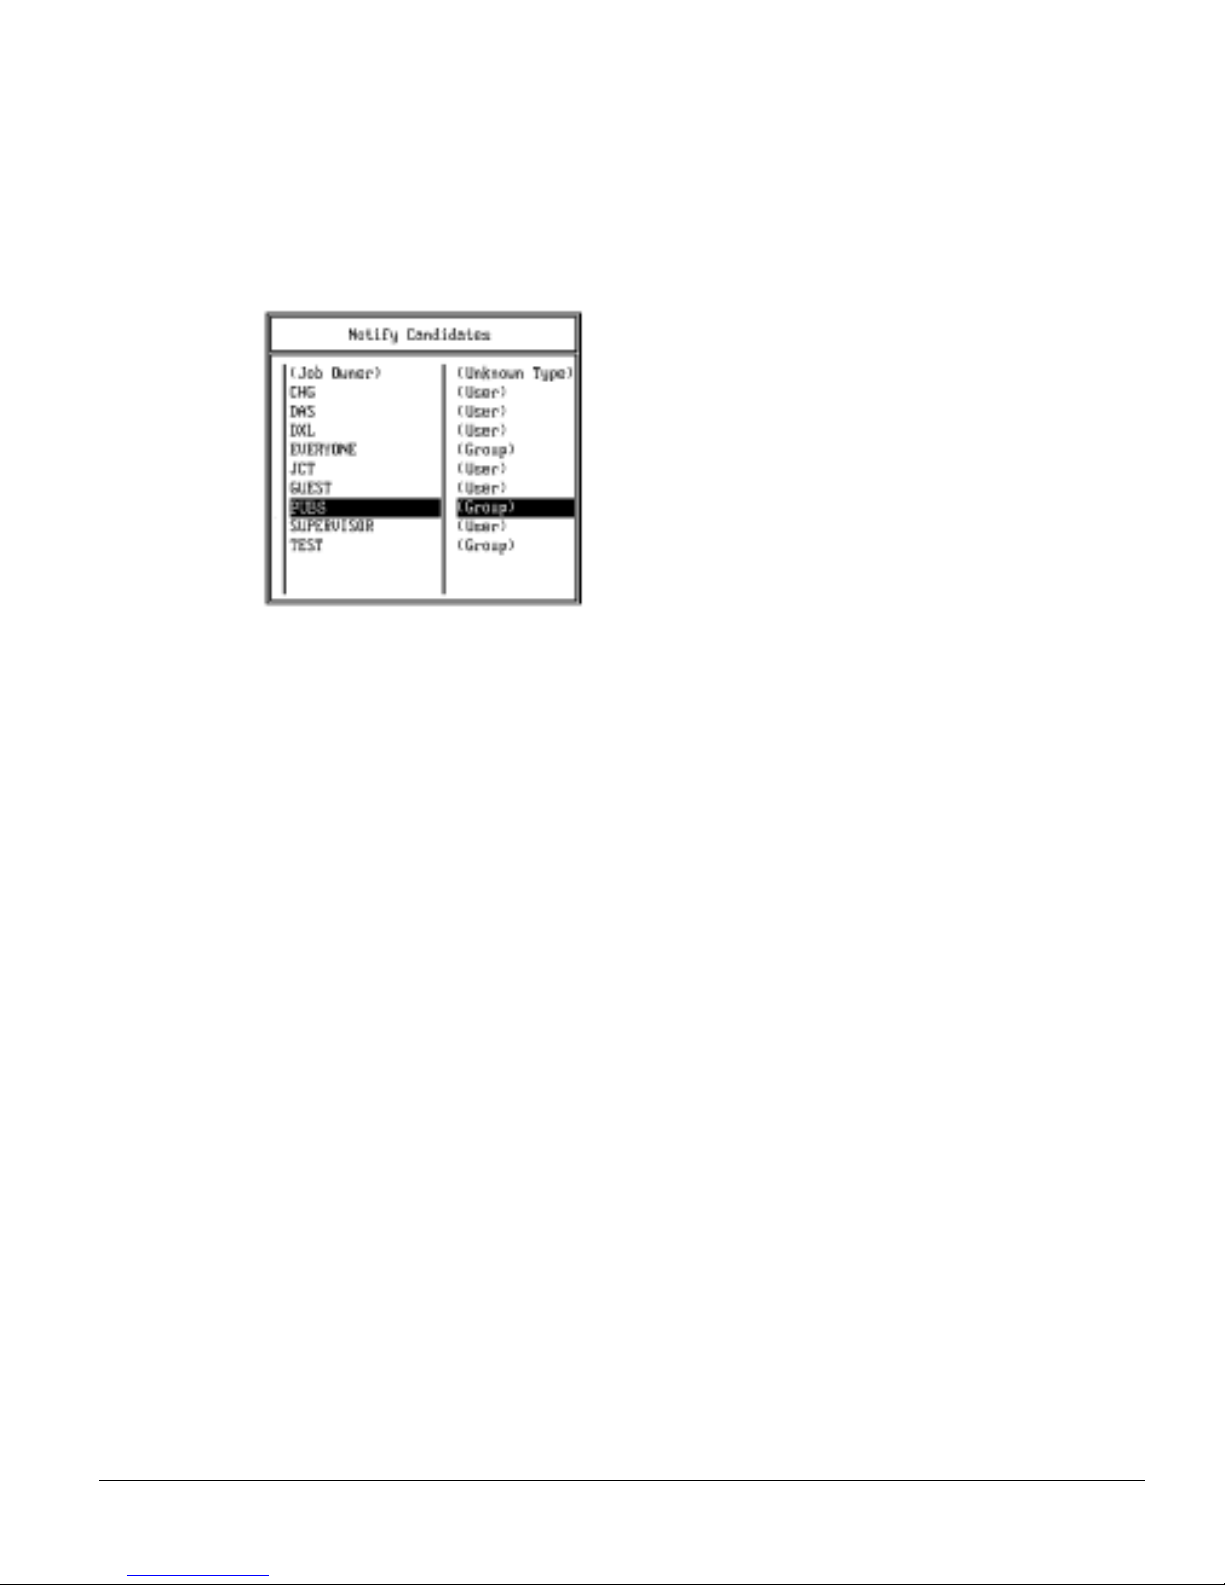
2. Select the printer from the Defined Printers list. The screen appears (which is
blank for an initial installation). Press INS to view a list of Notify Candidates.
3. Select the user or group from the list.
4. Set the First and Next intervals in the Notify Intervals screen. It is r ecomme nded
that you use the defaults. The First interval is the number of seconds the network
waits before it notifies candidates about a print job problem. The Next interval
specifies how often in seconds candidates are notified. Enter a number for each
interval and press ENTER.
5. Press the ESC key and then choose Save Changes. Press the ESC key at each
screen until you reach the Print Server Configuration menu. If you have finished
the configuration, press the ESC key and then save the changes.
4.1.7 Installing the EcoLAN 1000E on Multiple File Servers
To install the EcoLAN 1000E on more than one file server, perform the procedures
described in Sections 4.1.1 through 4.1.6 for each file server. You must use the same
name and passwo rd for the print ser ver ( or no pas sword) on all f ile serve rs. You set the
password for the EcoLAN 1000E using the MAP program (refer to 4.3 Configuring
the EcoLAN 1000E in NetWare Directory Services ). If you use a password, specify it
on each f ile s erver usi ng the Change Pass word option on the Print Server Information
menu of the PCONSOLE utility.
NetWare Configuration 4-7
Page 31

When the EcoLAN 1000E comes up, it automatically searches for and attaches to the
file servers that are no more than four hops and have no more than eight ticks
propagation delay. For extremely large or complex networks, this allows a bounded
search time on sta rt-up. If the prin t serv er must att ach to f ile s erve rs bey ond this r ange,
or , if you wish t o acceler ate st art-up by e limina ting th e need to sear ch all f il e serv ers in
the four h ops/eight ticks rad ius, the file servers with which the print server is to
operate may be entered into the Print Server Configuration of a "primary" file server.
The primary file server can be any file server within the four hops/eight ticks
propagation t ime li mi t s, but ideall y is as close as po ssi bl e t o th e pr int server. Once the
print serv er locates the primary f ile se rv er and the list of fi le serv ers to be servi ced, the
automatic search is dropped and the print server will go directly to those file servers
listed (and to no others).
4.1.8 Primary File Server
To use the primary file serv er opt ion, use the foll o wing proc edure on a f ile se rver close
to the prin ter:
1. List the file servers to be serviced by the primary file server by selecting File
Server To Be Serviced option from the Print Server Configuration Menu.
2. Press the Insert key to display the Available File Servers list.
3. Select the name if each f ile se rver to be servic ed and pre ss ENTER to a dd it to the
File Servers To Be Serviced list.
4. When the list is complete, press the ESC key to return to the menu.
5. Install the EcoLAN 1000E on each of the primary file servers.
4.1.9 Preferred File Servers
The MAP or Web Browser utilitie s allo w you to iden tify a "p referre d" f ile serv er, to be
identified wit hin the EcoLAN 1000E itself. If a preferred file server is listed , the
EcoLAN 1000E will attach to this identified file server instead of initiating the
automatic search. If the prefer red file ser ver is also a pri m ar y file serv er (for example,
has file servers listed under file servers to be serviced), the EcoLAN 1000E will
connect directly to these file servers.
Note: The Preferred File Server is only applicable to bindery-based queues. Entering it
has no affect on NDS queues.
NetWare Configuration 4-8
Page 32

4.2 Configuring NetWare 4.x — Bindery Emulation
Novell’s NetWare 4.x can operate in two modes — NetWare Directory Services
(NDS) and Bindery Services Emulation. For Directory Services, see 4.3 Configuring
the EcoLAN 1000E in NetWare Dir ectory Ser vices . The se services run simult aneously
and transparently to each other. The EcoLAN 1000E may be configured to operate
with Bindery Services mode only (this section), or to operate under NDS (4.3
Configuring the EcoLAN 1000E in NetWare Directory Services ). When configured
under NDS, the EcoLAN 1000E will also service older fileservers operating in
bindery mode.
Note: If the EcoLAN 1000E is not properly set up for NDS and the Bindery Services
mode is not running, the EcoLAN 1000E can not find its file servers, and the
status page indicates the Novell NetWare protocol is not active.
4.2.1 Confirm Bindery Context
Before installing the EcoLAN 1000E on a Novell NetWare 4.x server in Bindery
Emulation mode, check that the server has a Bindery Context (name for the server
under Bindery Servi ces mode). If the ser v e r do es not hav e Bi ndery Context, it may b e
preferable to install in NDS mode. If the EcoLAN 1000E must be installed in the
Bindery Emulation mode, the server must have Bindery Context. Perform the
following steps to confirm the server has Bindery Context:
1. Go to the 4.x server and at the system console type: load install
2. Select Maintenance/Selective Install from the menu.
3. Select NCF Files Options from the menu.
4. Select Edit AUTOEXEC.NCF from the menu.
5. Search the file to see if you have a statement similar to the following included:
SET BINDERY CONTEXT=0U=ENG
Where =0U=ENG is an example of a name for the file server context. Use your
own file server context in place of =0U=ENG.
NetWare Configuration 4-9
Page 33

6. At the console prompt, type the SET BINDERY CONTEXT statement that you
entered in the autoexec.ncf file.
Note: The command at the console prompt takes effect immediately. The definition in
the file takes effect when the server is shut down and then restarte d.
4.2.2 Configure in Bindery Mode with PCONSOLE
Once you confirm the server has Bindery Context, use the following procedures to
configure the EcoLAN 1000E.
1. Log into the network as ADMIN.
2. Type PCONSOLE and press ENTER. The following screen appears.
Available Options
Print Queues
Printers
Print Drivers
Quick Setup
Change Context
3. When the Available Options menu appears, press the F4 key (for the Bindery
Mode).
Note: If you recei v e a message asking you t o login to a serv er with Bind ery conn ections,
the server you are attached to does not have Bindery Mode enabled. Follow the
procedures in 4.2.1 Confirm Bindery Context or log onto a server with Bindery
Services activated.
NetWare Configuration 4-10
Page 34
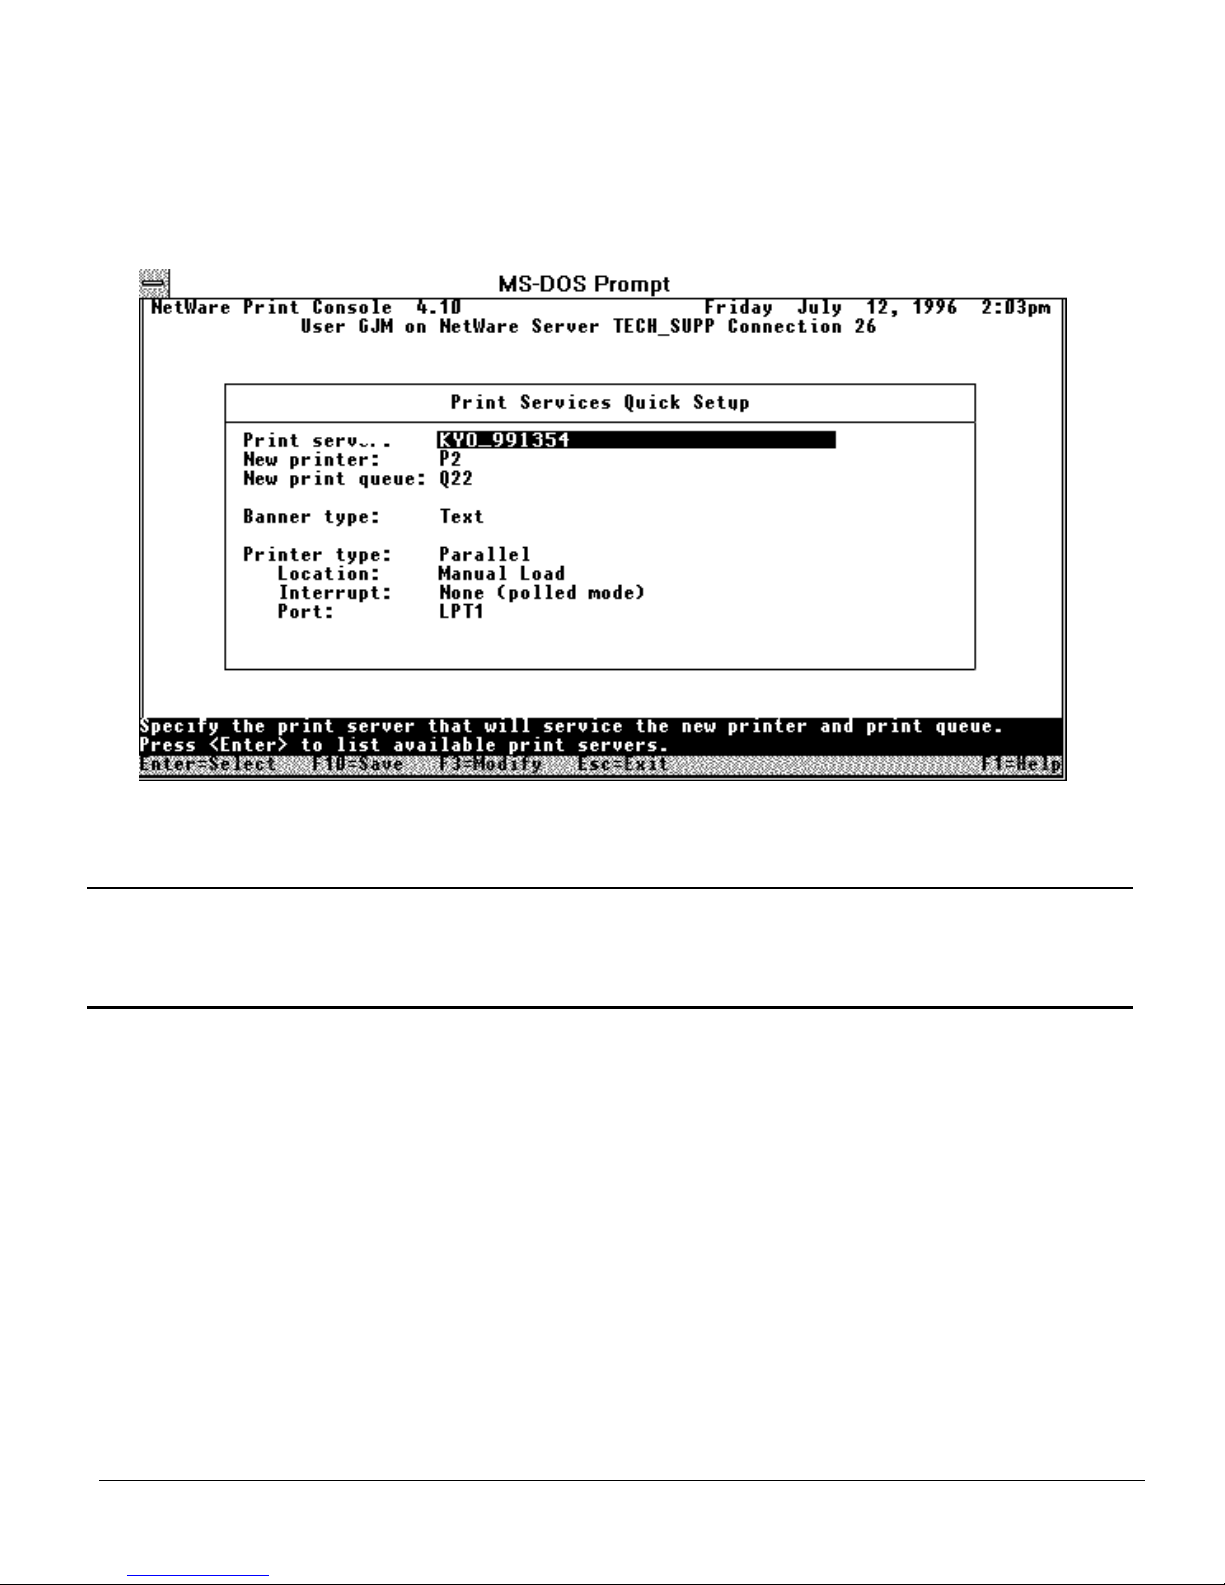
4. From the Available Options screen, select Quick Setup and press ENTER.
Use Quick Setup to connect your EcoLAN 1000E, print queue and printer
correctly. You can modify these later if you need to.
5. Select Print server and press the F3 key to modify the entry.
6. Enter th e name of the print server in the Print serve r field and press ENTER.
Note: The print server name is printed under the Novell Network Information on the
Status and Configuration report. The factory default name consists of three letter
identifier, an underscore, and the serial number of the unit.
7. Press the ESC key to move to the New printer field. Enter a name and press
ENTER.
8. Press the ESC key to move to the New print queue field. Enter a name and pre ss
ENTER.
9. Press the ESC k ey to move to the Printer type field and pr ess ENTER. From the
list of printer types, select Other/Unknown and press ENTER.
10. When you are finished, press the F10 key to save the configuration.
Repeat steps 5 through 10 for each file server that the printer server services.
11. To view , add, del ete, or modify pri nt serv ers or queues af ter the initial setup, sel ect
either the Print Queues or Print Servers option on the Available Opti ons scree n.
NetWare Configuration 4-11
Page 35

4.3 Configuring the EcoLAN 1000E in NetWare
Directory Services
NetWare Directory Services (NDS) offers a different, more advanced approach to
network management than previous NetWare versions. Generally, it stores and tracks
all network objects. As a rule, all 4.x servers must have NDS loaded in order to
function. In this way, every NetWare 4.x server is a Directory server, because it
services named Dir ectory obj ects such as prin ters, pri nt serv ers a nd print que ues. W it h
the appropriat e pri vile ges, you c an create a print serv er object, which, once configured
in its context (or location) on the network, eliminates the cumbersome setup of print
servers on every network server. NDS provides true enterprise networking based on a
shared networ k datab ase rather than a i ndividually defined phys ica l sit es. The re sult i s
greatly improved print server setup and management.
The Directory Information Base (DIB) is used to store information about servers and
services, users, printers, gateways, etc. It is a distributed database, allowing access to
data anywher e on the n etwork whe re ver it is st ored. Pre- 4.x NetWare versions pr ov ide
the same data fou nd in the DIB b ut th e data is stor ed in the Ne tWare Bindery . The DIB
was designed with more flexible access, more specific security, and, since it is
distributed, it was designed to be partitioned. The Directory uses an object-oriented
structure rather than the flat-file structure of the Bindery, and offers network-oriented
access, rather than server-oriented access found in the Bindery.
The Directory is backward-compatible with the NetWare Bindery through Bindery
emulation mode. This section describes Print Server Operation with a 4.x NetWare
system in bindery emulation mode. When Bindery emulation is enabled, Directory
Services will accept Bindery requests and respond just as if a Bindery existed on the
NetWare server being accessed. Be aware that information obtained from the Bindery
query may not be stored in the server since the Directory is a partitioned and
distributed database. Even though the NetWare 4.x server is not operating from a
Bindery, the applications making Bindery requests will not know the difference.
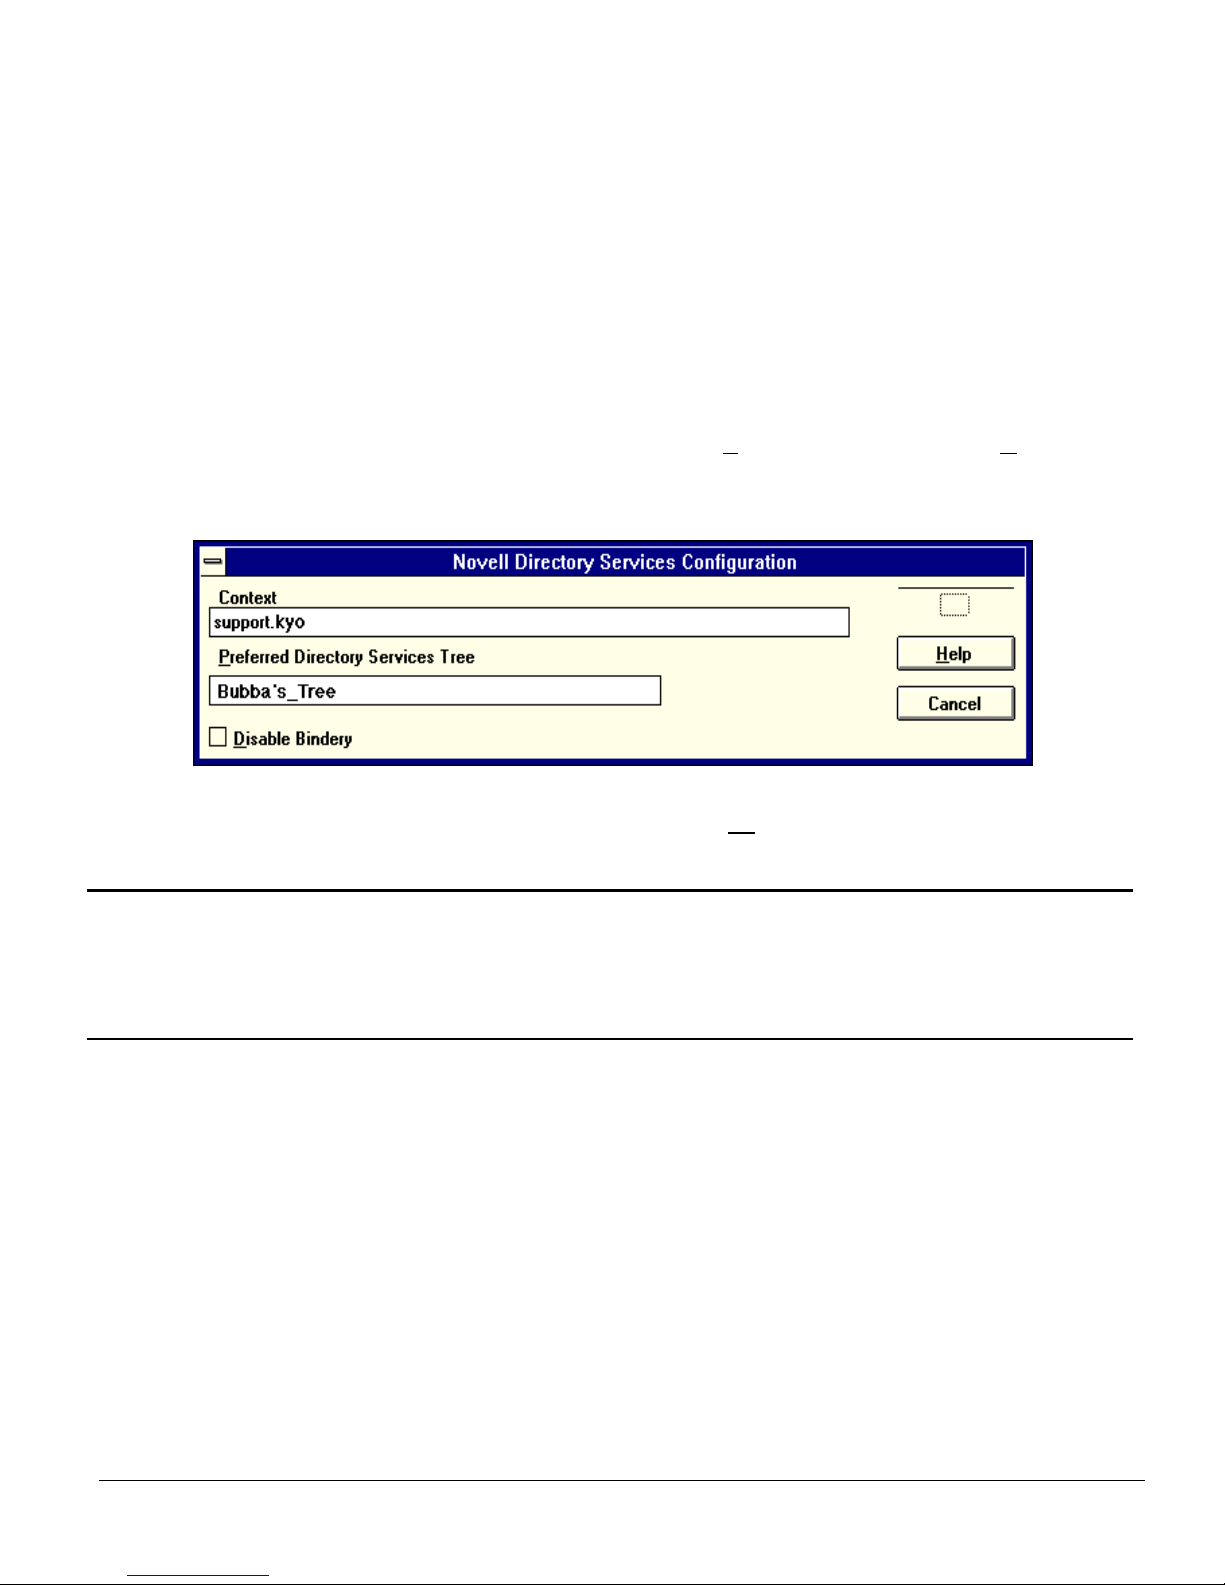
You may use NWADMIN to configure the prin ter in NDS. Prior to pr inting, NDS must
be set up as follows and the EcoLAN 1000E must be set up with NDS Context and
Tree. See Section 4.4. The steps below describe the use of NWADMIN configuration
to create printer, print server, and print queue objects. Then, you will assign, or
associate those objects with each other. If you wish to keep Bindery resources on any
server, you can under NetWare 4.x if you declare a SET statement in your
AUTOEXEC.NCF file.
NetWare Configuration 4-12
Page 36
For those who prefer, NetWare does offer PCONSOLE as an alternative to
NWADMIN. PCONSOLE can be used to set up static information about print servers
such as: which queues to service, and whom to notify in the event of a problem. See
Novell NetWare documentation for more information about the use of PCONSOLE
for NDS.
4.3.1 Create Printer Object
1. Click on the NWADMIN icon in the NetWare Tools group in Windows. The
NetWare Administrator window will appear. To bring up your Directory Tree,
open a Browser window by clicking on the T
item.
ools menu item and, the Browse
2. Highlight the Organizational Unit or Organization where you want to create the
print service in the Directory T ree, select the O
bject item from the main menu and
choose Create...
Note: If you wish, you can create objects another way in NWADMIN by: selecting an
Organizati onal Unit, clicking on the right mouse but ton (which produces a p op-up
menu), and clicking on Crea te... use the left mouse button to bring up the New
Object window). From this point, the procedure continues as described.
NetWare Configuration 4-13
Page 37
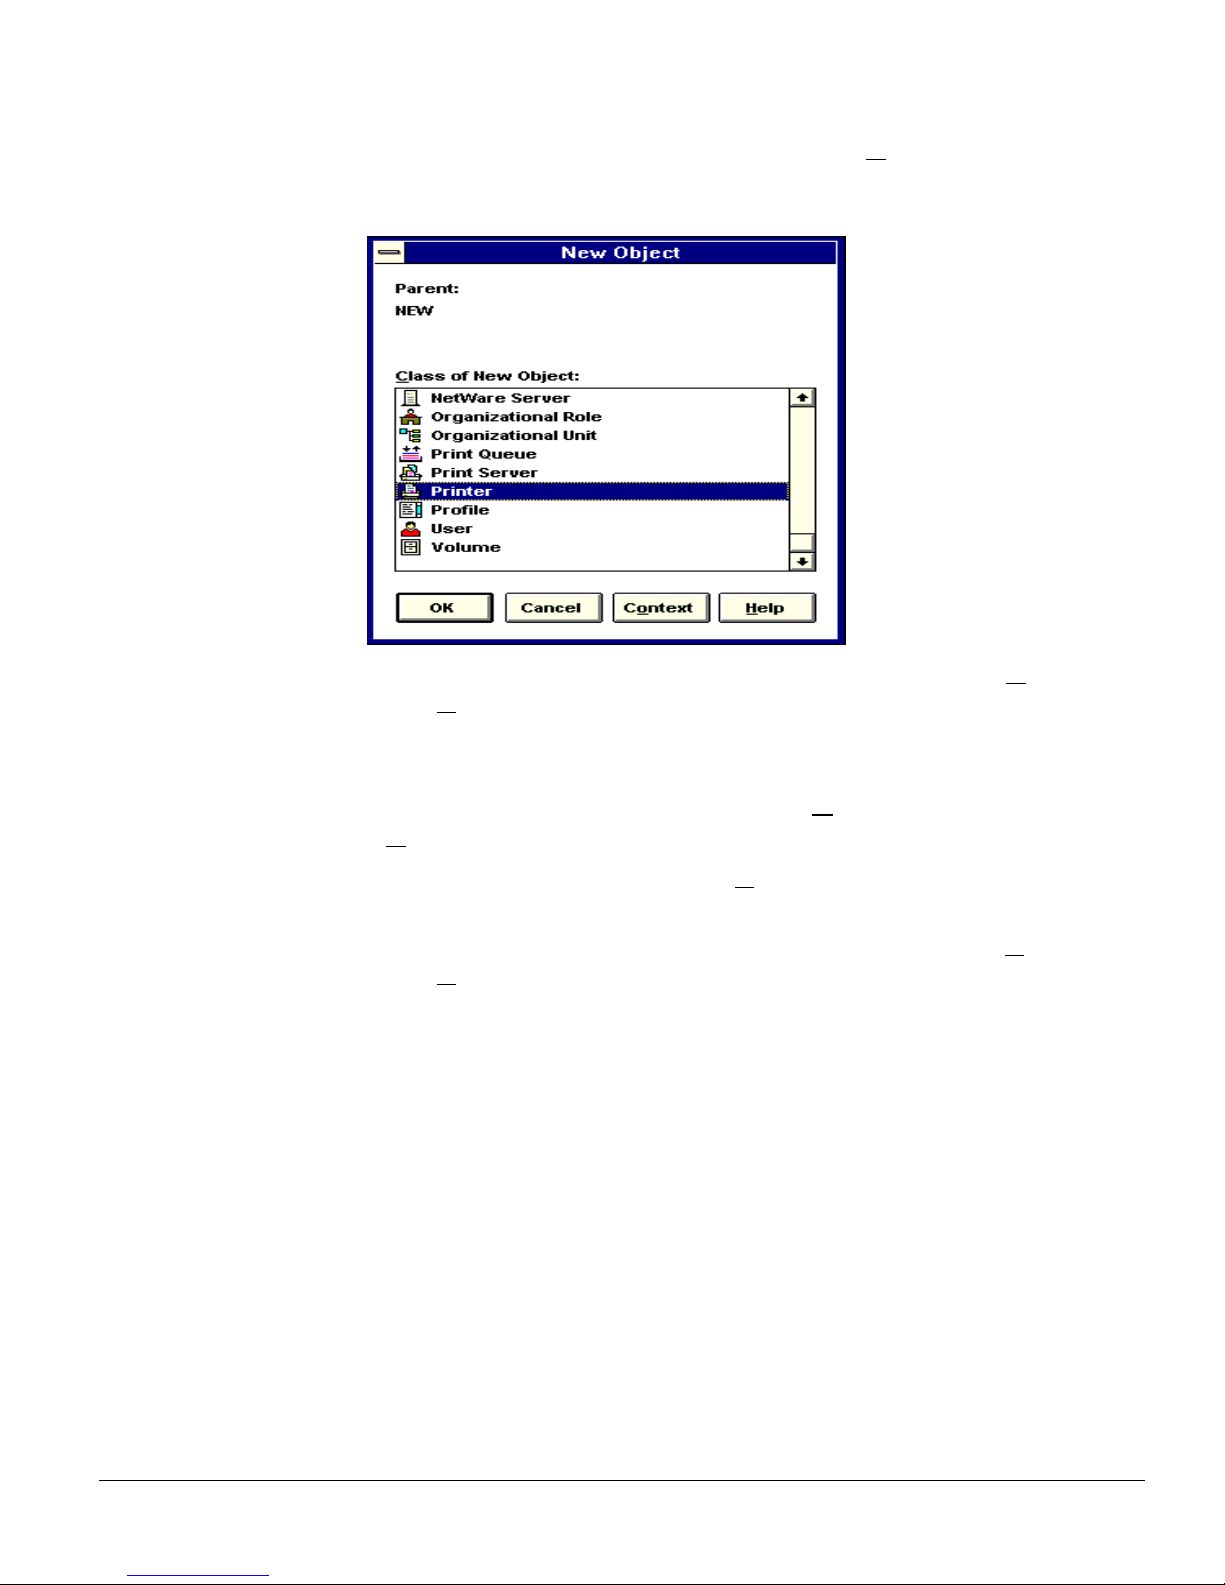
3. When the New Object window appears, scroll down the Class of New Object
icon list, select the Printer icon and click on the OK button.
4. When the Crea te Printer windo w appea rs, type a v alue in the P rinter N
and click on the C
reate button.
4.3.2 Create Print Server Object
1. Again, highlight the Organizational Unit, select the Object item from the menu
and choose C
2. At the New Object windo w, scroll down the C
the Print Server icon, and click on the OK button.
3. At the Create Print Server window, type a value in the Print Server N
and click on the C
reate...
reate button.
ame field
lass of New Object icon li st, s elect
ame field
NetWare Configuration 4-14
Page 38
4.3.3 Create Print Queue Object
1. Once again, highlight the Organizational Unit, select the Object item from the
menu an d choose C
reate.
2. At the New Object windo w, scroll down the C
lass of New Object icon li st, s elect
the Print Queue icon, and click on the OK button.
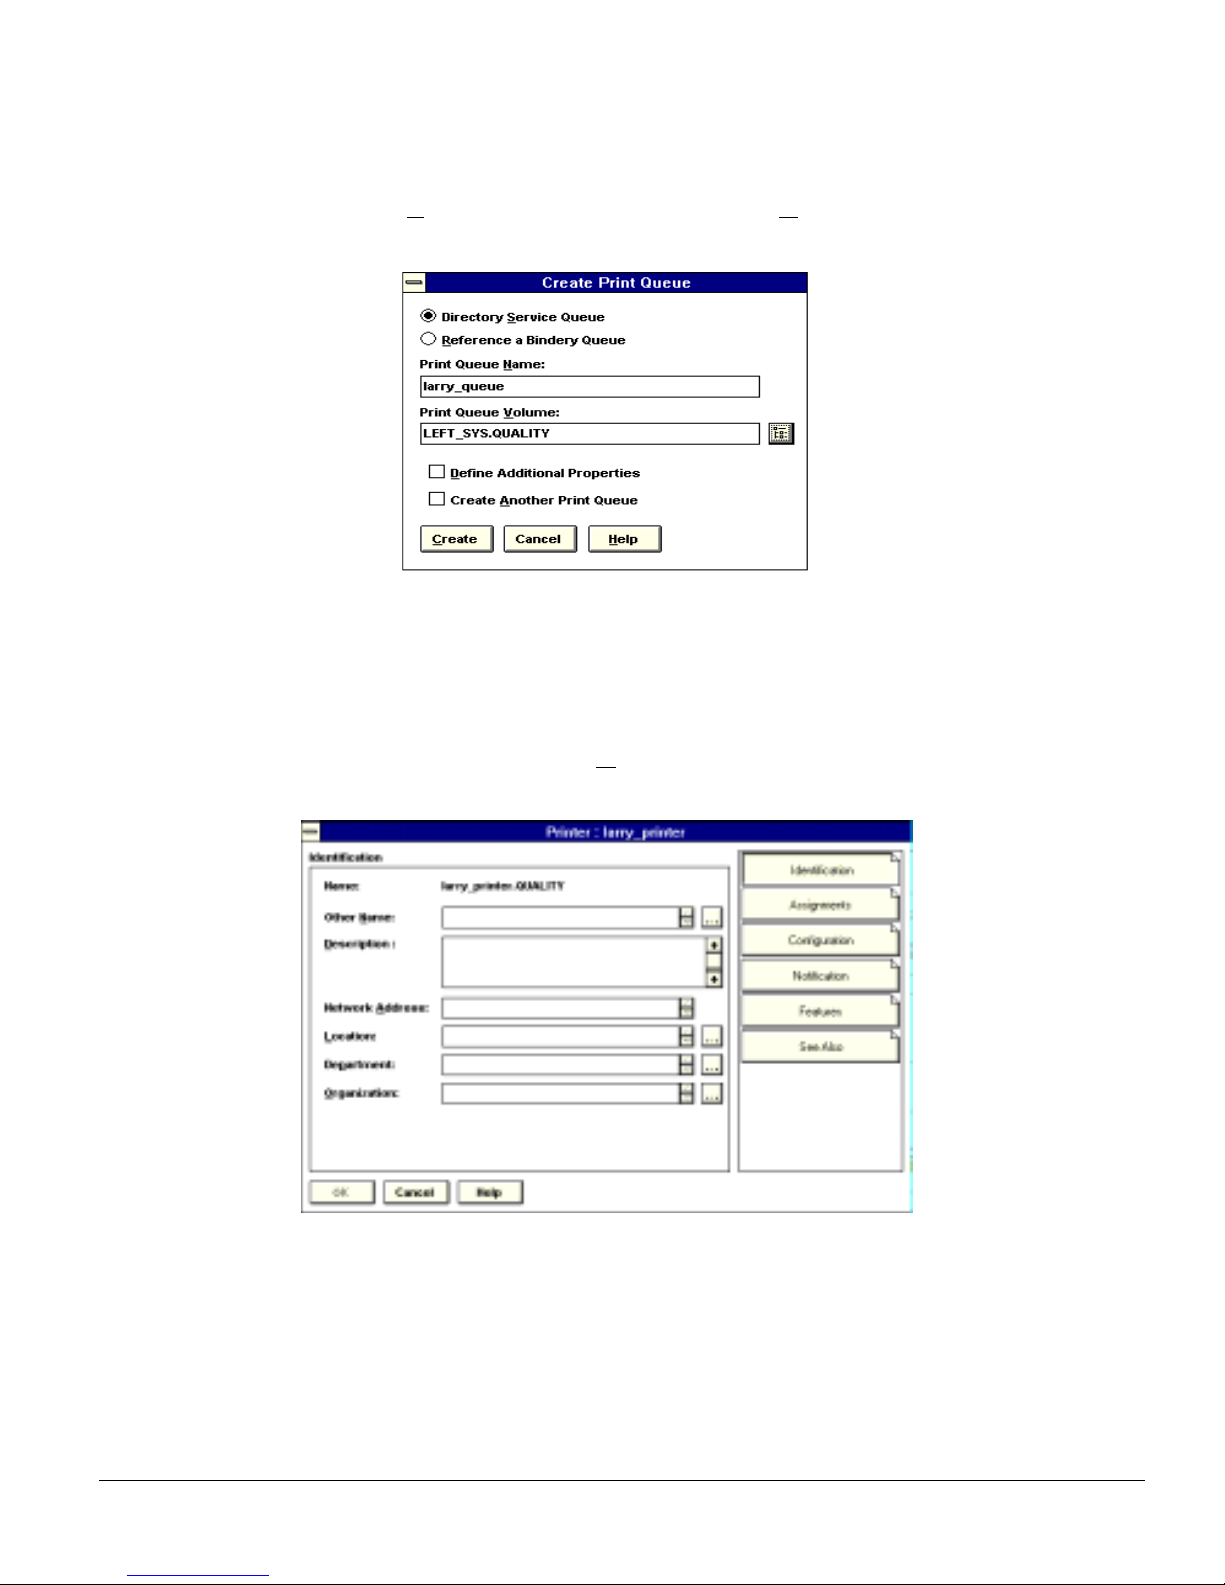
3. At the Crea te Pri nt Queue scr een, cl ick on the Directory
then type in values fo r Print Queue N
the C
reate button. If you don't know the Pri n t Que ue Volume name (the hard
ame and Print Queue Volume and clic k on
Service Queue button,
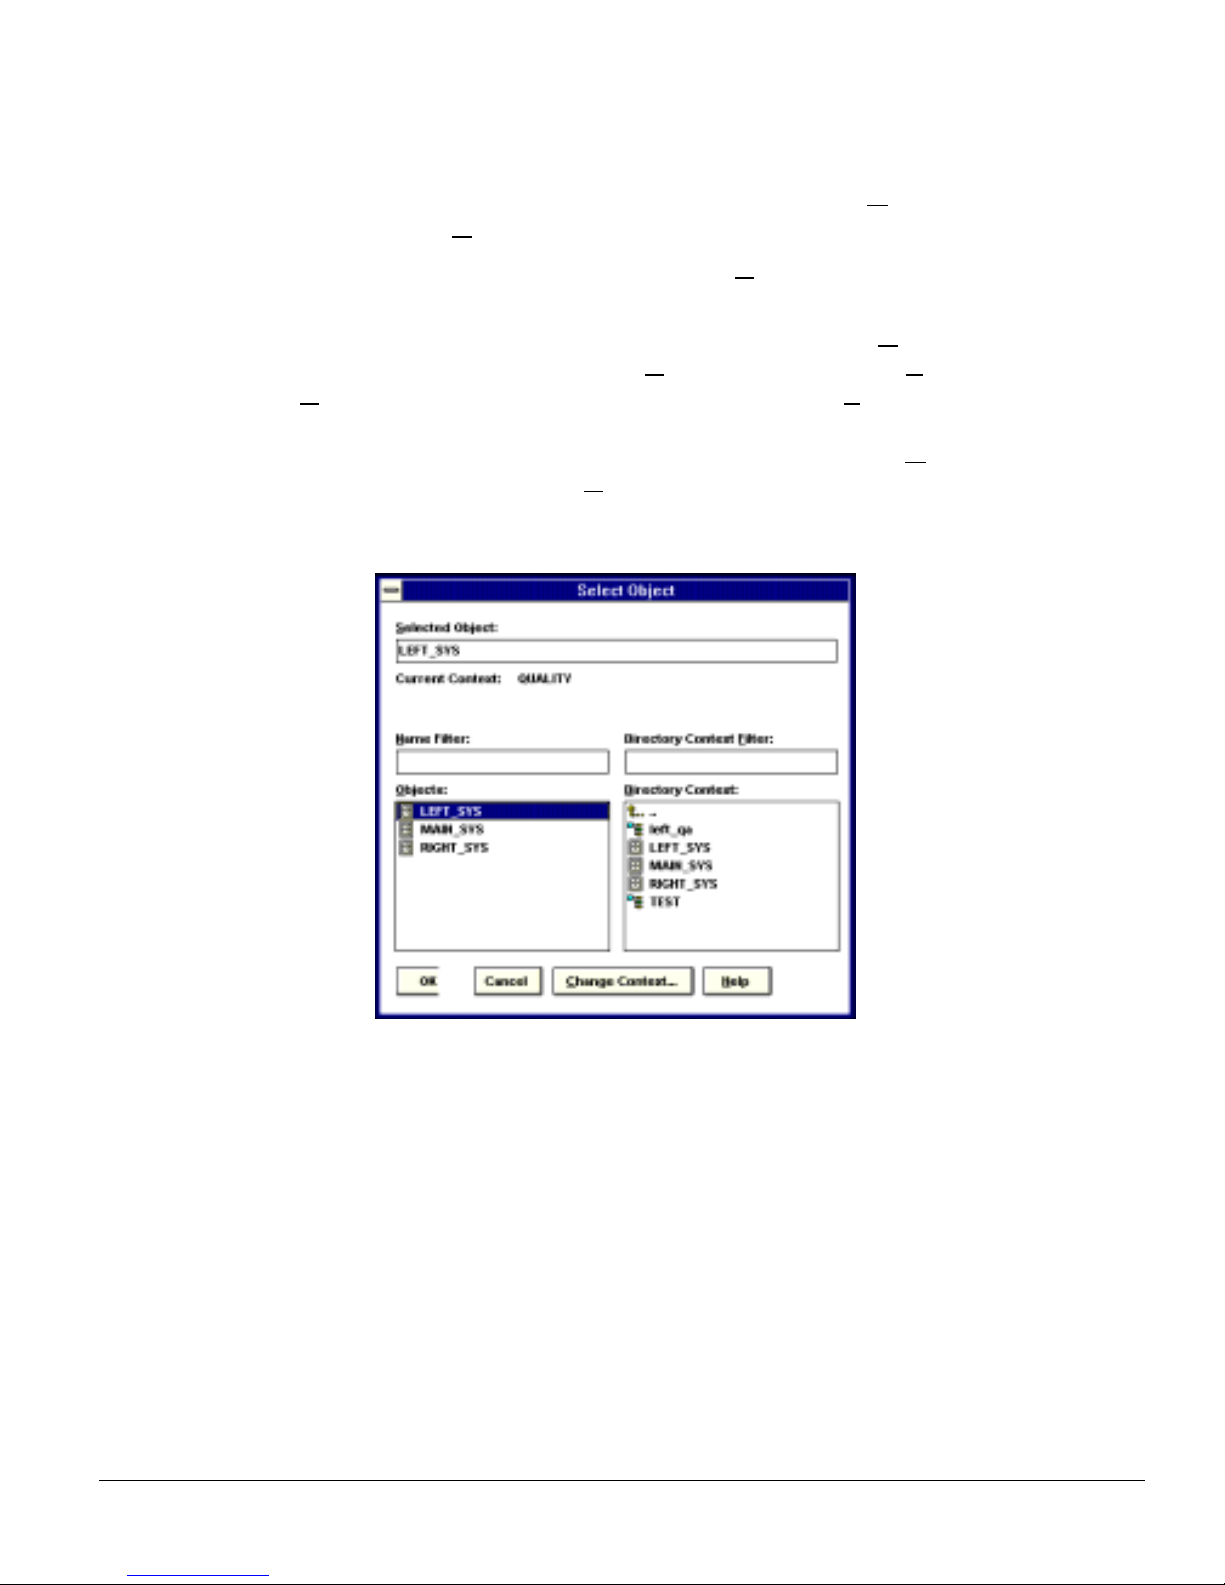
driv e you will be acce ssing) , clic k on the icon to the ri ght of the volume f ield. The
Select Object window will appear with the volume listed in O
volume is not listed, scroll the D
irectory Contex t i tems unt il you find the v olume
bjects. If the
where you want the queue to reside.
NetWare Configuration 4-15
Page 39
Click on the object (hard drive) of your choice and it will appear in the Selected
Object: field. Click on the OK button. The full volume will now appear in the
Print Queue V
olume field. Finally, click on the Create button.
4.3.4 Assign Printer Object
1. Go to the Directo ry T r ee. Doubl e clic k on the printer o bject j ust cre ated and bring
up the Printer window. See below . Fi nd the Assignments b utt on on the ri ght- side
of the window and click on the A
dd button.
NetWare Configuration 4-16
Page 40
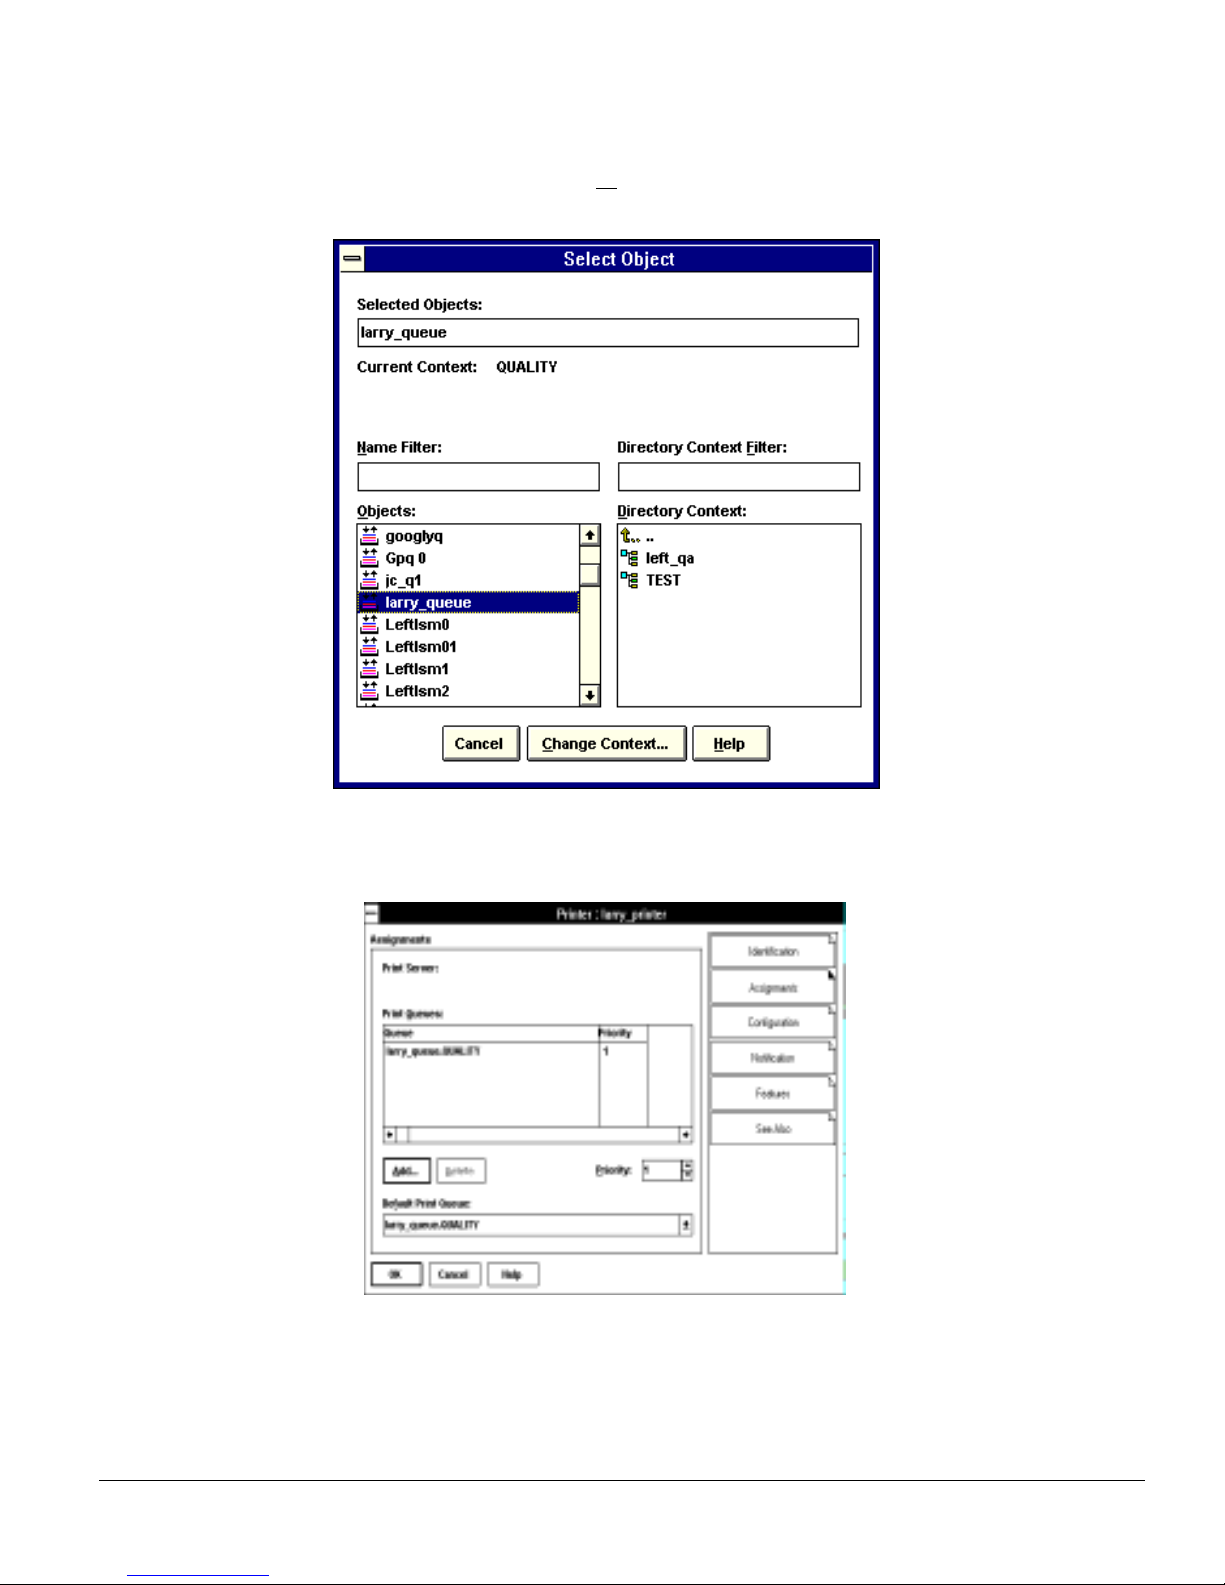
2. When the Select Object window appears, find the print queue object just created
among the choices listed in the O
bjects box and select it.
Click on the OK button and the print queue just created is added to the Print
Queues: box in the Printer: window. Click on the OK button again.
NetWare Configuration 4-17
Page 41
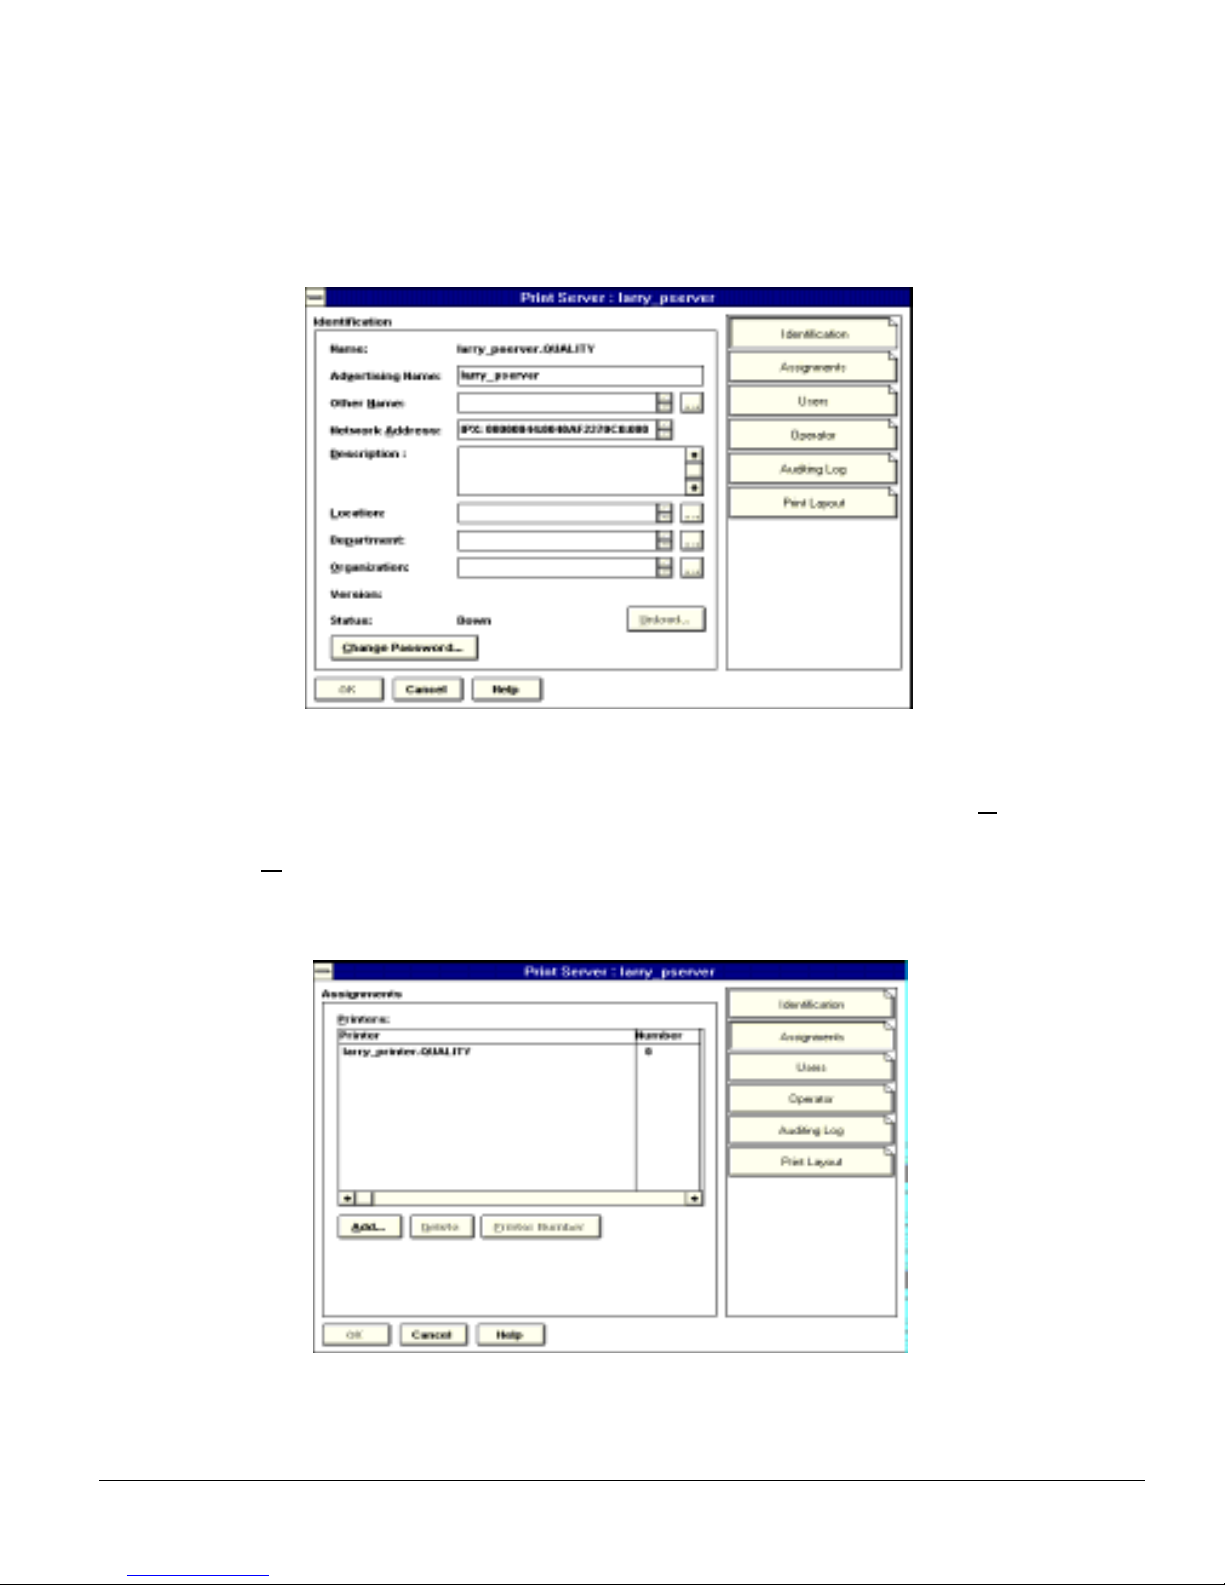
4.3.5 Assign Print Server Object
1. At the Director y Tree, double click on the pri nt serv er objec t you just creat ed and
bring up the Print Server window.
2. At the Print Server: window, click on the Assignments bu tton and Add bu tton to
bring up the Select Object window. Select the printer obje ct j ust cr eat ed from the
O
bjects: box and click on the OK button. Now the printer (with its con text)
appears in the Printers: box of the Print Server window. Click on the OK button.
NetWare Configuration 4-18
Page 42
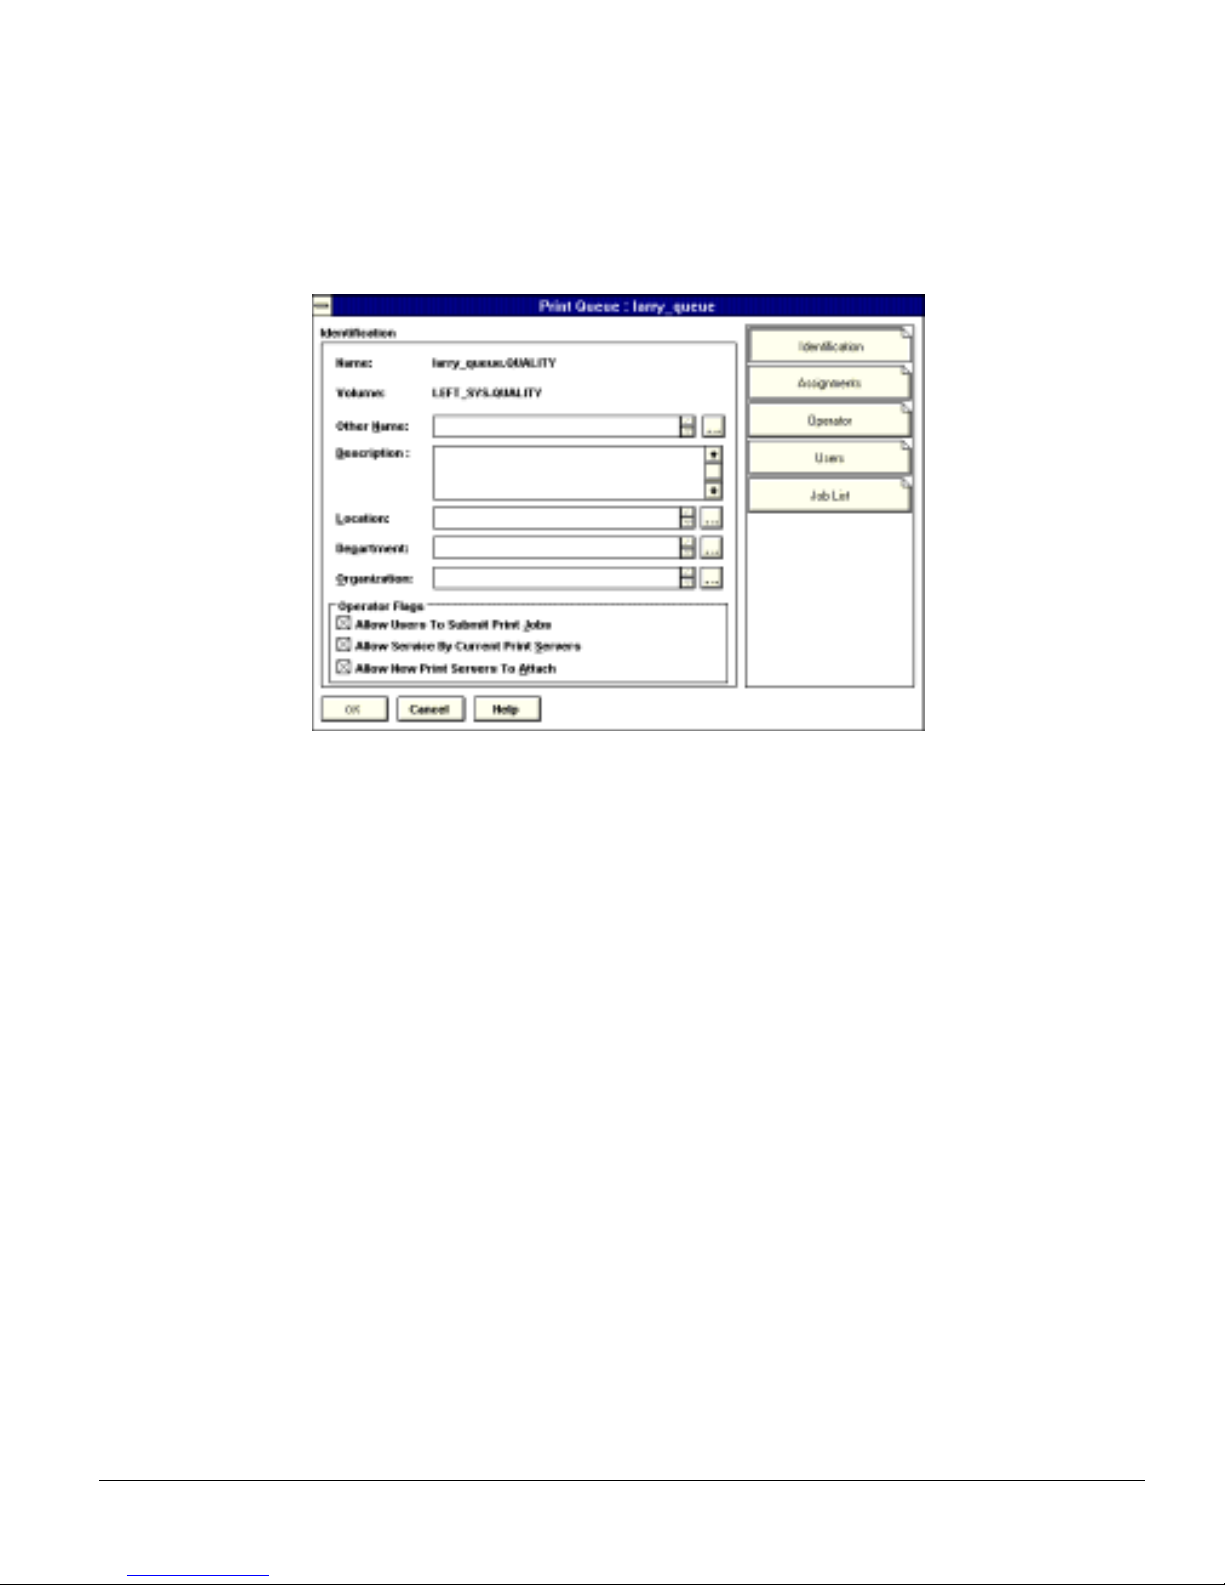
4.3.6 Check Assignments
At the Dire ct ory Tree, double click on the Print Queue object you just created. At
the Pri nt Queue window, click on the Assignments butt on.
NetWare Configuration 4-19
Page 43
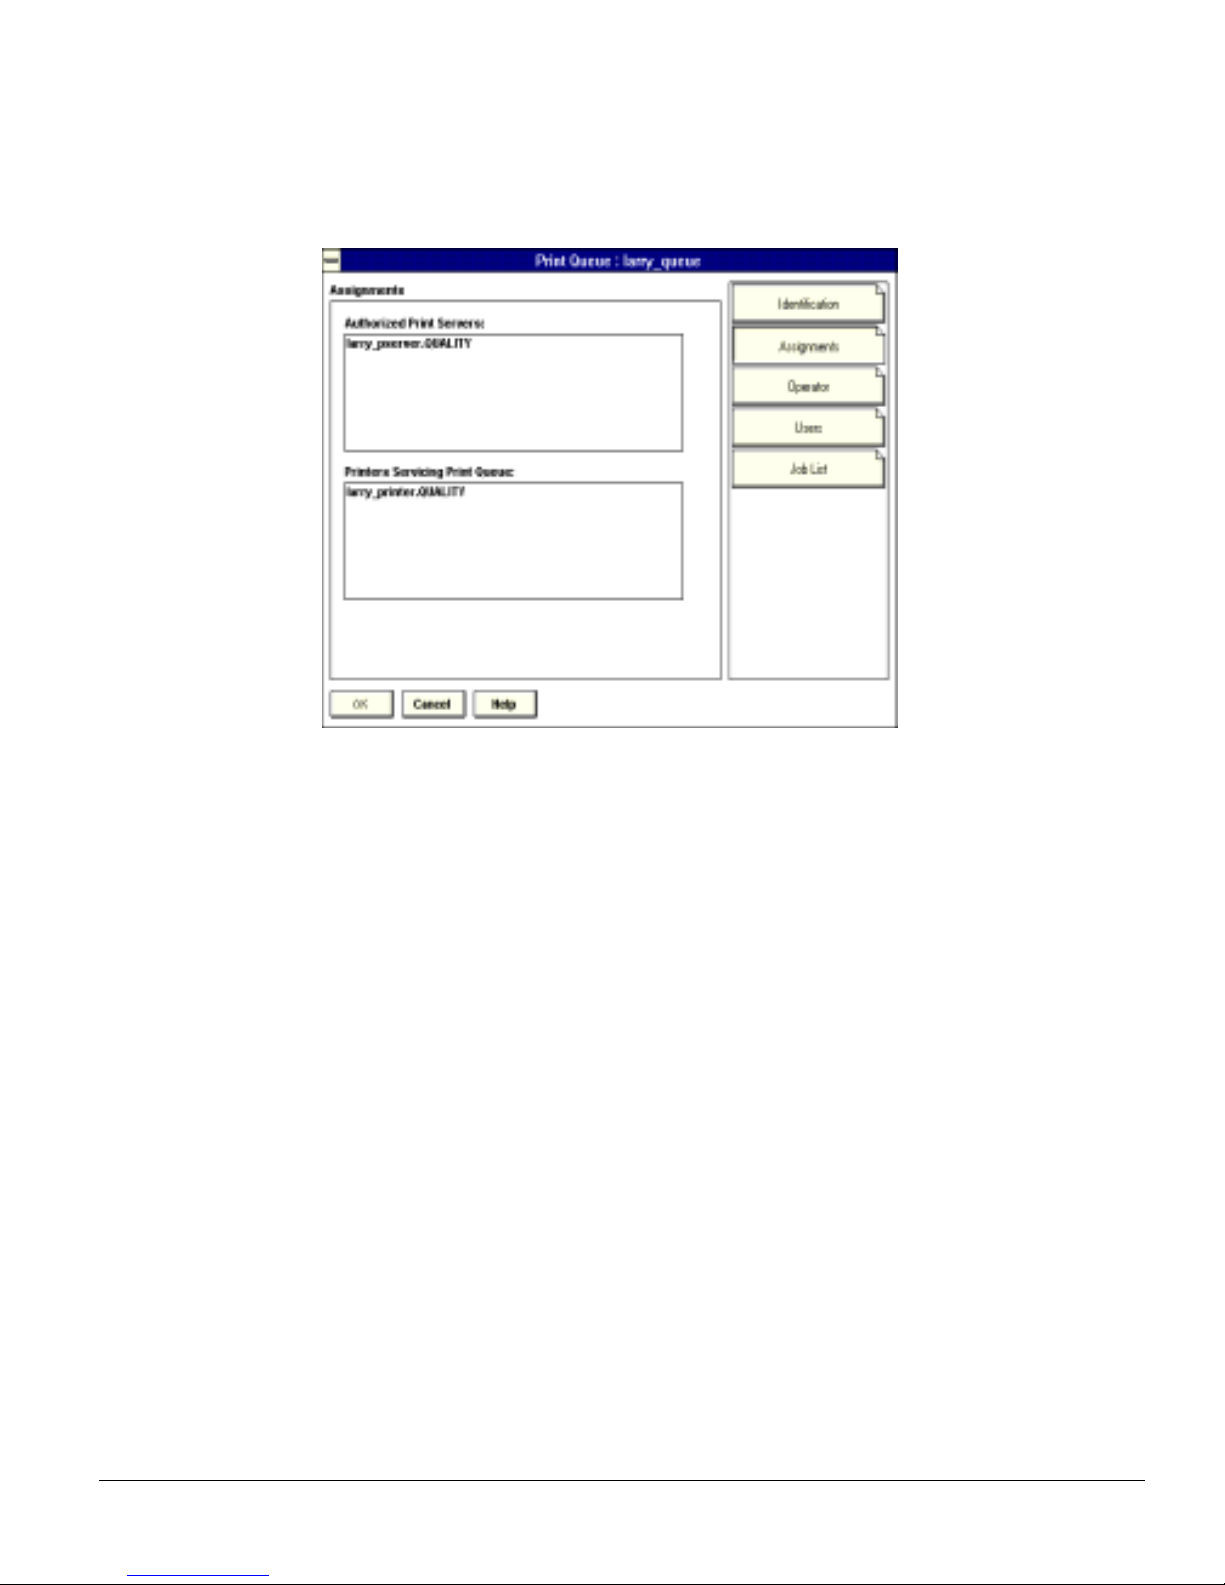
If you configured the print queue and printer correctly they will appear in the proper
boxes on th e Print Queue window. Press the Cancel button.
4.3.7 Set Up and Reset the Printer
NWADMIN configuratio n is complete . Before you can begin pr inting, t hough, be sure
to perform the EcoLAN 1000E Configuration in the following section and reset
(power cycle) the printer.
NetWare Configuration 4-20
Page 44

4.4 EcoLAN 1000E Configuration
The MAP utilit y o r a n I P Web Browser must used to define the cont ext and tree of the
Print Server. It is also used to change the Print Server name, set in a password, modify
scan and frame search parameters, and sent in bindery-mode specific values.
Use the MAP util it y or IP Web Browse r (refer to Chapter 3) to access th e Set up pages
of the EcoLAN 1000E. Once you have accessed the Netw ork Ad minist rati on pages or
the Main Men u, do the following:
1. Select Setup NetWare under Protocols.
2. Click on Enable NetWare. If it is not selected, the NetWare protocols will not
come up, the EcoLAN 1000E will no t appear as a n adver tised de vice , and the NIC
will not be accessible using IPX SNMP.
3. The default name for the NetWare Print Server is KYO_123456, where 123456 is
the serial number of the EcoLAN 1000E. This is also the name of the printer in
peer-to-peer mode. If you want to change the default Print Server name , type this
name in the Print Server Name space. This name must match the Print Server
name previously defined in the PCONSOLE or NWADMIN setup. Leave the
space blank if the default name is to be used.
4. If you want the EcoLAN 1000E login with a password, this password may be
entered in the Print Server Password field, and again in the Password Retype
field. If a password is used, this password must be the same password for all
bindery-based and NDS-based Print Server entries.
5. Enter th e name of a preferred bindery-based file server in th e Preferred File
Server field. The Preferred File Server entry is significant only for bindery or
bindery emulation based operations. Refer to 4.1.9 Preferred File Servers for the
significance of a Preferred File Server. The Print Server must be configures on the
preferred file server. Incorrect setup of a Preferred File Server can interfere with
NetWare printing.
6. If the Print Server is to be operated under Novell Directory Services, type in a
Context entry and P
referr ed NDS Tree entry in the appr opria te f ie lds. Be su re to
give the whole context, whether typed or typeless, and do not begin your context
path with a trailing period (.). If you don't know your tree, type: whoami at the
DOS command line. A typed context name example is:
ou=standard.ou=organization_1
NetWare Configuration 4-21
Page 45

7. In the default mode, the Print Server scans each queue which it is to service once
per second. If you pr efer a longer scan r ate, you may en ter t he time b etween s cans
in seconds in the Print Queue Scan Rate field.
8. The EcoLAN 1000E will nor mally monit or the netw ork to d etermine whi ch frame
type is being used for Novell. When it recognizes a type, it will assume the same
frame type. Once it selects a frame type, the EcoLAN 1000E will only operate
over that Novell frame type. Monitoring normally starts looking for IEEE 802.3,
then Ethernet II, then 802.3 SNAP, etc. If your network is using multiple frame
types for Novell, you should bias the frame search to the desired type by setting
the button next to the designation under Ethernet Frame Type.
9. You can Disable Bindery mode on the Print Server if are oper ating in NDS mode
only. To do so, click on that box. If you disable Bindery, the EcoLAN 1000E will
not support Print Servers on a Bindery file server.
10. Once you have selected all desired settings and entered the desired NetWare
information, you may cause this information to be entered in the EcoLAN 1000E
NV RAM by clicking on Accept Settings. As with all value cha nges , i f y ou have
not entered the EcoLAN 1000E Management Password before, you must enter it
in the appropriate space before clicking on Accept Settings.
11. Entered values do not take effect until the EcoLAN 1000E is reset or power
cycled. You may reset from MAP or the Web Browser by returning to the Home
or Network Administration page, and click on Reset under System. Now click
on Reset Unit. Alternatively, you may power cycle the printer. The new NetWare
values should now be in effect.
4.5 Using the Novell PCONSOLE Utility
This section explains how to use the PCONSOLE utility to perform the following
tasks:
• Attach and select a file server
• Select or delete q ueues for the print server
• Set-up the Notify fun cti on
See the NetWare Print Server Manual for detailed information on this utility.
Note: You must have Supervisor privileges to perform many PCONSOLE operations.
NetWare Configuration 4-22
Page 46

4.6.1 Changing the File Server
You can specify a file server as the current one. To change the file server, use the
following procedures:
1. Log into the current file server and start the PCONSOLE utility.
2. Select Change Current File Server from the Available Options menu.
3. Press the Insert key to display the available file servers.
4. Select the file server you want as the current one and press ENTER.
5. Enter your username a nd pr ess ENTER. If the username r equi r es a pas sword, the
Password screen is displayed. Enter the password and press ENTER.
6. Select Change Curr ent File Ser v er from the Available Options menu. A list of
the attached file servers is displayed.
7. Select the current file server from the File Server/Username screen .
4.6.2 Changing Print Queues
When you print a file, your system sends the file to a print queue. The print server
assigned to that queue extracts the print job and sends it to the assigned printer. If a
print serve r is servi cing que ues on mult iple f i le serv ers, you mu st assi gn queues to the
printer on each file server. To change the print queues, use the following procedures:
1. Start the PCONSOLE utility.
2. Select Print Server Information from the Available Options menu.
3. Select the print server from the list.
4. Select Print Server Configuration from the menu.
5. Select Queues Serviced by Printer from the menu.
6. Select a printer from the Defined Printers list.
7. Press INS at the File Server/Queue/Priority screen. The Available Queues list
appears.
8. Select a queue from the list.
9. Press ENTER at the Priority screen to leave the priority setting at 1.
The highest priority queue is 1; 10 is the last. To change the priority of a queue,
press ENTER at the File Server/Queue/Priority screen to display the Priority
setting screen. Press the back-arrow key to delete the current setting. Type a new
number from 1 to 10 and press ENTER.
Repeat steps 7, 8, and 9 to assign additional queues to the printer.
10. Press the ESC key and save all changes.
NetWare Configuration 4-23
Page 47

4.6.3 How to Set Up Notify
You can specify users or groups of users that are notified if a problem occurs when a
print job is sent to the printer. If the print server is servicing queues on multiple file
servers, y ou must set up a NOTIFY list for each file ser ve r. To se t u p NO TI FY, use the
following procedures:
1. Start the PCONSOLE utility.
2. Select Print Server Information from the Available Options menu.
3. Select the print server from the menu.
4. Select Print Server Configuration from the menu.
5. Select Notify List for Printer from the menu.
6. Select the printer from the Defined Printers menu.
7. Press the ESC key at the File Server/Notify Name/Notify Type/First/Next
screen. The Notify Candidates screen appears.
8. Select the user or user group from the Notify Candidates screen. The Notify
Intervals screen displays.
9. Set the First and Next intervals for notifying users about printer problems. The
First interval is the number of seconds the network waits before it notifies users
about a print job problem. The Next interval specifies how often in seconds users
are notified. Enter a number for each interval and press ENTER.
10. Press the ESC key and save all changes.
11. Press the ESC key until you see the prompt to exit PCONSOLE. Select Yes and
then pres s ENTER.
NetWare Configuration 4-24
Page 48

Windows Peer -to-Peer Printing
Windows Peer-to-Peer printing allows Windows-95 workstations and Windows NT
4.0 workstations and servers to print to EcoLAN 1000E printers without an
intervening server and without using IP. The main features of the Windows
Peer-to-Peer printing are as follows:
• Runs on W indo ws-95 w orkstat ions and on W indo ws NT 4.0 w orkstat ions or se rv ers
“out of the box”.
• Runs on networks which do not have a NetWare file server, as well as those that do.
• Implements pe er-to -peer bi-di rectional printing be tween W indo ws w orkstations and
EcoLAN 1000E printers.
5.1 Introduction and Preparation
5
The Peer-to-Peer implementation uses the IPX/SPX stacks that are provided with
Windows 95 or Windows NT. The redirector software provided will establish a
connection with the printers supporting Peer-to-Peer, without using an intermediate
file server, whether or not your network uses Novell NetWare.
When configuring the network capabilities for the Windows computer, you must
include the "IPX/SPX Compatible Protocol". If you are not using NetWare, you do
not need t o activate any NetWare Client application.
Windows Peer-to-Peer Printing 5-1
Page 49

This inclusion of IPX/SPX can also be done after initial Windows installation by
going to the Netw ork setup f unction und er Control P anel. To do this, you will need the
Windows CD.
Note: Because Peer-to-Peer uses the IPX/SBX Protocol, Novell operation must remain
enabled on the EcoLAN 1000E, even if traditional Novell printing facilities are
not being used. The name of the Peer-t o-Peer prin ter , as it appears in th e W indo ws
Port List, is the same as the Novell Print Server name, and may be changed by
changing the Nov ell Print Serv er name using the Web-based management or MAP
utilities.
On power up, the EcoLAN 1000E sniffs the network to see if there is Novell activity.
If there is, i t wil l use the same frame typ e a nd the local network number that i t sen ses.
If, in addition, the NIC can log on to a file server, it will assume that Novell is
normally used and will store this frame type and new number in NV RAM so that,
when it comes up again, it will not have to spend the time sensing (which can take
some time). However, if the NIC cannot attach to a file server, it will use the sensed
values, but will not store them.
If the NIC does not see any Novell activity, it will use 802.2 on 802.3 as a frame type
and will assign itself a network number of 0. The frame type and network number
being used is reported on the status and configuration sheet.
If a NIC is being moved from a site that had active Novell to a site that does not, the
unit shou ld be reset to factory default to clear the fr ame type and network nu mber
information.
5.2 Installation and Operation
Install the Windows Peer-to-Peer redirector as follows:
1. Put the Windows Setup utilities diskette in your A: or B: drive.
2. From the Windows main window, click on Start.
3. Click on Run.
4. From the Run screen, select the Setup file from the diskette that you placed in
your A: or B: drive.
5. Click on OK.
Windows Peer-to-Peer Printing 5-2
Page 50

6. At the Peer-to-Peer Set up screen, click on Next.
If setup detected a previous installation of the Peer-to-Peer Redirector, it will
prompt you to have Setup delete the old driver and continue the installation
procedure. Click on Yes or No.
Once the redirector is installed, each printer on the network that supports this peer-topeer capability will appear as a Port under Printer Properties.
To use the Peer-to-Peer connection, create a logical printer using the Add Printer
Wizard accord ing to the instructions for your printer. Set up the printer as a LOCAL
printer. Use the driver that came with your printer.
When the Add Printer Wizard asks you to choose the Port, select the name of the
Peer-to-Peer printer you wish to print to. When you complete the installation, select
the Pri nt Test Page option.
Windows Peer-to-Peer Printing 5-3
Page 51

EcoLAN 1000E and the Macintosh Computer
The network printer information presented in this chapter applies to the Macintosh
Operating System. The DP-2800 Macintosh solution is supported by an installer on
the CD packaged with the DP-2800 printer.
Important: For Macintosh compatibility, the PostScript option, KPDL-II must be
installed, and the default emulation for the Option interface mu st be set to
KPDL or KPDL (Auto).
A utility called KyoManage which allows setting the printer’s IP Address from a
Macintosh is available from Mita’s web site (www.Mita.com). Instructions for
KyoManage are included at the end of this chapter. Once the printer’s IP Address is
set, the 1000E may be managed with a standard browser by connecting to the printers
IP address (http://xxx.xxx.xxx.xxx).
6
6.1 Using the DP-2800 Macintosh Installer
The DP-2800 Macintosh installer can be found on the Mita CD which accompanies
the print er. Because the DP-2800 Driver and the DP -2800 Util ity create their own
preference files on the Macintosh, the DP-2800 installer must be used on each
Macintosh system on the network.
To use the installer , open the dri ve rs folder on the CD and select the DP-2800 insta ller.
The DP-2800 installer places the DP-2800 Driver, the DP-2800 Utility, the TrueType
Screen Font s, PPDs, and the readme fi le ont o your Maci nt osh. Aft er in st all i ng t h e DP2800 files, the DP-2800 installer closes and restarts the Macintosh system.
EcoLAN 1000E and the Macintosh Computer 6-1
Page 52

The DP-2800 installer consists of the following items:
• DP-2800 Driver - the software works with applications to select DP-2800 printer
features and options. It reads information from the Postscript printer description
(PPD) file, finding the available options for the selected model. Both theDP-2800
Driver and the PPDs are selected in the Chooser under the Apple Menu. The
installer places the 450K driver into the System/Extensions folder.
• DP-2800 Utility - the software enables the user to manage network printers, to
identify their general features, to send text and command strings to the them, to
manage fonts, to rename network printers and set power on status pages. The
installer places the 320K utility on the desktop.
• TrueType Screen Fonts- this collection of ten (10) screen fonts matches the printer
fonts to prov ide true WYSIWYG. The i nstal ler pl aces t he 1. 5 MB font col lecti on in
the System/Fonts folder.
• Postscript printer description (PPD) file- This file contains the feature and option
information for each model DP-2800 printer. It uses an industry standard PPD
format to report t o the d ri ver and the ut ilit y and pr ov ides s upport for pap er handli ng
options, fonts, language support, paper size, and pri nter options . The installe r places
the DP-2800 PPD files into the System/Extensions/Printer Descriptions folder
where they reside with other manufacturer's PPDs. They occupy 1.2MB of disk
space on the Macintosh.
• Readme File- This file provides installation instructions, font information and last
minute change information. The installer places the file on the Apple desktop.
6.2 Setting the Printer’s Default Emulation
Before accessing the printer from the Macintosh, the printer’s default emulation must
be set to KPDL or KPDL (Auto). KPDL (Auto) will automatically determine the
necessary emulation for KPDL (PostScript) and non-KPDL print jobs.
If only PostScript print jobs will be sent to the printer, use KDPL emulation. If both
PostScript and non-PostScript jobs will be sent to the printer, use KPDL (Auto)
emulation.
The following procedure may be used to change the default emulation from the
printer’s front panel.
1. Press the Mode Select key.
2. Press + or - until Interface is displayed. If the current Interface is not Option, then
press Enter , press + or - until Option is displayed, and press Enter again.
EcoLAN 1000E and the Macintosh Computer 6-2
Page 53

3. Press + or - until Emulation is displayed.
4. Press Enter and press + or - until KPDL or KPDL (Auto) is displayed, and press
Enter again to accept the new setting.
5. Press Mode Select to exit the menu.
6.3 Renaming the Printer
By default, the print er adopt s an AppleTalk name of KY O_###### wher e the six dig it
number is the 1000E serial number. The following procedure may be used to give the
printer a more user friendly name.
1. Open the DP-2800 Utility which was installed on your Macintosh desktop by the
DP-2800 Installer.
2. Select the a ppropriat e Appl eTalk zone (if an y) and t he des ired pri nter from t he li st
of PostScript Printers and click on General.
3. Click on Rename Printer.
4. Type the new name for the printer and click OK.
5. Close the DP-2800 Utility.
Additional DP-2800 Utility functions are described in section 6.4.
EcoLAN 1000E and the Macintosh Computer 6-3
Page 54
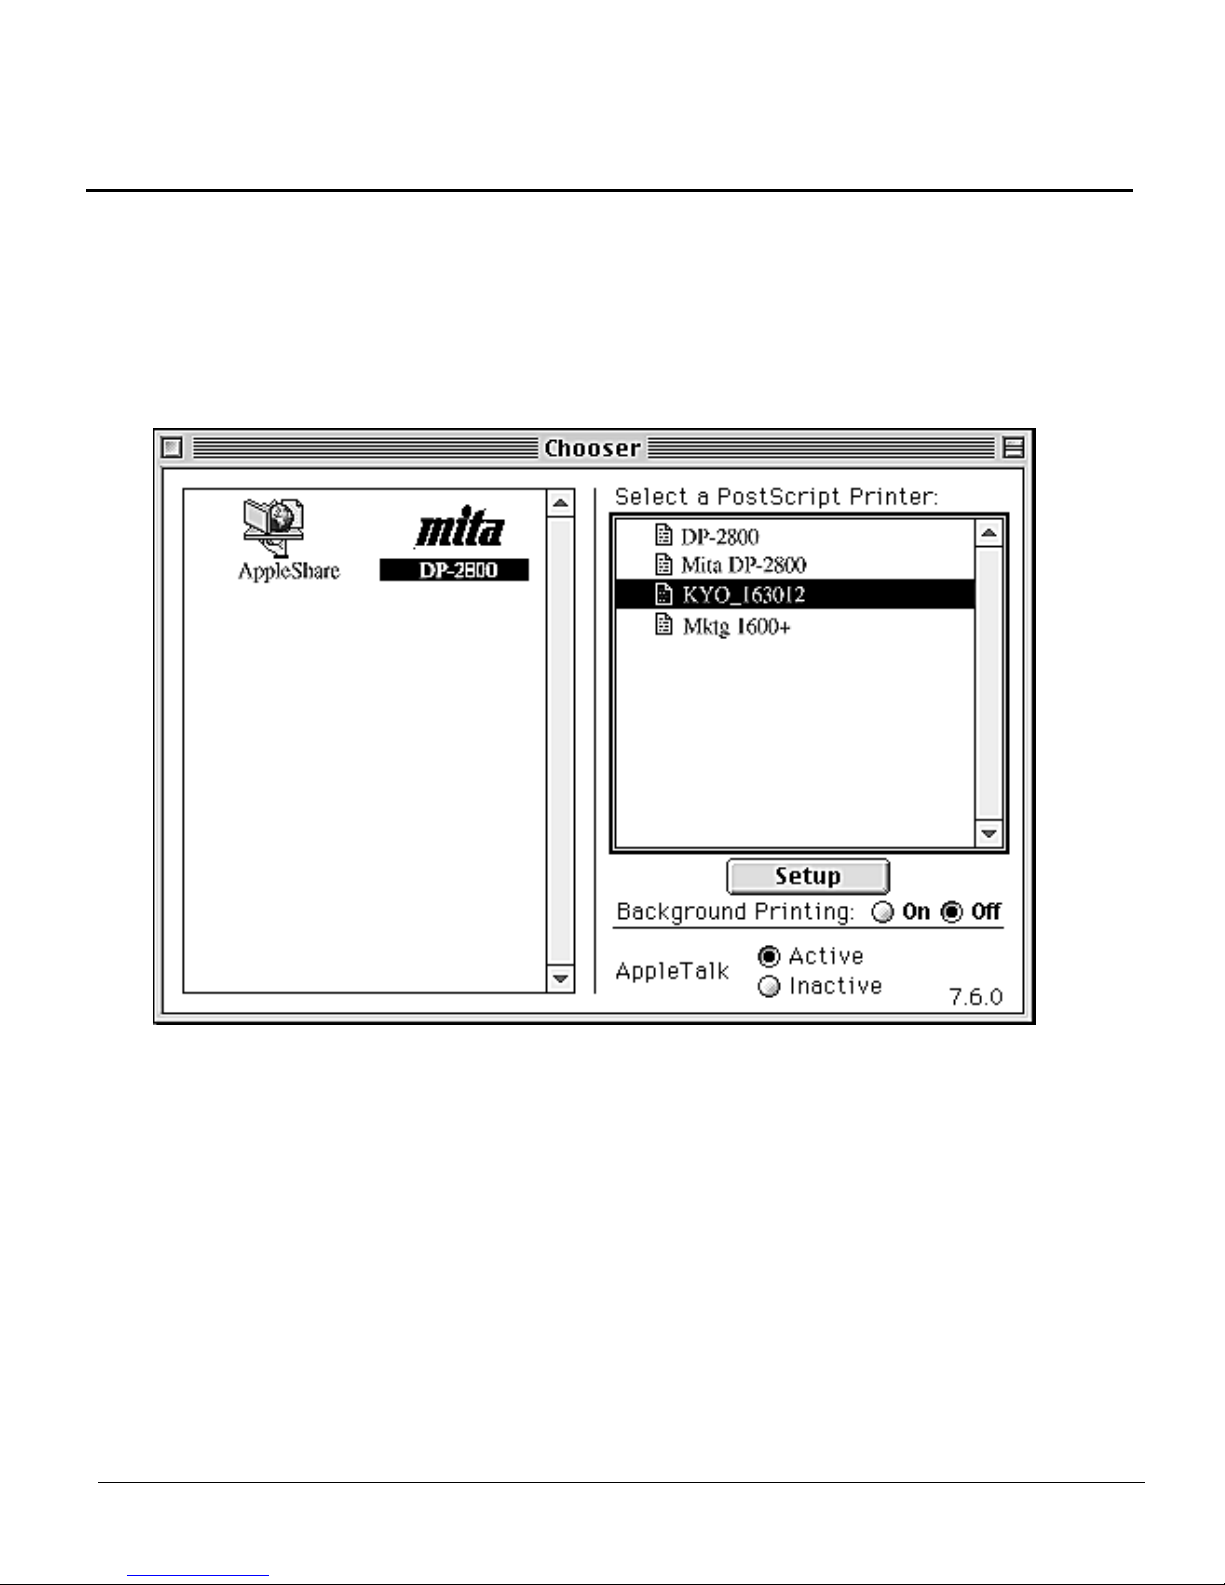
6.4 Chooser Setup and Selecting Installed Options
After the run ning the instal le r and renaming the printer, the us er m ust follow the st eps
below to comple te installation:
1. Under the Apple Menu, select Chooser.
2. In the Chooser, select the DP-2800 Driver, the zone if any, then highlight the
desired DP-2800 model appearing under Select a PostScript Printer. The default
name of the print er i s KY O_ followed b y t he 100 0E six digit serial numb er. Select
Setup.
3. Under Selected PPD, choose the DP-2800 PPD that matches the desired model.
Turn on Background Printing if desired and close the Chooser.
EcoLAN 1000E and the Macintosh Computer 6-4
Page 55
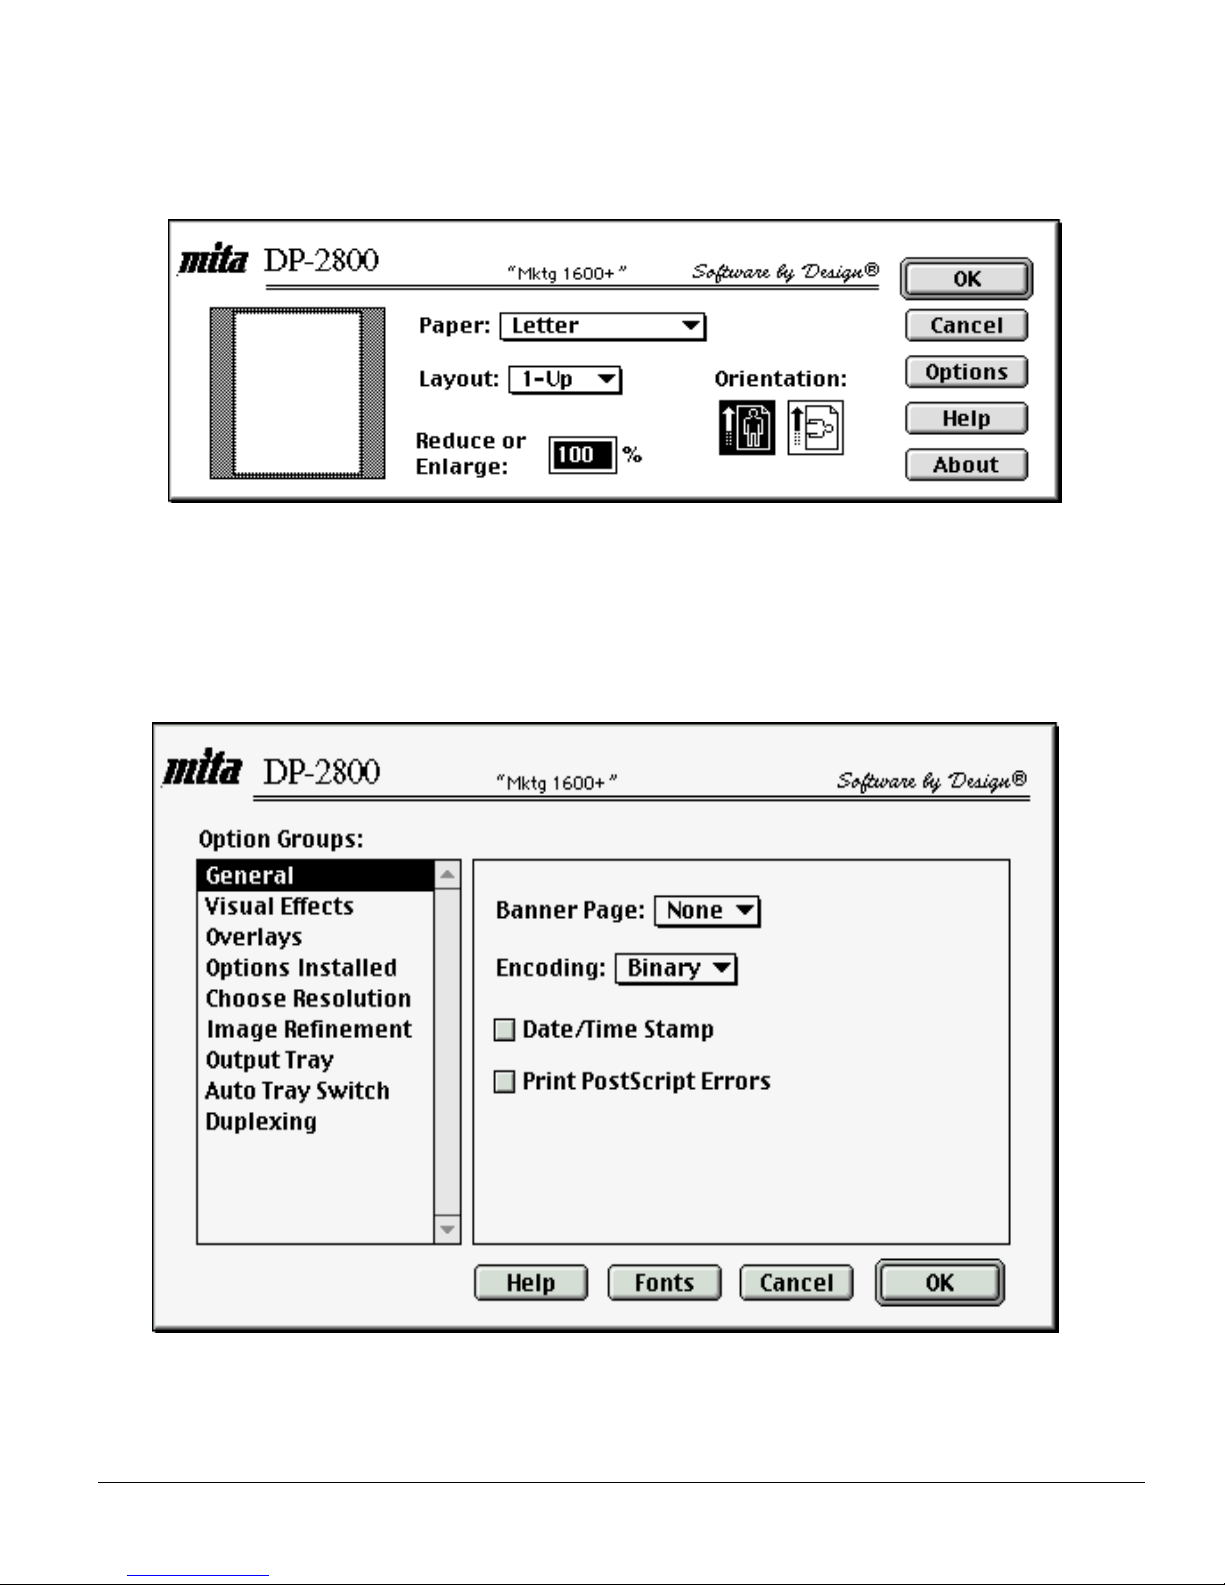
4. From the file menu within any application, select either Page Setup or Print.
5. Click on the Options button.
EcoLAN 1000E and the Macintosh Computer 6-5
Page 56
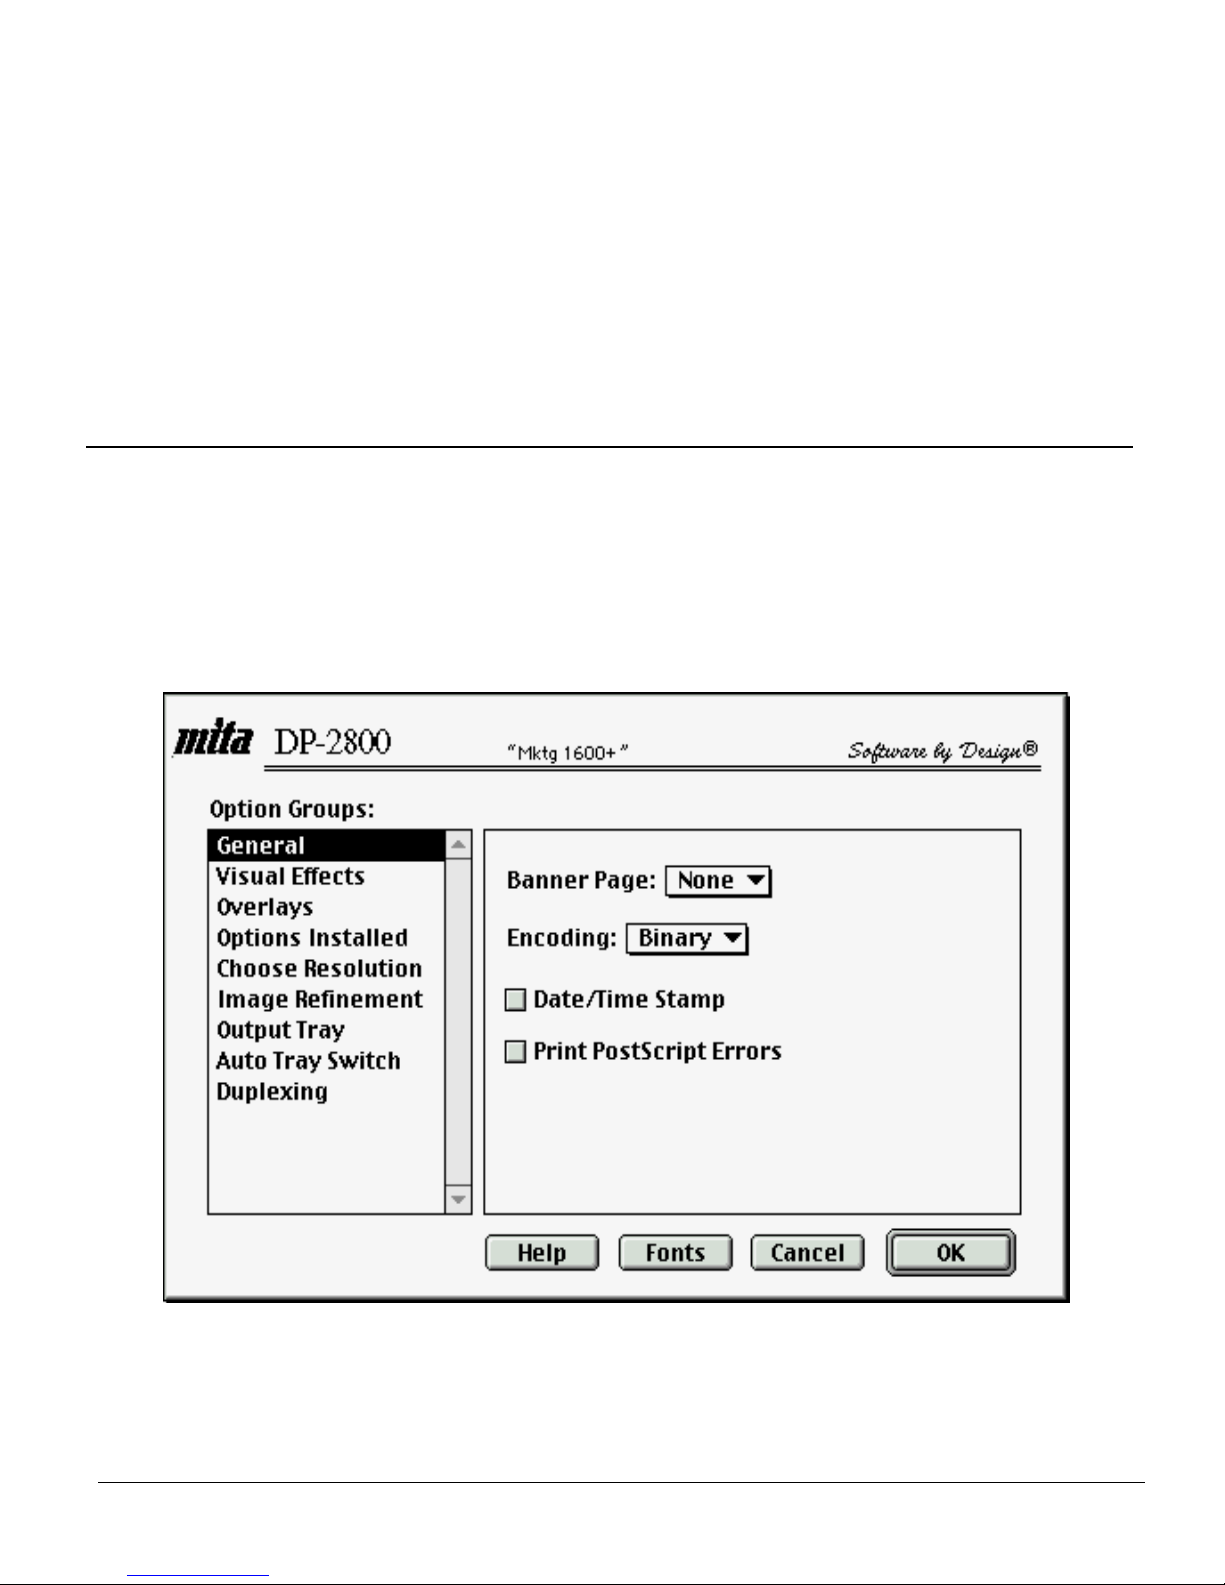
6. Click on Options Installed and select the memory upgrade and paper handling
accessories that are installed on the printer.
7. Optional: Click on the appropriate selection to set the desired defaults for options
such as Output Tray, Image Refinement, Duplexing, etc.
8. Click on OK when finished. This completes the Macintosh printing setup. The
following sections include detailed information on the available options in the
DP-2800 Driver and DP-2800 Utility.
6.5 Using the DP-2800 Driver
Page Setup, universally available on the desktop or from most application software,
accesses the features of the driver in coordination with the PPDs. The initial Page
Setup screen estab lishes se ttings f or page si ze selection , n-up pr inting, reduc e/enlar ge,
and page orientation.
EcoLAN 1000E and the Macintosh Computer 6-6
Page 57

Under Options/General, the user can establish the encoding method for sending data
to the printer (binary provides the fastest throughput). Options are also available for
selecting a banner page (displays the document name, User Name, Date and Time)
before or aft er the job, f or placi ng a dat e/time s tamp at the bott om of eac h page an d for
printing postscript error messages to the selected printer when they occur.
General
Banner Page None First Last
Encoding Binary ASCII
Date/Time Stamp
Print PostScript Errors
Under Options/Ov er lay, the user can choose to pla ce an o verlay image i nto a print job.
The overlay image can be placed on the first or second page of a job or overlaid onto
every page, either on top or below the text and graphics information.
Overlay
Overlay First Page Image None
Overlay 2nd Page Image None
Overlay Under
Overlay Over
Under Options/Visual Effects, the user can choose to manipulate graphics (inverting
them or flipping them horizontally or vertically), implement precision bitmaps (the
user can select output based upon the resolution of the printer -75 dpi scale- or the
resolution of the monitor -72 dpi scale- and smart underlining (the user can select
underlining based on intersecting or not intersecting the type descenders.)
Visual Effects
Flip Horizontal Print Patterns as Gray
Flip Vertical Smart Underlining
Invert Image Precision Bitmaps
EcoLAN 1000E and the Macintosh Computer 6-7
Page 58

Under Options Installed, the user can select the options available for the selected
printer. The DP-2800 driver reads this i nformation from the P PD.
Options Installed
Envelope Feeder Duplexing Unit
Universal Feeder Sorter Stacker Unit
Optional Paper Feeders Upgraded Memory Amount
Under Options/Output Information, the user can select the default output destination
for print jobs. With the SO-6 installed, print jobs can be set up for sorting, collating,
bulk stacking, face-up and face down and delivery to mailboxes.
Output Information
Face Up Mailbox 1-15
Face Down Stacker
Sorter Collator
Under Options/KIR Selection, the user can select the default setting for it.
KIR Selection
Off Medium
Dark Light
Under Options/Duplexing, the user can enable duplexing by selecting long edge or
short edge.
Duplexing
Long Edge Short Edge Off
EcoLAN 1000E and the Macintosh Computer 6-8
Page 59

Under Options/Font Configuration, the user can select the method for font handling.
Font Configuration
Add Remove
Substitute Fonts
TrueType Fonts Convert to Type 1 Keep as TrueType
Include Fonts None All
All but PPD/Installed All But Standard 13
All But Standard 35 All But Resident
6.6 Using the DP-2800 Utility
The DP-2800 Utility works with the PPDs like the DP-2800 Driver, but performs more
network and management functions than job related functions. In the Utility, the user
can view the li st of netw ork Post scri pt pri nters. To start the Uti lity, double click on the
DP-2800 Utility icon located on the desktop.
Components of the DP-2800 Utility are described below.
• PostScript Printers- presents a list of the network Postsc ript printers. Any of the
listed printers can be selected by the DP-2800 Utility.
• AppleTalk Zones- displays the AppleTalk zones established for the Macintosh
network.
• Print Requested Info- a check box for instructing the utility to send information to
the print er when Printer Info o r List Fonts is selected. Printer info will ge nerate a
printer information page with the following information displayed:
Product Name Firmware Revision PostScript Version
PostScript Language Level Maximum Available Memory
Memory in Use Save Nesting Levels Total Pages Printed
Startup Page
The List Fonts selection queries the printer to generate a list of all the fonts, resident
and non-resident, currently found in the printer.
• Help- links to the Help module for the DP-2800 Utility.
EcoLAN 1000E and the Macintosh Computer 6-9
Page 60

• Printe r is Silent- disables the Send Fonts and Printer Info button. It is a seldomly
used function of DP-2800 printers.
• Update Lists- queries the network printers, displaying any printers currently
available on the network and in the currently selected zone.
• List Fonts- qu eries the printer for the available fonts. It will display a simple list of
the fonts. For printed output, select the Print Requested Info box at the bottom of
the screen.
• Download- enables the user to download fonts to the printer.
• Printer Info- queries and displays the following amount of information for the
selected printer:
PostScript Level Memory in Use
Product Name Max. Memory Available
PostScript Version Pages Printed
Firmware Revision Startup Page Enabled
Save Nesting Level
• Send File- enables the user to send a file directly from the utility to the printer.
6.6.1 General Printer Options
The General Pr int er Opti ons in the DP-2800 Utility govern the general and net work
features of the DP-2800 printers. It includes the following functions:
EcoLAN 1000E and the Macintosh Computer 6-10
Page 61
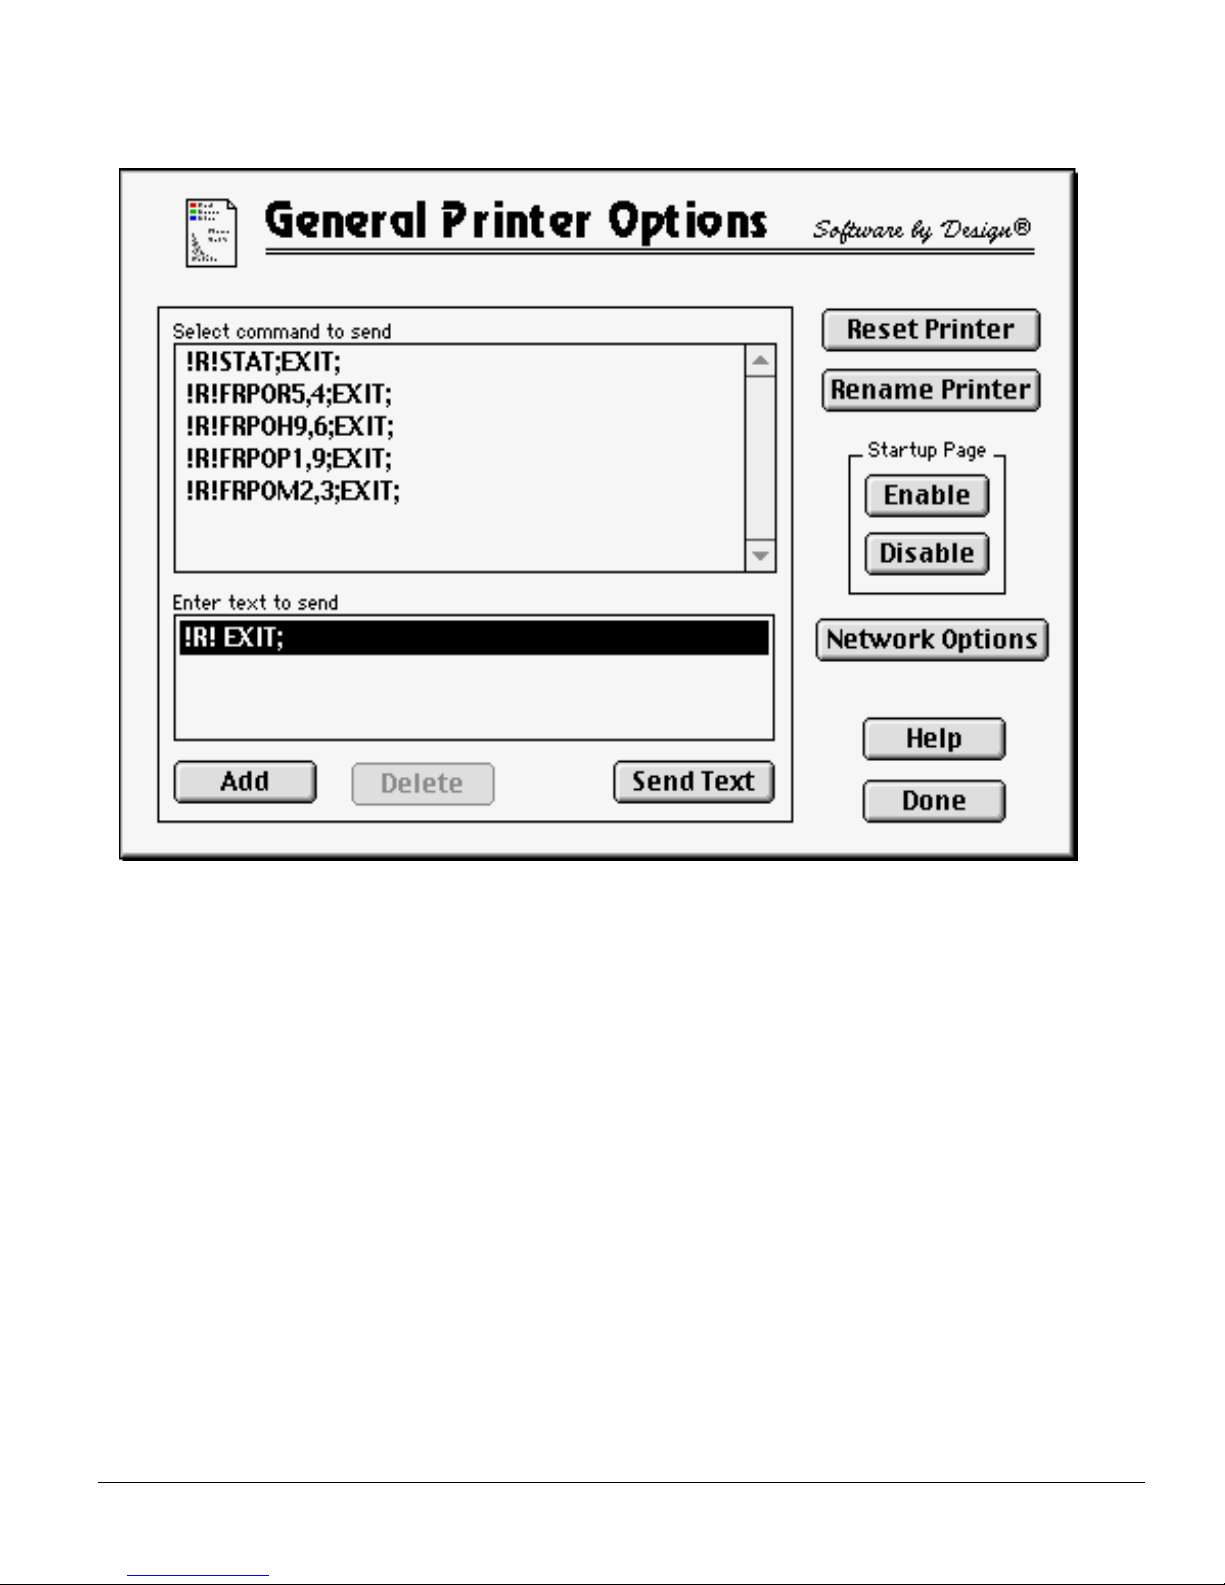
• Reset Pr inter- issues a reset command to the printer.
• Rename Printer- enables the user to rename the AppleTalk printer name. This
change will effect the printe r name as it ap pea rs i n the DP-2800 Util it y and on the
Network Status page under AppleTalk Printer Name.
• Enable/Disable Status Page- applies to the DP-2800 printer status page which if
enabled, will be printed when the printer is powered on.
EcoLAN 1000E and the Macintosh Computer 6-11
Page 62
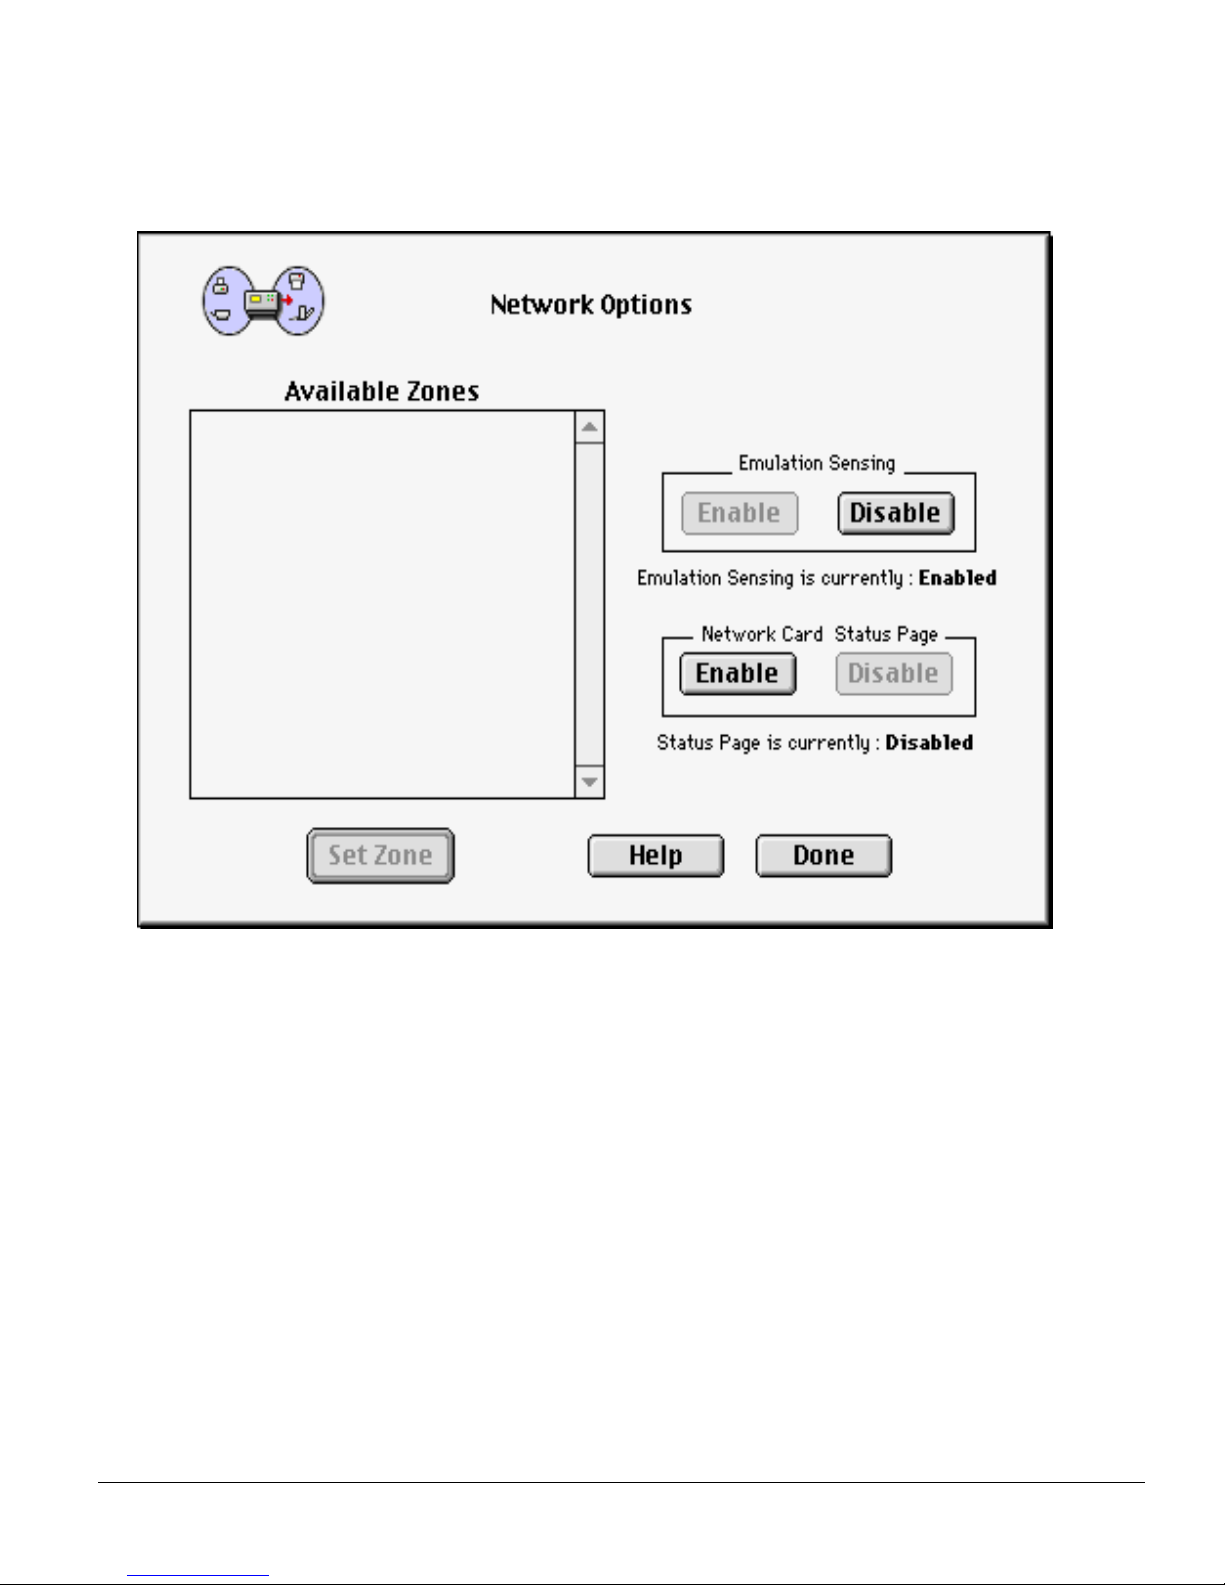
Network Options
• Enable Emulation Sensing- sends a command that enables the printer to detect
whether print jobs use PCL or KPDL and print the job accordingly.
• Network Card Status Page- instructs the printer to generate a network card status
page when the printer is powered on.
• Set Zone- enables the user to set the Zone for the selected printer.
• Select Command to Send- enables the user to maintain a list of frequently used
Prescribe commands.
• Enter Text to Send- enables the user to enter Prescribe commands to be sent to the
printer. Some of the typical comm an ds used in this li st include settings for the form
feed time out, default printer emulation and interface, and establishing raster size.
• Add Button- adds the command string to the list of Commands to Send.
EcoLAN 1000E and the Macintosh Computer 6-12
Page 63
• Delete Button- removes the highlighted Prescribe command string from the list.
• Send Text button- sends the text highlighted in the enter text to send box to the
selected printer.
6.7 Using the KyoManage Utility
The KyoManage Utility is available from Mita’s web site (www.Mita.com) for
network syst em adminis trators who use a Macintosh c omput er to manage t he ne twor k
DP-2800 printers. With this Utility, the network administrator can rename the DP2800 printers and set IP addresses for them. With an IP address, the printer can be
assigned and managed on the network and viewed by web browsing software. IP
address assignment is not available through the DP-2800 Driver or DP-2800 Utility.
The KyoManage Utility can be run from the diskette or copied to and run from a
folder on your system.
EcoLAN 1000E and the Macintosh Computer 6-13
Page 64

To set the printer’s IP Address, follow these steps:
1. Open KyoManage.
2. Highlight the desired Mita printer and click on Select.
3. Open the LAN Printer Server menu and select Protocol Setup.
4. Enter the appropr iate on/off settings for NetWare and TCP/IP. LAT for DEC systems is not functional for the EcoLAN 1000E.
5. For TCP/IP, set the IP Address, the Subnet Mask and the Default Gateway.
6. Choose OK and exit KyoManage.
Setting the IP Address will cause the EcoLAN 1000E to reset and print a Network
Status Page. On large networks the status page may take several minutes to print. The
new IP Address may be verified on the Network Status Page.
EcoLAN 1000E and the Macintosh Computer 6-14
Page 65

7
TCP/IP Configuration
This chapter explains how to configure the EcoLAN 1000E and your network for use
with TCP/IP communication in various environments. Independent setup and
installati on procedur es are pr ovid ed for W indo ws systems an d for mos t popular UNIX
systems. The EcoLAN 1 000E TCP/I P capa bilit y will also op era te with lpr spool ers o n
other systems, and with spooler/supervisor capabilities that communicate raw print
jobs to the Print Server TCP/IP Port. This port number defaults to 9100, but may be
changed to any desired number using the Telnet utility, SNMP, or the HTML pages
accessible via MAP or a Web Browser. Section 7.4 Running Telnet on page 40
describes the interactive setup capability accessible through the Telnet utility on any
TCP/IP platform, and is equally applicable to Windows, UNIX, and other TCP/IP
environments. The use of MAP or a Web Browser to access HTML management
pages in the EcoLAN 1000E is described in Chapter 3.
7.1 Installation in a Windows Environment
The several versions and variations of Microsoft Windows may be used on NetWare
and/or TCP/IP networks, as well as in a native Microsoft Windows networks. This
flexibility allows various options for setting up the network printing system even
though this EcoLAN 1000E does not support Netbeui. If the Windows workstations
are connected to a NetWare network, configure the printer interfaces for NetWare, and
use standard Windo ws /NetWare utilities to pro vid e acc ess to t he prin ter. If NetW a re is
not to be used, the users may access the printer using TCP/IP. Windows 95 and
Windows NT 4.0 users can also use the EcoLAN 1000E Peer-to-Peer capability as
described in Chapter 5. The following sections describe installation using TCP/IP
under Windows for Workgroups, Windows 95, and Windows NT.
TCP/IP Configuration 7-1
Page 66

7.1.1Windows for Workgroups
Printing with TCP/IP requires that the workstation have TCP/IP capability and the
corresponding spooler, lpr; or that the workstation can share an lpr queue on a
Windows NT server (for example) that has one. In general, if printers are not shared,
an -lpr queue must be created on each workstation from which printing is initiated.
See the Windows documentation about sharing printers.
Windows for Workgroups does not normally come with TCP/IP. However, various
TCP/IP faciliti es are ava ilabl e for Windows for Workgr oups workst ations, including a
free TCP/ IP provided by Microsoft. There are third party lpr spoolers available. The
following instructions are based on the Microsoft TCP/IP and a shareware lpr
application that is available from various sources, including Mita. You will need the
files WFWTCP32.zip and WFWTCP32.txt for the TCP/IP, and wlprs41.zip and
wlprspl.txt for the lpr.
You will need the BOOTPL.exe file if you wish to use the BOOTP Lite pr ogram t o set
up IP parameters. The BOOTPL.exe file is provided with the EcoLAN 1000E on the
Windows Setup Utilities diskette.
7.1.1.1Installing TCP/IP
Follow the instructions in the text file for the TCP/IP stack to set up TCP/IP on the
workstations.
7.1.1.2Loading the lpr Spooler
The Windows lpr Spooler Version 4.1 - User’s Guide (wlprspl.txt), provides detailed
instructions for decompressing and installing the shareware lpr spooler.
7.1.1.3Setting up the EcoLAN 1000E
The EcoLAN 1000E must be given IP address and routing infor mation to be use d with
TCP/IP. This can be done with Management Access Program (MAP) if you have a
NetWare connection on your ne twork, or with the Appl eTalk KYOMana ge progr am if
there is an Apple Macintosh on the network. The KYOManage program is not
included with the EcoLAN 1000E, but is available from Mita’s web site at:
www.Mita .com. Follow the instructions for these programs which are documented
elsewhere in this handbook. If you cannot use these programs, you can use either the
ARP procedure or the BOOTP Lite program.
TCP/IP Configuration 7-2
Page 67

Prior to running t hese pr ograms, i nstal l the Ec oLAN 1000E in your pri nter. Power -up
the printer. Keep the status sheet handy for the Ethernet (MAC) address. It should
show that TCP/IP is enabled, b ut t hat the Pr otocol add ress is n ot conf igure d. If the u nit
already has an IP address, -these procedures will not work. However, you can Telnet
to the unit or use the HTML pages accessed by MAP or a Web Browser to change the
IP parameters.
7.1.1.4Assigning IP Address with ARP
The EcoLAN 1000E must be on the same network segment as the workstation that
you are using to configure it. The TCP/IP stack must be installed and operating.
Use the procedures in 7.1.1 .5 Assig ning IP Address with BOOTP Lite on pa ge 4 if y ou
prefer to use a windows-based program to configure the IP address instead of the
command line utility ARP:
1. From Windows, enter the MS/DOS box.
2. At the command prompt enter:
ping [any valid IP address on your network - not the print server]; the identified unit
should reply
arp -s [IP address of EcoLAN 1000E] [MAC Address of EcoLAN 1000E]; the entry
should be accepted
Note: For Windows 95 users, the MAC address must be separated by a dash (-). For
example, 00-40-af-36-85-40.
For UNIX users, t he M AC address must b e sep ar ate d by a colon (:). For example,
00:40:af:36:85: 40.
ping [IP address of EcoLAN 1000E]; request should time out
3. Recycle the power on the printer, or let the EcoLAN 1000E reset itself. The
EcoLAN 1000E will produce a status page that should include the entered IP
address.
4. When the EcoLAN 1000E is up again, type the foll owing at th e command prompt:
TCP/IP Configuration 7-3
Page 68

ping [IP address of EcoLAN 1000E] (continue until you get a reply)
Note: This only enters the IP addre ss ; you must use the Telnet facility, the HTML pages
accessed b y MAP, or a Web Browser t o c om ple te the IP setup for networks wher e
subnets are used. See 7.4 Running Telnet on page 40 for instructions on how to
enter the other IP parameters using Telnet.
7.1.1.5Assigning IP Address with BOOTP Lite
This program uses the BOOTP protocol. The EcoLAN 1000E must be on the same
network segment as the workstation that you are using to configure it. The TCP/IP
stack must be installed and operating. The BOOTP Lite program will not work in a
Windows PC Operating as a DHCP Server.
The BOOTPL.exe program will work with a 16 Bit TCP/IP Stack (FTP, NetManage,
B&W, or WFWG).
1. Copy the BOOTPL.exe file to the Windows directory of your workstation.
2. From Program Manager under File, select Run \windows\ BOOTPL.exe.
3. Pull down the Admin menu to Configure option.
4. Enter the IP address that you want to assign to the EcoLAN 1000E, its Subnet
Mask (make sure it matche s what you are using on your subnet) , the Defau lt Gateway (your router’s IP address), and the MAC address of the EcoLAN 1000E
(Hardware Addre ss, listed on t he Stat us sheet as Ether net Addr ess). Us e colons as
delimiters as shown on the status sheet rather than the dashes that Windows uses.
5. Click on Go. You will get a message that the program is Verifying, and then it
will tell you whether the unit is active or not.
6. Wait for about five minutes for the EcoLAN 1000E to reset. The Status sheet
should report the newly entered IP information.
7. Enter the MS/DOS box. At the command prompt enter:
ping [IP address of EcoLAN 1000E] (continue until you get a reply)
If it does not respond, verify that TCP/IP is enabled on the status sheet. If the status
sheet doe s not show the IP information, then repeat the above proced ures.
TCP/IP Configuration 7-4
Page 69

7.1.1.6Setting up IP Parameters
The EcoLAN 1000E provides for a setup connection via the standard Telnet port. To
be able to make changes to a unit with factory default settings, you must logon as
"sysadm". The default password is also "sysadm" (This password can be changed
from the Telnet utility). Section 7.4 Running Telnet on page 40 describe s the use of the
Telnet utility.
1. Telnet to the EcoLAN 1000E (the login and password are both sysadm).
2. Turn off the protocols that you are not utilizing (option 3).
3. Setup the subnet mask and default gateway for the EcoLAN 1000E if applicable
(menu option 1). (If you used BOOTP, this will already have been done).
4. Exit, Save and Reset the EcoLAN 1000E.
You can also use the HTML pa ges accessible vi a MA P or a Web Browser to set up l pr.
The password to change parameters with the HTML pages is the same as the Telnet
password.
7.1.1.7Loading the lpr Spooler
The Windows lpr Spooler Version 4.1 - User’s Guide (wlprspl.txt) provides detailed
instructions for decompressing and installing the shareware lpr spooler.
7.1.1.8Creating an lpr Queue on the Workstation
Once you install the spooler onto the workstation, the setup program will create a
group and icon.
1. Double click on the spooler icon.
2. Click on setup, and define a new queue.
3. At the Remote Host Name prompt enter the EcoLAN 1000E IP Address. Enter
PORT1 for the Remote Printer Name
4. Go to Control Panel, Printers, and choose Connect.
5. Select your driver and click on Next.
At this point, you should see an entry for your Windows lpr Spooler’s printer in the
"Available ports" listing. For example, C:\SPOOL\PRINTER_NAME.
TCP/IP Configuration 7-5
Page 70

7.1.2 Microsoft Windows 95
Windows 95 comes with a TCP/IP stack. To print with this protocol, a client also
requires an lpr utility. This program is available from various sources. The lpr queue
can be created on ea ch wo rkst ation or the lpr queue can be cre ated on on e w orksta tion
and shared on the network. Windows 95 workstations can also share a lpr printer
installed on an Windows NT server on the network.
The following instructions are based on the a shareware lpr application that is
available from various sources, including Mita. You will need the wlprs41.zip and
wlprspl.txt for the lpr.
If you wish to use the Bootp Lite program, you will also need the ntBOOTP.exe file
provided with this EcoLAN 1000E on the Windows Setup Utilities diskette.
7.1.2.1 Setting up the EcoLAN 1000E with Windows 95
The EcoLAN 1000E must be gi v en IP addr ess and routin g inform ation to be used with
TCP/IP. This can be done with MAP if you have a NetWare connection on your
network, or with the AppleTalk KyoManage program if there is an Apple Macintosh
on the network. The KyoManage pr ogram is not include d with the EcoLAN 1000 E but
is available from Mita’s web site at www.Mita.com/printers. Follow the instructions
for these programs which are documented elsewhere. If you cannot use these
programs, you can use either the ARP procedure, or the ntBOOTP program.
1. Install the EcoLAN 1000E in your printer.
2. Power-up the printer.
Keep the status sheet handy for the Ethernet (MAC) address. It should show that
TCP/IP is enabled but that the Protocol address is not configured.
If the unit already has an IP address, these procedures will not work. However, you
can Telnet or the HTML pages accessed by MAP or Web Browser to change the IP
parameters.
7.1.2.2 Assigning IP Address with ARP
The EcoLAN 1000E must be on the same network segment as the workstation that
you are using to configure it. The TCP/IP stack must be installed and operating.
TCP/IP Configuration 7-6
Page 71

Use the procedures in 7.1.2.4 Assigning IP Address with ntBOOTP, if you prefer to
use a Wi ndo ws based program to con fig ure the IP addres s instead of the c ommand line
utility ARP:
1. From Windows, enter the MS/DOS box. At the command prompt enter:
ping [any valid IP address on your network - not the print server]. The identified unit
should reply.
arp -s [IP address of the EcoLAN 1000E] [MAC Address of the EcoLAN 1000E]. The
entry should be accepted
ping [IP address of the EcoLAN 1000E]. Request should time out.
2. Recycle the power on the printer, or let the EcoLAN 1000E reset itself. The
EcoLAN 1000E will produce a status page that should include the entered IP
address.
3. When the EcoLAN 1000E is up again, at the command prompt, enter:
ping [IP address of EcoLAN 1000E] (continue until you get a reply).
Note: This only enters the IP address; you must use the Telnet facility, the HTML page s
accessed b y MAP, or a Web Browser t o c om ple te the IP setup for networks wher e
subnets are used. See 7.4 Running Telnet, for instructions on how to enter the
other IP parameters using Telnet.
7.1.2.3 Assigning IP Address with ntBOOTP
You may provide the I P address a nd other I P parameters t o the pri nter EcoLAN 100 0E
on 32 Bit TCP/IP Stack (Windows NT & Windows 95) using the NTBOOTP.exe
program. You will have to store the ntBOOTP.exe file in the Windows directory. The
ntBOOTP.exe program will not work if the Windows PC is an active DHCP Server.
This program uses the BOOTP protocol. The EcoLAN 1000E must be on the same
network segment as the workstation that you are using to configure it. The TCP/IP
stack must be installed and operating.
1. From Program Manager under File, select Run ntBOOTP.exe.
2. Pull down the Admin menu to Configure option.
3. Enter the IP address that you want to assign to the EcoLAN 1000E, its Subnet
Mask (make sure it matche s what yo u are u sing on your su bnet ), Def ault Gateway
(your router’s IP address), and the MAC address of the EcoLAN 1000E (Hardware Address, listed on the Status sheet as Network Address). Use colons as
delimiters as shown on the status sheet rather than the dashes Windows uses.
4. Click on Go.
TCP/IP Configuration 7-7
Page 72

5. Wait ab out five minutes. The Eco LAN 100 0E s hould recycle and pr oduc e a status
sheet showing the IP parameters you have just entered.
6. Pull down Admin menu to Verify. You should get a message back stating that the
Unit is Acti v e . If you do not ge t thi s messa ge, ve rify that TCP/IP is en abled on the
status sheet.
7. When you get a response that your unit is active, you should be able to ping and
Telnet to the EcoLAN 1000E.
7.1.2.4 Setting up IP and lpr Parameters
The EcoLAN 1000E provides for a setup connection via the standard Telnet port. To
be able to make changes to a unit at factory default settings, you must logon as
sysadm. The default passwor d is also "sysadm". (This pa ssword ca n be changed f rom
the Telnet utility.) See 7.4 Running Telnet on page 40 for instructions on using Telnet.
1. Telnet to the EcoLAN 1000E (the login and password are both "sysadm").
2. Turn off the protocols that you are not utilizing (option 3).
3. Setup the subnet mask and default gateway for the EcoLAN 1000E if applicable
(option 1).
4. Exit, Save, and Reset the EcoLAN 1000E.
You can also use the HTM L pages acce ssibl e via MAP or a Web Browse r to set u p lpr.
The password to change parameters with the HTML pages is the same as the Telnet
password.
7.1.2.5 Setting up lpr on the Workstation
Once you install the spooler onto the workstation; the setup program will create a
group and icon.
1. Double click on the spooler icon.
2. Click on setup, define new queue.
3. At the Remote Host Name prompt enter the EcoLAN 100 0E’s IP Address, and for
the Remote Printer Name e nter PORT1.
4. Go to Settings.
5. Select Printers.
6. Choose Add Printer.
7. Click on Next.
8. Select your driver and click on Next.
At this point, you should see an entry for your Windows lpr Spooler’s printer in the
"Available Ports" listing. For example, C:\SPOOL\PRINTER_NAME.
TCP/IP Configuration 7-8
Page 73

7.1.3 Windows NT Instructions
Windows NT (version 3.5 or higher) does come with TCP/IP and lpr capabilities,
although these must be installed when the unit is configured. You must install the
TCP/IP Protocol, Simple TCP/IP Services, and Microsoft TCP/IP Printing prior to
entering the network printer on the workstation.
Note: Once you have lpr installed on an Windows NT Server workstation and have
allowed printer sharing, other workstations may use the printer through the
Microsoft Windo ws Ne twork without having to have separate lpr queues instal le d
on each workstation.
If you wish to use nt BOOTP, you will nee d the ntBOOTP.exe file. This file is on
the Windows Setup Utilities diskette supplied with the EcoLAN 1000E.
7.1.3.1Setting Up the EcoLAN 1000E
The EcoLAN 1000E must be given an IP address and routing information to be used
with TCP/IP. This can be done with MAP if you have a NetWare connection on your
network, or with the AppleTalk KyoManage program if there is an Apple Macintosh
on the network. The KyoManage pr ogram is not include d with the EcoLAN 1000 E but
is available from Mita’s web site at www.Mita.com. Follow the instructions for these
programs which are documented elsewhere in this manual. If you cannot use these
programs, you can use either the ARP procedure or the ntBOOTP program.
1. Install the EcoLAN 1000E in your printer.
2. Power-up the printer.
Keep the status sheet handy for the Ethernet (MAC) address. It should show that
TCP/IP is enabled but that the Protocol address is not configured.
If the unit already has an IP address, these procedures will not work. However, you
can TELNET to the unit to change the IP parameters.
7.1.3.2Assigning IP Address with ARP
The EcoLAN 1000E must be on the same network segment as the workstation that
you are using to configure it. The TCP/IP stack must be installed and operating.
TCP/IP Configuration 7-9
Page 74

Use the procedures in 7.1.3.3 Assigning IP Address with ntBOOTP, if you prefer to
use a Wi ndo ws based program to con fig ure the IP addres s instead of the c ommand line
utility ARP:
1. From Windows, enter the MS/DOS box. At the command prompt enter:
ping [any valid IP address on your network - not the print server]. The identified unit
should reply
arp -s [IP address of the EcoLAN 1000E] [MAC Address of the EcoLAN 1000E]. The
entry should be accepted
Note: For Windows 95 users, the MAC address must be separated by a dash (-). For
example, 00-40-af-36-85-40.
For UNIX users, t he M AC address must b e sep ar ate d by a colon (:). For example,
00:40:af:36:85: 40.
ping [IP address of the EcoLAN 1000E]. Request should time out
2. Recycle the power on the printer or let the EcoLAN 1000E reset itself. The
EcoLAN 1000E will produce a status page that should include the entered IP
address.
3. When the EcoLAN 1000E is up again, at the command prompt, enter:
ping [IP address of EcoLAN 1000E] (continue until you get a reply).
Note: This only enters the IP addre ss ; you must use the Telnet facility, the HTML pages
accessed by MAP, or Web Browser facility to enter the other IP parameters.
7.1.3.3Assigning IP Address with ntBOOTP
You may provide the I P address a nd other I P parameters t o the pri nter EcoLAN 100 0E
on 32 Bit TCP/IP Stack (Windows NT & Windows 95) using the ntBOOTP.exe
program.
This program uses the BOOTP protocol. The EcoLAN 1000E must be on the same
network segment as the workstation that you are using to configure it. The TCP/IP
stack must be installed and operating.
TCP/IP Configuration 7-10
Page 75

The NT cannot be operating as an active DHCP Server.
1. From Windows Program Manager under File, select Run ntBOOTP.exe.
2. Pull down the Admin menu to Configure option.
3. Enter the IP address that you want to assign to the EcoLAN 1000E, its Subnet
Mask (make sure it matche s what yo u are u sing on your su bnet ), Def ault Gateway
(your router’s IP address), and the MAC address of the EcoLAN 1000E (Hardware Address, listed on the Status sheet as Network Address). Use colons as
delimiters as shown on the status sheet rather than the dashes Windows uses.
4. Click on Go.
5. Wait ab out five minutes. The Eco LAN 100 0E s hould recycle and pr oduc e a status
sheet showing the IP parameters you have just entered.
6. Pull down Admin menu to Verify. You should get a message back stating that the
Unit is Acti v e. If you do not g et thi s messa ge, check t hat TCP/IP is enable d on th e
status sheet
7. When you get a response that your unit is active, you should be able to ping and
Telnet to the EcoLAN 1000E.
7.1.3.4Setting up IP and lpr Parameters
The EcoLAN 1000E provides for a setup connection via the standard Telnet port. To
be able to make changes to a unit at factory default settings, you must logon as
sysadm. The default password is also "sysadm" (this password can be changed from
the Telnet utility). The use of the Telnet utility is described elsewhere.
1. Telnet to the EcoLAN 1000E (the login and password are both "sysadm").
2. Turn off the protocols that you are not utilizing (option 3).
3. Setup the subnet mask and default gateway for the EcoLAN 1000E if applicable
(option 1).
4. Exit, Save, and Reset the EcoLAN 1000E.
You can also use the HTM L pages acce ssibl e via MAP or a Web Browse r to set u p lpr.
The password to change parameters with the HTML pages is the same as the Telnet
password.
TCP/IP Configuration 7-11
Page 76

7.1.3.5Setting up lpr on the Workstation
The following procedure is used to set up the lpr spooler on the Windows NT server.
1. Open Control Panel.
2. Go to Printers.
3. Choose Printer Menu.
4. Choose Create Printer.
5. Enter a printer name (For example, lprprint er).
6. Select the proper printer driver.
7. Enter a description. This is optional.
8. In the Print To dialog, choose Other.
9. In Print Destinations window, select lpr port. This leaves you with add lpr com-
patible printer window.
10. Line 1: Address of host providing lpd (Print server); enter IP address.
11. Line 2: Name of printer on that machine - enter PORT1 (the word PORT MUST
be in uppercase).
12. Choose OK to exit.
Your EcoLAN 1000E is now configured to oper at e Windows NT. You may print from
any application by the following the normal print instructions for that application.
7.2 FTP Printing
FTP printing allows users se v e ral wa ys to pri nt f i les thr ough the in te rnet dir ectl y from
their favorite IP b rowser or other FTP clien t.
Important:The user must be aware of the type of file they are sending to the printer.
TCP/IP Configuration 7-12
Page 77

7.2.1FTP Printing Using Netscape
Connect to the por t you wish to send the pr int job t o on your prin t serv er. For example,
to print to the EcoLAN 1000E from Netscape (must be Netscape 2.0 or greater), do
the following:
1. Type: ftp://port1@<destination server IP address>
2. Select File.
3. Select Upload File.
Note: FTP printing does not support selecting multiple file names.
The selected file is now sent to the printer.
7.2.2 ASCII to Post Script (A2PS) Method
Connect to the port you wis h to send the te xt-based f iles to a Pos tScript print er on your
print server. For example, to print to A2PS1(ascii to postscript) your EcoLAN 1000E
from Netscape (must be Netscape 2.0 or greater), do the following:
1. Type: ftp://a2ps1@<destination server IP address>
2. Select File.
3. Select Upload File.
The selected file is now sent to the printer.
TCP/IP Configuration 7-13
Page 78

7.2.3 Drag and Drop Method
You can also use the "drag and drop" method of printing files from Netscape. For
example, to print a fi le on your EcoLAN 1000E from Netsc ape ( must be Netscape 2. 0
or greater), do the following:
1. Type: ftp://port1@<destination server IP address>
2. Click and hold on the file that is on your system and drag it to your IP browser’s
window.
3. Click on OK to upload file.
The selected file is now sent to the printer.
Note: FTP printing does not support selecting multiple file names.
Only one person can be logged on to a port at any particular time.
7.2.4 FTP Client
To print from a FTP Client, do the following:
1. Type: ftp <destination server ID>
2. Type: port1 (login using username of port number)
3. Type: put <filename>
The selected file is now sent to the printer.
TCP/IP Configuration 7-14
Page 79

7. 3 UNIX Printing
The EcoLAN 1000E can support UNIX TCP/IP printing in two modes:
• Host-based lpd where a supplied line printer daemon is run on one or more
workstations and print data is communicated to the EcoLAN 1000E via a TCP/IP
port or,
• Printer -based lpd where the printer appea rs a s a host running a line print er daemon.
In general, printer-based lpd is easiest to use on BSD UNIX systems, requiring an
entry in th e pri nt cap file o nce t he EcoLAN 1000E has it s IP information . So me UNIX
System V systems have restrictions on support of remote LPD printers, requiring that
the host-based LPD approach be used. For many operating systems, you have the
option of using host-resident printing or print server-resident printing. Each mode has
certain advantages.
• The host-resident method can print the username and filename on its banner page;
the print server-resident method prints a banner page with the host's name.
• The print server-resident method requires you to configure the printer only one
time, when you install the print s erver. The hos t-resident method requires that a
printing daemon be installed on every host that you want to be able to print jobs.
Note: The EcoLAN 1000E will also operate with other host-resident print
supervisor/spooler programs that present a print image to the printer over a
TCP/IP port. Th e b ase TCP/ IP port number ca n be changed via Telnet, or the NI C
HTML setup pages accessed by MAP or a Web Browser. Remember, the actual
port is always one higher than the base port number. The Network Status Page
indicates the actual port number.
TCP/IP Configuration 7-15
Page 80

Between the host-based and printer-based TCP/IP printing capabilities, the E coLAN
1000E works with:
• All UNIX systems that support lpd
• System V Rel. 4 (on 386 platforms)
• DEC ULTRIX RISC Versions 4.3 and 4.4
• DEC OSF/1 Versions 2.0 and 3.0
•Solaris:
Version 1.1.3 (SunOS 4.1.3),
Version 2.3 (SunOS 5.3),
Version 2.4, and
Version 2.5
• HP-UX Series 700 and 800 Version 9.01 and Version 10.0
• IBM AIX Version 3.2.5
• SCO UNIX Version 3.2
•AS400
The TCP/IP di skett e also incl udes sour ce code that yo u can recompile host-ba sed c ode
for configuring on other System V platforms.
7.3.1 Configuring the IP Address on the EcoLAN 1000E
Regardless of the printing mode selected, the EcoLAN 1000E must be given IP
address and routing parameters. You can configure the IP address for the EcoLAN
1000E in one of the following ways:
• Use MAP, as described in Chapter 3.
• Use the AppleTalk KYOManage utility program, available from the Mita web site
as described in Chapter 6.
• Use the Internet Boot Protocol (BOOTP).
• Use the reverse ARP (rarp) capability (Ethe rnet II fra me type only).
• Use arp and ping capability.
For each method, you will need to provide the Ethernet address of the EcoLAN
1000E. The Ethernet address is the 12-character code that is printed under Network
Address on the configuration status report each time the printer is turned on.
TCP/IP Configuration 7-16
Page 81

You can use the BOOTP, rarp, or ping procedures only when the Print Server is in its
factory default state (no IP informat ion entered .) After the P rint Server has an IP
address, you must use the Telnet util ity, the Apple Talk KYOManage utility for the
Macintosh, or the EcoLAN 1000E HTML management pages accessed through the
MAP utility or a Web Browser to change an IP address, Subnet Mask and Default
Gateway.
7.3.1.1Using BOOTP
The BOOTP daemon is a native TCP/IP option for configuring the IP address of a
diskless network device. To communicate the IP address, use the following
procedure:
1. Turn off the printer.
2. Log in as superuser on a host on the same subnet as the print server. However, if
the server resides on another subnet, complete this procedure to store the IP
address in the print server. Reconnect the print server anywhere on the network,
and then use Telnet or the HTML pages accessed by MAP or a Web Browser utility to change the I P address. Se e 7.4 Runni ng Telnet on page 40 for instructi ons on
using Telnet.
3. Find the Ethernet address of the EcoLAN 1000E. The address is printed on the
configuration status report each time you turn the printer on.
4. Edit the hosts fi le (usu ally /etc/hosts) or use NIS or DIS to add the IP address and
EcoLAN 1000E's node name. See the network administrator for the IP address.
For example, a EcoLAN 1000E named printfast with an IP address of
192.9.200.200 has the following entry:
192.9.200.200 printfast
5. Stop the BOOTP daemon if it is running.
TCP/IP Configuration 7-17
Page 82

6. Edit the /etc/BOOTPtab file and add the following information:
nic_host:\
:ht = hardware type:\
:ha = ethernet address:\
:ip = IP address:\
:sm = subnet mask:\
:gw = gateway address:
For example, for an RFC 1 048 system:
printfast:\
:ht = ether:\
:ha = 0040AF03AF6E:\
:ip = 192.9.200.200:\
:sm = 255.0.0.0:\
:gw = 192.9.200.10:\
If running with a more recent BOOTP implementation, such as with SCO UNIX, add:
:vm = rfc1048:
The same information uses the following format on an RFC 951 system:
host htype haddr iaddr bootfile
printfast 1 00:40:af:03:af:6e 192.9.200.200 defaultboot
7. Start the BOOTP daemon by typing:
bootpd -s
8. Check the printer to verify that the EcoLAN 1000E is connected to the network.
Turn on the printer.
9. Wait until the printer powers up and finishes initializing to allow enough time for
the IP address to become known and to be saved in non-volatile memory. The
EcoLAN 1000E should reinitialize itself.
10. After the EcoLAN 1000E has rei niti alize , send a ping c ommand to v erif y that t he
print server obtained its IP address. For example:
ping 192.9.200.200
If the print server has the address, the result is a confirmation message:
192.9.200.200 is alive
TCP/IP Configuration 7-18
Page 83

11. Remove, or comment out, your changes to the /etc/BOOTPtab file.
12. Stop the BOOTP daemon and, if you want it to run, restart it.
7.3.1.2Using
rarp
The Reverse Address Resolution Protocol (rarp) allows network devices to query a
server for their IP addresses on start-up. For this procedure, there needs to be a
workstation with a rarp server. To store the IP address, use the following procedure:
1. Turn off the printer.
2. Log in as superuser on the rarp server. However, if the server resides on another
subnet, complete this procedure to store the IP address in the print server. Reconnect the print server anywhere on the network, and then use the Telnet or the
HTML pages accessed by MAP or a Web Browser to adjust the IP parameters for
the subnet on which the EcoLAN 1000E is to operate.
3. Find the Ethernet address of the EcoLAN 1000E. The address is listed as Network Address on the configuration status report when you power on the printer.
4. Edit the hosts file (usually /etc/hosts) or use NIS or DIS to add the IP Add ress a nd
EcoLAN 1000E’s node name. See the network administrator for the IP address.
For example, a print server with the name of printfast has the following entry:
192.9.200.200 printfast
5. Edit the /etc/ethers file or use NIS or DIS to add t he Ethern et addr ess. To continue
the example, for the printfast card with an Ethernet address of 00:40:c8:00:00:ff,
make the followin g entry:
0:40:c8:0:0:ff printfast
6. If the rarp daemon is running, stop it and restart it. Verify that the daemon is running.
7. Check the printer to see that the print server is connected to the network. Turn on
the printer.
8. Wait until the printer powers up and finishes initializing to allow enough time for
the IP address to become known and to be saved in non-volatile memory. The
EcoLAN 1000E should then reset itself.
9. After the EcoLAN 1000E has reset, send a ping command to verify that the print
server obtained its IP address. For example:
ping 192.9.200.200
If the print server has the address, the result is a confirmation message:
192.9.200.200 is alive
10. Remove, or comment out, your changes to the /etc/ethers file.
11. Stop the rarp daemon and, if you want it to run, restart it.
TCP/IP Configuration 7-19
Page 84

7.3.1.3Using
ping
Use the following procedure to enter the IP Address:
1. Turn off the printer.
2. Log in as superuser on a host on the same subnet as the print server. However, if
the server resides on another subnet, complete this procedure to store the IP
address in the print server. Reconnect the print server anywhere on the network,
and then use Telnet or the HTML pages accessed by MAP or a Web Browser utility to change the I P address. Se e 7.4 Runni ng Telnet on page 40 for instructi ons on
using Telnet.
3. Find the Ethernet addr ess of the Ec oLAN 1000E. The addre ss is listed a s Netwo rk
Address on the configuration status report each time you turn the printer on.
4. Edit the hosts file (usually /e tc/hosts) or use NIS or DIS to add the IP add re ss and
[print server's node name. See the network administrator for the IP address. For
example, a print server with a name of printfast and an IP address of
192.9.200.200 has the following entry:
192.9.200.200 printfast
5. Add an entry to the arp cache for the Print Server's IP address and Ethernet
address. For example:
arp -s 192.9.200.200 0:40:c8:0:0:ff
6. Check the printer to see that the Print Ser ver is connected to t he ne twork. Turn on
the printer.
7. Send a ping command the EcoLAN 1000E to verify it is running on the network.
For example:
ping 192.9.200.200 or
ping printfast
The EcoLAN 1000E will not respond to this ping command but it will read its IP
address from the packets.
8. Turn the printer off and back on again and then send the ping command again to
verify that the print server obtained its IP address. If the Print Server has the
address, the result is a confirmation message:
192.9.200.200 is alive
9. Remove the entry from the arp cache using the following command. Specify the
Print Server either by its IP address or by its name. For example:
arp -d printfast
TCP/IP Configuration 7-20
Page 85

7.3.2 lpd Printing
lpd is an implementation of the standard UNIX line printer daemon which lets you
print across a TCP/ IP network wit hout the need to install so ftware on your worksta tion
with all fi lter ing an d banner s d one b y EcoLAN 100 0E. Remote p rinti ng uses the s ame
commands (lpr, lpq, lpc) as local printing.
The process begins when the lpr call finds a printer on a remote system by looking at
the remote (rm) entry in the /etc/printcap file for that printer. lpr handles a print job for
a remote printer by opening a connection with the lpd process on the remote system
and sending the data file (followed by the control file containing control information
for this job) to the remote system. The printer-based lpd then filters the data and prints
the job according to information contained in the control file and its own printcap file.
EcoLAN 1000E lpd recognizes the format of a certain printer emulations and filters
the data, if possib le, so it can be printed on the printer type you spec ify. You can
indicate to the EcoLAN 1000E lpd what type of printer is attached to by either:
1. Accepting the default port setting (PCL, PostScript and other), or
2. Changing the listed emulations via the Telnet or the HTML pages accessed by
MAP or a Web Browser utility.
The following sections give specifics lpd setup instructions for various systems.
7.3.2.1 Setting Up a BSD Remote Printer to Use lpd
To set up a remote printer on the host that sends jobs to EcoLAN 1000E using printer
resident lpd, a dd an entr y to the /e tc/prin tcap f ile on your host for ea ch printe r you use.
The steps are described below.
1. Open the /etc/printcap file. Make an entry naming the EcoLAN 1000E as the
remote host and PORT1 as the remote printer name. A typica l printcap entry is
shown below:
<printer_name>\
(for example, lprprinter)
:lp=:\
:rm=<remote_host>:\
(for example, name as entered in /etc/hosts)
:rp=PORT1:\
:sd=/usr/spool/lpd/<printer_name>:
(for example, spool directory on system used to spool data and control files)
TCP/IP Configuration 7-21
Page 86

This entry will send jobs spooled at /usr/spool/lpd/<printer_name> to the printer
designated <printer_name> to be printed at port 1 (the internal connection to the
printer) of the EcoLAN 1000E designated as <remote_host>.
2. Create the spooling directory. For example, type:
mkdir /usr/spool/lpd/<printer_name>
3. To print via the spooler, use the lpr command. Type:
lpr-P <printer_name>< file_name>
Installation and testing is done. You are now ready to print.
7.2.2.2Setting Up an AIX Version 2.5 Remote Printer to Use lpd
Set up a remote printer on the host that sends jobs to the EcoLAN 1000E using the
EcoLAN 1000E’s lpd. Use the following procedures to do this:
1. At the prompt, type:
#smit spooler <cr>
2. When a window appears, select Manage Remote Printe rs .
3. When a menu appears, select Client Services.
4. Another menu appears, select Remote Printer Queues.
5. Another menu appears, select Add a Remote Queue.
6. When a window appears, change the values shown to configure the EcoLAN
1000E. The values displayed are default values. You must replace the short and
long form filter values with the values shown below.
Requested Information
Inputted Data Example Description of Inputted Data
Name of queue to add print1 Name of local printer
queue Destination Host printfast
Short Form Filter /usr/lpd/bsdshort Required value
Long Form Filter /usr/lpd/bsdlong Required value
Name of remote printer
queue
Name of device to add print1 Name of local queue
PORT1
EcoLAN 1000E
EcoLAN 1000E
IP hostname
7. After you have supplied all values, press e.
TCP/IP Configuration 7-22
Page 87

You can now print.
7. 3.2.3Setting Up an AIX 4.0 System
Use the following procedures to install a EcoLAN 1000E in an AIX 4.0 system:
1. Run SMIT Printer.
2. Select Print Spooling.
3. Select Add a Print Queue
4. Select Remote.
5. Use Standard Processing.
6. Assign a queue name.
7. Use the host address of the EcoLAN 1000E for the Remote System.
8. Use PORT1 for the queue on the remote syste m.
9. Add a description (optional).
10. Press e to generate.
Installation is complete. Test your printer by executing the following command:
lp -d<queue_name> <file_name>
7.3.2.4Setting Up an HP/UX Remote Printer to Use lpd
Set up a remote printer on the host that sends jobs to a EcoLAN 1000E using the
EcoLAN 1000E lpd. To do this:
1. At the prompt, type: sam
2. When a window appears, select Printer/Plotter Manager.
3. When the menu appears, select List printer and plotters.
4. When a list appears, select Actions in the title bar.
5. From the pull-down menu, select Add Remote Printer.
6. When a window appear s, add values to conf igure EcoLAN 1000 E. See the following example.
Description of Inputted Data
Input Requested Example
Printer Name myprinter name to be used in lp command
Remote System Name fastprint
EcoLAN 1000E
hostname as in /etc/hosts
Remote printer Name PORT1 lpd queue name
TCP/IP Configuration 7-23
Page 88

7. At the bottom of the screen, select Remote Printer is on BSD system from the
three choices available.
8. Click on the OK button.
9. Ping the unit to test communications. Type:
ping <EcoLAN 1000E IP address>
10. Ping should confirm your IP address with the message:
<EcoLAN 1000E IP address> is alive
11. If the connection is confirmed, you can now print.
7.3.2.5 Setting Up an AS/400 Systems to Use lpd
When working with the output queue description (WORKOUTQD), there are several
fields that must be defined for the EcoLAN 1000E to function properly as a remote
printer device. Use the following procedures to do this:
1. When prompted for the remote system, type INTNETADR so the AS/400
recognizes the device as an IP device.
2. Type PORT1.
3. Connection type must be IP.
4. Internet addres s mus t be the IP address of the EcoLAN 1000E device.
5. Destination type must be OTHER.
6. When prompted for transforming SCS to ASCII, type YES to allow the AS/400
do the character translation.
7. Manufacturer type and model must be the print driver that goes with your printer.
7.3.2.6Setting Up a DEC ULTRIX 4.3 RISC or OSF1/ALPHA Remote Printer
Set up a remote printer on the host that sends jobs to a EcoLAN 1000E.
1. At the prompt, type:
lprsetup
2. Select add.
3. Enter a name for your printer and press ENTER.
TCP/IP Configuration 7-24
Page 89

4. "Do you want more information on specific printer types? " Press ENTER.
5. A list of ULTRIX-supported printers is listed. Type remote and press ENTER.
6. Enter a printer synonym (alias) and press ENTER.
7. Designate a spooler directory and press ENTER, or accept the default spooler
directory displayed and press ENTER.
8. Designate a remote system name and press ENTER.
9. Designate PORT1 as the remote system printer name and press ENTER.
10. You are asked to enter the name of a printcap symbol from a displayed list. Type
Q and press ENTER.
11. Your configuration is displayed. You are asked whether these values are final.
Type Y or N and press ENTER. An example is shown below.
Printer #7 Symbol Type Representative Value
lp (line printer) STR
rm (remote host) STR
rp (remote printer) STR PORT1
sd (spooler directory) STR /usr/spool/lpd7
EcoLAN 1000E
_host
12. Add comments to the printcap file. For example, you can type:
Dick's printer down the hall ENTER
13. Select exit to save your configuration and press ENTER.
You are now prepared to print.
7.3.2.7Setting Up a SCO UNIX Remote Printer to Use lpd
Set up a remote pr int er on the host that sends jobs to a Eco L AN 1000 E using lpd. Use
the following procedures to do this:
1. At the prompt, type: mkdev rlp
TCP/IP Configuration 7-25
Page 90

Note: You cannot run mkdev rlp twice. I f you ha v e ad ditio nal pri nter s to be con f igur ed,
use the rlpconf command.
2. You will now be asked a series of questions. Respond as follows. Do you want to
install or remove a remote printer? Type: I
3. Do you want to change printer description file /etc/printcap? Type: Y
4. Write a printer nam e. For example, type: lprprinter1
5. Is lprprinter1 a re mote printer or a local printer? Type: R
6. Enter remote host name: type host name entered in printcap for EcoLAN 1000E.
For example, type: lprprin ter
7. Confirm the information you have entered. Type: Y
8. Confirm the preceding connection as your system default. Type: Y
9. Enter another printer name or quit setup. Type: Q
10. Do you want to start the remote daemon now? Type: Y
11. Using a line editor of your choice, edit the /etc/printcap file by changing the
:rp= entry to PORT1. For example,
printer1:\
:lp=:\ (us ed to specif y the device nam e for a local p rinter; this field must be
empty)
:rm=lprprinter:\ (remote machine name or network name of the print server)
:rp=PORT1:\ (remote printer name or the name of the print server)
:sd=/usr/spool/lpd/printer1: (name of the spool directory on the client)
7.3.2.8Setting Up System V Release 4 and Solaris 2.X to Use lpd
If your system recogni zes the LPSYSTEM command, you can use l pd. Another option
is the admintool if your system supports it.
TCP/IP Configuration 7-26
Page 91

LPSYSTEM Installation
Use the following procedures to install LPSYSTEM:
Note: The following must be executed from the Bourne Shell. Type: SH ENTER to
enter the Bourne Shell program.
1. lpsystem -t bsd <IP_address_of_EcoLAN 1000E>
Enter EcoLAN 1000E host name in /etc/hosts file. Your system may want its IP address
instead of the remote host name.
2. lpadmin -p <local printerna m e> -s <remote host name or IP address>!PORT1
Note: There is no space after the remote host name.
3. Enable <local printername>
4. Accept <local printername>
TCP/IP Configuration 7-27
Page 92

7.3.3 Installing TCP/IP for EcoLAN 1000E If Not Running lpd
The TCP/IP diskette provided with the EcoLAN 1000E includes install scripts for
various UNIX systems. This section describes how to install TCP/IP printing to the
EcoLAN 1000E on any of the following operating systems:
• DEC ULTRIX 4.3 RISC
• System V Rel. 4
• Solaris (Ver. 1.x, 2.x)
• SCO UNIX
• OSF1/ALPHA
• IBM AIX
• HP/UX
Once the EcoLAN 1000E has its IP information loaded, the following steps are
necessary for Host-Side TCP/IP printing:
1. Load the print server software on your workstation. It is presented as a tar file on
the TCP/ IP diskette.
2. Run the appropriate installation script, if available.
3. Complete the configuration for your operating system.
7.3.3.1Loading the Software
The following procedures are only necessary when using the supplied host-based lpr
capability. Loading the software is not necessary if printer-based lpr is used.
Important: The host-based lpr requires a TCP/IP port number of 9100. The default port
number for the EcoLAN 1000E is 9100. Please use Te lnet, the MAP utility,
or a Web Browser to change the port number. In the configuration utilities
the port number is set to one less t han the des ired port number. For example,
for port 9100, enter 10000. The EcoLAN 1000E Network Status Page
displays the actual port number in use.
1. Log in as superuser to the system that spools directly to the print server.
2. Insert the print server's TCP/IP diskette in the host drive.
TCP/IP Configuration 7-28
Page 93

3. Go to or create the directory in which you want to install the software. For
example:
mkdir /usr/PSC_install
Note: If you already have a EcoLAN 1000E printer at your site and you are now install-
ing another one, de lete the f iles in the i nstal la tion di rect ory (not /usr/nic). If these
files remain, th ey can prevent the installation o f a subsequ ent print se rver.
4. Use the tar command to load the software from the diskette. Choose your UNIX
version from the example from the following table, or if not shown, consult the
man page for your system:
UNIX Version Example
BSD/ULTRIX/AIX/SCO tar -xvf/dev/rfd0
System V tar -xvf/dev/rdsk/f13ht
System V/Solaris 2.3 tar -xvf/dev/rdiskette
Note: The device name varies depending on the computer and its peripheral
designations. The first BSD floppy device is often called rfd0.
5. After performing the tar, the system will display a list of EcoLAN 1000E files
copied by the tar. At this point, go to the specific section for your system for
instructions on running the installation script.
7.3.3.2Script Selection of Filters
There will be certain options in executing the script for various systems.
One of the questions posed by the install script is whether the printer is a PostScript
printer. If you answered no to this question, the install script uses an input filter
(infilter) that suppl ies CR/LF translati on to print A SCII files on a PCL printer. If you
answered yes to this question, your printcap file w ill reference psfilter which offers
easy ASCII-to-Po st Script con version. Normal Post Script format fi les are not affected.
Proprietary and public domain filters are available for broader filtering capabilities.
TCP/IP Configuration 7-29
Page 94

7.3.3.3Manual Selection of Filters
The EcoLAN 1000E ships with an input f ilter call ed psfilter and an o utput fi lter c alled
psbanner to print PostScript banners.
You may wish to change infilter or outfilter entries in the /etc/printcap file. The
following is a sample printc ap entry us ing these filter s:
<print_name> | EcoLan 1000E printer:\
:lp=/dev/nic/<printer_name>:\
:if=/usr/nic/psfilter:\
:of=/usr/nic/psbanner:\
:sd=/usr/spool/<printer_name>:
7.3.3.4Installing and Printing on Ver. 1 Solaris and OSF1 Systems
1. Run the Installation script by typing: nicinst.
The script automatically downloads the correct EcoLAN 1000E utilities for your particular system and prompts you for information as needed.
2. What is the node name of the Print Server unit?
Type the node name entered in /etc/hosts. For example: printfast and press ENTER.
3. What is the printer name?
Type the desired printer name and press ENTER.
4. Your screen will now display the information you provided to the install script.
For example:
Node name of the EcoLAN 1000E: printfast
Printer name to be used: <printer_name>
The printer is attached on: PORT 1
You are asked to OK this configuration. Type yes or no and press ENTER.
5. Is this printer PostScript?
Type yes or no and press ENTER.
TCP/IP Configuration 7-30
Page 95

6. The script creates a printcap entry for the printer just configured. The screen displays the entry and asks if you want the script to append it to your /etc/printcap
file. See below for a sample printcap file. Type yes or no and press ENTER. If
you type no, you may perform manual edits.
In your /etc/p ri ntc ap file, be sure not to chan ge the name of the device gi v en EcoLAN
1000E in Step 2. You must reference the same l p: ent ry you wrote on the lp command
line of the printcap file. For example:
<printer_name> | ´coLAN 1000E printer:\
:lp=/dev/<printer_name>:\
:if=/usr/nic/infilter:\
:sd=/usr/spool/<printer_name>:
All printcap entries must be prefaced with a tab except for the entry on the first line.
7. The script creates a spool directory in /usr/spool and starts the daemon for the
newly configured printer. It also displays the path used if you ever need to restart
the daemon. For example:
/usr/nic/lpr_print /dev/nic/<printer_name> printfast 9100 &
8. Run the ps command so that you can view all your lpd processes.
Type: ps -ax | grep lpd
9. Kill all of your lpd processes. Type: kill -9 <Process ID> (this will stop ALL
printing).
10. Restart the daemon.
Type: /usr/lib/lpd
11. Installation for the system is done. You are prompted to configure any more printers.
Type yes or no and press ENTER. We also suggest you ping the EcoLAN 1000E to test
communications.
7.3.3.5Installing & Printing on an DEC ULTRIX 4.3 System
1. Run the Installation script by typing: nicinst.
The script automatically downloads the correct EcoLAN 1000E utilities for your particular system and prompts you for information as needed.
2. What is the node name of the Print Server unit?
Type the node name ente red in /etc/hosts. For example, printfast and press ENTER.
TCP/IP Configuration 7-31
Page 96

3. What is the printer name?
Type the desired printer name and press ENTER.
4. Your screen will now display the information you provided to the install script.
For example:
Node name of the EcoLAN 1000E: printfast
Printer name to be used:<printer_name>
The printer is attached on:PORT 1
You are asked to OK this configuration. Type yes or no
and press ENTER.
5. Is this printer PostScript?
Type yes or no and press ENTER.
6. The script creates a printcap entry for the printer just configured. The screen displays the entry and asks if you want the script to append it to your /etc/printcap
file. See below for a sample printcap file. Type yes or no and press ENTER. If
you type no, you may perform manual edits.
<printer_name> | EcoLAN 1000E printer:\
:lp=/dev/<printer_name>:\
:if=/usr/nic/infilter:\
:sd=/usr/spool/<printer_name>:
7. Installation for the system is done. The program prompts you to configure any
more printers. Type yes or no and press ENTER. We suggest pinging the
EcoLAN 1000E to test communications.
Like all BSD systems, ULTRIX uses the /etc/printcap file to configure a printer. The
interface to the installation script is the same for all BSD systems, however, the
printcap entry is di ffer ent.
If you use the printca p entry gen erated auto matically by the installation script , this
will be transparent to you.
7.3.3.6Installing and Printing on the HP/UX System
1. Run the Installation script by typing: nicinst.
The script automatically downloads the correct EcoLAN 1000E utilities for your particular system and prompts you for information as needed.
2. What is the node name of the Print Server unit?
Type the node name ente red in /etc/hosts. For example, printfast and press ENTER.
TCP/IP Configuration 7-32
Page 97

3. What is the printer name?
Type the desired printer name and press ENTER.
Your screen will now display the information you provided to the install script. For exam-
ple:
Node name of the EcoLAN 1000E: printfast
Printer name to be used: <printer_name>
The printer is attached on: PORT 1
You are asked to OK this configuration. Type yes or no and press ENTER.
4. The script star ts the dae mon for th e ne wly conf igur ed printe r automa tical ly. It also
displays the path used should you ever need to restart the daemon. In the following example, the path would be:
/usr/nic/lpr_print /dev/nic/printer_name printfast 9100 &
This example reflects names supplied to the script earlier.
When the installation script is complete, you must configure the printer and make it
known to the lp system. The HP/UX lp system uses the lpadmin maintenance
command to configure a printer (there is not a /et c/printcap file). The specific
commands to do this are:
lpadmin -p printer_name -v /dev/nic/printer_name
enable printer_name
accept printer_name
You can also use other options for the lpadmin command. See your system
documentation for de tails.
Note: The printer name must be the same as the one you entered during the EcoLAN
1000E installati on. HP suppl ies the sam progr am as an al tern ati ve t o conf igu re the
printer.
When using sam, specify everything as if the printer were directly connected
to /dev/lprprin ter/printer_name.
TCP/IP Configuration 7-33
Page 98

The software installed with your HP system can satisfy most of your printing needs.
HP supplies ASCII-to- PostScript filters and the syste m will in v oke the m automaticall y
if you define the conte nt type of the printer as PostScript. The HP/UX lp system als o
supplies interface scripts that produce PostScript banners. Use the lpfilter command
to define new filters and content types if necessary. The full power and flexibility of
the lp print service is now available to you. The fact that you are printing across the
network is completely transparent.
7.3.3.7Installing and Printing on a System V (Solaris Ver. 2)/System V Rel. 4
386-based Machine
Installation and setup is exactly the same for System V Solaris and SVR4 i386-based
machines. Solution uses a network direct filter called nicfilter. The system invokes
nicfilter directly from the printer interface file. To load the software, create a /usr/nic
directory and tar the TCP/IP diskette to it.
1. Go to the /usr/nic directory by entering the following:
cd /usr/nic
2. Run the Installation script by typing: nicinst.
Once the operating system has been identified, the script downloads the files for your
particular sys tem, to the /usr/ nic d irector y, and prompts you for informa tion as ne eded.
3. Type cd /usr/spool/lp/ model / sta nda rd/ usr/nic/port1_i nte rface
Note: Use of this default interface in most cases will suffice for gen eric or routine print -
ing of most PostScript, PCL, and ASCII files. In order to utilize a printer specific
interface other than the default interface script (named standard), you must have a
copy of that printer interface edited and installed in the /usr/nic directory.
Next, you will need to edit the printer interface program you created in step 3.
4. Type: cd /usr/nic and using your favorite editor, open and edit the port1_interface
file.
TCP/IP Configuration 7-34
Page 99

5. Search on FILTER=" and insert the following line above or below the #
FILTER="${LPCAT} section of the file. Remark out (using the # sign) any other
FILTER entries present in this section of the file.
FILTER="/usr/nic/infilter| /usr/nic/nicfilte r printer server name 9100"
Note: The <print serv er name> mus t be the sa me as the on e prese nt in the /et c/hos ts file.
Optional arguments to be inserted after the 9100 entry and before the
trailing " are ${banner}, ${user_name}, ${request_ID}, and ${files}. For further
explanatio n of these and the statement above, refer to th e System 5 Release 4 Sys-
tem Administration Manual.
6. Save the f i le and close the edito r.
You need to configure the host- side printe r using lpadmin.
7. Type the following:
lpadmin -p <printer name> -v /dev/null -i /usr/nic/port1_interface
Note: lpadmin configures the peinter name and associates it with a given device and
printer interface program. There is no /etc/printcap file involved with this method
of configuration.
Next, you need to initialize the printer
8. Type the following commands:
accept <printer name> and press ENTER.
enable <printer name> and press ENTER.
Note: After each entry, lpadmin should provide an acknowledgement of the command
invoked.
9. Type the command:
lp -d <printer name> /etc/hosts, and press ENTER.
10. Check for output, or type the following:
lpstat <printer name> or -t.
TCP/IP Configuration 7-35
Page 100

7.3.3.8Installing & Printing on a SCO UNIX System
Installation and setup is similar for HP/UX and SCO UNIX systems. The EcoLAN
1000E solution uses a network direct filter called nicfilter. The system invokes
nicfilter directly from the printer interface file.
After completing sof tware downlo ad in Section 7.3.3.1 Loading the Software on page
28 you must configure the printer and make it known to the lp system. Follow the
steps below:
1. Run the Installation script by typing: nicinst.
The script automatically downloads the correct EcoLAN 1000E utilities for your particular system and prompts you for information as needed.
2. Select your system. Choose one from these options:
1) AT&T/SVR4; 386
2) SCO UNIX System V
3) None of the above
Type 1, 2, or 3 and press ENTER.
3. What is the node name of the EcoLAN 1000E?
Type the name assigned in the /etc/hosts file and press ENTER. For examp le, printfast
4. What is the printer name for this EcoLAN 10 00E-linked printer?
Type a printer name and press ENTER.
5. Your screen will now display the information you provided the install script. For
example:
Node name of the EcoLAN 1000E: printfast
Printer name to be used: <printer_name>
The printer is attached on: PORT 1
Do you want to accept this configuration? Type yes or no and p ress ENTER.
6. Is this printer PostScript?
Type yes or no and press ENTER.
7. The script automatically starts the daemon for the newly configured printer . It
also displays the path used should you ever need to restart the daemon. In the preceding example, the path would be:
/usr/nic/lpr_print /dev/nic/printer_name printfast
9100 &
This example reflects names supplied the script earlier.
When the ins ta ll at ion script is c om plete, you must st ill configure the print er and make
it known to the lp system.
TCP/IP Configuration 7-36
 Loading...