

Page 1

These instructions contain information about:
Fault-finding
Repair
Edition: 03.2001
MISTRAL
SERVICE
INSTRUCTIONS
Page 2

Service Instructions MISTRAL
As at: 04.07.02 Page1
General information
These repair instructions contains all the information necessary for maintenance and overhaul of
the wheelchair.
· All maintenance and overhaul work must be carried out in accordance with these repair
instructions.
· Please observe all safety instructions.
· Information about operation or about general maintenance and care work should be taken
from the wheelchair Operating Manual.
· You can find information about ordering spare parts in the spare parts catalogue.
· We reserve the right to make any alterations on the grounds of technical improvements.
· The wheelchair may only be maintained and overhauled by qualified personnel.
· - The minimum requirement for a maintenance technician is a specialist training e.g. as
bicycle or orthopaedic mechanic, or suitably long experience.
- Experience and knowledge of electrical measuring devices (Multimeter) is also a
requirement.
· If you have any problems or questions please contact INVACARE SERVICE:
Central office: Tel. 05731-754-0
Fax. 05731-754-111
Service Dept.: Tel. 05731-7545-(70-80)
Fax. 05731-7542-(08-16)
Address: Invacare Deutschland GmbH
Dehmer Str. 66
32549 Bad Oeynhausen
PO Box: Invacare Deutschland GmbH
Postfach 60 01 06
32 527 Bad Oeynhausen
· Alterations to the wheelchair which occur as a result of incorrectly or improperly executed
maintenance or overhaul work lead to the exclusion of all liability on the side of INVACARE.
Page 3

MISTRAL Service Instructions
Page 2 As at: 04.07.02
Notes on transport
· If the wheelchair has to be shipped back to the manufacturer for major repairs, you should
always use the original packaging for transport.
· You should also include as accurate a fault description as possible.
The following symbols are used in these repair instructions:
Note:
This symbol identifies general information which indicate special points or simplifications in
dismantling / reassembly.
CAUTION:
it is imperative that you observe any >safety instructions< identified with this symbol
This symbol identifies service work.
ü
Page 4

Service Instructions MISTRAL
As at: 04.07.02 Page3
Contents
1 SAFETY AND ASSEMBLY INSTRUCTIONS 6
1.1 Before any inspection or repair work: 6
1.2 During dismantling/reassembly 6
1.3 Before operation / after completion of work: 7
2 TOOL LIST 8
3 LAYOUT OF MODULES, COMPONENTS AND DISPLAYS AND
CONTROLS 9
4 ELECTRONIC CONTROLLER COMPONENTS / ELECTRONICS 10
5 INSPECTION PLAN 11
6 OPERATIONAL FAULTS 13
6.1 General 13
6.2 Fault causes 13
7 ERROR CODES FOR REMOTE 15
8 MODULE COMPOSITION / VARIATIONS 16
9 MAINTENANCE AND REPAIR 17
9.1 Chassis 17
9.2 Drive unit, disengaging mechanism, anti-tip mechanism 20
9.2.1 Drive unit 20
9.2.2 Tongue (1.4) / Crank (1.1) 21
9.2.3 Wheel hub (1.13) 21
9.2.4 Disengaging mechanism 22
9.3 Anti-tip mechanism 25
9.3.1 Anti-tip tube (3.1) 26
9.3.2 Anti-tip spring (3.6) 26
9.4 Brake 27
· unscrew cylinder head screw (1.7) 28
· screw on new brake cylinder 28
· check brake for functioning and readjust if necessary (see brake assembly) 28
· unscrew cylinder head screw (1.6 and 1.7) 28
· replace brake lever 28
· check brake for functioning and readjust if necessary (see brake assembly) 28
Page 5

MISTRAL Service Instructions
Page 4 As at: 04.07.02
9.5
Steering wheels 8" x 2" 29
9.5.1 Removal of steering wheels 30
9.5.2 Solid rubber wheel (steering wheel) (1.2) 30
9.5.3 Deep groove ball bearing (1.6), head tube axle (1.1.2), wheel fork (1.1.1) 30
9.6 Drive wheels 31
9.6.1 Wheel 12-1/2 X 2-1/4 31
9.6.2 Wheel rim halves (2.1 external, 2.2 internal) 32
9.6.3 Reassembly 32
9.6.4 Wheel 12-1/2 X 2-1/4 puncture-proof 33
9.6.5 Wheel rim halves (3.1 external, 3.2 internal) 33
9.6.6 Reassembly 34
9.6.7 Wheel 200 X 50 35
9.6.8 Wheel rim halves (4.1) 35
9.6.9 Reassembly 36
9.7 Battery case 37
9.7.1 Battery case 31 Ah 37
9.7.2 Batteries (1.5) 38
9.7.3 Battery case 50 Ah 40
9.7.4 Batteries (1.6) 41
9.8 Lighting 43
9.8 Electronics 50
9.9 Seat unit, seat angle adjustment, armrest and side panel 60
9.9.1 Seat unit, seat angle adjustment 60
9.9.2 Armrests and side panels 65
9.10 Side panel (1) 66
9.11 Side panel mounting (1.2 left, 1.3 right) 66
9.11.1 Clamping lever (1.12) 66
9.12 Backrest unit 67
9.12.1 Backrest detachable 67
9.12.2 Connecting strut (1.9) 68
9.12.3 Backrest padding fixing(1.12 left, 1.13 right) , backrest tube (1.11) , handle (1.1) 68
9.12.4 Backrest element adjustable 69
9.12.5 Backrest removal 71
9.12.6 Fixing the headrest 76
9.12.7 Headrest shell (1.4) 76
10 FOOTRESTS / LEG SUPPORTS 77
10.1.1 Footrest upper part standard 80 77
10.1.2 Turning knuckle (1.14) 79
10.2 Loosen machine screw with Phillips head (1.15) 79
10.2.1 Interlock 79
10.2.2 Clamp (1.3) 80
10.2.3 Footrest tube (1.1) 81
10.2.4 Footrest lower part 82
10.2.5 Calf strap (2.11) 83
10.2.6 Footplate (2.5 ) / Circular washer (2.8) 83
10.2.7 Push-in tube (2.1) 84
10.2.8 Reassembly takes place in the reverse order. 84
10.2.9 Leg support upper part with preset angle adjustment 85
10.2.10 Interlock 86
10.2.10 Interlock 86
Page 6

Service Instructions MISTRAL
As at: 04.07.02 Page5
10.2.11
Footrest (VARI F, 90°-65°) with fixed footplates 87
10.2.12 Footrest LH (90°-65°) with angle-adjustable footplate 91
10.2.13 Leg support manually height-adjustable with angle adjustment 96
10.2.14 Leg support manually height-adjustable with ergonomic length adjustment 102
10.2.15 Leg support RH electrical height adjustment with ergonomic length adjustment 108
10.3 Accessories 116
10.3.1 Kerb climber 116
10.4 Kerb climber complete 116
10.5 Lining BB 1517 DU (1.4) 117
10.5.1 Cane holder complete 118
Page 7

MISTRAL Service Instructions
Page 6 As at: 04.07.02
1 Safety and assembly instructions
The safety instructions are intended as prevention of accidents at work and it is imperative that
they are observed.
1.1 Before any inspection or repair work:
· Read and observe this repair manual and the associated operating manual.
· Observe the minimum requirements for carrying out the work (see chapter "
General information”).
CAUTION:
· Please note the high weight of some components. This applies especially to removal of
drive units and batteries.
· The wheelchair must be switched off before removal of voltage-carrying components.
To do this remove the battery.
· When making measurements on voltage-carrying components, avoid short-circuiting
the contacts.
Danger of fire and combustion !
· Use only undamaged tools in good condition.
1.2 During dismantling/reassembly
· Mark all current settings for the wheelchair (seat, armrests, backrest etc.), and the cable
connecting plugs associated, before any removals. This makes reassembly easier.
CAUTION:
· Support the wheelchair when raised with suitable equipment before beginning
removal or reassembly.
· Never use "standard" nuts instead of self-locking nuts.
· Always use correctly dimensioned washers or spacers.
NOTE:
· All plugs are fitted with mechanical safety devices which prevent release of the
connecting plugs during operation.
· To release the connecting plugs the safety devices must be pressed in.
· When reassembling ensure that these safety devices are correctly engaged.
· Cable binders which have been cut off during disassembly should be replaced
by new ones during reassembly.
ü
Page 8

Service Instructions MISTRAL
As at: 04.07.02 Page7
1.3 Before operation / after completion of work:
CAUTION:
· Check all fixings for tight fit.
· Check all parts for correct interlocking.
· Only operate wheelchair with correct tyre pressure (2.5 bar).
· Check electoral components for correct functioning, as incorrect cable polarity
can lead to "reverse" functioning (e.g. electrical leg supports).
As a last check always
carry out a trial run.
Page 9

MISTRAL Service Instructions
Page 8 As at: 04.07.02
2 Tool list
You will need a standard tool set with at least the following:
· set of open and ring spanner
· set of Allen keys
· torque wrench (commercial)
· socket spanner set
· set of screwdrivers
· oblique pliers
· flat-nosed pliers
· circlip pliers
· pointed pliers
· cable lug pliers
· wooden or plastic hammer
· tyre repair kit (commercial)
· tyre pressure indicator
· valve removal tool
· wheel bearing puller
· Multimeter with probes and various cable clips
· soldering iron 30 W
· front wheel hub puller (available from INVACARE Service)
· circlip pliers for Star lock caps (commercial, e.g. Tigtemeyer)
· pop riveting tool
· stepped mandril
Page 10

Service Instructions MISTRAL
As at: 04.07.02 Page9
3 Layout of modules, components and displays and controls
The following figures show the layout of "MISTRAL" modules.
Removal and reassembly of spare parts is described in Chapter 9.
1 Chassis
2 Drive unit, disengaging
mechanism, anti-tip
mechanism
3 Brake (no diagram)
4 Steering wheel
5 Drive wheel
6 Battery case
7 Lighting
8 Electronics
9 Seat unit, seat angle
adjustment, armrests,
side panels
10 Backrest
11 Leg supports
12 Accessories (no
diagram) kerb climber,
cane holder
Page 11

MISTRAL Service Instructions
Page 10 As at: 04.07.02
4 Electronic control l e r components / Electronics
1. Remote
2. Lighting
3. Drive RH
4. Connecting cable remote
– battery – drive units
5. Battery case
6. Drive unit LH
7. 2 batteries 12 V
8. Strip fuse holder with
strip fuse
9. Battery bridge
10. Battery cable
11. ACS-Clam (light-m otor
module combined)
12. Lighting
13. Electr. leg supports
Page 12

Service Instructions MISTRAL
As at: 04.07.02 Page11
5 Inspection plan
Component Check Remedy Chapter
ü
Armrests and
side panels
· Armrest damage and
fastening
· Side panel damage and
fixing
Þ Tighten screws, replace
padding
Þ Tighten screws, replace
side panels
9.9
9.9
Seat unit / seat
angle
adjustment
· Check seat angle
adjustment
Þ Replace parts
9.9
Back unit
mechanical
Back unit
electrical
· Damage and seams
· Fixings
· Check cabling
· Check function
Þ Replace parts
Þ Tighten screws
Þ Replace cable or motor if
necessary
9.10
Chassis with
battery case
strap / battery
case fixing
· Fixings, welded seams,
reflectors and battery
case strap. Check
Þ Tighten screws, replace
components
9.1
Wheel
suspension and
wheels
· Check drive wheels for
tight fit and side play
· Check steering wheels for
tight fit, float and side play
· Check steering wheel
forks
· Check tyres
Þ Adjust, replace wheel
hubs
Þ Replace wheels, wheel
fork or wheel bearings
Þ Replace
Þ Fit new
9.5
9.4
9.4
9.4
Drive units,
disengaging
mechanism
· Check functions in drive
and push modes
· Check disengaging
mechanism
Þ Replace motor if
necessary
Þ Tighten screws / nuts,
adjust or replace if
necessary
9.2
9.2
Footrests
· Check welded seams,
interlocking, screws,
footplates
Þ Tighten, replace
9.11
Electrical leg
supports
· Check cabling
· Check contacts
· Check functions
Þ Replace cable if
necessary
9.11
Lighting
· Check cabling
· Check function
Þ Replace cable or bulbs if
necessary
9.11
Page 13

MISTRAL Service Instructions
Page 12 As at: 04.07.02
Component Check Remedy Chapter
ü
Batteries
· Damage to batteries and
case, contact corrosion
· Check contacts, terminals
· Check battery voltage
Þ Clean contacts, replace
batteries or case
Þ Tighten, replace
Þ Charge batteries / replace
9.6
Remote /
electronics
· Remote,
status display blinking
· Fixing
· Cable, connecting plug
· Joystick function
· Power supply
Þ Evaluate blinking code
Þ Tighten, replace
Þ Replace
Þ Replace joystick
Þ Replace cable, connector
plug or console
7
9.8
9.6, 9.8
9.8
9.6
Page 14
Service Instructions MISTRAL
As at: 04.07.02 Page13
6 Operational faults
6.1 General
If faults occur in drive mode or power supply proceed as follows:
· First assess the fault causes described in Chapter 6.2.
· Check the status display on the remote and assess the error codes in accordance with
Chapter 7.
· Carry out the necessary testing / repairs. While doing this please note the references to the
appropriate chapter in the manual or to the appropriate documentation.
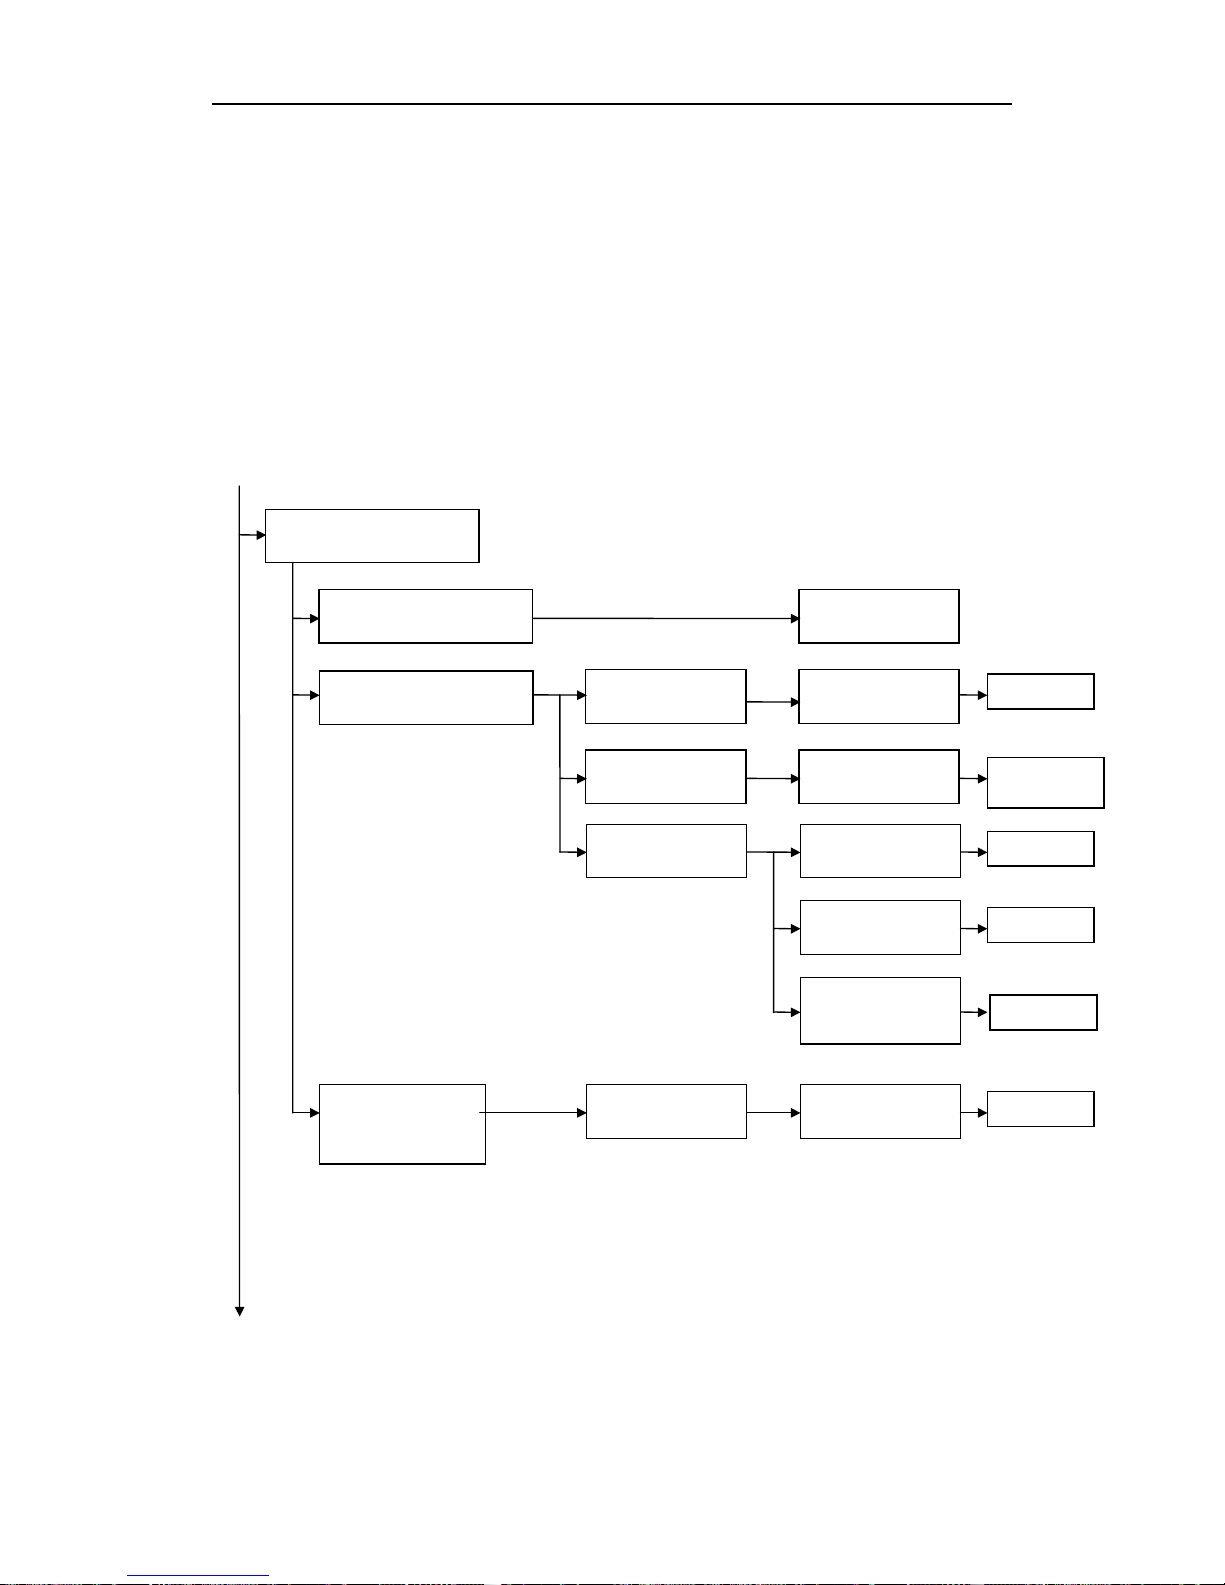
6.2 Fault causes
Wheelchair will not
engage motors
drive motors disengaged
batteries
defective
replace batteries
delete status display on
remote
pre-charge
batteries
completely
discharge battery
check battery
fuses
check voltage at
remote
power supply
interrupted
check voltage at
batteries
status display
blinking on
wheelchair
assess error code
error code 1-12
Chapt. 9.6
Operating
manual
Chapt. 9.6
Chapt. 9.6
Chapt. 7
Chapt. 9.6
Page 15

MISTRAL Service Instructions
Page 14 As at: 04.07.02
replace drive unit
drive unit
defective
Wheelchair judders in drive mode
Chapt. 9.2
replace battery
replace charging
device
batteries defective
charging device defective
Cannot charge batteries
Chapt. 9.6
warning horn defective
replace remote
lighting defective
check / replace
cabling or bulbs
Chapt. 9.8
Chapt. 9.7
electrical leg support defective
check / replace
cabling or motor
pneumatic backrest adjustment defective
check / replace
release unit / Bowden
cable, gas-filled
spring
Chapt. 9.11
Chapt. 9.10
electrical backrest adjustment defective
check / replace
cabling ,control unit,
moto r
Chapt. 9.8
Chapt. 9.10
Page 16

Service Instructions MISTRAL
As at: 04.07.02 Page15
7 Error codes for remote
Before assessing the error codes, carry out the following test:
· Turn the remote on and off several times. Before you switch on wait approx.. 5 seconds.
The test checks whether the error can be automatically rectified by the electronics, and if
necessary deactivates the blinking status display at the remote. If this is not the case, you can
locate the fault using the blink codes as follows:
· turn the remote on and off
· check which blink code is showing by counting
· wait for the blink code pause (approx. 2-3 seconds)
· re-count the code.
Blink code: Meaning: Immediate measure:
1 x blink
Module defective - Replace module
Chapt. 9.8
2 x blink
Accessory fault -
3 x blink
Fault in right-hand motor.
Connection
loose/defective
· Check connecting
plugs
Check drive unit /
battery Chapt. 9.2
/ 9.6
4 x blink
Fault in left-hand motor.
Connection
loose/defective or motor
defective
· Check connecting
plugs
Check drive unit /
battery Chapt. 9.2
/ 9.6
5 x blink
Fault/brake fault on righthand motor. Connection
loose/defective or motor
defective
Motors disengaged
· Check connecting
plugs
· Engage motors Turn
the remote on and off
Check drive unit /
battery
Chapt. 9.2 / 9.6
6 x blink
Fault/brake fault on lefthand motor. Connection
loose/defective or motor
defective.
· Check connecting
plugs
Check drive unit /
battery Chapt. 9.2
/ 9.6
7 x blink
Completely discharge
battery
· Pre-charge battery
Check battery
Chapt. 9.6
8 x blink
Battery voltage too high - Check battery
Chapt. 9.6
9 or 10 x blink
Faulty data transmission
between modules
- Check drive unit /
battery Chapt. 9.2
/ 9.6
11 x blink
Motors overloaded
· Turn remote on and
off
12 x blink
Compatibility problems - Check drive unit /
battery Chapt. 9.2
/ 9.6
Page 17

MISTRAL Service Instructions
Page 16 As at: 04.07.02
8 Module composition / variations
The Mistral can be supplied the following options from start of production:
· Batteries (Chapt. 9.6)
31 Ah
50 Ah
· Brake (Chapt. 9.3)
· Drive wheels (Chapt. 9.5)
12-1/2 x 1-1/4 (pneumatic tyre)
12-1/2 x 1-1/4 (puncture-proof)
200 x 50
· Lighting (9.7)
· Remote and accessories (9.8)
Compact
ACS operation for attendant
"Commando" attendant operation for backrest adjustable
"Commando" attendant operation for backrest detachable
Swivelling table
Operating console holder height-adjustable / swivelling
· Backrest elements (9.10)
Backrest element adjustable
Pneumatic backrest adjustment
Electrical backrest adjustment
· Headrest (9-10)
· Footrests / leg supports (9.11)
Standard 80
With preset angle adjustment
Vari 90° - 65°
Angle-adjustable footplates
Leg supports manually height-adjustable with angle adjustment
Leg supports manually height-adjustable with ergonomic length adjustment
Leg supports with electrical height adjustment
· Kerb climber (9.12)
· Cane holder (9.12)
Page 18

Service Instructions MISTRAL
As at: 04.07.02 Page17
9 Maintenance and repair
9.1 Chassis
Pos Qty. Item No./Pcs. Item Description
1.1 2 B210001.P18 Frame tube, RAL 5025 Pearl Gentian Blue
1.1 2 B210001.P91 Frame tube, RAL 1028 Melon Yellow
1.1 2 B210001.P92 Frame tube, Silver Grey gloss
1.2 1 B284012.P28 Battery case fixing RH
1.3 1 B284005.P28 Battery case fixing LH
1.4 2 B210015.00 Transport shackle
1.5 4 G00106 Washer 8.4 x 17 x 1.6
1.6 4 F20105 Hexagon nut M8 self-locking
1.7 1 B284020 Battery case fastening strap LH
1.8 1 B284021 Battery case fastening strap RH
1.9 2 D90195 Countersunk screw with Allen key M8 x 16 ULS
A2
1.10 2 G10103 Washer 8.4 x 25 x 2
1.11 2 F00002 Hexagon nut M8 self-locking
1.12 4 B284031 Cover plugs
Page 19

MISTRAL Service Instructions
Page 18 As at: 04.07.02
Pos Qty. Item No./Pcs. Item Description
1.13 1 B212007 Scissor stay complete
1.13.1 2 B212006.P28 Scissor stay
1.13.2 1 B212008.99 Straight pin Ø 8 x 110
1.13.3 2 B212009.99 Straight pin Ø 10 x 125
1.13.4 2 K32302 Star lock cap 8 mm, black
1.13.5 4 K32303 Star lock cap 10 mm, black
1.14 1 B290001 "Mistral" nameplate
Note:
Repair work to the chassis is easier to carry out if the complete seat unit has been
dismantled beforehand.
Removal of seat unit
· carefully lever off Star lock caps (A , B) with screwdriver
· pull out straight pins
· the complete seat unit can then be removed upwards
Scissor stay (1.13, 1.13.1)
· carefully lever off Star lock caps (1.13.5) with
screwdriver
· pull out straight pins (1.13.3)
· carefully lever off Star lock cap (1.13.4) with
screwdriver
· pull out straight pins (1.13.2)
· insert new scissor stay(s) (1.13.1)
Note:
Use new Star lock caps when reassembling.
ü
ü
Page 20

Service Instructions MISTRAL
As at: 04.07.02 Page19
Battery case fastening strap (1.7 left, 1.8 right)
· loosen countersunk screw with Allen key (1.9) and
hexagon nut (1.11)
· insert new battery case fastening strap (1.7 RH or
1.8LH)
Battery case fixing (1.2 right, 1.3 left) / transport shackle (1.4)
· unscrew hexagon nut M8 (1.6)
· remove battery fastening (1.2 or. 1.3)
· carefully tap transport shackle (1.4) out with wood
block and hammer
· insert new transport shackle or new battery fastening
Reassembly takes place in the reverse order.
Page 21

MISTRAL Service Instructions
Page 20 As at: 04.07.02
9.2 Drive unit, disengaging mechanism, anti-tip mechanism
9.2.1 Drive unit
Pos Qty. Item No./Pcs. Item Description
1 1 B253001 Drive unit complete
1.1 2 B222003 Crank
1.2 2 B222012 Lining 20x1x28,6
1.3 2 B222013 Lining 18x3x29
1.4 2 B222023.00 Spring
1.5 2 B222014 Stop
1.6 2 DG00001 Hexagon bolt M12 x 45
1.7 2 F00105 Hexagon nut M12
1.8 1 P00038 Drive unit LH
1.9 1 P00039 Drive unit RH
1.10 2 N23004 Feather key A 6 x 6 x 40
1.11 6 D50120 Cylinder-head screw with Allen key M6 x 40
1.12 6 D50133 Cylinder-head screw with Allen key M6 x 30
1.13 2 N322007 Wheel hub
1.14 2 Z122014 Wheel hub cover
1.15 2 D60200 Countersunk screw with Allen key M8 x 30-8.8
PB
Page 22

Service Instructions MISTRAL
As at: 04.07.02 Page21
Note:
Repair work is easier to carry out if the complete seat unit has been dismantled
beforehand.
Removal of seat unit
· carefully lever off Star lock caps (A , B) with screwdriver
· pull out straight pins
· the complete seat unit can then be removed upwards
9.2.2 Tongue (1.4) / Crank (1.1)
· dismantle drive gear (see chapter drive gear)
· support drive unit with woodblock (weight)
· unscrew hexagon bolt (1.6) /nut (1.7)
· replace spring(1.4)
· unscrew cylinder-head screw (1.11, 1.12)
· replace crank (1.1)
9.2.3 Wheel hub (1.13)
· Engage motor
· Lay wheelchair on soft bed on its side, so that the drive
wheel to be removed is at the top or
use suitable support
(e. g. wooden block) and prop the wheelchair up so that the
drive wheels are free.
· Loosen countersunk screw (1.15) with cover (1.14) and pull
drive wheel complete with wheel hub off the drive motor
(the axle has a feather key (1.10) fitted).
NOTE:
When removing the wheel hub (1.13) do not lose the feather key (1.10) in gear axle.
Reassembly takes place in the reverse order.
(Observe position of groove in wheel and feather key on axle).
ü
ü
Page 23

MISTRAL Service Instructions
Page 22 As at: 04.07.02
9.2.4 Disengaging mechanism
Pos Qty. Item No./Pcs. Item Description
2 1 B252012 Disengaging mechanism complete
2.1 2 B252007.99 Disengaging rod complete
2.2 2 B252017.99 Ball joint with M8 thread
2.3 2 F00103 Hexagon nut M6
2.4 2 F00104 Hexagon nut M8
2.5 2 K32301 Star lock cap 6 mm, black
2.6 1 B252004.P28 Disengaging lever, matt black
2.7 1 B252011 Plastic handle
2.8 1 B252001.P28 Turning knuckle RH, matt black
2.9 1 B252014.P28 Turning knuckle LH, matt black
2.10 1 B252005.P28 Lining 22x8,2x20
Pos Qty. Item No./Pcs. Item Description
2.11 2 J30007 Dowel pin 4 x 20
2.12 2 B252009.P28 Disengaging strut
Page 24

Service Instructions MISTRAL
As at: 04.07.02 Page23
2.13 2 D50108 Cylinder-head screw with Allen key M6 x 25
2.14 1 D50051 Cylinder-head screw with Allen key M6 x 16
2.15 3 F20109 Hexagon nut M6 self-locking
2.16 2 B252016.89 Washer T 2.5
After repair work to the disengaging mechanism it must be adjusted and checked
for correct functioning.
Disengaging rod (2.1)
· carefully lever off Star lock cap (2.5) with screwdriver
· pull out disengaging rod (2.1) from turning knuckle (2.8 or
2.9)
· unscrew disengaging rod (2.1) from ball joint (2.2)
Ball joint (2.2)
· unscrew hexagon cap nut (2.4)
· pull out ball joint (2.2) upwards and unscrew out of
disengaging rod (2.1)
· insert new ball joint
Disengaging strut (2.12)
· unscrew cylinder head screw (2.13, 1.14)
· remove disengaging strut (2.12)
Plastic handle (2.7), disengaging lever (2.6) / lining (2.10)
· pull off plastic handle (2.7)
· carefully drill out dowel pin (2.11)
· remove disengaging lever (2.6) from turning knuckle
ü
Page 25

MISTRAL Service Instructions
Page 24 As at: 04.07.02
Turning knuckle (2.8 right, 2.9 left)
· dismantle disengaging lever (2.6) or lining (2.10)
· unscrew cylinder head screw (2.13)
· remove disengaging lever ( 2.6) or lining (2.10) from turning
knuckle (2.8 or 2.9)
Functional check of disengaging mechanism
· prop the wheelchair up so that the drive wheels are free.
· set the switch lever to the horizontal position (both drive wheels should not be able to be
turned by hand)
· slowly turn the switch lever upwards and try to turn the drive wheels at the same time
Both drive wheels should be simultaneously disengaged (the wheels can be turned).
NOTE:
When the switch lever is in the upper position both drive wheels must be freely rotating.
If this is not the case, the disengaging mechanism must be readjusted.
Adjusting the disengaging mechanism
· loosen hexagon nut (2.3) on disengaging rod (2.1)
· carefully lever off ball joint (2.4) with screwdriver
· screw disengaging rod more or less into the ball joint
· set the ball joint on again and push down until the ball has engaged properly
· when adjustment is correct retighten hexagon nut
ü
Page 26

Service Instructions MISTRAL
As at: 04.07.02 Page25
9.3 Anti-tip mechanism
Pos Qty. Item No./Pcs. Item Description
3 2 B222022 Anti-tip mechanism complete
3.1 1 B222017.P28 Anti-tip tube; matt black
3.2 1 M14905 Support wheel
3.3 1 D50138 Cylinder-head screw with Allen key M6 x 40
3.4 1 F20109 Hexagon nut M6 self-locking
3.5 1 G00115 Washer 6.4 x 12.5 x 1.6
3.6 1 B222019.99 Anti-tip spring
Page 27

MISTRAL Service Instructions
Page 26 As at: 04.07.02
Support wheel (3.2), Anti-tip tube (3.1), Anti-tip spring (3.6)
Support wheel (3.2)
· unscrew cylinder-head screw (3.3) and hexagon nut (3.4)
· remove support wheel (3.2)
9.3.1 Anti-tip tube (3.1)
· loosen Allen screw (1.11, 1.12) on crank (1.1)
· pull out anti-tip tube (3.1)
· dismantle support wheel (3.2)
· when reassembling ensure that anti-tip spring (3.6)
engages
9.3.2 Anti-tip spring (3.6)
· dismantle anti-tip tube
· push anti-tip spring (3.6) completely home on both sides
(e.g. with Allen key)
· pull out anti-tip spring e.g. with pointed pliers
· when reassembling ensure that anti-tip spring (3.6)
engages in anti-tip tube (3.1)
Reassembly takes place in the reverse order.
Page 28

Service Instructions MISTRAL
As at: 04.07.02 Page27
9.4 Brake
Pos Qty. Item No./Pcs. Item Description
1 1 B2XX002 Brake complete
1.1 1 B231007 Brake lever LH
1.2 1 B231006 Brake lever RH
1.3 2 5007791 Brake lever handle
1.4 8 F20109 Hexagon nut M6 self-locking
1.5 4 D50051 Cylinder-head screw with Allen key M6 x 16
1.6 2 D50004 Cylinder-head screw with Allen key M6 x 30
1.7 2 D50122 Cylinder-head screw with Allen key M6 x 45
1.8 2 1400669 Brake cylinder
1.9 2 1400666-2 Connection piece
1.10 2 1400671-2 Cap
1.11 8 G00115 Washer 6.4 x 12.5 x 1.6
1.12 1 B231001.P28 Brake bracket RH
1.13 1 B231002.P28 Brake bracket LH
1.14 1 1400670 Spring LH
1.15 1 1400671 Spring RH
Page 29

MISTRAL Service Instructions
Page 28 As at: 04.07.02
Brake installation
· Screw the brake bracket RH (1.12) or LH (1.13)
loosely to the LH or RH battery holder with cylinder
head screws (1.5).
· Align the brake brackets so that the brake acts firmly
when operated, and so that there is enough play
between the wheel and the brake cylinder in drive
mode.
Replacing the brake cylinder (1.8)
· unscrew cylinder head screw (1.7)
· screw on new brake cylinder
· check brake for functioning and readjust if necessary (see brake assembly)
Replacing the brake lever (1.1 LH, 1.2 RH)
· unscrew cylinder head screw (1.6 and 1.7)
· replace brake lever
· check brake for functioning and readjust if necessary (see brake assembly)
Page 30

Service Instructions MISTRAL
As at: 04.07.02 Page29
9.5 Steering wheels 8" x 2"
Pos Qty. Item No./Pcs. Item Description
1 1 B222011 Wheel suspension 200 x 50 complete
1.1 1 B222015 Wheel fork complete
1.1.1 1 B222001.79 Wheel fork
1.1.2 1 B222002.99 Head tube axle
1.1.3 2 F00115 Hexagon nut M12 x 1.5 self-locking
1.2 1 5004320 Solid rubber wheel 8" x 2" with bearing
1.3 1 D08196 Hexagon bolt M8 x 90
1.4 1 F20105 Hexagon nut M8
1.5 1 B210013 Protective cap
1.6 2 2701003 Bearings R8-2RS 1/2" x 1.1/8" x 5/16
1.7 4 G00106 Washer 8.4 x 17 x 1.6
Page 31

MISTRAL Service Instructions
Page 30 As at: 04.07.02
9.5.1 Removal of steering wheels
Use suitable support (e.g. wooden block) and prop the wheelchair up so that the steering wheels
are free.
9.5.2 Solid rubber wheel (steering wheel) (1.2)
· unscrew hexagon cap nut (1.3)
· replace solid rubber wheel (1.2)
9.5.3 Deep groove ball bearing (1.6), head tube axle (1.1.2), wheel fork (1.1.1)
· remove protective cap (1.5) (lever out carefully with screwdriver)
· unscrew hexagon nut (1.1.3a)
· pull out steering wheel with wheel fork
· the deep groove ball bearing (1.6) can now be replaced
· unscrew hexagon nut (1.1.3b)
· replace head tube axle (1.1.2) or wheel fork (1.1.1)
Reassembly takes place in the reverse order.
Page 32

Service Instructions MISTRAL
As at: 04.07.02 Page31
9.6 Drive wheels
9.6.1 Wheel 12-1/2 X 2-1/4
Pos Qty. Item No./Pcs. Item Description
2 2 N321003 Wheel 12-1/2 x 2-1/4 complete
2.1 1 Z121007.P17 Wheel rim 1.5 J X 8" (external wheel rim body)
2.2 1 Z121008.P17 Wheel rim 1.5 J X 8" (internal wheel rim body)
2.3 5 D50117 Cylinder-head screw with Allen key M6 x 35
2.4 1 M11005 Tyre 12-1/2 x 2-1/4
2.5 1 M12004 Hose 12-1/4 x 2-1/4
2.6 4 D60183 Countersunk screw with Allen key M8 x 20
Lay wheelchair on not too soft bed on its side, so that the drive wheel to be removed is at
the top or use suitable support (e. g. wooden block) and prop the wheelchair up so that
the drive wheels are free.
Drive wheels (2)
· unscrew countersunk screw (2.6) complete and remove drive gear (2)
Caution:
Risk of accidents: Before the next stage you must remove the valve cap and
depressurise the tyre by pushing in the valve seat.
Page 33

MISTRAL Service Instructions
Page 32 As at: 04.07.02
9.6.2 Wheel rim halves (2.1 external, 2.2 internal)
· loosen cylinder-head screw with Allen key (2.3) and loosen both wheel rim halves (2.1, 2.2)
from the tyre (2.4)
Tyre (2.4), inner tube (2.5)
· remove inner tube (2.5) from tyre
· repair inner tube or replace with new, or replace tyre
9.6.3 Reassembly
· pump up inner tube (2.5) a little until round
· place inner tube (2.5) in tyre (2.4) and place both wheel rim halves (2.1 external, 2.2
internal) in the tyre from outside
NOTE:
the recesses in the wheel rim halves must enclose the valve.
Ensure that the inner tube is not caught between the wheel rim halves.
· insert countersunk screw (2.6), tighten gradually and then tighten with torque wrench (25-30
Nm)
· pump tyres up to full pressure (2.5 bar) and screw on valve cap
· insert wheel into hub, screw in cylinder head screw with Allen key (2.3) and tighten securely
NOTE:
The cylinder head screws must under no circumstances be lubricated.
During factory assembly they are inserted with "Plasbolt" and can be
dismantled/reassembled up to 6 times.
After the 7th reassembly the bolts must be cleaned and inserted with "Loctite" thereafter.
ü
ü
Page 34

Service Instructions MISTRAL
As at: 04.07.02 Page33
9.6.4 Wheel 12-1/2 X 2-1/4 puncture-proof
Pos Qty. Item No./Pcs. Item Description
3 2 1415040 Wheel 12-1/2 X 2-1/4 grey puncture-proof
complete
3.1 1 Z121007.P17 Wheel rim 1.5 J X 8" (external wheel rim body)
3.2 1 Z121008.P17 Wheel rim 1.5 J X 8" (internal wheel rim body)
3.3 5 D50117 Cylinder-head screw with Allen key M6 x 35
3.4 1 B221001 Tyre 12-1/2 x 2-1/4
3.5 4 D60183 Countersunk screw with Allen key M8 x 20 PH
Lay wheelchair on not too soft bed on its side, so that the drive wheel to be removed is at
the top or use suitable support (e. g. wooden block) and prop the wheelchair up so that
the drive wheels are free.
Drive wheels (3) puncture-proof
· unscrew countersunk screw (3.5) complete and remove drive gear (3)
9.6.5 Wheel rim halves (3.1 external, 3.2 internal)
· loosen cylinder-head screw with Allen key (3.3) and loosen both wheel rim halves (3.1, 3.2)
from the tyre (2.4)
Tyre (3.4)
· replace tyre
Page 35

MISTRAL Service Instructions
Page 34 As at: 04.07.02
9.6.6 Reassembly
NOTE:
Both wheel rim halves must be pressed together during reassembly. You can use two or
three longer bolts (M6x50) as an aid.
Insert the cylinder head screws (3.3) in the other holes.
Tighten the aid bolts so far that they reach into the cylinder head screws. Then replace
the aid bolts with the cylinder head screws (3.3).
· insert cylinder head screw (3.3), tighten gradually and then tighten with torque wrench (2530 Nm)
· insert wheel into hub, screw in cylinder head screw with Allen key (3.3) and tighten securely
NOTE:
The cylinder head screws (3.3) must under no circumstances be lubricated.
During factory assembly they are inserted with "Plasbolt" and can be
dismantled/reassembled up to 6 times.
After the 7th reassembly the bolts must be cleaned and inserted with "Loctite" thereafter.
ü
ü
Page 36

Service Instructions MISTRAL
As at: 04.07.02 Page35
9.6.7 Wheel 200 X 50
Pos Qty. Item No./Pcs. Item Description
4 2 U121051 Wheel 200 X 50 with 2-part wheel rim; black /
grey
4.1 1 M10998 Plastic wheel rim 2-part
4.2 1 M11010 Tyre 200 X 50 grooved; grey
4.3 1 M12001 Hose 7 X 1-3/4" with valve 90°; black
4.4 5 Not available
as spare part
Cylinder head screw with Allen key
4.5 5 Not available
as spare part
Hex-nut
Lay wheelchair on not too soft bed on its side, so that the drive wheel to be removed is at
the top or use suitable support (e. g. wooden block) and prop the wheelchair up so that
the drive wheels are free.
Drive wheels (4)
· unscrew countersunk screw complete and remove drive gear (4)
Caution:
Risk of accidents: Before the next stage you must remove the valve cap and
depressurise the tyre by pushing in the valve seat.
9.6.8 Wheel rim halves (4.1)
· loosen cylinder-head screw with Allen key (4.4) and loosen both wheel rim halves (4.1) from
the tyre (4.2)
Tyre (4.2), inner tube (4.3)
· remove inner tube (4.3) from tyre
· repair inner tube or replace with new, or replace tyre
Page 37

MISTRAL Service Instructions
Page 36 As at: 04.07.02
9.6.9 Reassembly
· pump up inner tube (4.3) a little until round
· place inner tube (4.3) in tyre (4.2) and place both wheel rim halves (4.1) in the tyre (4.2) from
outside
NOTE:
the recesses in the wheel rim halves must enclose the valve.
Ensure that the inner tube is not caught between the wheel rim halves.
· insert cylinder head screw with Allen key (4.4) and hex-nut (4.5) , gradually tighten
diagonally, and then tighten with torque wrench (25-30 Nm)
· pump tyres up to full pressure (2.5 bar) and screw on valve cap
NOTE:
The cylinder head screws (4.4) must under no circumstances be lubricated.
During factory assembly they are inserted with "Plasbolt" and can be
dismantled/reassembled up to 6 times.
After the 7th reassembly the bolts must be cleaned and inserted with "Loctite" thereafter.
ü
ü
Page 38

Service Instructions MISTRAL
As at: 04.07.02 Page37
9.7 Battery case
9.7.1 Battery case 31 Ah
Pos Qty. Item No./Pcs. Item Description
1 1 B284017 Battery case 31 Ah complete
1.1 1 B284006 Battery case
1.2 1 B284007.99 Battery tray
1.3 1 B284008 Battery case cover
1.4 2 B284015 Battery cover
1.5 2 P50029 Battery 12V / 31 Ah
1.6 2 B284018 Battery strap
1.7 2 B284011 Battery cable
1.8 2 B284013 Battery bridge
1.9 2 P12191 Strip fuse 50A
1.10 2 P12293 Strip fuse holder
1.11 1 B284016 Battery adapter
1.12 1 B284019 Battery case strap
1.13 1 B284029 Battery adapter cable
Page 39

MISTRAL Service Instructions
Page 38 As at: 04.07.02
9.7.2 Batteries (1.5)
· ensure that both batteries are charged (24V), if necessary charge batteries completely
Caution:
· Take care with tools. Do not bridge battery terminals, risk of short circuit!
· Please note the high battery weight, risk of crushing!
· Use only batteries supplied by Sonnenschein as spare batteries in accordance with the
spare parts list.
Examination of batteries:
Check total battery voltage with a Multimeter (50V / 25V DC) on the charging jack at the remote.
· voltage below 24V: charge batteries
· voltage below 19V: check individual battery voltage
Batteries (1.5)
· to pull off the connector plug press the safety device
together.
· when reassembling ensure that connector plugs are
engaged!
· pull "remote – battery case" connecting cable off at remote
· open battery case strap and pull battery case out towards rear
· open battery case strap (1.12) and remove battery case cover (1.3)
· pull battery cable (1.7) off
Page 40

Service Instructions MISTRAL
As at: 04.07.02 Page39
Checking individual battery voltage
· connect Multimeter directly to battery terminal
· voltage < 9.5V : charge battery
If the voltage is still too low after charging, replace battery.
· measure voltage at battery cover jack (1.4) between red and black
If the voltage measured at the battery is correct, and that measured at the jack is 0V, check strip
fuse (1.7) and battery cable (1.8) and replace if necessary.
Strip fuse (1.9) 31Ah version
· open strip fuse holder (1.10)
(carefully lever out with
screwdriver)
· loosen both fixing nuts (A) and
replace strip fuse (1.9)
Reassembly takes place in the reverse order.
Page 41

MISTRAL Service Instructions
Page 40 As at: 04.07.02
9.7.3 Battery case 50 Ah
Pos Qty. Item No./Pcs. Item Description
1 1 B284030 Battery case 50 Ah complete
1.1 1 B284006 Battery case
1.2 1 B284008 Battery case cover
1.3 1 B284029 Battery adapter cable
1.4 1 B284007.99 Battery tray
1.5 1 B284019 Battery case strap
1.6 2 PG50989 Battery 12V/50 Ah
1.7 2 B284014 Battery cover
1.8 2 B284018 Battery strap
1.9 2 B284010 Battery cable
1.10 2 PG12187 Fuse 50 APUDENZ
1.11 2 PG12292 Insulated nut M8 PUDENZ 255.0808.0001
1.12 2 D08135 Hexagon bolt M8 x 35
Page 42

Service Instructions MISTRAL
As at: 04.07.02 Page41
9.7.4 Batteries (1.6)
· ensure that both batteries are charged (24V), if necessary charge batteries completely
Caution:
· Take care with tools. Do not bridge battery terminals, risk of short circuit!
· Please note the high battery weight, risk of crushing!
· Use only batteries supplied by Sonnenschein as spare batteries in accordance with the
spare parts list.
Examination of batteries:
Check total battery voltage with a Multimeter (50V / 25V DC) on the charging jack at the remote.
· voltage below 24V: charge batteries
· voltage below 19V: check individual battery voltage
Batteries (1.6)
· To pull off the connector plug press the safety device
together.
· When reassembling ensure that connector plugs are
engaged!
· pull "remote – battery case" connecting cable off at remote
· open battery case strap and pull battery case out towards rear
· open battery case strap (1.5) and remove battery case cover (1.7)
· pull battery cable off
Page 43

MISTRAL Service Instructions
Page 42 As at: 04.07.02
Checking individual battery voltage
· connect Multimeter directly to battery terminal
· voltage < 9.5V : charge battery
If the voltage is still too low after charging, replace battery.
· measure voltage at battery cover jack between red and black
If the voltage measured at the battery is correct, and that measured at the jack is 0V, check fuse
or battery cable and replace if necessary.
Fuse (1.10) 50 Ah version
· unscrew hexagon bolt (1.12) or insulated nut (1.11)
· replace fuse (1.10)
Page 44

Service Instructions MISTRAL
As at: 04.07.02 Page43
9.8 Lighting
Page 45

MISTRAL Service Instructions
Page 44 As at: 04.07.02
Pos Qty. Item No./Pcs. Item Description
1
1 B281017 Lighting unit complete
1.1
2 P31102 Bulb 24V/18W (Sofitte)
1.2
2 P31194 Bulb 24V/3W
1.3
2 P31191 Bulb 24V/5W (Sofitte)
1.4
2 D30110 Machine screw with Phillips head M4 x 16
1.5
2 D30105 Machine screw with Phillips head M5 x 16
1.6
2 D30108 Machine screw with Phillips head M5 x 20
1.7
4 F60102 Hexagon cap nut M4 self-locking
1.8
2 F20111 Hexagon nut M5 self-locking
1.9
2 F20109 Hexagon nut M6 self-locking
1.10
1 B281012 Spring
1.11
4 LG50002 Headed lining 5,2 x 3
1.12
2 EG00901 Screw M4 x 12
1.13
4 G00103 Washer 4.3 x 9 x 0,8
1.14
4 G00115 Washer 6.4 x 12.5 x 1.6
1.15
2 P32008 Direction indicators
1.16
2 B281014.P28 Headlight receptacle
1.17
1 B281001.P28 Light bracket LH
1.18
1 B281013.P28 Light bracket RLH
1.19
2 P31083 Headlight LA 55
1.20
2 PG31001 Tail lamps with reversing light
1.21
2 G00110 Washer 6.4 x 12.5 x 1.6
Page 46

Service Instructions MISTRAL
As at: 04.07.02 Page45
Replace the bulb (1.2), headlight (1.20)
· unscrew Phillips head-screw
· remove front lamp part
· remove bulb holder with bulb
· unscrew bulb
· insert new bulb 24V/3W
· unsolder cable
· loosen machine screw with Phillips head (1.5)
· replace headlight (1.19)
· screw in machine screw with Phillips head (1.5)
· solder cable
Reassembly takes place in the reverse order.
Check lighting for correct function.
Page 47

MISTRAL Service Instructions
Page 46 As at: 04.07.02
Replace the bulb (1.3), tail lamps (1.20)
· carefully lever the Plexiglass out of the holder with a
screwdriver
· remove Plexiglas
· insert new bulb 24V/5W (Sofitte)
· unsolder both cables
· unscrew screw (1.6)
· replace tail lamps (1.20)
· screw in screw (1.16) again
· solder cable
Reassembly takes place in the reverse order.
Check lighting for correct function.
Page 48

Service Instructions MISTRAL
As at: 04.07.02 Page47
Replace the bulb (1.1), tail lamps (1.15)
· unscrew both Phillips head screws
· remove Plexiglas
· insert new bulb 24V/5W (Sofitte)
· unsolder both cables
· unscrew screws (1.4, 1.12)
· replace direction indicators (1.15)
· screw in screws (1.4,1.12) again
· solder cable
Reassembly takes place in the reverse order.
Check lighting for correct function.
Page 49

MISTRAL Service Instructions
Page 48 As at: 04.07.02
Pos Qty. Item No./Pcs. Item Description
1 1 B281020 Clam complete
1.1 1 P10081 ACS-Clam (light-motor module combined)
1.2 4 D37101 Phillips self-tapping screw 4 x 12
1.3 2 D10108 Countersunk screw with Phillips head M5 x 20
1.4 2 B282002.P28 Bracket for Amp connector plug
1.5 1 B281021 Clam wiring harness
Page 50

Service Instructions MISTRAL
As at: 04.07.02 Page49
Lighting cabling
LH lighting
RH lighting
Lighting motor
module
Connecting plug lighting to
lighting/motor module
Page 51

MISTRAL Service Instructions
Page 50 As at: 04.07.02
9.8 Electronics
Compact remote
Pos Qty. Item No./Pcs. Item Description
1 1 B283014 Compact remote complete
1 1 B2XX001 Compact DX remote complete
1.1 1 PG10048 Compact – Basic remote
1.1 1 PG10047 Compact – DX remote
1.2 1 B283006.P28 Commando remote holder, matt black
1.3 4 G00103 Washer 4.3 x 9 x 0,8
1.4 4 D30110 Machine screw with Phillips head M4 x 16
1.5 1 B283013.P28 Hand protector, matt black
1.6 2 D30194 Machine screw with Phillips head M3 x 40
1.7 1 Z183229 Spare part joystick knob
1.7.1 1 P10398 Joystick screen
1.7.2 1 P10399 Joystick knob
1.8 1 P51981 Charging device 8A with XLR connector plug
Page 52

Service Instructions MISTRAL
As at: 04.07.02 Page51
Spare part joystick knob (1.7)
· pull off joystick knob (1.7.2) or joystick screen (1.7.1) upwards
· replace joystick knob or joystick screen
Hand protector (1.5)
· unscrew machine screw (1.6)
· fit new hand protector
Remote (1.1), remote holder (1.2)
· pull off connector cable "remote – battery – drive units" at remote
· unscrew machine screws (1.4)
· remove remote
· loosen wing nut on armrest and pull out remote holder
Reassembly takes place in the reverse order.
Functional check
A functional check must be carried out after any repair work on the remote.
CAUTION:
Do not reverse the connection plug between remote – drive unit left or right. If the
connection is made the wrong way round the wheelchair will drive in the opposite
direction (risk of accident).
Page 53

MISTRAL Service Instructions
Page 52 As at: 04.07.02
Table can be swivelled for operation RH
Pos Qty. Item No./Pcs. Item Description
1 1 B277001 Table can be swivelled for operation RH
complete
1.1 1 Z177024A.00 Guide for table/central control, chromed
1.2 2 F20106 Hexagon nut M12 self-locking
1.3 2 L31001 Wing nut M6 x 10
1.4 4 D30110 Machine screw with Phillips head M4 x 16
1.5 4 F60106 Hexagon cap nut M6 self-locking
1.6 4 D10199 Countersunk screw with Phillips head M6 x 20
1.7 1 L01008 Skidder SL 22
1.8 2 L01037 Cover cap SKS 12 for nut M12
1.9 4 Z17032A Lining rd. 19 X 3.5 X 25
1.10 1 Z177016 Table top with cut-out RH, transparent
1.11 2 L01055 Cap cover E 15x15
1.12 4 G00104 Washer 13 x 24 x 2,5
1.13 4 G00103 Washer 4.3 x 9 x 0,8
1.14 4 G00110 Washer 6.4 x 12.5 x 1.6
1.15 1 B283031.P28 Remote holder
1.16 1 B283041.P28 Guide rod
1.17 1 Z17270A.00 Swivel arm, chromed
1.18 1 Z17150A.00 Swivel arm extension, chromed
1.19 1 Z17160A.00 Table top receptacle, chromed
Page 54

Service Instructions MISTRAL
As at: 04.07.02 Page53
Table can be swivelled for operation LH
Pos Qty. Item No./Pcs. Item Description
1 1 B277002 Table can be swivelled for operation LH
complete
1.1 1 Z177039.00 Guide for table/central control
1.2 2 F20106 Hexagon nut M12 self-locking
1.3 2 L31001 Wing nut M6 x 10
1.4 4 D30110 Machine screw with Phillips head M4 x 16
1.5 4 F60106 Hexagon cap nut M6 self-locking
1.6 4 D10199 Countersunk screw with Phillips head M6 x 20
1.7 1 L01008 Skidder SL 22
1.8 2 L01037 Cover cap SKS 12 for nut M12
1.9 4 Z17032A Lining rd. 19 X 3.5 X 25
1.10 1 Z177017 Table top with cut-out LH, transparent
1.11 2 L01055 Cap cover E 15x15
1.12 4 G00104 Washer 13 x 24 x 2,5
1.13 4 G00103 Washer 4.3 x 9 x 0,8
1.14 4 G00110 Washer 6.4 x 12.5 x 1.6
1.15 1 B283031.P28 remote holder
1.16 1 B283041.P28 Guide rod
1.17 1 Z17270A.00 Swivel arm, chromed
1.18 1 Z17150A.00 Swivel arm extension, chromed
1.19 1 Z17160A.00 Table top receptacle, chromed
Page 55

MISTRAL Service Instructions
Page 54 As at: 04.07.02
ACS operation for attendant switchable
Pos Qty. Item No./Pcs. Item Description
1 1 1415033 ACS operation for attendant switchable
complete
1.1 1 6001425 ACS operation for attendant switchable
1.2 2 Z12008A.P40 Clamp terminal with hex hole, RAL 9005 deep
black
1.3 1 1415035 Handle (shortened)
1.4 1 P10304 ACS joystick for standard remote
1.5 1 Z183196.P40 Fixing bracket operation attendant, RAL 9005
deep black
1.6 1 Z183001A Bellows for ACS joystick, black
1.7 1 F60107 Hexagon cap nut M6 self-locking
1.8 6 F20109 Hexagon nut M6 self-locking
1.9 1 D60111 Countersunk screw with Allen key M6 x 16
1.10 2 D08127 Hexagon bolt M6 x 20
1.11 4 D60106 Countersunk screw with Allen key M6 x 35
1.12 1 G10502 Washer 20 x 7,9 x 1
1.13 1 Z183183.P40 Bracket for operator attendant, RAL 9005 deep
black
1.14 3 G00115 Washer 6.4 x 12.5 x 1.6
1.15 2 G00107 Washer 6,4 x 18 x 1,6
1.16 1 GSM63008 ACS bus cable L=800 mm
1.16 1 GSM63011 ACS bus cable L=1100 mm
Page 56

Service Instructions MISTRAL
As at: 04.07.02 Page55
Fitting ACS operation for attendant
· screw on clamp terminal and fixing bracket (1.5) with the countersunk screws (1.11)
to the back tube
· screw bracket (1.13) with countersunk screw (1.9) to fixing bracket (1.5)
· screw operation ACS to bracket (1.13) with countersunk screws (1.10) )
Bellows (1.6), ACS joystick (1.4)
· pull off joystick-button (A)
· loosen screws (B)
· pull off bellows (1.6) upwards
· remove plugs from ACS joystick (1.4)
· replace ACS joystick
Page 57

MISTRAL Service Instructions
Page 56 As at: 04.07.02
Remote holder RH height-adjustable and swivelable.
Pos Qty. Item No./Pcs. Item Description
1 1 B283036 Remote holder RH height-adjustable and
swivelable, complete
1.1 1 F383069.P28 Guide 3 for remote swiv., matt black
1.2 1 F383071.P28 Guide for remote swiv., matt black
1.3 2 D36112 Pan head tapping screw with Phillips head 4,8 x
16
1.4 1 N19999 Thrust pad 8 mm, sprung
1.5 1 L31001 Wing nut M6 x 10
1.6 4 F20111 Hexagon nut M5 self-locking
1.7 1 D70188 Grub screw with Allen key and
point M6 x 8
1.8 4 D08192 Hexagon bolt with shaft M5 x 40
1.9 1 D50126 Cylinder head screw with Allen key M6 x 10
1.10 2 F18001A Bearing block
1.11 3 L01055 Cap cover E 15x15
1.12 3 F383010.P28 Lever 1 for remote swiv., matt black
1.13 1 F383011.P28 Lever 2 for remote swiv., matt black
1.14 1 B283016.P28 Remote receptacle 90° for remote holder
swivelable
1.15 1 B283020.P28 Guide RH, matt black
1.16 1 D90188 Drilling screw with cheese head 4.2 x 13
Page 58

Service Instructions MISTRAL
As at: 04.07.02 Page57
Remote holder LH height-adjustable and swivelable.
Pos Qty. Item No./Pcs. Item Description
1 1 B283037 Remote holder LH height-adjustable and
swivelable, complete
1.1 1 F383069.P28 Guide 3 for remote swivelable, matt black
1.2 1 F383071.P28 for remote swivelable, matt black
1.3 2 D36112 Pan head tapping screw with Phillips head 4,8 x
16
1.4 1 N19999 Thrust pad 8 mm, sprung
1.5 1 L31001 Wing nut M6 x 10
1.6 4 F20111 Hexagon nut M5 self-locking
1.7 1 D70188 Grub screw with Allen key and point
M6 x 8
1.8 4 D08192 Hexagon bolt with shaft M5 x 40
1.9 1 D50126 Cylinder-head screw with Allen key M6 x 10
1.10 2 F18001A Bearing block
1.11 3 L01055 Cap cover E 15x15
1.12 3 F383010.P28 Lever 1 for remote swivelable, matt black
1.13 1 F383011.P28 Lever 2 for remote swivelable, matt black
1.14 1 B283016.P28 Remote receptacle 90°
1.15 1 B283020.P28 Guide RH, matt black
1.16 1 D90188 Drilling screw with cheese head 4.2 x 13
Page 59

MISTRAL Service Instructions
Page 58 As at: 04.07.02
"Commando" attendant operation for backrest adjustable
Pos Qty. Item No./Pcs. Item Description
1 1 1415046 "Commando" attendant operation for backrest
adjustable
1.1 2 Z12008A.P28 Clamp terminal with hex hole
1.2 4 D30110 Machine screw with Phillips head M4 x 16
1.3 8 F20109 Hexagon nut M6 self-locking
1.4 4 D60106 Countersunk screw with Allen key M6 x 35
1.5 4 G00103 Washer 4.3 x 9 x 0,8
1.6 1 1415070.P28 Bracket RH for attendant operation console
"Commando" attendant operation for backrest adjustable
· screw on clamp terminal and holder (1.6) with the countersunk screws (1.4) to the
back tube
· screw on "Commando" attendant operation console to the bracket (1.6) with the machine
screw (1.2)
· connect cable and check function
Page 60

Service Instructions MISTRAL
As at: 04.07.02 Page59
"Commando" attendant operation for backrest detachable
Pos Qty. Item No./Pcs. Item Description
1 1 1415059 "Commando" attendant operation for backrest
detachable
1.1 2 Z12008A.P28 Clamp terminal with hex hole
1.2 1 1415035 Handle (shortened)
1.3 4 D30110 Machine screw with Phillips head M4 x 16
1.4 4 F20109 Hexagon nut M6 self-locking
1.5 4 D60106 Countersunk screw with Allen key M6 x 35
1.6 4 G00103 Washer 4.3 x 9 x 0,8
1.7 1 1415069.P28 Bracket RH for backrest detachable
"Commando" attendant operation for backrest detachable
· screw on clamp terminal (1.1) and holder (1.7) with the countersunk screws (1.5) to
the back tube
· screw on "Commando" attendant operation console to the bracket (1.7) with the machine
screws (1.3)
· connect cable and check function
Page 61

MISTRAL Service Instructions
Page 60 As at: 04.07.02
9.9 Seat unit, seat angle adjustment, armrest and side panel
9.9.1 Seat unit, seat angle adjustment
Page 62

Service Instructions MISTRAL
As at: 04.07.02 Page61
Pos Qty. Item No./Pcs. Item Description
1 1 B263001 Seat unit complete
1.1 1 B261004.P28 Seat frame middle part LH; matt black
1.2 1 B261005.P28 Seat frame middle part RH, matt black
1.3 2 B261034.99 Straight pin Ø 15.9
1.4 4 K32306 Star lock cap 16 mm
1.5 4 D50176 Cylinder-head screw with Allen key M8 x 30
1.6 4 F00002 Hexagon nut M8 self-locking, DIN-985
1.7 2 B261012.P28 Seat frame front; matt black
1.8 2 B261024.P28 Seat frame rear; black matt
1.9 2 Z173201.79 Footrest adapter
1.10 2 D90185 Cheese-head screw with Allen key
M6 x 35
1.11 1 B261027 Seat base RH
1.12 1 B261028 Seat base LH
1.13 1 B260001 Seat cushion
1.14 4 B261001.P28 Hinge; black matt
1.15 4 B261002.P28 Hinge; black matt
1.16 6 B261031.P28 Lining, matt black
1.17 16 G00115 Washer 6.4 x 12.5 x 1.6
1.18 16 D50051 Cylinder-head screw with Allen key M6 x 16
1.19 1 B261032.99 Straight pin Ø 12
1.20 2 K32307 Star lock cap 12 mm
2 2 B264010 Seat angle adjustment complete
2.1 1 B264001.P28 Seat adjustment top, matt black
2.2 1 B264005.P28 Seat adjustment bottom, matt black
2.3 1 L10024 Wing nut M6 x 16
2.4 2 B264009.99 Straight pin Ø 8 x 40
2.5 4 K32397 Star lock cap 8 mm
3 1 B260005 "Contour" cushion
4 2 B281026 Electrical adapter for leg support, height-
adjustable
Page 63

MISTRAL Service Instructions
Page 62 As at: 04.07.02
CAUTION:
seat adjustments such as seat angle, seat depth, backrest angle and distance between
armrests should be individually adjusted to suit the user. These settings should therefore be
retained when carrying out service work.
Note:
Repair work to the seat unit is easier to carry out if the complete seat unit has been
dismantled beforehand.
· carefully lever off Star lock caps (1.4, 2.5)
with screwdriver
· pull out straight pin (1.3, 2.4)
· the complete seat unit can then be
removed upwards
Seat base(1.11 right, 1.12 left), hinge(1.14)
· unscrew cylinder-head screw with Allen key
(1.18)
· insert new seat base (1.11, 1.12)
· carefully lever off Star lock cap (1.20) with
screwdriver
· pull out straight pin (1.19)
· unscrew cylinder-head screw with Allen key
(1.18)
· replace hinge (1.14)
ü
Page 64

Service Instructions MISTRAL
As at: 04.07.02 Page63
Seat frame front (1.7), lining front (1.16), hinge front (1.15)
· unscrew front hexagon nut M8 (1.6)
· unscrew cylinder-head screw with Allen key
(1.5)
· pull out seat frame towards front
· front seat frame (1.7) or lining (1.16) can
be replaced
· unscrew cylinder-head screw with Allen key
(1.18)
· hinge (1.15) can be replaced
Seat frame rear (1.9), lining rear (1.16) ), hinge rear (1.15)
· unscrew screws A (dismantling of
backrest tube)
· unscrew rear hexagon nut M8 (1.6)
· unscrew cylinder-head screw with Allen key
(1.5)
· pull out seat frame towards rear
· rear seat frame (1.8) or lining (1.16) can be
replaced
· unscrew cylinder-head screw with Allen key
(1.18)
· hinge (1.15) can be replaced
Seat frame middle part (1.1 left, 1.2 right)
· dismantle front seat frame (1.7) and rear
seat frame (1.8)
· seat frame middle part(1.1, 1.2) can be
replaced
Page 65

MISTRAL Service Instructions
Page 64 As at: 04.07.02
Footrest adapter (1.9)
· unscrew cheese-head screw with Allen
key M6 x 1.10
· replace footrest adapter (1.9)
Seat angle adjustment
· loosen wing nut (2.3)
· carefully lever off Star lock cap (2.5) with
screwdriver
· pull out straight pin (2.4)
· replace seat adjustment (2.1) or (2.2)
· When assembling, ensure that the wing
nut (2.3) locates in the bore provided. The
seat angle setting should not be changed.
Reassembly takes place in the reverse order.
Note:
Use new Star lock caps when reassembling.
ü
Page 66

Service Instructions MISTRAL
As at: 04.07.02 Page65
9.9.2 Armrests and side panels
Pos Qty. Item No./Pcs. Item Description
1 2 B270009 Side panel complete
1.1 2 B271001.P28 Side panel mounting
1.2 1 B270005.P28 Side panel mounting LH
1.3 1 B270006.P28 Side panel mounting RH
1.4 2 B270001 Side panel plate
1.5 4 D60177 Countersunk screw with Allen key M5 x 16
1.6 4 G91108 Insert ring
1.7 1 D171009A Armrest padding LH
1.8 1 D1710010A Armrest padding RH
1.9 4 G00115 Washer 6.4 x 12.5 x 1.6
1.10 4 D30105 Machine screw with Phillips head M5 x 16
1.11 4 L31001 Wing nut M6 x 10
1.12 2 L32902 Clamping lever M6 x 10
Page 67

MISTRAL Service Instructions
Page 66 As at: 04.07.02
9.10 Side panel (1)
· loosen wing nut (1.11) and pull out side panel upwards
9.10.1.1 Armrest padding (1.7 left, 1.8 right)
· unscrew machine screws (1.10) and remove armrest padding
9.10.1.2 Side panel plate (1.4)
· unscrew countersunk screws (1.5) and remove side panel plate (1.4)
9.11 Side panel mounting (1.2 left, 1.3 right)
· loosen wing nut (1.11) and pull out side panel upwards
· loosen clamping lever (1.12)
· pull out side panel mounting (1.2, 1.3)
9.11.1 Clamping lever (1.12)
· unscrew
Reassembly takes place in the reverse order.
Page 68

Service Instructions MISTRAL
As at: 04.07.02 Page67
9.12 Backrest unit
9.12.1 Backrest detachable
Pos Qty. Item No./Pcs. Item Description
1 1 B266010 Backrest detachable complete
1.1 2 L01009 Handle
1.2 2 5009551 Plastic rosette
1.3 2 F368016.99 Quick release bolts (QUICK RELEASE)
1.4 2 L10024 Wing nut M6 x 16
1.5 2 F20109 Hexagon nut M6 self-locking
1.6 2 D50138 Cylinder-head screw with Allen key M6 x 40
1.7 2 G00115 Washer 6.4 x 12.5 x 1.6
1.8 2 B266002.99 Sleeve M6
1.9 1 B266005.P28 Connecting strut
1.10 1 B265002 Cushion
1.11 2 B266008.P28 Back tube
1.12 1 B265003 Backrest fixing LH
1.13 1 B265004 Backrest fixing RH
1.14 2 D90188 Drilling screw with cheese head 4.2 x 13
2 1 B267001 Seat belt Velcro
3 1 Z163006A Seat belt long with snap buckle
Page 69

MISTRAL Service Instructions
Page 68 As at: 04.07.02
9.12.2 Connecting strut (1.9)
· unscrew wing nut (1.4)
· replace connecting strut
9.12.3 Backrest padding fixing(1.12 left, 1.13 right) , backrest tube (1.11) , handle (1.1)
· unscrew cylinder-head screw with Allen key (1.6)
· unscrew drilling screw with cheese head (1.14)
· pull backrest padding fixing downwards and replace if necessary
· pull off handle (1.1) (use compressed air if necessary)
· replace backrest tube (1.11) or handle (1.1)
Reassembly takes place in the reverse order.
Page 70

Service Instructions MISTRAL
As at: 04.07.02 Page69
9.12.4 Backrest element adjustable
Page 71

MISTRAL Service Instructions
Page 70 As at: 04.07.02
Pos Qty. Item No./Pcs. Item Description
1 1 B267003 Backrest element adjustable complete
1.1 1 F366004.P28 Frame tube for backrest element adjustable
1.2 2 5009551 Plastic rosette
1.3 2 F368016.99 Quick release bolts (QUICK RELEASE)
1.4 4 F20109 Hexagon nut M6 self-locking
1.5 2 F00002 Hexagon nut M8 self-locking, DIN-985
1.6 4 D50138 Cylinder-head screw with Allen key M6 x 40
1.7 2 D00102 Hexagon bolt with shaft M8 x 45
1.8 2 Z131009A Lining rd. 18 x 3 x 22
1.9 4 G00115 Washer 6.4 x 12.5 x 1.6
1.10 4 G00107 Washer 8.4 x 17 x 1.6
1.11 2 H11036A.99 Lining rd. 12 x 1.8 x 23
1.12 2 B266013 Lining
1.13 1 B265002 Cushion
1.14 1 B268001.P28 Back tube bottom
1.15 1 B265003 Backrest fixing LH
1.16 1 B265004 Backrest fixing RH
1.17 2 D90188 Drilling screw with cheese head 4.2 x 13
2 1 F365029 Backrest upholstery contour. grey
2.1 4 Z16001A Clamp terminal
2.2 8 D16108 Self-tapping screw with Phillips head 4,8 x 22
3 1 B267001 Seat belt Velcro
3.1 2 U20094 Brushed belt cut 50 x 50 mm
4 1 Z163006A Seat belt long with snap buckle
Page 72

Service Instructions MISTRAL
As at: 04.07.02 Page71
The backrest element can be supplied with pneumatic or electrical backrest adjustment.
Service work is identical for both backrests.
9.12.5 Backrest removal
· press in quick release bolts (A) and pull out
· unscrew screw (B)
· remove backrest adjustment (pneum. or
electrical)
· press in quick release bolts (C) on left and
right and pull out
· the complete backrest can now be
removed
Frame tube for backrest element (1.1),
Back tube bottom (1.14)
Backrest fixing (1.15 LH, 1.16 RH)
· unscrew hex screw (1.7)
· remove back tube downwards (1.14)
· when reassembling the hex screws (1.7)
do not tighten so much that the backrest
cannot be moved.
· unscrew drilling screw (1.17)
· replace backrest fixing (1.15 LH or 1.16
RH).
Page 73

MISTRAL Service Instructions
Page 72 As at: 04.07.02
9.12.5.1 Pneumatic backrest adjustment
Pos Qty. Item No./Pcs. Item Description
4 1 B268006 Pneumatic backrest adjustment, complete
4.1 4 Z168005 Lining rd. 20 X 10,5 X 7
4.2 1 F368018 Gas-filled spring F=350 N
4.3 1 F368016.99 Quick release bolts (QUICK RELEASE)
4.4 1 N368003 Stabilus release unit
4.5 1 L31001 Wing nut M6 x 10
4.6 2 D30108 Machine screw with Phillips head M5 x 20
4.7 1 F00002 Hexagon nut M8 self-locking, DIN-985
4.8 1 D00102 Hexagon bolt with shaft M8 x 45
4.9 1 N368002.P14 Bracket for released lever; RAL 7021 dark grey
4.10 2 N368004 Sliding liner
4.11 2 L01055 Cap cover E 15x15
Page 74

Service Instructions MISTRAL
As at: 04.07.02 Page73
Pneumatic release unit (4.4)
· unscrew machine screw (4.6)
· remove the Bowden cable from the gas-filled spring (A)
· screw on a new release unit
· fit the Bowden cable to the gas-filled spring (A)
· adjust the Bowden cable with the hex nut (B) so that when the release leader is operated
the gas-filled spring is released (adjustable backrest).If the lever is not operated, the
backrest must remain locked in place.
Page 75

MISTRAL Service Instructions
Page 74 As at: 04.07.02
9.12.5.2 Electrical backrest adjustment, motor (5.1)
Pos Qty. Item No./Pcs. Item Description
5 1 B266014 Adjustable electrical backrest, complete
5.1 1 PG01050 Motor LA 28.1-75-24-001
5.2 1 F368016.99 Quick release bolts (QUICK RELEASE)
5.3 1 K32395 Self-locking washer 10 mm
5.4 1 J50999 Bolt BEK 10x39,5x35
5.5 1 B281022 Extension cable for backrest motor
· pull-out extension cable (5.5)
· remove locking washer (5.3)
· pull out bolt (5.4)
· pull out quick release bolts 5.2
· replace motor (5.1)
· check function after reassembly
Page 76

Service Instructions MISTRAL
As at: 04.07.02 Page75
9.12.5.3 Headrest
Pos Qty. Item No./Pcs. Item Description
1 1 F375001 Headrest fabric pre-fitted
1.1 1 4005575 Headrest holder
1.2 1 4005576.P40 Headrest arm
1.3 1 C175011B.89 Fixing for headrest shell
1.4 1 C175016 Headrest shell
1.5 1 U20093 Brushed belt cut 50 x 410 mm
1.6 1 C175004A Headrest cushion black
1.7 1 G10502 Washer 20 x 7,9 x 1
1.8 3 G00107 Washer 8.4 x 17 x 1.6
1.9 1 L32901 Clamping lever M8
1.10 1 D08138 Hexagon bolt M8 x 50
1.11 2 E541038A.99 Lining rd. 12 x 1,8 x 13,5
1.12 1 F20105 Hexagon nut M8 self-locking
1.13 2 L01041 Cover cap SKS 8 for nut M8
1.14 2 D30105 Machine screw with Phillips head M5 x 16
2 1 Z175001 Headrest holder for standard/comfort seat,
complete
2.1 1 Z175002 Headrest holder fixing kit
2.1.1 4 D50108 Cylinder-head screw with Allen key M6 x 25
2.1.2 4 F20109 Hexagon nut M6 self-locking
2.1.3 1 D00091 Hexagon bolt M8 x 55
Page 77

MISTRAL Service Instructions
Page 76 As at: 04.07.02
Pos Qty. Item No./Pcs. Item Description
2.1.4 2 G00107 Washer 8,4x17x1,6
2.1.5 1 F00002 Hexagon nut M8 self-locking
2.1.6 1 L31001 Wing nut M6x10
2.2 2 Z12008A.P14 Clamp terminal with hex hole
2.3 1 F16020A.P14 Headrest holder
9.12.6 Fixing the headrest
· screw the clamp terminals (2.2) to the back
tube with the cylinder head screws (2.1.1)
· screw the headrest holder (2.3) on with the
hex bolt (2.1.3) washers (2.1.4) and hex
nut (2.1.5)
· insert headrest holder (1.1) and fix with
wing nut (2.1.6)
9.12.7 Headrest shell (1.4)
· unscrew machine screw (1.14)
· screw on new headrest shell
Page 78

Service Instructions MISTRAL
As at: 04.07.02 Page77
10 Footrests / leg supports
10.1.1 Footrest upper part standard 80
Page 79

MISTRAL Service Instructions
Page 78 As at: 04.07.02
Pos Qty. Item No./Pcs. Item Description
1 1 B273002
Footrest upper part standard 80 RH complete,
RAL 5025 Pearl Gentian Blue
1 1 1418089
Footrest upper part standard 80 RH complete,
RAL 1028 Melon Yellow
1 1 1418091
Footrest upper part standard 80 RH complete,
RAL silver-grey gloss
1 1 B273003
Footrest upper part standard 80 RLH complete,
RAL 5025 Pearl Gentian Blue
1 1 1418090
Footrest upper part standard 80 LH complete,
RAL 1028 Melon Yellow
1 1 1418092
Footrest upper part standard 80 LH complete,
RAL silver-grey gloss
1.1 1 B273004.P18 Footrest tube; RAL 5025 Pearl Gentian Blue
1.1 1 B273004.P91 Footrest tube, RAL 1028 Melon Yellow
1.1 1 B273004.P92 Footrest tube, silver-grey gloss
1.2 1 1026124 Tube end stops, open
1.3 1 Z173192 Clamp
1.4 2 D50075 Cylinder-head screw with Allen key M4 x 30
1.5 2 H40694 Pop blind rivet LSR ACD 608 AS
1.6 2 F60102 Hexagon cap nut M4 self-locking
1.7 1 Z173173 Shell LH
1.8 1 Z173174 Shell RH
1.9 1 D50050 Cylinder-head screw with Allen key M5 x 25
1.10 1 F20111 Hexagon nut M5 self-locking
1.11 1 Z173178 Tension spring
1.12 1 Z173177 Clasp lever
1.13 1 Z173190 Release lever RH
1.13 1 Z173191 Release lever LH
1.14 1 Z173175 Turning knuckle
1.15 1 D90194 Machine screw with Phillips head M5 x 16
Page 80

Service Instructions MISTRAL
As at: 04.07.02 Page79
10.1.2 Turning knuckle (1.14)
10.2 Loosen machine screw with Phillips head (1.15)
· insert new turning knuckle (1.14)
10.2.1 Interlock
· unscrew cylinder-head screw (1.4) and
hexagon cap nuts (1.6)
· pull out interlock
· unscrew cylinder-head screw (1.9)
· remove both shells (1.7, 1.8)
Page 81

MISTRAL Service Instructions
Page 80 As at: 04.07.02
· tension spring (1.11), clasp lever (1.12) or
release lever (1.13) can now be replaced
10.2.2 Clamp (1.3)
· carefully drill out pop blind rivet (1.5) and
remove clamp (1.3)
Page 82

Service Instructions MISTRAL
As at: 04.07.02 Page81
10.2.3 Footrest tube (1.1)
· unscrew hexagon cap nut
(2.3)
· unscrew cylinder-head screw
(2.2)
· pull out push-in tube (2.1)
· unscrew cylinder-head screw
(1.4) and hexagon cap nuts
(1.6)
· pull out interlock
· carefully drill out pop blind
rivet (1.5)and remove clamp
(1.3)
· unscrew machine screw
(1.15)
· remove turning knuckle (1.14)
Page 83

MISTRAL Service Instructions
Page 82 As at: 04.07.02
10.2.4 Footrest lower part
Pos Qty. Item No./Pcs. Item Description
2 1 B273010 Footrest lower part standard LH, complete
2 1 B273009 Footrest lower part standard RH, complete
2.1 1 B273005.00 Push-in tube
2.2 1 DG50001 Cylinder-head screw with Allen key M6 x 30
2.3 1 F60107 Hexagon cap nut M6 self-locking
2.4 1 L01049 Skidder SL 18
2.5 1 0572-04435 Footplate LH, black
2.5 1 0572-04449 Footplate RH, black
2.6 1 D50114 Cylinder-head screw with Allen key M6 x 50
2.7 2 F20109 Hexagon nut M6 self-locking
2.8 2 0572-02152 Circular washer shape B, black
2.9 1 F00103 Hexagon nut M6
2.10 1 0029-40516 Screw M6 x 60
2.11 1 B273011 Calf strap
Page 84

Service Instructions MISTRAL
As at: 04.07.02 Page83
10.2.5 Calf strap (2.11)
· unscrew hexagon cap nut (2.3)
· unscrew cylinder-head screw (2.2)
· pull out push-in tube (2.1)
· insert new calf strap (2.11)
10.2.6 Footplate (2.5 ) / Circular washer (2.8)
· loosen cylinder-head screw (2.6)
· replace footplate (2.5) or circular washer
(2.8)
Page 85

MISTRAL Service Instructions
Page 84 As at: 04.07.02
10.2.7 Push-in tube (2.1)
· dismantle footplate (2.5)
· unscrew hexagon cap nut (2.3)
· unscrew cylinder-head screw (2.2)
· insert new push-in tube (2.1)
10.2.8 Reassembly takes place in the reverse order.
Note:
Observe part orientation while reassembling (LH = left-hand side / RH = right-hand side).
Adjust leg supports to identical length .
ü
Page 86

Service Instructions MISTRAL
As at: 04.07.02 Page85
10.2.9 Leg support upper part with preset angle adjustment
Pos Qty. Item No./Pcs. Item Description
3
2 B21XX001 Leg support upper part with preset angle
adjustment
3.1
3 F20111 Hexagon nut M5 self-locking
3.2
1 F00002 Hexagon nut M8 self-locking, DIN-985
3.3
3 D50050 Cylinder-head screw with Allen key M5 x 25
3.4
1 D50052 Cylinder-head screw with Allen key M8 x 40
3.5
1 Z173184.99 Plunger rod
3.6
1 Z173183 Release button
3.7
1 Z173181 Leg support shell LH
3.8
1 Z173182 Leg support shell RH
3.9
1 Z173177 Clasp lever
3.10
1 J10096 Straight pin RD. 5 X 32, DIN-7
3.11
1 J10097 Straight pin RD. 8 X 40, DIN-7
3.12
1 Z173178 Tension spring
3.13
1 B273015.P28 Leg support upper part
Page 87

MISTRAL Service Instructions
Page 86 As at: 04.07.02
10.2.10 Interlock
· unscrew cylinder-head screw (3.2) and
hexagon nut (3.4)
· unscrew cylinder-head screw (3.1) and
hexagon nut (3.3)
· remove leg support shell (3.8 RH)
· plunger rod (3.5), release button (3.6),
clasp lever (3.9) and. tension spring (3.12)
can now be replaced
· replace leg support shells (3.7, 3.8) if
necessary
Page 88

Service Instructions MISTRAL
As at: 04.07.02 Page87
10.2.11 Footrest (VARI F, 90°-65°) with fixed footplates
Page 89

MISTRAL Service Instructions
Page 88 As at: 04.07.02
Pos Qty. Item No./Pcs. Item Description
1 1 Z173199 Footrest LH (VARI F, 90°-65°) with fixed
footplates
1 1 Z173200 Footrest RH (VARI F, 90°-65°) with fixed
footplates
1.1 1 Z173197 upper part LH (Vari F) pre-assembled
1.1 1 Z173198 upper part RH (Vari F) pre-assembled
1.1.1 3 D50050 Cylinder-head screw with Allen key M5 x 25
1.1.2 1 D50051 Cylinder-head screw with Allen key M6 x 16
1.1.3 1 D50052 Cylinder-head screw with Allen key M8 x 40
1.1.4 1 F00002 Hexagon nut M8 self-locking, DIN-985
1.1.5 3 F20111 Hexagon nut M5 self-locking
1.1.6 1 J10096 Straight pin RD. 5 X 32, DIN-7
1.1.7 3 J10097 Straight pin RD. 8 X 40, DIN-7
1.1.8 1 Z173177 Clasp lever
1.1.9 1 Z173178.99 Tension spring
1.1.10 1 Z173181 Leg support shell LH (Vari F)
1.1.11 1 Z173182 Leg support shell RH (Vari F)
1.1.12 1 Z173183 Release button
1.1.13 1 Z173184.99 Plunger rod
1.1.14 1 Z173185.P14 Leg support upper part Vari F, RAL 7021 dark
grey
1.1.15 2 Z173188 Pressure cone
1.1.16 1 Z173189.99 Nut M6 SP-14
1.2 1 Z173195 Lower part LH with fixed footplate, preassembled
1.2 1 Z173196 Lower part RH with fixed footplate, preassembled
1.2.1 2 0572-02152 Circular washer shape B, black
1.2.2 1 0572-04449 Footplate RH, black
1.2.3 1 0572-04435 Footplate LH, black
1.2.4 1 D50114 Cylinder-head screw with Allen key M6 x 50
1.2.5 1 Z173211.89 Push-in tube (Vari F)
1.2.6 1 Z174158 Heel band complete
1.2.6.1 1 0029-40516 Screw M6 x 60
1.2.6.2 1 F00103 Hexagon nut M6
1.2.6.3 1 F20109 Hexagon nut M6 self-locking
1.2.6.4 1 Z174156 Heel band
Page 90

Service Instructions MISTRAL
As at: 04.07.02 Page89
Interlock
· unscrew cylinder-head screw (1.1.3) and
hexagon cap nuts (1.1.4)
· unscrew cylinder head screw with Allen key
(1.1.1), hexagon nut (1.1.5)
· remove leg support shell (1.1.11 RH)
· plunger rod (1.1.13), release button
(1.1.12), clasp lever (1.1.8) and tension
spring (1.1.9) can now be replaced
· replace leg support shell (1.1.10 LH, 1.1.11
RH) if necessary
Leg support upper part (1.1.14), pressure cone (1.1.15)
· unscrew cylinder head screw (1.1.2)
· pull out push-in tube (1.2.5)
· remove leg support shell (1.1.11 RH)
· dismantle interlock
· pull out straight pins (1.1.7)
Page 91

MISTRAL Service Instructions
Page 90 As at: 04.07.02
· remove pressure cone (2x 1.1.15)
· leg support upper part (1.1.14) and
pressure cone (1.1.15) can now be
replaced
· When reassembling, ensure that the
pressure cone has the side with the
smallest diameter facing inwards.
Push-in tube (1.2.5), heel band (1.2.6.4), footplate (1.2.2 RH, 1.2.3 LH)
· unscrew cylinder head screw (1.1.2 )
· pull out push-in tube (1.2.5)
· unscrew cylinder head screw (1.2.4)
· remove footplate (1.2.2 RH or 1.2.3 LH)
and circular washer (1.2.1)
· when reassembling the footplate, ensure
that the circular washer is in the right
position (radius towards inside)
Page 92

Service Instructions MISTRAL
As at: 04.07.02 Page91
10.2.12 Footrest LH (90°-65°) with angle-adjustable footplate
Page 93

MISTRAL Service Instructions
Page 92 As at: 04.07.02
Pos Qty. Item No./Pcs. Item Description
1 1 Z173215 Footrest LH (90°-65°) with angle-adjustable
footplate
1 1 Z173216 Footrest RH (90°-65°) with angle-adjustable
footplate, complete
1.1 1 Z173197 upper part LH (Vari F) pre-assembled
1.1 1 Z173198 upper part RH (Vari F) pre-assembled
1.1.1 3 D50050 Cylinder-head screw with Allen key M5 x 25
1.1.2 1 D50051 Cylinder-head screw with Allen key M6 x 16
1.1.3 1 D50052 Cylinder-head screw with Allen key M8 x 40
1.1.4 1 F00002 Hexagon nut M8 self-locking, DIN-985
1.1.5 3 F20111 Hexagon nut M5 self-locking
1.1.6 1 J10096 Straight pin RD. 5 X 32, DIN-7
1.1.7 3 J10097 Straight pin RD. 8 X 40, DIN-7
1.1.8 1 Z173177 Clasp lever
1.1.9 1 Z173178.99 Tension spring
1.1.10 1 Z173181 Leg support shell LH (Vari F)
1.1.11 1 Z173182 Leg support shell RH (Vari F)
1.1.12 1 Z173183 Release button
1.1.13 1 Z173184.99 Plunger rod
1.1.14 1 Z173185.P14 Leg support upper part Vari F, RAL 7021 dark
grey
1.1.15 2 Z173188 Pressure cone
1.1.16 1 Z173189.99 Nut M6 SP-14
1.2 1 Z174155 Footrest lower part LH angle-adjustable
1.2 1 Z174154 Footrest lower part RH angle-adjustable
1.2.1 1 0029-40516 Screw M6 x 60
1.2.2 1 0572-04449 Footplate RH, black
1.2.2 1 0572-04435 Footplate LH, black
1.2.3 2 D50049 Cylinder-head screw with Allen key M6 x 20
1.2.4 1 D50114 Cylinder-head screw with Allen key M6 x 50
1.2.5 1 F00103 Hexagon nut M6
1.2.6 4 F20109 Hexagon nut M6 self-locking
1.2.7 2 G00115 Washer 6.4 x 12.5 x 1.6
1.2.8 1 Z174144.89 Push-in tube
1.2.9 1 Z174147.79 Footplate receptacle
1.2.10 1 Z174156 Heel band
Page 94

Service Instructions MISTRAL
As at: 04.07.02 Page93
Interlock
· unscrew cylinder-head screw (1.1.3) and
hexagon cap nuts (1.1.4)
· unscrew cylinder-head screw (1.1.1) and
hexagon cap nuts (1.1.5)
· remove leg support shell (1.1.11)
· plunger rod (1.1.13), release button
(1.1.12), clasp lever (1.1.8) and tension
spring (1.1.9) can now be replaced
· replace leg support shell (1.1.10 LH, 1.1.11
RH) if necessary
Page 95

MISTRAL Service Instructions
Page 94 As at: 04.07.02
Leg support upper part (1.1.14), pressure cone (1.1.15)
· unscrew cylinder head screw (1.1.2)
· pull out push-in tube (1.2.8)
· remove leg support shell (1.1.11)
· dismantle interlock
· pull out straight pins (1.1.7)
· remove pressure cone (2x 1.1.15)
· leg support upper part (1.1.14) and cone
(1.1.15) can now be replaced
· When reassembling, ensure that the
pressure cone has the side with the
smallest diameter facing inwards.
Page 96

Service Instructions MISTRAL
As at: 04.07.02 Page95
Push-in tube (1.2.8), heel band (1.2.10), footplate (1.2.2)
· unscrew cylinder head screw (1.1.2)
· pull out push-in tube (1.2.8)
· pull off heel strap (1.2.10)upwards
· unscrew cylinder head screw (1.2.3)
· remove push-in tube (1.2.8) and footplate
receptacle (1.2.9)
· unscrew cylinder head screw (1.2.4)
· remove footplate (1.2.2)
Page 97

MISTRAL Service Instructions
Page 96 As at: 04.07.02
10.2.13 Leg support manually height-adjustable with angle adjustment
Page 98

Service Instructions MISTRAL
As at: 04.07.02 Page97
Pos Qty. Item No./Pcs. Item Description
1
1 Z174151 Leg supports LH manually height-adjustable,
with angle adjustment
1
1 Z174150 Leg supports LH manually height-adjustable,
with angle adjustment
1.1
1 Z174153 Upper part adjustable LH pre-assembled
1.1
1 Z174152 Upper part adjustable RH pre-assembled
1.1.1
3 D50050 Cylinder-head screw with Allen key M5 x 25
1.1.2
3 F20111 Hexagon nut M5 self-locking
1.1.3
1 J10096 Straight pin RD. 5 X 32, DIN-7
1.1.4
3 J10097 Straight pin RD. 8 X 40, DIN-7
1.1.5
1 L10024 Wing nut M6 x 16
1.1.6
1 L32906 Clamping lever M6
1.1.7
1 Z173177 Clasp lever
1.1.8
1 Z173178.99 Tension spring
1.1.9
1 Z173182 Leg support shell RH (Vari F)
1.1.10
1 Z173183 Release button
1.1.11
1 Z173184.99 Plunger rod
1.1.12
1 Z173189.99 Nut M6 SP-14
1.1.13
1 Z173193 Leg support shell LH outside
1.1.14
1 Z173203.P14 Upper part adjustable (Vari A), RAL 7021 dark
grey
1.1.15
3 Z173206.80 Clamp block
1.1.16
1 Z174131.89 Nut M6 SW13
1.1.17
1 Z174132.99 Clamp cone
1.1.18
1 Z174133.99 Bearing plate
1.1.19
1 Z174163 Calf plate complete
1.1.19.1
1 6301333 Calf plate
1.1.19.2
4 D36121 Pan head tapping screw with Phillips head 4,8 x
19
1.1.19.3
2 D50047 Cylinder-head screw with Allen key M6 x 12
1.1.19.4
1 D50048 Cylinder-head screw with Allen key M5 x 35
1.1.19.5
1 D90098 Countersunk screw with slot and stud M6 x 12
1.1.19.6
1 F20109 Hexagon nut M6 self-locking
1.1.19.7
1 F20111 Hexagon nut M5 self-locking
1.1.19.8
1 G40100 Lock washer A6-Fst
1.1.19.9
1 J30006 Dowel pin 4 x 16
1.1.19.10
2 Z173189.99 Nut M6 SP-14
1.1.19.11
1 Z174116.89 Calf plate holder
Pos Qty. Item No./Pcs. Item Description
Page 99

MISTRAL Service Instructions
Page 98 As at: 04.07.02
1.1.19.12
1 Z174141.79 Calf plate rocker
1.1.19.13
1 Z174142.89 Calf plate receptacle
1.1.20
1 Z174155 Footrest lower part LH angle-adjustable, pre-
assembled
1.1.20
1 Z174154 Footrest lower part RH angle-adjustable, pre-
assembled
1.1.20.1
1 0029-40516 Screw M6 x 60
1.1.20.2
1 0572-04449 Footplate RH, black
1.1.20.2
1 0572-04435 Footplate LH, black
1.1.20.3
2 D50049 Cylinder-head screw with Allen key M6 x 20
1.1.20.4
1 D50114 Cylinder-head screw with Allen key M6 x 50
1.1.20.5
1 F00103 Hexagon nut M6
1.1.20.6
4 F20109 Hexagon nut M6 self-locking
1.1.20.7
2 G00115 Washer 6.4 x 12.5 x 1.6
1.1.20.8
1 Z174144.89 Insert tube
1.1.20.9
1 Z174147.79 Footplate receptacle
1.1.20.10
1 Z174156 Heel band
Page 100

Service Instructions MISTRAL
As at: 04.07.02 Page99
Interlock, angle adjustment
· unscrew clamping lever (1.1.6) and
hexagon cap nuts (1.1.16)
· unscrew cylinder-head screw (1.1.1) and
hexagon cap nuts (1.1.2)
· remove leg support shell RH (1.1.9 )
· plunger rod (1.1.11), release button
(1.1.10), clasp lever (1.1.7) and tension
spring (1.1.8) can now be replaced
· replace leg support shell (1.1.9 RH, 1.1.13
LH) if necessary
 Loading...