

Page 1
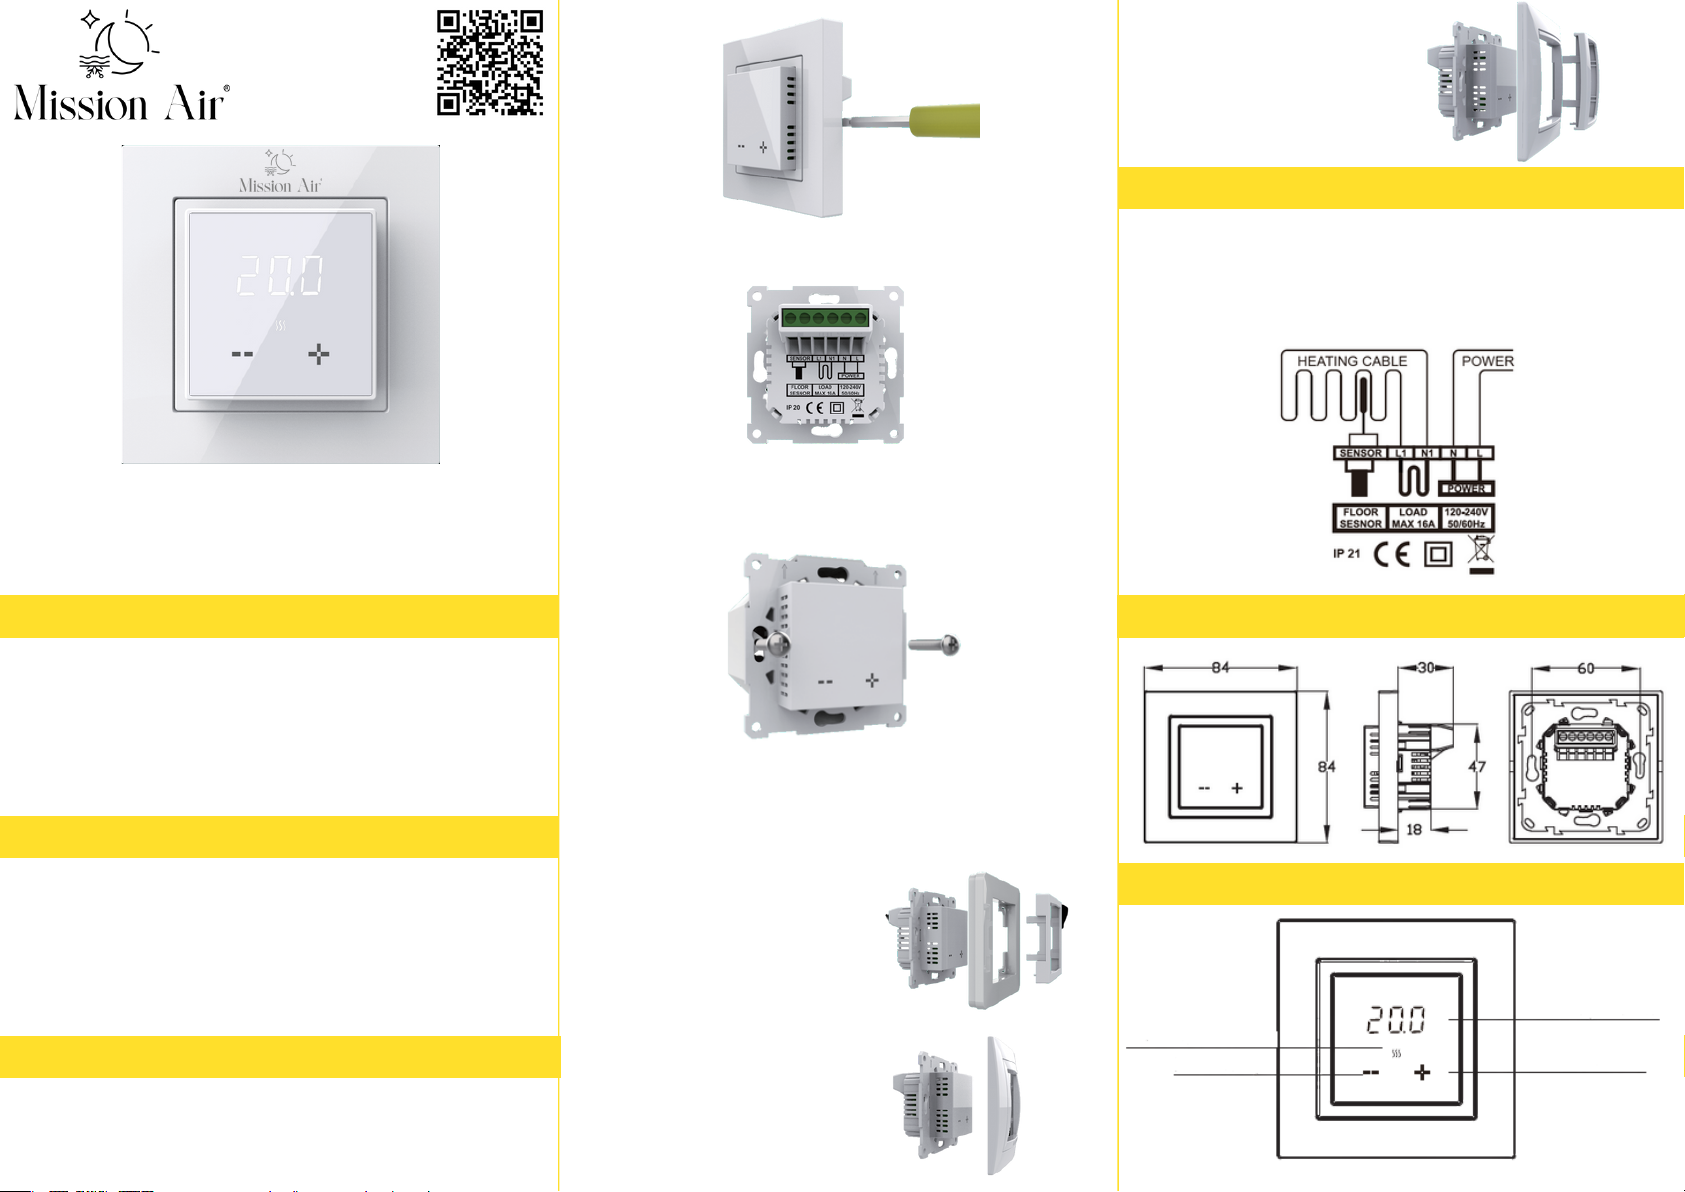
Termostat AIRES LCD to wysokiej jakości termostat o minimalistycznym
designie. Został zaprojektowany do dokładnej kontroli temperatury
powietrza i podłogi dla systemów elektrycznego ogrzewania
podłogowego o maksymalnym obciążeniu 3600W/16A.
Przy pierwszym użyciu należy wejść w ustawienia zaawansowane aby
ustawić moc obciążenia (kod funkcji i działania: 08: 0:2900~3600W 1:
1800~2900W 2:0~1800W)
Napięcie: 120~240V 50/60Hz
Maksymalne obciążenie: 16A
Specyfikacja okablowania: ≤ 2,5 mm²
Pobór mocy w trybie gotowości: < 1W
Klasa: IP 21
Limit ochronny temp. podłogi: 30℃
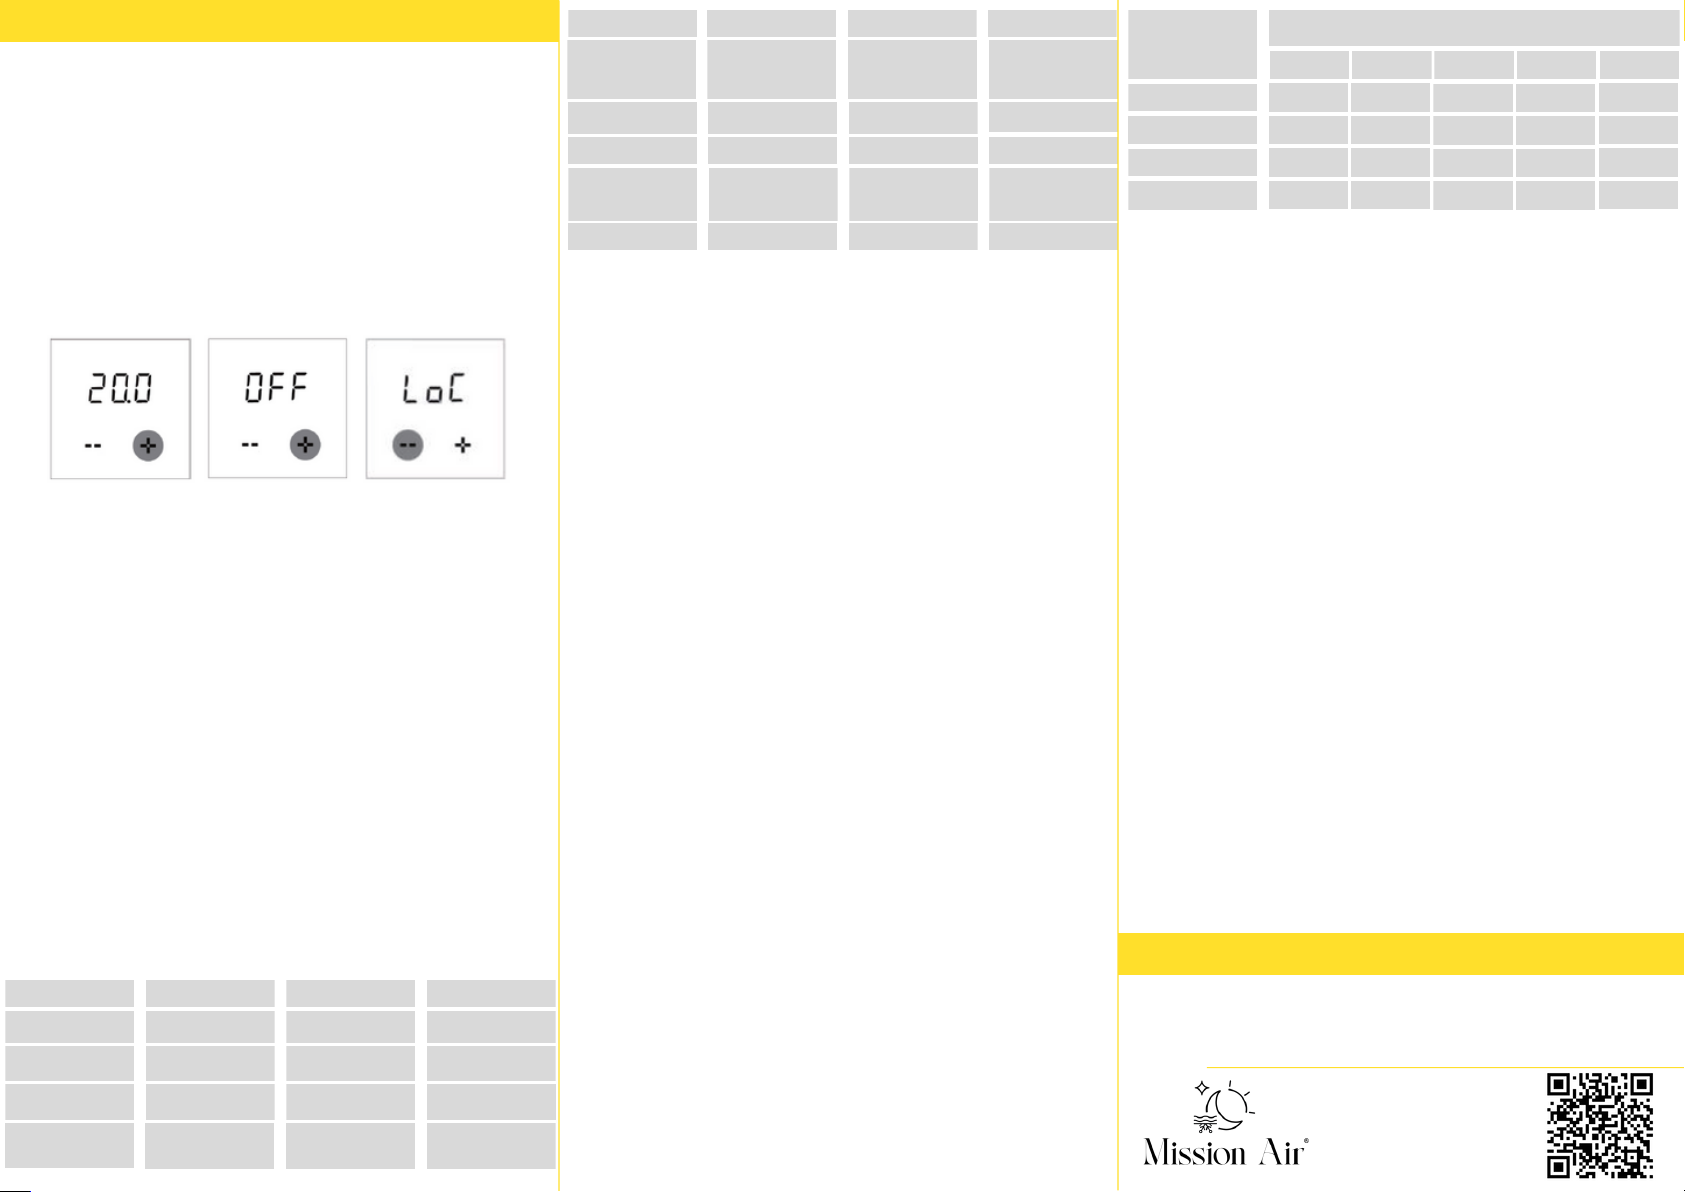
Krok 1: Użyj płaskiego śrubokręta, aby oddzielić ramkę i adapter od
termostatu, jak pokazano na rysunku.
Krok 2: Podłącz odpowiedni obwód, jak pokazano na rysunku.
Krok 3: Użyj śrub montażowych, aby zamocować termostat w puszce/
skrzynce montażowej.
Krok 4: Zainstaluj ramkę i adapter w termostacie.
ARIES LCD
WPROWADZENIE
PARAMETRY TECHNICZNE
INSTALACJA
Jeśli używana jest ramka o
wewnętrznym wymiarze 56x56
mm, należy zainstalować ramkę i
adapter do termostatu, jak
pokazano na rysunku obok.
W przypadku korzystania z ramki
Schneider Unica zainstalować
ramkę i adapter do termostatu w
sposób jak pokazano na rysunku
obok.
Jeśli używana jest seria Legrand
Valena zainstalować ramkę i
adapter do termostatu w sposób jak
pokazano na rysunku obok.
INSTRUKCJA PODŁĄCZENIA
L/N: Podłącz kabel zasilający.
L1/N1:Podłącz system grzewczy.
Sensor: Podłącz czujnik podłogowy.
Sugestia: Należy utrzymywać maksymalne obciążenie na poziomie około
90% z 16A, aby przedłużyć żywotność.
WYMIAR (MM)
SYMBOLE
Symbol grzania
Przycisk minus
Przycisk plus
Temperatura
regulator temperatury
www.missionair.pl
Page 2
FUNKCJE I OPERACJE
1.On/Off
Metoda ustawiania:
A. Włączanie
Po wybudzeniu termostatu naciśnij i przytrzymaj przycisk + przez 3 sekundy, aby go włączyć.
B. Wyłączanie
Po wybudzeniu termostatu, gdy wyświetlana jest temperatura podłogi, naciśnij i przytrzymaj
przycisk + przez 3 sekundy, aby wyłączyć urządzenie.
Gdy funkcja ochrony przed zamarzaniem jest włączona, termostat będzie utrzymywał
temperaturę podłogi na poziomie 5°C w stanie wyłączenia.
2. Ustawianie temperatury
Po ustawieniu temperatury przez użytkownika termostat utrzymuje temperaturę na
ustawionym poziomie. Po wyłączeniu i ponownym włączeniu zasilania, pierwotnie ustawiona
temperatura zostanie zachowana i wykonana. Ustawienie termostatu: 5-40°C.
Metoda ustawiania:
Po wybudzeniu termostatu naciśnij przycisk +/-, aby zmienić ustawioną temperaturę.
Po ustawieniu należy odczekać 5 sekund, a następnie powrócić do wyświetlania temperatury.
3. Blokada przycisków
Można ustawić blokadę klawiszy dla termostatu, gdy dzieci lub osoby starsze nie powinny
obsługiwać termostatu. Po wyłączeniu i ponownym włączeniu zasilania blokada klawiszy
będzie nadal działać.
Metoda ustawiania:
Po wybudzeniu termostatu naciśnij i przytrzymaj przycisk - przez 3 sekundy.
Wyświetlacz wskazuje LoC, co oznacza, że ustawienie powiodło się.
Po wybudzeniu termostatu naciśnij przycisk - przez 3 sekundy,
interfejs wyświetli temperaturę, a blokada przycisków zostanie anulowana.
4. Ustawienia zaawansowane
W celu dopasowania do większej liczby zastosowań, termostat oferuje szereg
funkcji specjalnych.
SYMBOL NAZWA DOMYŚLNIE ZAKRES
01
Kalibracja
temperatury podłogi
0,0 -0,5℃-5℃
02
Kalibracja temperatury
pomieszczenia
0,0 -0,5℃-5℃
03 Rodzaj czujnika
1
0: pokój;
1: podłoga; 2: oba
SYMBOL NAZWA DOMYŚLNIE ZAKRES
05
Typ czujnika
podłogowego
0
0: 3950 10K;
1: 3700 10K; 2:
3600 12K; 3: 3380
10K; 4: 15K
06
Jasność w trybie
gotowości
1 0/1/2/3/4/5/6/7/8
09 Reset NO NO/ YES
07 Otwarte okna OFF ON/ OFF
08
Wybór mocy
obciążenia
1
0: 2900W-3600W;
1: 1800W-2900W
2: 0W-1800W
04
Funkcja
zapobiegająca
zamarzaniu
OFF ON/ OFF
Wyjaśnienie funkcji:
01/02. Kalibracja temperatury podłogi/pomieszczenia
Ta funkcja umożliwia użytkownikowi skorygowanie błędu czujnika
podłogowego/pokojowego.
Przykład: W tym samym środowisku rzeczywista temperatura wynosi 20°C,
a termostat wyświetla 21°C. Następnie należy ustawić ten parametr na -1,0°C.
Metoda ustawiania:
a. Zapisz rzeczywistą temperaturę pomniejszoną o różnicę wyświetlaną przez termostat.
b. Po wybudzeniu termostatu naciśnij i przytrzymaj jednocześnie przyciski - i +
przez 3 sekundy, a interfejs wyświetli 01.
c. Naciśnij -, aby ustawić wartość różnicy.
d. Naciśnij przycisk + jeden raz do 02. Temperatura w pomieszczeniu jest kalibrowana w ten
sam sposób.
03. Rodzaj czujnika
Służy do wyboru działającego czujnika.
Metoda ustawień:
a. Po wybudzeniu termostatu przytrzymaj przyciski - i + przez 3 sekundy. Na wyświetlaczu
pojawi się 01.
b. Naciskaj przycisk +, aż zostanie wyświetlony ekran 03.
c. Naciśnij przycisk -, aby wybrać rodzaj czujnika.
d. Naciskaj przycisk +, aż zostanie wyświetlony ekran temperatury.
04. Funkcja zapobiegająca zamarzaniu
Po włączeniu tej funkcji temperatura podłogi jest utrzymywana na poziomie 5°C, gdy
termostat jest wyłączony.
Metoda ustawiania:
a. Po wybudzeniu termostatu naciśnij i przytrzymaj przyciski - i + przez 3 sekundy, a interfejs
wyświetli 01.
b. Naciskaj przycisk + do momentu wyświetlenia ekranu 04.
c. Naciśnij przycisk -, aby wybrać ON lub OFF.
d. Naciskaj przycisk + do momentu wyświetlenia ekranu temperatury.
05. Typ czujnika
Ta funkcja służy do wymiany starego regulatora temperatury. Gdy parametry starego
czujnika podłogowego są podobne do parametrów określonego modelu przedstawionego
w poniższej tabeli, nie ma potrzeby wymieniać czujnika podłogowego. Wystarczy wybrać
odpowiedni model czujnika podłogowego.
Metoda ustawiania:
a. Po wybudzeniu termostatu naciśnij i przytrzymaj jednocześnie przyciski - i + przez 3
sekundy, a interfejs wyświetli 01.
b. Naciskaj przycisk + do momentu wyświetlenia ekranu 05.
c. Naciśnij przycisk -, aby wybrać model czujnika.
d. Naciskaj przycisk + do momentu wyświetlenia ekranu temperatury.
TEMPARATURA
Wartość rezystancji czujnika podłogowego
w odpowiednim punkcie temperatury (Ω)
4: 15K
3:3380 10K2:3600 12K
1:3700 10K0:3950 10K
0℃
10℃
20℃
30℃
41900
2605034423
3028632800
27281
1763022217
1905519733
18205
1204014660
1232012419
12427
83319869
81657905
06. Jasność w trybie gotowości
Termostat zapewnia regulację jasności w trybie czuwania. Jasność można ustawić na 0
(całkowicie wyłączona) lub 1 (minimalna jasność).
Metoda ustawiania:
a. Po wybudzeniu termostatu naciśnij i przytrzymaj jednocześnie przyciski - i + przez 3 sekundy,
a interfejs wyświetli 01.
b. Naciskaj przycisk + do momentu wyświetlenia ekranu 06.
c. Naciśnij przycisk -, aby wybrać jasność.
d. Naciskaj przycisk + do momentu wyświetlenia ekranu temperatury.
07. Otwarte okna
Termostat wykrywa spadek temperatury spowodowany otwarciem okna.
Tymczasowo wyłącza ogrzewanie, aby oszczędzać energię.
Metoda ustawiania:
a. Po wybudzeniu termostatu naciśnij i przytrzymaj jednocześnie przyciski - i + przez 3 sekundy,
a interfejs wyświetli 01.
b. Naciskaj przycisk + do momentu wyświetlenia ekranu 07.
c. Naciśnij przycisk -, aby wybrać OFF lub ON.
d. Naciskaj przycisk + do momentu wyświetlenia ekranu temperatury.
08. Wybór mocy obciążenia
Ze względu na moc ogrzewania podłogowego, ciepło generowane przez regulator
temperatury jest inne, co wpływa na wykrywaną wartość temperatury przez czujnik pokojowy.
Program może dokonać odpowiednią korektę i kompensację wartości detekcji w zależności od
różnej mocy.
Metoda ustawiania:
a. Po wybudzeniu termostatu naciśnij i przytrzymaj jednocześnie przyciski - i
+ przez 3 sekundy, a interfejs wyświetli 01.
b. Naciśnij przycisk +, aby wybrać 08.
c. Naciśnij przycisk -, aby wybrać zakres mocy systemu..
e. Naciskaj przycisk + do momentu wyświetlenia ekranu temperatury.
09. Reset
Ta funkcja przywraca parametry ustawionej temperatury i ustawień zaawansowanych do
domyślnych parametrów fabrycznych.
ROZWIĄZYWANIE PROBLEMÓW
Uwaga: W przypadku wystąpienia alarmu usterki należy skontaktować się z profesjonalistą w
tym zakresie w celu naprawy lub wymiany.
E1: Alarm awarii czujnika pokojowego.
E2: Alarm awarii czujnika podłogowego.
WAŻNE!
Termostat ARIES LCD może pracować w trybie czujnika podłogowego / powietrznego / lub
obu jednocześnie. W trybie czujnika podłogowego wyświetlacz pozwala określić
temperaturę podłogi. W trybie czujnika powietrznego wyświetlacz pozwala na ustawienie
zadanej temp. powietrza w pomieszczeniu. W trybie wspólnym wyświetlacz służy do
ustawienia temperatury powietrza, a temperatura podłogi każdorazowo ustawiona jest
automatycznie na maksymalny poziom ochronny 30℃.
+48 797 451 111
www.missionair.pl
Page 3
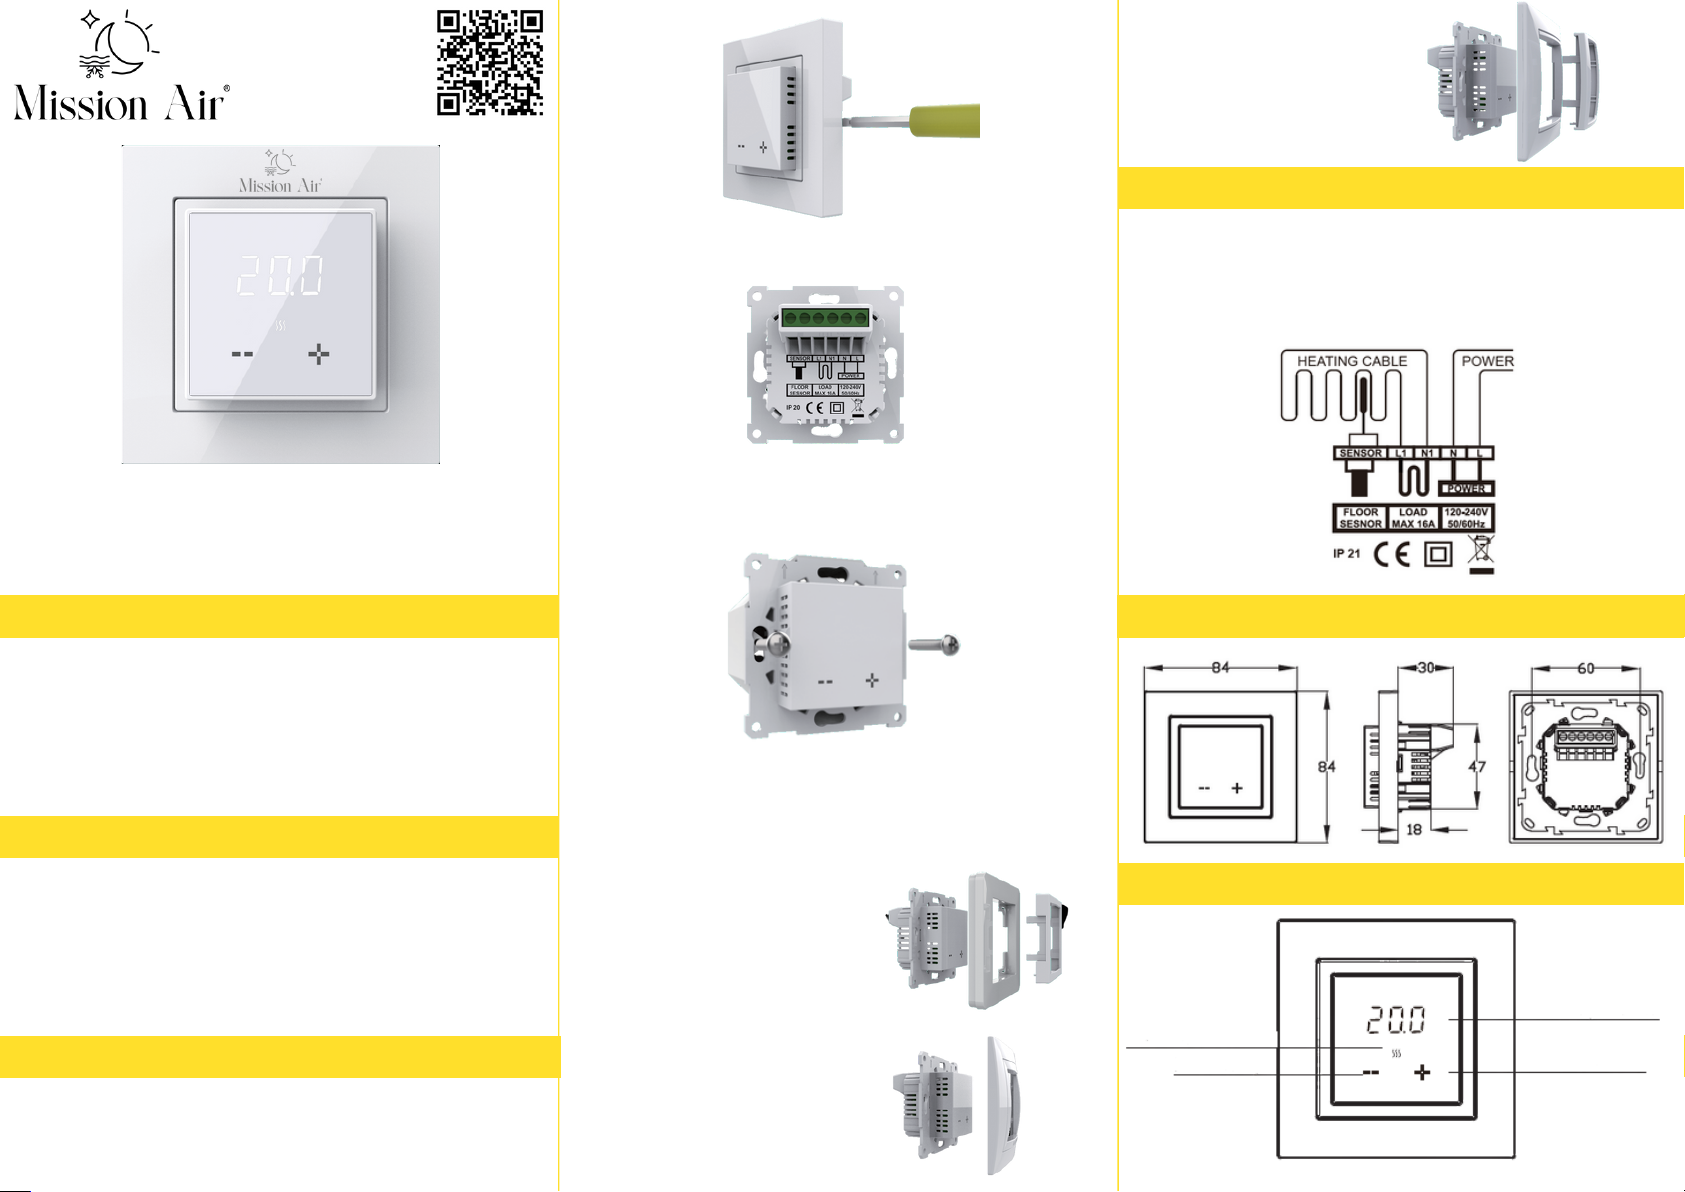
The AIRES LCD thermostat is a high quality thermostat with a minimalist
design. It has been designed to accurately control air and floor
temperature for electric underfloor heating systems with a maximum load
of 3600W/16A.
When using it for the first time, enter the advanced settings to set the load
power (function and action code: 08: 0:2900~3600W 1:
1800~2900W 2:0~1800W)
Voltage: 120~240V 50/60Hz
Maximum load: 16A
Wiring specification: ≤ 2.5 mm²
Standby power consumption: < 1W
Class: IP 21
Floor temperature protection limit: 30℃
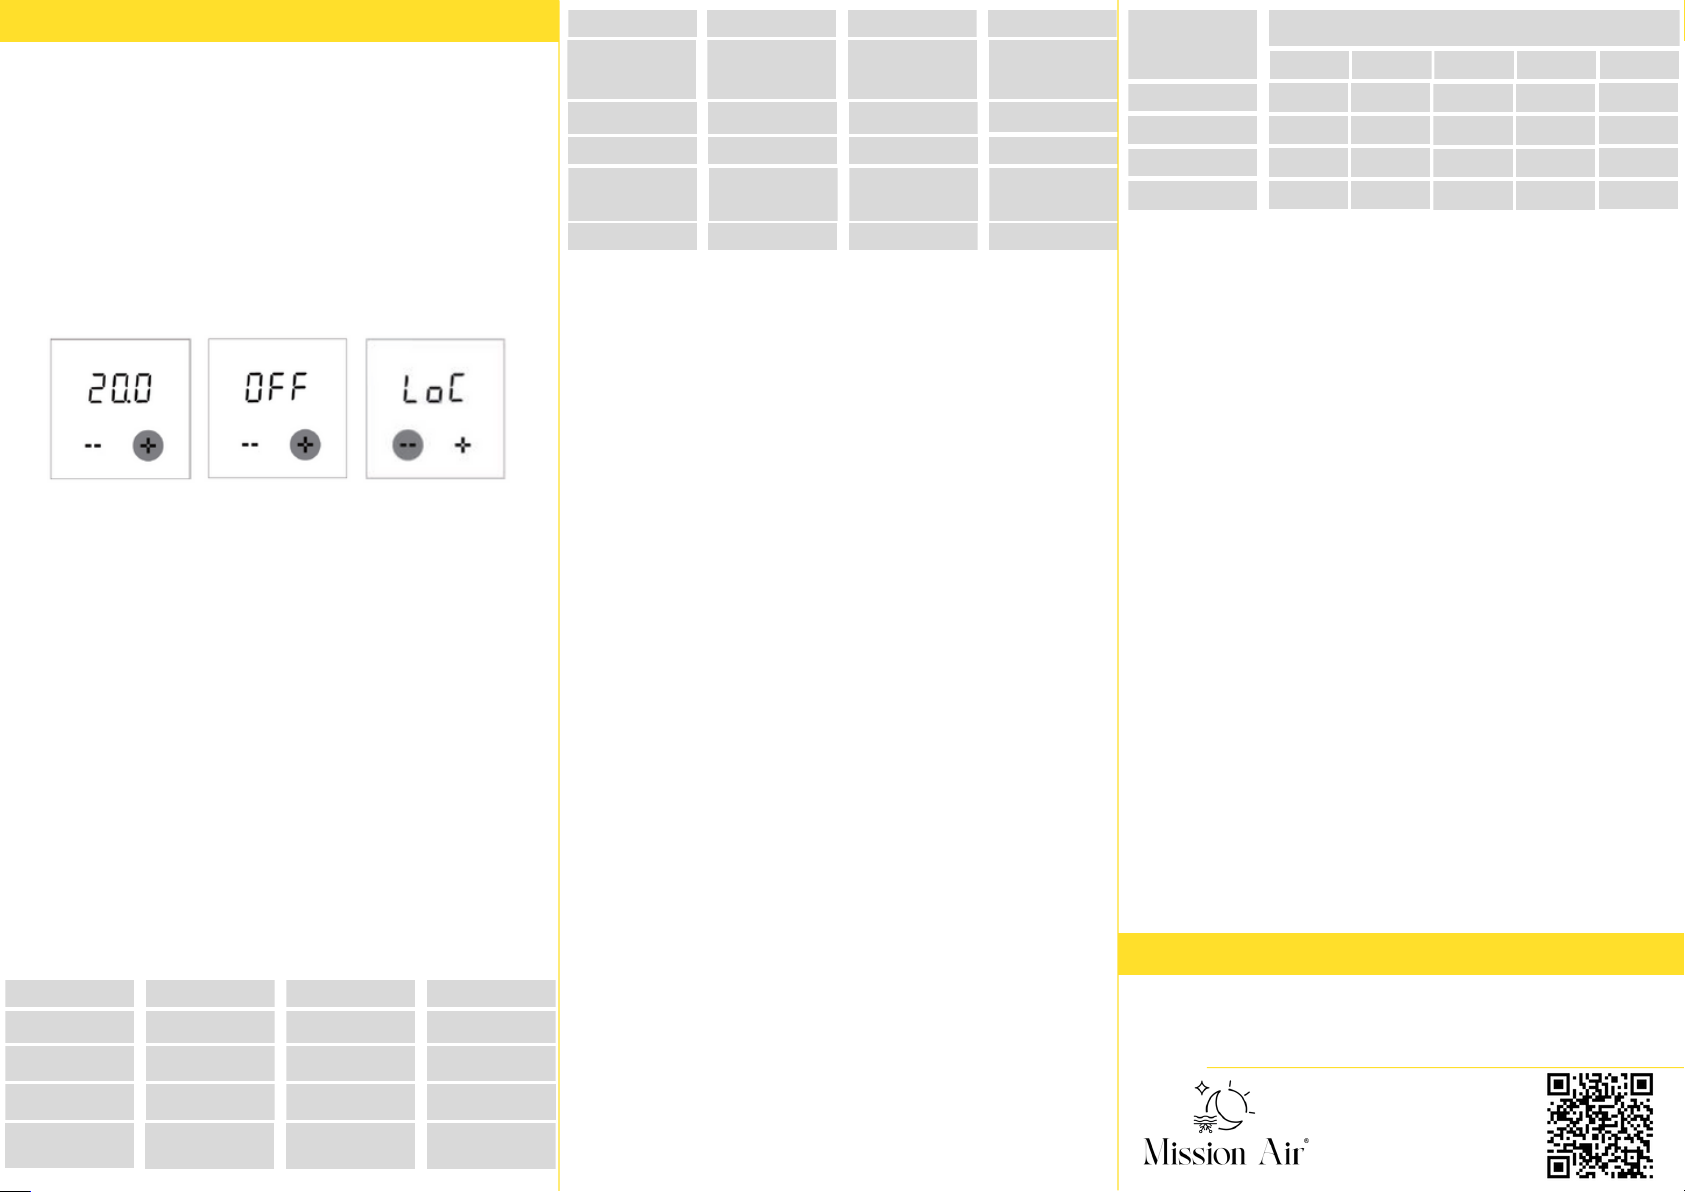
Step 1: Use a flathead screwdriver to separate the bezel and adapter
from the thermostat as shown.
Step 2: Connect the appropriate circuit as shown.
Step 3: Use the mounting screws to fix the thermostat in the mounting
box/cabinet.
Step 4: Install the frame and adapter in the thermostat.
ARIES LCD
INTRODUCTION
TECHNICAL SPECIFICATIONS
INSTALLATION
If a frame with an internal
dimension of 56x56 mm is used, the
frame and thermostat adapter must
be installed as shown in the
diagram opposite.
If using the Schneider Unica frame,
install the frame and adapter to the
thermostat as shown opposite.
If the Legrand Valena series is used,
install the frame and thermostat
adapter as shown in the diagram
opposite.
CONNECTION INSTRUCTIONS
L/N: Connect the power cable.
L1/N1:Connect the heating system.
Sensor: Connect the floor sensor.
Suggestion: Keep the maximum load at around 90% of 16A to extend the
life.
DIMENSION (MM)
SYMBOLS
Heating symbol
Minus button
Plus button
Temperature
temperature controller
www.missionair.pl
Page 4
FUNCTIONS AND OPERATIONS
1.On/Off
Setting method:
A. Switching on
Once the thermostat has woken up, press and hold the + button for 3 seconds to switch it on.
B. Switching off
After waking up the thermostat while the floor temperature is displayed, press and hold the +
button for 3 seconds to switch the unit off.
When the frost protection function is activated, the thermostat will maintain the floor
temperature at 5°C in the off state.
2. Temperature setting
Once the user has set the temperature, the thermostat maintains the temperature at the set
level. When the power is switched off and on again, the originally set temperature is retained
and executed. Thermostat setting: 5-40°C.
Setting method:
Once the thermostat has woken up, press the +/- button to change the set temperature.
Once set, wait 5 seconds and then return to the temperature display.
3. Button lock
A key lock can be set for the thermostat when children or the elderly should not operate the
thermostat. When the power is switched off and on again, the key lock will continue to
operate.
Setting method::
Once the thermostat has woken up, press and hold the - button for 3 seconds.
The display shows LoC, indicating that the setting was successful.
After the thermostat has woken up, press the - button for 3 seconds,
the interface will display the temperature and the button lock will be cancelled.
4. Advanced settings
To suit a wider range of applications, the thermostat offers a number of
special functions.
SYMBOL NAME HOPE SCOPE
01
Floor temperature
calibration
0,0 -0,5℃-5℃
02
Room temperature
calibration
0,0 -0,5℃-5℃
03 Type of sensor
1
0: room;
1: floor; 2: both
SYMBOL NAME HOPE SCOPE
05
Floor sensor type
0
0: 3950 10K;
1: 3700 10K; 2:
3600 12K; 3: 3380
10K; 4: 15K
06 Standby brightness 1 0/1/2/3/4/5/6/7/8
09 Reset NO NO/ YES
07
Open windows
OFF ON/ OFF
08 Load power selection
1
0: 2900W-3600W;
1: 1800W-2900W
2: 0W-1800W
04 Anti-freeze function OFF ON/ OFF
Explanation of function:
01/02 Floor/room temperature calibration
This function allows the user to correct the error of the floor/room sensor.
Example: In the same environment the actual temperature is 20°C,
and the thermostat displays 21°C. Then set this parameter to -1.0°C.
Setting method:
a. Record the actual temperature minus the difference displayed by the thermostat.
b. After the thermostat has woken up, press and hold the - and + buttons simultaneously
for 3 seconds and the interface will display 01.
c. Press - to set the difference value.
d. Press the + button once until 02. The room temperature is calibrated in the same way.
03. Type of sensor
Used to select the sensor in operation.
Setting method:
a. After the thermostat has woken up, hold down the - and + buttons for 3 seconds. The
display will show 01.
b. Press the + button until the 03 screen is displayed.
c. Press the - button to select the type of sensor.
d. Press the + button until the temperature screen is displayed.
04. Anti-freeze function
When this function is activated, the floor temperature is maintained at 5°C when the
thermostat is switched off.
Setting method:
a. Once the thermostat has woken up, press and hold the - and + buttons for 3 seconds and
the interface will display 01.
b. Press the + button until the 04 screen is displayed.
c. Press the - button to select ON or OFF.
d. Press the + button until the temperature screen is displayed.
05. Sensor type
This function is used to replace the old temperature controller. When the parameters of the
old floor sensor are similar to those of the specific model shown in the table below, there is no
need to replace the floor sensor. Simply select the correct floor sensor model.
Setting method:
a. Once the thermostat has woken up, press and hold the - and + buttons simultaneously for 3
seconds and the interface will display 01.
b. Press the + button until the 05 screen is displayed.
c. Press the - button to select the sensor model.
d. Press the + button until the temperature screen is displayed.
TEMPERATURE
Resistance value of the floor sensor
at the corresponding temperature point (Ω)
4: 15K
3:3380 10K2:3600 12K
1:3700 10K0:3950 10K
0℃
10℃
20℃
30℃
41900
2605034423
3028632800
27281
1763022217
1905519733
18205
1204014660
1232012419
12427
83319869
81657905
06. Standby brightness
The thermostat provides brightness control in standby mode. The brightness can be set to 0
(completely off) or 1 (minimum brightness).
Setting method:
a. Once the thermostat has woken up, press and hold the - and + buttons simultaneously for 3
seconds and the interface will display 01.
b. Press the + button until the 06 screen is displayed.
c. Press the - button to select the brightness.
d. Press the + button until the temperature screen is displayed.
07. Open windows
The thermostat detects a drop in temperature caused by opening a window.
It temporarily switches off the heating to save energy.
Setting method:
a. Once the thermostat has woken up, press and hold the - and + buttons simultaneously for 3
seconds and the interface will display 01.
b. Press the + button until the 07 screen is displayed.
c. Press the - button to select OFF or ON.
d. Press the + button until the temperature screen is displayed.
08. Load power selection
Due to the power of the underfloor heating, the heat generated by the temperature controller is
different, which affects the detected temperature value by the room sensor. The programme can
make the appropriate correction and compensation of the detection value according to the
different power.
Setting method:
a. After the thermostat has woken up, press and hold the - and
+ for 3 seconds and the interface will display 01.
b. Press the + button to select 08.
c. Press the - button to select the system power range....
e. Press the + button until the temperature screen is displayed.
09. Reset
This function restores the parameters of the set temperature and advanced settings to the factory
default parameters.
PROBLEM SOLVING
Note: In the event of a fault alarm, contact a professional in this area for repair or replacement.
E1: Room sensor failure alarm.
E2: Floor sensor failure alarm.
IMPORTANT!
The ARIES LCD thermostat can operate in floor sensor / air sensor mode / or both at the
same time. In floor sensor mode, the display allows you to set the floor temperature. In air
sensor mode, the display allows you to set the desired room air temperature. In the common
mode, the display is used to set the air temperature and the floor temperature is automatically
set to the maximum protection level of 30℃ each time.
+48 797 451 111
www.missionair.pl
 Loading...