

TTMM
R
WWiirreelleessss,, PPeerrssoonnaall SSeeccuurriittyy AAllaarrmm SSyysstteemmss
e
e
all
a
R
ffoorr RReeaall EEssttaattee PPrrooffeessssiioonnaalls
G
u
u
arr
a
G
“An Agent’s Best Friend!”
d
d
s
User’s Manual
80
-

Patent pending.
May 2004 Revision 3
Copyright Notice
Copyright 2003, 2004 Misiu Systems LLC
Customer Support: 425-487-6536
Website: http://www.realguard.com
This document is copyrighted. No part of this publication may be copied or distributed,
transmitted, transcribed, stored in a retrieval system, or translated into any language, in any
form or by any means, or disclosed to third parties without the express written permission of
Misiu Systems.
Disclaimer
Misiu Systems makes no representation or warranties, expressed or implied, with respect to
this publication, the products discussed in this publication, or any Misiu Systems products,
including but not limited to warranties of merchantability or fitness for any particular
purpose.
Misiu Systems reserves the right to make changes of any kind to the products described in
this manual and/or the manual without obligation to notify any person, institution or
organization of such changes.
Caution!
Any changes or modifications made to this system not expressly approved by the
manufacturer could void your authority to operate this equipment.

This device complies with Part 15 of the FCC Rules. Operation is subject to the following two
conditions:(1) This device may not cause harmful interference.(2) This device must accept any
interference received, including interference that may cause undesired operation.
FCC Regulatory Information
15.105 Federal Communications Commission (FCC) Requirements, Part 15
This equipment has been tested and complies with the limits for a Class B digital device,
pursuant to Part 15 of the FCC Rules. These limits are designed to provide reasonable
protection against harmful interference in a residential installation. The equipment generates,
uses and can radiate radio frequency energy and, if not installed and used in accordance with
the instructions, may cause harmful interference to radio communications. However there is
no guarantee that interference will not occur in a particular installation. If this equipment
does cause harmful interference to radio or television reception, which can be determined by
turning the equipment off and on, you are encouraged to try to correct the interference by
one or more of the following measures:
• Reorient or relocate the receiving antenna.
• Increase the separation between the equipment and receiver.
• Connect the equipment into an outlet on a circuit difference from that to which the receiver
is connected.
• Consult the dealer or an experienced radio/TV technician for help.
You may find the following booklet, prepared by the Federal Communications Commissions,
helpful: How to Identify and Resolve Radio and TV Interference Problems. This booklet is available
from the US Government Printing Office, Washington, DC 20402.
Regulatory information / Disclaimers
Installation and use of this Wireless, Personal Security Alarm System must be in strict
accordance with the instructions included in the user documentation provided with the
product. Any changes or modifications (including the antennas) made to this device that are
not expressly approved by the manufacturer may void the user’s authority to operate the
equipment. The manufacturer is not responsible for any radio or television interference
caused by unauthorized modification of this device, or the substitution of the connecting
cables and equipment other than manufacturer specified. It is the responsibility of the user to
correct any interference caused by such unauthorized modification, substitution or
attachment. Manufacturer and its authorized resellers or distributors will assume no liability
for any damage or violation of government regulations arising from failing to comply with
these guidelines.
RealGuard
iii

Important Note (Co-Location)
FCC RF Radiation Exposure Statement: This equipment complies with FCC RF radiation
exposure limits set forth for an uncontrolled environment. This device and its antenna must
not be co-located or operating in conjunction with any other antenna or transmitter.
iv
RealGuard

Important Safety Instructions
Read all the safety and operating instructions before you begin using the RealGuard Personal
Security System. Make sure you follow the operating and maintenance instructions carefully.
Then keep this manual for future reference.
Make sure you heed all the warnings on the units and in this manual.
Health and Safety Warnings
Do not attempt to service any RealGuard unit yourself. Opening the covers may expose you
to dangerous voltage or other hazards. Refer all servicing to qualified service personnel.
Never push objects of any kind into any RealGuard unit through openings as they may touch
dangerous voltage points or short-out parts that could result in a fire or electric shock.
Route the power cord so that it is not likely to be walked on or pinched by items placed upon
or against it. Pay particular attention to the cord at plugs, receptacles, and the point where it
exits from the product.
Do not handle the power cord or wire harness with wet hands.
Do not use this product near water, for example, near a bath tub, wash bowl, kitchen sink, or
laundry tub; in a wet basement; or near a swimming pool.
If water gets inside any unit, turn off the power switch and detach it from any electrical
source. Before you use it again, contact Misiu Systems or its authorized service
representatives to replace or repair the unit.
Connect the home unit only to a power supply of the type described in the operating
instructions. When unplugging the home unit from the wall outlet do not pull the power
cord, pull the plug adapter.
Do not use any of the units in conditions where there is danger of electrically ignited
explosions.
Product Protection
Keep the RealGuard units away from heat sources such as radiators, heat registers, stoves, or
other products (including amplifiers) that produce heat.
Make sure to follow the manufacturer’s instructions when installing this product. Use only
mounting accessories recommended by the manufacturer.
RealGuard
v

Use only the attachments recommended by the product manufacturer. Other attachments
may cause hazards.
Maintenance
Replacement Parts Unauthorized substitution of parts may result in fire, electric shock,
or other hazards. The RealGuard units contain no user-serviceable parts and should be
returned to Misiu Systems or its authorized representatives for any service or repair
requirements. When replacement parts are required, the parts should be genuine parts
manufactured by Misiu Systems. Use of parts other than those provided by Misiu Systems
can potentially void the warranty of the products or cause emissions beyond acceptable
levels as prescribed by the FCC.
Cleaning the Units – Before cleaning any of the three units, make sure the it is not connected
to an electrical outlet. Use only a damp cloth for cleaning it. Do not use liquid cleaners or
aerosol cleaners. Benzene, thinner or any other organic solvents or disinfectants may damage
or discolor the surface.
Damage Requiring Service Unplug the wall unit and have your RealGuard system
serviced by qualified service personnel under the following conditions:
• When the power-supply cord or plug is damaged.
• If liquid has been spilled on a unit, or objects have fallen into it.
• If a unit has been exposed to rain or water.
• If a unit has been dropped or damaged in any way.
• If a unit exhibits a distinct change in performance.
• If a unit does not operate normally according to the operating instructions. Adjust only
those controls that are covered by the operating instructions. Improper adjustment of other
controls may result in damage and may require extensive work by a qualified technician to
restore the product to its normal operation.
Note: Upon completion of any service or repairs to this product, Misiu Systems will perform
complete testing to ensure that the product is reliable and that it conforms to applicable US
and Canadian laws.
Battery Replacement and Disposal
Check batteries often, and replace them when necessary.
Defective batteries must be returned to a collection point for chemical waste disposal.
vi
RealGuard

Contents
1. What is RealGuard? 1
Personal Unit 1
Auto Unit 2
Home Unit 2
2. Unpacking Checklist 3
3. Personal Security System Controls 4
Personal Unit 4
Auto Unit 5
Home Unit 6
4. Installing the Units 7
Personal Unit 7
Loading the Batteries 7
Other Features of the Personal Unit 8
Auto Unit 9
Installing the Unit in the Vehicle 9
Installing the Horn 9
Connecting the Cables 10
Installing the Antenna 11
Installing the Antenna 12
Using the Auxiliary Outputs (Optional) 13
Home Unit 14
5. Setting up and Testing the System 15
Coordinating Your Personal Unit and Auto Unit 15
Testing the System 17
Selecting the Deactivation Sequence 18
RealGuard
vii

6. Using the Personal Unit 20
Activating the Alarm 20
Using the Flashlight 20
Changing the Alarm Mode of the Home Unit 21
7. Technical Specifications 22
8. Limited Warranty 23
viii
RealGuard

1. What is RealGuard?
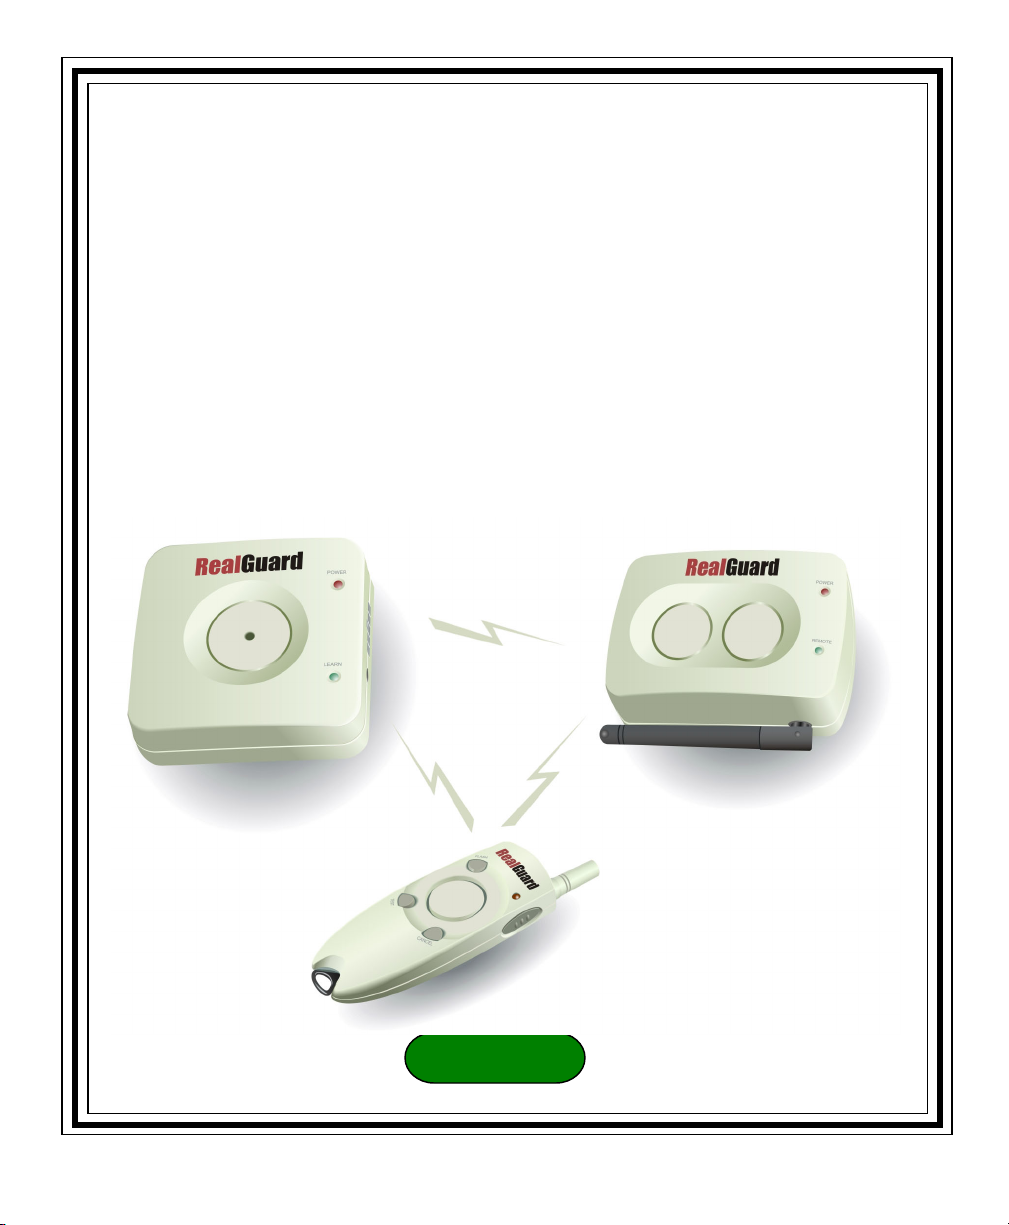
The RealGuard Personal Security System is a wireless personal security alarm system
designed for real estate professionals. As a real estate agent, you can use the RealGuard
system to give you a new level of personal safety during your regular course of business of
showing properties to prospective buyers.
RealGuard includes three alarm units, which communicate with each other through remote,
wireless transmitters and receivers:
• A Personal Unit, which you keep with you to use in case of an emergency.
• An Auto Unit, which is installed on your automobile.
• A Home Unit, which is installed in the home you are showing.
You can purchase additional Personal Units and Home Units to expand your existing system.
Personal Unit
The Personal Unit is the source of the alarm signal. You can
carry it in your hand, keep it in your pocket or handbag, or
attach it to your belt. In an emergency, you press the panic
button and the unit sounds an ear-piercing siren. It also
transmits an emergency signal to the Auto Unit, which sends
the signal on to the Home Unit. All three units sound an
audible alarm.
To turn off the siren, you press a sequence of four buttons. During setup, you select the
sequence you want to use.
The Personal Unit contains a flashlight, which can be useful in the dark for opening doors
and lockboxes, and seeing your way around areas of homes and properties that are not
adequately lit.
Warning: Make sure you keep the unit away from your ears when you press the panic
button. The alarm is very loud.
RealGuard
1
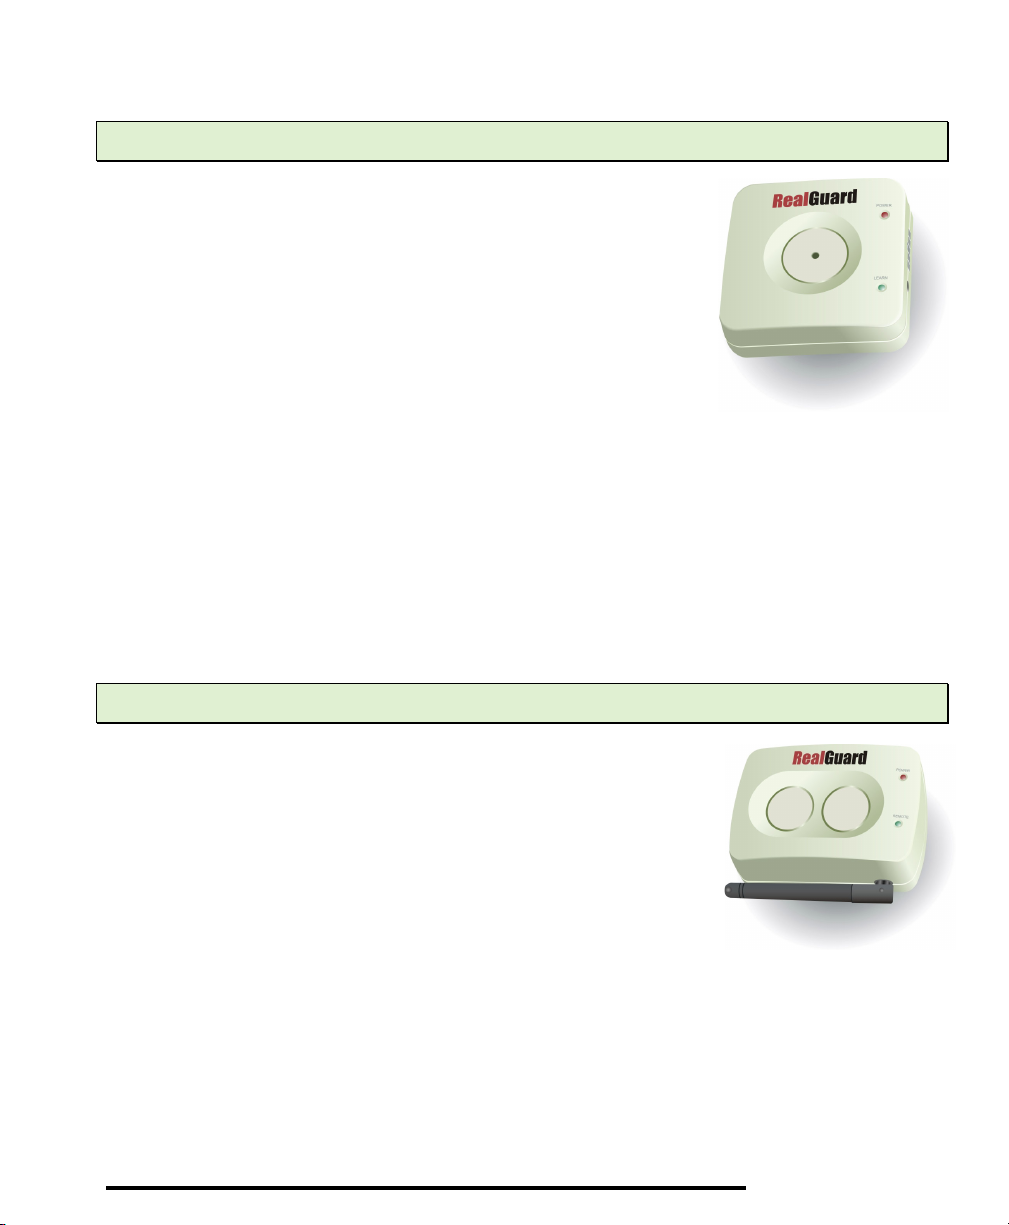
Auto Unit
The Auto Unit is installed in your automobile; it is the control
unit for each RealGuard system. A unique coded signal set up for
your system ensures that only your Personal Unit can activate
your Auto Unit. When you press the panic button on the Personal
Unit, it sends a signal to the Auto Unit, which sounds a horn
installed under the hood. The Auto Unit passes the signal on to
the Home Unit, which also emits a sound.
The manufacturer recommends that you have a profession install
the Auto Unit. To find the names of authorized installation firms,
contact Misiu Systems Customer Service or refer to Misiu Systems web site.
Installation includes:
• Mounting an external 5-Watt horn in the engine compartment of your vehicle.
• Mounting the Auto Unit behind the dashboard on the driver’s side of the car with the help
of the included mounting bracket.
The Auto Unit also is set up to operate with auxiliary devices, such as the optional RealGuard
Automatic Vehicle Location (AVL) device for reporting address information to local law
enforcement agencies.
Home Unit
The Home Unit is plugged into an electrical outlet in the listed
home, before the home is shown to potential buyers. While each
Personal Unit must be accompanied by its own Auto Unit, the
alarm on the Home Unit operates for any agent who is using a
RealGuard system.
The Home Unit can also be installed in brokerage offices or any
other location to be secured by RealGuard Personal Security
Alarms. It can be placed in an inconspicuous location on the
property, such as behind a curtain, couch, or chair.
You can manually switch the Home Unit to receive its activation signal directly from a
Personal Unit, in case you do not have your vehicle on the premises or the Auto Unit has not
yet been installed.
2
RealGuard
(
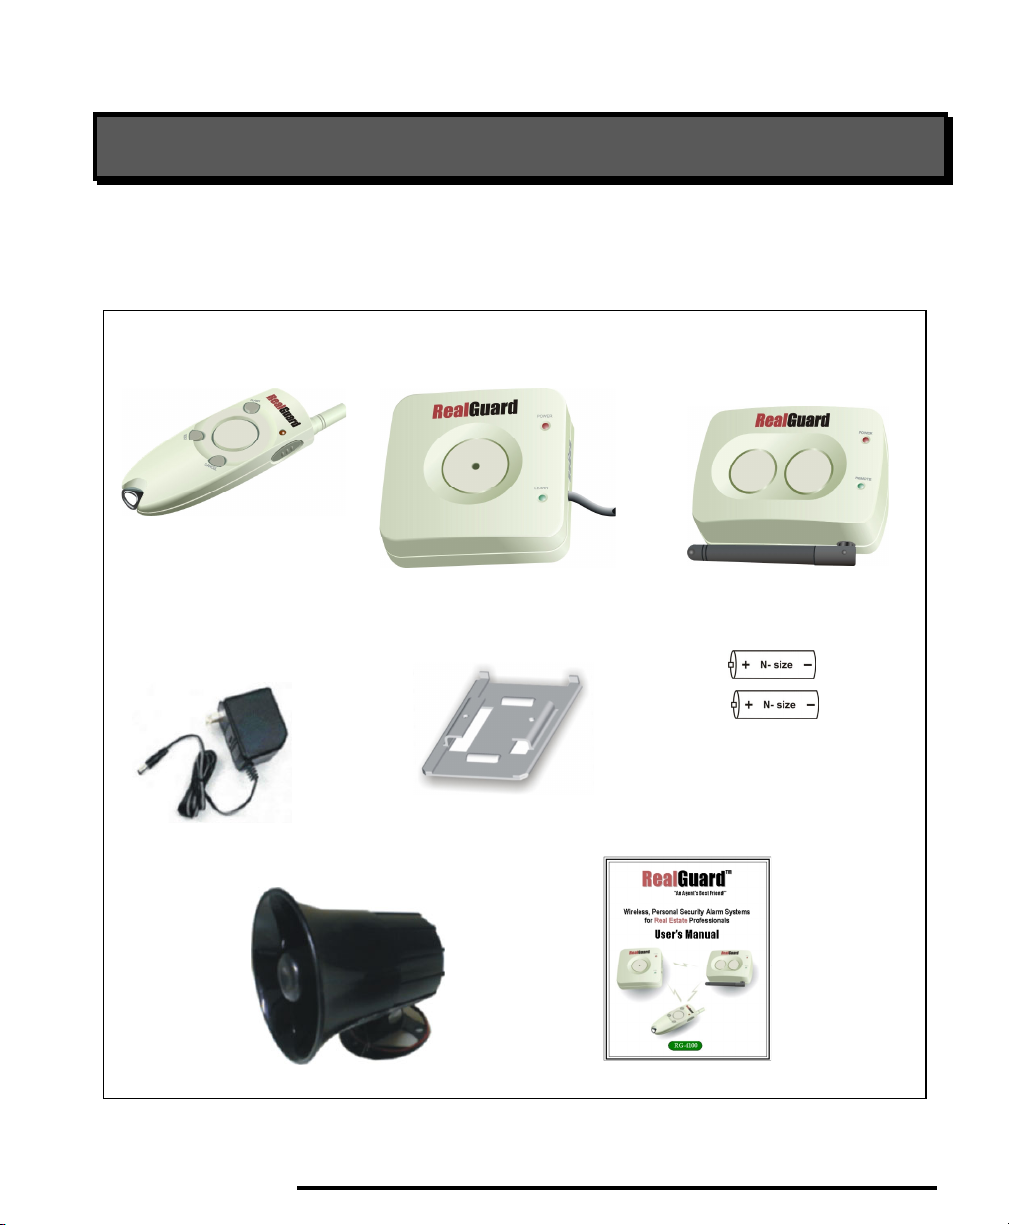
2. Unpacking Checklist
As you unpack the RG-4100 RealGuard system, use the illustration below to check and
identify the contents of the package. If any item is damaged or missing, please notify Misiu
Systems Customer Service. Keep the packaging materials; you may need them to transport
your product in the future.
Personal unit
(RGR4101)
AC Adapter
(RG-4103
Model A)
Horn
Auto unit
RGA-4102)
Mounting bracket
Home unit
(RGH-4103)
N Size 1.5 V batteries
(2 Pcs)
User Manual
(this document)
3
RealGuard

3. Personal Security System Controls
g
This chapter points out the control buttons and other features on the RealGuard Personal
Security System units. Use this information to become familiar with the units before you
begin installing the system.
Personal Unit
Top View
Flash
Test
Key Ring
Transmittin
Cancel
Side View
Antenna
Flash Light
Panic
4
RealGuard

W
Auto Unit
Top View
Power Light
Side View
Antenna cable
Learn Light
Learn Button
ire Harness Connector
5
RealGuard

Home Unit
t
Top View
Back View
Power Light
Remote Ligh
Antenna
Remote / Local Switch
Side View
AC Input Jack
6
RealGuard

4. Installing the Units
This chapter provides instructions for installing the three RealGuard units. Be sure to follow
all the installation instructions carefully and in order to ensure that the units work correctly
when you use them.
Personal Unit
Loading the Batteries
Cautions:
1. Turn the screw on the back of the Personal Unit counter-clockwise to loosen the battery
compartment cover. Remove the cover.
2. Insert two N Size 1.5V batteries inside the battery compartment as indicated by the
drawing inside the compartment.
3. Replace the cover, and tighten the screw on the cover.
• Do not mix new and old batteries or batteries of different types.
• Do not use rechargeable batteries.
RealGuard
7

Other Features of the Personal Unit
The Personal Unit can also be used as
a key chain holder, as shown in the
figure.
A wrist strap can be attached to the
Personal Unit, as shown in the figure.
8
RealGuard

Auto Unit
Installing the Unit in the Vehicle
The Auto Unit is designed to be installed under the dashboard on the driver’s side, as shown
in the illustration. Normally, there is sufficient room behind the steering column. Since the
installation process varies widely from car to car, we recommend that you have a qualified
automobile installation service firm install the Auto Unit. If you plan to do it yourself, make
sure you use the information in your vehicle’s user manual to help you.
Installing the Horn
The waterproof, outdoor horn sounds the alarm for the Auto Unit. Install the horn under the
hood by mounting it securely to the firewall of the vehicle.
Horn Battery
RealGuard
9

Connecting the Cables
The Auto Unit requires a 12V DC electrical supply, which is normally provided by the
vehicle’s electrical system. The power source must be able to provide power to the unit when
the vehicle is not running. The Auto Unit controls the horn. It can also control a Auxiliary
Alarm Unit or a Telematics Device (see page 13).
Use the diagram on the following page as a guide to connect the wires coming out of the
Auto Unit.
1. Connect the Red, fused wire from the Auto Unit to a non-switched electrical source, such
as the battery’s positive connector. We recommend that you splice into the cable between
the battery and the starter switch.
Important: Test the system often (see page 17), and replace the 3A/250V fuse if the Auto
Unit stops working.
2. Connect the Black wire to the battery’s negative connector as a ground.
3. Feed the electrical leads of the horn through the firewall.
4. Connect the Blue wire from the Auto Unit to the Red wire from the horn. Ground the
horn by connecting the Black wire
5. Ground the horn by connecting the Black wire to the frame of the vehicle.
10
RealGuard

y)
The wires include leads for two auxiliary devices that would be turned on when the Auto
Unit sounds an alarm. (NO1, COM1, NC1, NO2, COM2, NC2). If you are not using an
auxiliary device, such as a Telematics device, tie off these wires and position them out of the
way.
BROWN
GREEN
YELLOW
VIOLET
WHITE
GREY
RED
BLACK
BLUE
NO1
COM1
NC1
NO2
COM2
NC2
Fuse
12V (Car Battery)
Ground (Car Batter
Horn (Positive)
RealGuard
11

Installing the Antenna
The Antenna is the single loose wire
coming out of the top of the Auto
Unit.
1. Route the antenna wire behind
the dashboard such that a small
portion of the antenna comes
out on the dashboard of the
vehicle to receive the alarm
signal from the Personal Unit.
2. Make sure the tip of the antenna
at least ¼ inch is near
glass, outside the border of the
vehicle’s metal framework.
Otherwise it will not receive the
signal.
12
RealGuard

Using the Auxiliary Outputs (Optional)
The Auto Unit includes two sets of auxiliary outputs, each of which contains normally open
(NO), normally closed (NC), and common ground (COM) leads. You can use either of these
outputs to connect to an Auxiliary Alarm Unit or a Telematics Device. When the Auto Unit
sounds an alarm, the auxiliary device is activated.
The example below shows the connections from the Auto Unit to the car battery and horn. It
also shows the two possible methods of connecting an auxiliary device to the Auto Unit.
Note: The example is only for reference and may not be
applicable for some installations. Check with a qualified
automotive service technician before doing these types of
connections.
To
Ground
Blue
Red
Black
NO
COM1
NO
NO
NC
NC
- - - Use either configuration.
+
Telematics Device
12 V Operated
Car Battery
12 V
+
13
RealGuard

Home Unit
The Home Unit is designed to be installed in homes that are listed for sale or rent by a real
estate professional. They can also be installed in offices or other premises that will be visited
by real estate professionals that use the RealGuard system.
1. Place the Home Unit in a convenient and unobtrusive position where its audible alarm
can be heard by outsiders when it is activated.
2. Plug the AC Adapter into the AC Input Jack on the side of the Home Unit.
3. To turn on the unit, plug the AC Adapter into a common 110-Volt non-switched electrical
connection. The unit will not operate unless it is plugged into a working electrical outlet.
14
RealGuard

5. Setting up and Testing the System
Coordinating Your Personal Unit and Auto Unit
Your Auto Unit must be trained to recognize the signal from your Personal Unit. After you
have trained the Auto Unit, each time you press the Test button on the Personal Unit, all
three units will emit a chirping sound.
Note: Your Auto Unit can support up to eight Personal Units. You must train it to recognize
each one.
Follow these instructions to complete the training. If you are using more than one Personal
Unit with the Auto Unit, follow this procedure individually for each Personal Unit.
1. Make sure the red power light on the Auto Unit is
lit. If the unit has been correctly installed, it is
automatically powered on.
2. Set the Auto Unit in Learn Mode. To do so, insert
a sharp object into the hole and press the Learn
button. Use the point of a pen, a paperclip, a
thumb tack, or some other object that is not a lead
pencil. Lead can damage the components.
While the Auto Unit is in Learn mode, the green
Learn light is lit. The unit remains in the Learn
Mode for approximately 30 seconds and then
automatically returns back to normal mode.
RealGuard
15

3. Press the Test button on the Personal Unit.
The Transmit light on the Personal Unit starts
blinking for a few seconds indicating that it is
sending a signal to the Auto Unit.
When the Auto Unit successfully recognizes the
signal from the Personal Unit it turns off the Learn
light.
4. Press the Test button on the Personal Unit again.
The unit will not make a sound, but the Learn
light on the Auto Unit will blink for a few seconds
indicating that the training was successful.
From then on, each time you press the Test button
on the Personal Unit, all units in the system chirp.
16
RealGuard

Testing the System
Test the system after you have completed all the installation. Then test it periodically to
make sure it is still working. If the Auto Unit does not operate correctly during a test,
replace the fuse on the power wire. (See page 10 for more information.)
Before testing the system, make sure:
• Batteries have been installed in the Personal Unit.
• The Auto Unit is powered on and successfully trained. The red
power light should be lit.
• The Home Unit is plugged in (so it is powered on). The red power
light should be lit.
To test the system:
• Press the Test button on the Personal Transmitter Unit.
Immediately all the three units will give a short chirp sound
indicating they are functioning properly. Now your Personal
Security Alarm is ready for use.
RealGuard
17

Selecting the Deactivation Sequence
Once you have pressed the Panic button on the Personal Unit, you can turn off the alarm by
pressing a 4-button sequence: the Panic button followed by one of four optional 3-button
sequences. Each of the 3-button sequences is a combination of the Test and Cancel buttons.
Panic button
Test button Cancel button
You can use the deactivation sequence set up at the factory. Or, you can change the sequence
to one of the other available sequences by changing the settings of the switches inside the
battery compartment of the Personal Unit.
Note: On the switch set, only switches 3 and 4 are used. Do not change the settings of
switches 1 and 2.
18
RealGuard

Sequence 1, the factory setting
Press: Panic Test Cancel Cancel
If you want to change the deactivation sequence setting, move the switches to the positions
shown beside your choice. Use a sharp object, such as the tip of a ball point pen.
Sequence 2
Panic Cancel Test Cancel
Sequence 3
Panic Test Test Cancel
Sequence 4
Panic Cancel Cancel Test
19
RealGuard

6. Using the Personal Unit
Activating the Alarm
IMPORTANT: Make sure all units are as far as possible from your ears when you sound
the alarm. These sirens emit a high frequency sound of 103 decibels @ 1KHz to 2KHz, louder
than a smoke alarm.
In case of an emergency:
• Press the Panic button on the
Personal Unit and keep it pressed for
approximately 2 seconds.
All the three units will generate an ear-piercing
siren sound and will continue until you use your
deactivation sequence. (See page 18.)
Using the Flashlight
For your convenience, the Personal Unit contains a small flashlight.
It is designed to stay on only as long as you are pressing the Flash
button in order to save your batteries for emergencies.
• To turn the flashlight on, press the Flash button.
• To turn it off, release the Flash button.
WARNING: Do not shine the flashlight directly into your eyes.
Damage can occur.
20
RealGuard

Changing the Alarm Mode of the Home Unit
Every Home Unit responds to any Personal Unit. In normal operation, your vehicle (with
your Auto Unit installed) must be nearby in order for the Home Unit’s siren to sound when
you press the Panic button. The feature is a safeguard against a prankster finding a Personal
Unit and setting off false alarms in neighborhood homes.
However, if your vehicle is not in the vicinity, for example, if a friend gives you a ride to an
open house you are hosting, you can changing the Home Unit to Local Mode, and your Panic
button alone will activate the Home Unit.
Important: When you leave the home, make sure you change the Home Unit back to
REMOTE mode, so it can only be activated by someone with a complete RealGuard system.
On the left side of the Home Unit is a slide
switch that sets the unit to either Local Mode
or Remote Mode.
To change the setting of the Alarm Mode,
slide the switch to the proper setting by
using any sharp object, such as the tip of a
pen, a paperclip, or a small screwdriver.
Remote
Local
RealGuard
21

7. Technical Specifications
Personal Transmitter Unit (RGR-4101)
Power supply
Transmission
Frequency 915MHz
Buzzer
Display
LED 3mm (Red)
Flash light Bright white LED
Range
2 X 1.5V N Size Alkaline
Battery
Piezoelectric
100 meters (line of sight)
Auto Transceiver Unit (RGA-4102)
Power supply
Fuse
Transmission /
Reception
Frequency
Auxiliary Dry
Contact Outputs
Horn
Display
LED
Range
12VDC car battery
3A, 6.35 X 32mm (Glass
Quick Acting Fuse)
915MHz
2 Sets NO/NC Selectable
5W siren
2 X 3mm (Red & Green)
100 meters (line of sight)
Home Receiver Unit (RGH-4103)
Power Supply
Reception
Frequency
Buzzer
Display
LED
Range
6V AC, 60Hz
915MHz
2 X Piezoelectric
2 X 3mm (Red & Green)
100 meters (line of sight)
Dimensions Width x Height x Depth
Personal Unit
Auto Unit
Home Unit
4.4cm X 11cm X 2.6cm
8.3cm X 8.5cm X 3.5cm
7.1cm X 10cm X 4.1cm
Power Consumption
Personal Unit
Idle Mode 0.02 ma
Alarm Mode 150 ma
Auto Unit
Idle Mode 0.065W
Alarm Mode 15.5W
Home Unit
Idle Mode 0.055W
Alarm Mode 0.2607W
Environmental
Operating Range
Temperature 0° ~ +50° Celsius
Relative
Humidity
Storage Range
Temperature
(battery
removed)
Relative
Humidity
10% ~ 70%
-10° ~ +70° Celsius
10% ~ 80%
Net Weight
Personal Unit
Auto Unit
Home Unit
Specifications are subject to change without
prior notice.
Tbd
Tbd
Tbd
22
RealGuard

8. Limited Warranty
Misiu Systems, LLC, having its principal place of business at 3808 209th Place SE, Bothell,
WA 98021 ("Manufacturer") warrants its RealGuard products (the "Products") as follows:
1. Limited Warranty
Manufacturer warrants that the Products sold hereunder will be free from defects in material
and workmanship for a period of one (1) year from the date of purchase. If the Products do
not conform to this Limited Warranty during the warranty period (as herein above specified),
Buyer shall notify Manufacturer in writing of the claimed defects and demonstrate to
Manufacturer satisfaction that said defects are covered by this Limited Warranty. If the
defects are properly reported to Manufacturer within the warranty period, and the defects
are of such type and nature as to be covered by this warranty, Manufacturer shall, at its own
expense, furnish replacement Products or, at Manufacturer's option, replacement parts for
the defective Products. Shipping and installation of the replacement Products or replacement
parts shall be at Buyer's expense.
2. Other Limits
THE FOREGOING IS IN LIEU OF ALL OTHER WARRANTIES, EXPRESS OR IMPLIED,
INCLUDING BUT NOT LIMITED TO THE IMPLIED WARRANTIES OF
MERCHANTABILITY AND FITNESS FOR A PARTICULAR PURPOSE. Manufacturer does
not warrant against damages or defects arising out of improper or abnormal use or handling
of the Products; against defects or damages arising from improper installation (where
installation is by persons other than Manufacturer), against defects in products or
components not manufactured by Manufacturer, or against damages resulting from such
non-Manufacturer made products or components. Manufacturer passes on to Buyer the
warranty it received (if any) from the maker thereof of such non-Manufacturer made
products or components. This warranty also does not apply to Products upon which repairs
have been effected or attempted by persons other than pursuant to written authorization by
Manufacturer.
RealGuard
23

3. Exclusive Obligation
THIS WARRANTY IS EXCLUSIVE. The sole and exclusive obligation of Manufacturer shall
be to repair or replace the defective Products in the manner and for the period provided
above. Manufacturer shall not have any other obligation with respect to the Products or any
part thereof, whether based on contract, tort, strict liability, or otherwise. Under no
circumstances, whether based on this Limited Warranty or otherwise, shall Manufacturer be
liable for incidental, special, or consequential damages.
4. Other Statements
Manufacturer's employees or representatives' ORAL OR OTHER WRITTEN STATEMENTS
DO NOT CONSTITUTE WARRANTIES, shall not be relied upon by Buyer, and are not a part
of the contract for sale or this limited warranty.
5. Entire Obligation
This Limited Warranty states the entire obligation of Manufacturer with respect to the
Products. If any part of this Limited Warranty is determined to be void or illegal, the
remainder shall remain in full force and effect.
24
RealGuard


Misiu Systems LLC
Customer Support: 425-487-6536
Website: http://www.realguard.com
 Loading...