

s
o
a
p
d
i
s
i
n
f
e
c
t
w
a
t
e
r
Instruction manual
CLASSIC
EN ...18 - 38
DE ...39 - 60
NL ...61 - 83
2
”paos a
ec
s
i
m
“
“miscea soap”
x 1x 1x 1x 1
x 1x 1x 1x 1
x 1x 1x 1x 1
x 1x 1x 1x 1
x 1x 1x 1x 1
x 1x 1x 1x 1
x 3x 3x 3x 3
L = 45 mm
x 7x 7x 7x 7
L = 35 mm
x 7x 7x 7x 7
L = 19 mm
L = 25 mm
x 5x 5x 5x 5
x 2x 2x 2x 2
1A
7A
”paos a
ec
s
i
m
“
“miscea soap”
L = 19 mm
L = 25 mm
L = 100 mm
ø
= 10 mm
x 1x 1x 1x 1
x 1x 1x 1x 1
x 1x 1x 1x 1
x 3x 3x 3x 3
x 3x 3x 3x 3
x 5x 5x 5x 5
x 2x 2x 2x 2
x 1x 1x 1x 1
L = 45 mm
x 7x 7x 7x 7
L = 35 mm
x 7x 7x 7x 7
1B
7B
A
8
V 17.04
3
A - B
3a
9a
5
4
6
2
3b
9b
5
4
6
2
B
4
C
3a/b
1A
2
3a/b
1B
2
2
3a/b
1C
Made in Germany
CX-X-X-XX
X.XXX
XXXX-XXXX
”
p
a
os
a
ec
s
im“
W1-X.XXX-XXXX-XXXX
Made in Germany
Voltage 24VDC
Power 40W
S1-X-XX-XX-XXXX-XXXX
Made in Germany
3a
S2-X-XX-XX-XXXX-XXXX
Made in Germany
3b
V 17.04
5
C - D
D
min 50 mm
1C
1B
1A
“miscea soap”
”paos aecs
i
m“
“
m
is
c
e
a
s
o
a
p
”
L = 850 mm
L = 1000 mm
min 25 mm
1 - 45 mm
“miscea soap”
”paos aecs
i
m“
”
pa
os
aecs
i
m“
“
m
is
c
e
a
s
o
a
p
”
L = 850 mm
L = 1000 mm
34 - 45 mm
L = 850 mm
50 - 60 mm
L = 1600 mm
min 150 mm
min 50 mm
L = 850 mm
L = 1000 mm
34 - 45 mm
“miscea soap”
”paos aecsi
m“
“
m
i
s
c
e
a
s
o
a
p
”
ø6 mm
ø8 mm
“miscea soap”
2/4
6
3a/5
3b/5
G 3/8''
6
E01 - E02
”paos
Miscea soap
pa
os aecsi
M
“
m
i
s
c
e
a
s
o
a
p
”
paos a
ecs
i
m
“
”
3x
1A
1B
2A
2B
V 17.04
7
E - F
F01 - F04
Click
3a/b
“
m
is
c
e
a
s
o
a
p
”
“m
iscea soap
”
“miscea soap
”
3a/b
3a/b
L= 19 mm
4x
1
3
2
4

8
G01 - G04
3 4
1 2
V 17.04
9
G - H
H01 - H02
1 2
10
I01 - I06
2x
L = 25 mm
L = 19 mm
1x
Click
!
1
3
5
2
4
6
19 mm

V 17.04
11
EN | Connect to water mains supply
DE | Verbindung zum Eckventil
NL | Aansluiten op het waternet
EN | The exible hoses should not be kinked, stretched or twisted.
DE | Die Schläuche nicht verdrehen!
NL | De exible aansluitslangen mogen niet worden geknikt, gebogen, uit elkaar
worden getrokken of gedraaid.
I
12
J01 - J02
152
140
22083
Ø 32
Ø 62
Ø 34
20840
Ø 60
135
129
Ø 38
V 17.04
13
J01 - J03
J03
124
198
48
Ø 38
Ø 69
14
J04 - J05
220
77 155
280
92
220
90
V 17.04
15
J04 - J06
J06
220
77
155
16
NL
EN
DE
s
o
a
p
d
i
s
i
n
f
e
c
t
w
a
t
e
r
Instruction manual
CLASSIC
18
© 2017 miscea GmbH
No part of this publication may be reproduced, transmitted, transcribed, stored in any retrieval system or
translated into any human or computer language by any means or in any form, without the prior written
permission of miscea. Contravention of the owner’s copyright may also reduce the ability of miscea to
provide eective support for its equipment.
All technical information, data and instructions contained in this manual for operations that can and are
to be performed, are up to date at the time of editing.
This manual contains our current knowledge and experience to the best of our understanding.
We reserve the right to make technical modications arising from further development of the miscea
product presented in these operating instructions. For this reason, no claims may be derived from
technical data, descriptions and illustrations.
miscea reserves the right to make changes without notice to both this manual and to its products
described within this manual. Nothing in this manual represents any contractual or other commitment on
the part of miscea and should not be taken as such. All possible care has been taken in the preparation
of this publication. Contact miscea for suggestions of improvement. This manual is originally written in
English. A copy is available on request.
Version: V17.04
NL
EN
DE

V 17.04
19
English
1. General 20
1.1 About this manual 20
1.2 Labels in this manual 20
2. Package Contents 20
3. Description 20
3.1 Components 21
3.2 Identication of the product 21
3.3 Application areas 21
4. Installation 21
4.1 Installing the system 22
5. Use 23
5.1 Faucet head 23
5.2 Operating the system 23
5.3 Tapping water 23
5.4 Dispensing liquids 24
5.5 Optional accessories 25
5.6 Use the remote control with miscea CLASSIC system 25
6. Cleaning and maintenance 25
6.1 Storage 25
6.2 Cleaning 26
6.3 Automatic spool cycle 26
6.4 Replacing the pouch / bottle 26
6.5 Priming the tubes 27
7. Rell Liquids Safety Information 27
8. Technical Data 29
8.1 Electrical Test Data 30
8.2 Electrical Specications 30
8.3 Certications and conformity 30
9. Warranty and information 32
9.1 Warranty 32
9.2 Warranty conditions 32
9.3 Contact information 32
9.4 Updates of the manual 32
9.5 Environment and recycling 32
10. Service 33
Table of contents
20
1.1 About this manual
This manual includes technical specications, instructions and explanations that help to use the product
safely. Read and understand these instructions before you transport, install, commission, restart, operate
or perform maintenance on the product.
The illustrations, drawings and graphics in this manual may be dierent from the actual components.
Contact your local supplier for questions that are not answered in this manual.
Keep this manual for future reference. Please pass these instructions on to the end user of the tting!
1.2 Labels in this manual
WARNING
A warning means that injury or death is possible if the instructions are not followed.
CAUTION
A caution means that damage to the equipment is possible.
A note gives additional information, e.g. for a procedure.
1. General
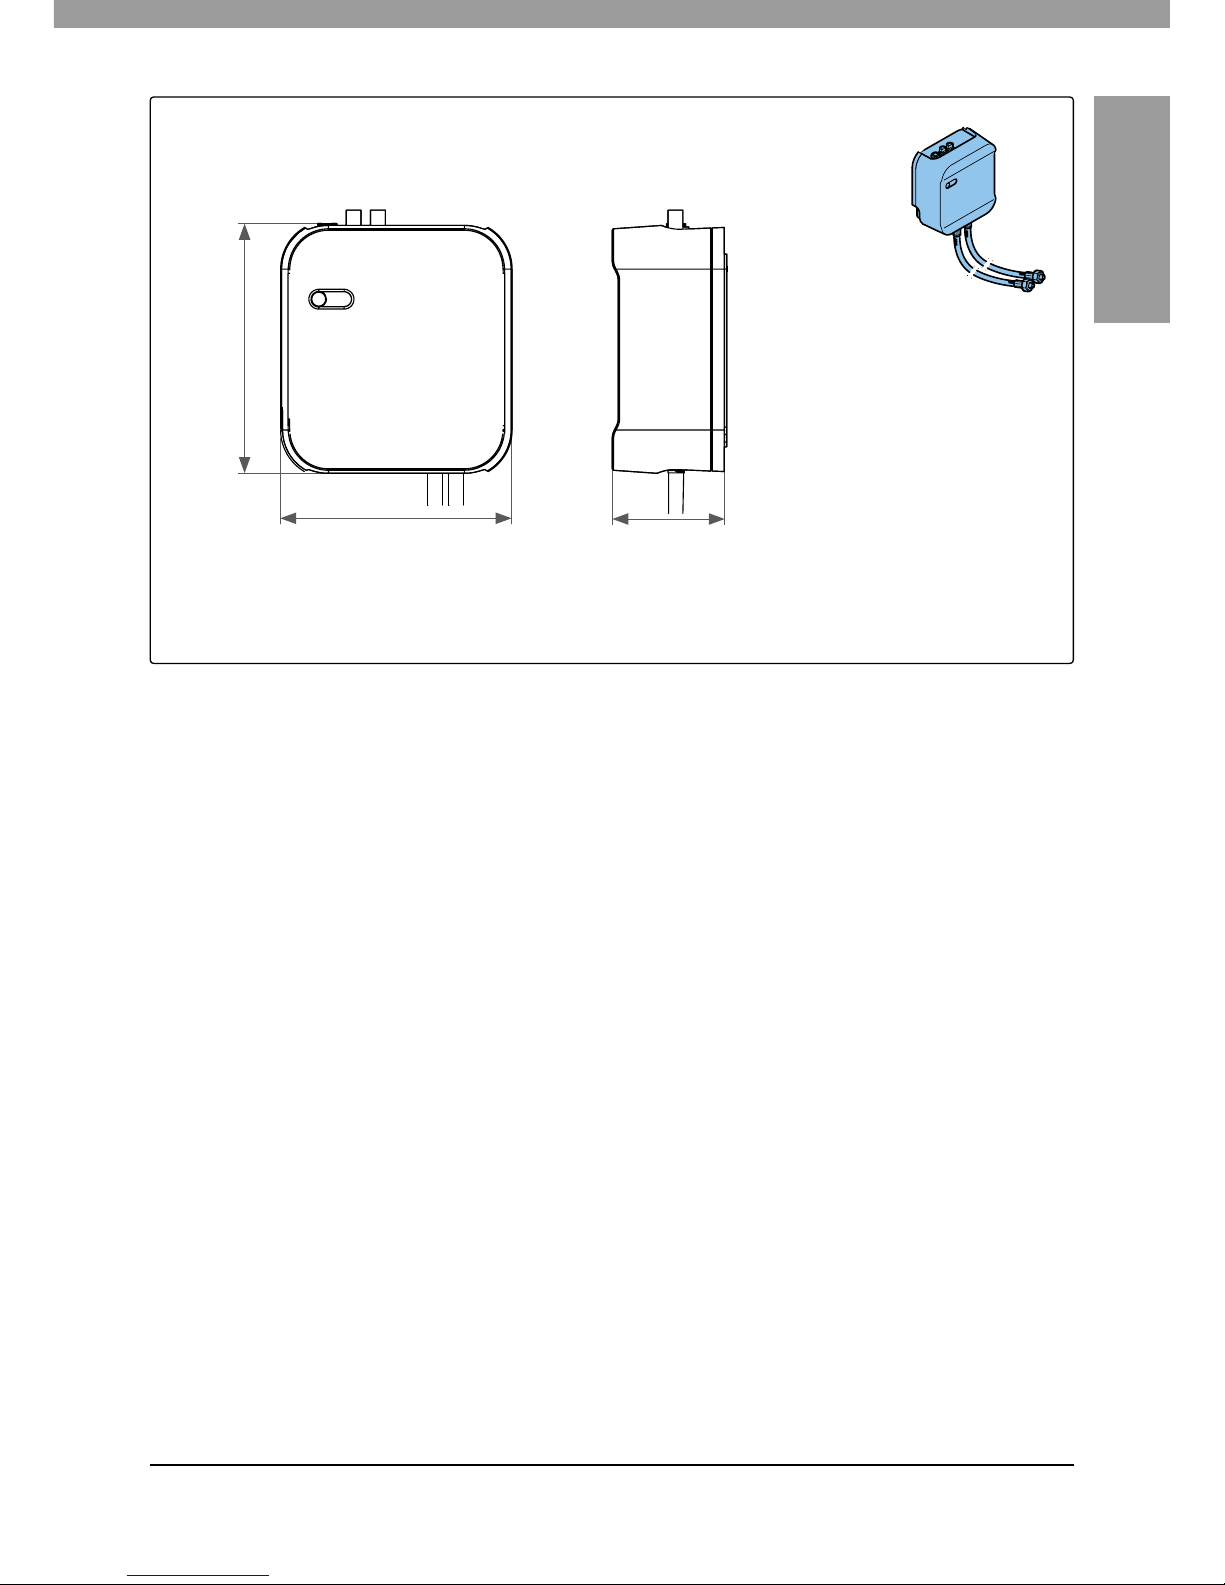
2. Package Contents
3. Description
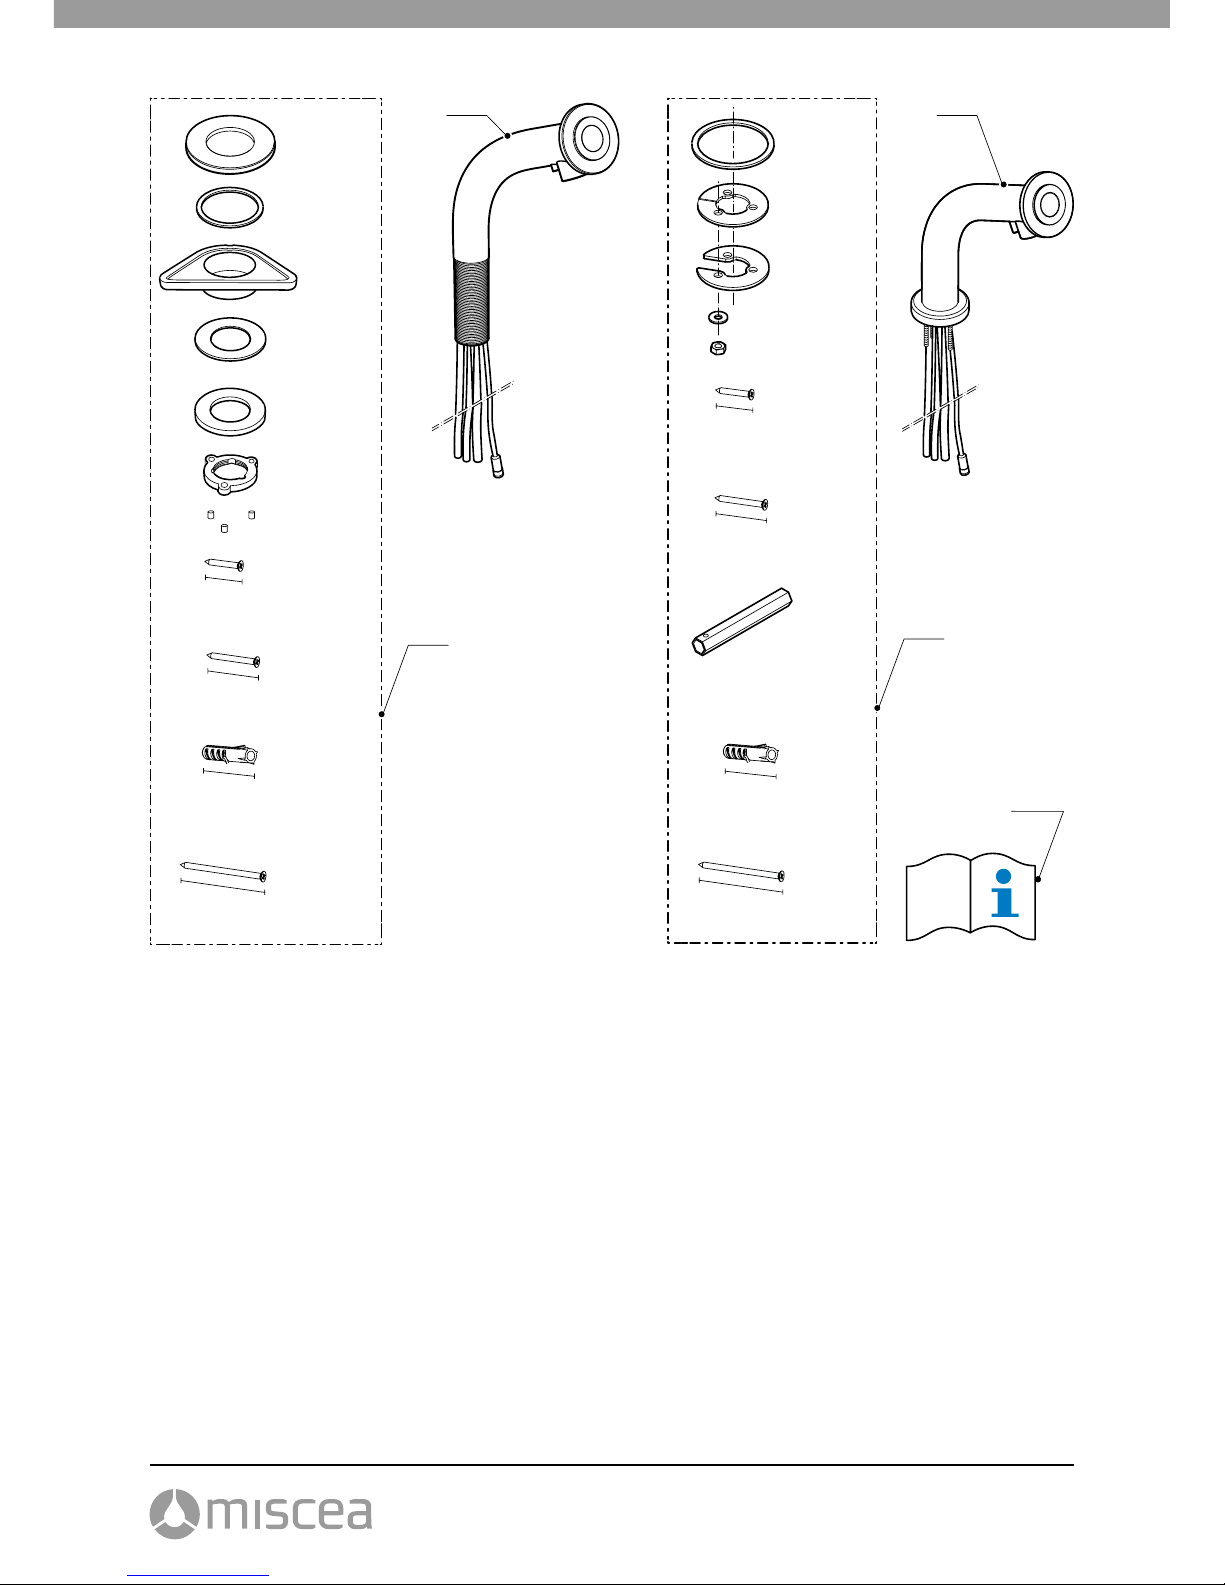
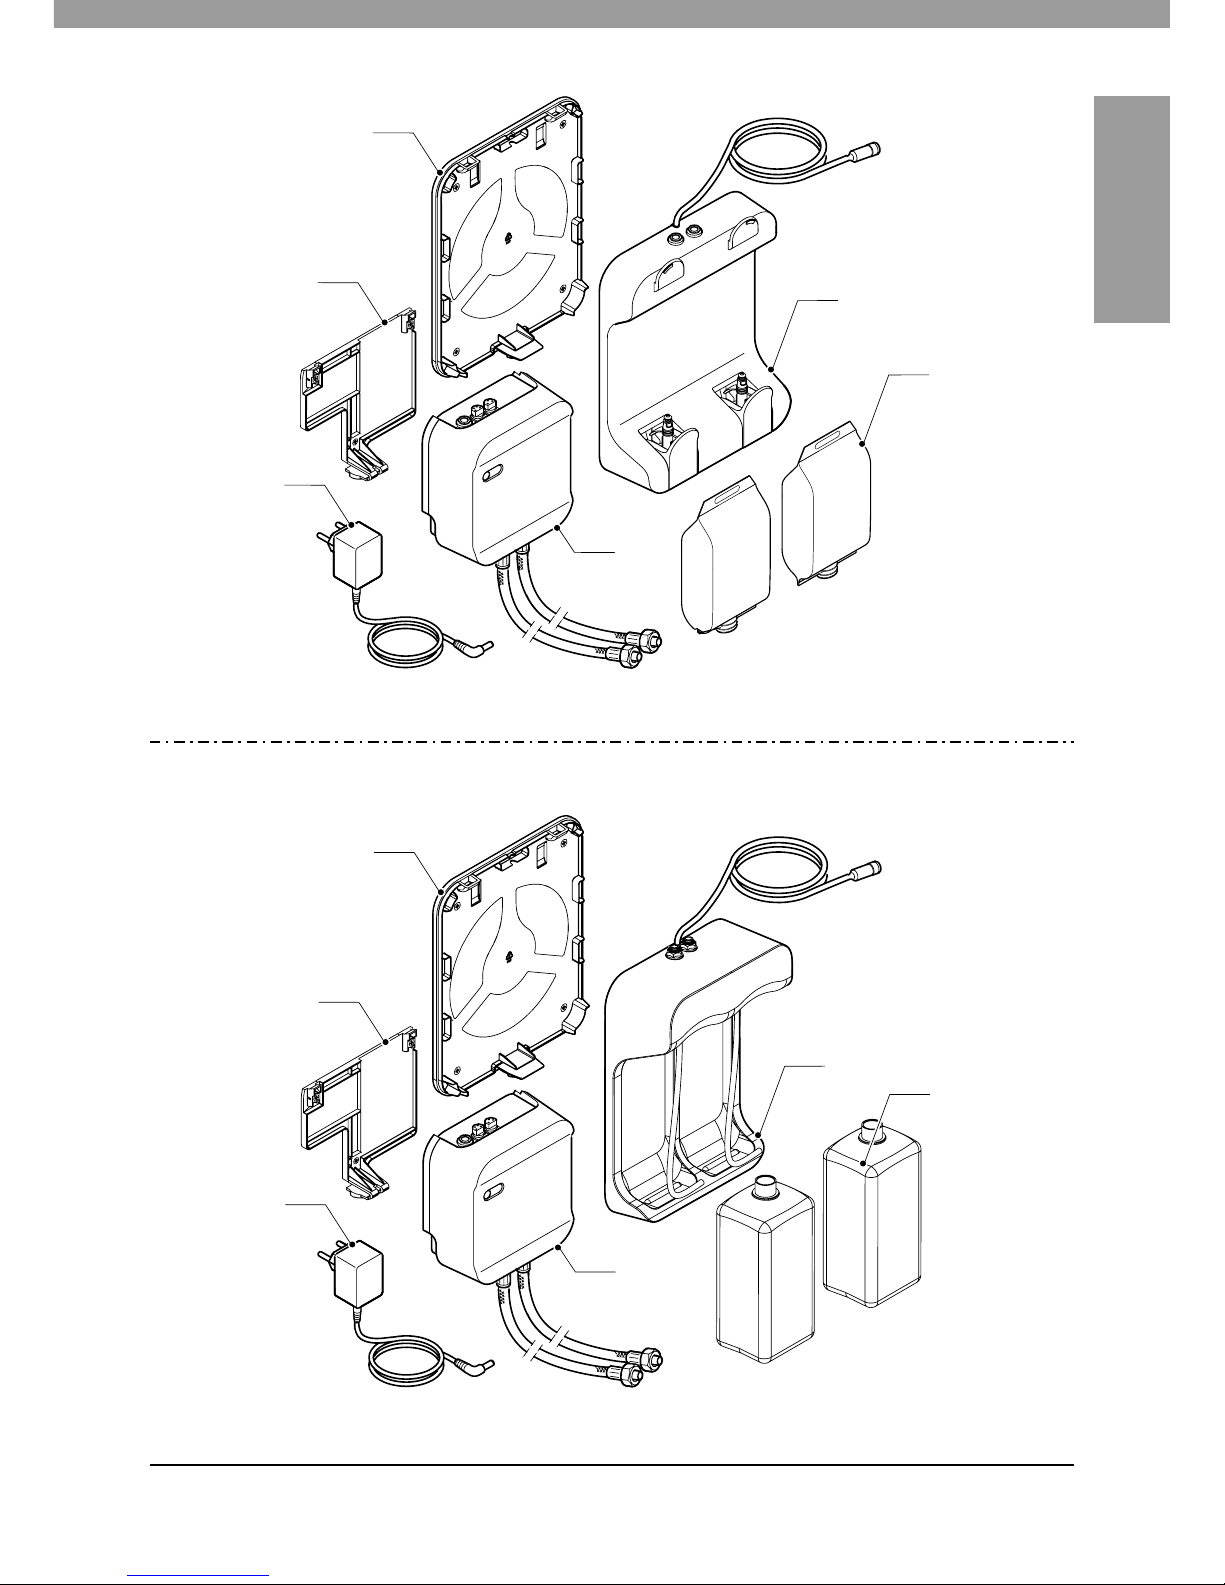
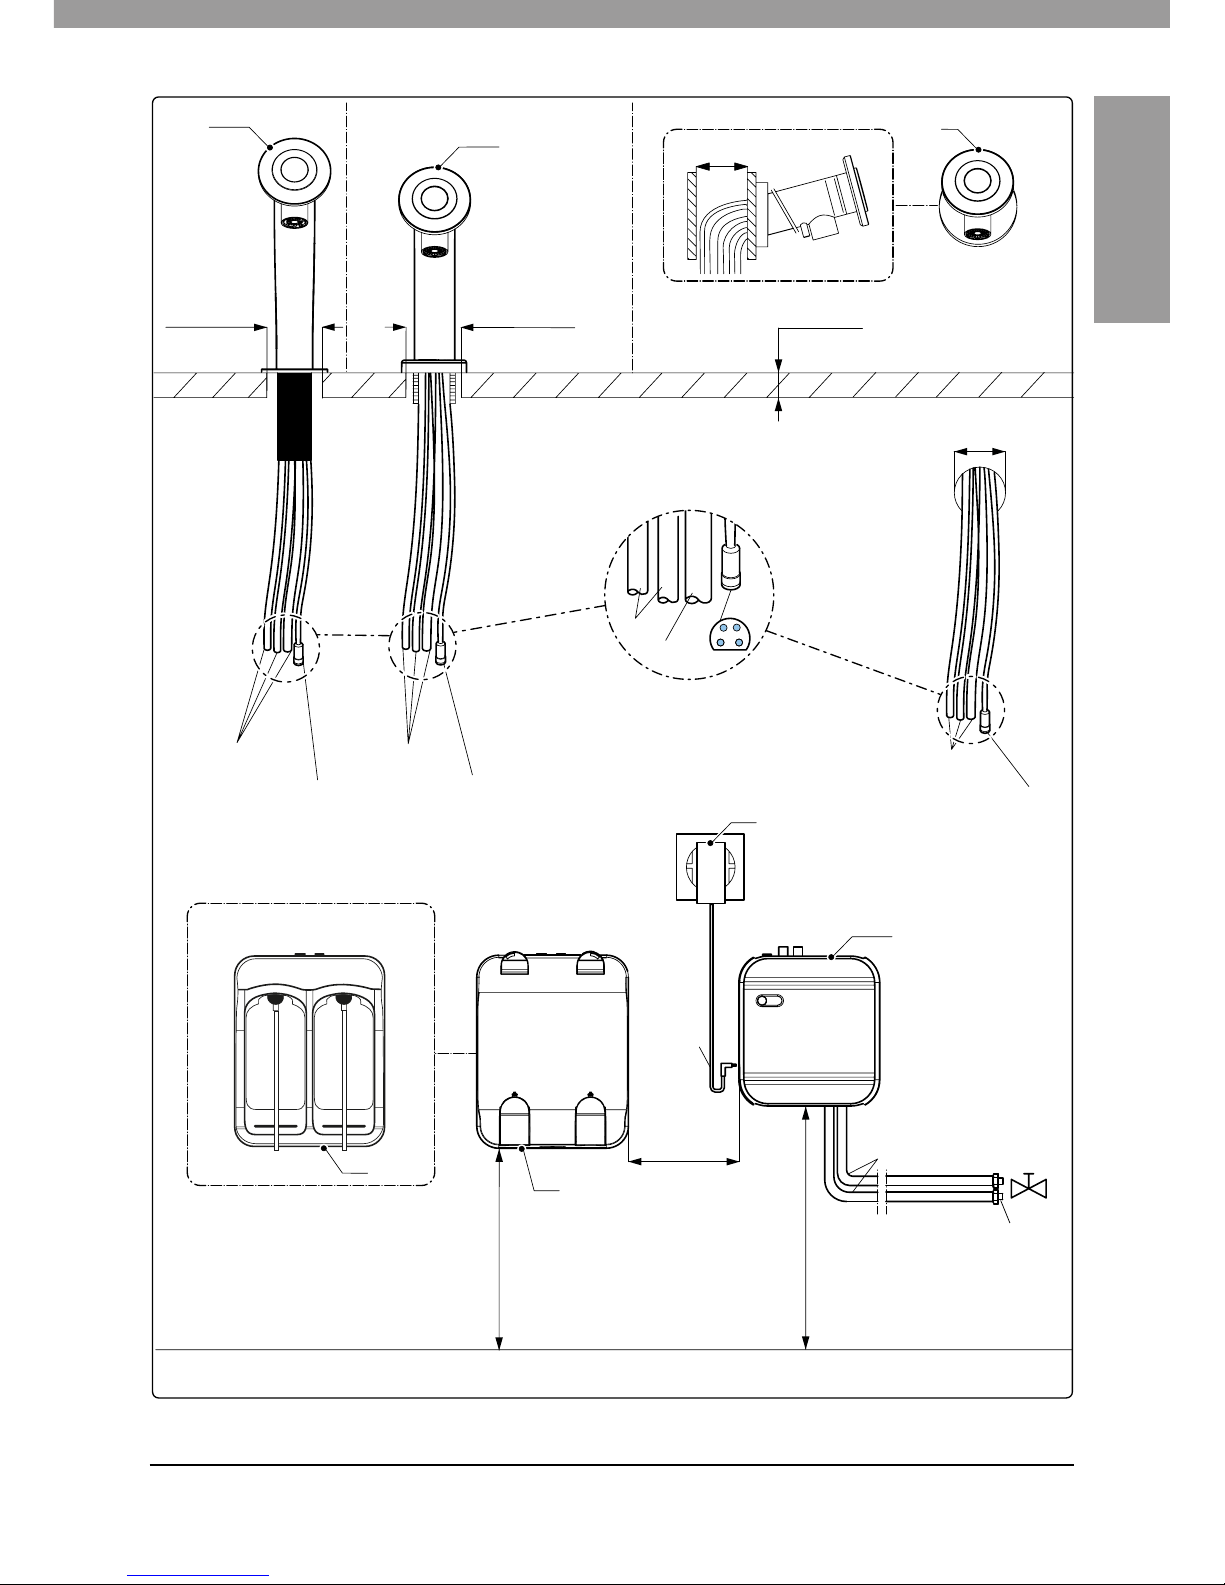
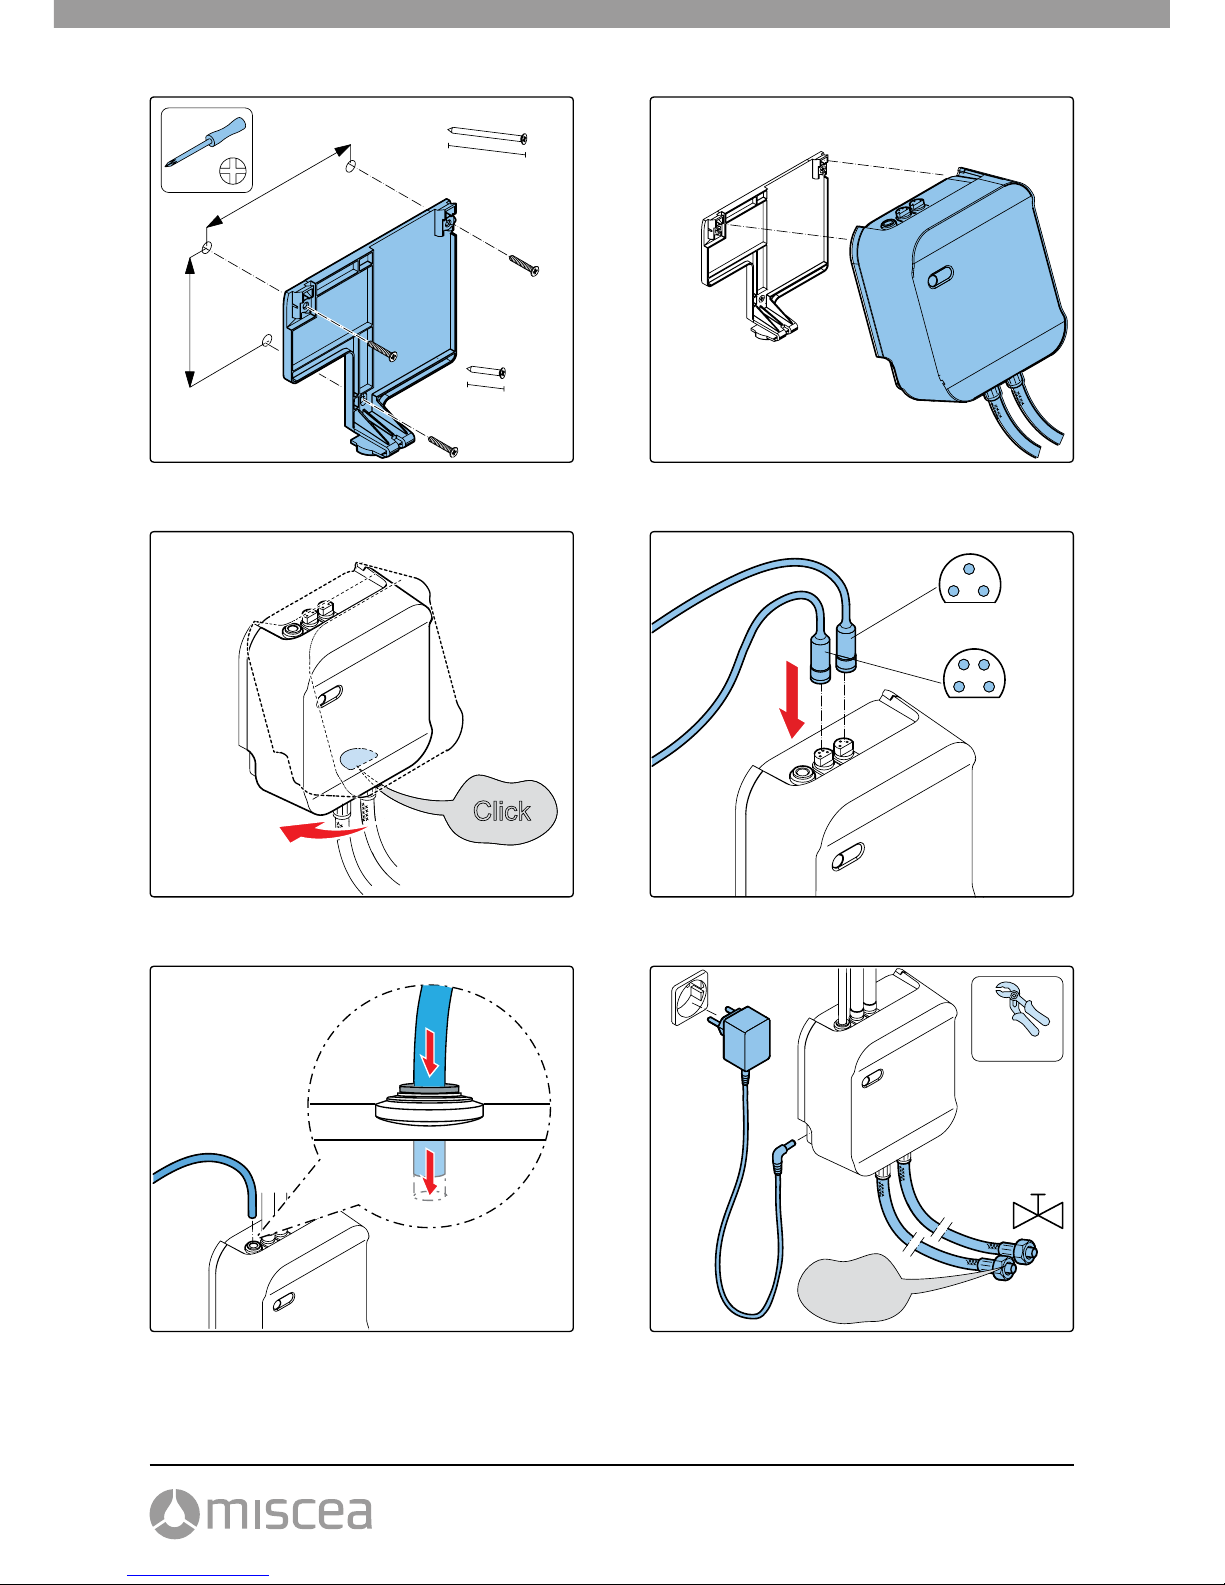
Refer to g. A and B for the identication of the package contents.
1. Faucet
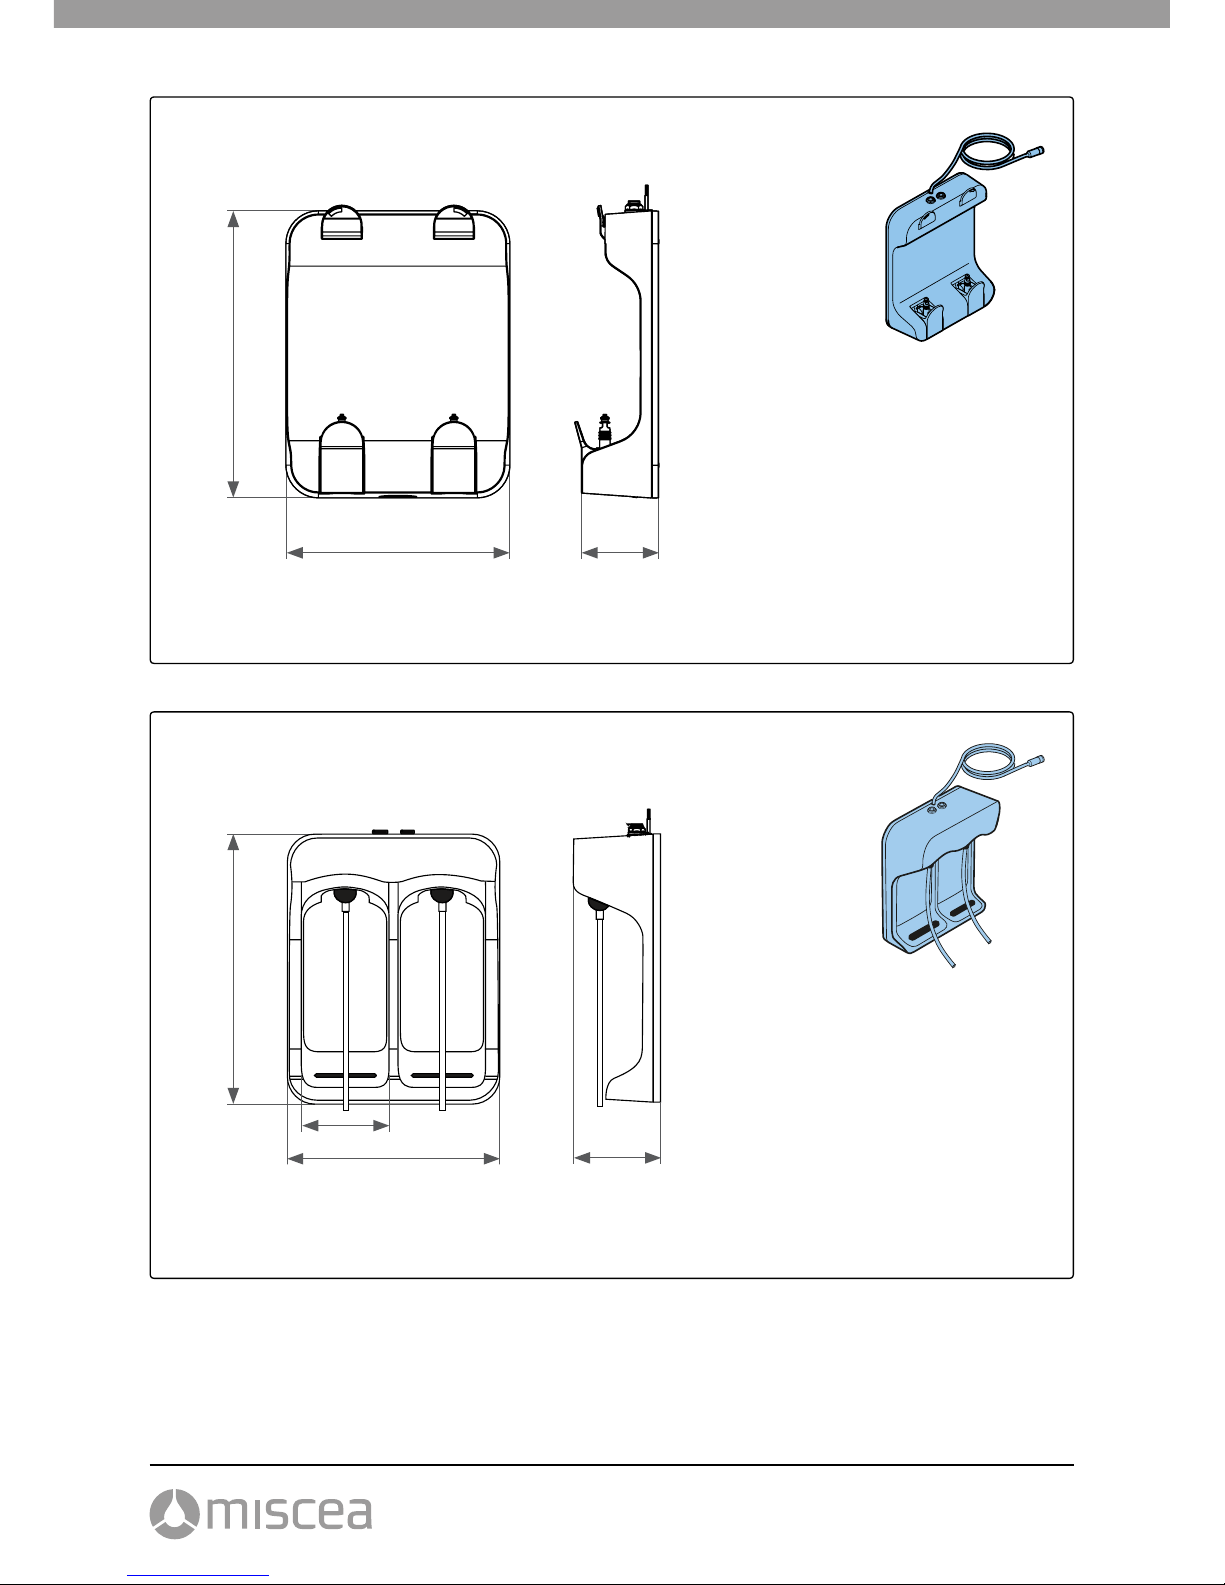
2. Water box
3. Soap box
4. Mounting plate for water box (pre-mounted to the waterbox)
5. Mounting plate for soap box (pre-mounted to the soap box)
6. Power adapter
7. Set of fasteners and seals
8. Instruction manual
9. Rell Liquids
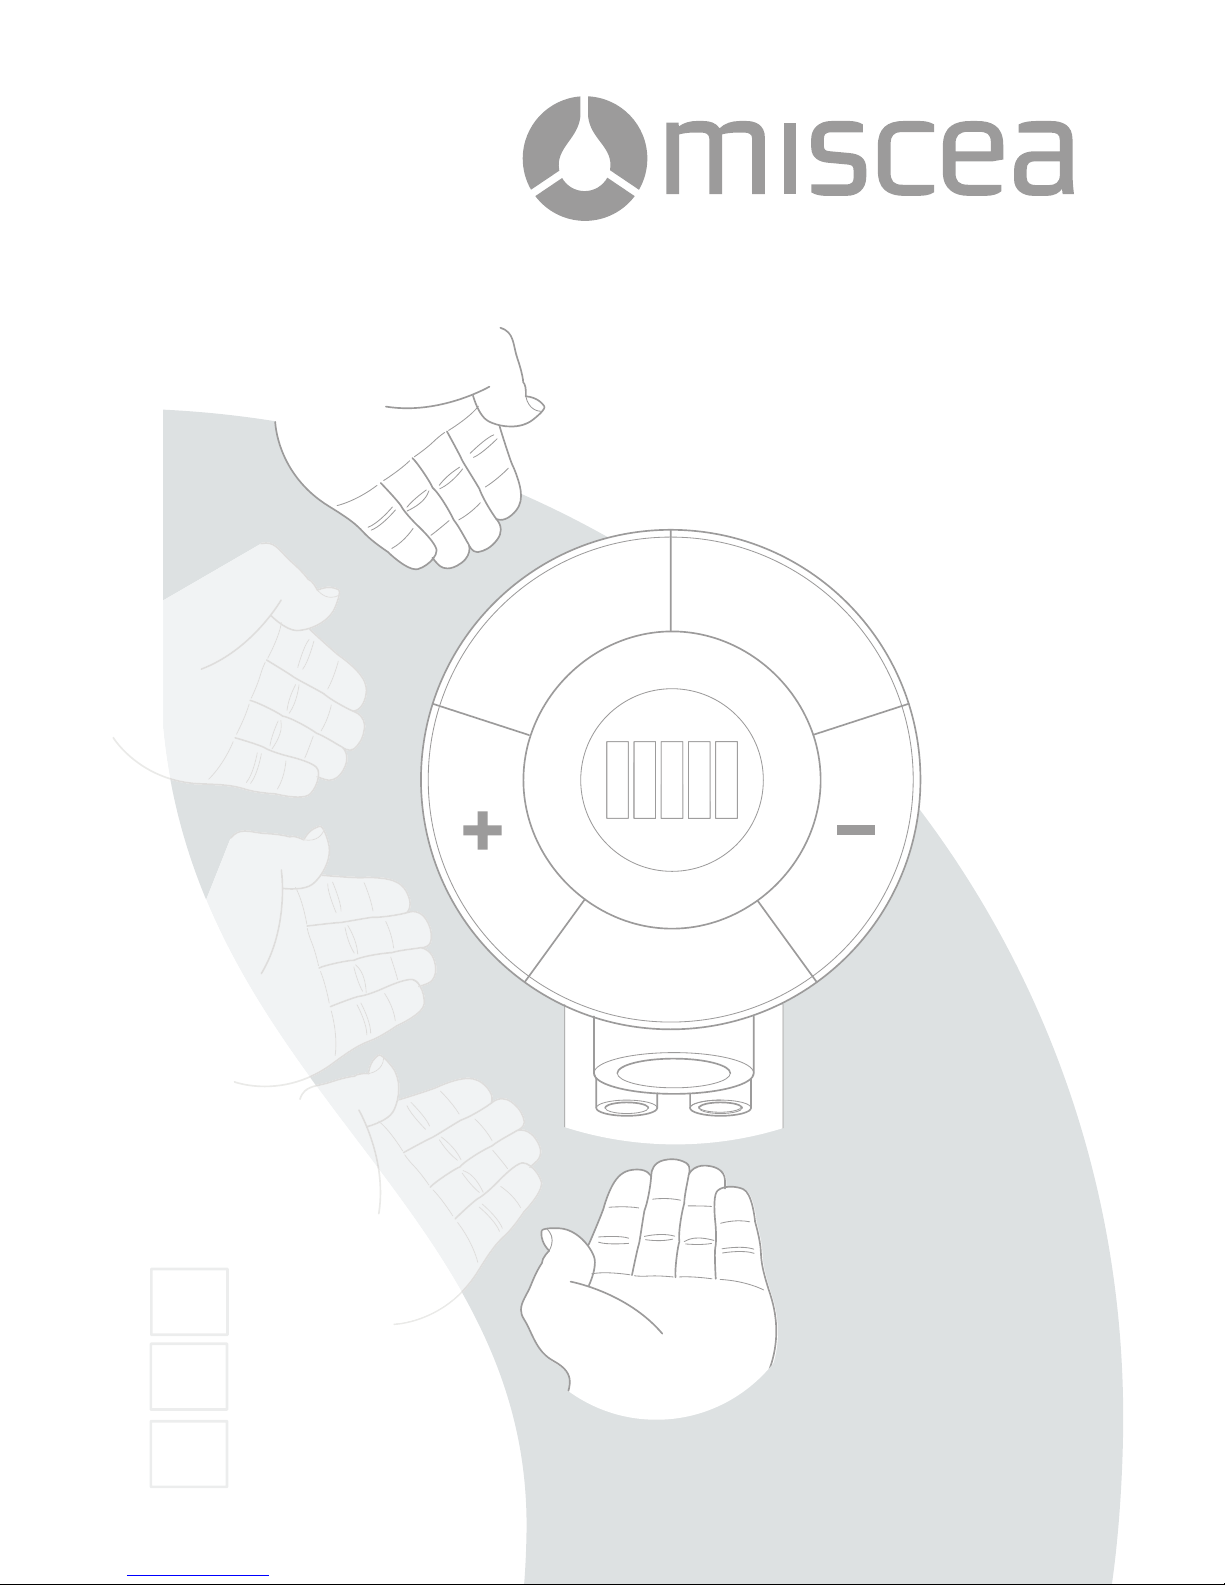
The miscea CLASSIC hand hygiene system enables you to wash your hands without touching the
system. The faucet head has dierent sectors with built-in infrared sensors. The functions can be
activated by moving your hands in the detection zones of the sensors.
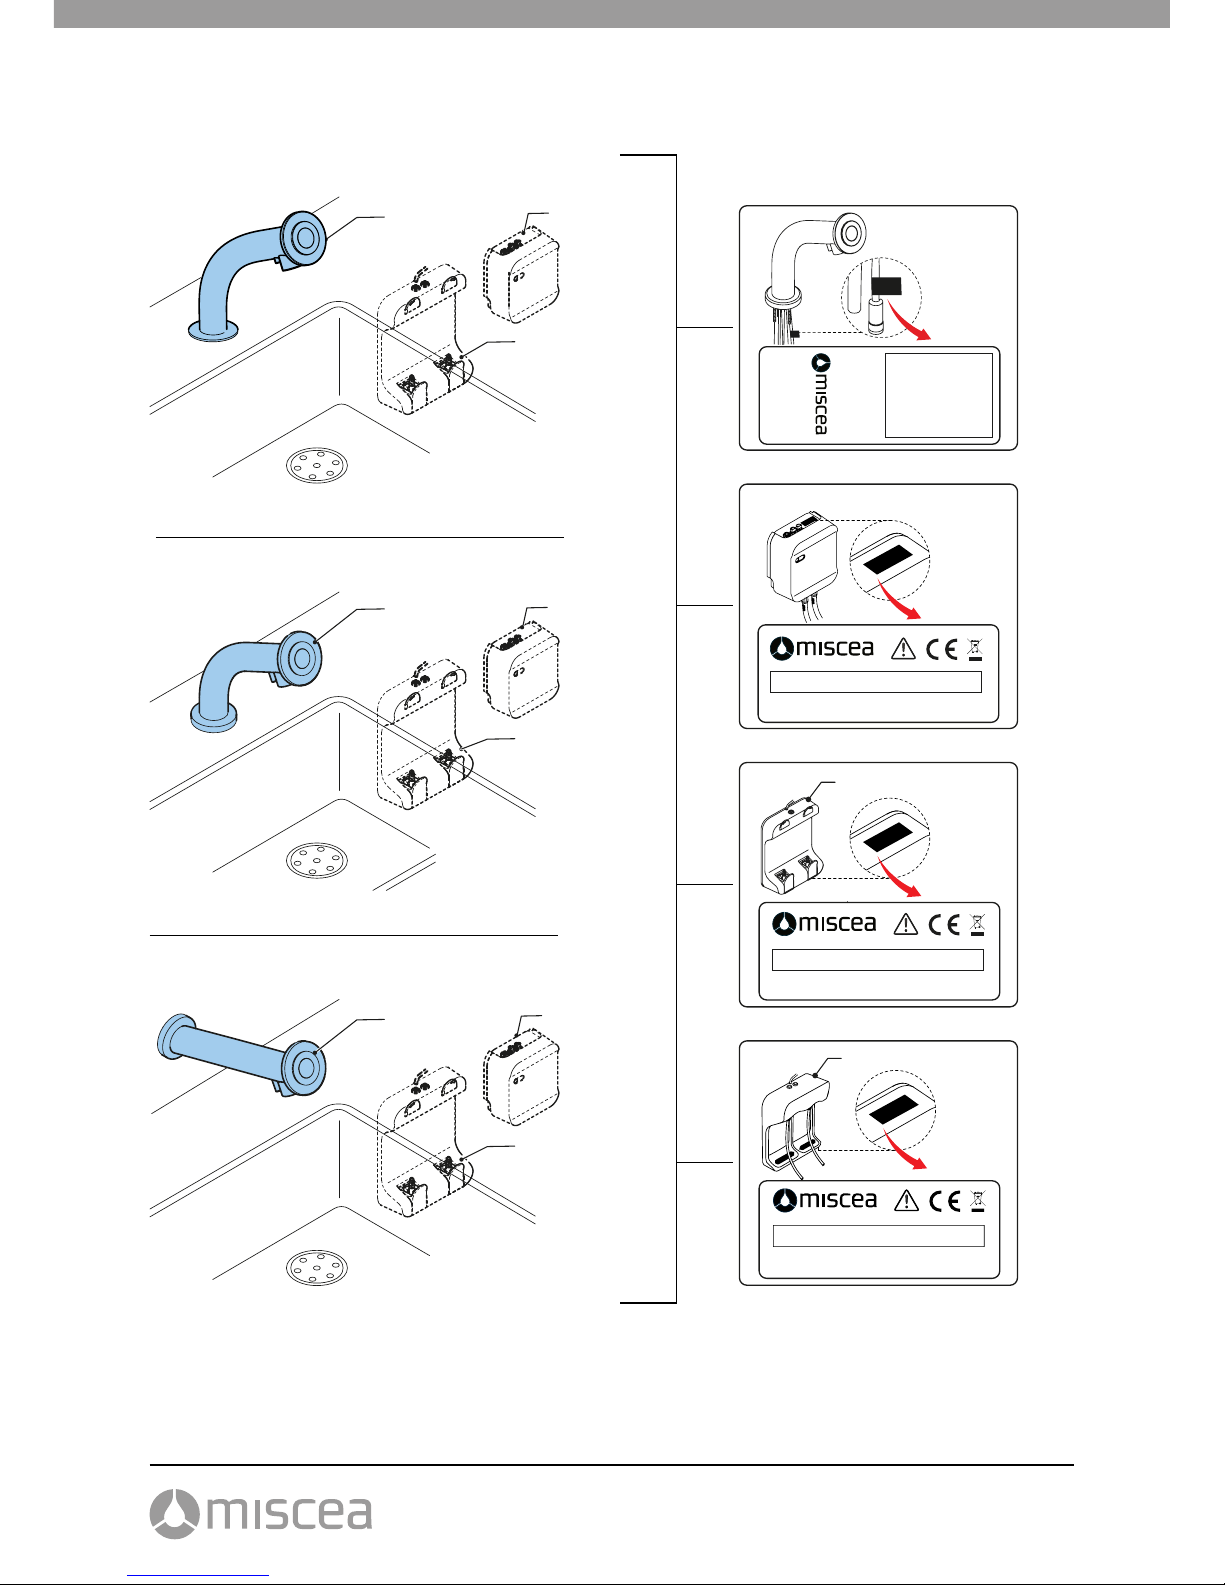
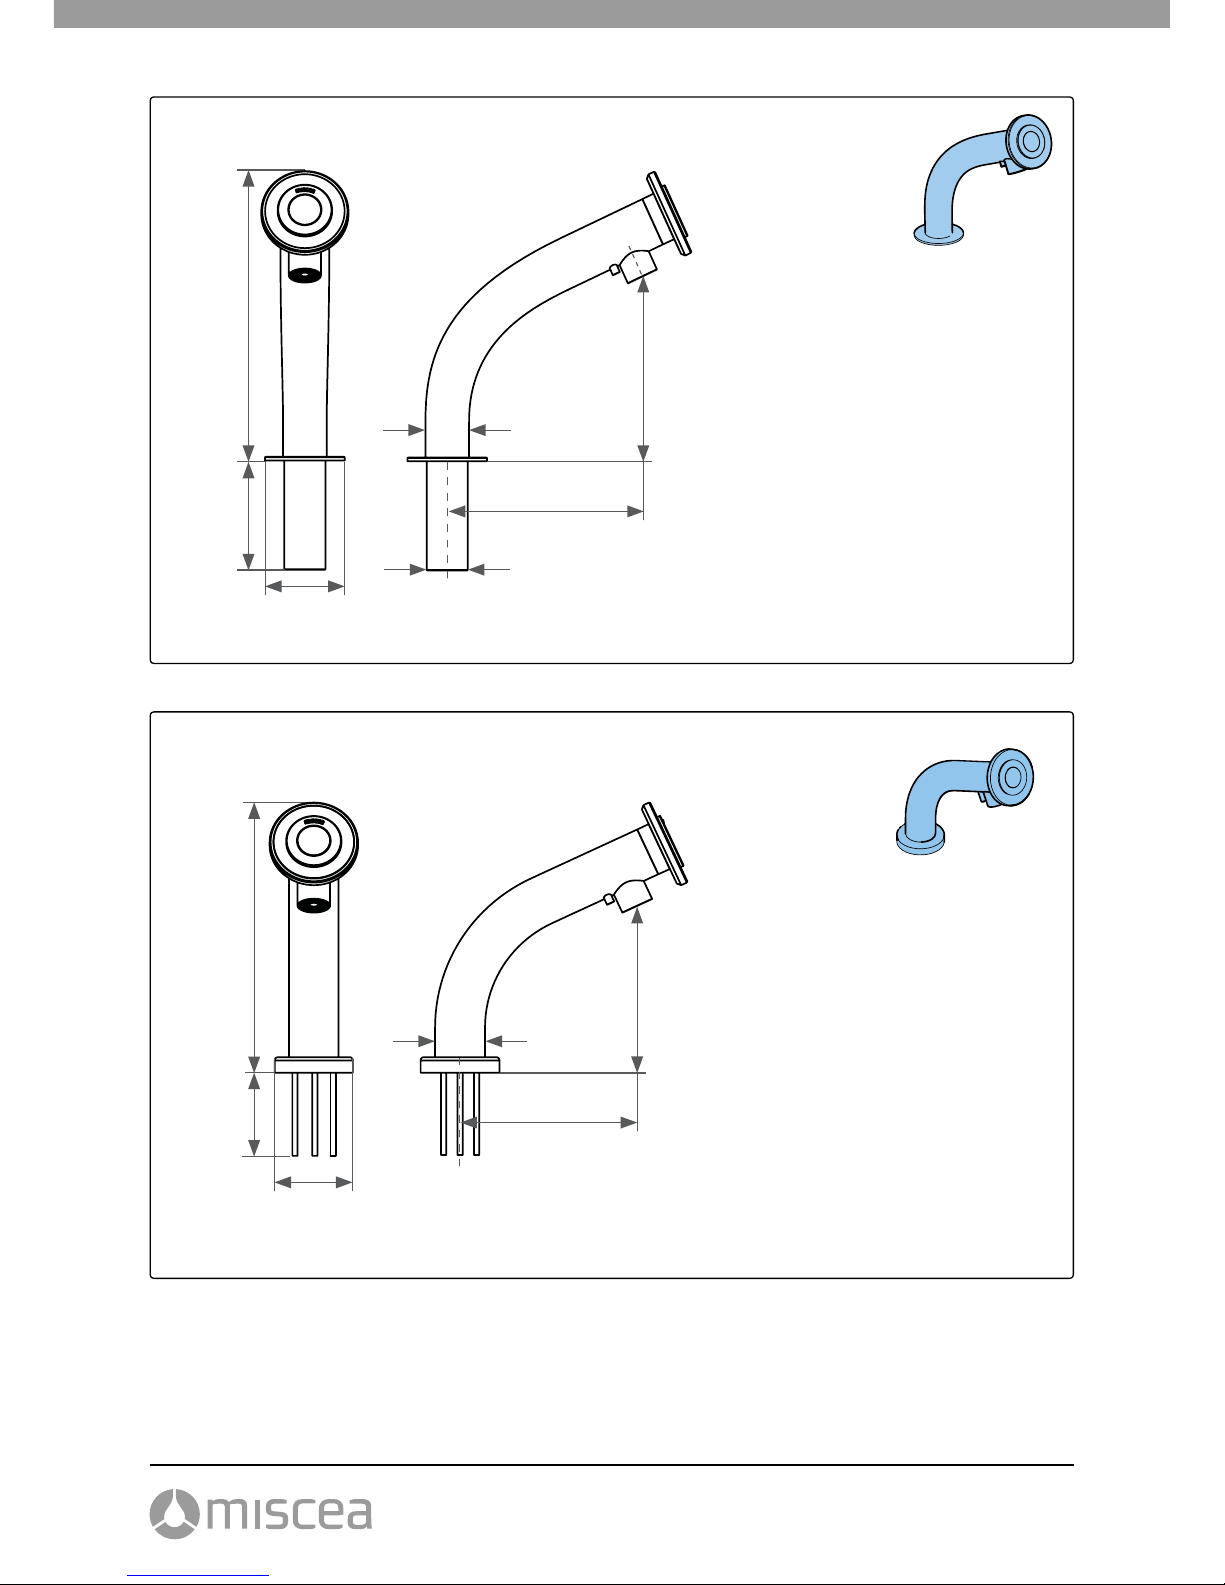
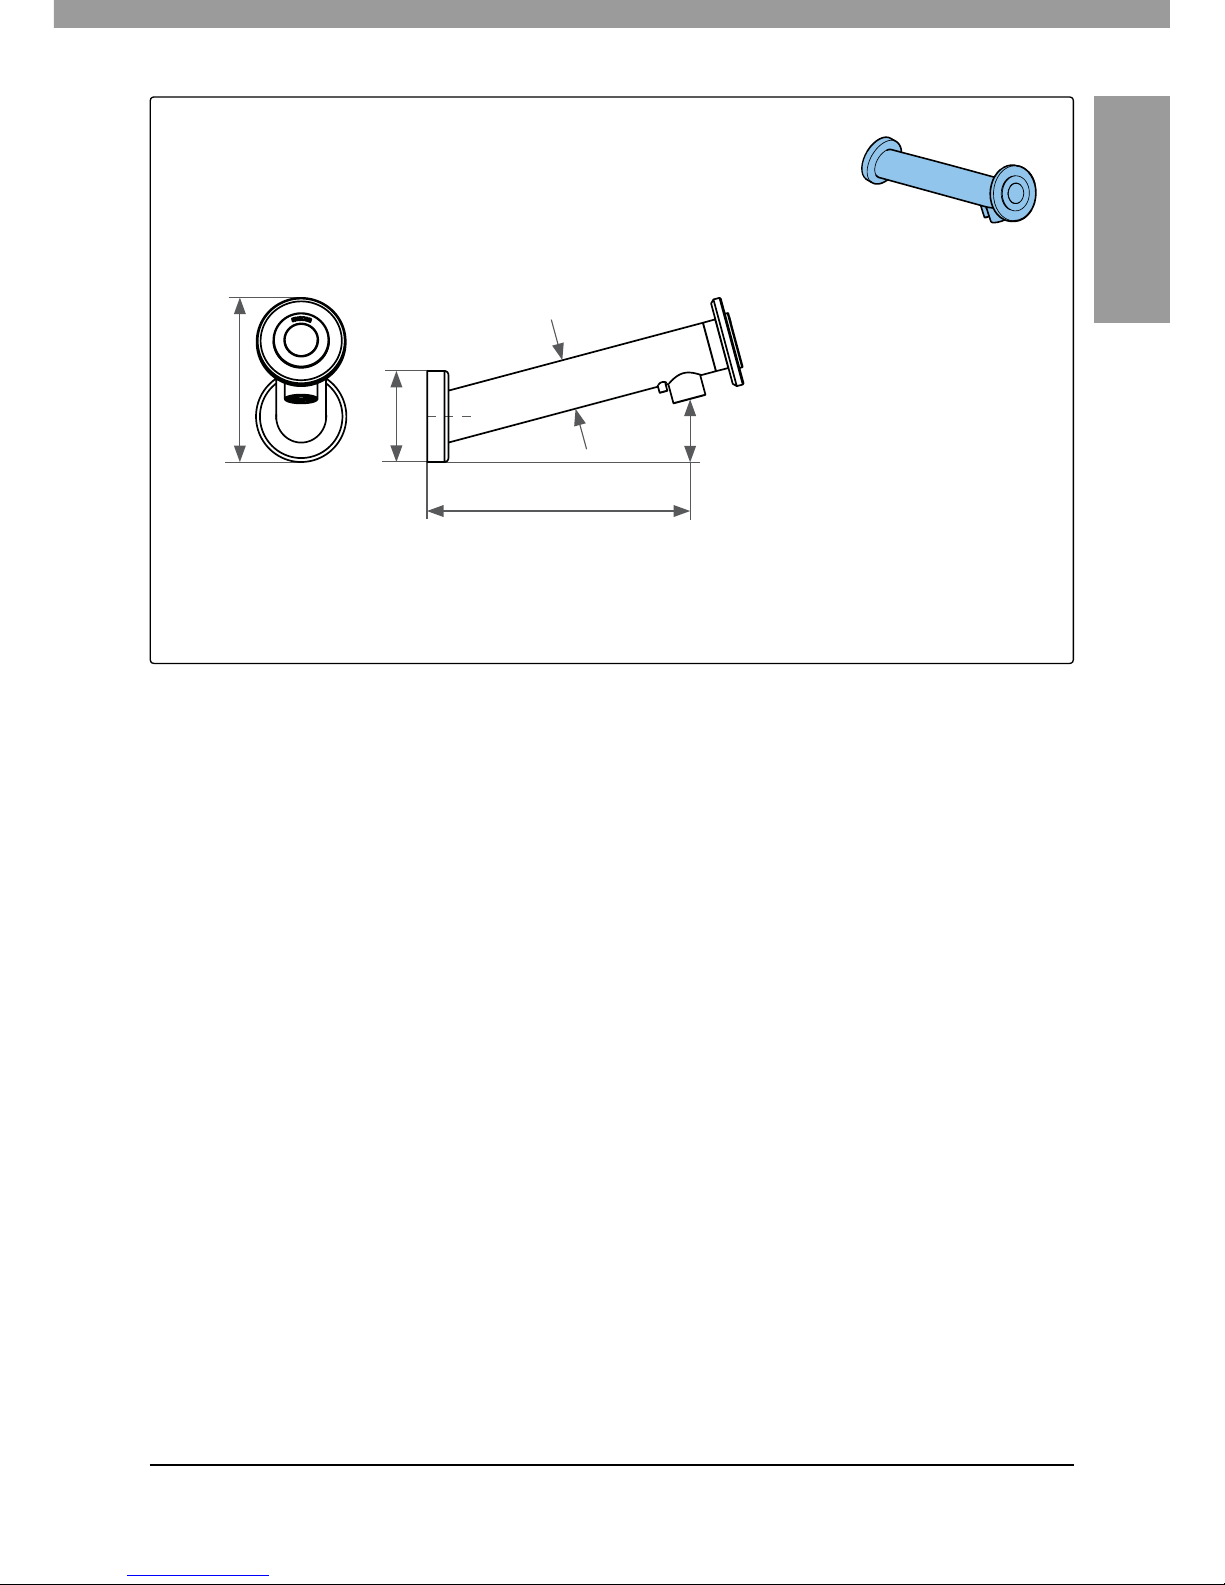
The following faucet models are available (refer to g. C)
1A. Standard model
1B. Small model
1C. Wall mounted model

V 17.04
21
English
CAUTION
• Do not open the water box or break the seal of the water box. If you do, the warranty
becomes void.
• Do not connect the faucet to a water supply that has no strainer. If you do, the warranty
becomes void.
• Do not install hoses when the faucet is switched on or when the power adapter is connected.
• Do not hold any object close to the faucet head when the calibration is in progress. This can
block the light and interfere with the calibration.
• Do not install or store the faucet in a location that has the risk of frost damage.
• Be careful with the power cable of the faucet and the soap box. The connector at the end of
each cable is fragile.
• Do not connect the water box of one set to the faucet of another set. There is a possibility that
the system does not function properly.
• Make sure that the hoses for the liquids are correctly connected.
• Do not cut or kink the hoses.
• Only use the supplied materials to install the system. Only use the power adapter supplied
with the system.
• Use only genuine replacement parts and accessories. The use of other parts will invalidate
the warranty and CE marking and may result in personal injury.
3. Description
3.1 Components
Refer to g. C for the identication of the components.
1. Faucet (1A, 1B or 1C)
2. Water box
3. Soap box (3a or 3b)
3.2 Identication of the product
Refer to g. C for the location of the product type labels.
3.3 Application areas
miscea systems can be used in conjunction with:
• Pressurized storage heaters
• Thermally controlled instantaneous heaters
• Hydraulically controlled instantaneous heaters
Operation with low-pressure displacement water heaters is not possible.
The miscea CLASSIC is certied according to EN1717, and is equipped with a DIN-DVGW tested
one-way valves for back-ow prevention.
4. Installation
22
• Avoid damage from defective power supply cables. In the case of damage, the plug-in power
supply must be replaced by the manufacturer or his customer service or an equally qualied
person.
• The enclosed plug-in power supply (plug type C) is only suitable for use with Schuko sockets
(CEE 7/4).
• The miscea systems are only suitable for indoor use.
• Do not install if the product (power cord) is live.
• Make sure the surface on which the system is installed is strong enough to support the
weight of the unit.
• Do not scratch, damage, manipulate, bend, twist or bundle the power cord, or place heavy
objects on it or pinch it.
• Do not disassemble or modify the unit, which is not specically described in this manual. This
could result in re, electric shock or injury.
• Do not use the system in a hot place, such as a shower where condensation may form on the
appliance, or where water may spatter directly onto the appliance. This could result in re,
electric shock, or a malfunction.
• Use single-phase power with 220-240V.
• The miscea CLASSIC system components must be protected against mechanical damages,
like heat and direct sunlight (maximum temperature is 50 degrees Celsius). Do not place near
heat sources or open re.
CAUTION
Care must be taken that the system components are easily accessible for maintenance work.
• The screen seals that are tted to the valve must be installed in order to prevent dirt from the
pipeline.
• Open cold and hot water supply and check connections for leaks
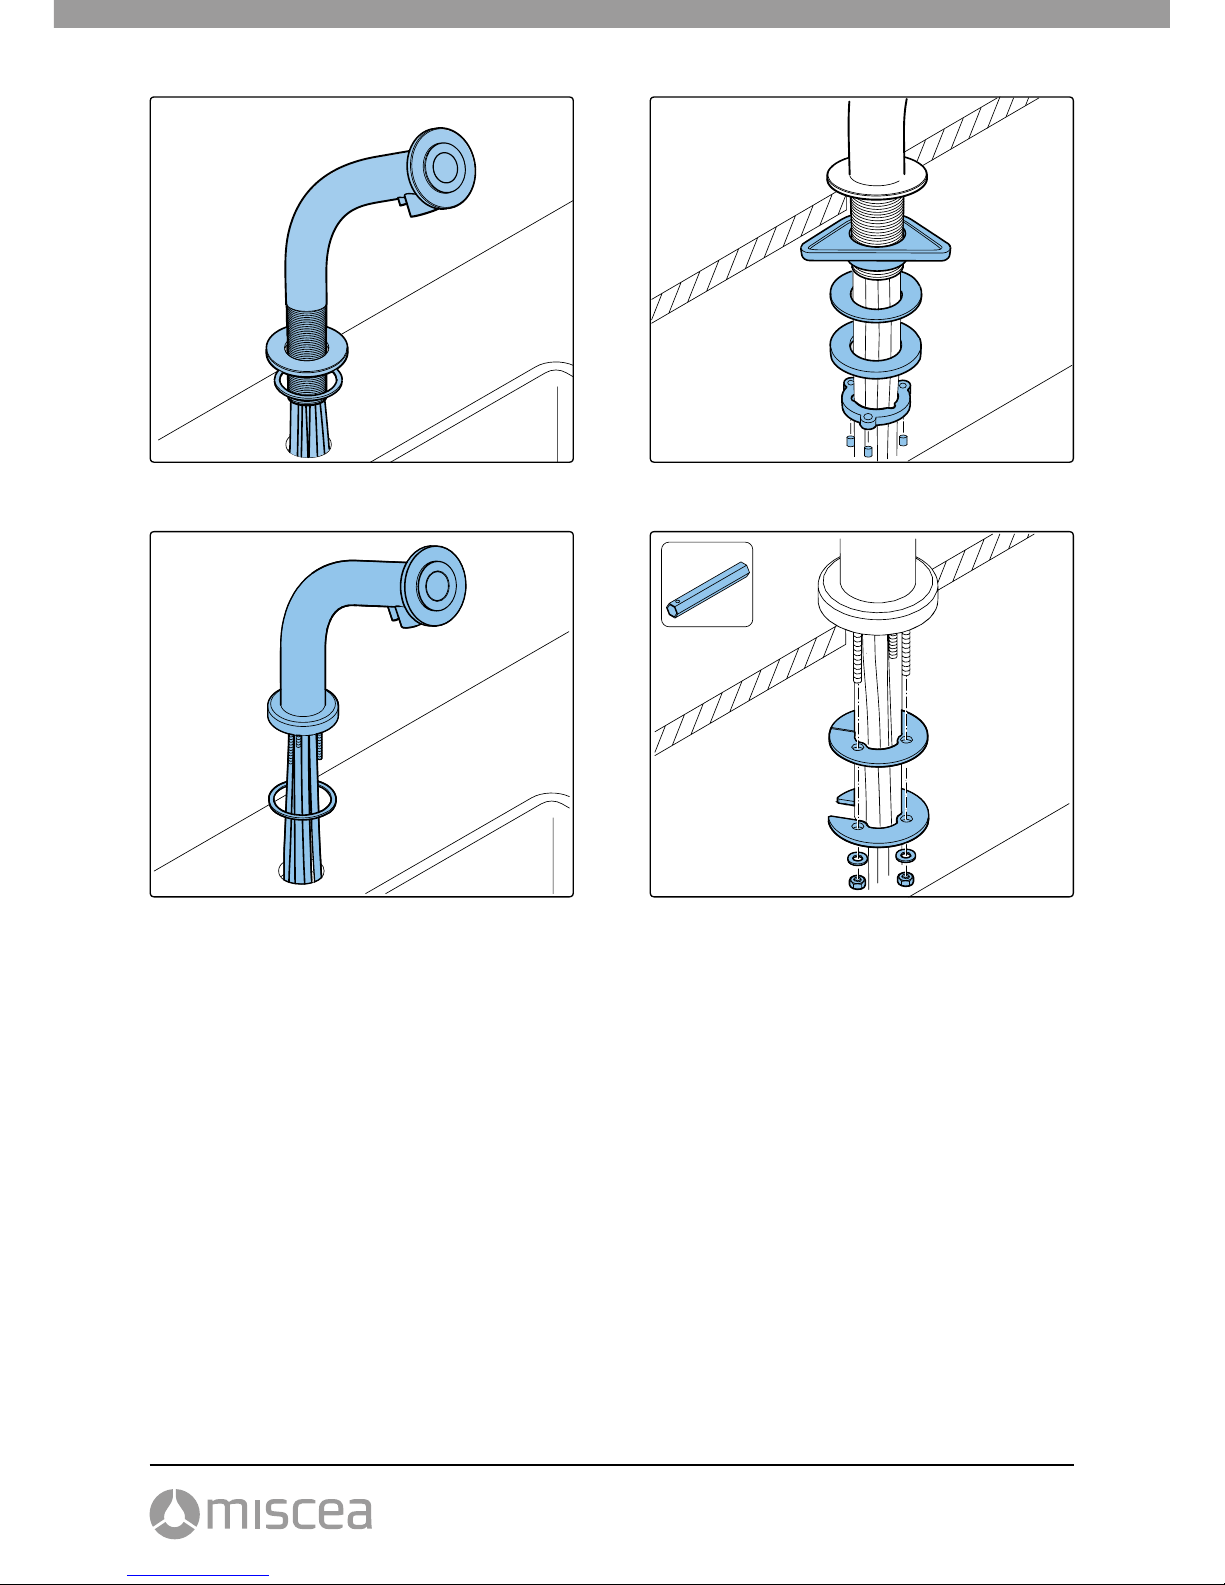
4.1 Installing the system
CAUTION
• Flush the water supply system thoroughly before installing the system (Observe DIN 1988 /
DIN EN 806!). Be sure that the water supply is absolutely clean. Dirt and debris in the water
can impair the function and / or damage the functional parts of the electrical appliance,
miscea is not responsible for damages of this nature.
Install a shut-o valve between the water supply and the system. In case of maintenance or
repair work to the system, the shut-o valve can be closed and it will not be necessary to shut
o the water supply system.
• Refer to g. D - I for the installation of the system. Assemble the system in the given order.
4. Installation
V 17.04
23
English
5. Use
CAUTION
• Make sure that the installation procedure is correctly executed before you use the faucet.
• Only use liquids and pouches that are approved by miscea.
• This device is not intended for use by persons (including children) with limited physical,
sensory or mental abilities, as well as lack of experience and knowledge.
• Children must be supervised to ensure that they do not play with the appliance
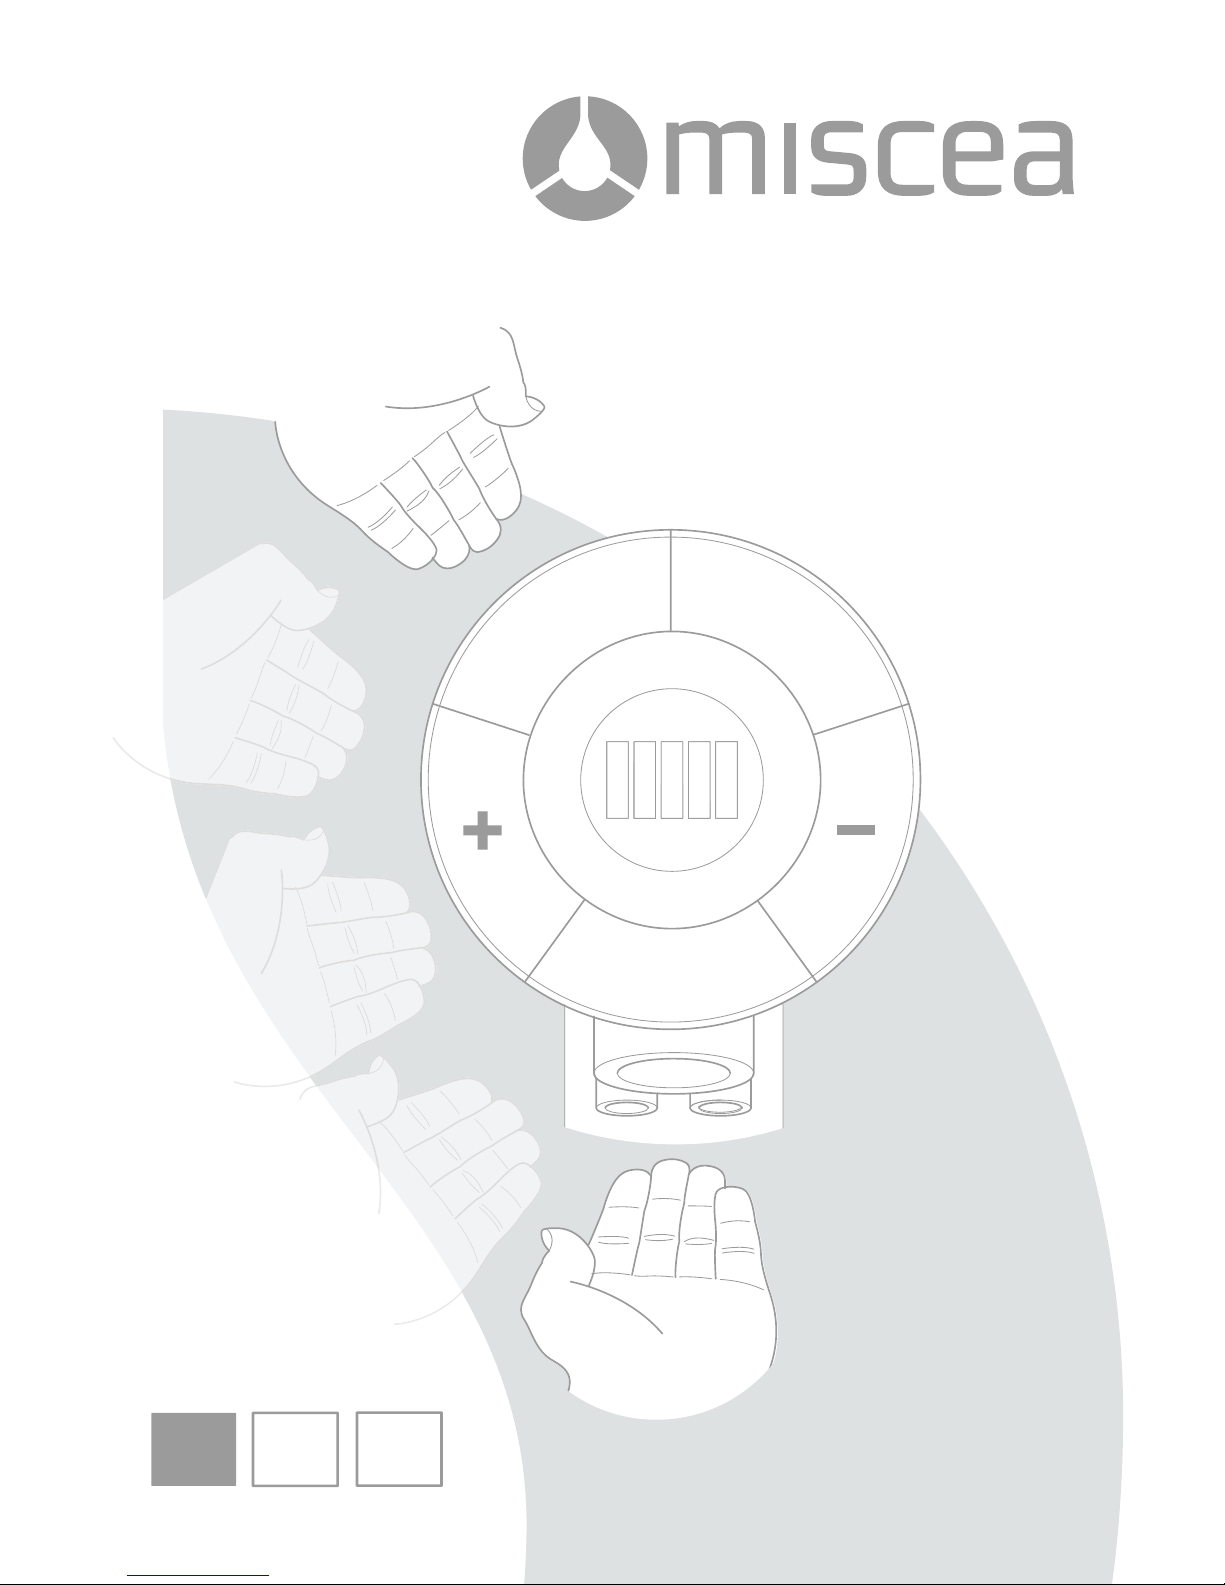
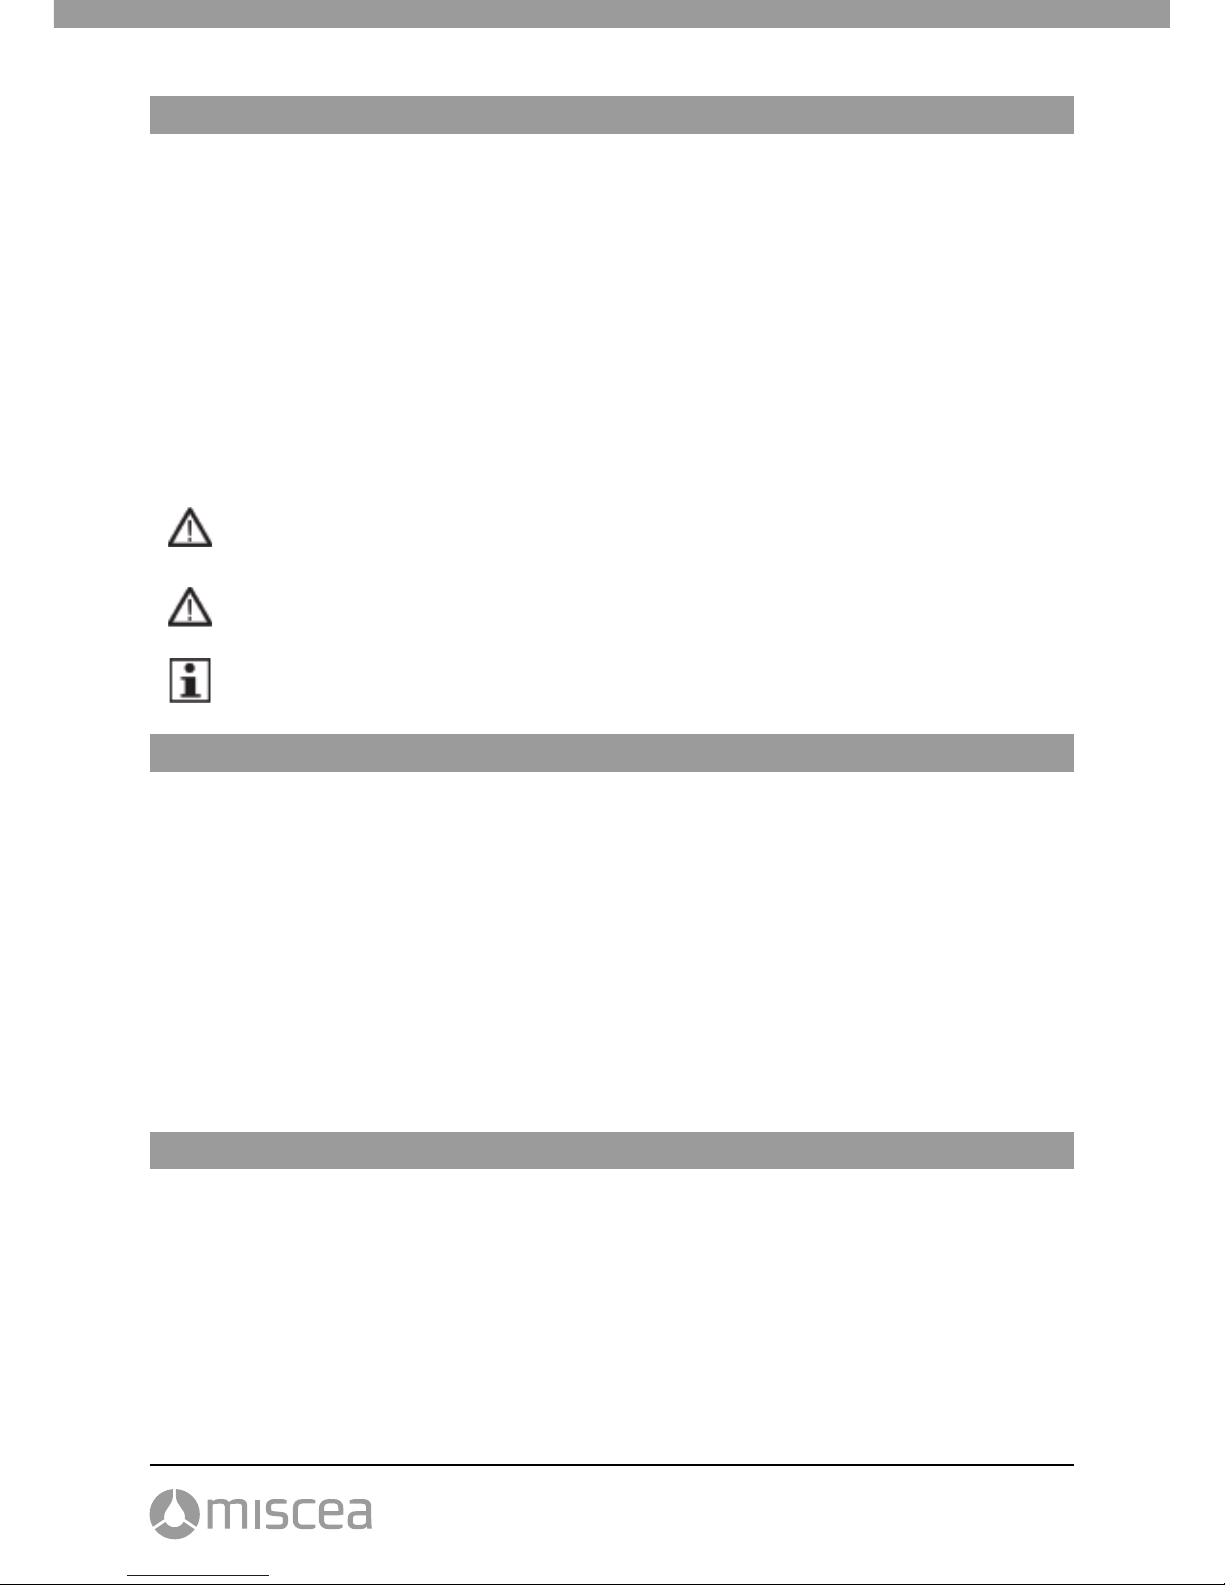
5.1 Faucet head
1. Water outlet
2. Water tap sector
3. Water temperature sector (+)
4. Soap dispense sector
5. Disinfectant dispense sector
6. Water temperature sector (-)
7. Water temperature display
8. Disinfectant outlet
9. Soap outlet
5.2 Operating the system
Once the system has been connected to the mains power supply, the power is on. To indicate that the
system is operational, the LED switch on the water box is on and the faucet head shows a pulsating
white light.
Activating a sector
• To activate the water tap sector, hold your hand to a maximum of 15 cm distance from the
sector.
• To activate any other sector, hold your hand to a maximum of 5 cm distance from the sector.
De-activating a sector
• Remove your hand away from the sector.
• In addition, you can quickly de-activate the dispense sectors by repeating the movement of
the hand as described above.
5.3 Tapping water
Washing hands
• Activate sector 2.
• Hold your hands under the water outlet.
• The water ow stops automatically 1
second after you have pulled your hand
away from the water ow.
4
3
2
1
9
8
7
6
5
2
1
4
3
6
5
24
4
2
2
5
9
8
5. Use
CAUTION
Always check the temperature before you place your hands in the water stream. Risk of
burning your hands due to hot water.
Filling a bucket
• Place a container under the water outlet.
• Activate sector 3 & 6 at the same time for 1 second. The water starts owing.
• The water ow stops automatically 10 minutes after the activation.
• To stop the water ow manually, hold your hand over sector 4 or 5 for 1 second.
Adjusting the water temperature
• Check the display for the actual temperature.
• To adjust the temperature:
• Activate sector 3 to increase the tem-
perature. The sector shows a red light.
• Activate sector 6 to decrease the
temperature. The sector shows a blue
light.
You can adjust the water temperature whilst the water is owing or when the system is in
standby mode.
You can use one hand to adjust the temperature, and hold your other hand under the water
ow to check the temperature.
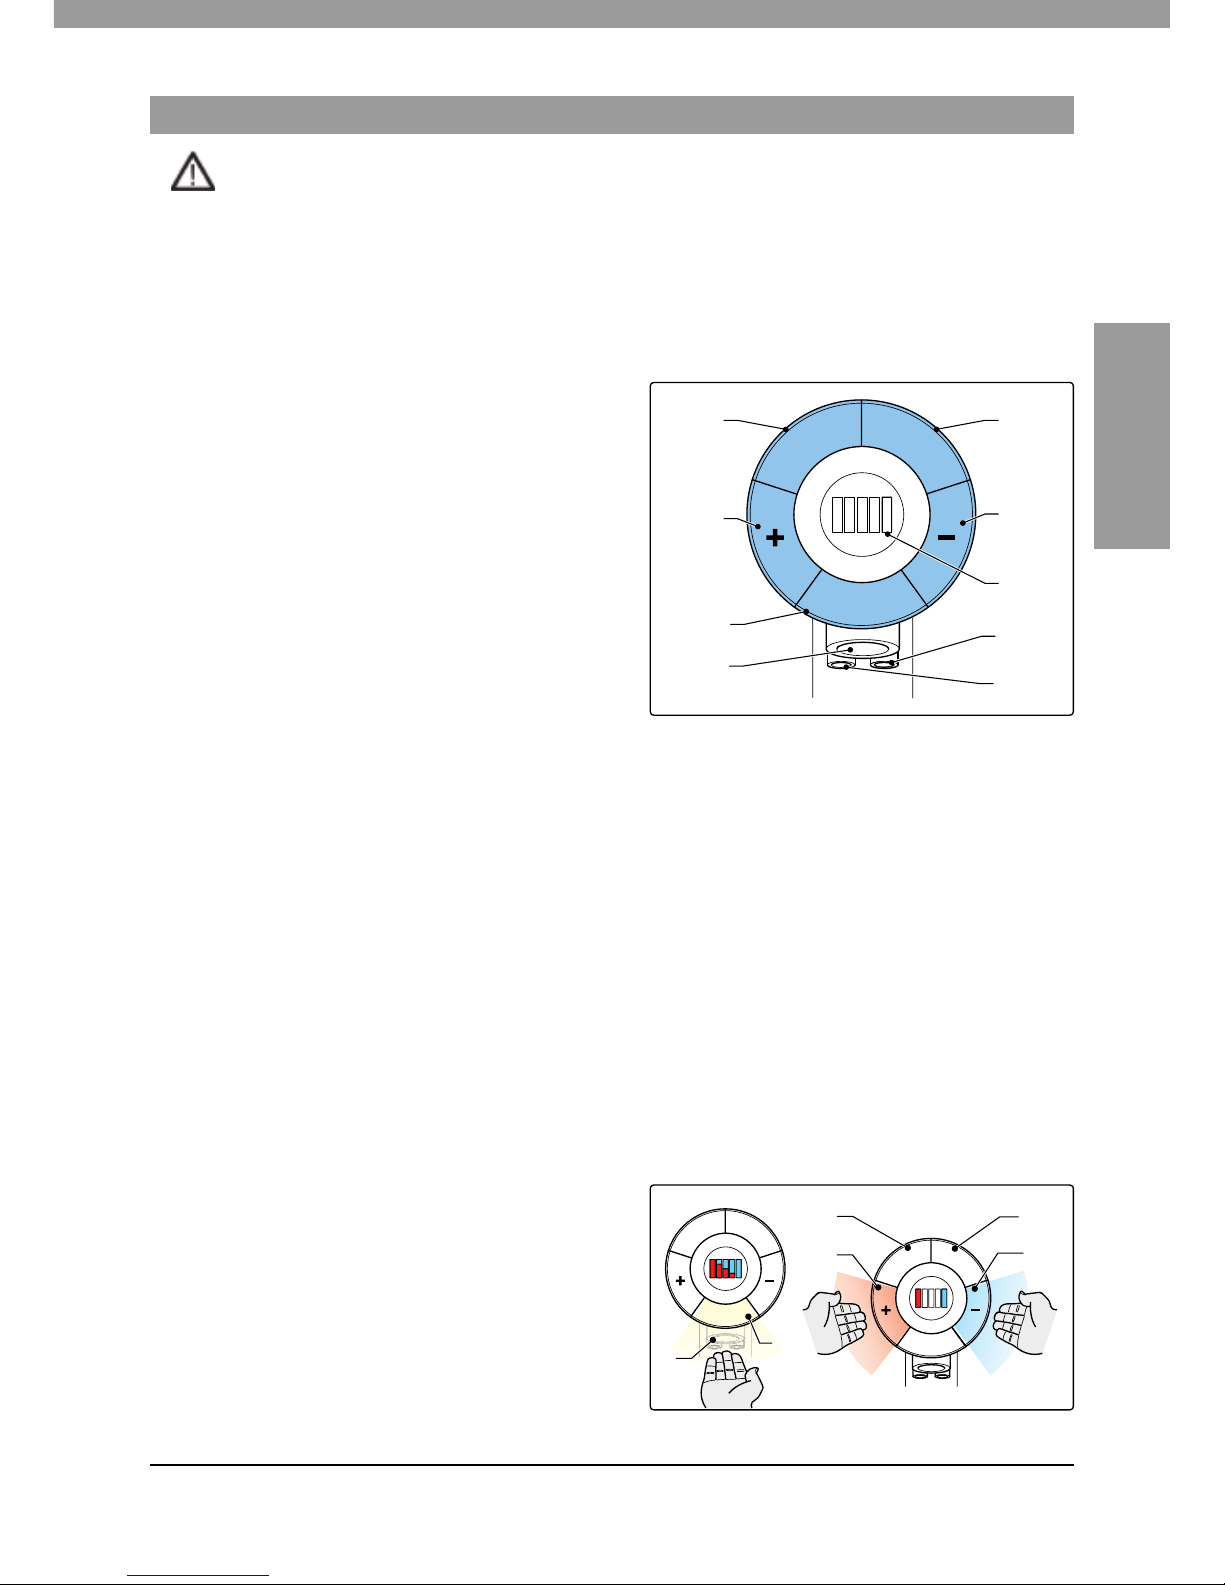
5.4 Dispensing liquids
Dispensing soap
• Activate sector 4. The sector shows a
pulsating green light.
• Activate sector 2 and hold your hand
under outlet 9.
Dispensing lotion or disinfectant
• Activate sector 5.The sector shows a
pulsating orange light.
• Activate sector 2 and hold your hand
under outlet 8.
3
6
V 17.04
25
English
5. Use
5.5 Optional accessories
Remote control
With the remote control, you can change the default settings of the system. The settings include, but
are not limited to the following: temperature, dosage, spool cycle, light pulse and resetting. For further
information, please visit our website for the miscea representative in your country.
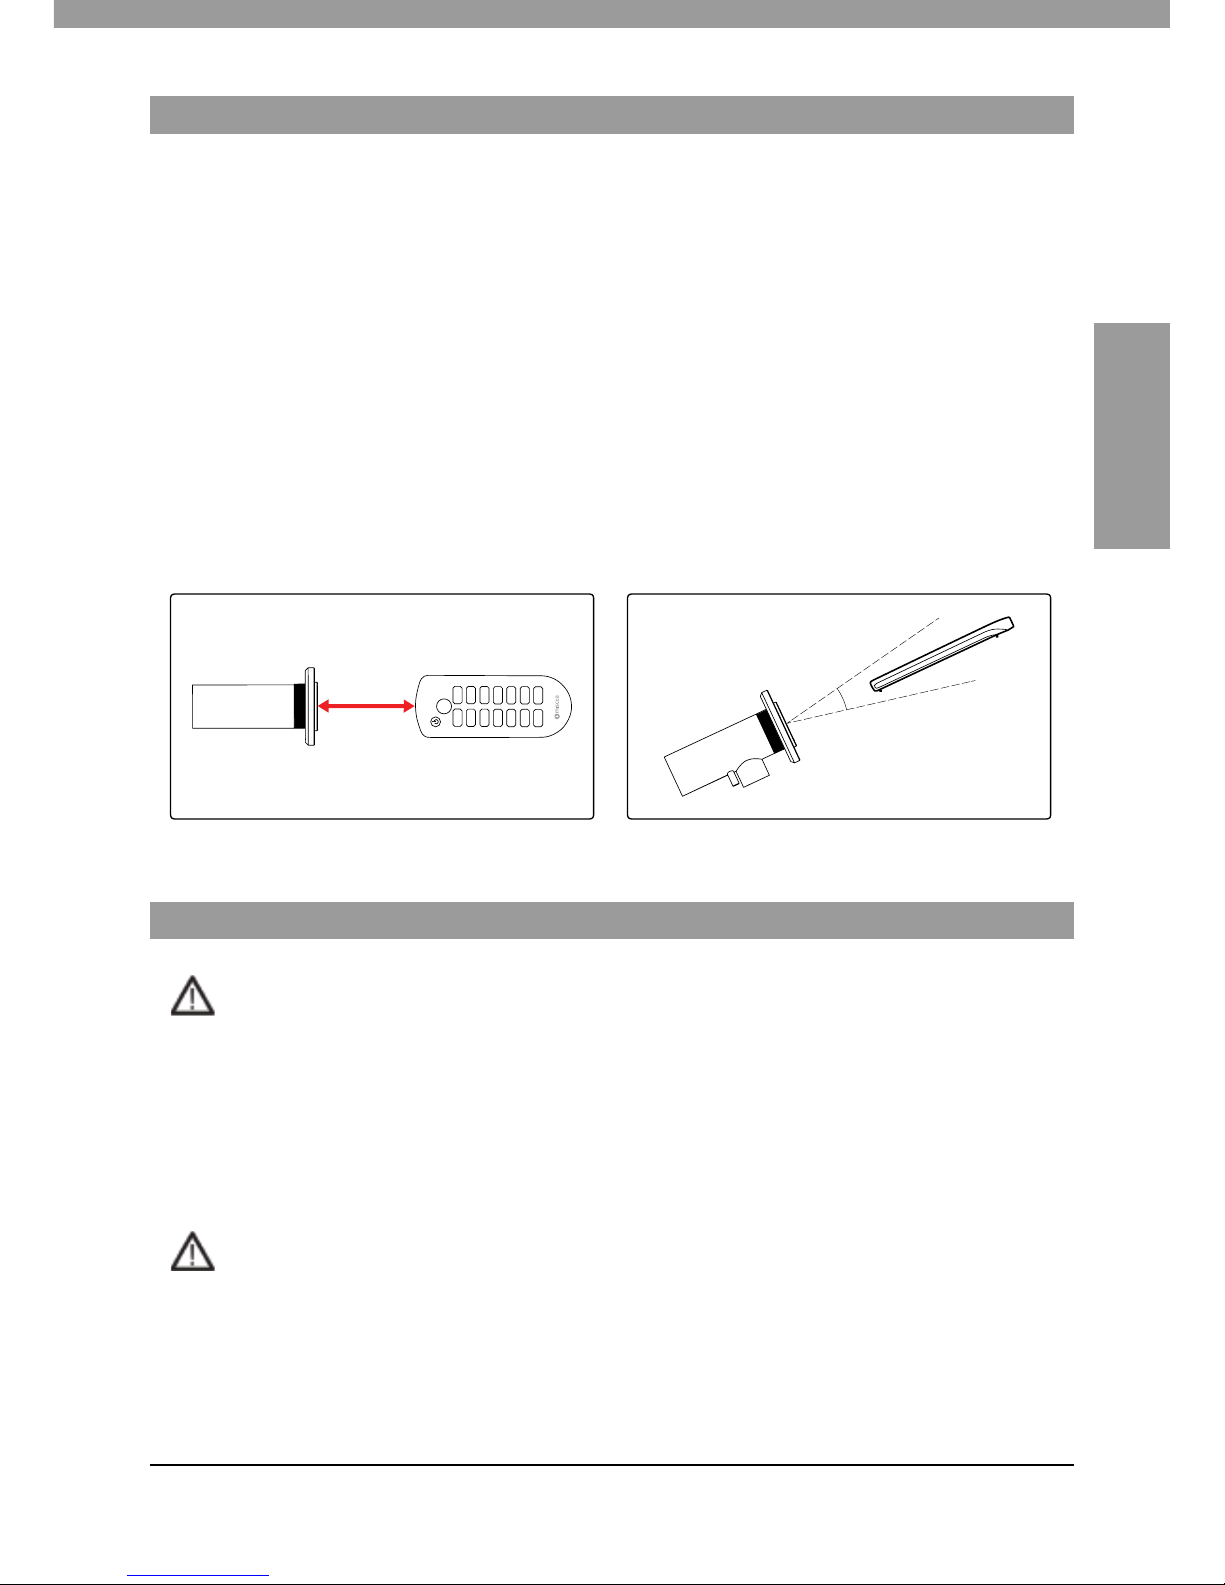
5.6 Use the remote control with miscea CLASSIC systems
The remote control signal is detected through the display screen in the faucet head. Position the remote
control as shown in Fig. K and L below to operate. Then the desired settings can be changed.
For instructions on how to change specic settings using the remote control, please refer to the miscea
Remote Control instruction manual.
LANG
LIGHT
MEMO
LIQUID 2
SA
VE
LIQUID 1
T
E
MP
DELA
Y
B
U
CK
E
T
DURA
TION
BEEP
DE
F
A
UL
T
SPOOL
-
+
m
a
x
. 3
0
c
m
30 º
Fig. K Fig. L
CAUTION
• Do not try to repair the faucet, the water box or the soap box yourself. Only qualied miscea
personnel are qualied to make repairs. If you make repairs yourself, the warranty becomes
void.
• Do not clean the faucet with abrasives, strong acids or bleach products. If you do, the
warranty becomes void.
• When cleaning, do not spray the device or plug directly or indirectly with water.
WARNING
Do not clean the system when it is switched on.
6.1 Storage
• Store the system in a dry place, out of reach of children.
6. Cleaning and maintenance
26
6. Cleaning and maintenance
6.2 Cleaning
• Clean the system with a soft, clean cloth, water and a mild cleaning product.
• To remove dirt or scale:
• Let white vinegar or all-purpose cleaner act on the system for a few minutes.
• Wash the system with plenty of water.
• Dry the system.
• Clean the water box and the soap box with a damp cloth.
In order to preserve the beauty of the high-quality surface, the following notes must be observed:
chrome, brushed stainless steel surface, chrome-matt and color-coated surfaces are sensitive to acid
and abrasive detergents and sponges.
If soiled or calcied, clean the ttings with soapy water or dilute a mild cleaning solution, rinse with clean
water and dry. Damage caused by improper handling is not covered by the miscea warranty.
To ensure hygienic operation of your miscea system, we recommend following the procedures set out
in the miscea Maintenance Manual. A copy of the maintenance manual can be found on the miscea
website at www.miscea.com. All the necessary cleaning tools and required parts are provided in the
miscea SystemCare Set and can be ordered from your local miscea representative.
6.3 Automatic spool cycle
The automatic spool function is designed to prevent clogging of the soap and disinfectant tubes and to
prevent the waterline from being infected by Legionella and other waterborne bacteria. The automatic
spool function will initiate after a minimum amount of time the soap or disinfectant has not been in use.
This has been set by default at 2 weeks.
If the soap or disinfectant has not been in use for 2 weeks, the system will perform the following steps on
the liquid that was last used 2 weeks ago:
• Step 1: The soap or disinfectant pump will operate for 30 seconds
• Step 2: Cold water ows for 60 seconds
Note: It is possible to change the frequency of the auto spool function for more frequent water ushing,
however it is not possible to change the frequency of the auto spool function for soap and disinfectant
ushing.
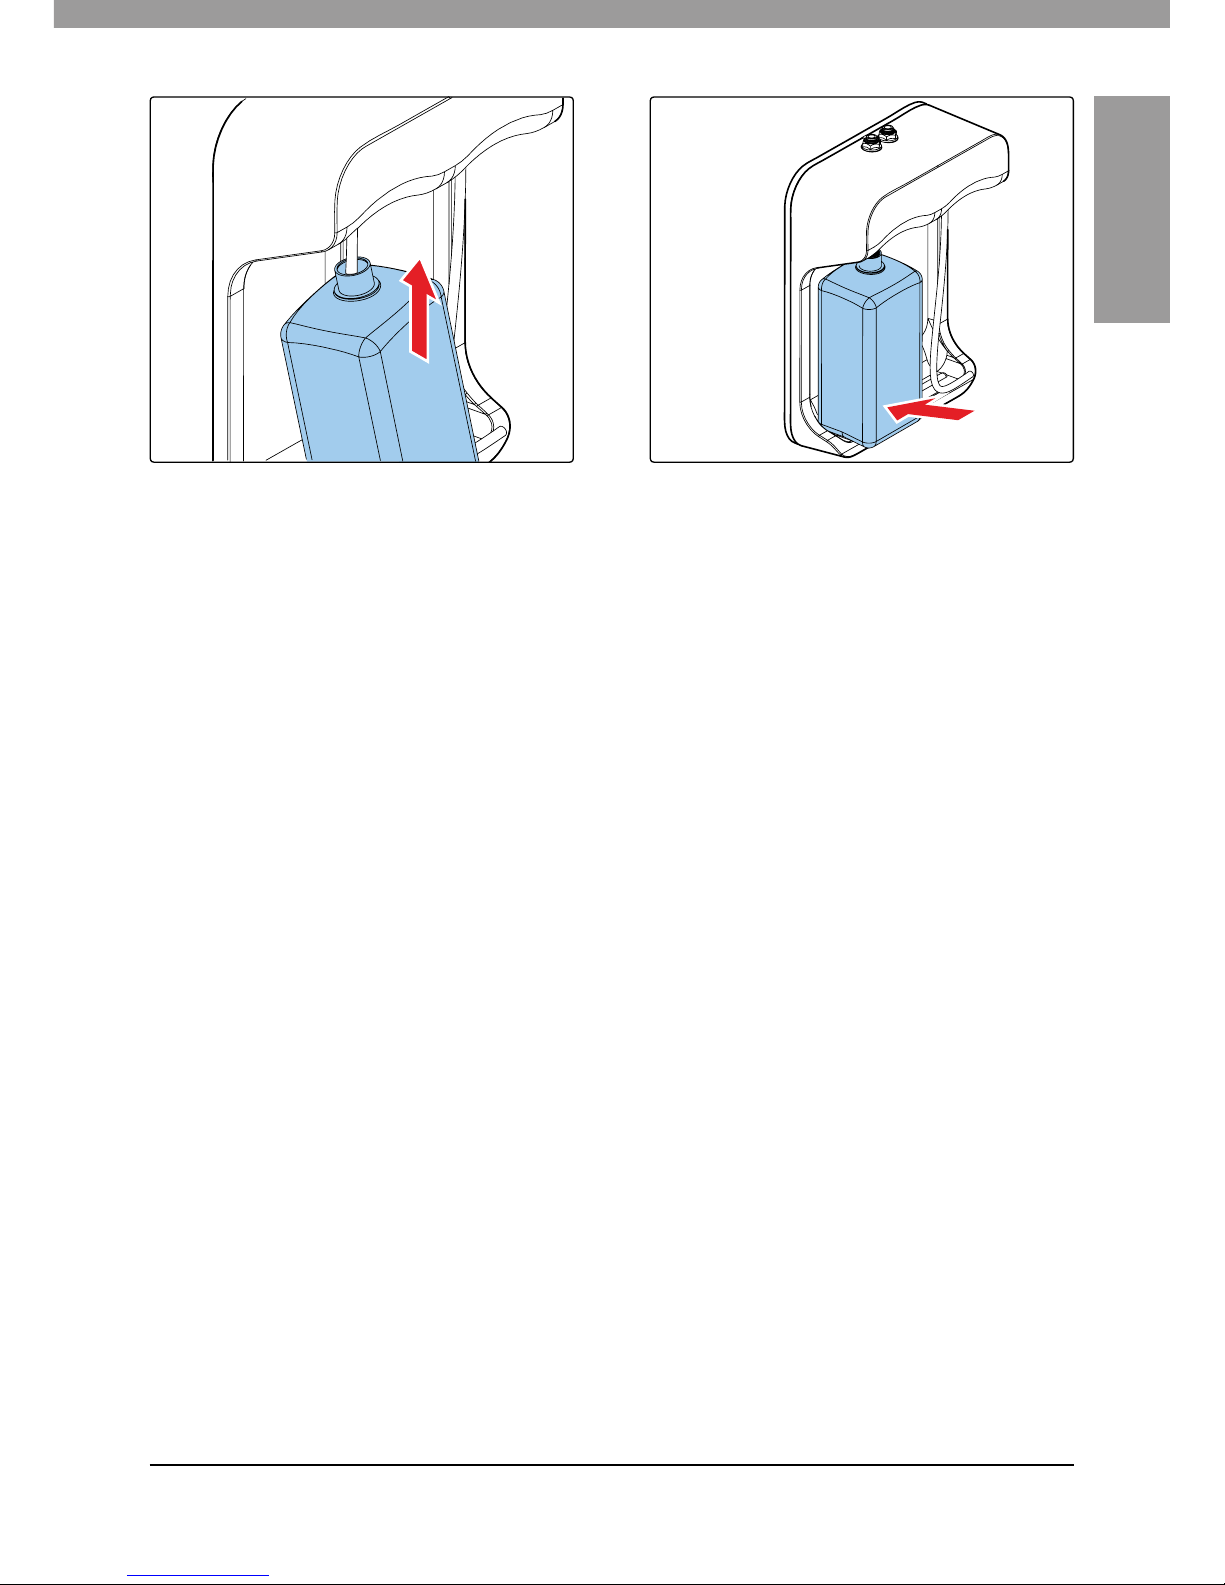
6.4 Replacing the pouch / bottle
Once the system does not dispense soap, lotion or disinfectant anymore, the pouch / bottle needs to be
replaced.
• Refer to g. G / H for the correct installation of the pouch / bottle.

V 17.04
27
English
6. Cleaning and maintenance
7. Rell Liquid Safety Information
5
36
4
6.5 Priming the tubes
After the installation of the pouches/bottles, the tubes need to be primed. When the procedure has been
completed, the tubes are clean and free of air bubbles.
• Press the LED switch on the water box for
1 seconds. The LED starts blinking.
• To prime the soap tube: Activate sector
4 & 6 at the same time. Activate sector 5
to stop.
• To prime the lotion or disinfectant tube:
• Activate sector 5 & 3 at the same time.
• Activate sector 4 to stop.
Specic end use(s)
Skin and hand disinfectant products may not be used for any other purpose.
Precautions for safe handling
• Disinfectant is a ammable medium as a liquid as well as a vapor. Vapors may form explosive
mixture with air.
• Keep away from heat, hot surfaces, sparks, open ames and other ignition sources.
• When using, do not eat, drink or smoke.
• Keep out of reach of children
• Remove and wash contaminated clothes before re-use.
• Do not breath vapours or spray mist.
• Avoid contact with eyes.
• Ensure adequate ventilation, especially in conned areas.
• Special precautions for user: Take the usual precautions when handling chemicals.
Conditions for safe storage, including any incompatibilities
• Disinfectant is classied as a dangerous good. Store liquids according to local storage regulations for dangerous goods.
• Keep container tightly closed in a dry, cool and well-ventilated place.
• Dispose of contents/containers in accordance with local and national regulations. Do not
discharge into surface waters/groundwater.
• Keep product and empty container away from heat and sources of ignition.
• Keep away from food, drink and animal feeding stus.
• Incompatible with oxidizing agents.

28
7. Rell Liquid Safety Information
The following is general rst aid information.
Most important symptoms and eects, both acute and delayed
• causes serious eye irritation.
• May cause drowsiness or dizziness.
• Remove contaminated soaked clothing immediately.
• If you feel unwell, seek medical advice.
After inhalation
• Move to fresh air in case of accidental inhalation of vapours.
• In the event of symptoms refer for medical treatment.
After contact with eyes
• Rinse immediately and cautiously with plenty of water, also under the eyelids, for at least 15
minutes. Remove contact lenses, if present and easy to do so.
• If eye irritation persists, consult a specialist.
After ingestion
• Immediately give plenty of water (if possible charcoal slurry).
• Summon a doctor immediately.
• Induce vomiting only upon the advice of a physician.

V 17.04
29
English
The performance specications as mentioned in the table below have been tested and certied.
8. Technical data
PERFORMANCE SPECIFICATIONS
Parameter Value
Voltage 24 V
DC
Input voltage 100 ~ 240 VAC / 50 ~ 60 Hz
Operating water pressure 0,5 - 8 bar
Max. water temperature 70 °C
Enclosure rating of PCB compartments IP 55
Faucet weight (incl. hoses and cable) Standard model: 1,0 kg
Small model: 0,9 kg
Wall-mounted model: 0,9 kg
Water box weight (incl. hoses) 1,75 kg
Soap box weight (excl. pouches) 0,95 kg
DEFAULT SETTINGS
Parameter Value
Response time of water ow stop 1 s
Dispense volume of soap 1 ml
Dispense volume of lotion or disinfectant 3 ml
Automatic spool cycle 2 weeks
TRANSPORT & STORAGE
Parameter Value
Transport weight Standard model: 6,8 kg
Small model: 6,7 kg
Wall-mounted model: 6,7 kg
Dimensions packaging 47 cm x 30 cm x 20 cm
Storage temperature 10 - 50 °C
DIMENSIONS
Component Value
Faucet Standard model Fig. J1
Faucet Small model Fig. J2
Faucet Wall-mount model Fig. J3
Soap box Fig. J4 / J5
Water box Fig. J6

30
8. Technical data
Connection wall socket with protective conductor, protected by a 10 A fuse.
Max. Power consumption 36 W
Standby power dissipation < 3.0 W
Test pressure of the valve 16 bar
Flow at 3 bar ow pressure. Tap (tap water) 6 L / min
Ambient temperature 10 - 40 °C temperature
Hot water inlet tting 70 °C
Recommended (energy saving) 60 °C
Water connection tting cold - blue, warm - red
8.1 Electrical test Data
Rated shock voltage: 2000 V
The test for electromagnetic compatibility (interference emission test) was carried out with the rated
voltage and the rated current.
8.2 Electrical Specications
8.3 Certications and Conformity
Declaration of conformity
EU-Richtlinien 93/68/EEC, 98/83/EC, 2006/95/EC, 89/336/EEC
Michiel Ubink, Managing Director of miscea GmbH, headquartered in Hauptstraße 2, 14979
Großbeeren, Germany hereby declares that the multifunctional faucet product family, known under the
brand name miscea, is designed and manufactured in accordance with EU Directives (93/68 / EEC,
98/83 / EC, 2006/95 / EC, 89/336 / EEC) And in accordance with the following European standards.
Model numbers:
CCR1S1NCDE CCR2S2NCEN CER2S1NCEN CER3S2NCFR LCR1S12NBDE
CCR1S1NCEN CCR2S2NCFR CER2S1NCFR KCR4S1NC LCR1S12NCDE
CCR1S1NCFR CCR3S1NCDE CER2S2NCDE KCR4S1NC0 LCR3S0NC
CCR1S2NCDE CER1S1NCDE CER2S2NCEN KCR4S2NC LCR3S11NCDE
CCR1S2NCEN CER1S1NCEN CER2S2NCFR KCR4S2NC0 LCR3S11NCEN
CCR1S2NCFR CER1S1NCFR CER3S1NCDE LCR1S0NB LCR3S12NCDE
CCR2S1NCDE CER1S2NCDE CER3S1NCEN LCR1S0NC LER1S11NCDE
CCR2S1NCEN CER1S2NCEN CER3S1NCFR LCR1S11NBEN
CCR2S1NCFR CER1S2NCFR CER3S2NCDE LCR1S11NCDE
CCR2S2NCDE CER2S1NCDE CER3S2NCEN LCR1S11NCEN
V 17.04
31
English
8. Technical data
Applied standards:
• EN 15091: 2013
• EN 60335-1: 2012
• EN 61000-6-1: 2007 and EN 61000-6-3: 2011
• EN 1717: 2011
• EN ISO 3822: 2010
All miscea ttings are certied according to DVGW and WRAS guidelines and thus comply with the
above standards.
Germany, January, 2017.
Michiel Ubink
Managing Director
The declarations of conformity can be requested at the following address:
miscea GmbH | Hauptstr. 2, D-14979 Grossbeeren, Germany.

32
9. Warranty and information
9.1 Warranty
The warranty period is 2 years from the date of purchase documented on the purchase receipt. If the
faucet needs repairing, contact your miscea dealer.
9.2 Warranty conditions
The warranty becomes void if you perform any of the following:
• Open the water box or break the warranty seal of the water box.
• Connect the faucet to a water supply that has no strainer.
• Change, repair or replace the spouts of the soap box.
• Clean the faucet with abrasives, strong acids or bleach products.
• Repair the faucet, the water box or the soap box yourself.
In addition, miscea refers to the miscea Sales and Delivery conditions regarding the applicable warranty
conditions.
9.3 Contact information
For questions about where to buy our products or questions concerning the use or installation: please
visit our website for the miscea representative in your country.
9.4 Updates of the manual
We update this manual regularly. If you want to have the latest version of this manual, you can download
a copy from www.miscea.com or send your request to info@miscea.com.
9.5 Environment and recycling
The miscea CLASSIC is an electrical appliance for which return and collection obligations apply in many
countries. miscea is involved in appropriate return systems in Germany.
Your miscea product has been designed and manufactured using high-quality materials and components
that are suitable for recycling and / or re-use. This symbol means that electrical and electronic devices
as well as batteries and accumulators must be disposed of separately from household waste at the end
of their useful life.

V 17.04
33
English
Service
To resolve problems, follow the table error / cause / solution. In the case of maintenance work on the
system, the power supply must rst be switched o!
If the problem cannot be solved, disconnect the power supply. Write the serial number of the water box
from the top of the unit and contact a qualied installer or contact miscea by email at
berlin@miscea.com.
The table below provides helpful hints and solutions for troubleshooting the Third Generation miscea
CLASSIC System as well as scenarios for possible hardware and software problems.
Before contacting miscea Technical Support
If you are having problems with your Third Generation miscea CLASSIC System try the appropriate
solutions below to isolate the exact problem before contacting miscea GmbH for further technical
support.
1. Check the system is plugged into a working electrical outlet and switched on.
2. Check the system is connected to the mains water supply and the water supply is turned on.
3. Check the pouches containing the liquid hand products are installed and not empty.
4. Check all cable and tubing connections for loose connections or incorrect connections. Please
refer to appropriate manual for correct installation procedures.
Solving General Problems
You may be able to easily resolve general problems described in this section. If a problem persists and
you are unable to resolve it yourself or if you feel uncomfortable about performing the operation, please
contact your nearest miscea technical support.
10. Service
WATER RELATED PROBLEMS
Symptoms Experienced Possible Problem or Cause Solution
• The water won’t stop. The bucket ll mode was accidentally activated.
When the bucket ll mode is activated, the system will automatically
stop dispensing water after 10
minutes. To manually stop bucket
ll mode, activate the soap or
disinfectant sector.
There is an issue with the solenoid
valve.
Disconnect the miscea system
from the power point. After 10 seconds, reconnect the miscea system
to the power point. This should
reset the system and resolve any
minor system glitches.
If the problem persists, please
contact miscea GmbH for further
technical assistance.

34
10. Service
WATER RELATED PROBLEMS
Symptoms Experienced Possible Problem or Cause Solution
• The faucet is not dispensing
hot water.
• The faucet is not dispensing
cold water.
• Only one water temperature
is dispensed. Not able to
change water to hot or cold.
Interruption in communication
between the motor and Cartouche
components located inside the
waterbox.
NOTE: Please check the miscea
system is connected to a hot
and cold water outlet or device
that allows for availability of hot
water. If only a cold water outlet is
available, then it is not possible to
receive hot water.
Disconnect the miscea system
from the power point. After 10 seconds, reconnect the miscea system
to the power point. This should
reset the system and resolve any
minor system glitches.
If the problem persists, please
contact miscea GmbH for further
technical assistance.
The faucet is not dispensing
water.
The system is not plugged into a
working power point.
The mains water supply is not set
to open.
The shut o valve (if available) is
not set to open.
Check the system is plugged into a
working power point and switched
on.
Check the mains water supply is
set to open.
Check the shut o valve (if available) is set to open.
Check all cable and tubing connections for loose connections or
incorrect connections. Please refer
to relevant pages of the manual for
correct installation procedures.
An issue with one or more of the
components in the waterbox.
Disconnect the miscea system
from the power point. After 10 seconds, reconnect the miscea system
to the power point. This should
reset the system and resolve any
minor system glitches.
If the problem persists, please
contact miscea GmbH for further
technical assistance.
The faucet is leaking/dripping
water.
If newly installed, the mains water
supply was not ushed thoroughly
enough before installation, resulting in dirt particles entering the
waterbox, causing problems with
components inside the waterbox.
Disconnect the miscea system
from the power point. After 10 seconds, reconnect the miscea system
to the power point. This should
reset the system and resolve any
minor system glitches.
Flush the faucet using the bucket
ll mode or continuously activating
the water sector for 1 minute.
If the problem persists, please
contact miscea GmbH for further
technical assistance.

V 17.04
35
English
10. Service
WATER RELATED PROBLEMS
Symptoms Experienced Possible Problem or Cause Solution
• The faucet is dispensing wa-
ter on its own (ghost water)
The sensor in the sector is dirty.
Issue with sensors in faucet head.
Possible environmental factors
such as bright light or super reective surfaces aecting the sensors.
Switch the faucet o, and clean
the sensor ring in the sector with a
damp cloth.
If problem persists, please contact
miscea GmbH for further technical
support.
• The waterbox is making a lot
of noise.
The system is calibrating.
Issue with sensors in the faucet
head.
If this is only happening once a
day, then it is completely normal. If
happening more than once a day,
reset the system by disconnecting
from power point, then reconnecting after 10 seconds.
If the problem persists, please
contact miscea GmbH for further
technical assistance.
• The water stream is very
weak.
The mains water supply is not
completely set to open.
The shut o valve (if available) is
not completely set to open.
Check the mains water supply is
set to completely open.
Check the shut o valve (if available) is set to completely open.
If the problem persists, please
contact miscea GmbH for further
technical assistance.

36
10. Service
SOAP/DISINFECTANT/LOTION RELATED PROBLEMS
Symptoms Experienced Possible Problem or Cause Solution
• The soap/disinfectant/lotion
won’t dispense.
• The soap/disinfectant/lotion
dispenses with sputters.
• The soap/disinfectant/lotion
sometimes dispenses and
others not.
The system is not plugged into a
working power point.
The cables and tubing may have
not been connected correctly.
The soap/disinfectant/lotion pouches may have not been secured
correctly.
The soap and disinfectant sectors
have not been primed, or the liquid
hoses contain air.
The liquid outlet is clogged
Check the system is plugged into a
working power point and switched
on.
Check all cable and tubing connections for loose connections or
incorrect connections. Please refer
to the relevant pages of the manual
for correct installation procedures.
Check soap/disinfectant/lotion
pouches are secured correctly.
Please refer to user manual.
Prime/bleed the soap/disinfectant/
lotion. Please refer to the relevant
pages of user manual.
Switch o the system and clean the
liquid outlet with a damp cloth.
If the problem persists, please
contact miscea GmbH for further
technical assistance.
Possible issue with pump components in soap-box.
Soap/Disinfectant/Lotion tubes are
blocked/damaged.
Disconnect the miscea system
from the power point. After 10 seconds, reconnect the miscea system
to the power point. This should
reset the system and resolve any
minor system glitches.
If the problem persists, please
contact miscea GmbH for further
technical assistance.
• Only a small amount of
soap / disinfectant / lotion is
dispensed.
• Too much soap / disinfectant
/ lotion is dispensed.
The pre-selected amount of dis-
pensed liquid is to high/low.
You can adjust the amount of
dispensed liquid with the remote
control.
Contact miscea GmbH for further
technical assistance.

V 17.04
37
English
10. Service
OTHER PROBLEMS
Symptoms Experienced Possible Problem or Cause Solution
• Temperature display does not
light up.
LED lights damaged. Disconnect the miscea system
from the power point. After 10 seconds, reconnect the miscea system
to the power point. This should
reset the system and resolve any
minor system glitches.
If the problem persists, please
contact miscea GmbH for further
technical assistance.
• Faucet not reacting to
anything for a long period
of time.
The system is not plugged into a
working power point.
Possible problem with electronics
in waterbox and faucet head.
Check the system is plugged into a
working power point and switched
on.
Disconnect the miscea system
from the power point. After 10 seconds, reconnect the miscea system
to the power point. This should
reset the system and resolve any
minor system glitches.
If the problem persists, please
contact miscea GmbH for further
technical assistance.
• Faucet does not respond to
remote control.
Position of remote control is
incorrect.
Be sure to hold the remote control
in the right position to the faucet
head. Please refer to the relevant
pages of the user manual.
• A sector does not light prop-
erly when activated.
The sector is dirty.
The LED of the sector is broken.
Switch the faucet o, and clean the
sector with a damp cloth.
If the problem persists, please
contact miscea GmbH for further
technical assistance.

38

NLEN
DE
Betriebsanleitung
CLASSIC
s
e
i
f
e
d
e
s
i
n
f
e
k
t
w
a
s
s
e
r

40
© 2017 miscea GmbH
Kein Teil dieser Veröentlichung darf ohne die vorherige schriftliche Einwilligung von miscea in beliebiger
Weise oder Form reproduziert, übertragen, aufgezeichnet, in einem Datenträger gespeichert bzw. in eine
menschliche oder Computersprache übersetzt werden. Bei einer Verletzung des Urheberrechtes sieht
miscea sich eventuell nicht mehr dazu in der Lage, wirksame technische Unterstützung für das Produkt
zu bieten.
Sämtliche technischen Informationen, Daten und Anweisungen in dieser Anleitung zu Schritten, deren
Ausführung möglich und nötig ist, sind zum Zeitpunkt der Herausgabe auf dem neuesten
Stand.
Diese Anleitung spiegelt nach bestem Wissen und Gewissen unser derzeitiges Know-how und unsere
bisherigen Erfahrungen wider.
Wir behalten uns das Recht vor, technische Änderungen im Rahmen der Weiterentwicklung des in
dieser Anleitung vorgestellten miscea-Produktes vorzunehmen. Aus diesem Grund sind aus den technischen Daten, Beschreibungen und Abbildungen keinerlei Rechte abzuleiten.
miscea behält sich das Recht vor, sowohl diese Anleitung als auch die darin beschriebenen Produkte
ohne vorherige Ankündigung zu ändern. Kein Teil dieser Anleitung stellt eine vertragliche oder sonstige
Verpichtung von miscea dar oder ist so zu verstehen. Diese Veröentlichung wurde mit größtmöglicher
Sorgfalt vorbereitet. Wenden Sie sich in Zusammenhang mit Verbesserungsvorschlägen bitte an miscea.
Das Original dieser Anleitung ist in englischer Sprache verfasst. Eine Kopie ist auf Anfrage erhältlich.
Version: V17.04
NL
EN
DE

V 17.04
41
Deutsch
1. Allgemeines 42
1.1 Über diese Anleitung 42
1.2 Zeichen in dieser Anleitung 42
2. Verpackungsinhalt 42
3. Technische Beschreibung 42
3.1 Komponenten 43
3.2 Identikation des Produkts 43
3.3 Anwendungsbereich 43
4. Installation 43
4.1 Installation des Systems 44
5. Gebrauch 45
5.1 Armaturenkopf 45
5.2 Bedienung des Systems 45
5.3 Wasserentnahme 45
5.4 Spenden von Flüssigkeiten 46
5.5 Optionales Zubehör 47
5.6 Verwendung der Fernbedienung 47
6. Reinigung und Wartung 47
6.1 Lagerung 47
6.2 Reinigung 48
6.3 Automatischer Spülzyklus 48
6.4 Austausch des Beutels / Flasche 48
6.5 Leitungen mit Flüssigkeit füllen 49
7. Nachfüllmedien Sicherheitsinformation 49
8. Technische Daten 51
8.1 Elektrische Prüfdaten 52
8.2 Elektrische Daten 52
8.3 Zulassung und Konformität 52
9. Garantie und Information 54
9.1 Garantie 54
9.2 Garantiebedingungen 54
9.3 Kontaktinformation 54
9.4 Aktualisierungen der Betriebsanleitung 54
9.5 Umwelt und Recycling 54
10. Service 55
Inhaltsverzeichnis

42
1.1 Über diese Anleitung
Diese Anleitung enthält technische Daten, Anweisungen und Erläuterungen zur sicheren Verwendung
dieses Produktes. Vor Transport, Installation, Inbetriebnahme, Neustart, Bedienung oder Wartung des
Produktes sind diese Anweisungen zu lesen und zu verstehen.
Die Abbildungen, Zeichnungen und Graken in dieser Anleitung unterscheiden sich eventuell von den
tatsächlichen Bauteilen. Wenden Sie sich mit Fragen, die nicht in dieser Anleitung beantwortet werden,
an Ihren Lieferanten vor Ort. Bewahren Sie diese Anleitung zur künftigen Bezugnahme auf. Bitte diese
Anleitung an den Benutzer der Armatur weitergeben!
1.2 Zeichen in dieser Anleitung
WARNUNG
Eine Warnung bedeutet, dass die Gefahr von Verletzungen - auch tödlichen - besteht, wenn
die Anweisungen nicht befolgt werden.
VORSICHT
Vorsicht bedeutet, dass Schäden am Gerät möglich sind.
Ein Hinweis liefert Zusatzinformationen, z.B. für eine Maßnahme.
1. Allgemeines
2. Verpackungsinhalt
3. Technische Beschreibung
Beschreibung des Verpackungsinhalts siehe Abb. A und B.
1. miscea Armatur
2. Wasserbox
3. Seifenbox
4. Befestigungsplatte für die Wasserbox (an der Wasserbox vormontiert)
5. Befestigungsplatte für die Seifenbox (an der Seifenbox vormontiert)
6. Netzteil
7. Befestigungsmaterial und Dichtungen
8. Betriebsanleitung
9. Nachfüllmedien
Das Handhygiene-System miscea “CLASSIC” macht es möglich, dass Sie Ihre Hände waschen können,
ohne das System zu berühren. Der Kopf der Armatur hat verschiedene Sektoren mit eingebauten Infrarotsensoren. Die Funktionen können aktiviert werden, indem Sie Ihre Hände in die Erkennungszonen
der Sensoren bewegen.
Folgende Armaturen-Modelle sind verfügbar (siehe Abb. C):
1A. Standardmodell
1B. Kleines Modell
1C. Wandmodell

V 17.04
43
Deutsch
3. Technische Beschreibung
4. Installation
3.1 Komponenten
Identikation der Komponenten siehe Abb. C
1. Armatur (1A, 1B oder 1C)
2. Wasserbox
3. Seifenbox (3a oder 3b)
3.2 Identikation des Produkts
Lage der Produkttypenschilder siehe Abb. C.
3.3 Anwendungsbereich
Der Betrieb der Armatur ist möglich mit:
• Druckfesten Warmwasserspeichern
• Thermisch gesteuerten Durchlauferhitzern
• Hydraulisch gesteuerten Durchlauferhitzern
Der Betrieb mit drucklosen Speichern (Niederdruckspeicher) ist nicht möglich!
Die miscea CLASSIC ist mit einem DIN-DVGW bauartgeprüften Rückussverhinderer ausgerüstet.
VORSICHT
• Önen Sie die Wasserbox nicht und beschädigen Sie auch das Siegel nicht. Ansonsten
verfällt jeglicher Garantieanspruch.
• Schliessen Sie die Armatur niemals ohne Filter an der Warm- und Kaltwasserzuleitung an.
Ansonsten verfällt jeglicher Garantieanspruch.
• Schliessen Sie die Schläuche nie bei eingeschalteter Armatur oder angeschlossenem
Netzteil an.
• Halten Sie während des Kalibrierungsprozesses keine Gegenstände in die Nähe des
Armaturenkopfes. Dies könnte den Lichtstrahl unterbrechen und die Kalibrierung
beeinussen.
• Armatur nicht an einem frostgefährdeten Ort anbringen oder aufbewahren.
• Vorsicht mit dem Stromkabel der Armatur und der Seifenbox. Der Stecker am Ende der
beiden Kabel ist zerbrechlich.
• Nur Wasserbox und Armatur aus dem gleichen Lieferkarton kombinieren und anschließen.
Ansonsten ist es möglich, dass das System nicht einwandfrei funktioniert.
• Vergewissern Sie sich, dass die Schläuche für die Flüssigkeiten richtig angeschlossen sind.
• Schläuche nicht beschädigen oder knicken.
• Verwenden Sie nur die mitgelieferten Teile, um das System zu installieren.
• Verwenden Sie nur das mit dem System gelieferte Netzteil.
• Nur Originalersatz- und Zubehörteile verwenden. Die Benutzung von anderen Teilen führt
zum Erlöschen der Gewährleistung sowie der CE-Kennzeichnung und kann zu Verletzungen
führen.
44
• Gefahr durch beschädigte Spannungsversorgungskabel vermeiden. Bei Beschädigung muss
das Steckernetzteil vom Hersteller oder dessen Kundendienst oder einer gleichermaßen
qualizierten Person ersetzt werden.
• Der beiliegende Netzteil-Stecker (Stecker Typ EFC) ist ausschließlich für die Verwendung mit
Schukosteckdosen (CEE 7/4) geeignet.
• Die miscea CLASSIC ist ausschließlich zum Gebrauch in geschlossenen Räumen geeignet.
• Führen Sie die Installation nicht durch, wenn das Produkt (Stromkabel) unter Strom steht.
• Führen Sie die Installation sicher an einer Stelle aus, die stark genug ist, um das Gewicht des
Gerätes zu stützen.
• Installieren Sie das Produkt nicht an Orten, wo Schäden durch Salz auftreten könnten, oder
wo aggressive, neutrale oder reduktive Gase vorhanden sind.
• Es ist nicht erlaubt, das Stromkabel zu zerkratzen, zu beschädigen, zu bearbeiten,
übermäßig zu verbiegen, zu ziehen, zu verdrehen, zu bündeln und auch nicht, schwere
Gegenstände darauf zu stellen oder es einzuklemmen.
• Führen Sie keinen Auseinanderbau oder Modikation des Geräts durch, die nicht
ausdrücklich in dieser Anleitung beschrieben wird. Dies könnte nämlich zu Bränden,
elektrischen Schlägen oder Verletzungen führen.
• Verwenden Sie es nicht an einem heißen Ort, wie etwa einer Dusche, wo sich
Kondenswasser auf dem Gerät bilden könnte, oder wo eventuell Wasser direkt auf das Gerät
spritzt. Dies könnte zu Bränden, elektrischen Schlägen oder Fehlfunktionen führen.
• Verwenden Sie einphasigen Strom mit 220-240 V.
• Die miscea CLASSIC Systemkomponenten müssen am Einbauort vor mechanischen
Beschädigungen sowie vor Hitze und direkter Sonneneinstrahlung geschützt werden
(Temperatur max. 50 °C). Nicht in der Nähe von Hitzequellen oder oenem Feuer montieren.
VORSICHT
Es ist darauf zu achten, dass die Systemkomponenten für Wartungsarbeiten gut zugänglich
sind.
• Die der Armatur beigepackten Siebdichtungen müssen eingebaut werden, um Schmutzeinspülungen aus dem Leitungsnetz zu vermeiden. Schmutzeinspülungen können die Funktion
beeinträchtigen und/oder zu Beschädigungen an Funktionsteilen des Elektrogeräts führen,
für hieraus ergebende Schäden haftet miscea nicht.
• Kalt- und Warmwasserzufuhr önen und Anschlüsse auf Dichtheit prüfen.
4.1 Installation des Systems
VORSICHT
Spülen Sie die Warm- und Kaltwasserzuleitung gründlich durch, bevor Sie das System
installieren (DIN 1988/DIN EN 806 beachten). Vergewissern Sie sich, dass das Wasser
absolut sauber ist.
Installieren Sie ein Eckventil zwischen der Wasserversorgung und dem System. Im Falle von
Wartungs- oder Reparaturarbeiten am System kann dieses Eckventil geschlossen werden.
• Installation des Systems siehe Abb. D - I. Bauen Sie das System in der angegebenen
Reihenfolge zusammen.
4. Installation

V 17.04
45
Deutsch
VORSICHT
• Vor Verwendung der Armatur ist sicherzustellen, dass die Montage korrekt durchgeführt
wurde.
• Nur von miscea zugelassene Flüssigkeiten und Beutel verwenden.
• Dieses Gerät ist nicht für den Gebrauch durch Personen (einschließlich Kindern) mit
eingeschränkten physischen, sensorischen oder geistigen Fähigkeiten sowie mangelnder
Erfahrung und Kenntnis bestimmt.
• Kinder müssen beaufsichtigt werden um sicherzustellen, dass sie nicht mit dem Gerät
spielen.
5.1 Armaturenkopf
1. Wasserauslass
2. Wasserentnahmesektor
3. Wassertemperatursektor (+)
4. Seifenspendersektor
5. Desinfektionsspendersektor
6. Wassertemperatursektor (-)
7. Wassertemperaturanzeige
8. Desinfektionsauslass
9. Seifenauslass
5.2 Bedienung des Systems
Sobald das System an die Netzstromversorgung angeschlossen ist, ist es eingeschaltet. Um
anzuzeigen, dass das System in Betrieb ist, leuchtet der blaue LED-Schalter an der Wasserbox auf und
am Kopf der Armatur beginnt ein weißes Licht zu pulsieren.
Aktivierung eines Sektors
• Um den Wasserentnahmesektor zu aktivieren, halten Sie Ihre Hand mit einem Abstand von
maximal 15 cm in den Sektor.
• Um einen anderen Sektor zu aktivieren, halten Sie Ihre Hand mit einem Abstand von maximal
5 cm in den Sektor.
Deaktivierung eines Sektors
• Entfernen Sie Ihre Hand aus dem Sektor.
• Des Weiteren können Sie die Spendersektoren schnell deaktivieren, indem Sie die oben
beschriebene Handbewegung wiederholen.
5.3 Wasserentnahme
Hände waschen
• Aktivieren Sie Sektor 2. Halten Sie Ihre
Hände unter den Wasserauslass 1.
• Der Wasserstrom wird nach 1 Sekunde,
nachdem Sie Ihre Hand aus dem
Wasserstrom herausgezogen haben,
automatisch gestoppt.
5. Gebrauch
4
3
2
1
9
8
7
6
5
2
1
4
3
6
5

46
5. Gebrauch
VORSICHT
Prüfen Sie stets die Temperatur, bevor Sie Ihre Hände in den Wasserstrom halten. Es besteht
die Gefahr, dass Sie sich durch heißes Wasser die Hände verbrennen.
Füllen eines Eimers
• Stellen Sie einen Eimer unter den Wasserauslass.
• Aktivieren Sie Sektor 3 & 6 eine Sekunde lang gleichzeitig. Das Wasser beginnt zu ießen.
• Der Wasserstrom stoppt 10 Minuten nach Aktivierung automatisch.
• Um den Wasserstrom manuell zu stoppen, halten Sie Ihre Hand eine Sekunde lang über
Sektor 4 oder 5.
Einstellen der Wassertemperatur
• Lesen Sie die tatsächliche Temperatur auf
der Anzeige ab.
• Zur Einstellung der Temperatur:
• Aktivieren Sie Sektor 3, um die
Temperatur zu erhöhen. Im Sektor
erscheint ein rotes Licht.
• Aktivieren Sie Sektor 6, um die
Temperatur zu verringern. Im Sektor
erscheint ein blaues Licht.
Sie können die Wassertemperatur auch einstellen, während das Wasser ießt, oder wenn
das System im Standby-Modus ist.
Die Wassertemperatur lässt sich mit einer Hand einstellen, während mit der anderen Hand
unter dem Wasserstrom die Wassertemperatur gefühlt werden kann.
5.4 Spenden von Flüssigkeiten
Spenden von Seife
• Aktivieren Sie Sektor 4. Im Sektor
erscheint ein pulsierendes grünes Licht.
• Aktivieren Sie Sektor 2 und halten Sie
Ihre Hand unter Auslass 9.
Spenden von Lotion oder Desinfektionsmittel
• Aktivieren Sie Sektor 5. Im Sektor
erscheint ein pulsierendes oranges Licht.
• Aktivieren Sie Sektor 2 und halten Sie
Ihre Hand unter Auslass 8.
3
6
4
2
2
5
9
8

V 17.04
47
Deutsch
5.5 Optionales Zubehör
Fernbedienung
Mit der Fernbedienung können Sie die Voreinstellungen des Systems ändern. Veränderbar sind:
Temperatur, Dosierung von Seife und Desinfektionsmittel, Spülzyklus, Lichtimpuls und Piepton. Das
Zurücksetzen auf die Werkeinstellungen ist jederzeit möglich. Besuchen Sie für weitere Informationen
unsere Website oder wenden Sie sich an Ihren miscea-Vertreter.
5.6 Verwendung der Fernbedienung
Die Anweisungen, wie Sie bestimmte Einstellungen mit der Fernbedienung ändern können, entnehmen
Sie bitte der miscea Betriebsanleitung «miscea Fernbedienung».
VORSICHT
• Versuchen Sie nicht, die miscea Armatur, die Wasserbox oder die Seifenbox selbst zu
reparieren. Reparaturen sind nur qualizierten miscea-Mitarbeitern gestattet. Wenn Sie selbst
Reparaturen durchführen, verfällt jeglicher Garantieanspruch.
• Armatur nicht mit aggressiven, stark ätzenden oder bleichenden Produkten reinigen.
Ansonsten verfällt jeglicher Garantieanspruch.
• Bei der Reinigung das Gerät und Steckernetzteil nicht direkt oder indirekt mit Wasser
abspritzen.
WARNUNG
Reinigen Sie das System nicht, wenn es eingeschaltet ist.
6.1 Lagerung
• Lagern Sie das System an einem trockenen Ort und außerhalb der Reichweite von Kindern.
6. Reinigung und Wartung
5. Gebrauch
LANG
LIGHT
MEMO
LIQUID 2
SA
VE
LIQUID 1
T
E
MP
DELA
Y
B
U
CK
E
T
DURA
TION
BEEP
DE
F
A
UL
T
SPOOL
-
+
m
a
x
. 3
0
c
m
30 º
Abb. K Abb. L

48
6. Reinigung und Wartung
6.2 Reinigung
• Reinigen Sie das System mit einem weichen, sauberen Lappen, Wasser und einem milden
Reinigungsmittel.
• Um Schmutz oder Kalk zu entfernen:
• Lassen Sie Haushaltsessig oder ein handelsübliches Entkalkungsmittel ein paar Minuten
auf die verkalkten Stellen einwirken.
• Waschen Sie die behandelten Stellen mit reichlich Wasser ab. Trocknen Sie das System.
• Reinigen Sie Wasser- und Seifenbox mit einem feuchten Lappen.
Um die Schönheit der hochwertigen Oberäche zu erhalten, sind folgende Hinweise zu beachten:
Chrom, gebürstete Edelstahl-Oberächen und farbbeschichtete Oberächen sind empndlich gegen
säure- und sandhaltige Reinigungsmittel sowie kratzende Schwämme.
Bei Verschmutzung oder Verkalkung, Armaturen mit Seifenwasser oder verdünntem Haushaltsessig
reinigen, mit klarem Wasser nachspülen und trockenreiben. Schäden, die durch unsachgemäße
Behandlung entstehen, unterliegen nicht der miscea-Gewährleistung.
Um den hygienischen Betrieb des miscea Systems zu gewährleisten, empfehlen wir die Schritte von der
miscea Wartungsanleitung. Eine Kopie von der Wartungsanleitung ist verfügbar auf unserer Website:
www.miscea.com.
Alle für die Einstellungen und Pege eines miscea System notwendigen Materialien und Werkzeuge sind
im Lieferumfang des “miscea SystemCare Set” enthalten und kann von Ihrem miscea Händler bestellt
werden.
6.3 Automatischer Spülzyklus
Die automatische Spülfunktion wurde entwickelt um ein Verstopfen der Seifen- und Desinfektionsmittelleitungen sowie die Bildung von Legionellen und anderen Bakterien in den Wasserleitungen zu
verhindern. Während des Spülens führt das System folgende Schritte durch:
• Schritt 1: die Seife oder Desinfektionsmittel Pumpe wird für 30 Sekunden betrieben
• Schritt 2: kaltes Wasser ießt für 60 Sekunden.
Sie wird ausgelöst, wenn innerhalb eines bestimmten Zeitraums weder Seife noch Desinfektionsmittel
verwendet werden. Dieser Zeitraum ist zunächst auf 2 Wochen eingestellt.
Anmerkung: Es ist möglich, die Häugkeit der automatischen Spülfunktion für Wasser zu erhöhen, es
ist jedoch nicht möglich, die Frequenz der automatischen Spülfunktion für Seife und Desinfektionsmittel
Spülung ändern.
6.4 Austausch des Beutels / Flaschen
Sobald das System keine Seife, Lotion oder Desinfektionsmittel mehr spendet, muss der Beutel/Flasche
ausgetauscht werden. Richtige Installation des Beutels/Flaschen siehe Abb. G / H.

V 17.04
49
Deutsch
6. Reinigung und Wartung
7. Nachfüllmedien Sicherheitsinformationen
6.5 Leitungen mit Flüssigkeit füllen
Nach der Installation der Beutel/Flasche müssen die Leitungen Flüssigkeit ansaugen. Nach Abschluss
sind die Leitungen sauber und frei von Luftblasen.
• Drücken Sie 1 Sekunde lang den LED
Schalter an der Wasserbox. Die LED
beginnt zu blinken.
• Um den Seifenschlauch zu füllen:
aktivieren Sie Sektor 4 & 6 gleichzeitig.
Aktivieren Sie Sektor 5 um den Spülvorgang zu stoppen.
• Um den Lotion- oder Desinfektonsmittelschlauch zu füllen: aktivieren Sie Sektor
5 & 3 gleichzeitig. Aktivieren Sie Sektor 4
um den Spülvorgang zu stoppen.
5
36
4
Spezische Benutzung
Haut- und Handdesinfektionsmittel darf nicht für andere Zwecke verwendet werden.
Vorsichtsmaßnahmen zur sicheren Handhabung
• Desinfektionsmittel ist ein brennbares Medium sowohl als Flüssigkeit als auch als Dampf.
Dämpfe können mit Luft explosionsfähiges Gemisch bilden.
• Von Hitze, heißen Oberächen, Funken, oenem Feuer und andere Zündquellen fernhalten.
• Bei der Verwendung nicht essen, trinken oder rauchen.
• Außerhalb der Reichweite von Kindern aufbewahren.
• Entfernen Sie und waschen Sie kontaminierte Kleidung vor der Wiederverwendung.
• Dämpfe nicht einatmen oder versprühen.
• Vermeiden Sie Kontakt mit Augen.
• Sorgen Sie für ausreichende Belüftung, besonders in geschlossenen Räumen.
• Besondere Vorsichtsmaßnahmen für die Benutzer: Beachten Sie die üblichen Vorsichtsmaß-
nahmen beim Umgang mit Chemikalien
Bedingungen für die sichere Lagerung, einschließlich Unverträglichkeiten
• Desinfektionsmittel wird als Gefahrgut eingestuft. Lagern Sie Flüssigkeiten nach lokalen
Lagerungsverordnungen für gefährliche Güter.
• Bewahren Sie die Behälter dicht verschlossen an einem trockenen, kühlen und gut belüfteten
Ort auf.
• Inhalt/Behälter, in Übereinstimmung mit örtlichen und nationalen Vorschriften entsorgen.
Nicht ins Gewässer/Grundwasser ablassen.
• Halten Sie Produkt- und leeren Behälter von Hitze und von Zündquellen fern.
• Essen, Trinken und Tierfuttermittel fernhalten.
• Nicht kompatibel mit Oxidationsmitteln.

50
7. Nachfüllmedien Sicherheitsinformationen
Erste Hilfe-Maßnahmen
In diesem Kapitel sind die wichtigsten erste Hilfe-Maßnahmen zu nden. Die wichtigsten Symptome und
Wirkungen, akute sowie verzögerte sind:
• Verursacht schwere Augenreizung.
• Kann Schläfrigkeit und Benommenheit verursachen.
• Entfernen Sie kontaminierte getränkte Kleidung sofort.
• Wenn Sie sich unwohl fühlen, holen Sie ärztlichen Rat ein.
Nach der Inhalation
• Gehen Sie an die frische Luft im Falle eines versehentlichen Einatmens der Dämpfe.
• Bei Beschwerden beziehen Sie medizinische Behandlung.
Nach Berührung mit den Augen
• Vorsichtig sofort mit viel Wasser, auch unter den Augenlidern, mindestens 15 Minuten
ausspülen. Entfernen Sie Kontaktlinsen, falls vorhanden um es leichter zu machen.
• Wenn Augenreizung anhält, suchen Sie einen Facharzt auf.
Nach Verschlucken
• Mund sofort mit reichlich Wasser ausspülen (wenn möglich mit medizinischem Kohlezusatz).
• Rufen Sie sofort einen Arzt.
• Erbrechen nur auslösen auf Rat eines Arztes.

V 17.04
51
Deutsch
8. Technische Daten
Die Leistungsdaten gemäß Tabelle unten wurden geprüft und zertiziert.
LEISTUNGSDATEN
Parameter Wert
Spannung 24 V
DC
Eingangsspannung 100 ~ 240 VAC / 50 ~ 60 Hz
Betriebswasserdruck 0,5 - 8 bar
max. Wassertemperatur 70 °C
Schutzklasse des Leiterplattengehäuses IP 55
Gewicht der Armatur (einschl. Schläuche und Kabel) Standardmodell: 1,0 kg
kleines Modell: 0,9 kg
Wandmodell: 0,9 kg
Gewicht Wasserbox (einschl. Schläuche) 1,75 kg
Gewicht Seifenbox (ohne Beutel) 0,95 kg
VOREINSTELLUNGEN
Parameter Wert
Reaktionszeit Wasseruss/Stopp 1 s
Spendevolumen Seife 1 ml
Spendevolumen Lotion oder Desinfektionsmittel 3 ml
Automatischer Spülzyklus 2 Wochen
TRANSPORT & LAGERUNG
Parameter Wert
Transportgewicht Standardmodell: 6,8 kg
Kleines Modell: 6,7 kg
Wandmodell: 6,7 kg
Abmessungen der Verpackung 47 cm x 30 cm x 20 cm
Lagerungstemperatur 10 - 50 °C
ABMESSUNGEN
Komponente Abbildung
Armatur Standardmodell Abb. J1
Armatur kleines Modell Abb. J2
Armatur Wandmodell Abb. J3
Seifenbox Abb. J4 / J5
Wasserbox Abb. J6

52
8. Technische Daten
Anschluss Wandsteckdose mit Schutzleiter, über eine 10 A Sicherung abgesichert
Max. Leistungsaufnahme 36 W
Standby-Verlustleistung < 3.0 W
Prüfdruck der Armatur 16 bar
Durchuss bei 3 bar Fließdruck 6 L / min
Umgebungstemperatur 10 - 40 °C Temperatur
Warmwassereingang Armatur 70 °C
Empfohlen (Energieeinsparung) 60 °C
Wasseranschluss kalt - blau, warm - rot
8.1 Elektrische Prüfdaten
Bemessungs-Stoßspannung: 2000 V
Die Prüfung zur elektromagnetischen Verträglichkeit (Störaussendungsprüfung) wurde mit der
Bemessungsspannung und dem Bemessungsstrom durchgeführt.
8.2 Elektrische Daten
8.3 Zulassung und Konformität
Konformitätserklärung
EU-Richtlinien 93/68/EEC, 98/83/EC, 2006/95/EC, 89/336/EEC
Michiel Ubink, Geschäftsführer der miscea GmbH mit Sitz in Hauptstraße 2, 14979 Großbeeren,
Deutschland, erklärt hiermit, dass die multifunktionale Wasserhahn-Produktfamilie, bekannt unter dem
Markennamen miscea, gemäß den EU-Richtlinien (93/68/EEC, 98/83/EC, 2006/95/EC, 89/336/EEC)
entwickelt und hergestellt wird und im Einklang mit den folgenden europäischen Normen steht.
Modellnummern:
CCR1S1NCDE CCR2S2NCEN CER2S1NCEN CER3S2NCFR LCR1S12NBDE
CCR1S1NCEN CCR2S2NCFR CER2S1NCFR KCR4S1NC LCR1S12NCDE
CCR1S1NCFR CCR3S1NCDE CER2S2NCDE KCR4S1NC0 LCR3S0NC
CCR1S2NCDE CER1S1NCDE CER2S2NCEN KCR4S2NC LCR3S11NCDE
CCR1S2NCEN CER1S1NCEN CER2S2NCFR KCR4S2NC0 LCR3S11NCEN
CCR1S2NCFR CER1S1NCFR CER3S1NCDE LCR1S0NB LCR3S12NCDE
CCR2S1NCDE CER1S2NCDE CER3S1NCEN LCR1S0NC LER1S11NCDE
CCR2S1NCEN CER1S2NCEN CER3S1NCFR LCR1S11NBEN
CCR2S1NCFR CER1S2NCFR CER3S2NCDE LCR1S11NCDE
CCR2S2NCDE CER2S1NCDE CER3S2NCEN LCR1S11NCEN

V 17.04
53
Deutsch
8. Technische Daten
Angewandte Normen:
• EN 15091: 2013
• EN 60335-1: 2012
• EN 61000-6-1: 2007 und EN 61000-6-3: 2011
• EN 1717: 2011
• EN ISO 3822: 2010
Alle miscea Armaturen sind zertiziert entsprechend DVGW- und WRAS-Richtlinien und weisen somit
die Einhaltung der obengenannten Normen nach.
Deutschland, Januar, 2017.
Michiel Ubink
Geschäftsführer
Die Übereinstimmungserklärungen können unter der folgenden Adresse angefordert werden:
miscea GmbH | Hauptstr. 2, D-14979 Großbeeren, Deutschland.

54
9. Garantie und Information
9.1 Garantie
Der Garantiezeitraum beträgt 2 Jahre ab dem Kaufdatum gemäß Kaufbeleg. Ist eine Reparatur der
Armatur notwendig, wenden Sie sich bitte an Ihren miscea-Händler.
9.2 Garantiebedingungen
Die Garantie verfällt, wenn folgendes durchgeführt wurde:
• Önen der Wasserbox oder beschädigen des Garantiesiegels an der Wasserbox.
• Anschluss der Armatur an das Wassernetz ohne Filter.
• Änderung, Reparatur oder Austausch der Ausläufe an der Seifenbox.
• Reinigung der Armatur mit abrasiven, stark säurehaltigen oder bleichenden Produkten.
• Selbst ausgeführte Reparaturen an Armatur, Wasser- und Seifenbox.
Im Übrigen verweist miscea im Hinblick auf die geltenden Garantiebedingungen auf die miscea
Verkaufs- und Lieferbedingungen.
9.3 Kontaktinformation
Wenn Sie an Informationen über Verkaufsstellen unserer Produkte oder Antworten auf Fragen zur
Verwendung oder Montage interessiert sind: besuchen Sie unsere Website: Dort nden Sie einen
miscea-Vertreter für Ihr Land.
9.4 Aktualisierungen der Betriebsanleitung
Wir aktualisieren diese Betriebsanleitung regelmäßig. Eine Kopie der jüngsten Fassung dieser
Betriebsanleitung können Sie unter www.miscea.com herunterladen oder Ihre Anfrage an
info@miscea.com senden.
9.5 Umwelt und Recycling
Die miscea CLASSIC ist ein Elektrogerät für das in vielen Ländern Rückgabe- und Rücknahmepichten
gelten. miscea ist in Deutschland an entsprechenden Rücknahmesystemen beteiligt.
Ihr miscea-Produkt wurde unter Einsatz von qualitativ hochwertigen Materialien und Komponenten
konstruiert und gefertigt, die für Recycling und/oder Wiederverwendung geeignet sind. Dieses Symbol
bedeutet, dass elektrische und elektronische Geräte sowie Batterien und Akkus am Ende ihrer
Nutzungsdauer von Hausmüll getrennt zu entsorgen sind.

V 17.04
55
Deutsch
10. Service
WASSERBEZOGENE STÖRUNGEN
Störung Ursache Abhilfe
• Wasser stoppt nicht Der “Eimerfüllmodus” wurde
aktiviert.
Wenn der “Eimerfüllmodus”
aktiviert wurde, ießt das Wasser
dauerhaft und stoppt nach
einer denierten Zeit automatisch
(Werkseinstellung 10 Minuten). Um
den Modus vorzeitig zu beenden,
aktivieren Sie den Seifen- oder
Desinfektionssektor.
Service
Zur Beseitigung von Problemen, die Tabelle: Störung / Ursache / Abhilfe beachten.
Bei Wartungsarbeiten an der Anlage ist generell erst die Spannungsversorgung zu unterbrechen!
Wenn das Problem nicht behoben werden kann, Spannungsversorgung unterbrechen. Seriennummer
der Wasserbox von der Oberseite des Geräts aufschreiben und an einen Fachinstallateur wenden oder
per E-Mail die Servicehotline des Hauses miscea unter berlin@miscea.com kontaktieren.
Die Tabelle unterhalb enthält hilfreiche Tipps und Lösungen für Probleme der dritten Generation von der
miscea CLASSIC, außerdem enthält Sie auch Szenarien für Hardware und Software Probleme.
Vor dem Kontakt mit dem technischen Support von miscea
Wenn Sie Probleme mit der dritten Generation Ihrer miscea CLASSIC haben probieren Sie die unten
aufgeführten Lösungen und versuchen Sie das genaue Problem zu lokalisieren bevor die miscea GmbH
kontaktieren für weitere Hilfe.
1. Prüfen Sie ob das System angeschlossen ist und Stromanschluss vorhanden ist
2. Prüfen Sie ob das System an dem Hauptwasseranschluss angeschlossen ist und verbunden ist
3. Prüfen Sie ob die Flüssigkeiten in Flaschen/Beuteln nicht leer sind oder falsch angeschlossen sind
4. Prüfen Sie alle Kabel und sehen Sie nach ob alles korrekt angeschlossen ist. Gucken Sie dazu in
die Bedienungsanleitung für den korrekten Installationsprozess.
Lösung von allgemeinen Problemen
Allgemeine Probleme können Sie vielleicht mit dieser Beschreibung lösen. Falls das Problem jedoch
bestehen sollte oder Sie sich nicht sicher sind ob Sie dazu alleine in der Lage sind, kontaktieren Sie bitte
Ihren nächsten miscea Technik Support.

56
10. Service
WASSERBEZOGENE STÖRUNGEN
Störung Ursache Abhilfe
• Wasser stoppt nicht Das Magnetventil hat eine Störung. Trennen Sie das System von der
Stromversorgung. Warten Sie
10 Sekunden und stellen Sie die
Stromversorgung wieder her. Das
System wird neugestartet und
kleinere Systemstörungen sollten
behoben sein.
Falls das Problem weiterhin
besteht, kontaktieren Sie bitte
die miscea GmbH für weitere
technische Unterstützung.
• Die Armatur spendet kein
Warmwasser.
• Die Armatur spendet kein
Kaltwasser.
• Die Wassertemperatur kann
nicht verstellt werden.
Störungen in der Kommunikation/
Anbindung von Motor- und
Kartuschen
HINWEIS: Bitte prüfen Sie,
ob das miscea System an
eine funktionstüchtige Kaltund Warmwasserversorgung
angeschlossen ist. Falls nur ein
Kaltwasseranschluss vorhanden
ist, kann die Armatur kein
Warmwasser spenden.
Trennen Sie die Wasserbox von
der Stromversorgung. Warten Sie
10 Sekunden und stellen Sie die
Stromversorgung wieder her. Das
System wird neugestartet und
kleinere Systemstörungen sollten
behoben sein.
Falls das Problem weiterhin
besteht, kontaktieren Sie bitte
die miscea GmbH für weitere
technische Unterstützung.
• Armatur tropft aus dem
Wasserauslass
Im Falle einer Neuinstallation
wurden die Leitungen nicht
ausreichend gespült, wodurch
Schmutzpartikel ins System
gespült wurden sind.
Spülen Sie die Armatur durch
Aktivierung des „Eimermodus“ für
mindestens 1 Minute.
Falls das Problem weiterhin
besteht, kontaktieren Sie bitte
die miscea GmbH für weitere
technische Unterstützung.

V 17.04
57
Deutsch
10. Service
WASSERBEZOGENE STÖRUNGEN
Störung Ursache Abhilfe
• Wasser ießt nicht Das System ist nicht an eine
Stromversorgung angeschlossen.
Die Eckventile der Wasserversorgung sind geschlossen.
Die Hauptwasserleitung ist
abgesperrt.
Prüfen Sie, ob das Steckernetzteil
in eine Steckdose gesteckt ist und
ob Spannung anliegt.
Prüfen Sie, ob beide Eckventile
geönet sind.
Prüfen Sie, ob die Hauptwasserlei-
tung geönet ist.
Prüfen Sie alle Kabel und
Schlauchleitungen auf eventuelle
Defekte oder Wackelkontakte.
Bitte beachten Sie die Kapitel der
Bedienungsanleitung zur korrekten
Installation.
Ein Problem mit einer oder
mehreren Komponenten der
Wasserbox ist aufgetreten.
Trennen Sie das miscea System
von Ihrem Stromanschluss.
Schließen Sie es nach 10
Sekunden wieder an. Das System
sollte sich zurücksetzen und alle
kleineren System Störungen
beheben. Wenn das Problem
weiterhin besteht, kontaktieren
Sie für weitere technische
Unterstützung die miscea GmbH.
• Armatur schaltet selbst-
ständig
Die Infrarotsensorik ist
verschmutzt.
Fehlerhafte Infrarotsensorik.
Mögliche Umgebungseinüsse, wie
z. B. helles Licht oder spiegelnde
Oberächen beeinträchtigen die
Infrarotsensorik.
Schalten Sie die Armatur aus und
Reinigen sie die Infrarotsensorik
am Armaturenkopf (schwarzer
Kunststoring hinter der
Glasscheibe.
Trennen Sie die Wasserbox von
der Stromversorgung. Warten Sie
10 Sekunden und stellen Sie die
Stromversorgung wieder her.
Falls das Problem weiterhin
besteht, kontaktieren Sie bitte
die miscea GmbH für weitere
technische Unterstützung.

58
10. Service
STÖRUNGEN BEZÜGLICH DES SPENDERS (SEIFEN/DESINFEKTIONSMITTEL)
Störung Ursache Abhilfe
• Seife/Desinfektionsmittel wird
nicht gespendet.
• Seife/Desinfektionsmittel
spritzt aus den
Auslassönungen.
• Nur eine der beiden
Flüssigkeiten wird gespendet
Das System ist nicht an eine
Stromversorgung angeschlossen.
Die Kabel oder Schlauchleitungen
sind nicht korrekt angeschlossen.
Die Beutel/Flaschen wurden nicht
korrekt eingesetzt.
In den Schlauchleitungen bendet
sich Luft.
Die Auslassönungen sind
verstopft.
Prüfen Sie, ob das Steckernetzteil
in eine Steckdose gesteckt ist und
ob Spannung anliegt.
Prüfen Sie alle Kabel und
Schlauchleitungen auf eventuelle
Defekte oder Wackelkontakte.
Bitte beachten Sie die Kapitel der
Bedienungsanleitung zur korrekten
Installation.
Prüfen Sie ob die Beutel/Flachen
wie in der Bedienungsanleitung
beschrieben eingesetzt sind.
Entlüften Sie die Schlauchleitungen, wie in der Bedienungsanleitung beschrieben.
Schalten Sie die Armatur aus
und Reinigen Sie beide Auslas-
sönungen. Falls das Problem
weiterhin besteht, kontaktieren Sie
bitte die miscea GmbH für weitere
technische Unterstützung.
WASSERBEZOGENE STÖRUNGEN
Störung Ursache Abhilfe
• Die Wasserbox macht
Geräusche.
Das System kalibriert sich.
Probleme mit der Infrarotsensorik.
Wenn die Geräuschentwicklung
nur 1-mal täglich auftritt, ist dies
völlig normal. Sollte das Problem
häuger auftreten, starten Sie das
System neu. Falls das Problem
weiterhin besteht, kontaktieren Sie
bitte die miscea GmbH für weitere
technische Unterstützung.
• Der Wasserstrahl ist sehr
schwach.
Der Hauptwasseranschluss ist
nicht vollständig oen.
Absperrventil (falls vorhanden) ist
nicht vollständig oen.
Sehen Sie nach ob der Hauptwas-
seranschluss komplett oen ist.
Überprüfen Sie, dass das
Absperrventil (falls vorhanden)
richtig eingestellt ist, so dass es
vollständig oen ist. Verwenden
Sie den Wasser-Durchussregler,
um den Fluss zu erhöhen, indem
Sie ihn gegen den Uhrzeigersinn
drehen.

V 17.04
59
Deutsch
10. Service
STÖRUNGEN BEZÜGLICH DES SPENDERS (SEIFEN/DESINFEKTIONSMITTEL)
Störung Ursache Abhilfe
• Seife/Desinfektionsmittel wird
nicht gespendet.
• Seife/Desinfektionsmittel
spritzt aus den
Auslassönungen.
• Nur eine der beiden
Flüssigkeiten wird gespendet
Mögliches Problem mit der Pumpe
in der Seifenbox.
Seife/Desinfektion/Lotion
Schläuche sind beschädigt oder
blockiert.
Trennen Sie das miscea System
von der Steckdose. Schließen
Sie es nach 10 Sekunden wieder
an. Das System sollte sich
zurücksetzen und alle kleineren
System Störungen beheben.
Wenn das Problem weiterhin
besteht, kontaktieren Sie für
weitere technische Unterstützung
die miscea GmbH.
• Es wird zu wenig Seife/
Desinfektion/Lotion wird
gespendet.
• Es wird zu viel Seife/
Desinfektion/Lotion wird
gespendet.
Die Voreinstellungen der
Flüssigkeiten sind zu hoch/niedrig
eingestellt.
Sie können die Menge der
abgegebenen Flüssigkeiten mit der
Fernbedienung einstellen.
Kontaktieren Sie die miscea
GmbH für weitere technische
Unterstützung.
ANDERE STÖRUNGEN
Störung Ursache Abhilfe
• Die Armatur reagiert nicht
mehr.
Das System ist nicht an eine
Stromversorgung angeschlossen.
Mögliche Probleme mit der
Elektronik.
Prüfen Sie, ob das Steckernetzteil
in eine Steckdose gesteckt ist und
ob Spannung anliegt.
Trennen Sie die Wasserbox von
der Stromversorgung. Warten Sie
10 Sekunden und stellen Sie die
Stromversorgung wieder her. Das
System wird neugestartet und
kleinere Systemstörungen sollten
behoben sein.
Falls das Problem weiterhin
besteht, kontaktieren Sie bitte
die miscea GmbH für weitere
technische Unterstützung.

60
ANDERE STÖRUNGEN
Störung Ursache Abhilfe
• Ein Sektor wird nicht korrekt
beleuchtet.
Der Sektor ist verschmutzt.
Eine LED ist defekt.
Schalten Sie die Armatur aus und
Reinigen Sie den Armaturenkopf.
Falls das Problem weiterhin
besteht, kontaktieren Sie bitte
die miscea GmbH für weitere
technische Unterstützung.
• Das Temperatur Display
leuchtet nicht.
Das LED Licht ist kaputt. Trennen Sie das miscea System
von Ihrem Stromanschluss.
Schließen Sie es nach 10
Sekunden wieder an. Das System
sollte sich zurücksetzen und alle
kleineren System Störungen
beheben.
Wenn das Problem weiterhin
besteht, kontaktieren Sie für
weitere technische Unterstützung
die miscea GmbH.
• Die Armatur reagiert nicht auf
die Fernbedienung.
Die Positionierung der Fernbedienung ist nicht korrekt.
Stellen Sie sicher dass Sie die
Fernbedienung in der Richtigen
Position halten. Sehen Sie dazu in
dem Benutzerhandbuch nach.
10. Service

NL
EN
DE
s
o
a
p
d
i
s
i
n
f
e
c
t
w
a
t
e
r
Gebruikershandleiding
CLASSIC
62
© 2017 miscea GmbH
Geen enkel onderdeel van deze uitgave mag zonder vooafgaande schriftelijke toestemming van miscea
met alle middelen of in welke vorm dan ook worden vermenigvuldigd, verzonden, overgezet, opgeslagen
in een zoeksysteem of vertaald in geen enkele taal waaronder ook computertaal. Schending van de
auteursrechten van de eigenaar kan ook negatieve invloed hebben op het verlenen van eectieve
ondersteuning door miscea betreende de apparatuur.
Alle technische informatie, gegevens en instructies in deze handleiding voor alle handelingen die kunnen
en moeten worden uitgevoerd, zijn op het moment van het ter perse gaan van deze uitgave bijgewerkt.
Deze handleiding bevat onze huidige kennis en ervaring naar ons beste vermogen.
Miscea houdt zich het recht voor om technische wijzigingen aan te brengen die voortkomen uit verdere
ontwikkeling van het in deze gebruikershandleiding gepresenteerde miscea product. Om deze reden
kunnen geen rechten worden ontleend op basis van technische gegevens, beschrijvingen en illustraties.
miscea houdt zich het recht voor om zowel deze handleiding als de beschreven producten zonder
kennisgeving te wijzigen. Niets in deze handleiding vertegenwoordigt enige contractuele of andere
verplichtingen van de zijde van miscea en dient ook niet als zodanig te worden opgevat. Alle mogelijke
zorg is besteed aan de uitvoering van deze uitgave. Voor suggesties voor verbeteringen kunt u contact
opnemen met miscea. Deze handleiding is oorspronkelijk in het Engels geschreven. Een exemplaar is
op verzoek verkrijgbaar.
Versie: V17.04
NL
EN
DE

V 17.04
63
Nederlands
Inhoudsopgave
1. Algemeen 64
1.1 Over deze handleiding 64
1.2 Labels in deze handleiding 64
2. Inhoud van de verpakking 64
3. Technische beschrijving 64
3.1 Componenten 65
3.2 Identicatie van het product 65
3.3 Toepassingsgebieden 65
4. Installatie 65
4.1 Het systeem installeren 66
5. Gebruik 67
5.1 Kop van de kraan 67
5.2 Het systeem bedienen 67
5.3 Water aftappen 67
5.4 Vloeistofuitgifte 68
5.5 Optionele accessoires 69
5.6 Gebruik afstandsbediening voor miscea CLASSIC systemen 69
6. Reiniging en onderhoud 69
6.1 Opslag 69
6.2 Reiniging 70
6.3 Automatische spoelfunctie 70
6.4 Vervangen navullingen 71
6.5 Doorspoelen vloeistofslangen 71
7. Navullingen: veiligheidsinformatie 71
8. Technische gegevens 73
8.1 Elektrische test gegevens 74
8.2 Elektrische specicaties 74
8.3 Certicaten en conformiteit 74
9. Garantie en informatie 76
9.1 Garantie 76
9.2 Garantievoorwaarden 76
9.3 Contactgegevens 76
9.4 Bijgewerkte uitgaven handleiding 76
9.5 Milieu en recycling 76
10. Service 77

64
1.1 Over deze handleiding
Deze handleiding bevat technische specicaties, instructies en uitleg voor het veilig gebruiken van
dit product. Zorg ervoor dat u deze instructies leest en begrijpt voordat u het product gaat vervoeren,
installeren, in bedrijf stellen, opnieuw opstarten, bedienen of onderhoudswerkzaamheden gaat
uitvoeren. De illustraties, tekeningen en graeken in deze handleiding kunnen van de werkelijke
onderdelen afwijken. Neem, indien u vragen heeft die niet in deze handleiding worden beantwoord,
contact op met uw leverancier.
Bewaar deze handleiding als naslagwerk. Gelieve deze instructies over te brengen aan de
eindgebruiker.
1.2 Labels in deze handleiding
WAARSCHUWING
Een waarschuwing betekent kans op (dodelijk) letsel bij het niet opvolgen van de instructies.
VOORZICHTIG
Dit symbool betekent dat de apparatuur beschadigd kan raken.
Dit symbool verschaft aanvullende informatie, bijvoorbeeld met betrekking tot een procedure.
1. Algemeen
2. Inhoud van de verpakking
Zie g. A en B voor de inhoud van de verpakking.
1. miscea kraan
2. Waterbox
3. Zeepbox
4. Montageplaat voor de waterbox (aan de waterbox voorgemonteerd)
5. Montageplaat voor de zeepbox (aan de zeepbox voorgemonteerd)
6. Adapter
7. Set van bevestigingsmiddelen en afdichtingen
8. Gebruikershandleiding
9. Navullingen
Met het handhygiëne systeem miscea CLASSIC kunt u uw handen wassen zonder het systeem aan te
raken. De kop van de kraan bestaat uit verschillende sectoren met ingebouwde infrarood sensoren. De
functies kunnen worden geactiveerd door uw handen in de detectie zones van de sensoren te bewegen.
De volgende kraan modellen zijn verkrijgbaar (zie g. C):
1a. Standaard model
1b. Small model
1c. Wall-mounted model
3. Technische beschrijving

V 17.04
65
Nederlands
3. Technische beschrijving
4. Installatie
3.1 Componenten
Zie g. C voor de identicatie van de componenten
1. Kraan (1A, 1B, of 1C)
2. Waterbox
3. Zeepbox (3a of 3b)
3.2 Identicatie van het product
Zie g. C voor de plaats van de producttype labels.
3.3 Toepassingsgebieden
miscea systemen kunnen gebruikt worden in combinatie met:
• Drukvaste boilers
• Thermisch gestuurde elektrische geisers
• Hydraulisch gestuurde elektrische geisers
Werking met lage druk boilers is niet mogelijk.
De miscea CLASSIC is gecerticeerd volgens EN1717, en is voorzien van naar DIN-DVGW richtlijnen
geteste terugslagkleppen.
VOORZICHTIG
• Open de waterbox niet en verbreek niet het garantiezegel van de waterbox. Indien u dit wel
doet, komt de garantie te vervallen.
• Sluit de kraan niet aan op een watertoevoer zonder lter. Indien u dit wel doet, komt de
garantie te vervallen.
• Installeer geen leidingen en/of slangen terwijl de kraan is ingeschakeld of wanneer de
adapter is aangesloten.
• Houd geen objecten in de buurt van de kraankop tijdens het kalibreren. Dit kan het licht
blokkeren en zodoende het kalibreringsproces verhinderen. Het kalibreren is een proces wat
in werking gaat als de stroom wordt aangesloten.
• Installeer en bewaar de kraan niet op een plaats waar de kans op vorstschade aanwezig is.
• Ga voorzichtig om met de voedingskabel van de kraan en de zeepbox. De connector aan het
einde van iedere kabel is kwetsbaar.
• Sluit de waterbox van een miscea systeem niet aan op de kraan van een ander miscea
syteem Dit kan een correcte werking van het systeem verhinderen.
• Controleer of de slangen voor de vloeistoen goed zijn aangesloten.
• Snij niet in de slangen en voorkom knikken in de slangen.
• Gebruik uitsluitend de bijgeleverde materialen voor installatie van het systeem. Gebruik
uitsluitend de bij het systeem geleverde voedingsadapter.

66
• Gebruik uitsluitend originele onderdelen en accessoires. Het gebruik van andere onderdelen
zal de garantie laten vervallen en de CE- toelating ongeldig maken. Het niet gebruiken van
originele onderdelen en accessoires kan leiden tot persoonlijk letsel.
• Voorkom schade door beschadigde voedingskabels. In het geval van schade, moet de
adapter en/of andere voedingskabels vervangen worden door. miscea, de klantenservice van
miscea of een gekwaliceerd persoon.
• De meegeleverde adapter(plug type C) is alleen geschikt voor gebruik met Schuko contactdozen (CEE 7/4).
• De miscea systemen zijn alleen geschikt voor binnenshuis gebruik.
• Installeer niet indien het product (de adapter) aangesloten is op de stroomvoorziening.
• Zorg ervoor dat de oppervlakte waarop het product geinstalleerd wordt sterk genoeg is om
het gewicht van het product te ondersteunen.
• Het is niet toegestaan het netsnoer te bekrassen, beschadigen, wijzigingen aan te brengen,
buigen, draaien, bundelen, zware voorwerpen er op te plaatsen of klem te zetten.
• Demonteer of modiceer het product niet, indien dit niet nadrukkelijk in deze handleiding zo
beschreven wordt. Indien dit gedaan wordt kan dit leiden tot brand, elektrische schokken of
verwondingen.
• Gebruik het systeem niet op een hete plek, zoals een douche, waar condens op het product
kan ontstaan, of waar water direct op het product kan spetteren. Dit kan tot brand, elektrische
schokken of defecten aan het product leiden.
• Gebruik eenfase voeding tussen 220-240V.
• De miscea CLASSIC systeemcomponenten moeten beschermd zijn tegen mechanische
beschadigingen, zoals hitte en direct zonnenlicht (temperatuur maximaal 50 graden Celcius).
Niet in de buurt plaatsen van hittebronnen of open vuur.
VOORZICHTIG
Er moet voor worden gezorgd dat de onderdelen van het systeem makkelijk toegankelijk zijn
voor onderhoudswerkzaamheden.
• De lters aan de uiteinden van de exibele aansluitslangen, moeten geïnstalleerd worden om
vervuiling vanuit het leidingnet te voorkomen.
• Open koud en warm water en controleer de aansluitingen op lekkage
4.1 Het systeem installeren
VOORZICHTIG
• Spoel de waterleiding grondig door voor de installatie van het systeem (Let op DIN 1988 /
DIN EN 806!). Zorg ervoor dat de waterleidingen absoluut schoon zijn. Vuil en puin in het
water kan de werking verstoren en / of beschadigingen aanbrengen aan de functionele onderdelen van het miscea systeem, miscea is niet verantwoordelijk voor deze schade.
Plaats stopkranen (water afsluiters) tussen de watertoevoer en het systeem. Bij het uitvoeren
van onderhoudswerkzaamheden aan het handhygiëne systeem, kunt u de stopkraan sluiten
en hoeft u de gehele watertoevoer niet af te sluiten.
• Zie g. D - I voor de installatie van het systeem. Monteer het systeem in de gegeven
volgorde.
4. Installatie

V 17.04
67
Nederlands
VOORZICHTIG
• Zorg, vóór gebruik van de kraan, er voor dat de installatieprocedure correct is uitgevoerd.
• Gebruik uitsluitend door miscea goedgekeurde vloeistoen en navullingen.
• Dit apparaat is niet bedoeld voor gebruik voor personen (inclusief kinderen) met beperkte
lichamelijke, zintuiglijke of geestelijke vermogens, evenals gebrek aan ervaring en kennis.
• Kinderen moeten onder toezicht zijn om ervoor te zorgen dat ze niet met het apparaat spelen.
5.1 Kop van de kraan
1. Wateruitgifte
2. Water sector
3. Water temperatuur sector (+)
4. Zeep sector
5. Desinfectans sector
6. Water temperatuur sector (-)
7. Water temperatuur display
8. Desinfectans uitgifte
9. Zeep uitgifte
5.2 Het systeem bedienen
Zodra het systeem op netstroom is aangesloten, is het systeem ingeschakeld. Om aan te geven dat het
systeem in werking is, brandt de blauwe LED-schakelaar op de waterbox en pulseert een wit LED licht
op de kraankop.
Een sector activeren
• Om de water tapsector te activeren, hand houdt u uw op maximaal 15 cm van de sector.
• Om een andere sector te activeren, houd houdt u uw op maximaal 5 cm van de sector.
Een sector deactiveren
• Beweeg uw hand van de sector af.
• U kunt de afgifte sectoren ook snel uitschakelen door de hierboven beschreven handbeweging te herhalen.
5.3 Water aftappen
Handen wassen
• Activeer sector 2.
• Houd uw handen onder de wateruitgifte 1.
• De waterstoom stopt automatisch 1
seconde, nadat u uw hand hieruit heeft
verwijderd.
5. Gebruik
4
3
2
1
9
8
7
6
5
2
1
4
3
6
5

68
5. Gebruik
VOORZICHTIG
Controleer altijd de temperatuur voordat u uw handen onder de waterstroom houd. U kunt uw
handen aan het hete water branden.
Een emmer vullen
• Plaats een emmer onder de wateruitgifte 1.
• Activeer sectoren 3 en 6 tegelijkertijd gedurende 1 seconde. Het water begint te stromen.
• De waterstroom stopt automatisch 10 minuten na het activeren.
• Om de waterstroom handmatig te stoppen, houd u uw hand gedurende 1 seconde tussen
sectoren 4 en 5.
De watertemperatuur instellen
• Controleer het display voor de werkelijke
watertemperatuur.
• De watertemperatuur instellen:
• Activeer sector 3 om de watertempe-
ratuur te verhogen. De sector wordt
rood verlicht.
• Activeer sector 6 om de watertempe-
ratuur te verlagen. De sector wordt
blauw verlicht.
U kunt de watertemperatuur instellen terwijl het water stroomt of als het systeem in stand-by
modus staat.
U kunt met één hand de watertemperatuur instellen en uw andere hand onder de waterstroom houden om de watertemperatuur te controleren.
5.4 Vloeistofuitgifte
Zeepuitgifte
• Activeer sector 4. De sector gaat groen
knipperen.
• Activeer sector 2 en houd uw hand onder
de uitgifte 9.
Lotion of desinfectans uitgifte
• Activeer sector 5. De sector gaat oranje
knipperen.
• Activeer sector 2 en houd uw hand onder
de uitgifte 8.
3
6
4
2
2
5
9
8

V 17.04
69
Nederlands
5.5 Optionele accessoires
Afstandsbediening
Met de afstandsbediening kunt u de standaardinstellingen van het systeem wijzigen. De instellingen
omvatten: temperatuur, dosering, spoelfunctie, lichtinstelling van de kraankop, pieptoon en resetten
standaardinstellingen.
5.6 Gebruik afstandsbediening voor miscea CLASSIC systemen
Het signaal van de afstandsbediening wordt herkend door de elektronica achter het beeldscherm van de
kraan. Plaats voor gebruik de afstandsbediening zoals aangegeven in Fig. K en L hieronder. Vervolgens
kunnen de gewenste systeem instellingen worden gewijzigd.
Voor instructies aangaande het wijzigen van specieke systeem instellingen met de afstandsbediening,
verwijzen wij u graag naar de miscea afstandsbediening gebruikershandleiding.
VOORZICHTIG
• Probeer de kraan, de waterbox of de zeepbox niet zelf te repareren. Laat reparaties uitsluitend uitvoeren door hiervoor opgeleid personeel van miscea. Indien u zelf reparaties uitvoert,
komt de garantie te vervallen
• Reinig de kraan niet met schuurmiddelen, sterke zuren of bleekproducten. Indien u dit wel
doet, komt de garantie te vervallen.
WAARSCHUWING
Reinig het systeem niet terwijl het is ingeschakeld.
6.1 Opslag
• Sla het systeem op een droge plaats, buiten het bereik van kinderen op.
6. Reiniging en onderhoud
5. Gebruik
LANG
LIGHT
MEMO
LIQUID 2
SA
VE
LIQUID 1
T
E
MP
DELA
Y
B
U
CK
E
T
DURA
TION
BEEP
DE
F
A
UL
T
SPOOL
-
+
m
a
x
. 3
0
c
m
30 º
Fig. K Fig. L

70
6. Reiniging en onderhoud
6.2 Reinigen
• Reinig het systeem met een zachte, schone doek, water en een mild reinigingsmiddel.
• Voor het verwijderen van vuil of kalk:
• Laat schoonmaakazijn of een allesreiniger gedurende enkele minuten op het systeem
inwerken
• Spoel het systeem met ruim water af.
• Droog het systeem.
• Reinig de waterbox en de zeepbox met een vochtige doek.
Om de schoonheid van de hoge kwaliteit van het oppervlak te behouden, moeten de volgende aanwijzingen gevolgd te worden: chroom, geborsteld roestvrij stalen oppervlak, chroom-mat en kleur-gecoate
oppervlakken zijn gevoelig voor zuur en zand-bevattende wasmiddelen, evenals krassende sponzen.
Indien vervuild of verkalkt, reinig de armaturen dan met een mild sopje met water, afspoelen met schoon
water en drogen. Schade veroorzaakt door ondeskundig gebruik wordt niet gedekt door de miscea
garantie.
Om hygiënische werking van uw miscea systeem te garanderen, raden wij u aan de miscea onderhoudshandleiding procedures aan te houden. Een kopie van het onderhoudsboekje is te vinden op de
miscea website www.miscea.com. Alle noodzakelijke reinigingsgereedschappen en de benodigde onderdelen zijn te vinden in de miscea SystemCare Set en kan via uw miscea dealer worden besteld.
6.3 Automatische spoelfunctie
De automatische spoelfuncties zijn ontwikkeld om het verstoppen van de leidingen van de vloeistoen
en de verontreiniging van het leidingwater door bijvoorbeeld legionella tegen te gaan.
De automatische spoel functie voor het reinigen van de vloeistoeidingen zal starten na een minimale
tijd dat zeep of ontsmettingsmiddel niet in gebruik is. Deze staat standaard ingesteld op 2 weken.
Als zeep en desinfectans niet wordt gebruikt voor 2 weken dan doorloopt het systeem automatisch de
volgende spoelcyclus.
• Stap 1: De zeep of desinfectans pomp spoelt voor 30 seconden.
• Stap 2: Koud water spoelt voor 60 seconden.
Opmerking; het is mogelijk om de frequentie van de automatische waterspoelingen ter voorkoming van
legionella te verhogen of verlagen. De automatische waterspoeling staat bij levering niet aan. Deze kan
worden ingeschakeld door middel van de afstandsbediening. Hierna kan men ook de bovengenoemde
frequentie inschakelen. Het is niet mogelijk om de automatische spoelfunctie voor de vloeistoen 1 en 2
te verwijzen.
6.4 Vervangen navullingen
Zodra het systeem geen zeep, lotion of desinfectant meer uitgeeft, dienen de navullingen vervangen te
worden. Zie g. G / H voor de correcte plaatsing van de vloeistof navullingen.

V 17.04
71
Nederlands
6. Reiniging en onderhoud
7. Navullingen: veiligheidsinformatie
6.5 Doorspoelen vloeistofslangen
Na iedere installatie van de navullingen, dienen de vloeistofslangen doorgespoeld te worden. Na voltooiing van deze procedure zijn de slangen schoon en vrij van luchtbellen.
• Druk 1 seconde de LED-schakelaar op de
waterbox in. De blauwe LED schakelaar
gaat knipperen.
• Om de zeepslang te spoelen: Activeer
sectoren 4 en 6 tegelijkertijd. Activeer
sector 5 om het doorspoelen te stoppen.
• De lotion of desinfectant slang te spoelen:
Activeer sectoren 5 en 3 tegelijkertijd.
Activeer sector 4 om het doorspoelen te
stoppen.
5
36
4
Speciek eind gebruik
Huid en Hand desinfectiemiddel. Het product kan niet worden gebruikt voor andere doeleinden.
Voorzorgsmaatregelen voor het veilig hanteren
• Desinfectiemiddel is een brandbaar medium zowel als vloeistof of als een damp. Dampen
kunnen explosief mengsel vormen met lucht.
• Uit de buurt van hitte, hete oppervlakken, vonken, open vuur en andere ontstekingsbronnen
houden. Niet roken.
• Bij gebruik, niet eten, drinken of roken.
• Buiten het bereik van kinderen houden
• Verwijder en was vervuilde kleding vóór hergebruik.
• Dampen of sproeimiddel niet inademen.
• Vermijd contact met ogen.
• Zorg voor voldoende ventilatie, vooral in gesloten ruimten.
• Bijzondere voorzorgen voor de gebruiker: Neem de gebruikelijke voorzorgsmaatregelen bij
de omgang met chemicaliën.
Voorwaarden voor een veilige opslag
• Desinfectans is geclassiceerd als een gevaarlijke stof. Bewaar vloeistoen volgens de plaatselijke regelgeving voor opslag gevaarlijke stoen.
• Houd de container goed gesloten op een droge, koele en goed geventileerde plaats.
• Verwijdering van de inhoud / containers in overeenstemming met de plaatselijke en nationale
voorschriften. Niet lozen in oppervlaktewater / grondwater.
• Product en lege verpakking bij warmte en ontstekingsbronnen vandaan houden.
• Uit de buurt houden van voedsel, drank en dierenvoer.
• Niet combineerbaar met oxidatiemiddelen.

72
7. Navullingen: veiligheidsinformatie
Eerste hulp maatregelen
Belangrijkste symptomen en eecten, acute en vertraagde
• Veroorzaakt ernstige oogirritatie.
• Kan slaperigheid of duizeligheid veroorzaken.
• Vervuilde, doordrenkte kleding onmiddellijk van het lichaam verwijderen.
• Als u zich niet goed voelt, een arts raadplegen.
Na het inademen
• Zoek frisse lucht op, in het geval van per ongeluk inademen van dampen.
• In het geval van klachten zoek direct medische behandeling.
Na contact met de ogen
• Onmiddellijk afspoelen met veel water, ook onder de oogleden, minstens gedurende 15
minuten. Contactlenzen verwijderen, indien aanwezig.
• Indien de oogirritatie blijft, een specialist raadplegen.
Na inname
• Onmiddellijk veel water geven (indien mogelijk houtskoolbrij).
• Neem direct contact op met een arts.
• Braken opwekken alleen op advies van een arts.

V 17.04
73
Nederlands
8. Technische gegevens
De in de onderstaande tabel genoemde productspecicaties zijn getest en gecerticeerd.
PRODUCTSPECIFICATIES
Parameter Waarde
Spanning 24 V
DC
Voedingsspanning 100 ~ 240 VAC / 50 ~ 60 Hz
Operationele waterdruk 0,5 - 8 bar
max. Watertemperatuur 70 °C
Behuizing rating van PCB componenten IP 55
Gewicht kraan (incl. slangen en kabel) Standaard model: 1,0 kg
Klein model: 0,9 kg
Wand model: 0,9 kg
Gewicht Waterbox (incl. slangen) 1,75 kg
Gewicht Zeepbox (excl. navullingen ) 0,95 kg
STANDAARDINSTELLINGEN
Parameter Waarde
Reactietijd van de waterstroom / stop 1 s
Dosering van zeep 1 ml
Dosering van lotion of desinfectant 3 ml
Automatische spoelcyclus 2 Weken
TRANSPORT EN OPSLAG
Parameter Waarde
Transport gewicht Standaard model: 6,8 kg
Klein model: 6,7 kg
Wand model: 6,7 kg
Afmetingen verpakking 47 cm x 30 cm x 20 cm
Opslag temperatuur 10 - 50 °C
AFMETINGEN
Component Illustratie
Kraan model: standaard Fig. J1
Kraan model: klein Fig. J2
Kraan model: wand Fig. J3
Zeepbox Fig. J4 / J5
Waterbox Fig. J6

74
8.3 Certicaten en conformiteit
Conformiteitsverklaring
EU-Richtlinien 93/68/EEC, 98/83/EC, 2006/95/EC, 89/336/EEC
Michiel Ubink, Algemeen Directeur van miscea GmbH, hoofdkantoor in Hauptstraße 2, 14979
Großbeeren, Duitsland verklaart hierbij dat de multifunctionele kraan product familie, onder de
merknaam miscea bekend, is ontworpen en vervaardigd in overeenstemming met EU-richtlijnen
(93/68/EEG, 98/83 / EG, 2006/95 / EG, 89/336 / EEG van de Raad ) En volgens de Europese normen.
Model nummers:
8. Technische gegevens
CCR1S1NCDE CCR2S2NCEN CER2S1NCEN CER3S2NCFR LCR1S12NBDE
CCR1S1NCEN CCR2S2NCFR CER2S1NCFR KCR4S1NC LCR1S12NCDE
CCR1S1NCFR CCR3S1NCDE CER2S2NCDE KCR4S1NC0 LCR3S0NC
CCR1S2NCDE CER1S1NCDE CER2S2NCEN KCR4S2NC LCR3S11NCDE
CCR1S2NCEN CER1S1NCEN CER2S2NCFR KCR4S2NC0 LCR3S11NCEN
CCR1S2NCFR CER1S1NCFR CER3S1NCDE LCR1S0NB LCR3S12NCDE
CCR2S1NCDE CER1S2NCDE CER3S1NCEN LCR1S0NC LER1S11NCDE
CCR2S1NCEN CER1S2NCEN CER3S1NCFR LCR1S11NBEN
CCR2S1NCFR CER1S2NCFR CER3S2NCDE LCR1S11NCDE
CCR2S2NCDE CER2S1NCDE CER3S2NCEN LCR1S11NCEN
Aansluiting Wandcontactdoos met beschermde geleider door een 10 A
zekering.
Max. Stroomverbruik 36 W
Standby-vermogen dissipatie < 3.0 W
Test van de klep 16 bar
Flow bij 3 bar waterdruk. Tap (leidingwater) 6 L / min
Omgevingstemperatuur 10 - 40 °C temperatuur
Warm water inlaattting 70 °C
Aanbevolen (energiebesparing) 60 °C
Wateraansluiting tting koud Koud - blauw, warm - rood
8.1 Elektrische test gegevens
Beoordeeld shock spanning: 2000 V
De test voor de elektromagnetische compatibiliteit (interferentie emissie-test) werd uitgevoerd met de
nominale spanning en de nominale stroom.
8.2 Elektrische specicaties

V 17.04
75
Nederlands
Toegepaste normen:
• EN 15091: 2013
• EN 60335-1: 2012
• EN 61000-6-1: 2007 and EN 61000-6-3: 2011
• EN 1717: 2011
• EN ISO 3822: 2010
Alle miscea armaturen zijn gecerticeerd volgens DVGW en WRAS richtlijnen en voldoen dus aan de
bovengenoemde normen.
Duitsland, Januari, 2017.
Michiel Ubink
Algemeen Directeur
De verklaringen van overeenstemming kunnen worden aangevraagd op het volgende adres:
miscea GmbH | Hauptstr. 2, D-14979 Grossbeeren, Duitsland
8. Technische gegevens

76
9. Garantie en informatie
9.1 Garantie
De garantietermijn bedraagt 2 jaar vanaf de datum die vermeld staat op het aankoopbewijs.
Indien uw systeem reparatie vereist, neem dan contact op met een miscea dealer in uw land/regio.
9.2 Garantievoorwaarden
De garantietermijn komt te vervallen indien u één van de onderstaande activiteiten uitvoert:
• De waterbox openen of het garantiezegel van de waterbox verbreken.
• De kraan op een watertoevoer zonder lter aansluiten.
• De aansluitingen voor de exibele vloeistofslangen van de zeepbox verwisselen,
repareren of vervangen.
• De kraan met schuurmiddelen, sterke zuren of bleekproducten reinigen.
• De kraan, waterbox of de zeepbox zelf repareren.
Daarnaast verwijst miscea met betrekking tot de van toepassing zijnde garantievoorwaarden naar de
algemene miscea Verkoop- en Leveringsvoorwaarden.
9.3 Contactgegevens
Indien u vragen heeft over het aanschaen van onze producten, dan wel over het gebruik of installatie
hiervan: verwijzen wij u naar onze website www.miscea.com.
9.4 Bijgewerkte uitgaven van de handleiding
Wij werken deze handleiding regelmatig bij. Indien u de meest recente versie van deze handleiding wilt
ontvangen, kunt u deze downloaden via www.miscea.com of een verzoek tot verzending hiervan mailen
naar info@miscea.com.
9.5 Milieu en recycling
De miscea CLASSIC is een elektrisch apparaat waarvoor terugkeer en aossingsverplichtingen van
toepassing zijn in vele landen. miscea is betrokken bij de terugkeer van de systemen naar Duitsland.
Uw miscea product is ontworpen en gefabriceerd met behulp van hoogwaardige materialen en componenten die geschikt zijn voor recycling en / of hergebruik. Dit symbool betekent dat elektrische en
elektronische apparaten zoals batterijen en accu’s afzonderlijk moet worden afgevoerd uit huishoudelijk
afval aan het einde van hun levensduur.

V 17.04
77
Nederlands
10. Service
Service
Om problemen op te lossen, volgt u de tabel fout / oorzaak / oplossing. In het geval van onderhouds-
werkzaamheden aan het systeem, moet de elektrische voeding eerst worden uitgeschakeld!
Als het probleem niet opgelost kan worden, moet de elektrische voeding los gemaakt worden. Schrijf het
serienummer van de waterbox op de bovenkant van het apparaat op en neem contact op met miscea
via e-mail op berlin@miscea.com.
De onderstaande tabel geeft nuttige tips en oplossingen voor het oplossen van de derde generatie
miscea CLASSIC Systemen evenals scenario’s voor mogelijke hardware- en softwareproblemen.
Voordat u contact opneemt met de technische dienst van miscea
Als u problemen heeft met uw derde generatie miscea CLASSIC System probeer de juiste onderstaande oplossingen om het exacte probleem te isoleren voordat u miscea GmbH voor verdere technische
ondersteuning contacteert.
1. Controleer of het systeem is aangesloten op een werkend stopcontact en ingeschakeld.
2. Controleer of het systeem is aangesloten op de waterleiding en de watertoevoer is ingeschakeld
3. Controleer of de navullingen met daarin de vloeibare handzeep producten zijn geïnstalleerd en niet
leeg zijn.
4. Controleer alle kabels en leiding aansluitingen op losse verbindingen of verkeerde verbindingen.
Algemene problemen oplossen
De algemene problemen die in dit gedeelte worden beschreven zijn eenvoudig op te lossen. Als er een
probleem blijft bestaan en u niet in staat bent om het te verhelpen, of als u het liever niet zelf doet, neem
dan contact op met miscea via berlin@miscea.com voor technische ondersteuning.
WATER GERELATEERDE PROBLEMEN
Probleem Mogelijk probleem of oorzaak Oplossing
• Het water blijft stromen De “emmermodus” werd per ongeluk geactiveerd.
Wanneer de “continue waterstand”
is geactiveerd, zal het systeem
automatisch stoppen met het afgeven van water na 10 min. Om de
“continue waterstand” handmatig
te stoppen, activeer de zeep of
desinfectant sector.
Er is een probleem met de elektromagnetische klep.
Ontkoppel het miscea systeem
van het stopcontact. Sluit na 10
seconden het miscea systeem aan
de elektrische voeding. Dit moet
het systeem resetten en eventuele kleine systeem problemen
oplossen. Als het probleem blijft
bestaan, neem dan contact op
met miscea GmbH voor verdere
technische hulp.

78
10. Service
WATER GERELATEERDE PROBLEMEN
Probleem Mogelijk probleem of oorzaak Oplossing
• De kraan geeft geen heet
water.
• De kraan geeft geen koud
water.
• Temperatuurverstelling
werkt niet.
Communicatie onderbreking
tussen de motor en Cartridge
componenten.
LET OP: Controleer of het
miscea systeem aangesloten is
op warm en koud water. Als het
miscea systeem alleen op koud
water is aangesloten dan is het
niet mogelijk om warm water te
krijgen.
Ontkoppel het miscea systeem van het
stopcontact. Sluit na 10 seconden het
miscea systeem op de elektrische voeding. Dit moet het systeem resetten en
eventuele kleine systeem problemen oplossen. Als het probleem blijft bestaan,
neem dan contact op met miscea GmbH
voor verdere technische hulp.
De kraan geeft geen water. Het systeem is niet aangesloten
op een werkend stopcontact.
De elektrische voeding is niet
ingesteld om te openen.
De watertoevoer is afgesloten.
Controleer of het systeem is aangesloten
op een werkend stopcontact en is
ingeschakeld.
Controleer of de watertoevoer is
geopend.
Controleer alle kabels en leiding
aansluitingen op losse verbindingen of
verkeerde verbindingen. Zie de relevant
pagina van de handleiding voor de juiste
installatieprocedure.
Een probleem met één of meer
van de componenten in de
waterbox.
Ontkoppel het miscea systeem van
het stopcontact. Sluit na 10 seconden
het miscea systeem op de elektrische
voeding. Dit moet het systeem resetten
en eventuele kleine systeem problemen
oplossen. Als het probleem blijft bestaan,
neem dan contact op met miscea GmbH
voor verdere technische hulp.
De kraan lekt / druppelt water. Tijdens de installatie, wird
de waterleiding niet grondig
genoeg gespoeld voor de
installatie, dit heeft geleid tot
vuildeeltjes in de systeem met
als gevolg problemen met de
onderdelen in de systeem.
Spoel de kraan met behulp van de
“emmermodus” of door continu activeren
van de water sector door gedurende 1
minuut. Ontkoppel het miscea systeem
van het stopcontact. Sluit na 10 seconden het miscea systeem opnieuw aan
op de elektrische voeding. Dit moet het
systeem resetten en eventuele kleine
systeem problemen oplossen. Als het
probleem blijft bestaan, neem dan contact op met miscea GmbH voor verdere
technische hulp.

V 17.04
79
Nederlands
10. Service
WATER GERELATEERDE PROBLEMEN
Probleem Mogelijk probleem of oorzaak Oplossing
• De kraan geeft uit zichzelf
water.
De sensor in de sector is vuil.
Probleem met de sensoren in de
kraan.
Mogelijke omgevingsfactoren zoals
fel licht of super reectieve oppervlakken die de sensoren activeren
Zet de kraan uit en reinig de
sensor in de ring sector met een
vochtige doek.
Ontkoppel het miscea systeem
van het stopcontact. Sluit na 10
seconden het miscea systeem op
de elektrische voeding. Dit moet
het systeem resetten en eventuele
kleine systeem problemen oplossen.
Als het probleem blijft bestaan,
neem dan contact op met miscea
GmbH voor verdere technische
hulp.
• De waterbox maakt veel
geluid.
Het systeem is aan het kalibreren.
Probleem met sensoren in de
kraan.
Als dit slechts eenmaal per dag
gebeurd, dan is het heel normaal.
Als het meer dan één keer per dag
gebeurd.
Ontkoppel dan het miscea systeem
van het stopcontact. Sluit na 10
seconden het miscea systeem op
de elektrische voeding. Dit moet
het systeem resetten en eventuele
kleine systeem problemen oplossen.
Als het probleem blijft bestaan,
neem dan contact op met miscea
GmbH voor verdere technische
hulp
• Er komt slechts een kleine
hoeveelheid water uit de
kraan
De hoofdwaterleiding staat niet
helemaal open.
De stopkraantjes staan niet voldoende open.
Controleer of de hoofdwaterleiding
open staat.
Controleer of de stopkraantjes
open staan.
Als het probleem blijft bestaan,
neem dan contact op met miscea
GmbH voor verdere technische
hulp.

80
10. Service
ZEEP/DESINFECTANT/LOTION GERELATEERDE PROBLEMEN
Probleem Mogelijk probleem of oorzaak Oplossing
• De kraan geeft geen of op
een onregelmatige manier
zeep en/of desinfectans af
• De zeep / desinfectans/ lotion
geeft af met spetters.
Het systeem is niet aangesloten op
een werkend stopcontact.
De kabels en slangen zijn mogelijk
niet correct aangesloten.
De zeep en desinfectans navullingen zijn mogelijk niet correct
vastgezet.
De zeep en desinfectant sectoren
zijn niet doorgespoeld, of de vloeistof slangen bevatten lucht.
De vloeistof uitlaat is verstopt.
Controleer of het systeem is
aangesloten op een werkend stopcontact en is ingeschakeld.
Controleer alle kabels en leiding
aansluitingen op losse verbindingen of verkeerde verbindingen.
Zie de relevant pagina van de
handleiding voor de juiste installatieprocedure.
Controleer of zeep / desinfectans /
lotion navullingen goed vast zitten.
Raadpleeg de handleiding.
Spoel / Ontlucht de zeep / desinfectant / lotion. Zie de relevant
pagina van de handleiding voor de
juiste installatieprocedure.
Zet het systeem uit en reinig de
vloeistof uitlaat met een vochtige doek. Als het probleem blijft
bestaan, neem dan contact op
met miscea GmbH voor verdere
technische hulp.
Mogelijk probleem met pomp
componenten in zeepbox.
Zeep / desinfectant / Lotion slangen zijn verstopt / beschadigd
Ontkoppel dan het miscea systeem
van het stopcontact. Sluit na 10
seconden het miscea systeem op
de elektrische voeding. Dit moet
het systeem resetten en eventuele
kleine systeem problemen oplossen.
Als het probleem blijft bestaan,
neem dan contact op met miscea
GmbH voor verdere technische
hulp.
• Er komt te weinig zeep en/of
desinfectans uit de kraan
• Er komt te veel zeep en/of
desinfectans uit de kraan
De af te geven hoeveelheid vloeistof is niet goed ingesteld.
U kunt dit aanpassen door middel
van de afstandsbediening.
Als het probleem blijft bestaan,
neem dan contact op met miscea
GmbH voor verdere technische
hulp.

V 17.04
81
Nederlands
10. Service
ANDERE PROBLEMEN
Probleem Mogelijk probleem of oorzaak Oplossing
• Temperatuur display geeft
geen licht.
LED lichten beschadigd. Ontkoppel dan het miscea systeem
van het stopcontact. Sluit na 10
seconden het miscea systeem op
de elektrische voeding. Dit moet
het systeem resetten en eventuele kleine systeem problemen
oplossen. Als het probleem blijft
bestaan, neem dan contact op
met miscea GmbH voor verdere
technische hulp.
• Kraan reageert niet voor een
langere tijd of periode.
Het systeem is niet aangesloten op
een werkend stopcontact.
Mogelijk probleem met de elektronica in de waterbox en kraan.
Controleer of het systeem is
aangesloten op een werkend stopcontact en is ingeschakeld.
Ontkoppel dan het miscea systeem
van het stopcontact. Sluit na 10
seconden het miscea systeem op
de elektrische voeding. Dit moet
het systeem resetten en eventuele kleine systeem problemen
oplossen. Als het probleem blijft
bestaan, neem dan contact op
met miscea GmbH voor verdere
technische hulp.
• Een sector brand niet goed
wanneer geactiveerd.
De sector is vuil.
De LED van de sector is gebroken.
Ontkoppel dan het miscea systeem
van het stopcontact. Sluit na 10
seconden het miscea systeem op
de elektrische voeding. Dit moet
het systeem resetten en eventuele kleine systeem problemen
oplossen. Als het probleem blijft
bestaan, neem dan contact op
met miscea GmbH voor verdere
technische hulp.
• De kraan reageert niet op de
afstandsbediening.
De afstandsbedining wordt niet in
de juiste positie gehouden voor
een correcte werking.
Zorg ervoor dat de afstandsbedining is de juiste positie gehouden
wordt ten opzicht van het display
op de kraan. De gegevens hiervoor
zijn te vinden in de gebruiksaanwijzing.

82

V 17.04
83
Nederlands

miscea GmbH
Hauptstraße 2
14979 Großbeeren
Germany
W: www.miscea.com
E: info@miscea.com
 Loading...