

Misa Digital KITARA User Manual
User Manual / EN

General information
Introduction
Specifications
What’s in the Box
Kitara Description
Setup
Configuration Screen
Basic Operation
Advanced Configuration Screen
Configuration Menu
Presets
Synth / MIDI
Effects Overview
Compression & Distortion
Modulation & Delay
Reverb
Mixer / EQ
Assigning Controls to Synth or MIDI Parameters
Advanced MIDI configuration
MIDI troubleshooting
Troubleshooting
Warranty Statement
Support
Declaration of Conformity
Disclaimer
...........................................................................................
..........................................................................................................
......................................................................................................
................................................................................................
...............................................................................................
......................................................................................................................
.........................................................................................
...................................................................................................
.....................................................................
..............................................................................................
.....................................................................................
.............................................................................
...........................................................
........................................................................
...............................................................................................
.........................................................................................
.................
..........................................................................
....................................................................
..................................................................................................
..........................................................................................
..................................................................................................................
................................................................................
.............................................................................................................
3
4
5
6
7
8
9
10
11
12
13
15
16
17
18
19
20
21
24
25
26
27
29
31
Table of Contents
WARNING
CAUTION
3
Always follow the basic precautions listed below to avoid the possibility of serious injury or even death from electrical shock, short-circuiting, damages, fire or
other hazards. These precautions include, but are not limited to, the following:
• Only use the voltage specified as correct for the instrument. The required
voltage is imprinted on the power adapter included.
• Use the specified power adapter only. Using the wrong power adapter can
result in overheating or damage to the instrument.
• Check the electric plug periodically and remove any dirt or dust which may
have accumulated on it.
• Do not place the AC adapter cord near heat sources such as heaters or
radiators, and do not excessively bend or otherwise damage the cord, place
heavy objects on it, or place it in a position where anyone could walk on, trip
over, or roll anything over it.
POWER SUPPLY / AC POWER ADAPTER
• Do not expose the instrument to rain, use it near water or in damp or wet
conditions, or place containers with liquids which might spill into any
openings. If any liquid such as water seeps into the instrument, turn off the
power immediately and unplug the power cord from the AC outlet.
• Never insert or remove an electric plug with wet hands.
WATER WARNING
• Do not put flammable items, such as candles, on the unit. A combustible item
may fall over and cause a fire.
FIRE WARNING
• Do not open the instrument or attempt to disassemble the internal parts or
modify them in any way. The instrument contains no user-serviceable parts. If
it should appear to be malfunctioning, discontinue use immediately.
DO NOT OPEN
Always follow the basic precautions listed below to avoid the possibility of physical injury to you or others, or damage to the instrument or other property. These
precautions include, but are not limited to, the following:
Misa Digital Instruments cannot be held responsible for damage caused by improper use or modifications to the instrument.
ALWAYS TURN THE POWER OFF WHEN THE INSTRUMENT IS NOT IN USE.
• When removing the electric plug from the instrument or an outlet, always
hold the plug itself and not the cord.
• Unplug the AC power adapter when not using the instrument, or during
electrical storms.
• Do not connect the instrument to an electrical outlet using a
multiple-connector. Doing so can result in lower sound quality, or possibly
cause overheating in the outlet.
POWER SUPPLY / AC POWER ADAPTER
• When cleaning the instrument, use a soft, dry cloth. Do not use paint
thinners, solvents, cleaning fluids, or chemical-impregnated wiping cloths.
• Do not place the instrument in an unstable position where it might
accidentally fall over.
• Do not rest your weight on, or place heavy objects on the instrument, and do
not use excessive force on the buttons, switches or connectors.
• Do not use the instrument/device or headphones for a long period of time at
a high or uncomfortable volume level, since this can cause permanent hearing
loss. If you experience any hearing loss or ringing in the ears, consult a
physician.
HANDLING AND MAINTENANCE
• Before connecting the instrument to other electronic components, turn off
the power for all components. Before turning the power on or off for all
components, set all volume levels to minimum. Also, be sure to set the
volumes of all components at their minimum levels and gradually raise the
volume controls while playing the instrument to set the desired listening level.
CONNECTIONS

4
INTRODUCTION
Welcome to t he Kitara community!
Congratulations on the purchase of your very own KITARA.
Please take a few minutes to read the user manual and familiarize yourself with the functionality and use of Kitara. Note all
safety precautions, including directions for care and maintenance of the product to ensure longevity and optimum use of your
digital guitar.
We hope you enjoy your new Kitara and we're looking forward to seeing what you and other users will create with this instrument
we love very much!
The Misa team
SPECIFICATIONS
5
144 keys
Tun eab le in div id ual st ri ngs
Fret markers (3rd, 5th, 7th, 9th, 12th, 15th , 17th, 19th, 21st and 24th frets)
30 voices (5 per string)
40+
1GB (Flash)
Maximum Polyphony
Presets
User Memory available
Five points multi-touch capacitive
USB Drive with User Manual, AC Adapter, Strap, Audio Cable, MIDI Cable, Cleaning Cloth
Neck
Tou ch Pa ne l
Accessories
Synthesizer
815 mm
345 mm
35 mm
2.9 kg
Height
Width
Depth
Weight
Size and Weight
Controls
Connectors
Power Supply
Effects
Effects
FX Blocks
Distortion, Compression, Modulation, Delay, Reverb, Filter, Equalizer
2 (synthesizer voices individually routable to FX1, FX2 or neither)
Audio
Data
Power
¼” Audio Output Jack, Headphone jack
MIDI-OUT Connector, USB
Barrel Connector
Current Rating DC 1.2 A - 9 V
Audio Output
Line-out Output Level
Headphone Output Power
RMS
0.6 V
32 Ohm - 10mW
Supports all tunings
Assignable to any synthesizer effect parameter or voice parameter
Tou ch a nd dr ag ge st ure s as sig na bl e t o an y s yn th esi ze r e ffe ct or v oi ce pa ram et er
Normal Mode and Tap Mode
800x600 resolution LCD - 24 bit color
6 Strings Blocks
X/Y Controller
Tou ch Pa d
Modes
Display
WHAT’S IN THE BOX
6
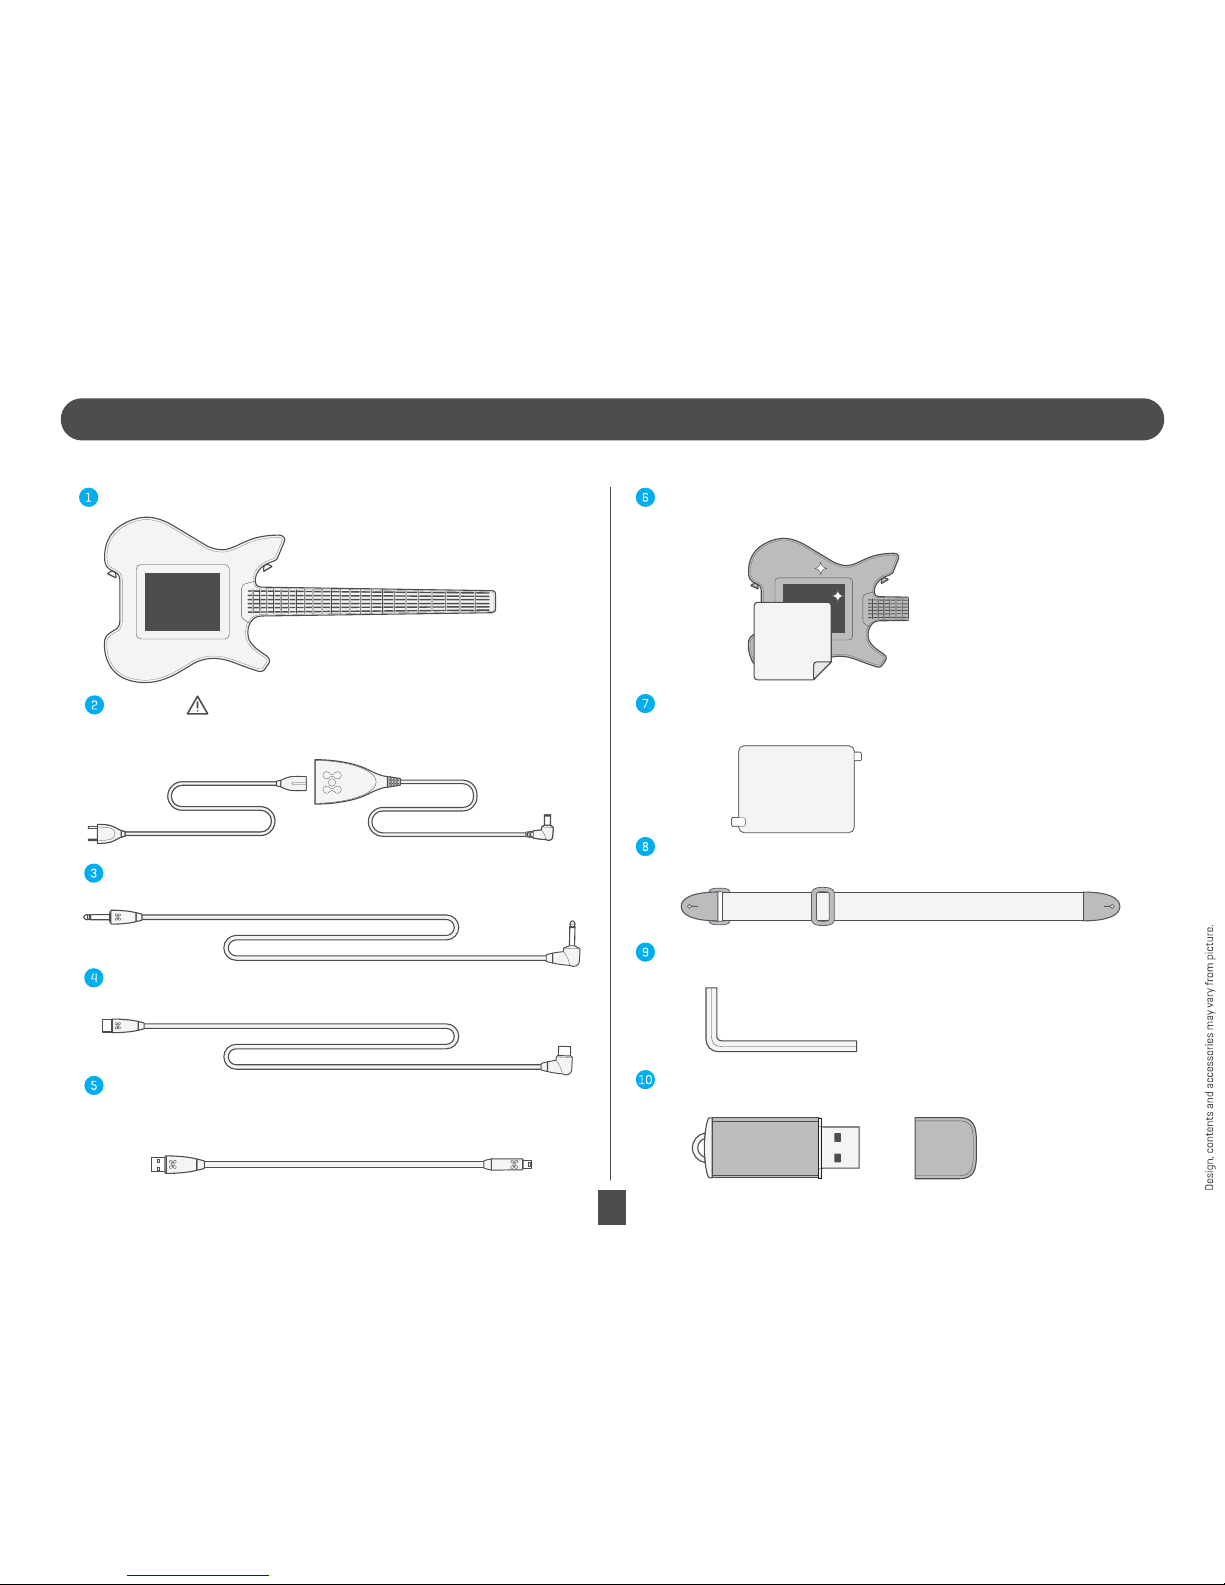
The Misa Digital Instruments Kitara package contains several items. Please make sure that all items are included in your box. If any are missing, contact the dealer that sold you the Kitara.
Kitara Digital Guitar
MIDI Cable
This cable connects between Kitara and a MIDI interface.
USB Cable
This cable connects between Kitara and your computer in order to transfer files
and perform firmware updates.
Audio Cable
This cable connects between Kitara and external speakers.
AC Adapter
Please make sure you only use the supplied AC adapter with Kitara.
Do not use any other AC adapter as it may cause damage to the unit.
Cleaning Cloth
Use this to clean Kitara’s screen and body.
Screen Protector
Use this to provide an extra protection to the screen
Strap
Attach this to the strap buttons
Allen Key
Use this to swap the strap buttons.
USB drive
Contains User Manual and PC/MAC software.
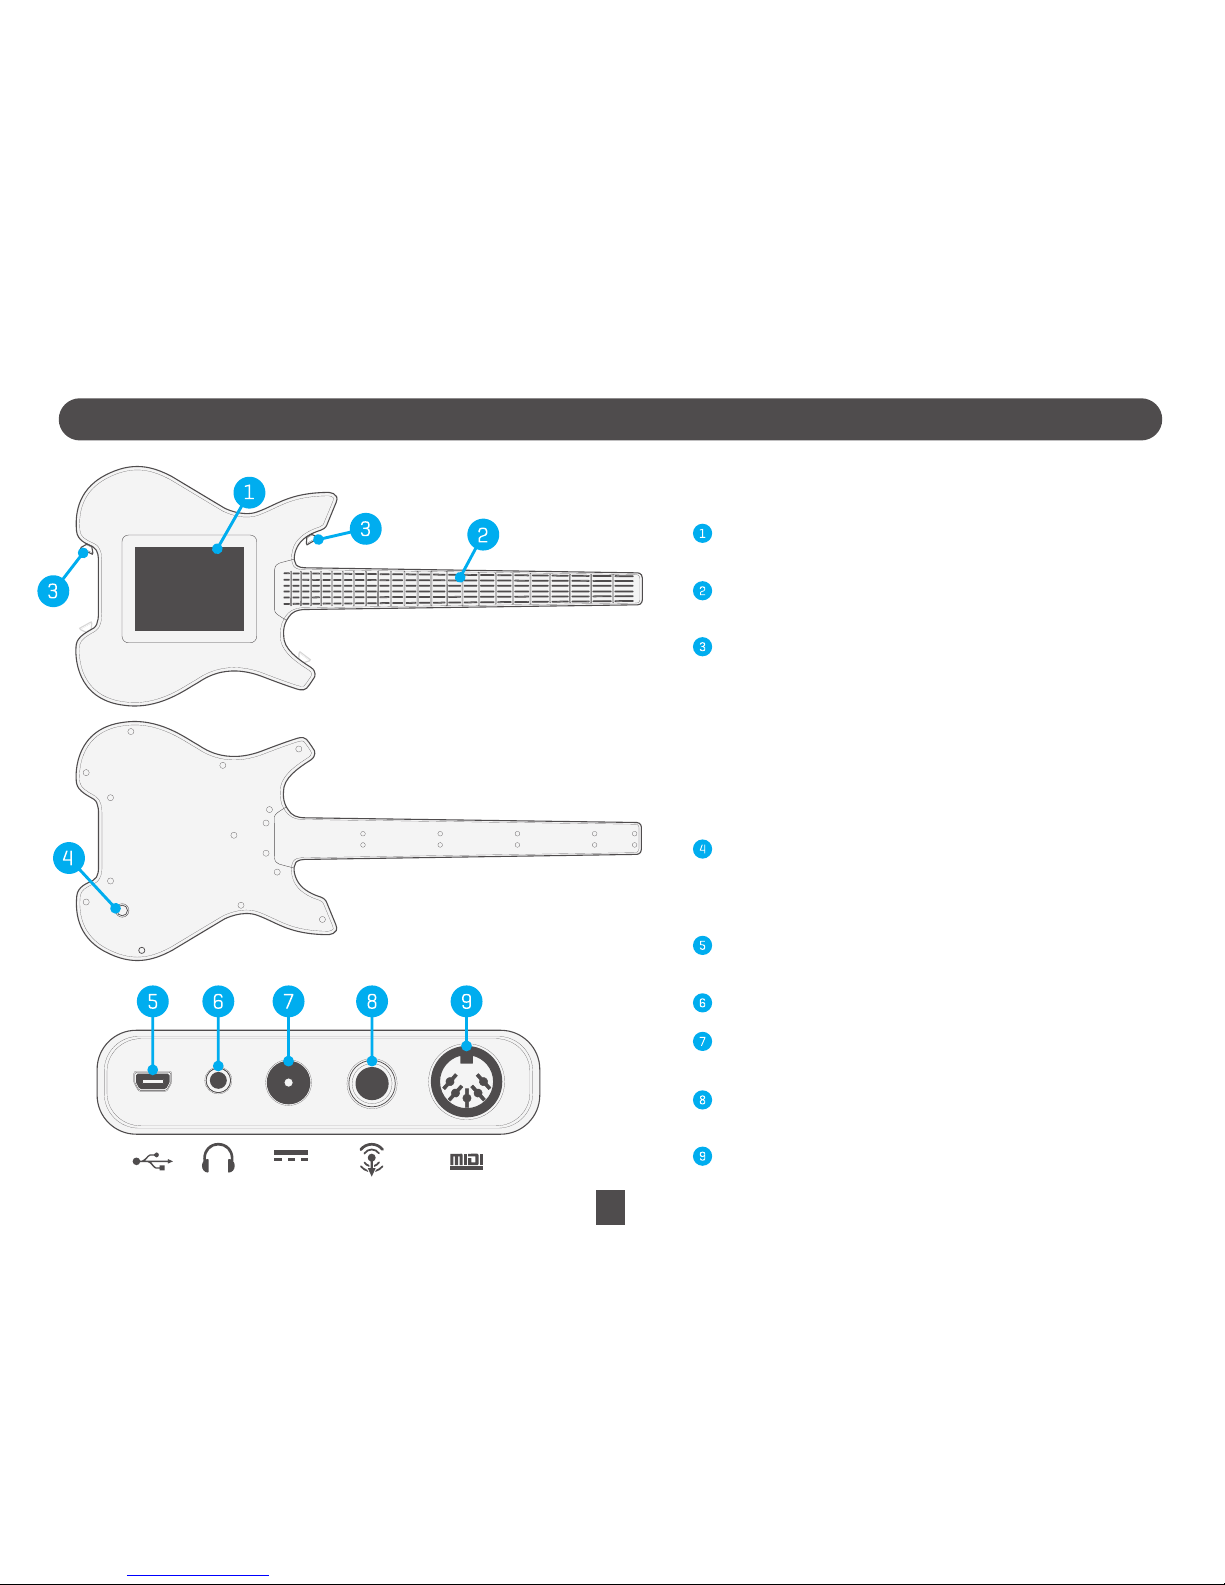
KITARA DESCRIPTION
7
Tou ch sc ree n – I nd ic ate s th e c ur re nt pl ay ing m od e a nd va ri ou s
configuration settings of Kitara.
Neck – Each of the 144 note buttons designates a musical tone.
The default tuning is the same as a regular guitar.
Strap hooks – To attach a guitar strap to the strap hooks.
(note: strap hooks can be swapped for left-handed users)
USB port – Connect USB cable (included) to your PC to allow file
transfer or firmware update.
Headphone jack – Connect to headphones.
AC Adapter connection – Connect the AC adapter provided, to this
port and your wall power supply.
Audio line out – Connect an audio cable to external speakers or any
audio interface.
MIDI-out – Connect to an external MIDI device.
Power button – Hold for 2 seconds to power on/off Kitara.
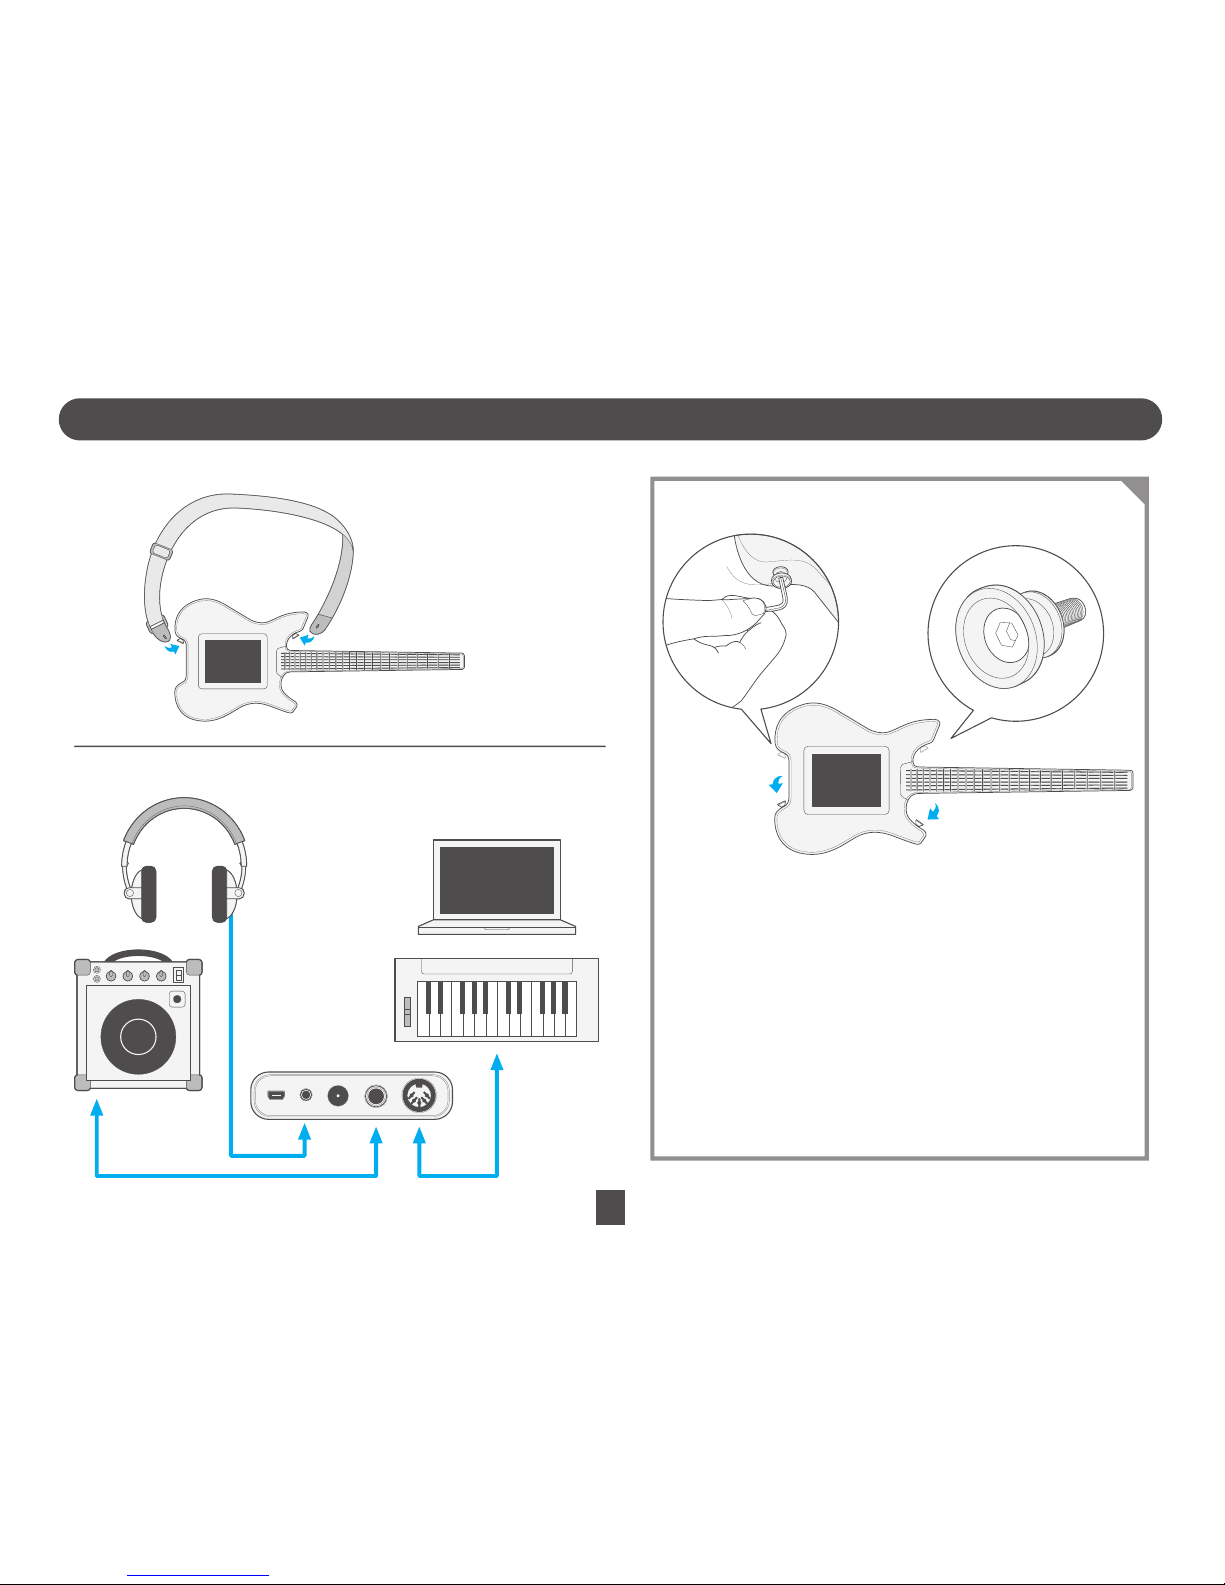
SETUP
8
Attach the Kitara strap to both strap buttons.
How to connect to Kitara
Left-Handed Mode
Kitara’s default orientation is for right-handed players. To switch Kitara
to a left-handed orientation:
-Unscrew the strap buttons from their current position.
-Screw the strap buttons into the holes on the opposite side of Kitara.
Access the configuration menu, then the system menu, and select
“Left-handed”. The screen should immediately flip to accomodate.

CONFIGURATION SCREEN
9
The configuration menu is divided into the following
sections:
Volume Slider – Controls the master output volume
Preset Window – Load Kitara presets. You can slide your
finger across this window to see more presets.
Ball button – Enables/disables Ball Mode.
String button – Enables/disables String Mode.
Tap – E na bl es/ di sa bl es Ta p Mod e.
Advanced – Shows the Advanced Menu.
Close – Return to Play Screen.
For an explanation
on the modes, see
the section “Basic
Operation”
To st ar t t he co nfi gu rat io n scr ee n:
Press the two rear corners of the touch panel and select “Configuration”.
VOLUME LOAD CLOSE
ADVANCED
Preset #1
Preset #2
Preset #3
Preset #4
Preset #5
Preset #6
Preset #7
Preset #8
STRINGS
BALL
TAP
LOAD
Preset #1
Preset #2
Preset #3
Preset #4
Preset #5
Preset #6
Preset #7
Preset #8
LOAD
Preset #1
Preset #2
Preset #3
Preset #4
Preset #5
Preset #6
Preset #7
Preset #8
How to load a preset
LOAD
Preset #1
Preset #2
Preset #3
Preset #4
Preset #5
Preset #6
Preset #7
Preset #8

BASIC OPERATION
10
When first switching on Kitara, the instrument will default to Touchpad Mode.
The screen will be blue.
Pressing on the touchpad will play the highest note pressed on each of
the six strings.
Pressing on a string will play the corresponding note, similar to a guitar string
on a traditional guitar.Press a note key on the neck to increase the tone pitch of
of the string block.
In Tap Mode, the general operation is the same as in Standard Play Mode, except
that notes on Kitara’
s neck immediately plays regardless of any fingers being
pressed on the touch panel. It is useful for the two-handed tapping technique.
The Touchpad, Strings and X/Y ball control are a different colour in Tap Mode.
Dragging the X/Y ball will modify various sound parameters. This is
determined by the settings in the configuration menu (unique for each preset).
See section “Assigning Controls to Synth or MIDI Parameters” for more
information.
TOUCHPAD MODE
STRINGS MODE
BALL MODE
TAP MODE
 Loading...