

Page 1
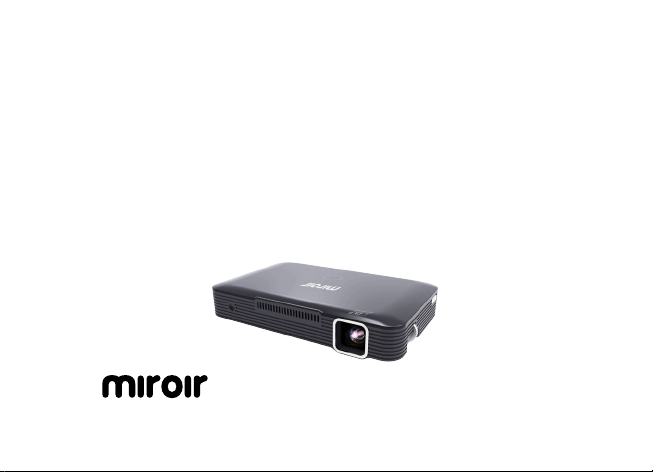
HD MINI PROJECTOR MP150W
Page 2

Page 3

CONTENTS
Caution ...................................................................2
Warning! ..................................................................5
FCC Information...........................................................6
Specifications ............................................................10
Projector Compatibility ....................................................11
Cables and Adapters Included In the Box ....................................... 11
®
Devices...............................................................12
Apple
Other Devices ................................................................13
Android™ Devices ............................................................ 14
Streaming Devices............................................................ 15
Operating the Projector ...................................................17
Setup ........................................................................17
Audio ........................................................................20
Charging with the Projector ...............................................22
Troubleshooting ..........................................................23
1
Page 4

CAUTION
• TO REDUCE THE RISK OF ELECTRIC SHOCK, DO NOT REMOVE
COVER. THERE ARE NO SERVICEABLE PARTS INSIDE
• TO REDUCE THE RISK OF FIRE OR ELECTRIC SHOCK, DO NOT
EXPOSE THIS UNIT TO RAIN OR MOISTURE.
The lightning flash with arrow-head symbol within an equilateral triangle is
intended to alert the user to the presence of uninsulated “dangerous voltage”
within the unit’s enclosure that may be of sufficient magnitude to constitute a
risk of electric shock
The exclamation point within an equilateral triangle is intended to alert the
user to the presence of important operating and maintenance (servicing)
instructions in the literature accompanying the unit.
IMPORTANT SAFETY INSTRUCTIONS
All of the safety and operating instructions should be read, adhered to and
followed before the unit is operated.
SAVE THESE INSTRUCTIONS!
2
Page 5

DANGER
To reduce the risk of electric shock, burns, fire or injury:
1. Do not use while bathing or in a shower.
2. Do not place or store unit where it can fall or be pulled into a tub or sink.
3. Do not place in, drop or submerge in water or other liquid.
4. Do not reach for unit that has fallen into water. Unplug it immediately.
5. Care should be taken so that objects do not fall and liquids are not
spilled onto the unit.
WARNING
1. Close supervision is necessary when this appliance/product is used by or
near children or mentally disabled individuals.
2. Use this unit only for its intended use as described in this manual.
3. Unplug this unit during lightning storms or when unused for long periods
of time.
4. Never drop or insert an object into any opening.
5. Protect the adapter cord from being walked on or pinched, particularly at
plug outlets, convenience receptacles and the point where it exits the unit.
6. Do not allow adapter cord to touch hot surfaces. Wrap cord loosely
around the unit when storing.
3
Page 6

7. The unit should be situated away from direct sunlight or heat sources
such as radiators, electric heaters, heat registers, stoves, or other units
(including amplifiers) that produce heat. Avoid placing on top of stereo
equipment that radiates heat.
8. Never block the air openings of the unit with materials such as clothing,
plastic bags or papers, or place it on a soft surface such as a bed or
couch, where the air openings may be blocked.
9. Do not overload electrical outlet. Use only the power source
as indicated.
10. Do not carry this unit by cord or use cord as handle.
11. Never operate this unit if it has a damaged cord or plug, if it is not
working properly, or if it has been dropped or damaged, or dropped into
water. If the unit’s power supply cord or plug is damaged, do not attempt
to fix it yourself.
12. To avoid the risk of electric shock, do not disassemble or attempt to
repair the unit. Incorrect repair can cause risk of electric shock or injury to
persons when unit is used.
13. Do not operate in the presence of explosive and/or flammable fumes.
14. Never remove the plug from the socket by pulling the power cord.
4
Page 7

WARNING!
This producT conTains a rechargeable baTTery
• Do not store this product in high temperatures, damp areas, or in
direct sunlight.
• Never disassemble the product.
• Never dispose of the product in fire or water, which may result in
explosion and/or injury.
• Keep product out of reach of children.
• Do not touch product with damp hands.
• Dispose of the product properly.
• The product must not be discarded with ordinary household waste.
• Contact your local recycling center for proper disposal.
5
Page 8

FCC INFORMATION
This device complies with part 15 of the FCC rules. Operation is subject to the
following two conditions:
1) This device may not cause harmful interference, and
2) This device must accept any interference received including interference that
may cause undesired operation.
WARNING:
responsible for compliance could void the user’s authority to operate the equipment.
CAUTION: To maintain compliance with the FCC’s RF exposure guidelines,
place the product at least 8 inches from nearby persons.
NOTE: This equipment has been tested and found to comply with the limits
for a Class B digital device, pursuant to Part 15 of the FCC Rules. These limits
are designed to provide reasonable protection against harmful interference
in a residential installation. This unit generates, uses, and can radiate radio
frequency energy and if not installed and used in accordance with the
instructions, may cause harmful interference to radio communications. However,
6
Changes or modifications to this unit not expressly approved by the party
Page 9

there is no guarantee that interference will not occur in a particular installation.
If this equipment does cause harmful interference to radio or television
reception, which can be determined by turning the equipment off and on, the
user is encouraged to try and correct the interference by one or more of the
following measures:
• Reorient or relocate the receiving antenna.
• Increase the separation between the equipment and receiver.
• Connect the equipment to an outlet on a circuit different from that to
which the receiver is connected.
• Consult the dealer or an experienced radio/TV technician for help.
Shielded cables must be used with this unit to ensure compliance with the
Class B FCC limits.
CAUTION: The radiated output power of the Wi-Fi technology is below the
FCC radio frequency exposure limits. Nevertheless, it is advised to use the
wireless equipment in such a manner that the potential for human contact
during normal operation is minimized.
7
Page 10
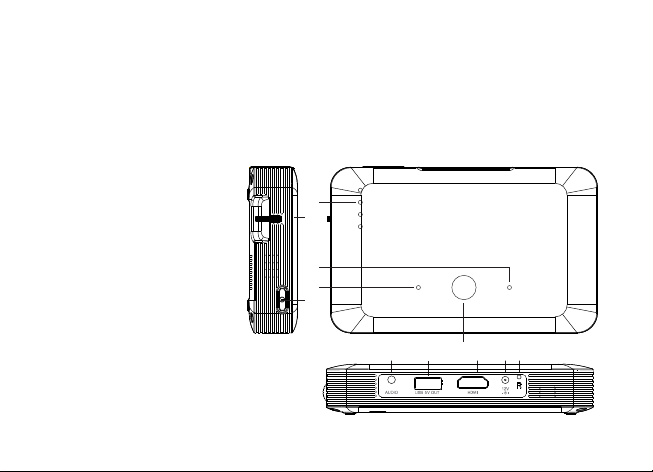
LOCATION OF PARTS AND CONTROLS
1. Battery indicator lights
2. Focus wheel
3. Volume up control
4. Volume down control
5. Power button
6. 3.5mm Audio out
7. USB out (5V/1A)
8. Mode control
9. HDMI Input
10. DC input (12V/2A)
11. Reset Button
8
1
2
3
4
5
6
8
7
9 1110
Page 11
4
3
5
6
7
9 11108
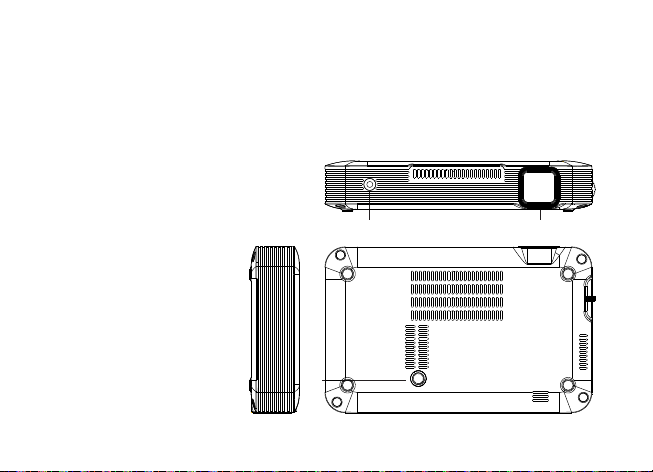
LOCATION OF PARTS AND CONTROLS
12. Ambient light sensor
13. Lens
14. Tripod Dock
12 13
14
9
Page 12

SPECIFICATIONS
Product Dimensions 3.3” x 5.3” x 1”
Brightness Up to 200 Lumens*
Lamp Life LED lamp with up to 20,000 hours
Image Size Up to 100”
Distance 2ft to 10ft
Throw Ratio 1.66
Contrast Ratio 400:1*
Native Resolution 1280 x 720 (720p)
Aspect Ratio 16:9
Built-in Speaker 2 1-watt speakers
Power DC 12V/2A
Auto Keystone +/- 40 degrees auto vertical keystone correction
Battery Li-polymer, 5,000 mAh
*TI’s DLP® IntelliBright™ technology dynamically adjusts the projector brightness range for each individual
pixel based on image content and the ambient room light level.
10
Page 13
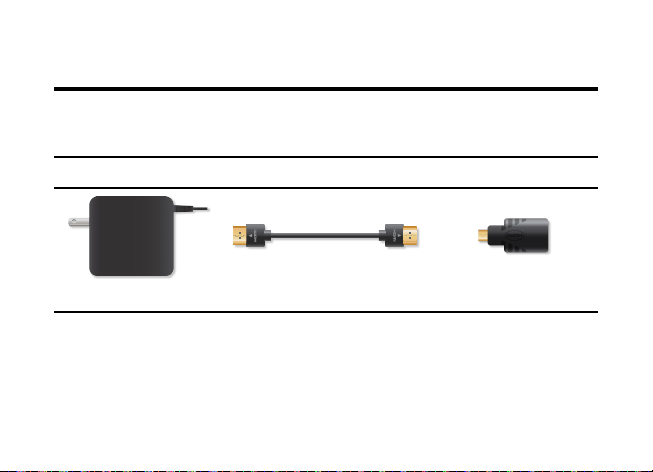
PROJECTOR COMPATIBILITY
cables and adapTers included in The box
AC Adapter HDMI® to HDMI Cable Micro HDMI Adapter
Included in the box
Purchase separately
11
Page 14

apple® devices
DEVICE WIRELESS CONNECTION WIRED CONNECTION
iPhone® 6
iPhone 6 Plus
iPhone 5s
iPhone 5c
iPhone 5
iPod touch
iPad Air
®
iPad
iPad 4
iPhone 4s
iPad 3
iPad 2
12
Mini
®
5th Gen
Miroir Projector App
required*
Miroir Projector App
required*
*NOTE: iOS 7 or later required. See the App store for more
information. Wireless viewing is limited with iOS to certain files
types such as native video, photos, .PPTX, .KEY, and .PDF.
Lightning™ Digital AV Adapter
HDMI Compatible Cable
30-Pin Digital AV Adapter
HDMI Compatible Cable
Page 15

DEVICE WIRELESS CONNECTION WIRED CONNECTION
MacBook Pro® with
Retina display
Mac Mini
Not available
HDMI Compatible Cable
Mac Pro
®
MacBook Air
MackBook Pro
iMac
Apple TV Not available
®
Not available
Mini DisplayPort to HDMI Adapter
HDMI Compatible Cable
HDMI Compatible Cable
oTher devices
GoPro
®
Not available
Micro HDMI Adapter
HDMI Compatible Cable
13
Page 16

android™ devices
DEVICE WIRELESS CONNECTION WIRED CONNECTION
Samsung Galaxy S® 6
Samsung Galaxy Note® 4
Samsung Galaxy Note® 3
Samsung Galaxy S 5
Samsung Galaxy S 4
14
Requires Android OS
4.4 or later and wireless
screen mirroring capability
Requires Android OS
4.4 or later and wireless
screen mirroring capability
Not Available - device does not support
Samsung MHL Micro USB to
HDMI HDTV Adapter
HDMI Compatible Cable
Micro USB to USB Power Cable
video out
Page 17

sTreaming devices
DEVICE WIRELESS CONNECTION WIRED CONNECTION
Roku®
®
Apple TV
Amazon Fire TV
U-verse
Roku
Stick
®
®
Streaming
®
Not available
Not available
HDMI Compatible Cable
Plugs directly into the HDMI
compatible port on the projector
Google Chromecast
Amazon Fire TV Stick
*NOTE: Both the Chromecast and the Amazon Fire TV Stick require a power source. The USB power
cable that comes with both these units can be plugged into the USB Out port on the projector or can be
plugged into a wall outlet with the power adapter.
Not available
Plugs directly into the HDMI
compatible port on the projector*
15
Page 18

CHARGING THE BATTERY
1. The built-in battery is charged using the included AC adapter.
IMPORTANT: Fully charge the battery before first use (approx. 4-5 hours).
2. The battery has 4 battery charge indicator lights. The lights will flash in
turn as the device charges. The battery is fully charged when all 4 lights
are lit and no longer flash.
3. Check the battery life by briefing pushing the power button. The indicator
lights will illuminate indicating the amount of battery remaining (for
example, if 3 lights illuminate, there is approximately 75% of the battery
life remaining).
16
Page 19

OPERATING THE PROJECTOR
seTup
The projector can be powered using the included AC adapter or the
built-in battery.
• To power the projector with AC power, connect the AC adapter to
the projector’s DC input and plug the other end into an outlet. Once
connected, the battery indicator lights will illuminate on the projector
showing the amount of battery power remaining.
• To power the projector with the built-in battery, simply turn the projector
on. To check the remaining battery life of the projector press the power
button briefly.
IMPORTANT: Fully charge the battery before first use (approx. 4-5 hours).
17
Page 20

connecT a source device
The projector can be connected to a variety of HDMI compatible devices via a
wired connection and to some smartphones and tablets via a wireless connection
IMPORTANT: Before you power on the projector, please be sure to check that there is
nothing blocking the ambient light sensor on the front of the projector (the location of this
sensor can be seen in Locations and Parts diagram on page 8). Blocking this sensor may
impact the IntelliBright adjustments the projector makes which optimizes the projected image.
WIRED CONNECTION
1. To connect via a wired connection, plug in the HDMI compatible cable
(included in the box) to the HDMI compatible port on the projector and to
your device.
NOTE: Some devices may require an adapter to connect to your device To determine what type of adapter
you need to use, please reference the Compatibility section of this manual.
2. Power on the projector by pressing and holding the power button
for 3 seconds.
3. Allow the projector 15 to 30 seconds to fully start up, sync with your
device and make image adjustments.
18
.
Page 21

NOTE: After syncing with the projector, you may see your device’s screen being mirrored by the projector.
Some devices may not have this ability, but they can still be used with the projector to project videos, and
photo slide shows.
4. Choose the media you would like to view from the menu on your device
and play as you normally would.
WIRELESS CONNECTION
1. To connect wirelessly, power the projector on by pressing and holding the
power button for 3 seconds.
2. Allow the projector 15 to 30 seconds to fully start up. The projector will
automatically start in wired mode.
3. Change the projector to wireless mode by pressing the mode button. On
screen, the projector will display wireless information labeled as Android
devices or iOS devices.
Android Devices
a. Keep pressing the mode button until you see the Android wireless screen
displayed.
b. From the quick menu on your Android device, launch screen mirroring (some
devices have a Quick Connect button for this functionality).
19
Page 22

c. Select the Miroir projector from the device list.
d. Choose the media you would like to view from the menu on your device and
play as you normally would.
iOS Devices
a. For Apple devices, download the Miroir Projector App from the App store.
b. On the projector, keep pressing the mode button until you see the iOS
Wireless screen displayed.
c. Go to Settings on your iOS device and select Wi-Fi.
d. Select the Miroir projector from the list of devices. and enter the password
from the iOS Wireless screen.
e. Launch the Miroir Projector App and select the media you want to view.
audio
If desired, connect a speaker to the 3.5mm audio out jack. If no external
speaker is connected, the projector’s 2 internal 1-watt speakers will be
used for audio.
20
Page 23

ADJUSTING THE VOLUME
Touch the mode control area to activate the volume controls. Use the volume
up and volume down control areas to adjust to the preferred volume level.
image adjusTmenTs
ADJUSTING THE FOCUS
Simply roll the focus wheel control forwards and backwards to fine-tune the image.
ADJUSTING THE VERTICAL KEYSTONE
The projector will automatically adjust the display screen to the best condition
(+/- 40 degrees automatic vertical keystone correction).
ADJUSTING INTELLIBRIGHT
WHAT IS INTELLIBRIGHT? TI’s DLP® IntelliBright™ technology dynamically adjusts
the projector brightness range for each individual pixel based on image content and the
ambient room light level.
When the projector starts up IntelliBright will automatically optimize the
projected image settings for the room environment.
21
Page 24

CHARGING WITH THE PROJECTOR
The projector has one USB out jack which can be utilized to charge a variety of
smart phones.
• Connect your device to the fully-charged projector with a USB cable
(not included).
• Your device’s screen will let you know your device is charging and when
it’s fully charged.
22
Page 25

TROUBLESHOOTING
. Q The projected image is blurry.
. A Adjust the focus wheel on the projector to fine-tune the picture. Also check that the
surface you are projecting on is smooth.
. Q The projected image is too small.
. A Move the projector farther away from the projection surface.
. Q The projector is not projecting.
. A Here are several things to check if your projector is not projecting:
- If on battery power, check the battery life remaining by pressing the power button. If battery
power is low, plug into AC power.
- If on AC power, check that the AC power is plugged into the correct port on the projector and
the AC adapter is securely plugged into a powered outlet.
- If using a wired connection, check the compatibility section of this manual to ensure you are
using any necessary adapters to connect your device. If an adapter is required, power down
the projector, add the adapter, and then turn the projector back on. Also check with your device
manufacturer to ensure your device supports video out.
- If using a wireless connection, check the compatibility section of this manual for instructions. Also
check with your device manufacturer to ensure your device supports wireless screen mirroring.
- If using a wireless connection on battery power, check the battery life remaining on the projector
by briefly pressing the power button. If battery power is low, plug into AC power.
VISIT WWW.MIROIRUSA.COM FOR ADDITIONAL FAQS AND SUPPORT
23
Page 26

ONE (1) YEAR LIMITED WARRANTY
Miroir (“Miroir”) warrants to you, the original retail purchaser (“Consumer”), that this product
(“Product”) will under normal use operate substantially in accordance with the accompanying
documentation for a period of one (1) year from date of original purchase. Consumer’s sole
and exclusive remedy, and Miroir’s sole and exclusive responsibility under this warranty will
be, at Miroir’s option, either to repair or replace the defective Product during the one (1) year
limited warranty period so that it performs substantially in accordance with the accompanying
documentation on the date of your initial purchase.
The forgoing warranty is limited and is not applicable to: (i) normal wear and tear; (ii) defects
or damage caused by misuse, accident (including without limitation collision, fire and the
spillage of food or liquid), neglect, abuse, alteration, unusual stress, modification, improper
or unauthorized repair, installation, wiring, or testing, improper storage, use in an unapproved
device or if the serial number has been removed; (iii) use not in accordance with the
documentation; and (iv) damage caused by the equipment with which the Product is used.
To obtain warranty service for any Product that is subject to the foregoing warranty,
Consumer must contact Miroir at [email protected], providing proof of purchase and a
description of the issue. Consumer shall bear the cost of returning the Product for repair or
replacement under this limited warranty. Any Product returned without proof of purchase will
not be honored under this limited warranty.
The limited warranty extends only to Consumer and is not assignable or transferable
to any subsequent purchaser or user. THE LIMITED WARRANTY SET FORTH ABOVE
IS PROVIDED IN LIEU OF ALL OTHER WARRANTIES AND MIROIR HEREBY
DISCLAIMS ALL OTHER WARRANTIES OF ANY KIND, WHETHER EXPRESS, IMPLIED,
STATUTORY OR OTHERWISE, INCLUDING WITHOUT LIMITATION ANY WARRANTIES
24
Page 27

OF MERCHANTABILITY, FITNESS FOR A PARTICULAR USE OR PURPOSE, NONINFRINGEMENT, QUALITY AND TITLE. MIROIR DOES NOT WARRANT THAT THE
PRODUCT IS ERROR FREE OR THAT IT WILL FUNCTION WITHOUT INTERRUPTION.
To the extent Miroir may not, as a matter of applicable law, disclaim certain implied warranties,
the duration of any such implied warranty shall be limited to the shorter of the one (1) year
limited warranty period or the minimum time period permitted under such law. Some states
do not allow limitations on the duration of implied warranties, so the above limitation may not
apply to you. This limited warranty gives you specific legal rights, and you may also have other
rights that vary from state to state.
IN NO EVENT WILL MIROIR BE LIABLE FOR ANY SPECIAL, INDIRECT, INCIDENTAL,
PUNITIVE OR CONSEQUENTIAL DAMAGES OF ANY NATURE WHATSOEVER
INCLUDING BUT NOT LIMITED TO LOSS OF PROFITS OR REVENUES, LOSS OF DATA,
LOSS OF USE OF THE PRODUCT OR ANY ASSOCIATED EQUIPMENT, COST OF ANY
REPLACEMENT GOODS OR SUBSTITUTE EQUIPMENT, LOSS OF USE, CLAIMS OF
ANY THIRD PARTIES, OR ANY OTHER DAMAGES ARISING FROM MIROIR’S BREACH
OF THIS LIMITED WARRANTY OR THE USE OF THE PRODUCT, REGARDLESS OF THE
FORM OF ACTION WHETHER IN CONTRACT,TORT (INCLUDING NEGLIGENCE) OR ANY
OTHER LEGAL OR EQUITABLE THEORY, EVEN IF MIROIR HAS BEEN ADVISED OF THE
POSSIBILITY OF SUCH DAMAGES. IN NO EVENT WILL MIROIR’S TOTAL CUMULATIVE
LIABILITY EXCEED THE PRICE PAID BY CONSUMER FOR THE PRODUCT.
Some states do not allow the exclusion or limitation of incidental or consequential damages,
so the above limitation or exclusion may not apply to you. If you have any questions
concerning this statement of limited warranty please email Miroir at [email protected] for
any more questions.
25
Page 28

Miroir assumes no responsibility for any errors that may appear in this manual.
Information contained herein is subject to change without notice.
© 2015 Miroir USA. All rights reserved. Miroir is a registered trademark of Miroir
USA in the US and other countries. All other trademarks are the property of their
respective owners.
MP150W-091420151448
 Loading...