

Page 1
FX-3500
Fire Alarm Control Panel
LT-1083 Rev.2.1
December 2013
Installation and Operation Manual
For the latest compatability information visit www.mircom.com/deviceguide
Page 2

Page 3

Table of Contents
Table of Contents
1.0 Industry Canada and FCC Notice 9
1.1 Notice for all FX-3500 Series Built-In UDACTs Sold in Canada .................................... 9
1.2 Industry Canada Notice ................................................................................................. 9
1.3 Notice for all FX-3500 Series Built-in UDACTs Sold in the U.S.A. ................................ 9
1.4 FCC Notice .................................................................................................................... 10
2.0 Introduction 11
2.1 The FX-3500 Addressable Fire Alarm Control Panel ....................... ... ... .... ... ... ... ... ........ 11
2.1.1 Optional Items ................................................................................................................ 11
2.2 General Notes ................................................................................................................ 12
2.3 Contact Us ..................................................................................................................... 13
2.3.1 General Inquiries ............................................................................................................ 13
2.3.2 Customer Service ......................................................................... ... ... ........................... 13
2.3.3 Technical Support .. ... ... ... .... ... ... ... ....................................... ... ... .... ... ... ... .... ... ... ... ... ........ 13
2.3.4 Website ............................... ................................................................... ........................ 13
3.0 FX-3500 Overview 14
3.1 FX-3500 Fire Alarm Control Panel Models .................................................................... 14
3.2 FX-3500 System Components ............................ ....................................... .................... 15
3.2.1 Devices .......................................................................................................................... 20
4.0 Installation 23
4.1 BBX-1024DS and BBX-1024DSR Mechanical Installation ............................................ 23
4.2 Installation Tips .............................................................................................................. 24
4.3 Installing Adder Modules ................................................................................................ 24
4.3.1 Installing the PR-300 Polarity Reversal and City Tie Module ........................................ 28
4.4 Installing the ALC-636 Dual Loop Adder ........................................................................ 28
4.4.1 Installing the RAX-1048TZDS Display Adder Module .................................................... 30
5.0 Operation 31
5.1 Addressable/Analog Devices ......................................................................................... 31
5.1.1 Supervision of Devices .................................................................................................. 32
5.1.2 Device LEDs .................................................................................................................. 32
5.1.3 Alarm Conditions ....................... ... ... .... ... ... ... .... ... ... ....................................... ... ... ... .... .... 32
5.1.4 Drift Compensation ........................................................................................................ 33
5.1.5 Auto Test ........................................................................................................................ 33
5.2 Configurable Input Types ............................................................................................... 33
3
Page 4

Table of Contents
5.2.1 Alarm Input (Non-Verified) ............................................................................................. 34
5.2.2 Supervisory Inputs ................ .... ... ... ... ... .... ... ....................................... ... ... ... .................. 34
5.2.3 Building/Property Safety Input ............... .... ... ... ... .... ...................................... .... ... ... ... ... .. 35
5.2.4 Priority Alarm .................................................................................................................. 35
5.2.5 Trouble-Only Input ......................................................................................................... 35
5.2.6 Waterflow Alarm Input ............................... ... ... ... .... ... ... ....................................... ... ... ... .. 36
5.2.7 System Status Correlations ....................... ... ... ... .... ... ..................................................... 36
5.2.8 Audible Walktest ....................... ... ... ... ....................................... ... ... .... ... ... ... .................. 36
5.2.9 Silent Test .......................................... ... ....................................... ... ............................... 36
5.2.10 Manual Day/Night ........................................................................................................... 37
5.2.11 Auto Day/Night ............................................................................................................... 37
5.2.12 Verified Alarm Input ........................................................................................................ 37
5.3 Output Types .................................................................................................................. 37
5.3.1 Signal Output ................................................................................................................. 38
5.3.2 Strobe Type Settings ...................................................................................................... 38
5.3.3 Relay Output .................................................................................................................. 39
5.4 NAC Circuit Operation ........................ ... .... ... ... ... .... ... ... ....................................... ... ... ... .. 39
5.5 Single Stage Operation .................................................................................................. 40
5.6 Two-Stage Operation ......................................... .... ... ... ... .... ...................................... ... .. 40
5.7 Evacuation Codes .......................................................................................................... 42
5.7.1 Two Stage Alert Code .................................................................................................... 42
5.8 Positive Alarm Sequence ............................................................................................... 42
5.8.1 Enabling or Disabling the Positive Alarm Sequence ...................................................... 43
5.9 Remote Annunciator Operation ....................................... ............. ............. ............. ........ 44
5.9.1 Supervision of annunciators ........................................................................................... 44
5.9.2 RAX-LCD-LITE Shared Display Annunciator ................................................................. 44
5.9.3 RAM-3500-LCD Shared Display Annunciator ........................... ... ... .... ... ... ... .... ... ... ... ... .. 44
5.9.4 Conventional Annunciators ............................................................................................ 45
5.9.5 SRM-312 Smart Relay Module ...................................................................................... 45
5.10 Dialer Operation ............................................................................................................. 45
5.10.1 Event Reporting ............................................................................................................. 45
5.10.2 Telephone line supervision ............................................................................................ 45
5.11 Using the Operation Menu from the Control Panel ........................................................ 47
5.11.1 Setting the Time ........... ... ... ... .... ... ... ... ............................................................................ 48
5.11.2 Setting the Password ..................................................................................................... 48
5.11.3 Reports ........................................................................................................................... 49
5.11.4 Clear Logs ...................................................................................................................... 52
5.11.5 Walk Test ....................................................................................................................... 52
5.11.6 Bypass ........................................................................................................................... 53
5.11.7 Auxiliary Disconnect ....................................................................................................... 57
5.11.8 Test Dialer ...................................................................................................................... 57
5.11.9 After Hours ..................................................................................................................... 57
5.11.10 Clear Verify Count .......................................................................................................... 58
5.11.11 Ground Fault Test - Factory Use Only ........................................................................... 58
5.11.12 Positive Alarm Sequence ............................................................................................... 58
4
Page 5

Table of Contents
5.11.13 Exit .................................. .................................................................... ........................... 59
6.0 Indication & Controls 60
6.1 Indication and Controls ............. ... ... .... ... ... ... .... ... ....................................... ... ... ... ... .... ... . 60
6.2 LCD Display ................................................................................................................... 60
6.2.1 Numeric Keypad and Cursor Buttons ............................................................................ 61
6.3 Common LED Indicators and Control Buttons ............................................................... 62
6.3.1 Flash Rates .................................................................................................................... 65
7.0 Wiring 66
7.1 Wiring Tables ............................................................................ .... ... ... ........................... 66
7.1.1 Addressable Loop Wiring Maximums ............................................................................ 66
7.1.2 RS-485 Wiring to Annunciators and other Devices ........................................................ 66
7.1.3 NAC and Auxiliary Power Supply Circuits ...................................................................... 66
7.1.4 Input Circuits .................................................................................................................. 67
7.2 Wire Routing .................................................................................................................. 68
7.3 Addressable Loop Wiring ............................................................................................... 69
7.3.1 Addressable Loop Wiring - Class B or Style 4 ....... ....................................... ................. 69
7.3.2 Addressable Loop Wiring - Class A or Style 6 ....... ....................................... ................. 69
7.3.3 Addressable Loop Wiring - Class A or Style 7 ....... ....................................... ................. 70
7.4 NAC Circuit Wiring ......................................................................................................... 70
7.4.1 NAC Circuit – Class B or Style Y Wiring ............................................. ... .... ... ... .............. 71
7.4.2 NAC Circuit – Class A or Style Z Wiring ............. ... ... .... ... ... ... ... .... ................................. 71
7.4.3 UL 864 Rev. 9 Addressable Supervised Output Module Wiring ......... ... ....... ... ... ... .... ... . 72
7.4.4 RTI-1 Common Remote Trouble Indicator Wiring ......................... ............. ............ ........ 72
7.5 Module and Devices Wiring ........................................................................................... 73
7.5.1 Dialer Wiring ............................. ... ... .... ... ... ... .... ... ... ....................................... ... ... ... ........ 73
7.5.2 Connecting to a DCS SurGuard Receiver ..................................................................... 74
7.5.3 PR-300 Polarity Reversal and City Tie Module Wiring .................................................. 75
7.6 Power Supply Wiring ...................................................................................................... 76
7.6.1 Main Power Supply ... ... ... .... ... ... ... ... ....................................... ... .... ... ... ... .... ... ... ... ... .... .... 76
7.6.2 Supervision of Auxiliary Supplies ................................................................................... 77
7.7 System Checkout ........................................................................................................... 79
7.7.1 Before Turning The Power ON ...................................................................................... 79
7.7.2 Power-up Procedure .... ................................................................................. ................. 79
7.8 Troubleshooting ............................................................................................................. 79
7.8.1 Circuit Trouble ........................... ... ....................................... ... ... .... ... ... ... ........................ 79
7.8.2 Ground Fault .................................................................................................................. 79
7.8.3 Battery Trouble .............................................................................................................. 79
7.8.4 Common Trouble ........................................................................................................... 79
5
Page 6

Table of Contents
8.0 Appendix A - Compatible Receivers 80
9.0 Appendix B - FX-3500 Series Compatible Devices 81
9.1 FX-3500 Series ULI Listed Compatible Devices ............................................................ 81
9.1.1 ULI Listed Compatible Addressable Devices ................................................................. 81
9.1.2 ULI Listed Compatible Two-Wire Smoke Detectors ............... ........................................ 84
9.2 FX-3500 Compatible Horn/Strobes ................................................................................ 86
9.3 FX-3500 Series ULC Listed Compatible Devices .......................................................... 87
9.3.1 ULC Listed Compatible Addressable Devices ............................................................... 87
9.3.2 ULC Listed Two-Wire Smoke Detectors ........................................................................ 90
9.3.3 UL and ULC Listed Supported Non-Synchronous Horn/Strobes ................................... 90
10.0 Appendix C - Manual Panel Configuration 91
10.0 COMMAND MENU ......................................................................................................... 91
10.0 COMMAND MENU/ 1. CONFIGURATION MENU ......................................................... 91
10.0 CONFIGURATION MENU/1. PANEL CONFIGURATION ............................................. 91
10.0 PANEL CONFIGURATION/1. FEATURES .................................................................... 91
Note: PANEL CONFIGURATION/2. ADDRESS CFG. ............................................................ 94
Note: PANEL CONFIGURATION/3. DEVICE LABEL .............................................................. 94
Note: PANEL CONFIGURATION/4. USER MESSAGE .......................................................... 95
Note: PANEL CONFIGURATION/5. LANGUAGE ................................................................... 95
11.0 Appendix D - Reporting 96
11.1 Ademco Contact-ID FX-3500 Series Event Codes ....................................................... 96
11.2 Security Industries Association SIA Format Protocol FX-3500 Series Event Codes ..... 97
12.0 Appendix E - Specifications And Features 98
12.1 FX-3500 Fire Alarm Control Panel ................................................................................. 98
12.2 FX-3500 System Module and Annunciator Specifications ........................................... .. 99
13.0 Appendix F - Battery Calculations 100
14.0 Warranty and Warning Information 102
6
Page 7

List of Figures
List of Figures
Figure 1 FX-3500 with DOX-1024DSR ............. ... ... ... .... ... ... ... .... ... ... ... ... .... ... ... ... .... ... ... .............. 14
Figure 2 BBX-1024DS and BBX-1024DSR Installation Instructions and Dimensions ................. 23
Figure 3 Main Board with all Adder Modules Installed ......................... ... .... ... ... ... .... ... ... ... ... ........ 25
Figure 4 Port and Jumper Locations on Main Board .................................................................... 26
Figure 5 Installing the PR-300 Polarity Reversal and City Tie Module ........................................ 28
Figure 6 Installing the ALC-636 Dual Loop Adder ........................................................................ 29
Figure 7 FX-3500 Configurator Date and Time Settings ...................................... .... ... ... ... ... .... ... . 32
Figure 8 Enabling the Positive Alarm Sequence .. ... ... .... ... ... ... .... ... ... ... ... .... ... ... ... .... ... ... ... ... .... ... . 43
Figure 9 Operation Menu ............................................................................................................ 47
Figure 10 LED Indicators and Control Buttons .............................. ... ... ... ... .... ... ... ... .... ... ... ... ... .... ... . 60
Figure 11 Numeric Keypad ............................. .... ... ... ... .... ... ........................................................... 61
Figure 12 Wire Routing ................ ....................................... ... ... .... ... ... ... ... .... ... ... ... ........................ 68
Figure 13 Addressable Loop Wiring - Class B or Style 4 .............................. ... ... ... ........................ 69
Figure 14 Addressable Loop Wiring - Class A or Style 6 .............................. ... ... ... ........................ 69
Figure 15 Addressable Loop Wiring - Class A or Style 7 .............................. ... ... ... ........................ 70
Figure 16 NAC Circuit – Class B or Style Y Wiring .......................................... ... ... .... ... ... ... ... .... ... . 71
Figure 17 NAC Circuit – Class A or Style Z Wiring .......... ... ... ... .... ... ... ... ... .... ... ... ... .... ... ... ... ... .... ... . 71
Figure 18 RTI-1 Common Remote Trouble Indicator Wiring .......................................................... 72
Figure 19 Wiring the Dialer ............................ ....................................... ... .... ... ... ... .... ... ................. 73
Figure 20 Connecting an FX-3500 FACP to a DCS Surguard System Receiver ............. .............. 74
Figure 21 Wiring the PR-300 Polarity Reversal and City Tie Module ............................................ 75
Figure 22 Main Power Supply Wiring and Connections ...... ... ... .... ... ... ...... .... ... ... ... .... ... ... ... ... .... ... . 77
Figure 23 Supervision of Auxiliary Supplies ................................................................................... 78
7
Page 8

List of Tables
Table 1 FX-3500 System Components .. ... ... ... ... .... ... ... ... .... ... ... .......................................... ... ... .. 15
Table 2 Advanced Protocol Detectors ......................................................................................... 20
Table 3 Advanced Protocol Intelligent Modules .......................................................................... 20
Table 4 Advanced Protocol Manual Stations .............................................................................. 21
Table 5 Ancillary Modules ......... ... ... ... .... ... ....................................... ... ... ... ... .... ... ... ... .... ... ........... 21
Table 6 Bases .............. ... ... ... ....................................... ... .... ... ....................................... .............. 21
Table 7 CLIP Detectors ............................. ... ... ... .... ... ... ... .... ... ....................................... ... ... ........ 22
Table 8 CLIP Modules ................................................................................................................. 22
Table 9 Main Board Connectors and Jumper ............................................................................. 27
Table 10 PR-300 Polarity Reversal and City Tie Module Connectors and Jumpers ..................... 28
Table 11 ALC-636 Dual Loop Adder Connectors and Jumpers .................................................... 29
Table 12 UL864 90.23 Table ......................................................................................................... 31
Table 13 Configurable Input Types ............................................................................................... 33
Table 14 Configurable Output Types ............................................................................................ 38
Table 15 Annunciator Address DIP Switch Settings ..................................................................... 44
Table 16 List Bypass Special Characters ..................................................................................... 55
Table 17 Keypad and Cursor buttons descriptions ....................................................................... 61
Table 18 LED Indicators and Control Buttons ............................................................................... 62
Table 19 Advanced Protocol and CLIP Devices Addressable Loop Wiring Table ........................ 66
Table 20 NAC and Auxiliary Power Circuits Wiring Table ........................................ ................ ..... 66
Table 21 MIX-502MAP(A) Conventional Zone Module Input Circuit Wiring Table ........................ 67
Table 22 Power Supply Electrical Ratings .................................................................................... 76
Table 23 Compatible DACR Receivers .................................... ............................................. ........ 80
Table 24 ULI Advanced Protocol Detectors .................................................................................. 81
Table 25 ULI Advanced Protocol Intelligent Modules ................................................................... 81
Table 26 ULI Advanced Protocol Manual Stations ........................................................................ 81
Table 27 ULI Ancillary Modules .................................................................................................... 82
Table 28 ULI Bases .................................. ... ... ... ... ....................................... ... .... ... ... ... .... .............. 82
Table 29 ULI Intelligent Detectors ................................................................................................. 82
Table 30 ULI Intelligent Modules ................................................................................................... 83
Table 31 ULI Two-Wire Smoke Detectors ..................................................................................... 84
Table 32 FX-3500 Compatible Horn/Strobes ..................................... ........................................... 86
Table 33 ULC Advanced Protocol Detectors ................................................................................ 87
Table 34 ULC Advanced Protocol Intelligent Modules ................... .... ... ... .....................................
Table 35 ULC Advanced Protocol Manual Stations ...................................................................... 87
Table 36 ULC Ancillary Modules ................................................................................................... 88
Table 37 ULC Bases ......... ... ... .... ... ... ....................................... ... ... .... ... ... ... ... .... ... ... ..................... 88
Table 38 ULC Intelligent Detectors ...... .... ... ... ... ... ....................................... ... .... ... ... ... .... ... ... ... ..... 88
Table 39 ULC Intelligent Modules ..... ... .... ... ... ............................................................................... 88
Table 40 ULC Two-Wire Smoke Detectors .......... ......................................................................... 90
Table 41 Contact-ID Event Codes ................................................................................................ 96
Table 42 SIA-DCS Event Codes . ... ... ... .... ... ... .......................................... ..................................... 97
Table 43 FX-3500 Specifications ................ ... ............................................................................... 98
Table 44 FX-3500 System Modules and Annunciator Specifications ................... ... ... .... ... ... ... ... .. 99
Table 45 Recommended Batteries ................................................................................................ 101
87
8
Page 9

Industry Canada and FCC Notice
!
i
1.0 Industry Canada and FCC Notice
1.1 Notice for all FX-3500 Series Built-In UDACTs Sold in Canada
Mircom's FX-3500 SERIES BUILT-IN UDACT Communicator described in this manual is listed
by Underwriters Laboratories Canada (ULC) for use in slave application under Standard ULCS527 (Standard for Control Units for Fire Alarm Systems) and ULC-S559 (Equipment for Fire
Signal Receiving Centres and Systems). These Communicators should be installed in
accordance with this manual; the Canadian / Provincial / Local Electrical Code; and/or the
local Authority Having Jurisdiction (AHJ).
1.2 Industry Canada Notice
Repairs to certified equipment should be made by an authorized Canadian maintenance
facility designated by the supplier. Any repairs or alteration made by the user to this
equipment, or equipment malfunctions, may give the telecommunications company cause to
request the user to disconnect the equipment. Users should ensure for their own protection
that the Earth Ground connections of the power utility, telephone lines and internal metallic
water pipe system, if present, are connected together. This is necessary both for proper
operation and for protection.
Attention: Users should not attempt to make such connections themselves, but
should contact the appropriate electric inspection authority, or
electrician, as appropriate.
Users should not attempt to make such connections themselves, but should contact the
appropriate electric inspection authority, or electrician, as appropriate
1.3 Notice for all FX-3500 Series Built-in UDACTs Sold in the
U.S.A.
Notes: The Ringer Equivalence Number (REN) assigned to each terminal device
provides an indication.
The termination on an interface may consist of any combination of devices
subject only to the requirement that the sum of the Ringer Equivalence Numbers
of all the devices does not exceed 5.
The Label Identification Number for this product is xxx. The zzz represents the REN without a
decimal point (e.g., zzz is a REN of z.zz). For earlier products, the REN is separately shown
on the label.
Mircom's FX-3500 SERIES BUILT-IN UDACT Digital Communicator described in this manual
is listed by Underwriters Laboratories Inc.
(ULI) for use in slave application in conjunction with a Listed Fire Alarm Control Panel under
Standard 864 (Control Units for Fire Protective Signalling Systems). These Communicators
comply with the National Fire Protection Association (NFPA) performance requirements for
UDACTs and should be installed in accordance with NFPA 72 Chapter 4 (Supervising Station
Fire Alarm System). These Communicators should be installed in accordance with this
9
Page 10

manual; the National Electrical Code (NFPA 70); and/or the local Authority Having Jurisdiction
(AHJ).
1.4 FCC Notice
This equipment complies with Part 68 of the FCC rules and the requirements adopted by the
ACTA. On the telco transformer of this equipment is a label that contains, among other
information, a product identifier in th e format US:XXXXXXXX. If requested, this number must
be provided to the telephone company. This equipment is capable of seizing the line. This
capability is provided in the hardware.
Type of Service
The Communicator is designed to be used on standard device telephone lines. It connects to
the telephone line by means of a standard jack called the USOC RJ-11C (or USOC FJ45S).
Connection to telephone company provided coin service (central office implemented systems)
is prohibited. Connection to party lines service is subject to state tariffs.
Telephone Company Procedures
The goal of the telephone company is to provide you with the best serv ice it can. In orde r to do
this, it may occasionally be necessary for them to make changes in their equipment,
operations or procedures. If these changes might affect your service or the operation of your
equipment, the telephone company will give you notice, in writing, to allow you to make any
changes necessary to maintain uninterrupted service. In certain circumstances, it may be
necessary for the telephone company to request information from you concerning the
equipment which you have connected to your telephone line. Upon request of the telephone
company, provide the FCC registration number and the ringer equivalence number (REN);
both of these items are listed on the equipment label. The sum of all of the REN’s on your
telephone lines should be less than five in order to assure proper service from the telephone
company. In some cases, a sum of five may not be usable on a given line.
Industry Canada and FCC Notice
If Problems Arise
If any of your telephone equipment is not operating pr operly, you should immediately remove it
from your telephone line, as it may cause harm to the telephone network. If the telephone
company notes a problem, they may temporarily discontinue service. When practical, they will
notify you in advance of this disconnection. If advance notice is not feasible, you will be
notified as soon as possible. When you are notified, you will be given the opportunity to correct
the problem and informed of your right to file a complaint with the FCC. Contact your
telephone company if you have any questions about your phone line. In the event repairs are
ever needed on the Communicator, they should be performed by Mircom Technologies Ltd. or
an authorized representative of Mircom Technologies Ltd. For information contact Mircom
Technologies Ltd. at the address and phone numbers shown on the back page of this
document.
10
Page 11

2.0 Introduction
i
This document provides information for the successful installation and operation of the FX-
3500.
2.1 The FX-3500 Addressable Fire Alarm Control Panel
Mircom’s FX-3500 Addressable Fire Alarm Control Panel provides the following:
• Advanced Protocol mode with one or three loops with 159 addre ssable sensors and 159
addressable modules per loop.
• CLIP Device compatible.
• Four Power Limited Class B (Style 4) or Class A (Style 6 or 7) NAC circuits.
• NAC circuits may be configured as silenceable signal, non-silenceable signal,
silenceable strobes, non-silenceable strobes, or relay outp ut. The audible signal may be
Steady, Temporal Code, California Code, or March Time.
• Supports sync strobe protocols from major manufacturers.
• Software configuration.
• Two-stage, alarm verification, waterflow retard and positive alarm sequence operations.
• Configurable Signal Silence Inhibit, Auto Signal Silence, Two-Stage Operation, and
One-Man Walk Test.
• Subsequent Alarm, Supervisory, Monitor and Trouble operation.
• Relay Contacts for Common Alarm, Common Supervisory and Common Tr ouble all
non-disconnectable and Auxiliary Alarm Relay (disconnectable).
• Built-in Dialer Module.
Introduction
2.1.1 Optional Items
• Supports up to 2 RAX-1048TZDS Display Adder Modules.
• Semi-flush or surface mountable enclosures for retrofits and new installations.
Note: Installation of the FX-3500 Series Fire Alarm Control panel should be in
accordance with Canadian Electrical Code Part 1, ULC-S524 installation of Fire
Alarm System; or National Electrical Code NFPA 70 and NFPA 72. Final
acceptance subject to the Local Authority Having Jurisdiction (AHJ).
11
Page 12

2.2 General Notes
Circuits
Refers to a physical electrical interface for the analog loop, indicating signals or relays, and
common alarm, supervisory, and trouble relay outputs.
Zone/Group
Is a logical concept for a Fire Alarm Protected Area, and will consist of at least one Circuit. The
FX-3500 uses Groups extensively to facilitate annunciation of multiple input and output points
on the 30 (up to 64) LED display and to facilitate the bypassing of inputs and outputs.
Display Points
The FX-3500 LCD display annunciates the status of the system and connected devices. There
are up to two (2) RAX-1048TZDS Display Adder Module Display point s that may be co nfigured
to assign LEDs to groups of input s or ou tputs. There are two LEDs for every display point; one
single color (yellow) and one dual color (red/yellow).
Wiring Styles
The analog loop can be connected in Class B (Style 4) or Class A (Style 6 or 7) configurations.
Introduction
12
Page 13

2.3 Contact Us
For General Inquiries, Customer Service and Technical Support you can contact us Monday to
Friday 8:00 A.M. to 5:00 P.M. E.S.T.
2.3.1 General Inquiries
To ll Free 1-888-660-4655 (North America Only)
Introduction
Local 905-660-4655
Email mail@mircom.com
2.3.2 Customer Service
To ll Free 1-888-MIRCOM5 (North America Only)
Local 905-695-3535
Toll Free Fax 1-888-660-4113 (North America Only)
Local Fax 905-660-4113
Email salessupport@mircom.com
2.3.3 Technical Support
To ll Free 1-888-MIRCOM5 (North America Only)
Local 905-695-3535
Email techsupport@mircom.com
2.3.4 Website
www.mircom.com
13
Page 14

3.0 FX-3500 Overview
This chapter lists all the possible components of an FX-3500 system .
3.1 FX-3500 Fire Alarm Control Panel Models
All FX-3500 Fire Alarm Control Panels have the following features:
• Main Board, Power Supply and Backbox.
• Multi-zone fire alarm control panel
• MAM-3500 Main Display with 4 x 20 LCD display.
• Class A (Style 6 or 7) or Class B (Style 4) analog loop(s).
• Four Power Limited Class B (Style 4) or Class A (Style 6 or 7) NAC circ uits (max 1.5
Amps each - 6.0 Amps total).
• Dedicated common alarm, supervisory, trouble, and auxiliary alarm relays.
• Additiona l RAX-1048TZDS Display Adder Module can be added to provide 96
annunciation points per Adder.
• Additional outputs include connections for a RTI remote trouble indicator, PR-300
Reverse Polarity Module, an RS-485 bus for connection of up to seven RAX-LCD-LITE,
RAM-3500-LCDs, SRM-312s and RA-1000 Series annunciators.
• Auxiliary power is available in the form of 24V FWR unfiltered and unsupervised, 24VDC
filtered and regulated, and resettable auxiliary power supply.
FX-3500 Overview
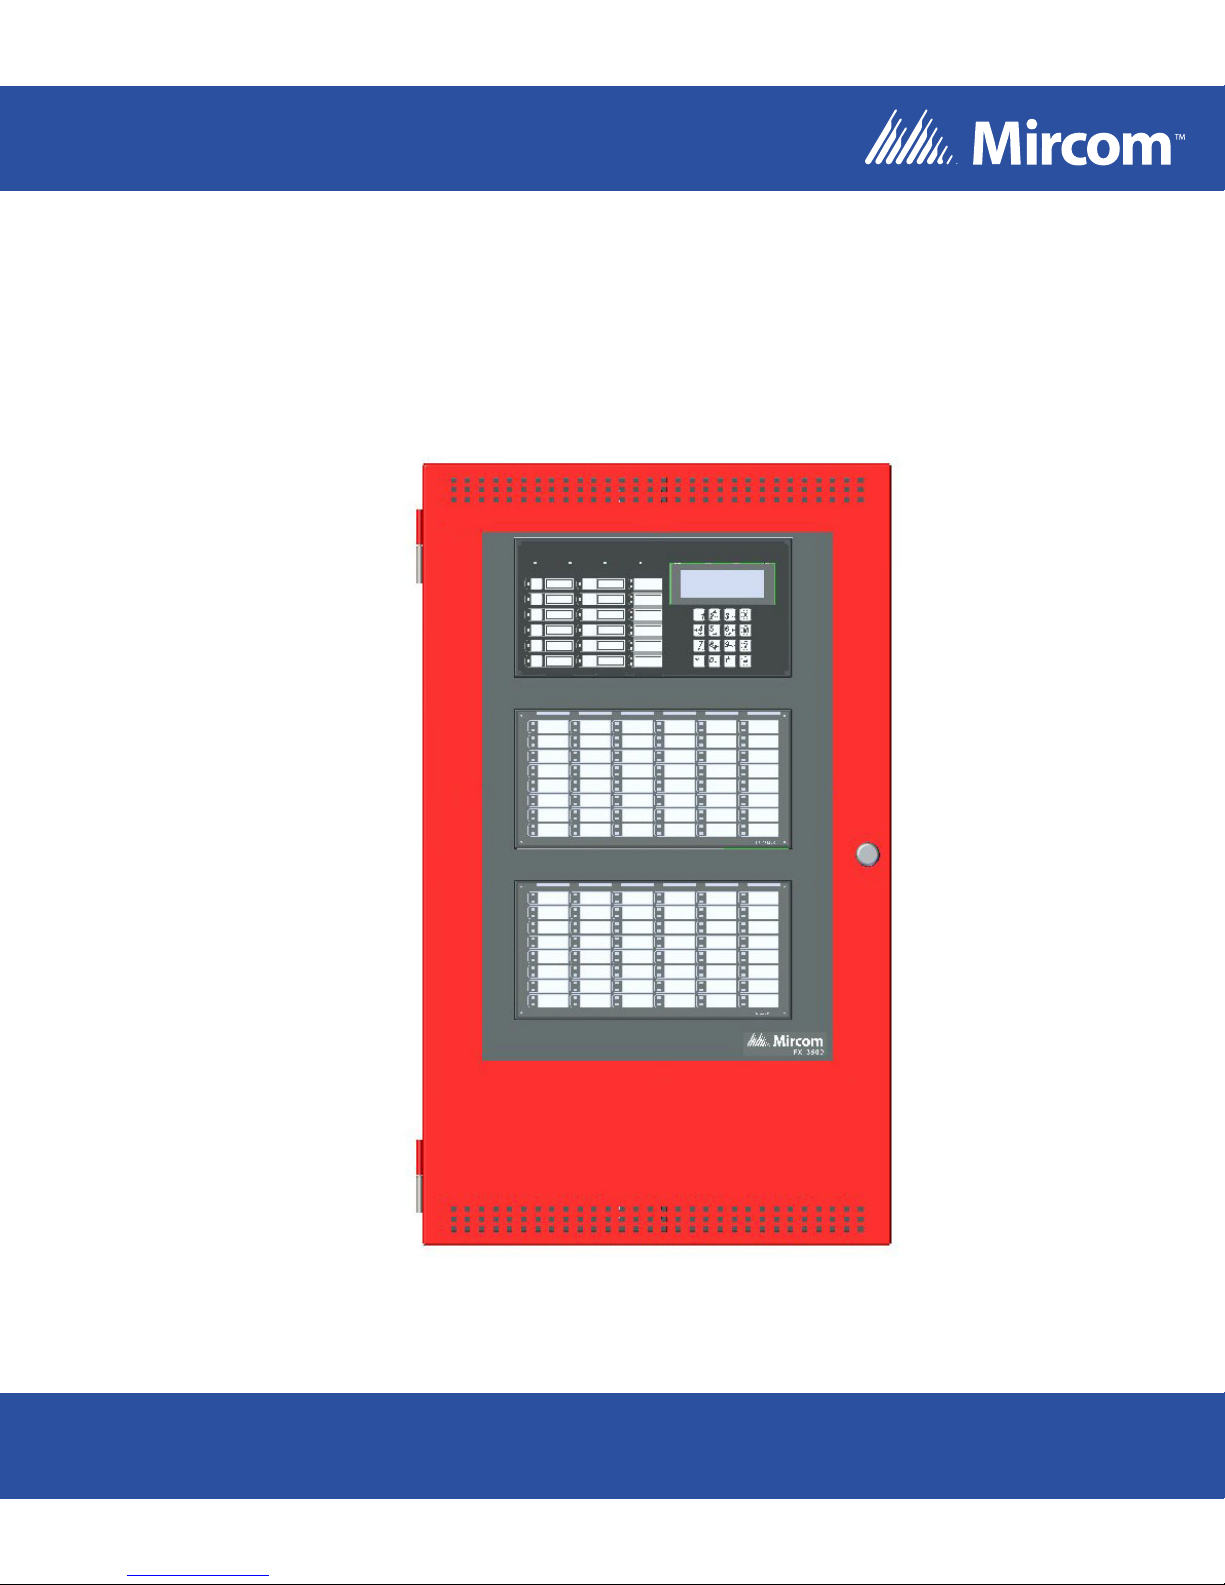
Figure 1 FX-3500 with DOX-1024DSR
14
Page 15
3.2 FX-3500 System Components
The following table describes the components of the FX-3500.
Table 1 FX-3500 System Components
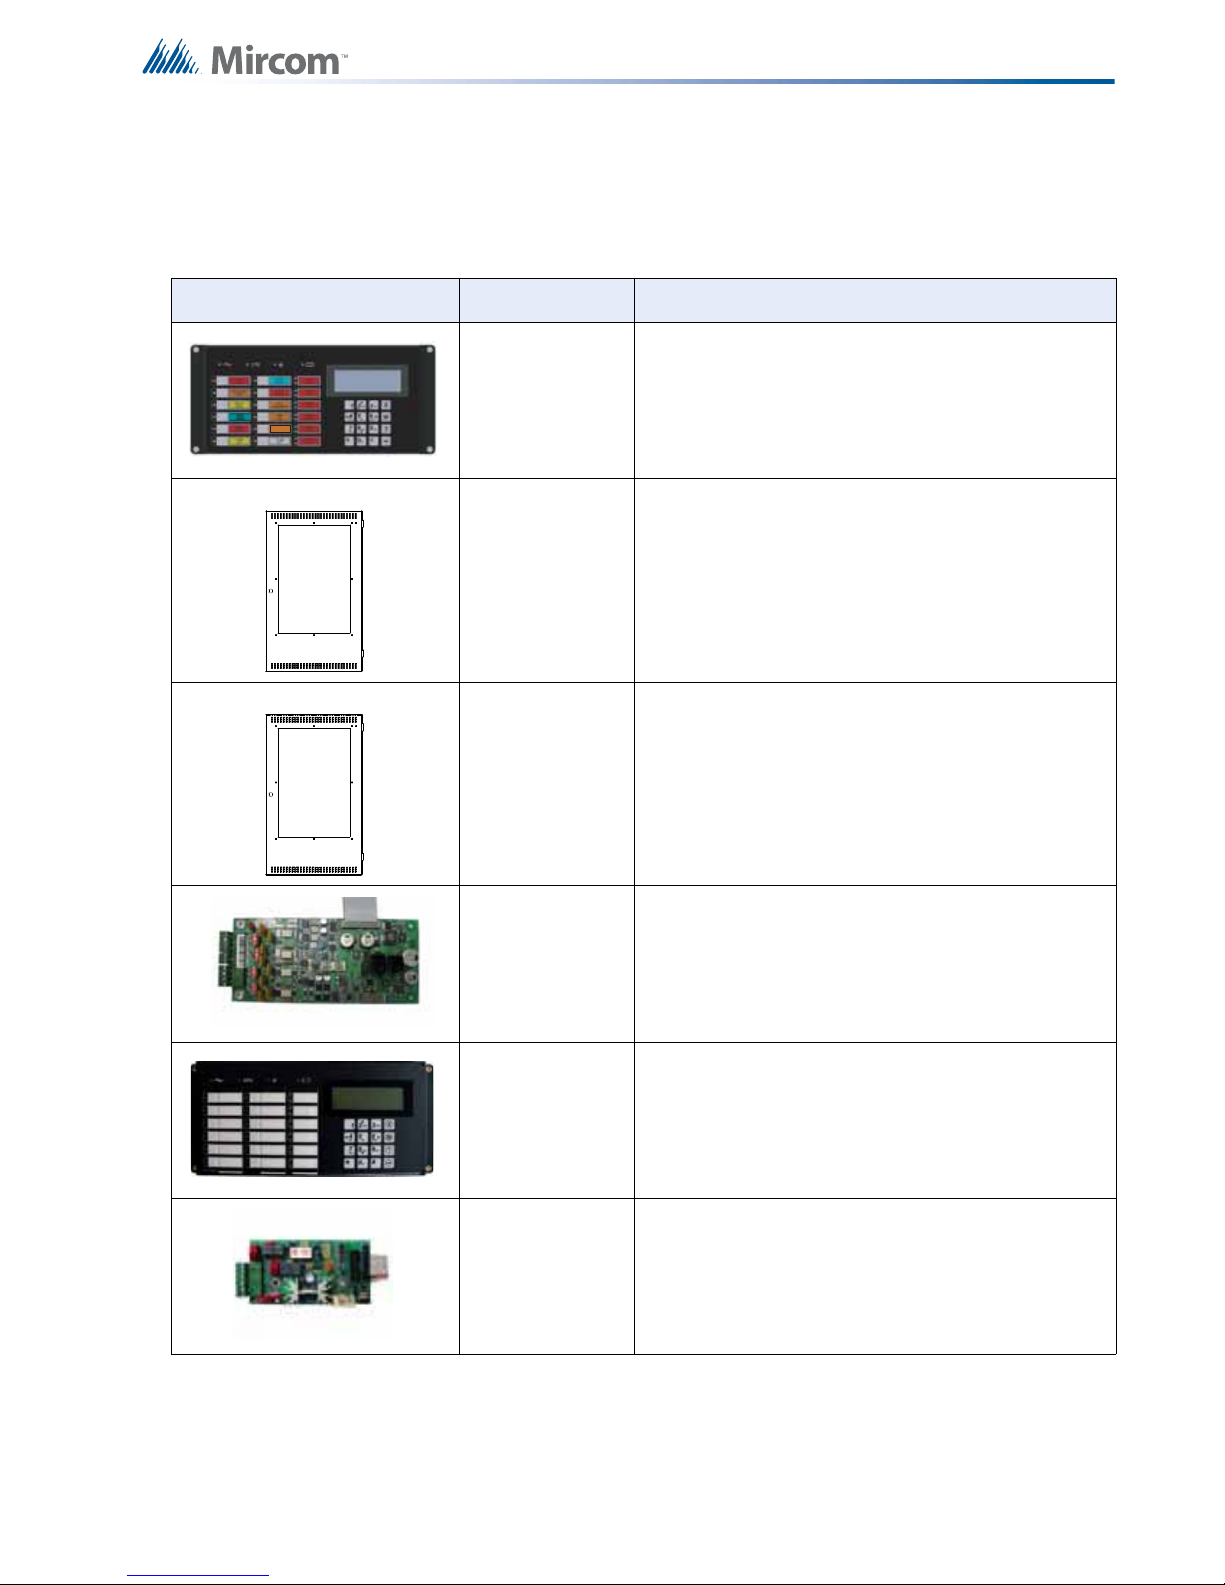
Model Description
MAM-3500 Main Display
Visual
Indicator Test
DOX-1024DS White enclosure door
FX-3500 Overview
DOX-1024DSR Red enclosure door
ALC-636 636 Point Dual Loop Adder.
RAM-3500-LCD Remote Annunciator with 4-line LCD Display.
PR-300 Polarity Reversal and City Tie Module.
15
Page 16
Table 1 FX-3500 System Components (Continued)
FA-300 SERIES
REMOTE RELAY
Model Description
FX-3500 Overview
PCS-100
SRM-312W
SRM-312R
Power Supply Interface Board use for powering
GS3060 Universal Wireless Alarm Communicator.
Smart Relay Module with White Enclosure.
Can support up to 12 relays.
Smart Relay Module with Red Enclosure.
Can support up to 12 relays.
RAM-1016TZDS
16 Point Annunciator Chassis with 16 Trouble
LEDs.
RAM-1032TZDS 32 point Remote Annunciator with 32 Tr ouble LEDs.
RAX-1048TZDS
48 Point adder annunciator display with 48 Trouble
LEDs.
16
Page 17
Table 1 FX-3500 System Components (Continued)
Model Description
JW
JW1
JW5
2 3 4 9 10 11
P2
P3
MGD-32 Graphic Annunciator.
FX-3500 Overview
P1
P4
JW
JW15
8 7 6 14 13 12
RAX-LCD-LITE Remote Annunciator with 4-line LCD Display.
JW
JW1
JW5
2 3 4 9 10 11
P2
P3
AGD-048 Graphic Annunciator Adder Driver Board.
P1
P4
JW
JW15
8 7 6 14 13 12
RTI-1
Common Remote Trouble Indicator, Buzzer and
LED.
BB-1001 White Enclosure for one annunciator.
BB-1001R Red Enclosure for one annunciator.
BB-1002 Enclosure for two annunciators.
17
Page 18

Table 1 FX-3500 System Components (Continued)
Model Description
BB-1002R Red Enclosure for two annunciators.
BB-1003 White Enclosure for three annunciators.
FX-3500 Overview
BB-1003R Red Enclosure for three annunciators.
BB-1008 Enclosure for eight annunciators.
BB-1008R Red Enclosure for eight annunciators.
BB-1012 Enclosure for twelve annunciators.
18
Page 19

Table 1 FX-3500 System Components (Continued)
Model Description
BB-1012R Red Enclosure for twelve annunciators.
MP-300 End of line resistor plate. 3K9.
FX-3500 Overview
BC-160 External Battery Cabinet.
INX-10A Intelligent NAC Expander Panel.
19
Page 20
3.2.1 Devices
The following tables lists all the devices available for the FX-3500.
Table 2 Advanced Protocol Detectors
Advanced Protocol Detectors
MIX-1251AP Advanced Protocol Ion Smoke Detector
MIX-1251APA Advanced Protocol Ion Smoke Detector ULC
MIX-2251AP Advanced Protocol Photo Smoke Detector
MIX-2251APA Advanced Protocol Photo Smoke Detector ULC
MIX-2251TAP Advanced Protocol Photo Heat Detector
MIX-2251TAPA Advanced Protocol Photo Heat Detector ULC
MIX-2251TMAP Advanced Protocol Acclimate Detector
MIX-2251TMAPA Advanced Protocol Acclimate Detector ULC
FX-3500 Overview
MIX-5251AP Advanced Protocol Heat Detector
MIX-5251APA Advanced Protocol Heat Detector ULC
MIX-5251HAP Advanced Protocol High Temperature Heat Detector
MIX-5251HAPA Advanced Protocol High Temperature Heat Detector ULC
MIX-5251RAP Advanced Protocol Rate of Rise Heat Detector
MIX-5251RAPA Advanced Protocol Rate of Rise Heat Detector ULC
Table 3 Advanced Protocol Intelligent Modules
Advanced Protocol Intelligent Modules
MIX-M500MAP Advanced Protocol Monitor Module
MIX-M500MAPA Advanced Protocol Monitor Module ULC
MIX-M500RAP Advanced Protocol Relay Control Module
MIX-M500RAPA Advanced Protocol Relay Control Module ULC
MIX-M500SAP Advanced Protocol Supervised Control Module
MIX-M500SAPA Advanced Protocol Supervised Control Module ULC
MIX-M501MAP Advanced Protocol Mini Monitor Module
MIX-M501MAPA Advanced Protocol Mini Monitor Module ULC
MIX-M502MAP Advanced Protocol Conventional Zone Module
MIX-M502MAPA Advanced Protocol Conventional Zone Module ULC
20
Page 21
Table 4 Advanced Protocol Manual Stations
Advanced Protocol Manual Stations
MS-401AP Addressable Single Stage Manual Station ULC
MS-402AP Addressable Two Stage Manual Station ULC
MS-701AP Addressable Single Stage Single Action Station ULC
MS-701APU Addressable Single Stage Single Action Station
MS-702AP Addressable Two St age Single Action Station ULC
MS-702APU Addressable Two St age Single Action Station
MS-710AP Addressable Single Stage Dual Action Station ULC
MS-710APU Addressable Single Stage Dual Action Station
Table 5 Ancillary Modules
Ancillary Modules
FX-3500 Overview
CR-6 Six Relay Control Module
CZ-6 Six Conventional Zone Interface Module
IM-10 Ten Input Monitor Module
MIX-M500X Fault Isolator Module
MIX-M500XA Fault Isolator Module ULC
SC-6 Six Supervised Control Module
Table 6 Bases
Bases
B210LP Intelligent Flanged Mounting Base
B210LPA Intelligent Flanged Mounting Base ULC
B224BI Intelligent Isolator Base
B224BIA Intelligent Isolator Base ULC
B224RB Intelligent Relay Base
B224RBA Intelligent Relay Base ULC
B501 Intelligent Flangeless Mounting Base
B501A Intelligent Flangeless Mounting Base ULC
DNR Intelligent non-relay photoelectric low-flow duct smoke detector housing
DNRW
DNRA Intelligent Non-relay Photoelectric Low-flow Duct Smoke Detector Housing ULC
Watertight Intelligent Non-relay Photoelectric Low-flow Duct Smoke Detector
Housing
21
Page 22
Table 7 CLIP Detectors
Intelligent Detectors
MIX-1251B Intelligent Low Profile Ionization Smoke Sensor
MIX-1251BA Intelligent Low Profile Ionization Smoke Sensor ULC
MIX-2251B Intelligent Low Profile Photoelectronic Smoke Sensor
MIX-2251BA Intelligent Low Profile Photoelectronic Smoke Sensor ULC
FX-3500 Overview
MIX-2251TB
MIX-2251TBA
Intelligent Low Profile Photoelectronic Smoke Sensor c/w 135°F Fixed Temp.
Thermal Sensor
Intelligent Low Profile Photoelectronic Smoke Sensor c/w 135°F Fixed Temp.
Thermal Sensor ULC
MIX-2251TMB Intelligent Low Profile Multi-Criteria Sensor
MIX-2251TMBA Intelligent Low Profile Multi-Criteria Sensor ULC
MIX-5251B Intelligent Low Profile Fixed Temp. Thermal Sensor 135°F
MIX-5251BA Intelligent Low Profile Fixed Temp. Thermal Sensor 135°F ULC
MIX-5251H Intelligent Low Profile High Temperature Thermal Sensor 190°F
MIX-5251HA Intelligent Low Profile High Temperature Thermal Sensor 190°F ULC
MIX-5251RB Intelligent Low Profile Fixed Temp. and Rate of Rise Thermal Sensor 135°F
MIX-5251RBA Intelligent Low Profile Fixed Temp. and Rate of Rise Thermal Sensor 135°F ULC
MIX-7251B Intelligent Low Profile Laser Smoke Detector
MIX-7251BA Intelligent Low Profile Laser Smoke Detector ULC
Table 8 CLIP Modules
Intelligent Modules
MIX-500DM Intelligent Dual Monitor Module
MIX-500DMA Intelligent Dual Monitor Module ULC
MIX-M500M Intelligent Addressable Monitor Module
MIX-M500MA Intelligent Addressable Monitor Module ULC
MIX-M500R Intelligent Addressable Relay Module
MIX-M500RA Intelligent Addressable Relay Module ULC
MIX-M500S Intelligent Addressable Supervised Control Module
MIX-M500SA Intelligent Addressable Supervised Control Module ULC
MIX-M501M Intelligent Addressable Mini-Monitor Module
MIX-M501MA Intelligent Addressable Mini-Monitor Module ULC
MIX-M502M Intelligent Addressable Interface Module
MIX-M502MA Intelligent Addressable Interface Module ULC
22
Page 23
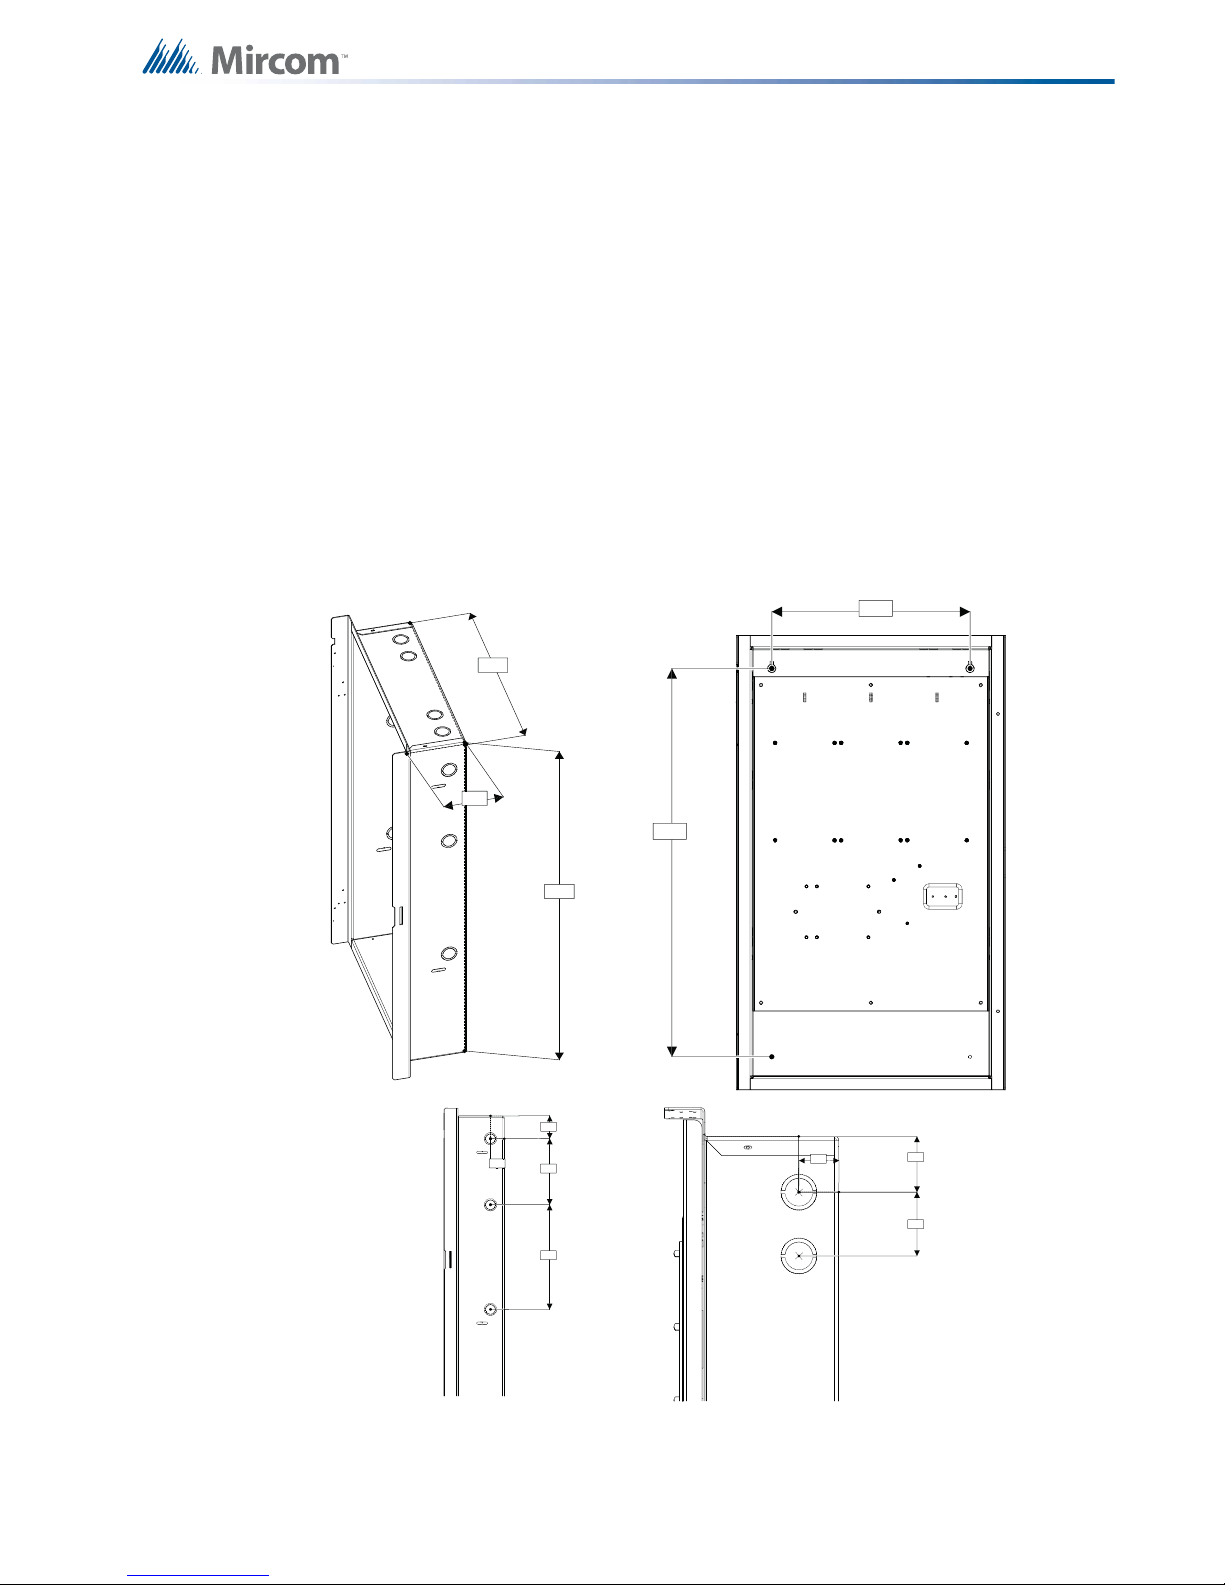
4.0 Installation
26.0 "
14.5 "
4.2 "
External Dimensions
This chapter describes the installation of the FX-3500.
4.1 BBX-1024DS and BBX-1024DSR Mechanical Installation
The BBX-1024DS and BBX-1024DSR are suitable for flush or surface mounting, and have a
built-in trim ring.
Dimensions of Enclosure (minus built in trim ring) 14.5” x 4.2” x 26”
Distance between horizontal mounting screws 12”
Distance between vertical mounting screws 23.5”
Complete Dimensions of Enclosures 16.3” x 5.5” x 27.5”
Installation
Mounting Dimensions
12.0 "
1.3 "
Side View
23.5 "
2.1 "
6.0 "
9.5 "
1.3 "
1.7 "
2.0 "
Top View
Figure 2 BBX-1024DS and BBX-1024DSR Installation Instructions and Dimensions
23
Page 24

4.2 Installation Tips
!
1. Group the incoming wires through the top of the enclosure. For easy identification and
neatness use a wire tie to group wires.
2. Be sure to connect a solid Earth Ground (from building system ground / to a cold water
pipe) to the Chassis Earth Ground Mounting Lug, and to co nnect the Ear th Gro und Wire
Lugs from the Main Chassis to the ground screw on the Backbox.
Attention: DO NOT install cable through bottom of the box. This space is reserved
for Batteries.
4.3 Installing Adder Modules
The FX-3500 Series Fire Alarm panels are shipped pre-assembled with all main components
and boards. Adder modules are not preinstalled.
The following items can be installed in the field:
Installation
• ALC-636 Dual Loop Adder
• PR-300 Polarity Reversal And City Tie Module
• PCS-100 Power Supply Interface Board
See the following diagrams for adder module installation locations. For Jumper or DIP Switch
settings refer to Table 9 and for Wiring Specifications see 7.1 Wiring Tables.
24
Page 25
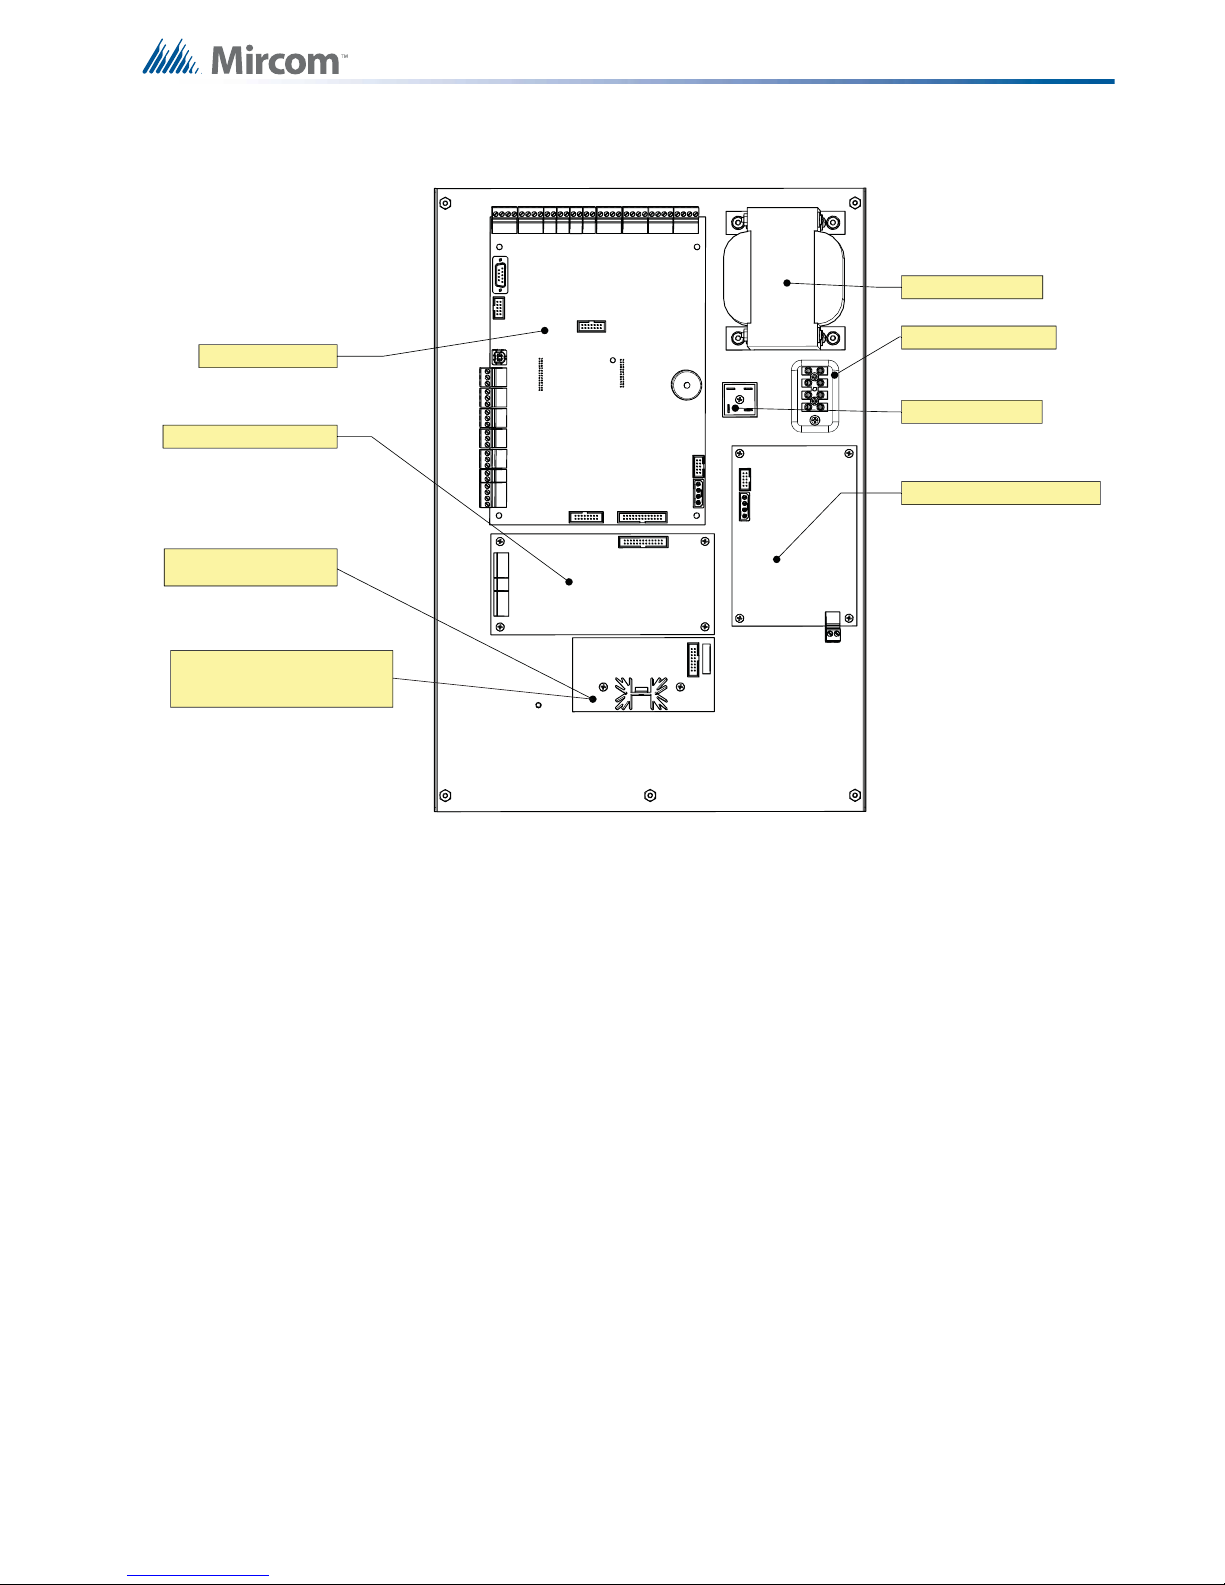
Installation
Rectifier Bridge
MD-1011 Power Supply Board
ALC-636 Dual Loop Adder
PR-300 Polarity Reversal
And City Tie Module
FX-3500 Main Board
TR-063A Transformer
Barrier Terminal Block
Note:
The PCS-100 mounts in the same
position as the PR-300.
Figure 3 Main Board with all Adder Modules Installed
25
Page 26
P2
P3
P4
P5
P8
P9
P13
P10P11P14
JW1
JW2
JW5
JW6
JW10
JW7
Buzzer
JW11
JW12
3
2
1
3
2
1
Installation
Figure 4 Port and Jumper Locations on Main Board
26
Page 27

Table 9 Main Board Connectors and Jumper
!
Installation
Connector/
Description
Jumper
P2 To Power Supply
P3 To Power Supply
P4 Ribbon Cable connects to P4 of MAM-3500
P5 To PC Configurator
P8 To PR-300
P9 To Printer
P10 To ALC-636 Loop Adder
P11 Factory Use Only
P13 USB Port
P14 Future Use
JW1 Must be ON - Allows Configuratio n Connection
JW2 Must be ON - Annunciator End of Line
JW5 Normally open. Place jumper here and power down (AC and batteries) and power
back to restore Master Password. After reset, remove jumper and leave normally
open.
JW6 Normally open to BLOCK remote configuration via modem. Place jumper here to
ALLOW for remote configuration. When jumper is set panel will indicate a trouble.
JW7 On the Main Fire Alarm Module, this jumper must be removed if a PR-300 Polarity
Reversal and City Tie Module is installed.
JW10 Must be in the 1-2 Position (Bottom 2 Pins) - Allows PC Connection through serial port
JW11 Place in the 1-2 Position (Bottom 2 Pins) for Serial Port or Place in the 2-3 Positio n
(Top 2 Pins) for Keltron Dialer
JW12 If set will output debug trace in the RS-232 port. Normally should not be used.
Attention: ADVANCED INSTALLER NOTE
Setting JW5 and JW6 at start-up will revert the panel to the default
configuration.
27
Page 28

4.3.1 Installing the PR-300 Polarity Reversal and City Tie Module
i
Mount the PR-300 as shown in Figure 5.
The Alarm Transmit signal to the PR-300 can be prog rammed to tur n OFF when signal silenc e
is active. This allows the City Tie Box to be manually reset. On subsequent alarms the
silenceable signals will resound and the City Tie Box will be retriggered.
The Trouble Transmit signal to the PR-300 can be programmed to delay AC power fail 0, 1, 2,
or 3 hours if this is the only system trouble.
JW4
Installation
SUPV
POLARITY
REVERSAL
ALARM
POLARITY
REVERSAL
TIE
CITY
+ | - + | - + | -
Mounting hole for
#6-32 screws
Mounting hole for
#6-32 screws
Reverse pola rity and city
tie module PR-300.
Mounted on hex spacer
with two screws provided
P1 P2
PR-300
Figure 5 Installing the PR-300 Polarity Reversal and City Tie Module
Table 10 PR-300 Polarity Reversal and City Tie Module Connectors and Jumpers
Item Setting
P1 Connect cable to P8 on th e Main Bo ar d of th e FX-3500
JW4 Not used. Keep jumper intact.
Note: If using a PR-300 remember to remove JW7 on the main board. For the location
of JW7 on the main board see Figure 3.
4.4 Installing the ALC-636 Dual Loop Adder
Mount the ALC-636 Dual Loop Adder as shown in Figure 5.
The panel can provide up to 350mA of alarm current to the devices on the loop. For device
currents see Appendix F - Battery Calculations on page 100.
28
Page 29

Installation
Mounted on hex spacer
with four screws provided
ALC-636
A LOOP1
B
+
-
+
-
Figure 6 Installing the ALC-636 Dual Loop Adder
Table 11 ALC-636 Dual Loop Adder Connectors and Jumpers
Item Setting
P1 Connect cable to P10 on the Main Board of the FX-3500.
29
Page 30

4.4.1 Installing the RAX-1048TZDS Display Adder Module
The FX-3500 can add a maximum of two RAX-1048TZDS Display Adder Module. No jumpers
or other physical configuration steps are required to install the RAX-1048TZDS Display Adder
Modules.
To Install the RAX-1048TZDS Display Adder Module
1. Remove the blank cover plate from the front door and install the RAX-1048TZDS with
the clear cover in the opening with the hardware provided.
2. Disconnect main and standby power and connect the cable of the second RAX1048TZDS into the open, remaining header of the existing RAX-1048TZDS. The
additional LEDs will be available for configuration as LEDs 49 to 96, when the system
power is restored.
Installation
30
Page 31

5.0 Operation
i
This chapter describes the operational capabilities of the FX-3500.
Table 12 UL864 90.23 Table
NOTICE TO USERS, INSTALLERS, AUTHORITIES HAVING JURISDICTION, AND OTHER INVOLVED PARTIES
This product incorporates field-programmable software. In order for the product to comply with the requirements in the Standard for
Control Units and Accessories for Fire Alarm Systems, UL 864, certain programming features or options must be limited to specific
values or not used at all as indicated below.
Operation
Program feature or option Permitted in UL 864? (Y/N) Possible settings
5.1 Addressable/Analog Devices
The FX-3500 System supports up to 3 loops of Advanced Protocol and CLIP compatible
devices.
Using the Advanced Protocol the FX- 3 50 0 su pp o rts up to:
• 159 addressabl e sensors per loop.
• 159 addressable modules per loop.
Using the CLIP protocol the FX-3500 supp orts up to:
• 99 analog sensors per loop.
• 99 analog modules per loop.
Configuration is done via the software configurator.
Settings permitted in UL
864
Note: When mixing modes every address assigned to CLIP removes the equal amount
of addresses from the Advanced Protocol addressable sensor and addressable
module range.
Additional Information
• The addressable loop can be configured for Class A or Class B operation.
• T-tapping is not recommended.
• Unshielded twisted pair (UTP) is recommended.
• Conventional de vices can be used in a semi addressa ble application in conjunction with
MIX-M502M, MIX-M502MA, MIX-M502MAP, or MIX-M502MAPA Intelligent Addressable
Interface Modules.
• A short or open on the loop will activate the common trouble sequence with a latching
trouble. (Class A only)
• DO NOT connect more than 25 devices to a single isolator or betwee n isolators.
• The FX-3500 FACP will test the sensitivity of a single sensor address every 4 minutes.
Each address will be tested once in approximately every 11 hours.
31
Page 32

5.1.1 Supervision of Devices
The loop interface software continuously supervises the devices on its loop against those
found during configuration for the following conditions:
• Device missing.
• Unconfigured device responding.
• Two or more devices responding to the same address.
• Wrong device type.
A communication or addressing error on a device is reported as a trouble on the associated
zone LED as configured. The detectors may be configured as non-verified or verified alarm
inputs.
5.1.2 Device LEDs
• Polling the devices on the loop causes the LED to flash normally.
• All device LEDs can be suppressed via the configurator. Suppressing the device LED’s
causes sounder or relay bases to not operate. AP devices do not support sounder or
relay bases.
• Activating devices on the loop (alarm for an input device, active for an output device)
illuminates the LED steady.
• The maximum number of active Advanced Protocol and/or CLIP devices with their LED
illuminated steady is fifty (50) per loop.
Operation
5.1.3 Alarm Conditions
Alarm conditions are determined by the system continually polling the analog devices and
comparing the reported value against stor ed thresholds for p re-alarm and alarm conditions. An
agency approved range of thresholds is provided for each type of analog device (except for
contact devices).
Devices can be individually configur ed with 2 separate thresholds, “day time” and one “night
time” or after hours operation; i.e. a device may be config ured to a low sensitivity for “day time”
and high sensitivity at “night time”. The day time threshold will be used unless the after hours
operation is active. To configure threshold settings, Enable Auto After Hours must be selected
in the configurator.
Figure 7 FX-3500 Configurator Date and Time Settings
The panel can provide up to 280mA of current to the devices on the loop at normal standby.
For device currents see Appendix F - Battery Calculations on page 100.
32
Page 33

For further information refer to the device Installation Instructions and other documentation
provided with the addressable devices, bases, and isolators.
5.1.4 Drift Compensation
Drift Compensation is built into AP devices and CLIP devices Models MIX-2251TMB and MIX7251B, and is not performed by the panel. Drift Compensation is not provided for other CLIP
devices.
Drift compensation automatically adjusts for gradually increasing effects of dust and other
accumulations of dirt in the detectors. It will adjust the thresholds to compensate for a detector
going dirty according to the gradual change in the normal clean air value receive d. When it can
no longer compensate for an increasingly dirty detector, a dirty detector trouble is indicated for
that device.
5.1.5 Auto Test
Periodically each detector is commanded to return an alarm value to test its ability to alarm. If
the device fails the test, a trouble is indicated on that device. This trouble is latched until
system reset.
5.2 Configurable Input Types
Operation
Input devices and modules m ay be configured as one of many possible inpu t types. Table 13
identifies the device types assignable to each input type. For device type descriptions see
sections 5.2.1 to 5.2.12.
Table 13 Configurable Input Types
Device Types
Description
As listed in
Input Type
Alarm Input Alarm Input 5.2.1 XX
Latched Supervisory Latched Supv 5.2.2 XX
Building/Property Safety
Input
Non-Latching
Supervisory
Priority Alarm Priority Alm 5.2.4 XX
Trouble Input Trouble Input 5.2.5 XX
Waterflow Alarm Input Waterflow 5.2.6 X
System Reset Sys Reset 5.2.7 X
Configurator
Building 5.2.3 XX
Non-Latch Supv 5.2.2 XX
located in
Section number
Detectors
Dual Mini Modules
Zone Module
Mini Monitor Module
Monitor Module
Fire Drill Fire Drill 5.2.7 X
Acknowledge Ack 5.2.7 X
Total Evacuation Total Evac 5.2.7 X
Auxiliary Disconnect Aux Disc 5.2.7 X
Buzzer Silence Buzz Sil 5.2.7 X
Signal Silence Signal Silence 5.2.7 X
33
Page 34

Input Type
!
Table 13 Configurable Input Types (Continued)
Description
As listed in
Configurator
located in
Section number
Device Types
Detectors
Dual Mini Modules
Zone Module
Operation
Mini Monitor Module
Monitor Module
Acknowledge General
Alarm
Audible Walktest Audible Walktest 5.2.8 X
Silent Test Silent Test 5.2.9 X
Manual Day/Night Manual Day/Night X
Auto Day/Night Auto Day/Night X
Auxiliary Reset Auxiliary Reset 5.2.7 X
Verified Alarm Verified Alm 5.2.12 X
Ack GA 5.2.7 X
5.2.1 Alarm Input (Non-Verified)
An un-bypassed, non-verified alarm input entering into alarm activates the common alarm
sequence.
Common Alarm Sequence
• Updates un-byp assed relay, signal, and strobe outputs based upon the ir configuration.
• Activates Alarm zone status indicators associated with the input.
• Alarm input activations d isplay first and as the highest priority on the shared display in
the common queue.
• Devices configured as alarm inputs display a pre-alarm condition on the shared display
and on the alarm zone status indicator.
• Restoring the pre-alarm condition clears the status. If the input goes from pre-alarm to
alarm, the pre-alarm status will be replaced with the alarm status for the input.
• Devices configured as alarm inputs display an alarm condition on the shared display
and on the alarm zone status indicator.
• Once an alarm input is in alarm the alarm condition is latched until system reset
(changes in status from alarm to pre-alarm or to normal are ignored).
5.2.2 Supervisory Input s
Attention: Non-latching supervisory inputs are not permitted in Canada unless
done so by the AHJ as per ULC-S527-11 4.6.3.
Devices can be configured as latching or non-latching supervisory inputs. Any un-bypassed
supervisory input entering alarm activates the common supervisory sequence.
Common Supervisory Sequence
• Updates un-byp assed relay, signal, and strobe outputs based upon the ir configuration.
• Activates Supervisory zone status indicators associated with the input.
• Supervisory input activations display as the second highest priority on the shared
display in the common queue.
• Devices configured as supervisory inputs display as supervisory conditions on the
shared display and on the supervisory zone status indicator.
34
Page 35

• Restoring the non-latching supervisory input returns all outputs correlated to the input,
!
i
that are not correlated to another active input, to normal.
• Zone display indicators update announcing the input is no longer active and removes
the message from the shared display common queue.
• If there are no other active supervisory inputs the common supervisory condition will be
restored.
Latched supervisory inputs operate the same as non-latched supervisory inputs with one
exception:
• A normal to off-normal status change indication shall be latched and only manually
resettable at the control unit or display and control centre.
5.2.3 Building/Property Safety Input
Building/Property Safety Inputs may include but are not limited to: fan status, dampers,
motors, elevators, telephones, etc.
Building/Property Safety Inputs may be programmed to LED Indicators. The input status will
activate the LED as configured.
• Building input activations display as the thir d highest priority on the shared di splay in the
common queue. They are lower than supervisory and higher than troubles.
• May also be programmed to relay, signal, and strobe outputs.
Operation
Caution: Correlating signal and strobe devices to building/property safety inputs
requires the approval of the AHJ and are not to be used for fire events.
• When an un-bypassed building circuit activates, the status display and programmed
outputs are activated.
• Restoring the building status returns all outputs correlated to the inp ut, that are not
correlated to another active input, to normal.
Note: Devices used for building inputs are to be isolated from fire operation. It is
required that these devices are placed on a separate SLC loop if Class B wiring
is used, otherwise wire the devices according to Class A (Style 7) to accomplish
isolation.
5.2.4 Priority Alarm
Increases the polling frequency and optimizes the transmission of data from the device.
5.2.5 Trouble-Only Input
An active condition on an un-bypassed trouble-only input initiates the common trouble
sequence as a non-latching trouble.
• Activates Trouble zone status indicators associated with the input.
• Trouble input activations display as the lowest priority on the shared display in the
common queue.
35
Page 36

• May also be programmed to relay, signal, and strobe outputs.
i
i
!
Note: Trouble conditions initiated as a result of a trouble-only input activating is
separate from the circuit or device supervision trouble.
5.2.6 Waterflow Alarm Input
Waterflow inputs are sampled every second. 10 samples in alarm in any given 15 second
period confirms the alarm condition. Therefore from a continuous input activation the alarm will
be processed within 10s.
LED Indication
The Alarm Zone LED indicator flashes when one sample indicates an alarm condition. If the
alarm is confirmed the LED indicator will illuminate steady. If 15 seconds elapses without any
samples in the alarm condition the LED Indicator will turn OFF. The waterflow retard operation
operates regardless of whether or not the system is in alarm.
Operation
Note: Do not use the retard operation with any external retarding device.
5.2.7 System Status Correlations
The following System Status processes can be correlated to configured (mini) monitor
modules:
• System Reset
• Fire Drill
• Acknowledge
• Total Evacuation
• Buzzer Silence
• Signal Silence
• Acknowledge Genera l Alarm
• Auxiliary Disconnect
Attention: Devices correlated with any of the above System Statuses need to be
contained within a secured enclosure accessibly only to those with the
proper authority.
5.2.8 Audible Walktest
Configures (mini) monitor modules as audible when conducting a walktest. For more
information on performing a walktest see 5.11.5 Walk Test.
5.2.9 Silent Test
Configures (mini) monitor modules as silent when conducting a walktest. For more information
on performing a walktest see 5.11.5 Walk Test.
36
Page 37

5.2.10 Manual Day/Night
i
Configures (mini) monitor modules for manual day/night alarm thresholds. For more
information on alarm thresholds see 5.1.3 Alarm Conditions.
5.2.11 Auto Day/Night
Configures (mini) monitor modules for auto day/night alarm thresholds. For more information
on alarm thresholds see 5.1.3 Alarm Conditions.
5.2.12 V erified Alarm Input
Un-bypassed verified alarm inputs entering into alarm are verified over a period of time to
determine if the alarm condition is valid.
Addressable / Analog Device Verification Process
If the system is not already in alarm:
1. A device entering into alarm initiates a 30 second delay timer.
2. When the 30 second delay times out the device is monitored for the next 60 seconds.
3. If the same device enters into alarm again during this time the alarm is confirmed. The
following will also confirm the alarm:
Operation
• Any additional Alarm Input activating aborts the verification process and confirms
the alarm.
• Any trouble detected on the circuit being verified aborts the verification process
and confirms the alarm.
LED Indication
The Alarm Zone LED indicator flashes for the duration of the verification process. If the alarm
is not confirmed the LED turns off. If the alarm is confirmed the LED illuminates steady.
Note: Conventional smoke detectors cannot utilize alarm verification with M502(AP)
zone modules.
5.3 Output Types
Output devices and modules may be configured as one of many possible output types. Table
14 identifies the device types assignable to each output type. For device type descriptions see
sections 5.3.1 to 5.3.3
Output modules on the addressable/analog loop may be configured as any of the following
output types:
• Signals
• Strobes
• Relay outputs
37
Page 38

Table 14 Configurable Output Types
i
Operation
Description
As listed in
Output Type
Relay Relay 5.3.3 XX
Signal Signal 5.3.1 XX
Strobe Strobe 5.3.2 XX
Configurator
Additional Operation Features
• When using CLIP devices once the FACP activates the sensor LED, an attached Relay/
Sounder base and any Remote Devices wired to the base are also activated.
Suppressing the device LED via the NF flag in the configurator means the Relay/
Sounder base and any Remote devices wired to the base will not activate.
• When using AP devices the FACP activates the sensor LED and the Remote Device
output separately. Suppressing the device LED via the NF flag in the configurator still
allows the activation of any remote device wired to th e base . Th e AP pro to co l does not
support Relay/Sounder Bases at this time+.
• The panel can synchronize strobes directly without the use of the synchro n ou s mo du le .
• Depending on the device, the system can detect open and short troubles and rep ort it as
an output circuit trouble.
located in
Section number
Relay Output
Device Types
Module
Supv Output
Module
5.3.1 Signal Output
For audible devices such as bells and piezo mini-horns. Signals operate in alert (two stage)
and/or evacuation rate.
5.3.2 Strobe Type Settings
Normal (non-synchronized)
• Strobe circuits operate similar to signals except that they are always turned ON
continuously (they are not affected by the alert or evacuation rates) if configured as
Normal.
• Configuring strobes as Normal does not use a sync protocol for the output circuit.
• Silenceable or non-silenceable.
Synchronized
Output circuits can be configured with various synchronization protocols.
When the output circuit is configured as strobe and also configured as non-silenceable and the
device used on the output is a combination of horn and strobe, then if the signal silence is
activated while the circuit is active the hor n(s) are silenced while the strobe keep s on flashin g.
Synchronized strobes and strobe/horn models of the following manufacturers are supported:
System Sensor, Wheelock, Secutron, and Mircom.
Note: Sile ncing of the h or n depen ds on th e feat u re pr ovided by the manu fa ctu rer of the
horn/strobe combination. Some models of the horn/strobe combination may not
have this feature and will not work as described above.
38
Page 39

5.3.3 Relay Output
Un-bypassed relay outputs are activated if any un-bypassed input circuit or common system
status which has been programmed to it is active. If the relay is configured as silenceable it is
inhibited when common auxiliary disconnect is active. Relays also turned off if they are
bypassed or if all inputs and system status correlated to the Relay Output are restored or
bypassed.
5.4 NAC Circuit Operation
NAC Circuits can be configured as
• Signal Output
• Strobe Output
• Relay Output
For more information on Outputs see 5.3 Output Types.
Powered output circuits are supervised while they are not active for both open circuits and
shorts.
Operation
The circuit will not be activated if there is a short trouble on the circuit. It will be activated if an
open trouble is indicated. A circuit trouble activates the common trouble sequence as a nonlatching trouble. Since open circuit supervision does not operate while the circuit is in alarm, if
the circuit was in trouble before it was activated, it will still indicate trouble while active. The
trouble condition will be re-evaluated when supervision resumes.
Output circuits configured as strobes can have sync protocol for synchronization if configured.
Certain strobe and strobe/horns models of the following brands are supported:
• Mircom
• Secutron
• System Sensor
• Wheelock
For a complete list of compatible Horn/Strobes see 9.2 FX-3500 Compatible Horn/Strobes.
When configured as normal, the output circuit is ON continuously when activated and does not
use any sync protocol. When configured as non-silenceable strobes, the strobes cannot be
silenced, but the horn can be silenced by pressing the 'signal silence' button.
If the strobe is configured as silenceable strobe both the horn and the strobe are silenced
(stopped) by pressing the 'signal silence' button.
39
Page 40

5.5 Single Stage Operation
In a single stage system, all alarm inputs are treated in a similar manner. Alarm inputs include
any of the following:
• Non-verified alarm
• Verified alarm
• Waterflow alarm
• Sprinkler alarm
Any of the above alarm inputs activating when the panel is not already in alarm cause the
following:
• The buzzer sounds steady.
• Cancels active fire drill.
• Common Alarm LED turns ON.
• Common Alarm relay activates if Aux disconnect is not active.
• The Auto Signal Silence timer activates (if configured).
• The Signal Silence Inhibit timer activates (if configured).
• If Aux disconnect is not active, activates all non-disconnected indicating circuits
programmed to the input.
• Activates non-disconnected strobes associated with the input.
• Activates non-disconnected signals associated with the input at the evacuation rate.
Operation
Subsequent alarms when the panel is already in alarm, cause the following:
• The alert buzzer sounds steady.
• Resounds silenced signals, turns off the Signal Silence LED, and restarts the Auto
Signal Silence timer (if configured).
• Activates continuously any additional non-disconnected strobes associated with the
input.
• Activates at the evacua tion rate any additional non-disconnected signals associated
with the new input.
5.6 Two-Stage Operation
In a two stage system, alarm inputs are either first stage (alert) inputs or second stage
(general alarm) inputs. First stage inputs include inputs from the following types of circuits:
• Non-verified alarm
• Verified alarm
• Sprinkler alarm
• Water-flow alarm
Second stage inputs include the following:
• Alarms on the general alarm inputs.
• Activation of the General Alarm button.
• Expiration of the Auto General Alarm timer.
Any of the above alarm inputs activating when the panel is not already in alarm cause the
following:
• The buzzer sounds steady.
40
Page 41

• Cancels active fire drill.
i
• Common Alarm LED turns ON.
• Common Alarm relay activates if Aux disconnect is not active.
• The Auto Signal Silence timer activates (if configured).
• The Signal Silence Inhibit timer activates (if configured).
• If Aux disconnect is not active, activates all non-disconnected indicating circuits
programmed to the input.
If the alarm is a Second S tage alarm, the following occurs:
• Activates non-disconnected strobes associated with the input.
• Activates non-disconnected signals associated with the input at the evacuation rate.
• General Alarm LED illuminates steady.
If the alarm is a First Stage alarm, the following occurs:
• Activates continuously non-disconnected strobe circuits programmed to that circuit.
• Activates with the alert code non-disconnected signal circuits programmed to that
circuit.
• Activates the Auto General Alarm timer (if configured).
• Acknowledge LED flashes.
Operation
Subsequent First Stage alarms when the panel is already in alarm, cause the following:
• The buzzer sounds steady.
• Resounds silenced signals, turns off the Signal Silence LED, and restarts the Auto
Signal Silence timer (if configured).
• If the panel is not already in General Alarm, activates additional non-disconnected
signals programmed to the new input with the Alert Code (see 5.3 Output Types on
page 37).
• If the panel is not already in General Alarm and the Acknowledge LED is ON steady
indicating that the Auto General Alarm timer has been acknowledge d, restarts the timer
and extinguishes the Acknowledge LED.
A second stage alarm (general alarm) when the p anel is alread y in alarm causes the fo llowing:
• The buzzer sounds steady.
• Activates all non-disconnected signals at the evacuation rate.
• If the Signal Silence LED is ON, it turns OFF and restarts the Auto Signal Silence timer
(if configured).
• If the Acknowledge LED is ON, turns the LED OFF.
• The General Alarm LED illuminates steady.
Alarm inputs are latching, they remain active until system reset.
Note: All circuits with process type designated as “signal or strobe” are automatically
correlated to the “fire drill” and “general alarm” status.
41
Page 42

5.7 Evacuation Codes
The following Evacuation codes can be configured for the FX-3500 FACP.
Continuous On 100% of the time.
Temporal Code 0.5 second on and 0.5 seco nd off repeate d 3 time s 1. 5s pause
March Code 0.5 second on 0.5 second off.
California Code 5 seconds on 10 seconds off.
5.7.1 Two Stage Alert Code
When configured for Two Stage operation, the FX-3500 FACP uses a pre-configured Alert
code that sounds prior to the evacuation code.
Alert Code 0.5 second on, 2.5 seconds off.
5.8 Positive Alarm Sequence
In a Positive Alarm Sequence (PAS) system, on ly smoke detectors can be dedicated as PAS
inputs. PAS Inputs can only be from the following process types:
Operation
• Non-verified alarm
• Verified alarm
Any of these alarm inputs activating when the panel is not already in alarm causes the
following:
• Buzzer sounds steady.
• Cancels active fire drill.
• Common Alarm LED turns ON.
• Individual zone LED (if programmed) turns ON.
• Common Alarm relay doe s not activate.
• PAS timer starts for 15 seconds.
• All outputs programmed to the input are not activated.
When the PAS alarm has been acknowledged by pressing the Alarm Cancel button within 15
seconds, the following sequence occurs:
• Buzzer silences
• Common Alarm LED remains ON.
• Individual zone LED (if programmed) remains ON.
• PAS timer starts for 180 seconds (3 minutes). This is the time allotted to reset the
system and avoid any true alarm sequence.
When the PAS alarm has been acknowledged within the given time limits and the system
resets, the following occurs:
• The buzzer remains silenced.
• Common Alarm LED turns OFF.
• Individual zone LED (if programmed) turns OFF.
• Cancels the alarm event with no log reference.
• Fire alarm system returns to normal.
42
Page 43

If at any time during the Positive Alarm Sequence a second alarm (PAS or otherwise) is
i
actuated or the given time limits expire, the fire alarm will go into evacuation mode and the
following occurs:
• Common Alarm relay activates if Aux disconnect is not active.
• The Auto Signal Silence timer activates (if configured).
• The Signal Silence Inhibit timer activates (if configured).
• If Aux disconnect is not active, activates all non-disconnected indicating circuits
programmed to the input.
• Activates non-disconnected strobes associated with the input.
• Activates non-disconnected signals associated with the input at the evacuation rate.
In a preconfigured FACP the Positive Alarm Sequence may be enabled or disabled as the
user requires. For more information on enabling or disabling the Positive Alarm Sequence see
5.8.1 Enabling or Disabling the Positive Alarm Sequence.
5.8.1 Enabling or Disabling the Positive Alarm Sequence
Enabling or Disabling the Positive Alarm Sequence is done using the numeric keypad. For
more information on how to use the Numeric Keypad see 6.2.1 Numeric Keypad and Cursor
Buttons on page 61. For details on configuring the FACP for PAS see LT-1148 FX-3500
Programming Manual.
Operation
How to Enable or disable the Positive Alarm Sequence
1. From the Keypad of the FACP press M to enter the Menu.
2. Using the Up and Down cursor buttons, scroll to Operation.
3. Press Enter.
4. In the Operation Menu scroll to Positive Alarm.
5. Press Enter.
6. You will now see the current status of the Positive Alarm Sequence and will be
prompted to change status.
Pos Alarm disabled
Enable ? Y
Figure 8 Enabling the Positive Alarm Sequence
7. To change the status press Enter.
Note: There will be no notification message advising a change of status.
8. To exit without changing the status press Cancel.
43
Page 44

5.9 Remote Annunciator Operation
The FX-3500 System supports the following types of annunciators
• RAX-LCD-LITE shared display annunciator.
• RAM-3500-LCD shared display annunciator.
• Conventional LED/switch annunciators.
Both types of annunciators are connected to the panel via the RS-485 serial link.
The maximum number of annunciators is seven (7). Configuration of the a nnu nciators is done
via the software configurator.
Ensure that the address DIP switch on each annunciator is set to the same value set in the
configurator. Only the first three (3) DIP switches are used for address configuration.
Table 15 Annunciator Address DIP Switch Settings
Address SW1-1 SW1-2 SW1-3
1 ON OFF OFF
Operation
2 OFF ON OFF
3 ON ON OFF
4 OFF OFF ON
5 ON OFF ON
6 OFF ON ON
7 ON ON ON
5.9.1 Supervision of annunciators
• The communications with each a nnunciator is constantly supervised by the panel and
the annunciator.
• If communications fails, the panel will activate the common trouble sequence. The
number of annunciators is set during panel configuration.
• If there is a mismatch in the total number of annunciators the panel will generate
communications trouble.
• The panel trouble is non-latching: when the correct number of annunciators is detected
the troubles will clear.
5.9.2 RAX-LCD-LITE Shared Display Annunciator
• The RAX-LCD-LITE is equipped with a large 4 line x 20 character backlit alphanumeric
LCD display which uses a simple menu system complete with a directional key pad and
switches for Enter, Menu, Cancel and Info.
• Contains a local alert buzzer.
• Under normal operation the alert buzzer is controlled by the system and operates in an
identical manner as the one in the main panel.
• If communication fails the buzzer is processed locally.
5.9.3 RAM-3500-LCD Shared Display Annunciator
• The RAM-3500-LCD operates identically to the main LCD FACP display. For ULC
approved applications some control functions are disabled.
44
Page 45

• Contains a local alert buzzer.
!
• Under normal operation the alert buzzer is controlled by the system and oper ates in an
identical manner as the one in the main panel.
• If communication fails the buzzer is processed locally.
5.9.4 Conventional Annunciators
The FX-3500 System is designed to interface with the RA-1000 series of conventional LED
annunciators. The LEDs may be configured to zone status indicators. Each conventional
annunciator contains a local alert buzzer. Under normal operation the alert buzzer is controlled
by the system and operates in an identical manner as the one in the main panel. If
communication fails it is processed locally.
5.9.5 SRM-312 Smart Relay Module
• Connects on the RS-485 loop along with other remote annunciators.
• Provides 12 relay contact outputs which actuate according to the first 12 remote LED
groups.
• Relays are bypassed by Auxiliary Bypass
• Supervised as one of the (maximum) seven permitted annunciators.
Operation
5.10 Dialer Operation
The FX-3500 is equipped with a built-in dialer. The dialer provides a means to communicate
panel status to the remote central monitoring sta tion using two de dicated phone line s. The two
standard protocols for communicating with the central monitoring station are supported by this
panel are as follows.
• SIA Format Protocol
• SIA Contact ID
Attention: As per UL864 R9 section 40.3.2.13 the dialer is not to call a number that
is call forwarded.
The automatic telephone line test and trouble report must be se nt to the
same supervising station.
5.10.1 Event Reporting
Events are reported in a special format depending upon the protocol selected. For a complete
description of the reporting codes see Appendix B on page 94.
5.10.2 Telephone line supervision
The phone lines are supervised for the presence of
• DC voltage.
• dial tone, stuttered dial tone and message waiting tone.
Supervision is carried out every two minutes as follows:
45
Page 46

Operation
1. DC voltage is supervised and if it is detected the dial tone is monitored.
2. If the phone lines are equipped with a house phone with proper connection and is in use
the supervision is suspended until the house phone is ON-HOOK again.
3. If there is an event to be reported in the dialer queue and the house phone is in use the
dialer tries the second line to report the event.
4. if that line’s house phone is also in use the dialer seizes the line. The dialer disconnects
the house phone and reports the event to the central monitoring station.
46
Page 47

5.11 Using the Operation Menu from the Control Panel
i
Operations of the FX-3500 Addressable Fire Alarm Control Panel can be managed via the
Operation Menu on the LCD Shared Display. Accessing the menus is done via the Numeric
Keypad and Cursor Buttons. For a complete description of how to use the Numeric Keypad
and Cursor Buttons see Numeric Keypad and Cursor Buttons on page 61.
The following items can be accessed through the Operation Menu:
• Setting the Time on the system
• Setting the Password on the system
• Viewing Reports
• Clearing Logs
• Walk Test Function
• Bypassing Relays
• Disconnecting Auxiliary Relays
• Testing the Dialer
• After Hours Operation
• Clearing Verification Counts
• Ground Fault Testing - Factory Use Only
Operation
Complete configuration of the system is done via the software configurator.
How to Enter the Operation Menu
1. Press the Menu button.
2. Use the DOWN Cursor key to scroll to 3. Operation and press the Enter button to enter
the Operation Menu.
Figure 9 Operation Menu
Note: Option 8. Test Dialer will only appear if there is a UDACT on-board.
3. To select an Operation use the DOWN Cursor key to scroll to desired choice and press
the Enter button.
47
Page 48

5.1 1 .1 Setting the Time
Date: Oct 08 , 2005
Time: 10 :00 PM
Access Level :1
Enter password
__________
Invalid password
Enter new password
__________
Re-enter password
__________
Sets the current date and time for the panel. Use the ‘#’ key to move the cursor forward and
the UP and DOWN key to change the date/time parameters.
5.1 1.2 Setting the Password
Sets the password for all three access levels. The minimum number of digit s fo r a password is
4. For changing a specific level of password the password required is the equivalent level or
higher level.
The user is prompted to enter the access level for which the password needs to be changed.
The user is then prompted to enter the current access level or higher level password. The
maximum number of digits allowed is ten (10).
Operation
If an incorrect password is entered an invalid password message displays on the shared LCD.
The user is given three attempts to enter the correct password. After three failed attempts the
display reverts back to the main operation menu.
If the password is correct the user is prompted to enter the new password and press the Enter
button.
To confirm the password the user is prompted to re-enter the password and press the Enter
button.
48
Page 49

5.11.3 Reports
Report Menu
1. Alarm Log
2. Event Log
3. Current levels
4. Verif Counts
5. Maint Report
6. A/P Report
Nverf alm ipt
Active 002/016
Lp:1 Addr:002
Jul 20 , 2005 09 :25 AM
Overview
Reports can be generated in command mode from the reports menu. Reports can be
displayed in a special format on the shared display for the following items:
1. Alarm log
The alarm log report displays the contents of the alarm event log on the shared display which
contains the last 400 of any of the following events:
• Activation of any alarm input or common control which activates the common alarm
sequence.
• Activation of system reset.
• Clearing of the event log (as the first entry).
Operation
Each entry contains the time and date of the ev ent and a description of wh at the ev ent was, fo r
example:
For input circuits the first line shows th e programmed message, the second line show s the
status of the circuit and the position of the event in the queue along with the total number of
events in the queue.
Pressing the INFO key gives the following additional information.
The first line shows the loop# and the address, the second line shows the date and time when
the event has occurred.
Other events are displayed in the same format with information applicable to that event only.
2. Event logs
The general event log report displays the contents of the general event log on the shared
display which contains the last 400 of any of the following events:
• Activations of any input circuits.
• Restoral of non-latching input circuits.
• Pre-alarm on any device.
• Initiation of the alarm verification sequence on a verified alarm input.
• Any system troubles.
• Activation of any system common control or any command on the command menu.
The report format is similar to the alarm log report. Pressing the INFO key shows additional
information about the log.
49
Page 50

Operation
Loop Number
Loop:__
Lp :1 Addr :001
Levl :0024 Alarm :000 %
No analog devices
found
Loop Number
Loop:__
Lp :1 Addr :001
Verify count :000
No verified devices
found
3. Current level
The current levels report displays device information for each of all eligible devices on the
target loop (specified by user) or on all eligible devices on all loops if user specifies target loop
as '0'. Eligible devices will be those present in the configuration and also detected as present
on the real loops. Browsing through target address can be done using Up/Down keys. User
can indicate the device address to start with, but only if he indicated loop numbe r as 1, 2, or 3.
Device information will consist of current analog values of the target and the percent of alarm if
device is an input. When the Info button is pressed the device type will be displayed together
with the alarm threshold if device is a smoke sensor.
Enter the loop number of the desired device and press the Enter button.
The display shows the loop number , device add ress, current level and the per cent age alarm in
the following format:
The user can press UP and DOWN cursor key to scroll through all the analog devices on the
loop. If there are no analog devices on the loop the following message will be displayed.
4. Verify counts
The verification count report displays the nu mber of times that the alarm verification cycle has
been initiated without causing an alarm for all verified device or circuits on th e specified loop or
loops. If the count is zero, the device is not displayed.
Enter the loop number of the desired device and press the Enter button.
The report shows the loop#, device address and verify count in the following format:
The user can press UP and DOWN cursor key to scroll through all the devices on the loop for
which the verify count is available. If there are no verified devices on the loop the following
message will be displayed.
If no verified devices with a non-zero counter ar e fo un d on th e sp ec ifie d loo p( s) , a me ss ag e is
displayed to that effect.
Verification counters are cleared by the clear verification count comm and and at in itial power up.
50
Page 51

Operation
Loop Number
Loop:__
Maint Report
Percent dirty :012%
No dirty devices
found
- Report To -
1. Printer
2. Screen
5. Maintenance report
The maintenance report displays all smoke sensors on the specified loop or loops detected as
dirty (% alarm > 75). The percent of alarm rises as the detector gets dirty. A trouble occurs
once the percentage reaches 75%. The repo rt shows the device address, percentage dirty,
device type, and programmed message in the following format:
Enter the loop number of the desired device and press the Enter button.
The maintenance report is shown in the following format.
The user can press UP and DOWN cursor key to scroll through all the devices on the loop for
which the maintenance report is available. If there are no dirty devices on the loop the
following message will be displayed
6. A/P Report
The Advanced Protocol (AP) Report will display or list on a printer all local parameters of an
AP device currently connected on the SLC. This feature will list the internal register values of
current AP devices. Since parameter values and addresses are not disclosed to the user, this
tool is used to report information to Mircom technical support.
If the panel is connected to a printer the user will be prompted to select an output source:
If “Printer” is selected the user will be prompted to select the address range. “All” selects all
addresses from all configured loops and “Loop” selects addresses from one loop.
1. All
2. Loop
If “Loop” is selected the user will be prompted to enter a loop number:
Loop Number
Loop: _
If the panel does not have a printer connected or if the user selects “Screen” under the report
to menu only one address will be displayed. The user will be prompted to enter this address:
Device Address
Loop: _ Devaddr:___
Once the report is on display it will list all the parameters of all the subaddresses related to the
device. In this display “Crt.” indicates report line number, “S/A” indicates device current
51
Page 52

subaddress, “Parm#” indicates parameter number from the current subaddress, and “Val#”
6HOHFW/RJ
$ODUP/RJ
*HQHUDO/RJ
$OO/RJV
Clear all the
Selected log (s)?Y/N
Log (s) cleared
indicates the paramter value.
Crt. S/A Parm# Val
1 000 01 002
2 000 02 034
3 000 02 003
5.11.4 Clear Logs
Clears the logs stored in the flash memory. Use the UP and DOWN cursor keys to the desired
log to be cleared and press the Enter button.
A message prompts for confirmation.
Operation
After confirmation the logs are cleared and the following information message is displayed:
5.11.5 Walk Test
Initiates a silent or audible Walk Test. The following occurs when in Walk Test mode:
• Generates a non-latching trouble that clears after exiting the walktest.
• Cancelling the walk test is done by pressing the Cancel button or if n o circuit activations
are detected for one hour.
• Zone indicators, including the Smart Re lay Module (SRM-312) function normally during
the test, displaying the input status when it is activated.
• Other Relays and signa l correlations to input circuit s are not p rocessed during walk-test.
Correlations to system status will still be processed.
• All common controls and keys not explicitly required for the walk-test operation are
disabled while the walk-test is active.
• The alarm verification and waterflow retard operation is disabled on inputs during walk-
test.
During an Audible walk test:
• activating any input activates all signals for ha lf a second.
• Trouble on any input activates all signals continuously for 5 seconds. After the code is
transmitted, the input resets (if resettable) and is tested again. If it is still in alarm or
trouble the code will be re-transmitted.
Use the UP and DOWN cursor keys to scroll to the desired option press the Enter button.
52
Page 53

Operation
Select Test Type
1. Audible Test
2. Silent Test
Initializing
Walk test ...
--Walk test Active -Alarm:nnn Trbs :mmm
i
The following message will show the walk test initializing.
While the walk-test is active the following message is displayed on the screen:
where nnn and mmm are continuously updated counts of the number of alarms and troubles
which have been recorded during the test (alarms includes all input circuit types tested).
Selective Output Testing
Walk Test can be operated with only a selection (up to 64) of outputs. To do this, select audible
test. The next screen will be:
Select “No” by using the right arrow key and the next screen will say:
Use the left and right arrow key to move through the outputs you wish to active during walk
test.
Note: Each event during the Walk Test is also recorded in the log. Therefore, any event
5.11.6 Bypass
The bypass operation has the following options:
past the 200 count will clear the log and be entered as event 1 and so on.
1. Device/Circuit
Individual circuit can be bypassed using this option. The user is prompted for the device’s loop
number and the device address to be bypassed.
53
Page 54

Operation
Dev Loop # & Addr
Loop :__ DevAddr :___
Device not bypassed
Bypass ?Y/N
Device /circuit
Bypassed
Device now bypassed
Unbypass ?Y/N
Device /circuit
Unbypassed
Group
Bypassed
If the device is not bypassed the user is prompted to bypass the circuit.
After the confirmation, the device is bypassed and the message appears that the device is
bypassed.
If the device is already bypassed the user is prompted to un-bypass the circuit.
After the confirmation, the device is un-bypassed and the information message shows that the
device is un-bypassed.
2. Groups
Configured bypass groups can be bypassed using this option. The list of all the configured
bypass groups is displayed and the user can select which group to bypass.
Scroll up/down to select group and press Enter. If the group selected is not bypassed the user
is prompted to bypass the group.
After the confirmation the group is bypassed and the message appears that the group is
bypassed.
If the group is already bypassed, the user is prompted to un-bypass the group.
After the confirmation, the group is un-bypassed and the message is that the group is unbypassed.
54
Page 55

Operation
Group
Unbypassed
Loop number
Loop:__
Loop 0 not bypassed
Bypass ?Y/N
Loop
Bypassed
Loop 0 is bypassed
Unbypass ?Y/N
Loop
Unbypassed
Loop number
Loop:__
3. Loop
The whole loop either conventional or addressable can be bypassed using this option. The
user is prompted to enter the loop number to be bypassed.
If the loop is not already bypassed the user is then prompted to bypass the loop.
After the confirmation, the loop is bypassed and a bypass confirmation message displays.
If the loop is already bypassed, the user is prompted to un-bypass the loop.
After the confirmation the loop is un-bypassed and an unbypass confirmation message
displays.
4. List Bypass
A list of devices may be bypassed using this option. The user is prompted to enter the loop
number associated with these devices.
Next enter the address list of device s you wish to bypass. Use the following symbols to enter
the address list:
Table 16 List Bypass Special Characters
Symbol Number of times to
press “1” key
Description
,
!
2 Sets the interval of consecutive addresses, e.g. 1-7.
3 Separates the addresses of the devices
4
Placed at the end of list to signify that no individual
confirmation is required.
55
Page 56

The message displayed if the current address carries no device is as follows:
Loop number
Loop:__
The following message is displayed to bypass.
If the device is already bypassed the message is as follows.
If the exclamation is not used, then there will be individual confirmation.
Operation
At the end of the bypass operation or if the exclamation is used, the message displays:
5. List Unbypass
A list of devices can be bypassed using this option. The user is prompted to enter the loop
number to be unbypassed.
Enter the list to unbypass, the last list bypassed will be displayed.
If the list to be unbypassed is shown, just press Enter to complete the unbypassing.
Otherwise, you may unbypass the devices one, two or more at a time.
If you are attempting to unbypass items that are already unbypassed you will get an “Already
un-bypassed” message.
Otherwise, if the exclamation is not used, then there will be individual confirmation.
56
Page 57

At the end of the un-bypass operation or if the exclamation is used, the message displays:
Aux relays connected
Disconnect ?Y/N
Aux relays
disconnected
Aux rly disconnected
Reconnect ?Y/N
Aux relays
Reconnected
---Dialer test ----
1. L#1 manual test
2. L#2 manual test
3. Reset dialer
Manual night mode
Change ?Y/N
5.11.7 Auxiliary Disconnect
The auxiliary disconnect operation is performed by the following the steps below. If the
auxiliary relays are connected the user is prompted to disconnect the relays.
After the confirmation the auxiliary relays are disconnected and the information message is
displayed that the auxiliary relays are disconnected.
Operation
If the auxiliary relays are already disconnected the user is prompted to reconnect the relays.
After the confirmation the auxiliary relays are reconnected and the information message is
displayed that the auxiliary relays are reconnected.
5.11.8 Test Dialer
Special function is provided to test the dialer operation. This function can manually test both
the phone line L1 and L2 and also r eset the dialer where all the ev ents to be reported in the
queue are cleared and the dialer status is reset.
5.11.9 After Hours
This operation allows to manually set the daytime or the nigh t time mode of operation thus
over-riding the current daytime or nighttime mode. The user is prompted for confirmation as
shown below:
After the confirmation the user is prompted to enter which mode to be set.
57
Page 58

After the user selection and information message is displaye d that the daytime nighttime mode
Select mode
1. Daytime
2. Night time
Day/night mode
updated
Clear all verif
Counters ?Y/N
Verify
Counters cleared
is updated.
5.11.10 Clear Verify Count
This operation is used to clear all the verification counts accumulated during the alarm
verification process. The user is prompted for confirmation as shown below:
After the confirmation the verification count is cleared and the information message is
displayed that the counts are cleared.
Operation
5.11.11 Ground Fault Test - Factory Use Only
Displays the system ground fault, positive and negative. When ground fault test is selected,
your passcode will be requested. An example of a ground fault test result is shown below.
5.1 1 .12 Positive Alarm Sequence
If this feature is enabled the system allows for Positive Alarm Sequence alarm signals from
automatic fire detection devices. This selection is mutually exclusive with Two Stage
Operation, i.e. you can have one or the other and not both. Any devices deemed PAS will
activate the common alarm LED, the individual LED (if programmed), flash the Acknowledge
LED and sound the alarm buzzer at the panel. The LCD display will also declare the PAS
alarm. There will be no alarm signalling initially. All evacuation signal and off-premises
signalling will be activated if the Acknowledge button is not pressed within 15 seconds of the
P AS alarm and the RESET button is not pressed within 180 seconds from the acknowledge, or
if a second device goes into alarm.
Selecting this menu item will have one of three outcomes:
An error message when the feature is not configured:
“Enable Pos Alarm option first!”
An option to enable when the feature is available but has been bypassed:
"Pos Alarm disabled"
"Enable? Y/N"
An option to disable when the feature is available and enabled:
"Pos Alarm enabled"
"Disable? Y/N"
58
Page 59

5.11.13 Exit
Exits to the main command menu.
Operation
59
Page 60

6.0 Indication & Controls
Visual
Indicator Test
This chapter describes the LED indicators and controls of the FX-3500.
6.1 Indication and Controls
FX-3500 Display Panel is equipped with the following
• 12 Control buttons with associated LEDs
• 16 button Numeric Keypad with Cursor buttons
• 6 Hazard Zones with 2 LEDs (red and yellow) each
Figure 10 displays the LED indicators and the control button on the FX-3500 main board.
Indication & Controls
Figure 10 LED Indicators and Control Buttons
The FX-3500 has the ability for 2 additional RAX-1048TZDS. Each RAX-1048TZDS Display
Adder Module provides annunciation for up to 48 Zones. Each LED zone has two LEDs.
• 1 Red/Yellow Alarm/Supervisory LED.
• 1 Yellow Trouble LED.
6.2 LCD Display
The display is a four line, 20 character back-lit alphanumeric LCD. It displays information
regarding the panel, its circuits, and devices. An on-screen cursor is controlled by the cursor
buttons for menu selection and control. Report information provided by the LCD display
includes:
• Alarm Log
• Event Log
• Current Levels
• Device Information
• Verification and Maintenance Reports
60
Page 61

Use the cursor buttons on the Numeric Keypad for menu selection and control. For more
Figure 11 Numeric Keypa d
4
GHI
8
TUV
M
information see 6.2.1 Numeric Keypad and Cursor Buttons on page 61.
6.2.1 Numeric Keypad and Cursor Buttons
Indication & Controls
1 2
ABC
4
GHI
5
JKL
7 8
PRS
TUV9WXY
* 0
QZ
Table 17 Keypad and Cursor buttons descriptions
Key Description
Key 2 (Up cursor)
2
ABC
Press this button to move the cursor or scroll up lists in a continuous loop.
Key 4 (Left Cursor)
Press this button to move the cursor or select options to the left.
3
DEF
6
MNO
#
X
M
?
6
MNO
X
?
Key 6 (Right Cursor)
Press this button to move the cursor or select options to the right.
Key 8 (Down Cursor)
Press this button to move the cursor or scroll down lists in a continuous loop.
Cancel Button
Press this button to cancel an operation or exit a menu.
Menu Button
Press this button to view the command menu.
Info Button
Press this button for detailed information about a displayed item.
Enter Button
Press this button to select a displayed item.
61
Page 62

6.3 Common LED Indicators and Control Buttons
For complete descriptions of all LED indicators and control buttons see the following table.
Table 18 LED Indicators and Control Buttons
Indication & Controls
LED Indicator and
Control Buttons
Description
AC On Indicator
Illuminates steady green when the main AC power is within acceptable levels.
The LED turns off when the level falls below the power-fail threshold and the
panel is switched to standby (battery) power.
Ground Fault Indicator
Flashes yellow at the Trouble ra te whe n a Gro und F ault is detected on any field
wiring. Clearing the Ground Fault clears the indicatio n and turns the LED off.
CPU Fault Indicator
Flashes yellow at the Trouble rate when the processo r ceases functioning.
Battery/Charger Trouble
Flashes yellow at the Slow Flash rate. Clearing the trouble condition clears the
indication and turns the LED off.
Alarm Queue Button and Indicator
Flashes red when there is an alarm in queue. The buzzer sounds steady.
An alarm can be generated in two ways
• When any Alarm configured point or input activates.
• Pressing the General Alarm button and the system is set for Two Stage
operation.
Pressing the Alarm Queue button allows the user to cycle through and review a
list of active alarms from oldest to most recent. Once all alarms in the queue
have been reviewed the LED will illuminate steady. Resetting the panel clears
the indication and turns the LED off.
Supervisory Queue Button and Indicator
Flashes yellow at the Fast Flash Rate when a Latching or Non-Latching circuit
is activated. The buzzer sounds at the fast rate.
Pressing the Supervisory Queue button allows the user to cycle through and
review a list of active supervisory a larms from oldest to most recent. On ce all
alarms in the queue have been reviewed the LED will illuminate steady.
If all Non-Latching Supervisory circuits are restored and there are no Latching
Supervisory Circuits active, the indication will clear and the LED will turn off.
Resetting the panel will clear the activation of any Latching Supervisory Alarms,
clears the indication and turns the LED off.
62
Page 63

Table 18 LED Indicators and Control Buttons (Continued)
Indication & Controls
LED Indicator and
Control Buttons
Description
Trouble Queue Button and Indicator
Flashes yellow when any trouble condition is detected on the panel. The buzze r
sounds at the slow rate.
Pressing the Trouble Queue button allows the user to cycle through and review
a list of active Troubles from oldest to most recent. Once all troubles in the
queue have been reviewed the LED will illuminate steady.
Clearing all Trouble conditions clears the indication and turns the LED off.
Building Queue Button and Indicator
Flashes yellow at the Trouble Flash rate when any Building condition is
detected on the panel. The buzzer sounds at the fast rate.
Pressing the Building Queue button allows the user to cycle th rough an d review
a list of active Building Conditions from oldest to most recent. Once all
conditions in the queue have been reviewed the LED will illuminate steady.
Clearing all Building conditions clears the indication and turns the LED off.
System Reset Button and Indicator
The System Reset button resets the Fire Alarm Control Panel and all Circuits.
Pressing the System Reset button causes a trouble to occur and the LED to
illuminate steady yellow. The following events will occur
• Resets all Latching, Trouble Conditions.
• Resets all Initiating Circuits.
• Resets 4-Wire Smoke Supply and Aux. Power Supply.
• Turns off all Indicating Circuits.
• Turns off Signal Silence, Ack & GA Indicators.
• Turns off Fire Drill.
• Stops and resets all Timers.
• Processes inputs as new events.
• Aux Disconnect is not affected.
• Reset cannot be activated until the Signal Silence Inhibit
timer has expired.
Resetting the System clears the indication and turns the LED off.
Alarm Acknowledge Button and Indicator - Two Stage Operation Only
LED and Indicator are active only when the Panel is configured for Two Stage
Operation. Flashes yellow at the Fast Flash Rate as the Auto General Alarm
Timer is timing.
Illuminates steady yellow by pressing the Acknowledge or Signal Silence
buttons and cancelling the Auto General Alarm Timer.
The expiring of the Auto General Alarm Timer causes the Panel to enter
General Alarm, clears the indication and turns the LED off.
63
Page 64

Table 18 LED Indicators and Control Buttons (Continued)
Automatic Alarm
Signal Cancel
Indication & Controls
LED Indicator and
Control Buttons
Description
Automatic Alarm Signal Cancel Button and Indicator
LED and Indicator are active only when the Panel is configured for PAS.
Flashes yellow at the Fast Flash Rate as the Auto General Alarm Timer is
timing.
If the panel is configured for Positive Alarm Sequence (PAS), activation of the
Acknowledge button within 15 seconds of a PAS alarm will delay a common
alarm activation for 180 seconds.
The expiring of the Auto General Alarm Timer causes the Panel to enter General
Alarm, clears the indication and turns the LED off.
General Alarm Button and Indicator - Two Stage Operation Only
LED and Indicator are active only when the Panel is configured for Two Stage
Operation.
LED illuminates steady red when the following occurs:
• Pressing the General Alarm button.
• Activating a General Alarm Initiating Circuit.
• The Auto General Alarm Timer expiring.
Resetting the System clears the indication and turns the LED off.
Signal Silence Button and Indicator
Flashes yellow at the Trouble Flash rate when Indication Circuits are silenced
by the following:
• Pressing the Signal SIlence button.
• The Auto Signal SIlence Timer.
Any Subsequent Alarms cause the Signals to resound, clears the indication and
turns the LED off.
Pressing the Signal Silence button when the Panel is in Alarm turns on the
Signal Silence Indicator and deactivates any Silenceable Indicating Circuits.
Non-Silenceable Circuits are unaffected. Signals will re-sound upon any
subsequent Alarm.
This button does not function during of the following:
• Any configured Signal Silence Inhibit Timer period.
• If Fire Drill has activated the Indicating Circuits.
Additional Two Stage Function
If the Auto General Alarm Timer has not expired, this Signal Silence button also
performs the same function as the Alarm Acknowledge button.
Buzzer Silence Button and Indicator
Flashes yellow at the Trouble Flash rate when the Buzzer Silence button is
pressed. Any new alarm, supervisory or trouble events resounds the buzzer
and will cause the Buzzer Silence LED to turn off.
64
Page 65

Table 18 LED Indicators and Control Buttons (Continued)
Visual
Indicator Test
Indication & Controls
LED Indicator and
Control Buttons
Description
Auxiliary Disconnect Button and Indicator
Activating the Auxiliary Disconnect button activates the Auxiliary Disconnect
function. The Auxiliary Alarm Relay is always disconnected with this button.
The Common Alarm Relay, the Common Supervisory relay and all correlated
alarm relays may be disconnected as selected through configuration. Activating
the Auxiliary Disconnect button also causes the Common Trouble LED to
illuminate steady, the common trouble relay to send a trouble message and the
trouble buzzer to flash at the trouble flash rate. Pressing the Auxiliary
Disconnect button again de-activates this function and the system will go back
to normal.
Visual Indicator Test Button and Indicator
Pressing the Visual Indicator Test button illuminates all front panel LEDs on
steady in the appropriate color and turns the buzzer on steady. If Visual
Indicator Test is active for more than 10 seconds, Common Trouble is activated.
Fire Drill Button and Indicator
Illuminates steady yellow during an active Fire Drill.
Pressing the Fire Drill button activates all programmed and non-Disconnected
Indicating Circuits. It does not transmit any Alarms via the City Tie, or Common
Alarm Relay.
Fire Drill may be programmed to operate specific NAC Circuits. Fire Drill is
cancelled by pressing the button again (toggle switch), or if the Panel goes into
a real Alarm.
6.3.1 Flash Rates
Fast Flash
120 flashes per minute, 50% duty cycle.
Trouble Flash
20 flashes per minute, 50% duty cycle.
65
Page 66

7.0 Wiring
This chapter describes the proper field wiring for the FX-3500.
7.1 Wiring Tables
7.1.1 Addressable Loop Wiring Maximums
Advanced Protocol and CLIP Devices
• Maximum Loop Current = 350 mA
• Maximum Loop Resistance = 40 ohms
• Maximum Loop Capacitance = 0.5 µF
• Maximum Number of Isolators = 20
Table 19 Advanced Protocol and CLIP Devices Addressable Loop Wiring Table
Wire Gauge Maximum Wiring Run to Last Device
(AWG) ft m
Wiring
18 3030 923
16 4760 1450
14 7690 2343
12 9820 2993
7.1.2 RS-485 Wiring to Annunciators and other Devices
• Use twisted shielded pair
• 300mA power limited
• 22 AWG ma xim u m of 200 0 fe et
• 20 AWG ma xim u m of 400 0 fe et
• 18 AWG ma xim u m of 800 0 fe et
• Maximum 40 ohm loop resistance
7.1.3 NAC and Auxiliary Power Supply Circuits
Table 20 NAC and Auxiliary Power Circuits Wiring Table
TOTAL
SIGNAL
LOAD
MAXIMUM WIRING RUN TO LAST DEVICE (ELR) MAX. LOOP
18AWG 16AWG 14AWG 12AWG
RESISTANCE
Amperes ft m ft m ft m ft m Ohms
0.06 2350 716 3750 1143 6000 1829 8500 2591 30
0.12 1180 360 1850 567 3000 915 4250 1296 15
0.30 470 143 750 229 1200 366 1900 579 6
0.60 235 71 375 114 600 183 850 259 3
0.90 156 47 250 76 400 122 570 174 2
66
Page 67

Table 20 NAC and Auxiliary Power Circuits Wiring Table
i
i
Wiring
TOTAL
SIGNAL
LOAD
1.20 118 36 185 56 300 91 425 129 1.5
1.50 94 29 150 46 240 73 343 105 1.2
1.70 78 24 125 38 200 61 285 87 1.0
7.1.4 Input Circuits
Wire Gauge Maximum Wiring Run to Last Device and Back (ELR)
(AWG) ft m
MAXIMUM WIRING RUN TO LAST DEVICE (ELR) MAX. LOOP
18AWG 16AWG 14AWG 12AWG
Notes: Main Board NAC Circuits are rated fo r of 1.5 Amperes each.
Maximum Voltage Drop Should Not Exceed 1.67 Volts
If using conventional input circuits in an FX-3500 system MIX-502MAP(A), MIX-502M and
CZ-6 Conventional Zone Modules must be used.
Table 21 MIX-502MAP(A) Conventional Zone Module Input Circuit Wiring Table
RESISTANCE
18 3787 1154
16 5952 1814
14 9615 2930
Notes: Maximum Loop Resistance Should Not Exceed 25 Ohms.
Maximum Wiring Run indicates wiring distance out and back to the panel. The
resistance accross the shorted wire should be less than 25 Ohms.
67
Page 68

7.2 Wire Routing
i
This knockout is to be used
exclusively for TS-1 from
the Power Supply Board
This knockout is to be used
exclusively for AC Input
This knockout is to be
used exclusively for the
City Tie connection
All power limited wiring
shall be routed through
the remaining knockouts.
Notes: All external connections are power limited except for the AC connections to the
transformer. Transformer connections must be routed separately from all other
external connections using their own conduit.
Wiring
Figure 12 Wire Routing
68
Page 69

7.3 Addressable Loop Wiring
CLASS B
WIRING
ION SMOKE
DETECTOR
PHOTO SMOKE
DETECTOR
HEAT DETECTOR
PULL STATION
OUTPUT MODULE
M
M
A LOOP1
B
+
-
+
-
7.3.1 Addressable Loop Wiring - Class B or Style 4
Wiring
Figure 13 Addressable Loop Wiring - Class B or Style 4
7.3.2 Addressable Loop Wiring - Class A or Style 6
ION SMOKE
CLASS A
WIRING
DETECTOR
PHOTO SMOKE
DETECTOR
HEAT DETECTOR
M
Figure 14 Addressable Loop Wiring - Class A or Style 6
M
OUTPUT MODULE
INPUT MODULE
A LOOP1
+
B
+
69
Page 70

7.3.3 Addressable Loop Wiring - Class A or Style 7
ION SMOKE
DETECTOR
PHOTO SMOKE
DETECTOR
HEAT DETECTOR
OUTPUT MODULE
I
ISOLATOR
M
II I I I
I
M
I
I
A LOOP1
B
+
-
+
-
Figure 15 Addressable Loop Wiring - Class A or Style 7
Wiring
7.4 NAC Circuit Wiring
The FX-3500 supports up to 4 NAC circuits that can be wired as either:
• Class B (Style Y)
• Class A (Style Z)
To supervise each Class B NAC circuit, use a 3.9K End-of-Line resistor.
Each NAC circuit provides up to 1.5A, total 6A of current maximum if no auxiliary power is
used.
For detailed wiring diagrams see Figure 16 NAC Circuit – Class B or Style Y Wiring or Figure
17 NAC Circuit – Class A or Style Z Wiring.
70
Page 71

7.4.1 NAC Circuit – Class B or Style Y Wiring
STYLE Y
WIRING
NAC
CIRCUIT - 1
BELL STROBE EOL-392 HORN
NAC1
++ - -
NAC CIRCUITS #2, #3 AND #4 ARE NOT SHOWN.
WIRE AS SHOWN ABOVE.
BELL
STROBE
HORN
STYLE Z
WIRING
NAC
CIRCUIT 1
NAC1
++ - -
NAC CIRCUITS #2, #3 AND #4 ARE NOT SHOWN.
WIRE AS SHOWN ABOVE.
Wiring
Figure 16 NAC Circuit – Class B or Style Y Wiring
7.4.2 NAC Circuit – Class A or Style Z Wiring
Figure 17 NAC Circuit – Class A or Style Z Wiring
71
Page 72

7.4.3 UL 864 Rev. 9 Addressable Supervised Output Module Wiring
As per UL864 Rev.9 51.4.3, ensure that a single break, ground or wire-to-wire fault on the
installation conductors of a signalling circuit for use with addressable notification app liances or
modules shall not affect the operation of more than one notification zone.
Exception: Riser conductors installed in accordance with the survivability from attack by fire
requirements in National Fire Alarm Code, NFPA 72.
7.4.4 RTI-1 Common Remote Trouble Indicator Wiring
WIRE NUT
CONNECTION
Wiring
RTI-1
Current: 35mA maximum
+-
TRL TRB
Voltage: 24V
Frequency: 20 pulses per minute (ppm)
UNFLTD
RTI
Power Factor: 1
Use 20 AWG or larger
Maximum wiring distance of 4000 feet
Figure 18 RTI-1 Common Remote Trouble Indicator Wiring
72
Page 73

7.5 Module and Devices Wiring
!
7.5.1 Dialer Wiring
Wire the Dialer to the Public Telephone Switch and premises Telephone as shown in Figure
19. For information on Compatible DACR Receivers see Chapter 8.0 Appendix A - Compatible
Receivers.
Wiring
Public Switch Telephone Wiring
TIP
RING
TIP
RING
Premises Telephone (if permitted)
Figure 19 Wiring the Dialer
4
5
RJ31X
6
1
23
7
8
Line 2 wiring as shown for Line 1
GREEN
RED
BROWN
GREY
TRTR
RES CO
LINE1
Caution: To reduce the risk of fire, use only No. 26 AWG or larger
telecommunication line cord.
73
Page 74

7.5.2 Connecting to a DCS SurGuard Receiver
A
L
A
R
M
R
E
L
A
Y
S
P
V
R
E
L
A
Y
T
R
B
L
R
E
L
A
Y
F
X
-
3
5
0
0
R
i
n
g
T
i
p
Telephone
Line A
Connec tion
G
S
3
0
6
0
G
S
3
0
6
0
T
R
B
L
1
2
V
E
O
L
3
.9
K
-
A
l
l
u
n
it
s
m
u
s
t
b
e
i
n
s
t
a
l
le
d
in
t
h
e
s
a
m
e
ro
o
m
.
-
A
ll
e
x
t
e
n
d
e
d
w
i
r
in
g
m
u
s
t
b
e
i
n
c
o
n
d
u
i
t
.
-
D
is
ta
n
c
e
m
a
x
1
8
m
t
s
-
R
e
p
r
o
g
r
a
m
m
e
s
s
a
g
e
s
fr
o
m
G
S
3
0
6
0
Z
1
,
Z
2
,
a
n
d
Z
3
To GS M/GPRS
T
yp
i
c
a
l
In
s
t
a
ll
a
t
i
o
n
in
C
a
n
a
d
a
Line 2
Ring
Tip
Line 1
Ring
Tip
PCS-100
P
O
W
E
R
2
4
V
G
N
D
P
G
M
4
G
N
D
1
4
V
N
C
C
O
M
N
O
T
B
L
R
E
L
A
Y
J
W
1
1
0
P
G
M
4
AUX 1
+
-
+
-
L
o
o
p
1
M
5
0
2
M
A
P
Internet
Com puter
Printer
SUR-GARD
SYSTEM II
Internal IP: X.X.X.X
External IP: X.X.X.X
SG-Systems
Cons ole 2.1
Default Gateway: X.X.X.X
Sub-Net Mask:X.X.X.X
Port #: YYYY (UDP)
Router
F
X
-
3
5
0
0
–
G
S
3
0
6
0
C
o
n
n
e
c
t
i
o
n
–
T
y
p
i
c
a
l
D
i
a
g
r
a
m
N
O
C
N
O
C
N
O
C
1
4
C
O
M
1
7
Z
3
1
6
Z
2
1
5
Z
1
T
1
R
1
Telephone
Line B
Connec tion
2
0
(
-
)
1
9
(
+
)
A typical connection is shown in Figure 20. For information on Compatible DACR Receivers
see Chapter 8.0 Appendix A - Compatible Receivers.
Wiring
Figure 20 Connecting an FX-3500 FACP to a DCS Surguard System Receiver
74
Page 75

7.5.3 PR-300 Polarity Reversal and City Tie Module Wiring
1
2
s
1
2
s
1
2
s
1
2
s
CITY TIE LOCAL ENERGY
RATED - 24VDC FILTERED
TRIP COIL - 13.7 and 14.4 Ohms,
270mA, 5mV RIPPLE
PROTECTOR
UNPROTECTED
PROTECTED
POLARITY REVERSAL ALARM
24VDC OPEN
12VDC AT 3.5mA
8mA MAX. SHORT
POWER LIMITED
POWER LIMITED
+
-
+
-
+
-
POLARITY REVERSAL SUPV.
24VDC OPEN
12VDC AT 3.5mA
8mA MAX. SHORT
POWER LIMITED
+
-
USE A SHORTING WIRE
WHEN THE CITY TIE IS
NOT USED
DIN RAIL CONNECTION
TO EARTH GROUND
+
-
1
2
s
1
2
s
1
2
s
1
2
s
PROTECTOR
UNPROTECTED
PROTECTED
+
-
DIN RAIL CONNECTION
TO EARTH GROUND
CONFIRMS TO NEMA STANDARD SB3-1969
INTENDED FOR CONNECTION TO POL
REVERSAL CIRCUIT OF A REMOTE
STATION RECEIVING UNIT HAVING
COMPATIBLE RATINGS
Wire the PR-300 Polarity Reversal and City Tie Module successfully as shown in Fi gure 21.
• Plug PR-300 ribbon cable P1 into connector P8 on the Main Fire Alarm Board.
• Remove jumper plug from JW7 on the Main Fire Alarm Board.
• Power Limited cable type FPL, FPLR or FPLP must be used.
• For USA installation, the installer must use Atlantic Scientif ic (Tel: 407-725-8000), Model
#24544 Protective Device, or similar UL-Listed QVRG secondary protector, as shown.
• For installations in Canada, the Protective Device is not required but still recommended.
Wiring
Figure 21 Wiring the PR-300 Polarity Reversal and City T ie Module
75
Page 76

7.6 Power Supply Wiring
!
7.6.1 Main Power Supply
Wiring
Wire the Power Supply as shown in Figure 22 and adhere to the following:
• Ensure that the AC supply is disconnected before wiring the power to the panel.
• Wire the AC power to the AC wiring terminals as shown in Figure 22 using the proper
wire gauge with 600 volt insulation and proper over current circuit protection that
complies with local codes.
For FX-3500 Power Supply Electrical Ratings see Table 22 Power Supply Electrical Ratings
and for Specifications see Appendix C.
Table 22 Power Supply Electrical Ratings
Type Electrical Rating
Electrical Input Rating 120 VAC,60 Hz, 3.1 A / 240 VAC, 50 Hz, 1.57 A
Wiring
Attention: The main AC branch circuit connection for the Fire Alarm Control Unit
must provide a dedicated continuous power without any disconnect
devices.
Fire alarm systems must be installed in compliance with local codes
and standards and with the Authority Having Jurisdiction (AHJ).
76
Page 77

Wiring
FX-3500 Main Board
Ribbon Cable
Power Connector
RED
P3
P2
Blue
Red
Red
Black
P2
P4
P5 P6
Green
+
BRIDGE
BLACK
240VAC 50Hz
120VAC 60Hz
N
Groun d
–
White/Blue Stripe
Black
Brown
MD-1011 Power
Supply Board
BLACK
+
BATTERY
Figure 22 Main Power Supply Wiring and Connections
-
7.6.2 Supervision of Auxiliary Supplies
Aux 2 Resettable Auxiliary Power (supervised, regulated)
The AUX 2 resettable auxiliary power supply is supervised for shorts.
A short will:
• Disconnect the power until the “RESET” button is pressed.
• Generate a trouble signal
The circuit must be supervised for opens utilizing the End of Line Relay Model EOLR-1A. This
supply is rated at 24VDC regulated/300mA max/1V voltage drop maximum.
Auxiliary Supply (supervised, regulated)
+
-
BATTERY
Supervised auxiliary power is used to power the remote annunciators and smart relay
modules.
77
Page 78

This filtered circuit is supervised for shorts.
A short will:
• Disconnect the power until the “R ESET” button is pressed.
• Generate a trouble signal
The circuit must be supervised for opens utilizing the End of Line Relay Model EOLR-1A as
shown in Figure 15. This supply is rated at 24VDC regulated/500mA max/1V voltage drop
maximum.
Unfiltered Supply (unsupervised, unregulated)
This unregulated supply is not supervised. When supervision is required, the circuit must be
supervised for opens utilizing the (UL listed - S3403) End of Line Relay Model EOLR-1A. This
supply is rated at 24V FWR/1.7A max. If there is a short on this circuit, the auxiliary power
does not recover automatically when the short is removed. The main power and the battery
must be disconnected, then reconnected and the panel reset to re-establish the auxiliary
power supply.
FIRE ALARM MAIN BOARD
AUX 2
RESETTABLE
AUXILIARY
POWER
OR
AUXILIARY
SUPPLY
OR
UNFILTERED
SUPPLY
+
-
Supervision for Auxiliary Supplies
Connect auxiliary devices here*
DETEC TO R PO WER SUPPLY
22VDC , 200m A
* Use this supervision set-up only
MAX. CURRENT - 300m A
MAX. RIPPLE VOL. 5m V
if auxiliary devices are used.
(POWER LIMITED)
6
3
4
END O F L INE REL A Y
5
2
1
Wiring
Class B (Style B)
WIRING
E.O.L.
47K Ohms
+-
B
+-
Loop
A
LEGEND
ION SMOKE
DETEC TOR
PHOT O SMO KE
DETEC TOR
Figure 23 Supervision of Auxiliary Supplies
Black
Red
MINI MONITOR
MODULE
MIX-501MAP
MIX-101P
Red
Black
HEAT DETEC T OR
Violet
White
78
Page 79

7.7 System Checkout
The following are the recommended steps before and during the powering up of the FX-3500.
7.7.1 Before Turning The Power ON
1. To prevent sparkin g, DO NOT connect the batteries first. Connecting the batteries is only
to be done after the system has been powered from the main AC Supply.
2. Check all field (external) wiring for opens, shorts, and ground.
3. Check that all interconnection cables are secure, and that all connectors are plugged-in
properly.
4. Check all Jumpers and Switches for proper setting.
5. Check the AC power wiring for proper connection.
6. Check that the chassis is connected to EARTH GROUND (cold water pipe).
7. Close the front cover plate before powering the system from main AC supply.
7.7.2 Power-up Procedure
1. After completing 7.7.1 Before Turning The Power ON procedures, power-up the panel.
The green AC-ON LED should illuminate.
2. Since the batteries are not connected, the Battery Trouble LED should illuminate, the
Common Trouble LED should flash and the Trouble Relay (on the main board) will be
active.
3. Connect the batteries while observing correct polarity; the red wire is positive (+) and
black wire is negative (-).
4. All indicators should extinguish except for normal power AC-ON green LED.
Wiring
7.8 Troubleshooting
The following are common methods to solving Circuit Ground Fault, Battery and Common
troubles.
7.8.1 Circuit Trouble
Normally when a circuit trouble occurs, the Common Trouble indicator will be illuminated and
the common trouble relay will be active. Additionally, the corresponding LED on the main
board will be illuminated. This can be viewed by opening the panel and looking the top of the
board. To correct the fault, check for open wiring on that particular circuit loop.
7.8.2 Ground Fault
This panel has a common ground fault detector. To correct the fault, check for any external
wiring touching the chassis or other Earth Ground connection.
7.8.3 Battery Trouble
Check for the presence of batteries and their conditions. Low voltage (below 20.4V) will cause
a battery trouble. If battery trouble condition persists, replace batteries as soon as possible.
7.8.4 Common Trouble
If only a common trouble is indicated on the main panel and none of those above confirming
trouble indicators are on, then check the following for possible fault
• any missing interconnection wiring
• improperly secured cabling
79
Page 80

8.0 Appendix A - Compatible Receivers
i
The dialers that are built into select models of the FX-3500 Fire Alarm Control Panels are
compatible with the following Digital Alarm Communicator Receivers (DACR) listed:
Table 23 Compatible DACR Receivers
DACR Receiver Model Protocols
SurGard MLR2 Multi-Line Receiver (ULC, ULI approved) SIA Format Protocol and SIA Contact ID
SurGard SLR Single-Line Receiver (ULC, ULI approved) SIA Format Protocol and SIA Contact ID
Osborne-Hoffman Quickalert! II Receiver (ULI a pproved) SIA Format Protocol and SIA Contact ID
Osborne-Hoffman OH-2000 Receiver (ULI Approved) SIA Format Protocol and SIA Contact ID
Silent Knight Model 9500 Receiver (ULI Approved) SIA Format Protocol and SIA Contact ID
Radionics Model D6500 Receiver (ULI Approved) SIA Format Protocol and SIA Contact ID
Radionics Model D6600 Receiver (ULI Approved) SIA Format Protocol and SIA Contact ID
DSC SurGard System III Receiver (ULC, ULI Approved)* SIA Contact ID
DSC SurGard System IV Receiver (ULC, ULI Approved)* SIA Contact ID
Note: *when used with DSC GS3060 Universal Wireless Alarm Communicator through
wireless IP connection.
80
Page 81

9.0 Appendix B - FX-3500 Series
Compatible Devices
9.1 FX-3500 Series ULI Listed Compatible Devices
9.1.1 ULI Listed Compatible Addressable Devices
Table 24 ULI Advanced Protocol Detectors
Advanced Protocol Detectors
MIX-1251AP Advanced Protocol Ion Smoke Detector
MIX-2251AP Advanced Protocol Photo Smoke Detector
MIX-2251TAP Advanced Protocol Photo Heat Detector
MIX-2251TMAP Advanced Protocol Acclimate Detector
MIX-5251AP Advanced Protocol Heat Detector
MIX-5251HAP Advanced Protocol High Temperature Heat Detector
MIX-5251RAP Advanced Protocol Rate of Rise Heat Detector
Table 25 ULI Advanced Protocol Intelligent Modules
Advanced Protocol Intelligent Modules
MIX-M500MAP Advanced Protocol Monitor Module
MIX-M500RAP Advanced Protocol Relay Control Module
MIX-M500SAP Advanced Protocol Supervised Control Module
MIX-M501MAP Advanced Protocol Mini Monitor Module
MIX-M502MAP Advanced Protocol Conventional Zone Module
Table 26 ULI Advanced Protocol Manual Stations
Advanced Protocol Manual Stations
MS-402APU Addressable Two Stage Manual Station
MS-701APU Addressable Single Stage Single Action Station
MS-702APU Addressable Two St age Single Action Station
MS-710APU Addressable Single Stage Dual Action Station
81
Page 82

Table 27 ULI Ancillary Modules
Ancillary Modules
CR-6 Six Relay Control Module
CZ-6 Six Conventional Zone Interface Module
IM-10 Ten Input Monitor Mo du le
M500X Fault Isolato r Module
SC-6 Six Supervised Control Module
Table 28 ULI Bases
Bases
B210LP Intelligent Flanged Mounting Base
B224BI Intelligent Isolator Base
B224RB Intelligent Relay Base
B501 Intelligent Flangeless Mounting Base
B501BH Intelligent Sounder Base
B501BHT Intelligent Temporal Tone Sounder Base
DNR Intelligent non-relay photoelectric low-flow duct smoke detector housing
DNRW
Table 29 ULI Intelligent Detectors
Watertight Intelligent Non-relay Photoelectric Low-flow Duct Smoke Detector
Housing
Intelligent Detectors
MIX-1251B Intelligent Low Profile Ionization Smoke Sensor
MIX-2251B Intelligent Low Profile Photoelectronic Smoke Sensor
MIX-2251TB
MIX-2251TMB Intelligent Low Profile Multi-Criteria Sensor
MIX-5251B Intelligent Low Profile Fixed Temp. Thermal Sensor 135°F
MIX-5251H Intelligent Low Profile High Temperature Thermal Sensor 190°F
MIX-5251RB Intelligent Low Profile Fixed Temp. and Rate of Rise Thermal Sensor 135°F
7251 Intelligent Low Profile Laser Smoke Detector
Intelligent Low Profile Photoelectronic Smoke Sensor c/w 135°F Fixed Temp.
Thermal Sensor
82
Page 83

Table 30 ULI Intelligent Modules
Intelligent Modules
MIX-500DM Intelligent Dual Monitor Module
MIX-M500M Intelligent Addressable Monitor Module
MIX-M500R Intelligent Addressable Relay Module
MIX-M500S Intelligent Addressable Supervised Control Module
MIX-M501M Intelligent Addressable Mini-Monitor Module
MIX-M502M Intelligent Addressable Interface Module
83
Page 84

9.1.2 ULI Listed Compatible Two-Wire Smoke Detectors
i
Notes: Detectors of different models are not to be mixed in a circuit.
When using two-wire smoke detectors a zone module is required.
Table 31 ULI Two-Wire Smoke Detectors
Make Model / Base Compatibility
Identifier Head/Base
Mircom
Bases MSB-65B, MSB-65B-4, MSB-65B-4R
MPD-65P MPD-65P 0.13 21
Apollo
Series 60A Bases 45681-200,-220,-232,-251
Series 65A Bases 45681-255,-256,-257,-258
55000-325 55000-325 0.13 21
55000-326 55000-326 0.13 21
55000-327 55000-327 0.13 21
55000-328 55000-328 0.13 21
Hochiki
DCD-135/HSC-220R HD-3/HB-72 0.035 12
DCD-135/NS6-220 HD-3/HB-3 0.035 12
Rated Standby
Current (mA)
Maximum # of
devices per
circuit
DCD-190/HSC-220R HD-3/HB-72 0.035 12
DCD-190/NS4-220 HD-3/HB-3 0.035 12
DCD-190/NS6-220 HD-3/HB-3 0.035 12
SIJ-24/HSC-220R HD-3/HB-72 0.04 12
SIJ-24/NS4-220 HD-3/HB-3 0.04 12
SIJ-24/NS6-220 HD-3/HB-3 0.04 12
SLR-24/HSC-220R HD-3/HB-72 0.045 12
SLR-24/NS4-220 HD-3/HB-3 0.045 12
SLR-24/NS6-220 HD-3/HB-3 0.045 12
Sentrol-ESL
429C / (701E, 701U, 702E, 702U) S10A-S00 0.1 30
429CRT / (702E, 702RE, 702RU, 702U) S11A-S00 0.1 30
429CST / (702E, 702RE, 702RU, 702U) S11A-S00 0.1 30
84
Page 85

Table 31 ULI Two-Wire Smoke Detectors (Continued)
Make Model / Base Compatibility
Identifier Head/Base
Rated Standby
Current (mA)
Maximum # of
devices per
circuit
429CT / (701E, 701U, 702E, 702U) S10A-S00 0.1 30
711U-UT / (701E, 701U, 702E, 702U) S10A-S00 0.1 30
713-5U / (701E, 701U, 702E, 702U) S10A-S00 0.1 30
713-6U / (701E, 701U, 702E, 702U) S10A-S00 0.1 30
721U / (701E, 701U, 702E, 702U) S10A-S00 0.1 30
721UT / (701E, 701U, 702E, 702U) S10A-S00 0.1 30
722U / (701E, 701U, 702E, 702U) S10A-S00 0.1 30
731U / (702E, 702RE, 702RU, 702U) S11A-S00 0.1 30
732U / (702E, 702RE, 702RU, 702U) S11A-S00 0.1 30
System Sensor
1400 A-N/A 0.1 25
2100 A-N/A 0.12 25
2400 A-N/A 0.12 25
1151/B110LP A-A 0.12 25
1151/B116LP A-A 0.12 25
1451/B401 A-A 0.12 25
1451/B401B A-A 0.12 25
1451/B406B A-A 0.12 25
1451DH/DH400 A-A 0.12 25
2100T A-N/A 0.12 25
2151/B110LP A-A 0.12 25
2151/B116LP A-A 0.12 25
2400TH A-N/A 0.12 25
2451/B401 A-A 0.12 25
2451/B401B A-A 0.12 25
2451/B406B A-A 0.12 25
2451/DH400 A-A 0.12 25
2451TH/B401 A-A 0.12 25
2451TH/B401B A-A 0.12 25
2451TH/B406B A-A 0.12 25
2W-B c/w base A-A 0.1 30
85
Page 86

Table 31 ULI Two-Wire Smoke Detectors (Continued)
i
Make Model / Base Compatibility
Identifier Head/Base
2WT-B c/w base A-A 0.1 30
Rated Standby
Current (mA)
Maximum # of
devices per
circuit
9.2 FX-3500 Compatible Horn/Strobes
Table 32 FX-3500 Compatible Horn/Strobes
Brand Strobe Model Maximum # of devices per circuit
Mircom FHS-240-110 7
Secutron MRA-HS3-24WW 16
SpectrAlert P2R 22
Wheelock NS-24 MCW-FW 17
Note: The FX-3500 supports “Regulated 24FWR” devices.
86
Page 87

9.3 FX-3500 Series ULC Listed Compatible Devices
9.3.1 ULC Listed Compatible Addressable Devices
Table 33 ULC Advanced Protocol Detectors
Advanced Protocol Detectors
MIX-1251APA Advanced Protocol Ion Smoke Detector
MIX-2251APA Advanced Protocol Photo Smoke Detector ULC
MIX-2251TAPA Advanced Protocol Photo Heat Detector ULC
MIX-2251TMAPA Advanced Protocol Acclimate Detector ULC
MIX-5251APA Advanced Protocol Heat Detector ULC
MIX-5251HAPA Advanced Protocol High Temperature Heat Detector ULC
MIX-5251RAPA Advanced Protocol Rate of Rise Heat Detector ULC
Table 34 ULC Advanced Protocol Intelligent Modules
Advanced Protocol Intelligent Modules
MIX-M500MAPA Advanced Protocol Monitor Module ULC
MIX-M500RAPA Advanced Protocol Relay Control Module ULC
MIX-M500SAPA Advanced Protocol Supervised Control Module ULC
MIX-M501MAPA Advanced Protocol Mini Monitor Module ULC
MIX-M502MAPA Advanced Protocol Convention al Zone Module ULC
Table 35 ULC Advanced Protocol Manual Stations
Advanced Protocol Manual Stations
MS-401AP Addressable Single Stage Manual Station ULC
MS-402AP Addressable Two Stage Manual Station ULC
MS-701AP Addressable Single Stage Single Action Station ULC
MS-702AP Addressable Two St age Single Action Station ULC
MS-710AP Addressable Single Stage Dual Action Station ULC
87
Page 88

Table 36 ULC Ancillary Modules
Ancillary Modules
CR-6A Six Relay Control Module
CZ-6A Six Conventional Zone Interface Module ULC
IM-10A Ten Input Monitor Modu le UL C
M500XA Fault Isolator Module ULC
SC-6A Six Supervised Control Module ULC
Table 37 ULC Bases
Bases
B210LPA Intelligent Flanged Mounting Base ULC
B224BIA Intelligent Isolator Base ULC
B224RBA Intelligent Relay Base ULC
B501A Intelligent Flangeless Mounting Base ULC
B501BHA Intelligent Sounder Base ULC
B501BHTA Intelligent Temporal Tone Sounder Base ULC
DNRA Intelligent Non-relay Photoelectric Low-flow Duct Smoke Detector Housing ULC
Table 38 ULC Intelligent Detectors
Intelligent Detectors
MIX-1251BA Intelligent Low Profile Ionization Smoke Sensor ULC
MIX-2251BA Intelligent Low Profile Photoelectronic Smoke Sensor ULC
MIX-2251TBA
MIX-2251TMBA Intelligent Low Profile Multi-Criteria Sensor ULC
MIX-5251BA Intelligent Low Profile Fixed Temp. Thermal Sensor 135°F ULC
MIX-5251HA Intelligent Low Profile High Temperature Thermal Sensor 190°F ULC
MIX-5251RBA Intelligent Low Profile Fixed Temp. and Rate of Rise Thermal Sensor 135°F ULC
7251A Intelligent Low Profile Laser Smoke Detector ULC
Table 39 ULC Intelligent Modules
Intelligent Low Profile Photoelectronic Smoke Sensor c/w 135°F Fixed Temp.
Thermal Sensor ULC
Intelligent Modules
MIX-500DMA Intelligent Dual Monitor Module ULC
MIX-M500MA Intelligent Addressable Monitor Module ULC
MIX-M500RA Intelligent Addressable Relay Module ULC
MIX-M500SA Intelligent Addressable Supervised Control Module ULC
88
Page 89

Table 39 ULC Intelligent Modules (Continued)
Intelligent Modules
MIX-M501MA Intelligent Addressable Mini-Monitor Module ULC
MIX-M502MA Intelligent Addressable Interface Module ULC
89
Page 90

9.3.2 ULC Listed Two-Wire Smoke Detectors
i
Notes: Detectors of different models are not to be mixed in a circuit.
When using two-wire smoke detectors a zone module is required.
Table 40 ULC Two-Wire Smoke Detectors
Make Model / Base Maximum # of
devices per
circuit
Apollo Hochiki
Series 60A Bases 45681-200,-220,-232,-251 DCD-135/HSC-220R 12
Series 60A Bases 45681-200,-220,-232,-251 DCD-135/NS6-220 12
55000-325 21 DCD-190/HSC-220R 12
55000-326 21 DCD-190/NS4-220 12
55000-327 21 DCD-190/NS6-220 12
55000-328 21 SIJ-24/HSC-220R 12
System Sensor i3 SIJ-24/NS4-220 12
C2W-BA c/w base 30 SIJ-24/NS6-220 12
C2WT-BA c/w base 30 SLR-24/HSC-220R 12
System Sensor SLR-24/NS4-220 12
1400A 20 SLR-24/NS6-220 12
2400A 20
Make Model / Base Maximum # of
devices per
circuit
1451/B401B 25
2451/B401B 25
1451A/B401BA 20
2451A/B401BA 20
2451THA/B401BA 20
2400THA 20
1151A/B110LPA or B401A 20
2151A/B110LPA or B401A 20
9.3.3 UL and ULC Listed Supported Non-Synchronous Horn/Strobes
Device Mircom Equivalent Part # Amseco Part #
Horns/Strobes FHS-240R/FHS-240W SH24W-153075
Strobes FS-240R/FS-240W SL24W-153075
90
Page 91

10.0 Appendix C - Manual Panel
Configuration
COMMAND MENU
The command menu is the first menu displayed for command mode. The command menu is divided into
four main sub menu categories, the configuration allows full fr ont p an el configuration of th e system and the
operation menu performs certain opera tions which may not be possible using the commo n control switches
and indicators on the front panel.
-- Command menu --
1. Configuration
2. Auto config.
3. Operation
COMMAND MENU/ 1. CONFIGURATION MENU
The configuration menu is divided into the following sub menu items:
-- Configuration --
1. Panel config
2. UDACT config
3. Time config
4. AdterHrs cfg.
CONFIGURATION MENU/1. PANEL CONFIGURATION
The panel configuration is further sub divided into the following sub menus
-- Panel Config --
1. Features
2. Address cfg.
3. Device label
4. User message
5. Language
PANEL CONFIGURATION/1. FEATURES
The features described are the overall features of the system and their impact is system wide. The default
setting in some features is shown as selected.
Panel Configuration/Features/Manual Signal Silence
Manual Signal Sil.
[x] Enabled
The manual signal silence option will allow silencing of the signal, from the common control signal silence
switch, when they are active.
Panel Configuration/Features/Fire Drill
Fire Drill
[x] Enabled
This function is used to enable/disable fire drill operation from the fire common control fire drill switch at the
91
Page 92

front panel.
Panel Configuration/Features/Auxiliary disconnect, disconnects alarm and supervisory relay
Aux Dis Alm&Sv
[ ] Enabled
If enabled the auxiliary disconnect operation, disconnects alarm and supervisory relays disabled the
auxiliary disconnect operation has no affect on the alarm and supervisory relays. Default is disabled.
Panel Configuration/Features/Signal silence inhibit timer
Sig.sil. inh.
[x] Disabled
[ ] 10 sec
[ ] 20 sec
[ ] 30 sec
[ ] 1 min
Select the timer value for the signal silence inhibit timer.
Panel Configuration/Features/Auto signal silence timer
Auto sil. tmr
[x] Disabled
[ ] 5 min
[ ] 10 min
[ ] 15 min
[ ] 20 min
[ ] 30 min
Select timer value for the auto signal silence timer.
Panel Configuration/Features/Alarm transmit silence
Alm. xmit. sil.
[ ] Enabled
This feature allows the alarm transmits and auxiliary alarm relay to reset on “SIGNAL SILENCE” rather than
the “RESET” switch if enabled. Default is disabled.
Panel Configuration/Features/Power fail timer
Pwr fail tmr.
[x] None
[ ] 1 Hr
[ ] 2 Hrs
[ ] 3 Hrs
This feature allows a programmed delay before the AC fail trouble is transmitted by the optional PR-300
(Note: the delay for transmission by the dialer is configured under Dialer Configuration – Item 4 –Time
Parameters - AC Loss Delay)
Panel Configuration/Features/Common supervisory relay
Com. supv. rly
[ ] Enabled
This feature is used to make the common supervisory relay acts as a common alarm relay if enabled.
.
92
Page 93

Default is disabled
i
Panel Configuration/Features/Signal silence isolator
Sig. isolators
[ ] Enabled
This feature makes the system aware that the isolators are present on the main panel powered output
circuits if enabled. Default is disabled.
Panel Configuration/Features/Strobe types
Strobes type
[x] Normal
[ ] System Sensor
[ ] Mircom
[ ] Wheelock
Select the strobe manufacturer for synchronous strobes. Synchronous strobes are driven by following a
different ON/OFF pattern depending on the manufacturer’s specification. Normal means the strobes are
not synchronized and when the circuit gets active it is turned ON steady. This feature applies to the main
panel powered output circuits, configured as strobes, only.
Note: Once a specific type of strobe is selected, for example Mircom, then only this
type of strobe is allowed for the entire system.
Panel Configuration/Features/Evacuation code
Evac. Code
[ ] Continuous
[ ] March Time
[x] Temporal
[ ] California
Select the evacuation code for the 2nd stage in a two stage system and for the 1st stage in a single stage
system.
Panel Configuration/Features/Building alert
Bldg. alert
[ ] Enabled
Alert sounds for building input activation. Default is disabled.
Panel Configuration/Features/Device LED flashing
Dev. Flash
[ ] Enabled
This feature allows flashing of the LED on the addressable sensors to flash momentarily, while polling, if
enabled. The input and output modules LED always flashes, while polling, regardless of this feature
enabled or disabled.
Panel Configuration/Features/Class-A loop
Loop ClassA
[ ] Enabled
93
Page 94

This feature configures all addressable loops as Class A if enabled.
Panel Configuration/Features/Auto after hours
Auto afthrs.
[ ] Enabled
This feature allows the daytime/nighttime mode to be set automatically if enabled.
Panel Configuration/Features/General alarm timer
Gen.alm tmr
[x] Disabled
[ ] 5 min
[ ] 10 min
[ ] 15 min
[ ] 20 min
[ ] 30 min
This feature sets the value for the general alarm timer
Panel Configuration/Features/Common alarm relay operation
Com alm rly op
[ ] Both Stages
[x] Second Stage
This feature sets the operation of the common alarm for two stage system.
Panel Configuration/Features/Agency selection
Jurisdiction
[ ] ULI
[x] ULC
This feature selects the agency having jurisdiction for the panel.
PANEL CONFIGURATION/2. ADDRESS CFG.
Allows user to select up to what address a CLIP device would go. Loop Selection Prompt:
Loop number
Loop: __
User is prompted to introduce address upper limit; press the “ #” key to move cu rsor to the le ft, press the “*”
key to move cursor to the right:
Reserved addr. space
size for CLIP device
for the current loop
Choose from 1-99:__
PANEL CONFIGURATION/3. DEVICE LABEL
Allows the user to edit the device label. Device Address Prompt:
Device address:
Loop: _ DevAddr:___
User is then prompted for adding a label (skipped if current label):
94
Page 95

Add label? Y (N)
User types the new label using keys. Press the “#” key to move cursor to the left, press the “*” key to move
cursor to the right:
Enter new tag...
______
PANEL CONFIGURATION/4. USER MESSAGE
Allows you to edit (change) the FACP Front Panel Message, i.e. “Welcome to Mircom”.
PANEL CONFIGURATION/5. LANGUAGE
Allows you to select the language of the LCD display. English is the default. To change the language to
French, select French in the panel configuration menu, then exit the configuration and then re-enter and
select auto default.
95
Page 96

11.0 Appendix D - Reporting
11.1 Ademco Contact-ID FX-3500 Series Event Codes
Table 41 Contact-ID Event Codes
Event Description Event
Qualifier Code Group # Contact #
Family
Phone Line #1 trouble detected Trouble New event 1 351 00 000
Phone Line #2 trouble detected Trouble New event 1 352 00 000
Phone Line #1 trouble restored Trouble Restore 3 351 00 000
Phone Line #2 trouble restored Trouble Restore 3 352 00 000
Failure to report to an Account Trouble New event 1 354 Acct # Acct #
Report to an Account successful Trouble Restore 3 354 Acct # Acct #
RS-485 Communication Trouble Trouble New event 1 350 00 485
Periodic (24 hr) Test Event (NORMAL) T est New event 1 602 00 000
Periodic (24 hr) Test Event (OFF
NORMAL)
Manually initiated dialer test Test New event 1 601 00 000
Zone Fire Alarm Alarm New event 1 110 00 NNN
Zone Fire Alarm restored Alarm Restore 3 110 00 NNN
Zone Trouble detected Trouble New event 1 300 00 NNN
Test New event 1 608 00 000
Zone Trouble restored Trouble Restore 3 300 00 NNN
Zone Supervisory condition Supervisory New event 1 200 00 NNN
Zone Supervisory restored Supervisory Restore 3 200 00 NNN
Water flow Alarm New event 1 113 00 NNN
Water flow restored Alarm Restore 3 113 00 NNN
Indicating Zone Trouble Trouble New event 1 320 00 NNN
Indicating Zone Trouble restored Trouble Restore 3 320 00 NNN
General Alarm Alarm New event 1 140 00 NNN
General Alarm restored Alarm Restore 3 140 00 NNN
AC power lost Trouble New event 1 301 00 000
AC power restored Trouble Restore 3 301 00 000
Battery Low Trouble New event 1 302 00 000
Battery Low restored Trouble Restore 3 302 00 000
Ground Fault Trouble New event 1 310 00 000
Ground Fault restored Trouble Restore 3 310 00 000
96
Page 97

11.2 Security Industries Association SIA Format Protocol FX-3500
Series Event Codes
SIA Format Protocol does not define indicating zone troubles, but lists it as Untyped Zone
Trouble/Restore.
Table 42 SIA-DCS Event Codes
Event Description Event Family Qualifier SIA Event Code Parameter
Phone Line #1 trouble detected Trouble New event LT 001
Phone Line #2 trouble detected Trouble New event LT 002
Phone Line #1 trouble restored Trouble Restore LR 001
Phone Line #2 trouble restored Trouble Restore LR 002
Failure to report to an Account Trouble New event YC Acct #
Report to an Account successful Trouble Restore YK Acct #
RS485 Communication Trouble Trouble New event YS 485
Periodic (24 hr) Test Event (Normal) Test New event RP 000
Periodic (24 hr) Test Event (Off-normal) Test New event RY 000
Manually initiated dialer test Test New event RX 000
Zone Fire Alarm Alarm New event FA NNN
Zone Fire Alarm restored Alarm Restore FH NNN
Zone Trouble detected Trouble New event FT NNN
Zone Trouble restored Trouble Restore FJ NNN
Zone Supervisory condition Supervisory New event FS NNN
Zone Supervisory restored Supervisory Restore FR NNN
Water flow alarm Alarm New event WA NNN
Water flow alarm restored Alarm Restore WH NNN
General Alarm Alarm New event QA NNN
General Alarm restored Alarm Restore QH NNN
Indicating Zone Trouble (*) Trouble New event UT NNN
Indicating Zone Trouble restored (*) Trouble Restore UR NNN
AC power lost Trouble New event AT 000
AC power restored Trouble Restore AR 000
Battery Low Trouble New event YT 000
Battery Low restored Trouble Restore YR 000
Ground Fault Trouble New event YP 000
Ground Fault restored Trouble Restore YQ 000
97
Page 98

12.0 Appendix E - Specifications And
Features
12.1 FX-3500 Fire Alarm Control Panel
Table 43 lists specifications for the FX-3500 panel:
Table 43 FX-3500 Specifications
FX-3500 Series Fire Alarm Control Panel
General Digital signal processor based design, fully configurable from front panel with
password protection
Electrical ratings AC line voltage 120VAC 60Hz/240VAC 50Hz, 10A slow blow fuse on
secondary of transformer
Power supply
rating
Battery Type 24VDC Gel Cell/Sealed lead acid – 10AH to 42AH
Charging capability 10AH to 42AH
Charging current 3A maximum
Protection 20A slow blow micro fuse built into WX-058 battery cable,
Standby current
rating at full load
Addressable loops Advanced Protocol mode with one or three loops with 159 addressable sensors
and 159 addressable modules per loop. CLIP mode with one or three loops with 99
addressable sensors and 99 addressable modules per loop. Maximum loop
resistance depends on number of devic es and device type. For a comple te list of
compatible devices see 9.0 Appendix B - FX-3500 Series Compatible Devices.
Power Limited / 22VDC / 350mA alarm maximum / 0.5 µF
Power Limited / 22VDC / 280mA normal standby maximum / 0.5 µF
29VAC 10A maximum (secondary of transformer)
120VAC 60Hz 3.1Amp (maximum primary of transformer)
240VAC 50Hz 1.57Amp (maximum primary of transformer)
Total load not to exceed 10A at 24VDC
field replaceable
1.25A
NAC Circuits 4 supervised style Y (Class B) NAC circuits, configured as strobes or audibles.
Terminals are labelled as “NAC 1”, “NAC 2”, “NAC 3” and “NAC 4”.
Rating Power limited / Regulated 24V FWR / 1.5A @ 49C per
Max power allowed Total 6.0A
Aux supply 1 Power limited / 24VDC regulated / 500mA max
98
circuit
1.5A per circuit
Page 99

T able 43 FX-3500 Specifications (Continued)
FX-3500 Series Fire Alarm Control Panel
Aux supply 2 Power limited / 24VDC regulated / 300mA max
Unfiltered supply Power limited / 24V FWR special application / 1.7A max at 49C
List of Compatible Devices: RAM-1016TZDS, RAM-1032TZDS, RAM-3500-LCD,
RAX-LCD-LITE
Auxiliary relays Common Alarm/
Supv./Trouble/
Auxiliary Alarm
RS-485 port For remote annunciators. Terminals are labelled “RS-485”.
Ground Fault
Impedance
Open Circuit Fault 100 K Ohms
Short Circuit Fault 0 Ohms
10 K Ohms
Must be connected to a listed power limited source of
supply Form C/28VDC/1A max
12.2 FX-3500 System Module and Annunciator Specifications
Table 44 FX-3500 System Modules and Annunciator Specifications
FX-3500 System Modules and Annunciators
RAM3500LCD
RAX-LCDLITE
RTI-1 Remote Trouble Indicator Normal standby 0mA / alarm 30mA maximum
Remote Annunciator Standby 70mA / alarm 100mA
Remote Annunciator Standby 65mA / alarm 80mA
PR-300 Polarity Reversal and City Tie Module
City Tie power limited / 24VDC unfiltered / 270mA max / 13.7 and
Polarity Reversal power limited / 24VDC open / 12VDC at 3.5mA / 8mA
Polarity Reversal Supv.
Terminal
Polarity Reversal Alarm
Terminal
Current Consumption standby 50mA / alarm 300mA (city tie in use) / alarm
14.4 Ohms
max (shorted)
24VDC (normal) / -24VDC (supervisory) / 0V (trouble)
24VDC (normal) / -24VDC (alarm) / 0V (trouble)
70mA (city tie not in use)
99
Page 100

13.0 Appendix F - Battery Calculations
IMPORTANT NOTICE
The main AC branch circuit connection for Fire Alarm Control Unit must provide a dedicated continuous power without provision of any
disconnect devices. Use #12 AWG wire with 600-volt insulation and proper over-current circuit protection that complies with the local
codes. For specifications see Appendix C Specifications And Features on page 98.
Power Requirements (All currents are in amperes)
Model Number Description Qty Standby
FX-3500 FX-3500 FACP with Dialer X 0.390 = 0.630 =
ALC-636 636 Point Dual Loop Adder X 0.120 = 0.200 =
RAM-3500-LCD
RAX-LCD-LITE
PR-300
SRM-312(W/R) Smart Relay Module X 0.030 = =
RAM-1016TZDS
RAM-1032TZDS
RAX-1048TZDS
RTI-1
MIX-1251AP(A)
MIX-2251AP(A)
MIX-2251TAP(A)
MIX-2251TMAP(A)
MIX-5251AP(A)
MIX-5251HAP(A)
MIX-5251RAP(A)
MIX-M500MAP(A)
MIX-M500RAP(A)
MIX-M500SAP(A)
Remote Annunciator with 4line LCD Display
Remote Annunciator with 4line LCD Display
Polarity Reversal and City
Tie Module
16 Point Annunciator
Chassis
32 Point Remote
Annunciator
48 Point adder annunciator
display
Remote Trouble Indicator,
Buzzer and LED
Advanced Protocol Ion
Smoke Detector (ULC)
Advanced Protocol Photo
Smoke Detector (ULC)
Advanced Protocol Photo
Heat Detector (ULC)
Advanced Protocol
Acclimate Detector (ULC)
Advanced Protocol Heat
Detector (ULC)
Advanced Protocol High
Temperature Heat Detector
(ULC)
Advanced Protocol Rate of
Rise Heat Detector (ULC)
Advanced Protocol Monitor
Module (ULC)
Advanced Protocol Relay
Control Module (ULC)
Advanced Protocol
Supervised Control Module
(ULC)
X 0.070 = 0.100 =
X 0.065 = 0.080 =
X 0.050 = 0.300 =
X 0.050 = 0.150 =
X 0.050 = 0.300 =
X 0.022 =
X .035 = .035 =
X .0003 = .0050 =
X .00036 = .0050 =
X .00036 = .0050 =
X .00036 = .0050 =
X .0003 = .0050 =
X ==
X ==
X .0004 = .0052 =
X .0003 = .0051 =
X .0004 = .0052 =
Total
Standby
Alarm
1 zone active: 0.026
2 zone active: 0.030
3 zone active: 0.035
4 zone active: 0.039
48 zone active: 0.262
Total
Alarm
=
100
 Loading...