

Page 1

PresStation
User Manual
03251-04
© April-2007
Software version 4.5
Miranda Technologies Ltd.
UK
Tel: +44 (0) 1491 820000
Fax: +44 (0) 1491 820001
Email: uksales@miranda.com
Web: www.miranda.com
Web: www.miranda.com
Page 2

Preface PresStation User Manual
Page 2 Miranda Technologies Ltd
Copyright © 1999 - 2007 Miranda Tec hn olo gi es Ltd . Al l ri ght s are reserved
and, under the copyright laws, this manual may not be reproduced in any
form, in whole or in part, without the prior written consent of Miranda
Technologies Ltd.
Printed in the UK.
Page 3

PresStation User Manual Preface
Miranda Technologies Ltd Page 3
Preface
Warranty
Miranda Technologies Ltd offer a 24 months free parts and labour warranty
on Oxtel Series equipment from the date of the initial invoice, providing
there is no evidence of negligence, abuse or failure to reasonably follow
instructions given by the Company for its proper use.
During the warranty period, Miranda Technologies Ltd will replace or repair
at its cost, Oxtel Series equipment returned to the factory, carriage and duty
paid and insured by the sender.
Before returning any item for warranty repair, a valid returns authorisation
must be granted by Miranda Technologies Ltd.
All repaired goods will be delivered (as instructed) carriage and duty paid
and insured by the sender.
Any warranty, over and above that offered here, is the responsibility of the
local Miranda Sales Office or appointed Distributor.
Contact Information
For service, repair and warranty information and for returns au thorisation
contact:
oxtelsupport@miranda.com
Page 4

Preface PresStation User Manual
Page 4 Miranda Technologies Ltd
Important Safety Notices
Injury Precautions
1. Use a proper power cable.
To avoid fire hazard, use only an appropriate power cable which
complies with the following:
For mains connection use only a 10amp IEC inlet lead
meeting EN60320 or equivalent.
Connection to the mains supply should be via a circuit
breaker or by a mains plug which meets the relevant local standards in
the country of installation.
2. Avoid electrical overload.
To avoid electric shock or fire hazard, do not apply a voltage to a
terminal that is outside the range specified for that terminal.
3. Ground the product.
PresStation is grounded through the grounding conductor of the power
cable. To avoid electrical shock, the grounding conductor must be
connected to earth ground. Before making connection s to the input or
output terminals of PresStation, ensure that the product is properly
grounded.
4. Do not operate without the covers.
To avoid electrical shock or fire hazard, do not operate PresStation with
its covers removed.
5. Use an appropriate fuse.
PresStation is not mains powered equipment and therefore has no
external fuses.
6. Do not operate in wet/damp conditions.
To avoid electrical shock, do not operate PresStation in wet or damp
conditions.
7. Do not operate in an explosive atmosphere.
Page 5

PresStation User Manual Preface
Miranda Technologies Ltd Page 5
To avoid injury or fire hazard, do not operate PresStation in an explosive
atmosphere.
Product Damage Precautions
8. Provide proper ventilation.
To prevent PresStation overheating, provide proper ventilation.
9. Do not operate with suspected failures.
If you suspect there is damage to PresStation, have it inspected by
qualified service personnel.
Certifications and Compliances
PresStation has CE approval and complies with the standards detailed in
EN50082-1:1992 and BS EN 60950:1992 Amd 3.
Scope of the User Manual
This User Manual includes all the information you will need to get started
using PresStation and using all the facilities available from the PresStation
control panel.
For technical, set-up and specific product information refer to the
publications listed below.
Associated Publications
Presmaster Integration Guide Part No. 01234
Presmaster Automation Guide Part No. 01235
Presmaster Configurator Manual Part No. 02717
Presmaster User Manual Part No. 01232
Imagestore User Manual Part No. 02359
Page 6

Preface PresStation User Manual
Page 6 Miranda Technologies Ltd
Contacts
For technical assistance, please contact your nearest Miranda Technical
Support centre:
Americas
Telephone (9:00am - 9:00pm EST)
+1-800-224-7882
techsupp@miranda.com
Asia
Telephone (9:30am - 5:30pm JST)
+81-3-5730-2987
asiatech@miranda.com
Europe, Middle East, Africa, UK
Telephone (10:00am - 7:00pm CET)
+44 (0) 1491 820222
eurotech@miranda.com
France (only)
Telephone (9:00am - 6:00pm CET)
Telephone: +33 (0) 1 55 86 87 88
francetech@miranda.com
www.miranda.com
Page 7
PresStation User Manual Preface
Miranda Technologies Ltd Page 7
How to find your way around this User
Manual
he PresStation User Manual provides a general introduction to the
PresStation system and describes all the facilities available from the
PresStation panel and control unit. The following list indicates which
chapter you should go to, to find out more details about each section.
T
Page 8

Preface PresStation User Manual
Page 8 Miranda Technologies Ltd
What does each chapter include?
1 Introducing PresStation describes all of the PresStation features and
facilities.
2 Getting started describes the general concepts of PresStation and the
layout and design of the PresStation control panel.
3 Doing a simple presentation describes how to cut between different
sources to change your current output (that is, what is currently going to
air).
4 Doing a presentation with a transi ti o n describes how to preview the next
source before going to air.
5 More about transitions describes the different types of transitions you can
make from the PresStation control panel and how to chan ge the settings of
the transition buttons.
6 Choosing a transition ra te describes how to choose and adjust the rate at
which a transition is made.
7 Choosing and changing your source describes how to choose, change and
edit the sources associated with the, PGM and PST source buttons.
8 Inserting a picture or logo describes how use PresStation to insert
channel branding stills and in-vision clocks and timers.
9 GPI Macros describes how to invoke a stored macro on the upstream
Imagestore. Uses include the Squeezy DVE option to perform a range of
squeezes, pans and wipes in real time.
10 Controlling multiple channels describes how to control multiple
channels from the PresStation control panel.
11 Voice overs and audio control describes how to adjust the output gain
and how to add voice overs to your output source.
12 Intuition describes how to control an Intuition.
13 Controlling an MVP describes how to setup and control an Evertz or
Miranda Kaleido K2 MVP
14 Prescontrol commands explain the front panel menu structure of the
Prescontrol unit.
Page 9

PresStation User Manual Preface
Miranda Technologies Ltd Page 9
15 Installation describes the functions of the rear panel connectors.
16 Where to get help tells you who to contact and what to do if you have
any problems with PresStation.
17 Appendix 1 describes how to upgrade software via a web browser.
Conventions used in this User Manual
The following typestyle conventions are used thro ughout the User Manual:
♦ boldface is used for emphasis and button names
♦ italics are used for screen titles, references to other parts of the guide,
new terms and LEDs
Page 10

Preface PresStation User Manual
Page 10 Miranda Technologies Ltd
Page 11

PresStation User Manual Table of Contents
Miranda Technologies Ltd Page 11
Table of Contents
Preface 3
Warranty--------------------------------------------------------------------------- 3
Important Safety Notices ------------------------------------------------------ 4
Injury Precautions------------------------------------------------------------- 4
Product Damage Precautions---------------------------------------------- 5
Certifications and Compliances-------------------------------------------- 5
Scope of the User Manual----------------------------------------------------- 5
Associated Publications ----------------------------------------------------- 5
Contacts --------------------------------------------------------------------------- 6
How to find your way around this User Manual-------------------------- 7
What does each chapter include?------------------------------------------- 8
Conventions used in this User Manual------------------------------------- 9
1 Introducing PresStation 19
What is PresStation?----------------------------------------------------------19
Multi-channel control --------------------------------------------------------19
Channel branding ------------------------------------------------------------19
Video and audio switching -------------------------------------------------20
Control system----------------------------------------------------------------20
2 Getting Started 21
What is the PresStation Control Panel? ----------------------------------21
The PresStation buttons and displays ----------------------------------22
Dialogue buttons-----------------------------------------------------------22
Function buttons-----------------------------------------------------------22
Rotary knob-----------------------------------------------------------------23
The PresStation VGA screen----------------------------------------------24
How to display a PresStation menu/dialogue-----------------------26
How to adjust a setting on the VGA screen-------------------------28
Selecting a channel----------------------------------------------------------29
Selecting a source -----------------------------------------------------------30
Page 12

Table of Contents PresStation User Manual
Page 12 Miranda Technologies Ltd
Automation -------------------------------------------------------------------- 31
Front Panel Control---------------------------------------------------------- 32
Alarms --------------------------------------------------------------------------35
3 Doing a Simple Presentation 37
How to cut to a different programme source ----------------------- 38
4 Doing a Presentation with a Transition 39
What is a transition?----------------------------------------------------------- 39
How to choose your preview (PST) source-------------------------40
And do a simple cut-------------------------------------------------------40
5 More about Transitions 41
The transition buttons---------------------------------------------------------42
The Transition Types and Rates screen----------------------------------43
How to change a transition type setting ----------------------------- 44
Audio and video only transitions--------------------------------------------45
Disable Fade and Silent buttons ----------------------------------------- 47
6 Choosing a Transition Rate 49
Adjusting the specified rates ------------------------------------------------49
How to change a transition rate ---------------------------------------50
7 Choosing and Changing Your Source 51
The Source Select screen ---------------------------------------------------52
How to change to a different group-----------------------------------53
How to change a source-------------------------------------------------53
How to edit a source------------------------------------------------------54
Name-------------------------------------------------------------------------54
Machine ---------------------------------------------------------------------54
Audio Type------------------------------------------------------------------55
Audio Source---------------------------------------------------------------55
Adjusting the level of the input channels----------------------------55
Page 13

PresStation User Manual Table of Contents
Miranda Technologies Ltd Page 13
Muting a channel ----------------------------------------------------------55
Inverting the input phase ------------------------------------------------55
Changing the output source --------------------------------------------56
Always Show Source----------------------------------------------------------57
Example:---------------------------------------------------------------------57
Enabling Always Show Source.-------------------------------------------58
Enable Always Show Source-------------------------------------------59
Always Show Source follows PST or PGM -------------------------59
Always Show Source bus source to use-----------------------------59
8 Inserting a Picture or Logo 61
The DSK Settings screen-----------------------------------------------------62
How to load an image----------------------------------------------------63
How to take an image to air---------------------------------------------63
How to remove an image------------------------------------------------64
How to load a live image-------------------------------------------------64
Rates, CGT and Keying-------------------------------------------------------65
Fade Rates --------------------------------------------------------------------65
How to adjust a fade time -----------------------------------------------66
CGT------------------------------------------------------------------------------66
How to adjust the clip, gain or transparency------------------------66
Keying ---------------------------------------------------------------------------67
How to choose a Key Source-------------------------------------------68
How to choose a Key Mode---------------------------------------------68
How to choose Key Invert-----------------------------------------------68
Position Size and Cropping--------------------------------------------------68
Position -------------------------------------------------------------------------70
How to adjust the position-----------------------------------------------70
Cropping------------------------------------------------------------------------71
How to adjust the cropping----------------------------------------------71
Options and Saving------------------------------------------------------------72
Real Time Update------------------------------------------------------------72
Save without Crop -----------------------------------------------------------72
Save with Crop----------------------------------------------------------------73
Preview Touch Screen------------------------------------------------------73
Delete from IS2---------------------------------------------------------------73
Page 14

Table of Contents PresStation User Manual
Page 14 Miranda Technologies Ltd
HD Load Live Input 1 & 2 --------------------------------------------------73
Accept with saving----------------------------------------------------------- 73
File type Icons ------------------------------------------------------------------ 74
9 GPI Macros (Virtual GPIs) 75
The Edit Squeezy screen ----------------------------------------------------77
How to edit a preset position------------------------------------------- 78
Entering a GPI on the Imagestore ------------------------------------ 79
GPI----------------------------------------------------------------------------80
GPIO A -------------------------------------------------------------------------81
GPIO B -------------------------------------------------------------------------82
PresStation GPIOs ----------------------------------------------------------83
Outputs (0-23) ------------------------------------------------------------- 83
Inputs (24-31)-------------------------------------------------------------- 84
Prescontrol --------------------------------------------------------------------84
Outputs (0-23) ------------------------------------------------------------- 84
Inputs (24-31)-------------------------------------------------------------- 84
10 Controlling Multiple Channels 85
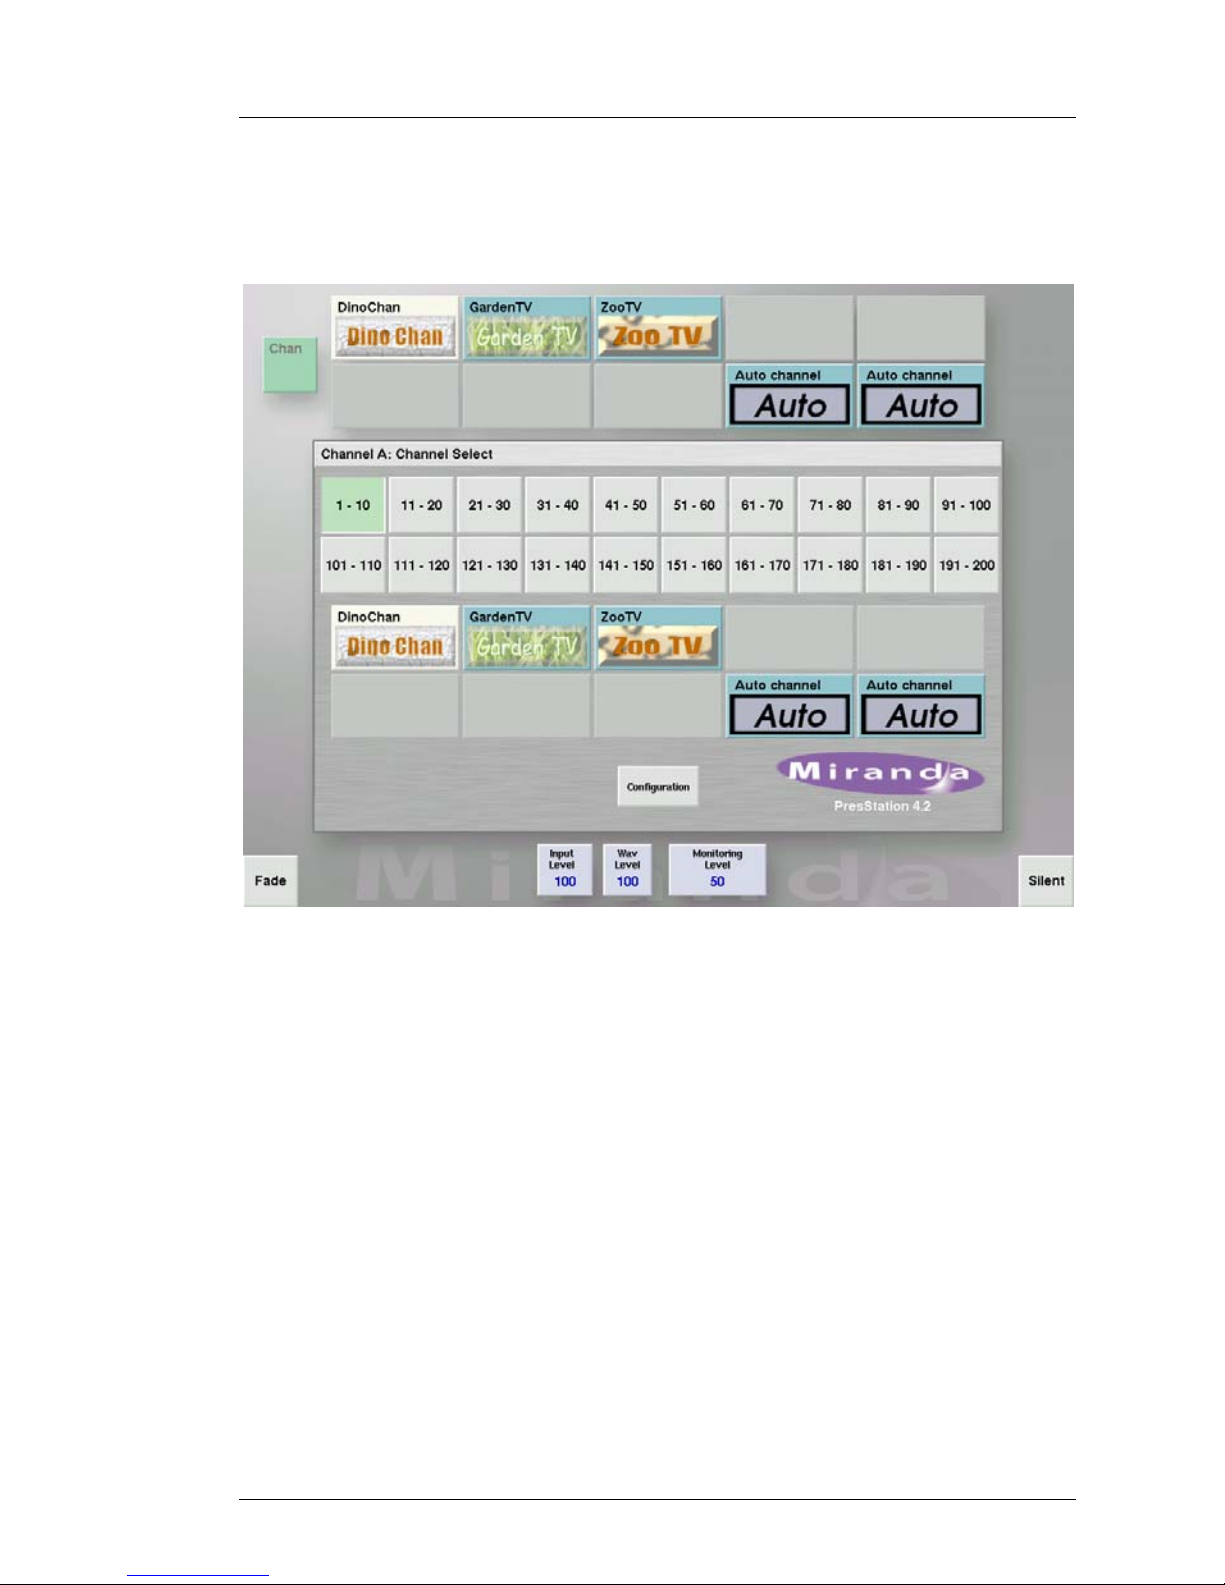
The Channel Select screen-------------------------------------------------- 85
How to save a configuration--------------------------------------------88
How to display version details about PresStation and Prescontrol
---------------------------------------------------------------------------------89
How to configure the PresStation panel-----------------------------90
How to save your new setup-------------------------------------------92
11 Using Audio 93
Adjusting the output gain-----------------------------------------------------93
Preview / Monitor--------------------------------------------------------------- 94
Adding voice overs ------------------------------------------------------------ 95
Specifying the voice over settings ----------------------------------------- 95
Duck Level---------------------------------------------------------------------96
Preset Level-------------------------------------------------------------------96
V/O Rate -----------------------------------------------------------------------96
Programme output select --------------------------------------------------97
Page 15

PresStation User Manual Table of Contents
Miranda Technologies Ltd Page 15
Configuring the Audio meters -----------------------------------------------98
Presets------------------------------------------------------------------------100
Default----------------------------------------------------------------------100
Full Scale------------------------------------------------------------------100
dBU 18--------------------------------------------------------------------- 100
PPM ------------------------------------------------------------------------100
Manual------------------------------------------------------------------------ 101
On---------------------------------------------------------------------------101
dBFS Top------------------------------------------------------------------101
dBFS Bot ------------------------------------------------------------------ 101
Text Top -------------------------------------------------------------------101
Red Div --------------------------------------------------------------------101
Options------------------------------------------------------------------------101
L – R balance-------------------------------------------------------------101
Peak hold------------------------------------------------------------------ 102
Peak hold mode --------------------------------------------------------- 102
Decay (ms/db)------------------------------------------------------------102
Configuring the meter labels------------------------------------------ 102
Changing the preview/monitor button names in the audio control
dialog----------------------------------------------------------------------- 106
Audio Monitoring Architecture-------------------------------------------107
Audio adjustment----------------------------------------------------------- 108
Input level ----------------------------------------------------------------- 108
Wav file level ------------------------------------------------------------- 108
Monitoring level---------------------------------------------------------- 108
12 Intuition 110
13 Controlling a MVP 114
Setting up control of a Miranda Kaleido--------------------------------- 114
Additional configuration for a Kaleido KX.------------------------------117
Setting up control of an Evertz MVP------------------------------------- 117
14 Prescontrol Front Panel Menu Commands 120
PCS Front Panel control screen------------------------------------------121
Information--------------------------------------------------------------------- 122
Page 16

Table of Contents PresStation User Manual
Page 16 Miranda Technologies Ltd
Serial Port data------------------------------------------------------------- 123
Version Details-------------------------------------------------------------- 124
System-------------------------------------------------------------------------- 124
Front panel inputs------------------------------------------------------------ 125
I/P Addresses--------------------------------------------------------------- 125
Change Name -------------------------------------------------------------- 126
15 Installation 128
Ventilation---------------------------------------------------------------------- 128
Power Requirements-------------------------------------------------------- 128
Environment------------------------------------------------------------------- 128
Rear Panel connectors ----------------------------------------------------- 129
GPIOA and GPIOB ----------------------------------------------------- 129
USB------------------------------------------------------------------------- 129
RS422---------------------------------------------------------------------- 130
LAN------------------------------------------------------------------------- 131
COM1 (RS232)---------------------------------------------------------- 131
VGA ------------------------------------------------------------------------ 132
PS2 (Keyboard / mouse)---------------------------------------------- 132
Audio OUT---------------------------------------------------------------- 133
Audio IN ------------------------------------------------------------------- 133
Power in------------------------------------------------------------------- 133
Mechanical ------------------------------------------------------------------ 134
Panel Cut-out --------------------------------------------------------------- 134
16 Support 136
Product Support-------------------------------------------------------------- 136
Warranty and Non-Warranty Repairs--------------------------------- 136
Obsolescence--------------------------------------------------------------- 136
Upgrades--------------------------------------------------------------------- 137
Service Visits---------------------------------------------------------------- 137
Equipment Loans ---------------------------------------------------------- 137
Training----------------------------------------------------------------------- 137
Web Page-------------------------------------------------------------------- 138
Returns Procedure--------------------------------------------------------- 138
Page 17

PresStation User Manual Table of Contents
Miranda Technologies Ltd Page 17
Transit Packaging----------------------------------------------------------138
Contact information--------------------------------------------------------139
17 Appendix 1 140
Software updates------------------------------------------------------------- 140
Installing software------------------------------------------------------------140
Login---------------------------------------------------------------------------140
Password --------------------------------------------------------------------- 141
Apply patch ------------------------------------------------------------------ 141
Set Active Version --------------------------------------------------------- 142
Reset-------------------------------------------------------------------------- 143
18 Index 144
Page 18

Table of Contents PresStation User Manual
Page 18 Miranda Technologies Ltd
Page 19

PresStation User Manual Introducing PresStation
Miranda Technologies Ltd Page 19
1 Introducing PresStation
What is PresStation?
resStation is a powerful master-control switching and branding system
designed for automated, multi-channel environments. It is designed to
control the Imagestore automated master control and channel branding
system used by many of the world’s largest broadcaster s for mor e than 800
transmission channels worldwide.
PresStation includes a variety of features including:
♦ multi-channel control (up to 24 channels can be controlled by a single
operator)
♦ channel branding (including animated logo and clock insertion, Squeezy
DVE and networked image distribution (using the Imagestore Media
Manager software)
♦ video and audio switching
♦ a robust and scalable control system
Multi-channel control
With a PresStation system you can control up to 200 transmission channels
from a single panel or you can simply operate a single transmission channel
manually.
Channel branding
PresStation can control up to four keying layers per channel, which you can
use to insert stills and animations including logos and in-vision clocks and
timers. You can use the Squeezy DVE option for picture-in-picture
applications such as over the shoulder news transitions as well as squeezes
for schedules, credits, news flashes an d sp orts results. You can also use the
windows-based (2000 and XP) Imagestore Media Manage software to
browse and distribute remote image and audio files via the Ethernet.
P
Page 20

Introducing PresStation PresStation User Manual
Page 20 Miranda Technologies Ltd
Video and audio switching
The PresStation switcher can control up to 10 source inputs fed from an
external dedicated router or a large station router shared amongst multiple
channels. For example, you can scroll through the inputs of a large router and
access 10 feeds at any one time. You can switch by cutting, fading and
wiping auto-transitions. PresStation also enables you to control full group
digital audio mixing and two stereo voice-overs. You can also store and play
out up to 400 minutes of digital stereo audio inserts and voice-overs if you
have the Easyplay option fitted to your Imagestore system.
Control system
PresStation includes a robust and highly scalable control system. Each
PresStation control panel must be connected to one (or up to 6) Presmaster
Control Unit(s) PCS-001 to provide interfacing to:
♦ Imagestore or Intuition channel-branding systems
♦ external router(s)
♦ automation system(s)
♦ Sony 9 pins
Each Presmaster Control Unit PCS-001 can control up to 4 channels, so by
linking 6 Presmaster Control Units to a single panel up to 24 transmission
channels can be controlled by the user.
Each Presmaster Control Unit PCS-001 can control up to two Imagestores or
one Imagestore and one Intuition (in series) per transmission channel (and up
to 8 in total (2 x 4 channels)) to provide up to four keying layers. Each
Imagestore provides two independent keying layers and storage for up to
4000 animations, stills or clocks.
Page 21
PresStation User Manual Getting Started
Miranda Technologies Ltd Page 21
2 Getting Started
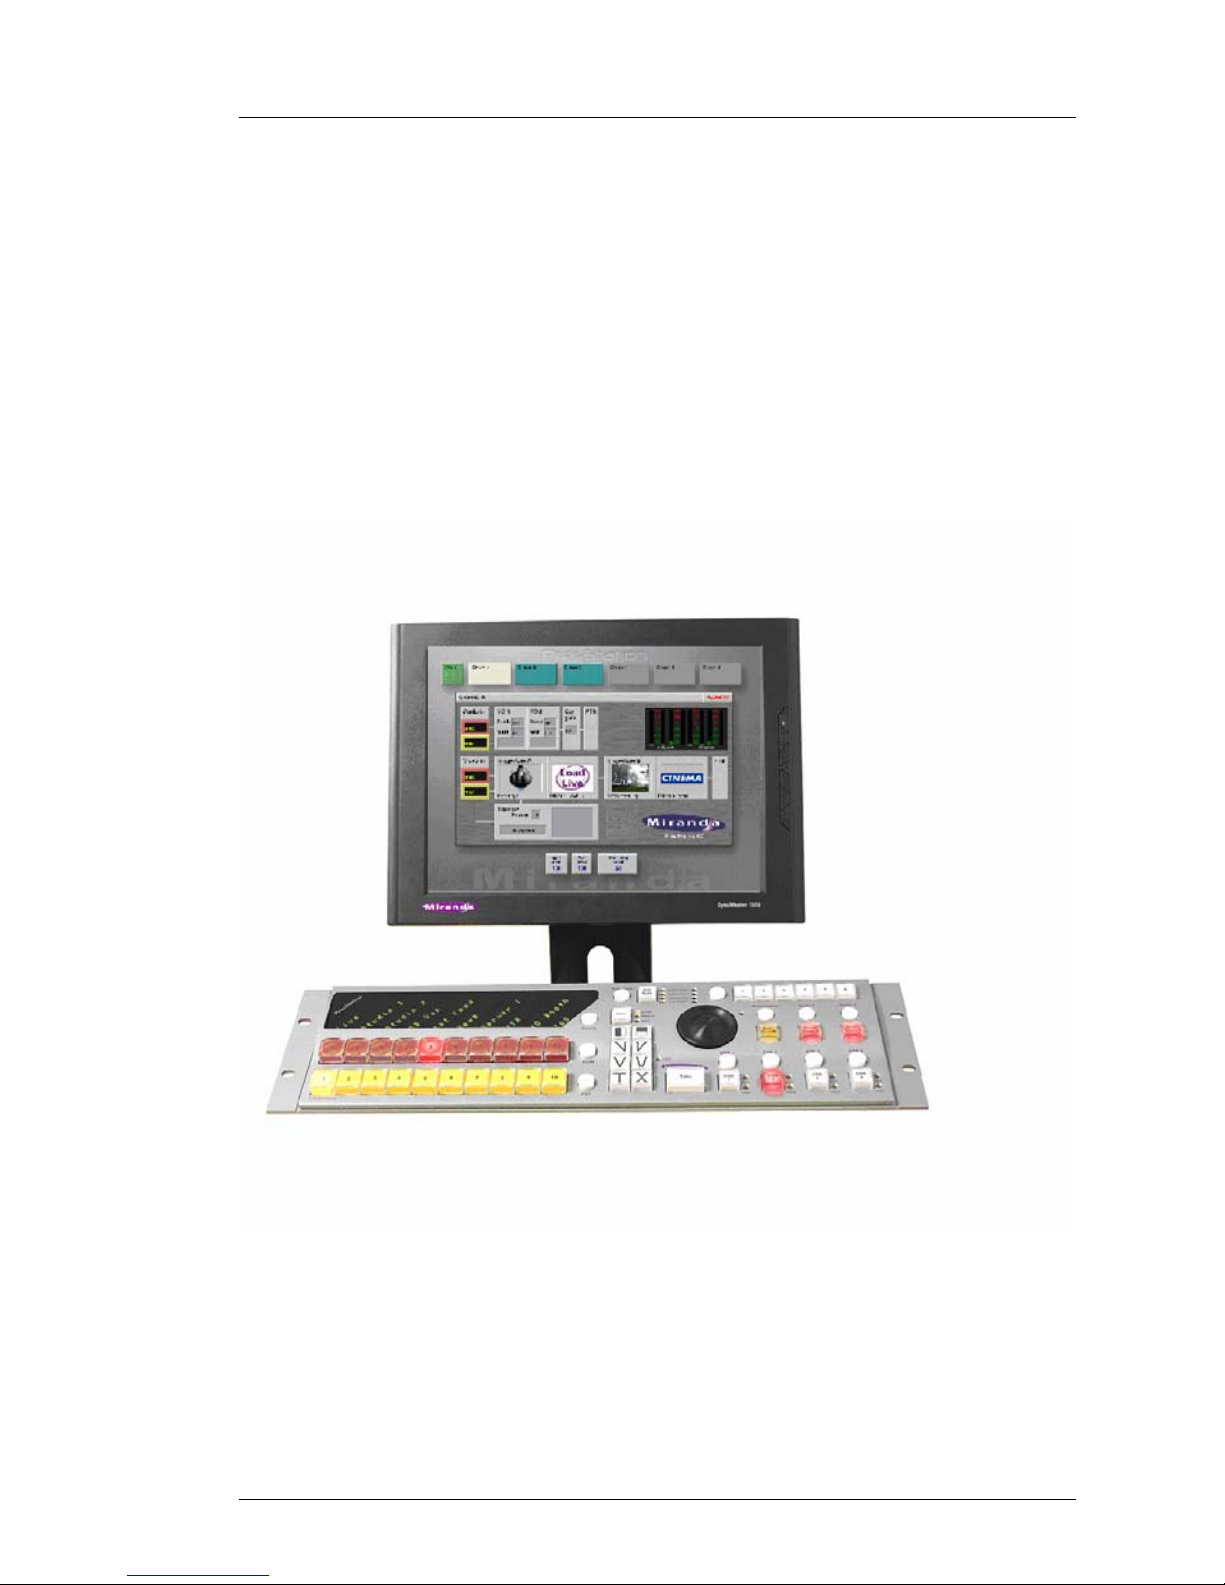
What is the PresStation Control Panel?
ou use the PresStation Control Panel to control a Presmaster Control
Unit PCS-001. It has two different types of control:
♦ dedicated buttons and displays (for the most frequently used actions and
most frequently required pieces of information) .
♦ an external VGA monitor and mouse for viewing and changing a varied
range of settings.
Y
Page 22
Getting Started PresStation User Manual
Page 22 Miranda Technologies Ltd
The PresStation buttons and displays
The PresStation control panel includes a variety of dedicated buttons and
displays, which you can use to operate PresStation manually.
Dialogue buttons
The white round buttons are known as dialogue buttons and are used to
display PresStation menus and/or dialogues on the VGA screen.
When you press a dialogue button it lights up green to show that it is active
and the associated menu or dialogue is displayed on the VGA screen. To
switch it off, simply press it again and the green light goes out (see How to
display a PresStation menu/dialogue below for further details).
Function buttons
The square buttons are known as function buttons and are used to perform an
action/function.
Some function buttons also have associated displays for additional, dedicated
information.
Dialogue
b
uttons
Function
buttons
Page 23
PresStation User Manual Getting Started
Miranda Technologies Ltd Page 23
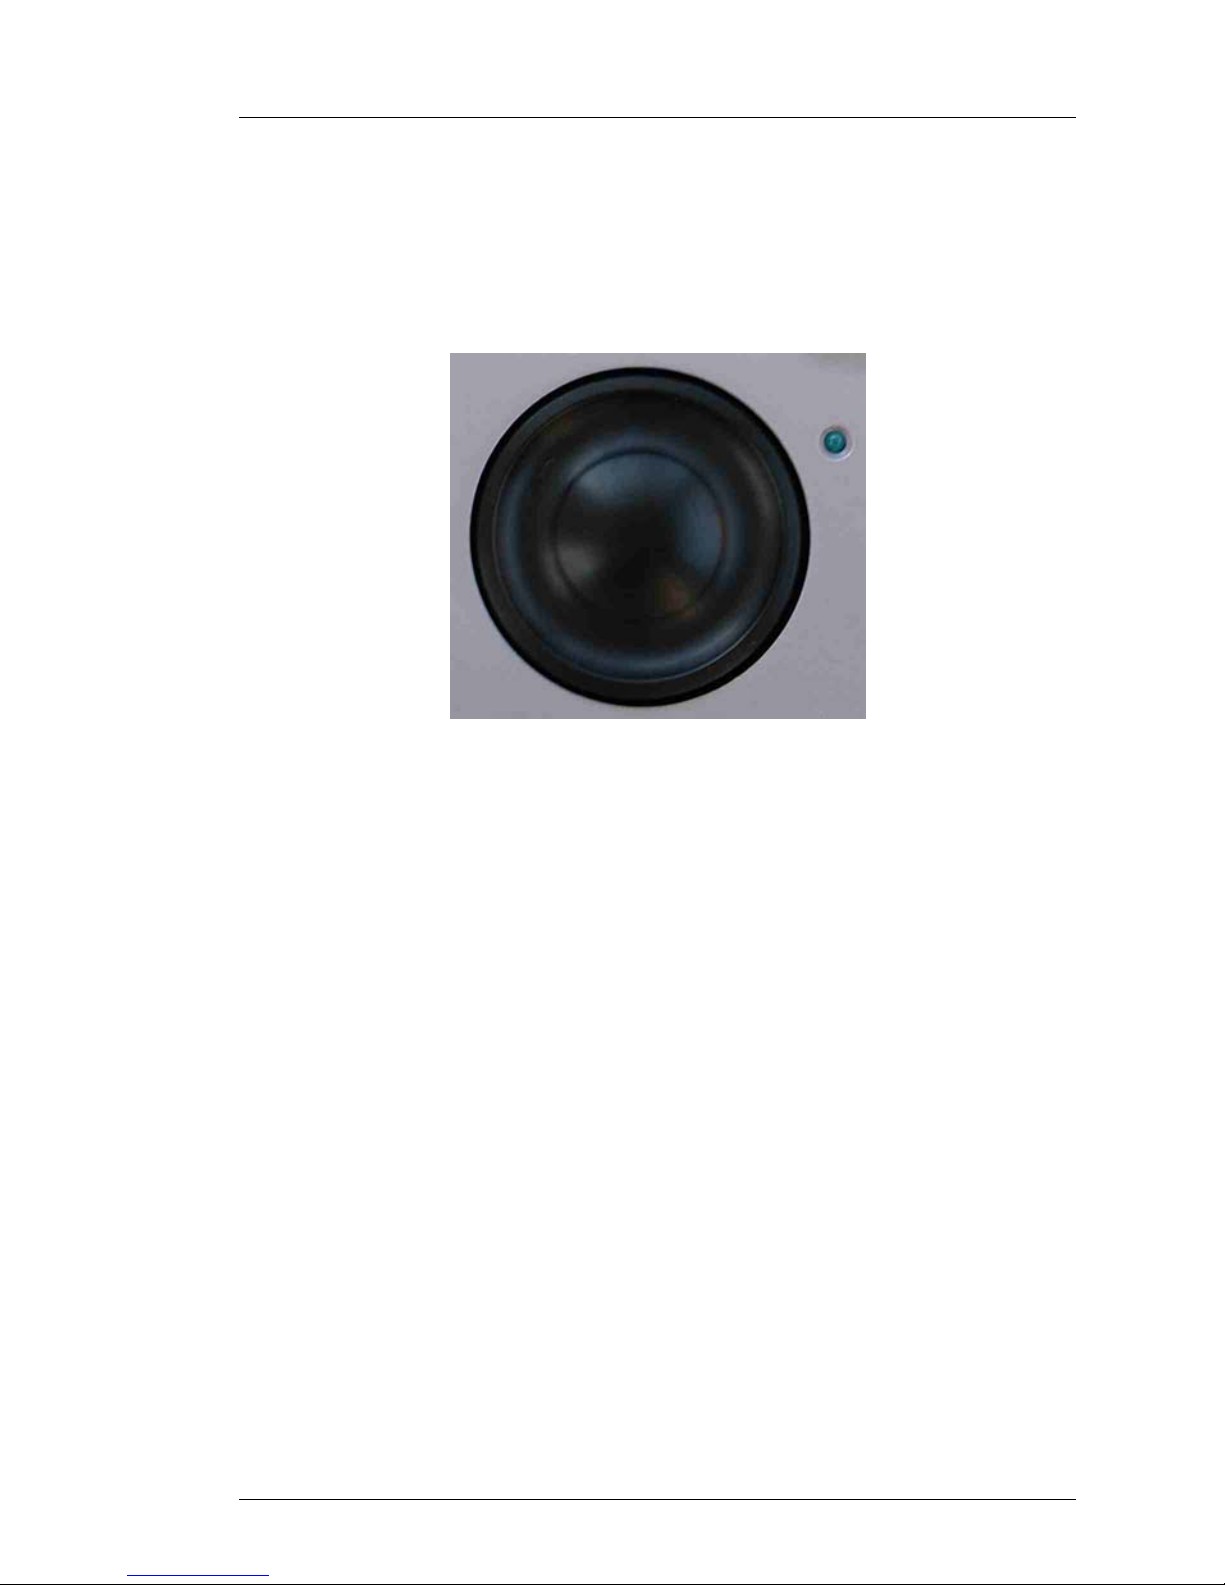
Rotary knob
The large black dial in the centre of the PresStation Panel is known as the
rotary knob.
You use this to adjust the settings on some of the PresStation menus/screen
displays (see How to adjust a setting on the touch screen below).
To adjust the sensitivity of the Jog wheel refer to page 84.
The rotary knob is only active when the blue LED (positioned at 2 o’clock) is
illuminated.
Page 24
Getting Started PresStation User Manual
Page 24 Miranda Technologies Ltd
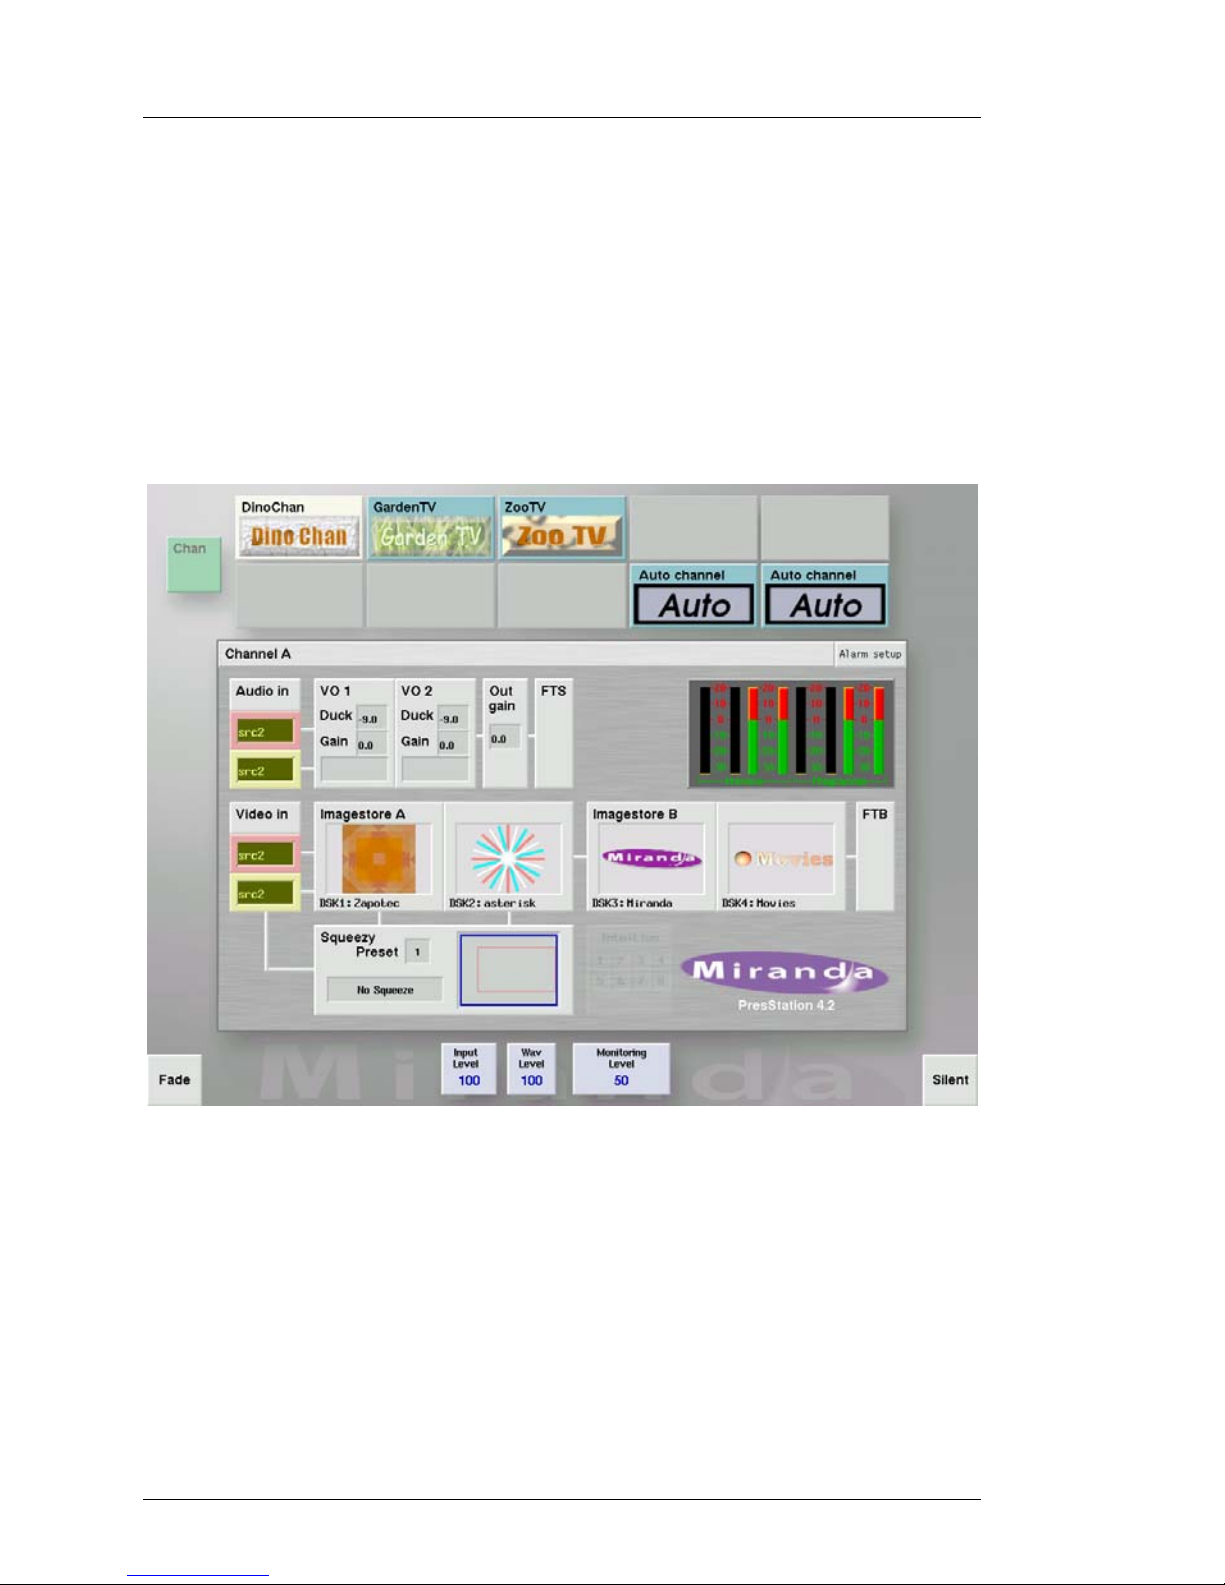
The PresStation VGA screen
PresStation uses an external VGA monitor to view and change settings,
which do not need permanent space on the control panel. The main screen, as
shown below gives an overview of the system in terms of: Imagestores
connected, bugs loaded, current DVE (squeeze) preset, voice-overs levels and
audio metering with peak hold indicators.
This dynamic screen constantly changes to reflect the current status of the
system. Items in use will be highlighted red and features not connected will
be greyed out.
Page 25
PresStation User Manual Getting Started
Miranda Technologies Ltd Page 25
For example, the next screen shows the downstream Imagestore B option is
not fitted/configured and fade to black (FTB) and fade to silence (FTS) are
active.
As well as providing an overview, short cuts to other menu screens can be
achieved by clicking the mouse on the following boxes:
♦ VO 1
♦ VO 2
♦ Out gain
♦ Imagestore A DSK 1 and DSK 2
♦ Imagestore B DSK 3 and DSK 4 (optional)
♦ DVE (optional)
♦ Alarm
♦ Meters
♦ Logo
Page 26

Getting Started PresStation User Manual
Page 26 Miranda Technologies Ltd
When any of these regions are selected the corresponding menu screen is
displayed.
Clicking on the Imagestore A DSK 1 box will display the following screen.
How to display a PresStation menu/dialogue
To display any of the PresStation menu/dialogue screens, simply press one of
the white, round buttons (known as dialogue buttons) on the PresStation
Panel. When you press a dialogue button, the button lights up in green and
the associated menu/dialogue is displayed on the VGA screen.
Page 27
PresStation User Manual Getting Started
Miranda Technologies Ltd Page 27
For example, if you press the PGM dialogue button (to the right of the red
programme bus buttons) the following screen is displayed.
To select an item, simply click with the mouse and the item automatically
changes colour to show that it is selected.
To go back to the previous screen (Main screen) press the PGM dialogue
button again or click on the region to the left of ALARM known as the ‘Title
Bar’ (note that the green PGM dialogue button light also goes out) .
Page 28
Getting Started PresStation User Manual
Page 28 Miranda Technologies Ltd
How to adjust a setting on the VGA screen
On some screen screens you can adjust settings using the rotary knob (found
to the right of the Transitions buttons). For example, from the Transition
Types and Rates screen below you can adjust the transition times.
To adjust a transition time, click on the appropriate button (Slow, Medium or
Fast) and then turn the rotary knob. As you turn the knob you will see the
current settings go up or down depending on which way you turn the knob.
See the relevant sections in this manual for details about how to change the
settings etc. for items you select from the VGA screen.
Page 29
PresStation User Manual Getting Started
Miranda Technologies Ltd Page 29
Selecting a channel
You can use the Channel Select buttons (numbered Chan 1 to Chan 6) to
switch between the various channels controlled by one PresStation panel.
The name of the channel currently being controlled is shown on the screen
display next to the Channel Select button.
See Chapter 10 Controlling Multiple Channels for more information.
Page 30

Getting Started PresStation User Manual
Page 30 Miranda Technologies Ltd
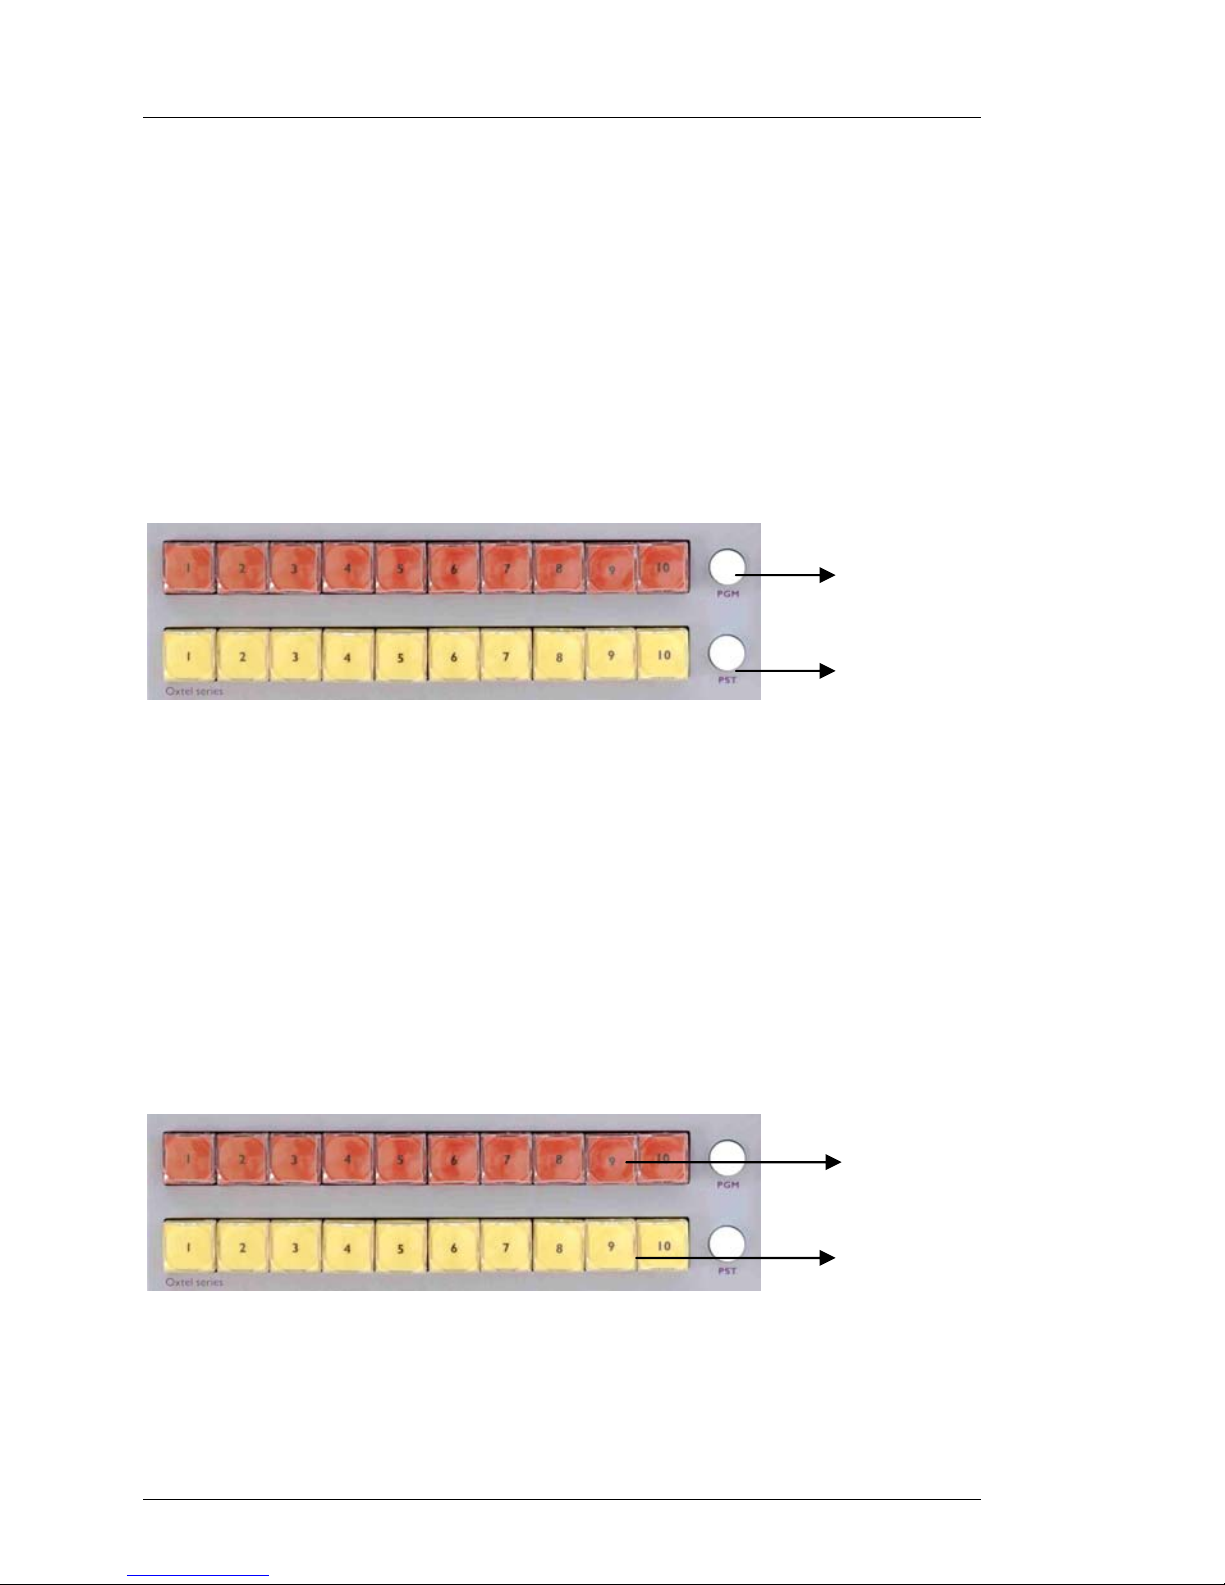
Selecting a source
PresStation allows you to select from up to 10 sources at any one time. These
can be chosen from the range of sources the router has available for the
current channel. The name of each source is displayed above the two rows of
ten buttons. You can also change the source by pressing the Source button
and then choosing the new source from the Source Select screen (displayed
on the VGA screen). See Chapter 7 Choosing and Changing Your Source for
more information.
Page 31

PresStation User Manual Getting Started
Miranda Technologies Ltd Page 31
Automation
If the PresStation panel is configured for automation,
enabled at start up, the Auto On/Off button
automatically lights up when you switch the panel on.
To switch to manual control and ignore au tomation
commands, press the Auto On button so the light goes
out. Press the Automation dialogue button then click on
Use Panel Under Auto to use the system at the same
time as automation.
Page 32

Getting Started PresStation User Manual
Page 32 Miranda Technologies Ltd
Front Panel Control
Connected Imagestores can be manually controlled from the PresStation
panel. Select the appropriate channel (Chan1 – Chan 6).
From the Channel Select screen click on the Configuration button to display
the Configuration screen.
Page 33

PresStation User Manual Getting Started
Miranda Technologies Ltd Page 33
Click on the IS2-1 button to access the upstream Imagestore and the IS2-2
button to control a downstream Imagestore, if connected.
Page 34

Getting Started PresStation User Manual
Page 34 Miranda Technologies Ltd
Click on the screen buttons to navigate through the Imagestores menus.
For further information please refer to the Imagestore User Manual.
Page 35

PresStation User Manual Getting Started
Miranda Technologies Ltd Page 35
Alarms
PresStation has the ability to measure its internal power supplies voltages and
inform the user in the event of a failure, unless the condition is turned off.
To display the alarm screen click on the ‘ALARM’ text on the right hand
edge of the Title Bar.
Click on the appropriate tab to display the alarm settings for either the Panel
or PCS. Values highlighted in red are outside the factory default settings and
are therefore considered an alarm condition. If an alarm is registered the
ALARM text shown in the ‘Title Bar’ will change from grey to red.
To turn an alarm off click on the button to the left of the value. Clicking it
again will turn it on.
Page 36

Getting Started PresStation User Manual
Page 36 Miranda Technologies Ltd
To return to the main screen click in the Title Bar to the left of the ALARM
text.
In the event of an alarm condition on the PCS, the message will be displayed
immediately on the front panel. Previous alarm messages will on ly be shown
when the screen saver is activated.
Page 37

PresStation User Manual Doing a Simple Presentation
Miranda Technologies Ltd Page 37
3 Doing a Simple Presentation
lthough up to 24 transmission channel s can b e controlled from one
PresStation panel and up to 10 different output sources (at one time)
per channel, you can also use the PresStation panel to simply
switch/cut between different sources to change your current programme
output (that is, what is currently going to air).
This method is useful if you are only working with a limited number of
sources (that is, a minimum of two and maximum of ten) and you are not
concerned about checking a source before it goes to air.
PresStation has two rows of 10 buttons (buses) for selecting and switching
between sources. The yellow PST buttons enable you to choose and preview
other available sources before going to air. However, you only need to use
the red programme (PGM) buttons in the middle row to control the current
programme output.
A
Page 38

Doing a Simple Presentation PresStation User Manual
Page 38 Miranda Technologies Ltd
The button for the PGM source, which is currently going to air is lit up (the
name of the source is displayed at the top of the three rows of buttons).
Note: This BUS is distinguished in red to denote ‘On-Air’.
How to cut to a different programme source
To cut to a different source:
♦ press the appropriate red PGM source button
♦ the new button lights up and the previous source button light goes out
♦ the programme output automatically cuts to the source you have just
chosen
If you simply use the PGM buttons to cut to different output sources you do
not get the chance to check the source before you go to air. If you want to be
able to preview your next source before going to air you will need to use the
set of PST (preset buttons). For more information see Chapter 4 Doing a
Presentation with a Transition below.
Page 39

PresStation User Manual Doing a Presentation with a Transition
Miranda Technologies Ltd Page 39
4 Doing a Presentation with a
Transition
n the previous section you learned how to do a simple presentation using
only the PGM source buttons to switch/cut between sources. This is fine if
you are only working with a limited number of sources and do not need to
check each source before going to air. However, if you are choosing from a
wider selection of sources or if you want to add a special video eff ect it may
be necessary to look at a preview of a source before going to air. The yellow
PST source buttons on the bottom row enable you to choose and preview the
next source before going to air.
Before you can use the PST source buttons to choose your next source, you
have to tell PresStation how you are going to transfer the preview source to
the current programme output – this is known as a transition.
What is a transition?
The process of switching between two vide o sou rces is
known as a transition. Although PresStation enables you
to make a variety of transitions (all of which are
described in Using Transitions later in this manual) in
this section you will learn how to do a simple cut. The
cut transition button is at the bottom, left-hand corn er of
the bank of transition buttons. For example:
I
Page 40

Doing a Presentation with a Transition PresStation User Manual
Page 40 Miranda Technologies Ltd
The cut is the most common form of transition. It is where one video source
(or picture) is immediately replaced by another source.
How to choose your preview (PST) source
To choose a preview source:
♦ press the cut transition button (the transition arm LED lights up to show
that it is armed (active))
♦ press the appropriate yellow PST source button (the
name of the source is displayed above the three rows
of buttons)
♦ the new button lights up and the previous PST source
button light goes out
♦ the new source is immediately shown on your preview monitor
Once you have chosen and checked your preview (PST) source, you are
ready to make the transition (cut) from the preview source to the programme
output.
And do a simple cut
Once you have chosen (armed) the type of transition you want to make and
checked your preview (PST) source, you are ready to make the transition
(cut) from the preview source to the programme output.
To cut from the preset source to the programme output:
♦ press the Take output control button to take the
chosen preview source to air
Page 41

PresStation User Manual More about Transitions
Miranda Technologies Ltd Page 41
5 More about Transitions
n the previous section you learned how to replace the current programme
output with a preset source using a simple cut transition.
PresStation, however, enables you to make a variety of transitions using one
of the transition buttons on the PresStation control panel. The different
transition buttons can be grouped into the following basic types:
Cut This is the most common form of transition. It is
where one video source (or picture) is immediately
replaced by another source. This type of transition is
not affected by the transition rate (see Choosing a
Transition rate below).
Fade There are five types of fade – cut-fade, fade-cut, V-
fade, X-fade and U-fade. With a fade there is a
gradual transition from an image to a black screen
or from a black screen to an image.
Wipe This is where one video source (picture) is gradually
replaced (wiped out) by anoth er pi ct ure. De p e nding
on which type of wipe transition you choose, the
current picture is either wiped from side to side (left
to right or right to left) or from top to bottom or
bottom to top.
I
Page 42

More about Transitions PresStation User Manual
Page 42 Miranda Technologies Ltd
The transition buttons
Once you have decided on the basic type of transition you want to make (cut,
fade or wipe) you are ready to choose one of the following transition buttons
from the PresStation control panel (note that the following list describes the
buttons and actions set up by Miranda – your set-up/configuration may be
different):
Button Action
The Cut transition button immediately replaces the current
programme output by your chosen pr eset source.
The Cross/Fade transition button produces a standard mix
between the programme output and the preset source.
The Cut/Fade transition button cuts the programme output
to black and then fades it up to the preset source.
The Fade/Cut transition button fades the programme output
down to black and then cuts to the preset source.
The V Fade transition button fades the programme output to
black and then fades from black to the preset source (i.e. it is
effectively two cross fades – the first from programme to
black and the second from black to preset).
The U Fade transition button has the same effect as a V fade
except that you can control the time spent at black by
pressing and holding the TAKE button. When you press
TAKE, the programme output fades to black and then
remains black until you release the TAKE button.
Page 43

PresStation User Manual More about Transitions
Miranda Technologies Ltd Page 43
The V Wipe transition button gradually wipes over the
current source with the new source. A V wipe can be from
top to bottom or bottom to top depending on how your
system is set up (configured).
The H Wipe transition button has the same effect as a V
wipe except that the wipe is from left to right or right to left
depending on how your system is set up (configured).
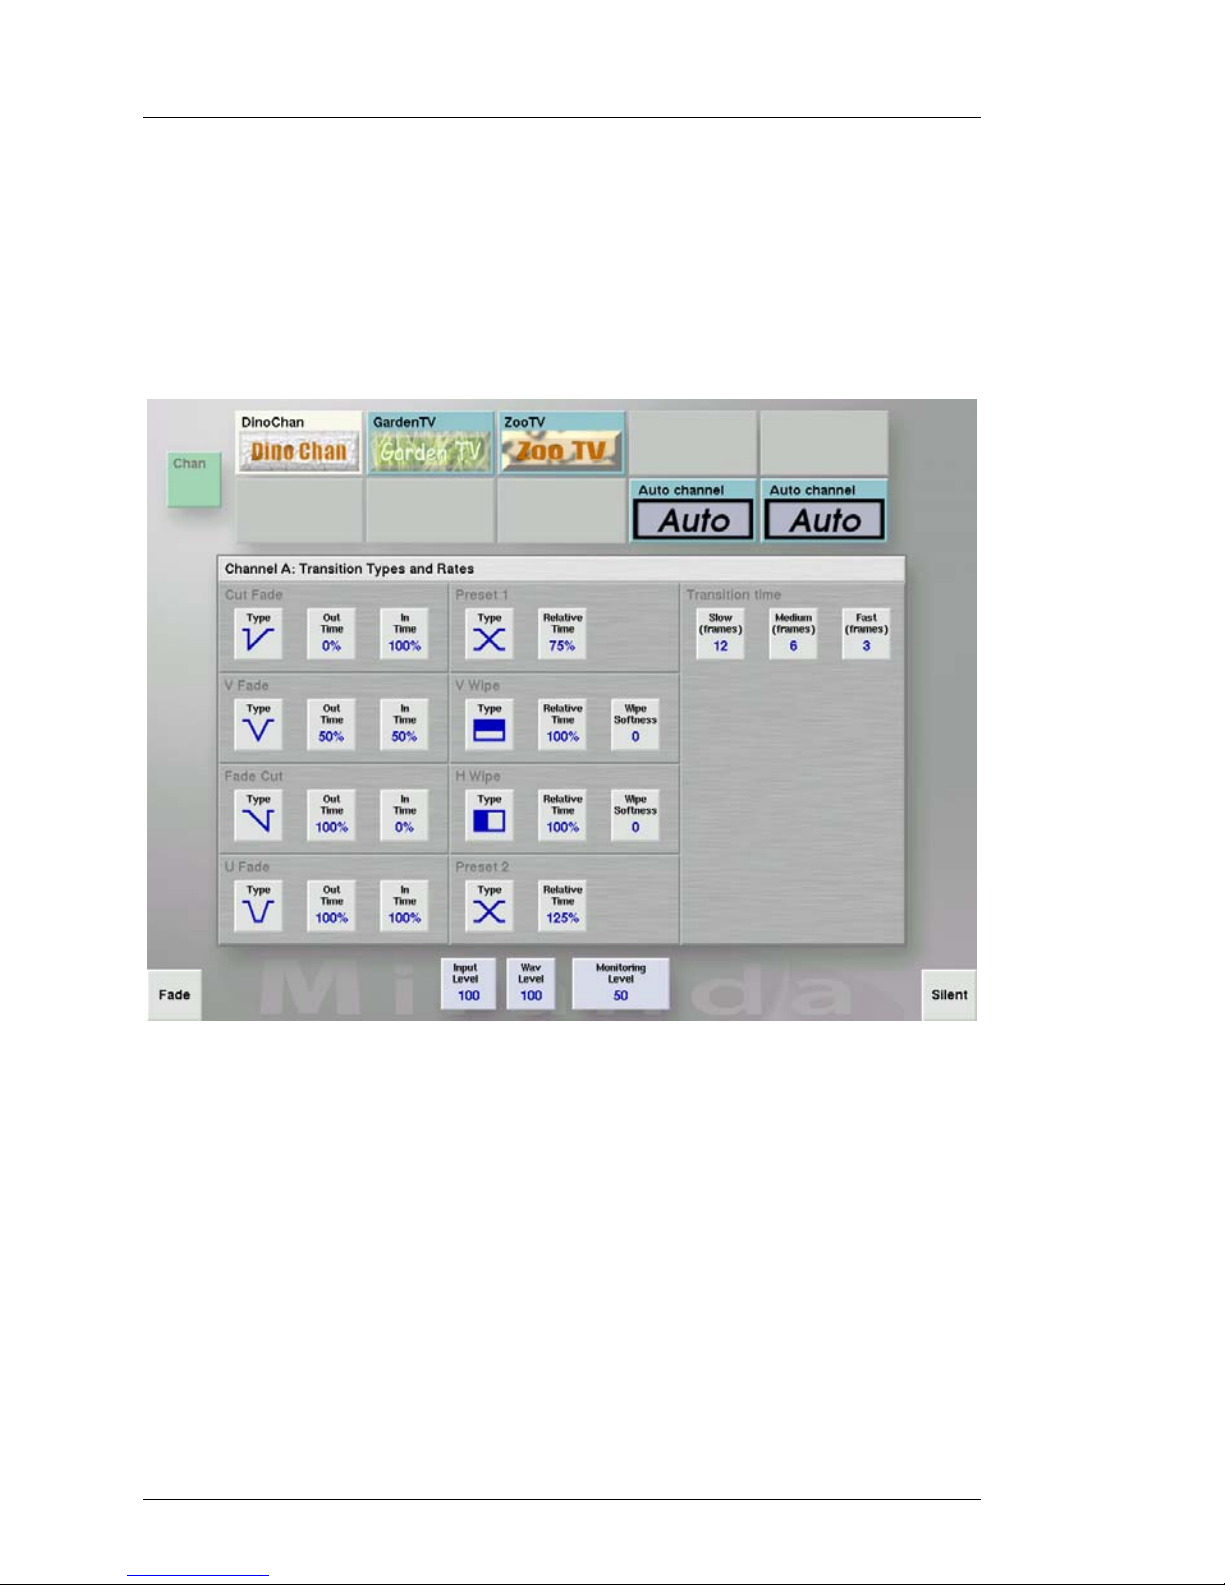
The Transition Types and Rates screen
You use the Transition Types and Rates
screen to change the settings of the transition
buttons. You can also change the rate (speed)
at which a transition is made from this screen
(see Chapter 6 Choosing a transition rate for
more information).
To display the Transition Types and Rates
screen, press the white, round dialogue button
to the left of the A/V Split button.
Page 44

More about Transitions PresStation User Manual
Page 44 Miranda Technologies Ltd
The Transition Types and Rates screen displays details about all the
transition buttons except the cut and cross fade. You can change the settings
of all the buttons displayed on this screen.
Note: The cut and cross fade buttons are not configurable and are
therefore not displayed on this screen.
How to change a transition type setting
To change any of the transition type settings (for example, the in and out
times, the relative times or the wipe softness):
♦ click on the appropriate button
♦ turn the rotary knob (the setting goes up or down depending on which
way you turn the knob)
Note: Changing the out time of a cut fade or the in time of a fade cut will
change the transition type to a V fade.
Page 45

PresStation User Manual More about Transitions
Miranda Technologies Ltd Page 45
Audio and video only transitions
Usually audio and video signals are used in a transition simultaneously.
However, you can use the Audio Only and Video Only button selection to
specify whether you want a subsequent transition to affect only the audio or
video part of the output (known as an audio/video breakaway).
To select Audio Only press the A/V split button until the orange light to the
left of AUDIO ONLY is lit and then press the Take button. To select Video
Only press the A/V split button until the orange light to the left of VIDEO
ONLY is lit and then press the take button.
When you select Audio Only, the next transition will only affect/change the
audio part of the on-air signal. Similarly, when you select Video Only, the
next transition will only affect/change the video part of the on-air signal.
After you have made an audio only or video only transition both the
programme and preset sources will be on air. If you then choose a different
preset (preview) source, only the output you have chosen (that is, audio or
video) will be affected.
Once the separating transition has been started by selecting either Audio
Only or Video Only and then pressing the Take button the red light to the
right of the effect test that you have selected will light, and the orange light
for the other breakaway effect will be lit. Pressing the Take button again
will complete the transition.
Page 46

More about Transitions PresStation User Manual
Page 46 Miranda Technologies Ltd
If you do not want to follow an Audio Only transition with a video transition
or a Video Only transition with an audio transition, select the Audio Only or
Video Only again before you do a subsequent take.
Note The breakaway occurs in the upstream Imagestore only, not in
the router.
You use the Lead Audio option (in combination with the Take button) to
add the audio from the preset source with the programme output. You select
the LEAD AUDIO option by pressing the A/V Split button until the orange
LED to the left of LEAD AUDIO is lit and then pressing the Take button.
When you subsequently press Take, the transition is made and the light in the
Lead Audio button goes out.
This is similar to an Audio Only transition (see above), except that both the
programme and preset audio are added and used as the output. When the
Lead Audio button is lit up, the preset audio source is on air and subsequent
cuts on the preset source only affect the audio output.
You use the Lag Audio option (in combination with the Take button) to add
audio from the current program source with the video from the preset source.
You select the LAG AUDIO option by pressing the A/V Split button until
the orange LED to the left of LAG AUDIO is lit and then pressing the Take
button. When you subsequently press Take, the transition is made and the
light in the Lead Audio button goes out.
When the Lag Audio button is lit up, the preset video source is on air and
subsequent cuts on the preset source only affect the video output
You use the Fade button (see bottom left of the screen display) to toggle a
fade to black. Note that when you press the Fade button you are not arming it
for a subsequent transition – it affects the output straight away. The Fade
button is lit up when the output is black and the audio button lit when audio is
silent.
Page 47

PresStation User Manual More about Transitions
Miranda Technologies Ltd Page 47
You use the Silent button (see bottom right of the screen display) to toggle a
fade to silence. Note that when you press the Silent button you are not
arming it for a subsequent transition – it affects the output straight away. The
Silent button is lit up when the output audio is silent, the video remains
unchanged.
Disable Fade and Silent buttons
The Fade and Silent buttons can be disabled to avoid accidental pressing. To
disable or enable the feature go to the Button Disabling screen using the
following sequence.
Press the Channel Select dialogue button.
From the Channel Select screen press the Configuration button Then the
Disable Buttons in the following screenPressing FTS will enable or disable
Page 48

More about Transitions PresStation User Manual
Page 48 Miranda Technologies Ltd
Pressing FTS will enable or disable Silent button.
Pressing FTB will enable or disable Fade button
Pressing Auto will enable or disable Auto On button.
Pressing Lead/Lag will enable or disable the Lead and Lag buttons.
To return to the main screen press the Title Bar.
Page 49

PresStation User Manual Choosing a Transition Rate
Miranda Technologies Ltd Page 49
6 Choosing a Transition Rate
hen you make a transition you can also choose the rate (speed) at
which the transition is made. You do this by choosing one of the
three possible rates (slow, medium or fast) next to the Rate button:
When you press the Rate button, PresStation
cycles through each of the three preset rates for
the type of transition you chose.
For the X-fade transition, the preset rate is
stored as fields. All other transition types have
their component part timing expressed as a
percentage of the total X-fade time. For
example, the V-fade down and up times could
be 60% and 82%.
The total time for any transition type does not
have to be 100%. For example, a V-fade with a
down time of 60% and an up time of 82%
would create a transition which lasts 1.42 times
as long as an X-fade. These proportions stay
the same irrespective of the rate (slow,
medium, fast) you choose.
Adjusting the specified rates
You can adjust the specified slow, medium and fast rates (that is, the number
of frames to complete the transition) from the Transition Types and Rates
screen. To display the screen, press the white, round dialogue butto n to the
right of the cut and cross fade transition buttons:
W
Page 50

Choosing a Transition Rate PresStation User Manual
Page 50 Miranda Technologies Ltd
How to change a transition rate
♦ click on the Slow, Medium or Fast buttons (the selected button will
illuminate green)
♦ turn the rotary knob (the number of frames will go up or down
depending on which way you turn the knob)
Note You cannot choose a rate which is in the same range as a slower
or faster rate (in other words they cannot overlap).
Page 51

PresStation User Manual Choosing and Changing your Source
Miranda Technologies Ltd Page 51
7 Choosing and Changing Your
Source
resStation enables you to manually select from 10 sources at any one
time. The name of each source is displayed above the two rows of ten
buttons.
PGM These buttons control the programme output (that
is, what is currently going to air). Although it is
unlikely that you will need to press any buttons in
this row, the buttons relating to the source(s)
which are currently contributing to the programme
output are lit up. If you do press a button in this
row, the programme output will always be
affected (unless it is hidden by a DSK or fade-toblack).
PST These buttons enable you to choose the next
source to go to air. When you press one of the
preset buttons, the button lights up and the source
is immediately shown on the preview monitor,
P
Page 52

Choosing and Changing your Source PresStation User Manual
Page 52 Miranda Technologies Ltd
providing either a transition is enabled or the
PresStation is set-up to ‘Always Preview Preset.
You take the chosen source to air by selecting a
transition and then pressing the TAKE button, (or
any one of the transition output control buttons).
See Using Transitions for further details.
The Source Select screen
You use the Source Select screen to choose and change the groups and
sources associated with the PGM and PST buttons. To display the Source
Select screen, press the Source dialogue button and the Source Select screen
is displayed on the VGA screen. For example:
The current group (that is, the group of sources which is currently available
from the PresStation control panel) is highlighted in green. The currently
Page 53

PresStation User Manual Choosing and Changing your Source
Miranda Technologies Ltd Page 53
selected programme (PGM) output is highlighted in dark grey and the source
associated with that PGM output button is highlighted in green. The name of
the source (currently selected) is displayed at the bottom of the screen after
the Source Name: prompt. When you choose a different source the
information is automatically updated.
How to change to a different group
To change to a different group, simply click on the appropriate group button
on the Source Select screen. The group you chose is then highlighted in
green. You can now check and/or change the associated sources for that
group.
How to change a source
Once you have chosen your group, you can change the source for each of the
ten source buttons within that group.
To change a source:
♦ click on the appropriate source button (it changes to dark grey to show
that it is selected)
♦ then click the source you want to associate with that bu tton (it changes to
green to show that it is selected) - the available sources are displayed
beneath the numbered source buttons – if there are more sources
available than can be displayed on the VGA screen, click on the c and
d buttons to move up and down the screen
Page 54

Choosing and Changing your Source PresStation User Manual
Page 54 Miranda Technologies Ltd
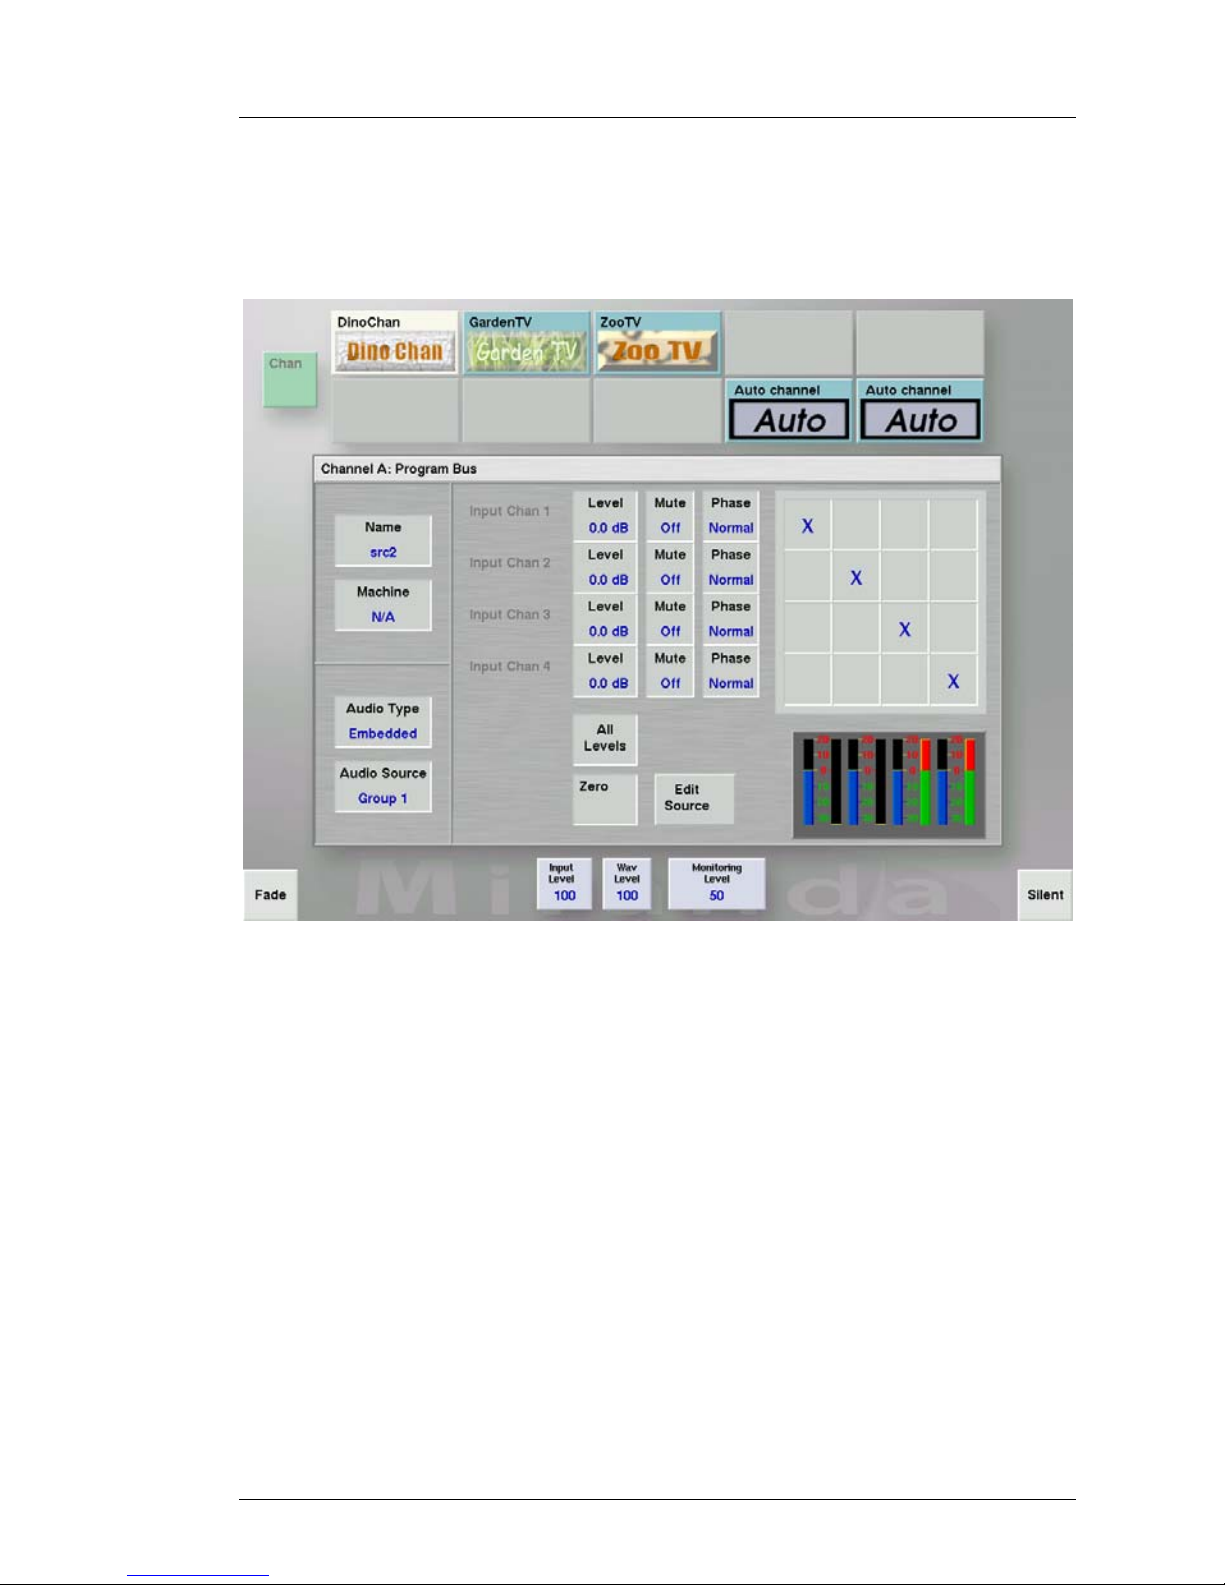
How to edit a source
To edit (change) a source, press either the PGM or PST dialogue buttons,
and the Edit Source screen for that option is displayed:
Name
Displays the source name associated with the illuminated bus button.
Machine
Displays the name of the connected VCR, if set in the Prescontrols
configuration file.
Note: PresStation has no manual control over VCR machines
Page 55

PresStation User Manual Choosing and Changing your Source
Miranda Technologies Ltd Page 55
Audio Type
To change the audio type, simply click on the Audio Type button and the
audio type toggles (switches) between Embedded and AES (if configured).
Audio Source
To change the audio source, click on the Audio Source button and then use
the rotary knob to:
♦ switch between the available groups (1-4) if the audio type is embedded
♦ select the AES router source to be associated with the video channel.
Adjusting the level of the input channels
There are four input channels used either as two channels of stereo pairs or as
four mono channels. You can change the level of each input channel
individually or you can change the level of all the channels at on ce.
To change the level of an individual channel, click on the appropriate input
channel level box (1, 2, 3 or 4) to activate it (it goes green to show that it is
activated) and then use the rotary knob to adjust the level. When you h ave
finished making the adjustment, click on the box again to de-activate it.
To change all levels at once, click on the All Levels button and then use the
rotary knob to adjust the levels of all channels.
To return the level to zero for all channels, simply click on the Zero button
and all levels are automatically returned to zero.
Muting a channel
The Mute buttons enable you to mute individual channels. To toggle (switch)
between mute on and mute off, simply click on the appropriate Mute button.
Inverting the input phase
The Phase buttons enable you to invert the phase of individual channels. To
toggle between Normal and Invert, simply click on the appropriate Phase
button.
Page 56

Choosing and Changing your Source PresStation User Manual
Page 56 Miranda Technologies Ltd
Changing the output source
You can specify which output source you use for each input channel.
In the above example, each input channel goes to the corresponding output
channel (for example, input chan nel 1 goes to output 1 and so on). To cha nge
the output source for an input channel, simply click on the appropriate output
box to display a cross.
These configurations can be set on a source-by-source basis. The information
is stored on the PCS-001 and is transferred to the connected Imagestore when
the source is selected.
Page 57

PresStation User Manual Choosing and Changing your Source
Miranda Technologies Ltd Page 57
Always Show Source
In manual operation you can only select sources of the current displayed
group but under automation or router RCP control it is possible to select a
source outside of the displayed group. In this situation the illuminated soured
buttons will be turned off as they no longer represent activ e sources.
To monitor out of range sources use the Always Show Source mode which
can be selected from the panel configuration screen. In this m ode, when a
source is selected that is outside of the displayed group either button 1 or 10
(default) is reallocated to that source.
Example:
With group 1 sources displayed and Always Show Source enabled, when the
preset bus changes to source 16 (group 2) PresStation will assign source 16 to
button 10 (default) which now represents the out-of-range preset. The button
will light up and the text displayed for that source will change to that of
source 16. The entire 10th column has become source 16 temporarily. If you
press the 10th button on the PGM bus you are actually cutting to source 16
not source 10. The same is true for the AUX bus.
The 10th button will stay as source 16 for as long as the preset remains on it
and Always Show Source remains enabled. If the preset source moves back to
within the displayed group, for example source 4, button 4 will light up and
the 10th bus will go back to being source 10. If the preset changes to source
17, Always Show Source will still be active and the 10th light will stay lit but
the text source will change to display source 17.
Page 58

Choosing and Changing your Source PresStation User Manual
Page 58 Miranda Technologies Ltd
Whilst the 10th button is in this mode, the non-followed source (normally
programme) can be switched forward and backward from the temporary
source. The 10th bus will not change until the preset changes. The mode will
remain active until either the source is switched back to within the displayed
group or the feature is turned off from the configuration screen.
Enabling Always Show Source.
Always Show Source is enabled from the Panel Configuration screen.
To open the Panel Configuration window click on:
Chan Configuration Panel Configuration.
Page 59

PresStation User Manual Choosing and Changing your Source
Miranda Technologies Ltd Page 59
Enable Always Show Source
The default option is off.
Click on the button to toggle between off and on.
Always Show Source follows PST or PGM
Use this option to follow either the Preset or Programme bus selection.
The default option is PST where the mode is activated when the preset bus
goes out of the displaye d group.
Click on the button to select PGM where the mode is activated when the
programme bus goes out of the displayed group.
Always Show Source bus source to use
Use this option to determine which bus button source is to be reallocated.
The default option is button 10. Click on the button to toggle between butto n
1 and button 10.
Page 60

Choosing and Changing your Source PresStation User Manual
Page 60 Miranda Technologies Ltd
Page 61

PresStation User Manual Inserting a Picture or Logo
Miranda Technologies Ltd Page 61
8 Inserting a Picture or Logo
he PresStation control panel also enables you to use up to four
Imagestore keying layers for inserting channel branding stills,
animations, in-vision clocks and timers. Each Imagestore has two
independent keying layers, which are linked to the Down Stream Keyer
(DSK) buttons on the control panel. One Imagestore is linked to DSK 1 and
DSK 2. A second Imagestore can be linked to DSK 3 and DSK 4.
Each DSK cluster is identical and they are ordered from left to right. This
means that as the signal travels from left to right; the right-hand DSK is the
last in the chain and is therefore the topmost layer (note that your system may
be set up (configured) differently).
Note: Only DSK 1 and DSK 2 are available unless the channel being
controlled has an extra Imagestore. Only DSK 1 and DSK 2
have DVE capability. If the additional Imagestore has a Squeezy
option fitted, DSK 3 and DSK 4 do not currently have DVE
capability.
T
Page 62

Inserting a Picture or Logo PresStation User Manual
Page 62 Miranda Technologies Ltd
The two yellow bulbs (LEDs) next to the DSK buttons indicate which (if
any) DSK operation is armed for that DSK. To choose an operation (that is,
Cut or Fade) press the appropriate DSK button to cycle through the available
options.
When a DSK is contributing to the output, the relevant DSK button is lit up
and illuminated in red.
The DSK Settings screen
When you press a dialogue button above a DSK cluster the DSK Settings
screen is displayed on the touch screen. You can then:
♦ choose an image, animation or clock from the Imagestore associated
with that DSK
♦ load a live image
♦ set the DSK parameters
Page 63

PresStation User Manual Inserting a Picture or Logo
Miranda Technologies Ltd Page 63
How to load an image
To load an image from the DSK Settings screen:
♦ click on Load Enable (it lights up in green to show that it is
selected)
♦ use the page up and down or top and bottom arrows to locate
the image
♦ Click on the image you want to use. While PresStation loads
the picture, Loading is displayed after the Loaded prompt in
the lower, left-hand corner of the screen – when the imaged
has been successfully loaded the name of the image is then
displayed after the Loaded prompt
Note: If the DSK is armed, you will see the image displayed
on your preview monitor.
How to take an image to air
Once you have loaded an image, you are ready to take it to air.
♦ press the appropriate DSK button and the selected image is displayed on
the PST preview monitor – note that you can change the image on the
PST preview monitor simply by choosing (clicking) another image on
the DSK Settings screen (the DSK LED is lit up to show that it is armed).
♦ choose the rate (speed) you want the image to be faded – simply press
the Rate button to choose Slow, Med or Fast.
♦ press the DSK button again to arm a Fade (the Fade LED lights up)
♦ press TAKE and the image goes to air on the PGM (programme output)
screen.
Note: Once an image is on air, the Load Image box on the DSK Settings
screen turns red to warn you that any subsequent changes to the
selected image on this screen will also affect the programme
output. The DSK button is also illuminated red.
Page 64

Inserting a Picture or Logo PresStation User Manual
Page 64 Miranda Technologies Ltd
How to remove an image
To remove an image:
♦ press the appropriate DSK button once to arm a cut or twice to arm a
fade (the image is removed from the PST preview monitor and the Cut or
Fade LED lights up)
♦ press TAKE and the image is removed from the PGM (programme
output) screen and the DSK lights goes out
How to load a live image
♦ press the appropriate DSK dialogue button to display the DSK settings
screen
♦ select the very first image button (Load Live) at the top of the screen by
touching the thumbnail
♦ the Fill input of the selected Imagestore will go straight to air and be
displayed on the programme monitor
Page 65

PresStation User Manual Inserting a Picture or Logo
Miranda Technologies Ltd Page 65
Rates, CGT and Keying
Click on the left hand tab on the DSK Settings screen to adjust:
♦ Fade rates
♦ Clip, Gain and Transparency)
♦ Keying modes (key source, key mode and key invert)
Fade Rates
Fade Rates enables you to set the number of frames it will take to complete a
fade transition. You can adjust the number of frames for each of the rates
(slow, medium and fast).
Page 66

Inserting a Picture or Logo PresStation User Manual
Page 66 Miranda Technologies Ltd
How to adjust a fade time
To adjust the fade rate:
♦ click on the Fade Rate parameter you want to adjust (Slow, Medium or
Fast) and the button will turn green
♦ turn the rotary knob on the PresStation control panel (the number of
frames will go up or down depending on way you turn the knob)
♦ click on the button again to accept the change. The button will now go
grey
Note: You cannot choose a fade time, which is in the same range as a
slower or faster time (i.e. they cannot overlap).
CGT
CGT enables you to adjust the clip, gain and transparency parameters. Note
that the CGT parameters are typically only used with Load Live.
Clip Clip is the level under which the key signal will be
forced to black. In a keying process this causes a
total absence of fill video in areas where the
incoming key signal is less than the clip lev e l.
Gain The gain level amplifies the key signal forcing
grey levels towards (and up to) white level. In a
keying process this causes the fill signal to be less
transparent than it usually would be in areas with a
grey signal.
Transparency The transparency level controls the amount of
background video that can seep through the keyed
image (for the whole picture).
How to adjust the clip, gain or transparency
To adjust the clip, gain or transparency:
♦ click on the parameter you want to adjust (Clip, Gain or Trans) and the
button will turn green.
Page 67

PresStation User Manual Inserting a Picture or Logo
Miranda Technologies Ltd Page 67
♦ turn the rotary knob on the PresStation control panel (the level goes up
or down depending on the way you turn the knob).
♦ Click on the button again to accept the change. The button will now go
grey.
Keying
This mode enables you to adjust the key source, key mode and key invert
parameters. Note that these parameters are typically only used with Load
Live.
Key Source When the Key Source parameter is set to Key, the
key data is derived from the luminance content of
the separate key image.
When the Key Source parameter is set to Self, the
key data is derived from the luminance content of
the fill image.
When the Key Source parameter is set to None, the
key for an image is white (i.e. there is no image
transparency).
Key Mode When the Key Mode parameter is set to Full, the
foreground image is passed only when the key
signal is present.
When the Key Mode parameter is set to Linear,
the background and foreground are summed and
the foreground is unaffected by the key.
Key Invert When the Key Invert parameter is set to Normal, a
black-level key signal creates a fully transparent
fill image which is not visible over a background
whereas a white-level key signal creates an
opaque fill image where the background is not
visible though the image.
When the Key Invert parameter is set to Invert, a
white-level key signal creates a fully transparent
fill image and a black-level key signal creates an
opaque fill image (the opposite/inverse of
Normal).
Page 68

Inserting a Picture or Logo PresStation User Manual
Page 68 Miranda Technologies Ltd
How to choose a Key Source
To choose a key source, click on the Key Source button (as many times as
necessary) to cycle through None, Self and Key (see The DSK Parameters
above for more information).
How to choose a Key Mode
To choose a key mode, click on the Key Mode button to switch between
Linear and Full (see The DSK Parameters above for more information).
How to choose Key Invert
To choose key invert, click on the Key Invert button to switch between
Normal and Invert (see The DSK Parameters above for more information).
Position Size and Cropping
Page 69

PresStation User Manual Inserting a Picture or Logo
Miranda Technologies Ltd Page 69
Click on the middle tab on the DSK Settings screen to adjust:
♦ X, Y position
♦ Crop top and bottom
♦ Crop left and right
Load an image to modify or press the Preview button to edit an already
loaded image.
The Preview screen will now show the on screen position of the image and
its crop boundaries.
Page 70

Inserting a Picture or Logo PresStation User Manual
Page 70 Miranda Technologies Ltd
Position
Position enables you to adjust the on screen position of the image.
How to adjust the position
♦ click on the X or Y Position button until it turns green.
♦ turn the rotary knob on the PresStation control panel until the desired
image position is obtained (the value will go up or down depending on
way you turn the knob). The image position is shown by the grey filled
rectangle.
♦ click on the button again to accept the change. The button will now go
grey.
To zero the image to the top left hand corner of the screen, click on the Zero
button.
Page 71

PresStation User Manual Inserting a Picture or Logo
Miranda Technologies Ltd Page 71
Cropping
Cropping enables you to adjust the margins thus confining an image to less
than full screen. Images may be cropped from the left, right, top or bottom.
How to adjust the cropping
♦ click on the appropriate crop button until it turns green.
♦ turn the rotary knob on the PresStation control panel until the desired
position is obtained (the value will go up or down depending on way you
turn the knob). The crop boundary is shown by the black rectangle.
♦ click on the button again to accept the change. The button will now go
grey.
To remove the cropping click on Zero button.
To redisplay the image library press the Browse button.
Page 72

Inserting a Picture or Logo PresStation User Manual
Page 72 Miranda Technologies Ltd
Options and Saving
Click on the right hand tab on the DSK Settings screen to adjust the following
parameters:
Real Time Update
Any changes made to the selected image with this option affect the
Imagestore immediately.
Save without Crop
Pressing this button will save the image back to the Imagestore without any
cropping details
Page 73

PresStation User Manual Inserting a Picture or Logo
Miranda Technologies Ltd Page 73
Save with Crop
Pressing this button will save the image back to the Imagestore with cropping
details. The area outside of the crop will be permanently lost.
Preview Touch Screen
Setting this option will allow adjustment of the X, Y position from the touch
screen as well as the rotary knob.
Delete from IS2
Pressing this button will delete the selected image from the Imagestore
library.
HD Load Live Input 1 & 2
These buttons set which input load live will be loaded into on the ImageStore
HD. These buttons only effect the ImageStore HD, and must be selected
prior to the Load Live being loaded. Pressing these buttons once load live is
already loaded will not change the input until load live is load ed again.
Accept with saving
Changes made to the image can be enabled i.e. sent to air by selecting this
option, however, these changes will not be saved back to the Imagestore
library.
Page 74

Inserting a Picture or Logo PresStation User Manual
Page 74 Miranda Technologies Ltd
File type Icons
To help identify the file types stored on the Imagestore i.e. animations,
clocks, audio wav files and stills, icons can be displayed next to the
thumbnails within the DS K br owser window.
To display the file icons, activate the mode from the Panel Configuration
window. To open the Panel Configuration window cli c k on :
Chan Configuration Panel Configuration.
The option is on the last button so you will need to use the down
arrow scroll button. Click on the Enable file-type icons in browser
to select the option then save the configuration.
This icon denotes a still (.oxt)
This icon denotes an animation, clock or Easytext crawl (.oxa)
This icon denotes an mpeg clip file (.clp)
This icon denotes an audio file (.oxw)
Sample image showing icon position
Page 75

PresStation User Manual GPI Macros (Virtual GPIs)
Miranda Technologies Ltd Page 75
9 GPI Macros (Virtual GPIs)
he Macro option enables you to invoke a GPI Input command, video or
audio, stored on the upstream Imagestore. The Macro can contain any
operation as defined under the Imagestores GPI Input Assign menu
structure. GPIs must be programmed from the Imagestores front panel or by
using the PresStation Mirror comm and (see Sect i on 2 Getting Started, page
32)
For a full list of GPI operations refer to the Imagestore User manual.
Each Macro button (1-6) can be assigned to one of the 9 video or 9 audio
GPIs via a matrix screen.
Press the Macro dialogue button to display the matrix screen.
T
Page 76

GPI Macros (Virtual GPIs) PresStation User Manual
Page 76 Miranda Technologies Ltd
Select the Physical Assignment button then the VGPI you wish to trigger.
Pressing the Macro button on the front panel will cause it to flash indicating
it is armed. Pressing the Take button will activate the GPI and turn the lamp
off.
To disarm a macro prior to a take command, press the relevant flashing
button(s).
DVE (Squeezes) are controlled in an identical manner whereby the Squeeze
move is stored as a GPI command on the Imagestore. These can be
programmed to perform a range of squeezes, pans, wipes and similar effects
on full-motion SDI video in real time. For example, you can use it for
picture-in-picture applications such as over the shoulder news transitions as
well as squeezes for credits, news flashes, sports results and schedules.
Page 77

PresStation User Manual GPI Macros (Virtual GPIs)
Miranda Technologies Ltd Page 77
Squeezy DVE can squeeze and reveal one source over another or an external
video feed can be squeezed to reveal an animated or still image stored within
PresStation.
To modify a Squeezy DVE setting, press the Edit Squeezy button.
The Edit Squeezy screen
When you press the Edit Squeezy button the DVE Settings screen is
displayed on the VGA screen. You can then:
♦ check the existing preset positions for each of the 100 DVE Presets held
on the Imagestore
♦ edit the size, aspect ratio, position and border widths.
♦ preview changes to the squeezy as you make them.
Page 78

GPI Macros (Virtual GPIs) PresStation User Manual
Page 78 Miranda Technologies Ltd
How to edit a preset position
To edit one of the 100 preset positions, touch the Preset button then turn the
rotary knob until the required number is displayed. Press GET & EDIT and
the Preset parameters will be displayed on screen and the wire frame will
display the current Squeezy position.
To adjust the preset use the buttons on the right hand side of the display in
conjunction with the rotary knob:
♦ X pos position to centre of squeeze image relative to screen width
(50% = screen centre)
♦ Y Pos position to centre of squeeze image relative to screen height
(50% = screen centre)
♦ Width width of squeeze image relative to screen width
(100% = full screen)
♦ Height height of squeeze image relative to screen height
(100% = full screen)
♦ Ratio Free / Ratio Locked Controls the aspect ration of the squeeze
image relative to the screen size.
♦ Revert resets the squeeze image to full screen, centrally placed
X=50, Y=50, W=100, H=100
♦ Preview LIVE pressing this button will display a preview of the preset
being modified on the preview monitor. This is displayed in the form of
a crop not an actual hardware squeeze, but does display the actual
position of the Squeeze on the preview.
♦ Preview Mode, pressing this button changes the mode of the preview.
Options are: B over A, A over B, Reveal MG Store, Reveal FG Store,
Squeeze MG Store and Squeeze FG Store.
To exit the window, touch the ‘Title Bar’ at the top of the screen.
Page 79

PresStation User Manual GPI Macros (Virtual GPIs)
Miranda Technologies Ltd Page 79
Entering a GPI on the Imagestore
This example sets up a squeeze transition on GPI 1 On and an unsqueeze on
GPI 2 On:
♦ From the Imagestore front panel select:
Set-up -> GPI Setup -> GPI Inputs Assign
♦ Go into the GPI Inputs Assign menu and select the GPI (1 -> 9) you want
to set. Its easiest to choose one of the first 6 as these are mapped by
default to the 6 Macro buttons on the Prespanel.
For this example, select GPI 1
Select the ON part of the GPI (the off part is not used)
♦ NO ACTIONS SET will appear in the display (providing that the GPI is
empty). Press the enter key then press enter again to insert an action.
In this example, select [squeezy] -> Squeeze mode 0 -> Reveal MG
Store. After pressing enter, VGPI 1 will now contain the squeeze mode,
but not the squeeze move. To add the squeeze move press the right hand
arrow key to display END OF LIST. Press enter and enter ag ain to insert
the next command after the previous one.
Select [squeezy] -> Squeeze move 0 -> 1.
You have now defined a VGPI macro that the Prespanel can arm and
take.
♦ Repeat the above process this time adding
[squeezy] -> Squeeze move 0 -> 0 to GPI 2 On
NOTE, squeeze move to 0 will always undo any squeeze.
Page 80

GPI Macros (Virtual GPIs) PresStation User Manual
Page 80 Miranda Technologies Ltd
GPI
There are 32 GPIO channels with 16 channels available on each connector.
However, note that GPIO connectors C and D share signals with GPIO
connectors A and B (that is, GPIO 0 signal on connector GPIO C is a
duplicate of GPIO 0 signal on connector GPIO A).
There are also 8 analogue fader inputs in two groups of 4 on connectors A
and B. As before, these are duplicated on connectors C and D. Assignment
and set-up can be specified in the software configuration file.
Port ID Label Desc Type
GPIO A
GPIO A General GPIO port. GPIO
GPIO B
GPIO B General GPIO port. GPIO
Page 81

PresStation User Manual GPI Macros (Virtual GPIs)
Miranda Technologies Ltd Page 81
GPIO A
Pin No Signal Name
1 Ground
2 GPIO 1
3 GPIO 3
4 GPIO 5
5 GPIO 7
6 GPIO 9
7 GPIO 11
8 GPIO 13
9 GPIO 15
10 Not Connected
11 AN_IN0 (Analogue Fader Input 0)
12 AN_IN2 (Analogue Fader Input 2)
13 Ground
14 GPIO 0
15 GPIO 2
16 GPIO 4
17 GPIO 6
18 GPIO 8
19 GPIO 10
20 GPIO 12
21 GPIO 14
22 + 5V OUT
23 + 12 V OUT
24 AN_IN1 (Analogue Fader Input 1)
25 AN_IN3 (Analogue Fader Input 3)
Connector type: 25 pin female D type
Page 82

GPI Macros (Virtual GPIs) PresStation User Manual
Page 82 Miranda Technologies Ltd
GPIO B
Pin No Signal Name
1 Ground
2 GPIO 17
3 GPIO 19
4 GPIO 21
5 GPIO 23
6 GPIO 25
7 GPIO 27
8 GPIO 29
9 GPIO 31
10 Not Connected
11 AN_IN4 (Analogue Fader Input 4)
12 AN_IN6 (Analogue Fader Input 6)
13 Ground
14 GPIO 16
15 GPIO 18
16 GPIO 20
17 GPIO 22
18 GPIO 24
19 GPIO 26
20 GPIO 28
21 GPIO 30
22 + 5V OUT
23 + 12 V OUT
24 AN_IN5 (Analogue Fader Input 5)
25 AN_IN7 (Analogue Fader Input 7)
Connector type: 25 pin female D type
Page 83

PresStation User Manual GPI Macros (Virtual GPIs)
Miranda Technologies Ltd Page 83
All GPIOs are active low, and momentary unless specified as latching.
PresStation GPIOs
Outputs (0-23)
GPIO 0 Latching PGM bus input selection (mapped to buttons 1-8)
GPIO 1 | In a mix both should close
GPIO 2 | In black all should release
GPIO 3 |
GPIO 4 |
GPIO 5 |
GPIO 6 |
GPIO 7 |
GPIO 8 Latching PST bus input selection (mapped to buttons 1-8)
GPIO 9 | In a mix both should close
GPIO 10 | In black all should release
GPIO 11 |
GPIO 12 |
GPIO 13 |
GPIO 14 |
GPIO 15 |
GPIO 16 Take momentary
GPIO 17 DSK1 Live (latching)
GPIO 18 DSK2 Live (latching)
GPIO 19 DSK3 Live (latching)
GPIO 20 DSK4 Live (latching)
GPIO 21 VO1 Live (latchin g)
GPIO 22 VO2 Live (latchin g)
GPIO 23 Alarm (OR of all possible alarms)
Page 84

GPI Macros (Virtual GPIs) PresStation User Manual
Page 84 Miranda Technologies Ltd
Inputs (24-31)
GPIO 24 Take button parallel
GPIO 25 Fade button parallel
GPIO 26 Silence button parallel
GPIO 27 VO1 button parallel
GPIO 28 VO2 button parallel
GPIO 29 Audio lead button parallel
GPIO 30 Audio lag button parallel
Prescontrol
Outputs (0-23)
GPIO 0 channel changed
GPIO 1 chan 1 selected (latching)
GPIO 2 chan 2 selected (latching)
GPIO 3 chan 3 selected (latching)
GPIO 4 chan 4 selected (latching)
GPIO 5 chan 1 automation on/off (latching)
GPIO 6 chan 2 automation on/off (latching)
GPIO 7 chan 3 automation on/off (latching)
GPIO 8 chan 4 automation on/off (latching)
GPIO 23 Alarm (OR of all possible alarms)
Inputs (24-31)
GPIO 24 chan 1 automation on/off
GPIO 25 chan 2 automation on/off
GPIO 26 chan 3 automation on/off
GPIO 27 chan 4 automation on/off
Page 85

PresStation User Manual Controlling Multiple Channels
Miranda Technologies Ltd Page 85
10 Controlling Multiple
Channels
ith PresStation you can control up to 24 transmission channels from
a single control panel.
You use the channel buttons (labelled Chan 1 to Chan 6) displayed at the top
of the VGA screen to switch between the first 6 channels. The name of the
channel currently being controlled is shown in the left hand edge of the Title
Bar. To choose any other channel, (once assigned) simply click on a Chan
button, then select from the Channel Select screen.
The Channel Select screen
W
Page 86

Controlling Multiple Channels PresStation User Manual
Page 86 Miranda Technologies Ltd
To add channel logos to a panel, first the logo graphics must be made. The
size is fixed as an automatic resize would lower the image quality. Each
channel logo must be a 148x50 pixels 24 bit colour .bmp The .bmp must be
the standard windows type, uncompressed (not RLE compressed).
The logo files must be given a filename that matches the name used in the
panel.conf file and placed in the following directory: /mnt/i565cache/logos/
(If the logos part of the directory does not exist, it must be created)
Here is an example of a 3 channel system with a logo for each channel, as
displayed in the dialogue example. First three files are created:
GardenTV.bmp
ZooTV.bmp
DinoChan.bmp
Then the panel.conf (on the panel or PresStation) is edited as follows:
The groups of channels can also be given na m e s, in the example dialog
displayed above, groups 1-10 is called Sports, 11-29 News, 21-30 Childrens
and 31-40 is called Evening.
panel
{
shot0="172.16.1.1/0"
shot1="172.16.1.1/1"
shot2="172.16.1.1/2"
shotname0="GardenTV"
shotname1="ZooTV"
shotname2="DinoChan"
Page 87

PresStation User Manual Controlling Multiple Channels
Miranda Technologies Ltd Page 87
}
group_names
{
groupname1=”Sports”
groupname2=”News”
groupname3-“Childrens”
groupname4=”Evening”
}
The channel name matches the filename. Please note that all text is case
sensitive.
Page 88

Controlling Multiple Channels PresStation User Manual
Page 88 Miranda Technologies Ltd
How to save a configuration
To save a configuration, click on the Configuration button on the Channel
Select screen and the Configuration screen is displayed.
Now press Save Configuration to save your configuration.
Page 89

PresStation User Manual Controlling Multiple Channels
Miranda Technologies Ltd Page 89
How to display version details about PresStation and
Prescontrol
To display version information i.e. software, serial numbers, IP addresses and
the build date click on the Version Info button on the Configuration screen.
The above screen simply displays version details about Prespanel and
Prescontrol. You cannot change any details on this screen – it is for
information only.
Page 90

Controlling Multiple Channels PresStation User Manual
Page 90 Miranda Technologies Ltd
How to configure the PresStation panel
To configure (set up) the PresStation panel:
♦ click on the Channel Select button and the Channel Select screen is
displayed
♦ click on the Configuration button on the Channel Select screen and the
Configuration screen is displayed
♦ click on the Panel Configuration button on the Configuration screen
and the Panel Configuration screen is displayed.
Each of the options (on the left-hand side of the screen) can be ON or OFF.
You simply click on an option to turn it on or off. When you select an option
it flashes in green and then goes to red (for ON) and blue (for OFF).
The following list describes each option:
Page 91

PresStation User Manual Controlling Multiple Channels
Miranda Technologies Ltd Page 91
Option Description
Disarm mixer on TAKE If this option is ON, the light on the
previously selected transition button
automatically goes out after a TAKE to
air.
Re-arm mix on source change If this option is ON, the mix transition is
automatically selected when a different
PST source is selected.
Disarm mix on DSK arm If this option is ON, a previously selected
mix is disarmed when a DSK is armed.
Arm DSK on FADE first If this option is ON, the DSK
automatically goes to FADE first instead
of CUT.
Disarm DSK on TAKE to air If this option is ON, the DSK is
automatically disarmed after a TAKE to
air.
Disarm DSK on TAKE from air If this option is ON, the DSK is
automatically disarmed after a TAKE
from air.
Flash TAKE key when mix armed If this option is ON, the TAKE key
flashes when a transition/mix is ready to
go.
Always view preset If this option is ON, you can always view
the PST source without selecting a
transition.
V/O uses Arm and TAKE If this option is ON, Voice Over 1 and 2
will arm first and will then need a TAKE
to send to air.
Page 92

Controlling Multiple Channels PresStation User Manual
Page 92 Miranda Technologies Ltd
You use the options on the right-hand side of the Panel Configuration screen
to:
♦ adjust the brightness of the lamps on the PresStation Panel (Lamp
Brightness button)
♦ adjust the brightness of text displays (for example, source names,
channel names) (Scribble Brightness button)
♦ adjust the flash rate of the buttons (Lamp Flash Rate button)
To select one of the above options simply click on it and it goes green. You
can now adjust the brightness and/or flash rate using the rotary knob.
You can also adjust the sensitivity of the Jog Wheel (Jog Wheel
Acceleration button) by changing the acceleration rate between:
None Linear acceleration
Rate of change constant to rotational speed of jog wheel.
Low Linear + logarithmic (default)
Rate of change mainly constant but will increase slightly as
rotational speed of jog wheel increases.
High logarithmic acceleration.
Rate of change increases sharply as rotational speed of jog wheel
increases.
How to save your new setup
When you have finished setting up your PresStation panel, press Save Setup
to save all your changes.
If you decide you do not want to save your new settings but wish to return to
the default settings, simply click on Restore Defaults. All your defaults are
restored and any changes you made are ignored.
Page 93

PresStation User Manual Using Audio
Miranda Technologies Ltd Page 93
11 Using Audio
ou use the PresStation audio functions to control the output gain on
the preset and programme meters and to add voice (audio) overs to
background video soundtracks.
Adjusting the output gain
You can adjust the output gain on the preset and programme meters from the
Audio Control screen. To display this screen, click on Output Gain region
of the main screen.
Y
Page 94

Using Audio PresStation User Manual
Page 94 Miranda Technologies Ltd
The following screen is then displayed.
The Output Gain button is automatically selected and highlighted in green.
To adjust the output gain, turn the rotary knob. You will see the output gain
level (in decibels) go up or down depending on which way you turn the knob.
The value range is –99dB to +28dB.
To re-set the output gain to zero, simply press the Zero button.
Preview / Monitor
The Preview/Monitor buttons along the bottom of the screen allow you to
monitor the audio levels of various sources:
♦ Preview preview source audio levels
♦ PGM Input programme input source audio levels (Imagestore A input)
♦ VO Input audio lev e ls of the AES inputs on Imagestore
Page 95

PresStation User Manual Using Audio
Miranda Technologies Ltd Page 95
♦ VO Mix combination of PGM Input and VO Input
♦ PST Input audio levels of the selected PST source
♦ Mix audio mix result prior to any VO insertion
♦ PGM Copy exact copy of the programme audio
Adding voice overs
To add a voice over press the Audio Over 1 or Audio Over 2 buttons. Audio
Over 1 is associate d with Easyplay (if you have an Imagestore with
Easyplay) and Audio Over 2 is associated with an AES input.
If you choose a DSK, which has an associated audio input, the appropriate
Audio Over button LED (arm) light comes on to show that it is armed for the
next TAKE.
Note: If the V/O uses ARM & TAKE option is set to OFF in the Panel
Config screen the voice over will go straight to air.
Specifying the voice over settings
You can specify the duck level, preset level and voice over rate for Audio
Over 1 and Audio Over 2 from the Voice-over Settings screens. To display
these screens press the dialog button above either Audio Over 1 or Audio
Over 2 buttons.
If you press the Audio 1 dialogue
button the Voice-over 1 Settings
screen is displayed.
Page 96

Using Audio PresStation User Manual
Page 96 Miranda Technologies Ltd
Duck Level
The duck level enables you adjust (clip) the level of the background audio
when the voice over is on.
Preset Level
The preset level enables you to adjust the level (volume) of the voice over
audio when the voice over is on.
V/O Rate
The V/O rate enables you to adjust the rate (in fields) at which the voice over
is applied.
To adjust any of these settings, click on the parameter you want to adjust and
then turn the rotary knob on the PresStation control panel. The value (dBs
Page 97

PresStation User Manual Using Audio
Miranda Technologies Ltd Page 97
decibels or fields) will go up or down depending on which way you turn the
knob.
Programme output select
The programme output select buttons allows you to determine whether pai r 1,
pair 2 or no voice over is applicable for the selected channel. The 4 x 2
matrix is a visual confirmation of the settings and cannot be adjusted from
this screen.
To adjust the settings for Audio Over 2, simply press the Audio Over 2
dialogue button to display the Voice-over 2 Settings screen.
Page 98

Using Audio PresStation User Manual
Page 98 Miranda Technologies Ltd
Configuring the Audio meters
To configure the audio meters click on the meter display section of the main
screen.
Page 99

PresStation User Manual Using Audio
Miranda Technologies Ltd Page 99
The PresStation audio meters work in the range from 0 (full volume) to –138
(infinitely quite) decibels i.e. Full Scale Deflection and adjustment can be
made within these limits to set the following:
♦ Upper decibel limit (dBFS Top)
♦ Lower decibel limit (dBFS Bot)
♦ Upper text limit (Text Top)
♦ Red threshold (Red Div)
Setting dbfs top=0 and dbfs bot = -25 will give a range of 25 dbfs, if we set
Text Top = 10, then the labelling on the meters will start at 10, go through 0
to -15 (25 dbfs range). Red Div is where the meters change from green to
red, not in dBFS, but as text for ease of use (normally set at zero). If it was in
dBFS you would have to set the value TextTop – dBFS Top, in order to get
the red position at zero label.
Page 100

Using Audio PresStation User Manual
Page 100 Miranda Technologies Ltd
Presets
4 preset meters are pre-programmed into the system, which cannot be
adjusted.
Default
These are the original PresStation meter settings:
dBFS Top dBFS Bot Text Top Red Div
0 -54 20 0
Full Scale
Sets a 36dbfs range with the meters labelled from 0 to –36, changing red
at –12dbfs.
dBFS Top dBFS Bot Text Top Red Div
0 -36 0 -12
dBU 18
Sets a 36dbfs range with the meters labelled from 18 to –18, changing red
at 0dbfs.
dBFS Top dBFS Bot Text Top Red Div
0 -36 18 0
PPM
Sets the meters to show Peak Programme Meters in accordance with BBC
(British Broadcasting Corporation) guidelines.
This display is different from the other presets in that it cannot be configured
from the manual buttons. The overall range is –6 to –34dbfs (28dbfs) with the
meters showing 7 to 0 (not in dbfs) changing red at 6, which represents
–10dbfs. In this option each increment is 4db.
 Loading...