

Page 1

DENSITÉ series
HMP-1801
High Definition Media Player
6 Jan 2010
Guide to Installation and Operation
M864-9900-106
Technologies Inc.
3499 Douglas-B.-Floreani
St-Laurent, Québec, Canada H4S 1Y6
Tel. 514-333-1772
www.miranda.com
© 2010 Miranda Technologies Inc..
Miranda
Fax. 514-333-9828
Page 2

GUIDE TO INSTALLATION AND OPERATION
China
France (only)
Compliance Information
Electromagnetic Compatibility
- This equipment has been tested for verification of compliance with FCC Part 15, Subpart B, Class A
requirements for Digital Devices.
- This equipment complies with the requirements of:
EN 55022 Class A, Radiated Emissions.
EN 55022 Class A, Conducted Emissions
EN 61000-4-2, -3, -6, -11 Electromagnetic Immunity
EN 61000-3-2 & -3-3, Electromagnetic Disturbance in Supply Systems
How to contact us:
For technical assistance, please contact the Miranda Technical support centre nearest you:
Americas
Telephone:
+1-800-224-7882
e-mail:
techsupp@miranda.com
Visit our web site at www.miranda.com
HMP-1801
Asia
Telephone:
+852-2539-6987
e-mail:
asiatech@miranda.com
Telephone:
+86-10-5873-1814
e-mail:
asiatech@miranda.com
Europe, Middle East, Africa, UK
Telephone:
+44 (0) 1491 820222
e-mail:
eurotech@miranda.com
Telephone:
+33 (0) 1 55 86 87 88
e-mail:
eurotech@miranda.com
Page 3

Table of Contents
GUIDE TO INSTALLATION AND OPERATION
1 HMP-1801 High Definition Media Player .................................................................................1
1.1 Introduction .......................................................................................................................................... 1
1.2 Features .............................................................................................................................................. 1
1.3 Block Diagram ..................................................................................................................................... 2
1.4 Front Card-edge Interface ................................................................................................................... 2
1.4.1 Compression Format .............................................................................................................. 3
1.4.2 Flash Memory ......................................................................................................................... 3
1.4.3 Web Interface ......................................................................................................................... 4
1.5 Applications ......................................................................................................................................... 4
1.5.1 Apology Clip or Full Screen Promo Playback ........................................................................ 4
1.5.2 Animated Curtains into Up/Down/Cross ARC ........................................................................ 4
1.5.3 Fill & Key ................................................................................................................................ 5
1.5.4 Direct Capture ........................................................................................................................ 5
1.5.5 Advanced Workflow Option .................................................................................................... 6
2 Installation ................................................................................................................................7
2.1 Unpacking ............................................................................................................................................ 7
2.2 Installation in the Densité frame .......................................................................................................... 7
2.3 Rear Connector Panel ......................................................................................................................... 7
2.3.1 Ethernet Port Configuration .................................................................................................... 8
2.3.2 GPI Connector ........................................................................................................................ 8
2.3.3 VDCP Connector .................................................................................................................... 9
3 Operation ................................................................................................................................ 10
3.1 Control options .................................................................................................................................. 10
3.2 Card-Edge Status LED ...................................................................................................................... 10
3.2.1 Playback Mode ..................................................................................................................... 10
3.2.2 Record Mode ........................................................................................................................ 11
3.3 Local control using the Densité frame control panel ......................................................................... 11
3.3.1 Overview ............................................................................................................................... 11
3.3.2 Menu for local control ........................................................................................................... 12
3.4 Remote control using iControl ........................................................................................................... 13
3.4.1 The iControl graphic interface window ................................................................................. 13
3.4.2 The Status panel .................................................................................................................. 16
3.4.3 The Setting panel ................................................................................................................. 17
3.4.4 The Playback panel .............................................................................................................. 24
3.4.5 The Record panel ................................................................................................................. 27
3.4.6 The Media Manager panel ................................................................................................... 28
3.4.7 The Reference panel ............................................................................................................ 28
3.4.8 The Thumbnail panel ............................................................................................................ 30
3.4.9 The RALM panel................................................................................................................... 30
3.4.10 The Factory / Presets panel ................................................................................................. 32
3.4.11 The Options panel ................................................................................................................ 32
3.4.12 The Alarm Config panel ........................................................................................................ 34
3.4.13 The Info panel....................................................................................................................... 36
HMP-1801
Page 4

GUIDE TO INSTALLATION AND OPERATION
4 Web Control Panel ................................................................................................................. 38
4.1 Ingest and Configuration Utility ......................................................................................................... 38
4.1.1 Playback ............................................................................................................................... 39
4.1.2 Record .................................................................................................................................. 41
4.1.3 Library ................................................................................................................................... 43
4.1.4 Jobs ...................................................................................................................................... 55
4.1.5 Refresh All ............................................................................................................................ 56
4.2 Firmware Upgrade ............................................................................................................................. 56
4.2.1 Using the Miranda Interface Updater (MIU) ......................................................................... 56
4.2.2 Using the HMP-1801 webpage ............................................................................................ 57
5 Specifications ......................................................................................................................... 59
ANNEX 1 – HMP-1801 User Interface (local menu structure) .................................................... 60
A) HMP-1801 in PLAYBACK mode ............................................................................................................ 60
B) HMP-1801 in RECORD mode ............................................................................................................... 61
ANNEX 2 – VDCP Commands Supported by HMP-1801 ............................................................ 64
System Commands .................................................................................................................................... 64
Immediate Commands ............................................................................................................................... 64
Preset / Select Commands ......................................................................................................................... 65
Sense Requests ......................................................................................................................................... 66
Deferred (Time Line) Commands ............................................................................................................... 66
Macro Commands ...................................................................................................................................... 66
HMP-1801
Page 5

GUIDE TO INSTALLATION AND OPERATION
1 HMP-1801 High Definition Media Player
1.1 Introduction
The Densité HMP-1801 module is a solid-state video clip server that can playback or record HD and SD
video sequences or stills. The HMP is ideal for frequently used full screen promos or for always available
animated apology sequences. The HMP-1801 can also be used to add animated side panels when
performing aspect ratio conversion using the Miranda XVP-1801 Up, Down, Cross and aspect ratio
converter.
Clip selection and playback can be controlled manually with GPI contacts or using the VDCP protocol. Clips
can also be controlled with iControl and created or edited using a dedicated web interface.
The HMP-1801 relies on widely available low-cost Flash Memory (Compact Flash) for media storage and
makes no use of moving mechanical parts for maximum long-term reliability and fast access times.
JPEG2000 Video compression is used to maximize storage space while preserving broadcast quality.
Content can be transferred to the card via the card’s dedicated 10/100Mbit Ethernet media transfer port.
The card can be genlocked using SD or HD reference signals or run on its own timebase-accurate oscillator.
Multiple cards installed in the same frame can be locked to an in-frame reference generated by the optional
REF-1801 card.
1.2 Features
o Capture and playback of video, audio and ANC, such as closed captioning, timecode, AFD, Name
dropper and Dolby E metadata
o Playback of a single clip or a sequence of clips (called a “clip list”)
o Supports SD and HD 525, 625, 1080i and 720p @ 50 and 59.94 Hz frame rates
o Uses low-cost Compact Flash memory cards for media storage.
o Reference input with loop-through capability (loop-through available only on DRP rear module)
o Dedicated 10/100 Ethernet port for Media access and upload
o Dual HD/SD-SDI Outputs (2
o Easy control & monitoring with iControl including Thumbnail for output confidence
o Support for 6 GPI In and 6 GPI out
o Built-in Web Server for configuration and file management
o Import .wav audio files at 48KHz only
o 16, 20 and 24 bit resolution supported
o Supports multiple mono files (up to eight channels) or a single multi-channel file. Groups 1-4 are
supported, with individual mute for each channel
o Supports a useful subset of VDCP commands
o Supports video key generation on 2
nd
output only available on DRP rear module)
.
nd
output (DRP rear only)
HMP-1801 | 1
Page 6

GUIDE TO INSTALLATION AND OPERATION
Status
LED
Select Button
Compact Flash Status
Ethernet
Status
1.3
Block Diagram
The following block diagram shows the functionality of the HMP-1801.
Figure 1.1 Functional block diagram of the HMP-1801
1.4 Front Card-edge Interface
The front card-edge of the HMP-1801 incorporates four elements:
• Status LED (see section 3.2)
• Select Button (see section 3.3)
• Compact Flash status indicator
• Ethernet Status indicator
Select
Status
HMP-1801
Figure 1.2 Front card-edge layout
2 | HMP-1801
Page 7
GUIDE TO INSTALLATION AND OPERATION
1.4.1 Compression Format
The HMP-1801 utilizes the JPEG2000 compression algorithm for high-quality video. This technique uses
wavelet transforms rather than the discrete cosine transforms used for JPEG and MPEG compression.
JPEG2000 does not use temporal or interframe compression. Each frame is processed individually.
The artifacts of JPEG2000 encoding are less visible than those of conventional MPEG, appearing as a
gradual blurring or smoothing of the image rather than the blocking or mosquito noise encountered in MPEG
images, and JPEG2000 supports mode encode/decode cycles than other formats. Furthermore, the images
can undergo a higher compression before artifacts appear. The HMP-1801 import tool will encode video at
100Mbps for HD video and 25Mbps for SD contents.
The HMP-1801 allows the export and import of compressed data files, and it is convenient to use this
approach when exchanging video essences between cards. The HMP-1801 can import these file formats:
• Sequence or still BMP
• Sequence or still JPG
• Sequence or still 24 bit TGA without alpha channels.
• Morgan MJ2K compressed AVI
• QuickTime file with Advanced workflow option
• MPEG2 mpg file with Advanced workflow option
Note: The HMP-1801 will output the original content without applying any filters. It is the responsibility of the
artist to generate a video sequence that is compliant with the SMPTE standards
1.4.2 Flash Memory
Video essences and clip definitions are stored in Compact Flash memory on board the HMP-1801 card. The
memory card is removable, and is physically located as shown in the diagram below. .
• Since the memory card is not formatted as a standard Windows device, it cannot be replaced by an
off-the-shelf card
Figure 1.3 Location of Flash Memory Card
HMP-1801 | 3
Page 8
GUIDE TO INSTALLATION AND OPERATION
1.4.3 Web Interface
The HMP-1801 incorporates its own ethernet interface, independent from the Densité frame’s interface. This
independent interface is used to load data, configure and manage clips and upgrade card’s firmware.
• This interface is described in detail in Section 4.
1.5 Applications
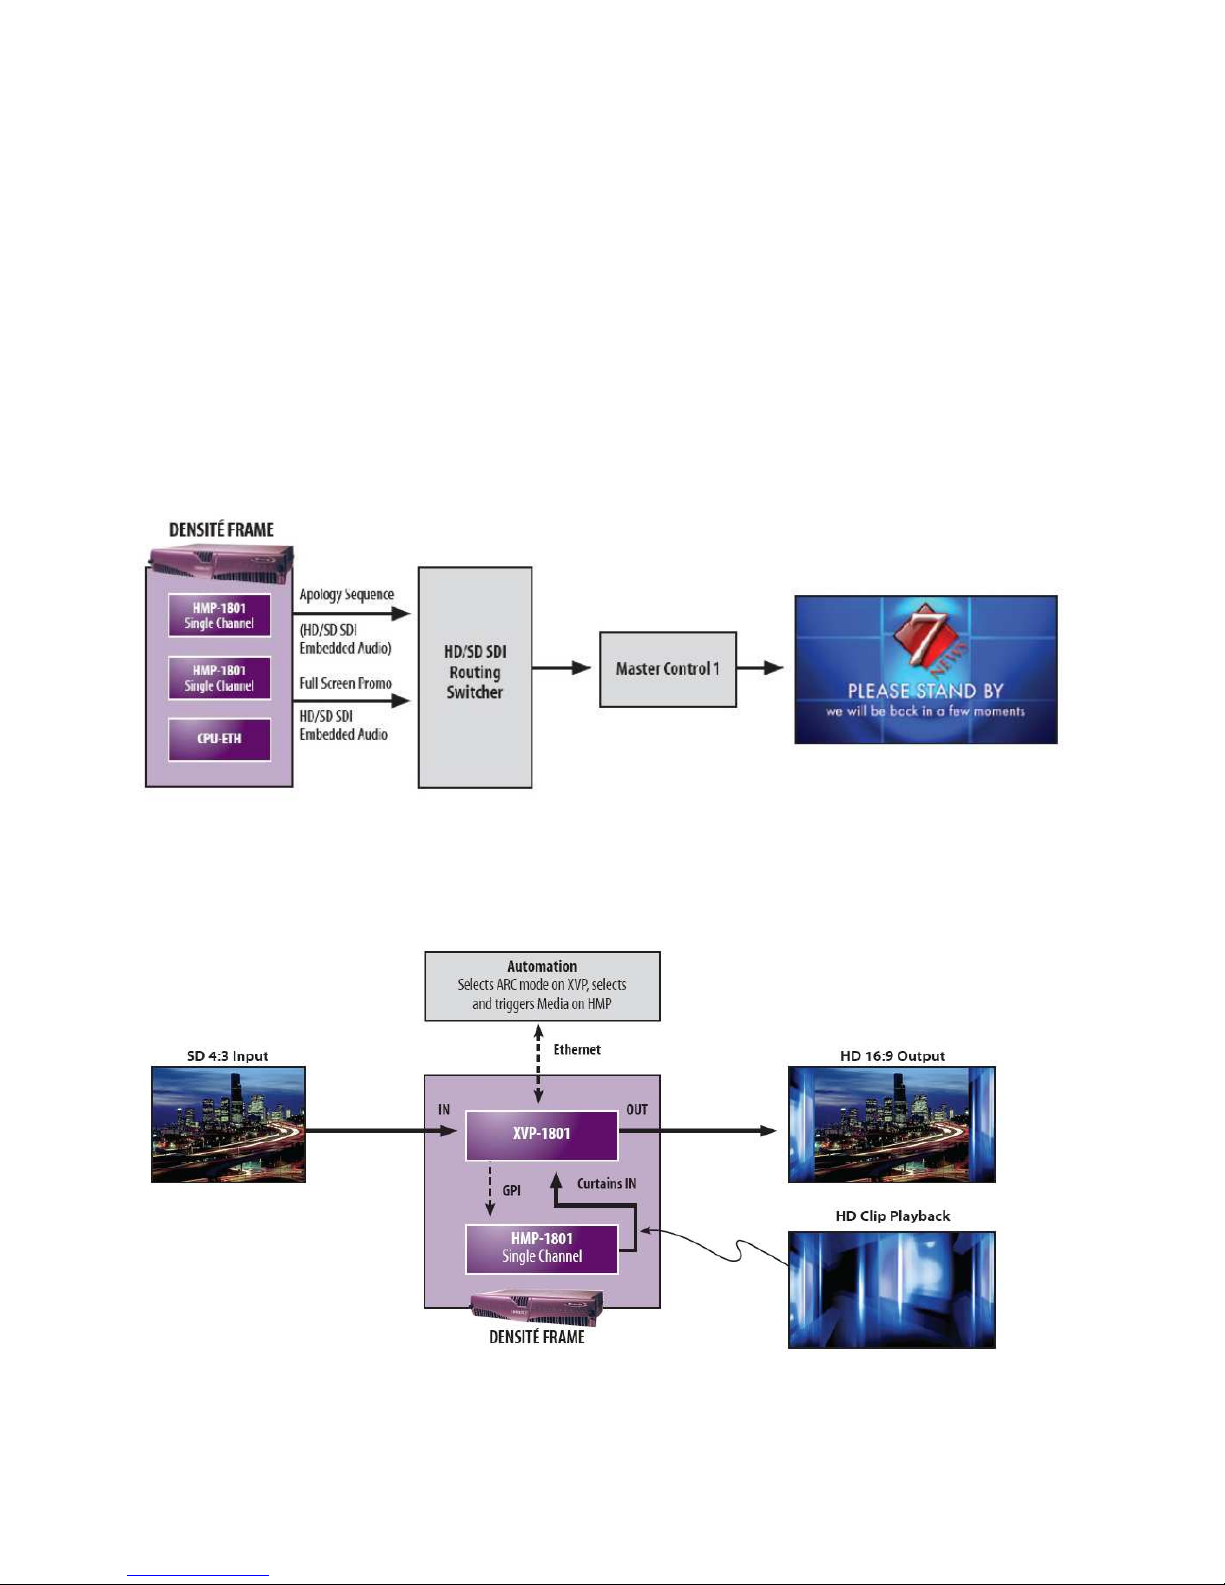
The following diagrams show some typical applications for the HMP-1801.
1.5.1 Apology Clip or Full Screen Promo Playback
1.5.2 Animated Curtains into Up/Down/Cross ARC
4 | HMP-1801
Page 9
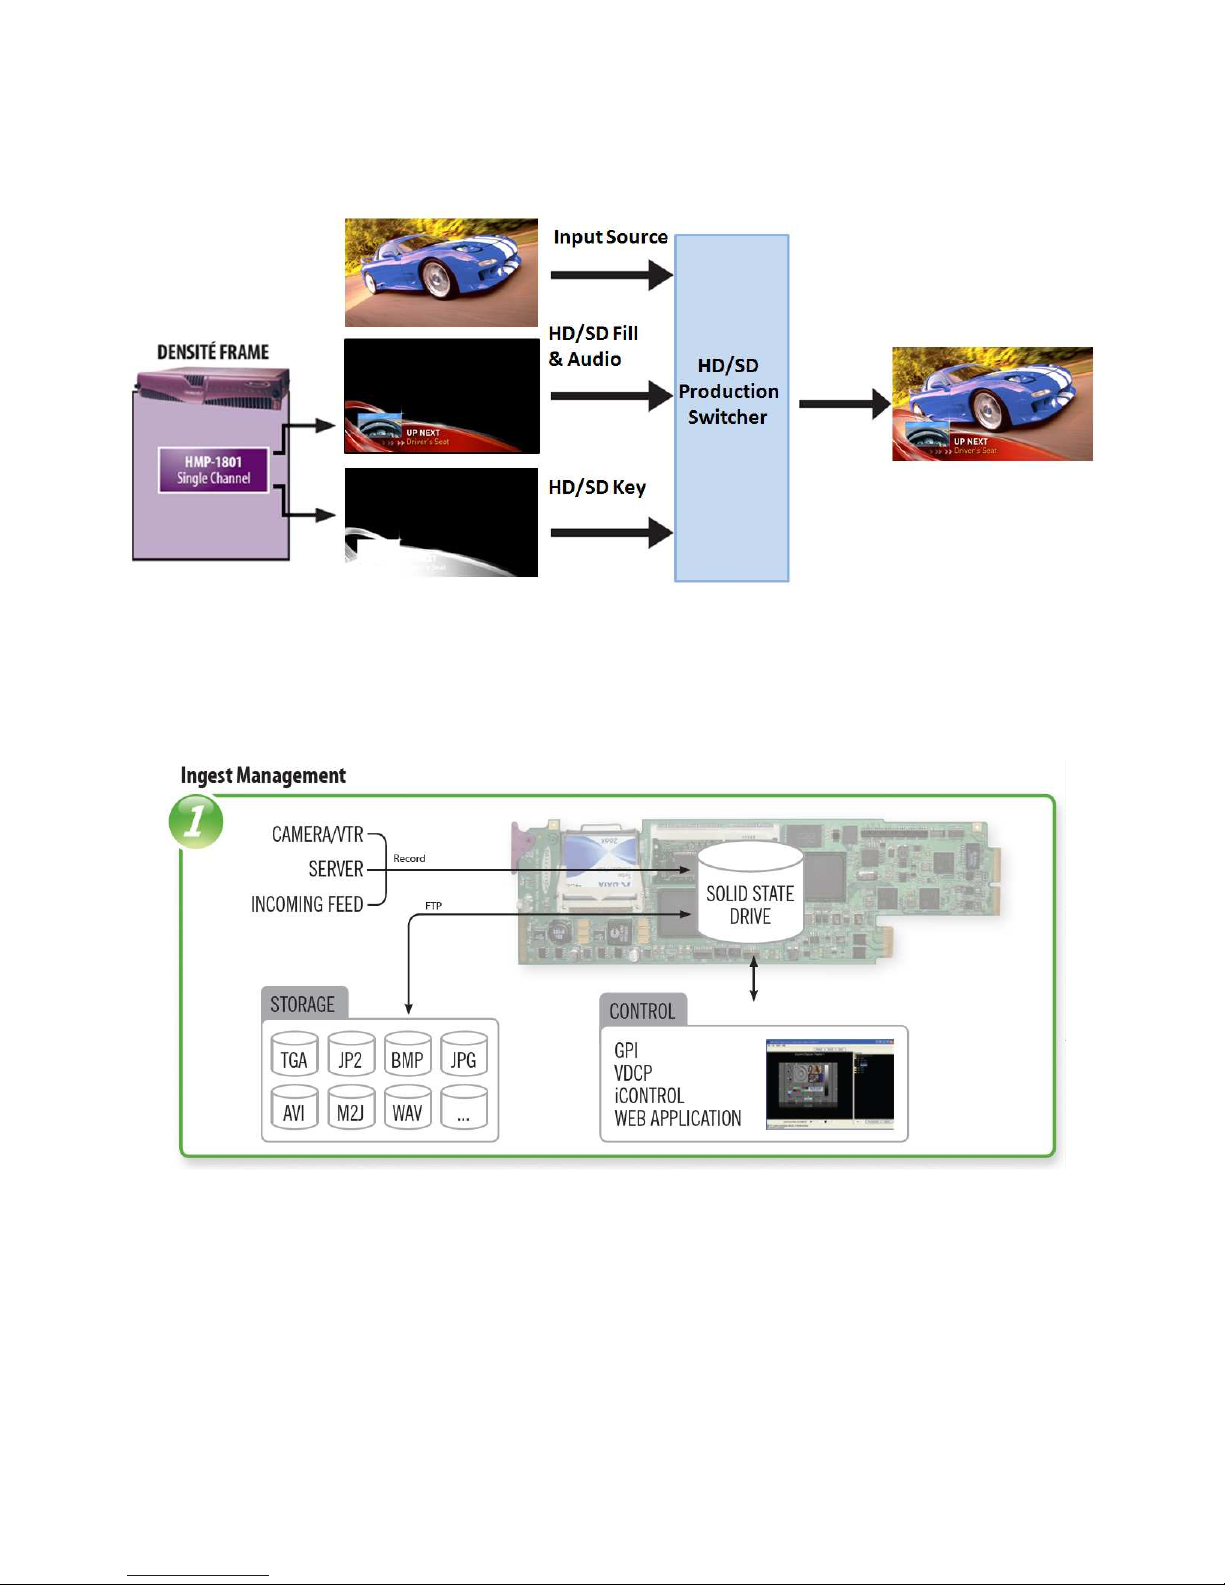
1.5.3 Fill & Key
GUIDE TO INSTALLATION AND OPERATION
1.5.4 Direct Capture
HMP-1801 | 5
Page 10
GUIDE TO INSTALLATION AND OPERATION
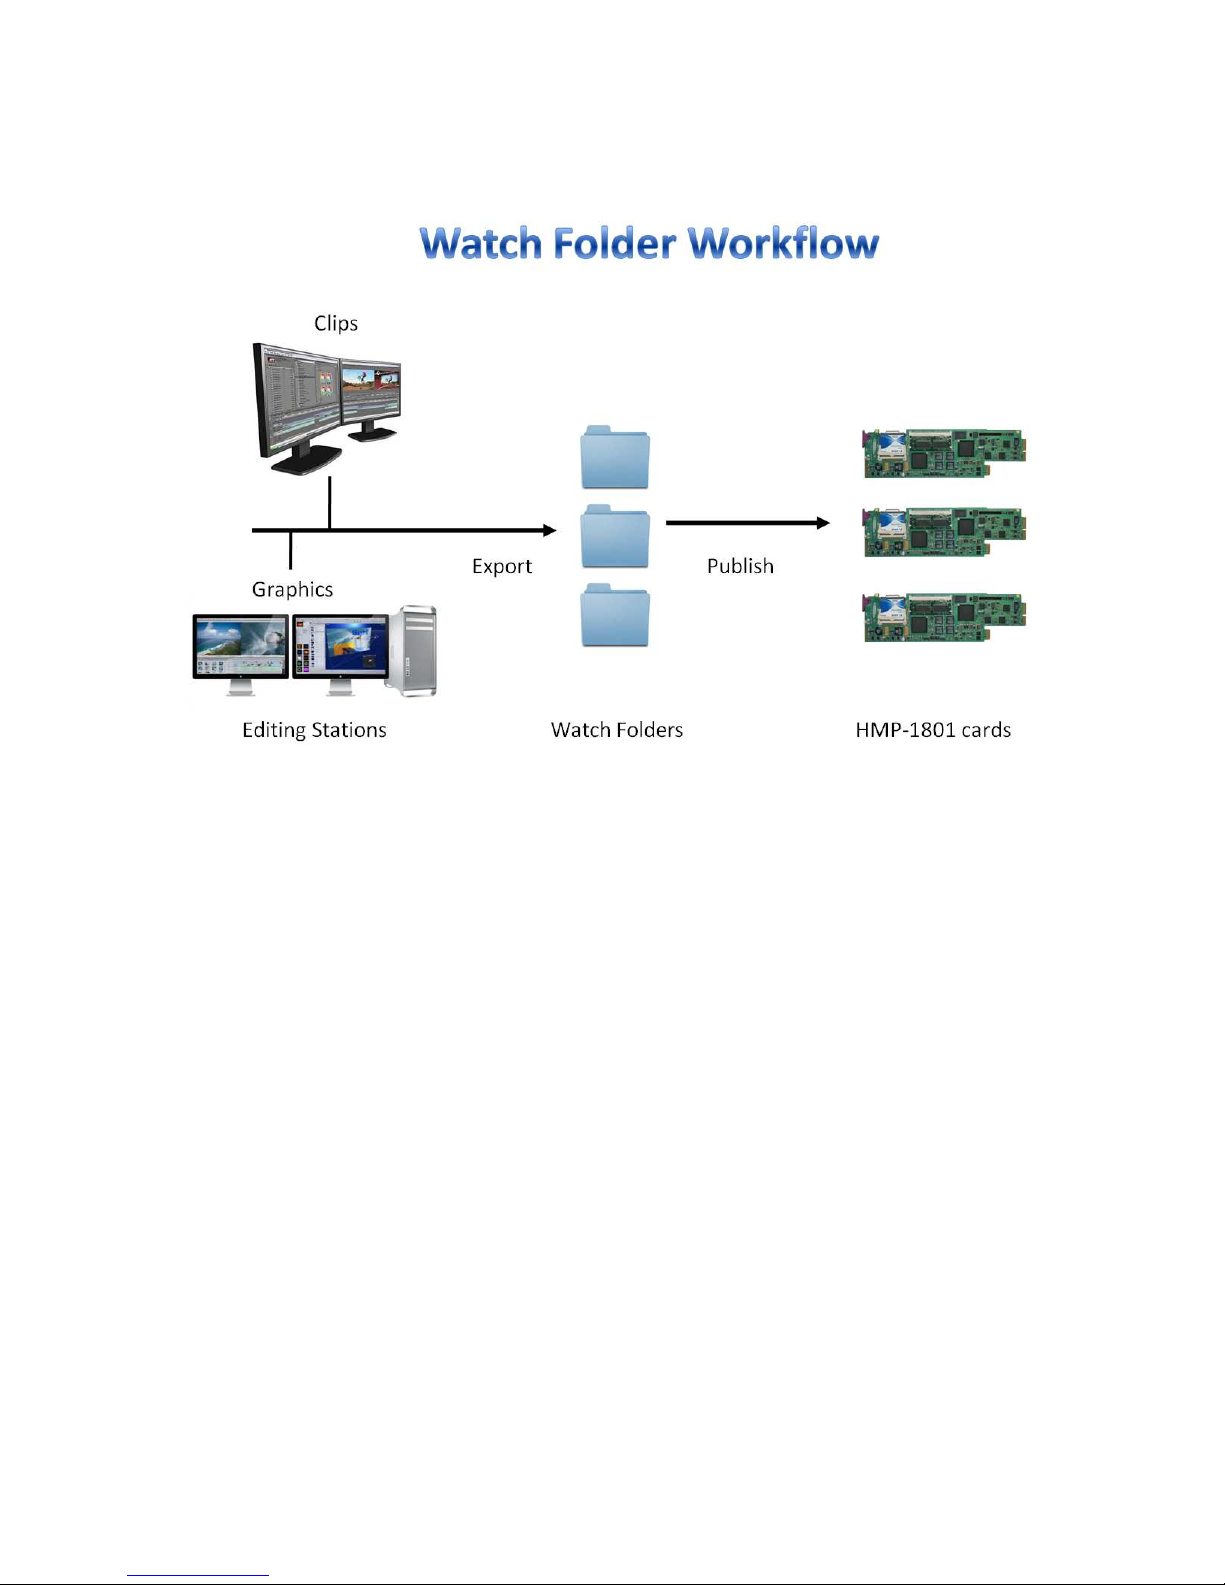
1.5.5 Advanced Workflow Option
6 | HMP-1801
Page 11
GUIDE TO INSTALLATION AND OPERATION
2 Installation
2.1 Unpacking
Make sure the following items have been shipped with your HMP-1801. If any of the following items are
missing, contact your distributor or Miranda Technologies Inc.
• HMP-1801 High Definition Media Player
• HMP-1801-DRP Rear Panel OR HMP-1801-3SRP Rear panel (see figure 2.1)
2.2 Installation in the Densité frame
The HMP-1801 and its associated rear connector rear panel must be mounted in a DENSITÉ frame. It is not
necessary to switch off the frame’s power when installing or removing the card. See the DENSITÉ Frame
manual for detailed instructions for installing cards and their associated rear panels.
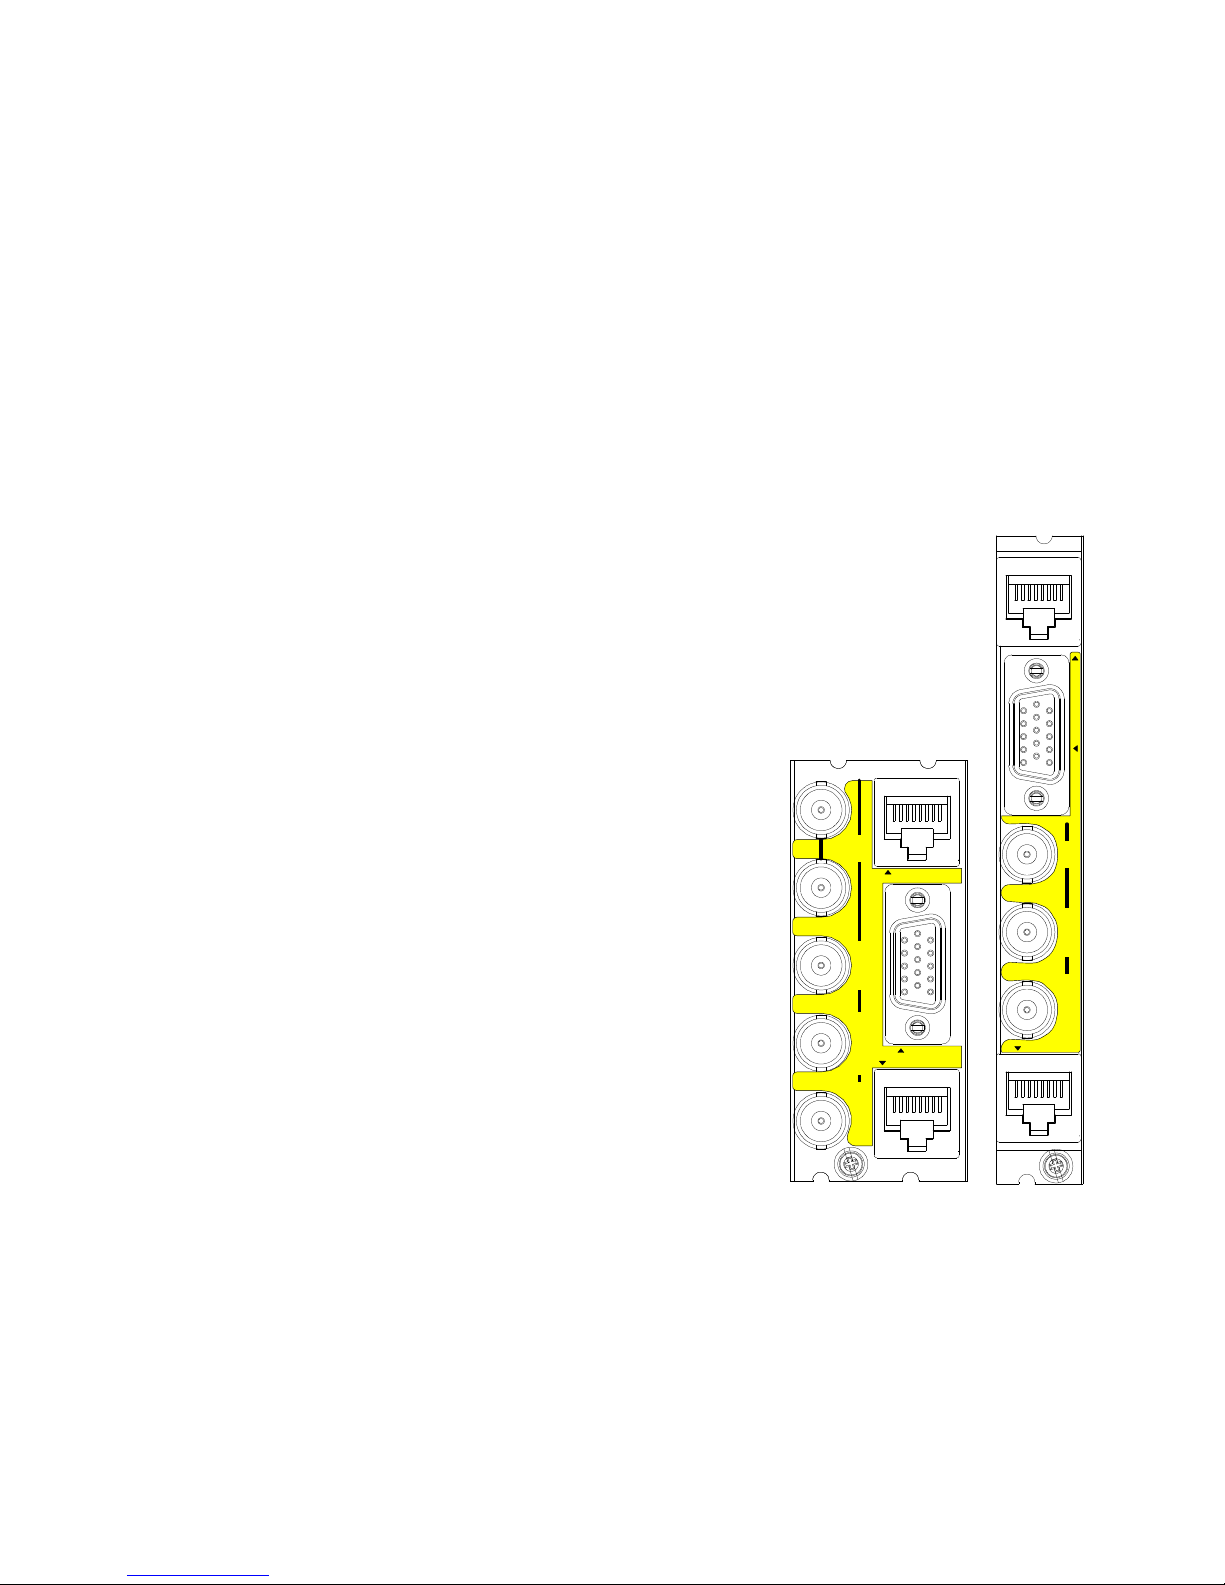
2.3 Rear Connector Panel
The HMP-1801 requires a dual-slot rear in the Densité 2 frame, and a
single-slot or dual-slot rear in the Densité 3 frame:
DRP (2RU)
• One reference input and one loop
• One video input for video recording
• Two video outputs
• One HD15 connector for GPI I/O lines (6 in / 6 out)
(Miranda’s NSH-15M wiring terminal adapter can be used to
connect the GPI lines to this connector)
• One RJ-45 for media transfer over Ethernet
• One RJ-45 (RS422) for control over VDCP protocol
SRP (3RU)
• One reference input
• One video input for video recording
• One video outputs
• One HD15 connector for GPI I/O lines (6 in / 6 out)
• One RJ-45 for media transfer over Ethernet
• One RJ-45 (RS422) for control over VDCP protocol
With the double-width rear panel installed in a Densité-2 frame, the
HMP-1801 must be installed in the right-most of the two slots covered
by the panel in order to mate with the panel’s connectors.
HMP-18x1
REF IN SD/HD SDI IN SD/HD SDI OUT 1
SD/HD SDI OUT 2
RS-422
GPIO
ETHERNET 10/100
HMP-18x1
RS-422
GPIO
REF IN SD/HD SDI IN SD/HD SDI OUT
ETHERNET 10/100
If it is placed in the wrong slot, the front panel LED will flash red. Move
the card to other slot for correct operation. No damage will result to the
card if this occurs.
DRP SRP
(Densité 2) (Densité 3)
Figure 2.1 Rear Panel Connectors
HMP-1801 | 7
Page 12
GUIDE TO INSTALLATION AND OPERATION
2.3.1 Ethernet Port Configuration
The ethernet port must be configured before it can be used to download media into the HMP-1801.
• Using iControl: See section 3.4.3.1 for instructions.
• Using the local control panel: See section 3.3 for instructions and use the menu found in the Annex
on page 60.
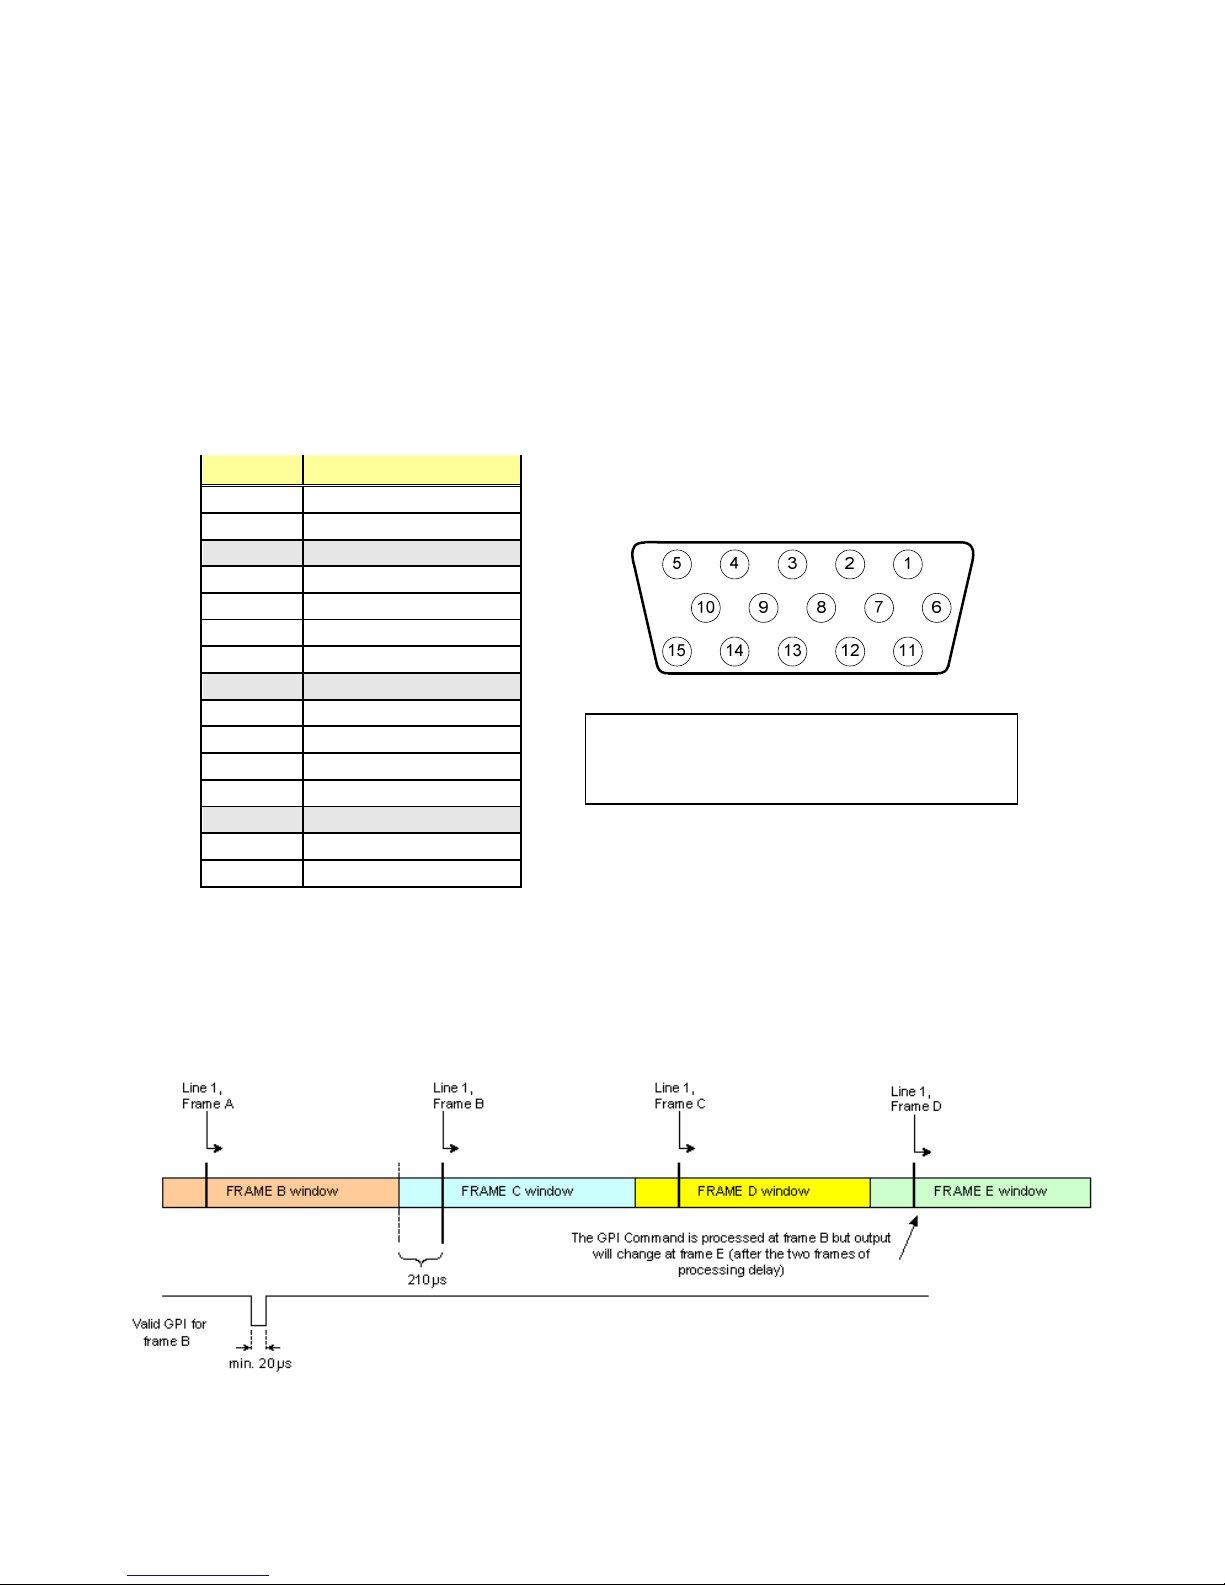
2.3.2 GPI Connector
The HD-15 GPI connector carries 6 GPI IN and 6 GPI OUT lines. The pinout of the GPI connector is:
Pin Function
1 GPI-IN 2
2 GPI-IN 5
3 GND
4 GPI-OUT 2
5 GPI-OUT 5
6 GPI-IN 1
7 GPI-IN 4
8 GND
9 GPI-OUT 1
10 GPI-OUT 4
11 GPI-IN 3
12 GPI-IN 6
13 GND
14 GPI-OUT 3
15 GPI-OUT 6
The GPI IN lines are control lines, whose function is assigned via the GPI I/O Config panel in an iControl
environment (see Section 3.4.3.7 ), or via the Densité frame control panel using the menu shown in the
Annex on page 60.
§
The window to accept a GPI command for the next frame starts at line 1 of the current frame, and ends
210 µs before the start of line 1 of the next frame
§
To be considered as valid, a GPI must stay low for at least 20 µs
Note: Miranda’s NSH-15M wiring terminal
adapter can be used to connect the GPI lines
to this connector
The GPI OUT lines are tallies for their corresponding inputs, and are only activated once the command has
been successfully executed.
8 | HMP-1801
Page 13

GUIDE TO INSTALLATION AND OPERATION
Acceptance
2.3.3 VDCP Connector
The HMP-1801 can interface to a remote recorder using the VDCP protocol via the RS-422 port on the rear
panel.
This interface is implemented on an RJ45 connector to save space.
The HMP-1801 supports a subset of the VDCP protocol. A detailed description of the supported commands
is contained in Appendix 2 to this document, beginning on page 64.
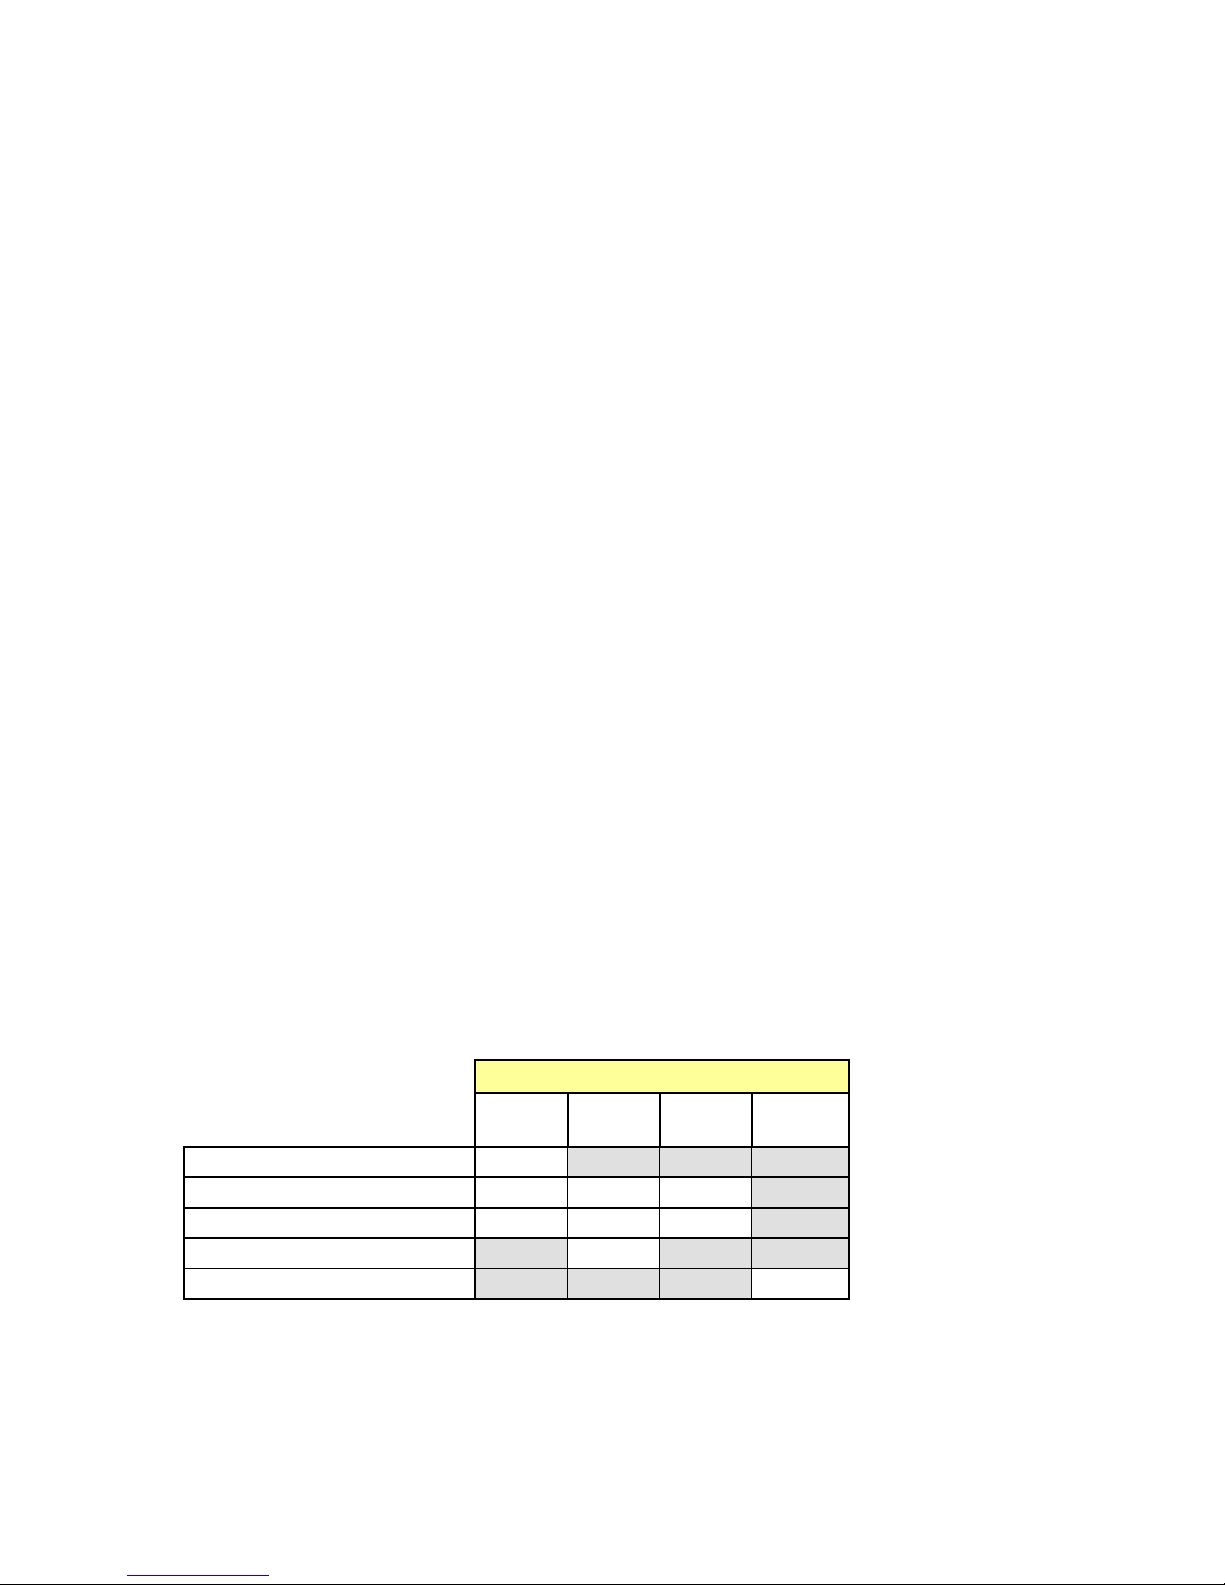
The VDCP response delay of the HMP-1801 is not constant. Particular attention was paid to the “immediate
commands” where it is necessary to respond within a frame.
A window of validity has been defined where the response time is constant and guaranteed. The chart and
diagram following illustrate the concept and show the timing for various video formats.
• For VDCP, the 11 ms
gray zone, where the
processing time may be
either 2 or 3 frames, is
to be avoided.
FORMAT
1080i59.94
1080i50
*720p59.94
720p50
*720p59.94 is the worst case
525
625
Zone
10 ms
17 ms
10 ms
17 ms
4 ms
6 ms
Windows FPGA
21 ms
28 ms
21 ms
28 ms
15 ms
17 ms
HMP-1801 | 9
Page 14
GUIDE TO INSTALLATION AND OPERATION
3 Operation
3.1 Control options
The HMP-1801 can be controlled in five different ways:
• The local control panel and its push-buttons can be used to move through a menu of parameters and to
adjust parameter values (see section 3.3).
• Miranda’s iControl system can be used to access the card’s operating parameters from a remote
computer, using a convenient graphical user interface (GUI). (see section 3.4)
• The loading and management of program content is handled via a dedicated web interface (Java-based
Applet), accessed through a dedicated ethernet port (see section 4).
• A GPI interface allows remote cue/play/stop/pause control (see sections 2.3.2 and 3.4.3.7).
• VDCP Interface (RS-422) (see section 2.3.3)
3.2 Card-Edge Status LED
The status monitor LED is located on the front card-edge of the HMP-1801, and is visible through the front
access door of the DENSITÉ frame. This multi-color LED indicates the status of the HMP-1801 by color, and
by flashing/steady illumination.
The chart shows how the various error conditions that can be flagged on the HMP-1801 affect the LED
status.
• If a cell is gray, the error condition cannot cause the LED to assume that status
• If more than one LED status is possible for a particular error condition, the status is configurable.
See Section 3.4.12 for details.
• The factory default status is shown by a
The LED will always show the most severe detected error status that it is configured to display, and in the
chart error severity increases from left to right, with green representing no error/disabled, and flashing red the
most severe error.
3.2.1 Playback Mode
Error Condition
No errors
No ref
Ref mismatch
Lock on the internal reference
Hardware Failure / No Rear
10 | HMP-1801
LED Status
Green Yellow Red
Flashing
Red
Page 15
GUIDE TO INSTALLATION AND OPERATION
3.2.2 Record Mode
Error Condition Green Yellow Red
No errors
No Input
Memory Low
Out of Memory
Hardware Failure / No Rear
LED Status
Flashing
Red
If the LED is Flashing Yellow, it means that the card is selected for local control using the Densité frame’s
control panel. See Section 3.3 for details.
3.3 Local control using the Densité frame control panel
3.3.1 Overview
Push the SELECT button on the HMP-1801 card edge (see Section 1.4) to assign the local control panel to
operate the HMP-1801. Use the control panel buttons to navigate through the menu, as described below.
All of the cards installed in a Densité frame are connected to the frame’s controller card, which handles all
interaction between the cards and the outside world. There are no operating controls located on the cards
themselves. The controller supports remote operation via its Ethernet ports, and local operation using its
integrated control panel.
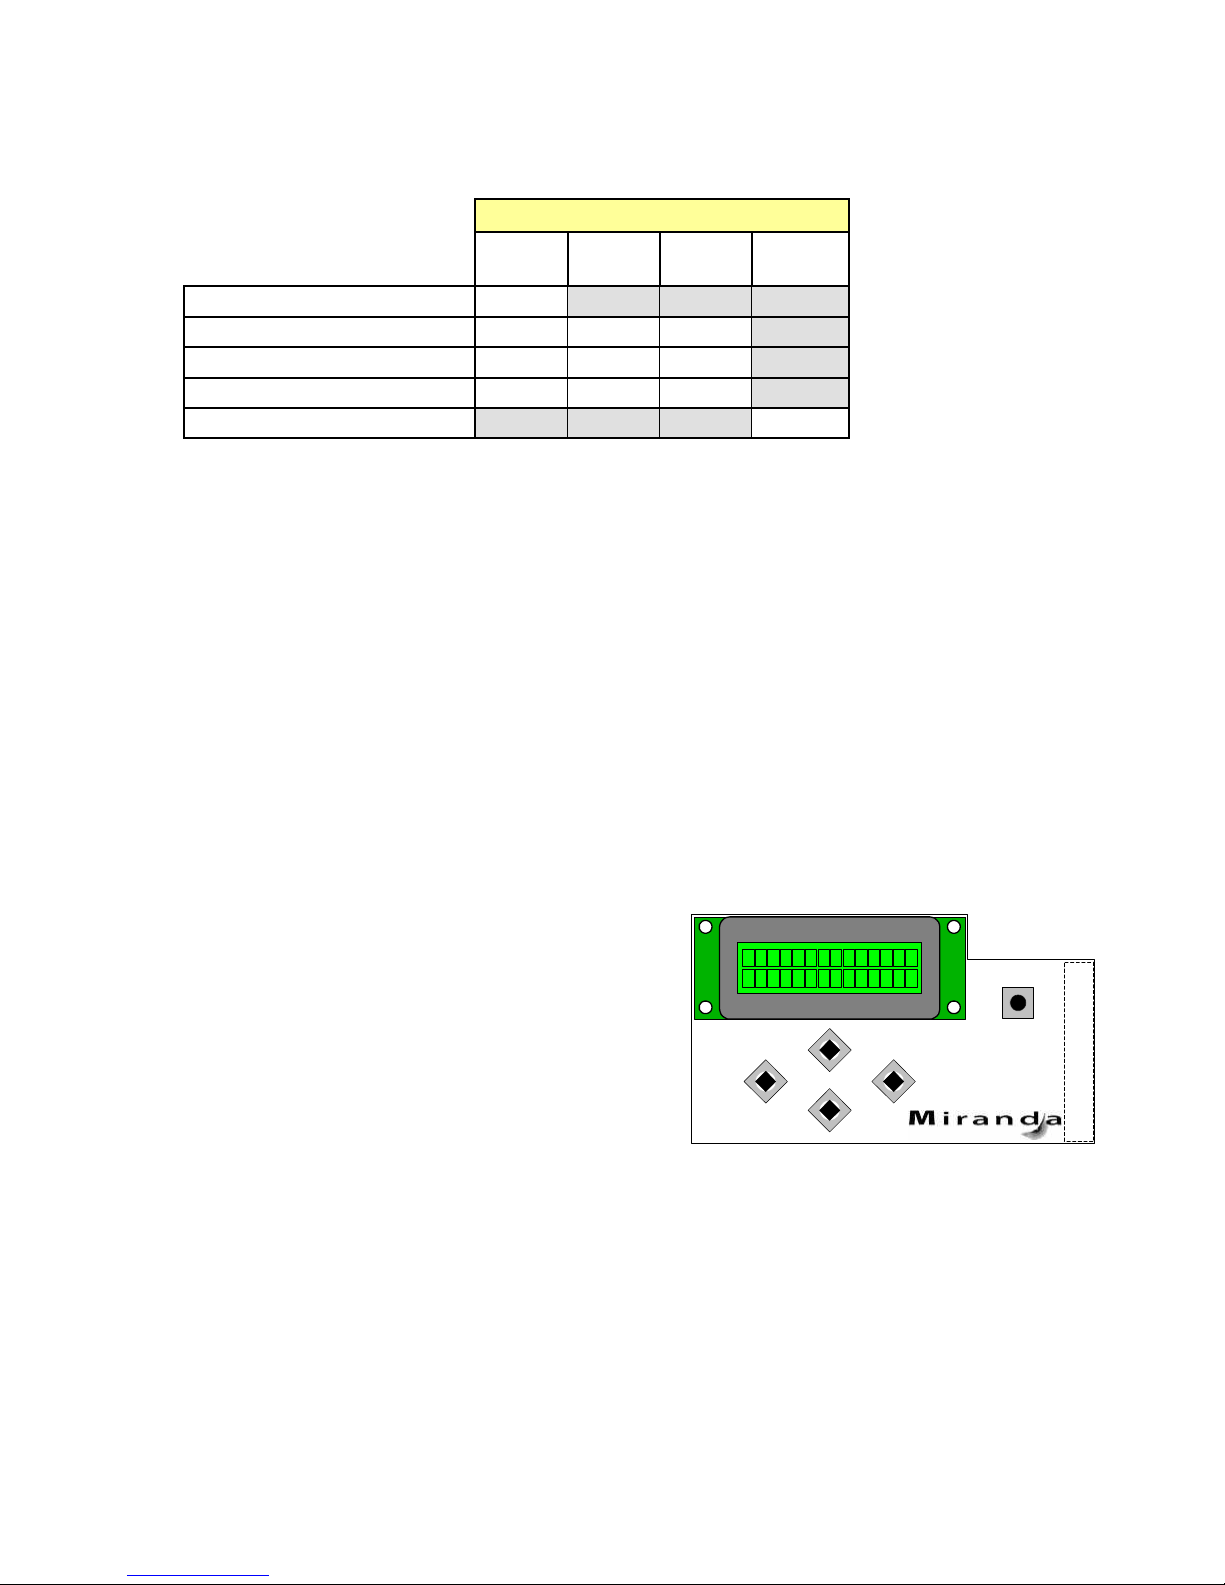
The local control panel is fastened to the controller card by a hinged connector, and when installed is located
in the front center of the frame, positioned in front of the power supplies. The panel consists of a display unit
capable of displaying two lines of text, each 16 characters in length, and five pushbuttons.
The panel is assigned to operate any card in the frame by
pushing the SELECT button on the front edge of that card.
• Pushing the CONTROLLER button on the control
panel selects the Controller card itself.
• The STATUS LED on the selected card flashes
yellow.
The local control panel displays a menu that can be
navigated using the four pushbuttons located beneath the
display. The functionality of the pushbuttons is as follows:
[+] [–] Used for menu navigation and value modification
[SELECT] Gives access to the next menu level. When a parameter value is shown, pushing this button
once enables modification of the value using the [+] and [–] buttons; a second push confirms the
new value
[ESC] Cancels the effect of parameter value changes that have not been confirmed; pushing [ESC]
causes the parameter to revert to its former value.
CONTROLLER
ESC
+
-
SELECT
Figure 3.1 Densité Frame local control panel
HMP-1801 | 11
Page 16

GUIDE TO INSTALLATION AND OPERATION
Pushing [ESC] moves the user back up to the previous menu level. At the main menu, [ESC]
does not exit the menu system. To exit, re-push the [SELECT] button for the card being
controlled.
If no controls are operated for 30 seconds, the controller reverts to its normal standby status, and the
selected card’s STATUS LED reverts to its normal operating mode. If a parameter was changed on the card
but not submitted (SELECT was not pressed) and the 30 second timeout occurs, the parameters will be
confirmed as if the SELECT key had been pressed.
3.3.2 Menu for local control
The HMP-1801 has operating parameters which may be adjusted locally at the controller card interface.
• Press the SELECT button on the HMP-1801 front card edge to assign the Densité frame’s local
control panel to the HMP-1801
• Use the keys on the local control panel to step through the displayed menu to configure and adjust
the HMP-1801.
The complete menu structure is shown in the Annex to this document, beginning on page 60.
12 | HMP-1801
Page 17
GUIDE TO INSTALLATION AND OPERATION
3.4 Remote control using iControl
The operation of the HMP-1801 may be controlled using Miranda’s iControl system.
• This manual describes the control panels associated with the HMP-1801 and their use.
• Please consult the iControl User’s Guide for information about setting up and operating iControl.
In iControl Navigator or iControl Websites, double-click on the HMP-1801 icon to open the control panel.
3.4.1 The iControl graphic interface window
The basic window structure for the HMP-1801 is shown in figure 3.2.
The window identification line gives the card type (HMP-1801 in this example) and the slot number where the
card installed in its Densité frame.
There are three main sections in the window itself, identified in figure 3.2:
1. The Status Icon area shows a series of seven icons that report the status of some card parameters. The
meaning of the various forms that may appear is as follows:
2
Figure 3.2 The iControl interface for the HMP-1801
1
3
HMP-1801 | 13
Page 18
GUIDE TO INSTALLATION AND OPERATION
Icon 1 – Control status
Green – Remote Control via iControl
Yellow – Local control at the Densité frame using the menu
con 2 – Reference status
I
Green – Playback mode – Locked to external reference
Red – Playback mode – card is configured in external reference mode but no external
reference is detected
Yellow – Playback mode – card is configured in internal reference mode
Gray – Reference DISABLED – HMP-1801 is in Record mode
Icon 3 – Output 1 reference mismatch
Green – OK (no mismatch)
Red – mismatch detected in playback mode
Gray – DISABLED – HMP-1801 is in the Record mode
Icon 4 – Record / Playback status
Green – Clip playing
Green – Stopped
Green – Clip cued
Green – Clip paused
Green – Card recording
Yellow – Card Post-processing
Icon 5 – Output Format
Green – Output OK – mouse-over to see the format in the message area
Gray – card is in the Record mode; input signal appears on the output
14 | HMP-1801
Page 19

GUIDE TO INSTALLATION AND OPERATION
Icon 6 – Input Format
Green – valid signal detected at input
Red – no signal detected at input
Gray – card is in the Playback mode and input is disabled
Icon 7 – Memory Level
Green – Sufficient memory space available
Red – Memory low - available space less than error threshold
Gray – card is in the Playback mode and this function is disabled
Move the mouse over an icon and a status message appears below the icon providing additional
information. If there is an error, the error status message appears in the message area without mouseover.
• If there are multiple errors, the error messages cycle so all can be seen
• The icon whose status or error message is shown is highlighted with a mauve background
2. The left-hand side of the panel contains a series of buttons that control the contents of the main window
(i.e. section 3). Click on one to access the indicated controls. The selected button is highlighted (darker)
and the main panel heading matches the button name.
3. This section contains the main operating controls and displays for managing the HMP-1801’s feature set.
The contents are selected by clicking one of the buttons on the left-hand side of the screen.
The left side of the window, containing section 2, can be hidden or revealed by clicking the arrow icon at the
center of the left side border.
Each of the panels associated with the groups accessed from the buttons in Section 2, and shown in Section
3, is described individually below.
HMP-1801 | 15
Page 20
GUIDE TO INSTALLATION AND OPERATION
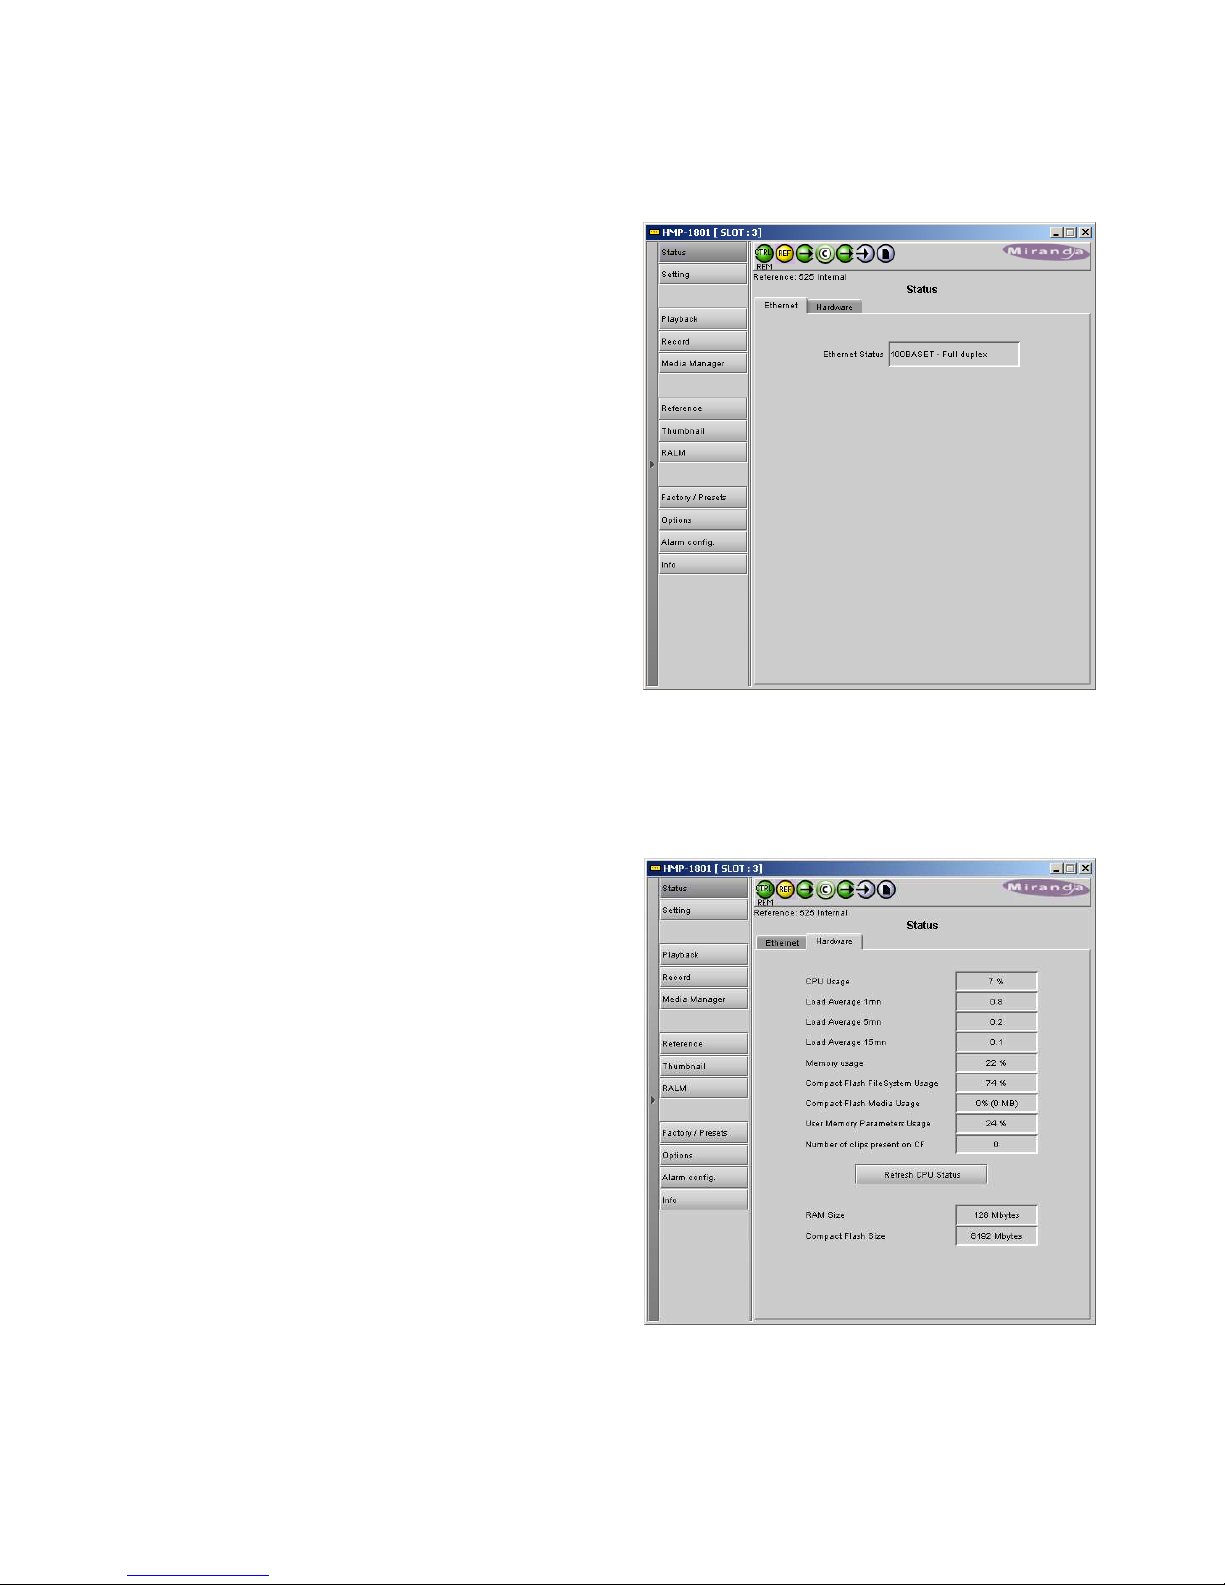
3.4.2 The Status panel
Ethernet tab
The data box reports on the current status of the rearpanel ethernet port.
This is set in the General/Network tab of the Settings
Panel (see section 3.4.3).
• If a fixed status is set there, it will be reported
here
• If the “Auto negotiate” option is chosen there,
then look here to see the actual status
Hardware tab
This tab reports on various aspects of the performance
of the HMP-1801 hardware
The upper section reports on usage of the CPU and the
compact flash media.
• Click the Refresh CPU Status button to update
the reported values.
The lower portion reports the size of RAM and Compact
Flash memory installed in the HMP-1801.
Figure 3.3 Status – Ethernet panel
16 | HMP-1801
Figure 3.4 Status - Hardware panel
Page 21
3.4.3 The Setting panel
This panel has three primary tabs:
(1) General, dealing with network configuration and storage
(2) Playback
(3) Record
only one of these will be active, corresponding to the current operating mode of the card
as set in the Playback and Record panels (sections 3.4.3.3 and 3.4.3.8 respectively)
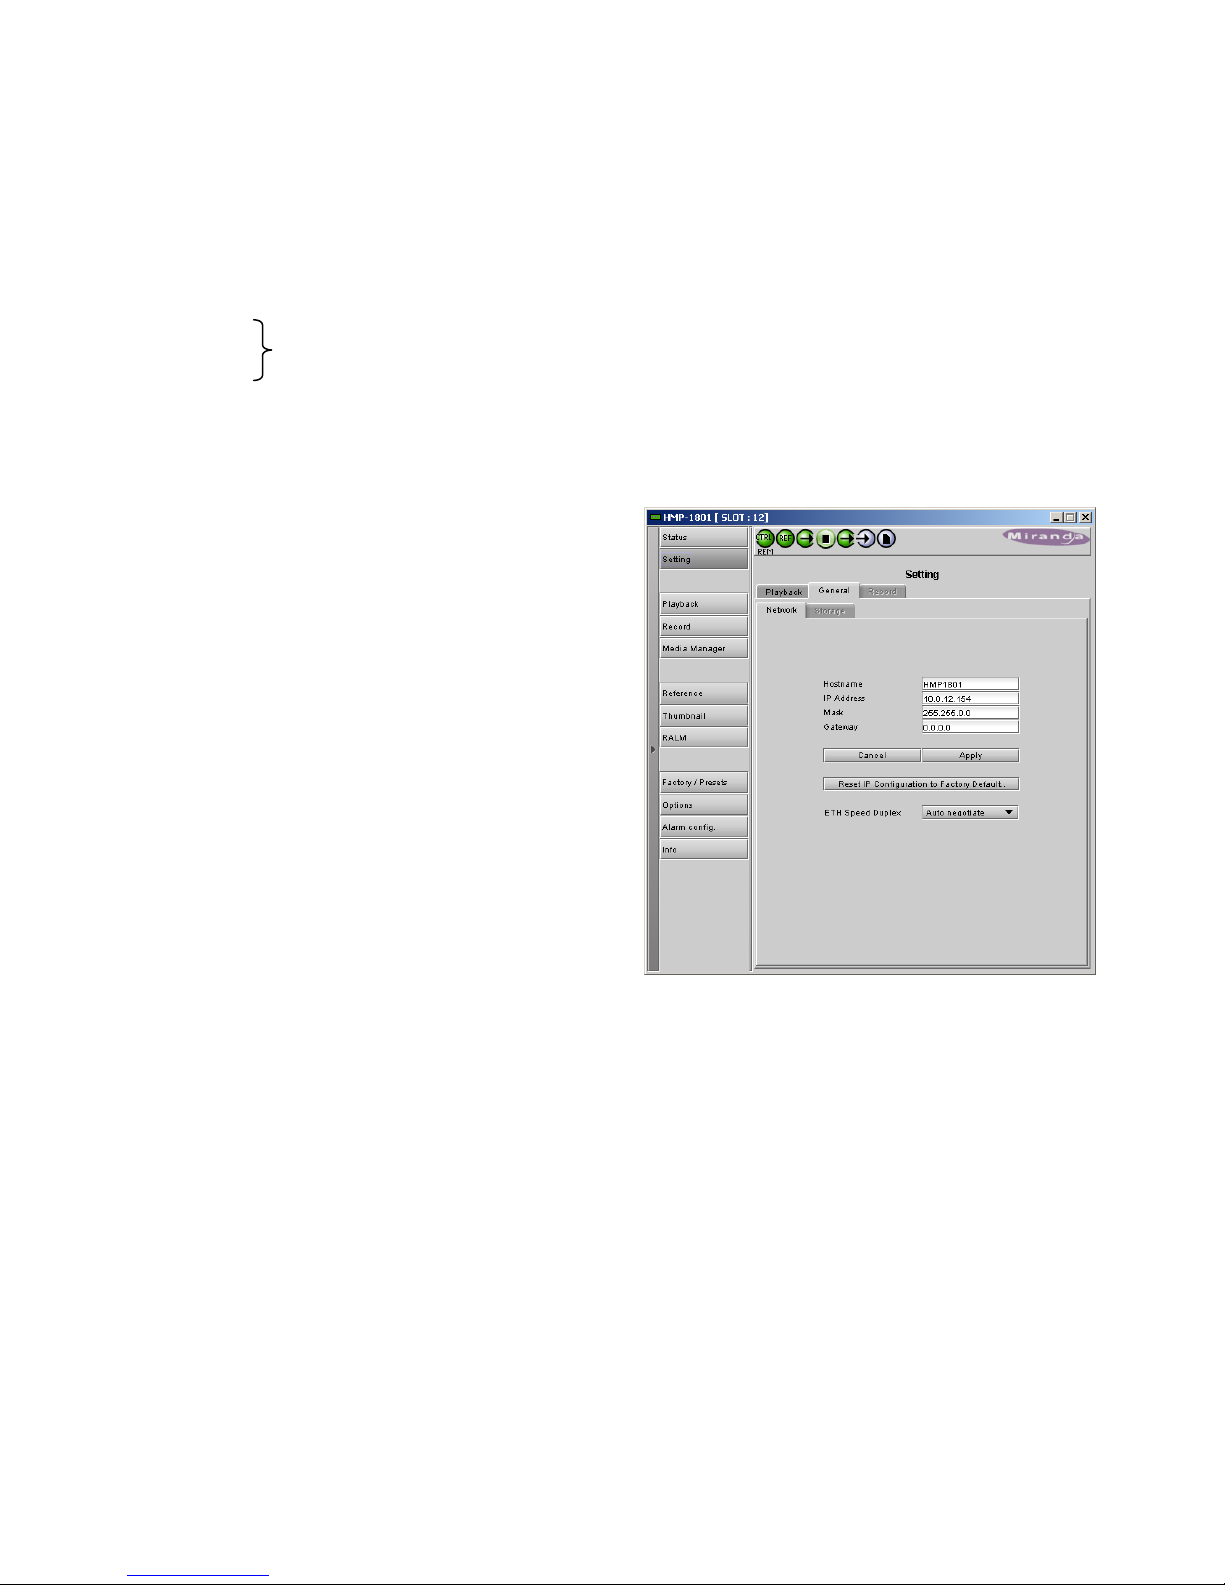
3.4.3.1 The General / Network tab
This panel is used to set the network configuration for
the rear-panel ethernet port on the HMP-1801.
• The settings on this panel do not affect the
Densité frame’s ethernet port. The settings for
that port are configured through the frame’s
controller card.
GUIDE TO INSTALLATION AND OPERATION
Hostname
The data box shows the current hostname for this HMP1801 card
• To change the hostname, type a new name into
the data box
• Click the Apply Hostname button to install the
new hostname
• Click the Cancel button to leave the old hostname
unchanged
IP Address / Mask / Gateway
The three data boxes show the IP address, subnet mask and gateway for the rear-panel ethernet port.
• To change any of these values, type a new address directly into the data box
• Consult with your network manager if necessary to obtain the appropriate addresses within your LAN.
• Click the Apply button to install the new addresses. The card will automatically reboot with the chosen
parameters. The IControl panel will disappear on reboot and you’ll need to re-open it.
• Click the Cancel button to leave the old addresses unchanged
Figure 3.5 Settings – General/Network tab
Reset IP Configuration to Factory Default
Click this button to initiate an IP configuration reset.
Resetting the IP Configuration will reboot the card, and any clip that is playing will be stopped
• A confirmation screen will open reminding you of the consequences of changing the IP settings, listing
the default settings that will be applied, and asking if you want to continue.
HMP-1801 | 17
Page 22

GUIDE TO INSTALLATION AND OPERATION
• Select the appropriate option in the confirmation
screen. The IControl panel will disappear on
reboot and you’ll need to reopen it.
ETH Speed Duplex
Options: Auto negotiate, 100 BASE-TX FD, 100 BASE-TX HD, 10 BASE-T FD, 10 BASE-T HD
3.4.3.2 The General / Storage tab
Use the slider in this tab to set the memory level
threshold.
This is the threshold at which the card will flag a
memory low error.
Figure 3.6 Setting / General / Storage tab
18 | HMP-1801
Page 23

GUIDE TO INSTALLATION AND OPERATION
3.4.3.3 The Setting / Playback tab
The Playback tab in the settings panel is only available when the HMP-1801 is in the Playback mode
• When the HMP-1801 is in the Record mode, this tab will be gray and non-functional
• To change over to Playback mode when in Record mode, open the Playback panel and click the
Enable Playback button (see section 3.4.4)
When enabled, the Playback tab displays four sub-tabs, which are described below:
• Playback / Video
• Playback / Audio (requires Audio option)
• Playback / ANC
• Playback / GPI
3.4.3.4 The Playback / Video tab
Default Clip – use the pulldown to select the default clip
– the clip that will be loaded by default whenever no
other clip is selected or the system is reset, etc.
Output Config – set the configuration of Output #2
• Auto: Output 2 will be the Key output when
Fill/Key mode is active, and white video when
Key/Fill mode is inactive.
• Copy of Output #1: Always, even when Fill/Key
mode is activated.
Figure 3.7 Setting / Playback / Video tab
3.4.3.5 The Playback / Audio tab
The HMP-1801 allows the playback of up to 8 audio
channels. This panel allows the user to enable and
assign the audio file to the output audio channels.
• Audio option required
Audio Input channels: The channels from the audio file
during the playback.
Destination audio Channels: The output of HD/SD SDI
embedded audio channels
• Use the checkboxes in the matrix to assign inputs
to outputs.
• Use the En checkboxes to enable output groups
Figure 3.8 Setting / Playback / Audio tab
HMP-1801 | 19
Page 24

GUIDE TO INSTALLATION AND OPERATION
3.4.3.6 The Playback / ANC tab
AFD – Insertion – control AFD insertion into the output
data stream:
• Auto: pass an existing AFD, and insert a user-
defined AFD when the input has no AFD
• Fixed: insert a user-defined AFD at all times
• OFF: the output will have no AFD
AFD – Line Insert – select the line into which the AFD
will be inserted at the HMP-1801 output when AFD
Insertion is AUTO or FIXED, for each of the six
indicated signal formats:
SD525 SD625
1080i59 1080i50
720p59 720p50
Note: in Fill and Key mode, the AFD associated with
the Fill essence will be inserted into both Fill and Key
outputs.
Time Code – Insertion – turn time code insertion into the output data stream ON or OFF
Time Code – Line Insert – select the line into which the time code will be inserted at the HMP-1801 output
when Time Code Insertion is ON, for each of the six indicated signal formats:
SD525 SD625
1080i59 1080i50
720p59 720p50
Time Code – Duplication (available in SD only) – Insert a second copy of the timecode into the signal,
nominally two lines later. This makes detection of the analog time code signal more reliable.
Closed Caption – Insertion – turn closed Caption insertion into the output data stream ON or OFF
Dolby Metadata – Insertion – turn Dolby metadata insertion into the output data stream ON or OFF
Dolby Metadata – Line Insert – select the line into which the Dolby Metadata will be inserted at the HMP-
1801 output when Dolby Metadata Insertion is ON, for each of the six indicated signal formats:
SD525 SD625
1080i59 1080i50
720p59 720p50
Dolby Metadata – Packet SDID – the HMP-1801 supports only one Dolby stream, so the user must specify
the ID of the packet to be inserted.
Name Dropper – Insertion – Use the pulldown to set Namedropper insertion ON or OFF
• Name Dropper embeds program-specific control signals for downstream graphics inserters into the
output data stream.
Figure 3.9 Setting / Playback / ANC tab
20 | HMP-1801
Page 25

GUIDE TO INSTALLATION AND OPERATION
Conflicts between various metadata for SD video are possible because of the limited space available to carry
ANC data. In most cases, combinations of ANC data cannot be placed on the same line. The only exception
is AFD & Dolby Metadata, which can co-exist on the same video line.
3.4.3.7 The Playback / GPI tab
This tab allows the user to configure the functionality of
the 6 GPI IN lines accessible on the rear panel GPI
connector (see Section 2.3.2).
For each of the six GPI inputs:
• Use the GPI IN Function pulldown to select the
action that will be taken when the GPI is
triggered. The choices are:
OFF – no action
CUE – cue a clip (see next bullet)
CUE & PLAY – cue a clip, and play it
immediately when cued
PLAY – play the cued clip
PAUSE – pause the clip that is playing.
Use PLAY to resume playback from the
same place.
STOP – stop the clip. Must be re-cued before
it can be played again
• If CUE or CUE & PLAY is selected, the Clip to Cue pulldown is activated, showing all available clips.
Select the clip that will be cued or cued and played when this GPI is triggered.
Figure 3.10 Setting / Playback / GPI tab
3.4.3.8 The Setting / Record tab
The Record tab in the settings panel is only available
when the HMP-1801 is in the Record mode
• When the HMP-1801 is in the Playback mode,
this tab will be gray and non-functional
• To change over to Record mode when in
Playback mode, open the Record panel and click
the Enable Record button (see section 3.4.5)
When enabled, the Record tab displays four sub-tabs,
which are described below:
• Video
• Audio (requires Audio option)
• ANC
• GPI
Figure 3.11 Setting / Record / Video tab
HMP-1801 | 21
Page 26

GUIDE TO INSTALLATION AND OPERATION
3.4.3.9 The Record / Video tab
This panel allows the user to set the encoding bit rate for the recording process.
SD and HD bitrates are set separately.
• Maximum is 100 Mbps
Use the sliders or type directly into the databox to set the appropriate values.
Default values are:
• SD: 25 Mbps
• HD: 100 Mbps
Note that the maximum bitrate for the Key output is 50 Mbps.
3.4.3.10 The Record / Audio tab
The HMP-1801 allows the capture of up to 8 audio
channels, of the 16 available at the input. This panel
allows the user to enable and assign the input audio
channels to the audio file that will be recorded.
• Requires the Audio option
Audio Capture: Click the checkbox to enable the
capture of audio during the record process.
Audio Input channels: The embedded audio channels of
the input HD/SD SDI signal
Destination Audio Channels: The audio channels of the
audio file that will be ingested.
• Click the checkboxes in the matrix to assign
input channels to destination channels.
Figure 3.12 Setting / Record / Audio tab
22 | HMP-1801
Page 27

3.4.3.11 The Record / ANC tab
AFD – Extraction – If enabled, the AFD code will be
captured during the record process.
Time Code – Extraction – If enabled, the time code will
be captured during the record process.
Closed Caption – Extraction – If enabled, the closed
caption will be captured during the record process.
Dolby metadata (SMPTE 2020) – Extraction – If
enabled, the Dolby metadata will be captured during the
record process.
Dolby metadata (SMPTE 2020) – Packet SDID – Select
the ID of a single Dolby stream to extract
GUIDE TO INSTALLATION AND OPERATION
Figure 3.13 Setting / Record / ANC tab
3.4.3.12 The Record / GPI tab
This panel allows the user to configure the functionality
of the 6 GPI IN lines accessible on the rear panel GPI
connector (see Section 2.3.2).
For each of the six GPI inputs:
• Use the GPI IN Function pulldown to select the
action that will be taken when the GPI is
triggered. The choices are:
OFF – no action
RECORD – Start the record process
STOP – stop the record process.
Figure 3.14 Setting / Record / GPI tab
HMP-1801 | 23
Page 28

GUIDE TO INSTALLATION AND OPERATION
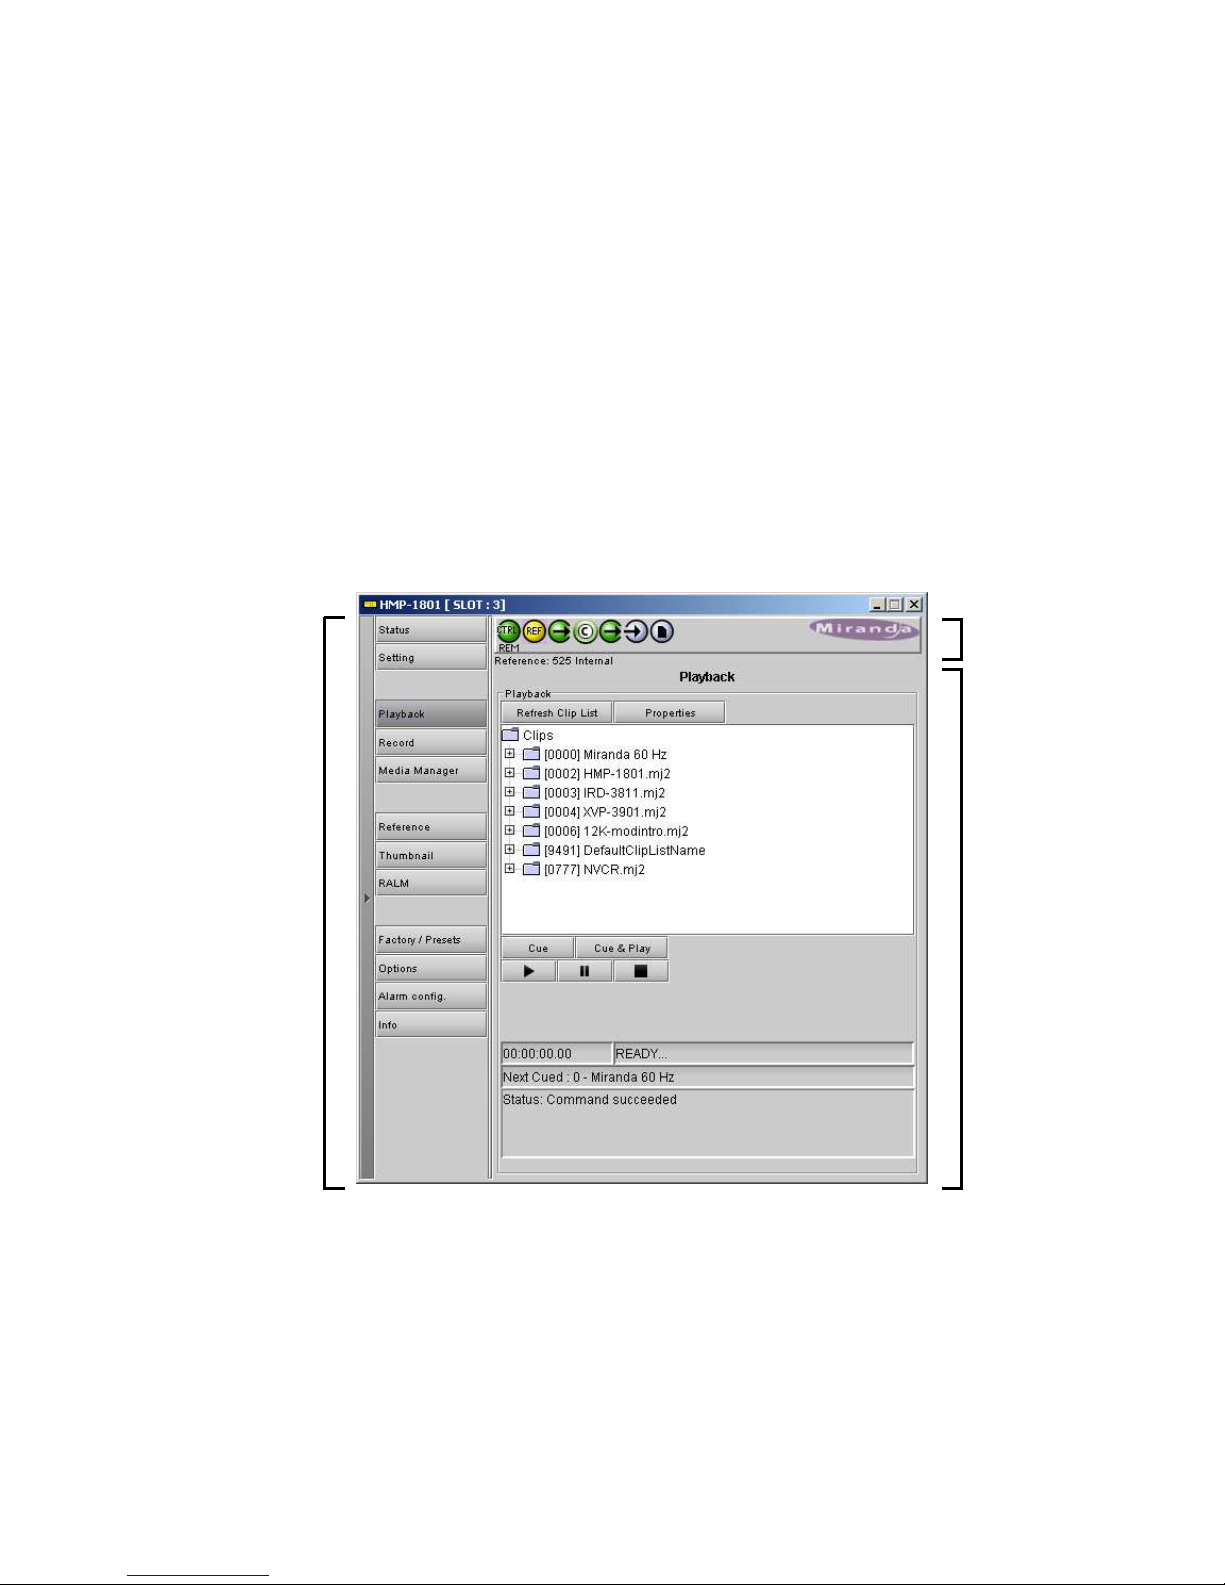
3.4.4 The Playback panel
This panel provides controls for operating the playback features of the HMP-1801.
If the HMP-1801 is currently in RECORD mode, this
panel will display a single button:
Click on this button to switch the HMP-1801 from
Record mode to Playback mode.
The panel display will change to show the playback
operating controls, as described here.
The window lists all the Clip Lists currently available for
playback on this card
• Click the Refresh Clip List button to update the list
(useful when maintenance operations are in
progress)
Click on a Clip List in the window to select it.
• The selected Clip List is highlighted
• The selected Clip List can be cued and played using the controls beneath the window, as detailed
below
The characteristics of the selected Clip List can be displayed by
clicking the Properties button above the window.
• These characteristics are specified using the Ingest and
Configuration Utility, as described in Section 4.1.3.3.
• They cannot be changed here
The Clip List properties are:
Parameter Contents
Number of clips Number of clips in the Clip List
End Clip Behavior What happens when the clip is finished playing. Possible values are:
• Black, Hold last frame, Cue first frame
Auto Play If this Clip List is cued with Auto Play ON, it will begin playback
automatically.
Loop Count Number of times the Clip List will be repeated
Video Format Format of the video essence.
Click on the box beside a Clip List to expand it and see its contents
Figure 3.15 Clip Playback panel
Figure 3.16 Clip List Properties
24 | HMP-1801
Page 29

GUIDE TO INSTALLATION AND OPERATION
It will contain the number of individual clips indicated in the Clip List properties window described above.
Click on a clip in the expanded Clip List to select it
• The selected clip is highlighted
The characteristics of the selected clip can be displayed by
clicking the Properties button above the window.
• These characteristics are specified using the Ingest and
Configuration Utility, as described in Section 4.1.3.3.
• They cannot be changed here
Parameter Contents
AFD Insertion Gives the static AFD code of the
clip
Name Name of the clip
Image position
Location of the top-left corner of the
image on the screen, in pixels
(X=horizontal, Y=vertical)
Video essence Output #1 The name of the video essence
used in this clip. This is the Fill
essence in a Key/Fill operation
Video essence Output #2 Key essence: must be of the
same video format & duration as
the Fill essence. It must be coded
with a bit rate less than 50 Mbps.
Hold First Duration How many frames to hold the first
frame after Play is activated,
before beginning to play the clip.
Figure 3.17 Clip Properties
Fade-in Duration How many frames to fade up from black when play is activated
Hold Last Duration How many frames to hold the last frame while playing, before implementing
the end behavior.
Fade-out Duration How many frames to fade down to black at the end of the clip
V-Joint How many frames for a fade down to black or fade up from black. A V-Joint
will occur when a clip is played more than one time. 0 means no V joint.
Play Count Number of times the clip is to be repeated before the end behavior is
activated.
Video format Format Format of the video essence.
Duration Duration of the clip
Audio Essence The name of the audio essence used in this clip.
Audio End Behavior What happens when the audio clip is not the same duration as video
• Audio follows Video
• Video holds until Audio ends
HMP-1801 | 25
Page 30

GUIDE TO INSTALLATION AND OPERATION
Cue status
Play status
CUE button
PAUSE
STOP
PLAY
CUE and PLAY button
Play time
Metadata Indicates the presence of certain metadata types (YES or NO)
[AFD, Dolby Metadata, Timecode, Closed Caption, Name Dropper]
3.4.4.1 Operating the card using this panel
Figure 3.18 shows the operating controls on the Playback panel.
Status
Message
window
Figure 3.18 Operating Controls on the Playback panel
Click on a clip in the window to select it
Click on the Cue button to cue the clip to the first frame
• The name of the clip will appear in the Cue status box when the clip is cued.*
• “READY” will appear in the Play status box when the clip is cued
• A clip may be cued while another clip is playing or paused, but ONLY if it is the same format.
• Attempts to cue an item with a different format will fail, and a message will appear in the Status
Message window explaining why.
Click on the Cue & Play button to cue the clip to the first frame, and then play it immediately
Click on the Play button to play the item
• The Play status box will show PLAYING… and the name of the clip
• The Cue status box will show Empty until another item is cued
Click on the Pause button to pause the playback
• The clip will stop playing and freeze on the last frame played
• The Play status box will show PAUSED… and the name of the clip
• The Cue status box will show Empty until another item is cued
Click on the Stop button to stop the playback
• The clip playback will be stopped
• The output will go to black
• Any Cued item will be removed from the cued status, and the Cue Status box will report Empty
26 | HMP-1801
Page 31

GUIDE TO INSTALLATION AND OPERATION
Note 1: When a second clip is cued while playing, pressing PLAY again will terminate the current play and
automatically start the second clip.
Note 2: When a second clip is cued while in pause, pressing PLAY will restart the current clip. Pressing
PLAY again will start the second clip
3.4.5 The Record panel
This panel provides controls for operating the recording
features of the HMP-1801.
If the HMP-1801 is currently in PLAYBACK mode,
this panel will display a single button:
Click on this button to switch the HMP-1801 from
Playback mode to Record mode.
The panel display will change to show the Record
mode operating controls, as described here.
This panel has three user-activated functions:
Record button – click on it to initiate a
recording
The recording will automatically stop if
there is no more space on the local drive, or if the input status changes
Stop button – click on it to stop a recording in progress
• File name data box – click in the box and type a name for the clip being recorded
There are also some status indicators beneath these operating controls:
• Time window – shows the elapsed time of the current recording
• Status window – shows the status of the most recent play or stop command
Status icon area:
Status icons are provided for these functions:
• AFD
• Dolby metadata
• Time code
• Closed Caption
• Name Dropper
• Audio (16 channels)
Figure 3.19 Record panel
HMP-1801 | 27
Page 32

GUIDE TO INSTALLATION AND OPERATION
3.4.6 The Media Manager panel
The Media Manager panel has a single button, located in the center of the panel:
Click this button to open the HMP-18x1 Ingest and Configuration Utility.
• Note that an Ethernet connection to the HMP-1801 rear panel is required to load the media
management utility
This utility is used to import and export video and audio essences and Clip Lists to/from the HMP-1801, and
to configure the characteristics of those essences.
• See section 4.1 for a complete explanation of this utility
3.4.7 The Reference panel
3.4.7.1 The Reference / Reference tab
The status icons in the Reference Presence area
indicate the presence or absence of an external
reference, or the Densité frame’s URS signal.
Use the radio buttons in the Reference Source area to
select from the following options:
• Auto – this mode selects the first source detected
in this order of priority:
o External reference
o URS
o Internal reference
• External – selects the signal connected to the
rear-panel REF IN connector
Note that if the external reference is in use and is
interrupted, the clip playback will be stopped
• URS (Universal Reference Signal) – selects the
internal reference from the backplane of the
Densité frame (from an REF-1801 card if present)
Note that if the URS is in use and is interrupted,
the clip playback will be stopped
• Internal – uses an internal free-running sync
generator.
URS Format – use the radio buttons in the URS Format area to select whether the URS is OFF, 29.97 Hz or
25 Hz.
This table shows the reference formats that work for the various output formats available on the HMP-1801.
Figure 3.20 Reference panel – Reference tab
28 | HMP-1801
Page 33

GUIDE TO INSTALLATION AND OPERATION
Reference Types
525
625
1080i59.94
1080i50
720p59.94
720p50
525
625
1080i59.94
X
X
X X
Output Formats
1080i50
720p59.94
720p50
X X
X X
X X
3.4.7.2 The Reference / Timing tab
Fill Output
The HMP-1801 will select the timing based on the clip
format, so the card output can be timed correctly for all
formats.
• Vertical control is +/- 1 frame in increments of 1 line
• Horizontal control is from 0 to 1 line in pixels
The controls are provided in the form of sliders with a
data box.
• The data box displays the current value.
• Values can be changed by moving the slider or by
typing a value directly into the data box
• The delay introduced here affects both Fill and
Key outputs
NOTE: The sliders change the timing values for the
active output format only. Each format has its
own set of timing values. In internal mode, the
timing alignment feature is disabled.
Key Offset
These controls allow the user to apply additional delay
to the key output to compensate for timing differences introduced into the system by cabling differences
between the key and fill paths.
Use the sliders or data boxes to insert a delay between the fill and key outputs:
• Vertical: +5 lines to -5 lines
• Horizontal: 0 to 1 line, in pixels (actual value is format-dependent)
Note: the output timing and key offset adjustments cannot be made while the clip is playing. Make the
adjustments first, then cue and play the clip.
Figure 3.21 Reference panel – Timing tab
HMP-1801 | 29
Page 34

GUIDE TO INSTALLATION AND OPERATION
3.4.8 The Thumbnail panel
The thumbnail panel displays a thumbnail image of the
HMP-1801 output.
Enable – Click the radio buttons to select whether the
thumbnails will be streamed from this HMP-1801
• OFF – streaming is disabled
• Video – streaming is enabled
Size – choose the thumbnail size:
• small, medium, large
Player – Click the radio buttons to select whether the
thumbnails will be displayed in this HMP-1801 panel.
Quality – choose the quality of the displayed image
• Poor, Normal, HiQ
Rate – select the desired refresh rate from the pulldown box. The choices are:
[Fast, 1 sec, 2 sec, …, 9 sec, 10 sec.]
Source – Use the pulldown to select the source of the thumbnail, from among these choices:
[Output #1, Output #2]
Figure 3.22 Thumbnail panel
3.4.9 The RALM panel
The Remote Audio Level Meter (RALM) panel displays audio level meters that can be assigned to the audio
channels of the HMP-1801.
• Each of the four meters displays two audio
channels
• Use the pulldowns in the RALM Remote Control
section at the bottom of the panel to select the
source for each meter display Options are:
OFF
Embedded Ch 1&2
Embedded Ch 3&4
….
Embedded Ch 15&16
Once the meter display is enabled, use the controls in
the RALM Connections tab to turn individual meterpairs on and off.
Speed – select the meter response from the pull-down
list, options are [slow, medium, fast]
30 | HMP-1801
Figure 3.23 RALM panel
Page 35

RALM Connections tab
180°
90° 0°
Use the radio buttons to turn the meter
display ON (RALM) or OFF for the
indicated channels. The meter appears
directly above the controls.
Reset Counter: click this button to reset
the overload counter on the ALM display to
zero. See the next section for instructions
on setting up the overload counter.
Meter Ballistics Config tab
Type – select a type of meter from the pulldown list
The meter is divided into three zones, and
the dividing points and color of each zone
are individually configurable in this tab.
GUIDE TO INSTALLATION AND OPERATION
Figure 3.24 RALM Connections tab
Upper Zone Limits – select the crossover
Figure 3.25 Meter Ballistics Config tab
level between the upper and middle zones
of the meter (the range of values shown in the pull-down list depends on the type of meter selected)
Lower Zone Limits – select the crossover level between the middle and lower zones of the meter (the range
of values shown in the pull-down list depends on the type of meter selected)
Color samples – the three samples show the current selected color for the upper, middle and lower zones of
the meter.
• Click on the color sample of a zone to open a color selection panel to choose a different color for that
zone
Overload Cursor – The overload cursor appears on the meter as an
arrowhead in the meter scale. The two pulldown boxes set the position
of the overload cursor on the left and right meters. If the audio level on
that channel goes above the cursor, the Overload Counter at the top of
the meter is incremented.
The Overload Counter shows a running count of the number of
overloads detected. The Overload level is shown by a marker beside
the meter, and its position can be set under the Meter Ballistics
Config tab
The Phasemeter (located at the bottom of the RALM meter display)
is a small meter that represents the phase correlation factor between
the two channels of a pair.
Figure 3.26 RALM meter details
HMP-1801 | 31
Page 36

GUIDE TO INSTALLATION AND OPERATION
3.4.10 The Factory / Presets panel
The HMP-1801 maintains “Factory Default” settings in
its memory, to which it can be restored at any time.
Click the Load Factory button to restore the card to its
Factory default settings.
User Presets
The HMP-1801 has memory registers which can hold
up to 5 sets of user-defined parameter settings.
• IP parameters are not included in the saved data
Select any one of the five presets using the pulldown
list. The name of the currently-selected User Preset is
shown on the on the pulldown icon (e.g. User1,
User2,… User5)
• Click Load to load the contents of the selected
User Preset into the HMP-1801. All parameter
settings and values will be replaced by the
contents of the selected User Preset.
• Click Save to store the current parameter settings
and values from the HMP-1801 into the selected
User Preset. The existing contents of the preset
will be overwritten.
Figure 3.27 Factory / Presets panel
3.4.11 The Options panel
There are three options available on the HMP-1801.
HMP-1801-OPT-AUD8 option (Audio)
This option enables the playback and embedding of
eight channels of audio for the HMP-1801 card.
Miranda supplies an activation key when the option is
purchased. The panel includes a data entry box “Enter
Key” where the activation key can be entered.
• Enter the Key in the data box, and click the
Enable Option button to activate the feature.
Figure 3.28 Options panel - Audio
32 | HMP-1801
Page 37

HMP-1801-OPT-KEY option (Fill & Key)
This option provides the extraction of a Key signal that
is sent to output 2 of the HMP-1801. This enables the
use of the two HMP-1801 outputs as Fill and Key, for
applications where the HMP-1801 is feeding a
downstream keyer that will insert its output into a video
program stream.
Miranda supplies an activation key when the option is
purchased. The panel includes a data entry box “Enter
Key” where the activation key can be entered.
• Enter the Key in the data box, and click the
Enable Option button to activate the feature.
Once activated, the Fill/Key mode can be enabled or
disabled using the Output Configuration buttons in the
Card Config panel (see Section 3.4.3)
HMP-1801-OPT-INPUT (Record)
This option enables the recording feature of the HMP-
1801.
Miranda supplies an activation key when the option is
purchased. The panel includes a data entry box “Enter
Key” where the activation key can be entered.
• Enter the Key in the data box, and click the
Enable Option button to activate the feature.
GUIDE TO INSTALLATION AND OPERATION
Figure 3.29 Options panel - Fill & Key
Figure 3.30 Options panel - Record
HMP-1801 | 33
Page 38

GUIDE TO INSTALLATION AND OPERATION
3.4.12 The Alarm Config panel
This panel allows the alarm reporting of the HMP-1801 to be configured. The panel opens in a new window
when the button is clicked, and can be resized if needed.
The panel is organized in columns.
Status/Name
This contains an expandable tree listing all the alarms reported by this HMP-1801 card.
• Each alarm name includes an icon that shows its current status
The Card LED, Overall alarm and GSM contribution columns contain pulldown lists that allow the level of
contribution of each individual alarm to the alarm named in the column heading to be set.
Figure 3.31 Alarm Configuration Panel
• If there is no arrowhead in the box, there is no pulldown and the alarm is not user-configurable
CARD LED
This column allows configuration of the behavior of the HMP-1801’s card-edge Status LED.
Overall Alarm
This column allows configuration of the contribution of each individual alarm to the Overall Alarm
associated with this card. The Overall Alarm is shown in the upper left corner of the iControl panel, and
also appears at the bottom of the Status/Name column.
34 | HMP-1801
Page 39

GUIDE TO INSTALLATION AND OPERATION
GSM Contribution
This column allows configuration of the contribution of each individual alarm to the GSM Alarm Status
associated with this card. GSM is a dynamic register of all iControl system alarms, and is also an alarm
provider for external applications. The possible values for this contribution are related to the Overall alarm
contribution:
• If the Overall alarm contribution is selected as Disabled, the GSM alarm contribution can be set to any
available value
• If the Overall alarm contribution is selected as any level other than disabled, the GSM contribution is
forced to follow the Overall Alarm.
Levels associated with these alarms:
The pulldown lists may contain some or all of the following options:
The alarm makes no contribution (black icon)
The alarm is of minor importance (yellow icon)
The alarm is of major importance (orange icon)
The alarm is of critical importance (red icon)
The alarm exists but has no effect (used for text and composite alarms)
Shortcut: if you click in one of the columns beside a major heading in the Status/Name column (where
there is no pulldown shown), you will open an “invisible” pulldown that lets you assign a level to all alarms
in that section of the column simultaneously.
Log Events
iControl maintains a log of alarm events associated with the card. The log is useful for troubleshooting and
identifying event sequences. Click in the checkbox to enable logging of alarm events for each individual
alarm.
At the bottom of the window are several other controls:
Copy to other cards
Click this button to open a panel that allows the alarm configuration set for this card to be copied into another
HMP-1801 card.
• Select one or more destination cards from
the list in the window by clicking in the
checkboxes, or all of them by clicking in
the All checkbox
Figure 3.32 Copy to other cards
HMP-1801 | 35
Page 40

GUIDE TO INSTALLATION AND OPERATION
Get alarm keys
Click this button to open a save dialog where you
can save a file containing a list of all alarms on
this card and their current values, along with an
Alarm Key for each. The alarm keys are useful
for system integration and troubleshooting.
• The file is saved in Excel.csv format
Figure 3.33 Get alarm keys save dialogue
OK, Apply, Cancel
• OK accepts the settings and closes the window once the card confirms that there are no errors.
• Apply accepts the settings, but leaves the window open
• Cancel closes the window without applying any changes, and leaves the previous settings intact.
3.4.13 The Info panel
When the HMP-1801 is included in an iControl
environment, certain information about the card should
be available to the iControl system. The user can enter
labels and comments that will make this card easy to
identify in a complex setup. This information is entered
here, into data boxes with a white background.
Label: type the label that appear for this HMP-
1801 when it appears in iControl
applications
Short Label type the short-form label that iControl
uses in some cases (8 characters)
Source ID type a descriptive name for this HMP-
1801
Comments: type any desired text
The remaining data boxes show manufacturing
information about this card.
Figure 3.34 Info panel
36 | HMP-1801
Page 41

GUIDE TO INSTALLATION AND OPERATION
Three buttons give access to additional information and controls:
• Details…: Reports the Firmware version, service version,
and panel version for this card
Figure 3.35 Details window
• Advanced…: Shows the Miranda LongID for this card.
The Miranda LongID is the address of this HMP-1801
in the iControl network.
Figure 3.36 Advanced window
• Remote System Administration – opens the Joining Locators data box, which lists remote lookup
services to which this HMP-1801 is registered.
Add: Force the iControl service for this HMP-1801 to
register itself on a user-specified Jini lookup service, using
the following syntax in the Input dialog:
jini://<ip_address>
where <ïp_address>
is the ip address of
the server running the
lookup service
Remove: select one of the services listed in the window by
clicking on it, and click Remove to delete it from the window.
Figure 3.37 Joining Locators window
HMP-1801 | 37
Page 42

GUIDE TO INSTALLATION AND OPERATION
4 Web Control Panel
The HMP-1801 is provided with a dedicated ethernet port on its rear panel, in order that it may communicate
with outside systems independently of the Densité frame controller and independently of the iControl system.
In addition, the card includes an on-board FTP server. These elements allow the creation and management
of clips from a remote computer.
When the remote computer connects to the HMP-1801 card by typing its IP address into a web browser, the
on-board web server sends a page giving access to two resources:
1. The Ingest and Configuration Utility (see Section 4.1)
2. The Firmware Upgrade (see Section 4.2)
Click on the link to access the desired resource.
Figure 4.1 Onboard Web Server Home Page
4.1 Ingest and Configuration Utility
The Ingest and Configuration Utility of the HMP-1801 can be accessed via either of two methods:
• Navigate to the HMP-1801’s rear panel ethernet port’s IP address using a browser, and click on the
“Start the Configuration Utility….” link in the onboard webserver’s home page (see Figure 4.1)
38 | HMP-1801
Page 43

GUIDE TO INSTALLATION AND OPERATION
• Click on the Media Manager… button in the HMP-1801’s iControl panel and then click the Load Media
Management Utility button in the panel (see Section 3.4.6)
In both cases, the Ingest and Configuration Utility window will open. Using this window, your can import,
export, and record video essences to the HMP-1801, and configure clips using those essences. You can
also trip or crop the video essences as required.
Note – the screen captures shown here are from version 400 of the utility
Figure 4.2 Ingest and Configuration Utility window
Across the top of the window are 5 buttons: Playback, Record, Library, Jobs, Refresh All
Click on one of these to open the relevant window display and control panel.
4.1.1 Playback
The Playback panel provides resources to select a Clip List, cue it and play it.
If the card is currently in Record mode, this window displays an Enable Playback Mode button
HMP-1801 | 39
Page 44

GUIDE TO INSTALLATION AND OPERATION
• Click the button to switch the card to Playback mode
• This is equivalent to switching the card mode via the iControl interface – see Section 3.4.4 on page 24
• This will interrupt the card’s output for a few seconds
Once the card is in the Playback mode, the window display appears as shown in the figure below.
Figure 4.3 Ingest and Configuration Utility - Playback panel
The Playlists window on the right of the panel lists all the Clip Lists that are stored in the HMP-1801’s onboard memory.
• If you do not have the Clip List you need in the onboard memory, but it exists elsewhere, you must
upload it to the HMP-1801. Click the Find in Library> button to move to the Library panel, from which
you may proceed to locate and upload the Clip List. See section 4.1.3.1 for a description of how to do
this.
Click on a Clip List to select it
• The selected Clip List will be highlighted in the Playlists window
• Below the Playlists window you will see an image of the first frame in the Clip List.
• Beside the thumbnail are given the name of the selected Clip List, its video format, and the number of
clips it contains.
• To see the clips contained in the selected Clip List, double-click on it in the Playlists window to expand
it; double-click again to contract it.
Click the Cue button below the Playlist window to cue the selected Clip List
40 | HMP-1801
Page 45

GUIDE TO INSTALLATION AND OPERATION
• The cued Clip List will be identified at the top of the main window, by name and format
• The first-frame thumbnail will appear in the main window
Click the Cue & Play button to cue the item and then play it immediately.
Click Play (below the main window) to play the cued item
• The control is not functional unless a Clip List has been cued.
Superimposed on the thumbnail image in both cued and play modes are two information windows:
• Clip List (at the top): shows the number of loops programmed for this list, and the current status
(e.g. if the Clip List has been programmed to repeat three times, and is currently playing for the
second time, this item will read Clip List: 2/3)
• Clip (at the bottom) shows which clip within the Clip List is currently playing.
During playback, the bar graph beneath the window shows the time line of the clip being played, and the
current time is shown numerically beside the Play button
• Note that the time will continue to increment when the clip reaches the end, if the end clip behavior is
set to Hold Last Frame.
.
When a Clip List is playing, click Pause to freeze it.
• Click Play to resume playback from the same spot
• Click Stop to end playback – the pause location is lost
When a Clip List is playing or paused, click Stop to end playback.
4.1.2 Record
The Record panel provides resources to record video through the card’s input.
If the card is currently in Playback mode, this window displays an Enable Record Mode button
• Click the button to switch the card to Record mode
• This is equivalent to switching the card mode via the iControl interface – see Section 3.4.5 on page 27
• This will interrupt the card’s output for a few seconds
Once the card is in the Record mode, the window display appears as shown in the figure below.
HMP-1801 | 41
Page 46

GUIDE TO INSTALLATION AND OPERATION
Figure 4.4 Ingest and Configuration Utility - Record panel
To name the clip to be recorded, click on the Recording Name display at the bottom of the screen
• the icon beside this item is a reminder that it is editable
Use the cursor to select the current name, and type in the data box to edit or replace it.
• Click the cancel [
• Click the accept [
] icon at the right to exit the edit mode and leave the old name unchanged
] icon at the right to exit the edit mode and use the new name. Clicking in the
“Recording Name:” area has the same effect.
The bar chart at the bottom of the panel shows the memory usage on the HMP-1801’s flash memory. Use it
to determine whether there is enough free memory to complete your recording.
42 | HMP-1801
Page 47

GUIDE TO INSTALLATION AND OPERATION
Click on the Record button to begin recording the current input and saving it under the name shown below
the screen.
• The elapsed time of the recording is shown beside the Record button
• A Stop button will be shown when the recording is in progress
• The recording will automatically stop if there is no more space on the local drive, or if the input status
changes
4.1.3 Library
The Library panel provides resources for managing the essences and Clip Lists stored on the HMP-1801.
Figure 4.5 Ingest and Configuration Utility - Library panel
The bottom portion of the screen shows the current memory allocation and availability, and status for the
FTP (import and export) and Densité frame connections.
The Media browser section contains the functional controls for clip media management.
At the top of the media browser section are tabs for selecting the type of item to manage, and sub-tabs to
order the items in the window (sort by and ascending/descending”
HMP-1801 | 43
Page 48

GUIDE TO INSTALLATION AND OPERATION
4.1.3.1 Library – Video
This view shows the video essences that are stored on board the HMP-1801.
Figure 4.6 Library panel - Video
The view is organized by columns:
Essence shows a preview image of the essence
Note that no thumbnail will be generated if the file is transferred in the .avi format, or if the
video is captured when no appserver is connected to the card.
Details lists specific details about the essence
Name: name assigned to the essence by the user
Duration: duration of the essence (time to nearest tenth of a second, also frames)
Format the video format, e.g. 1080i59.94
Bitrate in Mbps
(error message) If there is a problem with this essence, a warning message (in red) will
appear below the Bitrate specification.
AFD Code: if the essence carries an AFD code as metadata, the code and an appropriate graphic will be
displayed. If there is no AFD code, a “no selection” icon will be shown
Size: Shows the size of the essence, in MB
Use the scroll bar to move up and down the list
The total number of essences in the list is shown beside the Edit button below the main window.
Click anywhere in an essence row to select that essence.
• The Video Details of the selected essence will appear to the right of the window: Format, ID and name
• Below that will appear the icon, ID and name of every currently-defined Clip List that contains this
essence
44 | HMP-1801
Page 49

GUIDE TO INSTALLATION AND OPERATION
Below the window are four buttons that are used to manage the video essences
• All of the buttons will be enabled only when an essence is selected
• Select an essence by clicking anywhere in its row
Edit
Click the Edit button to open the essence edit window for the selected essence.
Figure 4.7 Library panel – Video essence edit window
Two features of the video essence can be edited from this window:
Description: This is the name for this essence in your system
To edit the description:
Click any where near the Description on the right of the panel
• the icon beside this item is a reminder that it is
editable
The editing data box will open.
Use the cursor to select the current description, and type in the
data box to edit or replace it.
• Click the cancel [
] icon at the right to exit the edit mode
and leave the old name unchanged
• Click the accept [ ] icon at the right to exit the edit mode
and use the new name. Clicking in the “Description:” area
has the same effect.
AFD: The AFD is used to signal the preferred presentation of the aspect ratio of the item. An AFD code
is inserted in the video output of the HMP-1801, unless No Selection is chosen in the procedure below.
• The window displays an icon illustrating the currently-selected AFD code.
HMP-1801 | 45
Page 50

GUIDE TO INSTALLATION AND OPERATION
Format
Samples
Lines
To change the current selection:
Click on the Change AFD button beside the AFD icon
• The Select AFD window opens, showing icons and descriptions representing the various AFD
codes that are available
Click on an icon to select it, and then click OK to confirm it
as the new AFD value and close the Select AFD window. If
you click Apply, the AFD is selected, but the Select AFD
window remains open. If you click Cancel, the selected AFD
code does not replace the original one, and the window
closes.
• The selected AFD code will be inserted in the video
output of the HMP-1801
• If AFD=0 (the first choice in the window) is chosen, no
AFD code will be inserted at the HMP-1801 output
Note: in Fill and Key mode, the AFD associated with the
Fill essence will be inserted into both Fill and Key outputs.
Delete: remove the selected essence from the list and delete it
from the HMP-1801’s memory.
Import: Import a video essence into the HMP-1801 via the rear-
Figure 4.8 Select AFD window
panel ethernet port.
• Click this button to open the Import Video window
• Click the Browse button to open a dialog on your local computer where you can browse for essences,
select one or more and then click “Open” to return to the Import Video window.
Supported formats: The HMP-1801 supports only the following image formats and picture sizes:
SD - 525 720 486
SD - 625 720 576
HD - 1080i50 & 1080i59.94 1920 1080
HD - 720p50 & 720p59.94 1280 720
Video types: The HMP-1801 accepts full scale targa sequences (.TGA), .BMP, .JPG and .AVI
(already encoded in JPEG2000) files for import.
Export: export a video essence to a computer via the rear-panel ethernet port.
• Click the Export button
A Select save directory window opens showing a tree of the files on the connected computer
• Navigate to the folder in which the essence is to be saved, and click on it to select it
You may select Make New Folder
• Click Open at the bottom of the window
The file will begin to download to the selected folder
46 | HMP-1801
Page 51

GUIDE TO INSTALLATION AND OPERATION
• The Jobs window will open
The progress of the current export will be tracked
• The essence will be saved as an .mhv file
4.1.3.2 Library – Audio
This view shows the audio essences that are stored on board the HMP-1801
Figure 4.9 Library panel - Audio
Essence shows an icon indicating the audio format of the essence
Details lists specific details about the essence
Name: name assigned to the essence by the user, and an ID number
Duration: duration of the essence (time to nearest tenth of a second)
Size: Shows the size of the essence, in MB.
Use the scroll bar to move up and down the list
The total number of essences in the list is shown beside the Edit button below the main window.
Click anywhere in an essence row to select that essence.
The Audio Details of the selected essence will appear to the right of the window: ID and name
Below that will appear the icon, ID and name of every currently-defined Clip List that contains this essence
Below the window are four buttons that are used to manage the audio essences
• All of the buttons will be enabled only when an essence is selected
• Select an essence by clicking anywhere in its row
HMP-1801 | 47
Page 52

GUIDE TO INSTALLATION AND OPERATION
Edit
Click the Edit button to open the essence edit window for the selected essence.
Use this window to edit the Name of the selected audio essence
To edit the name:
Click anywhere near the name on the panel.
the icon beside this item is a reminder
that it is editable
The editing data box will open.
Use the cursor to select the current name, and type
in the data box to edit or replace it.
• Click the cancel icon [
] at the right to exit the
edit mode and leave the old name unchanged
• Click the accept icon [
] at the right to exit the
edit mode and use the new name. Clicking in
the “Name:” area has the same effect.
Click Close to end the editing session and return to the Media Browser window.
Delete: Click the Delete button to remove the selected essence from the list and erase it from the HMP1801’s on-board memory.
Import: Import an audio essence into the HMP-1801 via the rear-panel ethernet port.
• Click the Import button to open the Import Audio window
• Use the radio buttons to select either Single Multi-Channel or Multiple .WAV files to import
• The window appearance will change to reflect your choice, as shown in the figure below
Figure 4.10 Import Audio window
48 | HMP-1801
Page 53

GUIDE TO INSTALLATION AND OPERATION
• Click the browse button beside a data box to open a dialog on your local computer where
you can browse for and select essences, and then click “Open” to return to the Import Audio window.
• Click Next in the Import Audio window, and then Import to import the selected file
If you have selected a .WAV file, you can store a copy of the essence (an .mha file) in the source
directory after it is imported
Export: export an audio essence to the computer via the rear-panel ethernet port.
• Click the Export button
A Select save directory window opens showing a tree of the files on the connected computer
• Navigate to the folder in which the essence is to be saved, and click on it to select it
You may select Make New Folder
• Click Open at the bottom of the window
The file will begin to download to the selected folder
• The Jobs window will open
The progress of the current export will be tracked
• The essence will be saved as an .mha file
4.1.3.3 Library – Clip Lists
This view shows the Clip Lists that are defined and stored on board the HMP-1801.
Figure 4.11 Library panel - Clip Lists
The view is organized by columns:
Thumbnail shows a preview image of the Clip List
HMP-1801 | 49
Page 54

GUIDE TO INSTALLATION AND OPERATION
Details lists specific details about the Clip List
Name: name assigned to the Clip List by the user, plus the ID number
Clips Contained: the number of individual clips that make up this Clip List
Format: the video format, e.g. 1080i59.94
Autoplay: whether the clip will start playing as soon as it is cued
[End behaviour] Shows how the HMP-1801 will behave once the playout of this Clip List is
completed
Clip count: Shows the number of individual clips that make up this Clip List
Use the scroll bar to move up and down the list
The total number of Clip Lists in the list is shown beside the Edit button below the main window.
Click anywhere in a Clip List row to select that Clip List.
• The Details of the selected Clip List will appear to the right of the window: Name, Format, ID and
number of clips contained
• Below that will appear the icon, ID and name of each clip contained in the Clip List
Below the window are five buttons that are used to manage the Clip Lists
• All of the buttons will be enabled only when a Clip List is selected
• Select a Clip List by clicking anywhere in its row
New
Click this button to begin the process of creating a new Clip List.
The button pulls down into a list of the video formats in which the Clip List
could be created
• Only formats for which there are video essences available on the
HMP-1801 are active
• A Clip List can only contain essences of the same video format
Click on a valid format, and the Editing Clip List window opens
The new Clip List is assigned an arbitrary ID and arbitrary default characteristics
• The window opens with one arbitrary blank clip defined, as Clip Lists must by definition include at least
one clip.
Note that this same Editing Clip List window opens when the Edit button is clicked after an existing Clip List
is selected in the Media Browser window. The descriptions that follow are applicable in both cases – data
must be entered completely for a new Clip List, while data may be modified when editing an existing Clip List.
Edit
Click the Edit button to open the Editing Clip List window for the selected Clip List.
Note that all items appearing in the window with an edit icon to their right can be edited
• Click anywhere along the row containing the item to open the edit window
The edit window may contain a text box, a pulldown list or a multi-value scroll box
• When you have modified a value in the edit window:
50 | HMP-1801
Page 55

GUIDE TO INSTALLATION AND OPERATION
Click the cancel icon [ ] at the right to close the edit window and leave the old value unchanged
Click the accept icon [
] at the right to close the edit window and use the new value. Clicking on
the parameter name has the same effect.
Edit the Clip List characteristics at the top of the window:
• Clip List ID – you can enter any number, but
if you enter an existing number you will be
asked if you want to overwrite the previouslydefined Clip List with the new one you are
creating now.
• Clip List Name – enter any name
• Auto Play – use the pulldown to select YES
(the Clip List will play immediately every time
it is cued) or NO (a Play command must be
received before the Clip List will play)
• End Behavior – use the pulldown to select
what will happen after the last frame of the
Clip List has been played:
Go to black
Hold the last frame
Cue to the first frame
• Loop Count – you may choose to have the
Clip List repeat continuously until stopped
manually (0 Continuous Play), or to loop
through a specific number of times before
initiating the end behavior. Use the scroll box
to select the desired number
A Clip List consists of a sequence of one or more
Figure 4.12 Editing Clip List window – simple view
clips, and the lower part of the Editing Clip List
window is devoted to the definition of the clips that make up the Clip List.
Clips only exist within the context of a Clip List.
Each clip is represented by an icon in the section to the left of the window
• The currently selected clip is highlighted on a purple background
• Scroll up and down the list using the Up and Down buttons at the top (mainly useful if the list has too
many clips to show at one time)
To select a clip, click on it or use the Up and Down buttons to scroll to it.
To add a clip to the Clip List, click the Add button at the bottom
• A new blank clip is added to the list
• You must define its contents in the clip details section
To delete a clip from the Clip List, select it and click the Del button at the bottom
• Video and audio essences associated with the clip are not deleted, and remain in the HMP-1801
memory
HMP-1801 | 51
Page 56

GUIDE TO INSTALLATION AND OPERATION
The Clip Details section on the right shows all the parameters of the selected clip, and the icon shows
those that are editable.
• Clip Name – enter a suitable name in the text box
• Video Duration – calculated from the duration of the video essence, plus any extra frames added
before and after (see Hold First duration and Hold last duration below)
• Video Format – as specified when the Clip List was created
• AFD insertion – as selected in the video essence edit procedure
• X-offset – horizontal image position relative to the top left of the image (0 pixels to max allowed by the
format, e.g. 1920 pixels for 1920x1080 video)
• Y-offset – vertical image position relative to the top left of the image (0 pixels to max allowed by the
format, e.g. 540 lines for 1920x1080 video)
• In/Out Frame Markers – shows the frame numbers within the video essence of the start and end of
playback (set in the advanced editing controls – see below)
• Video essence Output#1 – Use the pulldown to select the video essence for this clip. Only essences
in the video format of the Clip List are shown.
• Video essence Output#2 – Key source: must be of the same video format & length as the Fill
essence, and must be coded with a bit rate less than 50 Mbps (only essences that meet this
requirement will appear)
• Hold first duration – Select a number of frames to freeze on the first frame after Play is triggered
before beginning playback of the Clip
• Fade-in duration – Select the number of frames to fade up from black when play is initiated
• Hold last duration – Select a number of frames to freeze on the last frame of the clip after the last
frame has been played, as part of the clip playback.
• Fade-out duration – Select the number of frames to fade down to black at the end of the clip
• Play count – select the number of times the clip is to be repeated before the end behavior is activated.
0 means continuous play
• V joint – select the number of frames for a fade down to black and fade up from black between plays,
when a clip is repeated more than once. This is not the same as Fade-in and Fade-out, which occur at
the start of the first playback and the end of the last playback. 0 means no V joint.
• Audio essence – Use the pulldown to select the audio essence to be used in this clip
• Audio end behavior – Choose what happens when the audio essence is not the same duration as the
video essence:
Audio follows Video
Video holds until Audio ends
Click on the Advanced>> button above the Clip Details section to expand the window to display editing
controls that allow the clip details to be refined.
52 | HMP-1801
Page 57

GUIDE TO INSTALLATION AND OPERATION
IN point
OUT point
Pointer location
Start of essence
End of essence
Figure 4.13 Editing Clip List window - advanced view
The window shows a thumbnail of the video essence, plus an icon representing the AFD code associated
with it, and an icon indicating that there is an associated audio essence, if applicable.
Below the window are controls allowing the in and out points of the video playback to be changed, useful for:
• Setting in or out points based on video content
• Establishing a desired duration for the item
The graphic between the thumbnail window and the control buttons shows the video essence timeline,
expressed in H:M:S below (seconds to the nearest thousandth), and H:M:S:F above, with the total frame
count shown in brackets. A blue pointer can be moved along the timeline.
The H:M:S:F timeline shows the in and out points, plus the current position of the pointer. The graphic shows
the playout portion of the video essence (i.e. the portion between the in and out points) in green.
Figure 4.14 Video essence timeline display
HMP-1801 | 53
Page 58

GUIDE TO INSTALLATION AND OPERATION
When a clip is first created, the IN and OUT for playback of the video essence correspond to the first and last
frames of the essence as saved in the HMP-1801 memory.
This panel allows the user to move those points in order to optimize the presentation of the video.
Figure 4.15 Video essence In and Out point selection controls
The process is straight-forward:
Move the POINTER to the desired IN point:
• Use the Go IN and Go OUT buttons to move directly to the current IN and OUT points
• Click-and-drag to use the mouse to move the pointer
• Use the [-5, -1, +1, +5] buttons to move the pointer in 1 or 5 frame increments in the desired direction
View the video to base the IN or OUT point selection on scene content.
• The video corresponding to the pointer position is visible at the output when in this mode, allowing the
in and out points to be selected to frame accuracy based on scene content
When the desired point has been found:
• Click Set IN to set the current pointer location as the IN point
• Click Set OUT to set the current pointer location as the OUT point
Confirm the choices you have made in one of two ways:
• Click TRIM to save the IN and OUT points, but leave the essence itself untouched
You can go back and revise the IN and OUT points later
• Click CUT to crop the essence to match the IN and OUT points
The video that came before the new IN and after the new OUT is removed from the essence, so
you cannot go back later and move the IN earlier or the OUT later
Delete: remove the selected Clip List from the list and delete it from the HMP-1801’s memory.
Import: Import a Clip List into the HMP-1801 via the rear-panel ethernet port.
• Click this button to open the Import Clip List window
• Click the Browse button to open a dialog on your local computer where you can browse for Clip Lists
(.mhc files), select one or more and then click “Open” to return to the Import Clip List window.
Export: export a Clip List to a computer via the rear-panel ethernet port.
• Click the Export button
A Select save directory window opens showing a tree of the files on the connected computer
• Navigate to the folder in which the Clip List is to be saved, and click on it to select it
You may select Make New Folder
• Click Open at the bottom of the window
The file will begin to download to the selected folder
54 | HMP-1801
Page 59

GUIDE TO INSTALLATION AND OPERATION
• The Jobs window will open
The progress of the current export will be tracked
• The Clip List will be saved as an .mhc file
4.1.4 Jobs
The Jobs window shows the current status of all record, import and export tasks currently being performed
by this HMP-1801.
Figure 4.16 Ingest and Configuration Utility - Jobs window
Each job initiated on this HMP-1801 appears in this window
• This window opens automatically when a job is initiated
Multiple tasks are queued, and are executed one at a time in the order received.
• The card must be in an appropriate mode for the task to proceed, e.g. it must be in Stop before it can
receive data
• Tasks will pause until the conditions for their execution are met before proceeding
Each job is described under four headings:
• Task – a description of the job, e.g. type (import, export…), and source or destination
• Status – what is happening now, e.g. an import will first Encode, and then Transfer, then Done
• Progress – an estimate of the percentage of the job that has been completed
HMP-1801 | 55
Page 60

GUIDE TO INSTALLATION AND OPERATION
• Time left – an estimate of how much longer this job will take to complete
To remove a task from the queue, click on it to select it, and then click the Delete Task button
Tasks remain visible in the Jobs window after completion
• Use the Clear Done Tasks button to remove all completed tasks from the list
Note that you can initiate an import from this window by clicking the Import button
4.1.5 Refresh All
The Refresh All button forces a file synchronization with the HMP-1801 card. In normal use, the list should
always be up to date and a refresh would not make any difference. However, when many Web applications
are started at the same time or if the card is used with the Vertigo XMS software, a refresh might be needed
in order to get to files transferred by the other applications.
4.2 Firmware Upgrade
4.2.1 Using the Miranda Interface Updater (MIU)
o Enter the Densite frame’s IP Address
o Select the Upgrade file (.tar.gz)
o Check the cards to update
o Press “UPGRADE”
o Wait until the upgrade is completed
Note: Make sure to put the Densité Controller in
Standby mode in iControl before proceeding with
a card update.
56 | HMP-1801
Figure 4.17 Miranda Interface Updater
Page 61

GUIDE TO INSTALLATION AND OPERATION
4.2.2 Using the HMP-1801 webpage
Step 1: Type the IP Address of the card in a web browser to get the HMP-1801 web page
Step 2: Jump to the Updater webpage by clicking on the “Start HMP Updater….” button.
Step 3: Select upgrade package
HMP-1801 | 57
Page 62

GUIDE TO INSTALLATION AND OPERATION
Step 4: Wait until the upgrade is completed
Step 5: Click on the “
58 | HMP-1801
reboot the HMP-1801” link to apply the changes.
Page 63

GUIDE TO INSTALLATION AND OPERATION
5 Specifications
REFERENCE INPUT
SMPTE 170M/ ITU 624-4/BUT 470-6 or Comp. Sync
SMPTE 274M / SMPTE 296M Tri-Level Sync
INPUTS
SIGNAL (1) SMPTE-259M-C (270Mbps) and
SMPTE-292M (1.485, 1.485/1.001 Gbps)
SUPPORTED FORMATS SD: 480i59.94, 576i50
HD: SMPTE-274M: 1080i59.94, 1080i50
HD: SMPTE-296M: 720p59.94, 720p50
EMBEDDED AUDIO (8 CH) SMPTE 299M / 277M
RETURN LOSS >15 dB, up to 1.5GHz
OUTPUTS
SERIAL DIGITAL OUTPUT
SIGNAL (2) SMPTE-259M-C (270Mbps) and
SMPTE-292M (1.485, 1.485/1.001 Gbps)
(teletext is not supported)
SUPPORTED FORMATS SD: 480i59.94, 576i50
HD: SMPTE-274M: 1080i59.94, 1080i50
HD: SMPTE-296M: 720p59.94, 720p50
EMBEDDED AUDIO (8 CH) SMPTE 299M / 277M
RETURN LOSS >15 dB, up to 1.5GHz
JITTER < 0.2 UI in both SD and HD
STORAGE
On-board Flash memory Offered in 4GB, 8GB and 16GB versions
OTHER
MAXIMUM POWER 10 Watts Max
PHYSICAL FORMAT Densité, Densité-2, Densité-3
HMP-1801 | 59
Page 64

GUIDE TO INSTALLATION AND OPERATION
ANNEX 1 – HMP-1801 User Interface (local menu structure)
The contents of the menu depend on the card operating mode – PLAYBACK or RECORD. Both versions are
shown below.
A) HMP-1801 in PLAYBACK mode
STATUS CLIP STATUS (CUED, PLAYING, STOPPED, PAUSED)
REF 525 / REF 625 / REF 1080i59.94 / REF 1080i50 / REF 720p59.94 / REF 720p50 /
URS 525 / URS 625 / INTERNAL REF
REF MISMATCH
NO REAR / SINGLE REAR 3RU/ DOUBLE REAR 3U
OUT:525/625/720p50/720p59.94/1080i50/1080i59.94
ETH : 100BASETX-FD/100BASETX-HD/10BASET-FD/10BASET-HD
HARDWARE FAILURE
REFERENCE SOURCE [AUTO, EXTERNAL, URS, INTERNAL]
URS FORMAT [OFF, 29.97 Hz, 25 Hz]
CARD CONFIG DEFAULT CLIP [DEFAULT, Clip 1, Clip 2, etc]
TIMING VERTICAL X lines
HORIZONTAL X.XXX us
AUDIO SOURCE OUT CHANNEL X CHANNEL X
AUDIO CONFIG GROUP X AUDIO EMBED [ON, OFF]
OUTPUT #2 CONFIG KEY SOURCE [AUTO, COPY OF OUT #1]
KEY OFFSET
VERTICAL X lines
HORIZONTAL X.XXX us
METADATA AFD
INSERTION [ON, OFF]
LINE INSERT XX
Note: Timing adjustment will have an impact on the current output format
CLIP PLAYBACK CUE CLIP [DEFAULT, Clip 1, Clip 2, etc]
PLAY CLIP
PAUSE CLIP
STOP CLIP
GPI I/O CONFIG GPI I/O #1 CUE [DEFAULT, Clip 1, Clip 2, etc]
PLAY
STOP
PAUSE
GPI I/O #2
GPI I/O #3
(same as for GPI I/O #1)
60 | HMP-1801
Page 65

GPI I/O #4
GPI I/O #5
GPI I/O #6
ETHERNET
CONFIG
CONFIG ALARM NO REF
VERSION HMP-1801: X.X.X BUILD XXXX (RO)
OPTIONS AUDIO
FACTORY
DEFAULT
[IP ADDRESS] [XXX.XXX.XXX.XXX]
[NETMASK ADDRESS] [XXX.XXX.XXX.XXX]
[GATEWAY ADDRESS] [XXX.XXX.XXX.XXX]
[MAC ADDRESS] [AA:BB:CC:DD:EE:FF] (RO)
[HOSTNAME] (RO)
[SPEED/DUPLEX]
[RESET TO DEFAULT] [RESET]
REF MISMATCH
FILL & KEY
[RESTORE]
[AUTONEGOTIATE, 10BASET-FD, 10BASET-HD,
100BASET-FD, 100BASET-HD]
ALARM LEVEL
ALARM REPORT [NONE, GPI]
ALARM LEVEL
ALARM REPORT [NONE, GPI]
B) HMP-1801 in RECORD mode
STATUS CLIP STATUS (RECORDING, STOPPED)
CARD MODE (PLAY, RECORD)
NO REAR / SINGLE REAR / DOUBLE REAR 3U
INPUT:525/625/720@50p/720@59.94p/1080@50i/1080@59.94i/NO INPUT
ETH STATUS (100BASETX-FD/100BASETX-HD/10BASET-FD/10BASET-HD)
HARDWARE FAILURE
FIRMWARE FAILURE
AUDIO (AUDIO DETECTED, NO AUDIO)
AFD (NO AFD, AFD DETECTED)
DOLBY METADATA (DOLBY MET DETECT, NO DOLBY MET)
TIME CODE (NO TC, TC DETECTED)
CLOSED CAPTION (NO CC, CC608 DETECTED, CC708 DETECTED)
NAME DROPPER (NO NAME DROPPER, NAME DROP DETECT)
GUIDE TO INSTALLATION AND OPERATION
[GREEN, YELLOW, RED
RED]
[GREEN, YELLOW, RED
RED]
, FLASH
, FLASH
HMP-1801 | 61
Page 66

GUIDE TO INSTALLATION AND OPERATION
[PLAY
CARD MODE
CARD CONFIG RECORD
RECORDING [START RECORDING, STOP RECORDING]
GPI I/O CONFIG IN #1
ETHERNET
CONFIG
, RECORD]
RECORD BIT
OPTIONS
LOW MEM
THRESH.
IN #2
IN #3
IN #4
IN #5
IN #6
IP ADDRESS [XXX.XXX.XXX.XXX]
NETMASK ADDRESS [XXX.XXX.XXX.XXX]
GATEWAY ADDRESS [XXX.XXX.XXX.XXX]
MAC ADDRESS [AA:BB:CC:DD:EE:FF] (RO)
HOSTNAME
SPEED/DUPLEX
[RESET TO DEFAULT]
RATE
AUDIO CAPTURE
AFD CAPTURE
TIMECODE CAPTURE
CLOSED
CAPTION
DOLBY
METADATA
NAME
DROPPER
[0 … 25
… 100] %
SD
HD
CHANNEL
EXTRACT
CAPTURE
CAPTURE
INPUT
SELECT
CAPTURE
[OFF
, RECORD, STOP]
, RECORD, STOP]
[OFF
[OFF
, RECORD, STOP]
, RECORD, STOP]
[OFF
, RECORD, STOP]
[OFF
[OFF
, RECORD, STOP]
[AUTONEGOTIATE, 10BASET-FD, 10BASET-HD,
100BASET-FD, 100BASET-HD]
[1…25
…100] Mbit/s
[1…100
[ENABLE
CHANNEL 1
CHANNEL 2
CHANNEL 3
CHANNEL 4
CHANNEL 5
CHANNEL 6
CHANNEL 7
CHANNEL 8
[ENABLE
[ENABLE
[ENABLE
[ENABLE
[1
[ENABLE
] Mbit/s
, DISABLE]
, DISABLE]
, DISABLE]
, DISABLE]
, DISABLE]
…9]
, DISABLE]
[OFF, 1
[OFF, 1, 2
[OFF, 1…3
[OFF, 1…4
[OFF, 1... 5
[OFF, 1…6
[OFF, 1…7
[OFF, 1…8
…16]
…16]
…16]
…16]
…16]
…16]
…16]
…16]
62 | HMP-1801
Page 67

NO INPUT
MEMORY LOW
CONFIG ALARMS
OUT OF MEMORY
VERSION HMP-1801: XXX (RO)
OPTIONS
FACTORY
DEFAULTS
[RESTORE]
GUIDE TO INSTALLATION AND OPERATION
ALARM LEVEL
ALARM REPORT
ALARM LEVEL
ALARM REPORT
ALARM LEVEL
ALARM REPORT
[GREEN, YELLOW, RED
RED]
, GPI]
[NONE
[GREEN, YELLOW
RED]
[NONE
, GPI]
[GREEN, YELLOW, RED
RED]
, GPI]
[NONE
, RED, FLASH
, FLASH
, FLASH
HMP-1801 | 63
Page 68

GUIDE TO INSTALLATION AND OPERATION
ANNEX 2 – VDCP Commands Supported by HMP-1801
In the tables below:
Supported – Full............... means the command is implemented and respects the VDCP protocol.
Supported – Partial .......... means the command will be answered by the appropriate response but the
parameters in the answer may not represent reality. Specific details are given in
the tables for each case.
Supported – Not ............... means the command will be acked and the Not Supported bit of the Port Status
Request command will be set.
System Commands
Command Name
Full Partial Not
Local Disable X
Local Enable X
Delete From Archive X
Delete Protect ID X
UnDelete Protect ID X
Immediate Commands
Command Name
Stop X
Play X
Record X
Freeze X
Still X
Step X
Continue
Jog X
Veri. Play X
Unfreeze X
EE Mode X
Full Partial Not
X
Supported
Supported
2
Comments
Comments
2
Continue command is interpreted the
same way as the play command, so
either the play command or the
continue command can be used to
exit the still state.
64 | HMP-1801
Page 69

GUIDE TO INSTALLATION AND OPERATION
Preset / Select Commands
Command Name
Rename ID X
Preset Std. Time X
New Copy X
Sort Mode X
Close Port X
Select Port X
Record Init X
Play Cue X
Cue with Data
Delete ID
Get From Archive X
Clear X
Send To Archive X
% to signal full X
Record Init with Data X
Select Logical Drive X
System Delete ID X
Preset X
Vid. Compr. Rate X
Aud. Sample Rate X
Aud. Comp. Rate X
Audio IN Level X
Audio OUT Level X
Vid. Compr. Param. X
Select Output X
Select Input X
Record Mode X
SC Adjust X
H. Pos. Adjust X
Disk Preroll X
Copy To File X
Delete File From X
Abort Copy File To X
Supported
Full Partial Not
X
X
2
3
Comments
2
The command can be used to cue a
clip but the start position and the
duration parameters are ignored.
3
The command is acked but no ID is
deleted by the HMP-1801.
HMP-1801 | 65
Page 70

GUIDE TO INSTALLATION AND OPERATION
Sense Requests
Command Name
Supported
Full Partial Not
Comments
Open Port X
Next X
Last X
Port Status Request
1
Status 1: contains valid status
Status 2: Only IDs Added and IDs
Deleted bits are used
X1
Status 3: only Not Supported errors are
flagged for the moment
Status 4: all 0
Status 5: all 0
Position Request
X X
2
2
Will always answer with the position to
zero (Type 2).
Active ID Request X
Device Type Request X
Syst. Status Request
X
3
3
The HMP-1801 always answers with all
parameters set to 0
ID List X
ID Size Request X
IDs Added to Arch. X
ID Request X
Compr. Settings Request X
IDs Added List X
IDs Deleted List X
Multi Port Status X
Deferred (Time Line) Commands
Deferred (Time Line) commands are not supported by the HMP-1801.
Macro Commands
Macro commands are not supported by the HMP-1801
66 | HMP-1801
 Loading...