

MIrai Ricoh Owner's Manual
Ricoh Mirai
HTML Translations - German - Italian - French - Spanish - Others
These links will not translate any PDF files
AKA Olympus AZ-4
This camera manual library is for reference and historical purposes, all rights reserved.
This page is copyright by
This page may not be sold or distributed without the expressed permission of the producer
On-line camera manual library
This is the full text and images from the manual. This may take 3 full minutes for all images to appear.
If they do not all appear. Try clicking the browser "refresh" or "reload button" or right click on the image, choose "view image" then go back. It should now appear.
To print, try printing only 3 or 4 pages at a time.
If you find this manual useful, how about a donation of $3 to: M. Butkus, 29 Lake Ave., High Bridge, NJ 08829
This will allow me to continue to buy new manuals and pay their shipping costs. It'll make you feel better,
won't it? If you use Pay Pal, use the link below. Use the above address for a check, M.O. or cash.
, M. Butkus, NJ.
Back to my main Chinon information page
From Nicholas Jones
Olympus AZ-4 I have found the Ricoh Mirai and the Olympus AZ-4 identical except for the following:
The AZ-4 has no remote control socket
The AZ-4 uses 2xCR123 batteries, not one lithium and not 4xAAA
The AZ-4 does not have bulb mode; the bulb mode button instead allowsdouble exposure

A few of the LCD symbols are different;
On the AZ-4 'AV' for centre weighted average mode is instead 'F.I.'for Fill In flash
A C is used instead of a symbol on the button for continuous shooting mode.
There is no AE lock button on the AZ-4
There is a button marked 'spot' on the AZ-4 where the fill in flash
button is on the Ricoh Mirai. I have yet to determine what it does. The shape of the camera body is different (top is
round as opposed to having a bump in the middle)
CONTENTS
I. PREPARING TO SHOOT ...7
1. Inserting Battery ...8
2. Turning the camera ON ...10
3. Monitoring Battery Condition ...11
4. Loading the Film ...13
5. Setting the Film Speed ...17
6. Viewfinder Indicators ...18
7. LCD Data Panel ...21
8. How to Hold Your Camera (Using the Multi-Position Grip) ...24
II. BASIC STEPS ...27
1. Turning the Camera ON for Fully Automatic Operation ...28
2. Zooming the Lens ...28
3. Auto focusing ...30
4. Shooting ...31
5. Rewinding the Film ...32

III. MAKING THE MOST OF YOUR CAMERA ...37
1. Auto focus Techniques ...38
2. Pre-Focus Shooting ...40
3. Manual (Power) Focus ...42
4. Macro Setting ...43
5. Continuous Shooting Mode ...46
6. Metering Modes ...49
7. Understanding Programmed AE ...53
8. Auto Program Shift ...53
9. Manual Program Shift ...54
10. AE Lock ...56
11. Exposure Compensation ...58
12. Bulb (long exposure) Photography ...61
13. Remote Control Socket ...64
14. Flash Photography ...65
15. Daylight Fill-In Flash ...67
16. Flash Photography with Speedlite SL-301M ...69

17. Using the Self-Timer ...71
18. Using the Self-Timer with Flash ...73
19. Reset Button ...74
IV. CARING FOR YOUR CAMERA ...75
V. HELP! (Troubleshooting Guide)...77
Vl. ACCESSORIES ...81
Vll. APPENDIX (Charts, Diagrams) ...85
Vlll. MAJOR SPECIFICATIONS ...91
1. INSERTING BATTERY
1. Remove the Battery Holder by turning the Battery Holder Screw counterclockwise with a coin.
(Fig. 1)
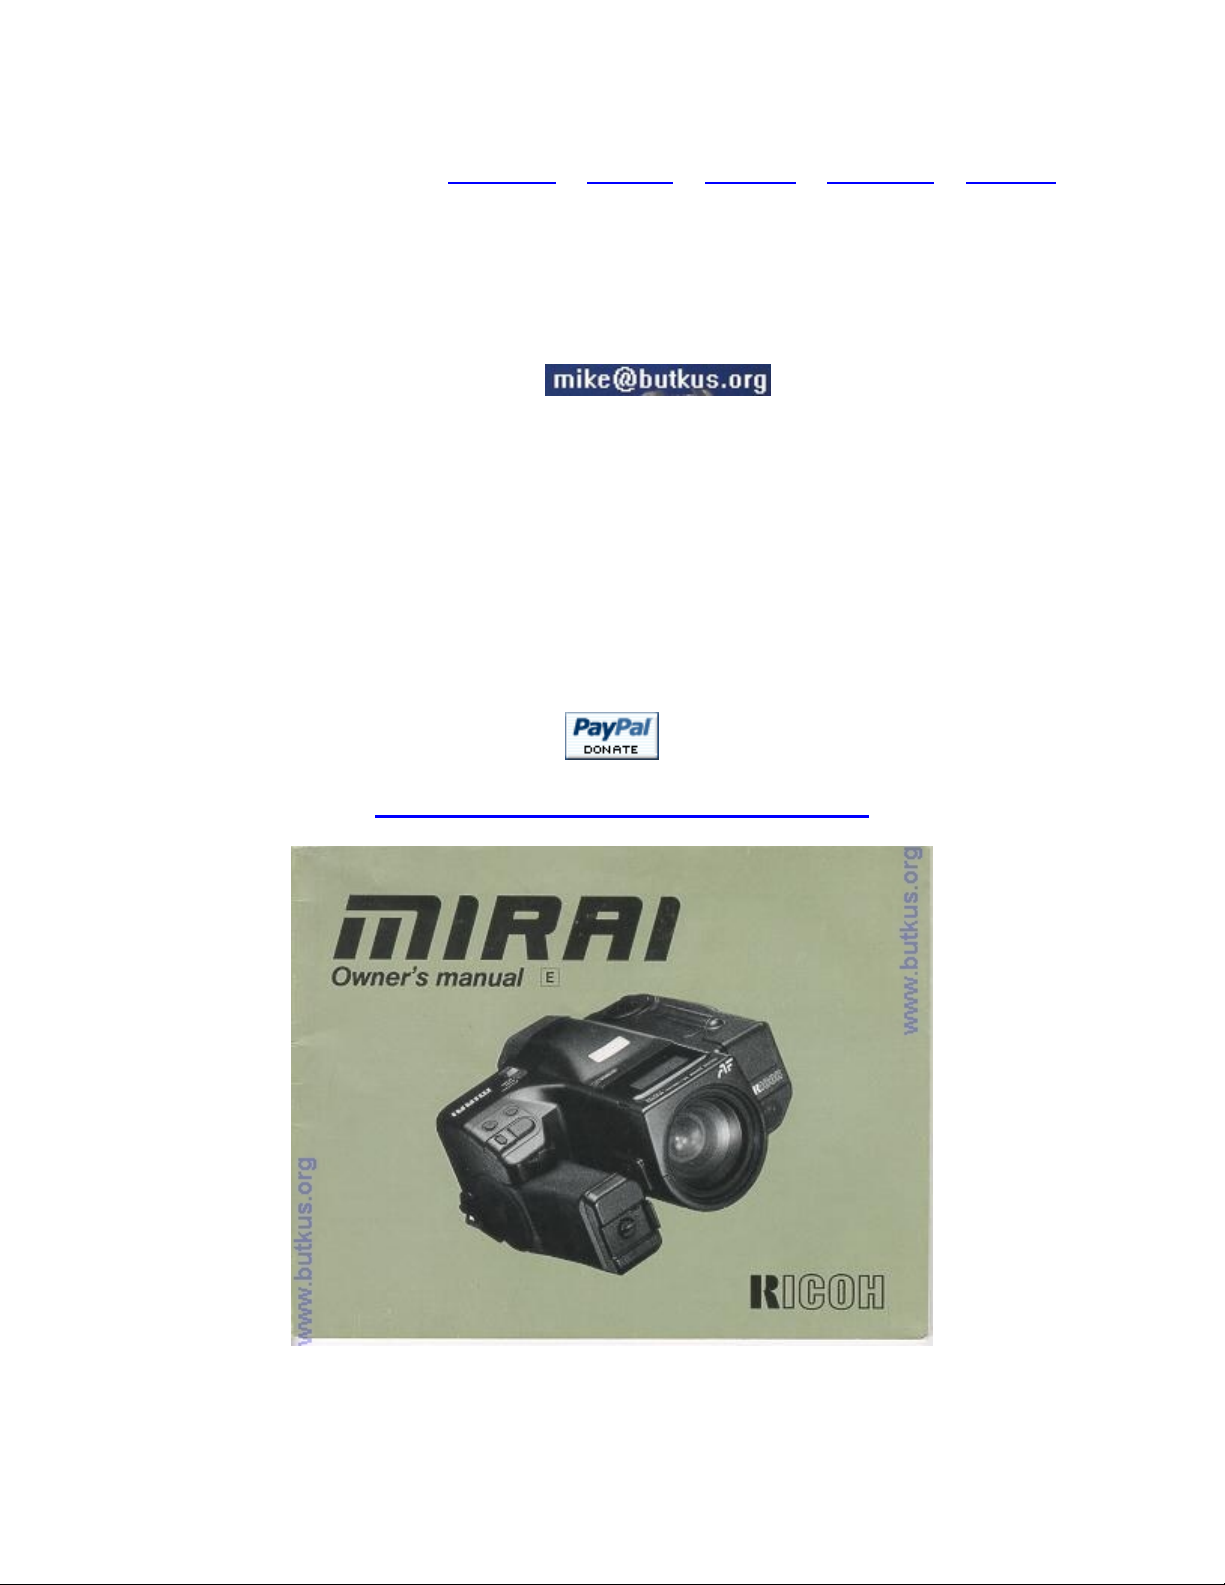
2. Insert fresh a lithium battery or four AAA size batteries into the Battery Holder, first
checking that the + and -on each battery are aligned according to the polarity diagram inside
the Battery Holder. (Fig. 2 A, 2.B)
4www.butkus.org
3. Resecure the Battery Holder to the Camera Grip by turning the Battery Holder Screw
clockwise with a coin. (Fig. 3)
Battery Choices:
* Lithium battery (CR-P2 or equivalent) is recommended. Four AAA (AM-4) alkaline batteries can
be used.
* Condition of battery (batteries) should be monitored frequently. See section "Monitoring
Battery Condition" on page 11 for details
Care of Battery:
1. Before installing, be sure to wipe all moisture and skin oil off both battery contact
surfaces in order to prevent future problems of corrosion and poor electrical contact.
* Dispose of used battery properly. Do not throw it into fire or expose to high temperature.
2. TURNING THE CAMERA ON
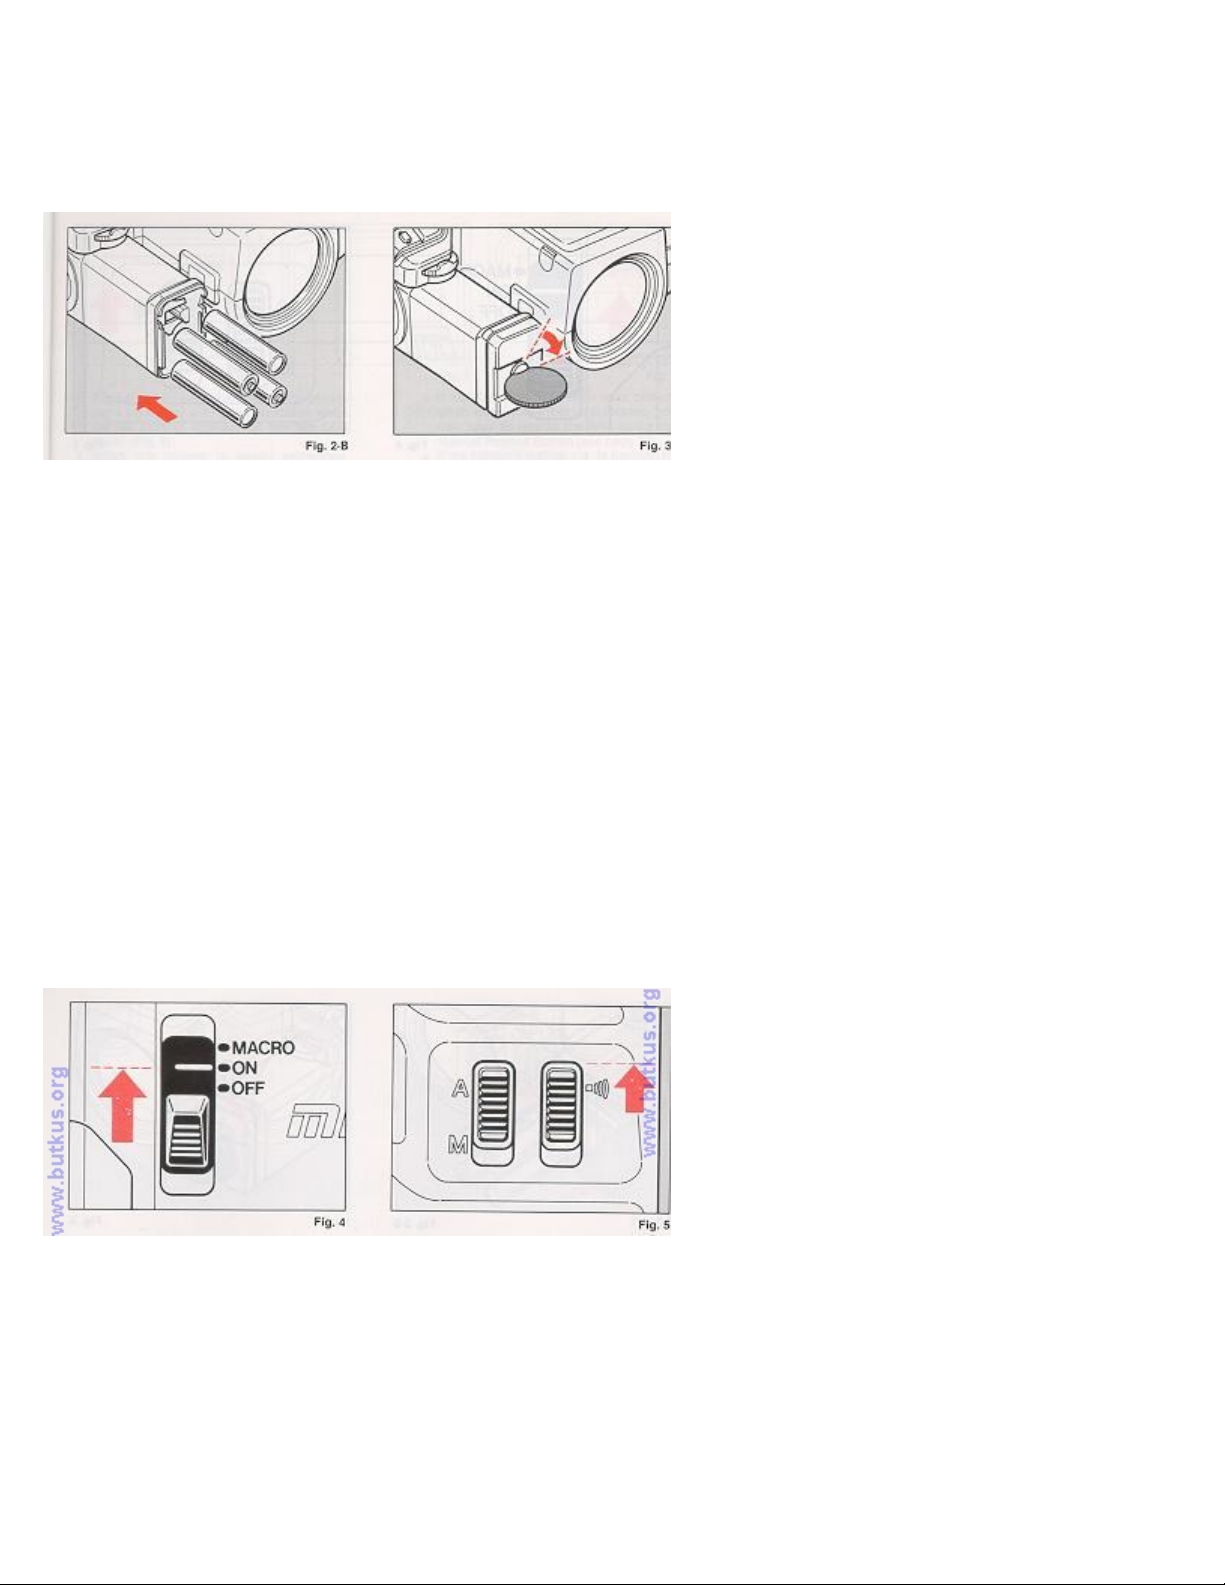
1. Slide the Main Operating Switch (Power On/Off and Macro) to ON. (Fig. 4)
* The camera is designed to shut off the main power supply automatically to save battery
energy when the camera is not in use for about 15 sec. even if the Main Operating Switch is
left ON. This will turn off the top LCD Panel and the Viewfinder but the information contained
in camera memory will be retained. Lightly press the Shutter Release Button to turn on the
power and update the LCD Panel. For maximum battery life, always turn the Main Operating
Switch to the OFF position when the camera is stored.
4www.butkus.org

* If you set the Sound Switch on the bottom of the camera (Fig. 5) to the sound mark A), beep
will be heard whenever proper auto focus is obtained, the self timer is used, etc. This
confirms that your selection has been made.
3. MONITORING BATTERY CONDITION
1. The battery (or set of batteries if you are using 4 AAA-size) is in good condition when the
sac symbol appears on the top LCD Panel. (Fig. 6)
2. When the battery is nearly exhausted, the symbol will be displayed on the top LCD
Panel. (Fig. 7)
When the symbol appears, it is recommended to replace the battery with a fresh one. If
there is film in your camera, finish the roll as soon as possible and then replace the old
battery with a fresh one. Fig. 8
* If non-DX-coded film is in your camera when the symbol is displayed, you may have to
rewind the film using the Manual Rewind Button (see page 33).
* If the battery's outline is flashing do not use the flash unit until the battery is
replaced. (Fig. 8)
3. When the battery is virtually dead the "empty battery" symbol will appear in the LCD Panel.
Replace with a fresh battery. (Fig. 9)4www.butkus.org
* If the "empty battery" symbol lights for about one minute, then disappears, the battery is
only capable of retaining camera memory. Do not attempt to use other camera functions, and do
not remove old battery until you are ready to replace it with fresh one. The memory of the
camera will be retained for about 30 minutes without battery. If you replace with new battery
within that 30 minutes, the display of all data in the camera memory will reappear in the LCD
Panel.
* Cold temperatures may reduce any battery's efficiency. In freezing weather, only the
symbol may show on the LCD Panel. If you are taking pictures in extremely cold weather, keep
the battery warm and insert it just before shooting.
4. LOADING THE FILM
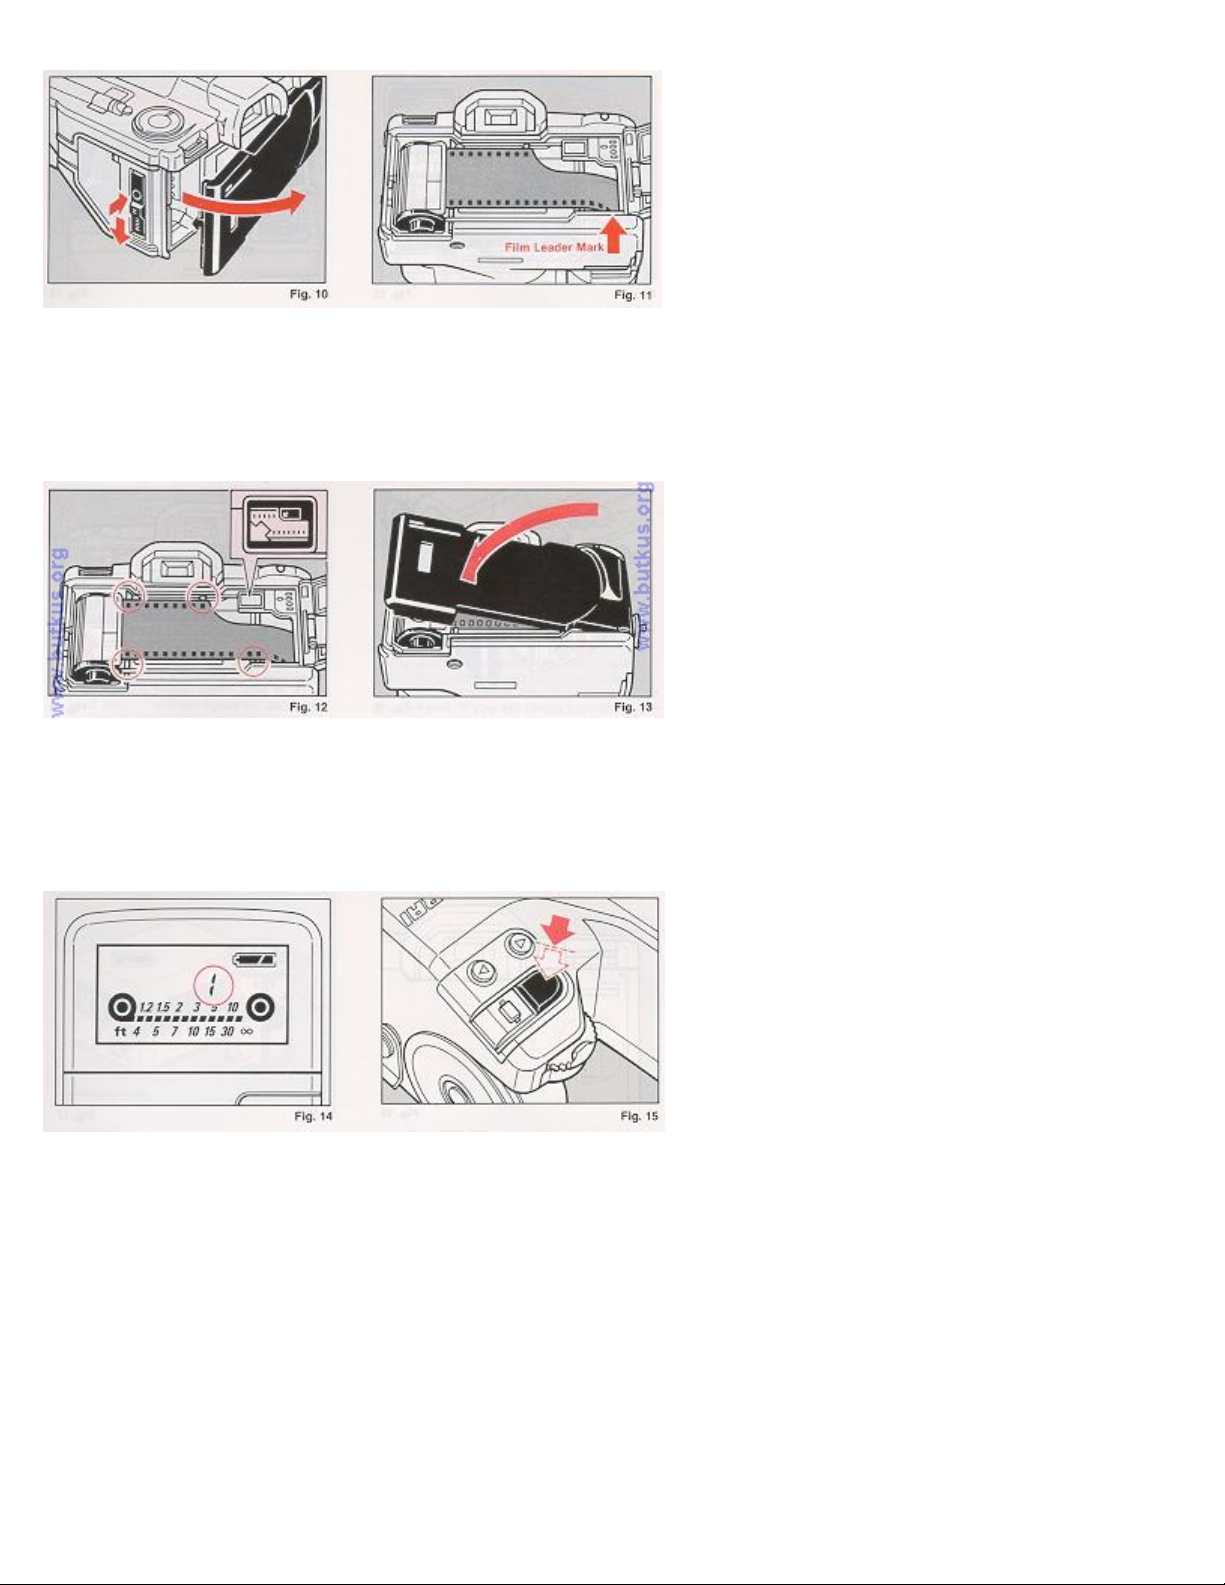
Always avoid direct sunlight when loading the film. 1. Depress the Back Cover Lock Release
Button and slide the Back Cover Latch down. (Fig. 10)
2. Load the Film Cassette into the Film Chamber and pull out enough film leader to extend just
beyond the film leader mark, against the Take-up Spool. (Fig. 11)
3. Make sure that the film is within the Film Guides, and that the upper sprocket edge will
pass under the Electronic Frame Counter Guide Plate. (Fig. 12)
4. Close the Back Cover, making sure that the Back Cover Latch snaps shut. (Fig. 13) The film
will now automatically advance until number "1" appears on the top-deck LCD Panel. (Fig. 14)
Then, the LCD Panel will show the information. (Fig. 14)
* If the display shuts off, lightly press the Shutter Release Button halfway to reactivate the
LCD. (Fig. 15)
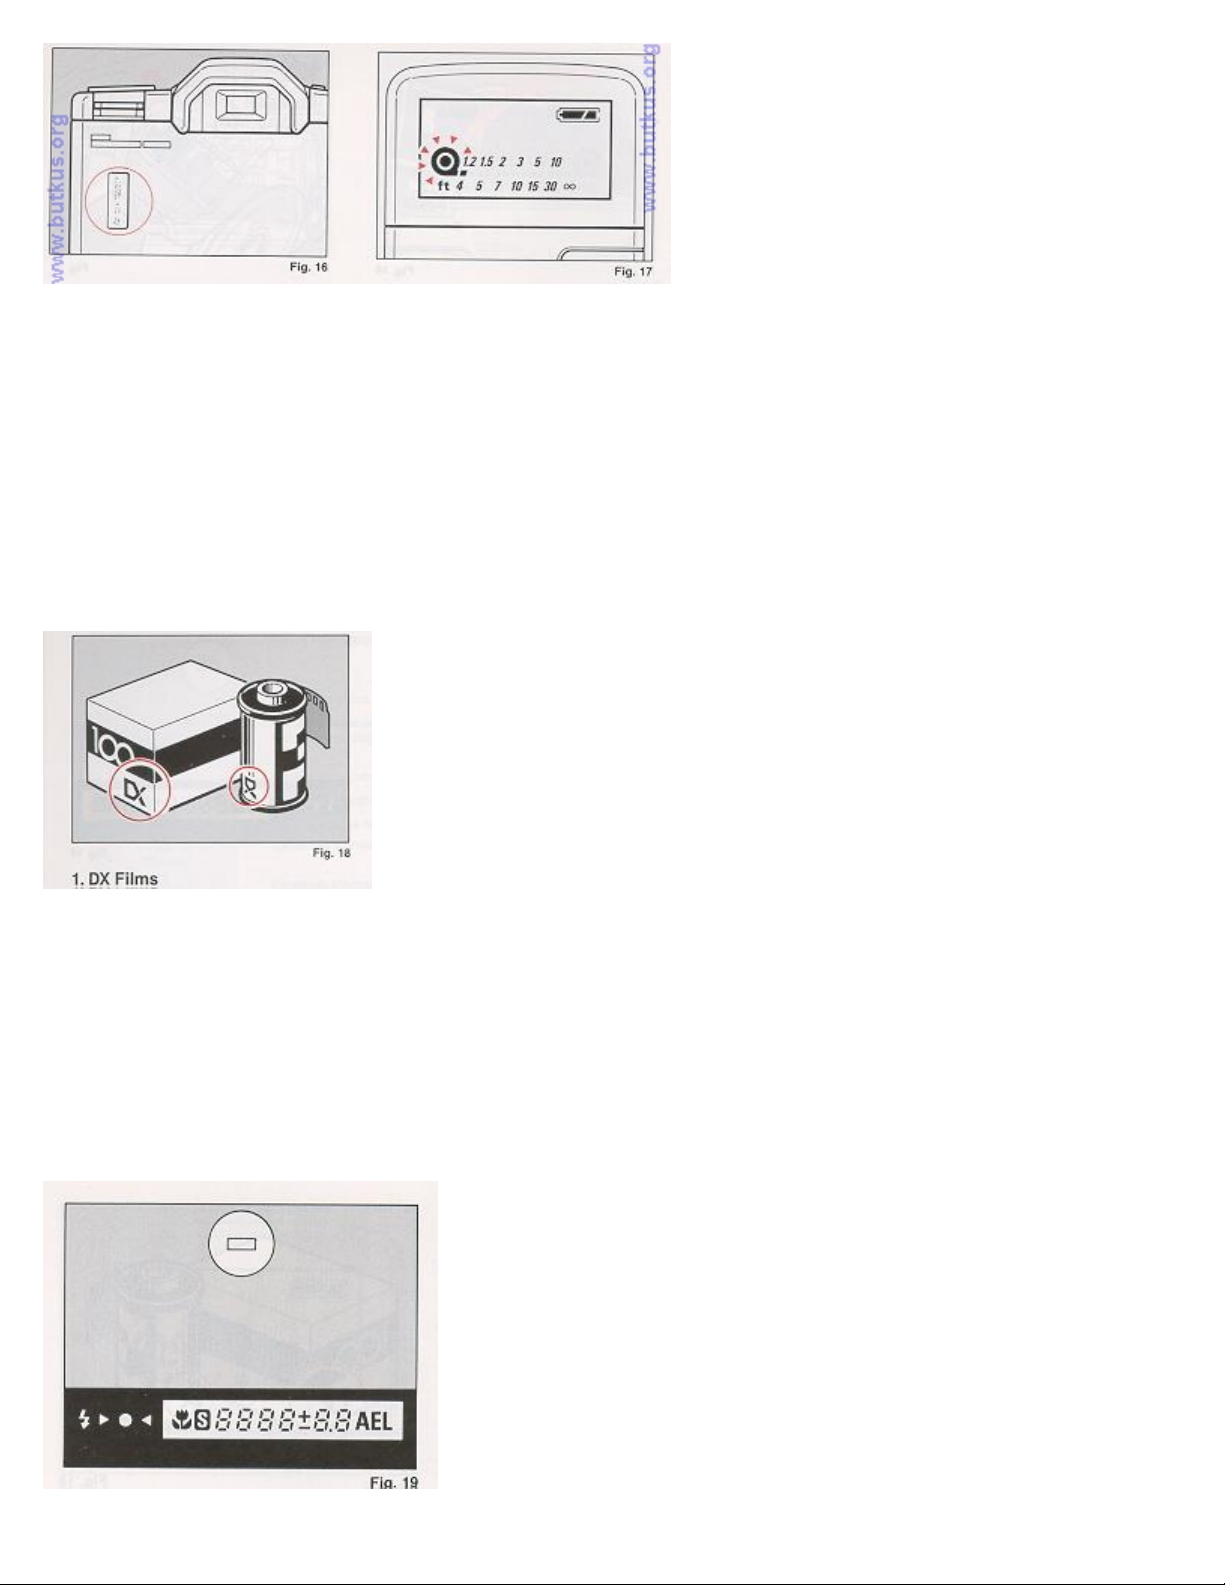
* The Film Loaded Window on the back of the camera can be used to check whether there is film
in the camera or not. (Fig. 16)
5. If the film has not advanced correctly or was not taken up onto the Film Take-up Spool, the
Film Cassette Loaded symbol on the LCD Panel will blink for about 15 sec. (Fig. 17 and the
shutter release will lock.
Reload the film correctly by repeating steps 1-4 shown above.
Note: If Non-DX film is loaded in your camera, no warning will appear on the LCD and the
shutter release does not lock.
4www.butkus.org
5. SETTING THE FILM SPEED
1. DX Films
DX-coded film cartridges are marked with black-and-silver patterns corresponding to the film
speed and other information. Your camera reads this pattern and automatically sets itself for
DX-coded film speeds ranging from ISO 25 to 5000. (Fig. 18)
2. Non DX Films
If Non-DX Film is used, your camera automatically sets itself to ISO 100. (Refer to the
exposure compensation (pages 58) when you make manual adjustments while loading Non-DX film in
your camera.)
6. VIEWFINDER INDICATORS
1. Auto Focus Frame
When activated, the Auto-Focus System focuses automatically on any subject that appears within
this small rectangle.
2. Viewfinder Display Panel
: Out of flash range (Shutter will still fire)
: Subject in focus
: Distance measurement cannot be made automatically; use manual
focusing (see page 42); or if too close, shift to macro mode (see
page 43).
: Manual focus shift direction indication (toward near)
: Manual focus shift direction indication (toward infinity)
: Macro Mode is set.
: Too-close warning: Switch to Macro Mode.
: Exposure Program Shift indicator
: Shutter Speed
: Overexposure warning
: Underexposure warning
: Hand Shaking warning with 35mm-70mm focal lengths blinks at
1/30 sec. or less.
: Hand Shaking warning with 70mm-135mm focal lengths blinks at
1/60 sec. or less.
: Exposure Compensation is set.
: F-stop4www.butkus.org

Overexposure warning (Actual f-stop number varies with focal
length.)
Underexposure warning (Actual f-stop number varies with focal
length.)
AE Lock is set.
* Viewfinder illumination
on automatically when the finder LCD is dark and difficult to see.
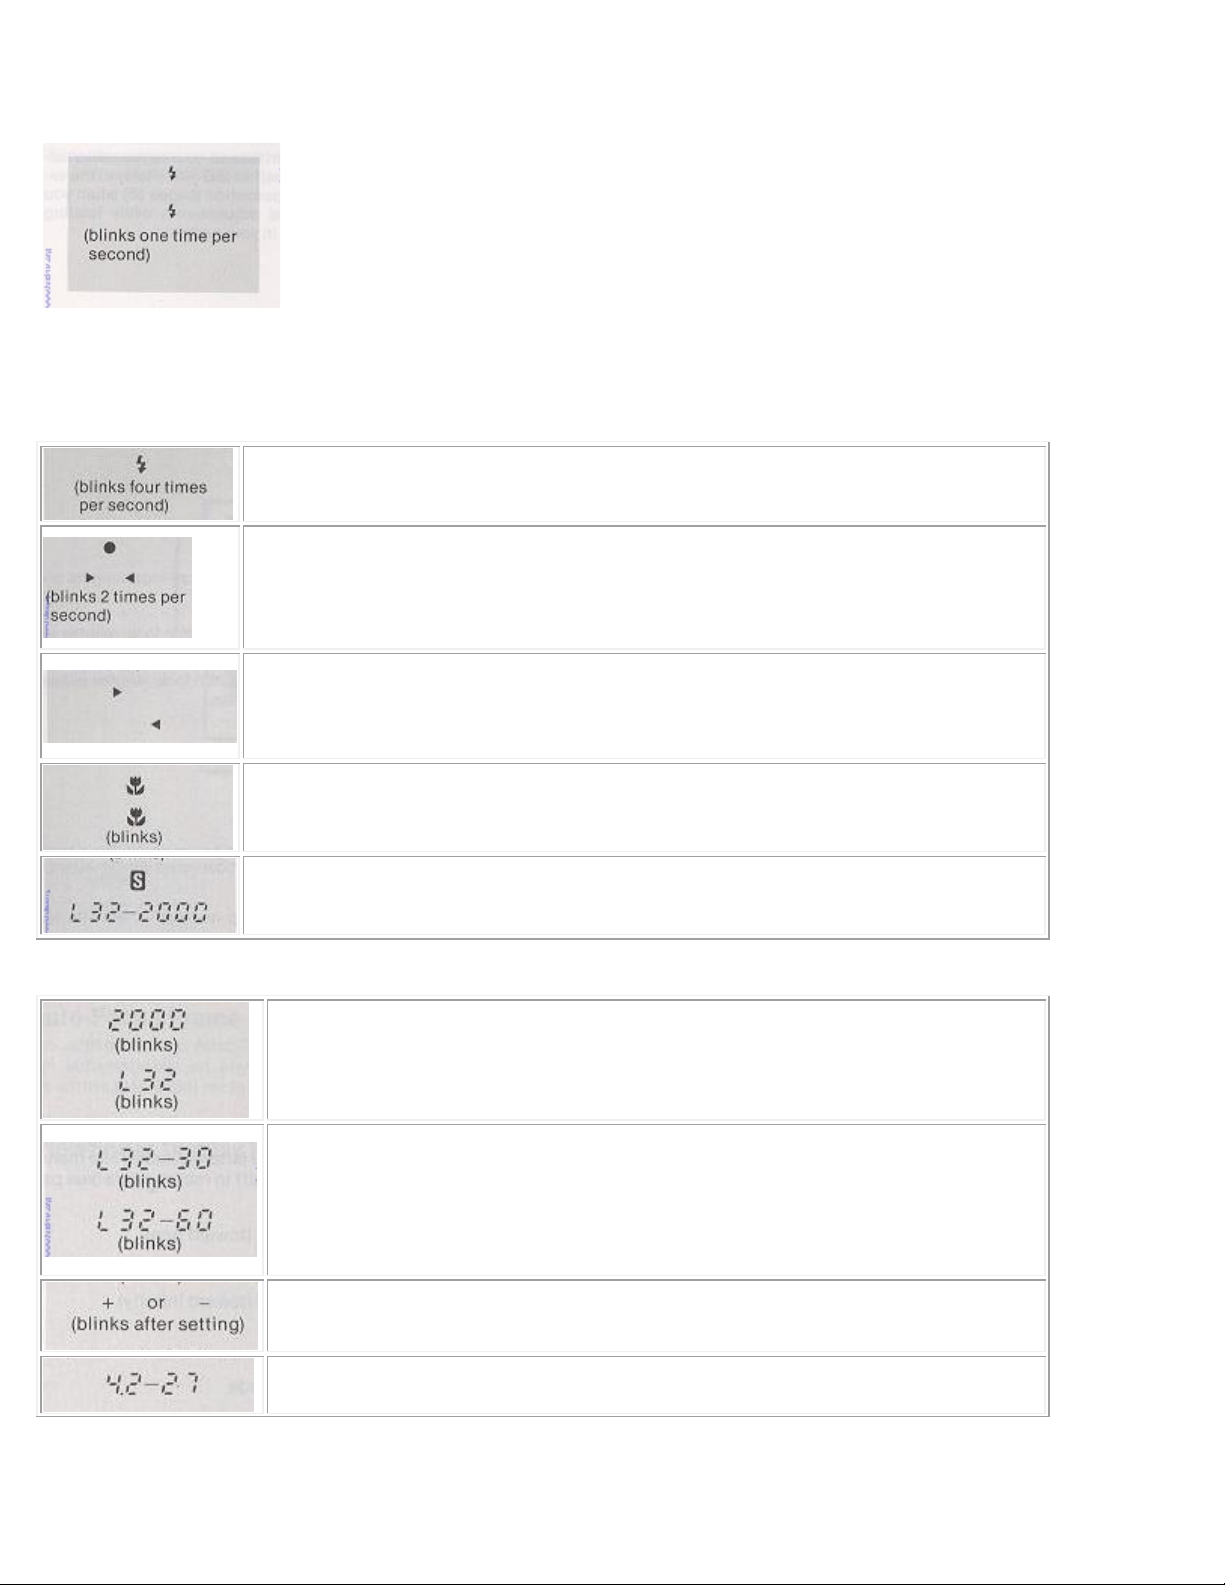
7. LCD DATA PANEL
: The battery is in good condition.
: The battery is nearly exhausted. If there
is film in your camera, finish the roll as
soon as possible and then replace the old
battery with a new one.
: The battery is not powerful enough to fire
the flash unit. Do not use the flash unit.
The battery is virtually dead. Replace with
new battery.
The film cassette is in your camera.
The film has not been taken up onto the Film
Take-up Spool. You must reload the film.
The film is loaded correctly in your camera,
you can make a shot.
The film will automatically advance until
next number "2" appears on the LCD Data
Panel. Proper film advancement is indicated
by the series of segments flashing in
sequence from left to right.
4www.butkus.org
When the end of the film has been reached,
the film will automatically rewind. The film
rewind is indicated by the series of
segments flashing in sequence from right to
left, while the counter is displaying a
countdown reading.
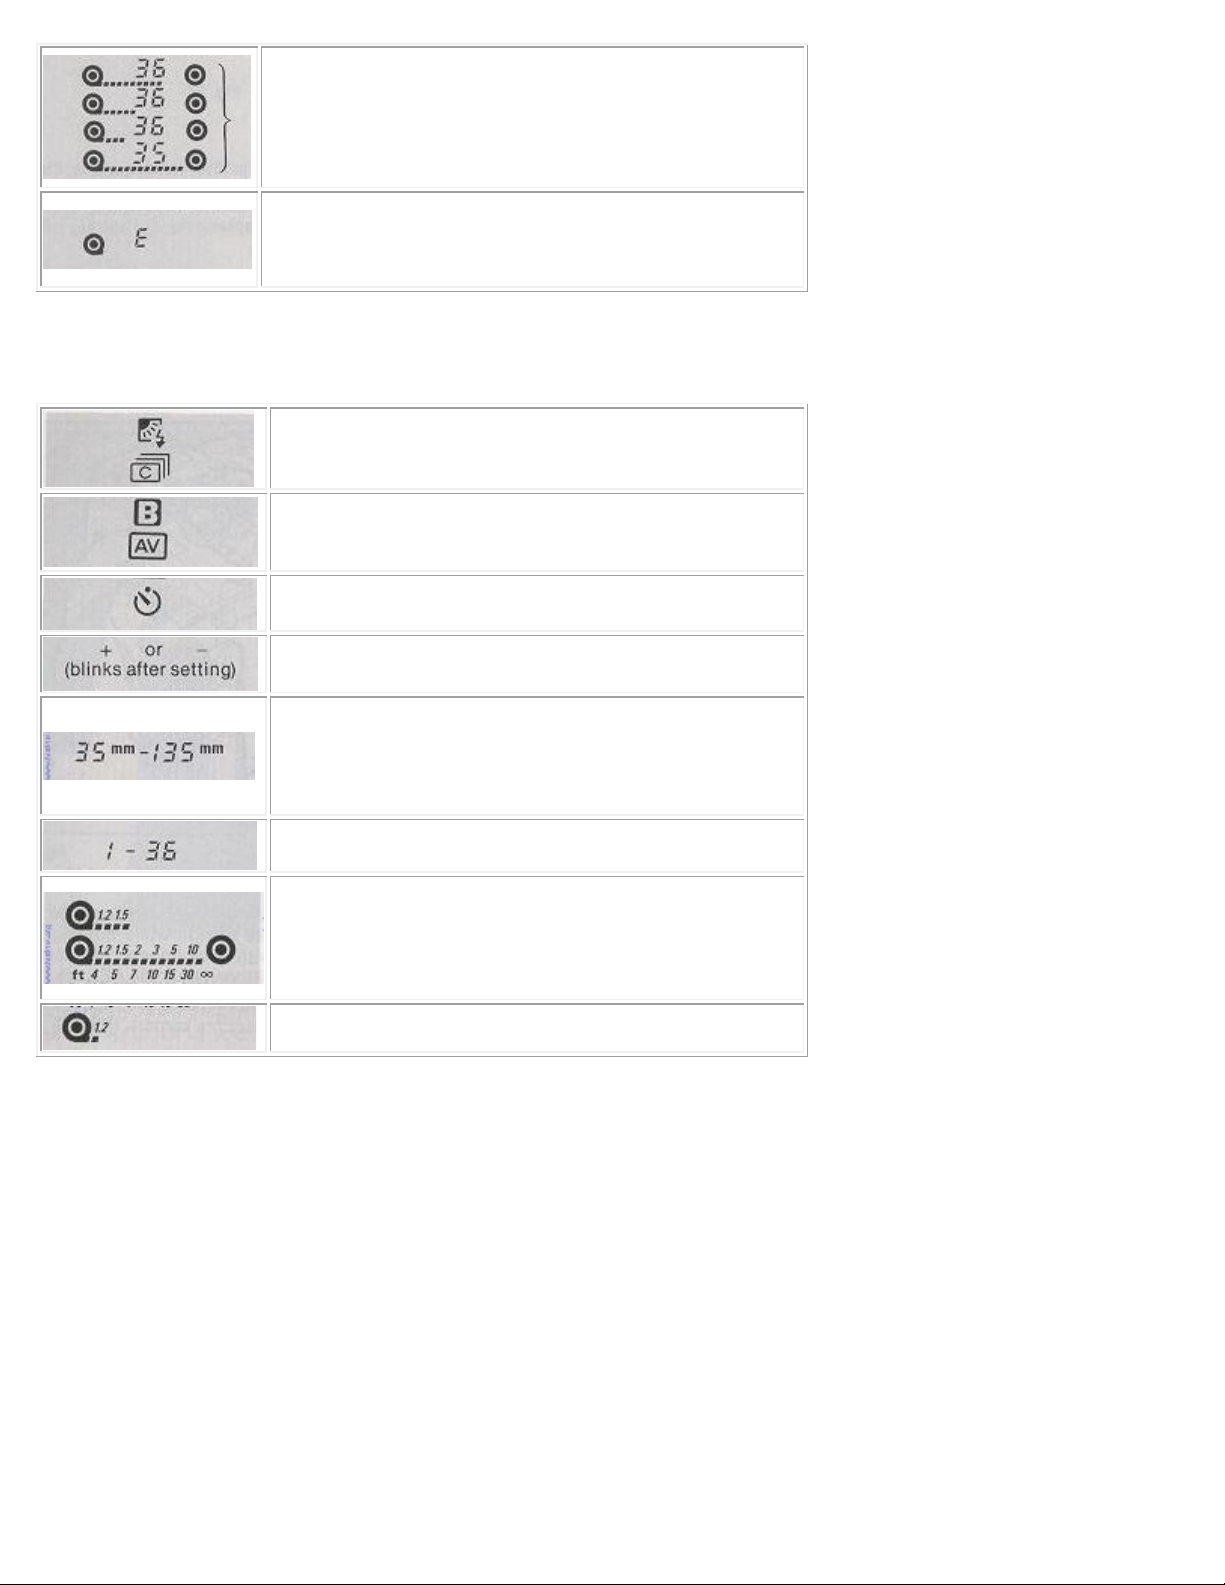
When the film is fully rewound, the motor
stops automatically and "E" appears in the
LCD Data Panel. You can now open the Back
Cover to unload the film.
: Fill-in Flash Photography Mode
: Continuous Shooting Mode
: Bulb Mode
: Center-weighted Average Mode
: Self-timer Mode
4www.butkus.org
: Exposure Compensation Mode
: The focal length (to the nearest 5mm
increment) is indicated on the LCD Data
Panel as you adjust ("zoom") the lens focal
length. It appears for about 2 seconds, then
displays the frame number.
: Number of exposures
: The distance of your subject is indicated:
1.5m (4.9ft)
: The distance of your subject is indicated:
Infinity (00)
: Macro Mode
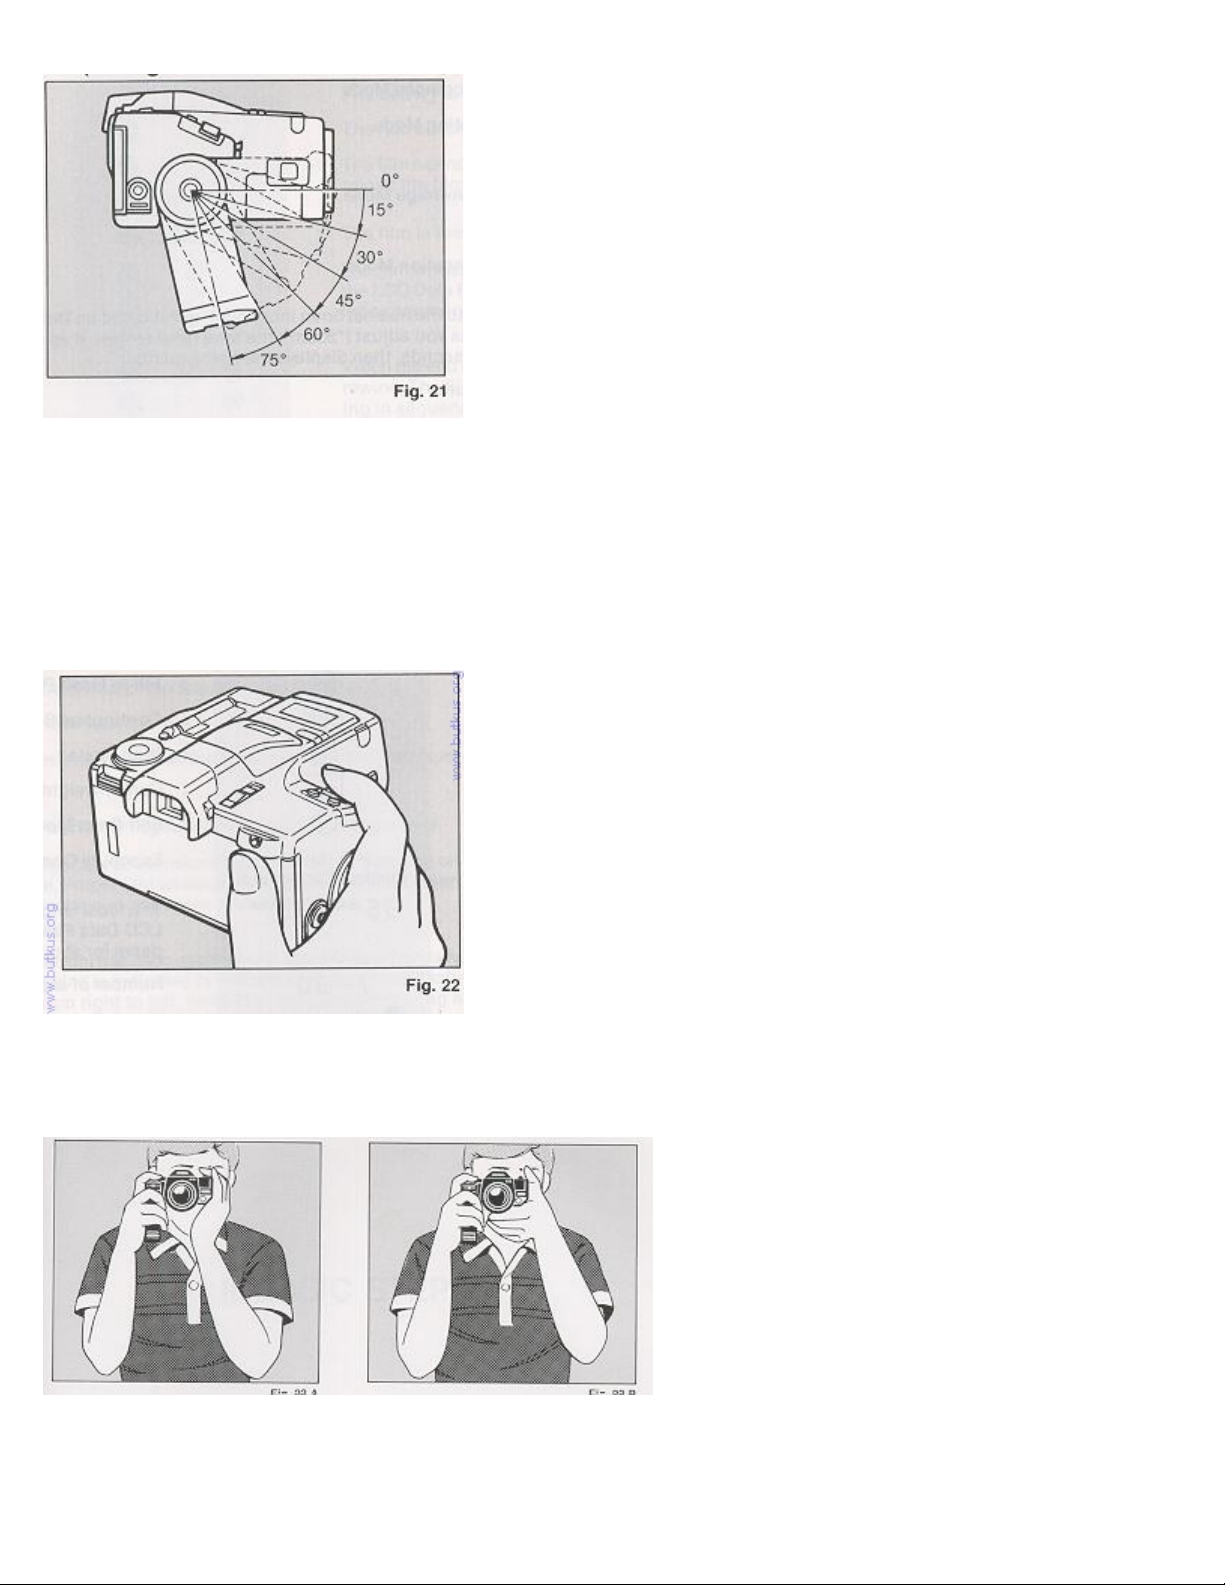
8. HOW TO HOLD YOUR CAMERA
The Mirai's convenient Multi-Position Grip allows you to maneuver the camera easily and
comfortably.
The Grip can be adjusted to O°, 15°, 30°, 45°,60° and 75° angles for maximum comfort when the
index finger is on the Shutter Release Button. To adjust the Grip, press the Grip Lock Release
Button while pushing the Grip down until it locks into the desired position. (Fig. 21)
1. Lightly put your right-hand forefinger on the Shutter Release Button while holding the
Camera Grip with other fingers. Your thumb should be positioned near the AE Lock Button on the
back of the camera. (Fig. 22)
4www.butkus.org
2. Make sure your right arm is comfortable, but keep it as close to your body possible for
maximum steadiness.
3. Use your left hand to steady the camera. (Fig. 23.A, 23.B)
 Loading...