

MIRAI DTL-319S100 User Manual [fr]

EN
DE
FR
NL
ES
experience the future
1
9
DTL-319S100

2
3
EN
Contents
Contents ...........................................................................................................................
Page 2
FCC and safety information ...........................................................................................
Page 3
Important safety instruction ...........................................................................................
Page 4
Precautions ......................................................................................................................
Page 5
Getting started .................................................................................................................
Page 6
-Adjusting the view angle of LCD TV .................................................................................................... Page 6
-Installing the LCD TV on the wall ......................................................................................................... Page 6
-Top panel ............................................................................................................................................. Page 7
-Front panel ........................................................................................................................................... Page 7
-Rare panel ............................................................................................................................................ Page 8
Connections .....................................................................................................................
Page 9
-Connecting to aerial ............................................................................................................................. Page 9
-Connecting to STB/ DVD Recorder/ Satellite Receiver ........................................................................ Page 9
-Connecting to external audio/video devices ......................................................................................... Page 10
-Connect to personal computer ............................................................................................................. Page 11
Remote Control ...............................................................................................................
Page 12
-Remote control functions ..................................................................................................................... Page 12
-Insert batteries to remote control ......................................................................................................... Page 13
-Remote control operation range .......................................................................................................... Page 13
Initial settings ..................................................................................................................
Page 14
-Turning on the power ........................................................................................................................... Page 14
-Setting TV OSD language .................................................................................................................... Page 14
-Setting TV system ................................................................................................................................ Page 14
-Setting SOUND system ........................................................................................................................ Page 14
-Setting TV channels ............................................................................................................................. Page 14
Basic operation ...............................................................................................................
Page 15
-Changing to different TV channels ....................................................................................................... Page 15
-Sound volume ...................................................................................................................................... Page 15
-Sleep timer ........................................................................................................................................... Page 15
-TV type ................................................................................................................................................. Page 15
-Channel skip ........................................................................................................................................ Page 15
-Channel setup ...................................................................................................................................... Page 15
-Fine tune .............................................................................................................................................. Page 15
-Switching input signal ........................................................................................................................... Page 15
-Program settings .................................................................................................................................. Page 16
-Teletext operation ................................................................................................................................ Page 16
OSD operation .................................................................................................................
Page 17
-Picture menu (TV/AV mode) ................................................................................................................ Page 17
-Sound menu (TV/AV/PC mode) ........................................................................................................... Page 18
-Channel menu (TV mode) .................................................................................................................... Page 19
-Setup menu (TV/AV/PC mode) ............................................................................................................ Page 20
-OSD menu (TV/AV/PC mode) .............................................................................................................. Page 21
-PC menu (PC mode) ............................................................................................................................ Page 22
Troubleshooting ..............................................................................................................
Page 23
Specication.....................................................................................................................
Page 24
3
EN
CAUTION
Keep product out of direct sunlight. Exposure to direct sunlight or extreme heat may cause damage or
malfunction. To prevent re or shock hazard, do not expose to rain or moisture.
FCC and Safety information
FCC Notice:
This equipment has been tested and found to comply with the limits for a Class B digital device pursuant
to part 15 of the FCC Rules. These limits are designed to provide reasonable protection against harmful
interference in a residential installation. This equipment generates, uses and can radiate radio frequency
energy and, if not installed and used in accordance with the instructions, may cause harmful interference
to radio communications. However, there is no guarantee that interference will not occur in a particular
installation. If this equipment does cause harmful interference to radio or television reception, which
can be determined by turning the equipment off and on, the user is encouraged to try to correct the
interference by one or more of the following measures:
– Reorient or relocate the receiving aerial.
– Increase the separation between the equipment and receiver.
–
Connect the equipment into an outlet on a circuit different from that to which the receiver is connected.
– Consult the dealer or an experienced radio/TV technician for help.
The lightning with arrowhead symbol, within an equilateral triangle, is intended to alert the
user to the presence of uninsulated “dangerous voltage” within the product’s enclosure that may
be of sufcient magnitude to constitute a risk of electric shock to persons.
The exclamation point within an equilateral triangle is intended to alert the user to
the presence of important operating and maintenance (servicing) instructions in the
literature accompanying the appliance.
CAUTION
RISK OF ELECTRIC SHOCK
DO NOT OPEN
This symbol on the product or in the instructions means that your electrical and electronic equipment
should be disposed at the end of its life separately from your household waste. There are separate
collection systems for recycling in the EU.
For more information, please contact the local authority or your retailer where you purchased the
product.

4
5
EN
l Damage
Never use your TV if it is damaged in any way. Always place your TV on a at level surface avoiding anywhere which
may be subject to strong vibration.
l Weather
It is advisable to unplug the aerial during an electrical storm.
l Temperature
Avoid extremes of temperature, either hot or cold, place your TV well away from heat sources such as radiators or
gas/electric res.
l Naked Flames
Naked ames such as candles and night lights should not be placed on or near your TV.
l Ornaments
Vases and other water containers or lamps should not be put on top of your TV set.
l Moisture
Do not allow your TV to be exposed to rain, moisture, dust. If any liquid is spilt into your TV it can cause serious damage. If you spill any liquid into your TV switch it off at the mains immediately. Contact your store.
l Ventilation
The TV must be well ventilated. Do not cover your TV or place it inside a small conned space. Make sure that there
is a gap of at least 10cm on both sides and 20 cm at the top.
l Interference
Do not place your TV on or near appliances which may cause electromagnetic interference (TV or Hi-Fi speakers). If
you do, it may adversely affect the working of the unit, and cause a distorted picture or sound.
l Screen Burn
A characteristic of Plasma and LCD TV Panels is that displaying the same image for a long time may cause a
permanent after-image to remain on the screen. This is called screen burn. Most pictures shown on your TV will be
constantly moving and ll the screen.
Examples of images that you need to watch out for are as follows (this is not an all-inclusive list):
Black Bars: If black bars appear at the left/right or top/bottom of the screen it is recommended to change the
format so that the picture lls the entire screen.
TV Channel Logos: e.g. Shopping channel logos and pricing displays - especially if they are bright and
stationary. Moving or low-contrast graphics are less likely to cause ageing of the screen.
PIP and Multipip: Do not view for long periods of time using the PIP or Multipip functions.
Time Displays
Teletext: Do not view a stationary page for long periods of time.
TV/DVD Menus: e.g. Listings of DVD disk content.
Pause Mode: Do not leave the screen in pause mode for long periods of time, e.g. When watching DVDs or
videos.
Note: To prevent screen burn if viewing any of the above for long periods of time, reduce contrast and brightness when viewing. Once burn-in occurs it will never disappear completely.
l Batteries
Batteries are easily swallowed by young children. Do not allow young children to play with the remote control unit.
l Covers
Do not remove any xed covers as this may expose dangerous voltages.
l Standby
The standby button on the remote control doesn’t switch off the TV completely and the TV will continue to draw
electricity from the mains supply. Therefore in the interests of safety and to avoid unnecessary energy consumption,
never leave your TV in standby while unattended for long periods of time, e.g. overnight, while on holiday or while
out of the house.
l Power Cord
Make sure your TV or TV stand is not resting on top of the power cord, as the weight of the TV may damage the cord
and create a safety hazard. Make sure that the mains plug is easily accessible.
l Packaging
If you can store the packaging it will prove useful should you need to transport the TV to protect it while it is in
transit. Try to reuse packaging wherever you can. If you cannot store it, contact your local authority for details of your
nearest recycling facilities.
Important safety instructions

5
EN
Please read these precautions before operating the unit
n Power cord protection
To avoid any malfunctions of the unit, and to protect against electric shock, re or personal injury, please
observe the following.
l Hold the plug rmly when connecting or disconnecting the AC power cord.
l Keep the AC power cord away from heating appliances.
l Never put any heavy object on the AC power cord.
l Do not attempt to repair or reconstruct the AC power cord in any way.
n Placement
Avoid placing the unit in areas of:
l Direct sunlight or heating radiators, or closed automobiles
l High temperature (over 35 C) or high humidity (over 90%)
l Much dust as the internal parts may be seriously damaged.
n Non-use periods
When the unit is not being used, turn it off. When left unused for a long period of time, the unit should
be unplugged from the household AC outlet.
n No ngers or other objects inside
l Touching internal parts of the unit is dangerous, and may cause serious damage to the unit. Do not attempt to
disassemble the unit.
l Do not put any foreign object on the disc tray.
n Keep away from water/magnet
l Keep the unit away from vases, tubs, sinks, etc. If liquids are spilled into the unit, serious damage could
occur.
l Never bring a magnet or magnetized object near the unit.
n Stacking
l Place the unit in a horizontal position, and do not place anything heavy on it.
Precautions
Proper positioning of this LCD TV
1. Locate the LCD TV in the room where light does not strike the screen directly.
2. Avoid the LCD TV exposes to sunlight and other sources of heat.
3. Make sure enough space for ventilation between TV and wall.
4. Do not cover the ventilator when using the LCD TV.
5. Total darkness or over brightness on the picture screen can cause eyestrain, soft and indirect lighting environment
is recommend for watching.
6. Do not use solutions to clear LCD panel such as petroleum, the panel can be cleaned with a damp cloth.
7. The LCD TV adapter is operated on AC 100-240V,50/60Hz.
6
7
EN
Thank you for you purchasing this LCD TV.
Before you start using this device, please read this User Guide to help you
operate this LCD TV.
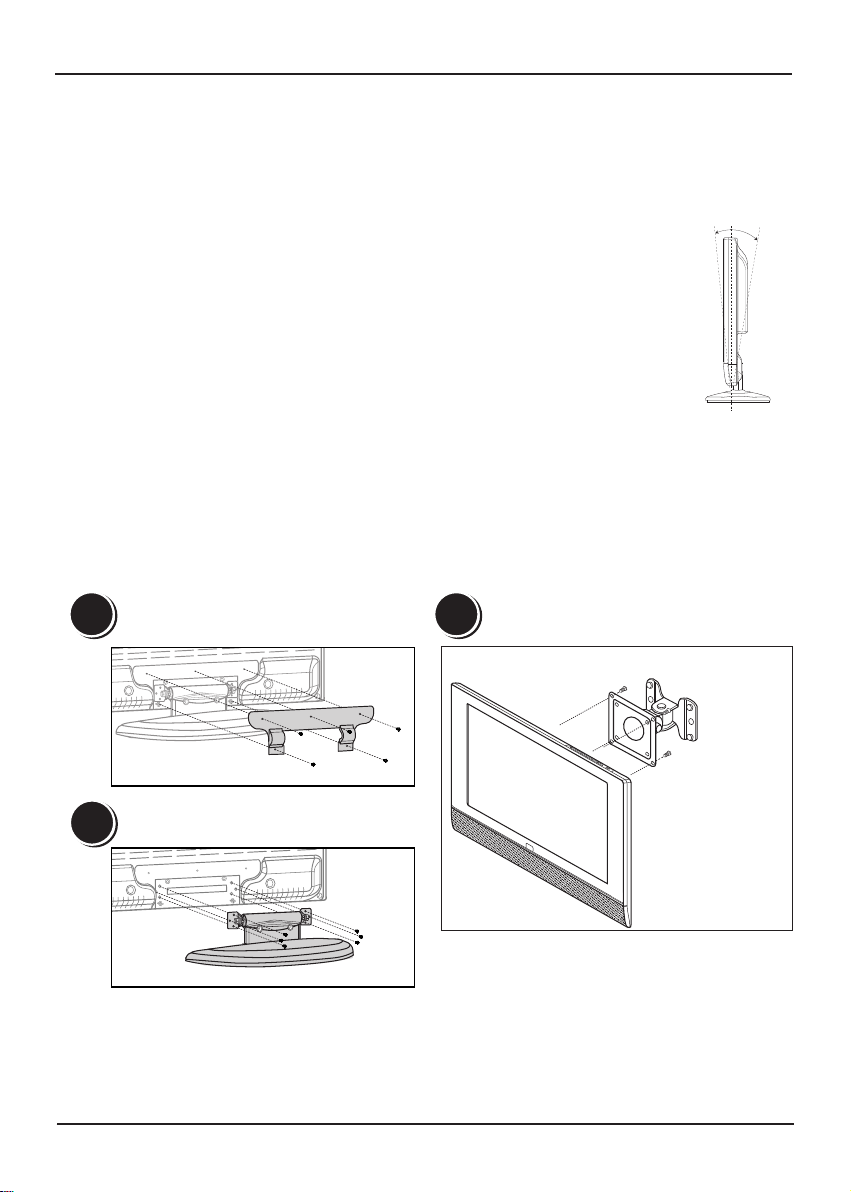
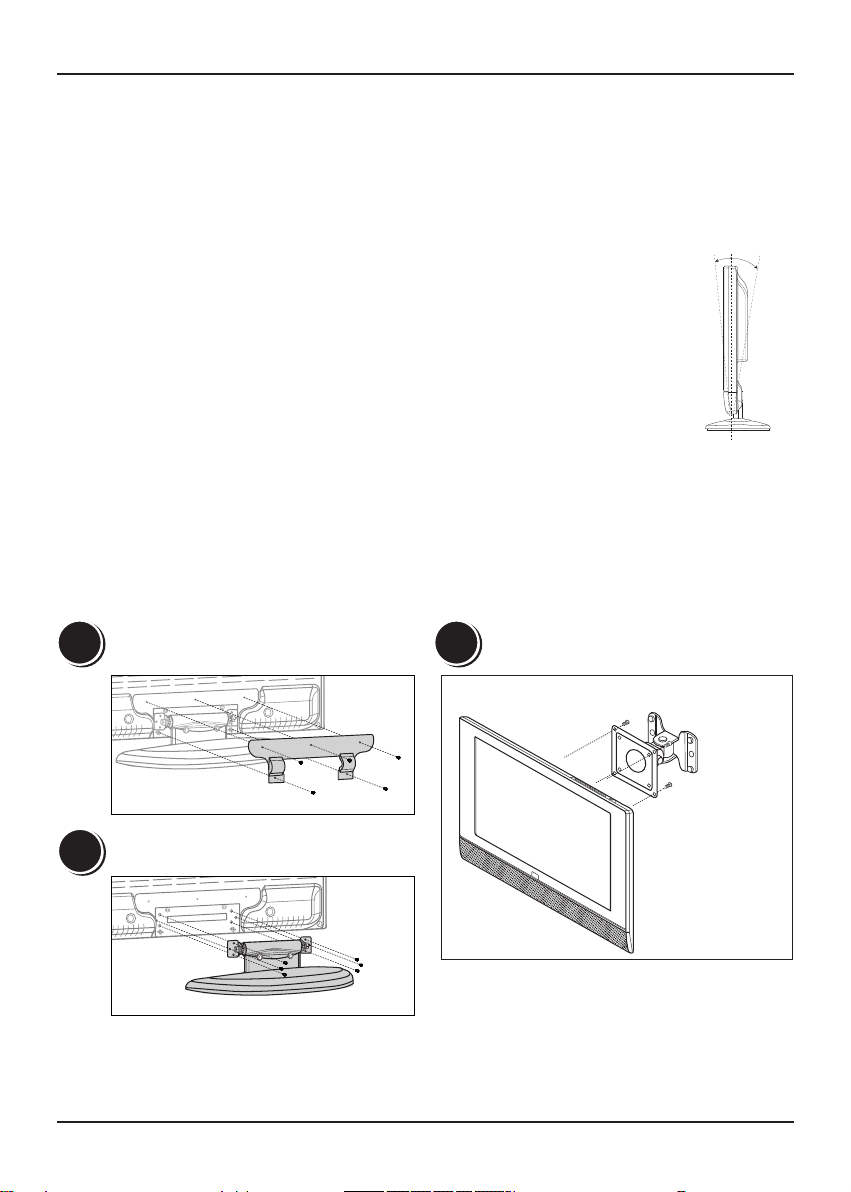
Adjusting the view angle of LCD TV
1. The vertical angle could be adjusted to 5˚ forward and 10˚ backward.
2. Hold the LCD TV stand with one hand to prevent slipping when adjusting the angle.
Installing the LCD TV on the wall
1. Unscrew 5 screws of stand cover in the rear cabinet.
2. Unscrew 6 screws and then remove the stand of LCD TV.
3. Attach the wall-mount kit to the TV. Please refer to the instructions supplied with the additional
purchase of wall-mount kit on how to mount the TV on the wall
1
2
3
5˚ 10˚
Example: 75mmx75mm
mini wall-mount
NOTE:
We strongly recommend that this product is installed by qualied personnel with enough skill and
competence. Dixons Stores Group cannot assume liabilities for damage caused by
mistake in installation, mounting, misuse or modication.
Getting started
7
EN
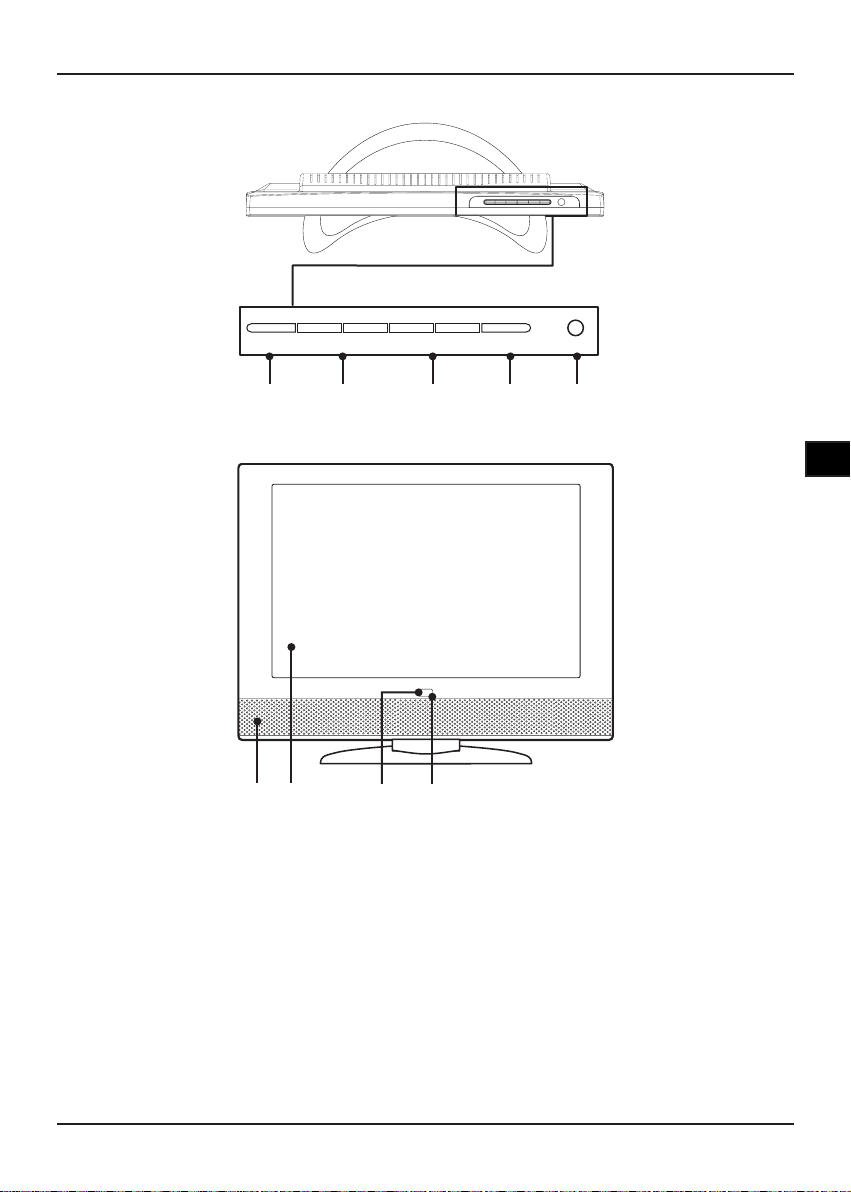
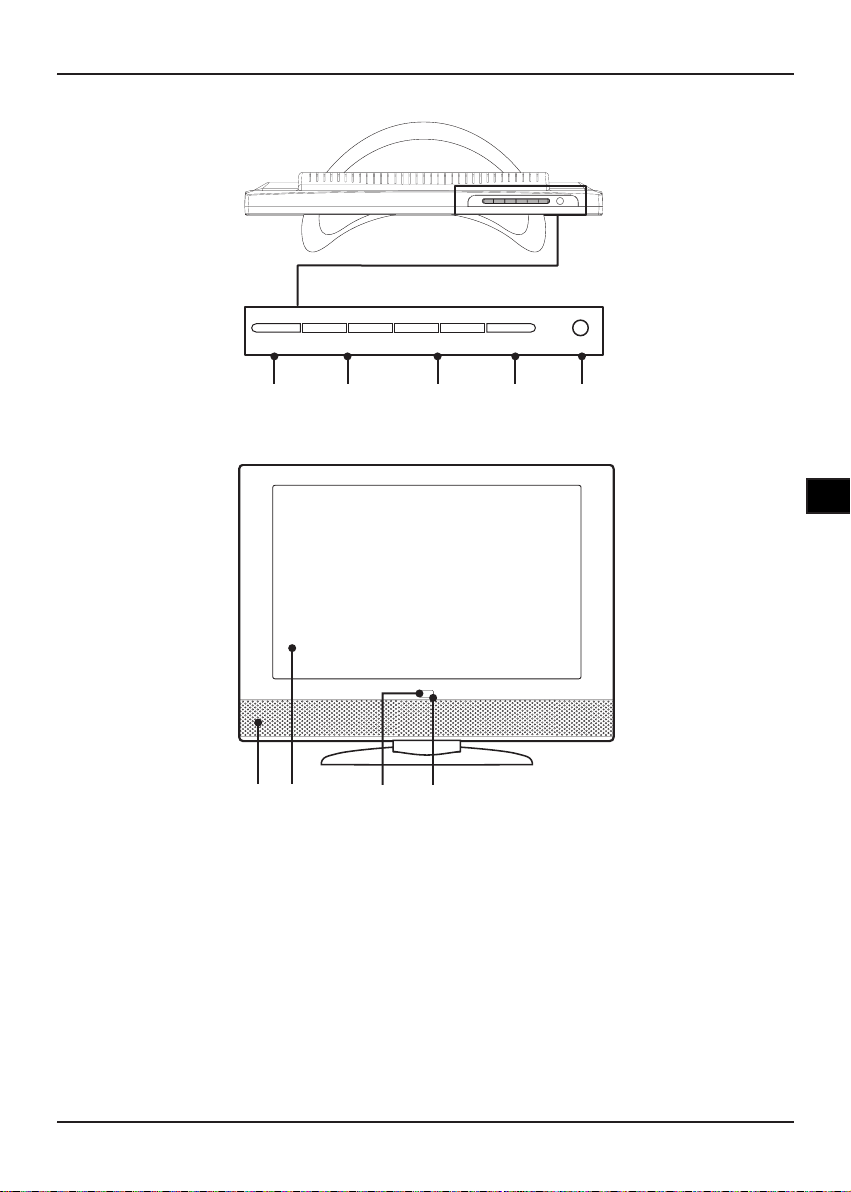
Front Panel
Top Panel
1. MENU button
Press to display the main menu.
2. VOLUME +/- button
Press to adjust the volume level.
3. CHANNEL +/- button
Press to select TV channel.
4. SOURCE button
Press to toggle through the input signals
connected to TV. (TV/AV/SVIDEO/PC/
SCART 1/SCART 2)
5. POWER button
Press to turn on/off the LCD TV.
6. Speaker
7. LCD screen
8. Power indicator
The power indicator lights in blue when turning
on the power, lights in red when in standby
mode.
9. Remote sensor
Receives signals from the remote control.
MENU -VOLUME+ -CHANNEL+ SOURCE POWER
1 2 3 4 5
Getting started
6 7 8 9
8
9
EN
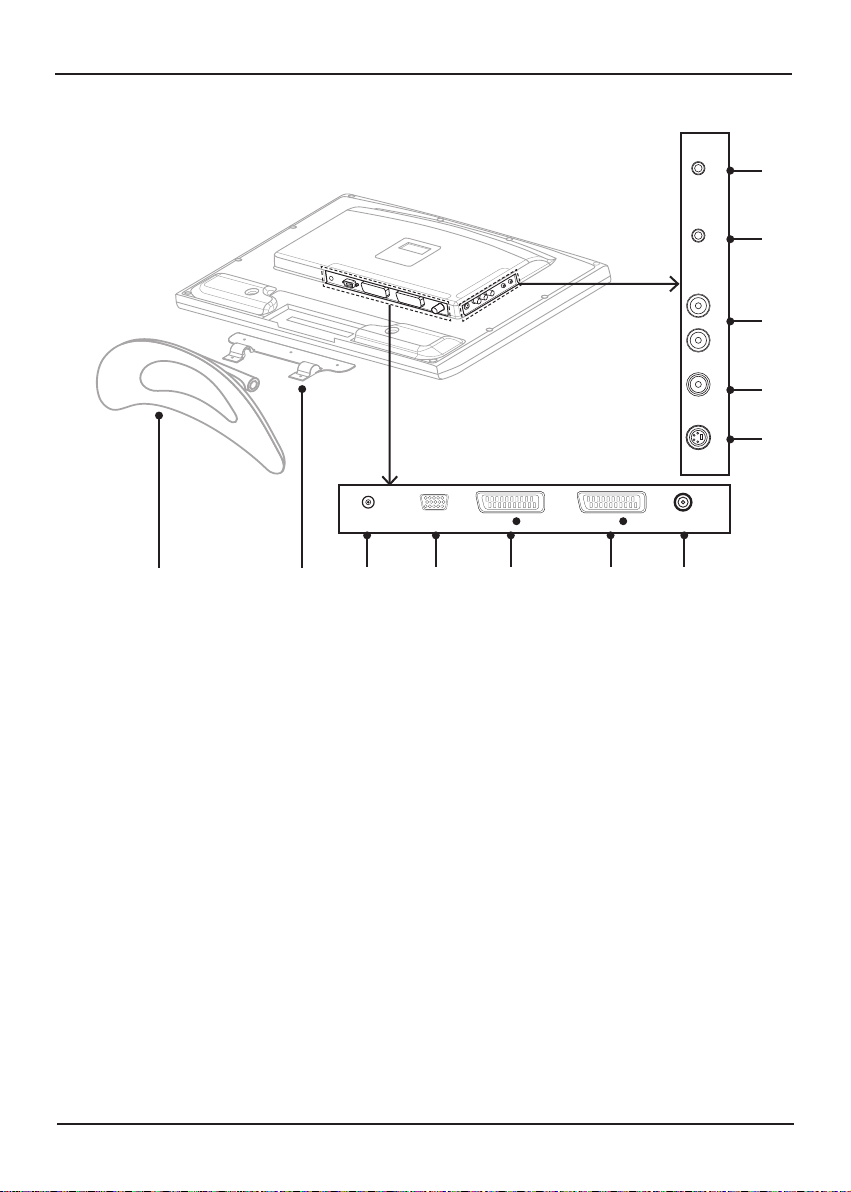
Rear Panel
10. TV Stand
11. Stand cover
12. DC IN connector
13. PC INPUT jack
Connect to VGA output jack on PC or other
D-sub output devices, such as Set Top
Box.
14. SCART 1 IN/OUT jack
Connects to European type SCART input
or output connector on other audio/video
devices.
15. SCART 2 IN jack
Connects to European type SCART output
connector on other audio/video devices.
16. ANTENNA IN jack
Connects the 75-ohm coaxial cable to
aerial or CATV.
17. EARPHONE jack
Output sound signal to earphone, when the
earphone is plugged into this LCD TV, the
build-in speaker will close automatically .
18. PC AUDIO in jack
Connects the audio output jack on PC.
19. L/R AUDIO in jacks
Connects to the L/R audio output jacks on
an audio/video device.
20. VIDEO IN jack
Connects to video output jack on other
video device.
21. S-VIDEO IN jack
Connects to S-video output jack on other
video device.
SVIDEO IN VIDEO IN AUDIO IN PC AUDIO IN EARPHONE
17
18
19
20
21
DC IN PC IN SCART
1
IN/OUT SCART
2
IN ANTENNA IN
12 13 14 15 16
10 11
Getting started
9
EN
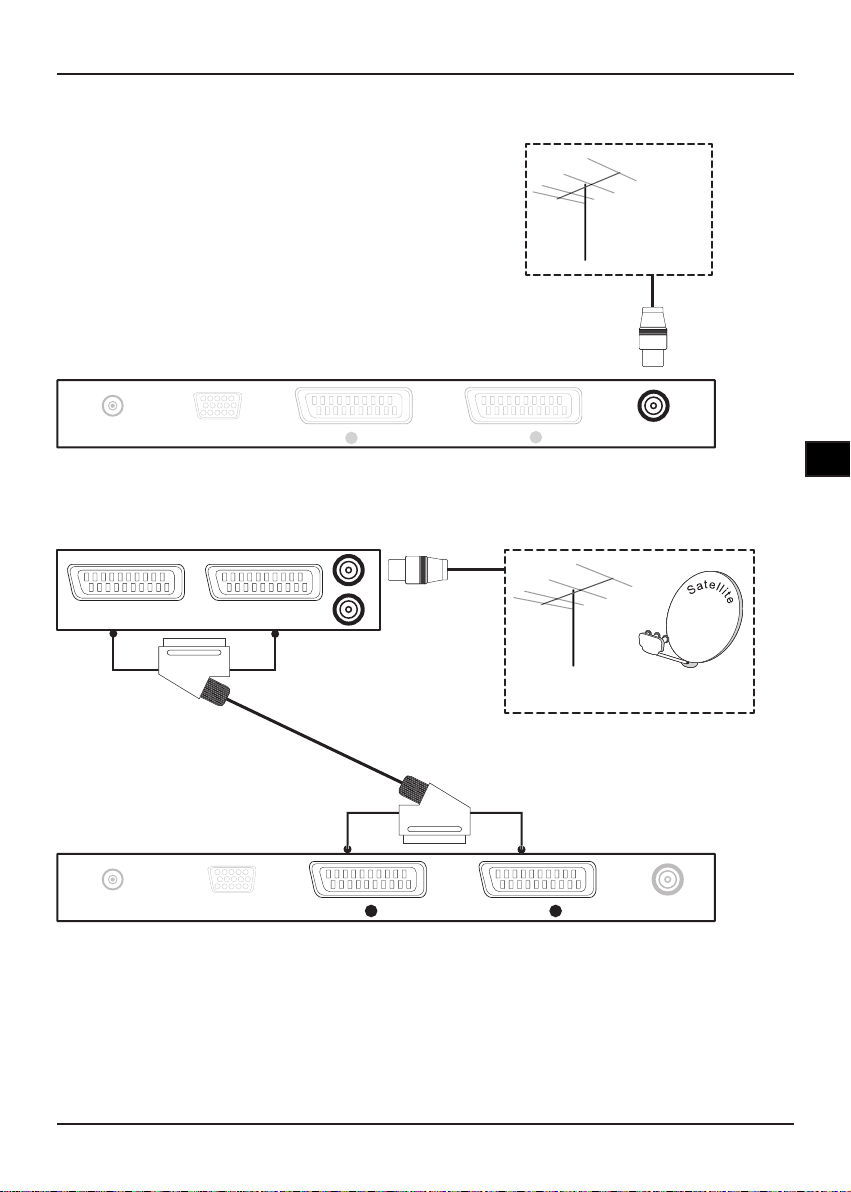
Connecting to an aerial (antenna)
• Connects the 75-ohm coaxial cable to an Aerial or CATV.
Connecting to Set Top Box/DVD Recorder/
Satellite Receiver (not supplied)
SCART
(not supplied)
DC IN PC IN SCART
1
IN/OUT SCART
2
IN ANTENNA IN
Aerial/Cable/Satellite
(not supplied)
DC IN PC IN SCART
1
IN/OUT SCART
2
IN ANTENNA IN
SCART OUT SCART OUT
Aerial/Cable
(not supplied)
or
Example
(not supplied)
Connections
10
11
EN
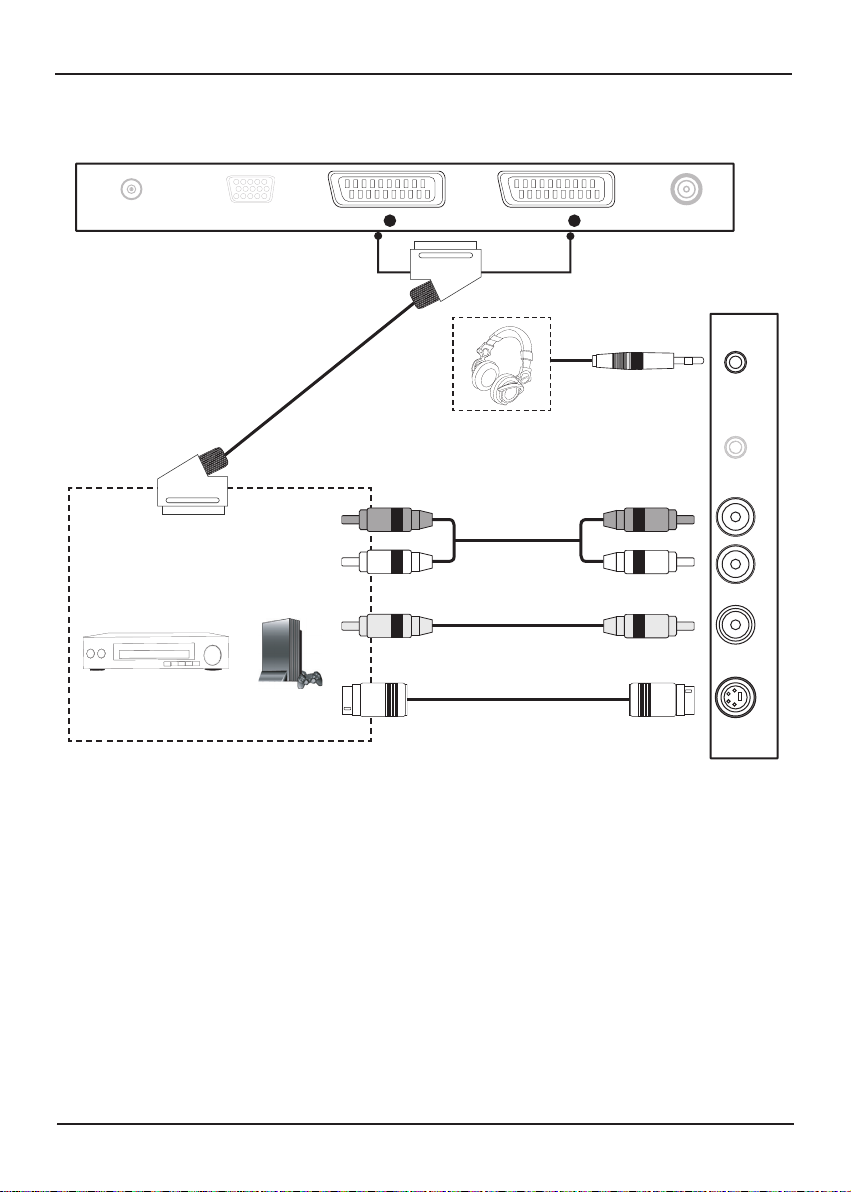
Connecting to external audio/video devices
• Use the Audio/Video/S-video/Scart cables to connect with external audio/video signal sources.
Example: Game/DVD Player/
DVD Recorder/Camcorder/VCR
or
Audio cable
(not supplied)
S-video cable
(not supplied)
SCART
(not supplied)
Video cable
(not supplied)
Red
White
Yellow
Red
White
Yellow
DC IN PC IN SCART
1
IN/OUT SCART
2
IN ANTENNA IN
SVIDEO IN VIDEO IN AUDIO IN PC AUDIO IN EARPHONE
Earphone
(not supplied)
Connections
11
EN
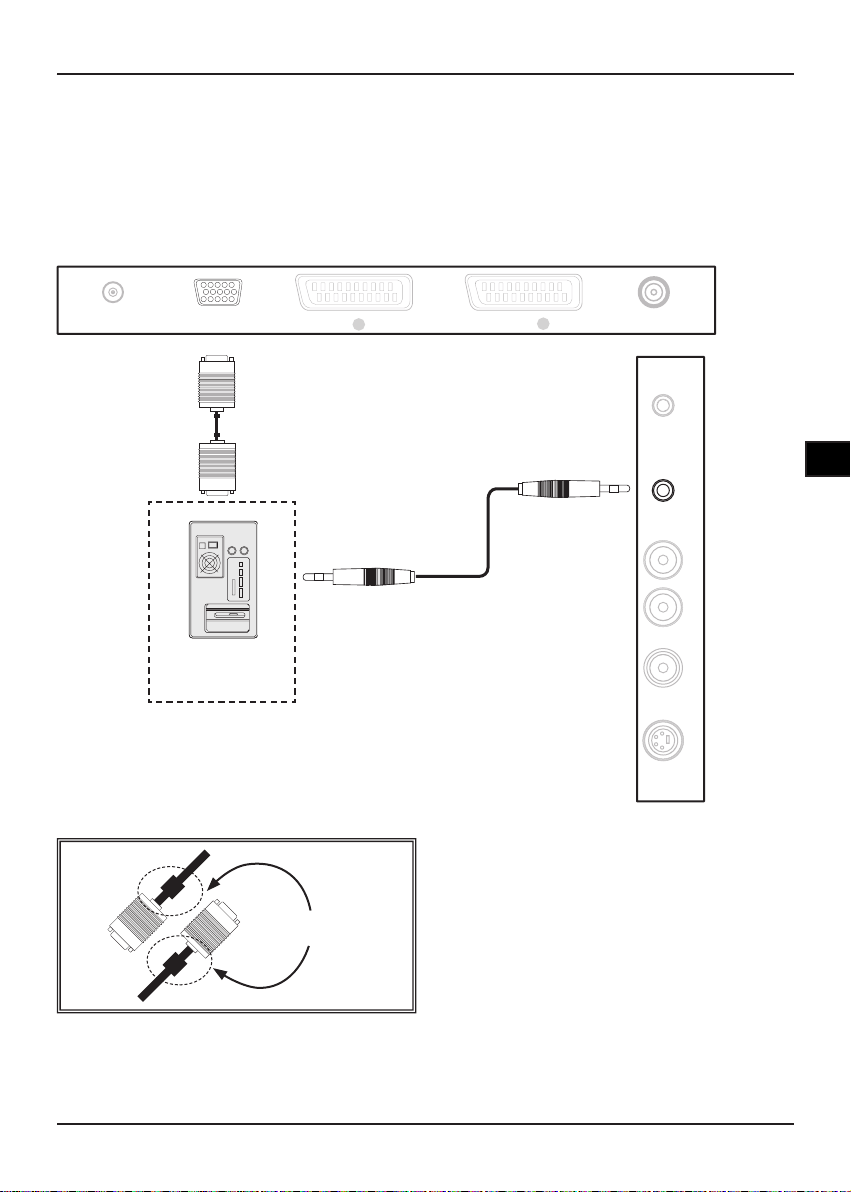
Connecting to personal computer
• This device also can connect to a computer as computer monitor, you can output audio and video
signals from your computer to this LCD TV.
• Connect to your computer via audio and video(D-sub connector) cables.
• The computer resolution will be automatically detected when you switch to PC mode. (If the LCD TV
does not detect it automatically, refer to PC Menu/AUTO details on page 22.)
D-sub connector
(not supplied)
PC or Laptop
(not supplied)
DC IN PC IN SCART
1
IN/OUT SCART
2
IN ANTENNA IN
Audio cable
(not supplied)
SVIDEO IN VIDEO IN AUDIO IN PC AUDIO IN EARPHONE
Note:
We suggest to use the VGA cable with a magnetic
ring on each end to prevent radio frequency and
electro-magnetic interference (EMI/RFI).
Magnetic ring
Connections
12
13
EN
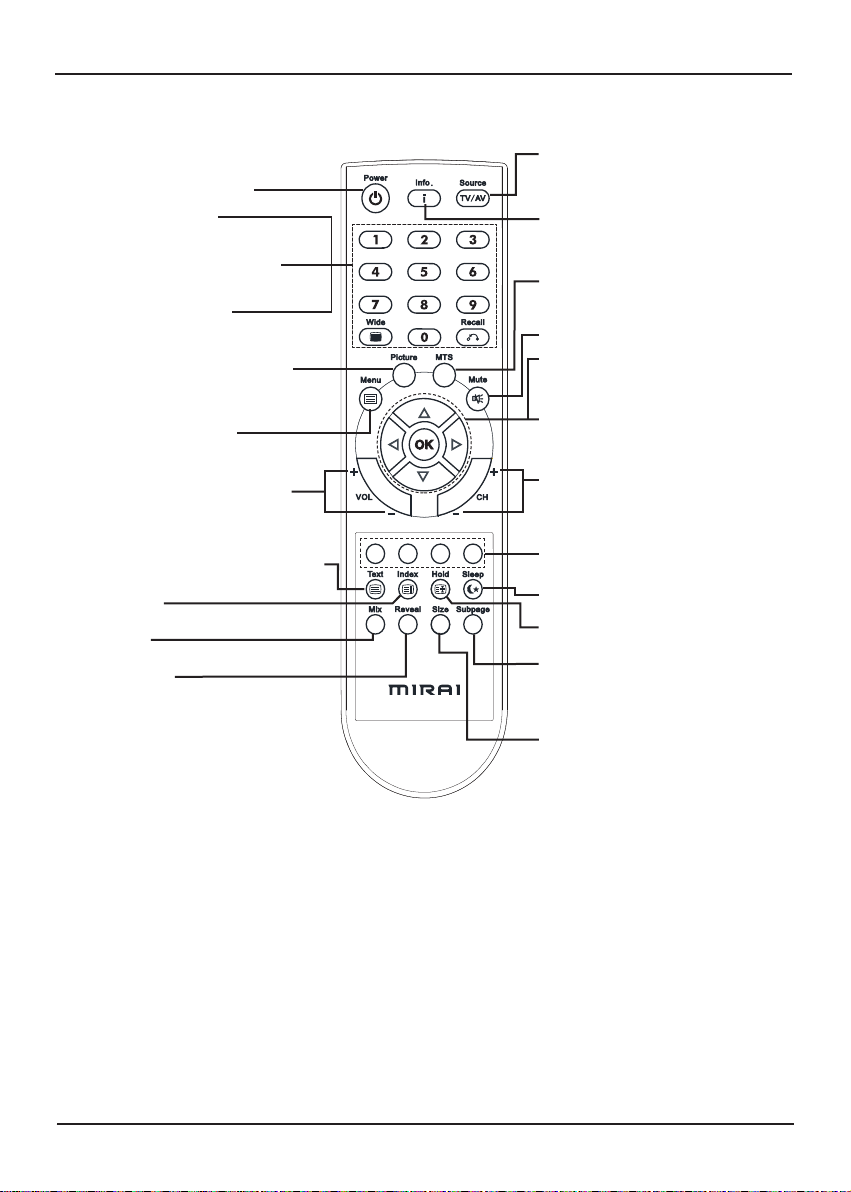
Remote control functions
Vol +/- Button: Adjust volume level
Picture Button: Switch to different
brightness settings
(NATIVE/SOFT/
BRIGHT/PERSONAL)
0-9 Number Buttons:
Direct access the channel
by press 0-9 buttons
Recall Button: Return to the last
viewed channel
Wide Button: Switch to
panoramic screen (16:9),
Normal (4:3)
Reveal Button:
Display or hide teletext information
Size Button:
Adjust the size of teletext display
screen
Power Button: Power on/off
Menu Button: Main menu
Text Button: Turn on/off teletext function
Index Button:
Return to index page of teletext
Mix Button:
Change the level of transparency
Source Button:
Select different input sources
(TV/AV/SVIDEO/PC/SCART/SCART 2)
Info Button:
Display source (TV/AV/SVIDEO/PC/
SCART/SCART 2) information.
MTS Button:
Mono/Stereo/Dual I/Dual II selection
Mute Button: Turn on/off the sound
Cursor Buttons:
▲(Up) ▼(Down) ◄(Left) ►(Right)
Select menu/setup items or settings
CH +/- Button: Select previous or
next channel
Sleep Button: Set timer of sleeping
Hold Button:
Lock the current page of teletext
Subpage Button:
Open the subpage of teletext
OK Button:
Confirm the selection or exit to the
previous menu
Red/Green/Yellow/Blue Buttons:
Teletext topic selection
NOTE:
• The remote control may differ due to variance in packaging.
Remote Control
13
EN
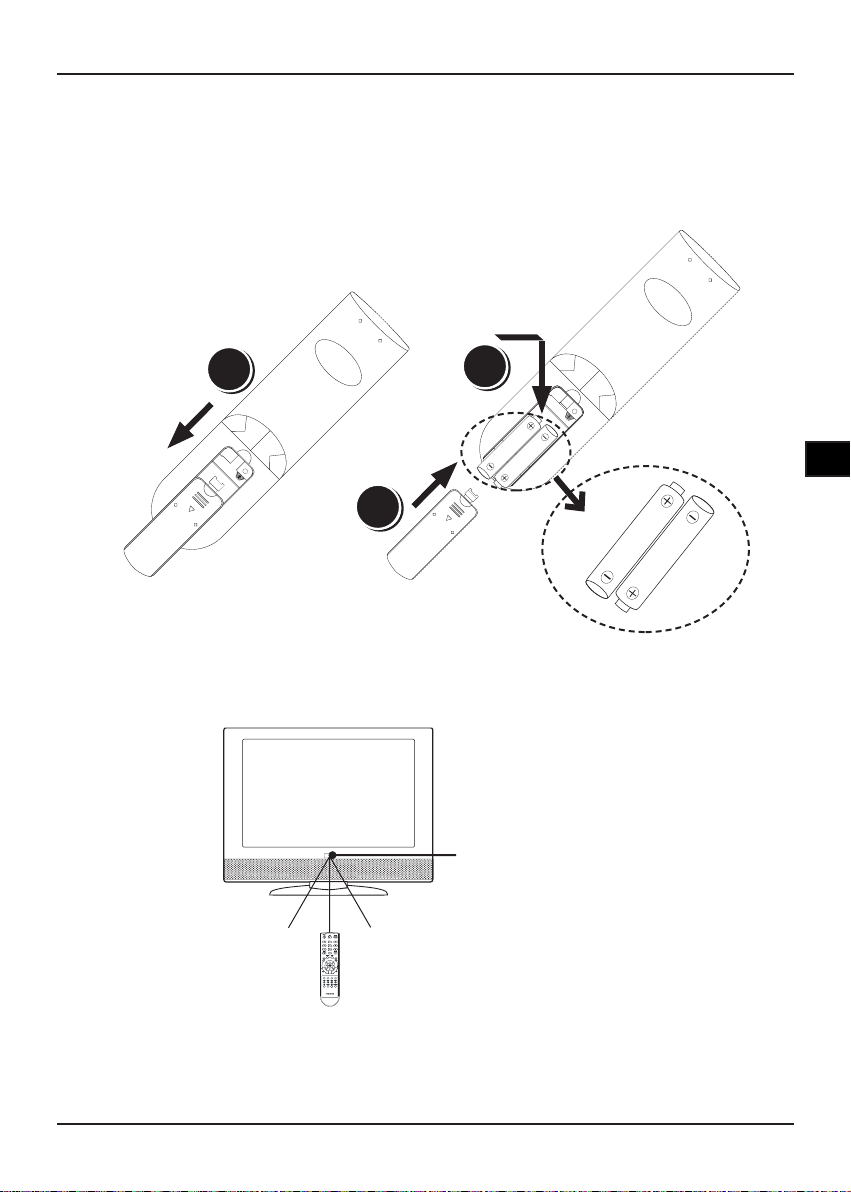
Insert batteries to remote control
1. Remove the battery cover of remote control.
2. Insert 2 AAA batteries in the correct position
3. Replace the battery cover.
NOTE:
• Alkaline batteries are recommended.
• Remove batteries when the remote control is not using for a long time.
• Make sure the batteries are properly aligned according to the (+) and (-) poles.
Remote control operation range
NOTE:
• Do not point bright lights at the remote control signal sensor.
• Do not place objects between the remote control unit and the remote control signal sensor.
• Do not use this remote control unit while operating the remote control unit of other equipment.
3
2
1
• Point the remote control unit no more than 5 meters from the remote control sensor and within 60° of
the front of the unit.
• In addition, the operating distance may vary according to the brightness of the room.
Remote Control
Remote sensor
30º 30º
14
15
EN
Turning on the power
MENU -VOLUME+ -CHANNEL+ SOURCE POWER
Power button
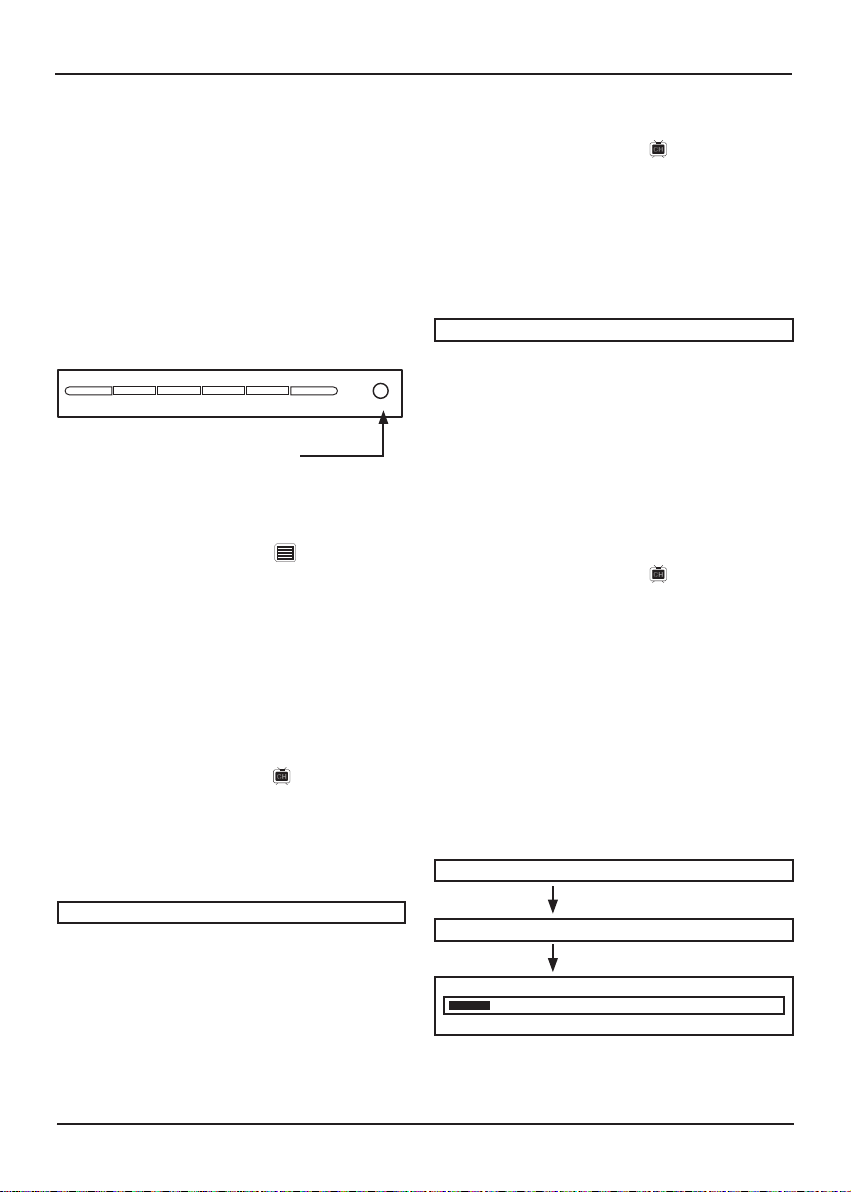
Setting TV channels
Setting TV system
1. Press the Menu button.
2. Press ◄►buttons to select CHANNEL.
and press ▼button to select TV SYS.
3. Press ◄►buttons to select the TV system. It
depends on the system is used in your location
4. Press Menu/OK to leave the main menu.
TV SYS. PAL
►
►
Setting TV OSD language
1. Press the Menu button.
2. Press◄►buttons to select OSD and
press▼button to LANGUAGE.
3. Press◄►buttons to select the language you
want to display.
4. Press Menu/OK twice to leave the main
menu.
1. Plugs the supplied AC power cord to the
power outlet.
2. Press the POWER button on the top of LCD
TV, or from remote control.
3. The screen display will appear after a few
seconds.
Note:
• To turn off the power, press the POWER button again.
• The power indicator lights in blue when you turn on the
power, and in red when you turn off power.
Setting SOUND system
1. Press the Menu button.
2. Press ◄►buttons to select CHANNEL.
and press ▼button to select SOUND SYS.
3. Press ◄►buttons to select the SOUND
system. It depends on the system is used in
your location.
4. Press Menu/OK twice to leave the main
menu.
SOUND SYS. B/G
►
►
• Before watching TV programs, the TV channel
setting is necessary.
• After the aerial has been connected, position
it at a proper location that allows good
reception.
1. Switch to TV mode on the remote control.
2. Press Menu button to display the main menu.
3. Press◄►buttons to select CHANNEL.
4. Press ▼button to select COUNTRY.
5. Press ◄►buttons repeatedly to select the the
country in which you are located.
6. Press▲▼button to select AUTO SCAN.
7. Press ►, the TV will start to search and
store all the channels available in your area.
Please be patient, this process will take a few
minutes.
8. When the auto scan process is complete, you
may need to press Menu/OK twice in order to
return to your TV screen.
AUTO SCAN 2
146.05 MHz VHF L
AUTO SCAN
►
COUNTRY UK
►
►
Initial settings
15
EN
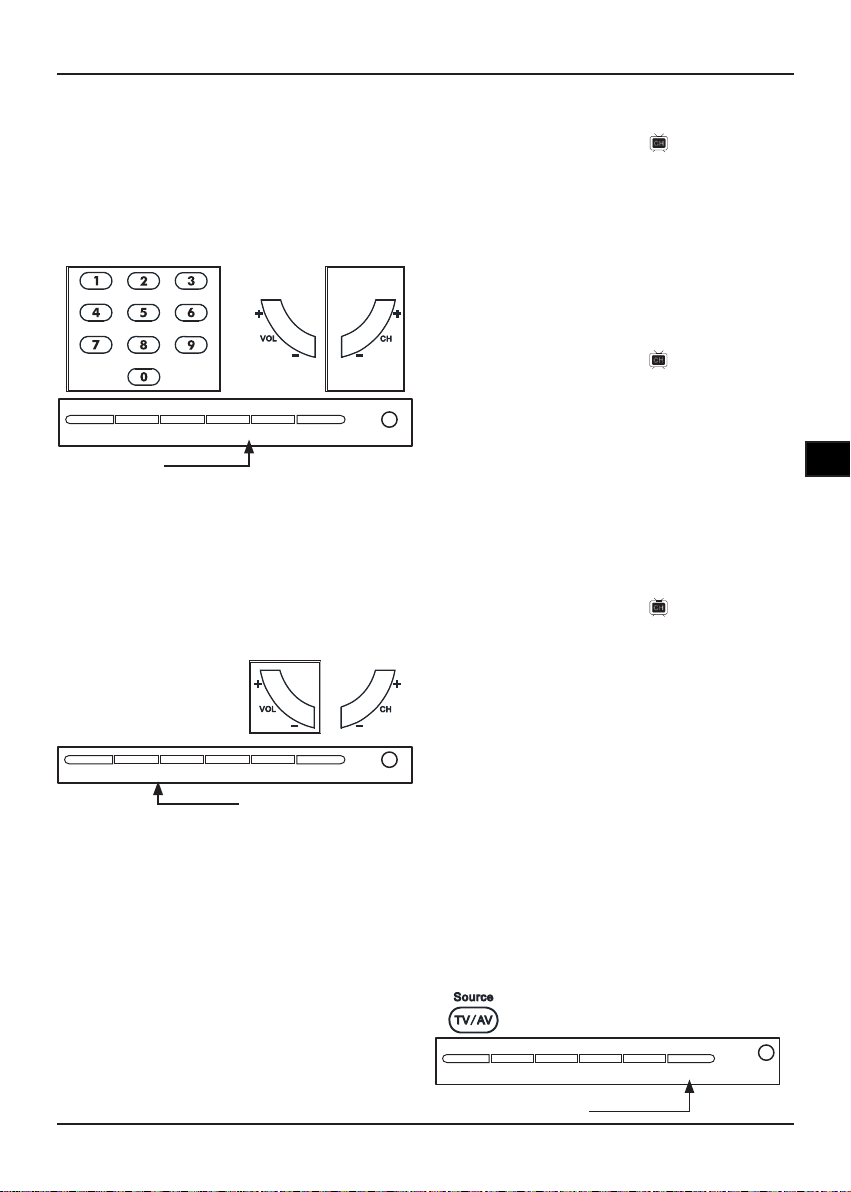
Changing to different TV
channels
• Press 0-9 NUMBER buttons on the remote
control to input channel’s number, the channel
will change after few seconds.
• Use the CH +/- to switch channels on the remote
control or on the top of the TV.
Channel button
MENU -VOLUME+ -CHANNEL+ SOURCE POWER
or
Sound volume
• Press VOLUME +/- on the remote control or
on the top of the TV to increase or decrease the
volume level.
Note:
• To silence the sound, press MUTE on the remote
control. Press MUTE again or VOLUME +/- twice to
cancel the mute.
MENU -VOLUME+ -CHANNEL+ SOURCE POWER
Volume button
or
Sleep timer
• This function allows you to set up the LCD TV
automatically to turn off the power.
• Press SLEEP button to set up sleeping timer.
You can set up 15/30/45/60 minutes, each press
of SLEEP button.
TV type
• This function allows you to select your preferred
TV type while you are watching TV programmes.
• Press Wide button to toggle following:
Panoramic screen (16:9)/Normal (4:3)
• This function can not work on PC mode.
Channel skip
1. Press the Menu button.
2. Press◄►buttons to select CHANNEL,
and press▼button to go to the CHANNEL
item.
3. Press◄►to select the TV channel you want
to skip.
4. Press▼to select SKIP, and then press
ON/OFF.
Channel setup
1. Press the Menu button.
2. Press◄►buttons to select CHANNEL,
and press▼button to go to the CHANNEL
item.
3. Press◄►to select the TV channel you want to
replace.
4. Press▼to select MANUAL, and then
press◄► to scan through the channels until
you nd the channel you want to set up.
Fine tune
1. Press the Menu button.
2. Press◄►buttons to select CHANNEL, and
press▼button to go to CHANNEL item.
3. Press◄►to select the TV channel you want to
ne tune.
4. Press▼to select FINE, and then
press◄►buttons to adjust.
Switching input signals
• This LCD TV can input different external
signals from AV equipment and PC (TV/AV/
SVIDEO/ PC/SCART 1/SCART 2).
1. Press SOURCE button on the top of the LCD
TV or from remote control.
2. Press -CHANNEL button (LCD TV)
or▲▼(remote control) to select the source you
want to input, and then press SOURCE (LCD
TV) or OK (remote control) button to confirm.
MENU -VOLUME+ -CHANNEL+ SOURCE POWER
Source button
or
+
Basic Operation
16
17
EN
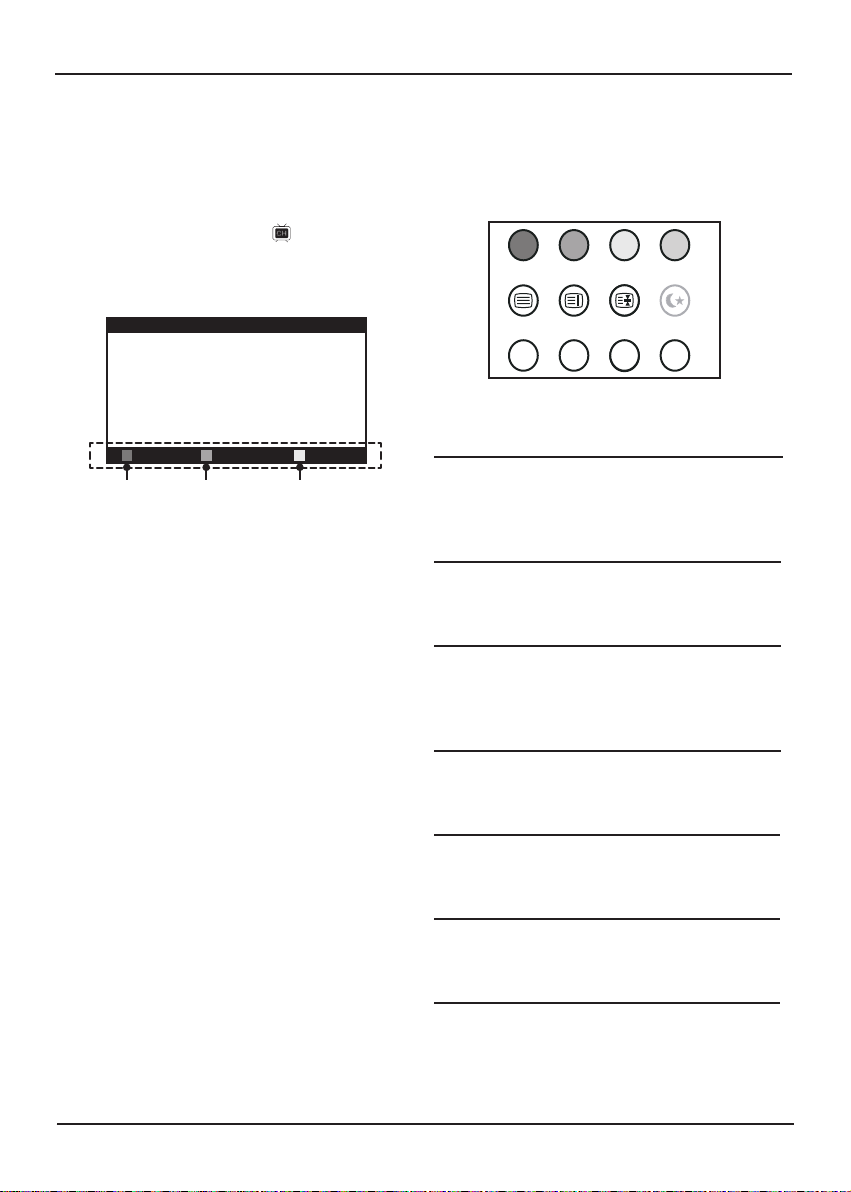
Text
Press the Text button to display the teletext
information.
Red/Green/Yellow/Blue
The features of these four colored buttons are
dened on different channels , each button will
correspond to various colored page numbers.
Index
Press Index button to return to the main index
page of teletext.
Hold
Press Hold button to hold the current teletext
page when the browsing multi-page information.
Press it again to release it.
Mix
Press Mix button to adjust the transparent level
of teletext background.
Reveal
Press Reveal button to display the hidden
teletext , press it again to hide it.
Size
Press Size button to adjust the size of teletext
display screen.
Subpage
Sometimes there are too much information on
teletext, the channel will divide it to subpage,
press Subpage button to switch directly to next
subpage.
Teletext operation
• Teletext is a variety of information services
which provided by television broadcast
companies. The content of teletext is only
available if the channel transmits it.
Text Index Hold Sleep
Mix Reveal Size Subpage
Program settings
Before you customize your program settings,
make sure you have already followed the
“Setting TV channels” procedures (refer to page
14).
1. Press the Menu button.
2. Press◄►buttons to select CHANNEL.
3. Press▼button to select PROGRAM, then
press ► to bring up the PROGRAM menu.
Note: The programs listed below are
examples only.
NAME
1. Press▲▼buttons to select the channel
you want to rename, then press Red
button to enter the NAME menu.
2. Press ▲▼buttons to add the first character
in the highlighted row. Press ►button and
repeat the process to add more characters.
3. Press Red button to confirm or Green
button to cancel.
DELETE
1. Press▲▼buttons to select the channel
you want to delete.
2. Press Green button to enter the DELETE
menu. The selected channel will be
highlighted.
3. Press Red button to delete or Green
button to cancel.
SWAP
1. Press ▲▼buttons to select the channel
you want to swap.
2. Press Yellow button to enter the SWAP
menu.
3. Press▲▼buttons to select the channel
you want to swap with the previously
selected channel.
4. Press Red button to swap or Green button
to cancel.
Red Green Yellow
PROGRAM
NAME
DELETE
SWAP
8
9
10
11
12
13
14
15
16
17
18
19
20
21
1 CH 1
2 CH 2
3 CH 3
4 CH 4
5 CH 5
6 CH 6
7 CH 7
Basic Operation
17
EN
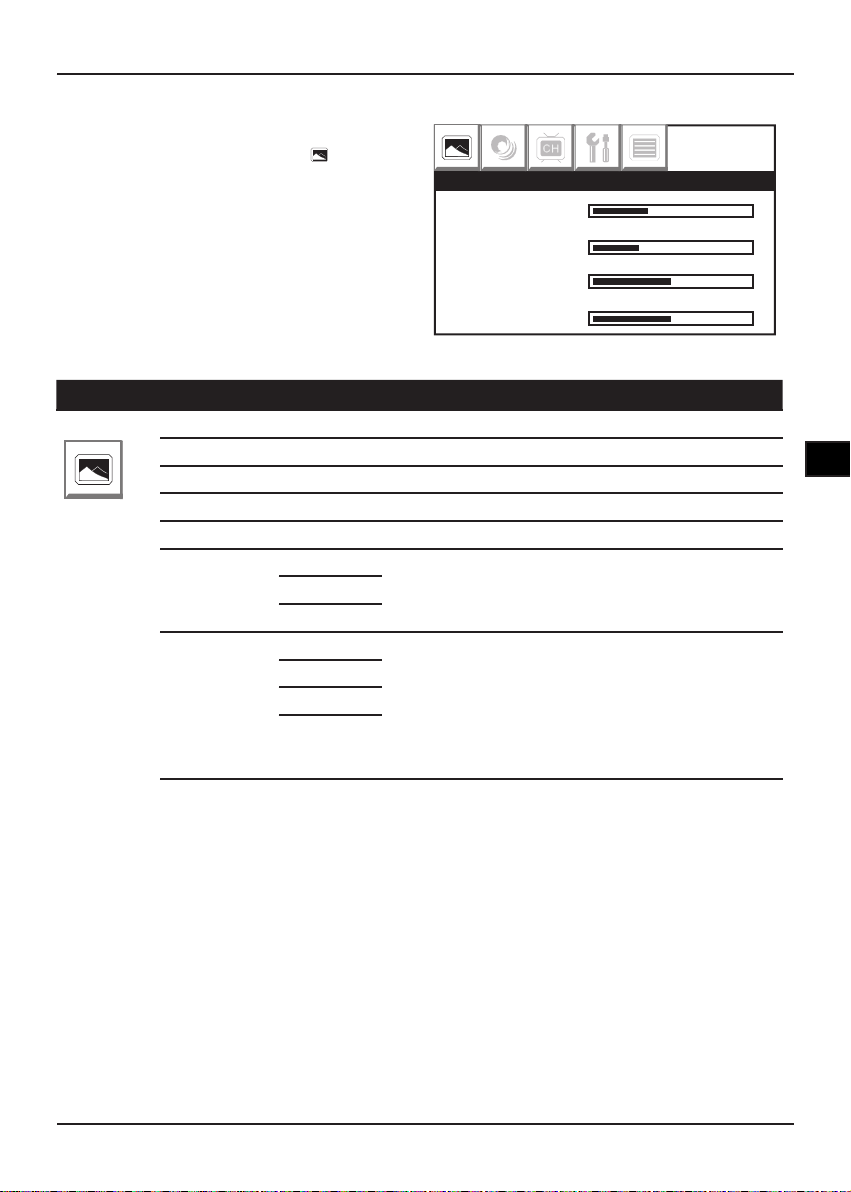
Picture Menu (TV/AV Mode)
Item Option Description
PICTURE
CONTRAST Increase or decrease the picture contrast.
BRIGHTNESS Adjust the picture to brighter or darker.
HUE* Adjust the picture’s color tone.
SATURATION Increase or decrease the color’s saturation.
SHARPNESS Adjust the picture sharper or softer.
COLOR
TONE
NORMAL Adjust the screen background color, depending on
your preference.
WARM
COOL
PICTURE
MODE
PERSONAL Picture mode provides three different customized
settings (except PERSONAL item) which allow you
to select your preferred setting quickly and directly.
If you adjust one of the following items: CONTRAST/
BRIGHTNESS/HUE/SATURATION/SHARPNESS/
COLOR TONE, the PICTURE mode will change to
PERSONAL item automatically.
NATIVE
SOFT
BRIGHT
CONTRAST
BRIGHTNESS
HUE
SATURATION
PICTURE
* Hue only can work on NTSC mode.
1. Press Menu button to enter the main menu.
2. Press ◄(Left) ►(Right) to select PICTURE.
3. Press ▲(Up) ▼(Down) button select the option,
and then press ◄(Left) ►(Right) to adjust the
parameter.
4. Press OK or Menu button to leave parameter
setting, press OK or Menu twice to leave the
main menu.
OSD Operation
18
19
EN
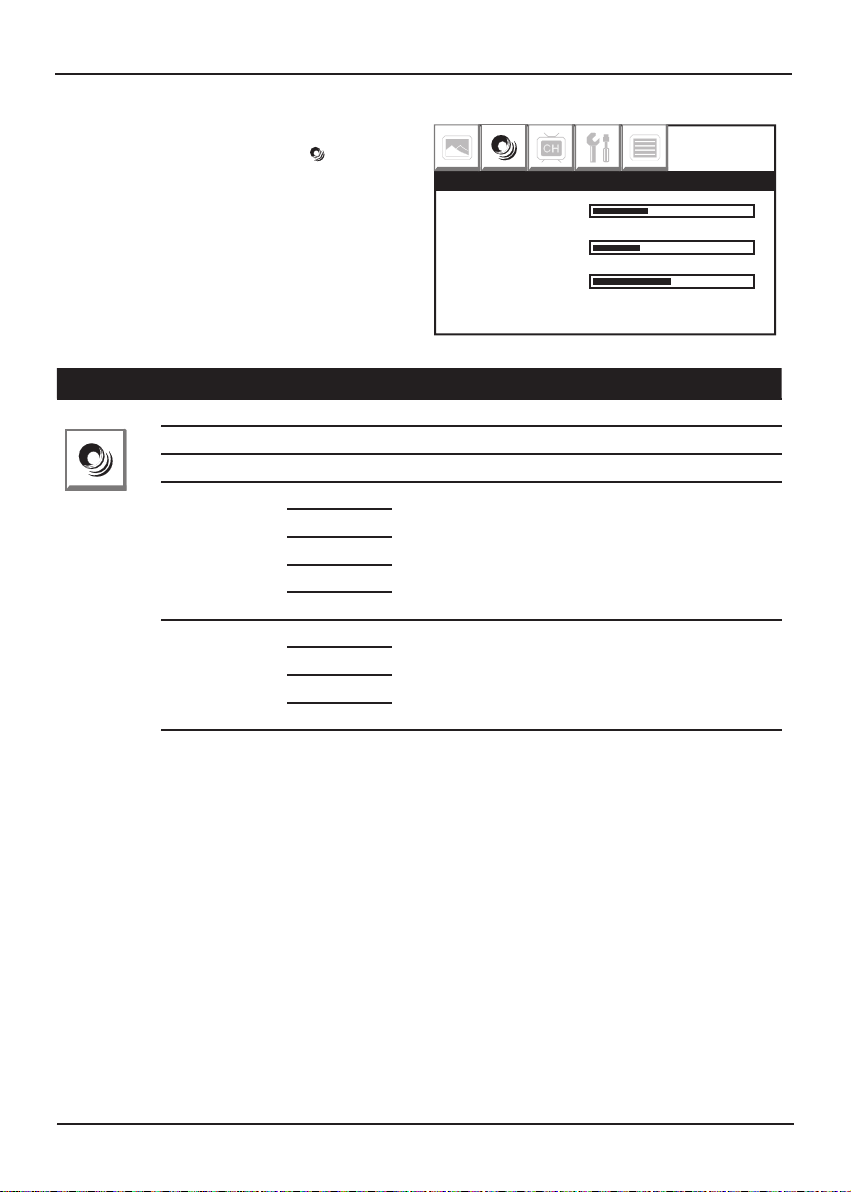
Sound Menu (TV/AV/PC Mode)
Item Option Description
SOUND
BASS Increase or decrease lower pitch sounds.
TREBLE Increase or decrease higher pitch sounds.
BALANCE Adjust the sound of right and left speakers’ balance.
SOUND MODE NEWS Sound mode provides four different customized
settings (except PERSONAL item) which allow you
to select your preferred equalizer setting quickly
and directly. If you adjust one of the following items:
BASS/TREBLE/BALANCE, the SOUND mode will
change to PERSONAL item automatically.
THEATER
HALL
PERSONAL
STEREO
MTS* MONO MTS allows you to select audio signals while you are
watching TV programs. These options depend on
signals transmitted from broadcast stations.
STEREO
DUAL I
DUAL II
* MTS item only can be used when you are in TV mode.
MTS function also can be selected by the remote control.
BASS
TREBLE
BALANCE
SOUND MODE ◄ PERSONAL ►
SOUND
1. Press Menu button to enter the main menu.
2. Press ◄(Left) ►(Right) to select SOUND.
3. Press ▲(Up) ▼(Down) button select the option,
and then press ◄(Left) ►(Right) to adjust the
parameter.
4. Press OK or Menu button to leave parameter
setting, press OK or Menu twice to leave the
main menu.
OSD Operation

19
EN
Channel Menu (TV Mode)
Item Option Description
CHANNEL
AUTO SCAN Before watching TV programs for the rst time on
this LCD TV, you have to operate “AUTO SCAN”
procedure. It can help you to auto search TV
channels.
CHANNEL Display the channel you are watching, select channel
or set up the channel for SKIP/MANUAL/FINE items.
TV SYS. PAL Select the TV system according to the system is used
in your location.
Note:
This function also can work on AV mode.
SECAM
AUTO
SOUND SYS. B/G Select the sound system according to the system
available in your area.
I
D/K
L
L’
AUTO
SKIP ON Skip the channel you do not want to watch. (Refer to
Channel skip on page 15 for details)
OFF Turn off the skip function.
MANUAL Set up the TV channel. (Refer to Channel setup on
page 15 for details)
FINE This function allows you to slightly adjust the received
channel with a weak signal. (Refer to Fine tune on
page 15 for details)
COUNTRY UK/IRELAND/DENMARK/FINLAND/ITALY/NORWAY/SPAIN/
SWEDEN/LUXEMBOURG/FRANCE/CZECH./POLAND/
HUNGARY/AUSTRIA/GERMANY/SWITZERLAND/BELGIUM/
NETHERLANDS
PROGRAM This function allows you to customize your program settings.
(Refer to Program settings on page 16 for details)
AUTO SCAN ►
CHANNEL 1
TV SYS. ◄ PAL ►
SOUND SYS. ◄ B/G ►
CHANNEL
1. Press Menu button to enter the main menu.
2. Press ◄(Left) ►(Right) to select CHANNEL.
3. Press ▲(Up) ▼(Down) button select the option,
and then press ◄(Left) ►(Right) to adjust the
parameter.
4. Press OK or Menu button to leave parameter
setting, press OK or Menu twice to leave the
main menu.
OSD Operation
20
21
EN
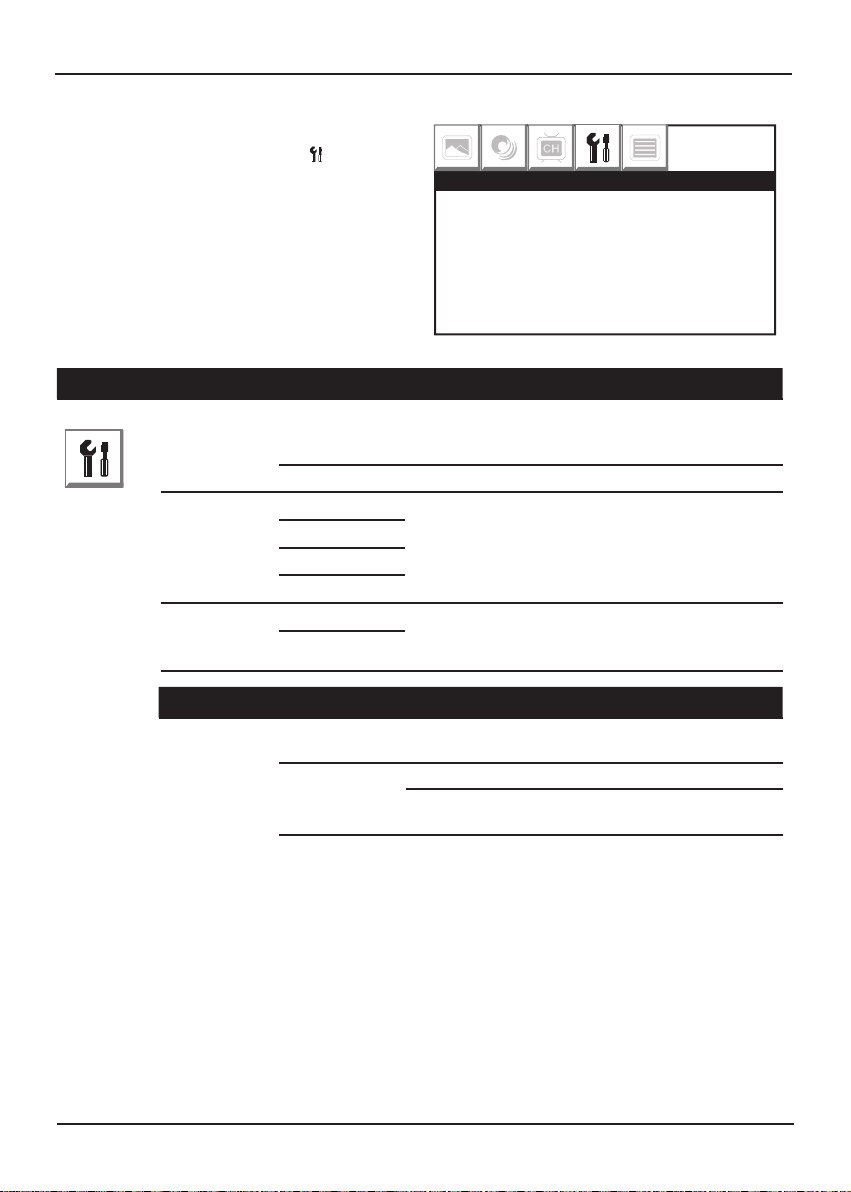
SETUP(TV/AV/PC Mode)
Item Option Description
SETUP
AUTO OFF
(TV/AV Mode)
ON If no signal (TV/AV/S-VIDEO/SCART) input to LCD
TV, the LCD will go into screen saver mode, after
15minutes, the screen will turn off automatically.
OFF Turn off this function.
TXT
LANGUAGE
EAST Select the teletext language according to the
system is used in your area.
WEST
ARABIC
RUSSIAN
TXT E/W EAST In some countries, the broadcast companies
transmit different teletexts to different areas, this
function allows you to select the suitable teletext.
WEST
AUTO OFF ◄ ON ►
TXT LANGUAGE ◄ EAST ►
TXT E/W ◄ WEST ►
SETUP
1. Press Menu button to enter the main menu.
2. Press ◄(Left) ►(Right) to select SETUP.
3. Press ▲(Up) ▼(Down) button select the option,
and then press ◄(Left) ►(Right) to adjust the
parameter.
4. Press OK or Menu button to leave parameter
setting, press OK or Menu twice to leave the
main menu.
Option Description
AUTO OFF
(PC Mode)
AUTO ON The LCD TV will go into standby mode
after 15 minutes if it is not used.
AUTO OFF Signal input Turn off this function.
No signal input The LCD TV will go into standby mode
after 15 seconds.
OSD Operation
21
EN
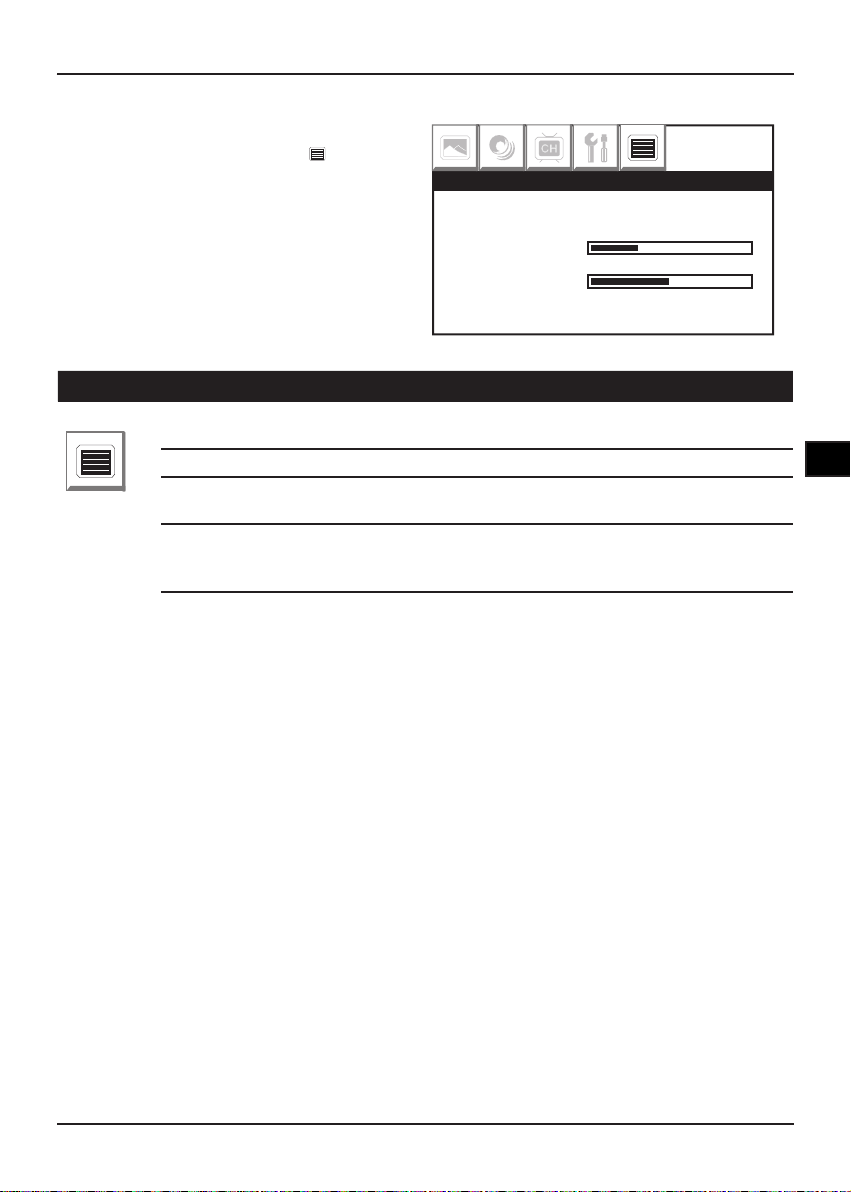
OSD Menu (TV/AV/PC Mode)
Item Option Description
OSD
LANGUAGE ENGLISH..... Select the language you want to display on
OSD.
DURATION Set up the OSD display time.
TRANSPARENT Set up the transparency of OSD display
background.
RESET Restore the factory default settings.
WARNING! Selecting this function will erase all
previously stored channels and settings.
LANGUAGE ◄ ENGLISH ►
DURATION
TRANSPARENT
RESET ►
OSD
1. Press Menu button to enter the main menu.
2. Press ◄(Left) ►(Right) to select OSD.
3. Press ▲(Up) ▼(Down) button select the option,
and then press ◄(Left) ►(Right) to adjust the
parameter.
4. Press OK or Menu button to leave parameter
setting, press OK or Menu twice to leave the
main menu.
OSD Operation

22
23
EN
PC Menu (PC Mode)
Item Option Description
PC
CONTRAST Adjust to increase or decrease the picture contrast.
BRIGHTNESS Adjust the picture to brighter or darker.
H-POSITION Adjust the picture horizontal position.
V-POSITION Adjust the picture vertical position.
CLOCK Adjust the picture vertical frequency.
PHASE Adjust the picture horizontal frequency.
AUTO Adjust the computer resolution, picture horizontal and
vertical position automatically.
CONTRAST
BRIGHTNESS
H-POSITION
V-POSITION
PC
1. Press Menu button to enter the main menu.
2. Press ◄(Left) ►(Right) to select PC.
3. Press ▲(Up) ▼(Down) button select the option,
and then press ◄(Left) ►(Right) to adjust the
parameter.
4 Press OK or Menu button to leave parameter
setting, press OK or Menu twice to leave the
main menu.
OSD Operation

23
EN
Troubleshooting
No picture on LCD TV
• Make sure the power is already connected to the power outlet
• Make sure the you are on the correct input signal mode, if not, please
switch it, for example, switch the TV/AV mode.
• Check the aerial connection is connected properly.
• Check the aerial is not broken.
• Check the connections between LCD TV and external equipment.
• Check the power of external equipment is turn on.
• Check TV system, make sure the TV system is selected correctly in
your location.
• Switch to another channels. If these channels’ signal is ne, probably
the problem is from TV station.
Unclear or unstable picture
• Check the aerial is connected.
• Adjust or move your aerial to different location.
• Adjust from OSD setting to select the correct settings.
No sound or noisy sound
• Check the connection of aerial.
• Check the aerial is not broken.
• Check TV system, make sure the TV system is selected correctly in
your location.
• Press the +/- or mute on remote control
• Make sure your earphone is already unplug from your earphone
jack.
Remote control
• Make sure no any obstructions between remote control and LCD TV.
• Replace the batteries of remote control if remote control lost power.
SYMPTOM (COMMON) REMEDY

Specications
Panel
Screen 19” wide, WXGA
Video
Video format Auto detecting
PC graphics 640x400@70Hz
640x480@60Hz/72Hz/75Hz
720x400@70Hz
800x600@
56Hz/60Hz/72Hz/75Hz
1024x768@60Hz/70Hz/75Hz
1152x864@75Hz
1280x720@60Hz
1440x900@60Hz
Aspect ratio 4:3 / 16: 9
Value adjustment Brightness/Contrast/Saturation/
Hue
Screen auto tune Support
2D comb-lter Y/C
Audio
Audio decoding Stereo
Speakers 3W x 2
Sound modes Personal/ News/Theater/Hall
Sound control Bass/Treble/Balance
TV
Tuner PAL (IEC type)
Source selection Cable/Air
MTS Mono/Stereo/Dual/NiCAM
(option)
Teletext Support
User interface
Graphic user interface Support
OSD language Multi-language support
Screen saver Support
Auto power off Support
Plug & play Support
Sleep timer 0/15/30/45/60
Connectors TV tuner/Audio&Video input
(RCA jacks)/S-video/D-sub
input(15pin)/PC Audio input
(M3.5jack)/Earphone/SCART
x2
Power
Consumption 48W
Power Source AC 100-240V 50/60Hz (option)
AC adaptor Global system support
(option)
Input DC jack
Output voltage 12V / 4A
Power LED Red/Blue
General
Dimensions :
W x H x D (mm)
508 x 410 x 175 (stand)
Weight (kg) 7 kg (approx)
Wall mount VESA support

2
3
DE
Inhalt
Inhaltsverzeichnis ..........................................................................................................
Seite 2
FCC- und Sicherheitsinformationen .............................................................................
Seite 3
Wichtige Sicherheitshinweise .......................................................................................
Seite 4
Vorsichtsmaßnahmen ....................................................................................................
Seite 5
Inbetriebnahme ...............................................................................................................
Seite 6
-Anpassen des Blickwinkels am LCD-TV ............................................................................................. Seite 6
-Montieren des LCD-TVs an eine Wand .............................................................................................. Seite 6
-Oberseite ............................................................................................................................................. Seite 7
-Frontseite ............................................................................................................................................ Seite 7
-Rückseite ............................................................................................................................................ Seite 8
Verbindungen .................................................................................................................
Seite 9
-Verbinden mit einer Antenne ............................................................................................................... Seite 9
-Verbinden mit einem STB/ DVD-Rekorder/ Satellitenreceiver ............................................................ Seite 9
-Verbinden mit externen Audio-/Videogeräten ..................................................................................... Seite 10
-Verbinden mit einem PC ..................................................................................................................... Seite 11
Fernbedienung ...............................................................................................................
Seite 12
-Fernbedienungsfunktionen .................................................................................................................. Seite 12
-Einlegen der Batterien in die Fernbedienung ...................................................................................... Seite 13
-Fernbedienungsreichweite .................................................................................................................. Seite 13
Anfangseinstellungen ....................................................................................................
Seite 14
-Einschalten .......................................................................................................................................... Seite 14
-Einstellen der TV-OSD-Sprache ......................................................................................................... Seite 14
-Einstellen des TV-Systems ................................................................................................................. Seite 14
-Einstellen des Soundsystems ............................................................................................................. Seite 14
-Einstellen der TV-Kanäle .................................................................................................................... Seite 14
Grundbedienung ............................................................................................................
Seite 15
-Wechseln in verschiedene TV-Kanäle ................................................................................................ Seite 15
-Lautstärkeregelung ............................................................................................................................. Seite 15
-Schlaf-Timer ........................................................................................................................................ Seite 15
-TV-Typ ................................................................................................................................................ Seite 15
-Kanal überspringen ............................................................................................................................. Seite 15
-Kanal einstellen ................................................................................................................................... Seite 15
-Feinabstimmen .................................................................................................................................... Seite 15
-Eingabesignal umschalten .................................................................................................................. Seite 15
-Programmeinstelungen ....................................................................................................................... Seite 16
-Teletext-Bedienung ............................................................................................................................. Seite 16
OSD-Bedienung ..............................................................................................................
Seite 17
-Bildmenü (TV/AV-Modus) ................................................................................................................... Seite 17
-Soundmenü (TV/AV/PC-Modus) ......................................................................................................... Seite 18
-Kanalmenü (TV-Modus) ...................................................................................................................... Seite 19
-Einstellungsmenü (TV/AV/PC-Modus) ................................................................................................ Seite 20
-OSD-Menü (TV/AV/PC-Modus) .......................................................................................................... Seite 21
-PC-Menü (PC-Modus) ......................................................................................................................... Seite 22
Fehlerbehebung .............................................................................................................
Seite 23
Technische Daten ...........................................................................................................
Seite 24
3
DE
VORSICHT
Halten Sie das Produkt von direkter Sonneneinstrahlung fern. Direktes Sonnenlicht und/oder
starke Erwärmung kann zu Schäden und Fehlfunktionen führen. Damit es nicht zu Bränden oder
Stromschlägen kommt, setzen Sie das Produkt weder Regen noch sonstiger Feuchtigkeit aus.
FCC-Hinweis:
Das vorliegende Gerät erfüllt die Grenzwertbestimmungen für digitale Geräte der Klasse B nach Teil 15
der FCC-Regeln zur Funkentstörung. Ziel dieser Bestimmungen ist es, beim Betrieb des Gerätes innerhalb
einer Wohnumgebung einen angemessenen Schutz gegen störende Interferenzen zu gewährleisten. Dieses
Gerät erzeugt und nutzt Hochfrequenzenergie und kann diese auch ausstrahlen. Wird es nicht gemäß den
hier gegebenen Anweisungen angeschlossen und genutzt, kann das Gerät Funkübertragungen erheblich
stören. Es ist jedoch trotz Befolgen der Anweisungen möglich, dass bei bestimmten Geräten Störungen
auftreten. Sollten durch das Gerät Störungen beim Radio- bzw. Fernsehempfang auftreten, was z.B. beim
Ein- und Ausschalten des Gerätes der Fall sein kann, versuchen Sie diese durch folgende Maßnahmen
zu beheben:
– Richten Sie die Empfangsantenne erneut aus, oder stellen Sie sie an einem anderen Ort auf.
– Vergrößern Sie die Distanz zwischen dem Gerät und dem Receiver.
– Schließen Sie das Gerät an eine Steckdose an, die zu einem anderen Stromkreis als zu dem des
Receivers gehört.
– Wenden Sie sich an Ihren Fachhändler oder einen erfahrenen Radio- und Fernsehtechniker, falls Sie
Hilfe benötigen.
Das Blitzsymbol innerhalb des gleichseitigen Dreiecks soll den Anwender auf nicht isolierte
Leitungen und Kontakte im Geräteinneren hinweisen, die im Fall einer Berührung zu
lebensgefährlichen Stromschlägen führen können.
Das Ausrufezeichen innerhalb des gleichseitigen Dreiecks soll den Anwender auf wichtige
Bedienungs- und Servicehinweise in der zum Gerät gehörenden Literatur aufmerksam
machen.
VORSICHT
STROMSCHLAGGEFAHR
GERÄTEABDECKUNG /-RÜCKWAND
NICHT ENTFERNEN
FCC- und
Sicherheitshinweise

4
5
DE
Wichtige Sicherheitshinweise
l Beschädigungen
Benutzen Sie Ihr Fernsehgerät niemals, wenn es auf irgendeine Weise beschädigt ist. Stellen Sie Ihr Fernsehgerät grundsätzlich auf einem achen Untergrund auf; meiden Sie Stellen, an denen das Gerät starken Vibrationen ausgesetzt
würde.
l Wetter
Bei Gewittern sollten Sie das Gerät von der Antenne trennen.
l Temperatur
Meiden Sie extreme Temperaturen - ob heiß oder kalt. Stellen Sie Ihr Fernsehgerät nicht in der Nähe von
Wärmequellen wie Heizungen oder Gas- und Elektroöfen auf.
l Offene Flammen
Offene Flammen wie Kerzen und anderes offenes Licht sollten nicht auf oder in der Nähe Ihres Fernsehgerätes
aufgestellt werden.
l Dekoration
Vasen und andere mit Wasser gefüllte Gefäße sowie Lampen sollten nicht auf Ihr Fernsehgerät gestellt werden.
l Feuchtigkeit
Setzen Sie Ihr Fernsehgerät weder Regen, sonstiger Feuchtigkeit noch Staub aus. Wenn Flüssigkeiten in Ihr Fernsehgerät eindringen, kann dies zu ernsthaften Schäden führen. Falls Flüssigkeiten in das Fernsehgerät eingedrungen sein
sollten, ziehen Sie sofort den Netzstecker. Wenden Sie sich an Ihren Händler.
l Belüftung
Das Fernsehgerät muss gut belüftet werden. Decken Sie Ihr Fernsehgerät nicht ab, stellen Sie es nicht an beengten
Stellen auf. Achten Sie darauf, mindestens 10 cm zu beiden Seiten und 20 cm nach oben hin frei zu lassen.
l Störungen
Stellen Sie Ihr Fernsehgerät nicht auf oder in der Nähe von Geräten auf, die elektromagnetische Störungen verursachen können ( z. B. Lautsprecher). Falls Sie dies dennoch tun, kann sich dies auf die Leistung Ihres Gerätes
auswirken und beispielsweise zu Bild- und Tonstörungen führen.
l Eingebrannte Bilder
Bei Plasma- und LCD-Fernsehgeräten ist es charakteristisch, dass permanente Nachbilder entstehen können, wenn
dasselbe Bild über längere Zeit angezeigt wird. Dieser Effekt wird gewöhnlich als eingebranntes Bild bezeichnet. Die
meisten Bilder, die Ihr Fernsehgerät anzeigt, sind in Bewegung und füllen den Bildschirm aus.
Nachstehend nden Sie einige Beispiele für Darstellungen, bei denen Sie etwas vorsichtig sein sollten (die
Liste ist nicht vollständig):
Schwarze Ränder: Wenn schwarze Ränder links/rechts oder oben/unten im Bild angezeigt werden, sollten
Sie das Anzeigeformat so ändern, dass das Bild den gesamten Bildschirm ausfüllt.
Logos von Fernsehsendern: Zum Beispiel Logos von Shoppingsendern und Preisangaben - insbesondere
dann, wenn diese kräftig leuchten und immer an derselben Stelle angezeigt
werden. Sich bewegende Graken und Graken mit geringem Kontrast führen
weniger schnell zu unliebsamen Effekten.
BiB und Multi-BiB: Nutzen Sie BiB- und Multi-BiB-Funktionen nicht über längere Zeit.
Zeitanzeigen
Videotext: Lassen Sie statische Seiten nicht längere Zeit anzeigen.
TV/DVD-Menüs: Zum Beispiel Listen von DVD-Inhalten.
Standbild (Pause): Lassen Sie nicht längere Zeit Standbilder von z. B. DVDs oder Videos anzeigen.
Hinweis: Damit es nicht zu Einbrenneffekten kommt, wenn Sie oben angeführte Darstellungen über längere
Zeit betrachten, reduzieren Sie Helligkeit und Kontrast. Wenn Bilder erst einmal eingebrannt sind, lassen sich
diese gewöhnlich nicht mehr restlos entfernen.
l Batterien
Batterien können leicht von Kleinkindern verschluckt werden. Lassen Sie jüngere Kinder nicht mit der Fernbedienung
spielen.
l Abdeckungen
Entfernen Sie keinerlei festen Abdeckungen; dies kann gefährliche Spannungen freisetzen.
l Bereitschaft
Die Bereitschaftstaste (Standby) an der Fernbedienung schaltet das Fernsehgerät nicht komplett aus; das Gerät
verbraucht nach wie vor etwas Netzstrom. Belassen Sie Ihr Fernsehgerät aus Sicherheits- und Energiespargründen
nicht über längere Zeit im Bereitschaftsmodus; z. B. nicht über Nacht, wenn Sie Urlaub machen oder aus anderen
Gründen außer Haus sind.
l Netzkabel
Achten Sie darauf, dass Fernsehgerät oder der Aufsteller des Fernsehgerätes nicht auf dem Netzkabel stehen: Das
Netzkabel kann durch das Gewicht des Fernsehgerätes beschädigt werden und Gefährdungen verursachen. Sorgen
Sie dafür, dass der Netzstecker frei zugänglich bleibt.
l Verpackung
Wenn die Möglichkeit besteht, die Verpackung aufzubewahren, kann sich dies als nützlich erweisen, wenn Sie das
Fernsehgerät einmal transportieren müssen: In der Originalverpackung ist das Gerät bestens geschützt. Versuchen Sie,
Verpackungsmaterial möglichst wiederzuverwenden. Falls Sie das Verpackungsmaterial nicht aufbewahren können oder
möchten, erfahren Sie bei Ihren örtlichen Behörden, wo Sie das Material am besten dem Recycling zuführen können.

5
DE
Lesen Sie die folgenden Sicherheitshinweise, bevor Sie das Gerät in Betrieb nehmen.
n Netzkabel
Beachten Sie die folgenden Hinweise, um Fehlfunktionen, elektrische Schläge, Feuer oder
Körperverletzungen auszuschließen.
l Fassen Sie das Kabel stets am Stecker an, wenn Sie es anschließen oder lösen.
l Das Netzkabel darf nicht in der Nähe von Heizkörpern verlegt werden.
l Stellen Sie unter keinen Umständen schwere Gegenstände auf das Netzkabel.
l Nehmen Sie keine baulichen Veränderungen oder eigenmächtigen Reparaturen am Netzkabel vor.
n Aufstellungsort
Beachten Sie bei der Wahl des Aufstellungsortes Folgendes:
l Vermeiden Sie direkte Sonneneinstrahlung, unmittelbare Nähe zu Wärmequellen oder eine Lagerung im
Autoinneren.
l Das Gerät darf weder hohen Temperaturen (über 35°C) noch übermäßiger Luftfeuchtigkeit (über 90%)
ausgesetzt sein.
l Stellen Sie das Gerät in einer staubfreien Umgebung auf, da innere Bauteile durch die Einwirkung
von Staubpartikeln nachhaltig beschädigt werden können.
n Nicht-Nutzung des Gerätes
Schalten Sie das Gerät aus, wenn Sie es nicht benutzen. Wenn Sie das Gerät über einen längeren Zeitraum
nicht nutzen, ziehen Sie den Netzstecker.
n Allgemeiner Umgang
l Berühren Sie keine inneren Bauteile. Das Gerät kann dadurch beschädigt werden.
l Bauen Sie das Gerät nicht auseinander.
l Legen Sie ausschließlich Disks in die Schublade ein.
n Flüssigkeiten und magnetische Gegenstände
l Stellen Sie keine Behälter mit Flüssigkeit (z.B. Vasen) in der Nähe des Geräts auf. Verschütten Sie
keine Flüssigkeiten auf dem Gerät, da es sonst beschädigt werden kann.
l Magnete oder magnetische Gegenstände dürfen nicht in die Nähe des Geräts gebracht werden.
n Aufstellungsart
l Stellen Sie das Gerät in horizontaler Lage auf. Stellen Sie keine schweren Gegenstände auf dem Gerät
ab.
Vorsichtsmaßnahmen
Der richtige Aufstellungsort
1. Stellen Sie das LCD-Fernsehgerät in einem Raum auf, in dem das Licht nicht direkt auf den Bildschirm fällt.
2. Vermeiden Sie Stellen, an denen das LCD-Fernsehgerät Sonnenlicht oder anderen Wärmequellen ausgesetzt
wird.
3. Achten Sie auf ausreichend Abstand zwischen Fernsehgerät und Wand, damit das Gerät gut belüftet werden
kann.
4. Decken Sie im Betrieb keinerlei Belüftungsöffnungen ab.
5. Fernsehen in komplett abgedunkelten oder sehr hellen Umgebungen kann die Augen überlasten. Wir empfehlen
eine sanfte, indirekte Beleuchtung.
6. Verwenden Sie keine aggressiven Reinigungsmittel oder sonstige Lösungen zum Reinigen des LCD-Bildschirms;
den Bildschirm reinigen Sie mit einem leicht angefeuchteten, weichen Tuch.
7. Das Netzteil des LCD-Fernsehgerätes ist für 100 bis 240 V Wechselspannung bei 50/60 Hertz ausgelegt.
6
7
DE
Vielen Dank für den Kauf dieses LCD-Fernsehgerätes.
Wir hoffen, dass Sie lange Zeit Freude an diesem Gerät haben werden.
Bevor Sie das Gerät in Betrieb nehmen, lesen Sie bitte die gesamte
Bedienungsanleitung aufmerksam durch, damit Sie Ihr neues LCDFernsehgerät von Anfang an richtig bedienen können.
Betrachtungswinkel einstellen
1. Sie können den Bildschirm um 5 ° nach vorne und um 10 ° nach hinten neigen.
2. Beim Einstellen des Winkels halten Sie den Ständer des LCD-Fernsehgerätes mit
einer Hand fest, damit das Gerät nicht kippt oder wegrutscht.
Wandmontage
1. Lösen Sie 5 Schrauben an der Ständerabdeckung an der Rückseite des Gerätes.
2. Lösen Sie 6 weitere Schrauben, nehmen Sie danach den Ständer ab.
3. Bringen Sie die Wandmontagehalterung am Fernsehgerät an. Zur Wandmontage beachten Sie bitte
die zusätzliche Installationsanleitung, die mit der Wandmontagehalterung geliefert wurde.
Erste Schritte
1
2
3
5˚ 10˚
Beispiel: 75 mm x 75 mm
Mini-Wandmontagehalterung
7
DE
Erste Schritte
Vorderseite
Draufsicht
1. MENU-Taste
Mit dieser Taste blenden Sie das Hauptmenü ein.
2. Lautstärketasten VOLUME +/-
Mit diesen Tasten stellen Sie die gewünschte
Lautstärke ein.
3. Kanalwahltasten CHANNEL +/-
Mit diesen Tasten wählen Sie den gewünschten
Fernsehkanal.
4. SOURCE-Taste
Diese Taste dient zur Auswahl der
unterschiedlichen Eingangssignalquellen, die
Sie an das Fernsehgerät anschließen können.
(TV/AV/SVIDEO/PC/SCART 1/SCART 2)
5. POWER-Taste
Zum Ein- und Ausschalten des LCD-
Fernsehgerätes.
6. Lautsprecher
7. LCD-Bildschirm
8. Betriebsanzeige
Die Betriebsanzeige leuchtet bei eingeschaltetem
Gerät blau. Wen n s ich das Gerät im
Bereitschaftsmodus befindet, leuchtet die
Anzeige rot.
9. Fernbedienungssensor
Empfängt Signale von der Fernbedienung.
MENU -VOLUME+ -CHANNEL+ SOURCE POWER
1 2 3 4 5
6 7 8 9
 Loading...