

Version 1.1
Smart Necklace
Manual V1.1

Version 1.1
Protocol
BT 4.0
MCU
ST, CSR
Projection distance
10 cm~30 cm
Sensor
G sensor, proximity sensor
Work voltage(V)
3.7V
Charge voltage(V)
5V
Working temperature
-20~60 ℃
Charge Port
Micro-USB adaptor
Charger cable
20 cm
Earphone talking time
Up to 60 minutes
Battery type
Lithium Battery
Earphone Battery capacity
15 mAh
Pendant Battery capacity
95 mAh
Standby life
Up to 3 days
Projection
Up to 150 Calls/SMS
Earphone size
24mm(L)x18mm(W)x14mm(Thickness)
Product size(mm)
48mm (L) x 17.5mm (Thickness)
Package size(mm)
142mm(L)x92mm(W)x52mm(Thickness)
Product Weight(g)
48 g
Package Weight(g)
51 g
Color
White, Black
Shell Material
Zirconia Ceramic
Please Read This User’s Manual
Please take the time to follow the instructions in this user’s manual carefully. It
will help you set up and operate your MiragiiTM product properly and enjoy its
advanced features. Please save this guide for future reference.
1 Technical Specification:

Version 1.1
Scene 1
Pendant
Earphone
Scene 2
2 Product Graphic Definition
The pendant has a concealed earphone on the back.
3 Product Function Definition
3.1 First Time Use
Charge the pendent and the earphone first after you received the
package. Please see section 4, for cable connections.
Version 1.1
Click
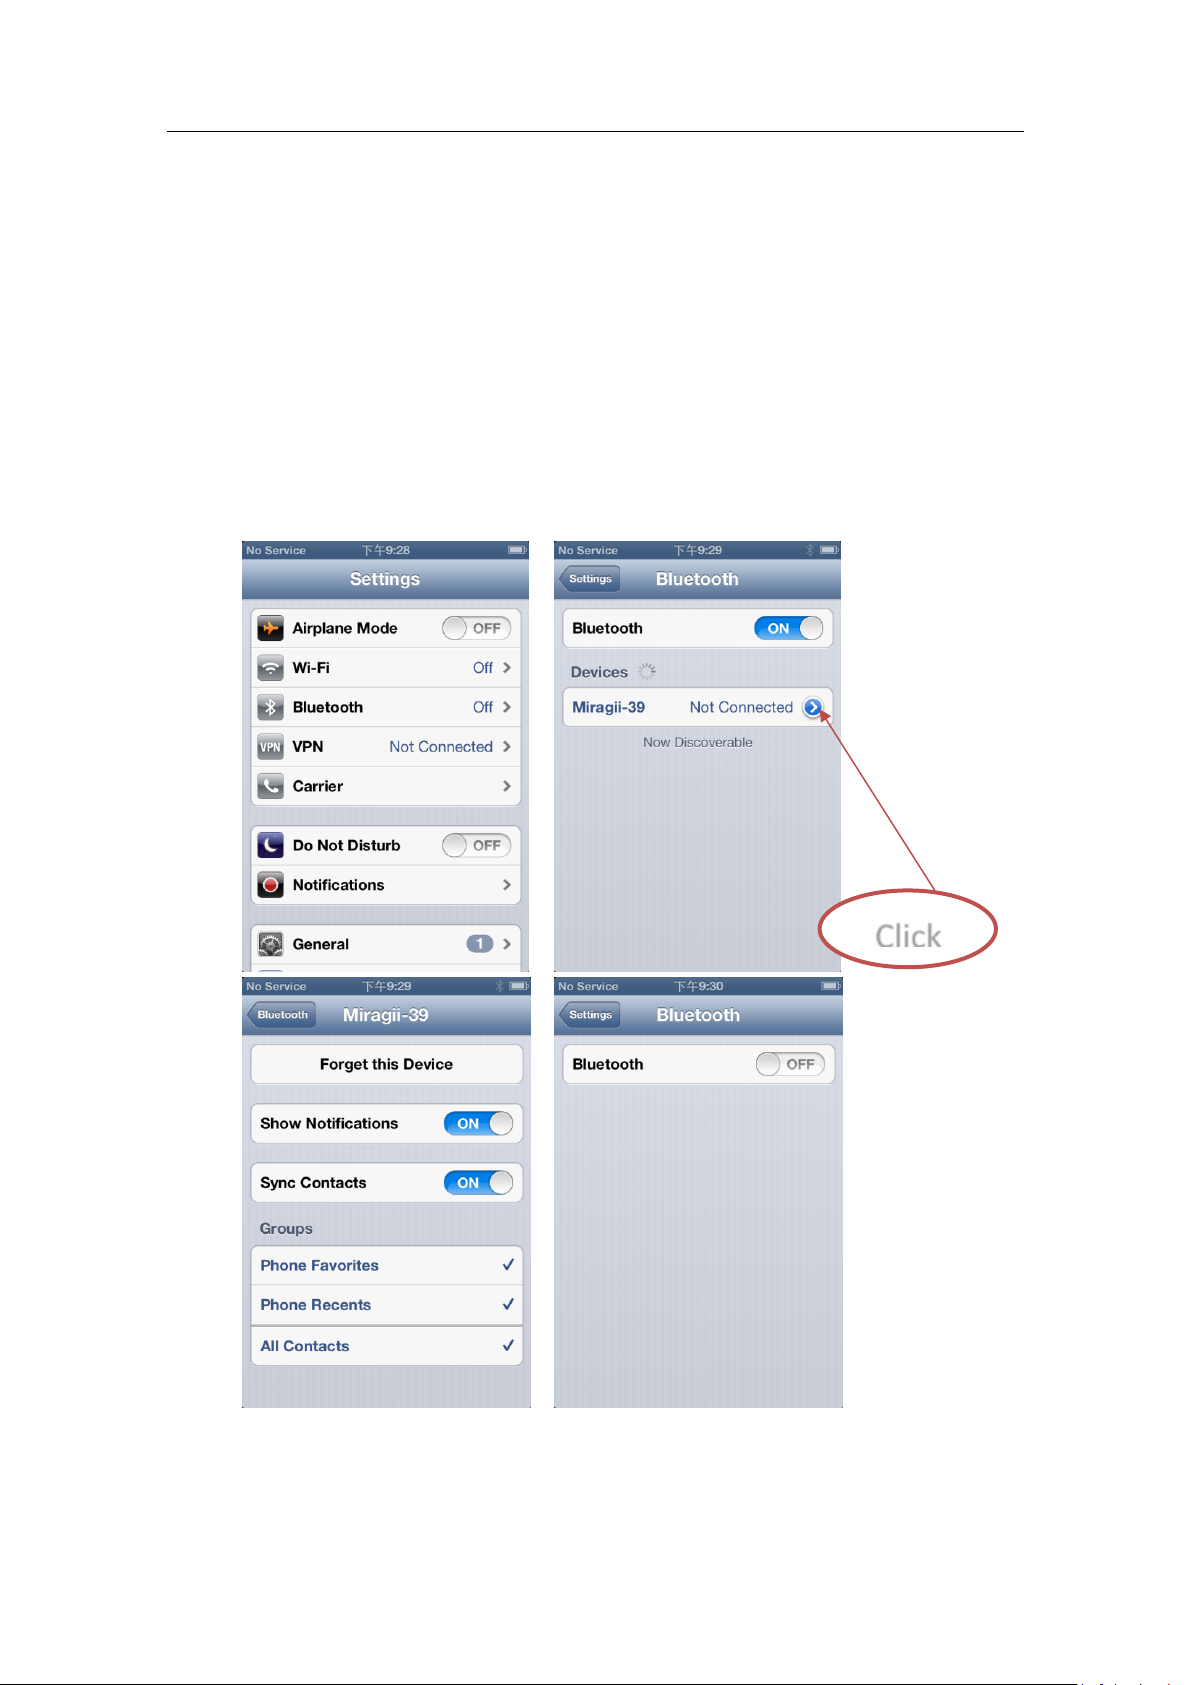
In iPhones 4 and above, users must follow the following instructions to
configure their iPhone.
a) In “Settings”, select “Bluetooth”.
b) Set “Bluetooth” to “ON”
c) Tap the earphone inside the pendent to wake it up
d) In Devices list, select Miragii product ID to connect.
e) Click the arrow next to “Connected” or “Not Connected”.
f) Set “Show Notifications” to “ON”
g) Set “Sync Contacts” to “ON”
h) Go back to step b,but set “Bluetooth” to “OFF”
i) Set “Bluetooth” to “ON” again
j) Repeat steps c to d,and make sure the device is “Connected”
In most Android phones with Android 4.4 system or above, during the
paring process, the phone will prompt two messages for the user to do
Version 1.1
Incoming Text Message
Incoming Calls
the setting. User simply has to accept both of the prompted messages.
3.2 Paring with a smart phone
1) In Scene 1, switch on the Bluetooth® of the smart phone to begin
searching for devices nearby.
2) Tap the earphone 2~3 times to turn it on, when the LED in the earphone
flashes green, the product is ready for pair. The Bluetooth® ID is printed
on the surface of the earphone.
3) In the smart phone Bluetooth® synchronizing list, select the Miragii
product ID and begin pairing.
4) During paring, the LED light alternates between green and blue.
5) Once paired, the LED will flash only blue.
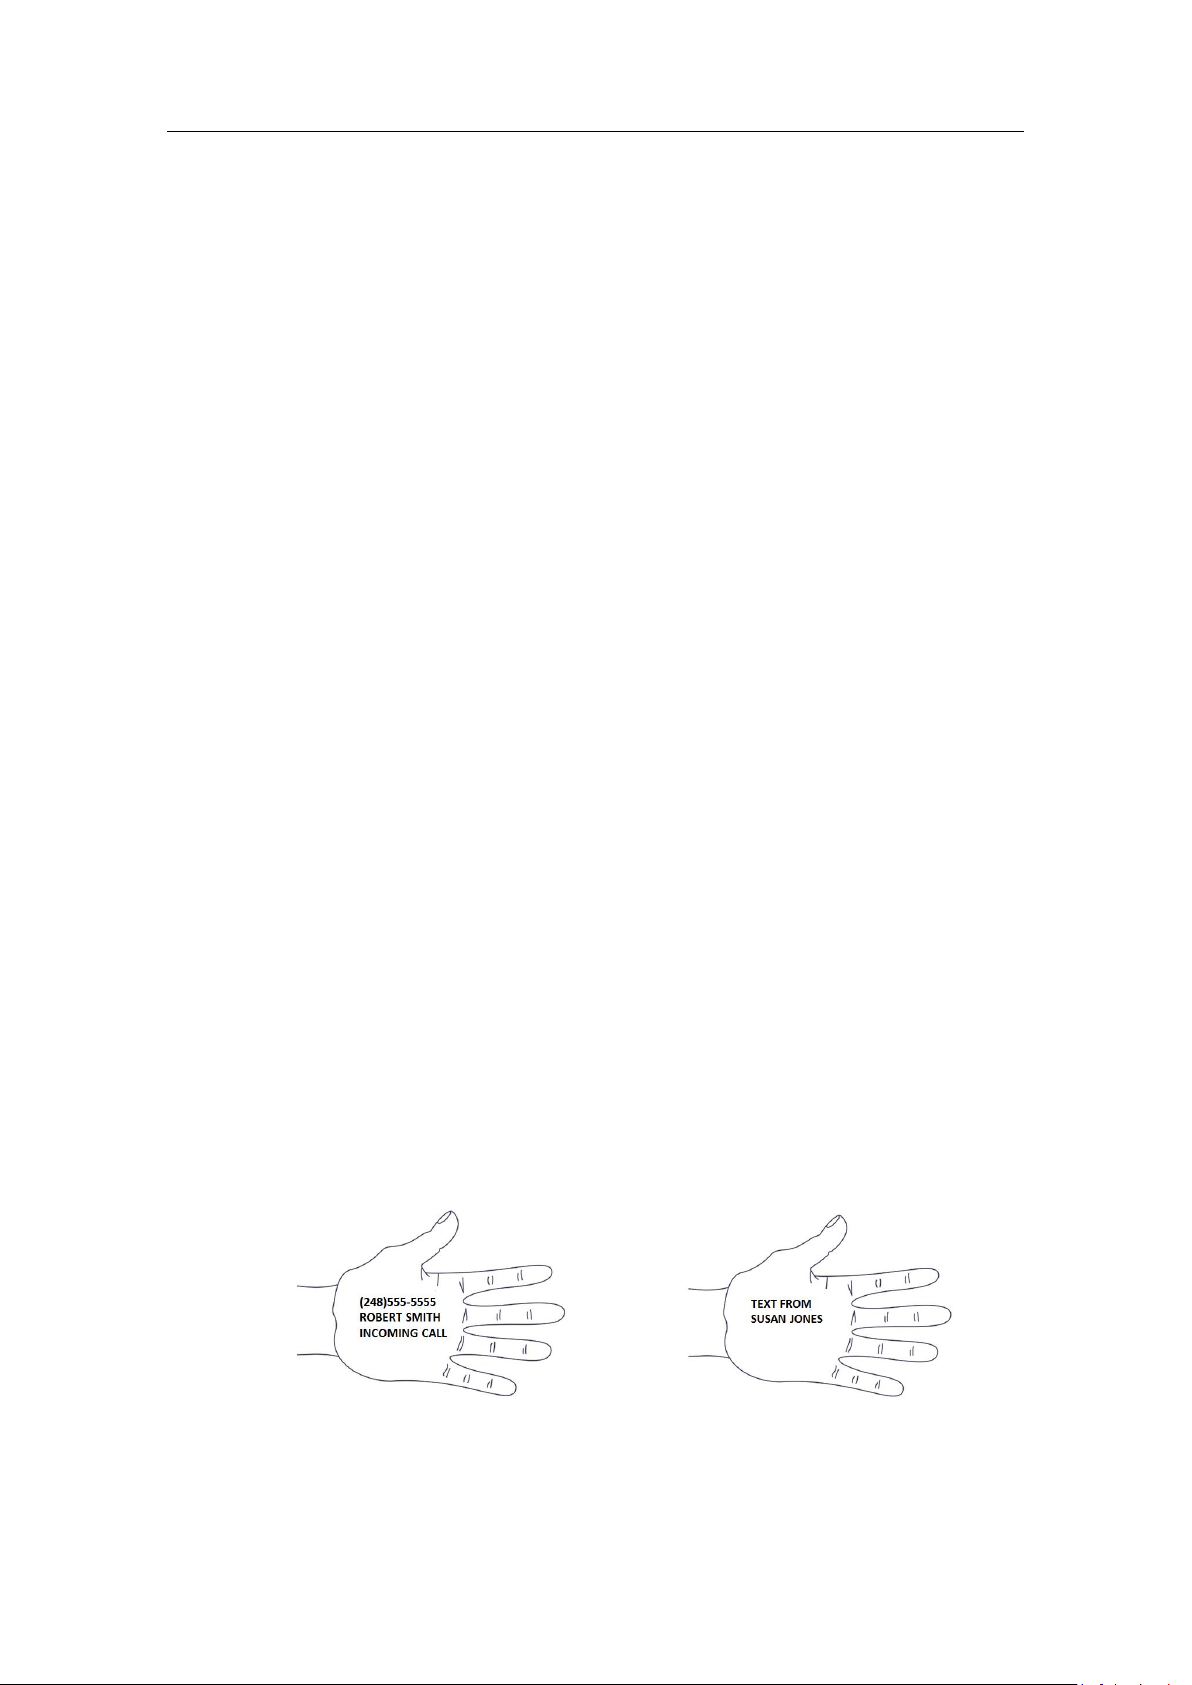
3.3 Incoming call
1) The earphone must be paired and attached to the pendent.
2) In Scene 2, an incoming call will trigger the vibrator inside the pendent; it
will vibrate 3 times as notification.
3) User puts one hand within 3 cm in front of the pendent, After the sensor
detects the hand, move that hand to about 10~30 cm in front of the
pendent, the incoming caller ID with caller name will be projected onto
the hand for 4 seconds.
4) User can repeat step 3 to view the projection again.
5) User can take the earphone out to answer the phone; by tapping the
earphone twice, volume will be increased; by tapping it once, volume will
be decreased.
6) User needs to put the earphone back onto the pendent after a call is
complete. Make sure the earphone is connected well to the pendent so
the next phone call will trigger the vibrator inside the pendent.
7) User can decline the call by putting the hand in front of the pendent
within 3 cm for about 1~3 second, then move the hand away completely.
3.4 Incoming text message
1) The earphone must be inside the pendent, connected, and the product
Version 1.1
has been paired with the smart phone.
2) In Scene 2, an incoming text message will trigger the vibrator inside the
pendent; it will vibrate 3 times as the notification.
3) User puts one hand within 3 cm in front of the pendent., After the sensor
detects the hand, move that hand to about 10~30 cm in front of the
pendent, the incoming message sender name will be projected on the
hand for 6 seconds.
4) User can scroll down to view the message by moving the hand toward
the pendent to about 5~10cm spacing, then moving the hand in front of
the pendent till 20cm away.
5) User can decline to view the text message by putting the hand in front of
the pendent within 3 cm for about 1~3 second, then move the hand away
completely.
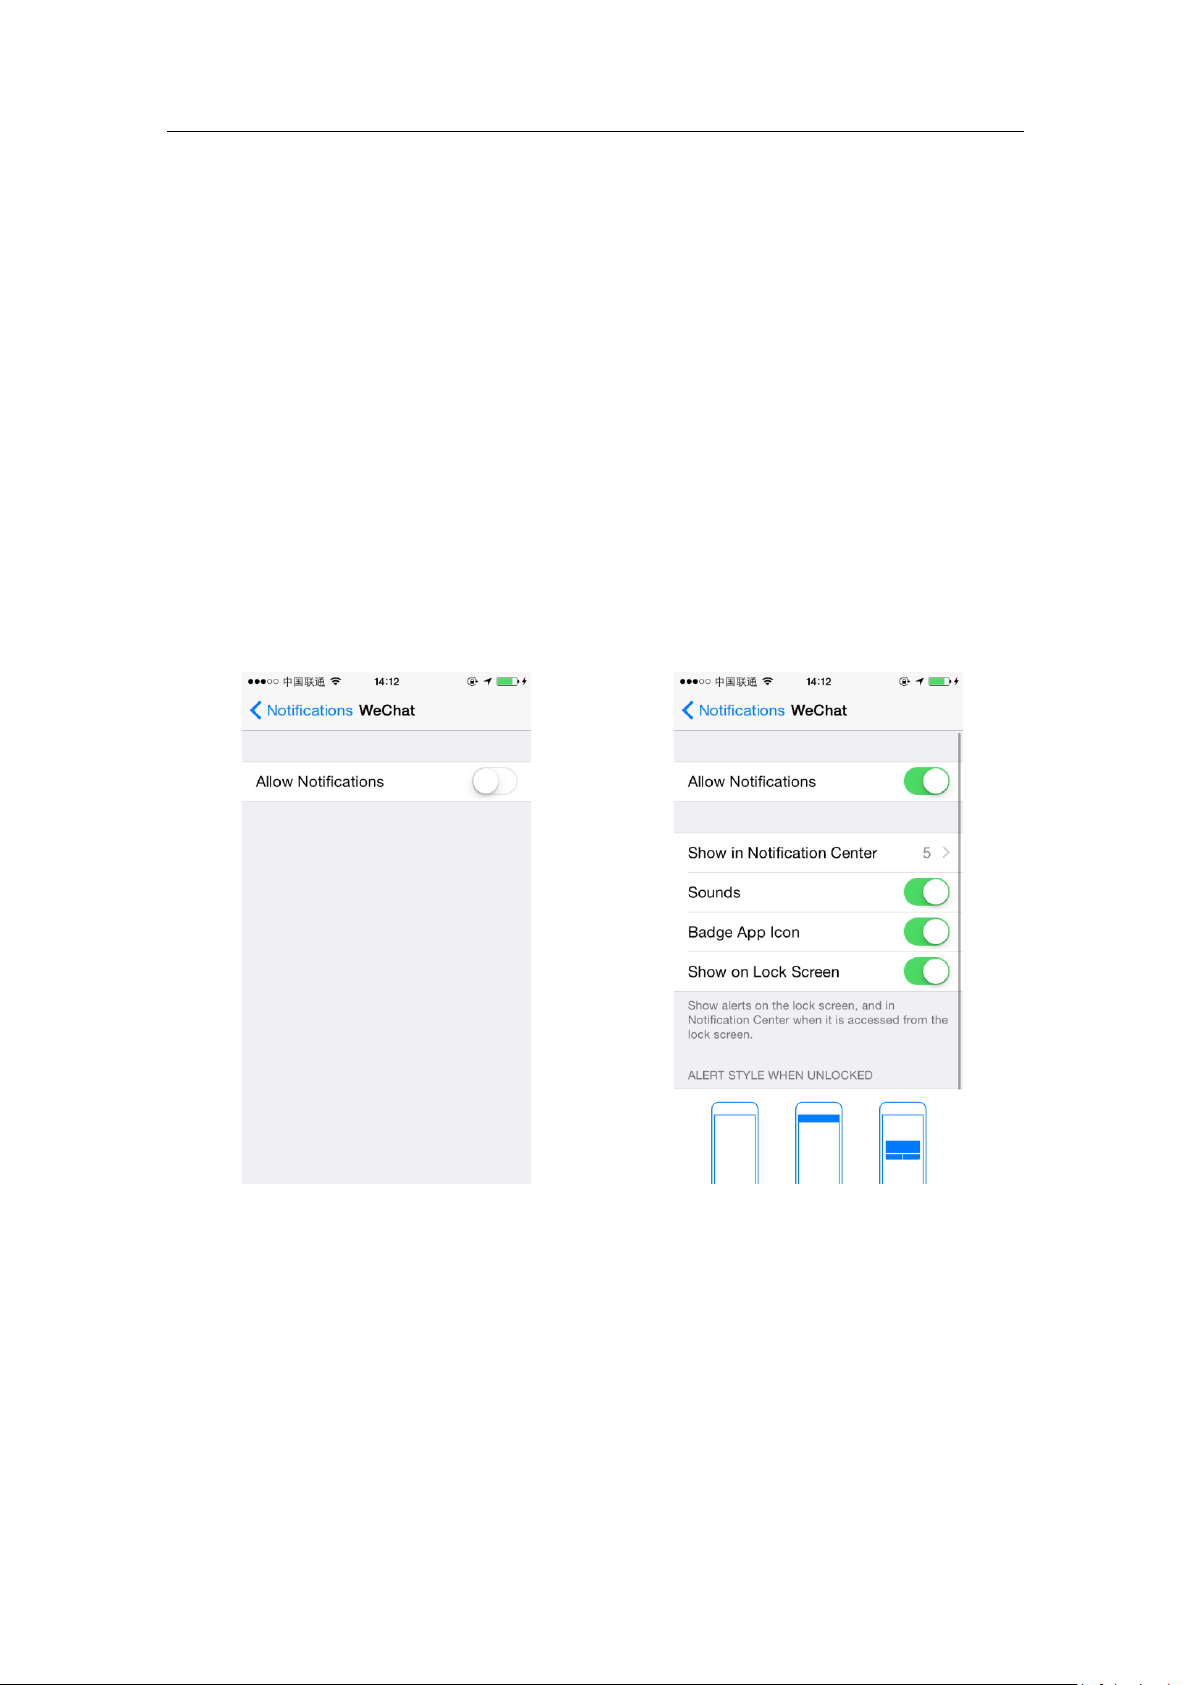
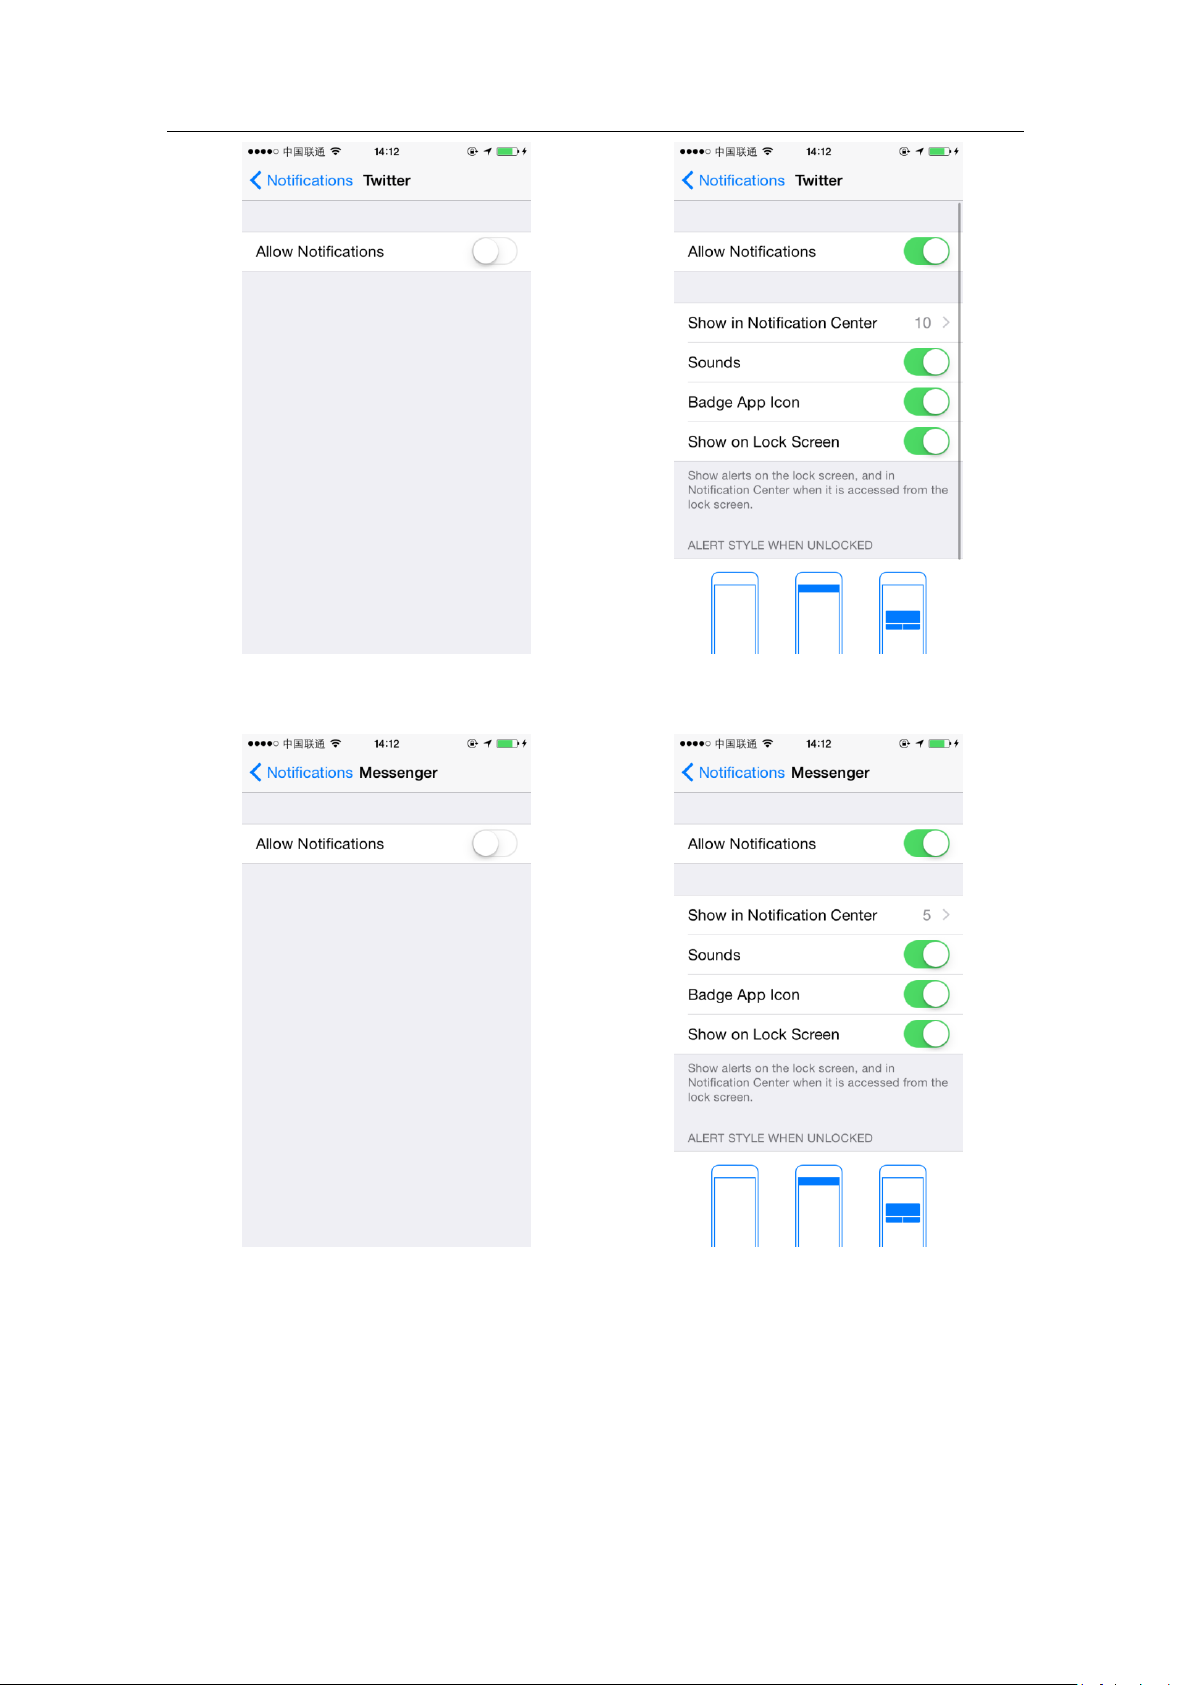
3.5 Incoming Social message setup for iOS
Note:
Each time after pairing, “Allow Notifications” must be turned off
and then on again due to iOS internal setup.
Version 1.1

Version 1.1
Step 1
Step 2
Step 3
3.6 Procedure to take out Earphone
1) In step 1, disconnect the earphone with the pendent connector by
carefully pulling the earphone head in the direction as the arrow shows.
2) In step 2, continue sliding the earphone toward the edge of the pendent
as the arrow shows.
3) Take out the earphone.
4) Please follow step 3, 2, 1 to put the earphone back.
5) Once the earphone is detached, projection function will be disabled.
3.7 Gesture Summary

Decline Call/SMS
Put the hand in front of the pendent
very close, within 3 cm for about
1~3 second, and then move the
hand away completely.
Scroll down message
Move the hand toward the pendent
to about 5~10cm spacing, and then
move the hand in front of the
pendent until about 20cm away.
Trigger Alert
Grasp the pendent and shake it for
3~5 seconds
Increase voice volume
Tap earphone twice quickly
Decrease voice volume
Tap earphone once
Wake up device for pairing
Tap the pendent (with earphone in)
a few times
Flashes green
Ready to pair
Flashes blue
Connected with phone
Flashes blue and green
alternatingly
In pairing
Low voltage
In red, no flash
In charging
In green, no flash
Fully charged
In blue, no flash
3.8 Outgoing call
Version 1.1
1) The earphone is inside the pendent connected and the product has been
paired with the smart phone.
2) Dial with the phone, take out the earphone to listen and speak.
3.9 Music
1) Take out the earphone, make sure it is connected and the product has
been paired with the smart phone.
2) The earphone functions as any other BT headset for music
3.10 Earphone LED Indication Summary
4 Product charging
1) When the earphone LED appears red, it indicates the earphone battery
power is low.

Version 1.1
Remove the rubber lid
to Pendant
to power USB port
to Earphone
2) Take Earphone out from Pendant.
3) Use the charging cable included to connect to both the earphone and the
pendent as shown on the following drawing.
4) Connect the USB port of the charging cable to power USB port.
5) Earphone LED will appear green, while the pendent will vibrate once to
indicate charging started
5 Reset
Each time you charge the earphone, the earphone will be reset.
To reset the pendent, please follow the instructions below as shown in the
figures:

item
description
Possible
reasons/solutions
1
No or low sound from earphone
Tap earphone twice to
increase volume
2
No projection
1) Earphone not paired or
connected to the smart
phone;
2) Earphone not plugged
into pendent;
3) Pendent battery is low;
4) Earphone battery is
low;
5) Press reset in the
pendent;
3
No caller name in the projection
1) The device comes with
English as the default
Use the specialized pin
to push the reset button
in the hole for 1 second.
6 Package
1) Pendant (Battery in)
2) Earphone (Battery in)
3) Cord
4) Charging cable
5) User manual
Version 1.1
7 Trouble shooting

Version 1.1
language, please check
our website for upgrade
and other language
packs;
4
No text message projection
In iPhone, “Notification”
is BT setting must be “on”
5
Projection goes away within 3
seconds
If the hand is quite far
away, the sensor
considers no hand, then
the projection will be
deactivated
8 Firmware Upgrade
1) Upgrade procedure cannot be conducted if the battery of the device is
low, including both pendent and earphone
2) Upgrade procedure cannot be conducted if the earphone is detached
from the pendent
3) Upgrade procedure is through phone mobile application (“APP”)
9 Phone APP Download
After APP is downloaded and installed, more functions such as software
upgrade etc. will be added. Further setup instructions will be available once APP
is released.
10 Limited Warranty
Miragii, LLC, including its affiliates (“Miragii”) warranty information can be
found online at http://www.miragii.com/legalnotice.html.
11 Compatibility
You acknowledge that you have verified the compatibility of the product with
other required equipment (e.g., ensuring that your mobile device and/or
operating system is compatible with the product). You are solely responsible
for determining the compatibility of the product with other equipment, and you
accept that lack of compatibility is not a valid claim under the warranty
provided with your products and does not otherwise constitute a basis for
receiving a refund after the fourteen (14) calendar day refund policy.

Version 1.1
10 Limitation of Liability
IN NO EVENT WILL MIRAGII BE LIABLE FOR ANY PUNITIVE,
EXEMPLARY, SPECIAL, CONSEQUENTIAL OR INCIDENTAL DAMAGES
(INCLUDING, WITHOUT LIMITATION, LOSS OF REVENUE, USE,
PROFITS, DATA, OR GOODWILL) OR COSTS OF PROCURING
SUBSTITUTE PRODUCTS, ARISING OUT OF, RELATING TO, OR IN
CONNECTION WITH THE PURCHASE, SALE, USE, OPERATION OR
PERFORMANCE OF THE PRODUCT, WHETHER SUCH LIABILITY
ARISES FROM ANY CLAIM BASED UPON CONTRACT, WARRANTY,
TORT (INCLUDING NEGLIGENCE), PRODUCT LIABILITY OR
OTHERWISE, WHETHER OR NOT MIRAGII HAS BEEN ADVISED OF THE
POSSIBILITY OF SUCH LOSS OR DAMAGE. IN NO EVENT WILL
MIRAGII’s LIABILITY TO YOU ARISING OUT OF, RELATING TO, OR IN
CONNECTION WITH THE PRODUCT OR ITS USE, FROM ALL CAUSES
OF ACTION AND UNDER ALL THEORIES OF LIABILITY, EXCEED THE
ACTUAL AMOUNT PAID TO MIRAGII BY YOU FOR THE PRODUCT THAT
GIVES RISE TO THE CLAIM. Some jurisdictions do not allow the limitation
or exclusion of liability for incidental or consequential damages, so the above
limitation or exclusion may not apply to you.
You are prohibited to directly or indirectly, infringe on any of the intellectual
property rights, title and interest of Miragii involved in, embedded or related
to the product and/or any of its parts, resell, reproduce, prepare derivative
works of, reverse engineer, decompile, disassemble, license, sublicense,
lend, copy, create a prototype of, or otherwise offer or make available the
product or any of its parts or the use of the product or any of its parts to any
third party. Any and all intellectual property rights involved in, embedded or
related to the product and/or any of its parts that is a property of Miragii shall
remain the exclusive property of Miragii. YOU ASSUME ALL RISK AND
RESPONSIBILITY FOR INJURY OR DAMAGE TO YOU OR OTHERS
BASED ON OR ARISING OUT OF POSSESSION, HANDLING, OR USE BY
YOU OR BY OTHERS OF THE PRODUCT OR ANY OF ITS PARTS FOR
ANY PURPOSE WHATSOEVER. YOU EXPRESSLY ACKNOWLEDGE
AND AGREE THAT, TO THE EXTENT PERMITTED BY APPLICABLE
LAW, YOUR USE OF THE PRODUCTS IS AT YOUR SOLE RISK AND
THAT THE ENTIRE RISK AS TO SATISFACTORY QUALITY,
PERFORMANCE, ACCURACY AND EFFORT IS WITH YOU.
11 Additional Disclaimer; Emergency Communication
Miragii product should not be relied upon for essential communications
(medical emergencies, calls to 911, or communications to emergency

Version 1.1
services). Miragii product is not designed or intended to be used for such
communication.
YOU UNDERSTAND THAT 911 SERVICE IS NOT PROVIDED OR
AVAILABLE THROUGH THE USE OF THE PRODUCT. IF YOU USE THE
PRODUCT OR APPS IN CONNECTION WITH OR ASSOCIATED WITH
THE PRODUCT, YOU MUST MAKE ALTERNATIVE ARRANGEMENTS TO
PLACE 911 CALLS, SUCH AS USING A TRADITIONAL WIRELINE OR
CELLULAR TELEPHONE, AND YOU SHOULD NOT RELY ON THE
PRODUCT OR ASSOCIATED SERVICES OR APPLICATIONS OF MIRAGII
TO CALL 911.
THE PRODUCT IS INTENDED FOR GENERAL PERSONAL USE ONLY. IT
IS NOT DESIGNED, MANUFACTURED, INTENDED, OR RECOMMENDED
FOR USE OR RESALE AS EQUIPMENT OR SERVICE IN
ENVIRONMENTS REQUIRING FAIL-SAFE PERFORMANCE (E.G.,
EMERGENCY MEDICAL CARE, HAZARDOUS ACTIVITIES) OR IN WHICH
THE FAILURE OF THE SERVICES COULD LEAD TO DEATH, PERSONAL
INJURY, OR SEVERE PHYSICAL OR ENVIRONMENTAL DAMAGE.
MIRAGII SPECIFICALLY DISCLAIMS ANY EXPRESS OR IMPLIED
WARRANTY OF FITNESS FOR HIGH RISK ACTIVITIES OR SERVICES.
12 FCC and IC Compliance Statement (United States & Canada)
This device complies with FCC part 15 FCC Rules. Operation is subject to
the following two conditions:
1. This device may not cause harmful interference, and
2. This device must accept any interference, including interference that may
cause undesired operation of the device.
RF exposure information: This device meets FCC and IC requirements for
RF exposure in controlled or uncontrolled environment.
Caution the user that changes or modifications not expressly approved by
the party responsible for compliance could void the user's authority to opera
te the equipment.
FCC Warning
Changes or modifications not expressly approved by the party responsible
for compliance could void the user’s authority to operate the equipment.
Note: This equipment has been tested and found to comply with the limits for
a Class B digital device, pursuant to part 15 of the FCC Rules. These limits
are designed to provide reasonable protection against harmful interference in

Version 1.1
a residential installation. This equipment generates, uses and can radiate
radio frequency energy and, if not installed and used in accordance with the
instructions, may cause harmful interference to radio communications.
However, there is no guarantee that interference will not occur in a particular
installation. If this equipment does cause harmful interference to radio or
television reception, which can be determined by turning the equipment off
and on, the user is encouraged to try to correct the interference by one or
more of the following measures:
• Reorient or relocate the receiving antenna.
• Increase the separation between the equipment and receiver.
• Connect the equipment into an outlet on a circuit different from that to
which the receiver is connected.
• Consult the dealer or an experienced radio/TV technician for help.
Changes or modifications not expressly approved by Miragii could void the
user’s authority to operate this equipment.
La operación de este equipo está sujeta a las siguientes dos condiciones: (1)
es posible que este equipo o dispositivo no cause interferencia perjudicial y
(2) este equipo o dispositivo debe aceptar cualquier interferencia, incluyendo
la que pueda causar su operación no deseada.
13 EU Compliance Statement (CE)
CAUTION
RISK OF EXPLOSION IF BATTERY IS REPLACED BY AN INCORRECT TYPE.
DISPOSE OF USED BATTERIES ACCORDING TO THE INSTRUCTIONS
14 Safety and Handling Information
Read these instructions.
Keep these instructions.
Heed all warnings.
Follow all instructions.
Handle Miragii product with care. It has sensitive electronic
components inside.
Miragii product can be damaged if dropped, burned, punctured,
or crushed, or if it comes in contact with water or other liquids.
Water and other liquids can get into the Miragii product's circuits,
leading to corrosion. Even when the Miragii product appears to
be dry and appears to operate normally, the circuitry could slowly
corrode and pose a safety hazard. If the Miragii product and/or
battery get wet, contact Miragii customer service, even if they
appear to be working properly.

Version 1.1
Do not attempt to open the product.
Substances contained in this product and/or its battery may
damage the environment and/or human health if handled and
disposed of improperly.
Don’t use a damaged Miragii product as it may cause injury.
Do not tamper with your Miragii product.
Do not use abrasive cleaners to clean your Miragii product.
Do not place your Miragii product in a dishwasher, washing
machine or dryer.
Do not expose your Miragii product to extremely high or low
temperatures. Do not use your Miragii product in a sauna or steam
room.
Do not leave your Miragii product in direct sunlight for an extended
period of time.
Do not leave your Miragii product near open flames.
Do not dispose of your Miragii product in a fire. The battery could
explode.
Do not attempt to disassemble your Miragii product.
Never allow children to wear or play with the Miragii product; the
small components and accessories (e.g. leather strap) may be a
choking hazard!
Repairing: Don’t open Miragii Product and don’t attempt to repair Miragii
product yourself. Disassembling Miragii product may damage it or may
cause injury to you. If Miragii product is damaged, malfunctions, or comes
in contact with liquid, contact Miragii customer support at
support@miragii.com.
Distraction: Using Miragii product in some circumstances can distract
you and may cause a dangerous situation. For example, you should not
use the Miragii product while exercising or driving.
Hearing loss: Damage to hearing occurs when a person is exposed to
loud sounds over time. The risk of hearing loss increases as sound is
played louder and for longer duration.
Prolonged exposure to loud sounds (including music) is the most common
cause of preventable hearing loss. Some scientific research suggests that
using portable audio devices, such as portable music players and cell
phones, at high volume settings for long durations may lead to permanent
noise-induced hearing loss. This includes the use of headphones
(including headsets, earbuds, and Bluetooth® or other wireless devices).
Exposure to very loud sound has also been associated in some studies
with tinnitus (a ringing in the ear), hypersensitivity to sound, and distorted

Version 1.1
hearing. Individual susceptibility to noise-induced hearing loss and
potential hearing problem varies. Additionally, the amount of sound
produced by a portable audio device varies depending on the nature of the
sound, the device settings, and the headphones that are used. As a result,
there is no single volume setting that is appropriate for everyone or for
every combination of sound, settings, and equipment. You should follow
some common sense recommendations when using any portable audio
device:
Always turn the volume down before plugging the earphones into an
audio source.
Set the volume in a quiet environment and select the lowest volume at
which you can hear adequately.
Be aware that you can adapt to higher volume settings over time, not
realizing that the higher volume may be harmful to your hearing.
When using headphones/earphones, turn the volume down if you
cannot hear the people speaking near you or if the person sitting next to
you can hear what you are listening to.
Do not turn the volume up to block out noisy surroundings.
Limit the amount of time you listen. As the volume increases, less time
is required before you hearing could be affected.
Avoid using earphones or headphones after exposure to extremely
loud noises, such as rock concerts, that might cause temporary hearing
loss. Temporary hearing loss might cause unsafe volumes to sound
normal. Do not listen at any volume that causes you discomfort. If you
experience ringing in your ears, hear muffled speech, or experience
any temporary hearing difficulty after listening to your portable audio
device, discontinue use and consult your doctor.
WARNING: To prevent possible hearing damage, do not listen at high
volume levels for long periods.
GPS and Navigation: Please refer to your mobile device user manual and
instructions related to information on Global Positioning System (GPS)
signal for location-based applications. Maps, directions, and other
navigation-data, including data relating to your current location, may
contain inaccurate or incomplete data, and circumstances can and do
change over time. In some areas, complete information may not be
available. Therefore, you should always visually confirm that the
navigational instructions are consistent with what you see before following
them. All users should pay attention to road conditions, closures, traffic,
and all other factors that may impact safe driving or walking. Always obey
posted road signs. You should not use the Miragii product while driving.

Version 1.1
Operating Environment: Remember to follow any special regulations in
force in any area, and always switch your mobile device/Miragii product off
whenever it is forbidden to use it, or when it may cause interference or
danger. When connecting the mobile device/Miragii product or any
accessory to another device, read its user's guide for detailed safety
instructions. Do not connect incompatible products.
Using Your Mobile Device Near Other Electronic Devices: Most
modern electronic equipment is shielded from Radio Frequency (RF)
signals. However, certain electronic equipment may not be shielded
against the RF signals from your wireless mobile device. Consult the
manufacturer to discuss alternatives.
Medical conditions and devices: If you have any medical condition that
you believe could be affected by Miragii product (for example, seizures,
blackouts, eyestrain, or headaches), consult with your physician prior to
using the Miragii product.
If you use any other personal medical devices, you should consult your
physician or the manufacturer of your medical device to determine if it is
adequately shielded from external RF energy and compatible with the
Miragii product. Your physician may also be able to assist you in obtaining
this information. Many manufacturers of medical devices recommend that
a minimum distance of separation should be maintained between a device
that emits RF energy such as the Miragii product and an implantable
medical device, such as a pacemaker or implantable ardioverter
defibrillator, to avoid potential interference with the medical device.
Persons who have such medical devices:
Should ALWAYS keep the Miragii product at or more than the distance
recommended by the manufacturer away from their implantable
medical device when the Miragii product is turned ON;
Should not carry the mobile device/Miragii product in a breast pocket;
Should use the ear opposite the implantable medical device to
minimize the potential for interference;
Should turn the mobile device/Miragii product OFF immediately if there
is any reason to suspect that interference is taking place;
Should read and follow the directions from the manufacturer of your
implantable medical device. If you have any questions about using your
wireless mobile device/Miragii product with an implantable medical
device, consult your health care provider.
Switch your mobile device/Miragii product off in health care facilities when
any regulations posted in these areas instruct you to do so. Hospitals or

Version 1.1
health care facilities may be using equipment that could be sensitive to
external RF energy.
Vehicles: RF signals may affect improperly installed or inadequately
shielded electronic systems in motor vehicles. Check with the
manufacturer or its representative regarding your vehicle before using your
mobile device in a motor vehicle. You should also consult the manufacturer
of any equipment that has been added to your vehicle. You should not
use the Miragii product while driving your vehicle.
Explosive atmospheres: Charging or using Miragii product in any area
with a potentially explosive atmosphere, such as areas where the air
contains high levels of flammable chemicals, vapors, or particles (such as
grain, dust, or metal powders), may be hazardous. Obey all signs and
instructions. Sparks in such areas could cause an explosion or fire
resulting in bodily injury or even death. Users are advised to switch the
mobile device/Miragii product off while at a refueling point (service station).
Users are reminded of the need to observe restrictions on the use of radio
equipment in fuel depots (fuel storage and distribution areas), chemical
plants, or where blasting operations are in progress. Areas with a
potentially explosive atmosphere are often, but not always, clearly marked.
They include below deck on boats, chemical transfer or storage facilities,
vehicles using liquefied petroleum gas (such as propane or butane), areas
where the air contains chemicals or particles, such as grain, dust, or metal
powders, and any other area where you would normally be advised to turn
off your vehicle engine.
High-consequence activities: This device is not intended for use where
the failure of the device could lead to death, personal injury, or severe
environmental damage.
Posted Facilities: Switch your mobile device/Miragii product off in any
facility where posted notices require you to do so.
15 Built-in Battery Precautions
Do not attempt to replace your Miragii product’s battery. It is built-in and
not changeable.
Charge the battery in accordance with the instructions supplied with this
guide.
Use only the charging cable that shipped with your product to charge the
product.
Charge your Miragii product using a certified computer, powered hub or
power supply.

Version 1.1
Do not attempt to force open the built-in battery.
16 Disposal and Recycling Information
You must dispose of Miragii product properly according to local laws and
regulations. Because Miragii product contains electronic components and
a battery, Miragii product must be disposed of separately from household
waste. Please kindly be aware that this is your responsibility to dispose
electronic equipment at recycling centers so as to help conserve natural
resources. When Miragii product reaches its end of life, contact local
authorities to learn about disposal and recycling options. Batteries are not
to be disposed of in municipal waste stream and require separate
collection.
Miragii, the Miragii logo, and other Miragii marks are trademarks or registered
trademarks of Miragii. All other trademarks are the property of their
respective owners. Miragii assumes no responsibility for any errors that may
appear in this manual. Information contained herein is subject to change
without notice. In the event there is any conflict or discrepancy between the
information provided in this manual and in any instructional videos provided
on the Miragii website, the information in this manual shall control.
Mention of third-party products is for informational purposes only and
constitutes neither an endorsement nor a recommendation. Miragii assumes
no responsibility with regard to the performance or use of these products. All
understandings, agreements, or warranties, if any, take place directly
between the vendors and the prospective users.
Contact:
Miragii, LLC
16885 West Bernardo Drive, Suite 320, San Diego, CA 92127.
support@miragii.com
© 2015 Miragii, LLC.

Version 1.1
 Loading...