

Mirage OMNICAN Owners manual
owners manual
PRINTED IN CHINA
7AI//OMNICAN
OMNICAN
OMNICAN PRO

owners manual
2
IMPORTANT SAFETY
INSTRUCTIONS READ CAREFULLY!
Read Instructions: All safety and operating instructions should be read before
the product is operated.
Retain instructions: Safety and operating instructions should be retained for
future reference.
Heed Warnings: All warnings on the product & operation instructions should
be adhered to.
Follow Instructions: All operating and use instructions should be followed.
INTRODUCTION
Congratulations on your purchase of Mirage Speaker Systems products! Proprietary
technology and high quality manufacturing will allow you to enjoy the most natural and
accurate music reproduction for many years.The advice offered in this manual is aimed
at helping you maximize and maintain peak performance, and therefore, your listening
satisfaction. Please take the time to read all of the instructions contained in this manual
to make certain your system is properly installed and functioning correctly.
BREAK-IN PERIOD
We strongly advise that you resist the temptation to play your Mirage Speaker Systems
speakers to their full capabilities until they have been properly broken in.This process
should last approximately 50 to 100 hours of music playback. This can be easily be done
by putting your compact disc player on Repeat mode, while playing a CD with a wide
dynamic range at average room volume listening levels.
AMPLIFIER REQUIREMENTS
All Mirage speakers are designed to be extremely efficient.All models are designed to be
8-ohm compatible allowing playback on almost any amplifier or receiver on the market.
Most amplifiers with a power rating of 20-100 watts per channel will effectively operate
your Mirage speakers.
Warning: If an amplifier or receiver is over-driven, the resulting distortion is
actually many times greater than its rated power. Over-driven amplifier distortion
is called “Clipping”, easily identified by its fuzzy, distorted sound, and can
damage any speaker. The volume control of most amplifiers and receivers is a
logarithmic type, which means that full power may be reached with the volume
control set at as little as the halfway point. Operating the loudness, treble, or
bass controls increases power output well beyond rated levels.The warranty on
your speakers is therefore void if the voice coils are burned or damaged as a
result of overpowering or clipping.
LIMITED WARRANTY POLICY
WARRANTY FOR UNITED STATES AND CANADA (see back cover)
Warranty Outside of the United States and Canada:
Product warranties may be legislated differently from one country to another. Ask
your local dealer for details of the LIMITED WARRANTY applicable in your country.
NOTE: Please retain the carton and packing material for your Mirage Speaker
Systems products to protect them in the event of a move or if they need to be
shipped to a service center. Product received damaged by a service center that
has been shipped by the end user in other than the original packaging will be
repaired, refurbished and properly packaged for return shipment at the end
user's expense.
PAINTING THE GRILLE AND THE BEZEL
If you wish, you can paint the grille and the visible frame of the OMNICAN to match the
décor and design of your home. Please take precautions to avoid any paint coming into
contact with the woofer cone, the tweeter, or the OMNIGUIDE module as this could
damage the speaker. Follow these simple steps to paint the speaker:
1) Separate the grille from the speaker.
2) The separated grille can now be painted on its own.
3) In order to paint the bezel, you should construct a protective cylindrical cover to slide
between the frame and the speaker (into the area where the grille is usually affixed).This
protective cover can be created by overlapping the ends of a piece of paper
approximately 16-inches (40cms) long.
4) After the protective cover is set in place, paint the frame, and then remove the protective
cover when the paint is dry.
NOTE: Please do not paint the black components which are hidden underneath
the grille, as they can easily be damaged.These components would also become
more visible underneath the grille when painted a lighter color. If any holes in the
grille become filled with paint, find a small sharp tool and carefully remove the
paint before completing the installation.
PLACEMENT / POSITIONING OPTIONS
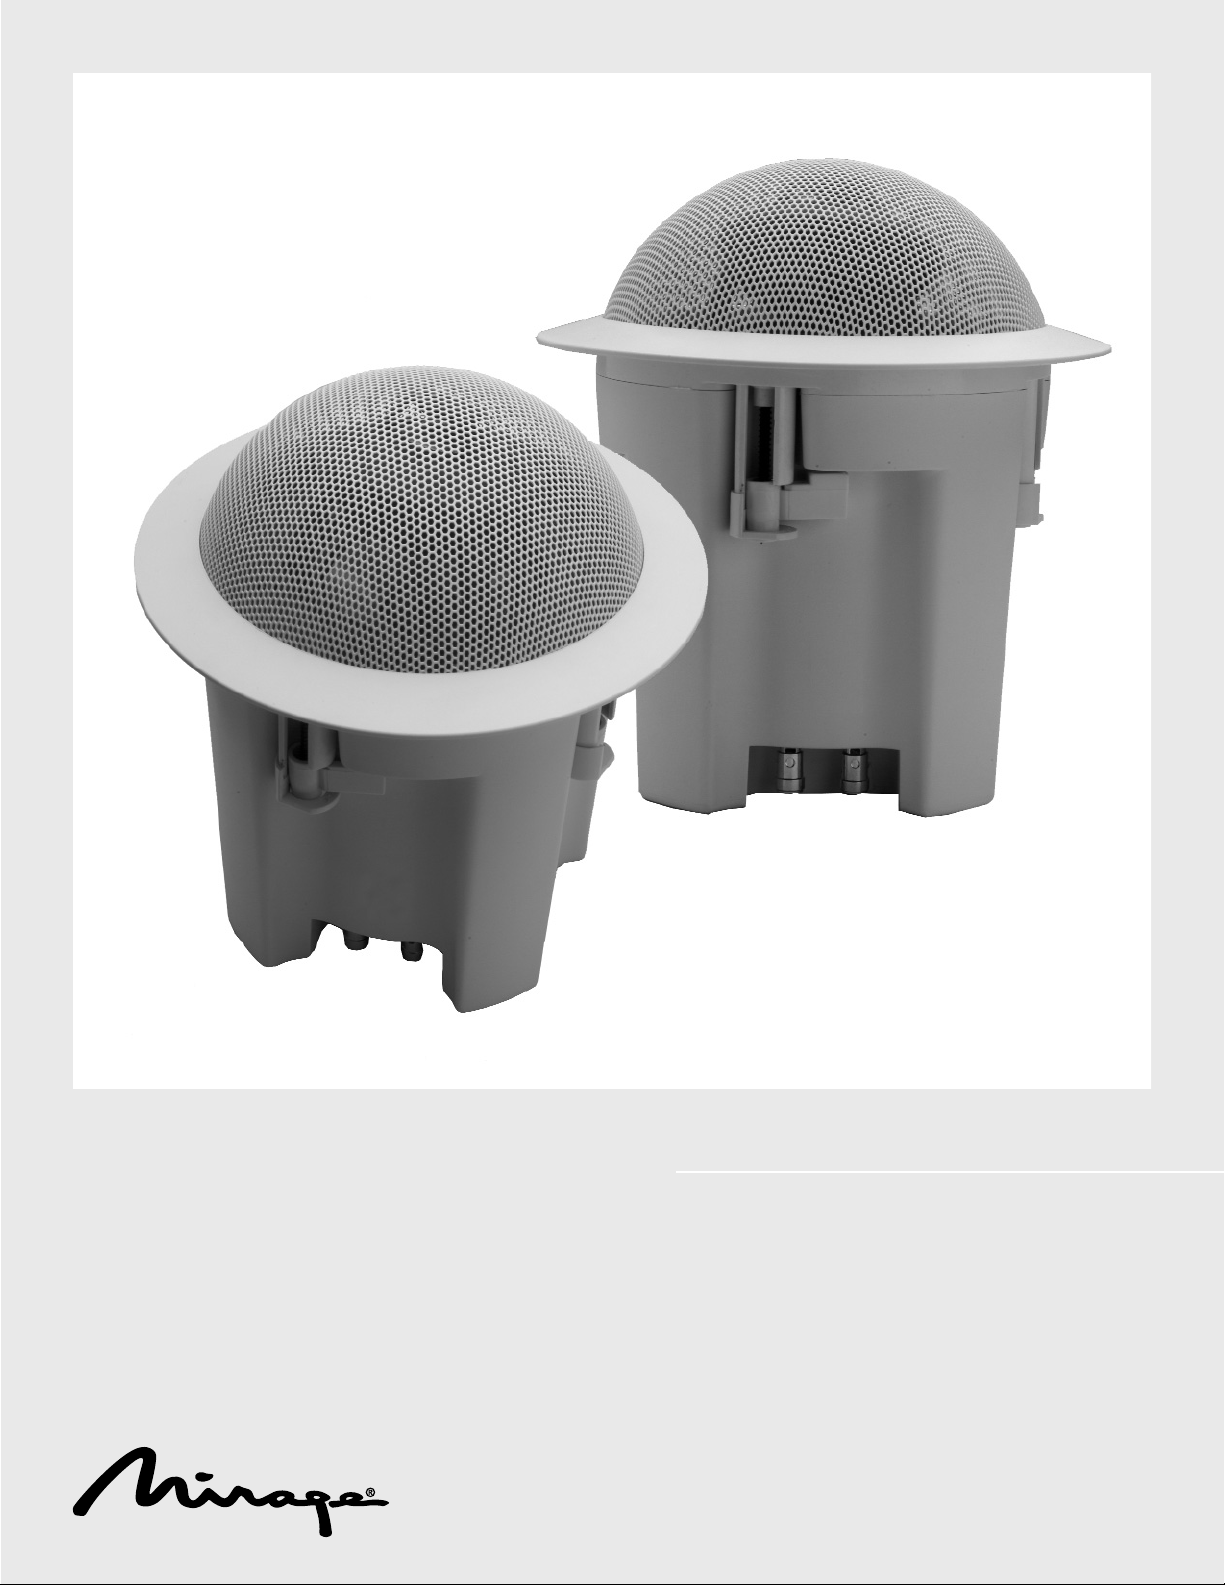
The OMNICAN is the most unique in-ceiling speaker developed to date. Featuring
Mirage’s exclusive OMNIPOLAR technology and other patent pending technological
advancements, the OMNICAN creates an unprecedented spacious soundfield. The
OMNICAN distributes sound evenly into the room, hence allowing for greater coverage
and smoother blending between speakers.
In order to achieve best results from the OMNICAN, it is important to understand the
fundamentals of the technology behind it.
The OMNIGUIDE is used to reflect the sound in a perfectly 360 degree dispersion
pattern. It is mounted to the OMNICAN in an angle to allow the OMNICAN to distribute
sound slightly towards a certain area. The OMNICAN can be aimed in different
directions by simply rotating it, thereby creating some amazing effects. This positioning
allows tremendous flexibility in accommodating any type of room environment.
By placing a ruler alongside the OMNIGUIDE, starting from the point at which the
OMNIGUIDE is attached to the frame, you can determine the direction toward which the
majority of sound is reflected. For further information please refer to diagram 1.
Using the above method to determine sound direction, we in general recommend firing
the sound towards the walls of the room. A large proportion of the sound that reaches
the listener is reflected from the walls, hence creating a soundstage and image that
appears to come from the middle of the walls instead of coming from the ceiling. Such
positioning can be very beneficial in particular for HOME THEATER set-ups. Diagram 2
shows a recommended set-up for a 5.1. home theater system when spaciousness is one
of the main criteria. The circles in the diagram illustrate the direction of the sound.
If the OMNICAN is mounted in a very large room it can be beneficial to aim the
OMNICAN towards the listening area, to further increase the coverage within the room.
It is important to note that no matter how the OMNICAN is mounted; it will
achieve great performance. The above should be seen as a very general
guideline on how to fine-tune the system, and how to cope with unusually
shaped rooms. We highly recommend experimenting with different angles
in order to find the perfect set-up for your room and to enjoy the
tremendous versatility of the OMNICAN series.

INSTALLATION INSTRUCTIONS
NOTE: If you are unable to install the speakers yourself, please contact an
authorized installation contractor, or your authorized Mirage Speaker Systems
retailer. Caution: Turn off all power in your audio/video system before
proceeding with your installation. Not doing so could result in potential damage
to the system.
INSTALLATION - Step by Step
1) Decide on the placement of your speakers.Advanced planning in regards to the
placement of your speakers is critical. In general we recommend leaving approximately
18-24 inches (45-60cm) of space between the speaker and the walls of the room. Please
refer to the Placement section for further information. The mounting location must be
void of wall studs or bracing.Adequate depth for the speaker to fit flush to the ceiling
surface is important.
2) Once you have determined the speaker’s final mounting position, use the supplied
template and mark the cut-out on the ceiling. To mark the cut-out size, simply trace an
outline of the supplied template. (Diagram 3)
3) Using the appropriate wall-cutting tool, accurately cut the hole into the ceiling.
(Diagram 4)
4) Insert the speaker cable(s) from the receiver or amplifier into the wall or ceiling, and
leave enough slack in the wire so that it can hang out from the hole and allow the
OMNICAN to rotate if necessary (Diagram 5). Using the appropriate wire is essential, as
your local municipality may have certain wiring codes that must be maintained.
NOTE: If you are using the 70 Volt version of the OMNICAN series, please adjust
the tap on the bottom of the speaker with a screwdriver to the desired wattage
before proceeding with the installation. (Diagram 6 - OMNICAN Pro ONLY)
5) Connect the speaker wire from the positive (RED +) terminal on the receiver to the
positive (RED+) terminal on the speaker. Connect the negative (BLACK-) terminal on the
receiver to the negative (BLACK-) terminal on the speaker. To connect the wire to the
speaker, completely push the appropriate terminal in, and insert the wire through the
hole that appears on the terminal. Release the terminal and the internal springs will hold
the wire in place. Repeat for the other terminal. NOTE: If you inadvertently reverse one of
the connections (i.e., red to black), you will notice a severe lack of bass from your
system. This is called wiring the system “Out of Phase”. If this occurs, check the wiring
and re-connect as necessary. (Diagram 7)
6) Do not pick the speaker up by the tweeter, as the Pure Titanium Hybrid Tweeter can easily
be damaged if this is done. Instead, use the frame of the speaker to hold it in place.
7) Insert the entire speaker into the hole (Diagram 8). Rotate the OMNICAN into the desired
direction and using a Philips screwdriver, tighten the screws attached to the dog clamps
until firm. DO NOT OVERTIGHTEN (Diagram 9 and 10)
8) To reattach the grille to the speaker, work in a circular fashion, gradually fitting the grille
into the bezel. (Diagram 11)
9) In order to rotate the speaker at a later point in time, take off the grille, slightly loosen
the four screws, and rotate the OMNICAN into the desired direction.
owners manual
3

manuel de l'utilisateur
4
IMPORTANTES CONSIGNES
DE SÉCURITÉ.
LISEZ-LES ATTENTIVEMENT !
Lire les instructions - Il est fortement recommandé de lire toutes les directives de sécurité et
d’utilisation avant de faire fonctionner l’appareil.
Conserver les instructions - Conserver les consignes de sécurité et les directives d’utilisation
pour consultation ultérieure.
Observer les mises en garde - Observer toutes les mises en garde apposées sur l’appareil et
contenues dans les directives d’utilisation.
Suivre les instructions - Se conformer à toutes les instructions d’installation et d’utilisation.
AVANT-PROPOS
Nous vous félicitons d’avoir choisi les enceintes acoustiques MirageMD ! La technologie
exclusive à MirageMD et la haute qualité de ses procédés de fabrication vous permettront de
tirer plaisir, de longues années durant, d’une restitution musicale aussi naturelle que précise.
Les conseils donnés dans ce manuel vous aideront à obtenir et à maintenir un rendement
optimal et, par conséquent, une entière satisfaction. Veuillez donc lire attentivement toutes les
instructions pour vous assurer que vos enceintes sont installées de manière appropriée et
qu’elles fonctionnent correctement.
PÉRIODE DE RODAGE
Nous vous recommandons fortement de résister à la tentation de faire fonctionner
immédiatement les enceintes MirageMD à leur pleine puissance. Essayez divers
positionnements et faites de l’écoute jusqu’à ce que les enceintes soient judicieusement
placées et bien rodées. Le processus est tout simple : mettez votre lecteur de disques
compacts en mode répétition et faites jouer un CD avec une dynamique étendue et à un niveau
d’écoute moyen, durant une période de 50 à 100 heures environ.
AMPLIFICATEURS RECOMMANDÉS
Toutes les enceintes Mirage sont conçues pour démontrer une très grande efficacité. L’enceinte
AS-06 est compatible avec une impédance de 8 ohms, permettant ainsi leur raccordement à
presque n’importe quel amplificateur ou récepteur. La plupart des amplificateurs avec une
puissance nominale de 20 W à 100 W par canal seront ainsi en mesure de prendre en charge
les enceintes Mirage.
Mise en garde : Lorsqu’un amplificateur est surchargé, la distorsion résultante est en
fait plusieurs fois plus élevée que sa puissance nominale. Cette distorsion, appelée
écrêtage, est facilement identifiable par le son flou et distordu produit, et peut
irrémédiablement endommager un haut-parleur. La commande de volume sur la
grande majorité des amplificateurs et récepteurs est de type logarithmique, ce qui
signifie que la puissance maximale peut être atteinte même lorsque la commande est
en position médiane. Les effets combinés du réglage du compensateur physiologique
et des commandes de tonalité – graves et aigus – peuvent amener la puissance de
sortie bien au-dessus des niveaux nominaux. Aussi, la garantie sur les enceintes sera-telle nulle dans l’éventualité où les bobines mobiles seraient brûlées ou endommagées
en raison d’une surcharge ou d’un écrêtage.
POLITIQUE DE GARANTIE LIMITÉE
Garantie au Canada et aux États-Unis
(voir l’endos de la couverture)
Garantie à l'extérieur des États-Unis et du Canada
Les garanties peuvent tomber sous le régime de législations différentes selon le pays. Pour de
plus amples détails sur les conditions de la garantie limitée applicables dans votre pays,
informez-vous auprès de votre revendeur local.
NOTA : Conserver le carton et les matières d'emballage en vue de protéger les
enceintes dans l'éventualité où il deviendrait nécessaire de les expédier à un centre de
service pour fins de réparation. Tout appareil qui est expédié par l'utilisateur dans un
emballage autre que celui d'origine et qui serait reçu endommagé, sera réparé, remis
en état et emballé pour expédition aux frais de l'utilisateur.
PEINTURE DU CADRE ET DE LA GRILLE
Il est possible de peinturer la grille et le cadre visible de l’enceinte OMNICA pour les marier au
décor de la pièce. Prenez toutes les précautions nécessaires pour éviter tout contact de la
peinture sur les surfaces du cône du haut-parleur des graves, du haut-parleur des aigus et du
module OMNIGUIDE car cela pourrait les endommager. Procédez de la manière décrite cidessous.
1) Séparez la grille de l’enceinte.
2) Peinturez la grille séparément.
3) Pour peinturer l’encadrement, il est fortement recommandé de confectionner un couvercle
cylindrique protecteur et de le glisser entre le cadre et le haut-parleur (dans l’espace où la grille
est normalement fixée). Ce masque peut être confectionné en repliant les extrémités d’une
feuille de papier d’environ 40 cm (16 po) de long.
4) Installez le masque, peinturez le cadre, puis une fois la peinture sèche, retirez le masque.
NOTA : Ne peinturez pas les composants noirs dissimulés derrière la grille, car cela
pourrait les endommager. D’autre part, si une couleur claire est utilisée, ces
composants deviendront plus visibles. Si des trous de la grille devaient être obstrués
par la peinture, retirez la peinture au moyen d’un objet effilé avant de terminer
l’installation.
CHOIX DE L’EMPLACEMENT
La conception de l’enceinte à suspendre OMNICAN est l’une plus originales à ce jour. Mettant
à profit la technologie OMNIPOLAIRE exclusive à Mirage et de nombreuses percées
technologiques (brevets en instance), l’enceinte OMNICAN crée un champ sonore d’une
ampleur inégalée. L’enceinte OMNICAN diffuse le son uniformément dans une pièce, d’où une
meilleure couverture et une meilleure harmonisation entre les diverses enceintes.
Pour en tirer un rendement optimal, il importe de comprendre la technologie à l’œuvre.
L’OMNIGUIDE est utilisé pour réfléchir le son selon un angle de rayonnement parfait de 360
degrés. Il est orienté de manière que l’enceinte diffuse le son vers une certaine aire de la pièce.
Il est possible d’orienter l’enceinte en la faisant pivoter, ce qui crée des effets acoustiques
parfois spectaculaires. De plus, cela confère une grande souplesse dans le choix de son
emplacement.
Pour déterminer l’aire de rayonnement principal, placez une règle le long de l’OMNIGUIDE à
partir de son point de fixation sur le cadre. Pour de plus amples renseignements, reportez-vous
à la Figure 1.
Il est généralement recommandé de diriger le son vers les murs de la pièce. Une grande
proportion du son qui atteint l’auditeur est réfléchi sur les murs ce qui donne l’impression que
les ondes sonores proviennent du centre des murs plutôt que du plafond. Un tel
positionnement convient particulièrement bien à une chaîne cinéma maison. Vous trouverez à
la Figure 2 la configuration recommandée avec une chaîne cinéma maison à 5.1 canaux dans
un contexte où l’ampleur du champ sonore s’avère le critère principal. Les cercles illustrent la
direction du son.
Dans le cas où l’enceinte OMNICAN serait installée dans une très grande pièce, il peut être
souhaitable de l’orienter vers la position d’écoute ce qui aura pour effet d’étendre sa
couverture dans la pièce.
Il convient de savoir que, peu importe l’emplacement choisi, l’enceinte OMNICAN
fournit toujours un rendement de haute qualité. Les instructions plus haut sont
données à titre indicatif seulement et ne constituent qu’un exemple des nombreux
moyens d’adapter l’enceinte à des pièces de formes irrégulières. Nous vous
recommandons de faire l’essai de divers emplacement et de diverses orientations
; vous découvrirez ainsi la merveilleuse polyvalence des enceintes de la série
OMNICAN.
 Loading...