

Mirage HDTCM-7 Owners manual
Installing the Grille
8. Fit the grille into the bezel gradually.
Work in a circular fashion, gradually fitting
the grille into the bezel. If you have any trouble fitting the grille in, check the dog screws.
If they are too tight, they can warp the bezel.
Once fully installed, the grille is absolutely
flush with the bezel.
Painting the Bezel and the Grille
Note: The inner section of the cardboard
cutout template acts as a paint mask if you
choose to paint the grille while it is installed.
11. The grille incorporates a scrim-cloth to
hide the metal domes and cones of the loudspeaker components when installed. This
scrim-cloth must be removed before painting. It is tacked into place in the four corners
of the grille. To remove, gently peel from
each corner in turn. Reserve the scrim-cloth
until the grille is painted and dry.
12. If you are using a spray gun, set it for the
most diffuse spray and try two very thin
coats. If you are using a brush, thin the paint
so that the grille holes will not be blocked.
13. After the paint is dry, apply four or five
small, thin spots of spray adhesive (similar to
3M Super 77) around the edge of the scrimcloth. Starting with one edge, work the
scrim-cloth back into place, making sure that
the cloth is stretched flat behind the grille.
Installation du Gril
10. Adapté le gril dans la monture graduellement.
Travaillez d'une mode circulaire, adaptant graduellement le gril dans la monture. Si vous avez
n'importe quel ennui adapter le gril dedans, vérifiez les vis de chien. Si elles sont trop serrées, elles
peuvent déformer la monture. Une fois qu'entièrement installé, le gril est absolument affleurant de la
monture.
Peindre la Monture et le Gril
Note: La section intérieure du calibre de coupecircuit de carton agit en tant que masque de peinture si vous choisissez de peindre le gril tandis
qu'il est installé.
11. Le gril incorpore un canevas-tissu pour cacher
les dômes en métal et les cônes des composants de
haut-parleur une fois installé. Ce canevas-tissu
doit être enlevé avant de peindre. Il est cloué dans
l'endroit dans les quatre coins du gril. Pour
enlever, épluchez doucement de chaque coin à
leur tour. Réservez le canevas-tissu jusqu'à ce que
le gril soit peint et séchez.
12. Si vous utilisez un pistolet de pulvérisation, le
placez pour le jet le plus diffus et essayez deux
manteaux très minces. Si vous employez une
brosse, amincissez la peinture de sorte que les
trous de gril ne soient pas bloqués.
13. Après que la peinture soit sèche, appliquez
quatre ou cinq petits, taches minces de l'adhésif de
jet (semblable à 3M 77 superbes) autour du bord
du canevas-tissu. Commençant par un bord, travaillez le canevas-tissu de nouveau dans l'endroit,
en s'assurant que le tissu est étiré à plat derrière le
gril.
HDT-CM7-SK
INSTALLATION
GUIDE / GUIDE D’INSTALLATION
CEILING MOUNT SPEAKER /HAUT-PARLEUR ENCASTRÉE-PLAFOND
TM
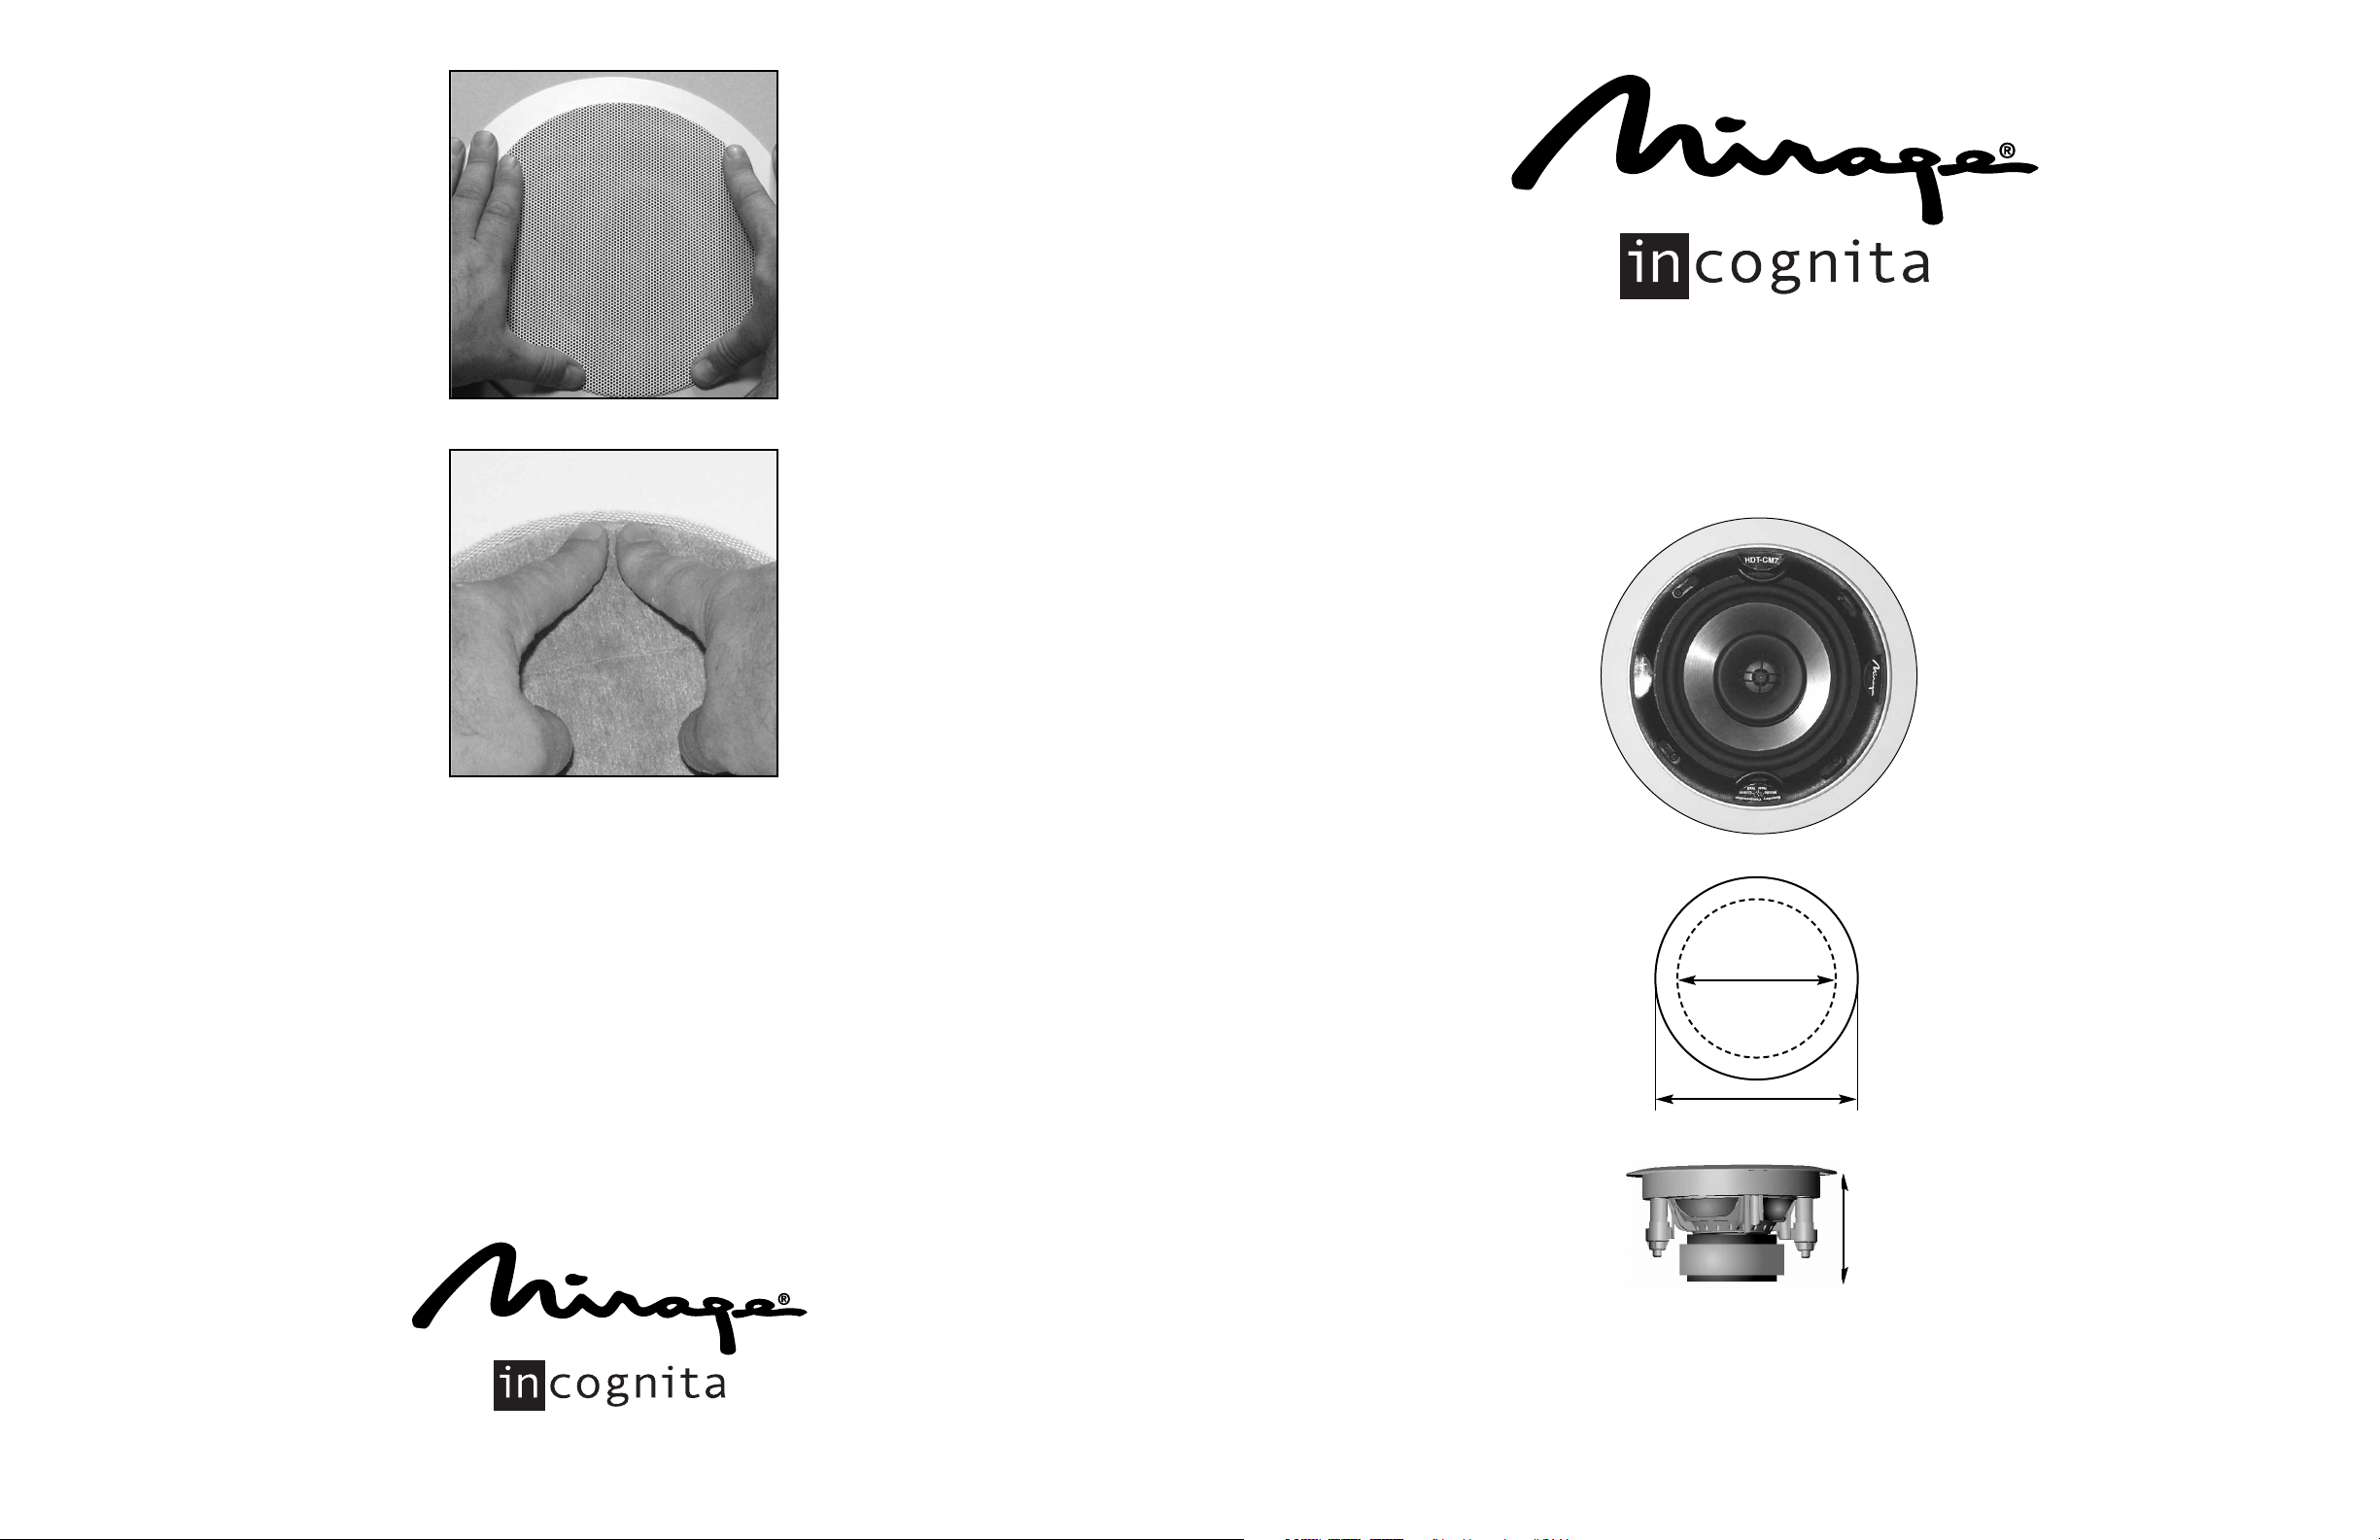
Introduction
Thank you for your purchase of the Mirage
Incognita HDT-CM7. The Mirage Incognita
High Definition Theater System and the
Mirage UltraDamped
TM
Mounting System
represent the culmination of an unprecedented and intense research and development program at Mirage.
The HDT-CM7 is designed with the traditional goal of all Mirage loudspeakers.
Nothing is held more important than musical
reproduction. Whether the music is played
back in DTSES
®
, DTS®, Dolby Digital EX®,
Dolby Pro Logic
®
, 5.1, 6.1, 7.1 Music or
Stereo, the HDT-CM7’s reward music listeners with flat, extended response, wide and
uniform dispersion and low distortion.
The HDT-CM7 accomplishes this via tweeter
and bass drivers configured for optimum
sound dispersion when mounted in the ceiling and features a pivoting tweeter to aid in
unusual mounting positions. Its 1" ferrofluid
cooled PTH™ Pure Titanium Hybrid dome
tweeter crosses over to a 6 1/2" woofer with
carbon fiber cone and butyl surroundin an
acoustically inert injection-molded copolymer basket.
The bass response is corrected by Mirage’s
three position boundary compensation. The
overall installation achieves a high degree of
freedom from resonance by virtue of the
Patent-Pending UltraDamped™ Mounting
system.
L'Introduction
Merci de votre achat du mirage HDT-CM7
Incognita. Le système élevé incognito de théâtre
de définition de mirage et le système de support
d'UltraDampedTM de mirage représentent le
point culminant d'un programme sans précédent
et intense de recherches et de développement au
mirage.
Le HDT-CM7 est conçu avec le but traditionnel de
tous les haut-parleurs de mirage. Rien n'est jugé
plus important que la reproduction musicale. Si la
musique est jouée en arrière dans DTSES
®
, DTS®,
Dolby Digital EX
®
, Dolby Pro Logic®, 5,1, 6,1, la
musique 7,1 ou stéréo, les auditeurs de musique
de récompense de HDT-CM7 avec la réponse plate
et prolongée, au loin et la dispersion uniforme et la
basse déformation.
Le HDT-CM7 accomplit ceci par l'intermédiaire
des conducteurs de tweeter et de basse configurés
pour la dispersion saine optima une fois monté
dans le plafond et comporte un tweeter de pivotement pour faciliter des positions de montage peu
communes. Son 1" PTH refroidi par ferrofluid
tweeter hybride titanique pur de dôme croise plus
d'à une woofers de 6 1/2" avec des cônes de fibre
de carbone et le butyle entoure dans un panier
injection-moulé acoustique inerte de copolymère.
La réponse basse est corrigée par la compensation
exclusive de frontière de Mirage par l'intermédiaire de trois positions. L'installation globale réalise
un degré élevé d'absence de résonance en vertu de
UltraDamped
TM
Brevet-En suspens Système de
support.
TM
3641 McNicoll Avenue, Toronto, Ontario, Canada M1X 1G5
Phone 416-321-1800
Work the grille into place gradually. / Adapté le gril
dans la monture graduellement.
After painting the grille, re-glue the scrimcloth into
place. / Après avoir peint le gril, re-colle le scrimcloth
dans l'endroit.
HDT-CM7
©2003 Audio Products International, Corp
Mirage, the Mirage logo, Incognita, the Incognita logo, Pure Titanium Hybrid,
PTH and Omnipolar are registered trademarks of Audio Products International Corp.
Dolby, Dolby Digital EX, Dolby ProLogic are trademarks of Dolby Laboratories Licensing.
DTSES, DTS are the trademarks of Digital Theater Systems Inc.
5” -12.7 cm
Depth
9.5”- 24 cm
Overall
8.1”- 21 cm
Hole Cutout
Considérations d'Installation
Mirage Incognita empaquette le HDT-CM7 dans
trois cartons séparés. Ceci le facilite pour des
installations dans la nouvelle construction,
puisque seulement la partie nécessaire est
apportée dehors à l'emplacement du travail à
chaque étape de construction. Dans une modification à un mur existant, vous devez apporter un kit
de haut-parleur de HDT-CM7-SK et un MK-MCM pour CHAQUE endroit de haut-parleur.
Des haut-parleurs de Mirage Incognita et les kits
de support sont emballés séparément, pas dans les
paires. Cependant, le NCB-M-CM (Supports
D'endroit de nouvelle construction) sont emballés
en vrac, quatre supports dans chaque carton.
Facultatif - “Épar
gnant De T
rou” - NCB-M-CM
Le NCB n'est jamais installé en adaptant un hautparleur dans un plafond existant. Il PEUT être
installé pendant un transformer ou la construction
d'une nouvelle maison, alors que les poutrelles et
les goujons structuraux sont exposés.
Typiquement, le fil est placé maintenant, pour
éviter les fils électriques (ils peuvent causer le fredonnement). Le NCB est simplement cloué entre
les goujons et fermé à clef en l'place avec des vis.
Intalled des forces de NCB l'installateur de wallboard pour couper le trou pour le haut-parleur, de
ce fait évitant la poussière potentielle et désordre.
En plus, il fournit un tiedown au fil de haut-parleur et montre clairement chacun où le haut-parleur sera installé, évitant des malentendus.
Requis -
API Kit D’Installation - MK-M-CM
Dans la nouvelle construction, le kit de support est
installé une fois que le mur est couvert de plaques
de plâtre ou de plâtre. Dans une modification à
un mur existant, le trou est coupé et utilisé pour
faciliter courir le fil de nouveau à l'implantation
des équipements d'abord, alors le kit de support
est installé.
Une fois que la monture est poussée dans le trou,
les chiens à ressort sont tournés dans l'endroit.
Maintenant la monture est prête pour le haut-parleur à être installée.
Pour plus de détail, consultez les instructions
emballées avec le kit.
Requis - HDT
-CM7-SK
Dans la nouvelle construction, le kit du haut-parleur HDT-CM7 est seulement installé une fois que
la maison est bloquée et prête pour l'occupation.
Dans une modification, le kit de haut-parleur est
installé après que la monture soit montée et avant
que le gril est adapté.
Installation Considerations
Mirage Incognita packages the HDT-CM7 in
three separate cartons. This makes it easier
for installations in new construction, since
only the necessary part is brought out to the
job site at each stage of construction. In a
retrofit to an existing wall, you must bring
both an HDT-CM7-SK speaker kit and an
MK-M-CM for EACH speaker location.
Mirage Incognita speakers and mounting kits
are packed singly, not in pairs. However, the
NCB-M-CM (New Construction Brackets) are
bulk packed, four brackets in each carton.
Optional - NCB-M-CM “Hole Saver”
The NCB is never installed when fitting a
speaker into an existing ceiling. It MAY be
installed during a remodel or the construction of a new house, while the structural
joists and studs are exposed. Typically, the
wire is placed now, to avoid electrical wires
(they can cause hum). The NCB is simply
nailed between the studs and locked into
position with screws. The intalled NCB
forces the wallboard installer to cut the hole
for the speaker, thus avoiding potential dust
and mess. Additionally, it provides a tiedown
to the speaker wire and clearly shows everyone where the speaker will be installed,
avoiding misunderstandings.
Requir
ed - API
Mounting Kit MK-M-CM
In new construction, the mounting kit is
installed once the wall is covered with drywall or plaster. In a retrofit to an existing
wall, the hole is cut and used to facilitate
running wire back to the equipment location
first, then the mounting kit is installed.
Once the bezel is pushed into the hole, the
spring loaded dogs are rotated into place.
Now the bezel is ready for the speaker to be
installed.
For more detail, consult the instructions
packed with the kit.
Requir
ed - HDT-CM7-SK
In new construction, the HDT-CM7 speaker
kit is only installed once the house is secure
and ready for occupancy. In a retrofit, the
speaker kit is installed after the bezel is
mounted and before the grille is fitted.
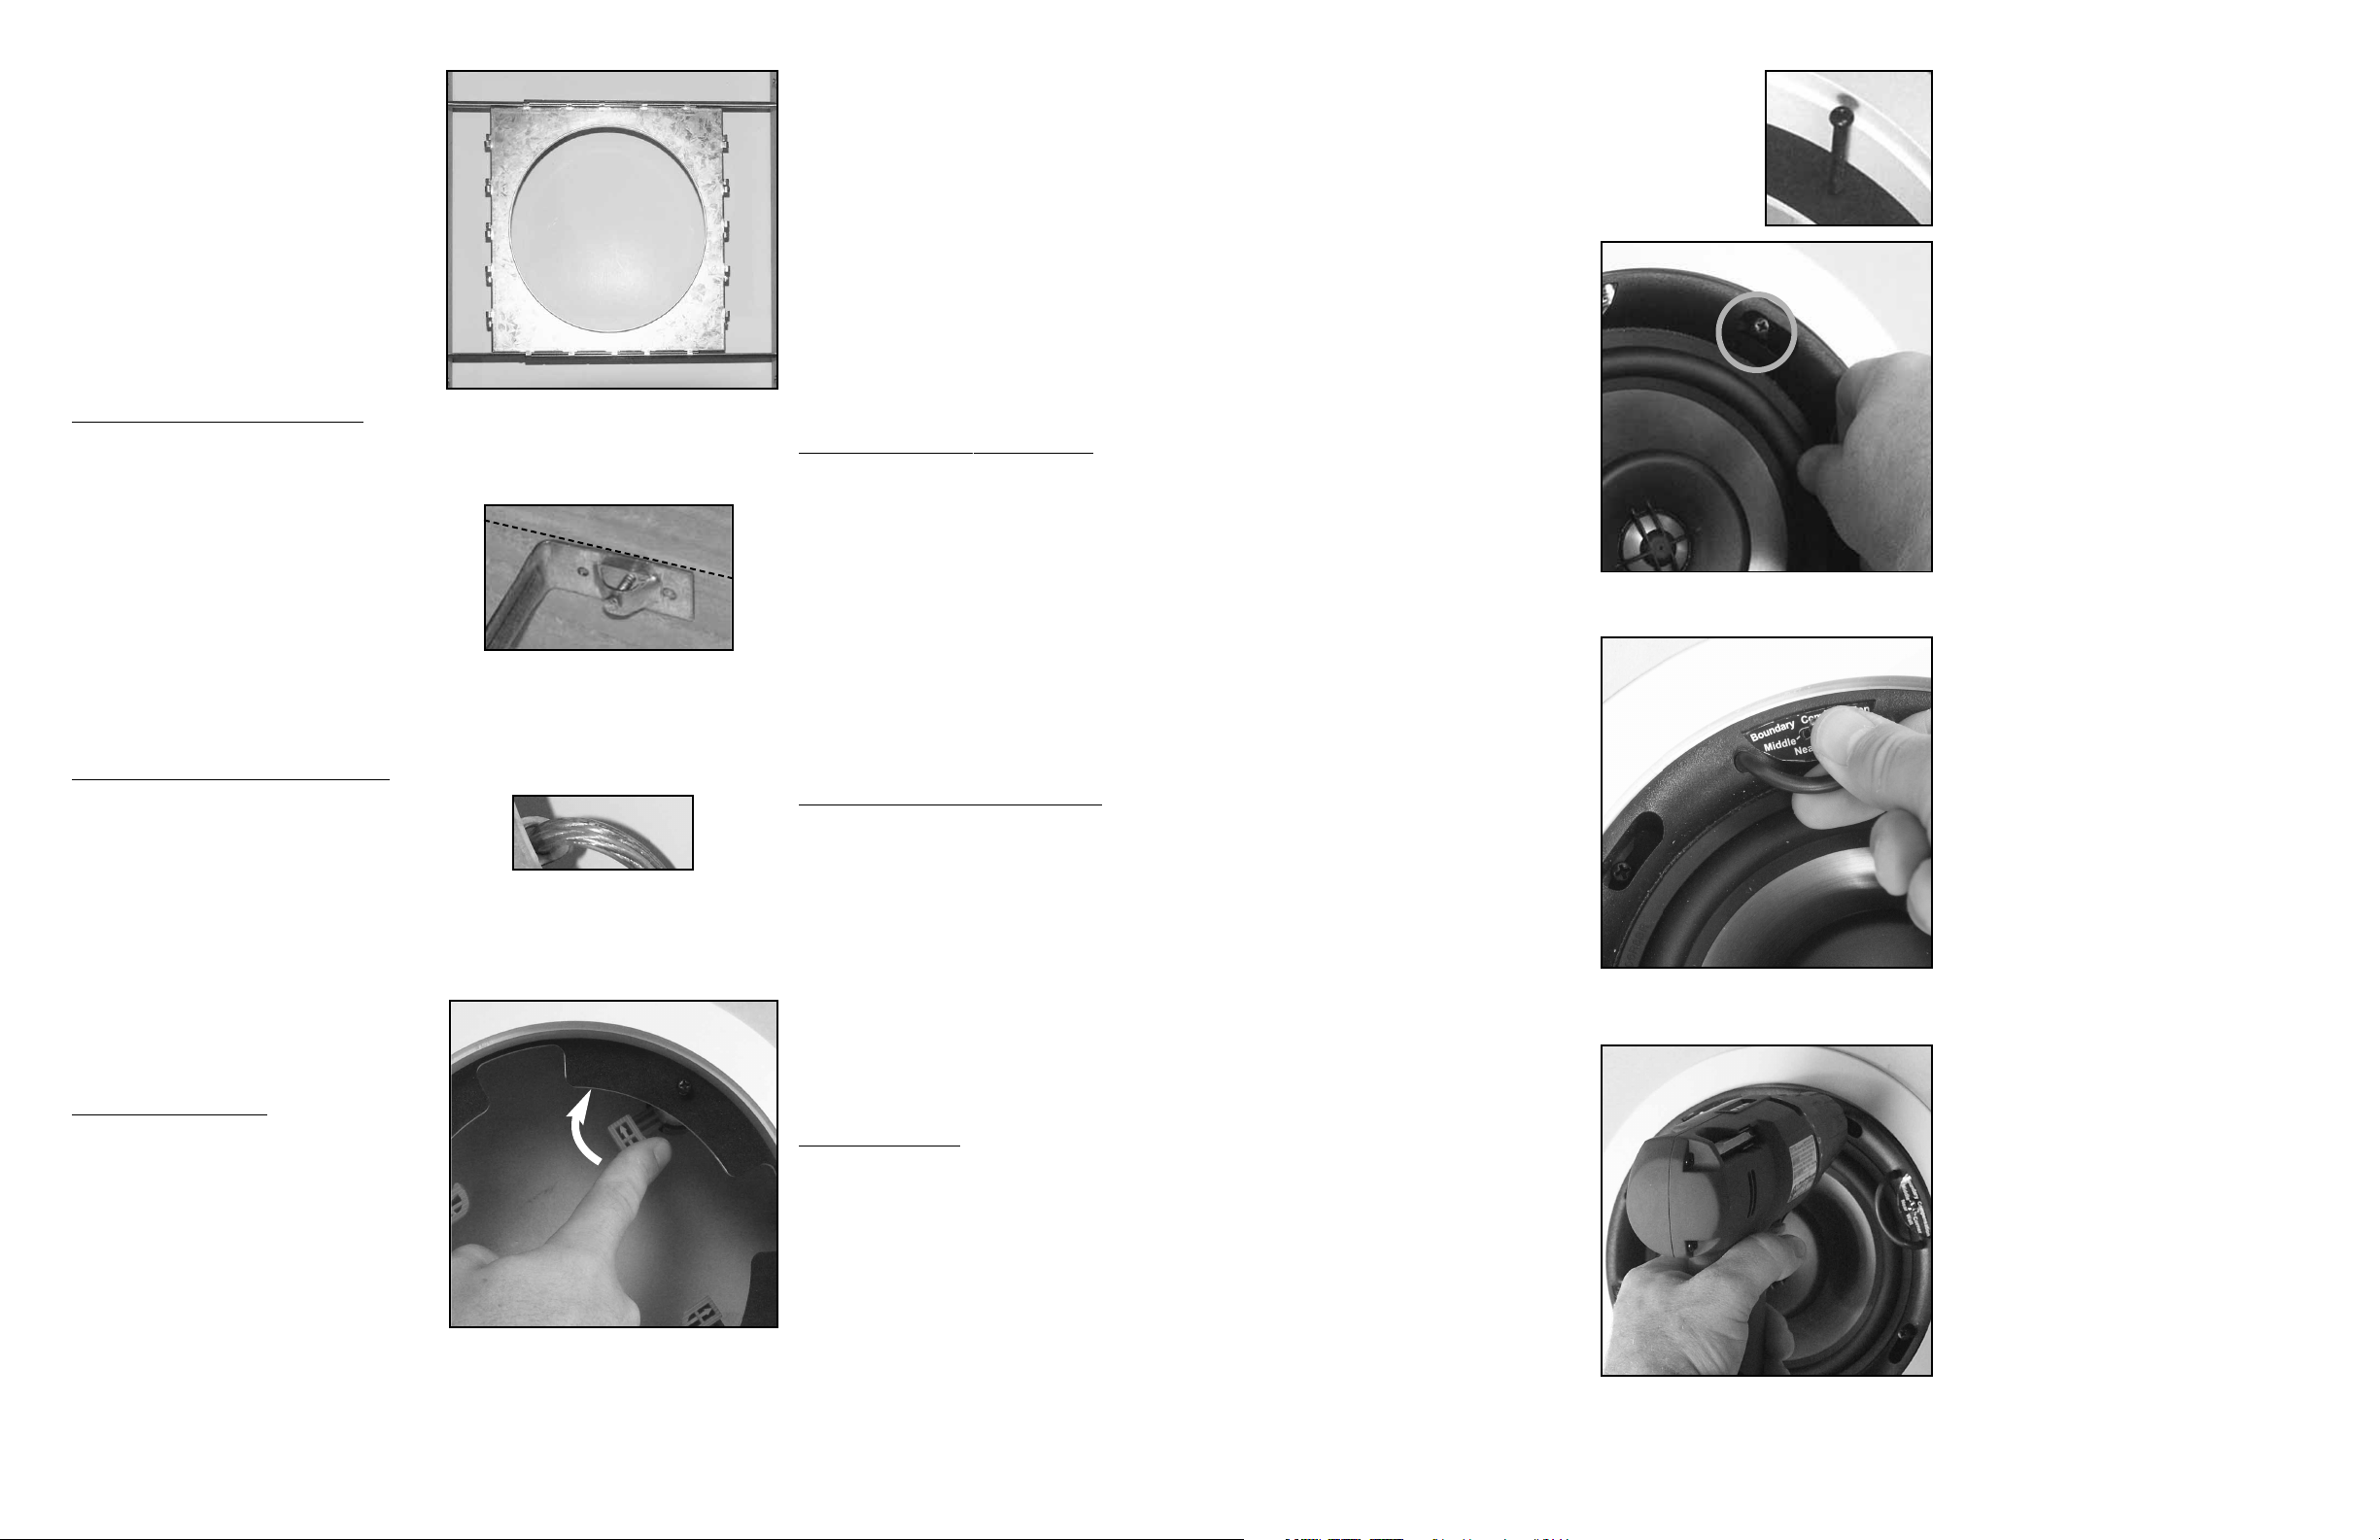
Installation - Step by Step
1. Verify that all of the Mounting Kit dogs
are rotated into place. The installed mounting kit bezel should be firmly secured to the
wall.
2. Verify that all of the dog screws are
extend OUT into the room. If the screws have
been mistakenly tightened, loosen them so
that the screwhead is at least an inch away
from the bezel. That way the speaker baffle
will easily slide onto the screwheads via the
unique keyhole slots.
3. Do not pick the speaker up by the tweeter/midrange pod! Use the installation bars to
hold the speaker. Connect the speaker wire
to the speaker terminals, observing the correct polarity. Observe the keyholes on the
speaker baffle.
4. Push the speaker up into the bezel, slipping the bezel's dog screws through the large
part of the speaker keyholes.
5. Twist the speaker so that the dog screw is
positioned in the small part of the speaker
keyhole. Tighten the dog screws until the
speaker is tight against the bezel. Do not
over-tighten. If the dog screws are too tight,
the bezel will be warped and the grille will
not fit. Refer to the instructions in the speaker box to adjust the controls. Go to Step14 to
install the grille.
6. Tighten each dog screw so that the screw
head is flush to the bezel. Do not overtighten.
If the dog screws are too tight, the bezel will
be warped and the grille will not fit.
7. Adjust the Boundary Compensation by:
When the speaker is mounted within two
feet of a boundary, substantial mid bass distortion is created. Correct the problem by
placing the switch in the “Corner” position
when near a corner, the “Wall” position
when near a single wall/ceiling boundary
and the “Mid” position when the speaker is
placed more than 2 feet from any boundary..
Installation -Point par Point
1. Vérifiez que tous les chiens de kit de support sont tournés dans l'endroit. La monture
de montage installée de kit devrait être fermement fixée au mur.
2. Vérifiez cela, tout le chien que les vis sont
extende DEHORS dans la salle. Si les vis ont
été de manière erronée serrées, détachez-les
de sorte que la tête de vis soit au moins
pouce loin de la monture. Que manière que
la cloison de haut-parleur glissera facilement
sur les têtes de vis par l'intermédiaire de la
fente unique de trou de la serrure.
3. Ne prennent pas le haut-parleur par la
cosse de tweeter/midrange! Employez les
barres d'installation pour tenir le haut-parleur. Reliez le fil de haut-parleur aux bornes
de haut-parleur, en observant la polarité correcte. Observez les trous de la serrure sur la
cloison de haut-parleur.
4. Poussez le haut-parleur vers le haut dans
la monture, glissant les vis de la bride de la
monture par la grande partie des trous de la
serrure de haut-parleur.
5. Tordez le haut-parleur de sorte que la vis
de bride soit placée dans la petite partie du
trou de la serrure de haut-parleur. Serrez les
vis de bride jusqu'à ce que le haut-parleur
soit serré contre la monture. Ne trop serrez
pas. Si les vis de bride sont trop serrées, la
monture sera déformée et le gril ne
s'adaptera pas. Référez-vous aux instructions dans la boîte de haut-parleur d'ajuster
les commandes. Passez à l'étape 14 pour
installer le gril.
6. Poussez lentement le haut-parleur dans
l'endroit à l'intérieur de la monture.
7. Ajustez la compensation de frontière par:
Quand le haut-parleur est monté à moins de
deux pieds d'une frontière, la mi déformation
basse substantielle est créée. Corrigez le
problème en plaçant le commutateur dans la
position
CORNER quand près d'un coin, la
position
WAL L quand près d'une frontière
simple de wall/ceiling et la position
MID
quand le haut-parleur est placé plus de 2
pieds de n'importe quelle frontière.
The NCB-M-CM “hole saving” bracket fits in between
the joists, so there is no bulge in the drywall. /
L'appui de nouvelle construction (NCB-M-CM)
s'adapte entre les goujons, tellement là n'est aucun
bombement dans le plaques de plâtre.
The swinging spring loaded dogs ease installtion of
the Mounting Kit/ Les brides à ressort d'oscillation
soulagent l'installtion du kit de support
The screws must all be
extended before fitting
the speaker. / Les vis
doivent tout être prolongées avant d'adapter
le haut-parleur.
Rotate the speaker using the installation bars, so that
the screw slides into the keyhole slot. / Glissez le
haut-parleur vers le bas, de sorte que les ajustements
de vis dans la fente de trou de la serrure.
Fit the speaker onto the screws via the keyholes. /
Adaptez le haut-parleur sur les vis par l'intermédiaire
des trous de la serrure.
Tighten the dog screws to secure the speaker. / Serrez
les vis de retenue pour fixer le haut-parleur.
The nail-holding end of the bar must be
mounted flush with the face of the joist. /
L'extrémité ongle-se tenante de la barre
doit être montée à affleurement du visage
de la poutrelle.
Wire-Tie / Fil-Attachent
 Loading...