

Mirabelle MIRBD200, MIRBD230, MIRBD240, MIRBD240EC, MIRBD250EC Installation Manual
...
WARRANTY
WHAT IS COVERED?
Wolseley North America “Wolseley” or the
“Company” warrants its products to be free
from defects in material and workmanship
under normal use and service FOR A PERIOD
OF ONE (1) YEAR FROM THE DATE OF
INSTALLATION.
WHAT IS NOT COVERED?
The warranty set forth in paragraph 1 does
not cover installation or any other labor
charges and does not apply to products which
have been damaged as a result of any
accident, abuse, improper installation or
maintenance, or modification of original
plumbing product. The warranty of such
products is limited to the warranty extended to
Wolseley by the product manufacturer. Finally,
WOLSELEY NORTH AMERICA SHALL NOT BE
RESPONSIBLE OR LIABLE FOR ANY FAILURE
OR DAMAGE TO THIS PRODUCT OR ANY
COMPONENT THEREOF CAUSED BY THE USE
OF ABRASIVE CLEANERS.
HOW TO OBTAIN WARRANTY SERVICE
The purchaser should contact their local
Wolseley location, installing contractor or
builder from whom the product was
purchased or upon written request addressed
to Wolseley North America 12500 Jefferson
Avenue, Newport News, VA 23602, Attention
Consumer Affairs. Warranty#: (800) 221-3379.
Any shipping charges, associated with warranty
service, must be prepared by the consumer. In
all cases, proof of purchase will be required.
LIMITATIONS OF IMPLIED WARRANTY AND
DISCLAIMER OF CONSEQUENTIAL OR
INCIDENTAL DAMAGES WOLSELEY NORTH
AMERICA DISCLAIMS ANY LIABILITY FOR
CONSEQUENTIAL OR INCIDENTAL DAMAGES
AND DISCLAIMS ALL EXPRESS OR IMPLIED
WARRANTIES, INCLUDING THOSE OF
MERCHANTABILITY AND FITNESS FOR A
PARTICUL AR PURPOSE, AS SET FORTH
ABOVE. IMPLIED WARRANTIES OF THE
PRODUCTS AND PRODUCT COMPONENTS
SET FORTH IN PARAGRAPH 1 ABOVE ARE
LIMITED TO THE DURATIONS OF THE
RESPECTIVE WARRANTY. Some states do not
allow the exclusion or limitation of incidental
or consequential damages or limitations on
how long an implied warranty lasts, so the
above limitations may not apply to you. This
warranty gives you specific legal rights and
you may also have other rights, which vary
from state to state.
TWO-PIECE WATER CLOSET
INSTALLATION INSTRUCTIONS
FOR BRADENTON SERIES
©2014 Ferguson Enterp rises, I nc. All Rig hts Reserved 0914 22352
MIRBD200 MIRBD230 MIRBD240 MIRBD240EC
MIRBD250EC MIRBD250
THANK YOU FOR CHOOSING MIRABELLE
Thank you for selecting Mirabelle. We appreciate your commitment to Mirabelle quality.
To ensure that your installation proceeds smoothly, please read these instructions before you
begin. Carefully unpack and examine all of the package contents.
Thanks again for choosing Mirabelle.
ALL INSTALLATION PROCEDURES MUST COMPLY IN STRICT ACCORDANCE
WITH APPLICABLE LOCAL PLUMBING AND BUILDING CODES.

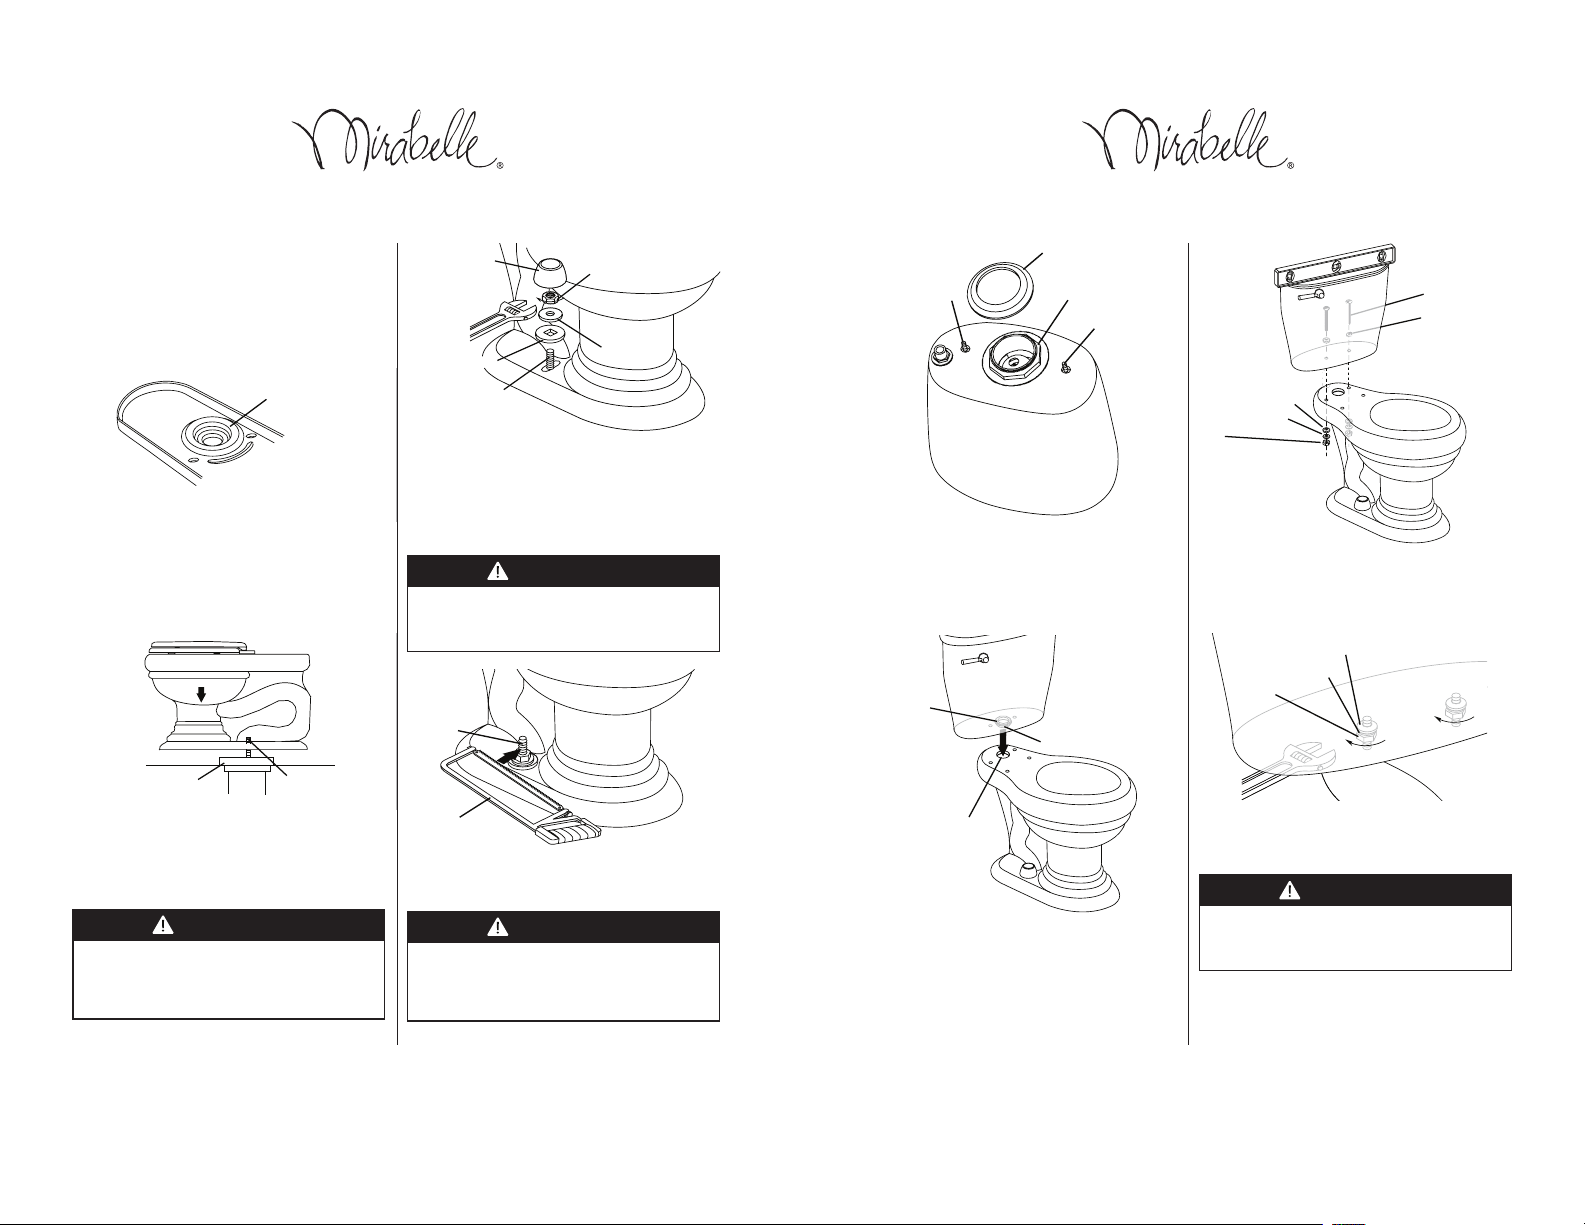
• Remove old wax seal from floor with
a putty knife.
Putty knife
Old wax seal
Flange
• Remove old wax seal from floor with
a putty knife.
• Carefully inspect the new toilet for damage.
• If the existing toilet does not have a supply
shut-off valve below the tank, install one
before installing the new toilet.
• Turn off water supply.
• Flush toilet, then sponge out all remaining
water from the tank.
• Disconnect supply shut-off valve (if present),
and remove old tank and bowl.
• Remove old wax seal from floor with
a putty knife.
• Replace old bolts with the new 5/16”
diameter bolts.
Putty knife
Old wax seal
Flange
Flange
5/16” Diameter bolts
CAUTION
Risk of personal injury or
product damage.
Handle with care. Vitreous china can break
or chip if the product is handled carelessly.
CAUTION
Risk of hazardous gases.
If the new toilet is not installed immediately,
temporarily stuff a rag in the closet flange.
TOOLS AND MATERIALS
• Carefully inspect the new toilet for damage.
• If the existing toilet does not have a supply
shut-off valve below the tank, install one
before installing the new toilet.
• Turn off water supply.
• Flush toilet, then sponge out all remaining
water from the tank.
• Disconnect supply shut-off valve (if present),
and remove old tank and bowl.
• Replace old bolts with the new 5/16”
diameter bolts.
• Remove old wax seal from floor with
a putty knife.
BEFORE YOU BEGIN 1. REMOVING THE EXISTING TOILET
TOOLS AND MATERIALS
TOOLS AND MATERIALS
• Turn off water supply.
• Flush toilet, then sponge out all remaining
water from the tank.
• Remove old wax seal from floor with
a putty knife.
Putty knife
Old wax seal
Flange
Flange
5/16” Diameter bolts
• Turn off water supply.
• Flush toilet, then sponge out all remaining
water from the tank.
• Remove old wax seal from floor with
a putty knife.
BEFORE YOU BEGIN 1. REMOVING THE EXISTING TOILET
• Carefully inspect the new toilet for damage.
• If the existing toilet does not have a supply
shut-off valve below the tank, install one
before installing the new toilet.
CAUTION
Risk of personal injury or
Handle with care. Vitreous china can break
or chip if the product is handled carelessly.
product damage.
• Turn off water supply.
• Flush toilet, then sponge out all remaining
water from the tank.
Old wax seal
Putty knife
TOOLS AND MATERIALS
10 “ Adjustable wrench
Supply shut-off valve
Tape measure
Level
Sponge
Wax seal
5/16” Bolts w/nuts and
washers
Putty knife
1/2” Nut driver/socket
Hacksaw
Screwdriver
• Disconnect supply shut-off valve (if present),
and remove old tank and bowl.
CAUTION
If the new toilet is not installed immediately,
Risk of hazardous gases.
temporarily stuff a rag in the closet flange.
• Remove old wax seal from floor with a
putty knife.
5/16” Diameter bolts
• Replace old bolts with the new 5/16”
diameter bolts.
Flange
Flange
21
• Place the tank-to-bowl gasket onto the
locknut on the flush valve shank against
the bottom of the tank (Be sure locknut
is tight).
• Insert bolts through holes inside tank and
down through holes in the bowl making
sure tank is level.
Bolt
Bolt
Tank to bowl
gasket
Locknut
Bolt
Rubber washer
Metal washer
Rubber washe
r
Rubber washer
Nut
Nut
Metal washer
• Install or relocate the supply and outlet as
necessary to conform to the roughing-in
dimensions.
• Install a supply shut-off valve.
• Lay the toilet down onto a padded surface.
• From the bottom of toilet, firmly press
a new wax seal around toilet outlet.
• Remove temporary rag (if used) from
toilet flange hole.
Bottom of bowl
Wax seal
• Place bolt cap bases over bolt.
• Place metal washers and nuts on plastic bolt
cap bases and bolts.
• Carefully tighten nuts.
Bolt Cap
Nut
Washer
Bolt Cap Base
Bolt
Bolt
Gasket
Locknut
Rubber washer
Nut
Metal washer
CAUTION
Risk of product damage.
Overtightening may cause breakage or
chipping of vitreous china.
• Install or relocate the supply and outlet as
necessary to conform to the roughing-in
dimensions.
• Install a supply shut-off valve.
• Lay the toilet down onto a padded surface.
• Carefully inspect the new toilet for damage.
• If the existing toilet does not have a supply
shut-off valve below the tank, install one
before installing the new toilet.
• Place bolt cap bases over bolt.
• Place metal washers and nuts on plastic bolt
cap bases and bolts.
• Carefully tighten nuts.
• Carefully inspect the new toilet for damage.
• If the existing toilet does not have a supply
shut-off valve below the tank, install one
before installing the new toilet.
• Insert bolts through holes inside tank and
down through holes in bowl making sure
tank is level.
2. INSTALL THE NEW TOILET 3. INSTALL THE TANK
Bolt
Rubber washer
Metal washer
Rubber washe
r
Rubber washer
Nut
Nut
Metal washer
Bolt
Bolt
Tank to bowl
gasket
Locknut
Bolt
Rubber washer
Metal washer
Rubber washe
r
Rubber washer
Nut
Nut
Metal washer
• Install or relocate the supply and outlet as
necessary to conform to the roughing-in
dimensions.
• Install a supply shut-off valve.
• Lay the toilet down onto a padded surface.
• Place bolt cap bases over bolt.
• Place metal washers and nuts on plastic bolt
cap bases and bolts.
Bolt Cap
Nut
Washer
Bolt Cap Base
Bolt
• Install or relocate the supply and outlet as
necessary to conform to the roughing-in
dimensions.
• Install a supply shut-off valve.
• Lay the toilet down onto a padded surface.
• Place bolt cap bases over bolt.
• Place metal washers and nuts on plastic bolt
cap bases and bolts.
2. INSTALL THE NEW TOILET 3. INSTALL THE TANK
Bolt
Bolt
Tank to bowl
gasket
Locknut
Bolt
Rubber washer
Metal washer
Rubber washe
r
Rubber washer
Nut
Metal washer
Bolt Cap Base
• Place the tank-to-bowl gasket onto the
locknut on the flush valve shank against
the bottom of the tank (Be sure locknut
is tight).
• Insert bolts through holes inside tank and
down through holes in the bowl making
sure tank is level.
• Assemble washers and nuts to tank bolts.
Bolt
Bolt
Tank to bowl
gasket
Locknut
Bolt
Rubber washer
Metal washer
Rubber washe
r
Rubber washer
Nut
Nut
Metal washer
cap bases and bolts.
Bolt Cap
Nut
Washer
Bolt Cap Base
Bolt
Gasket
Locknut
Rubber washer
Nut
Metal washer
CAUTION
Risk of product damage.
Overtightening may cause breakage or
chipping of vitreous china.
• Carefully inspect the new toilet for damage.
• If the existing toilet does not have a supply
shut-off valve below the tank, install one
before installing the new toilet.
• Insert bolts through holes inside tank and
down through holes in bowl making sure
tank is level.
• Assemble washers and nuts to tank bolts.
• Place the tank-to-bowl gasket onto the
locknut on the flush valve shank against
the bottom of the tank (Be sure locknut
is tight).
• Insert bolts through holes inside tank and
down through holes in the bowl making
sure tank is level.
• Assemble washers and nuts to tank bolts.
Alternately tighten nuts so that tank stays
level.
CAUTION
Risk of product damage.
Overtightening may cause breakage or
chipping of vitreous china.
Bolt
Bolt
Tank to bowl
gasket
Locknut
Bolt
Rubber washer
Metal washer
Rubber washe
r
Rubber washer
Nut
Nut
Metal washer
Locknut
Rubber washer
Nut
Metal washer
• Carefully inspect the new toilet for damage.
• If the existing toilet does not have a supply
shut-off valve below the tank, install one
before installing the new toilet.
• Insert bolts through holes inside tank and
down through holes in bowl making sure
tank is level.
• Assemble washers and nuts to tank bolts.
Alternately tighten nuts so that tank stays
level.
down through holes in the bowl making
sure tank is level.
Bolt
Rubber washer
Metal washer
Rubber washe
r
Nut
2. INSTALL THE NEW TOILET 3. INSTALL THE TANK
• Install or relocate the supply and outlet as
necessary to conform to the roughing-in
dimensions.
• Install a supply shut-off valve.
• Lay the toilet down onto a padded surface.
Wax seal
Bottom of bowl
• Carefully inspect the new toilet for damage.
• If the existing toilet does not have a supply
shut-off valve below the tank, install one
before installing the new toilet.
• Align and lower toilet over flange and bolts.
• Apply your full body weight around the toilet
to set seal.
placement. If you break the watertight
seal, you must install a new wax seal.
Closet flange
CAUTION
Risk of external leakage.
Do not lift or rock the bowl after
Bolt Cap
Bolt
• Place bolt cap bases over bolt.
• Place metal washers and nuts on plastic bolt
cap bases and bolts.
• Carefully tighten nuts.
CAUTION
Risk of produc t damage.
Overtightening may cause breakage or
chipping of vitreous china.
Bolt
Bolt
Hacksaw
• If bolts extend more than 1/4” (6 mm) over
top of the nuts, cut off excess.
Protec t the vitreous china from exposure
• Attach bolt caps.
CAUTION
Risk of produc t damage.
to the saw blade when cutting off
excess bolt length.
Nut
Washer
Bolt
• Carefully inspect the new toilet for damage.
• If the existing toilet does not have a supply
shut-off valve below the tank, install one
before installing the new toilet.
• Position tank on bowl by centering gasket
on bowl inlet.
Bowl inlet
Tank to bowl
gasket
Locknut
Bolt
Gasket
Rubber washer
Metal washer
Nut
• Insert bolts through holes inside tank and
down through holes in the bowl making
sure tank is level.
Rubber washer
Metal washer
Nut
• Assemble washers and nuts to tank bolts.
Alternately tighten nuts so that tank stays level.
CAUTION
Risk of produc t damage.
Overtightening may cause breakage or
chipping of vitreous china.
• Be sure nuts are tight enough to achieve a
watertight seal. Do not overtighten.
43
Bolt
Rubber washer
Rubber washe
Metal washer
Nut
r

• Install trip lever. Follow instructions packed
with the trip lever.
• Open supply shut-off valve slowly to check
for leaks. If the connections have been
properly assembled, a slight tightening of
the nuts should stop any leakage.
• Install toilet seat according to the packed
instructions.
• Adjust tank water level to the proper
marked waterline by rotating threaded rod
clockwise to raise water level or
counterclockwise to lower water level.
• Carefully set cover onto tank.
Waterline
Filter
screen
Remove tape before
flushin
g
.
Adjust water
level
Washer
Waterline
Filter
screen
Cap
Trip
lever
Fill valve
Locknut
Nut
Hose
Flapper
Seal
Flush
valve
Nut
Clip
Attention Installer:
Recommended water pressure is 20 psi
.
Care and Cleaning
Clean the outside surface of your vitreous
china water closet with mild soap and warm
water. Wipe the entire surface completely dry
with a clean soft cloth. You may use soft
abrasive cleaners when necessary to clean
your water closet.
Wipe any splashes of cleaning solutions from
plastic or plated surfaces immediately. Use
water closet cleaners on the inside of the bowl
only.
If the vitreous china surface becomes
excessively dirty, use a general purpose
cleaner such as: Fantastic, Basin Tub and Tile
Cleaner, Soft Scrub, Disinfectant Bathroom
Cleaner, Spic and Span Liquid, Scrubbing
Bubbles, or Bon Ami. Over time, hard water
deposits may clog water closet rim bowl rinse
holes and trapways. To clean, use a
commercial cleaner that is recommended for
removing hard water deposits. Follow the
cleaner manufacturer’s instructions for use.
Mirabelle shall not be responsible or liable
for any tank fitting damage caused by the use
of cleaners containing chlorine (calcium
hypochlorite).
CAUTION
Risk of product damage.
DO NOT use strong abrasive cleaners, as
they will scratch and dull the surface.
WARNING
Risk of property or product damage.
DO NOT use in-tank cleaners in your
water closet. Products containing chlorine
(calcium hypochlorite) can seriously
damage fittings in the tank. This damage
can cause leakage and property damage.
• Adjust tank water level to the proper
marked waterline by rotating threaded rod
clockwise to raise water level or
counterclockwise to lower water level.
• Carefully set cover onto tank.
• Open supply shut-off valve slowly to check
for leaks. If the connections have been
properly assembled, a slight tightening of
the nuts should stop any leakage.
• Install toilet seat according to the packed
instructions.
Attention Installer:
Recommended water pressure is 20 psi.
Care and Cleaning
Clean the outside surface of your vitreous
china water closet with mild soap and warm
water. Wipe the entire surface completely dry
with a clean soft cloth. You may use soft
abrasive cleaners when necessary to clean
your water closet.
cleaner such as: Fantastic, Basin Tub and Tile
Cleaner, Soft Scrub, Disinfectant Bathroom
Cleaner, Spic and Span Liquid, Scrubbing
Bubbles, or Bon Ami. Over time, hard water
deposits may clog water closet rim bowl rinse
holes and trapways. To clean, use a
commercial cleaner that is recommended for
removing hard water deposits. Follow the
cleaner manufacturer’s instructions for use.
Mirabelle shall not be responsible or liable
for any tank fitting damage caused by the use
of cleaners containing chlorine (calcium
hypochlorite).
Wipe any splashes of cleaning solutions from
plastic or plated surfaces immediately. Use
water closet cleaners on the inside of the bowl
only.
If the vitreous china surface becomes
excessively dirty, use a general purpose
4. COMPLETE THE INSTALLATION
IMPORTANT CONSUMERR INFORMATION
• Open supply shut-off valve slowly to check
for leaks. If the connections have been
properly assembled, a slight tightening of
the nuts should stop any leakage.
• Install toilet seat according to the packed
instructions.
Adjust water
level
Trip
lever
Fill valve
Attention Installer:
Recommended water pressure is 20 psi
.
Care and Cleaning
Clean the outside surface of your vitreous
china water closet with mild soap and warm
water. Wipe the entire surface completely dry
with a clean soft cloth. You may use soft
abrasive cleaners when necessary to clean
your water closet.
cleaner such as: Fantastic, Basin Tub and Tile
Cleaner, Soft Scrub, Disinfectant Bathroom
Cleaner, Spic and Span Liquid, Scrubbing
Bubbles, or Bon Ami. Over time, hard water
deposits may clog water closet rim bowl rinse
holes and trapways. To clean, use a
commercial cleaner that is recommended for
removing hard water deposits. Follow the
cleaner manufacturer’s instructions for use.
WARNING
• Open supply shut-off valve slowly to check
for leaks. If the connections have been
properly assembled, a slight tightening of
the nuts should stop any leakage.
• Install toilet seat according to the packed
instructions.
Attention Installer:
Recommended water pressure is 20 psi.
Care and Cleaning
Clean the outside surface of your vitreous
china water closet with mild soap and warm
water. Wipe the entire surface completely dry
with a clean soft cloth. You may use soft
abrasive cleaners when necessary to clean
your water closet.
cleaner such as: Fantastic, Basin Tub and Tile
Cleaner, Soft Scrub, Disinfectant Bathroom
Cleaner, Spic and Span Liquid, Scrubbing
Bubbles, or Bon Ami. Over time, hard water
deposits may clog water closet rim bowl rinse
holes and trapways. To clean, use a
commercial cleaner that is recommended for
removing hard water deposits. Follow the
cleaner manufacturer’s instructions for use.
4. COMPLETE THE INSTALLATION
IMPORTANT CONSUMERR INFORMATION
g
Attention Installer:
Recommended water pressure is 20 psi
.
Care and Cleaning
Clean the outside surface of your vitreous
china water closet with mild soap and warm
water. Wipe the entire surface completely dry
with a clean soft cloth. You may use soft
abrasive cleaners when necessary to clean
your water closet.
Wipe any splashes of cleaning solutions from
plastic or plated surfaces immediately. Use
water closet cleaners on the inside of the bowl
only.
cleaner such as: Fantastic, Basin Tub and Tile
Cleaner, Soft Scrub, Disinfectant Bathroom
Cleaner, Spic and Span Liquid, Scrubbing
Bubbles, or Bon Ami. Over time, hard water
deposits may clog water closet rim bowl rinse
holes and trapways. To clean, use a
commercial cleaner that is recommended for
removing hard water deposits. Follow the
cleaner manufacturer’s instructions for use.
Mirabelle shall not be responsible or liable
for any tank fitting damage caused by the use
of cleaners containing chlorine (calcium
CAUTION
Risk of product damage.
DO NOT use strong abrasive cleaners, as
they will scratch and dull the surface.
WARNING
Risk of property or product damage.
DO NOT use in-tank cleaners in your
water closet. Products containing chlorine
(calcium hypochlorite) can seriously
damage fittings in the tank. This damage
can cause leakage and property damage.
Attention Installer:
Recommended water pressure is 20 psi.
Care and Cleaning
Clean the outside surface of your vitreous
china water closet with mild soap and warm
water. Wipe the entire surface completely dry
with a clean soft cloth. You may use soft
abrasive cleaners when necessary to clean
your water closet.
cleaner such as: Fantastic, Basin Tub and Tile
Cleaner, Soft Scrub, Disinfectant Bathroom
Cleaner, Spic and Span Liquid, Scrubbing
Bubbles, or Bon Ami. Over time, hard water
deposits may clog water closet rim bowl rinse
holes and trapways. To clean, use a
commercial cleaner that is recommended for
removing hard water deposits. Follow the
cleaner manufacturer’s instructions for use.
Mirabelle shall not be responsible or liable
for any tank fitting damage caused by the use
of cleaners containing chlorine (calcium
Wipe any splashes of cleaning solutions from
plastic or plated surfaces immediately. Use
water closet cleaners on the inside of the bowl
only.
IMPORTANT CONSUMERR INFORMATION
4. COMPLETE THE INSTALLATION
Cap
Washer
Filter
screen
Nut
Tank
Fill valve nut
Supply shank
Seal washer
Tubing
Coupling
nut
Compression
nut
Ferrule
• Connect supply shut-off valve to toilet
supply shank.
• Flush toilet several times and check all
connections for leaks.
Hose
Locknut
Clip
Flush
valve
Waterline
Flapper
Seal
Nut
Comp.
washer
Tubing
Coupling
nut
Compression
nut
Ferrule
Supply shut-off
valve
5. CONFIRM OPERATION
• Open supply shut-off valve slowly to check
for leaks. If the connections have been
properly assembled, a slight tightening of
the nuts should stop the leakage.
• Install toilet seat according to the packed
instructions.
Filter
screen
• Adjust tank water level to the proper marked
waterline by rotating threaded rod clockwise
to raise water level or counterclockwise to
lower water level.
• Carefully set cover onto tank.
• Periodically check for leaks for several days
following the installation.
IMPORTANT CONSUMER INFORMATION
Attention Installer:
Recommended water pressure is 20 psi.
Care and Cleaning:
Clean the outside surface of your vitreous
china water closet with mild soap and warm
water. Wipe the entire surface completely
Adjust water
level
Waterline
Remove tape before
flushin
.
dry with a clean soft cloth. You may use soft
abrasive cleaners when necessary to clean your
water closet.
CAUTION
Risk of produc t damage.
DO NOT use strong abrasive cleaners, as
they will scratch and dull the surface.
Wipe any splashes of cleaning solutions from
plastic or plated surfaces immediately. Use
water closet cleaners on the inside of the bowl
only.
If the vitreous china surface becomes
excessively dirty, use a general purpose
cleaner such as: Fantastic, Basin Tub and Tile
Cleaner, Soft Scrub, Disinfectant Bathroom
Cleaner, Spic and Span Liquid, Scrubbing
Bubbles, or Bon Ami. Over time, hard water
deposits may clog water closet rim bowl rinse
holes and trapways. To clean, use a commercial
cleaner that is recommended for removing
hard water deposits. Follow the cleaner
manufacturer’s instructions for use.
CAUTION
Risk of property or product damage.
DO NOT use in-tank cleaners in your
water closet. Products containing chlorine
(calcium hypochlorite) can seriously damage
fittings in the tank. This damage can cause
leakage and property damage.
Mirabelle shall not be responsible or liable for
any tank fitting damage caused by the use of
cleaners containing chlorine (calcium
hypochlorite).
65
 Loading...