

Page 1
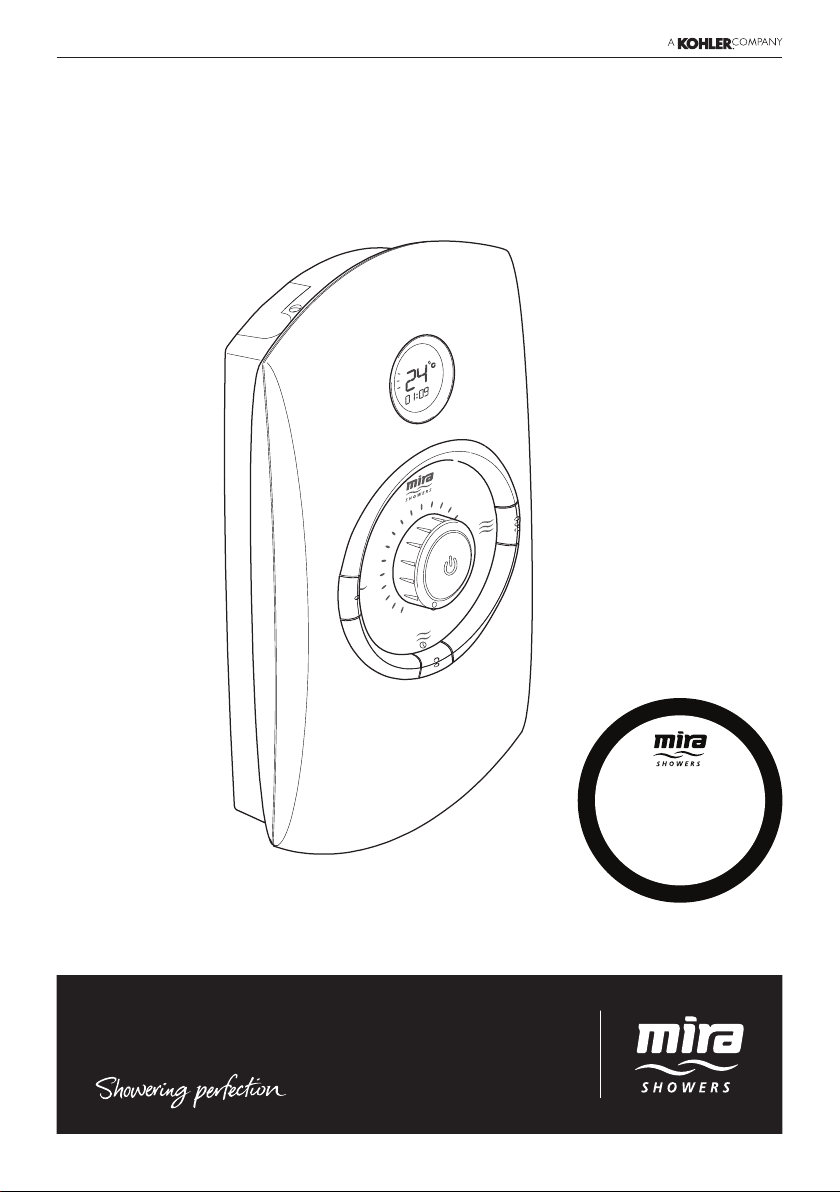
Mira Orbis
9.0, 9.8 & 10.8 kW
These instructions must be left with the user
Installation and User Guide
1
For SPARES, ADVICE
or REPAIRS
Please call us on
0844 571 5000
(UK Only)
Page 2
INTRODUCTION
Thank you for purchasing a quality Mira Orbis Thermostatic Electric Shower. To enjoy
the full potential of your new shower, please take time to read this guide thoroughly,
and keep it handy for future reference.
Products manufactured by Kohler Mira Ltd are designed to be safe provided, that
they are installed used and maintained in good working order, in accordance with
our instructions and recommendations.
Follow all warnings, cautions and instructions contained in this guide, and on or
inside the shower.
Mira Orbis Thermostatic electric showers have separate controls for power
selection and for temperature/ow adjustment. A unique ow regulator stabilises
any temperature changes caused by water pressure uctuations, which can result
from taps being turned on or off or toilets being ushed.
When this shower has reached the end of its serviceable life, it should be disposed
of in a safe manner, in accordance with current local authority recycling, or waste
disposal policy.
Mira Orbis models covered by this guide:
Product Model Number Colour
Orbis 9.0 J01A White/Chrome
Orbis 9.8 J01B White/Chrome
Orbis 10.8 J01C White/Chrome
Orbis 9.8 (Black) J01D Black/Chrome
Guarantee
For domestic installations, Mira Showers guarantee the Mira Orbis against any
defect in materials or workmanship for a period of two years from the date of purchase
(shower ttings for one year).
For non-domestic installations, Mira Showers guarantee the Mira Orbis against
any defect in materials or workmanship for a period of one year from the date of
purchase.
Recommended Usage
Domestic
Light Commercial
Heavy Commercial
Healthcare
Patents and Design Registration
Design Registration: 000738141-0002
Patents: GB: 2 341 667, 2 404 000, 2 428 286, 2 427 460
Eire: 82835, 85128, 85163, 85912
ü
ü
û
û
2
Page 3

IMPORTANT SAFETY INFORMATION
WARNING - This shower can deliver scalding temperatures if not operated,
installed or maintained in accordance with the instructions, warnings and
cautions contained in this guide and on or inside the appliance.
TO REDUCE THE RISK OF FIRE, ELECTRIC SHOCK OR INJURY:
1. Installation of this shower must be carried out in accordance with these
instructions by qualied, competent personnel.
2. Isolate the electrical and water supplies before commencing installation. The
electricity must be isolated at the consumer unit and the appropriate circuit
fuse removed, if applicable. Mains connections are exposed when the cover
is removed.
3. DO NOT install the shower in areas with high humidity and temperature
(i.e. Steam rooms and saunas).
4. DO NOT install the shower where it may be exposed to freezing conditions.
Ensure that any pipework that could become frozen is properly insulated.
5. DO NOT switch the shower on if there is a possibility that the water in the
shower is frozen.
6. DO NOT switch the shower on if water starts leaking from the shower case.
Isolate the electrical supply to the shower immediately.
7. DO NOT connect the outlet of the shower to any tap, control valve, trigger
handset or showerhead other than those specied for use with this shower -
scalding water temperatures and product damage may occur. Only Kohler Mira
recommended accessories should be used.
8. The water supplies to this product must be isolated if the product is not to be
used for a long period of time. If the product or pipework is at risk of freezing
during this period they should also be drained of water.
9. DO NOT perform any unspecied modications to the shower or its
accessories. When servicing only use genuine Kohler Mira replacement
parts.
10. If the shower is dismantled during installation or servicing then upon completion
the product must be inspected to ensure all electrical connections are tight and
that there are no leaks.
11. Read all installation instructions before installing this shower.
12. Upon completion of the installation, make sure that the user is familiar with the
operation of the shower, and leave this guide and the user guide with the owner.
If you experience any difculty with the installation of your new shower, then please
refer to “Fault Diagnosis”, before contacting Kohler Mira Limited. Our telephone
and fax numbers can be found on the back cover of this guide.
3
Page 4
PACK CONTENTS
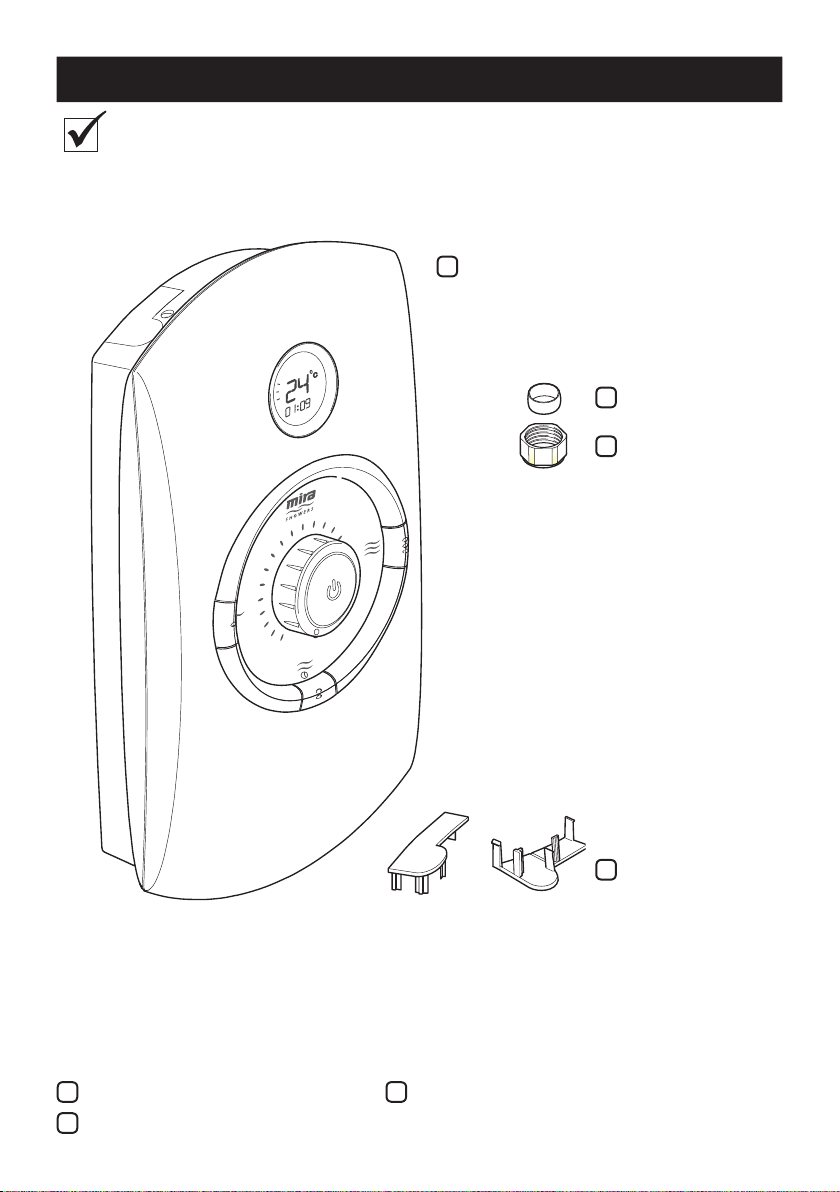
Tick the appropriate boxes to familiarise yourself with the part names and to
conrm that the parts are included.
1 x Mira Orbis
Electric Shower
1 x Olive
1 x Compression Nut
Documentation
1 x Installation and User Guide 1 x Guarantee Registration Document
1 x Installation Template
4
2 x Case Inserts
Page 5
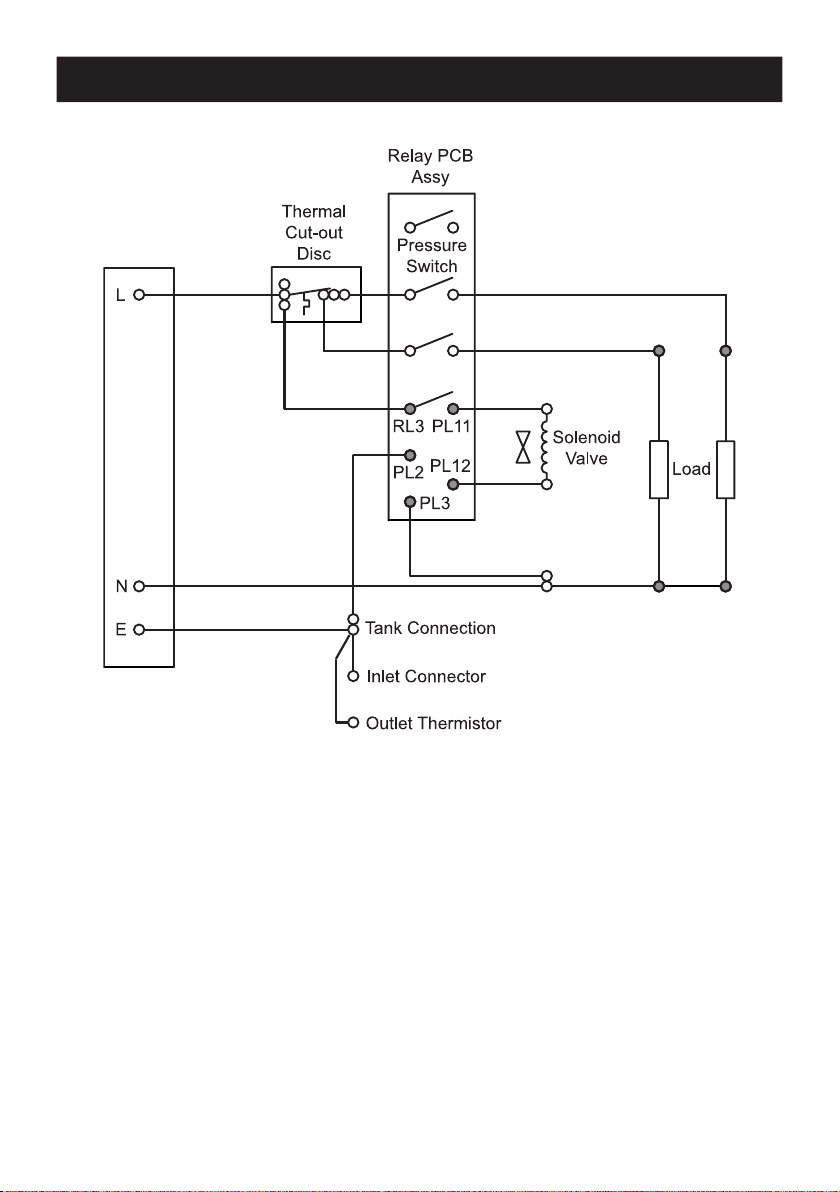
WIRING DIAGRAM
BROWN
GREEN
BROWN
GREEN
GREEN
BROWN
GREEN
BROWN
BLACKBLUE
RED
BROWN
BROWN
BLACK
RED
RED
RED
RED
BLUE
BLUE
5
Page 6
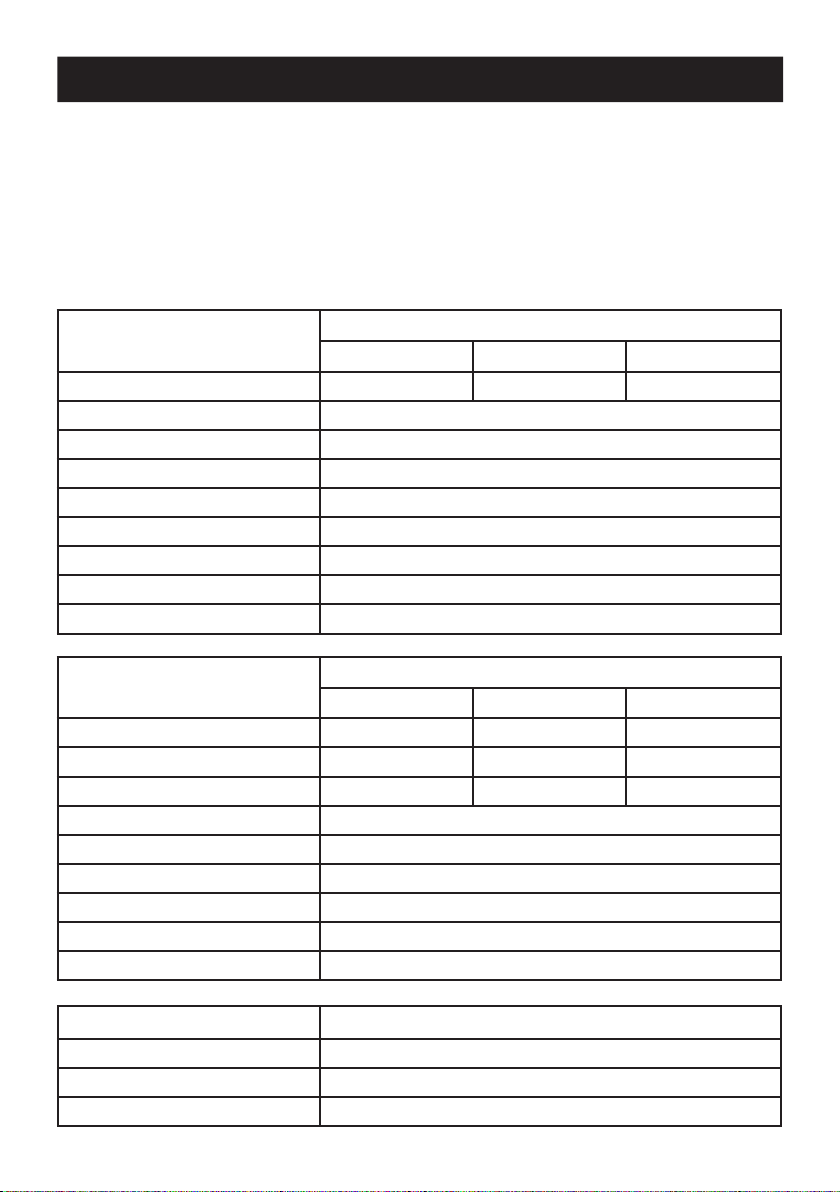
SPECIFICATIONS
European Conformity Information
The Mira Orbis shower complies with the following European directives:
2006/95/EC Low Voltage Directive, 2004/108/EC EMC Directive.
The Mira Orbis shower is a high power appliance and is subject to conditional
connection. If the main electrical supply fuse is rated less than 80 Amps, the local
electricity supply company must be contacted to conrm if the electrical supply is
adequate.
The Mira Orbis shower complies with the requirements of the UK’s water regulations.
Plumbing
Minimum Dynamic Pressure 70 kPa (0.7 bar) 70 kPa (0.7 bar) 100 kPa (1.0 bar)
Maximum Dynamic Pressure 500 kPa (5 bar)
Maximum Static Pressure 1000 kPa (10 bar)
Minimum Static Pressure 20 kPa (0.2 bar)
Maximum Inlet Temperature 30°C
Minimum Inlet Temperature 2°C
Inlet Connection 1/2” BSP Male / 15 mm Compression Fitting
Maximum Water Hardness 200 ppm CaCO
Outlet Connection 1/2” BSP Male
Electrical
Nominal Power at 230 V ac 8.3 kW 9.0 kW 9.9 kW
Nominal Power at 240 V ac 9.0 kW 9.8 kW 10.8 kW
Recommended MCB Rating 40 A 45 A 45 A
Maximum Supply Cable Size 16 mm²
Recommended RCD Rating 30 mA tripping current
Recommended Isolator Switch 45 A double-pole with 3 mm contact separation
Appliance Sealing Rating IP X4 - Suitable for installation in Zone 1
Maximum Ambient Temperature 30°C
Minimum Ambient Temperature 2°C
Orbis 9.0 Orbis 9.8 Orbis 10.8
Orbis 9.0 Orbis 9.8 Orbis 10.8
Variant
3
Variant
Dimensions
Height 388 mm
Width 212 mm
Depth 88 mm
6
Page 7

INSTALLATION REQUIREMENTS
Please read the Important Safety Information and specications sections at
the front of this guide, and the requirements detailed in this section before
installing the shower.
WARNING - TO REDUCE THE RISK OF FIRE, ELECTRIC SHOCK OR INJURY:
Plumbing
1. The plumbing installation must comply with all national or local water regulations
and all relevant building regulations, or any particular regulation or practice
specied by the local water supply company.
2. Do not install the product in a position in which service access is limited.
3. Decide on a suitable position for the shower (minimum distance of 200 mm from
the ceiling to allow for cover t and removal).
4. The position of the shower and shower ttings must provide a minimum gap of
25 mm between the showerhead and the spill over level of any bath, shower
tray or basin and a minimum gap of 30 mm between the showerhead and the
spill over level of any toilet, bidet or other appliance with a Fluid Category 5
backow risk (see diagram on page 8).
5. The shower is suitable for installation within the shower area and is tted with
a pressure relief valve. It must be positioned over a water catchment area with
the controls at a convenient height for the user.
6. The shower must be tted to a waterproof at and even wall surface.
7. DO NOT t the shower to the wall and tile up to the case.
8. DO NOT seal the gap between the shower and the wall surface.
9. The showerhead should be positioned so that it discharges down the centre
line of the bath or across the opening of a shower cubicle.
10. The showerhead must be directed away from the shower unit, during normal
use the showerhead must not spray directly on to the shower unit.
11. DO NOT apply excessive force to plumbing connections; always provide
mechanical support when making plumbing connections. Any soldered joints
should be made before connecting the shower.
12. This shower is not designed to be plumbed directly from the rear. For rear-entry
supply, add an elbow to the supply pipe and connect as a rising or a falling supply.
13. If pipework and/or electrical cables enter the shower from the rear through a
hole in the wall provision must be made to prevent water ingress back into the
wall structure.
14. Only use the inlet connector supplied with the shower. DO NOT use any other
type of tting.
7
Page 8
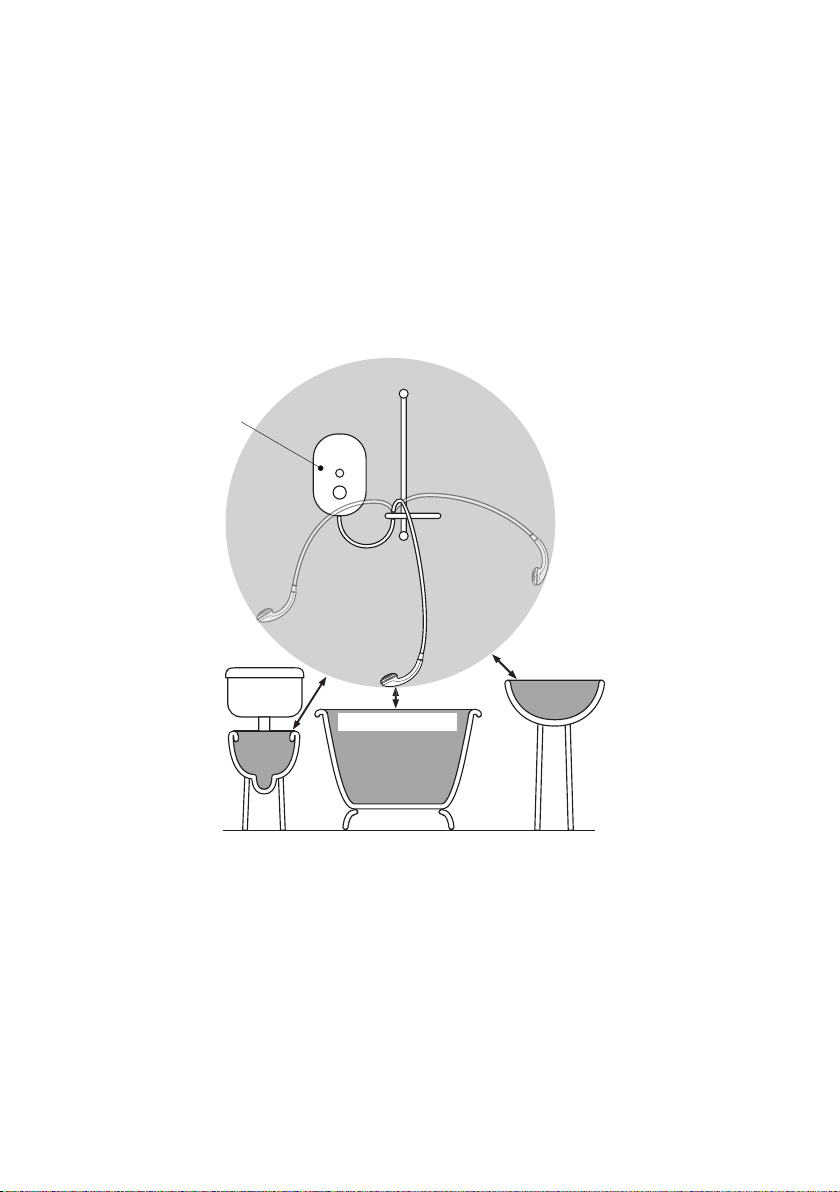
15. A full bore/non restrictive servicing valve must be tted in a readily accessible
position adjacent to the shower to facilitate maintenance of the shower.
DO NOT use a valve with a loose washer plate (jumper) as this can lead to a
build up of static pressure.
16. A water treatment device should be installed where the water hardness may
exceed 200 ppm. Malfunctions caused by excessive limescale formation are
not covered by this shower’s guarantee (see back page for details).
17. The installation must not cause the hose to be sharply kinked during normal use.
18. DO NOT perform the electrical installation until the plumbing has been completed
and checked for leaks.
Electric
Shower
Zone of
Backow Risk
25 mm
Minimum
30 mm
Minimum
25 mm Minimum
Toilet or Bidet
FC5
Bath or Shower
Tray FC3
Hand Basin
FC3
Hose Retaining Ring tted and shower ttings xed at a suitable height preventing
dirty water backow.
Note! There will be occasions when the hose retaining ring will not provide a suitable
solution for Fluid Category 3 installations, in these instances an outlet double
checkvalve must be tted, this will increase the required supply pressure typically by
10kPa (0.1 bar). Double checkvalves tted in the inlet supply to the appliance cause
a pressure build up, which affect the maximum static inlet pressure for the appliance
and must not be tted. For Fluid category 5 double checkvalves are not suitable.
8
Page 9
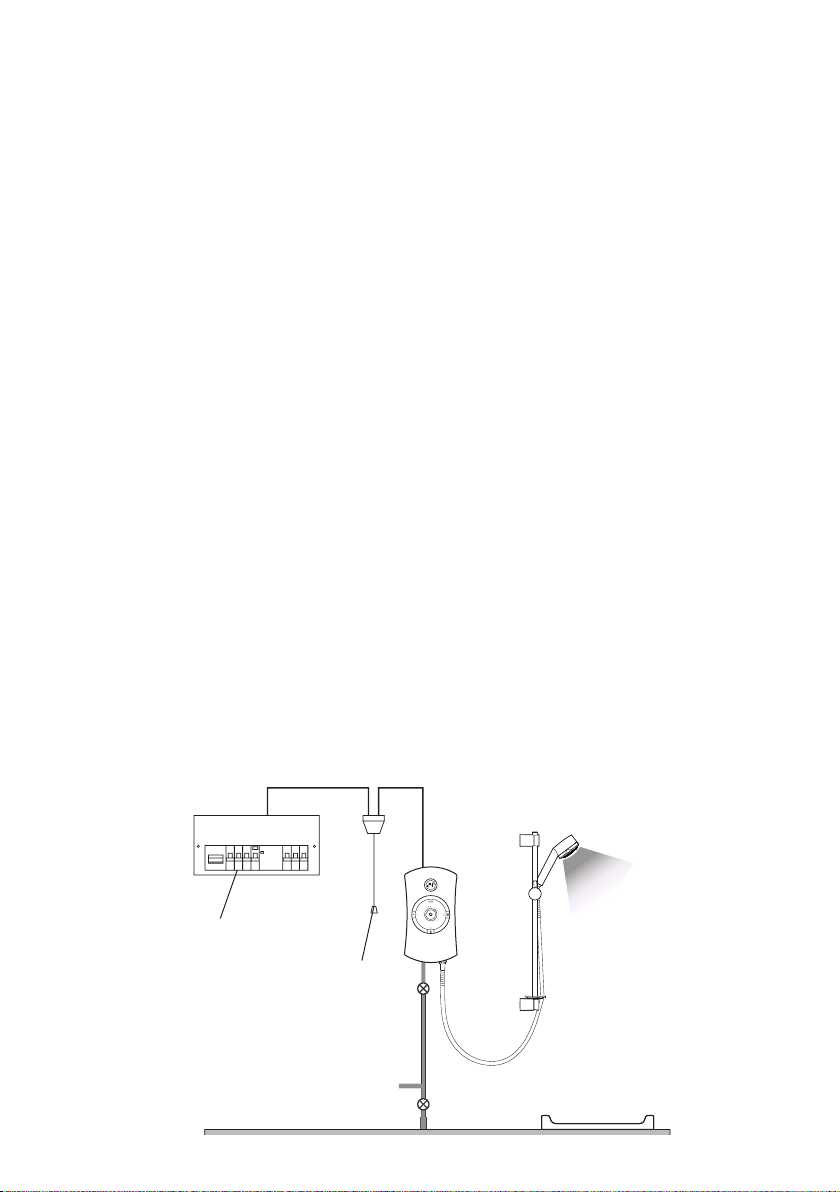
WARNING - TO REDUCE THE RISK OF FIRE, ELECTRIC SHOCK OR INJURY:
Electrical
1. The electrical installation must comply with BS 7671 (commonly referred to as
the IEE Wiring Regulations) and all relevant building regulations, or any particular
regulation or practice specied by the local electricity supply company.
2. Ensure that all circuit protection devices, switches and cabling are adequate
for the rated current of the shower and that the rating of the electricity supply
company fuse and the consumer unit is adequate for the additional demand.
3. The shower must be earthed. Ensure any supplementary bonding complies
with the relevant regulations.
4. This shower is intended to be permanently connected to the xed electrical wiring
of the mains system. A separate supply must be provided from the consumer
unit to the shower.
5. DO NOT supply any other electrical equipment including extractor fans or pumps
via this product.
6. This shower must be provided with means for local disconnection that is
incorporated into the xed wiring in accordance with the relevant local wiring
regulations. This must be a double pole switch, which has at least 3 mm contact
separation in each pole. The switch can be a ceiling mounted pull-cord type within
the shower room or a wall mounted switch tted in the applicable zone area.
7. A 30mA Residual Current Device (RCD) must be incorporated into the electrical
supply to this shower in accordance with wiring regulations.
8. DO NOT apply excessive force to the terminal block.
9. All electrical connections should be checked for tightness to prevent overheating
before switching on the electrical supply.
10. DO NOT switch on the electrical supply until the plumbing has been completed
and checked for leaks.
Consumer Unit
Double-pole
Isolating Switch
9
Page 10
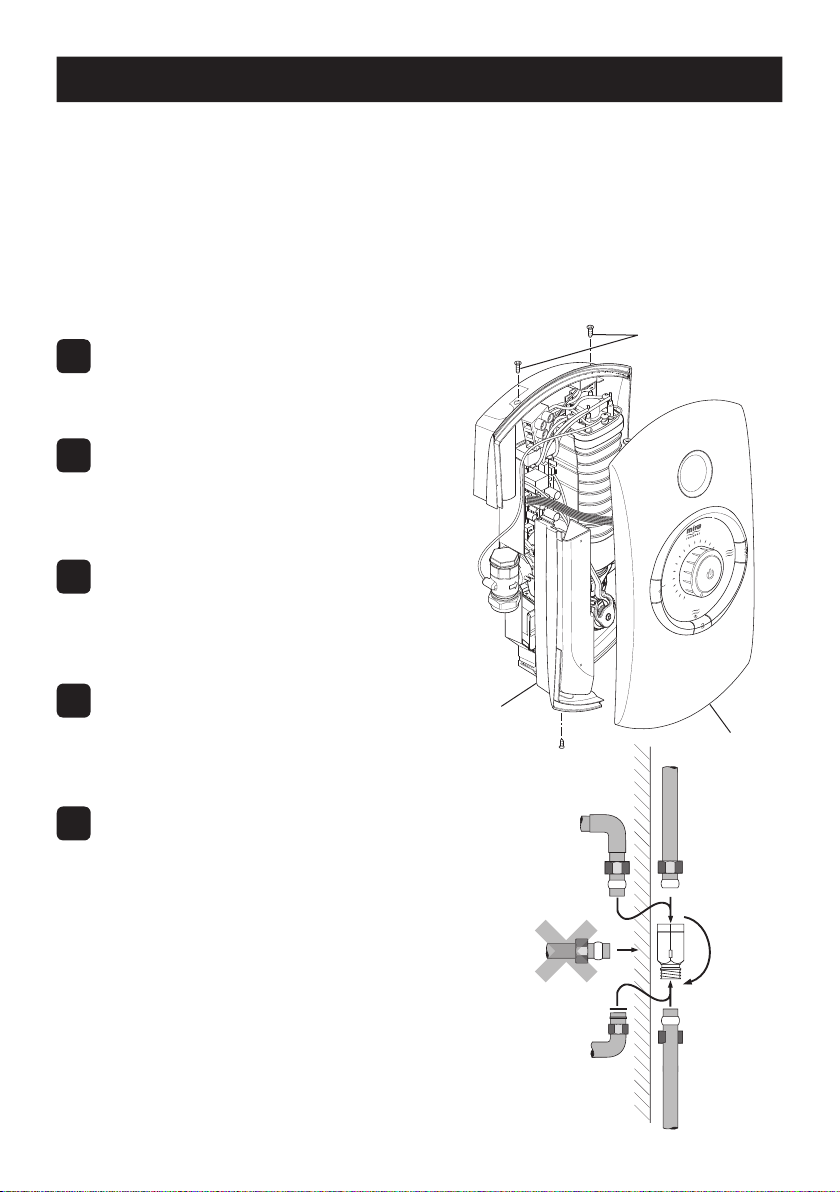
INSTALLATION
Warning! Isolate the electrical and water supplies before installing the shower. The
electricity must be turned off at the mains and the appropriate circuit fuse removed,
if applicable.
Note! An installation template is supplied to help you install the Mira Orbis.
Wall xings are not supplied. For solid wall structures a red rawl plug and a no. 8
x 1½” countersunk brass or stainless steel screw should be used. For other wall
structures such as panels alternative xings may be required. A minimum of 3 xing
screws should be used.
Cover Retaining
Remove the three cover retaining
1
screws.
2
Carefully remove the cover,
making sure that you do not
strain the multi-connector.
3
Carefully remove the multiconnector from the socket on
the control PCB in the case
Screws
4
Remove the service tunnel.
5
Determine the direction and route
of the incoming water supply:
falling (entering the shower from
the top), or rising (entering the
shower from the bottom).
Note! - DO NOT use an incoming
supply entering the shower
directly from the back. Add an
elbow to the supply pipe and
connect it as a rising or falling
supply.
Service Tunnel
Cover
10
Page 11
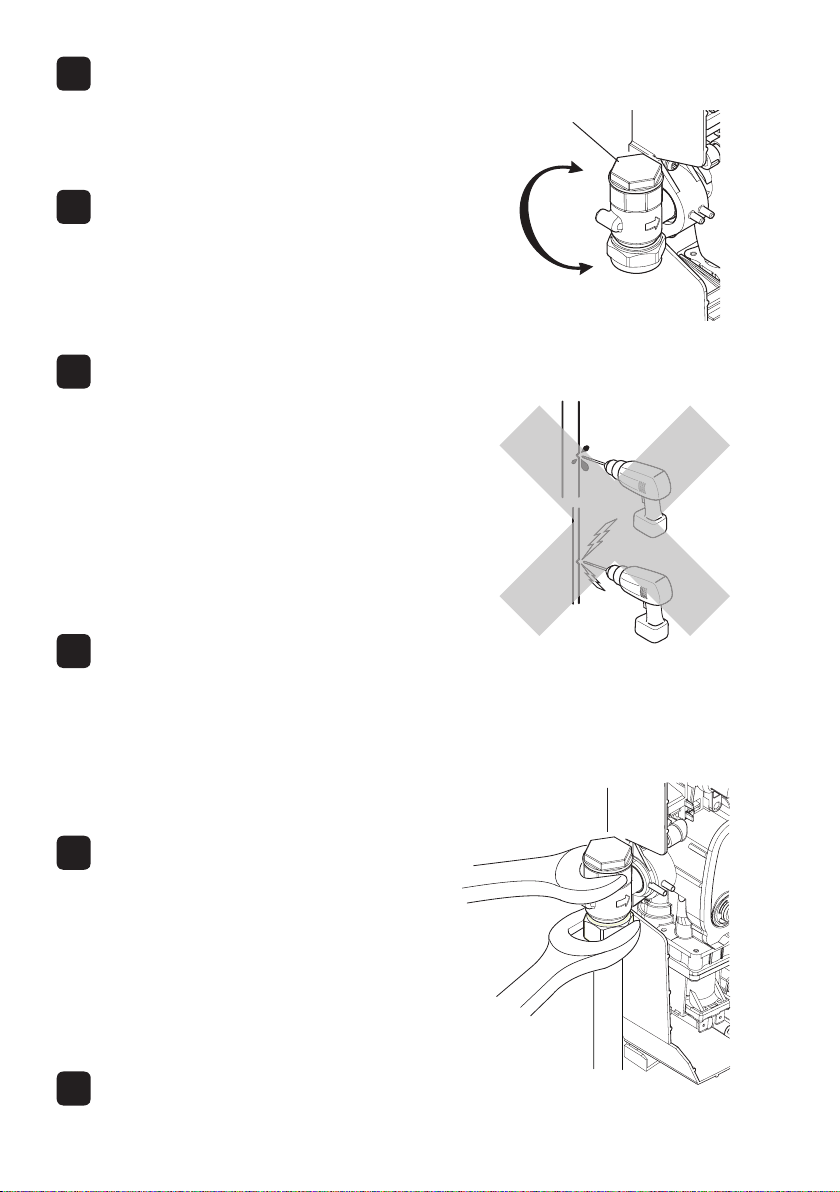
6
Rotate the inlet connector to
suit the direction of the incoming
water supply.
Upper and lower case inserts are
7
supplied and should be tted.
Trim the inserts to t incoming
electrical or water supplies
before tting.
8
Thoroughly ush the mains-
fed cold water supply pipe.
The supply must be clean
and free from debris BEFORE
connecting the Mira Orbis.
To ush the pipework, turn on
the water supply and drain a
minimum of 10 litres (2 gallons) of
water into a bucket or catchment
area. Turn off the water supply.
9
Using the installation template
supplied,mark the positions
of the three xing holes.
Note! Ensure that there are
sufcient lengths of supply pipe
and electrical cable to reach the
connection points.
Inlet
Connector
Caution! Do not drill into
buried cables or pipes.
10
Drill and plug the top two xing
holes. Secure the shower to the
wall with appropriate screws
provided. Drill the bottom xing
hole with the product in place.
Alternative xings (not supplied)
may be necessary for some wall
structures. Avoid drilling into any
supply cable/pipe.
11
Install the mains-fed cold water
supply pipe. Do not overtighten.
11
Page 12
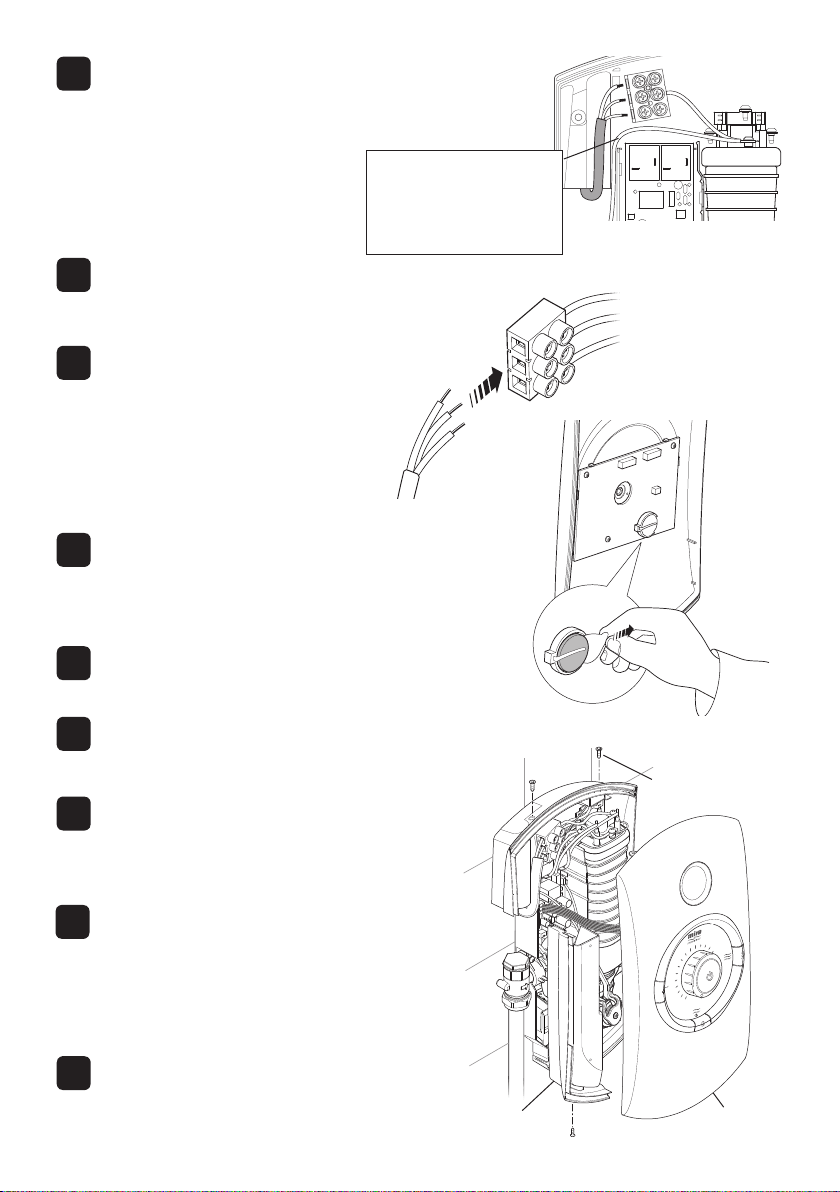
12
Feed cable into Case. Fit Earth
sleeve (not supplied) and strip
insulation.
Do not twist cable cores.
13
Loosen the screws in the terminal
block and insert the wires.
Tighten the screws in the terminal
14
block, ensure the wires are secure
and tight.
Note! Ensure the earth
bonding complies with relevant
regulations.
Before retting the cover, pull
15
the plastic tab off the battery to
activate it.
Important! Make sure
that the inlet earth wire is
routed as shown. Failure
to do so may cause
product malfunction.
L = BROWN
E = GREEN/YELLOW
N = BLUE
16
Ret the Service Tunnel.
17
Connect the multi-connector to
the socket on the PCB.
18
Ret the Cover. Make sure that it
ts correctly. Do not overtighten
screws.
19
Do not use alternative screws to
secure the Cover. This can cause
internal damage to the appliance.
Do not seal around the back of
appliance.
20
Install the shower fittings
in accordance with the
manufacturer’s instructions.
12
Service Tunnel
Cover Retaining
Screw
Cover
Page 13
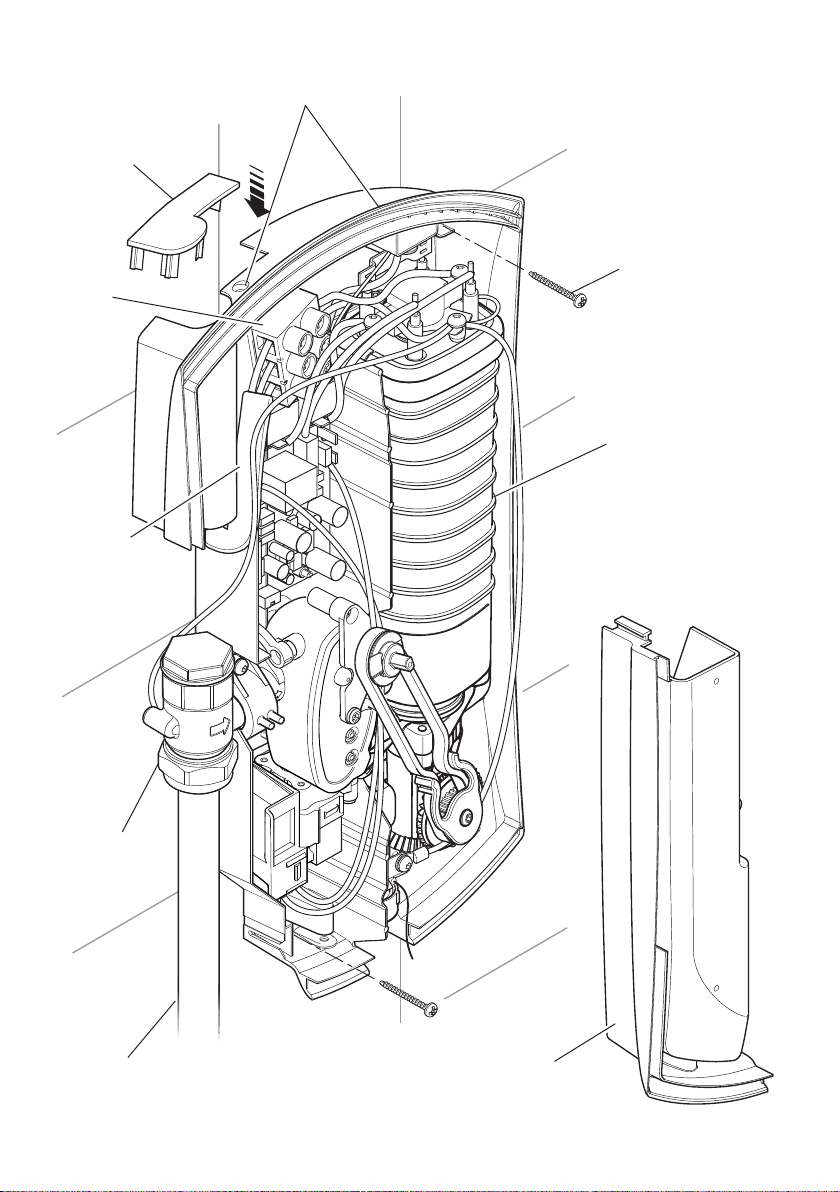
Case Insert
Terminal
Block
Electrical
Supply Cable
Holes For Cover
Retaining Screws
Fixing Screw
Heater Tank
Inlet Connector
Assembly
Cold Water Supply
Pipe (Bottom Entry)
Service Tunnel
13
Page 14
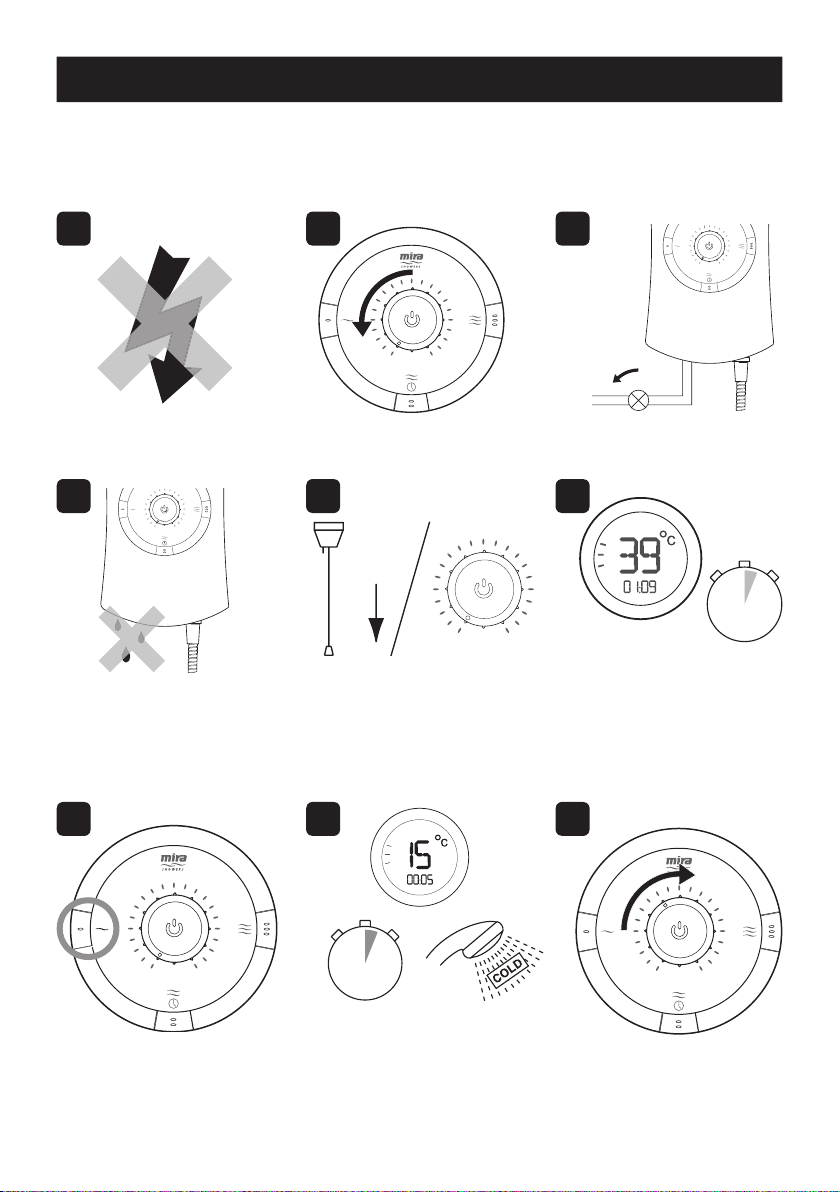
COMMISSIONING
If you are unsure how an electric shower works, please read through the User
Instructions section before continuing.
Note! The temperature display throughout this guide will depend upon inlet supply
conditions and product settings.
1 2 3
Electrical supply is turned
off at the mains.
4 65
Check for water leaks. Switch on the electrical
7 8 9
Turn control to full cold.
supply and press the
‘Start/Stop’ button
Turn the water supply
fully on.
5 - 10 Secs
The temperature indicator
becomes illuminated,
showing time. Temperature
will be displayed after a
few seconds.
Press the ‘Low’ button,
light on the display comes
on
0 - 5 Secs
Water will be at full force
and at a cool temperature
as indicated by the
temperature indicator.
14
Turn the control slowly.
Temperature remains cool
and ow is reduced
Page 15
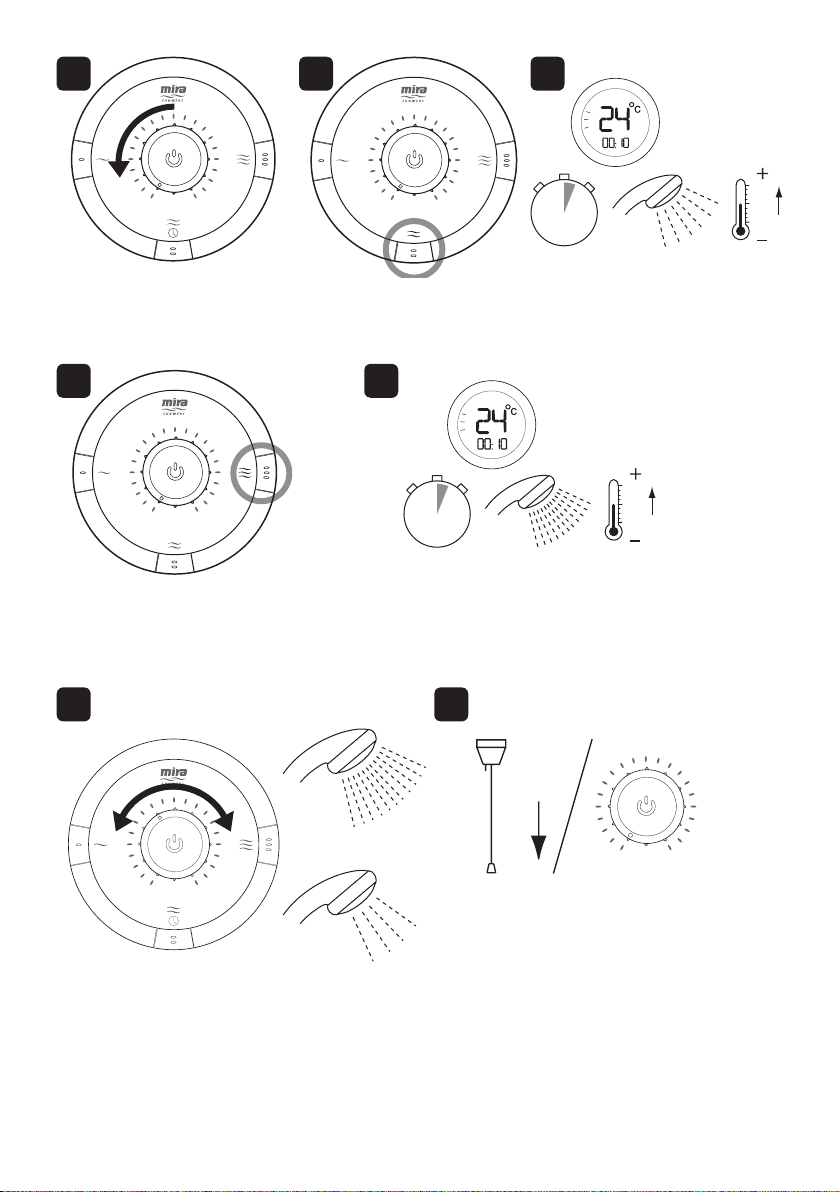
10 11 12
0 - 10 Secs
Turn control to full cold. The temperature will rise
Press the ‘Medium’ button,
light on the display comes
on
slightly as indicated by the
temperature indicator.
13 14
5 - 10 Secs
Press the ‘High’ button,
The ow rate will increase.
light on the display comes
on
15 16
Adjust temperature as
required. Flow rate will adjust
automatically.
Press STOP button, light on the
temperature indicator dims to standby
state. When the shower has stopped
running the temperature display will
only show the clock. The water flow
will continue for a few seconds before
stopping. Isolate power. Display will go
blank.
15
Page 16

17 18
0 - 5 Secs
The shower will purge water from
its tank for a few seconds.
Residual water may drain over a
few minutes.
Note! A slight hissing sound may be heard from the Mira Orbis during operation.
High mains water pressure and high shower temperatures will affect the tone. This
is quite normal in use.
16
Page 17
USER INSTRUCTIONS
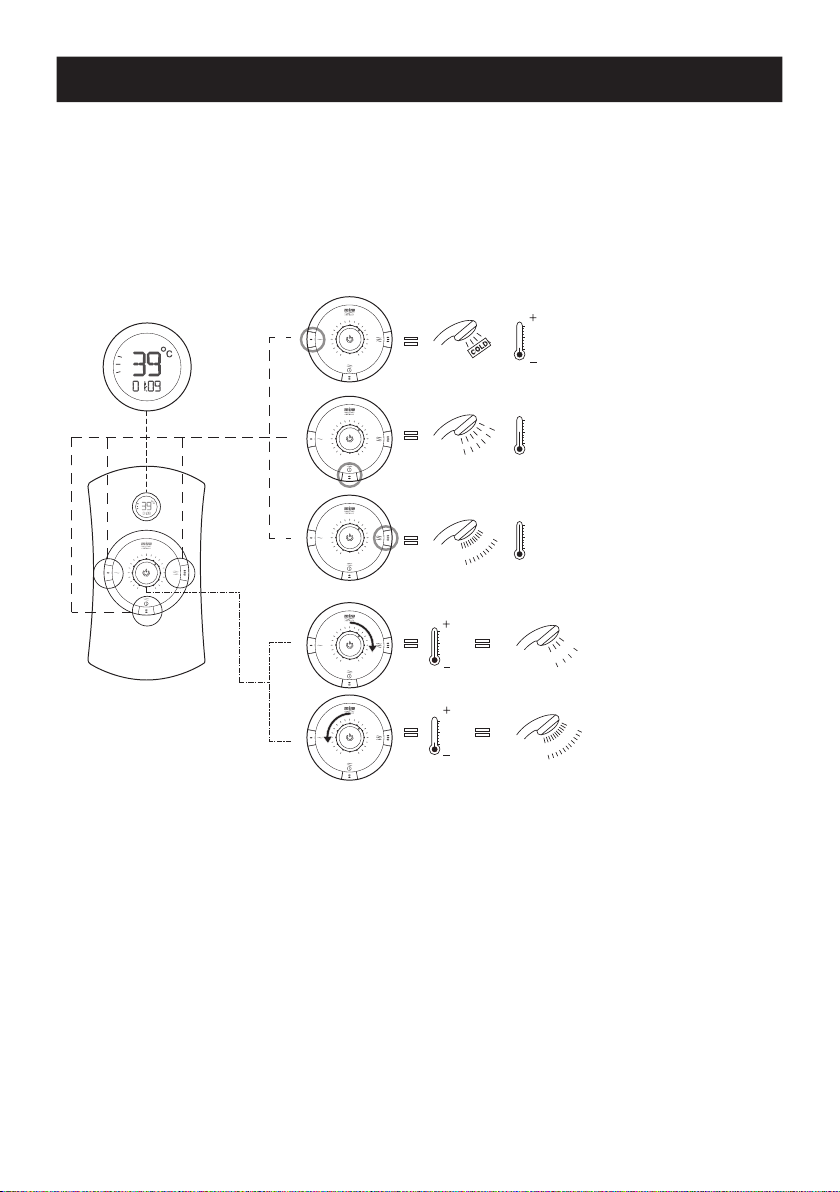
How Your Electric Shower Works
Heated water is produced by adjusting the ow of cold water passed through a
heater tank.
The temperature
indicator shows the
temperature of the
shower.
The shower has three
heater settings.
The warmer the
shower, the lower
the ow rate and vice
versa.
17
Page 18
Thermostatic (Temperature-Stable)
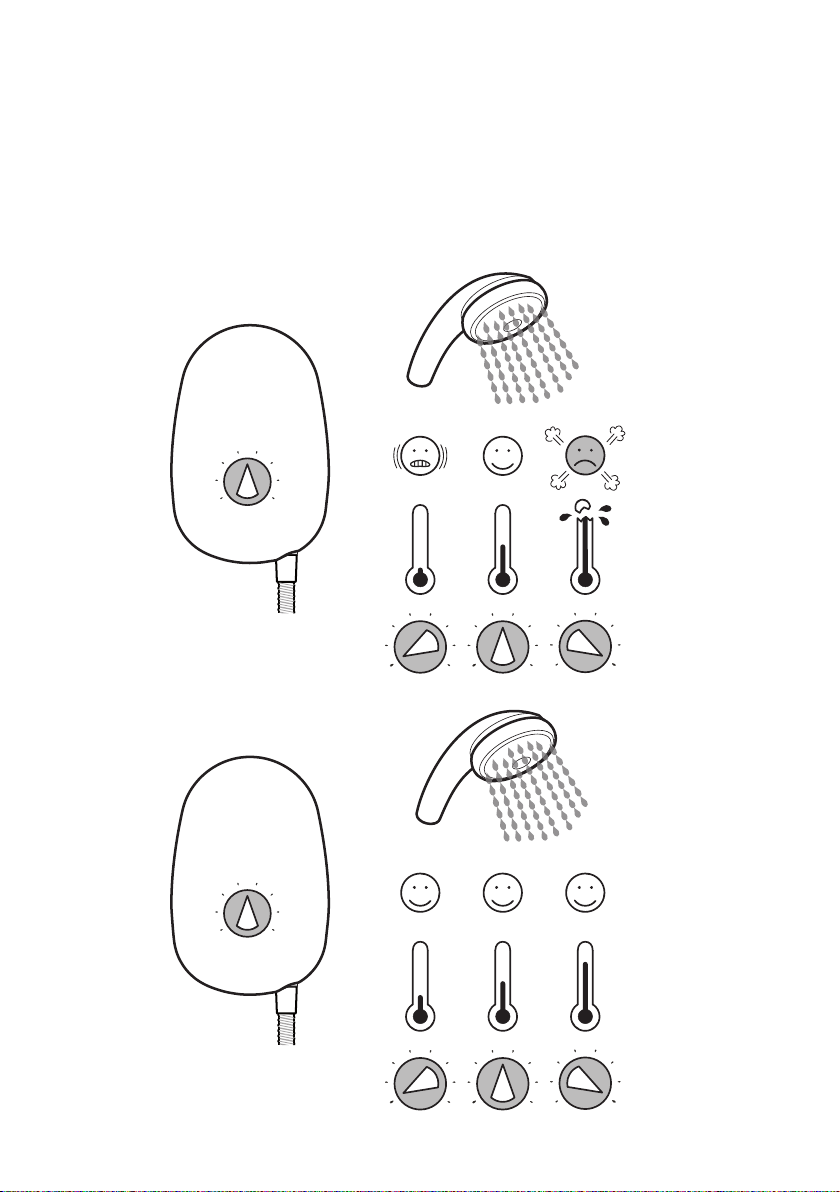
The shower's top priority is to keep the desired water temperature constant. Electric
showers with thermostatic control are able to keep a stable temperature across the
range from hot to cold, whilst also dealing with uctuations in electrical and water
supplies. As a result, there is a temperature limit the shower cannot go beyond. For
safety, this temperature is factory set and cannot be adjusted to make the shower
hotter or colder.
ORDINARY
ELECTRIC
SHOWER
THERMOSTATIC
ELECTRIC
SHOWER
18
Page 19
The Effect of Seasonal Changes
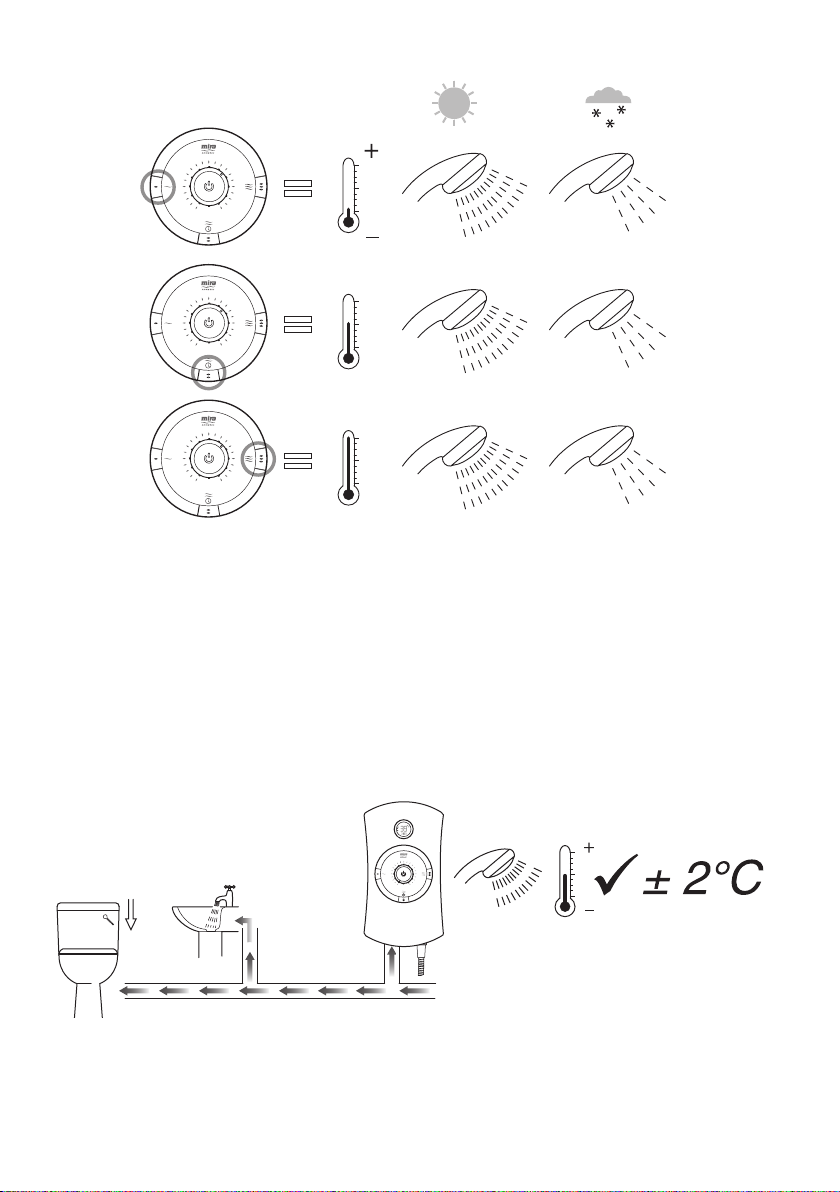
For a cold shower select ‘Low’.
For a summer warm shower select ‘Medium’.
For a winter warm shower select ‘High’.
During extremes of mains water supply temperature, adjust heater setting to obtain
a better showering temperature.
The Effect of Other Water Devices
Example of how shower temperature
stabilises due to pressure changes.
Water inlet pressure uctuations due to other draw offs (e.g. ushing toilet). Shower
temperature will be controlled to within ± 2°C of the set temperature provided that
the supply conditions remain within the required operating parameters (refer to
section: ‘Specications’).
19
Page 20

USER SAFETY INFORMATION
WARNING - THIS SHOWER CAN DELIVER SCALDING TEMPERATURES IF NOT OPERATED,
INSTALLED OR MAINTAINED IN ACCORDANCE WITH THE INSTRUCTIONS, WARNINGS AND
CAUTIONS CONTAINED IN THIS GUIDE AND ON OR INSIDE THE APPLIANCE.
To reduce the risk of re, electric shock or injury:
1. Make sure that you fully understand how
to operate this shower before use, read
all operating instructions and retain this
guide for future reference.
2. This shower is not intended for use by
persons (including children) with reduced
physical, sensory or mental capabilities,
or lack of experience and knowledge,
unless they have been given supervision
or instruction concerning the use of the
shower by a person responsible for their
safety.
3. Children should be supervised to ensure
that they do not play with the shower.
4. DO NOT switch the shower on if there is
a possibility that the water in the shower
is frozen.
5. DO NOT switch the shower on if water
leaks from the shower unit. Isolate
the electrical supply to the shower
immediately.
6. DO NOT switch the shower on if the case
appears to be damaged or incorrectly
tted. Isolate the electrical supply to the
shower immediately.
7. DO NOT connect the outlet of the shower
to any tap, control valve, trigger handset
or showerhead other than those specied
for use with this shower - scalding water
temperatures and product damage may
occur. Only Kohler Mira recommended
accessories should be used.
8. The showerhead must be de-scaled
regularly, refer to the user maintenance
section towards the rear of this guide for
details.
9. The shower hose must be checked
regularly and replaced if damaged, refer
to the user maintenance section towards
the rear of this guide for details.
10. DO NOT store bathroom items on top of
the shower case. ie. Shampoo or shower
gel containers.
20
11. Always check the water temperature
before entering the shower. Sunburn
or skin conditions can increase your
sensitivity to hot water. Make sure
that you set the shower to a cooler
temperature.
12. DO NOT operate the temperature control
rapidly, allow 10 – 15 seconds for the
temperature to stabilise before use.
13. DO NOT block or restrict ow through the
handset or hose whilst showering. eg. By
placing in direct contact with your body.
14. Be aware that any adjustment to
temperature control or power control
whilst showering will affect the showering
temperature and may result in a burst of
hot water.
15. Care is required if the shower is turned
off and then back on after a short time as
this will result in a burst of hot water from
the showerhead. Ensure temperature
has stabilised before re-using shower.
16. Switch off the appliance at electrical
isolating switch when not in use. This is
for safety and is recommended with all
electrical appliances.
17. If any of the following conditions occur,
isolate the electricity and water supplies
and contact your installer:
If the case is damaged or the cover is not
correctly tted and water has entered the
shower case.
If the shower begins to make an odd
noise, smell or smoke.
If the shower shows signs of a distinct
change in performance indicating a need
for maintenance.
Page 21
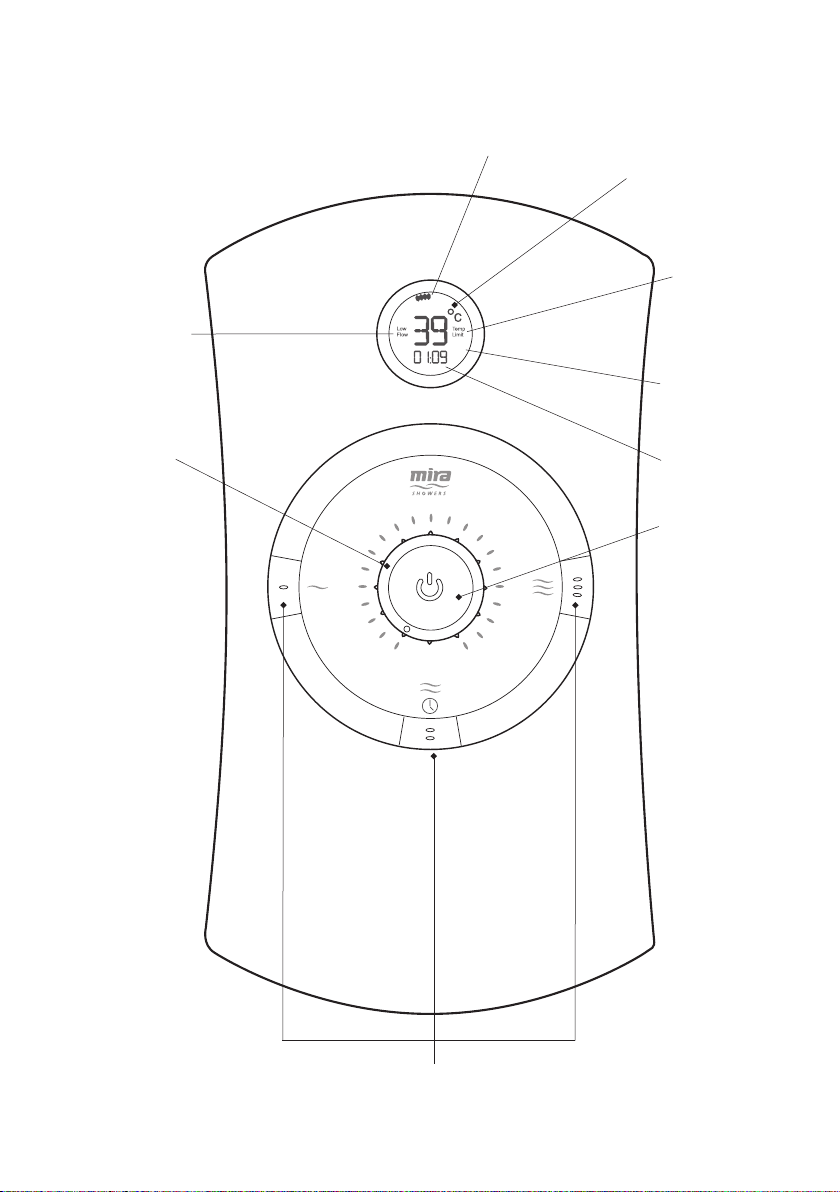
Using your Shower
Read the section “User Safety Information” rst.
Low Flow
Indicator
Temperature
Setting
Clock (seconds)
Temperature Display
(Backlit during operation)
Temperature
of Shower
Temperature
Limit Indicator
Clock
(hours/minutes)
Start/Stop
Button
Heater Settings
Low, Medium, High
21
Page 22
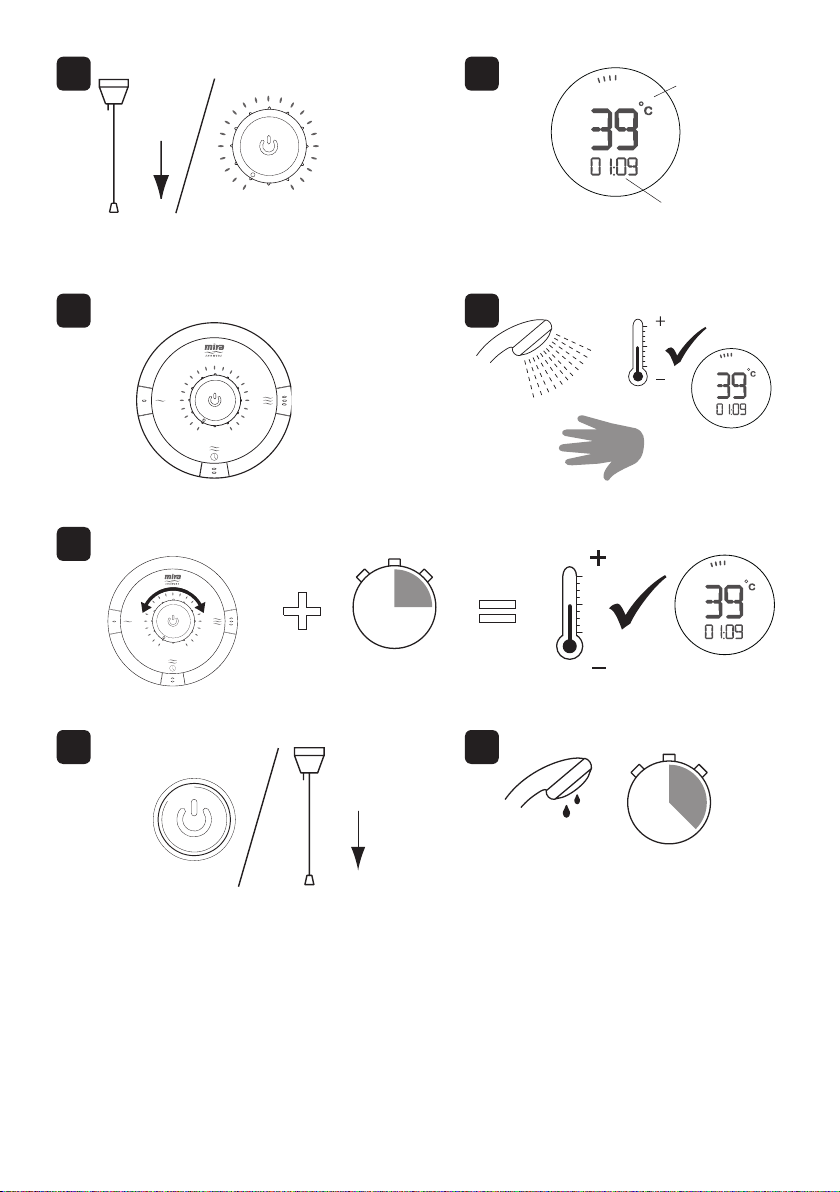
1 2
Switch on the electrical supply and
press the ‘Start/Stop’ button
3 4
Temperature
of Shower
Clock
The temperature indicator becomes
illuminated.
Set to the desired position.
Check the water temperature before
entering shower.
5
Allow 10 - 15 seconds for any temperature adjustments to reach the Showerhead.
6
Press STOP button, the light on the button
goes out. The Shower ow will continue for a
7
Residual water may drain over a
few minutes.
few seconds before stopping. Switch off the
electrical supply.
Note! After 40 minutes of continuous use, the
shower will automatically switch OFF.
Note! At the end of every shower make sure that the showerhead points into the
catchment area. A small amount of water may be retained in the showerhead after
the shower has been turned off. This may drain over a few minutes.
22
Page 23
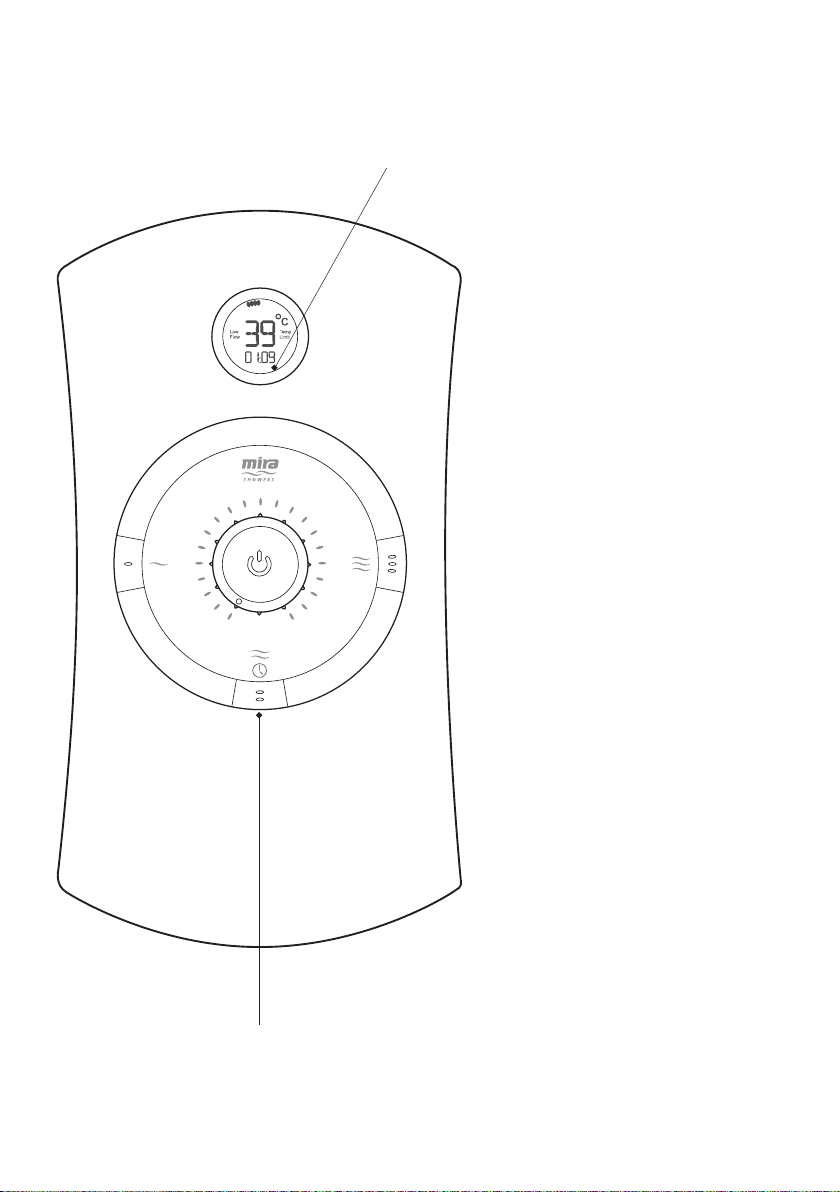
Clock Setting
Clock
1. Make sure that the product is
in ‘Standby’ state (i.e. Isolator
switch on).
2. Press and hold the ‘Medium
Power’ button - the clock
backlight will come on full
brightness.
3. After a delay of a few seconds
the hour segments of the clock
start ashing
4. Press ‘Medium Power’ button
repeatedly until desired ‘hours’
are displayed on the clock.
Medium Power
Pushbutton
5. After a short delay of a few
seconds the minute segments
of the clock start ashing.
6. Press ‘Medium Power’ button
repeatedly until desired
‘minutes’ are displayed on the
clock.
7. After a short delay of a few
seconds the minutes segments
stop flashing and the clock
backlight dims to its standby
state.
23
Page 24

LCD Indications
The table below shows what is shown on the LCD display once the shower has
been installed and is in use.
Product State LCD Display Backlight Comments
Off Blank Off Product turned off at pull
Standby Clock shown Dim
Product turned on via
Start / Stop button
Switching Power Clock Shown
Product turned off via - on
/ off button
Low Flow Clock shown
Temp Limit Clock shown
Clock Shown
Will display temperature
after a few seconds
Will display temperature
after a few seconds
Clock shown including
second indicators
Low Flow graphic
displayed
Temp Limit graphic
displayed
Full Brightness On initial start up unit will
Full Brightness Flow will change
Fade to Dim
Backlight ashes Product will stop heating
Backlight ashes Product will stop heating
cord
turn onto low power. The
next time you turn the unit
on it will be at the previous
setting
accordingly
the water, ow will reduce.
for 10 seconds and then
restart.
Turn the temperature
control down.
24
Page 25
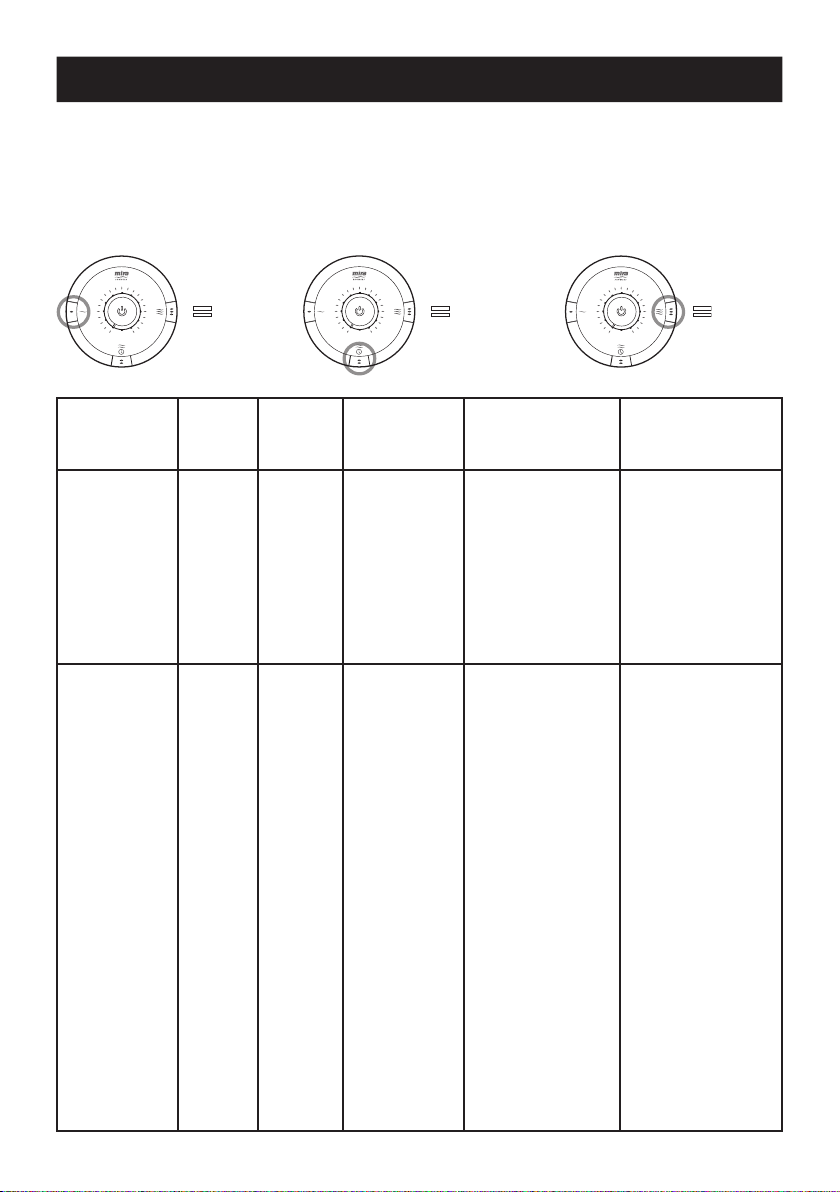
FAULT DIAGNOSIS
The trouble shooting information tabled below gives details on probable causes
and remedies should difculties be encountered whilst the shower is in operation.
Warning! There are no user serviceable components beneath the cover of the
appliance. Only a competent tradesperson should remove the front cover!
Heater Settings
Low Medium High
Symptom LCD
Back
Light
Appliance fails
to operate
Shower cycles
from hot to cold
OFF
OFF
OFF
OFF
ON
ON
ON
ON
ON
ON
ON
ON
ON
Low Flow
Warning
OFF
OFF
OFF
OFF
ON
ON
ON
ON
ON
OFF
OFF
OFF
OFF
Heater Setting
Low/Medium/
High
Medium/High
Medium/High
Medium/High
High
Medium/High
Medium/High
Medium/High
Probable Cause Probable Remedy
Electrical supply
isolated at double pole
switch.
Fuse blown or
MCB/RCD tripped,
indicating possible
electrical fault.
Faulty Relay PCB.
Faulty Control PCB.
Showerhead blocked.
Inlet Filter blocked.
Water pressure below
minimum required
for the appliance to
operate.
Faulty Relay PCB.
Faulty Inlet Valve.
Temperature limit
reached (ashes on
LCD).
Thermostatic
mechanism is faulty or
damaged.
Scaled Heater Tank
assembly.
Damaged Hose.
Switch on electrical
supply via the pullcord
or wall mounted switch.
Renew the fuse or
reset the MCB/RCD. If
fault persists, contact
your installer.
Replace Relay PCB.
Replace Control PCB.
Remove and clean.
Remove and clean.
Make sure incoming
mains water stopcock
and / or appliance
isolating valve is fully
turned on.
Replace Relay PCB.
Replace Inlet Valve
assembly.
Turn the temperature
control down or
reduce heater setting
to Medium until a
cooler temperature is
achieved.
Replace.
Replace.
Replace.
25
Page 26

Symptom LCD
Back
Light
Showerhead
dripping
Low or no ow
rate
Low or no ow
rate
No information
shown on LCD
display
Operation of
temperature
control has
little or no
effect on water
temperature.
OFF
OFF
ON
OFF
OFF
OFF
ON
ON
ON
ON
ON OFF Any Faulty Control PCB. Replace Control PCB.
ON
ON
ON
OFF
Low Flow
Warning
OFF
OFF
ON
OFF
OFF
OFF
ON
OFF
OFF
OFF
ON
OFF
OFF
OFF
Heater Setting
Low/Medium/
High
Any
Any
Any
Any
Any
Medium/High
Medium/High
Medium/High
Probable Cause Probable Remedy
Insufcient water
supply pressure for
shut off.
Inlet valve assembly
faulty.
Water supply pipework
or inlet lter restricted
by a blockage or
partial blockage.
Insufcient water
supply pressure / ow
for operation.
Faulty Relay PCB.
Faulty Control PCB.
Other outlets (e.g.
toilet, garden hose,
washing machine etc.)
drawing water whilst
the shower is being
used.
Hose Damaged.
Showerhead blocked.
Heater tank
excessively scaled.
Showerhead or inlet
lter blocked.
Thermostatic valve
faulty.
Heater tank failure.
Relay PCB failure.
The minimum static
pressure to ensure
shut off and prevent
dripping is 0.2 bar.
Note! If other
appliances are
operating, static
pressure may drop
below 0.2 bar. Contact
local water company.
Replace.
Flush supply pipe.
Clean inlet lter.
Contact local water
company.
Replace Relay PCB.
Replace Control PCB.
Turn off the other
appliances whilst the
shower is in use.
Replace.
Remove and clean.
Replace. In hard water
areas consider the use
of a water softener.
Remove and clean.
Replace.
Replace.
Replace Relay PCB
assembly.
26
Page 27

Symptom LCD
Back
Light
No change in
temperature
between Low/
Medium/High
setting.
Water will not
turn off.
Appliance fails
to produce hot
water when set
on ‘Medium /
High’ heater
setting.
Unable to select
a cool enough
shower.
Clock does not
keep time
E1 displayed on
screen
ON
ON
OFF
OFF
ON
ON
ON
ON
ON
ON OFF High Due to the rise in
ON OFF Any Battery needs
ON OFF Any Check thermistor is
Low Flow
Warning
ON
OFF
OFF
OFF
OFF
ON
ON
OFF
OFF
Heater Setting
Low/Medium/
High
Any
Any
Any
Any
Medium/High
Medium/High
Medium/High
Probable Cause Probable Remedy
Insufcient mains
water pressure.
Possible failure of
thermostatic valve or
heater tank.
Control PCB failure.
Thermal Trip failed.
Inlet valve, solenoid,
stop switch, relay PCB
or Control PCB faulty.
Supply pressure
below 20 kPa
(0.2 bar).
Inlet valve assembly
faulty.
Faulty relay PCB.
Possible failure of
the thermal switch.
Heater tank failure.
mains water supply
temperature, the
heater setting may be
too high.
replacing.
Faulty Control board.
plugged in.
Contact local water
company.
Check the continuity
of the heater tank
and replace parts as
necessary.
Replace Control PCB
assembly.
Replace thermal trip
or check the continuity
of the heater tank
/ replace parts as
necessary.
Replace as necessary.
Contact local water
company. Check mains
water static pressure.
Replace inlet valve
assembly.
Replace relay PCB.
Check the continuity
of the heater
tank / replace parts as
necessary.
Replace.
Press the ‘Medium’
heater setting and
adjust the temperature
control until a suitable
temperature is
reached.
Replace battery.
Replace.
Ret or replace.
Note! The Mira Orbis Thermostatic Shower offers a water saving feature where the shower will
automatically switch OFF after 40 minutes of continuous use.
27
Page 28
USER MAINTENANCE
WARNING - TO REDUCE THE RISK OF FIRE, ELECTRIC SHOCK OR INJURY:
There are no user serviceable
parts inside the shower. Only
qualified, competent personnel
should remove the front cover,
mains connections are exposed
when the cover is removed.
Switch the shower off at the isolator
switch before performing any user
maintenance or before cleaning
the shower.
DO NOT use the showerhead to
clean the shower.
If the shower is not to be used for
a long period, the electrical supply
and water supply to the shower
should be isolated. If the shower
or pipework is at risk of freezing
during this period a qualified,
competent person should drain
them of water.
DO NOT allow young children
to perform user maintenance
including cleaning of the shower.
Cleaning
Many household cleaners contain abrasives and chemical substances, and should
not be used for cleaning plated or plastic products or ttings. These nishes should
be cleaned with a mild washing up detergent or soap solution, and then wiped dry
using a soft cloth.
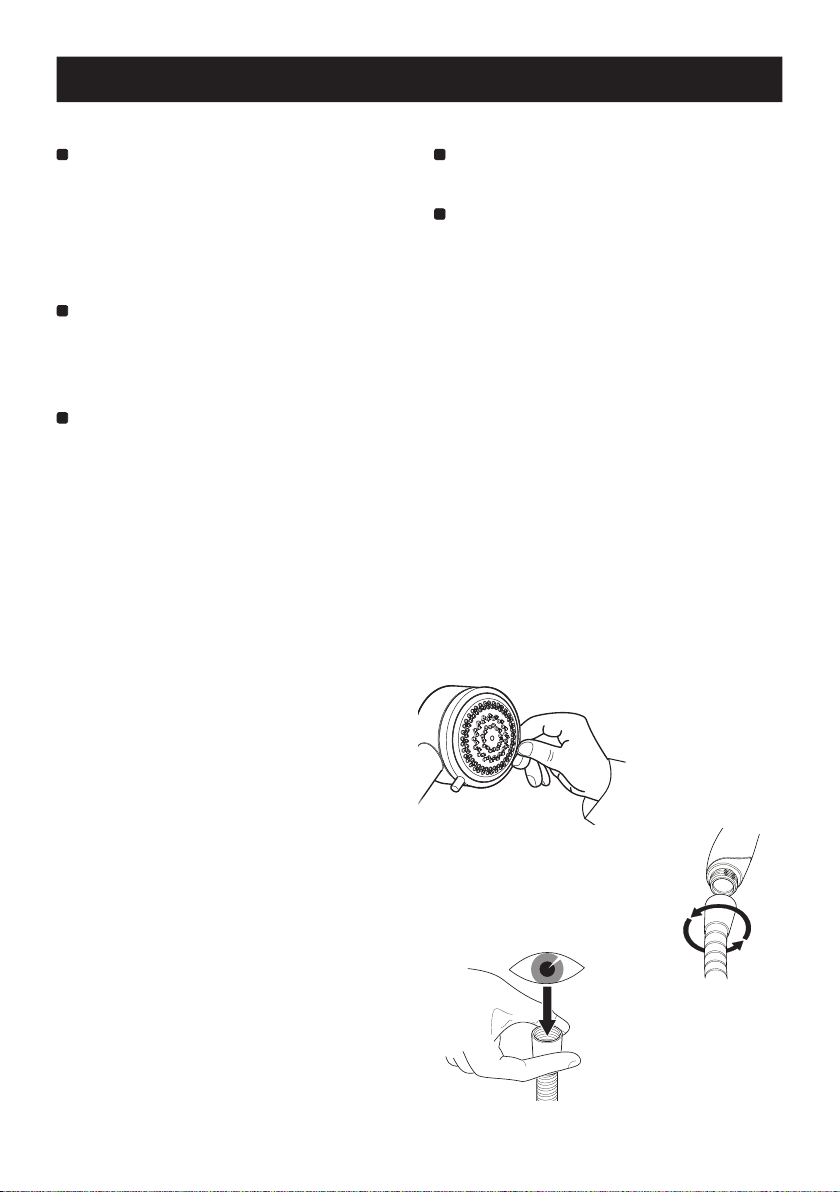
De-scaling the Showerhead
Important! Keeping the showerhead
clean and free from limescale will ensure
that your shower and showerhead
Use your thumb or a
soft cloth to wipe any
limescale from the
soft nozzles
continue to perform to their maximum.
A blocked showerhead can restrict the
flow rate and may cause damage to
your shower
Unscrew the hose from
Inspecting the hose.
the showerhead and
the shower outlet.
Important! The shower hose should
be inspected periodically for damage
or internal collapse, internal collapse
can restrict the flow rate from the
showerhead and may cause damage to
the shower. Remove the shower hose
Inspect the hose.
from the shower, inspect and replace the
hose if necessary.
28
Page 29
Servicing
WARNING There are no user serviceable parts inside the shower.
MAINS CONNECTIONS ARE EXPOSED WHEN THE COVER IS REMOVED.
Servicing of the shower must only be carried out by qualied, competent personnel
following the instructions provided in this guide and those provided with any spare
part. Before replacing any parts, ensure that the underlying cause of the malfunction
has been resolved.
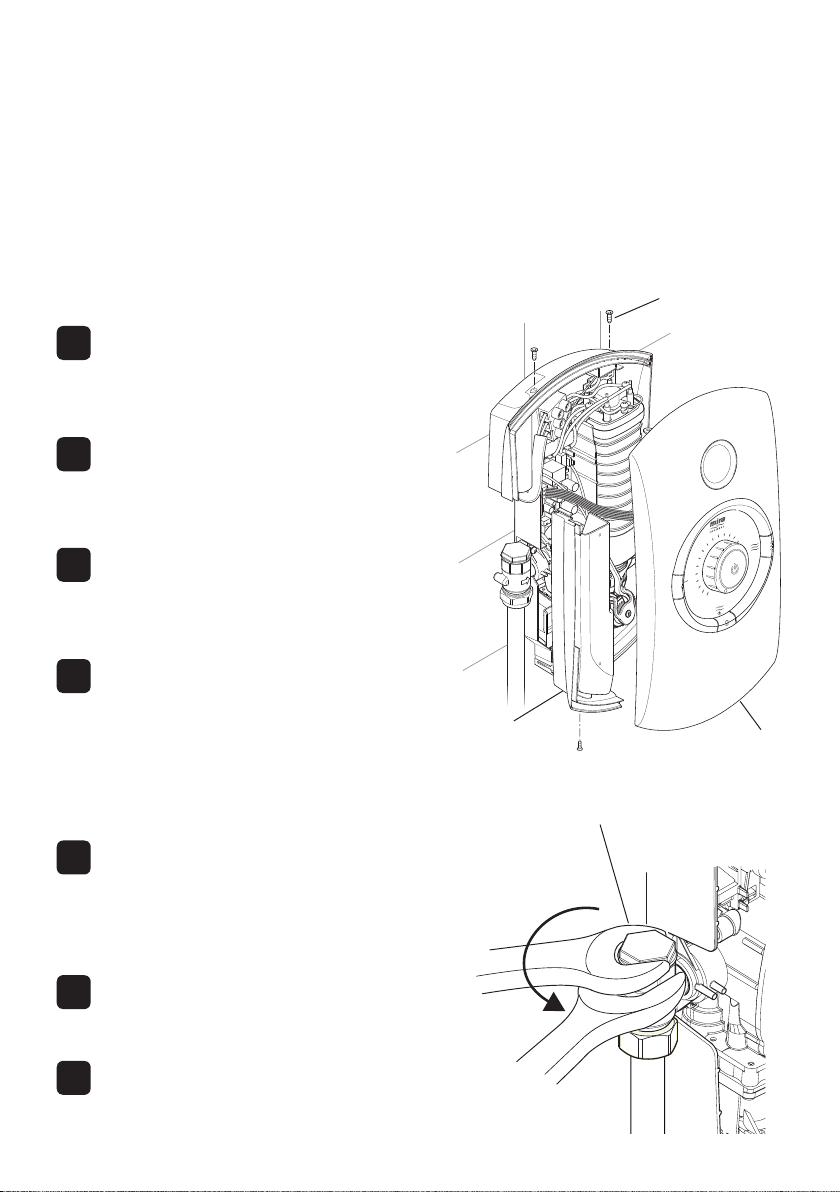
Inlet Filter - Cleaning / Renewing
Read the section “Important Safety Information” rst
1
Make sure that the electrical
supply is turned off at the mains
and that the water supply is fully
turned off.
2
Remove the three screws.
Carefully remove the cover,
making sure that you do not
strain the multi-connector.
3
Carefully remove the multiconnector from the socket on the
control PCB in the case. Remove
the service tunnel.
Cover Retaining
Screw
Hold a wrench across the ats
4
of the metal connector. Unscrew
the lter using another wrench as
shown. Clean or renew the Filter
as necessary. Ret in reverse
order making sure the Filter is
screwed fully home.
Do not overtighten. Make sure
5
plumbing connections are tight
before restoring the electricity
and water supply. Check for
leaks.
Refit the Service Tunnel and
6
connect the multi-connector to
the socket on the PCB.
Ret the Cover. Make sure that it
7
ts correctly. Do not overtighten
screws.
Service Tunnel
29
Cover
Filter
Page 30
Clock Battery Replacement Procedure
WARNING There are no user serviceable parts inside the shower.
Only a competent tradesperson should remove the front cover!
MAINS CONNECTIONS ARE EXPOSED WHEN THE COVER IS REMOVED.
Read the section “Important Safety Information” rst.
Make sure that the electrical
1
supply is turned off at the mains.
Remove the three screws.
2
Carefully remove the cover,
making sure that you do not
strain the multi-connector.
Unplug the multi-connector from
3
the socket on the relay PCB in
the case. Remove the service
tunnel.
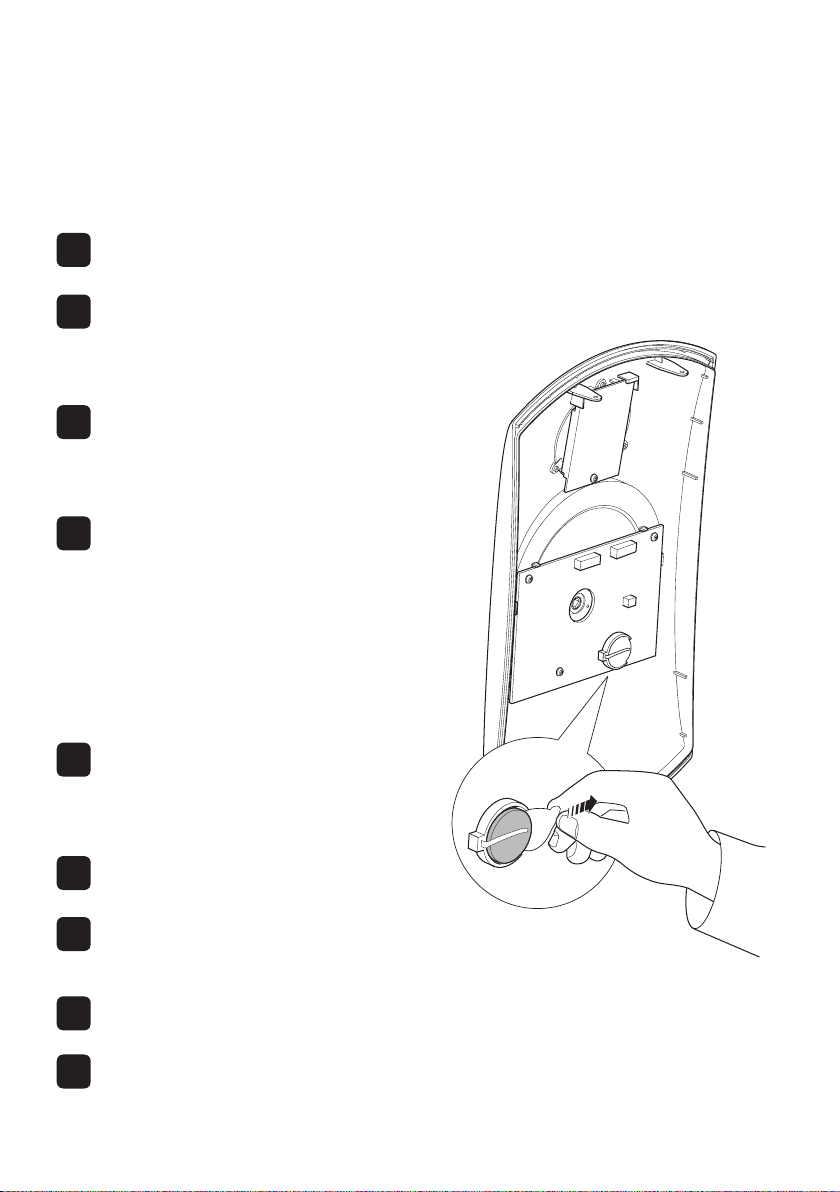
Carefully remove the battery from
4
the housing.
When the battery has reached
the end of its serviceable
life, make sure the battery is
disposed of in a safe manner,
in accordance with current
local authority recycling, or
waste disposal policy.
Refit a new battery, pull the
5
plastic tab off the battery to
activate it.
(Battery type BR2032 or CR2032)
Connect the multi-connector to
6
the socket on the relay PCB.
Ret the Cover. Make sure that it
7
ts correctly. Do not overtighten
the three cover retaining screws.
8
Restore the electrical supply.
Reset the clock, refer to the
9
‘Clock Setting’ procedure.
30
Page 31
SPARE PARTS
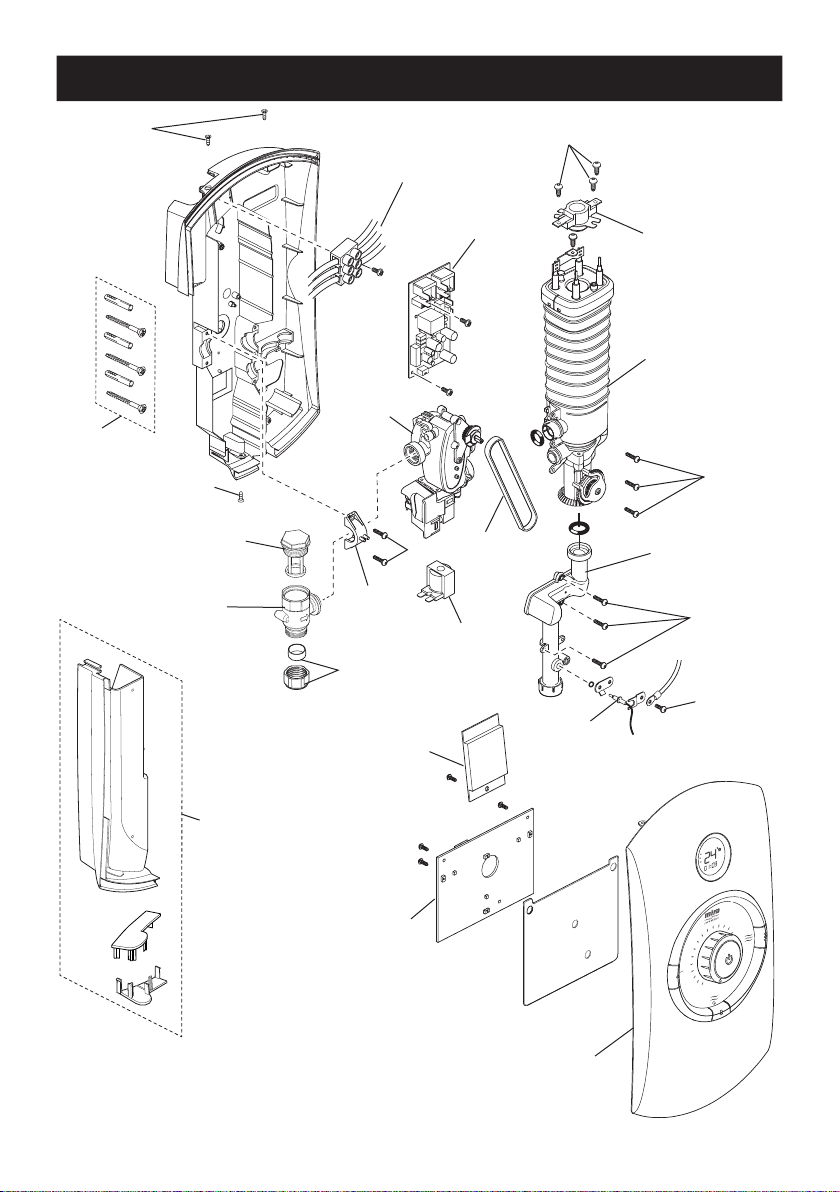
B
1647.103
Inlet Valve
A
B
1829.062
Inlet Filter
1829.063
Inlet
Connector
1647.096
Terminal
Block
B
416.38
Inlet Clamp
A
LCD Display
1647.107
1647.105
Relay PCB
1647.102
Control Belt
416.51
Coil
B
1647.095
Thermal Switch
1647.008 (9.0kW)
1647.009 (9.8kW)
1647.010(10.8kW)
Heater Tank
B
1647.101
Outlet
Connector
B
B
1647.108
Thermistor
1647.109 (White)
1647.150 (Black)
Service Tunnel
and Case Inserts
1647.106
Control PCB
1563.518 Component Pack - identied 'A'
1563.522 Cover Seal (not shown)
1563.541 Screw Pack - identied ‘B’
1647.110 Wire Pack (not shown)
1647.104 (White)
1647.148 (Black)
Cover
31
Page 32
CUSTOMER SERVICE
Guarantee
Your product has the benefit of our manufacturer’s
guarantee which starts from the date of purchase.
To activate this guarantee, please return your completed
registration card, visit our website or free phone 0800
0731248 within 30 days of purchase (UK only).
Within the guarantee period we will resolve defects in
materials or workmanship, free of charge, by repairing or
replacing parts or product as we may choose.
This guarantee is in addition to your statutory rights
and is subject to the following conditions:
● The guarantee applies solely to the original installation
under normal use and to the original purchaser only.
The product must be installed and maintained in
accordance with the instructions given in this user
guide.
● Servicing must only be undertaken by us or our
appointed representative. Note! if a service visit
is required the product must be fully installed and
connected to services.
● Repair under this guarantee does not extend the original
expiry date. The guarantee on any replacement
parts or product ends at the original expiry date.
● For shower fi ttings or consumable items we reserve
the right to supply replacement parts only.
The guarantee does not cover:
● Call out charges for non product faults (such as
damage or performance issues arising from incorrect
installation, improper use, inappropriate cleaning,
lack of maintenance, build up of limescale, frost
damage, corrosion, system debris or blocked fi lters)
or where no fault has been found with the product.
● Water or electrical supply, waste and isolation issues.
● Compensation for loss of use of the product or
consequential loss of any kind.
● Damage or defects caused if the product is repaired
or modifi ed by persons not authorised by us or our
appointed representative.
● Routine maintenance or replacement parts to
comply with the requirements of the TMV 2 or TMV
3 healthcare schemes.
● Accidental or wilful damage.
● Products purchased ex-showroom display.
What to do if something goes wrong
If your product does not work correctly refer to this
manual for fault diagnosis and check that it is installed
and commissioned in accordance with our instructions.
If this does not resolve the issue, contact us for help
and advice.
Extended Guarantees
A selection of protection plans are available that
enable you to cover repair bills (excludes Eire). Ring
01922 471763 for more details.
Helpdesk Service - Ring our Customer
Services Team for product advice, to purchase
spare parts or accessories or to set up service
visit. Yo u can contact us via phone or e-mail,
details below. Please provide y our model
name, power rating (if applicable) and date
of purchase.
Mira Showers Website (www.mirashowers.
co.uk)
Visit our website to register your guarantee,
download user guides, diagnose faults,
purchase our full range of accessories and
popular spares, or request a service visit.
Spares and Accessories - We hold the largest
stocks of genuine Mira spares and accessories.
Contact us for a price or visit our website to
purchase items from our accessory range and
popular spares
Service/Repairs - No one knows our products
better than our nationwide team of Service
Technicians. We can carry out service or repair
work to your product both during and after the
guarantee period. Ask about our fi xed price
service repairs.
.
To Contact Us: UK
0844 571 5000
Fax: 01242 282595
E-mail: Visit www.mirashowers.co.uk/
contactus
Mira Customer Services Dept, Cromwell
Road, Cheltenham, Gloucestershire, GL52
5EP
To Contact Us: Eire Only
01 531 9337
E-mail: CustomerServiceEire@
mirashowers.com
Mira is a registered trade mark of
Kohler Mira Limited.
The company reserves the right to alter
product specifi cations without notice.
1075158-W2-J (J01A, J01B, J01C, J01D) © Kohler Mira Limited, November 2013
32
FM 14648
 Loading...