

Page 1
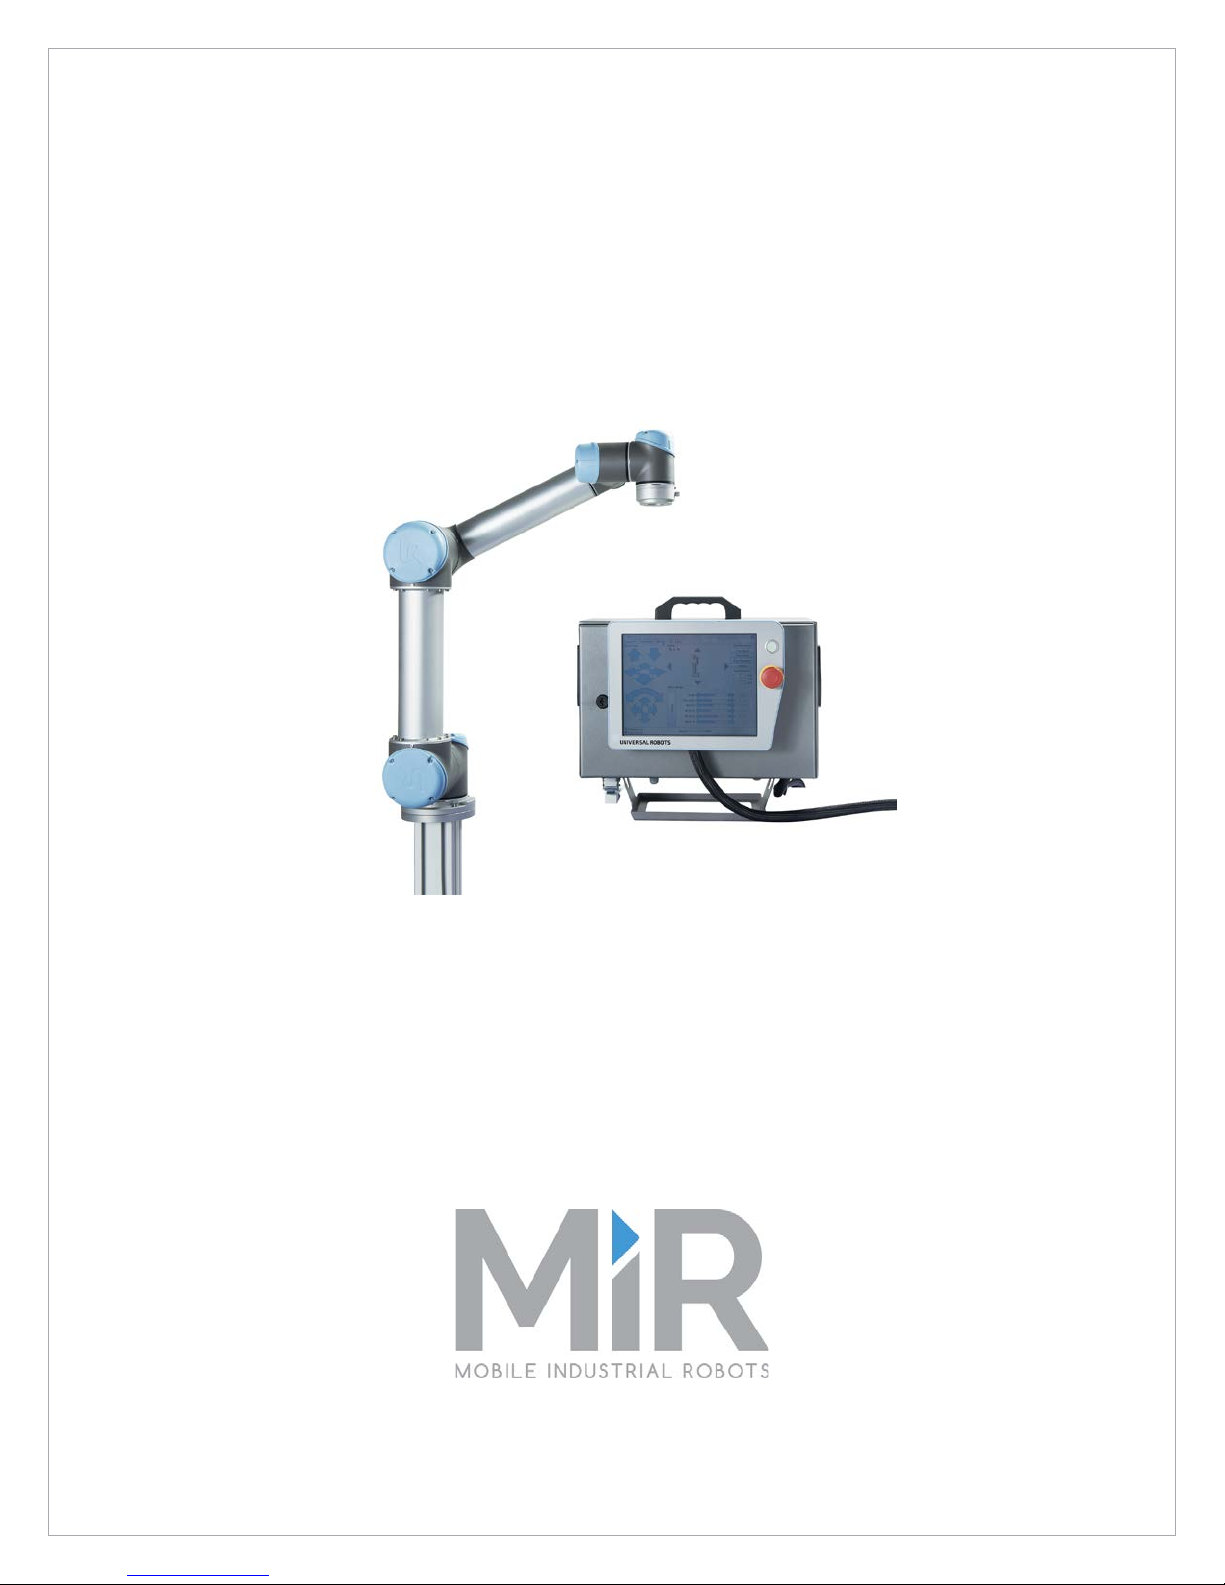
MiR100 UR Interface
Technical Documentation
Version 1.2
Software release 1.7
Release date: 26.09.2016
Page 2
MiR100 UR Interface Technical Documentation
Copyright Mobile Industrial Robots 2016 Page 2 of 17
Page 3
MiR100 UR Interface Technical Documentation
Table of contents
1 Introduction ...................................................................................................................................................... 4
2 Connecting MiR100 and UR Robot ................................................................................................................... 4
2.1 Preconditions ............................................................................................................................................ 4
2.2 Connecting MiR100 to the UR robot ........................................................................................................ 4
2.3 Safety connections ................................................................................................................................... 5
2.4 Connecting the Ethernet cable ................................................................................................................. 6
3 Handling the application .................................................................................................................................. 7
3.1 Starting the robot ..................................................................................................................................... 7
3.2 Creating a new program ........................................................................................................................... 9
3.3 Loading robot program ........................................................................................................................... 10
3.4 Network settings .................................................................................................................................... 13
3.5 Shutting down the robot ........................................................................................................................ 13
4 Using a Universal Robot with MiR .................................................................................................................. 14
4.1 Enabling Universal Robot features ......................................................................................................... 14
4.2 Connecting to Universal Robot ............................................................................................................... 15
4.3 Create mission with Universal Robot actions ......................................................................................... 16
4.4 Preparing the Universal Robot before use ............................................................................................. 16
5 Frequently Asked Questions ........................................................................................................................... 17
6 Changelog ....................................................................................................................................................... 17
Copyright Mobile Industrial Robots 2016 Page 3 of 17
Page 4
MiR100 UR Interface Technical Documentation
Caution
The MiR100 must be equipped with two batteries when running a UR application.
Notice
Read the instructions for the UR robot before continuing.
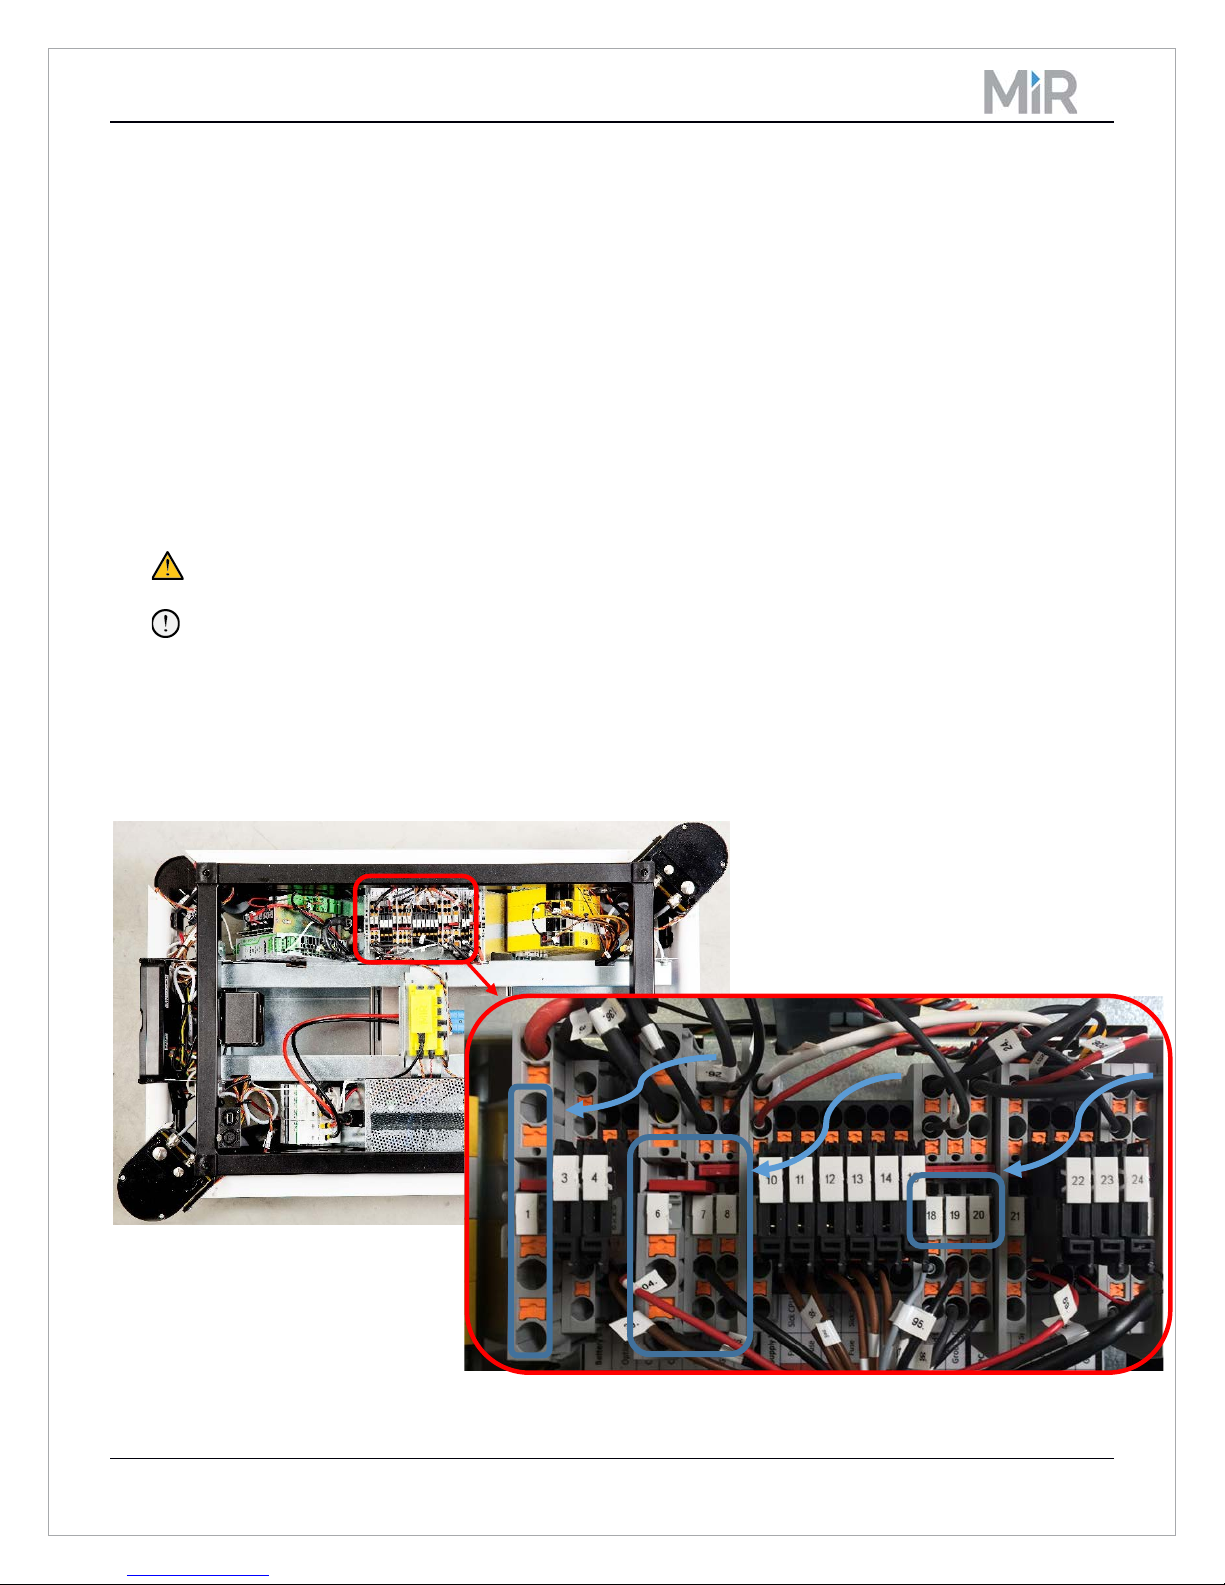
Figure 1 Connecting the MiR100
1 Introduction
The MiR UR Interface offers a simple way of interaction between a MiR100 and one robot arm from Universal
Robots mounted on the MiR. It is possible to run specific UR programs at certain points in a mission while the
MiR100 is standing still. After the particular UR program has finished, the MiR100 can continue moving.
2 Connecting MiR100 and UR Robot
2.1 Preconditions
It is the customer’s own responsibility to mount the UR robot on top of the MiR. This includes providing a
suitable bracket for the solution.
There are different options for powering the UR. The one explained in the following has been tested by Mobile
Industrial Robots. However, if any other solution is requested, please contact Universal Robots.
2.2 Connecting MiR100 to the UR robot
1. Connect two wires to the connection panel of the MiR100:
a. Connect the positive wire to any of the free ports in the connector labeled 1.
b. Connect the ground wire to any of the free ports on labeled 6, 7 or 8.
Copyright Mobile Industrial Robots 2016 Page 4 of 17
Page 5
MiR100 UR Interface Technical Documentation
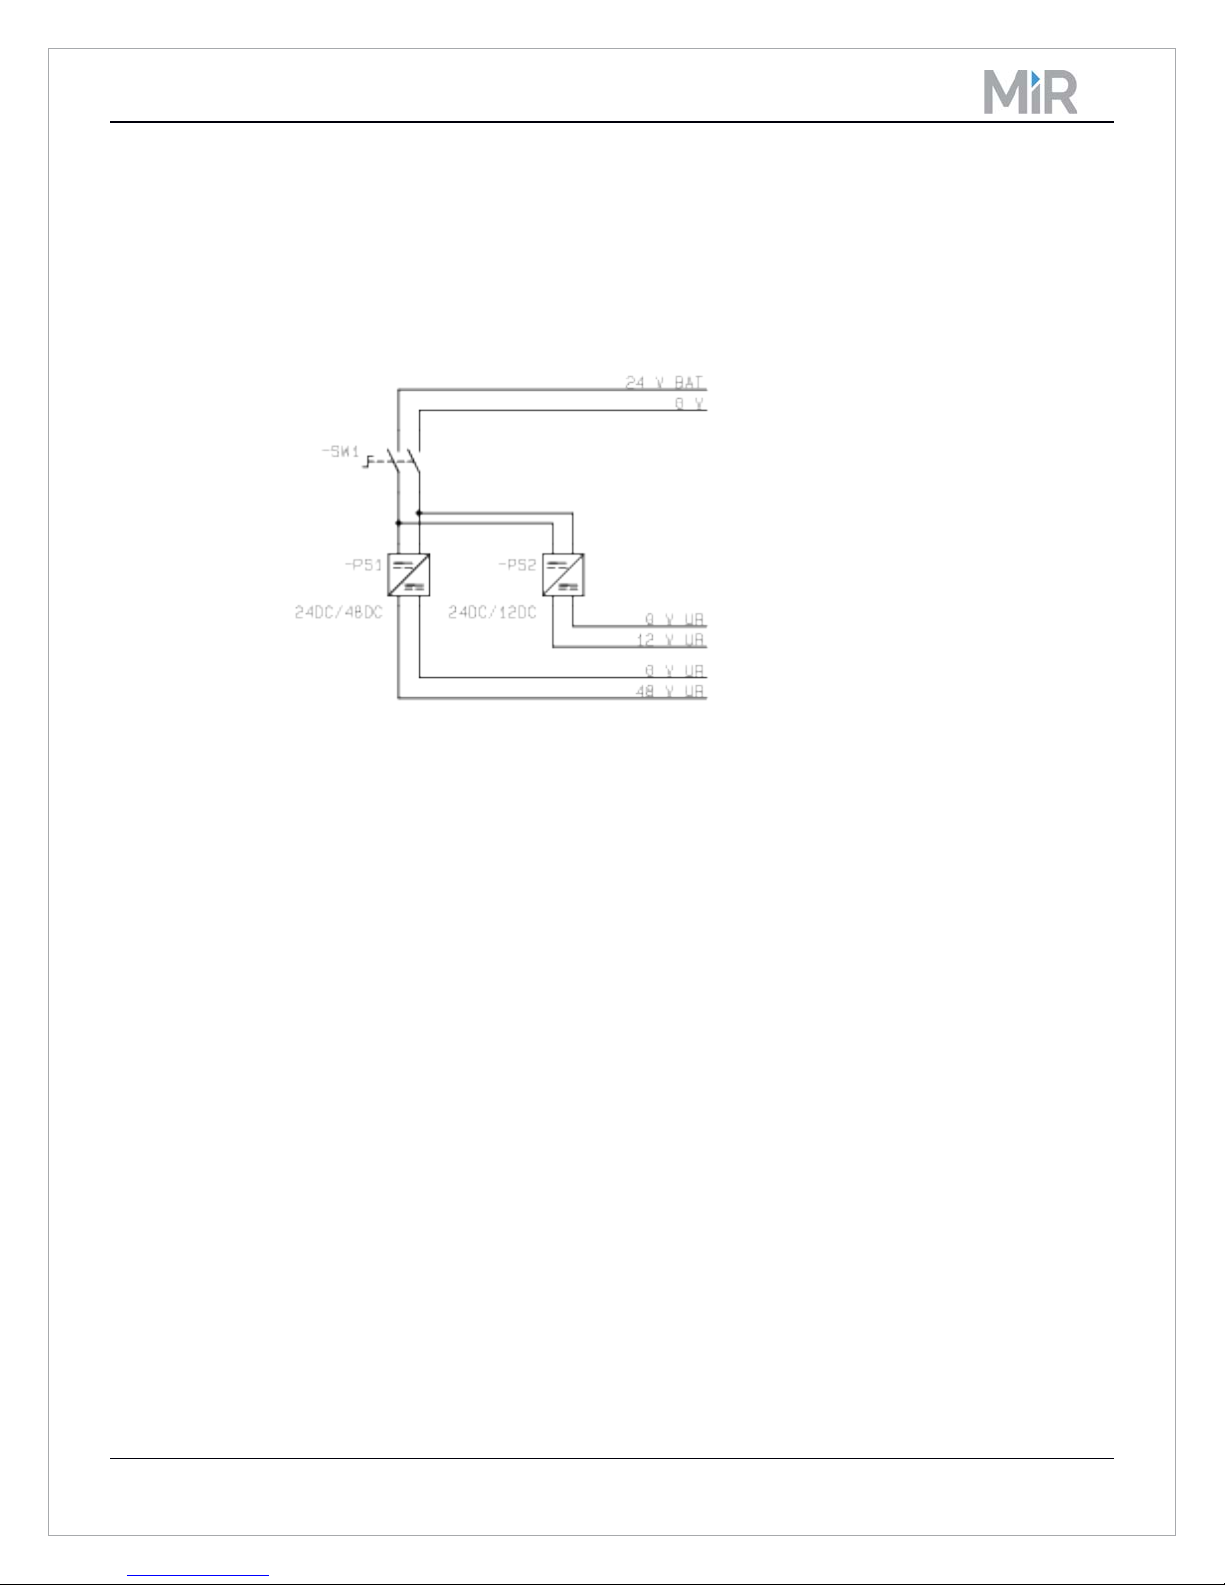
Figure 2 MiR100 wiring diagram
2. Connect these two wires to a two-phase switch as shown in Figure 2 MiR100 wiring diagram.
3. Connect the output of this switch to two different DC/DC converters. The first one converts the 24 V of
the MiR’s batteries to 48 V, and the second one converts it to 12 V, the two voltages which the UR
robot needs to work. See Figure 2 MiR100 wiring diagram.
Note: References, specifications and information on how to connect those power supplies to the UR robot’s
safety control board are found in the document “UR Robots with Battery Supply Installation guide”. (Please ask
Universal Robots for this document.)
2.3 Safety connections
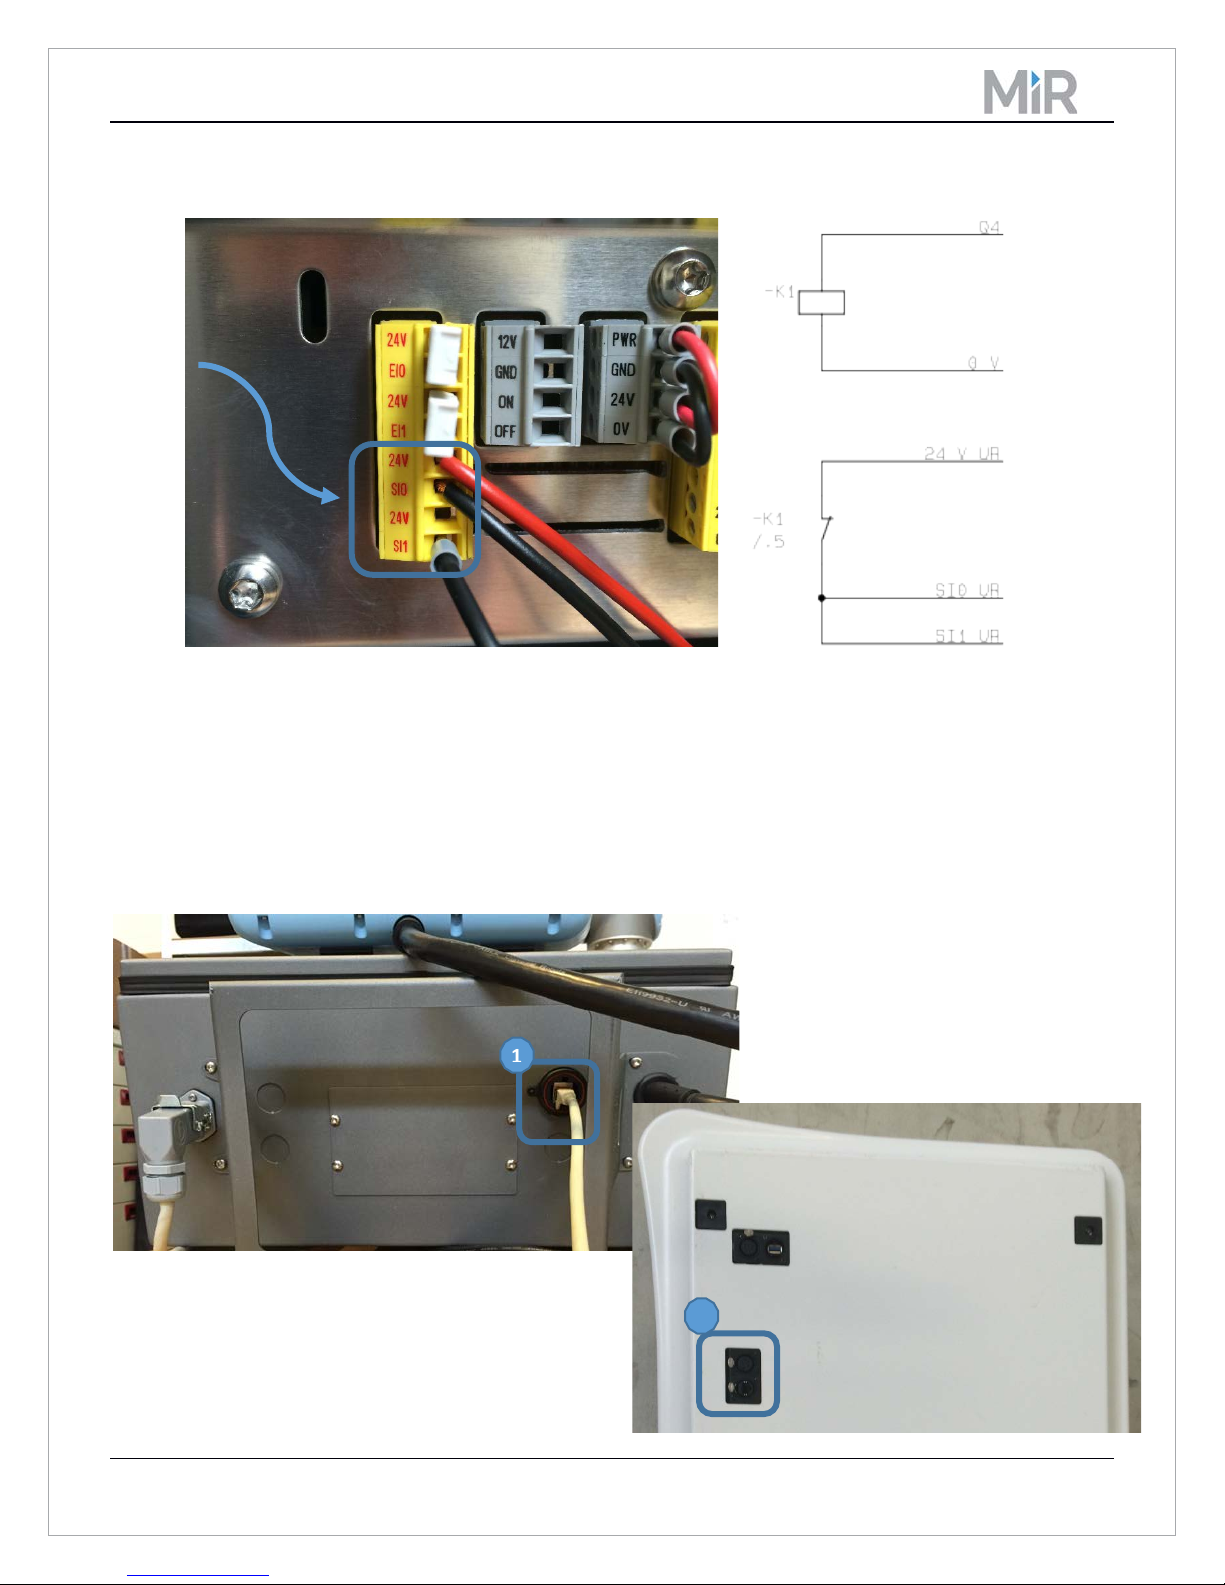
For safety reasons, the UR robot must be brought to stop whenever the MiR goes into an emergency stop. This
safety function is achieved by means of a relay connected to the safety PLC of the MiR and to the Safeguard
Stop connections:
1. Connect the positive input of the relay to the Q4 output of the safety PLC of the MiR.
2. Connect the negative input of the relay to any free port on connectors 18, 19 or 20 on the MiR (see
Figure 1 Connecting the MiR100).
3. On the UR side, remove the two bottom jumpers of the Safety pins, and connect the 24V to the
common connector of the relay and the NC connectors to both SI0 and SI1.
Copyright Mobile Industrial Robots 2016 Page 5 of 17
Page 6
MiR100 UR Interface Technical Documentation
2
Figure 3 Connecting the UR robot
2.4 Connecting the Ethernet cable
At the base of the UR robot’s gray controller cabinet, you’ll find an Ethernet port. Connect a standard RJ-45
Ethernet cable here. Connect the other end of the cable to the application interface on top of the MiR100.
Figure 4 Connecting Ethernet cable to UR robot (1) and MiR100 (2)
Copyright Mobile Industrial Robots 2016 Page 6 of 17
Page 7
MiR100 UR Interface Technical Documentation
Step
Instruction
Illustration
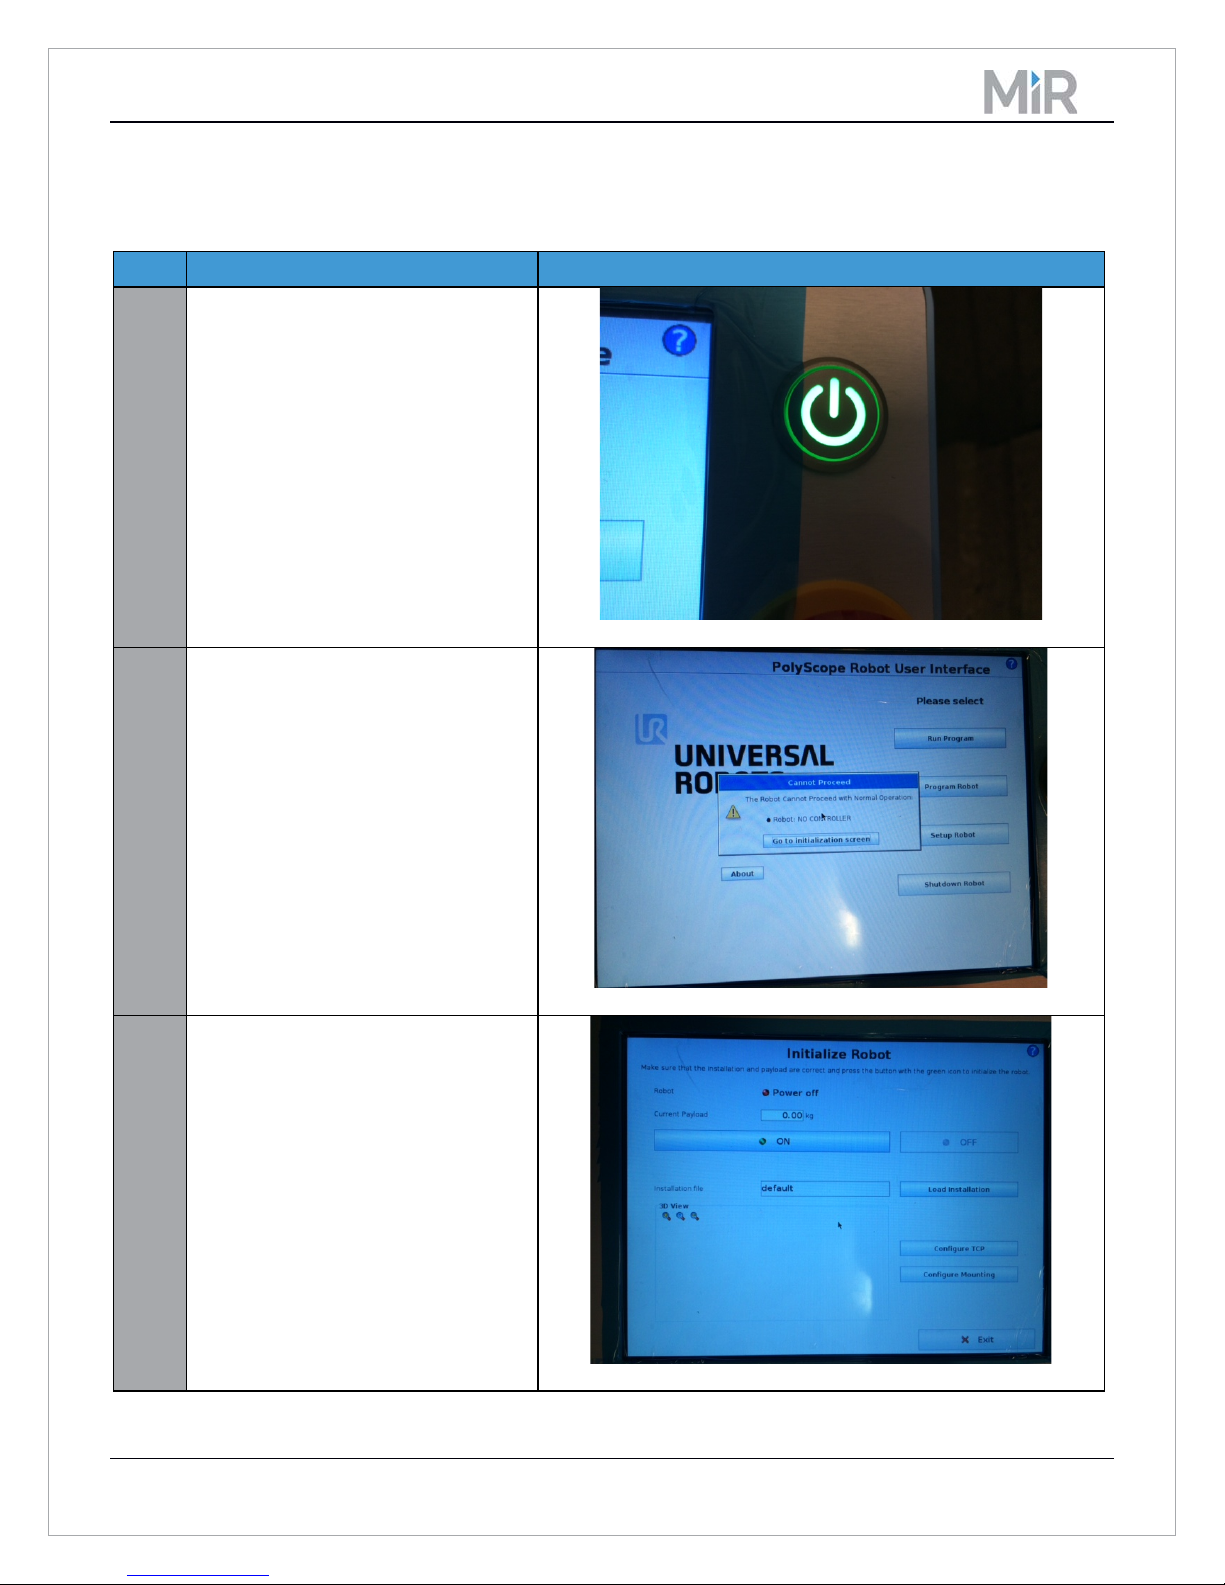
1
Make sure the UR control box is
2
When the UR touchscreen starts up,
3
Click the "ON" button to change
3 Handling the application
3.1 Starting the robot
connected to power (see previous
chapter). Start the UR, by pushing
the green on/off button on the UR
touchscreen.
click "Go to initialization screen".
screen state to "IDLE". A warning
about keeping a clear distance is
displayed because the brakes are
going to be released in the next
step.
Copyright Mobile Industrial Robots 2016 Page 7 of 17
Page 8
MiR100 UR Interface Technical Documentation
Step
Instruction
Illustration
4
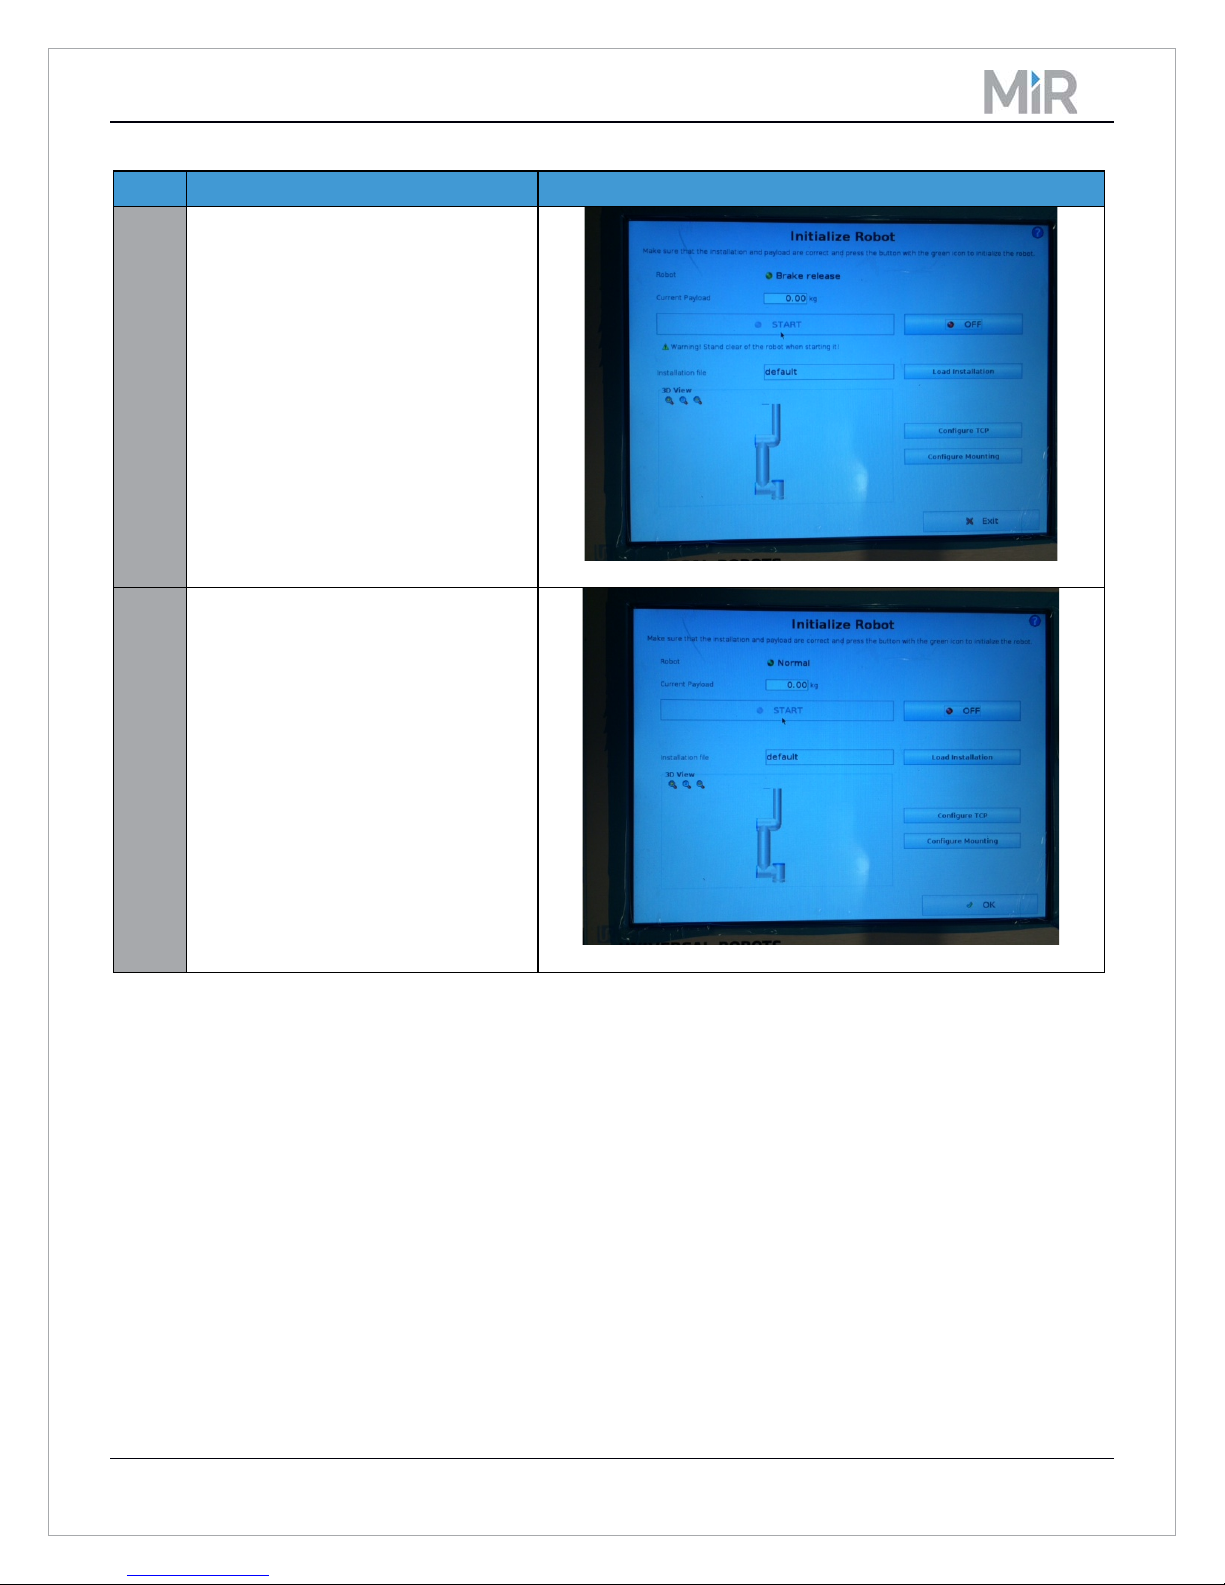
Click "START". You will hear a few
5
The UR is now initialized. Click the
clicking sounds letting you know
when the brakes are releasing.
"OK" button to continue.
Copyright Mobile Industrial Robots 2016 Page 8 of 17
Page 9
MiR100 UR Interface Technical Documentation
Step
Instruction
Illustration
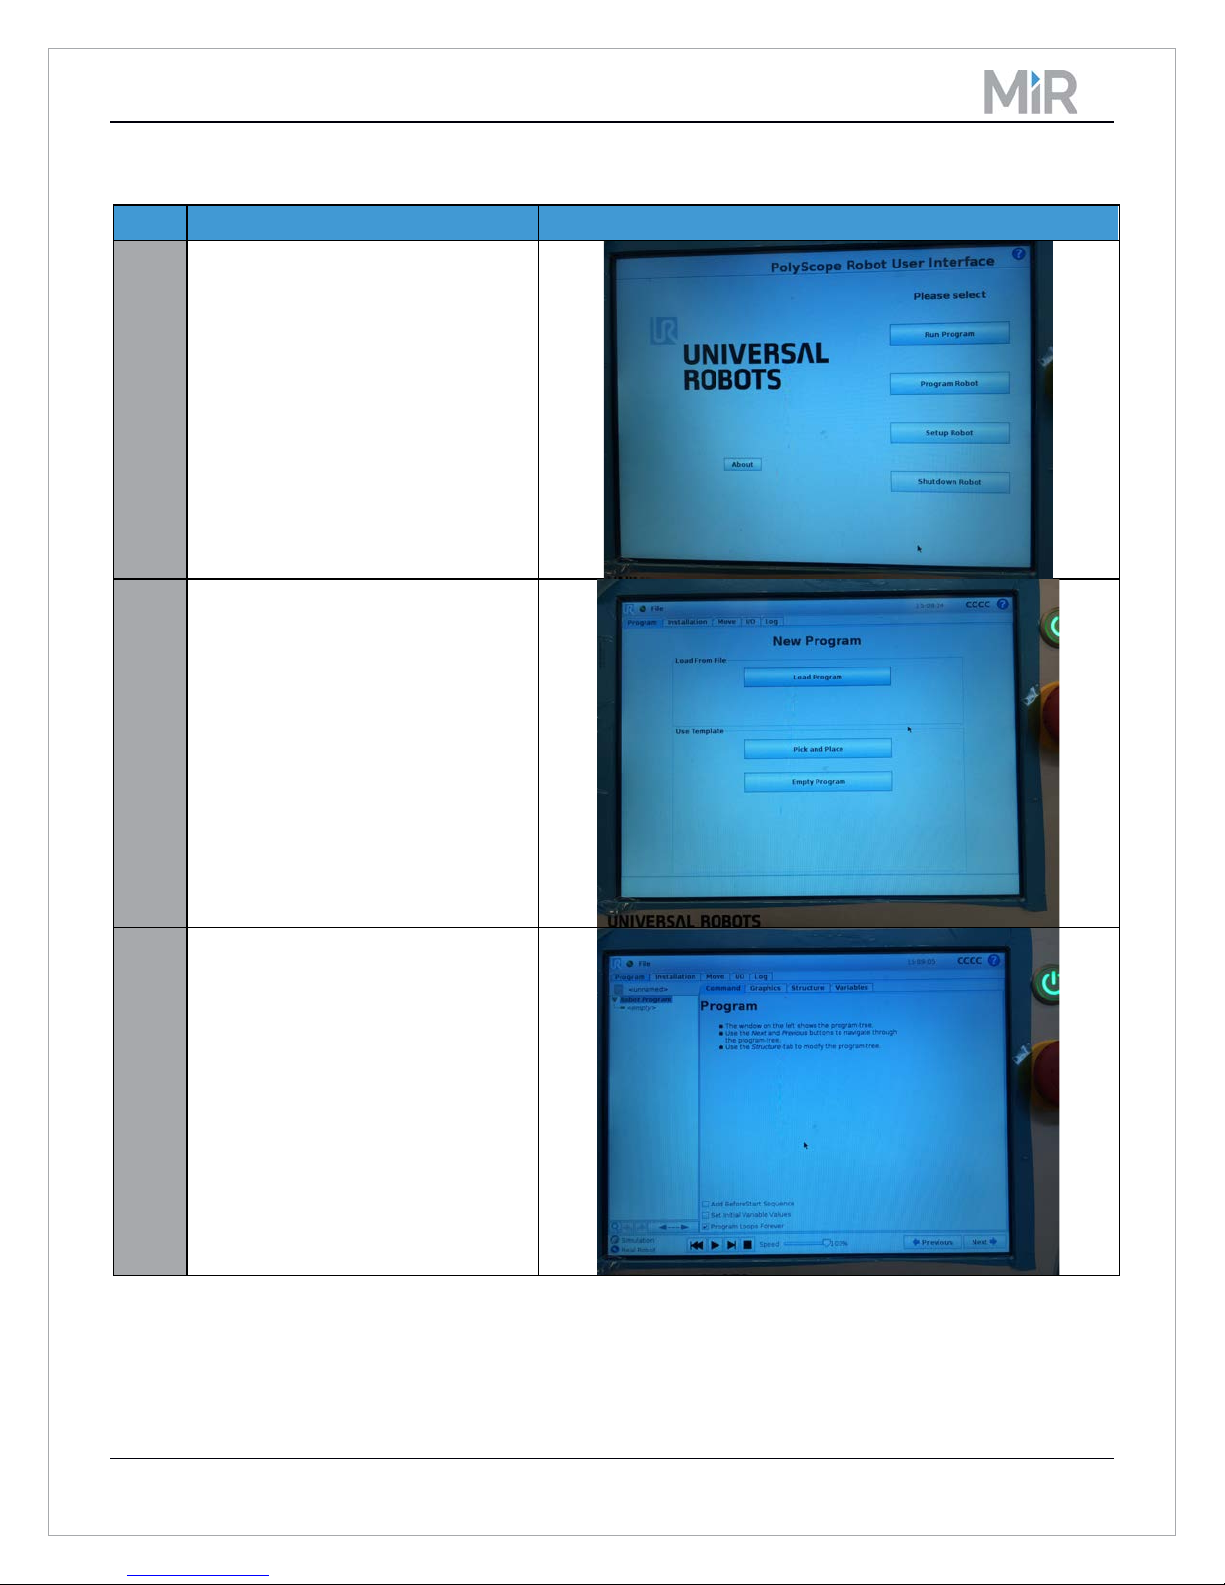
1
From the main menu click “Program
2
Choose either ‘Pick and Place’ or
3
When used with a MiR100 robot,
3.2 Creating a new program
Robot” to go to a menu where you
create a program.
‘Empty Program’.
make sure to uncheck ‘Program
Loops Forever’ before you save the
UR program.
Copyright Mobile Industrial Robots 2016 Page 9 of 17
Page 10
MiR100 UR Interface Technical Documentation
Step
Instruction
Illustration
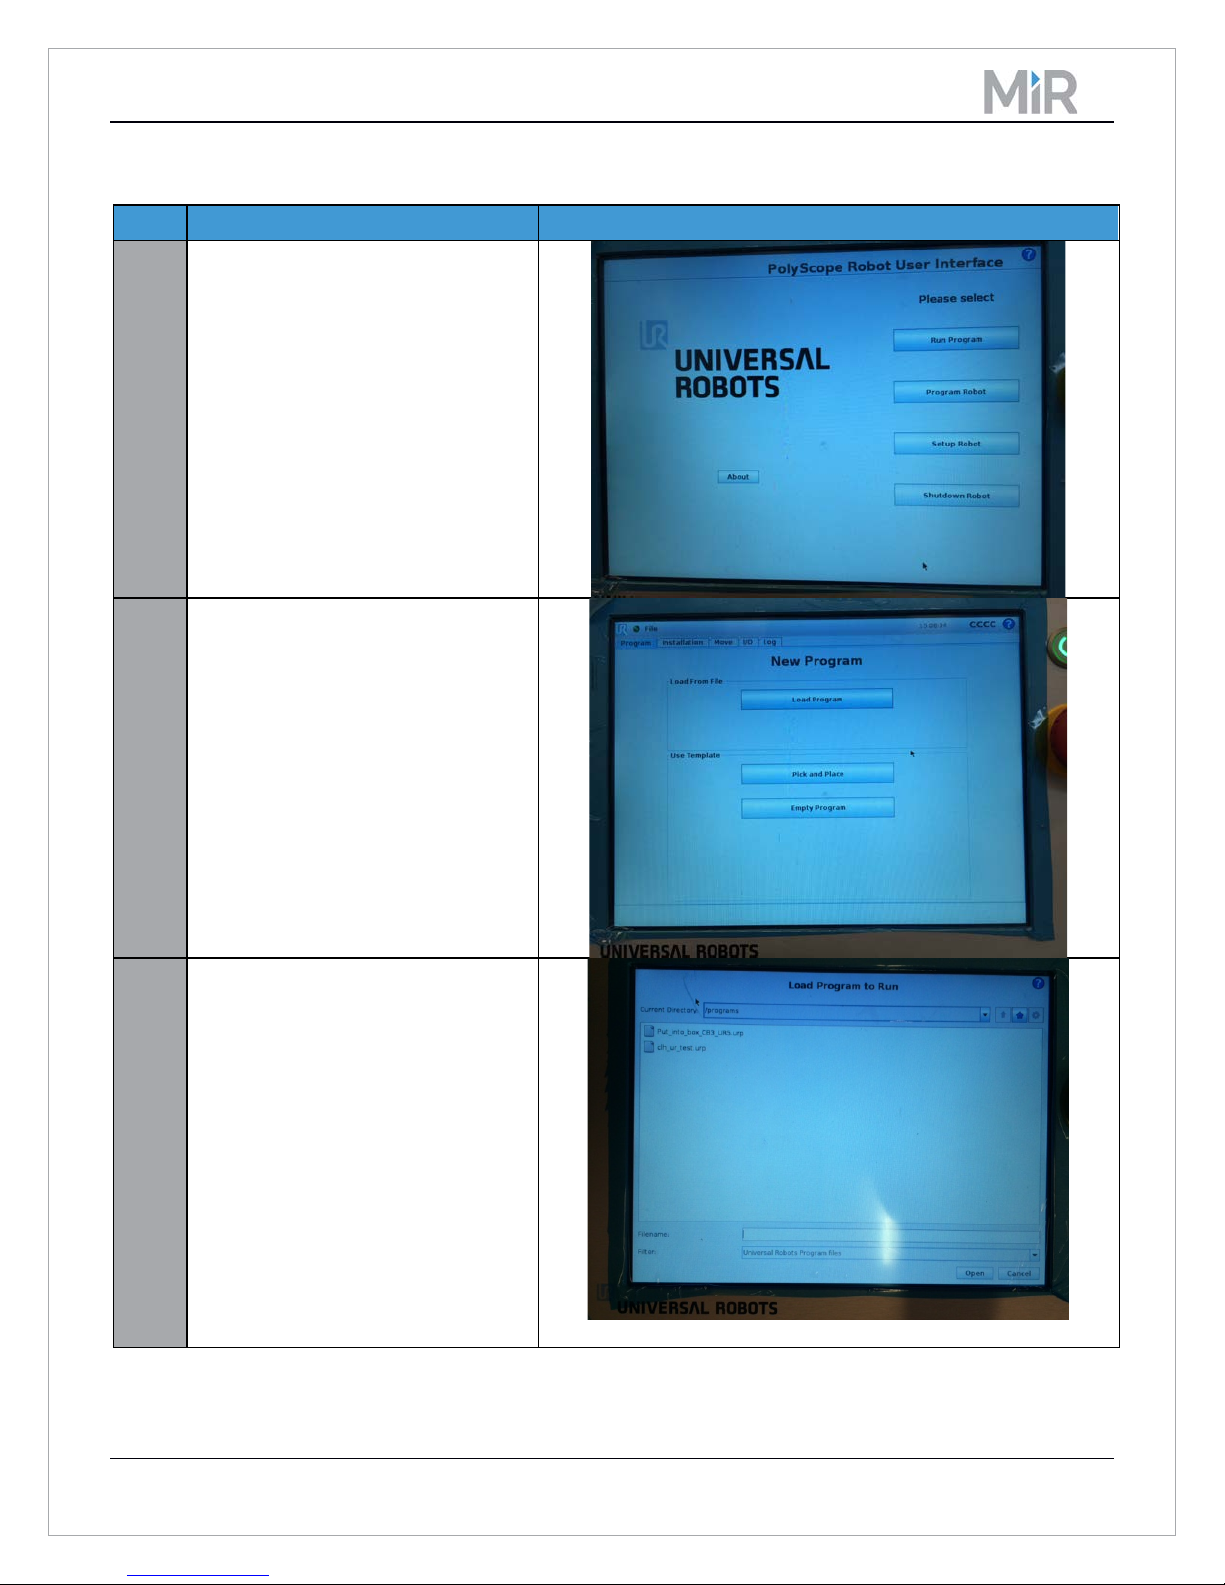
1
From the main menu choose
2
Click ‘Load Program’.
3
Select the program and click "Open".
3.3 Loading robot program
‘Program Robot’.
Make sure that the given UR
program (URP file) is collision free
and does not reach limitation in joint
configuration which can tilt the
MiR100. It is the user’s responsibility
to ensure this.
Copyright Mobile Industrial Robots 2016 Page 10 of 17
Page 11
MiR100 UR Interface Technical Documentation
Step
Instruction
Illustration
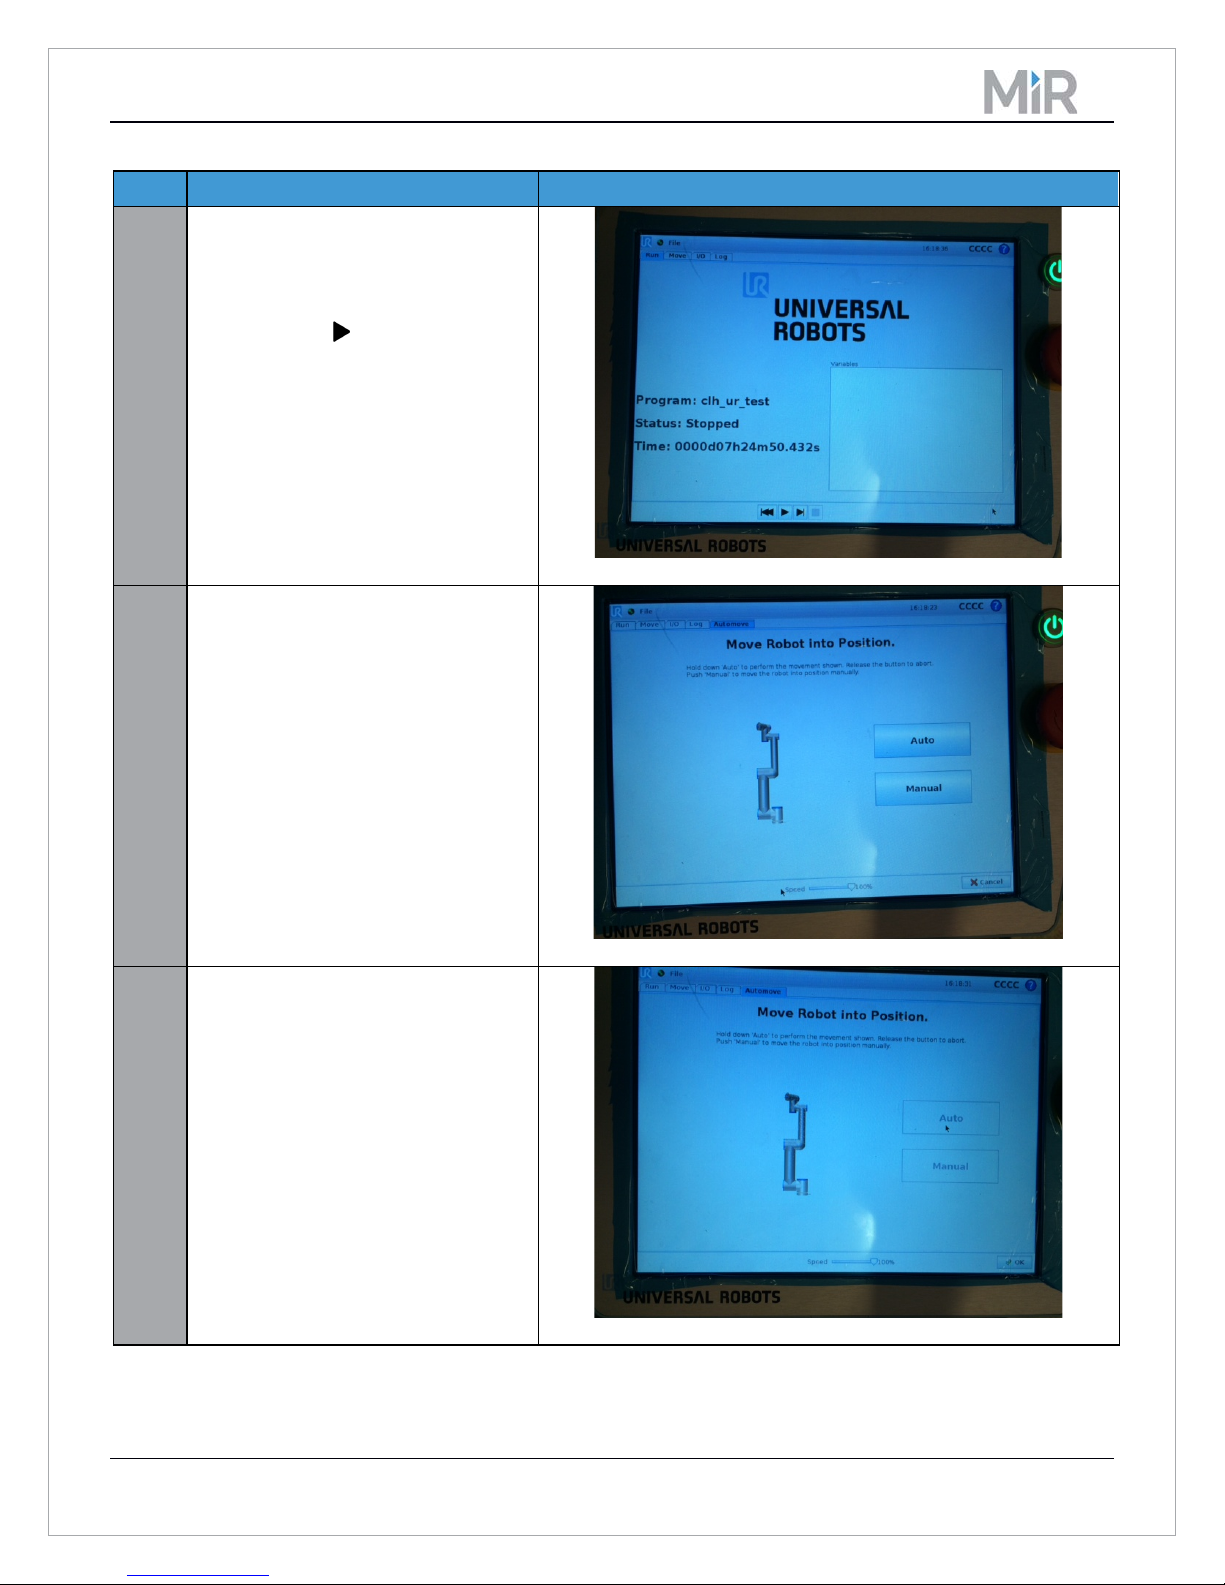
4
The program has loaded, but it will
5
If the URP program has a starting
4
Click the "OK" button in the lower
not execute until the robot has been
set to the initial position of the
program. In order to do so, click the
small play icon at the bottom of
the screen.
joint configuration which differs
from the physically joint
configuration of the UR arm, then
the “Move Robot into Position”
screen will appear. Move the UR
into initial position by holding down
the “Auto” button while the robot
slowly moves into position.
right hand corner of the screen
when the UR is in the initial position.
Copyright Mobile Industrial Robots 2016 Page 11 of 17
Page 12
MiR100 UR Interface Technical Documentation
Step
Instruction
Illustration
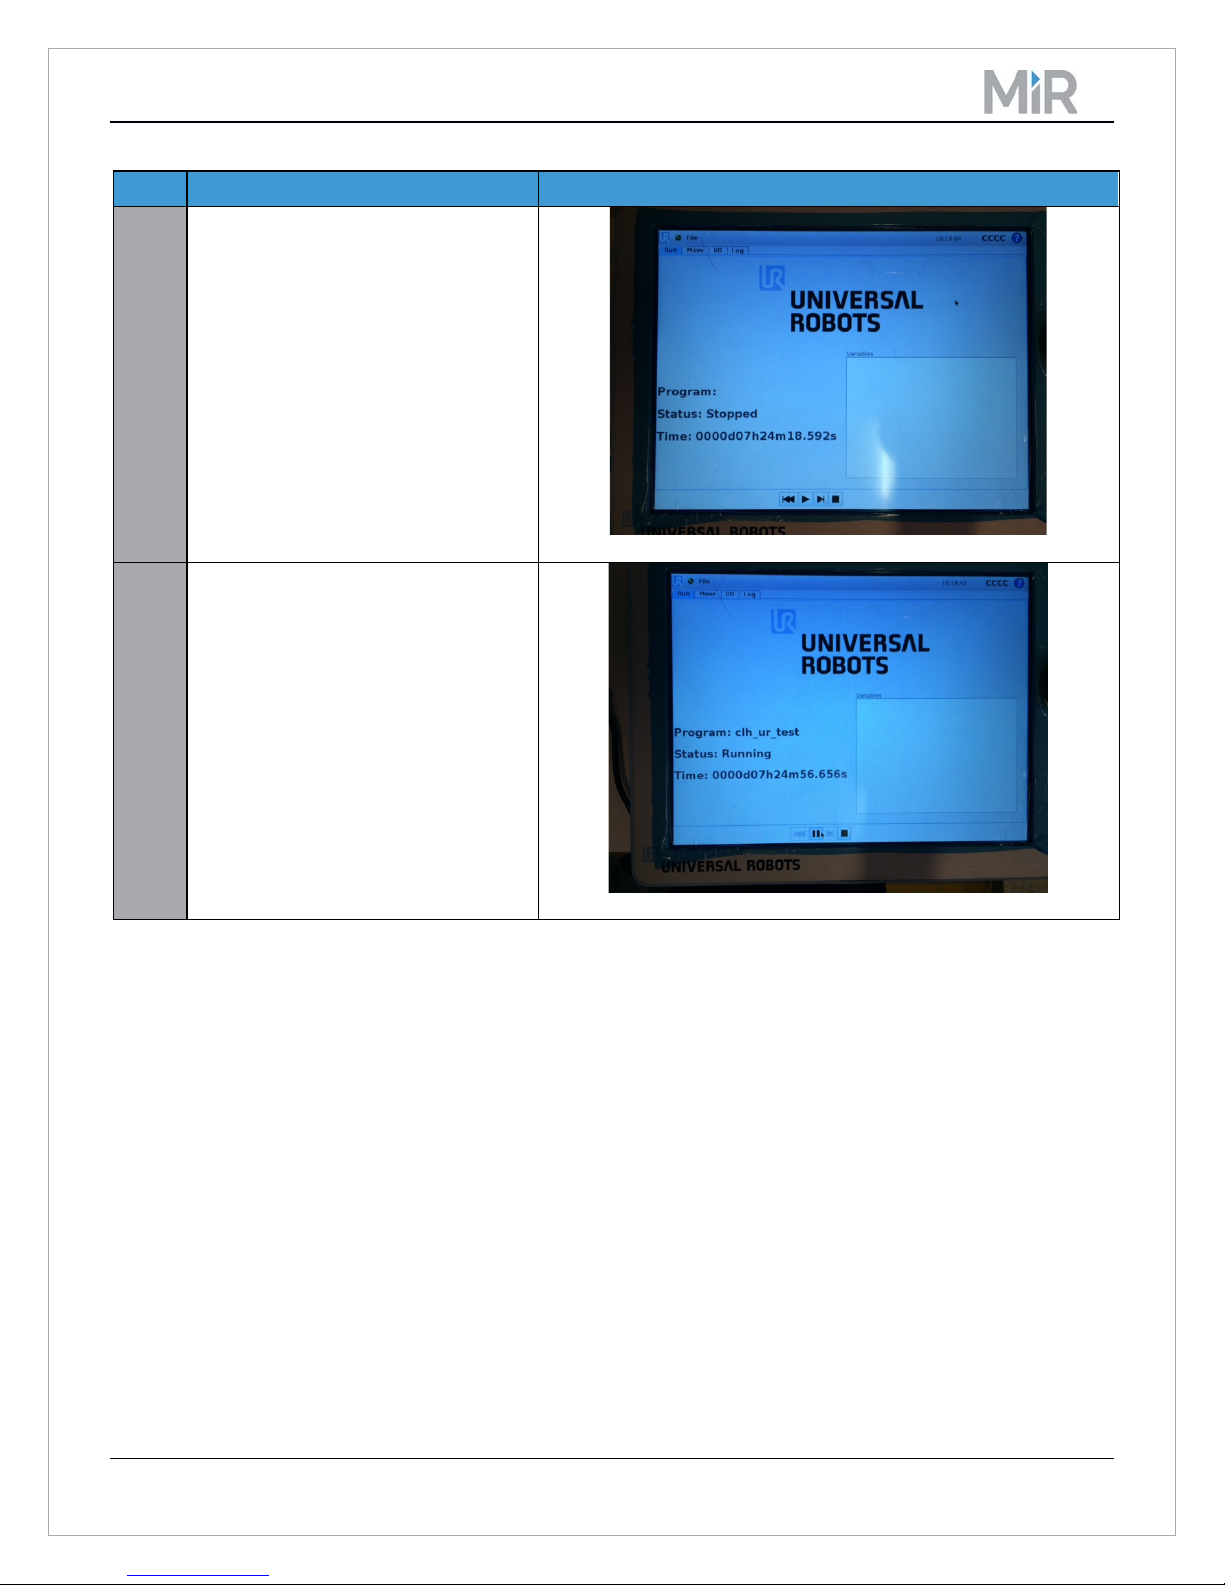
5
The program returns to the “Run
6
The program will now execute –
screen” where you can click on the
play icon again to test the loaded
program.
moving the joints of the UR at
regular speed.
IMPORTANT!
1. Make sure, that the UR
program does not loop.
2. Make sure, that the first and
last joint configuration are
the same. Otherwise the
screen will go into “Set
Robot in position”.
Copyright Mobile Industrial Robots 2016 Page 12 of 17
Page 13
MiR100 UR Interface Technical Documentation
Step
Instruction
Illustration
1
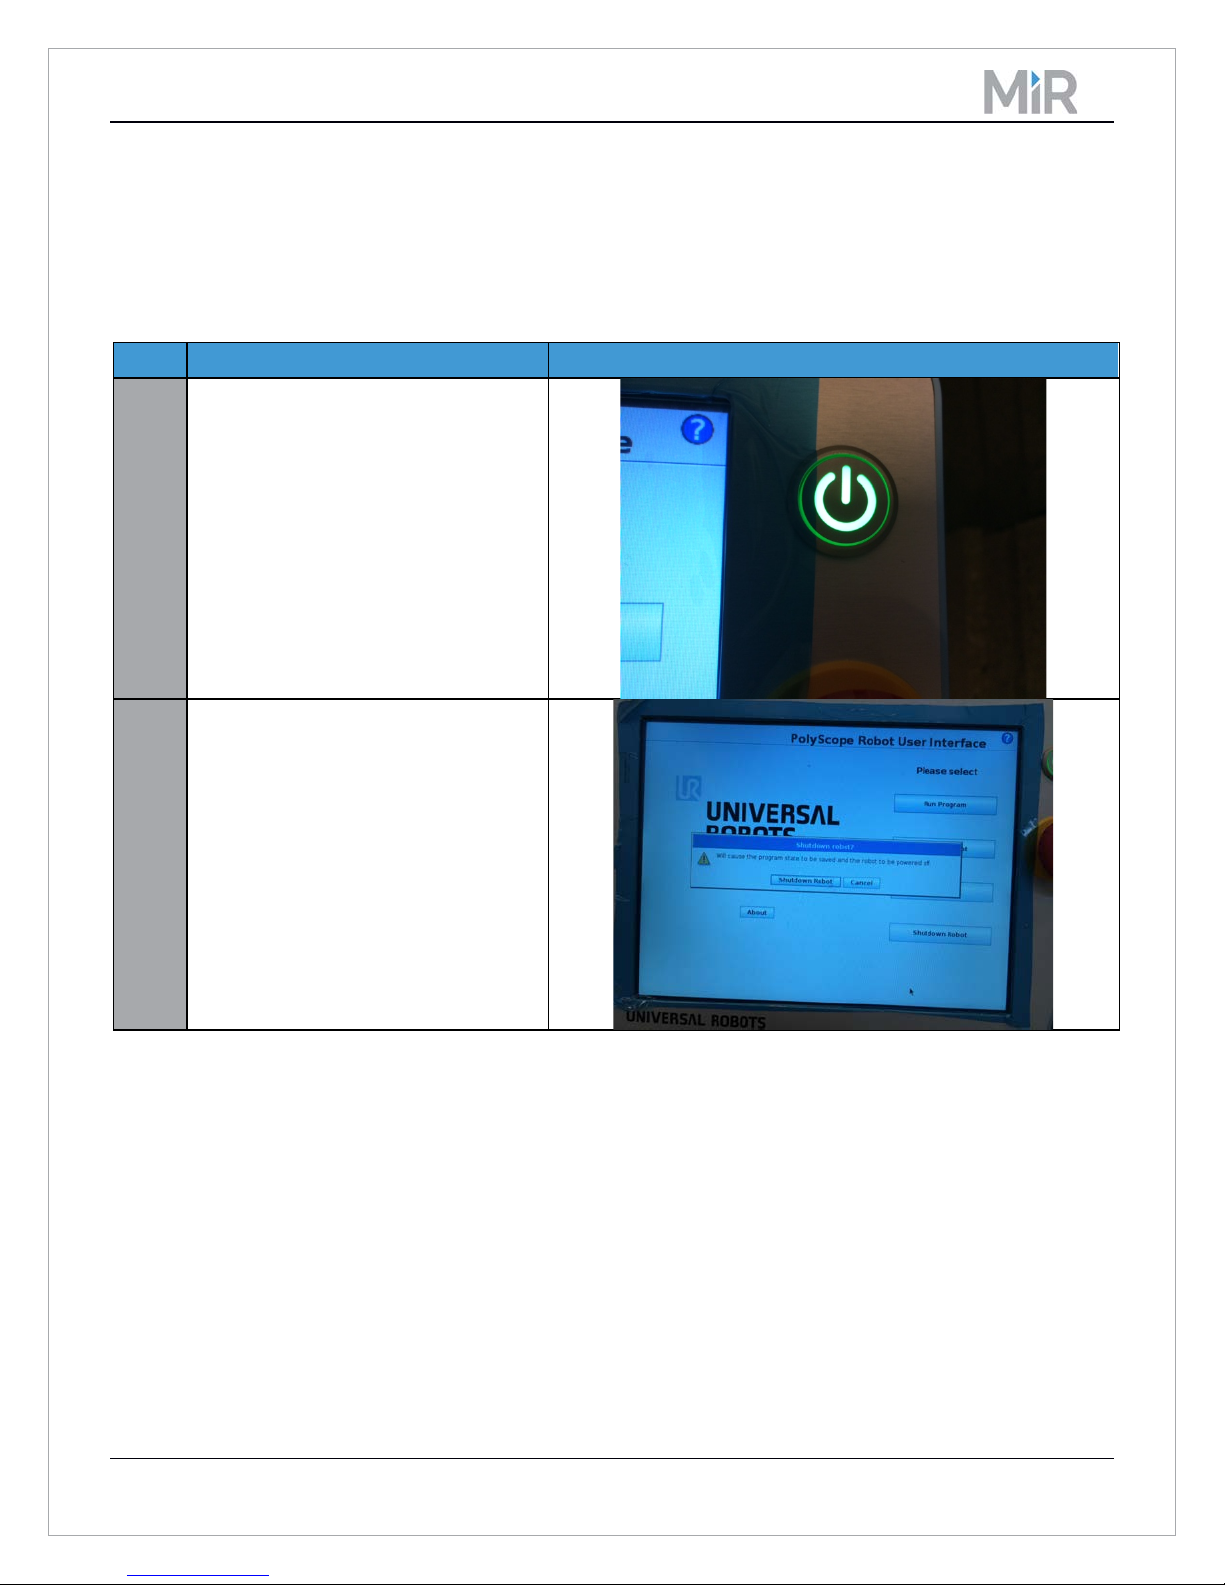
To shut down the UR robot, simply
2
You’ll be prompted on the screen to
3.4 Network settings
The IP address of the UR robot must be entered in the UR network settings. This is done via the touchscreen of
the UR under "Setup robot" > "Setup network". The static IP address should be in the range of 192.168.12.XX,
where XX is a number from 50-99. The Subnet must be set to 255.255.255.0.
3.5 Shutting down the robot
push the green power button on the
touchscreen once.
(Please be aware that holding the
power button down for a few
seconds will force an improper
shutdown.)
confirm shutdown of the system.
Click the ‘Shutdown Robot’ button,
and the robot will power down.
Copyright Mobile Industrial Robots 2016 Page 13 of 17
Page 14
MiR100 UR Interface Technical Documentation
Step
Instruction
Illustration
1
In the Web interface go to:
4 Using a Universal Robot with MiR
4.1 Enabling Universal Robot features
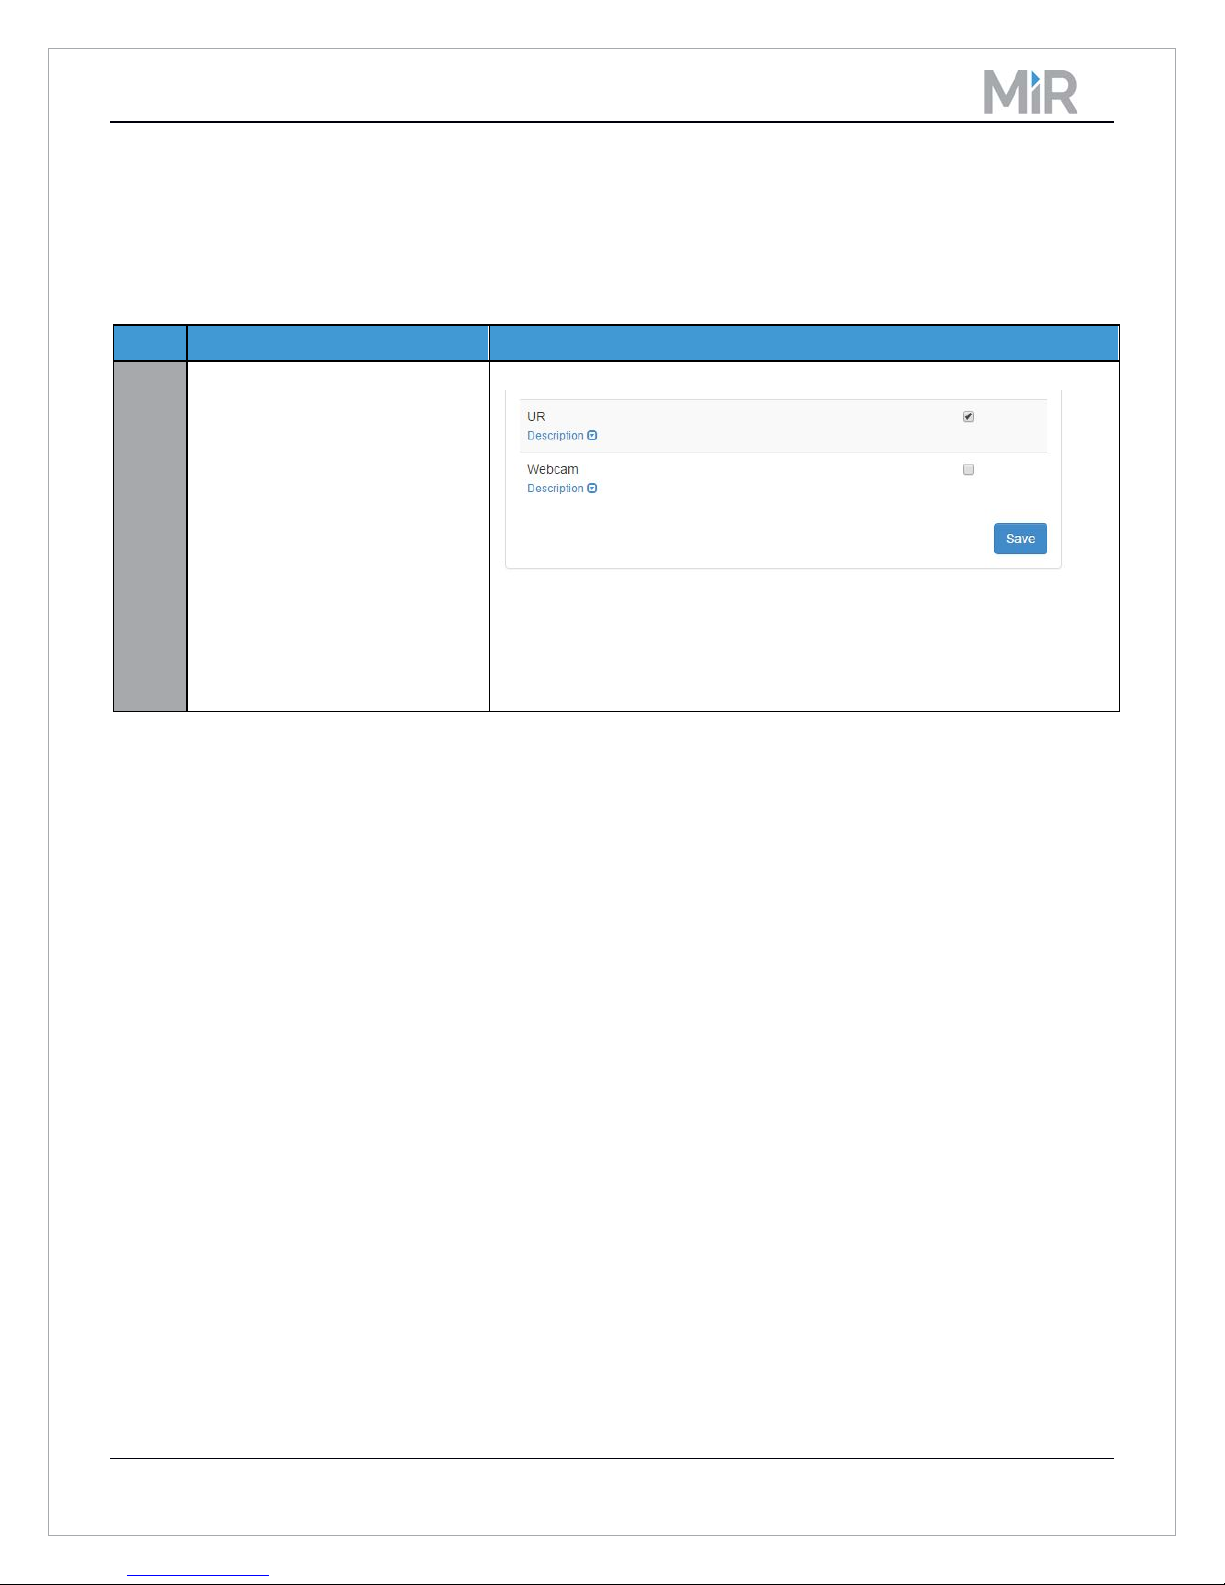
To be able to use the UR robot while running a MiR100 mission, a “UR” feature must be enabled in the MiR100
Web interface. This feature is disabled as factory default.
Service > Configuration >
System settings > Features and
tick off the action “UR” in the
“External features” section.
Enable Run UR program in the "Features" menu of the MiR100
Copyright Mobile Industrial Robots 2016 Page 14 of 17
Page 15
MiR100 UR Interface Technical Documentation
Step
Instruction
Illustration
1
In the Web interface go to:
2
The UR interface will start
4.2 Connecting to Universal Robot
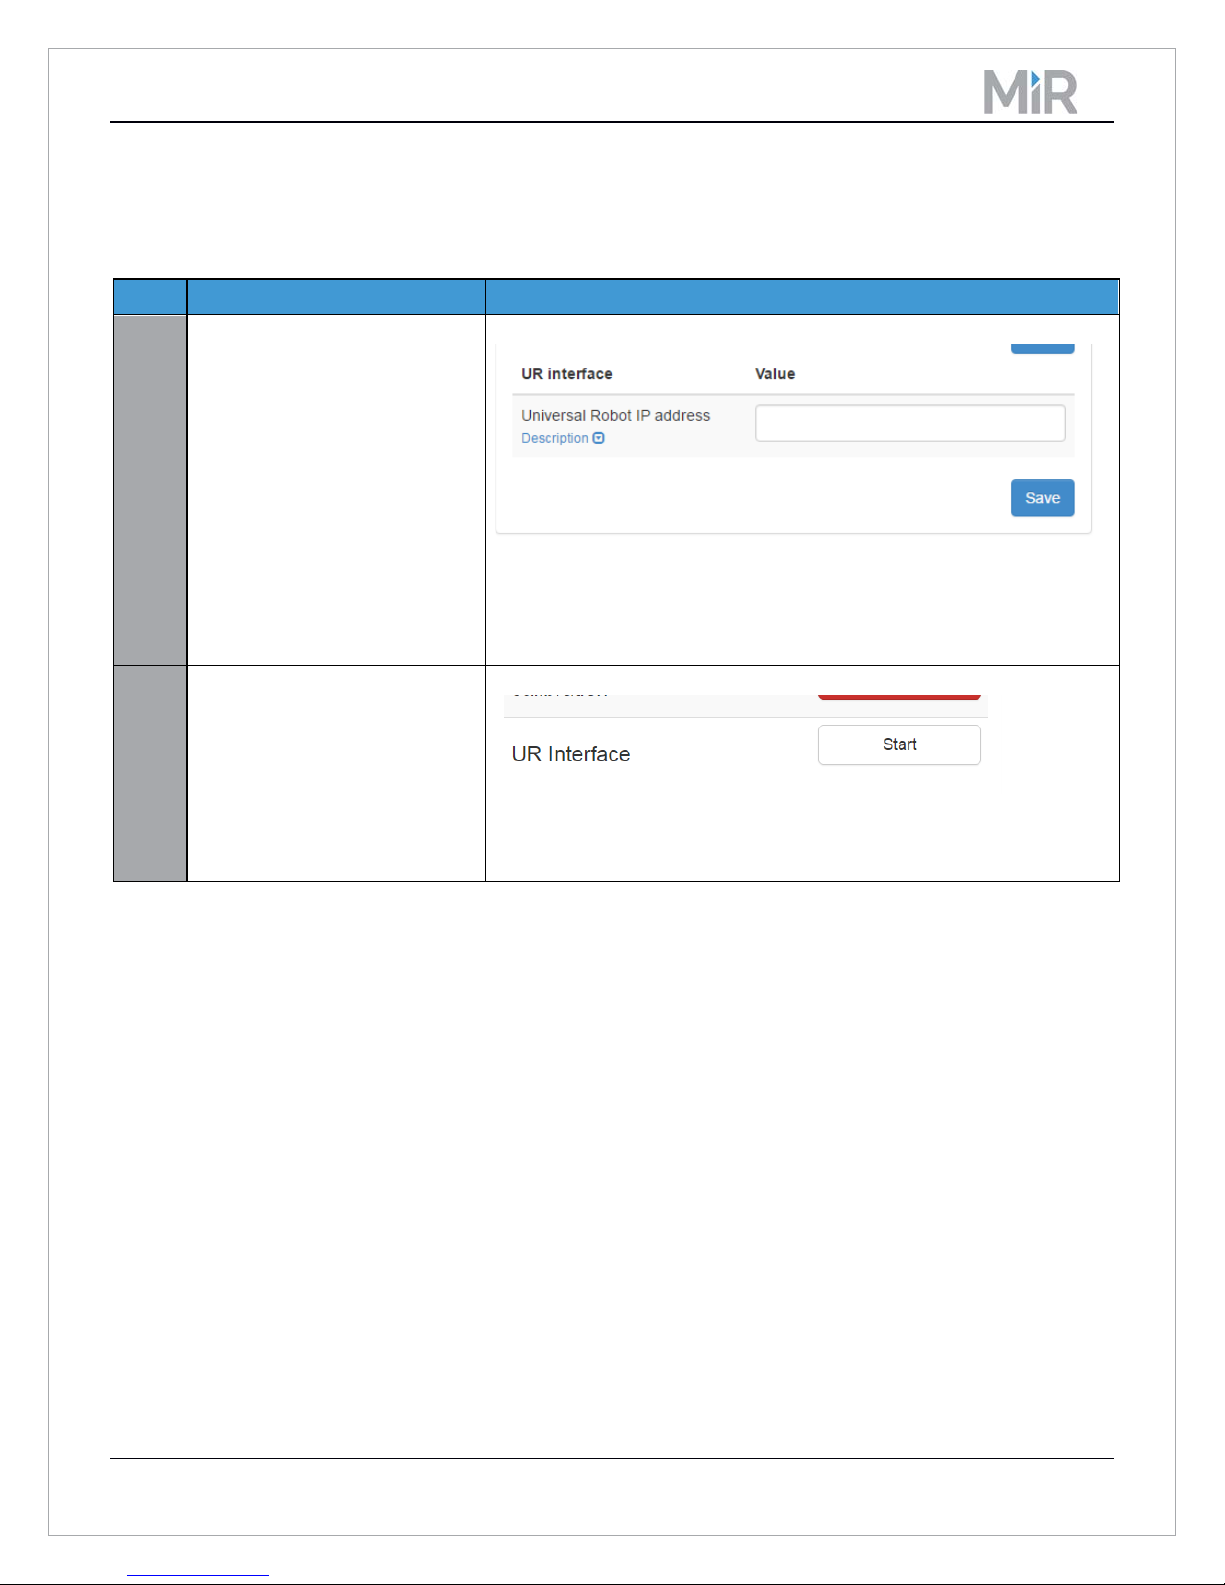
To be able to run a UR program through the MiR you must connect the UR to the MiR by setting up the UR’s IP
address in the Web interface.
Service > Configuration >
System settings > ROS
parameters and enter the IP of
the UR robot.
See also chapter 2.7 Network
settings about how to handle
the network settings on the
UR robot to prepare it for
communication with the
MiR100.
automatically when needed.
However, the UR interface can
be manually started or
stopped via the Launch menu
(Service > Configuration >
Launch menu).
Enter UR IP address to connect it to the MiR robot
Status of the start and stop UR interface via Launch menu
Copyright Mobile Industrial Robots 2016 Page 15 of 17
Page 16
MiR100 UR Interface Technical Documentation
Step
Instruction
Illustration
1
In the Web interface go to: Mission >
3
4.3 Create mission with Universal Robot actions
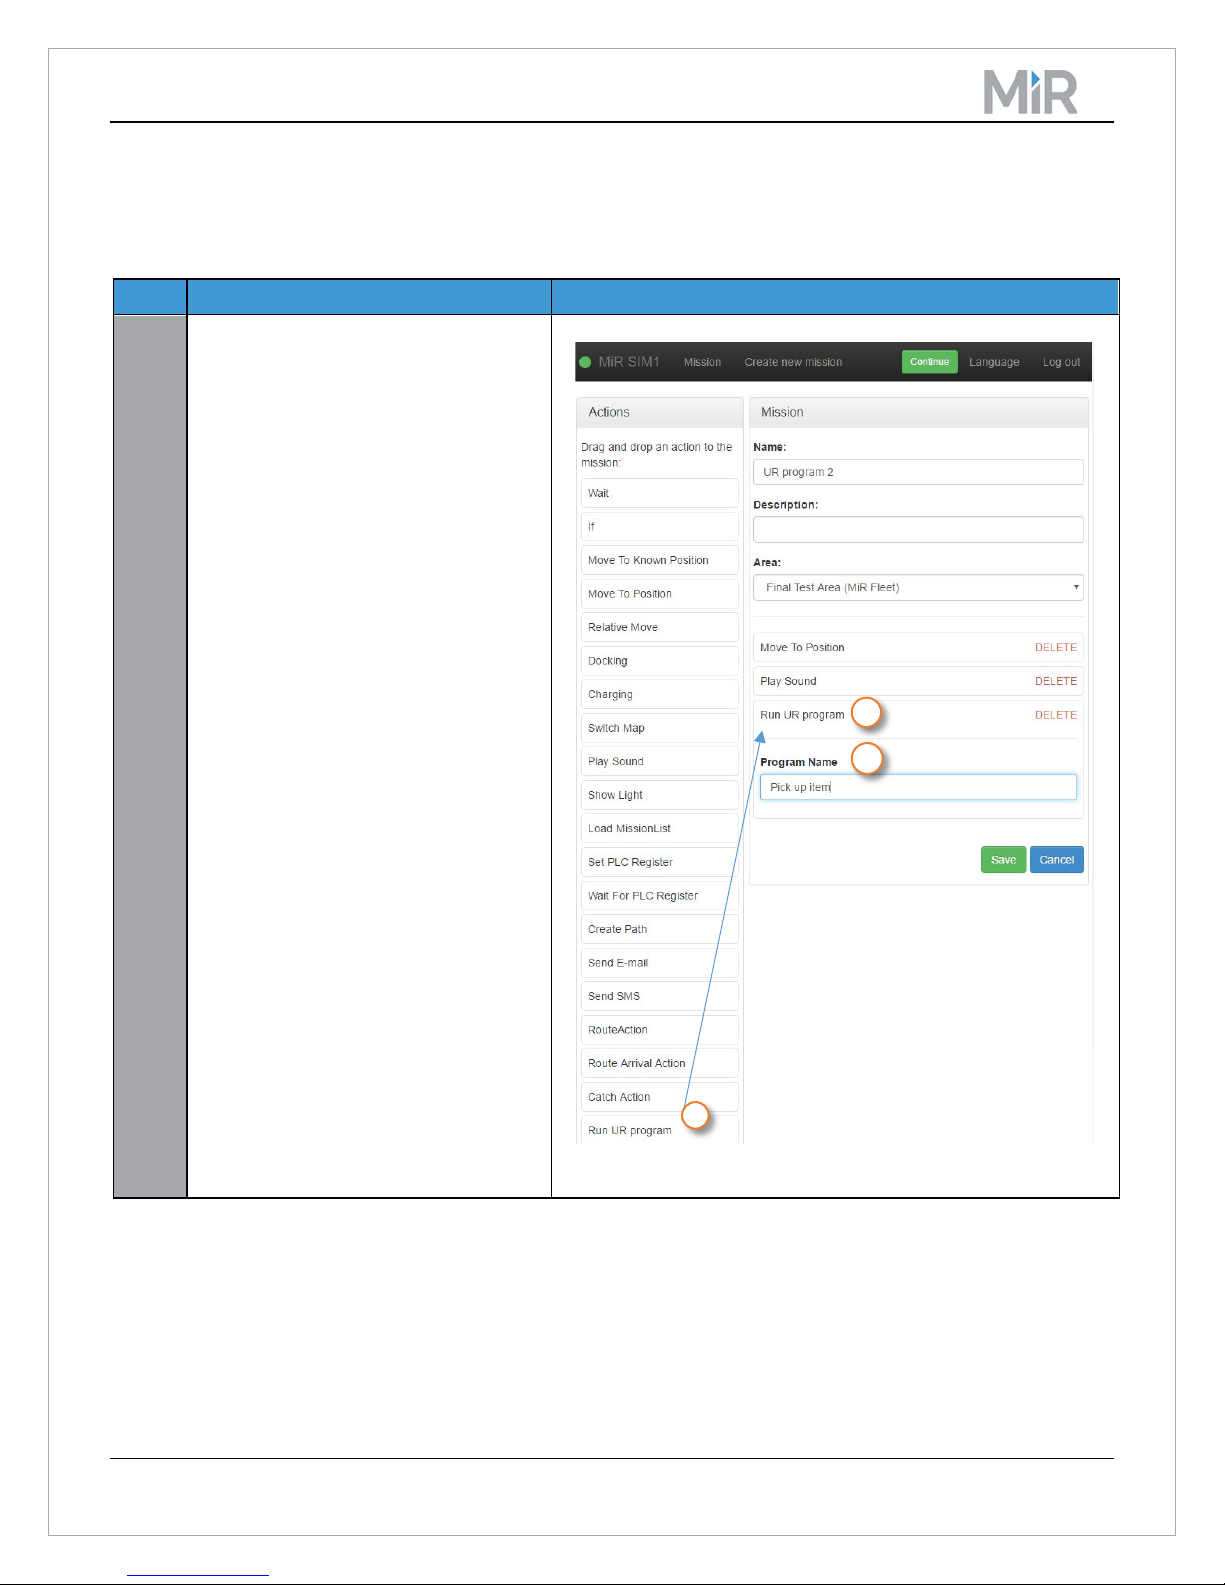
To run a UR program through the MiR, you must set up a mission that contains the action “Run UR program”.
Remember to verify that the correct UR program has been successfully loaded.
Create mission.
Set up the sequence of actions in
which the UR should be included.
1. Drag the action “Run UR program”
to the Mission field.
2. Click on the “Run UR program”
mission to unfold the field
“Program name”.
3. Enter program name. The name
must match the name of the file in
the UR interface but without the
.urp extension.
4.4 Preparing the Universal Robot before use
Each time the UR robot is powered up, it requires to be positioned according to its program’s initial state.
Please refer to previous chapters on how to (2.2) and (2.4).
Copyright Mobile Industrial Robots 2016 Page 16 of 17
Page 17
MiR100 UR Interface Technical Documentation
Version
Date
Changes
1.0
11.04.2016
Document ready for SW release
1.5
1.1
14.04.2016
Corrected section 2.5 regarding
UR network.
1.2
26.09.2016
• Connecting chapter added
release 1.7
5 Frequently Asked Questions
Question: The program on the UR robot seems to continue over and over, and the MiR100 doesn’t move. What
can I do?
Answer: You have to make sure that the UR program is not set to “Loop Program Forever”.
Question: The message “Set Robot into Position” is prompted every time the UR program is executed through
the mission.
Answer: The .urp project file, which is the UR program, should have the same joint configuration for the
starting configuration and end configuration, i.e. a valid UR program will look similar to this:
- Move to waypoint 1
- Move to waypoint 2
- Move to waypoint 3
- Move to waypoint 1.
One way of doing this through the UR touchscreen is to create the starting joint configuration and end joint
configuration without changing the joint configurations. After that, insert the other joint configurations in
between the start and end configurations.
6 Changelog
• Updated to MiR100 SW
Copyright Mobile Industrial Robots 2016 Page 17 of 17
 Loading...