

MiPV 013A, 016A, Leisure Installation Manual

Installation and Safety Guide
MIPV Leisure Series safety and
installation guide for Multiple
module photovoltaic systems for
Motorhomes & Caravans.
Products Codes:
MIPV 013A (480W)
MIPV 016A (330W)

Contents
2
MIPV Installation Manual v2.3.1
1. Introduction ................................................................................................................................................... 3
2. Scope ............................................................................................................................................................. 3
3. Package Contents .......................................................................................................................................... 3
4. Packaging ....................................................................................................................................................... 3
5. Disclaimer of liability ..................................................................................................................................... 4
6. General Safety ............................................................................................................................................... 4
7. Handling Safety ............................................................................................................................................. 4
8. Technical Specification .................................................................................................................................. 5
9. Installation Safety .......................................................................................................................................... 6
10. Required Tools ............................................................................................................................................... 6
11. Bonding MIPV module to the roof of a motorhome or a caravan. ............................................................... 7
12. Preparing the Roof ........................................................................................................................................ 8
13. Laying the panel ............................................................................................................................................ 9
14. Installing the Cabling ................................................................................................................................... 11
15. Position the Entry Gland Cowl ..................................................................................................................... 11
16. Installation wiring diagram for four module
17. Installation wiring diagram for three module parallel connection system ................................................. 13
18. Installing the Charge Controller .................................................................................................................. 14
19. Connecting to the battery ........................................................................................................................... 14
20. Connecting the solar modules ..................................................................................................................... 15
21. Maintenance of MiPV solar modules .......................................................................................................... 15
22. Accessories .................................................................................................................................................. 16
series-parallel system
......................................................... 12
2
3
MIPV Installation Manual v2.3.1
Introduction
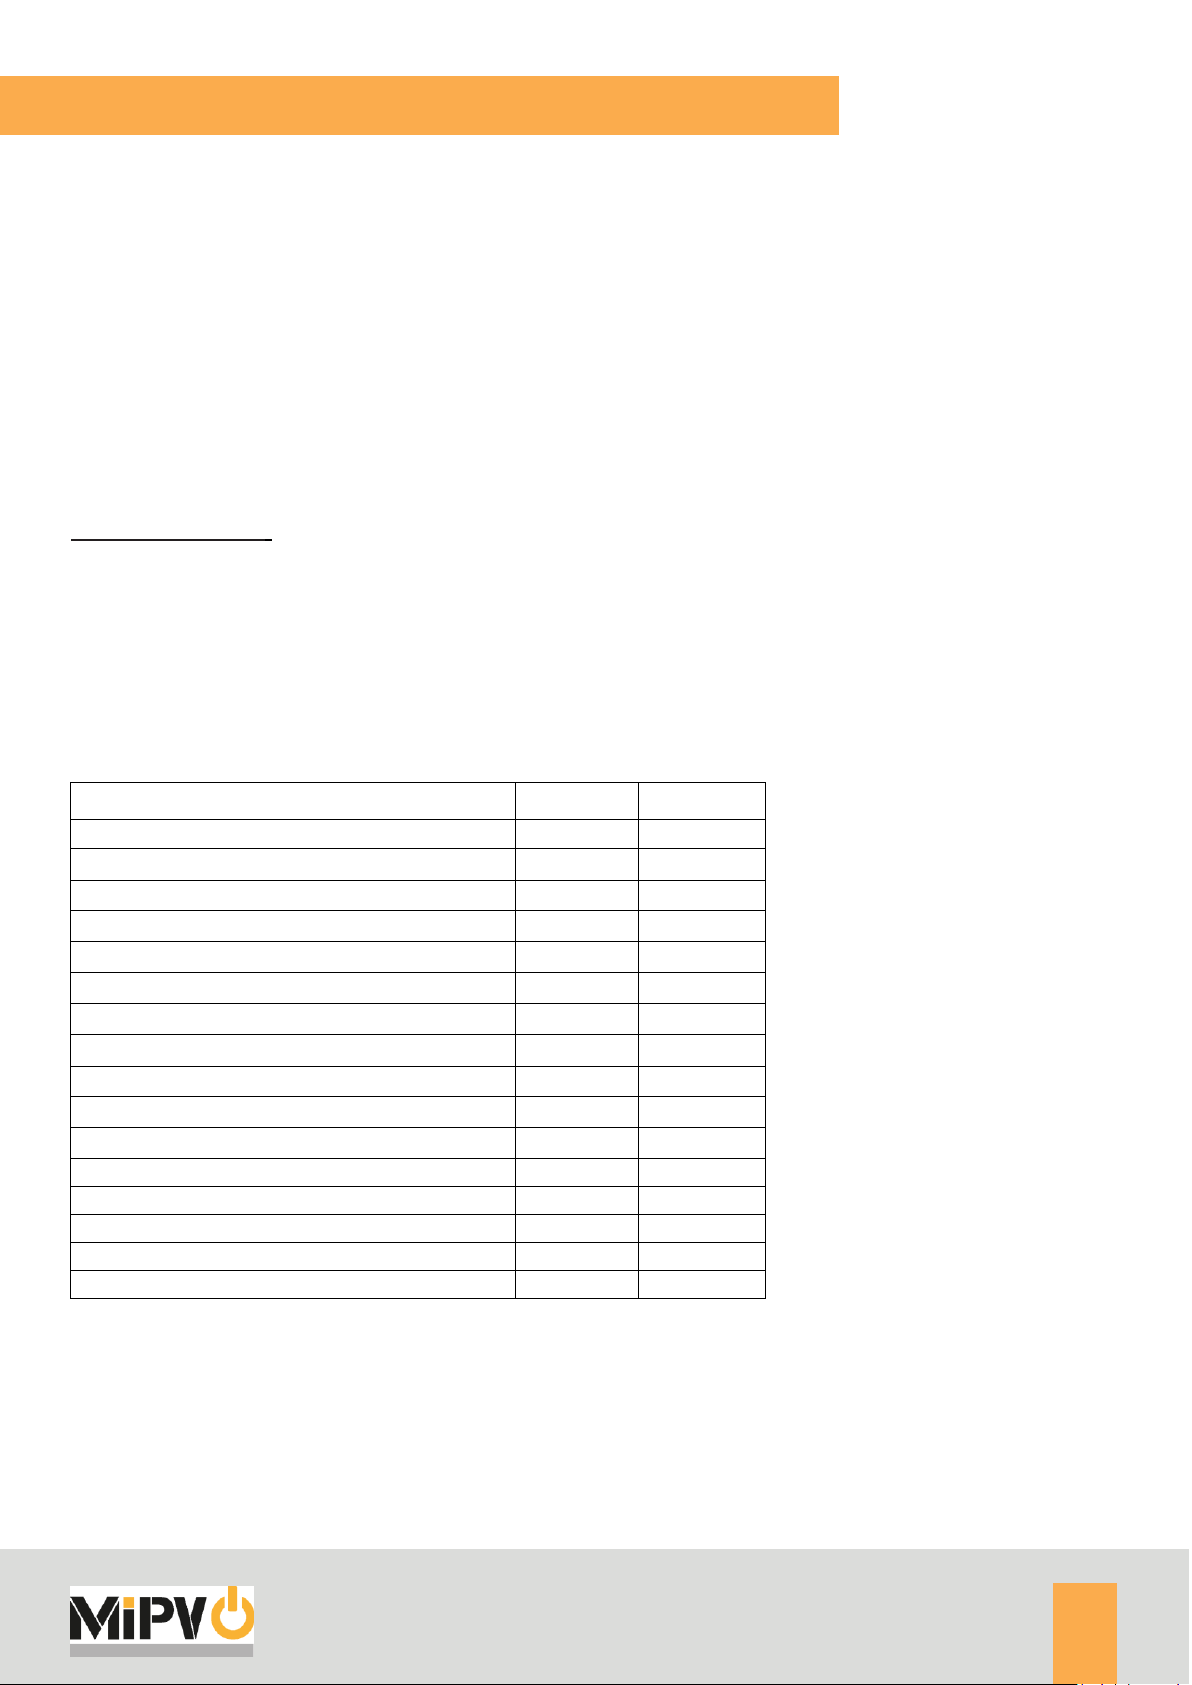
Product Reference:
MIPV013A
MIPV016A
MIPV solar module
4
3
Charge controller P1500B
-
1
Charge controller PC164015
1
-
Twin gland entry cowl
1
1
Red 4mm solar cable with MC4 connector
20m
15m
Black 4mm solar cable MC4 connector
20m
15m
Jumper cable MC4 connector
1 x 500mm
4 x 750mm
10A In-line Fuse
-
-
2 into 1 ’Y’ Connector (FF-M & MM-F)
2
-
3 into 1 ’Y’ Connector (FFF-M & MMM-F)
-
2
50ml Isopropanol cleaner (Aktivator)
8
3
290ml white adhesive / sealant
1
1
Twin gland entry cowl
1
1
Gloves 1 1
Installation and safety instruction
1
1
Warranty Card
1
1
PLEASE READ THIS MANUAL CAREFULLY BEFORE INSTALLING OR USING THE MODULES. PLEASE PASS
ALONG THE MANUAL TO YOUR CUSTOMER.
1. Introduction
The MIPV leisure series module is a truly flexible peel and stick PV module manufactured specifically for the
leisure vehicle market. Our Powerful, lightweight and flexible module is ideal for direct application onto
motorhome and caravan roofs.
2. Scope
This manual is for the installation of MiPV leisure series kits comprising of either three or four MIPV solar
modules, a charge controller and ancillaries for installing on a caravan or motorhome.
Applicable Products:
Product Codes: MIPV 013A (480W)
MIPV 016A (220W)
For other MiPV products please refer to the relevant instructions.
3. Package Contents
The MIPV Leisure series kit will contain the following items:
4. Packaging
Modules will be shipped to retail customers rolled up in cardboard boxes.
Boxes should be kept upright and stacked no more than 2 boxes high.
DO NOT use any sharp objects to open the packaging
3

4
MIPV Installation Manual v2.3.1
Safety
5. Disclaimer of liability
This document does not constitute a guarantee, expressed or implied. MiPV (BIPV Ltd.) does not assume
responsibility and expressly disclaims liability for loss, damage, or expense arising out of or in any way
connected with installation, operation, use or maintenance of the PV modules. No responsibility is
assumed by MiPV (BIPV Ltd.) for any infringement of patents or other rights of third parties that may result
from use of PV module. MiPV (BIPV Ltd.) reserves the right to make changes to the product, specifications
or installation manual without prior notice. All the information described in this manual is the intellectual
property of MiPV (BIPV Ltd.)
6. General Safety
The following guidelines are to be followed to ensure the safe storage, handling and installation of the
MiPV modules. Failure to follow these instructions may result in serious bodily injury, damage to the
equipment or property. Failure to follow these instructions may invalidate the MiPV warranty
Electrical and mechanical installation of the MiPV Leisure Series PV system should be carried out by a
qualified vehicle technician. MiPV has a network of authorised installers across the UK. For details of the
nearest authorised installer please contact customer.service@MiPV.co.uk.
The installation must comply with the administrative and technical provisions of the respective country in
which it is used. National regulations and law must be observed.
Under normal conditions, a photovoltaic module is likely to experience conditions that produce more
current and/or voltage than reported at standard test conditions. Accordingly, the values of Isc and Voc
marked on this module should be multiplied by a factor of 1.25 when determining component voltage
ratings, conductor current ratings, fuse sizes, and size of controls connected to the PV output.
When the modules are connected in series, voltage is cumulative. When the modules are connected in
parallel, current is cumulative, this will result in higher currents or voltages being present in a multi module
system.
The solar module generates electricity and is hazardous when exposed to light even in very low light
conditions; always treat the MiPV module as live. Avoid contact with any live parts and ensure all live
circuits have been isolated before making or breaking any connection.
Before installing the modules, we recommend you cover the front of the module to prevent any electricity
being produced.
DO NOT shade part of the MIPV module surface from the sunlight for a long time. A shaded cell may
become hot and will cause a drop in generated power and could cause failure
DO NOT artificially concentrate sunlight on the module.
ALWAYS use the correct tools when installing the PV module including insulated tools and appropriate
personal protective equipment (PPE).
TURN OFF charge controllers and circuit breakers immediately, should a problem occur.
7. Handling Safety
DO NOT lift or pull the module by the connection cables this can cause irreversible damage to the module
and invalidate the warranty.
4
5
MIPV Installation Manual v2.3.1
Safety
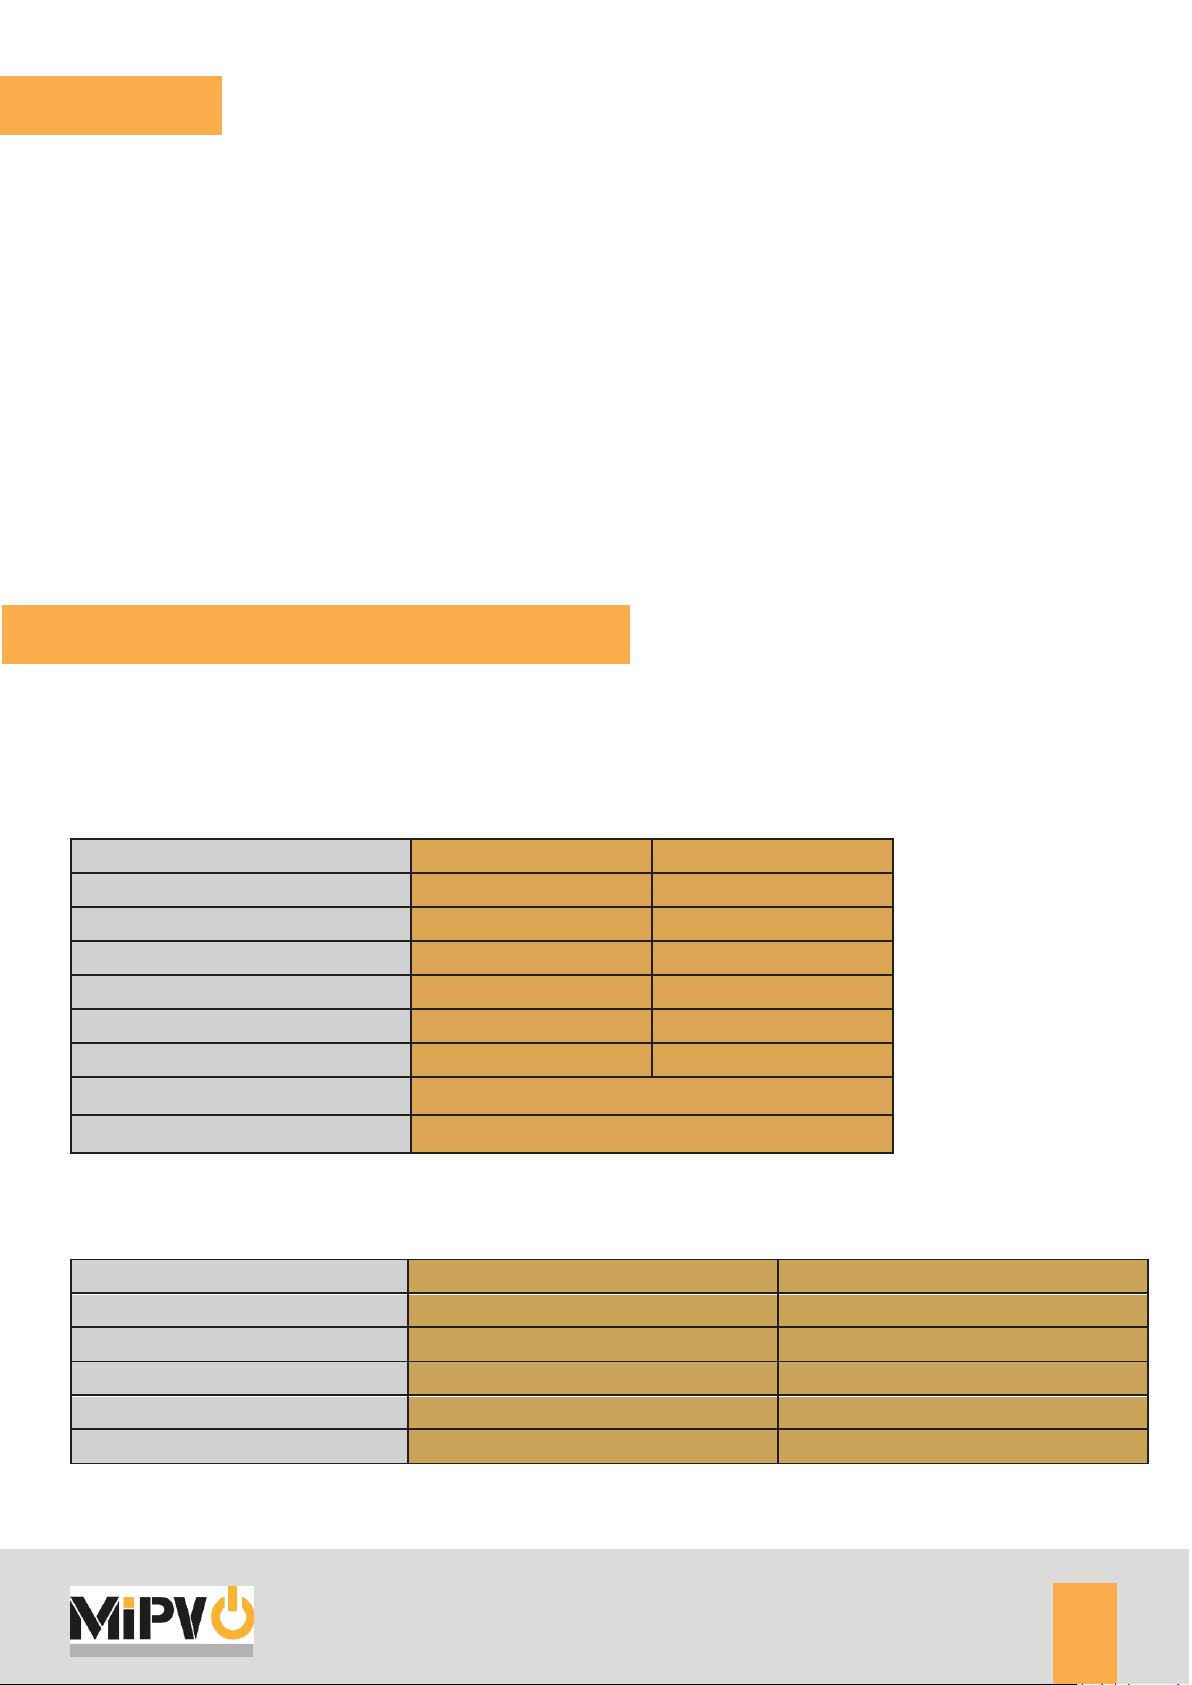
F11F-110BM
F13F-120B1
Nominal Power (W)
110
120
Open Circuit Voltage (V)
35.4
38.6
Open Circuit Current (A)
4.39
4.43
Maximum Series Fuse Rating (A)
10
10
Length (mm)
1293
2609
Width
674
358
Thickness
2.5mm – (17mm at Junction Box)
Solar cell type
CIGS (Copper, Indium, Gallium, Selenide)
P1500A
PC164015
Battery Voltage (V)
12
12
Maximum PV input voltage (V)
50
145
Rated Current (A)
30
40
Max PV Input Power (W)
390
600
Weight (kg)
0.35
2.5
Keep the MIPV modules packed in the carton until installation.
Static may be present in the MIPV module, e.g. after friction of the modules over the surfaces (electrostatic
loading). This can discharge through the edge on the module, to avoid discomfort always handle modules
with polymeric gloves (e.g. nitrile or nitrile coated knitted gloves).
Do NOT place MiPV modules directly on top of each other.
The front surface of the MiPV module is susceptible to scratching, avoid scraping with sharp edges.
Do NOT stand or step on the MiPV module.
Do NOT place or allow hard objects to fall onto MiPV modules
Do NOT cause the MiPV module to flex or twist excessively. A bending radius in excess of 225mm can
damage the module.
Technical Specification
8. Technical Specification
There are no user serviceable parts in the MIPV Leisure Series solar kits. DO NOT attempt to repair, alter
or remove any part of the equipment included in the kit.
MiPV PHOTOVOLTAIC MODULE SPECIFICATIONS
MIPV modules meet the requirements of IEC 61730 & 61646
MIPV CHARGE CONTROLLER SPECIFICATIONS
5

6
MIPV Installation Manual v2.3.1
READ CAREFULLY AND STRICTLY OBSERVE THE ASSEMEBLY INSTRUCTIONS BEFORE
STARTING WORK.
9. Installation Safety
DO NOT install MiPV modules in wet or windy conditions to avoid risk of personal injury or damage to
property.
When working at height follow all national guidelines. Always use appropriate safety equipment.
DO NOT walk on MiPV leisure series solar modules.
MiPV modules are designed to be applied on to subtlety curved structures such as those found on the
bulkhead of a motorhome. They are not intended to be applied to sharp curves.
DO NOT apply paint, adhesives or solvents to the top surface of the MiPV module. Keep all electrical
contacts clean and dry.
DO NOT cut, drill or penetrated or modify MiPV modules in anyway. Cutting the modules will result in
exposed conductors and will void the warranty and could result in injury.
MiPV Leisure Series (with adhesive backing) has a minimum shelf life of one year prior to installation
when stored at temperatures below 24°C
Leave all protective packing on the module until they have been installed on the roof.
Modules should be installed in a location where the wind uplift is at its minimum (see figure 1 for
example).
The ambient temperature at the time of installation should be between 4 °C and 40°C
If the temperature is greater than 40°C, the polymer release liner may be difficult to remove from the
adhesive backing and the adhesive may exceed the adhesive application temperature. If the
temperature is lower than 4°C the module may not adhere to the roof structure.
Before applying the module to the roof, ensure they are stored in a dry and cool location to avoid issues
with adhesion to the roof.
Modules should only be applied to a dry, clean roof prepared as per this manual. Do not apply on a
wet/damp roof.
10. Required Tools
Screwdriver
Drill Bit 10mm
Meter Ruler
Adhesive
Tape Marking Pen / Pencil
Clean Lint Free Cloth
Cartridge Gun
6
 Loading...