

Mippaa Stair Trainer User Manual

1. Intended use
The Stair trainer is a temporary handrail. The
Stair trainer is intended to teach young
children to hold on to a stai rcase and may
only be used under the supervi sion of an
adult. Any use other than the intended use
described above is regarded as inadvertent
use.
Mippaa cannot be held responsible for any
(consequential) damage caused by
unintended, wrong or unwi se use.
1.1 Product parts
Check that all parts
are present and check the product for
damage. If a part is missing or damaged,
contact the supplier.
The Stair trainer has two v ariants:
1. Set A, for 3.5 meters of handrail
2. Set B, for 1.12 meters of additional
handrail
Below is described which parts are available
per variant.
3. Assembly
• Observe local laws and regulations during
assembly of the product.
• The end user is responsi ble for correct and
safe assembly.
• Do not tighten the screws too tightly.
• Mount the product on a soft flat surface to
prevent scratches.
3.1 Assembly of the Stair trainer parts
… Place the M5 nut (8) in the recess in the
strap (4).
Bill of materials
1. Handrail holder (2 ×)
2. Wall spacer (2 ×)
3. Long tube (1 ×)
4. Strap (2 ×)
5. Short tube (2 ×)
6. End cap (2 ×)
7. Ball screw (hexagon socket / hexagon)
3,5 × 25 mm. Tube fixation (2 ×)
8. Inlay nut M 5 band (2 ×)
9. Long bolt (cross) M5 × 150 mm with full
thread (4 ×)
10. Pan Head bolt (cross) 3,5 × 10 mm for
wall spacer adjuster (2 ×)
11. Allen bolt low round head ISO 7380 M 3 ×
30 and cap nut M 3 DIN 1587 (2 ×)
12. Cellular rubber COLOR WHITE 25 × 25 ×
1.1 mm (4 ×)
13. Allen key 2
14. Allen key 4
1.2 Trap situations
The most common stair situations are shown in
the figure below. Per stage situation it is
indicated which sets (A and / or B) are
required.
Insert the M5 × 150 bolt (9) through the
bottom of the handrail holder (1).
Screw the M5 × 150 bolt (9) into the strap
(4) with M5 nut (8).
Bill of materials
1. Handrail holder (5 ×)
2. Wall spacer (5 ×)
3. Long tube (4 ×)
4. Strap (5 ×)
5. Short tube (2 ×)
6. End cap (2 ×)
7. Pan Head bolt (cross) 3,5 × 25 mm.
Tube fixation (8 ×)
8. Inlay nut M5 band (5 ×)
9. Long bolt (hexagon socket / hexagon)
M5 × 150 mm with full thread (7 ×)
10. Pan Head bolt (cross) 3,5 × 10 mm for
wall spacer adjuster (5 ×)
11. Allen bolt low round head ISO 7380 M3
×30 and cap nut M3 DIN 1587 (5 ×)
12. Cellular rubber COLOR WHITE 25 × 25 ×
1.1 mm (10 ×)
13. Allen key 2
14. Allen key 4
• Observe local laws and regulations
during assembly and / or use of the product.
• The responsibility for the correct installation
and use of the product lies with the end user.
Improper assembly or incorrect use can lead
to damage to or a defect of the product. The
warranty is voi d if the product is damaged
due to incorrect assembly or use.
• Keep children and animals away from the
mounting location.
• The product can carry a wei ght of up to 20
kg.
• Do not use power tools to tighten the
screws.
• Contact the supplier if parts are missing or
damaged. Assembled or parti ally assembled
products are not accepted by the return
policy.
• Mount the product on a soft flat surface to
prevent scratches.
• Mount Stair trainers for more than 1.2 meters
with two people.
• Mippaa advises to also attach the Stair
trainer to the wall. Fasteni ng materials are not
included.
Set
Stair Trainer manual
1.3 Required tools
• Phillips screwdriver
• Plastic pipe cutter or hacksaw
• Allen key no
2. Precautions and safety instructions
4 Place the cellular rubber (13) on the top
of the handrai l holder (1).
do not remove the protective
film at the top of the cellular
rubber! This only happens in
section 3.2.
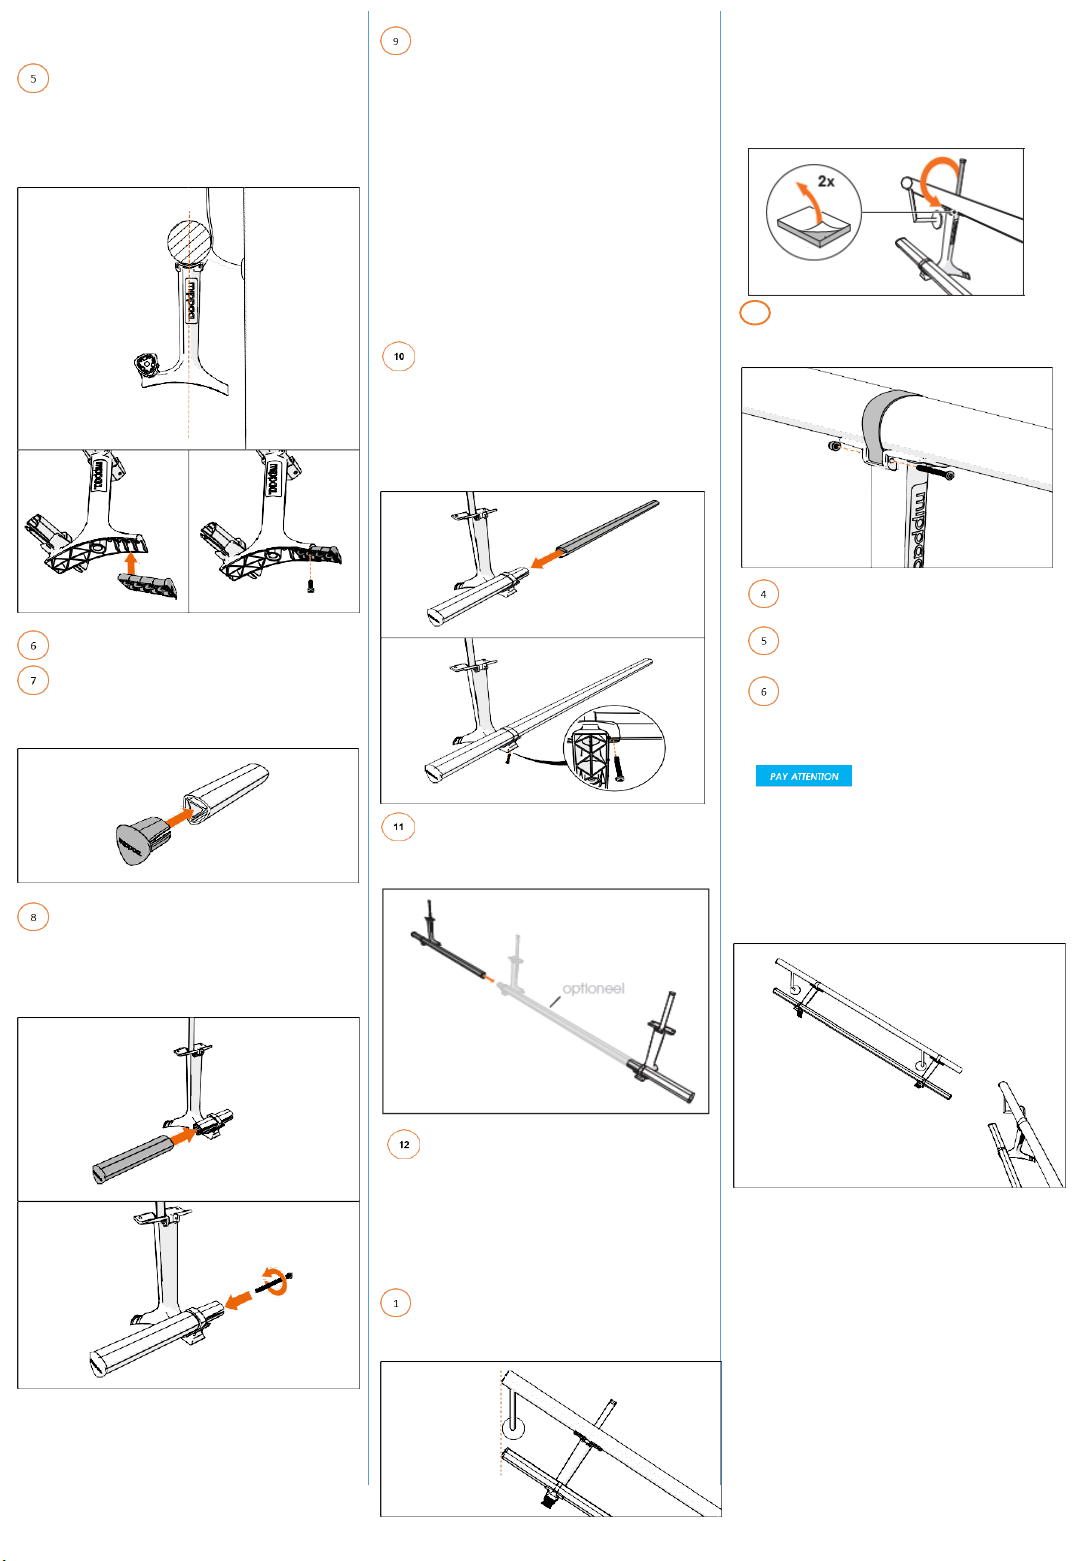
Push the wall spacer (2) into the desired
position. The handrail holder (1) should be
parallel to the wall.
Attach the wall spacer (2) wi th the 3.5 ×
10 mm Pan Head screw (10).
Repeat the above steps for the other
handrail holders (1).
Push the end caps (6) onto the end of the
short tubes (5).
Push the short tubes (5) onto the ends
of the handrail holders (1).
Attach the short tubes (5) to the
handrail holders (1) using the m5 × 150
bolt (9).
Measure the total length of your existing
banister and calculate the required length
of the tubes (3).
Standard length long tube: 78 cm Standard
length end: 16 cm Extra length handrail
holder: 1 cm
Example calculati on set A:
• The handrail has a length of 315 cm
• There are 2 ends of the Stai r trainer (2 ×
16 cm) = 32 cm
• There is 5 tim es a handrail holder (5 × 1
cm) = 5 cm
The remaining length is 315 - 32 - 5 = 278
cm Four long tubes fit in 278 cm:
278/4 = 69.5 cm per tube. Saw or cut the
tubes to length.
Push the long tube (3) onto a handrail
support
(1) at one of the ends and fix it with a pan
head screw (3,5 ×)
25 mm) (7).
Push the other side of the long tube (3)
into the next handrail support (1) and fix it
with a round head screw (3.5 × 25 mm) (7).
Repeat step 10 and 11 unti l all tubes
are attached and always fini sh with an
end piece.
3.2 Mounting the Stair trainer to the existing
handrail
ATTENTION Mount Stair trainers for more
than 1.2 meters with two people.
Start at the top of the stai rs by aligning
the Stair trainer vertically with the existing
handrail.
2 Fold the strap (4) around the existing
handrail.
ATTENTION If the strap does not fit
around the existing banister, the Stair
trainer can also be attached with
screws (screw holes are fitted).
Attach the strap (4) to the handrail
holder using the M 3 bolt (11) and the cap
nut (11).
The steps for mounting in a bend are the
same as on a strai ght section. See section
3.2 for more information.
4. Maintenance
• Check the fastening material of the
product on a weekly basis. Tighten the
fastening materi al if it is loose.
• Clean the product if necessary.
• Clean the product with a dry or slightly
moist cloth.
CAUTION Do not clean the product with
detergents, abrasives or other aggressive
liquids.
• Only move the product with two people
to prevent damage to the product.
Manually tighten the M5 × 150 bolt (9)
using the supplied 4 mm Allen key.
Repeat step 1 to 4 of thi s section for the
other handrail holders.
Ensure that the wall spacers (2) touch the
wall. See section 3.1 step 5 for more
informati on.
If there is still movement in the
Stair Trainer, the wall spacers (2) can be
fixed in the wall.
Attachment materials are not included.
3.3 Mounting in a bend
A Stair trainer mounted in a bend looks like
this:
3
 Loading...