

MIOX RIO ZUNI Quick Start Manual
ni
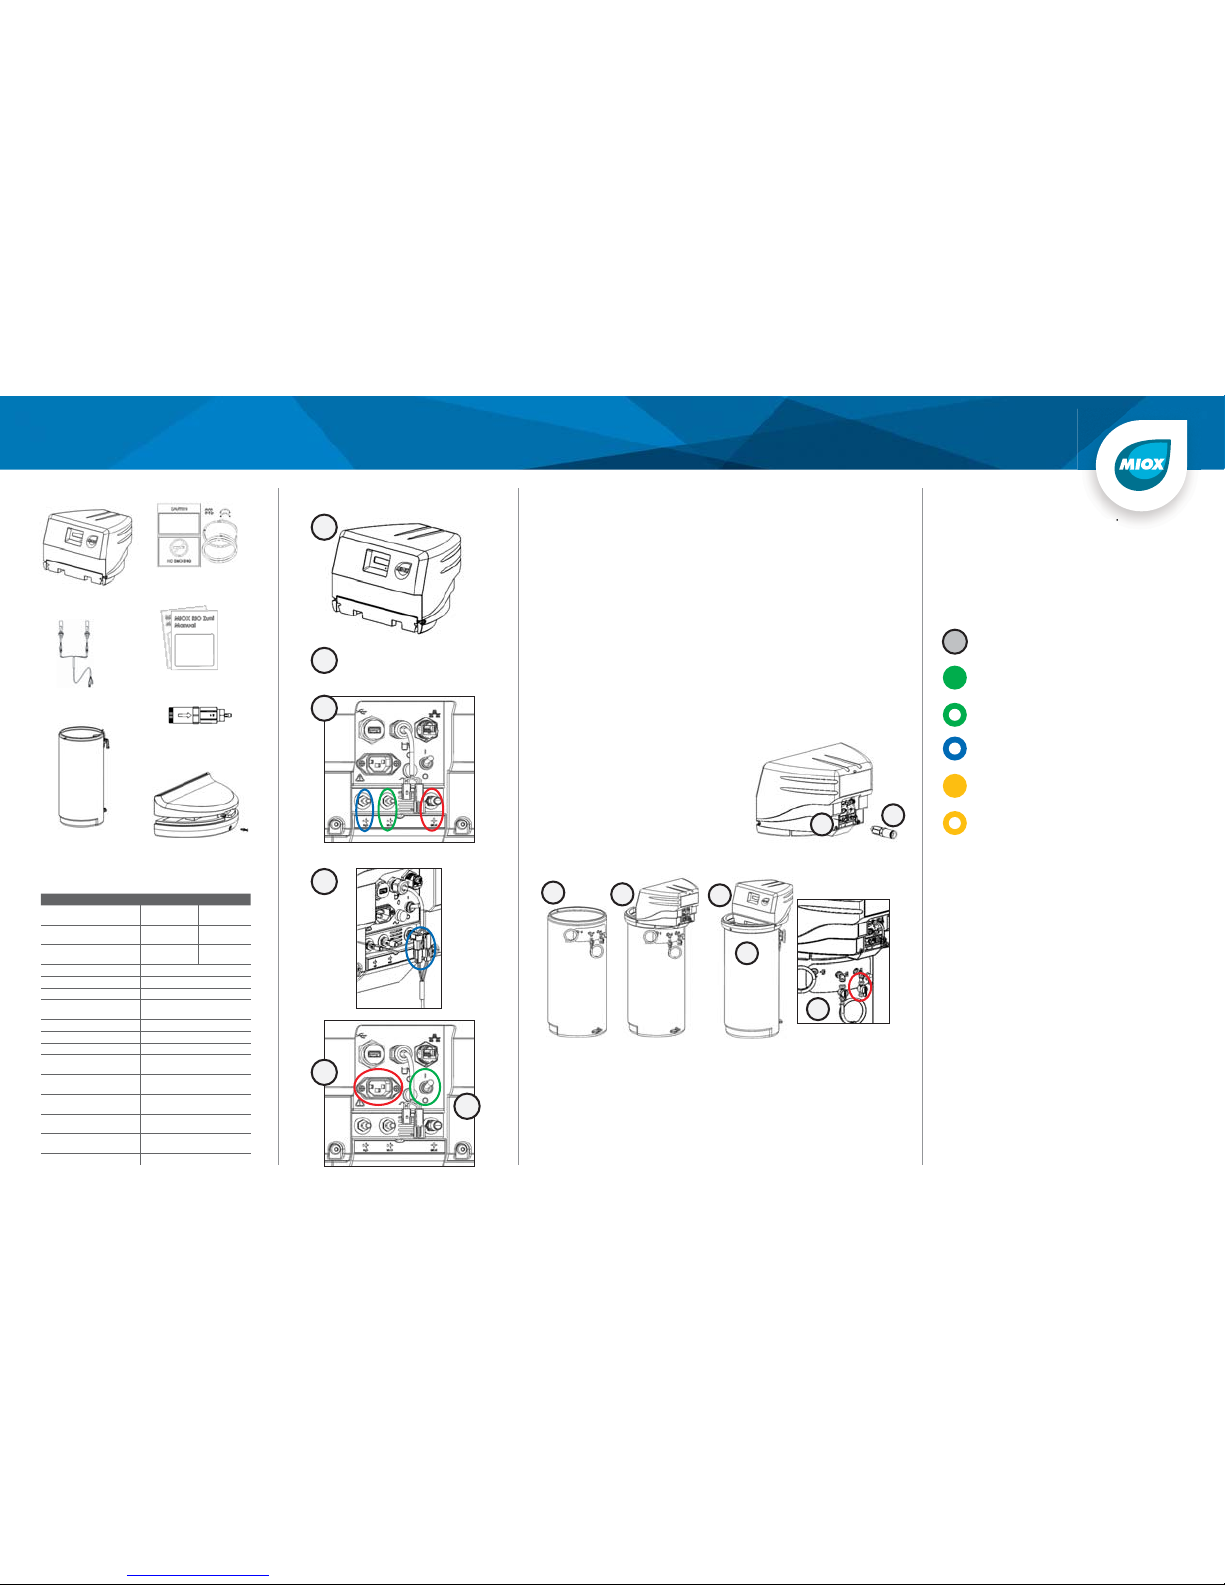
RIO ZUNI QUICK START GUIDE
In the Boxes
Spare Parts Kit
RIO Zuni OSG
Level Switch
Assembly
Integrated Tank
(Optional)
RIO Zuni Manuals
Inline Pressure
Reducer (Optional)
Tank Salt Lid Install
Kit (Optional)
RIO Zuni Specifications
RIO Zuni 1 PPD RIO Zuni 2 PPD
Rated FAC Capacity
Water Treatme nt Capaci ty (at 1
ppm FAC)
Flow Rate (± 15 %)
Self-Cleaning
FAC Concentration
Water Hardness
Electrical Service Requirement
(OSG Only)
Approximate Salt Ratio
Salt Quali ty Req.
Hydrogen Venting
Air Tempera ture Req.
Recommended Feed Water
Tempe rat ur e
Allowab le Feed Water
Temperature Range
Feed Water Pr essure
Dimensions (WxDxH)
Approx. Weight
1.0 lb/ day
0.45 kg/ da y
120,000 gal/ day
240,000 gal/ day
454 m³/ day
1.3 gph
4.9 lph
YES
4,000 ± 1,000 mg/L
0 – 170 mg/L
110 VAC to 240 VAC, 1 ph , 4A ratin g
50/60Hz
3.0 - 3.5 lb/ kg salt per lb /kg FAC
99.5% NaCl or be tter^
REQUIRED
40°F to 120°F
5°C to 49°C
50°F to 80°F
10°C to 27°C
40°F to 95°F
5°C to 35°C
1-75 psi
6.8 – 517 kPa
21” x 16” x 14”
53 cm x 41 cm x 36 cm
25 lbs
2.0 lb/ day
0.9 kg/ day
908 m³/ day
2.7 gph
10.2 lph
RIO Zuni Startup
1
See Note A or B for
2
installing plumbing
components
3
Water Brine Mixed Oxidant
5
6
OSG Installation
1) Unbox RIO Zuni OSG and all other components
2) Install RIO Zuni OSG in its operational location
a) If installing with the Inline Pressure Reducer, See Note A
b) If installing with the Integrated Tank, see Note B
3) Connect the 3 plumbing lines as labeled on the back of the OSG
a) Secure the lines to the barbs with the provided hose clamps
b) Open all plumbing valves to the OSG
4) Install the level switches into the oxidant tank
5) Connect the level switch assembly through the Delphi connectors
6) Plug the included power cord into an AC power outlet and the back I/O
panel of the OSG
7) Flip the power switch on the back I/O panel of the OSG
NOTE A: Inline Pressure Reducer Installation
a) Connect a pressurized water feed
source to the ¾” female NPT water
inlet
b) Connect the barb fitting from the
Inline Pressure Reducer to the
water inlet on the OSG
b
NOTE B: Integrated Tank Installation
a
Integrated Tank Installation
a) Ensure the O-ring is properly seated on the tank
b) Place the OSG on top of the integrated tank with the back I/O panel
7
c) Place the salt lid on the tank and secure it in the existing hole using the
d) Fill the tank with salt
e) Attach the water inlet plumbing line and open the valve
b
c
d
aligned with the plumbing I/O on the integrated tank
included nylon screw and washer
e
Operating the RIO Zuni
During operation, the LED indicator and display
constantly update with the system status. Operators
should also routinely check the salt level inside the
integrated tank.
LED Indicator Meanings
System in standby
System in normal operation
System in normal startup or shutdown
System operating abnormally –
check brine and salt supply
System faulted and needs reset
a
System faulted and will
automatically restart
Basic Troubleshooting
If the Miox RIO Zuni does not start normal operation
after following this quick start guide, follow this
procedure.
1) Confirm all plumbing lines are fully connected and
valves are open
1) Water in, Brine in, and Oxidant out on the OSG
2) Water in, Water out, Brine out on the
Integrated Tank
2) Confirm the AC power cable is fully plugged into
the wall and the back of the OSG
3) Check that the float switch assembly is plugged into
the OSG and both floats are down
4) Reset the system by turning it off, waiting 10
seconds, and turning it back on
5) If this does not resolve your issues, please review
the manual. For more complicated problems,
please contact MIOX Service at
1-888-646-9457
Zu
PN 102-00105-B
 Loading...