

MioWork A200, A300 Quick Start Manual
A200/A300 Series
en
es
tr
ja
tc
Quick Start Guide
Schnellstartanleitung de
Guía de inicio rápido
Guide de mise en route fr
Guida rapida it
Snelstartgids nl
Guia Rápido de Iniciação pt
Instrukcja szybkiego uruchomienia pl
Hızlı Başlangıç Kılavuzu
クイック スタート ガイド
快 速 使 用 指 南

Welcome
Thank you for purchasing a MioWORK product. This Quick Start Guide guides you through the
successful setup of your device and familiarises you with the basic skills of using the device.
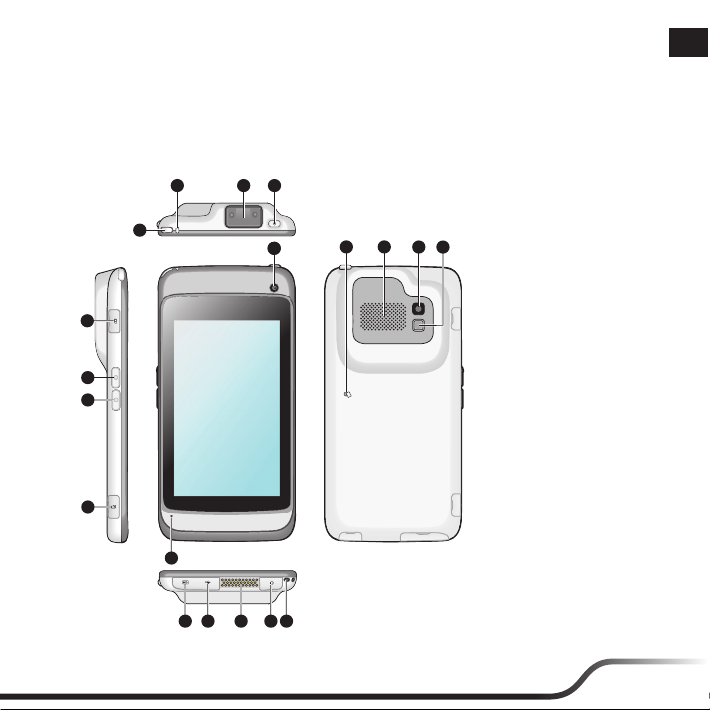
Getting to know your device
2
1
16
1
17
2
18
19
10
12
11
* For selected models only.
4
3
1. LED Indicator 1
Barcode reader status*:
Green/Red
6
9
5
7
2. LED Indicator 2
8
Battery charge status:
Green/Red
3. Barcode Reader*
4. POWER Button
5. NFC (Near Field
Communication) Sensor
6. Speaker
7. Rear Camera
8. Flash
9. Front Camera
10. Microphone
11. HD Connector
12. Mini-USB Port
13. Dock Connector
14. Headphone Socket
15. Lanyard Holder
16. Micro SIM Card Slot*
17. Volume Up Button /
Barcode Reader Button*
18. Volume Down Button /
13
14
15
Programmable
Application Button
19. Memory card slot
en
1
en
3
Getting started
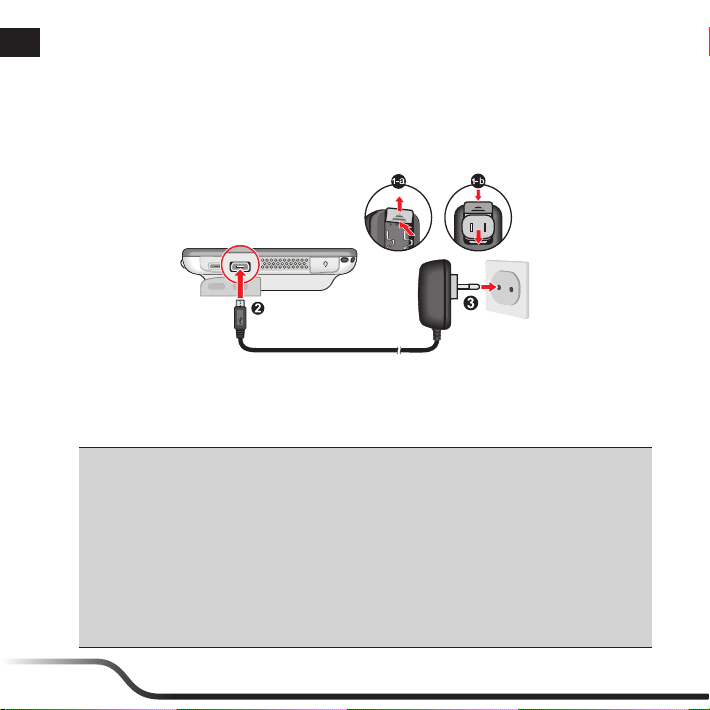
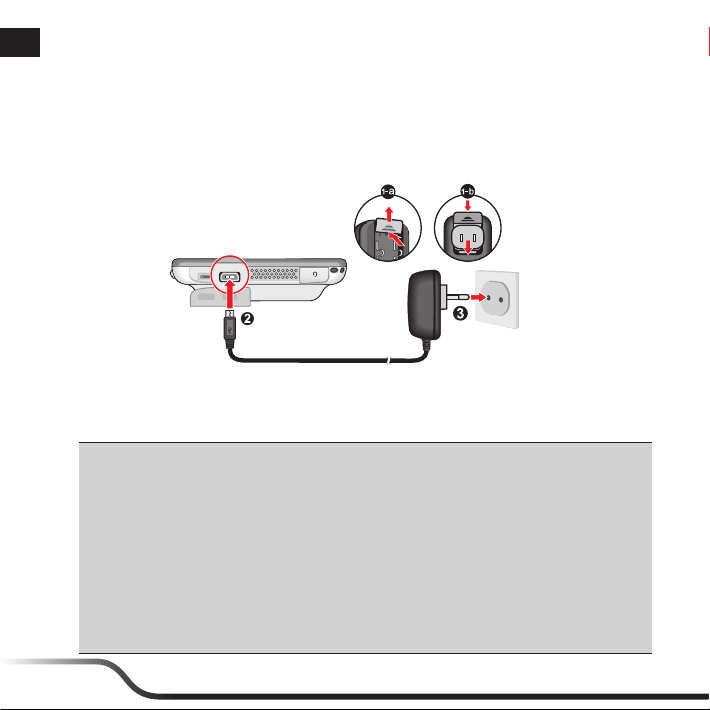
Charging the battery
When charging the battery for the very first time, you should charge it for at least 8 hours (using the AC
charger) with your device turned off. To charge the battery, plug the home charger cable into the MiniUSB port on the bottom of your device and the mains power charger into the power socket*.
The LED indicator will blink Red while the battery power is less than 15%. During charging, the LED
indicator on the device lights up to indicate the battery charge status: Green – battery full; Red –
battery charging.
CAUTION! For optimal performance of the lithium battery, note the following:
• Do not charge the battery where the temperature is high (e.g. in direct sunlight). The battery
will stop charging when the ambient temperature is less than -10ºC (14ºF) or more than 60ºC
(140ºF).
• Recharge the battery when it is nearly discharged. When recharging, make sure that the battery
is fully charged. Doing so can extend the battery life.
• If the device has not been used for over a month or if you find the discharge/recharge time has
been shortened, be sure to fully discharge the battery first before recharging it. You are also
advised to fully discharge and recharge the battery once every 1~2 months.
• Failure to follow the battery usage instructions can cause damage to your device, battery and
even bodily injury or property damage and will void the warranty.
* The plug type varies with the region of your purchase.
2
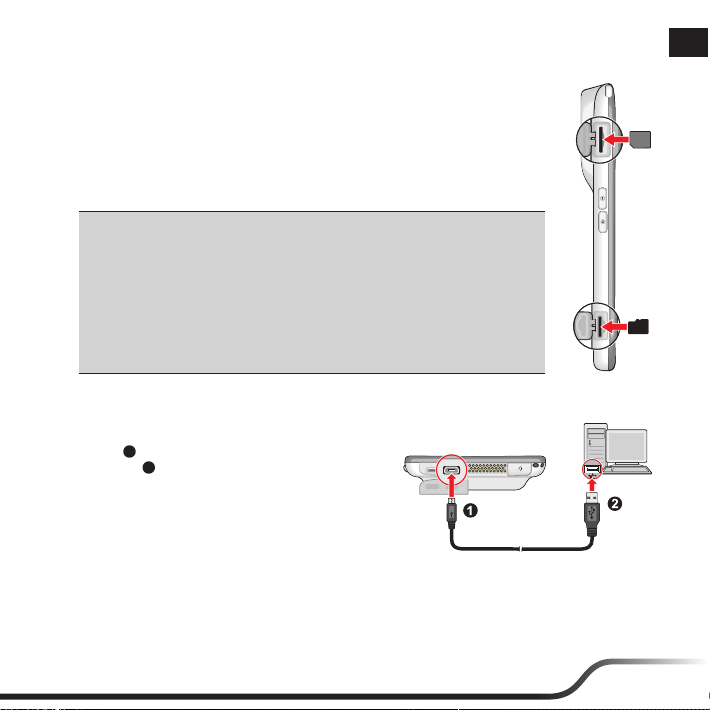
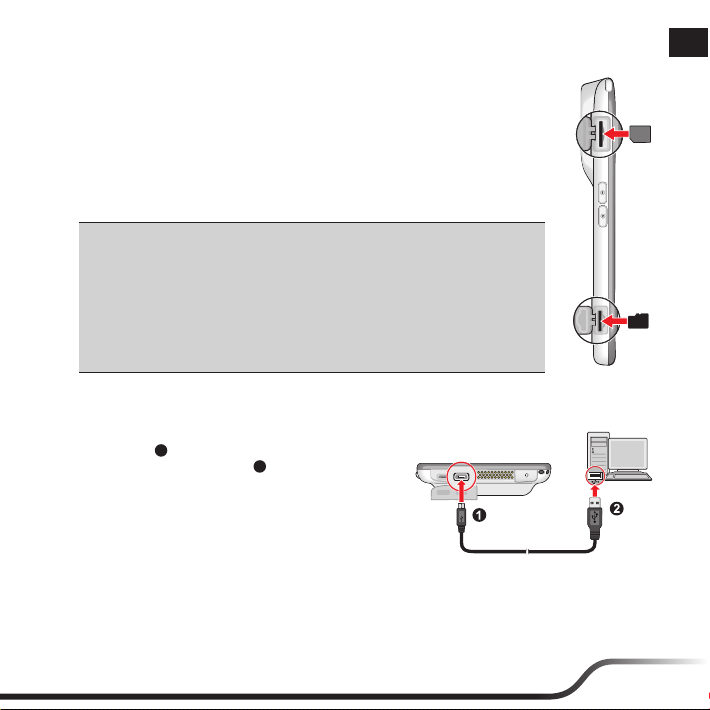
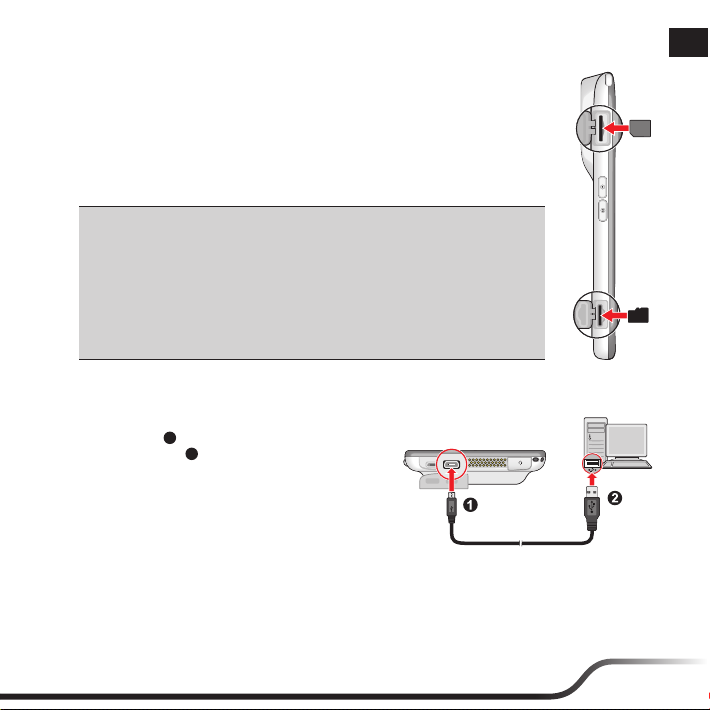
Installing the memory card and SIM card
1. Open the cover on the left side of the device to locate the Micro SIM card
slot* (a) and MicroSD card slot (b).
2. Follow the instruction to install the cards (not supplied).
3. Replace the cover and ensure the cover is securely closed.
* For selected models only.
Notes:
• The device supports up to 64GB MicroSD memory cards. However, it
does not guarantee the device’s compatibility with memory cards from all
manufacturers.
• While installing a card, do not apply pressure to the centre of the card. Do not
use your finger or any metal objects to touch and scratch the contact part of
the card.
• To remove a card, gently push the top edge of the card inwards to release it
and then pull it out of the slot.
Connecting your device to a computer
Connect the Mini-USB end of the USB cable to your
1
) and the other end to a USB port in your
device (
computer (
transfer the files between your computer and device
easily through MTP*.
* MTP (Media Transfer Protocol) allows media files (including music, pictures, and other files) to
be transferred automatically to and from portable devices. However, for Windows XP users, it is
required to install Windows XP Service Pack 3 and Windows Media Player 10 (or higher).
2
). Once connected, you will be able to
en
a.
b.
3
en
5
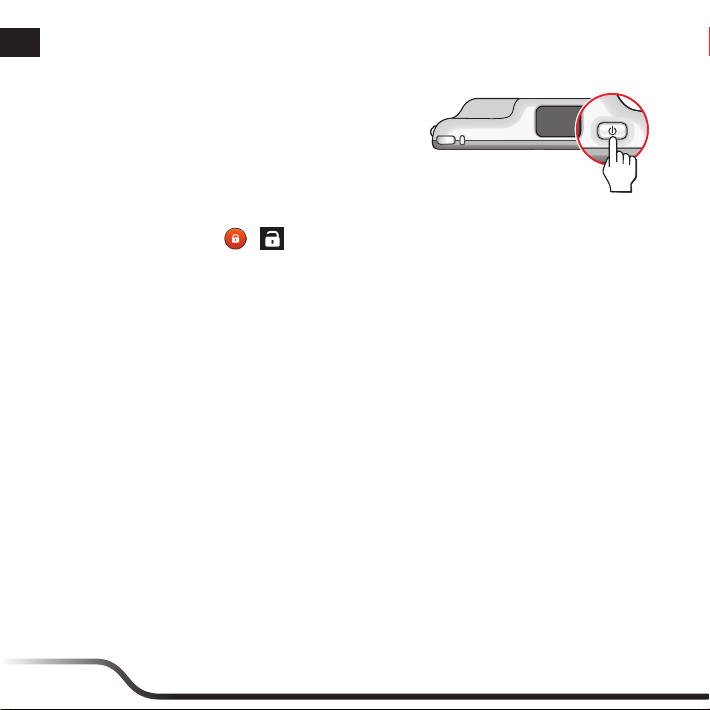
Operating basics
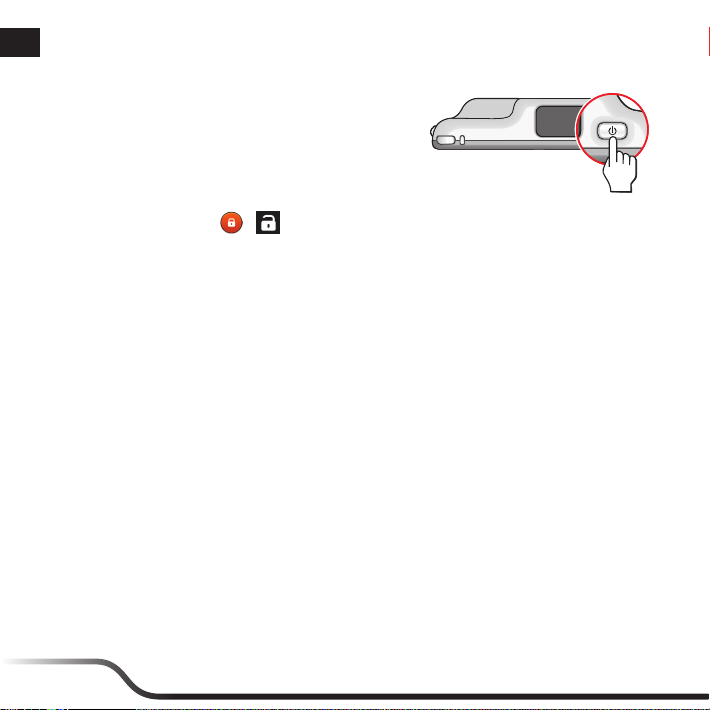
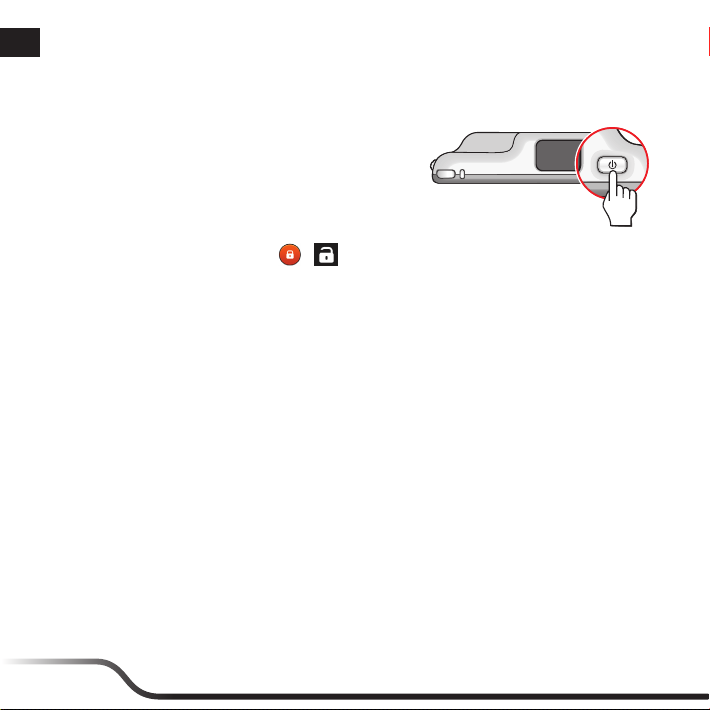
Using the POWER button
• To turn on the device
Press and hold the POWER button until the
device turns on. After the boot up screen, the
Home screen will be displayed and the device
is in Lock mode by default.
Drag the Lock icon (
• Sleep mode
Your device will automatically enter Sleep mode after 1 minute (by default) of inactivity. You can
also manually switch to Sleep mode by pressing the POWER button briefly.
To resume from Sleep mode, briefly press the POWER button.
• Aeroplane mode
When you are in an aeroplane or in the area where the use of wireless radio is prohibited, enable
Aeroplane mode. Many of your devices applications will continue to work (e.g. playing games or
listening music) but all wireless radios, including wireless network and Bluetooth, on the device
are turned off – it cannot send or receive data.
To enter Aeroplane mode, press and hold the POWER button and select Aeroplane mode from
the option menu.
• To restart / turn off the device
Press and hold the POWER button and select Restart / Power off from the option menu.
• To shut down the device manually
Press and hold the POWER button for 5 seconds.
> ) to unlock the system. You can now use your device.
4
Navigating on the screen
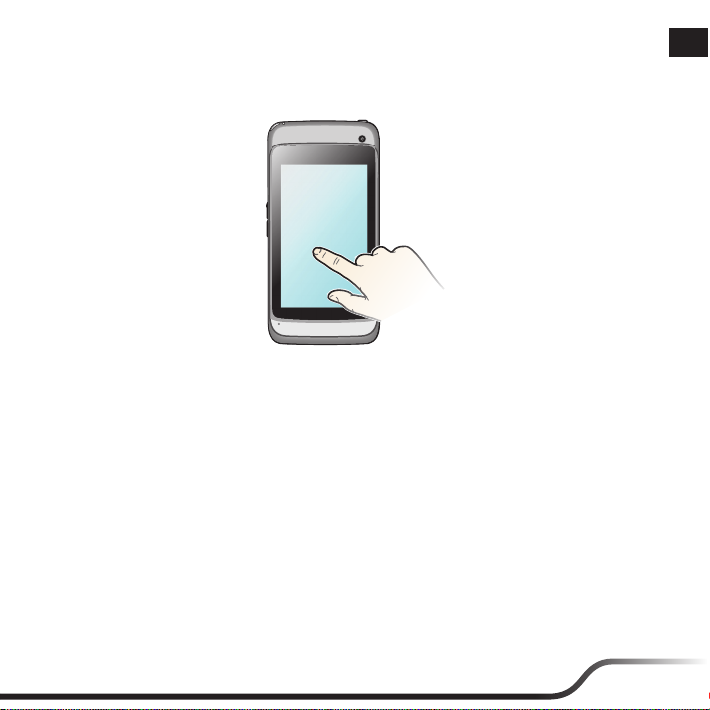
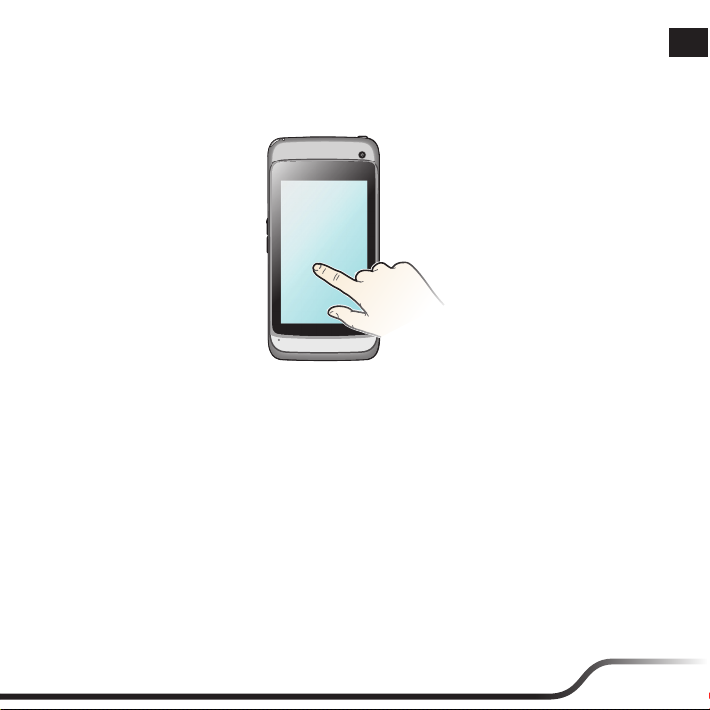
To operate your device, touch the screen with your fingertip. You can perform the following actions:
• Tap: Touch the screen once with your fingertip to open items or select onscreen buttons or
options.
• Tap and hold: Tap and hold on the desired item to open the pop-up menu that contains the
available options for the item.
• Drag: Tap and hold on the item and then move it to the target position without releasing your
fingertip.
• Slide: Drag to the left/right (or the top/bottom) to switch to the next/previous item on the list.
• Multi-touch gestures: Move your fingertips apart or together on the screen to zoom in or out
while viewing a picture or a web page.
• Rotating the screen: For most applications, you can automatically change the screen orientation
(from portrait to landscape, and vise versa) by turning the device sideways.
en
5
en
7
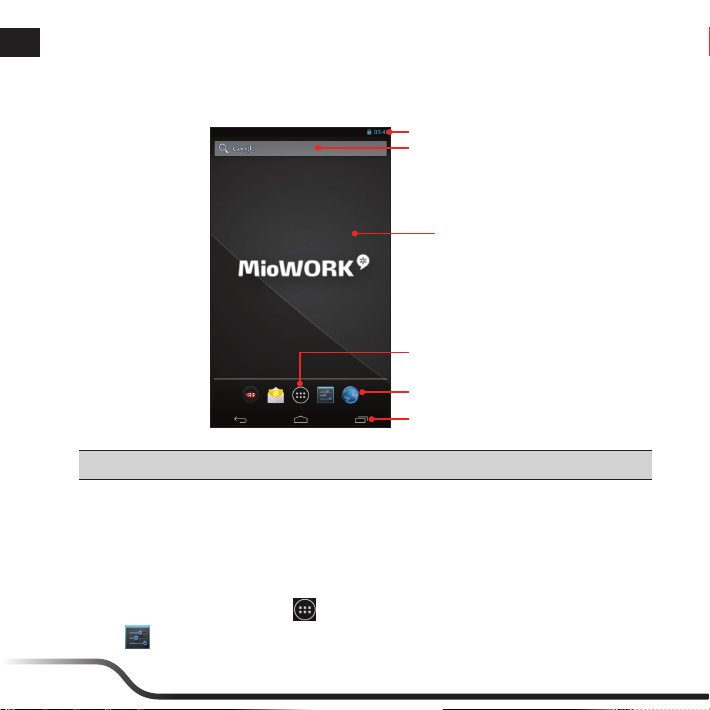
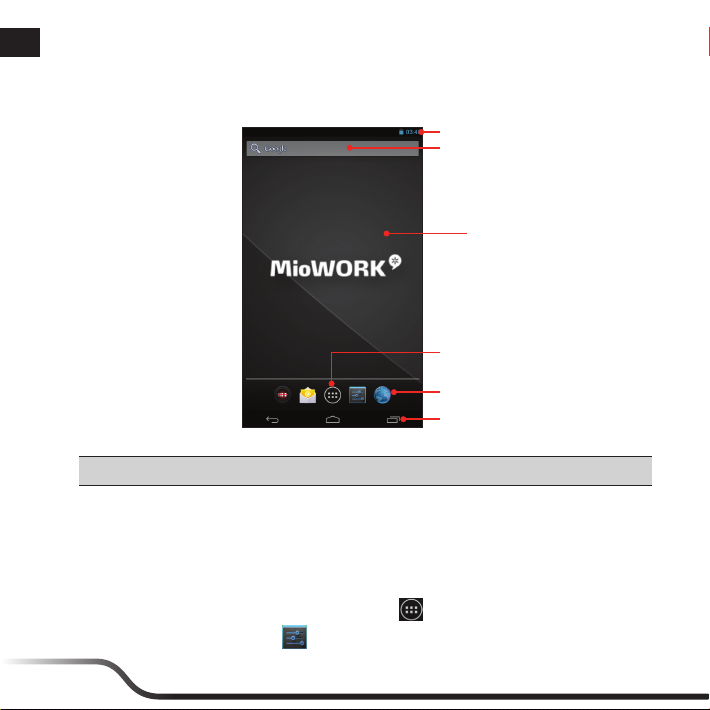
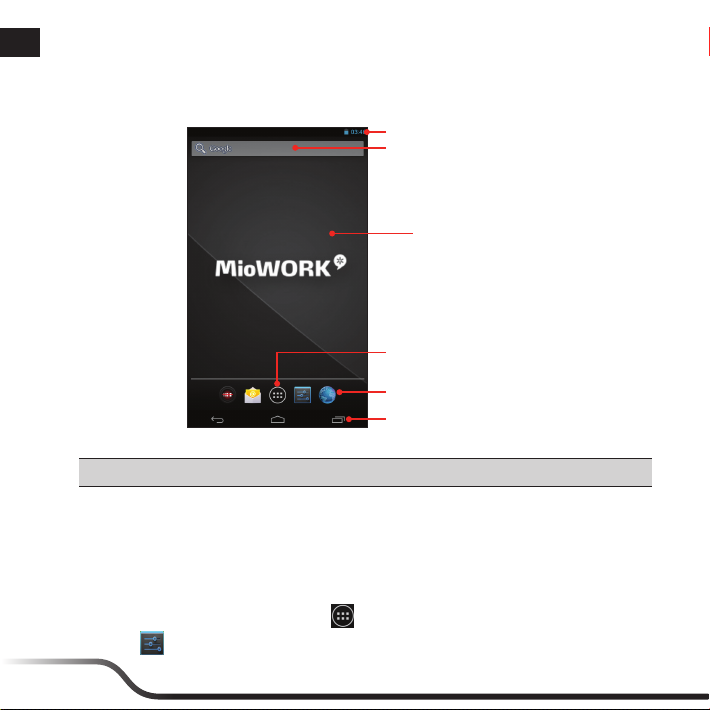
Home screen
The Home screen is your starting place for tasks, providing quick access to frequently used
applications and settings.
Status Bar
Shortcuts/widgets
Desktop
All Applications button
Quick Launcher
Soft keys: BACK / HOME / RECENT APPS
Tip: To display the Home screen, tap the HOME button at any time.
Customising your device
You can customise the device through the Settings menu, including personalising the Home screen,
changing the display and sound settings, configuring the connection settings, and more.
From the desktop, do one of the following to access the Settings menu:
• Tap the All Applications button (
• Tap
from the Quick Launcher.
) > Settings.
6
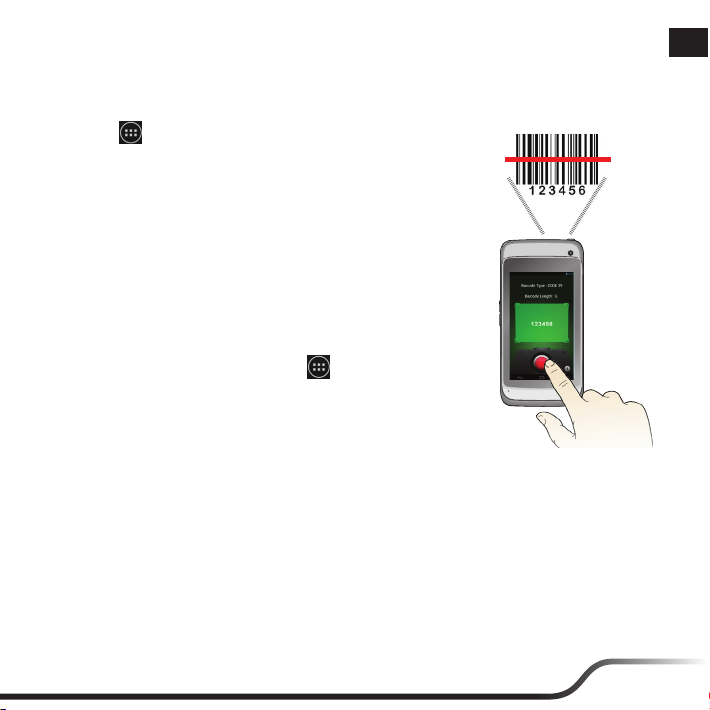
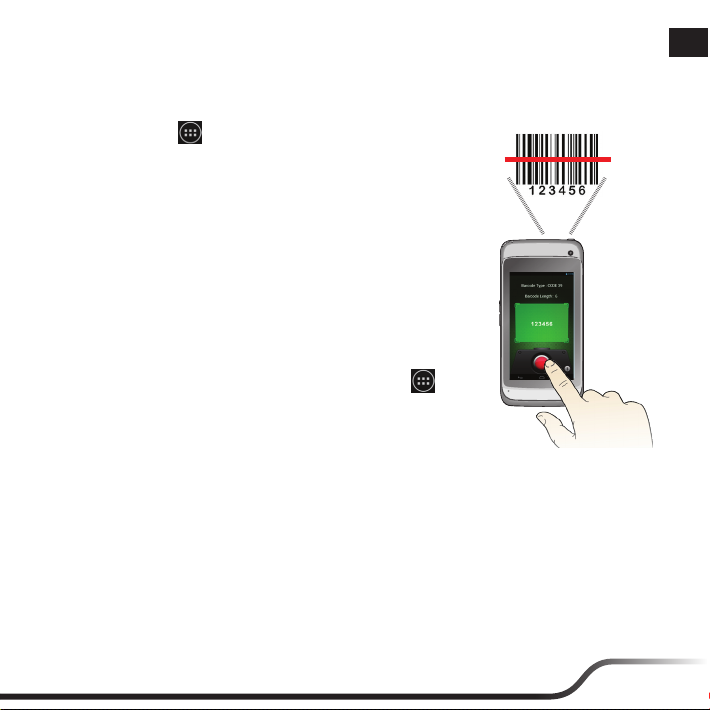
Using the Barcode Reader (for selected models only)
By using the Barcode Reader, your device will be able to read the information contained in the
barcode.
1. Tap
2. Position your device close to the barcode (approximately
3. Tap the “Scan” button of the application to start scanning;
4. The LED indicator blinks once to indicate the scanning status:
5. To configure the Barcode Reader, tap
> BCR Reader to launch the Barcode Reader
application on your device.
5~10 cm), and point the barcode reader sensor to the barcode.
meanwhile, hold your device steadily to keep the barcode
within the sensor coverage until the information is displayed
on the screen.
Green – successful scan.
Red – scan failed; please try again.
> BCR Settings.
en
7
en
9
For more information
Support
For initial support, contact your IT department or your local authorised dealer.
Occasionally, the manufacturer may offer free system updates to improve user experience. Please
regularly check the website http://miowork.mio.com/ for more information.
IP54
The IEC 60529/IP54 is a European system of test specification standards for classifying the degree
of protection provided by the enclosures of electrical equipment. An IP54 designation means that
the unit withstands dust protected (Ingress of dust is not entirely prevented, but it must not enter in
sufficient quantity to interfere with the satisfactory operation of the equipment; complete protection
against contact), and water splashing for up to 5 minutes (water volume: 10 litres per minute, Pressure:
80-100kPa). The manufacturer guarantees this grade provided the battery door and all jack covers are
properly and securely closed. This device is not IPX7/IPX8 grade; immersion in water or water-pressure
such as washing the unit with running water may cause damage to the unit and voids warranty.
Regulatory information (CE)
2200
Note: For regulatory identification purposes, your device is assigned a model number of N435.
Hereby, MiTAC declares that this N435 is in compliance with the essential requirements and other
relevant provisions of Directive 1999/5/EC.
This device complies with the R&TTE Directive (1999/5/EC), the EMC Directive (2004/108/EC), and
the Low Voltage Directive (2006/95/EC) issued by the Commission of the European Community. issued by the Commission of the European Community. Compliance with these directives implies
conformity to the following European Standards:
EN 301 489-1: Electronic compatibility and Radio spectrum Matters (ERM), Electromagnetic
Compatibility (EMC) standard for radio equipment and services; Part 1: Common technical
requirements.
EN 301 489-3: Electromagnetic compatibility and Radio spectrum Matters (ERM); ElectroMagnetic
Compatibility (EMC) standard for radio equipment and services; Part 3: Specific conditions for ShortRange Devices (SRD) operating on frequencies between 9 kHz and 246 GHz
EN301489-17: Electronic compatibility and Radio spectrum Matters (ERM), Electromagnetic
Compatibility (EMC) standard for radio equipment and services; Part 17: Specific conditions for 2.4
GHz wideband transmission systems and 5 GHz high performance RLAN equipment.
8

EN 300 328: Electromagnetic compatibility and Radio spectrum Matters (ERM); Wideband
Transmission systems; Data transmission equipment operating in the 2.4 GHz ISM band and using
spread spectrum modulation techniques; Harmonized EN covering essential requirements under
article 3.2 of the R&TTE Directive.
EN 301 893: Broadband Radio Access Networks (BRAN); 5 GHz high performance RLAN; Harmonized
EN covering the essential requirements of article 3.2 of the R&TTE Directive
EN 300 440: Electromagnetic compatibility and Radio spectrum Matters (ERM); Short range devices;
Radio equipment to be used in the 1 GHz to 40 GHz frequency range; Part 2: Harmonized EN covering
the essential requirements of article 3.2 of the R&TTE Directive
EN 302 291-1: Electromagnetic compatibility and Radio spectrum Matters (ERM); Short Range
Devices (SRD); Close Range Inductive Data Communication equipment operating at 13,56 MHz; Part 1:
Technical characteristics and test methods
EN 302 291-2: Electromagnetic compatibility and Radio spectrum Matters (ERM); Short Range
Devices (SRD); Close Range Inductive Data Communication equipment operating at 13,56 MHz; Part 2:
Harmonised EN under article 3.2 of the R&TTE Directive
EN 50566: Product standard to demonstrate compliance of radio frequency fields from handheld and
body- mounted wireless communication devices used by the general public (30 MHz — 6 GHz)
EN 62209-2: Human exposure to radio frequency fields from handheld and bodymounted wireless
communication devices — Human models, instrumentation, and procedures
EN 62479: Assessment of the compliance of low power electronic and electrical equipment with the
basic restrictions related to human exposure to electromagnetic fields (10 MHz to 300 GHz)
EN 60601: Medical electrical equipment —Part 1-2: General requirements for basic safety and
essential performance — Collateral standard: Electromagnetic compatibility — Requirements and
tests
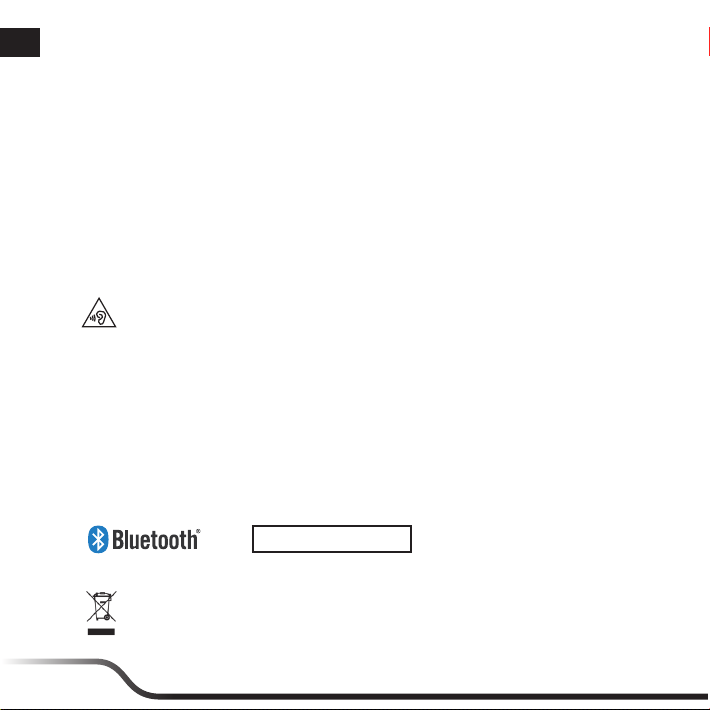
EN 50332: Prolonged listening of music in maximum volume can damage the ears.
EN 55022: Radio disturbance characteristics
EN 55024: Immunity characteristics
EN 61000-3-2: Limits for harmonic current emissions
EN 61000-3-3: Limitation of voltage fluctuation and flicker in low-voltage supply system
IEC 60950-1/A1:2009: Product Safety
For MioWORK A300 series:
EN 301 489-7: Electromagnetic compatibility and Radio spectrum Matters (ERM); ElectroMagnetic
Compatibility (EMC) standard for radio equipment and services; Part 7: Specific conditions for mobile
and portable radio and ancillary equipment of digital cellular radio telecommunications systems (GSM
and DCS)
en
9
en
EN 301 489-24: Electromagnetic compatibility and Radio spectrum Matters (ERM); ElectroMagnetic
Compatibility (EMC) standard for radio equipment and services; Part 24:Specific conditions for IMT2000 CDMA Direct Spread (UTRA and E-UTRA) for Mobile and portable (UE) radio and ancillary
equipment
EN 301 908-1: IMT cellular networks; Harmonized EN covering the essential requirements of article
3.2 of the R&TTE Directive; Part 1: Introduction and common requirements
EN 301 908-2: IMT cellular networks; Harmonized EN covering the essential requirements of article
3.2 of the R&TTE Directive; Part 2: CDMA Direct Spread (UTRA FDD) User Equipment (UE)
EN 301 511: Global System for Mobile communications (GSM); Harmonized EN for mobile stations
in the GSM 900 and GSM 1800 bands covering essential requirements under article 3.2 of the R&TTE
directive (1999/5/EC)
This device have been tested to comply with the Sound Pressure Level requirement laid down in the
applicable EN 50332-2 standards. Permanent hearing loss may occur if earphones or headphones are
used at high volume for prolonged periods of time.
Warning statement:
To prevent possible hearing damage, do not listen at high volume levels for long periods.
The manufacturer cannot be held responsible for modifications made by the User and the
consequences thereof, which may alter the conformity of the product with the CE Marking.
SAR information
The radio wave exposure guidelines employ a unit of measurement known as the Specific Absorption
Rate (SAR), which adopts the limit of 2 W/kg averaged over ten (10) gram of tissue. Your device has
been designed to comply with applicable safety requirements for exposure to radio waves.
SAR ≦ 0.96 W/kg
Bluetooth
Bluetooth DID D021801
WEEE
This product must not be disposed of as normal household waste, in accordance with the
EU directive for waste electrical and electronic equipment (WEEE - 2002/96/EC). Instead,
it should be disposed of by returning it to the point of sale, or to a municipal recycling
collection point.
10
Willkommen
Vielen Dank, dass Sie ein MioWORK-Produkt erworben haben. Diese Schnellstartanleitung führt
Sie durch die erfolgreiche Einrichtung Ihres Gerätes und stellt Ihnen grundlegende Fähigkeiten der
Gerätenutzung vor.
Ihr neues Gerät
2
1
16
1
17
2
18
19
10
* Nur bei bestimmten Modellen.
3
13
12
11
4
6
9
14
15
5
7
1. LED-Anzeige 1
Barcodeleserstatus*:
Grün/Rot
2. LED-Anzeige 2
8
Ladezustand des Akkus:
Grün/Rot
3. Barcodeleser*
4. Ein-/Austaste
5. NFC (Near Field
Kommunikation) Sensor
6. Lautsprecher
7. Rückseitige Kamera
8. Blitzlicht
9. Frontseitige Kamera
10. Mikrofon
11. HD-Anschluss
12. Mini-USB-Port
13. Docking-Anschluss
14. Kopfhöreranschluss
15. Tragebandhalter
16.
Micro-SIM Karteneinschub*
17. Lauter-Taste /
Strichcodeleser-Taste*
18. Leiser-Taste /
Programmierbar
Anwendungstaste
19. Speicherkartenschacht
de
11

de
13
Erste Schritte
Akku laden
Laden Sie den Akku beim ersten Mal mindestens 8 Stunden lang per Netzteil auf. Das Gerät sollte
dabei abgeschaltet bleiben. Um den Akku aufzuladen, stecken Sie das Netzteilkabel in den Mini-USB
Anschluss an der Unterseite des Gerätes und das Netzteil in die Steckdose*.
Die LED-Anzeige blinkt Rot, wenn der Akkuladestand weniger als 15% beträgt. Während des
Ladevorgangs leuchtet die LED-Anzeige auf dem Gerät zur Anzeige des Akkuladestatus:
Grün – Akku voll; Rot – Akku wird geladen.
VORSICHT! Bitte beachten Sie zur Optimierung Ihrer Akkuleistung folgende Hinweise:
• Laden Sie den Akku nicht bei hohen Temperaturen auf (z. B. im direkten Sonnenlicht). Bei
Umgebungstemperaturen unter -10ºC (14ºF) und über 60ºC (140ºF) wird das Aufladen des Akkus
ausgesetzt.
• Laden Sie den Akku nach, wenn er nahezu entleert ist. Achten Sie beim Aufladen darauf, dass der
Akku grundsätzlich komplett geladen wird. Auf diese Weise lässt sich die Akkulaufzeit verbessern.
• Falls Sie das Gerät längere Zeit (länger als einen Monat) nicht genutzt haben oder deutlich
verkürzte Lade-/Entladezeiten bemerken, entleeren Sie den Akku unbedingt vollständig, bevor
Sie ihn wieder aufladen. Wir empfehlen, den Akku alle 1 – 2 Monate komplett zu entladen und
anschließend wieder vollständig aufzuladen.
• Bei Nichtbeachtung der Hinweise zum richtigen Umgang mit dem Akku können Beschädigungen
des Gerätes, des Akkus bis hin zu Sachschäden und Verletzungen eintreten; zusätzlich erlischt die
Garantie.
* Der Stecker kann je nach Land etwas anders aussehen.
12
Einlegen der Speicherkarte und der SIM-Karte
1. Öffnen Sie die Abdeckung an der linken Seite des Gerätes, um den Micro-SIM
Karteneinschub* (a) und den MicroSD Karteneinschub (b) zu lokalisieren.
2. Folgen Sie den Anweisungen, um die Karten (nicht mitgeliefert) einzulegen.
3. Bringen Sie die Abdeckung wieder an und achten Sie darauf, dass die
Abdeckung richtig geschlossen ist.
* Nur bei bestimmten Modellen.
Hinweise:
• Ihr Gerät unterstützt microSD-Speicherkarten bis 64 GB. Allerdings können
wir nicht gewährleisten, dass Ihr Gerät mit Speicherkarten sämtlicher
Hersteller einwandfrei funktioniert.
• Achten Sie beim Einlegen einer Karte darauf, keinen Druck auf die Mitte der
Karte auszuüben. Berühren Sie die Kontakte der Karte nicht mit den Fingern
und nicht mit Metallgegenständen.
• Drücken Sie zum Entfernen sanft auf die Kante der Karte; dadurch springt
diese ein Stück heraus. Ziehen Sie sie aus dem Steckplatz.
Ihr Gerät an einen Computer anschließen
Schließen Sie das Mini-USB-Ende des USB-Kabels
an Ihr Gerät (
USB-Port Ihres Computers an (
Verbindung steht, können Sie Dateien einfach und
bequem per MTP* zwischen Computer und Ihrem
Gerät übertragen.
* MTP (Media Transfer Protocol – Medienübertragungsprotokoll) ermöglicht eine automatische
Übertragung von Mediendateien (Audio-, Bild- und andere Dateien) zu und von tragbaren Geräten.
Falls Sie jedoch noch mit Windows XP arbeiten sollten, müssen Sie dazu das Windows XP Service
Pack 3 und den Windows Media Player ab Version 10 installieren.
1
) und das andere Ende an einen
2
). Sobald die
de
a.
b.
13
de
15
Grundbedienung
Ein-/Austaste
• Gerät einschalten
Drücken und halten Sie die EIN/AUS-Taste,
bis sich das Gerät einschaltet. Nach dem
Systemstart mit Ladebildschirm erscheint der
Startbildschirm.
Das Gerät ist in diesem Moment per Vorgabe gesperrt. Zum Entsperren des Systems ziehen Sie
das Schlosssymbol (
• Schlafmodus
Ihr Gerät wechselt automatisch in den Schlafmodus , wenn Sie es eine Minute (Standardvorgabe)
lang nicht bedienen. Sie können das Gerät auch manuell in den Schlafmodus versetzen, indem Sie
die Ein-/Austaste kurz drücken.
Zum Aufwecken aus dem Schlafmodus drücken Sie kurz die Ein-/Austaste.
• Flugzeugmodus
Wenn Sie sich in einem Flugzeug oder einer Umgebung befinden, in der die Nutzung von
Drahtlosfunk verboten ist, aktivieren Sie bitte den Flugzeugmodus. Viele Ihrer Geräteanwendungen
funktionieren weiter (z. B. Spiele oder Musikwiedergabe), doch der gesamte Drahtlosfunk am
Gerät, inklusive WLAN-Netzwerk und Bluetooth, wird ausgeschaltet – es können keine Daten
empfangen oder gesend et werden.
Zum Umschalten in den Flugzeugmodus halten Sie die Ein-/Austaste gedrückt, anschließend
wählen Sie Flugmodus aus dem Auswahlmenü.
• Neu starten/abschalten
Halten Sie die Ein-/Austaste gedrückt, wählen Sie dann Neustart/Ausschalten aus dem
Auswahlmenü.
• Abschalten erzwingen
Halten Sie die Ein-/Austaste-Taste 5 Sekunden lang gedrückt.
> ) mit dem Finger zur Seite. Jetzt können Sie Ihr Gerät benutzen.
14
Bildschirmnavigation
Berühren Sie den Bildschirm zum Bedienen Ihres Gerätes mit Ihrer Fingerspitze. Sie können folgende
Aktionen durchführen:
• Tippen: Berühren Sie den Bildschirm zum Öffnen von Elementen oder Auswählen von
Bildschirmschaltflächen oder Optionen einmal mit Ihrer Fingerspitze.
• Tippen und halten: Tippen und halten Sie das gewünschte Element zum Öffnen des
Kontextmenüs, das die zum Element verfügbaren Optionen enthält.
• Ziehen: Tippen und halten Sie das Element, verschieben Sie es dann an die Zielposition, ohne Ihre
Fingerspitze vom Bildschirm zu lösen.
• Wischen: Ziehen Sie zum Aufrufen des nächsten/vorherigen Elements in der Liste nach links/
rechts (bzw. oben/unten).
• Multitouch-Gesten: Bewegen Sie Ihre Fingerspitzen beim Betrachten eines Bildes oder einer
Webseite zum Vergrößern oder Verkleinern auseinander oder zusammen.
• Bildschirm drehen: Bei den meisten Anwendungen können Sie die Bildschirmausrichtung durch
Drehen des Gerätes automatisch ändern (vom Hoch- ins Querformat und umgekehrt).
de
15
de
17
Startbildschirm
Der Startbildschirm ist Ihr Startpunkt zur Durchführung von Aktionen; er bietet schnellen Zugriff auf
häufig verwendete Anwendungen und Einstellungen.
Statusleiste
Verknüpfungen/Widgets
Desktop
Alle AnwendungenSchaltfläche
Schnellzugriff
Programmierbare Tasten:
Zurück / Startseite / Aktuelle Apps
Tipp: Zur Anzeige des Startbildschirms können Sie jederzeit die Startseite-Taste drücken.
Ihr Gerät anpassen
Sie können das Gerät über das Einstellungsmenü anpassen, inklusive Personalisierung des Startbildschirms,
Änderung der Anzeige- und Toneinstellungen, Konfiguration der Verbindungseinstellungen und mehr.
Führen Sie über den Desktop zum Zugreifen auf das Einstellungsmenü eine der folgenden Aktionen aus:
• Tippen Sie auf die Schaltfläche Alle Anwendungen (
• Tippen Sie im Schnellzugriff auf
.
) > Einstellungen.
16
Mit dem Strichcodeleser (für ausgewählte Modelle)
Durch die Verwendung des Strichcodelesers wird Ihr Gerät in der Lage sein, die im Strichcode
enthaltenen Informationen zu lesen.
1. Tippen Sie auf
Anwendung auf Ihrem Gerät zu starten.
2. Positionieren Sie das Gerät in der Nähe des Strichcodes (ca.
5~10 cm), und richten Sie den Strichcodeleser-Sensor auf den
Strichcode.
3. Tippen Sie auf die “Scan”-Taste der Anwendung, um das
Scannen zu beginnen. Halten Sie das Gerät gerade, um den
Strichcode innerhalb der Sensorabdeckung zu halten, bis die
Informationen auf dem Bildschirm angezeigt werden.
4. Die LED-Anzeige blinkt ein Mal, um den Scanstatus anzuzeigen:
Grün – erfolgreicher Scan.
Rot – Scan fehlgeschlagen. Bitte versuchen Sie es erneut.
5. Um den Strichcodeleser zu konfigurieren, tippen Sie auf
BCR Settings.
> BCR Reader, um die Strichcodeleser-
>
de
17

de
19
Weiterführende Informationen
Kundendienst
Wenden Sie sich zur Inanspruchnahme des Kundendienstes an Ihre IT-Abteilung oder Ihren örtlichen
autorisierten Händler.
Gelegentlich bietet MiTAC kostenlose Systemaktualisierungen zur Steigerung der Benutzererfahrung.
Bitte besuchen Sie regelmäßig http://miowork.mio.com/ für weitere Informationen.
IP54
IEC 60529/IP54 ist ein europäisches System von Testspezifikationsstandards zur Klassifizierung des
vom Gehäuse des Elektrogerätes bereitgestellten Schutzgrades. Eine IP54-Kennzeichnung bedeutet,
dass das Gerät staubgeschützt (das Eindringen von Staub wird nicht vollständig verhindert; Staub darf
jedoch nicht in übermäßiger Menge eindringen, dass der reibungslose Gerätebetrieb beeinträchtigt
wird; vollständiger Schutz gegen Kontakt) und bis zu 5 Minuten gegen Wasserspritzer (Wassermenge: 10
Liter pro Minute, Druck: 80 bis 100 kPa) geschützt ist. MiTAC garantiert diesen Grad, sofern Akkuklappe
und alle Anschlussabdeckungen richtig und fest verschlossen sind. Dieses Gerät erfüllt nicht IPX7/IPX8;
Eintauchen in Wasser oder Wasserdruck wie beim Abwaschen des Gerätes unter fließendem Wasser
können das Gerät beschädigen und Garantie könnte ungültig werden.
Hinweise zur Einhaltung von Vorgaben (CE)
2200
Hinweis: Zum Zwecke der Identifizierung ist Ihrem Gerät die Modellnummer N435 zugeordnet.
Hiermit erklärt die MiTAC Europe Ltd, dass dieser N435 mit den wesentlichen Anforderungen und
sonstigen Vorgaben der Richtlinie 1999/5/EG übereinstimmt.
Dieses Gerät entspricht der R&TTE-Richtlinie (1999/5/EG), der EMV-Richtlinie (2004/108/EG) und
der Niederspannungsrichtlinie (2006/95/EG) der Kommission der Europäischen Gemeinschaft. - der
Kommission der Europäischen Gemeinschaft. Die Übereinstimmung mit diesen Richtlinien impliziert die
Konformität mit den folgenden europäischen Normen:
EN 301 489-1: Elektromagnetische Verträglichkeit und Funkspektrumangelegenheiten (ERM),
Elektromagnetische Verträglichkeit für Funkeinrichtungen und -dienste (EMC); Teil 1: Herkömmliche
technische Anforderungen.
EN 301 489-3: Elektromagnetische Verträglichkeit und Funkspektrumangelegenheiten (ERM);
Elektromagnetische Verträglichkeit (EMC) Standard für Funkausrüstung und Dienstleistungen; Teil 3:
Spezifische Bedingungen für Geräte mit geringer Reichweite (SRD) Betrieb auf Frequenzen zwischen 9
kHz und 246 GHz.
EN 301 489-17: Elektromagnetische Verträglichkeit und Funkspektrumangelegenheiten (ERM),
Elektromagnetische Verträglichkeit für Funkeinrichtungen und -dienste (EMC); Teil 17: Spezifische
Bedingungen für 2,4-GHz-Breitband-Übertragungssysteme und leistungsstarke 5-GHz-RLAN-Geräte.
18
EN 300 328: Elektromagnetische Verträglichkeit und Funkspektrumangelegenheiten (ERM); BreitbandÜbertragungssysteme; Datenübertragungsgeräte, die im 2,4-GHz-ISM-Band arbeiten und BreitbandModulationstechniken verwenden; Harmonisierte EN, die wesentliche Anforderungen nach Artikel 3.2
der R&TTE-Richtlinie enthält.
EN 301 893: Breitband-Funkzugangsnetze (BRAN); 5-GHz-Hochleistungs RLAN; Harmonisierte EN, die
wesentliche Anforderungen nach Artikel 3.2 der R&TTE-Richtlinie enthält
EN 300 440: Elektromagnetische Verträglichkeit und Funkspektrumsangelegenheiten (ERM);
Funkgeräte geringer Reichweite; Funkeinrichtungen für den Einsatz im Frequenzbereich von 1 GHz bis
40 GHz; Teil 2: Harmonisierte EN, die wesentliche Anforderungen nach Artikel 3.2 der R&TTE-Richtlinie
enthält
EN 302 291-1: Elektromagnetische Verträglichkeit und Funkspektrumangelegenheiten (ERM);
Funkanlagen mit geringer Reichweite (SRD); Induktive Datenkommunikationsgeräte für den Nahbereich
zum Betrieb bei 13,56 MHz; Teil 1: Technische Eigenschaften und Prüfverfahren
EN 302 291-2: Elektromagnetische Verträglichkeit und Funkspektrumangelegenheiten (ERM);
Funkanlagen mit geringer Reichweite (SRD); Induktive Datenkommunikationsgeräte für den Nahbereich
zum Betrieb bei 13,56 MHz – Teil 2: Harmonisierte EN nach Artikel 3.2 der R&TTE-Richtlinie
EN 50566: Produktnorm zur Konformitätsüberprüfung von Hochfrequenzfelder von Hand- und am
Körper tragbaren von der breiten Öffentlichkeit verwendeten drahtlosen Kommunikationsgeräten (30
MHz – 6 GHz)
EN 62209-2: Exposition von Personen gegenüber Hochfrequenzfelder von Hand- und am Körper
tragbaren drahtlosen Kommunikationsgeräten — Menschmodelle, Instrumente und Vorgehensweisen
EN 62479: Prüfung der Vereinbarkeit von elektronischen und elektrischen Geräten kleiner Leistung mit
den Basisgrenzwerten für die Exposition des Menschen gegenüber elektromagnetischen Feldern (10 MHz
– 300 GHz)
EN 60601: Medizinische elektrische Geräte – Teil 1-2: Allgemeine Festlegungen für die Sicherheit
einschließlich der wesentlichen Leistungsmerkmale – Ergänzungsnorm: Elektro- magnetische
Verträglichkeit – Anforderungen und Prü fungen
EN 50332: Anhaltendes Anhören von Musik bei maximaler Lautstärke kann die Ohren schädigen.
EN 55022: Funkstörungscharakteristika
EN 55024: Immunitätscharakteristika
EN 61000-3-2: Grenzwerte hinsichtlich harmonischer Emissionen
EN 61000-3-3: Begrenzung von Spannungsänderungen, Spannungsschwankungen und Flicker in
Niederspannungs-Versorgungsnetzen
IEC 60950-1/A1:2009: Produktsicherheit
Für MioWORK A300-serie:
EN 301 489-7: Elektromagnetische Verträglichkeit und Funkspektrumsangelegenheiten (ERM);
Elektromagnetische Verträglichkeit (EMC) für Funkeinrichtungen und -dienste; Teil 7: Spezifische
Bedingungen für mobile und transportable Funk- und Zusatz-/Hilfseinrichtungen digitaler zellularer
Funk-Telekommunikationssysteme (GSM und DCS)
de
19
de
EN 301 489-24: Elektromagnetische Verträglichkeit und Funkspektrumsangelegenheiten (ERM);
Elektromagnetische Verträglichkeit für Funkeinrichtungen und -dienste; Teil 24: Spezielle Anforderungen
für IMT-2000 CDMA Direct Spread (UTRA und E-UTRA) für mobile und portable (UE) Funkgeräte und
Zusatzeinrichtungen
EN 301 908-1: IMT zellulare Funknetze; Harmonisierte EN, die wesentliche Anforderungen nach Artikel
3.2 der R&TTE-Richtlinie enthält; Teil 1: Einführung und allgemeine Bestimmungen
EN 301 908-2: IMT zellulare Funknetze; Harmonisierte EN, die wesentliche Anforderungen nach Artikel
3.2 der R&TTE-Richtlinie enthält; Teil 2: CDMA-Direkt-Spreizspektrum-Einrichtungen (UTRA FDD) für
den Nutzer (UE)
EN 301 511: Globales System für mobile Kommunikation (GSM); Harmonisierter Standard für
Mobiltelefone im GSM 900 und GSM 1 800 Band zur Erfüllung der minimalen Anforderungen von Artikel
3.2 der R&TTE- Richtlinie (1999/5/EU-Kommission)
Dieses Gerät wurde getestet und und in Übereinstimmung mit Grenzwerten für Schalldruck gemäß der
Norm EN 50332-2 befunden worden. Bei Verwendung der Ohr- oder Kopfhörer in zu hoher Lautstärke
kann es zu einer dauerhaften Schädigung des Gehörs kommen.
Warnhinweis:
Um Gehörschäden zu vermeiden, Hören Sie nicht für längere Zeit bei hoher Lautstärke Musik.
Der Hersteller kann für Modifikationen seitens des Benutzers und die daraus resultierenden
Konsequenzen nicht verantwortlich gemacht werden, die die Konformität des Produkts mit der CEKennzeichnung beeinflussen.
SAR-Informationen
Die Richtlinien zur Funkwellenbelastung verwenden eine Messeinheit, die als spezifische Absorptionsrate
(SAR) bekannt ist; sie setzt das Limit von 2 W/kg fest, gemittelt über zehn (10) Gramm Gewebe. Ihr
Gerät wurde so entwickelt, dass es mit geltenden Sicherheitsanforderungen zur Funkwellenbelastung
übereinstimmt.
SAR ≦ 0.96 W/kg
Bluetooth
Bluetooth DID D021801
WEEE
Gemäß der EG-Richtlinie für Elektro- und Elektronikaltgeräte (WEEE – 2002/96/EC) darf
dieses Produkt nicht zusammen mit dem normalem Hausmüll entsorgt werden. Stattdessen
muss es durch Rückgabe an die Verkaufsstelle oder an einer Sammelstelle für Altgeräte von der
Gemeinde entsorgt werden.
20

Bienvenido
Gracias por adquirir un producto MioWORK. Esta Guía rápida le acompañará a través del proceso de
instalación de su dispositivo y le ayudará a familiarizarse con las funciones básicas del dispositivo.
Familiarizarse con el dispositivo
2
1
16
1
17
2
18
19
10
12
11
* Solo deterinados modelos.
4
3
6
9
13
14
15
5
7
1. Indicador LED 1
Estado del lector de códigos
de barras
2. Indicador LED 2
8
Estado de carga de la
batería: verde/rojo
3. Lector de código de
barras*
4. Botón ENCENDIDO/
APAGADO
5. Sensor NFC
(Comunicación de campo
cercano)
6. Altavoces
7. Cámara trasera
8. Flash
9. Cámara delantera
10. Micrófono
11. Conector HD
12. Puerto mini-USB
13. Conector de base
14. Conector de auricular
15. Soporte del cordón
16. Ranura de la tarjeta
Micro SIM*
17.
Botón para subir el
volumen / Botón de lectura
de código de barras*
18. Botón para bajar el
volumen / Programable
Botón de aplicación
19. Ranura de la tarjeta de
memoria
*: verde/rojo
es
21
es
23
Procedimientos iniciales
Cargar la batería
Cuando cargue la batería por primera vez, deberá cargarla duramente al menos 8 horas (utilizando el
cargador de CA) con el dispositivo apagado. Para cargar la batería, conecte el cable del cargador de
inicio en el puerto mini-USB ubicado en la parte inferior de su dispositivo y el cargador de la fuente de
alimentación en el enchufe*.
El indicador LED parpadeará en rojo mientras la potencia de la batería sea inferior al 15%. Durante la
carga, el indicador LED del dispositivo se iluminará para indicar el estado de carga de la batería:
verde – batería llena; rojo – batería cargándose.
ATENCIÓN! Para un rendimiento óptimo de la batería, observe las siguientes medid
• No recargue la batería cuando la temperatura sea alta (por ejemplo, con luz solar directa). La
batería detendrá la carga cuando la temperatura ambiente sea inferior a -10ºC (14ºF) o superior a
60ºC (140ºF).
• Recargue la batería cuando esté prácticamente descargada. Cuando realice la recarga, asegúrese
de que la batería se cargue por completo. De esta forma podrá prolongar el período de vida útil de
la batería.
• Si no va a utilizar el producto durante un prolongado período de tiempo (más de un mes) u
observa que el tiempo de descarga y recarga se ha reducido, asegúrese de descargar primero
completamente la batería antes de volverla a cargar. También es aconsejable descargar y recargar
completamente la batería una vez cada 1 o 2 meses.
• Si no sigue las instrucciones de uso de la batería, se pueden producir daños en el dispositivo y en la
batería, así como lesiones personales o daños materiales. Además, la garantía quedaría invalidada.
* El tipo de enchufe varía en función de la región de compra.
22
Instalación de la tarjeta de memoria y la tarjeta SIM
1. Abra la carcasa ubicada en el lateral izquierdo del dispositivo para localizar la
ranura de la tarjeta Micro SIM* (a) y la ranura de la tarjetea MicroSD (b).
2. Siga estas instrucciones para instalar las tarjetas (no suministradas).
3. Sustituya la carcasa y asegúrese de que está debidamente cerrada.
* Solo deterinados modelos.
Notas:
• El dispositivo admite tarjetas de memoria MicroSD de hasta 64 GB. Sin
embargo, no se garantiza la compatibilidad del dispositivo con tarjetas de
memoria de todos los fabricantes.
• Cuando instale una tarjeta, no ejerza presión en el centro de la misma. No
utilice el dedo ni ningún objeto metálico para tocar ni arañar la parte de
contacto de la tarjeta.
• Para extraer una tarjeta, empuje suavemente el extremo superior de la tarjeta
hacia adentro para liberarla, y a continuación extráigala de la ranura.
Conexión del dispositivo a un ordenador
Conecte el extremo Mini-USB del cable USB a
su dispositivo (
USB de su equipo (
transferir los archivos entre su PC y el dispositivo
fácilmente a través de MTP*.
* MTP (Media Transfer Protocol, es decir, Protocolo de transferencia multimedia) permite transferir
archivos multimedia (archivos de música, imágenes y otros tipos de archivo) automáticamente a
dispositivos portátiles y desde estos. Sin embargo, en el caso de Windows XP, es necesario instalar
Windows XP Service Pack 3 y el Reproductor de Windows Media 10 (o superior).
1
) y el otro extremo a un puerto
2
). Una vez conectada, podrá
es
a.
b.
23
es
25
Principios básicos de funcionamiento
Utilizar el botón de ENCENDIDO/APAGADO
• Encender el dispositivo
Mantenga pulsado el botón de ENCENDIDO
hasta que se encienda el dispositivo. Después
de la pantalla de arranque, aparecerá
la pantalla de Inicio y el dispositivo se
encontrará en el modo de bloqueo de forma
predeterminada.
Arrastre el icono del candado (
dispositivo.
• Modo de Suspensión
El dispositivo entrará en el modo de Suspensión automáticamente si permanece inactivo durante
1 minuto (valor predeterminado). También puede cambiar al modo de Suspensión manualmente
presionando el botón de ALIMENTACIÓN brevemente. Para cancelar el modo de Suspensión para
que el dispositivo acceda al modo normal, presione brevemente el botón de ALIMENTACIÓN.
• Modo Avión
Si va en avión o se encuentra en la zona de prohibición de comunicaciones de radio inalámbricas,
habilite el modo Avión. Muchas de las aplicaciones de sus dispositivos continuarán funcionando
(p.ej. juegos o música) pero todas las comunicaciones de radio inalámbricas, incluyendo la red
inalámbrica y la función Bluetooth, del dispositivo se apagarán, impidiéndole enviar o recibir
datos.
Para entrar en el modo Avión, mantenga presionado el botón de ALIMENTACIÓN y seleccione
Modo Avión en el menú de opciones.
• Para reiniciar o apagar el dispositivo
Mantenga presionado el botón de ALIMENTACIÓN y seleccione Reiniciar / Apagar en el menú de
opciones.
• Para apagar el dispositivo manualmente
Mantenga presionado el botón de ALIMENTACIÓN durante 5 segundos.
> ) para desbloquear el sistema. Ahora podrá utilizar su
24

Navegación por la pantalla
Para poner en marcha su dispositivo, toque la pantalla con la yema del dedo. Las acciones que puede
realizar son las siguientes:
• Tocar: Toque la pantalla una vez con la yema del dedo para abrir elementos o seleccionar botones
u opciones de la pantalla.
• Tocar y mantener: Toque y mantenga el elemento deseado para abrir el menú emergente que
contiene las opciones disponibles para ese elemento.
• Arrastrar: Toque y mantenga el elemento y, a continuación, muévalo a la posición de destino sin
levantar la yema del dedo.
• Deslizar: Arrastre a izquierda/derecha (o arriba/abajo) para pasar al elemento siguiente/anterior
de la lista.
• Acercar o alejar: Mueva las yemas de los dedos separándolas o juntándolas sobre la pantalla para
acercar o alejar una imagen o página web.
• Girar la pantalla: Para la mayoría de las aplicaciones, el dispositivo ofrece la posibilidad de
cambiar automáticamente la orientación de la pantalla (de retrato a paisaje y viceversa) girando
el dispositivo lateralmente.
es
25
es
27
Pantalla de Inicio
La pantalla Inicio es el punto de partido para sus tareas, ofreciendo acceso rápido a las aplicaciones y
ajustes usados con más frecuencia.
Barra de estado
Accesos directos/widgets
Escritorio
Todas las aplicaciones
Iniciador rápido
Teclas programables:
ATRÁS / INICIO / APLICACIONES RECIENTES
Sugerencia: Para mostrar la página de inicio, toque el botón INICIO en cualquier momento.
Personalización de su dispositivo
Puede personalizar el dispositivo a través del menú Configuración, incluyendo la personalización de la
pantalla Inicio, cambiando la configuración de visualización y sonido, configurando los parámetros de
conexión y muchas cosas más. Desde el escritorio, siga una de las siguientes opciones para acceder al
menú Configuración:
• Toque el botón Todas las aplicaciones (
• Toque
en el Iniciador Rápido.
) > Ajustes.
26

Uso del lector de código de barras (solo en modelos determinados)
Cuando utilice el lector de código de barras, su dispositivo podrá leer la información contenida en un
código de barras.
1. Toque
del código de barras en su dispositivo.
2. Coloque su dispositivo cerca del código de barras
(aproximadamente a 5 – 10 cm) y dirija el sensor del lector al
código de barras.
3. Toque el botón “Scan” de la aplicación para iniciar el
escaneado. Mientras tanto, mantenga firme su dispositivo
para que el código esté dentro del rango del sensor hasta que
aparezca la información en la pantalla.
4. El indicador LED parpadea una vez para indicar el estado del
escaneado:
5. Para configurar el lector del código de barras, toque
BCR Settings.
> BCR Reader para ejecutar la aplicación del lector
Verde – Escaneado realizado correctamente.
Rojo – Fallo en el escaneado. Inténtelo de nuevo.
>
es
27

es
29
Si desea obtener más información
Asistencia técnica
Para la primera solicitud de asistencia técnica, póngase en contacto con su departamento de IT o su
distribuidor local autorizado.
De vez en cuando, MiTAC puede ofrecer actualizaciones gratuitas de sistema para mejorar la
experiencia del usuario. Por favor visite regularmente la http://miowork.mio.com/ pagina para mas
información.
IP54
IEC 60529/IP54 es un sistema europeo de estándares de especificación de prueba para clasificar el
grado de protección proporcionado por las carcasas de equipos eléctricos. La designación IP54 indica
que la unidad está protegida contra el polvo (no evita totalmente la entrada de polvo, pero debe evitar
que entre la cantidad suficiente como para afectar al funcionamiento correcto del equipo; protección
completa contra contacto) y las salpicaduras de agua hasta 5 minutos (volumen de agua: 10 litros por
minuto; presión: 80-100kPa). MiTAC garantiza esta categoría siempre que la tapa de la batería y todas
las tapas de los conectores estén cerradas correctamente y de forma segura. Este dispositivo no tiene
el grado de protección IPX8; la inmersión en agua o una presión de agua similar a la que se ejerce en la
unidad al lavarla con agua corriente puede dañar dicha unidad y anular la garantía.
Información sobre normativas (CE)
2200
Nota: Por motivos de identificación regulatoria, su dispositivo tiene asignado el número de modelo N435.
Por la siguiente, MiTAC declara que este N435 cumple los requisitos esenciales u otras provisiones
relevantes de la Directiva 1999/5/EC.
Este dispositivo cumple con la Directiva R&TTE (1999/5/EC), la directiva EMC (2004/108/EC) y
la Directiva de Bajo Voltaje (2006/95/EC) emitidas por la Comisión de la Comunidad Europea. El
cumplimiento de estas directivas implica la conformidad de los siguientes estándares europeos:
EN 301 489-1: Cuestiones de Compatibilidad Electrónica (ERM) y espectro de radio, Estándar de
Compatibilidad Electromagnética (EMC) para equipos y servicios de radio; Parte 1: Requisitos técnicos
habituales.
EN 301 489-3: Cuestiones de compatibilidad electromagnética y Espectro de Radiofrecuencia
(ERM). Norma de compatibilidad electromagnética (EMC) para equipos de radio y servicios. Parte 3:
Condiciones específicas para dispositivos de corto alcance (SRD) que funcionan en frecuencias entre
9 kHz y 246 GHz.
EN 301 489-17: Cuestiones de Compatibilidad Electromagnética y espectro de radio (ERM), Estándar
de Compatibilidad Electromagnética (EMC) para equipos y servicios de radio; Parte 17: Condiciones
específicas para sistemas de transmisión de banda ancha de 2,4 GHz y equipos RLAN de alto
rendimiento de 5 GHz.
28

EN 300 328: Cuestiones de Compatibilidad Electromagnética y espectro de radio (ERM); Sistemas de
Transmisión en Banda Ancha; Equipos de transmisión de datos que funcionan en la banda ISM de 2,4
GHz y utilizan técnicas de modulación de espectro disperso; EN harmonizado en cumplimiento de los
requisitos esenciales del artículo 3.2 de la Directiva R&TTE
EN 301 893: Redes de acceso por radio de banda ancha (BRAN). RLAN de alto rendimiento en 5 GHz.
Norma EN armonizada que cubre los requisitos esenciales del artículo 3.2 de la Directiva R&TTE
EN 300 440: Cuestiones de Compatibilidad Electromagnética y Espectro de Radiofrecuencia (ERM);
Dispositivos de corto alcance; Equipos de radiofrecuencia que funcionan en frecuencias entre 1 GHz
y 40 GHz. Parte 2: Norma EN armonizada que cubre los requisitos esenciales del artículo 3.2 de la
Directiva RTTE
EN 302 291-1: Cuestiones de Compatibilidad Electromagnética y Espectro de Radiofrecuencia (ERM).
Dispositivos de corto alcance (SRD). Equipo inductivo de comunicación de datos de corto alcance que
opera a 13,56 MHz. Parte 1: Características técnicas y métodos de prueba
EN 302 291-2: Cuestiones de Compatibilidad Electromagnética y Espectro de Radiofrecuencia (ERM).
Dispositivos de corto alcance (SRD). Equipo inductivo de comunicación de datos de corto alcance que
opera a 13,56 MHz. Parte 2: Norma EN armonizada que cubre los requisitos esenciales del artículo 3.2
de la Directiva RTTE
EN 50566: Norma de producto para demostrar la conformidad de los campos de radiofrecuencia de
los dispositivos de comunicación inalámbricos de mano o usados cerca del cuerpo utilizados por el
público general (30 MHz - 6 GHz).
EN 62209-2: Exposición de las personas a los campos de radiofrecuencia de los dispositivos de
comunicación inalámbricos de mano o usados cerca del cuerpo – modelos humanos, instrumentación
y procedimientos
EN 62479: Evaluación de la conformidad de los aparatos eléctricos y electrónicos de baja potencia
con las restricciones básicas para la exposición humana a los campos electromagnéticos (10 MHz 300 GHz)
EN 60601: Equipamiento eléctrico médico – Parte 1-2: requisitos generales para la seguridad básica y
el rendimiento esencial – Estándar colateral: compatibilidad electromagnética – requisitos y pruebas
EN50332: Escuchar música al nivel máximo de volumen durante periodos prolongados de tiempo
podría provocar lesiones auditivas.
EN 55022: Características de las perturbaciones radioeléctricas
EN 55024: Características de inmunidad
EN 61000-3-2: Límites para emisiones de corriente harmónica
EN 61000-3-3: Limitación de la fluctuación de voltaje en sistemas de bajo voltaje.
IEC 60950-1/A1:2009: Seguridad del Producto
Para el MioWORK serie A300:
EN 301 489-7: Cuestiones de compatibilidad electromagnética y Espectro de Radiofrecuencia (ERM).
Norma de compatibilidad electromagnética (CEM) para equipos y servicios radioeléctricos. Parte 7:
es
29
 Loading...