

Table of Contents
Introduction
Intended use ........................................................................................................................................Page 4
Description of parts and features .......................................................................................................Page 4
Supply Scope ......................................................................................................................................Page 4
Technical data .....................................................................................................................................Page 4
Safety information
Battery Safety Instructions ...................................................................................................................Page 5
Assembly
Inserting and replacing batteries .......................................................................................................Page 6
Creating the electrical connection .....................................................................................................Page 6
Fastening the battery box in place (see Fig. E) .................................................................................Page 6
Cleaning and Care ................................................................................................................... Page 7
Troubleshooting ........................................................................................................................Page 7
Service ...............................................................................................................................................Page 7
Disposal ............................................................................................................................................Page 7
3 GB
53896_mio_LED-Toilettensitz_content_LB4.indd 3 17.05.11 08:23
Introduction
Toilet Seat
Introduction
Please familiarise yourself with the product
prior to assembly. Carefully read the
following assembly instructions and safety
tips. Only use the unit as described and for the
specified applications. Store these instructions in
a safe place. If passing this product on to a third
party also include all documents.
Intended use
This toilet seat is intended for installation on standard
commercially available toilets. Any use other than
the aforementioned or any product modification is
prohibited and can lead to injuries and / or product
damage. The manufacturer is not liable for any
damages caused by any use other than its intended
purpose. This product is not intended for commercial
use.
Description of parts
and features
1
Hinge with threaded rod
2
Sealing cone washer
3
Metal washer
4
Plastic washer
5
Plastic nut
6
Metal nut
7
Wings for nut (tightening aid)
8
Toilet seat
9
Silicone cap
10
Battery box
11
Pile and loop fastening strip
12
Plug
13
ON / OFF switch
Supply Scope
Please check immediately on unpacking that the
delivery is complete and that the product and all
parts are in perfect condition. Do not under any
circumstances assemble the product if the delivery
is incomplete.
2 Hinges with threaded rod
2 Sealing cone washers
2 Metal washers
2 Plastic washers
2 Plastic nuts
2 Metal nuts
1 Wings for nut
1 Toilet seat
1 Silicone cap
1 Battery box
1 Pile and loop fastening strip
2 1.5 V
3 1.5 V
AA batteries (Model Z30397A)
AA batteries (Model Z30397B)
1 Assembly instructions
Technical data
Dimensions: approx. 36 x 5.5 x 42 cm
(W x H x D)
Operating voltage: 3 V (Model Z30397A)
4.5 V (Model Z30397B)
Battery: 2 x 1.5 V
, AA
(Model Z30397A)
3 x 1.5 V
, AA
(Model Z30397B)
LED: 10 x 0.03 A (Model Z30397A)
10 x 0.03 A (Model Z30397B)
Protection class: IP44 (spray water protected)
Maximum
load capacity: 150 kg
Model Z30397A: red LEDs
Model Z30397B: blue LEDs
Material
Toilet seat: Polyresin
Hinges: Stainless steel
4 GB
53896_mio_LED-Toilettensitz_content_LB4.indd 4 17.05.11 08:23
Introduction / Safety information
Sealing washers: Plastic
Fixings: Plastic / stainless steel
Safety information
PLEASE READ THE INSTALLATION INSTRUCTIONS BEFORE USE! PLEASE KEEP THE INSTALLATION INSTRUCTIONS IN A SAFE PLACE!
RISK OF
LIFE AND ACCIDENTS FOR
INFANTS AND CHILDREN!
Never leave children unattended with the
packaging material. Risk of suffocation. Keep
children away from the product.
CAUTION! RISK OF INJURY! Ensure all
parts are undamaged and correctly assembled.
Incorrect assembly poses the risk of injury.
Damaged parts may affect safety and function.
Do not stand on the toilet seat. It could break
apart, resulting in injury.
Do not allow the product to fall during installa-
tion. It could be damaged.
Ensure that all connections are firmly connected
and check all connection points for stability.
150 kg
result in injury and / or damage to the product.
Children or other individuals who do not know
or have no experience of handling this device,
or whose physical, sensory or mental abilities
are restricted, must not use the device without
supervision or instruction by an individual
responsible for their safety. Children must be
supervised in order to ensure that they do not
play with the device.
The supply cord cannot be replaced. If the
cord is damaged the appliance should be
scrapped.
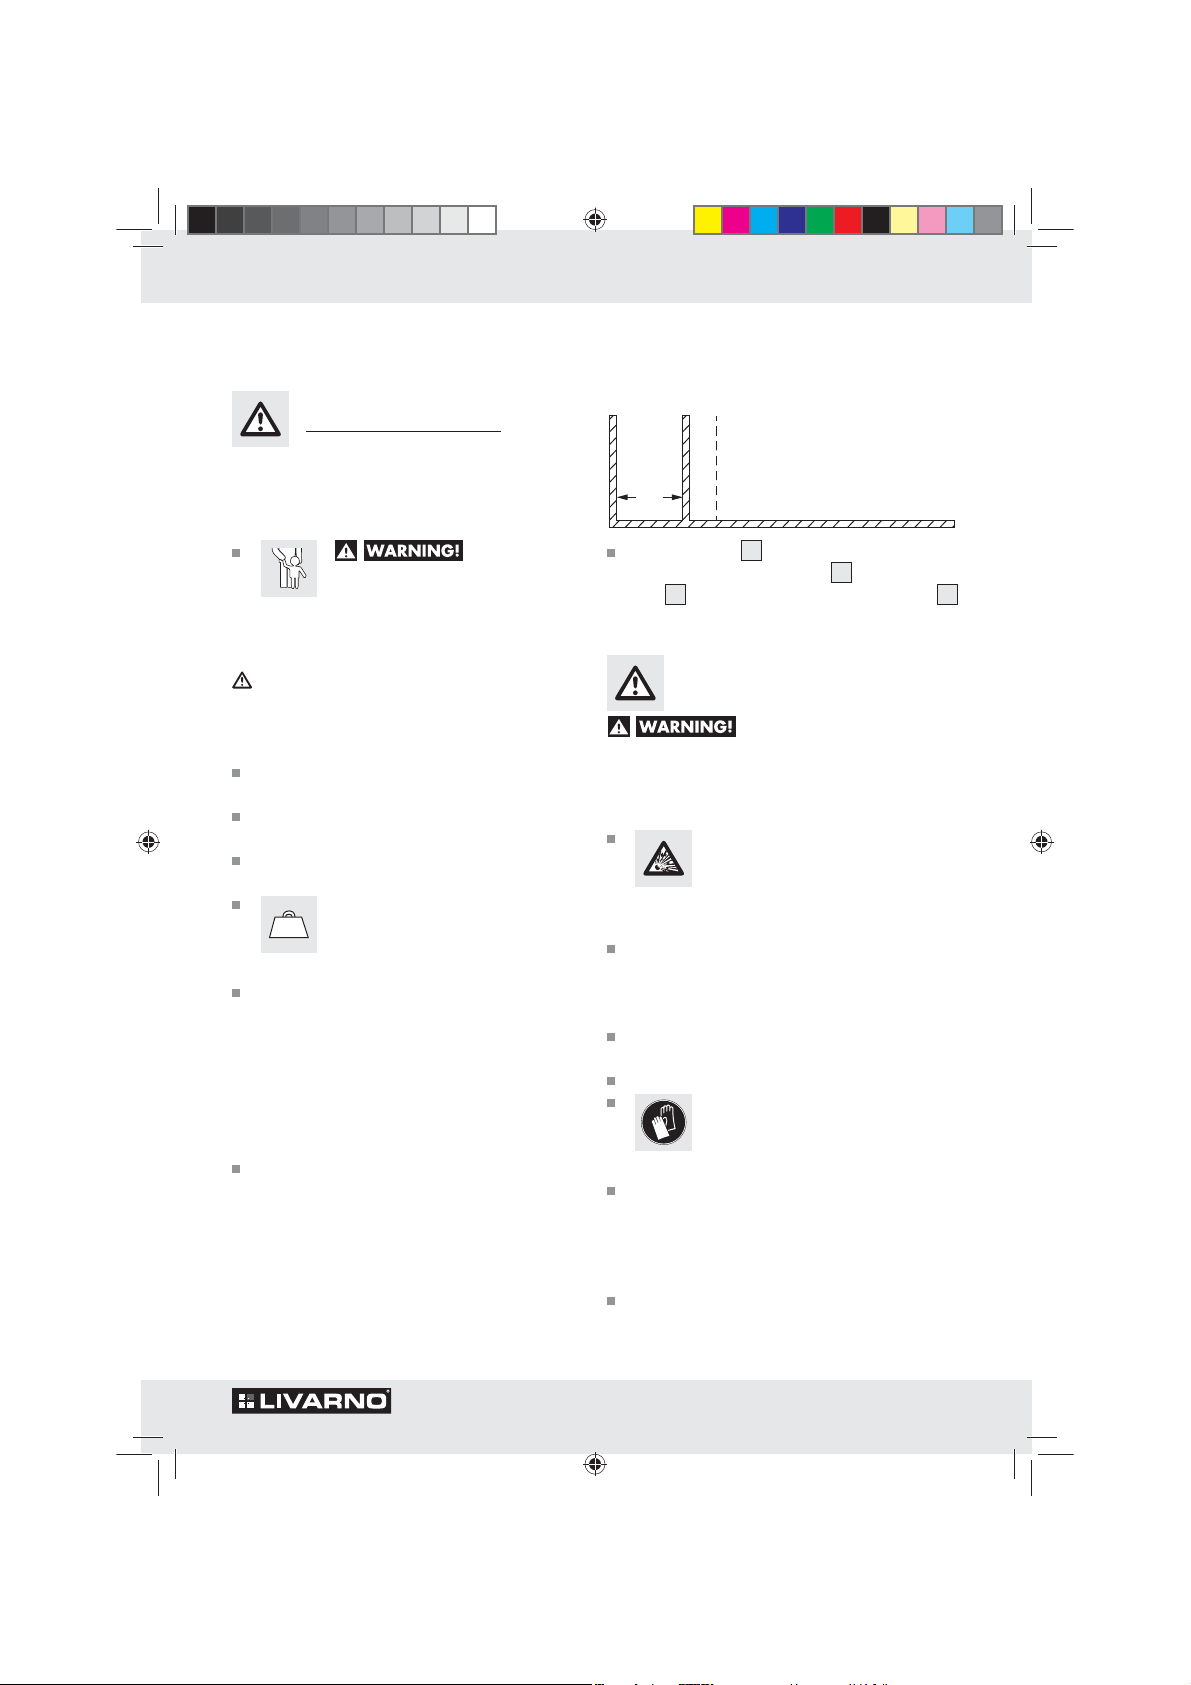
Do not exceed the maximum permitted load (150 kg) on the WC seat.
Failure to observe this advice may
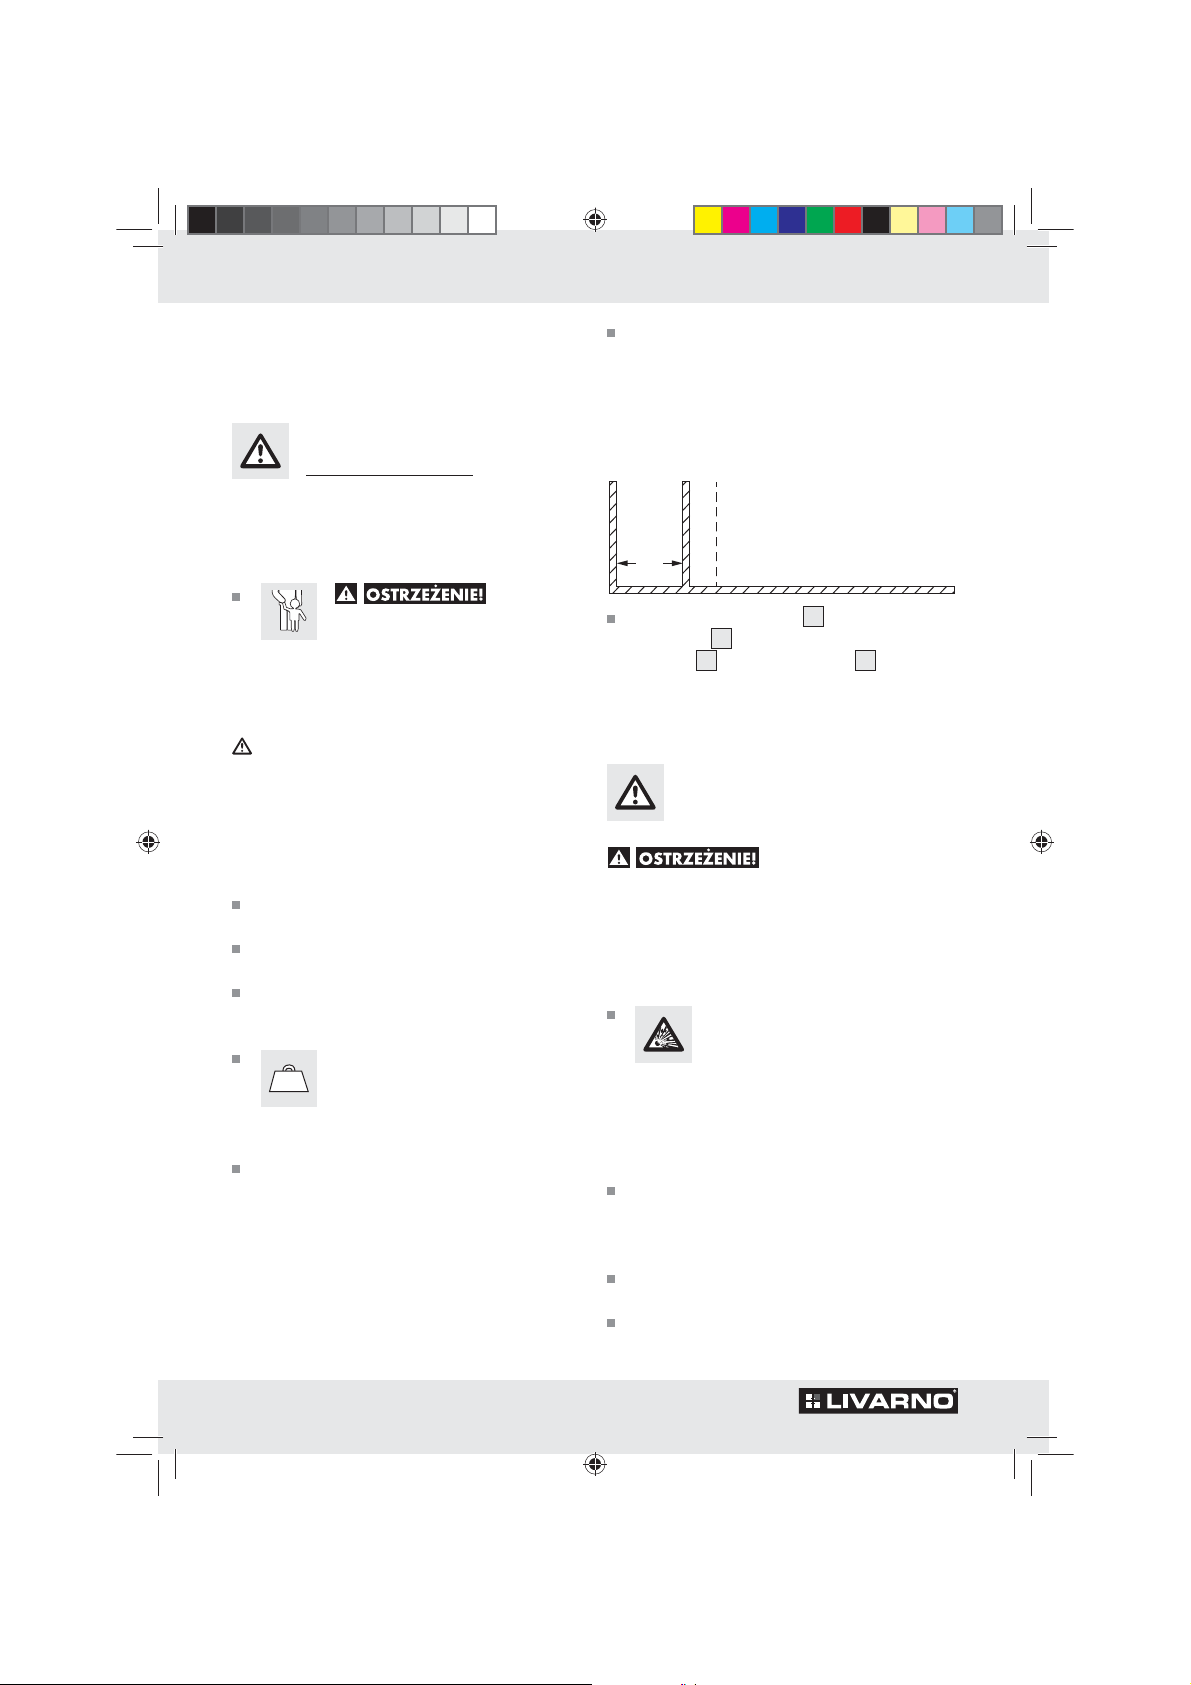
Attention! The toilet seat should not be
installed on zone 1 of the shower area.
Zone 1 Zone 2 Zone 3
Shower
area
0,60 m
The silicon cap 9 should be inserted into the
toilet seat when the DC jack
10
box
is removed. Otherwise, the toilet seat 8
12
of the battery
is not spraywater protected.
Battery Safety Instructions
DANGER TO LIFE! Keep
batteries out of the reach of children. Do not
leave batteries lying around. There is a risk of
children or animals swallowing them. Consult a
doctor immediately if a battery is swallowed.
EXPLOSION HAZARD! Never
recharge, short-circuit and / or open
batteries. This can cause them to
overheat, burn or burst. Never throw batteries
into fire or water. The batteries may explode.
Remove exhausted or old batteries from the
product immediately. Otherwise there is an
increased risk of leakage. Battery fluids can
damage the product.
Always replace all the batteries at once with
batteries of the same type.
Check the batteries at regular intervals for leaks.
Leaked or damaged batteries can
cause chemical burns if they come
into contact with the skin; in such
cases you must wear suitable protective gloves.
Avoid contact with the skin, eyes and mucous
membranes if fluid has leaked from the battery.
In the event of contact with battery acid, rinse
the affected area with plenty of clean water
and consult a doctor immediately.
Remove the batteries from the product if it is
not in use for any length of time.
5 GB
53896_mio_LED-Toilettensitz_content_LB4.indd 5 17.05.11 08:23
Safety information / Assembly
Make sure that the polarity is correct when you
insert the batteries. This is indicated in the battery compartment. The batteries can otherwise
explode.
Clean any light dirt deposits on the contacts of
the batteries or on the contacts of the product
with a dry, fluff-free cloth before insertion.
Please do not dispose of used batteries in your
household waste but take them to a designated
collection depot for special waste.
Assembly
Note: Before first use, please remove the protective
foil between the toilet lid and seat.
Remove the hinges 1 from the included pack
and insert them into the connection fittings on
the toilet seat
8
(see Fig. A).
Fit the plastic washers 4 over the threaded
rods of the hinges
1
(see Fig. A).
Place the toilet seat 8 on to the toilet bowl.
Guide the threaded rods of the hinges
1
through the openings at the back of the toilet
bowl (see Fig. B).
You can adjust the position of the toilet seat 8
by moving the threaded rods of the hinges
1
backwards and forwards inside the openings.
Press the fastening caps of the hinges over the
plastic washers
8
seat
over the threaded rods of the hinges
fix them in place with the plastic nuts
fit the metal washers
rods of the hinges
with the metal nuts
7
nuts
4
to fix the position of the toilet
. Now fit the sealing cone washers 2
1
and
5
. Now
3
over the threaded
1
and fix them in place
6
. Use the wings for the
as a tightening aid.
Inserting and replacing
batteries
Before first use, open the battery box 10 using
a Phillips screwdriver (not included).
Insert 2 x 1.5 V AA batteries (Model
Z30397A) or 3 x 1.5 V
Z30397B) into the battery box
AA batteries (Model
10
.
Note: Make sure you fit the batteries the right
way round (polarity). The correct orientation is
shown in the battery box
10
.
Close the battery box 10 and fasten it using
the Phillips screwdriver.
Creating the electrical
connection
Remove the silicone cap 9 and put it away in
a safe place.
Insert the plug 12 of the battery box 10 into
the socket on the toilet seat
8
(see Fig. D).
Check that the plug 12 is securely inserted into
the socket.
Open the lid of the toilet seat 8 and press the
ON / OFF switch
13
on the battery box 10 to
switch on the LED light (see Fig. D).
Close the lid of the toilet seat 8 or press the
ON / OFF switch
13
on the battery box 10
again to switch off the LED light.
Note: Leave the ON / OFF switch
OFF position if you do not wish to use the LED
function.
Fastening the battery box in
place (see Fig. E)
Pull off the protective foil from the back of the
pile and loop fastening strip
strip on to the battery box
Pull the second protective foil from the pile and
loop fastening strip
10
box
in the desired position on the wall or
11
other surface.
Now you can take the battery box 10 off the
wall at anytime by separating the two parts of
pile and loop fastening strip.
Note: Do not use the product for the first
24 hours after installation to allow the adhesive
on the pile and loop fastening strip
achieve its full bond strength. Once fixed in
position, do not pull the pile and loop fastening
strip from the supporting surface. The adhesive
foil could lose its ability to stick.
11
and stick the
10
.
and stick the battery
13
11
in the
to
6 GB
53896_mio_LED-Toilettensitz_content_LB4.indd 6 17.05.11 08:23
Cleaning and Care / Troubleshooting / Service / Disposal
Cleaning and Care
Do not under any circumstances use corrosive
or abrasive cleaning agents. Otherwise the
surface of the product can be damaged.
Use a slightly moist, fluff-free cloth when you
are cleaning or polishing the product.
Before doing any cleaning of the product,
place the silicon cap
toilet seat to prevent water from entering.
Troubleshooting
Note: This product contains sensitive electronic
components. It may therefore malfunction in the
vicinity of devices that emit radio signals. This applies, for example, to mobile telephones, wireless
devices, CB radios, remote control handsets and
microwave ovens.
If an electrostatic charge builds up on the product, it
may cause the product to stop working. If this occurs,
briefly remove the batteries and then reinsert them.
9
into the socket of the
To help protect the environment, please
dispose of the product properly when it
has reached the end of its useful life and
not in the household waste. Information
on collection points and their opening
hours can be obtained from your local
authority.
Defective or used batteries have to be recycled in
line with Directive 2006 / 66 / EC. Return batteries
and / or the device via the recycling facilities provided.
Environmental damage through
incorrect disposal of the batteries!
Pb
Batteries may not be disposed of with the usual domestic waste. They may contain toxic heavy metals
and are subject to hazardous waste treatment rules
and regulations. The chemical symbols for heavy
metals are as follows: Cd = cadmium, Hg= mercury,
Pb = lead. That is why you should dispose of used
batteries at a local collection point.
Service
GB
Service Great Britain
Tel.: 0871 5000 720
(0,10 GBP/Min.)
e-mail: milomex@lidl.gb
IAN 53896
Disposal
The packaging is made entirely of
recyclable materials, which you may
dispose of at local recycling facilities.
Contact your local refuse disposal authority for
more details of how to dispose of your worn-out
product.
EMC
Product Description:
Toilet Seat
Model No.: Z30397A, Z30397B
Version: 04 / 2011
7 GB
53896_mio_LED-Toilettensitz_content_LB4.indd 7 17.05.11 08:23
Spis zawartości
Instrukcja
Użycie zgodne z przeznaczeniem ................................................................................................. Strona 9
Opis części ....................................................................................................................................... Strona 9
Zakres dostawy ................................................................................................................................ Strona 9
Dane techniczne ..............................................................................................................................Strona 9
Wskazówki dot. bezpieczeństwa
Wskazówki bezpie czeństwa związanego z użyciem baterii .......................................................Strona 10
Montaż
Założenie oraz wymiana baterii ..................................................................................................... Strona 11
Stworzenie połączenia elektrycznego ...........................................................................................Strona 11
Zamocowanie skrzynki na baterie (zob. rys. E).............................................................................Strona 11
Czyszczenie oraz pielęgnacja ....................................................................................Strona 12
Rozwiązywanie problemów ......................................................................................Strona 12
Serwis .............................................................................................................................................Strona 12
Usuwanie .....................................................................................................................................Strona 12
8 PL
53896_mio_LED-Toilettensitz_content_LB4.indd 8 17.05.11 08:23
Instrukcja
Deska sedesowa
Instrukcja
Przed rozpoczęciem montażu należy
zapoznać się z produktem. W tym celu
należy uważnie przeczytać instrukcję
montażu i wskazówki dot. bezpieczeństwa. Produkt
używać wyłącznie zgodnie z jego poniżej opisanym
przeznaczeniem. Prosimy o zachowanie instrukcji
io jej dobre przechowywanie. W przypadku
przekazania produktu w ręce osoby trzeciej, prosimy
o przekazanie także wszystkich należących do
produktu instrukcji i innych dokumentów.
Użycie zgodne z
przeznaczeniem
Niniejszy sedes WC (sedes toaletowy) nadaje się
do zamontowania na dostępnych w handlu WC.
Użycie inne niż wyżej opisane lub dokonywanie
zmian produktu nie jest dozwolone i może prowadzić
do jego uszkodzenia. Producent nie ponosi odpowiedzialności za szkody powstałe wskutek użycia
produktu niezgodnego z jego przeznaczeniem.
Produkt nie jest przeznaczony do użytku komercyjnego.
Opis części
1
Zawias z prętem gwintowanym
2
Pierścień uszczelniający
3
Pierścień metalowy
4
Pierścień z tworzywa sztucznego
5
Nakrętka plastykowa
6
Nakrętka metalowa
7
Pomoc do przykręcania nakrętek
8
Deska sedesowa
9
Osłona silikonowa
10
Skrzynka na baterie
11
Taśma przyczepna
12
Wtyczka
13
Przełącznik ON / OFF
Zakres dostawy
Prosimy o sprawdzenie zawartości - bezpośrednio po
rozpakowaniu produktu - pod kątem kompletności i
stanu elementów. Nie należy składać produktu,
jeżeli zawartość opakowania jest niekompletna.
2 zawiasy z prętem gwintowanym
2 pierścienie uszczelniające
2 pierścienie metalowe
2 pierścienie z tworzywa sztucznego
2 nakrętki plastykowe
2 nakrętki metalowe
1 pomoc do przykręcania nakrętek
1 deska sedesowa
1 osłona silikonowa
1 skrzynka na baterie
1 taśma przyczepna
2 baterie 1,5 V
3 baterie 1,5 V
AA (model Z30397A)
AA (model Z30397B)
1 Instrukcja montażu
Dane techniczne
Wymiary: ok. 36 x 5,5 x 42 cm
(szer. x wys. x głęb.)
Napięcie robocze: 3 V (model Z30397A)
4,5 V (model Z30397B)
Baterie: 2 x 1,5 V
, AA
(model Z30397A)
3 x 1,5 V
, AA
(model Z30397B)
LED: 10 x 0,03 A
(model Z30397A)
10 x 0,03 A
(model Z30397B)
Rodzaj ochrony: IP44 (ochrona przed wodą
rozpryskową)
Maksymalne
obciążenie: 150 kg
Model Z30397A: czerwone diody LED
Model Z30397B: niebieskie diody LED
Materiał
Deska sedesowa: Polyresin
Zawias: stal nierdzewna
9 PL
53896_mio_LED-Toilettensitz_content_LB4.indd 9 17.05.11 08:23
Instrukcja / Wskazówki dot. bezpieczeństwa
Pierścienie
uszczelniające: plastyk
Materiał mocujący: plastyk / metal
Wskazówki dot.
bezpieczeństwa
PRZED UŻYCIEM PRZECZYTAĆ INSTRUKCJĘ
OBSŁUGI! PROSIMY O ZACHOWANIE
INSTRUKCJI OBSŁUGI!
NIEBEZPIE-
CZEŃSTWO WYPADKU I
UTRATY ŻYCIA PRZEZ MAŁE
DZIECI! W żadnym wypadku nie pozostawiać
dzieci bez nadzoru w pobliżu opakowania.
Niebezpieczeństwo uduszenia! Produkt przechowywać z dala od dzieci.
UWAGA! NIEBEZPIECZEŃSTWO ZRA-
NIENIA SIĘ! Należy upewnić się, czy wszystkie
elementy są w dobrym stanie i czy zostały
zamontowane prawidłowo. Nieprawidłowy
montaż grozi niebezpieczeństwem zranienia
się. Uszkodzone części mogą wpłynąć negatywnie na bezpieczeństwo i funkcję produktu.
Nie stawaj na sedesie WC. Mógłby on rozłamać
się. Skutkować może to obrażeniami ciała.
Nie pozwól, żeby podczas montażu produkt
spadł. Mógłby on zostać uszkodzony.
Upewnij się, że wszystkie złącza są mocno po-
łączone ze sobą i skontroluj wszystkie miejsca
połączenia pod względem stabilności.
150 kg
pieczeństwo odniesienia obrażeń i / lub
uszkodzenia produktu.
Dzieci oraz osoby, ktόre nie dysponują odpo-
wiednią wiedzą lub doświadczeniem w obchodzeniu się z urządzeniem, lub ktόrych zdolności
fizyczne, sensoryczne lub psychiczne ograniczone są nie powinny obchodzić się z urządzeniem bez nadzoru lub pouczenia osόb
odpowiedzialnych za ich bezpieczeństwo.
Dzieci powinny przebywać pod nadzorem, aby
nie bawiły się z urządzeniem.
Nie obciążać deski sedesowej ciężarem przekraczającym 150 kg. W
przeciwnym razie zachodzi niebez-
Przewód nie może być zastąpiony. Jeżeli jest
uszkodzony, produkt należy wyrzucić.
Uwaga! Produkt nie powinien być umiesz-
czony w obszarze 1 obszaru prysznica.
Obszar 1 Obszar 2 Obszar 3
Obszar
prysz nica
0,60 m
Włóż osłonę silikonową 9 do gniazdka deski
sedesowej
wtyczka
8
, jak tylko usunięta zostanie
12
skrzynki na baterie 10. W przeciwnym razie produkt nie jest chroniony przed
wodą rozpryskową.
Wskazówki bezpieczeństwa związanego z
użyciem baterii
ZAGROŻENIE ŻYCIA!
Baterie nie powinny znaleźć się w rękach
dzieci. Nie należy pozostawiać baterii w miejscu ogólnego dostępu. Istnieje niebezpieczeństwo połknięcia ich przez dzieci lub zwierzęta
domowe. W razie połknięcia należy udać się
natychmiast do lekarza.
NIEBEZPIECZEŃSTWO WYBU-
CHU! Nie należy nigdy ponownie
ładować baterii, nie doprowadzać
do zwiercia i / lub otwierać. Zwarcie biegunów
baterii może doprowadzić do ich przegrzania,
zapalenia lub wylania. Nie należy nigdy wrzucać baterii do ognia lub wody. Baterie mogą
wybuchnąć.
Usuń zużyte lub stare baterie natychmiast z
produktu. W przeciwnym razie istnieje wzmożone ryzyko wycieku. Kwas baterii może
spowodować uszkodzenie produktu.
Wymień zawsze równocześnie wszystkie stare
baterie i użyj jedynie baterii tego samego typu.
Baterię należy regularnie sprawdzać pod
względem wycieku.
10 PL
53896_mio_LED-Toilettensitz_content_LB4.indd 10 17.05.11 08:23
Wskazówki dot. bezpieczeństwa / Montaż
Rozlane lub uszkodzone baterie
mogą zranić skórę; w przypadku
kontaktu z takimi bateriami należy
używać rękawic ochronnych.
W przypadku wylania płynu z baterii należy
unikać kontaktu ze skórą, oczami i śluzówką.
Przy kontakcie z kwasem baterii należy przemyć dotknięte miejsce dużą ilością czystej
wody i natychmiast skontaktować się z lekarzem.
Należy usunąć baterię z produktu w przypadku
jej długotrwałego nie używania.
Podczas zakładania należy zwracać uwagę na
właściwą polaryzację! Jest ona oznakowana
w pojemniku na baterie. W przeciwnym razie
może dojść do eksplozji baterii.
Przed włożeniem należy oczyścić lekko zabru-
dzone styki baterii i produktu suchą, niemechacącą się szmatką.
Nie należy wyrzucać zużytych baterii do do-
mowego śmietnika, lecz w punktach specjalnie
do tego przeznaczonych.
Montaż
Wskazówka: Przed pierwszym zastosowaniem
należy usunąć papier ochronny pomiędzy pokrywą
sedesu, a siedzeniem.
Usuń zawiasy 1 z opakowania i wprowadź
je w króciec połączeniowy deski sedesowej
8
(zob. rys. A).
Nałóż pierścienie z tworzywa sztucznego 4 na
pręty gwintowane zawiasów
1
(zob. rys. A).
Nałóż deskę sedesową 8 na muszlę toaletową.
Poprowadź przy tym pręty gwintowane zawia-
1
sów
przez otwór w tyle muszli toaletowej
(zob. rys. B).
Pozycję deski sedesowej 8 można dostosować,
przemieszczając pręty gwintowane zawiasów
1
tam i spowrotem wewnątrz otworu.
Naciśnij kaptury mocujące zawiasy na
8
. Nałóż
4
, aby
pierścieniach z tworzywa sztucznego
ustalić pozycję deski sedesowej
pierścienie uszczelniające
wane zawiasów
plastykowymi
metalowe
1
5
. Teraz nałóż pierścienie
3
na pręty gwintowane zawiasów
2
na pręty gwinto-
i zamocuj je nakrętkami
1
i zamocuj je nakrętkami metalowymi 6. Użyj
do tego pomocy do przykręcania nakrętek
Założenie oraz wymiana
baterii
Przed pierwszym zastosowaniem otwórz
skrzynkę na baterie
10
za pomocą śrubokręta
krzyżakowego (poza zasięgiem dostawy).
Załóż baterie 2 x 1,5 V AA (model
Z30397A) lub baterie 3 x 1,5 V
AA (mo-
del Z30397B) do skrzynki na baterie
Wskazówka: Należy przy tym przestrzegać
właściwej polaryzacji. Jest ona oznakowana w
skrzynce na baterie
10
.
Zamknij skrzynkę na baterie 10 i zamocuj ją
za pomocą śrubokręta krzyżakowego.
Stworzenie połączenia
elektrycznego
Usuń osłonę silikonową 9 i przechowaj ją
starannie.
Wprowadź wtyczkę 12 skrzynki na baterie 10
do gniazdka w desce sedesowej
8
(zob. rys. D).
Upewnij się, że wtyczka 12 jest bezpiecznie
połączona z gniazdkiem.
Otwórz pokrywę sedesu 8 i naciśnij prze-
łącznik ON / OFF
10
, aby załączyć oświetlenie LED (zob. rys. D).
13
na skrzynce na baterie
Zamknij pokrywę sedesu 8 i naciśnij ponow-
nie przełącznik ON / OFF
10
baterie
, aby ponownie wyłączyć oświetlenie
13
na skrzynce na
LED.
Wskazówka: Przełącznik ON / OFF
należy pozostawić na pozycji „OFF“, gdy nie
korzysta się z funkcji LED.
Zamocowanie skrzynki na
baterie (zob. rys. E)
Ściągnij folię ochronną na odwrotnej stronie
taśmy przyczepnej
na baterie
11
i przyklej ją na skrzynce
10
.
7
.
10
.
13
11 PL
53896_mio_LED-Toilettensitz_content_LB4.indd 11 17.05.11 08:23
... / Czyszczenie oraz pielęgnacja / Rozwiązywanie problemów / Serwis / Usuwanie
Ściągnij teraz drugą folię ochronną z taśmy
przyczepnej
10
na ścianie / miejscu, na którym ma zostać
11
i przyklej skrzynkę na baterie
zamocowana.
Skrzynkę na baterie 10 można w każdej chwili
usunąć z ściany, zwalniając od siebie obydwie
taśmy przyczepne.
Wskazówka: Produkt należy używać dopiero
po 24 godzinach, ponieważ folie przylepne
na taśmie przyczepnej
11
dopiero po upływie
tego czasu osiągają swoją pełną przyczepność.
Po zamocowaniu taśmy przyczepnej, nie należy
jej ponownie ściągać z podłoża. Folie przylepne mogą utracić swoją przyczepność.
Czyszczenie oraz pielęgnacja
W żadnym razie nie wolno używać szorujących
lub żrących detergentów. W przeciwnym razie
materiał produktu może ulec uszkodzeniu.
Do czyszczenia oraz pielęgnacji należy uży-
wać lekko zwilżonej, nie strzępiącej się ścierki.
Przed każdym czyszczeniem należy umieścić
osłonę silikonową
9
w gniazdo deski sedeso-
wej, aby nie wdarła tam wilgoć.
Rozwiązywanie problemów
Wskazówka: Niniejszy produkt wyposażony jest
w wrażliwe, elektroniczne komponenty. W związku
z tym może, jeśli jest w pobliżu urządzenia emitującego sygnały radiowe, wywołać zakłócenia. Dotyczy to na przykład telefonów komórkowych, radia,
radia CB, pilotów oraz kuchenek mikrofalowych.
Naładowanie elektrostatyczne produktu może
doprowadzić do jego zakłócenia. Jeśli to nastąpi,
należy na krótko usunąć baterie i ponownie je
założyć.
Serwis
PL
Serwis Polska
Tel.: 22 397 4996
e-mail: milomex@lidl.pl
IAN 53896
Usuwanie
Opakowanie wykonane jest z
materiałów przyjaznych środowisku,
które można usuwać w miejscowych
punktach przetwarzania materiałów
wtórnych.
Informacje o możliwościach dotyczących wyrzucania
otrzymać można w urzędzie miejskim lub gminnym.
Nie należy wyrzucać zużytego
produktu, w celu ochrony środowiska,
do domowego kosza na śmieci, lecz w
odpowiednio do tego przeznaczonych
miejscach. Informacji o punktach
zbiorczych i ich godzinach otwarcia
udziela odpowiedni urząd.
Uszkodzone lub zużyte baterie muszą być poddane procesowi recyklingu zgodnie z wytyczną
2006 / 66 / EC. Baterie i / lub urządzenie należy
zdać w lokalnym punkcie zbiorczym.
Zagrożenie dla środowiska na
skutek niewłaściwego usuwania
Pb
baterii!
Baterii nie wolno wyrzucać do odpadów komunalnych. Mogą one zawierać trujące metale ciężkie i
dlatego należy je traktować jak odpady niebezpieczne. Chemiczne symbole metali ciężkich są
następujące: Cd = kadm, Hg = rtęć, Pb = ołów.
Dlatego też zużyte baterie należy przekazywać do
komunalnych punktów gromadzenia odpadów
niebezpiecznych.
12 PL
53896_mio_LED-Toilettensitz_content_LB4.indd 12 17.05.11 08:23
EMC
Oznaczenie produktu:
Deska sedesowa
Nr modelu: Z30397A, Z30397B
Wersja: 04 / 2011
13 PL
53896_mio_LED-Toilettensitz_content_LB4.indd 13 17.05.11 08:23

Tartalomjegyzék
Bevezetés
Rendeltetésszerű használat ...............................................................................................................Oldal 15
A részek megnevezése ......................................................................................................................Oldal 15
Csomagolás tartalma.........................................................................................................................Oldal 15
Műszaki adatok .................................................................................................................................Oldal 15
Biztonsági figyelmeztetés
Biztonsági tanácsok az elemek használatához ...............................................................................Oldal 16
Szerelés
Az elemek behelyezése és cseréje ...................................................................................................Oldal 17
Az elektromos csatlakozás létrehozása ...........................................................................................Oldal 17
Az elemtartó doboz rögzítése (l. az E ábrát) ..................................................................................Oldal 17
Tisztítás és ápolás ...................................................................................................................Oldal 18
Hibák keresése .........................................................................................................................Oldal 18
Szerviz ..............................................................................................................................................Oldal 18
Megsemmisítés ..........................................................................................................................Oldal 18
14 HU
53896_mio_LED-Toilettensitz_content_LB4.indd 14 17.05.11 08:23
Bevezetés
WC-ülőke
Bevezetés
Szerelés előtt ismerje meg a terméket.
Ehhez olvassa el figyelmesen a követ-
kező szerelési utasítást és a biztonsági
előírásokat. A terméket csak a leírtak szerint és a
megadott felhasználási területeken alkalmazza. Ezt
a szerelési utasítást jól őrizze meg. Amennyiben a
terméket harmadik személynek továbbadja, adja át
neki a teljes dokumentációt is.
Rendeltetésszerű használat
Ez a WC-ülőke (toilette -ülőke) a kereskedelemben
kapható WC-kre való szerelésre alkalmas. A leírtaktól eltérő használat, vagy a termék átalakítása
nem megengedett és sérülésekhez és / vagy a termék
károsodásához vezethet. A nem rendeltetésszerű
használatból fakadó károkért a gyártó nem vállal
felelősséget. A termék nem ipari felhasználásra
készült.
A részek megnevezése
1
zsanér menetes rúddal
2
tömítő gyűrű
3
fémgyűrű
4
műanyag gyűrű
5
műanyag csavaranya
6
fém csavaranya
7
csavaró segédeszköz a csavaranyák számára
8
WC-ülőke
9
szilikon fedőkupak
10
elemtartó doboz
11
tépőzáras pánt
12
csatlakozó dugó
13
ON- / OFF-kapcsoló
Csomagolás tartalma
A kicsomagolás után azonnal ellenőrizze a csomagolás tartalmát, annak teljességét, valamint a termék
és az elemek kifogástalan állapotát. Semmi esetre
se szerelje össze a terméket, ha a csomagolás nem
teljes.
2 zsanér menetes rúddal
2 tömítő gyűrű
2 fémgyűrű
2 műanyag gyűrű
2 műanyag csavaranya
2 fémanya
1 csavaró segédeszköz a csavaranyák számára
1 WC-ülőke
1 szilikon fedőkupak
1 elemtartó doboz
1 tépőzáras pánt
2 db.1,5 V
3 db.1,5 V
AA elem (a Z30397A modellnél)
AA elem (a Z30397B modellnél)
1 Szerelési útmutató
Műszaki adatok
Méretek: kb. 36 x 5,5 x 42 cm
(sz x ma x mé)
Üzemelési feszültség: 3 V (a Z30397A modellnél)
4,5 V (a Z30397B modellnél)
Elemek: 2 x 1,5 V
, AA
(a Z30397A modellnél)
3 x 1,5 V
, AA
(a Z30397B modellnél)
LED-ek: 10 x 0,03 A (a Z30397A
modellnél)
10 x 0,03 A (a Z30397B
modellnél)
Védettség: IP44 (fröccsenő vizzel
szemben védett)
Maximális terhelés: 150 kg
a Z30397A modellnél: piros LED-ek
a Z30397B modellnél: kék LED-ek
15 HU
53896_mio_LED-Toilettensitz_content_LB4.indd 15 17.05.11 08:23
 Loading...