

Page 1
Mio Moov DR03
MiVue 128
Page 2

01
Index
.................................................................................. 02
.............................................. 03
............................................................................................ 05
.................................................................................. 07
....................................................................................... 09
.......... 09
... 12
............................. 17
............................................... 19
............................................ 20
...................................... 25
.............................................................. 27
......................................................... 28
......................................................... 29
01 Table of Contents
02 Product Features and Specifications
03 Caution Note
04 Product Overview
05 Getting Started
A. Setup Installation mode for car use
Installation mode for bicycle use
B. Operating Recording function
Power off
C. Application Software Installation
System Setup
06 Appendix Troubleshooting
Package Contents
Safety Precautions
Page 3

02
01 Product Description
DR-03’s lightweight stature surpasses all similar products available on the market,
allowing for easy installation in your car, bicycle or motorcycle to keep a record of your
journey; it can also be installed in your house to be used for home security. In
addition to having outdoor recording and GPS functions, DR-03 is also combined with
a map, keeping a faithful record of your life. When recording photos and videos,
although images are kept, however, you can only keep other information by adding
additional remarks yourself as clues; as time passes by, these memories also become
harder and harder to recall.
DR-03 not only has recording functions, but also combines the precise information of
GPS, allowing users to easily and accurately combine images with location and other
geographic and travel information, faithfully recording your journey and making your
memories richer and more complete!
Page 4

03
02 Product Features and Specifications
► VGA (640×480) with 300,000 pixels
► MPEG-4 A/V encoding; AVI format output; VGA with 30FPS
► Storage: MicroSD card (Class6 or above suggested) with a maximum support
of 32G
► Built-in high resolution CMOS lens; enhanced night vision effects
► Camera view angle: 82 degrees
► Built-in microphone
► Uses 2 AAA batteries or car charger
► Automatic overwrite function, allowing loop recording
► Supports audio recording
► Provides two recording modes: Starts recording after receiving GPS signal or direct
recording
► Allows manual setting of time zone
► Supported languages: English, Traditional Chinese, Simplified Chinese and Russian
► User can manually switch between day or night mode to achieve best recording
effects
Page 5
04
Product Features and Specifications
Array Element
Sensor Size
Image Transfer Rate(Max)
Scan Mode
Electronic Exposure
Pixel Size
Image Area
Visible Angle
640x480 (VGA)
1/4”
VGA, CIF, QCIF, QQCIF -30 fps.
QVGA, QQVGA -60 fps
Progressive
Up to 510:1 (for selected fps)
6 μm x 6 μm
3.984 mm×2.952 mm
82 degrees
Power Source
Power Consumption
Operating Temperature
Operating Humidity
1. AAA x 2 Battery ( Ni-H ),
2. Car Adapter (Output: 3V/1A)
350mA 2.4V
Under 65˚C
5% ~ 85%
Car recorder host
GPS Module
GPS Chipset
Frequency
Channels
Antenna
Datum
Cold Start
Warm Start
Hot Start
Reacquisition
Sensitivity
Dimension
Weight
Storage
SiRF Star III
L1, 1575.42MHz
12 CH for tracking
GPS Patch Antenna
WGS-84
50 sec , average
33 sec , average
1 sec , average
< 1 sec
-158dbm
98 x 34 28mm
47.5g
MicroSD
*Note: Above data is based on open sky
condition.
CMOS Sensor Module
Power
Environment
Page 6

05
03 Caution Note
1. GPS Accuracy
The Global Positioning System (GPS) technology is developed and managed by the
U.S. Department of Defense. Based on policy or national security considerations, the
U.S. has the right to adjust the positioning accuracy of this system without prior
announcement. Users must consider the surrounding environment and judge when it is
appropriate to use this system in order to maintain personal safety.
2. Signal Reception
The GPS satellite receiver chip is located at the end of the main device body. When
used in a car, some car’s windshield or the material of the window film might affect the
product’s satellite signal reception ability; also, the signal source of a speeding radar
detector might interfere with the GPS signal as well and affect the operation of this
product.
3. Positioning Floating
When you are at a fixed location, your position on the device map might be floating.
This is because the satellite signal is unstable when there are buildings nearby and
because Google Maps is open source software and therefore could not lock onto your
location. Please rest assured as this is a normal condition.
4. Battery Usage
Battery usage time differs from brand to brand; after testing with a 1000mAh rechargeable battery, the usage time is approximately 2 hours.
Page 7

06
Caution Note
5. Memory Condition (If File Overwrite is not checked, the device will beep)
When the memory card capacity has less than 175MB remaining, the recording
indicator will flash quickly and the buzzer will beep three times every two minutes until
the memory card only has 1MB left, then the system will force itself to shut down.
When the memory card capacity is <=32MB, this means that the memory card capacity
left is not enough to start recording a new file, and the system will be forced to shut
down. During this time if the user still tries to turn the device on, the system will still
force itself to shut down after it has started up.
6. Low Power Warning
When the voltage is less than 2.2 volts, the low power indicator (green) will start to flash
once every 0.5 seconds and the buzzer will beep three times; this warning will repeat
itself once every two minutes. When the voltage is less than 2 volts, the product will
automatically shut down. The number of times the warning repeats also differs between
different brands of batteries; it usually repeats between 2-5 times.
7. Video File
The system’s default file size for every video file is 175MB with a length of 10 minutes;
the file extension is AVI files.
Page 8
07
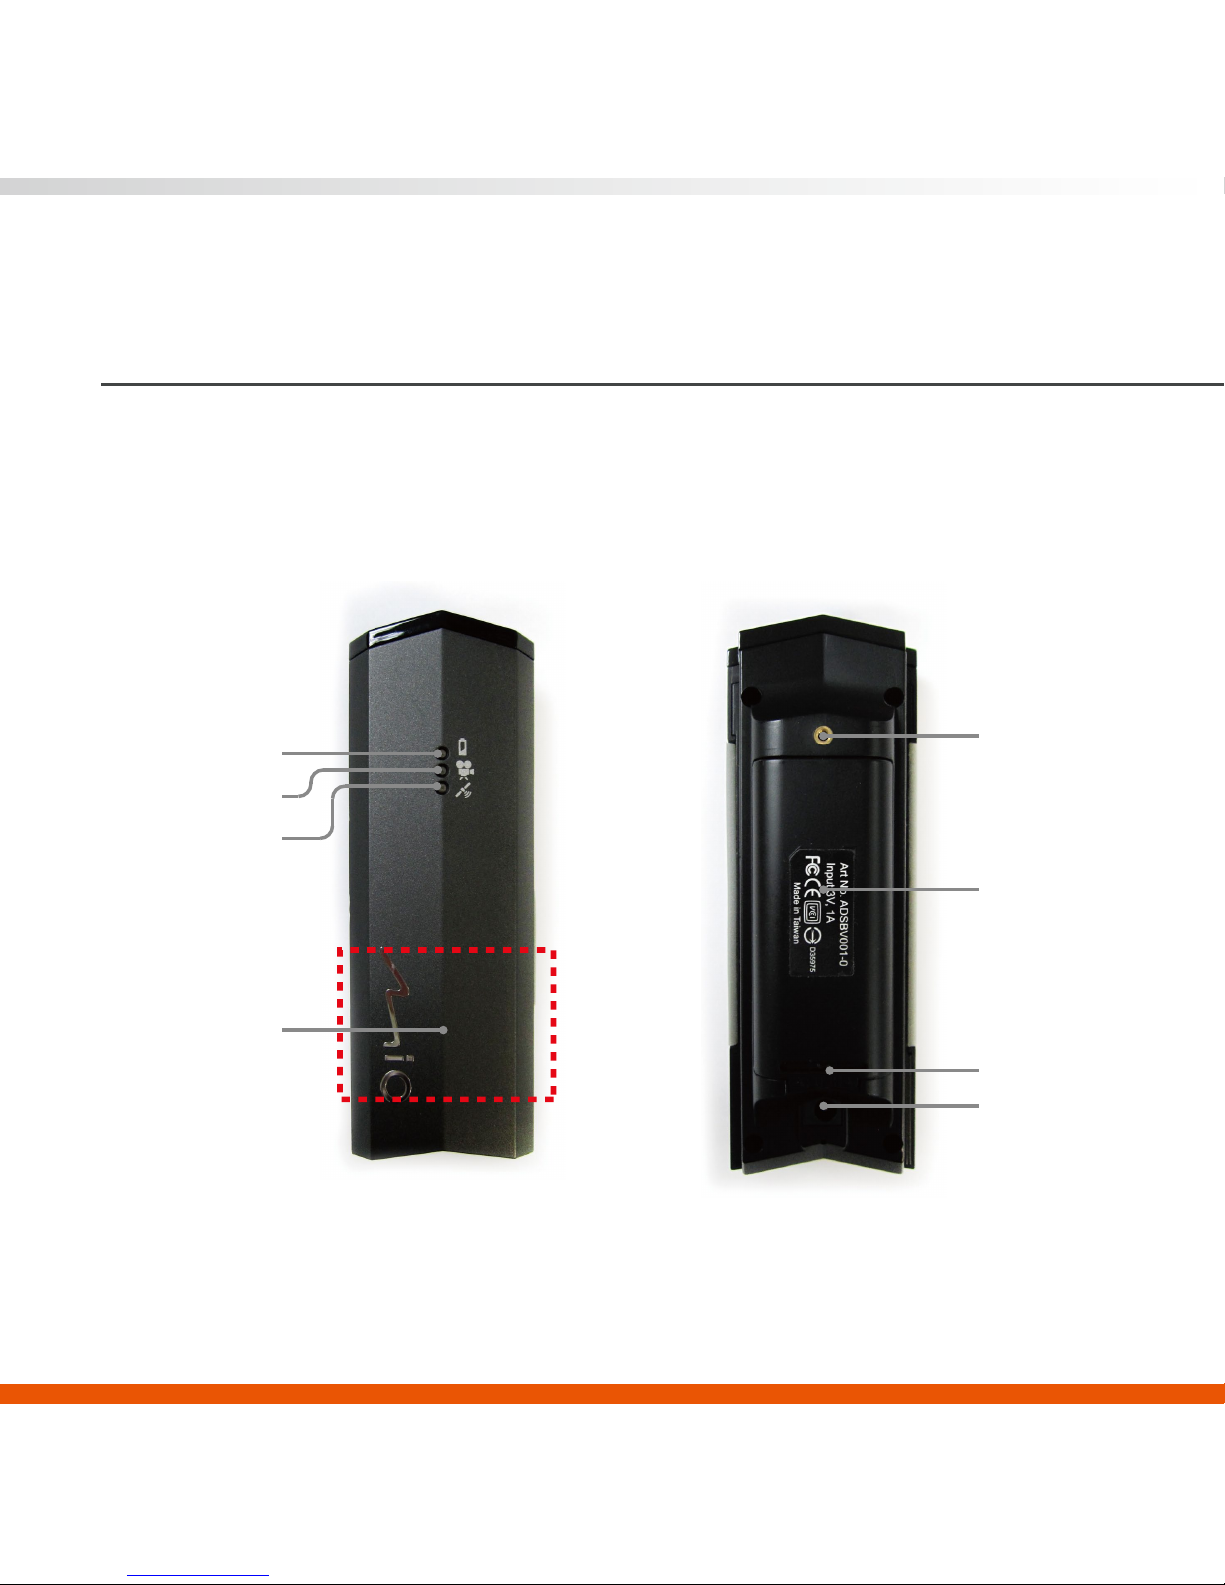
04 Product Overview
- Top View - - Bottom View -
Low power indicator
Screw hole for holder
Battery cover
DC Jack
Recording indicator
GPS indicator
GPS Satellite
Signal Reception
(Frame)
Microphone
Page 9
08
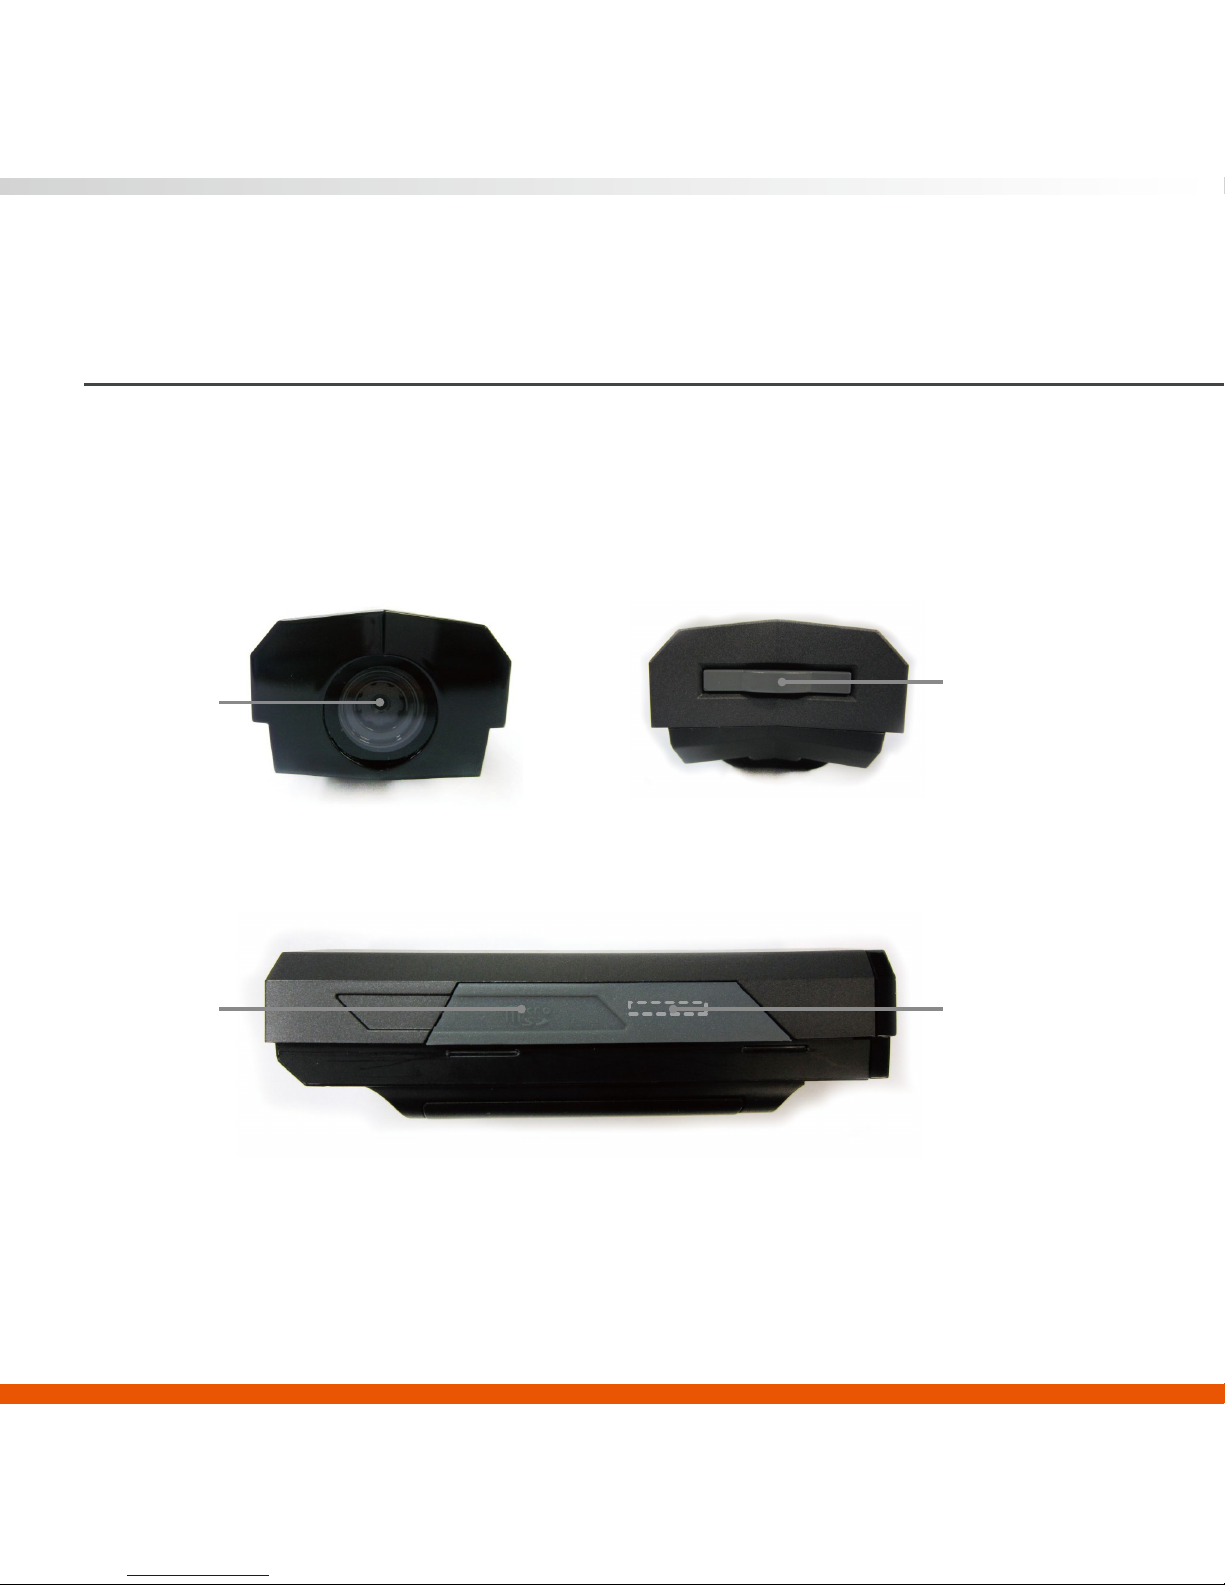
Product Overview
- Front View - - Back View -
- Left View -
Camera lens
Power/function Button
MicroSD card SocketBuzzer
Page 10
09
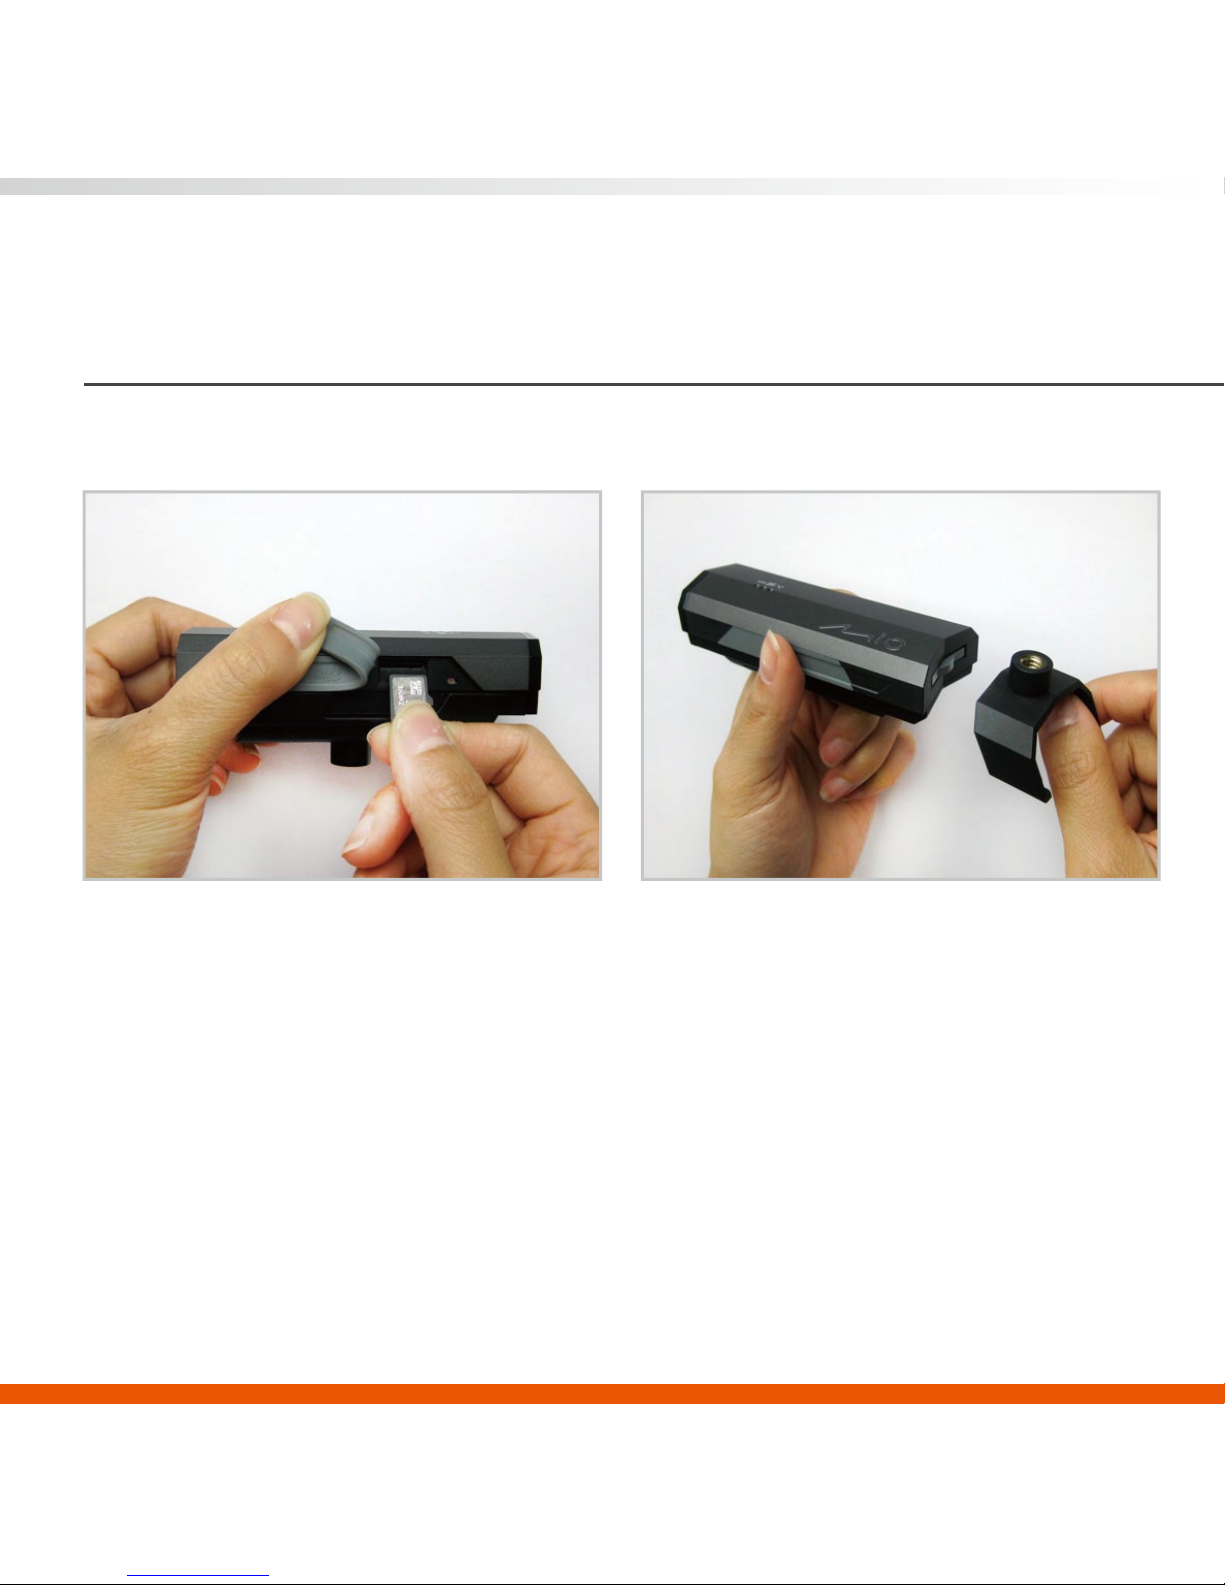
1. Installation mode for car use
05 Getting Started-Setup
2. Combine the holder with device.1. Please use Class6 or higher class
MicroSD cards.
※Please format your MicroSD card with Mio Manager PC Suite before inserting it.
Page 11

10
Getting Started-Setup
3. Combine the holder with the mounting
frame and attach it to the windshield.
4. Start the car engine.
5. Plug the DC jack of the car adaptor into
the main device and the other end to the
car’s cigarette lighter.
Page 12

11
Getting Started-Setup
6. Adjust the setting angle to get the best view.
※Please do not insert or remove Micro SD card, when MiVue 128 is operating.
Page 13

12
2. Installation mode for bicycle use
Getting Started-Setup
1. Please use Class6 or higher class
MicroSD cards.
2. Use your fingertip to push the battery
cover towards the direction which the
word PUSH indicates to easily open the
battery cover.
※Please format your MicroSD card with Mio Manager PC Suite before inserting it.
Page 14

13
Getting Started-Setup
4. Attach the holder onto the bottom of the
device.
3. Insert two AAA batteries according to
the directions indicated.
Page 15

14
Getting Started-Setup
6.Use the hand screw to tighten and firmly
hold the bottom holder and the device in
place.
5.Pull the silicon holder down from front to
back to wrap it around the device.
(you can decide whether to use the
silicon holder or not)
Page 16

15
Getting Started-Setup
7.Combine the bicycle holder with the
device with the bottom holder attached.
8.Loosen the screw, then select a suitable
latch height and attach it to the bicycle,
then tighten the screw again.
Page 17

16
Getting Started-Setup
9. Adjust the setting angle to get the best view.
※Please format your MicroSD card with Mio Manager PC Suite before inserting it.
Page 18

17
Getting Started-Operating
1. Activating Recording Function
A. Automatic Recording Mode (GPS
positioning completes direct recording)
1) First insert the formatted memory card,
then press the power/function button; the
indicator will light up sequentially and the
device will complete start up in approximately
1 second.
2) Then, the GPS indicator will flash continu-
ally with 0.5 second intervals, at this time it
has not yet entered recording status. When
GPS positioning is successful, the buzzer will
“beep” twice and the recording indicator will
light up and flash continually with 1 second
intervals, and this is when the recording
starts; the GPS indicator will flash with 3
second intervals.
Page 19

18
Getting Started-Operating
B. Manual Recording Mode (Force recording before the GPS has completed
positioning)
1) First insert the formatted memory card, then press the power/function button; the
indicator will light up sequentially and the device will complete start up in approximately
1 second.
2) Then, the GPS indicator will flash continually with 0.5 second intervals, at this time it
has not yet entered recording status. Press the power/function button again, the
buzzer will “beep” twice and the recording indicator will light up and flash continually
with 1 second intervals, this is when the recording starts; the GPS indicator will first
flash with 0.5 second intervals before the GPS positioning is complete, and when GPS
positioning is successful, the indicator will flash with 3 second intervals.
second intervals.
Page 20

19
Getting Started-Operating
2. Powering Off
When the system is in automatic or manual
recording mode, or before it started recording,
press and hold the power/function button for 3
seconds and then release to power off the
device.
Page 21

20
Getting Started-Application Software
1. Installation of application software
1. Insert the CD-ROM into your computer.
2. The system will automatically pop up
the setup window or you can also
double-click on “Setup.exe” from the
CD-ROM drive.
Page 22

21
Getting Started-Application Software
3. Click “Next” to continue installation.
4. When the application software is
finished installing, the corresponding
shortcut icon will appear on the desktop.
Page 23

22
Getting Started-Application Software
5. Remove the used MicroSD card from the device and connect it to the computer.
6. Double-click the icon on the desktop to run the application program.
Page 24

23
Getting Started-Application Software
7. Select the language you wish to use.
8. Click the first icon to open the recording files stored on the MicroSD card.
9. The information of the opened video file will be displayed in this field.
10. Click the Play icon to start the video playback.
Page 25

24
Getting Started-Application Software
11. When the video is playing, the corresponding geographical location will also be marked on the
map at the right side of the software. Click the icon at the top-right corner of the screen to
enlarge the map.
12. When the video is playing, the speed, distance, time, longitude, latitude, altitude and direction
information will be displayed here as well.
13. Click on the time bar to select the part you want to play.
14. Adjust playback volume, or click on the speaker icon to mute.
Page 26

25
Getting Started-System Setup
1. Remove the MicroSD card from the device
and connect it with the computer, then
execute the software.
2. Click on the tools icon to open the System
Setup window.
Page 27

26
Getting Started-Application Software
3. After setting the system settings, remove the MicroSD card from the computer and again
place it in the device; the device will automatically update these settings.
Dierent time zones can be set according to dierent countries.
If the MicroSD card’s capacity is full, the device will automatically overwrite
older les.
Sets the continual recording time for every recording
(10, 20, 30, 60 minutes)
Prevents water ripple interference for indoor recording.
Suggested to record during day time.
Suggested to record during night time.
The SD card must rst be formatted using this function when used for the
rst time and before changing the previous settings!
Time zone
File overwrite
Displays the speed on the screen.On-screen display
Disables the memory capacity full and low power warnings.Disable warning
Record Time
Format
Daylight lamp
Daytime
Night
Page 28

27
This chapter will list some of the problems you might face when using this device
and their solutions. Even if the following guide can not solve your problem, please
do not dismantle this device on your own! Please send the product back to the
store where you purchased it for maintenance.
06 Appendix-Troubleshooting
SolutionQuestion
Power indicator does not
light up
1. Install new batteries.
2. Unplug the car adaptor and reinsert it.
Set the proper time zone in System Settings before
recording.
Please confirm whether the computer has internet
connection before playing back the videos.
Please format the MicroSD card before inserting it
into the device.
1. To acquire GPS signal, you must power on this
device at a cloudless place.
2. If you travel to another country, it might take over
3 minutes to complete GPS positioning.
No GPS signal
No video file
No map information
Incorrect video date or time
Page 29

28
Appendix-Package Contents
Mounting frame x 1
(For car use)
Holder for bicycle x 1
Car adapter x 1
Mounting frame x 1
(for bicycle use)
Application software
CD-ROM x 1
Holder for car x 1
User manual x 1 Quick Start Guide x 1
Spill-resistant cover x 1
(Class:54)
Mio Moov DR-03
Mio Moov DR-03
Quick Start Guide
Mio DVR x 1
Page 30

29
Appendix-Safety Precautions
1. Please turn off the power when inserting or removing the MicroSD card, or else it
could cause damage to the device or the MicroSD card.
2. This device is a very sophisticated product; please avoid dropping it or expose it to
strong shaking or vibrations.
3. Please avoid placing this device at locations with high humidity or could be splashed
by liquids.
4. The device casing is made with plastic; please avoid contact with sharp objects to
avoid damages.
5. Please only use the included 3V/1A output power adapter.
6. Please turn the power off before cleaning; use only soft cloth to wipe it and use of
liquid cleaners is prohibited.
7. Avoid exposing this device to extreme heat.
8. Please do not dismantle this device on your own, or it might result in electric shocks
and voiding your warranty.
Page 31

 Loading...