

Page 1

User Manual
MiVue
TM
M350
Page 2

Table of Contents
Precautions and notices.............................................................3
Getting to know the recorder......................................................5
Inserting a memory card ............................................................7
Charging the battery ..................................................................8
Connecting to the AC charger .............................................8
Connecting to a computer ...................................................9
Connecting to a motobike .................................................10
Operating basics ...................................................................... 11
Turning the recorder ON and OFF .................................... 11
Setting your recorder.........................................................12
Setting the date and time ...........................................12
Setting the resolution..................................................13
Standard recording............................................................14
Continuous recording ........................................................15
Playback on an external viewing device ...........................16
System settings........................................................................17
MiVue Manager ........................................................................19
Installing MiVue Manager ..................................................19
Playing the recording les .................................................19
Settings menu ...................................................................23
English 1
Page 3

Caring for your device ..............................................................24
Regulatory information .............................................................25
CE .....................................................................................25
WEEE................................................................................26
Safety precautions ............................................................26
About charging ...........................................................26
About the charger .......................................................26
About the battery ........................................................27
2 English
Page 4

Precautions and notices
Never attempt to disassemble, repair or make any modications to
your recorder. Disassembly, modication or any attempt at repair could
cause damage to the recorder and will void any warranty.
If you see or smell smoke from the recorder, unplug the power charger
immediately.
Keep the recorder away from the chemical substances or detergents.
They could be corrosive and cause damage to the surface of the
recorder.
Do not subject your recorder to severe shock, or insert any object other
than memory card into the slot.
Make sure that no object is blocking the camera lens and no reective
material appears near the lens. Please keep the lens clean.
Always use the supplied mounting equipment with the recorder. When
mounting on a motorbike or bicycle, make sure that you place the
recorder in an appropriate place, so as not to obstruct your view.
A MicroSD card (not included) is required for video recordings.
Make sure to unplug and put away the charger when you stop and step
away from the motorbike or bicycle.
For your own safety, do not operate the controls of the recorder while
riding a motorbike or bicycle.
English 3
Page 5

It is normal for the quality of video to be momentarily affected as the
recorder moves from very dark to very bright conditions.
When a major accident happens and causes the power supply to
disrupt, the incident might not be recorded.
Do not submerge the recorder below 3 metres of water. When
swimming, bring the recorder to the surface and out of the water once
per hour.
When taking the recorder out of the water, make sure the device is
completely dried-up and all foreign objects are removed before opening
the protective cover.
As the battery life may be affected by extreme cold temperatures, you
are advised to turn on the device in a warm place before use and to
keep the device connected to power when in use.
Your recorder may be connected to an external viewing device that
supports the High Denition (HD) feature via a HD cable (not supplied).
For your safety, DO NOT use this feature when you are on the road.
4 English
Page 6
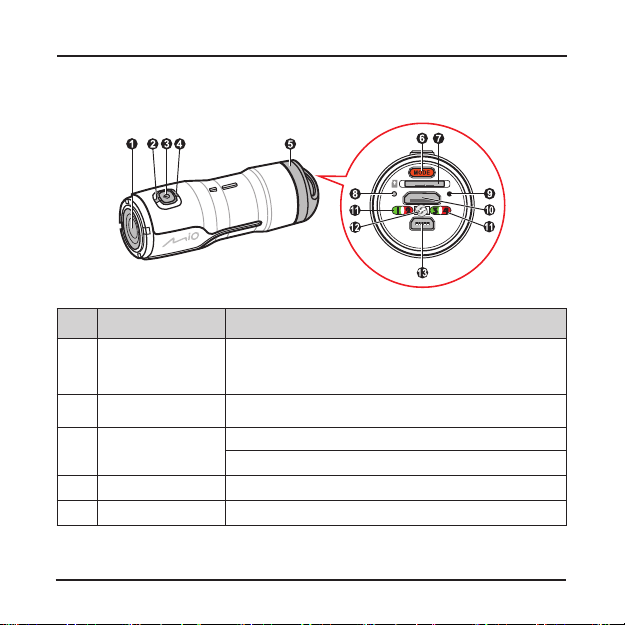
Getting to know the recorder
Name
Camera lens Make sure that no object is blocking the camera
Status indicator
Power/Record
button
Power indicator Glows in blue when the recorder is turned ON.
Protective cover Rotate to open and access more features.
English 5
Description
lens and no reective material appears near the
lens.
Glows in red when the recording is in progress.
Press and hold to turn the recorder ON and OFF.
Press briey to start and stop a recording.
Page 7
Name
Mode button Press to switch between standard mode and
Memory card
slot
Charge
indicator
Reset button
HD connector
Resolution/
frame rate
indicators
Continuous
mode indicator
Mini-USB
connector
6 English
Description
continuous mode.
Press to change the resolution/frame rate.
Accepts a MicroSD card.
Note: You are advised to use a Class 6 memory
card with at least 8GB capacity.
Glows in green when charging is in progress. It
turns off when the battery is fully charged.
Flashes in red when the memory card is full or not
inserted.
Shuts down your recorder.
Connects to an external viewing device.
Show the settings of the image resolution and frame
rate. See the "Setting the resolution" section for
more information.
Glows in amber when the recorder is in continuous
mode.
Connects to the charger.
Page 8

Inserting a memory card
CAUTION: Do not apply pressure to the centre of the memory card.
You have to insert a memory card before you can start recording.
The recorder supports MicroSD cards with up to 32GB capacity. You are
advised to use a Class 6 memory card with at least 8GB capacity.
Hold the card (MicroSD) by the edges and gently insert it into the slot with
the label facing down.
To remove a card, gently push the top edge of the card inwards to release it,
and pull it out of the slot.
Note: MiTAC does not guarantee the product’s compatibility with MicroSD cards
from all manufacturers.
Note: Before you start recording, please format the MicroSD card to avoid
malfunction caused by les not created by MiVue M350.
English 7
Page 9

Charging the battery
When charging the battery for the rst time, you should fully charge the battery.
To reduce the battery charging time, turn off your recorder when charging.
The charge indicator glows in green when charging is in progress. When the
battery is fully charged, the indicator turns off.
Note: Depending on the model you purchased, the look of the accessories may
not exactly match the graphics shown.
Note: The recorder will automatically power on when connecting to a power source.
Note: The recorder will vibrate 3 times when the battery power is low. Connect the
recorder to a power source for charging.
Connecting to the AC charger
1. Remove the protective cap.
2. Connect the mini-USB end of the USB cable to your recorder (
tightly secure the cap at the mini-USB end.
3. Connect the other end to the AC charger (
4. Install the plug of your region to the AC charger (
charger into a wall outlet ().
8 English
).
) and plug the AC
). Then
Page 10

Connecting to a computer
Note: The recorder will automatically power on when connecting to a power
source.
1. Turn on your computer.
2. Remove the protective cap.
3. Connect the mini-USB end of the USB cable to your recorder. Then
tightly secure the cap at the mini-USB end.
4. Push the cap at the USB end inwards to reveal the connector, and plug
the connector to a USB port on your computer.
English 9
Page 11

Connecting to a motobike
If your motorbike is equipped with a charger socket, you can charge your
recorder on a motobike with the supplied USB charger.
Note: To install the cigar plug cable on a motorbike, contact your motorbike dealer.
1. Remove the protective cap.
2. Connect the mini-USB end of the USB cable to your recorder (
tightly secure the cap at the mini-USB end.
3. Pull the cap at the USB end outwards, and plug the connector to the
USB charger (
Make sure the cap and the charger are secured tightly.
4. Plug the USB charger into the cigar plug on your motorbike (
10 English
).
). Then
).
Page 12

Operating basics
Turning the recorder ON and OFF
To turn on the recorder, press and hold the Power/Record button
The recorder will vibrate 3 times and the power indicator will glow in
seconds.
blue.
To turn off the recorder,
. The recorder will vibrate 3 times and the power indicator will be off.
seconds
Note: By default, the recorder will turn off automatically after 5 minutes of inactivity.
You can change the auto power-off settings. (See the "System settings" section for
more information.)
Note: The recorder will turn off automatically if the MicroSD card is not inserted.
Note: Alternatively, you can press the reset button to directly shut down the
recorder. To shut down the recorder, insert a small rod, such as a straightened
paperclip, into the reset button of your recorder.
English 11
press and hold the Power/Record button
( )
( )
for 5
for 5
Page 13

Setting your recorder
Setting the date and time
To ensure the accuracy of recorded date and time, make sure to set the date
and time before recording.
1. Make sure the MicroSD card is inserted.
2. Remove the protective cap.
3. Turn on your computer and the recorder.
4. Connect the recorder to your computer. (See the "Connecting to a
computer" section for detailed information.)
5. The recorder will be recognised as an external storage device. Open
the “Time.txt” le from the root directory of the MicroSD card.
6. Enter the correct date and time by following the sequences below.
Date: YYYY/MM/DD (for example, "2013/04/19")
Time: hh:mm:ss (for example, "10:30:54")
7. Change the setting value of [UPDATE:] from [N] to [Y] to save the
changes. Otherwise, your changes will not be saved.
8. Close the “Time.txt” le.
12 English
Page 14

9. For the changes to take effect, restart the recorder with the MicroSD
card inserted.
Setting the resolution
Note: You cannot set the recorder when the recording is in progress.
1. Make sure the MicroSD card is inserted.
2. Remove the protective cap.
3. Turn on the recorder.
4. Press the Mode button (
rate options. The resolution/frame rate indicators glow to show your
settings.
Indicator Status Resolution/Frame rate
Indicator 1 glows in green 1080p/30 FPS
Indicator 2 glows in red 960p/30 FPS
Indicator 3 glows in green 720p/60 FPS
Indicator 4 glows in red 720p/30 FPS
English 13
) to toggle through the resolution/frame
Page 15

Standard recording
Note: You cannot swtich to a different mode when the recording is in progress.
CAUTION: Keep the MicroSD card inserted in the recorder while recording.
1. Make sure the MicroSD card is inserted.
2. Remove the protective cap.
3. Turn on the recorder.
4. Press the Power/Record button (
in red. The recording starts after the recorder vibrates once.
Note: The recording will be divided into video clips with 4GB for each clip.
The recording will stop when the MicroSD card is full.
5. To stop the recording, press the Power/Record button ( ) briey. The
recorder vibrates once and the status indicator is off, indicating that the
recording has stopped.
14 English
) briey. The status indicator glows
Page 16

Continuous recording
Note: You cannot swtich to a different mode when the recording is in progress.
CAUTION: Keep the MicroSD card inserted in the recorder while recording.
1. Make sure the MicroSD card is inserted.
2. Remove the protective cap.
3. Turn on the recorder.
4. Press and hold the Mode button (
indicator glows in amber. The recording starts after the recorder vibrates
once.
The recording will be divided into several video clips (3 minutes for
each clip by default); recording will not stop between clips.
Note: In the continuous mode, if your memory card is full, the recording
continues and the earliest clips will be overwritten by the new ones.
Note: You can set the interval of each video clip.
section for more information.)
5. To stop the recording, press the Power/Record button ( ) briey. The
recorder vibrates once and the status indicator is off, indicating that the
recording has stopped.
English 15
) until the continuous mode
(See the "System settings"
Page 17

Playback on an external viewing device
You can connect the recorder to an external viewing device to view the
recorded video. For your safety, DO NOT use this feature when you are on
the road.
1. Make sure the MicroSD card with the recorded video is inserted.
2. Turn on the recorder and the external device.
3. Connect the small end of the HD cable to the rear side of the recorder.
4. Connect the other end of the HD cable to the HD connector on the
external device.
5. The recorded video will be displayed on the external device. Press the
Power/Record button (
6. To start the playback, press and hold the Power/Record button (
2 seconds.
7. To stop the playback, press and hold the Power/Record button (
2 seconds.
16 English
) repeatedly to select the desired video.
) for
) for
Page 18

System settings
You can set the advanced features using the "Cong.txt" le.
Note: The settings are for professional users only. If you are not familiar with the
settings, do not try to change them; otherwise, it may cause damage to the recorder.
Item Descriptoin Range/Option
AE Auto exposure Range: 0~2
AWB White balance Range: 0~6
EV Exposure Range: 0~12
SHRP Sharpness Range: 1 ~ 5
CTST Contrast Range: 32 ~ 88
SAT Saturation Range: 0 ~ 255
English 17
Options: (0) Center; (1) Average;
(2) Spot
Options: (0) Auto; (1) Incandescent;
(2) D4000; (3) D5000; (4) Sunny;
(5) Cloudy; (6) Flash
Options: (0) -2EV; (3) -1EV; (6) 0EV;
(9) +1EV; (12) +2EV
Options: (1) Soft; (3) Standard;
(5) Hard
Options: (32) Soft; (64) Standard;
(88) Hard
Page 19

Item Descriptoin Range/Option
MIC Microphone volume Range: 0 ~ 59db
DEF Digital effect Range: 0 ~ 5
FLK Flicker Range: 0 ~ 2
SPLIT Split le setting for
continuous recording
VQAL Video quality Range: 0 ~ 2
VSTP Video stamp Range: 0 ~ 3
APO Auto power-off Range: 0 ~ 300
VOS Video output system Range: 0 ~ 1
18 English
Options: (0) Off; (1) Art; (2) Sepia;
(3) Negative; (4) Black White; (5) Vivid
Options: (0) Auto; (1) 60Hz; (2) 50Hz
Range: 60/180/300
Options: (60)1 Min; (180) 3 Min; (300)
5 Min
Options: (0) Super Fine; (1) Fine;
(2) Normal
Options: (0) Off; (1) Date; (2) Time;
(3) Date&Time
Options: (0) Off; (180) 3Min.;
(300) 5Min.
Options: (0) NTSC_30; (1) PAL_25
Page 20

MiVue Manager
MiVue ManagerTM is a tool for you to view the videos recorded on a MiVue
recorder.
Note: Not all features are available for every model.
Installing MiVue Manager
Go to MioTM website (www.mio.com) to download MiVue Manager. Doubleclick Setup.exe and follow the on-screen prompts to install MiVue Manager.
Playing the recording les
Note: You are advised to copy the recording les to your computer for backup and
playback.
1. Do one of the following:
Connect the mini-USB end of the USB cable to the recorder and
the other end to a USB port on your computer.
Remove the memory card from the recorder and access the card
on the computer via a card reader.
2. Start MiVue Manager on the computer.
Note: The Map screen may not display when the computer is not connected
to the Internet.
Note: Your MiVue model does not support G-sensor.
English 19
Page 21

MaximiseMinimise
Exit
Calendar
Video
playback
screen
Playback
controls
File type
File list
3. By default, MiVue Manager shows the calendar and the le list on the
right. Click on the upper-left corner to select the folder that stores
the recording les.
When a recording le exists, you will see the date marked with “▲.”
Click that date to display the les that were recorded on that date.
You can choose the le type to display: Normal (continuous
recordings).
Note: Your MiVue model does not support "Event" or "Parking."
20 English
Page 22

To display all les in the current folder, click All. To return to the
calendar view, click Calendar.
Calendar Calendar and File List All File List
4. Double-click the desired le on the le list to start playback.
5. The playback controls are described as follows:
Icon Description
Starts or resumes the playback.
Pauses the playback.
/
English 21
Skips to the previous / next le on the list.
Changes the playback speed to 1/4x, 1/2x, 1x (default),
1.5x, or 2x.
Changes the playback direction. The ► icon indicates the
current playback direction.
Page 23

Icon Description
/
Mutes or unmutes the volume.
Adjusts the volume level.
Plays the video in full screen.
Returns to the normal view.
Displays the playback progress.
You can click on a point along
the track bar to move directly to a
different location for the playback.
6. The tool bar allows you to do the following:
Click
Click
to preview and print the current video image.
to back up the selected les to the specied location on
your computer.
Click
to capture and save the current video image to the
specied location on your computer.
Click
to export the GPS information of the selected le in the
KML format to the specied location on your computer.
Note: GPS supported through optional accessory only.
22 English
Page 24

Click to upload the selected le to Facebook or YouTubeTM.
Click
to open the Settings menu. (See the next section.)
Settings menu
Click to open the Settings menu. The Settings items are described as
follows:
Change Language: Sets the display language of MiVue Manager.
Change Skin: Sets the color scheme of MiVue Manager.
Check for Update: Checks if there is any new version of MiVue Manager.
Note: Internet access is required for this feature.
About: Displays the version and copyright information of MiVue
Manager.
English 23
Page 25

Caring for your device
Taking good care of your device will ensure trouble-free operation and
reduce the risk of damage.
Keep your device away from excessive moisture and extreme
temperatures.
Avoid exposing your device to direct sunlight or strong ultraviolet light
for extended periods of time.
Do not place anything on top of your device or drop objects on your
device.
Do not drop your device or subject it to severe shock.
The screen surface can easily be scratched. Avoid touching it with
sharp objects.
Never clean your device with it powered on. Use a soft, lint-free cloth to
wipe the screen and the exterior of your device.
Never attempt to disassemble, repair or make any modications to your
device. Disassembly, modication or any attempt at repair could cause
damage to your device and even bodily injury or property damage and
will void any warranty.
Do not store or carry ammable liquids, gases or explosive materials in
the same compartment as your device, its parts or accessories.
To discourage theft, do not leave the device and accessories in plain
view in an unattended vehicle.
Overheating may damage the device.
24 English
Page 26

Regulatory information
CE
Products with the CE marking comply with the Electromagnetic Compatibility
Directive (2004/108/EC) - issued by the Commission of the European
Community.
Compliance with these directives implies conformity to the following
European Standards:
EN 55022:2010
EN 61000-3-2:2006 +A1:2009 +A2:2009,
EN 61000-3-3:2008
EN 55024:2010
IEC 61000-4-2:2008
IEC 61000-4-3:2006+A1:2007+A2:2010
IEC 61000-4-4:2012
IEC 61000-4-5:2005
IEC 61000-4-6:2008
IEC 61000-4-8:2009
IEC 61000-4-11:2004
The manufacturer cannot be held responsible for modications made by the
User and the consequences thereof, which may alter the conformity of the
product with the CE Marking.
English 25
Page 27

WEEE
This product must not be disposed of as normal household waste, in
accordance with the EU directive for waste electrical and electronic
equipment (WEEE – 2002/96/EC). Instead, it should be disposed of by
returning it to the point of sale, or to a municipal recycling collection point.
Safety precautions
About charging
Use only the charger supplied with your device. Use of another type of
charger may result in malfunction and/or danger.
This product is intended to be supplied by a LISTED Power Unit marked
with “LPS”, “Limited Power Source” and output rated + 5 V dc / 1.0 A.
Use a specied battery in the equipment.
About the charger
Do not use the charger in a high moisture environment. Never touch the
charger when your hands or feet are wet.
Allow adequate ventilation around the charger when using it to operate
the device or charge the battery. Do not cover the charger with paper or
other objects that will reduce cooling. Do not use the charger while it is
inside a carrying case.
26 English
Page 28

Connect the charger to a proper power source. The voltage
requirements are found on the product case and/or packaging.
Do not use the charger if the cord becomes damaged.
Do not attempt to service the unit. There are no serviceable parts
inside. Replace the unit if it is damaged or exposed to excess moisture.
About the battery
Use a specied battery in the equipment.
CAUTION: This unit contains a non-replaceable internal Lithium
Ion battery. The battery can burst or explode, releasing hazardous
chemicals. To reduce the risk of re or burns, do not disassemble,
crush, puncture, or dispose of in re or water.
Important instructions (for service personnel only)
Caution: Risk of explosion if battery is replaced by an incorrect
type. Dispose of used batteries according to the instructions.
Replace only with the same or equivalent type recommended by
the manufacturer.
The battery must be recycled or disposed of properly.
Use the battery only in the specied equipment.
English 27
Page 29

Revision: R02
(2/2015)
Trademarks
All brand and product names are trademarks or registered trademarks of
their respective companies.
Disclaimer
Specications and documents are subject to change without notice.
MiTAC does not warrant this document is error-free. MiTAC assumes no
liability for damage incurred directly or indirectly from errors, omissions, or
discrepancies between the device and the documents.
Notes
Not all models are available in all regions.
Depending upon the specic model purchased, the color and look of your
device and accessories may not exactly match the graphics shown in this
document.
The IEC 60529/IPX8 is an European system of test specication standards
for classifying the degrees of protection provided by the enclosures of
electrical equipment. An IPX8 designation means that the unit withstands
immersion in three metres (approx 10 ft.) of still water for up to 1 hour. Mio
guarantees this grade provided the battery door and all the jack covers are
properly and securely closed.
28 English
Page 30

MiTAC Europe Ltd
www.mio.com
 Loading...