

Page 1
User’s Manual
Page 2

R02 (USA)
Trademarks
The Bluetooth word mark and logo are owned by the Bluetooth SIG, Inc. All other
brand and product names are trademarks or registered trademarks of their
respective companies.
Disclaimer
Specifications and manuals are subject to change without notice. Mio Technology
assumes no liability for damage incurred directly or indirectly from errors,
omissions, or discrepancies between the device and the manuals.
Page 3

Table of Contents
Precautions and Notices ......................................................................vii
1 Getting Started..................................................................................1
1.1 Understanding Hardware Components................................................ 1
Front Components ............................................................................... 1
Back Components................................................................................ 2
Left-Side Components ......................................................................... 3
Top Components.................................................................................. 3
Bottom Components ............................................................................ 4
1.2 Performing the Initial Start Up .............................................................. 4
1.3 Connecting to AC Power and Charging the Battery............................. 6
1.4 Charging the Battery via the USB Cable.............................................. 7
1.5 Using Your Device in a Vehicle............................................................ 8
Using the Cradle .................................................................................. 8
Connecting the Car Charger ................................................................ 8
Connecting the TMC Antenna.............................................................. 9
1.6 Operating Basics................................................................................ 10
Turning On and Off ............................................................................ 10
Navigating on the Screen................................................................... 10
Home Screen ..................................................................................... 11
Using the Soft Keyboard .................................................................... 12
1.7 Inserting a SD/SDHC/MMC Card....................................................... 14
2 Videos ..............................................................................................15
2.1 Starting and Exiting Videos................................................................ 15
2.2 Preparing the Video Files for Your Device......................................... 16
2.3 Playing Video Clips ............................................................................ 17
2.4 Video Playback Controls.................................................................... 18
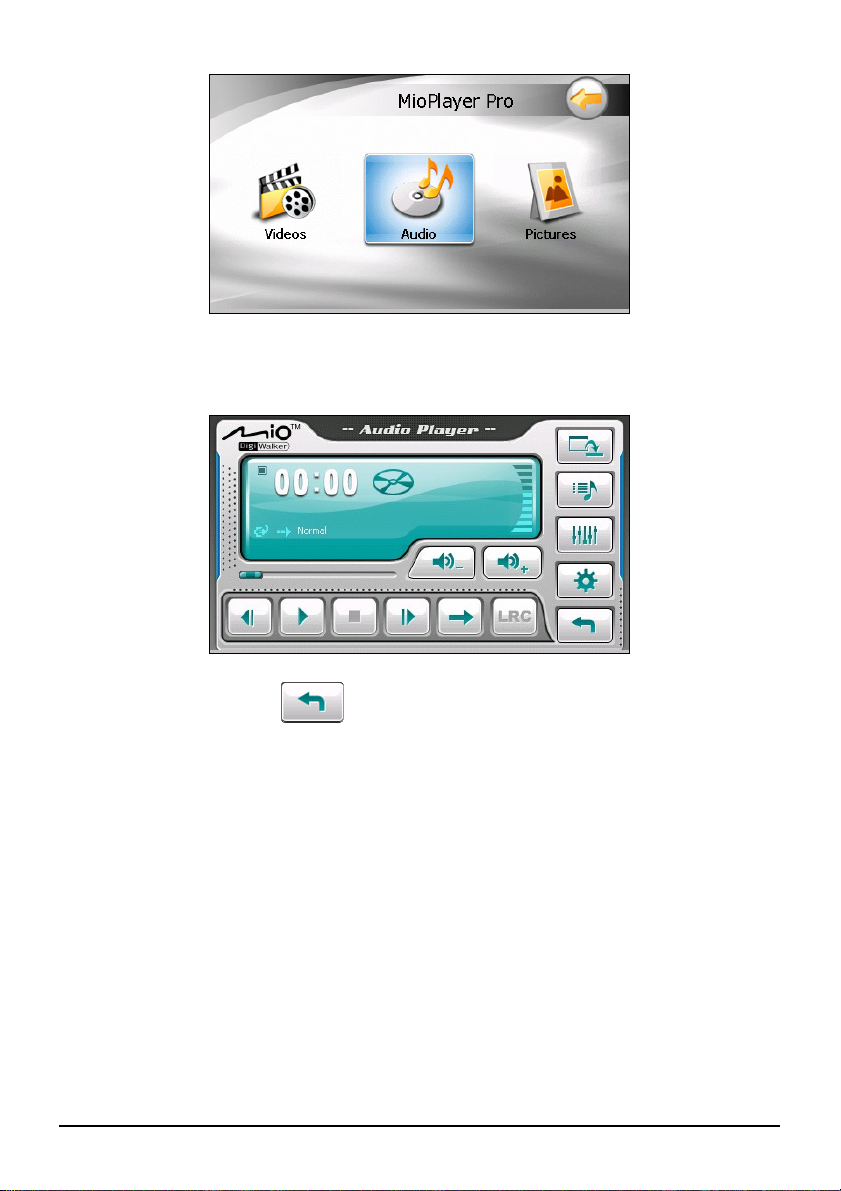
3 Audio................................................................................................19
3.1 Starting and Exiting Audio.................................................................. 19
3.2 Preparing the Audio Files for Your Device......................................... 20
i
Page 4

3.3 Playing Audio Files............................................................................. 21
3.4 Playback Controls .............................................................................. 22
3.5 Displaying Lyrics ................................................................................ 23
Preparing the Lyrics Files for your Device ......................................... 23
Playing Songs with Lyrics .................................................................. 23
3.6 Using the Play Lists............................................................................ 24
Creating a Play List ............................................................................ 24
Opening a Play List ............................................................................ 25
3.7 Equalizer ............................................................................................ 26
3.8 Settings .............................................................................................. 27
4 Pictures............................................................................................29
4.1 Starting and Exiting Pictures.............................................................. 29
4.2 Preparing the Pictures for Your Device.............................................. 30
4.3 Viewing Pictures in Thumbnail View .................................................. 30
4.4 Viewing a Picture in Full Screen ........................................................ 31
4.5 On-Screen Control Buttons ................................................................ 31
4.6 Viewing the Slideshow ....................................................................... 33
5 Camera.............................................................................................35
5.1 Starting and Exiting Camera .............................................................. 35
5.2 Taking a Photo ................................................................................... 36
Camera Screen Elements.................................................................. 38
5.3 Using the Special Camera Functions................................................. 40
Using the Continuous Shot Function ................................................. 40
Using the Timer.................................................................................. 40
Storing Geographic Coordinates........................................................ 41
5.4 Camera Settings ................................................................................ 42
5.5 Recording Videos............................................................................... 43
Video Screen Elements...................................................................... 44
5.6 Video Settings .................................................................................... 45
5.7 View Mode.......................................................................................... 46
Editing Photos .................................................................................... 48
6 Contacts ..........................................................................................51
6.1 Starting and Exiting Contacts............................................................. 51
6.2 Using the Contacts List ...................................................................... 52
6.3 Using the Summary Screen ............................................................... 53
6.4 Navigating to a Contact’s Address..................................................... 53
6.5 Making a Phone Call to a Contact ..................................................... 54
6.6 Managing Contacts ............................................................................ 55
Adding a Contact................................................................................ 55
Editing a Contact................................................................................ 57
ii
Page 5

Deleting a Contact.............................................................................. 57
7 Bluetooth .........................................................................................59
7.1 About Bluetooth Profiles..................................................................... 59
7.2 Connecting a Bluetooth Mobile Phone............................................... 60
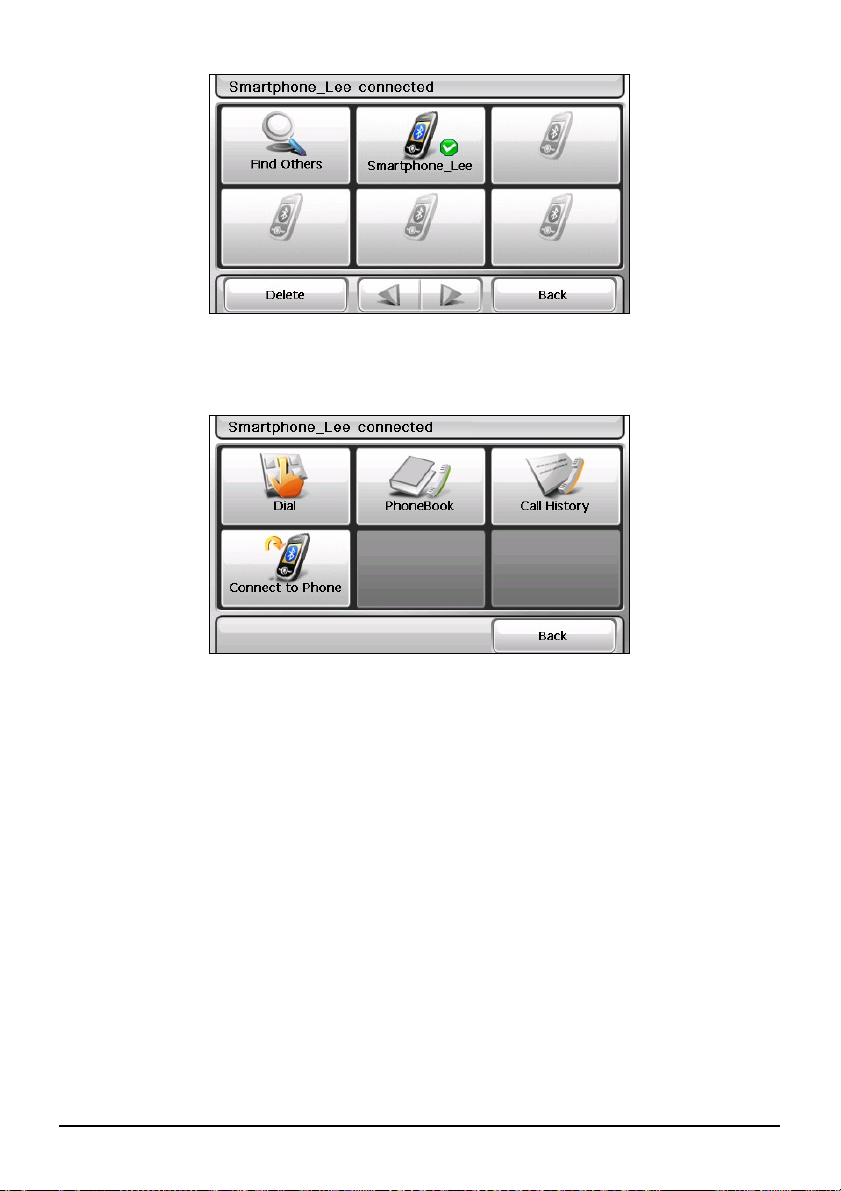
Connecting a Mobile Phone for the First Time................................... 60
Connecting a Different Mobile Phone ................................................ 63
Using the Mobile Phone Shortcut....................................................... 63
Disconnecting the Mobile Phone........................................................ 64
7.3 Phone Operations .............................................................................. 64
Placing a Call ..................................................................................... 64
Receiving a Call ................................................................................. 67
Operations during a Call .................................................................... 68
7.4 Connecting a Bluetooth Headset ....................................................... 69
Connecting a Headset for the First Time ........................................... 69
Connecting a Different Headset ......................................................... 71
Using the Headset Shortcut ............................................................... 71
Disconnecting the Headset ................................................................ 72
8 Card Scanner ..................................................................................73
8.1 Starting and Exiting Card Scanner..................................................... 73
8.2 Using the Card Scanner..................................................................... 74
8.3 Manually Scanning a Specific Area ................................................... 77
8.4 Adding Card Information .................................................................... 78
9 Calculator ........................................................................................81
9.1 Starting and Exiting Calculator........................................................... 81
9.2 Using the Calculator Mode................................................................. 82
Calculator Memory ............................................................................. 83
9.3 Using the Currency Mode .................................................................. 83
Editing Exchange Rate....................................................................... 85
9.4 Using the Conversion Mode............................................................... 86
10 File Manager....................................................................................89
10.1 Starting and Exiting File Manager...................................................... 89
10.2 Transferring Files ............................................................................... 90
From the Storage Card to Your Device.............................................. 90
From Your Device to the Storage Card.............................................. 92
10.3 Managing Folders and Files............................................................... 92
11 Settings............................................................................................93
11.1 Starting and Exiting Settings.............................................................. 93
iii
Page 6

11.2 Backlight............................................................................................. 94
11.3 Volume ............................................................................................... 95
11.4 Screen................................................................................................ 96
11.5 Power ................................................................................................. 97
11.6 Date/Time........................................................................................... 98
11.7 Language ......................................................................................... 100
11.8 Bluetooth .......................................................................................... 101
BT Preferences ................................................................................ 102
Auto-answer Preferences................................................................. 102
Delete Preferences .......................................................................... 103
11.9 Restore............................................................................................. 103
12 MioTransfer ...................................................................................105
12.1 Installing MioTransfer....................................................................... 105
12.2 Starting and Exiting MioTransfer...................................................... 106
12.3 Copying Multimedia Files to Your Device ........................................ 107
Managing Files................................................................................. 109
12.4 Copying Contacts Information to Your Device................................. 109
13 Video ToolBox...............................................................................111
13.1 About Video ToolBox ....................................................................... 111
13.2 Installing Video ToolBox................................................................... 111
13.3 User Interface................................................................................... 112
13.4 Four Steps to Create a Video File.................................................... 113
Step 1: Determine Video Output Setting.......................................... 113
Step 2: Add/Edit Media Clip ............................................................. 113
Step 3: Choose Style ....................................................................... 114
Step 4: Create Video File ................................................................. 115
13.5 Editing Video Clips........................................................................... 116
Trimming a Clip ................................................................................ 117
Trimming a Video into Multiple Clips................................................ 118
13.6 Creating an Image Slideshow .......................................................... 120
13.7 Choosing a Style .............................................................................. 121
Selecting a Movie Style.................................................................... 121
Changing the Transition Effect......................................................... 122
Editing Text ...................................................................................... 122
Change the Background Music........................................................ 123
14 POI Loader.....................................................................................125
14.1 Installing POI Loader........................................................................ 125
14.2 Preparing the Source Files............................................................... 125
Excel File Format Example .............................................................. 126
CSV File Format Example................................................................ 126
iv
Page 7

14.3 Importing POIs ................................................................................. 126
Using the Imported POIs with Your Device...................................... 128
15 Troubleshooting and Maintenance .............................................129
15.1 Restart and Shut Down.................................................................... 129
Restarting Your Device .................................................................... 129
Shutting Down Your Device ............................................................. 129
15.2 Troubleshooting ............................................................................... 130
Power Problems............................................................................... 130
Screen Problems.............................................................................. 130
Connection Problems....................................................................... 130
GPS Problems.................................................................................. 131
15.3 Maintaining Your Device .................................................................. 131
16 Regulatory Information ................................................................133
16.1 Regulations Statements................................................................... 133
Class B Regulations......................................................................... 133
Bluetooth .......................................................................................... 135
16.2 Safety Precautions ........................................................................... 135
About Charging ................................................................................ 135
About the AC Adapter ...................................................................... 135
About the Battery ............................................................................. 136
v
Page 8

Page 9

Precautions and Notices
z For your own safety, do not operate the controls of the product while driving.
z Use this product prudently. The product is intended for use solely as a
navigation aid. It is not for precise measurement of direction, distance,
location or topography.
z The calculated route is for reference only. It is the user’s responsibility to
follow the traffic signs and local regulations along the roads.
z When you get out of the car, do not leave your device on the dashboard
subjected to direct sunlight. Overheating of the battery can cause malfunction
and/or danger.
z GPS is operated by the United States government, which is solely responsible
for the performance of GPS. Any change to the GPS system can affect the
accuracy of all GPS equipments.
z GPS satellite signals do not typically pass through solid materials such as
brick, concrete, or lead-coated safety glass. When inside a tunnel, building or
under-ground parking structures, GPS positioning will not typically be
available.
z A minimum of 4 GPS satellite signals are typically needed to determine your
GPS position. Signal reception can be affected by dense overhead structures,
severe weather, geographic location or time of day.
z Other wireless devices in the vehicle might interfere with the reception of
satellite signals and cause the reception to be unstable.
z Your GPS device is always tracking your location (you are the green arrow)
when the navigation software is running and GPS signal is available. Your
GPS device is not designed to broadcast its location; therefore it can not be
tracked by anyone else.
vii
Page 10
z A device holder is needed when using the device in a car. Be sure that you
place the device in an appropriate place, so as not to obstruct the driver’s
view, or deployment of airbags.
Do not mount where the driver’s
field of vision is blocked.
Do not mount in front of
airbag panels.
Do not place unsecured
on the dashboard.
Do not mount in front of an
airbag field of deployment.
viii
Page 11
1 Getting Started
1.1 Understanding Hardware Components
NOTE: Depending upon the specific model purchased, the color of your device may not
exactly match the device shown in this manual.
Front Components
Ref Component Description
GPS Antenna Receives signals from the GPS satellites overhead.
n
Bluetooth
o
Indicator
Charge
p
Indicator
Microphone For Bluetooth hands-free calling.
q
Touch Screen Displays the output of your device. Tap the screen with your
r
Flashes in blue to indicate that Bluetooth is on.
Glows bright amber to indicate that the battery is charging,
and turns green when the battery is fully charged.
fingertip to select menu commands or enter information.
1
Page 12

Back Components
Ref Component Description
External GPS
n
Antenna
Connector
Viewing
o
Mirror
Camera Lens Takes photos or records videos.
p
Speaker Sends out music, sounds and voice.
q
This connector (under rubber dust cover) allows use of an
optional external GPS antenna with magnetic mount, which may
be positioned on top of the car for better signal reception in areas
with poor reception.
Lets you see your own reflection in the small mirror when taking
photos of yourself.
2
Page 13
Left-Side Components
Ref Component Description
SD/SDHC/MMC
n
Slot
Headphone
o
Connector
Accepts a SD (Secure Digital), SDHC (Secure Digital High
Capacity), or MMC (MultiMediaCard) card for accessing
data such as MP3 music.
Connects to 2.5mm stereo headphones.
Top Components
Ref Component Description
Power Button Turns on and off the device. (You will get different results
n
o
Camera
Button
depending on the amount of time you hold down this button. See
Sections 1.6 and 15.1 for information.)
Starts the Camera program. (This button function is disabled
when using MioMap.)
Serves as the shutter release button when using the Camera
program. Auto-focus can be achieved by holding down the
button half way.
3
Page 14
Bottom Components
Ref Component Description
Mini-USB Connector Connects to the charger or USB cable.
n
Cradle Connector Connects to the cradle.
o
1.2 Performing the Initial Start Up
1. For the initial start up, press the power button for 5 seconds to turn on your
device.
NOTE: For normal operation, briefly press the power button to turn on and off your device.
2. Your device turns on. Immediately charge your device as described in the
next section.
3. The “Switch Language” screen appears. Tap the arrow button to select the
desired language. Then, tap the
button.
4
Page 15
4. The “Date/Time” screen appears. Tap the appropriate arrow button to select
the time zone, date, and time. Then, tap the
5. The Home screen appears. You can now use your device.
button.
5
Page 16
1.3 Connecting to AC Power and Charging the Battery
When charging the battery for the very first time, you should charge it for at least
8 hours.
1. Slide and click the connector converter onto the AC adapter.
2. Connect the adapter cable to the bottom of your device.
3. Plug the AC adapter into a wall outlet.
4. The charge indicator glows amber when charging is in progress. Do not
disconnect your device from AC power until the battery is fully charged, the
charge indicator will turn green. This will take a couple of hours.
NOTE:
z Do not immediately turn on your device after connecting the AC adapter to charge a
power-depleted battery. If you need to turn on the device again, wait for at least one
minute.
z Depending on your region of purchase, the connector converter may not look exactly the
same as the picture shown.
CAUTION: For optimal performance of the lithium battery:
z Do not charge the battery where the temperature is high (e.g. in direct sunlight).
z There is no need to fully discharge the battery before charging. You can charge the battery
before it is discharged.
z When storing the product for a long period of time, be sure to fully charge the battery at
least once every two weeks. Over discharge of the battery can affect the charging
performance.
6
Page 17
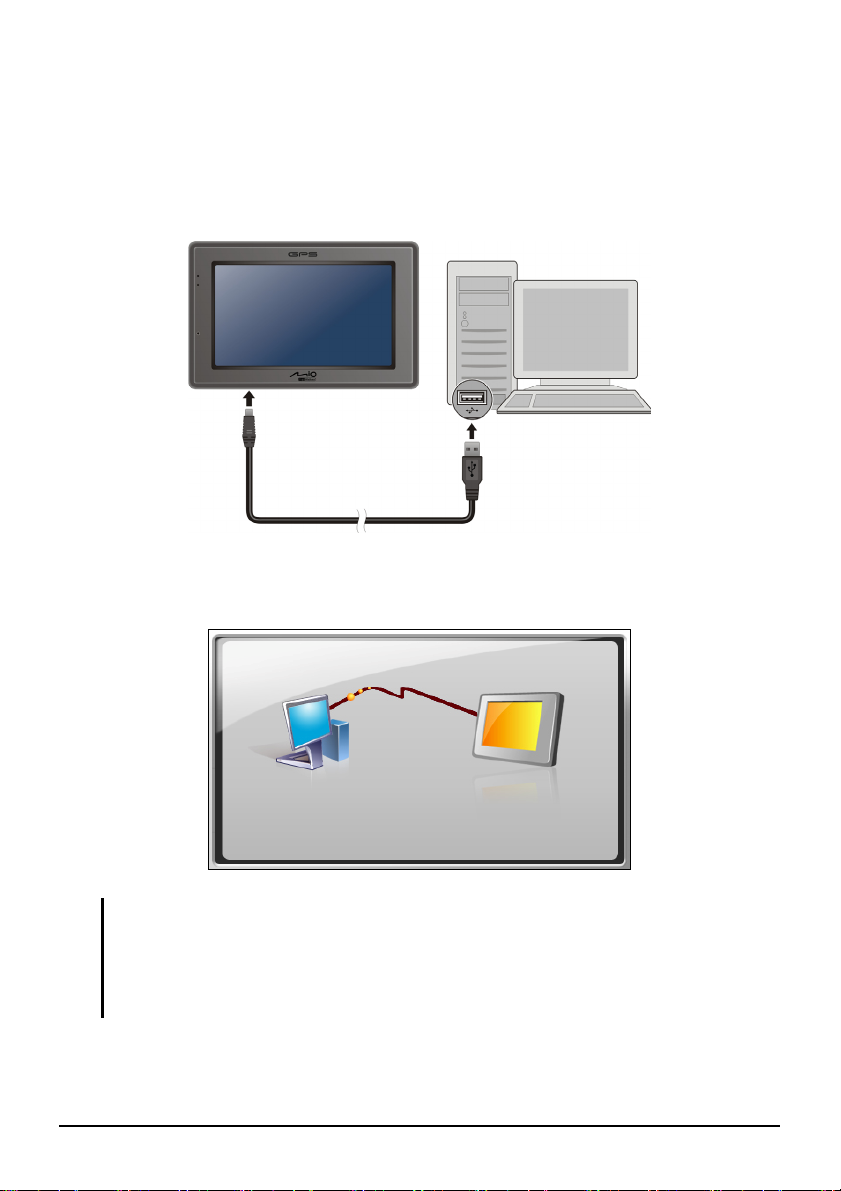
1.4 Charging the Battery via the USB Cable
1. Turn on the computer.
2. Connect the mini-USB end of the USB cable to the bottom of your device and
the other end to a USB port on your computer.
3. If your device is on, the screen as shown below appears. Whenever your
device is connected to a computer, you will not be able to use it.
NOTE:
z When the device is connected to a computer, it is recognized as an external mass storage
device. Do not delete any files pre-installed in the device. Deleting files of which the
function is unknown can cause programs or features to malfunction.
z If you intend to charge your device in this way, turn off your device so that it takes less time
to charge the battery.
7
Page 18
1.5 Using Your Device in a Vehicle
CAUTION:
z Select an appropriate location for mounting the device in a vehicle. Never place the device
where the driver’s field of vision is blocked. Make sure that the GPS antenna has a clear
view of the sky.
z If the car’s windshield is tinted with a reflective coating, an external antenna (optional) may
be needed to route the antenna to the top of the vehicle through a window. When closing
the window, be careful not to pinch the antenna cable.
Using the Cradle
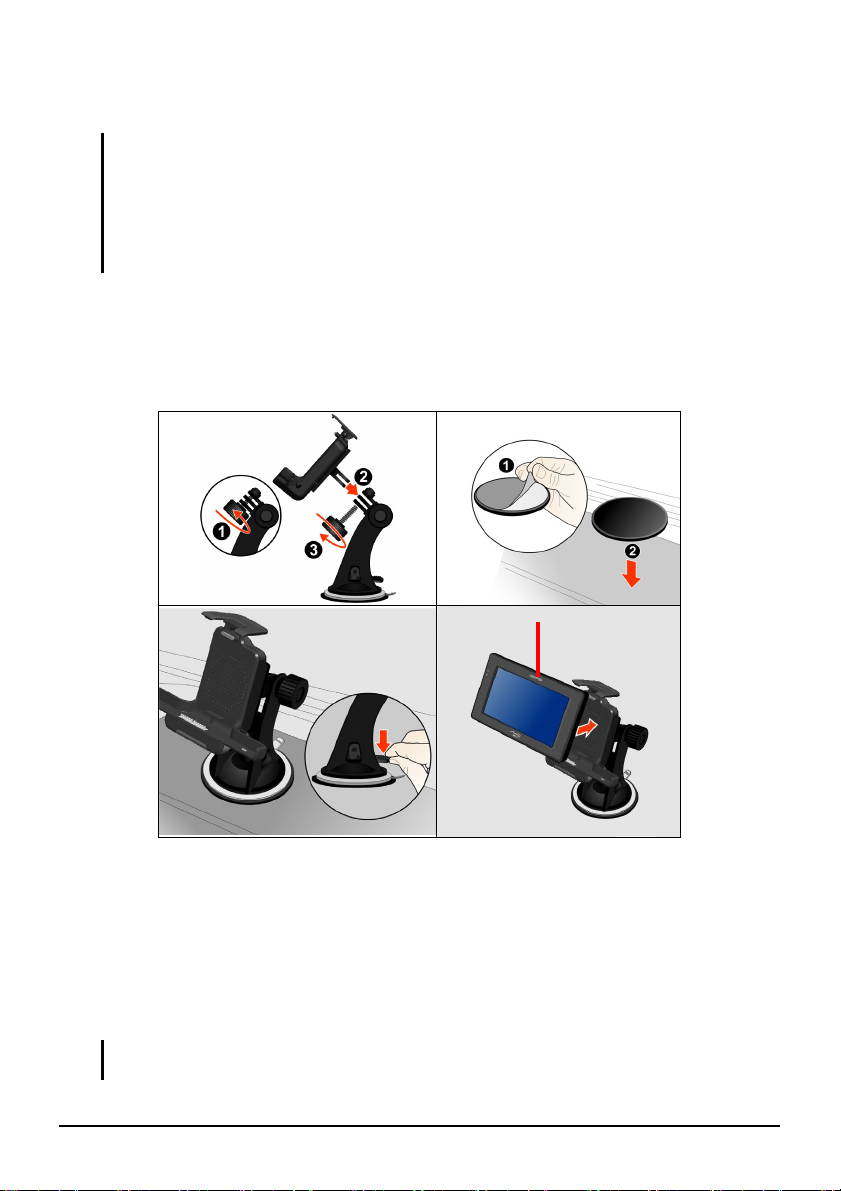
Use the cradle and the stand to fix your device in a vehicle.
GPS antenna
Connecting the Car Charger
The car charger supplies power and charges your device at the same time. If the
battery is fully charged, you can use the battery power without connecting the
charger. If you don’t want to drain the battery power, you can keep the car charger
connected while in a vehicle.
CAUTION: To protect your device against sudden surges in current, connect the car charger
only after the car engine has been started.
8
Page 19
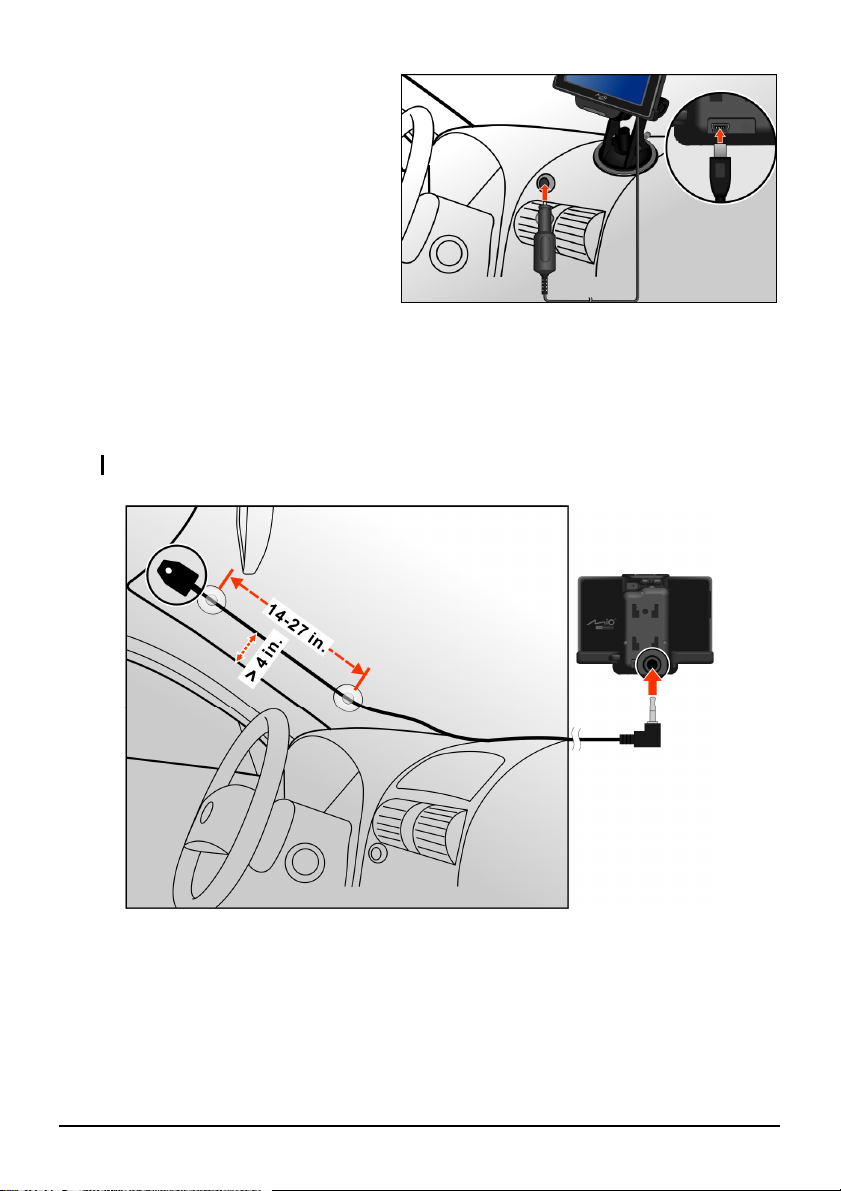
1. Connect one end of the car
charger to the power connector
of the cradle.
2. Connect the other end to the
cigarette lighter in the car to
power and charge your device.
Connecting the TMC Antenna
A TMC antenna is provided with your cradle. You must attach the antenna to the
back of the TMC cradle in order to receive real-time driving traffic information.
CAUTION: Keep the antenna cord fairly straight (not curled or bent) for best reception.
TMC information is monitored by the navigation software. Once the information
is received, you can view it on your device and traffic icons will appear in the map
view. Certain roads with reported traffic will be highlighted and you can choose to
avoid those roads and an alternate route will be automatically calculated. (See the
navigation software manual for detailed information.)
9
Page 20
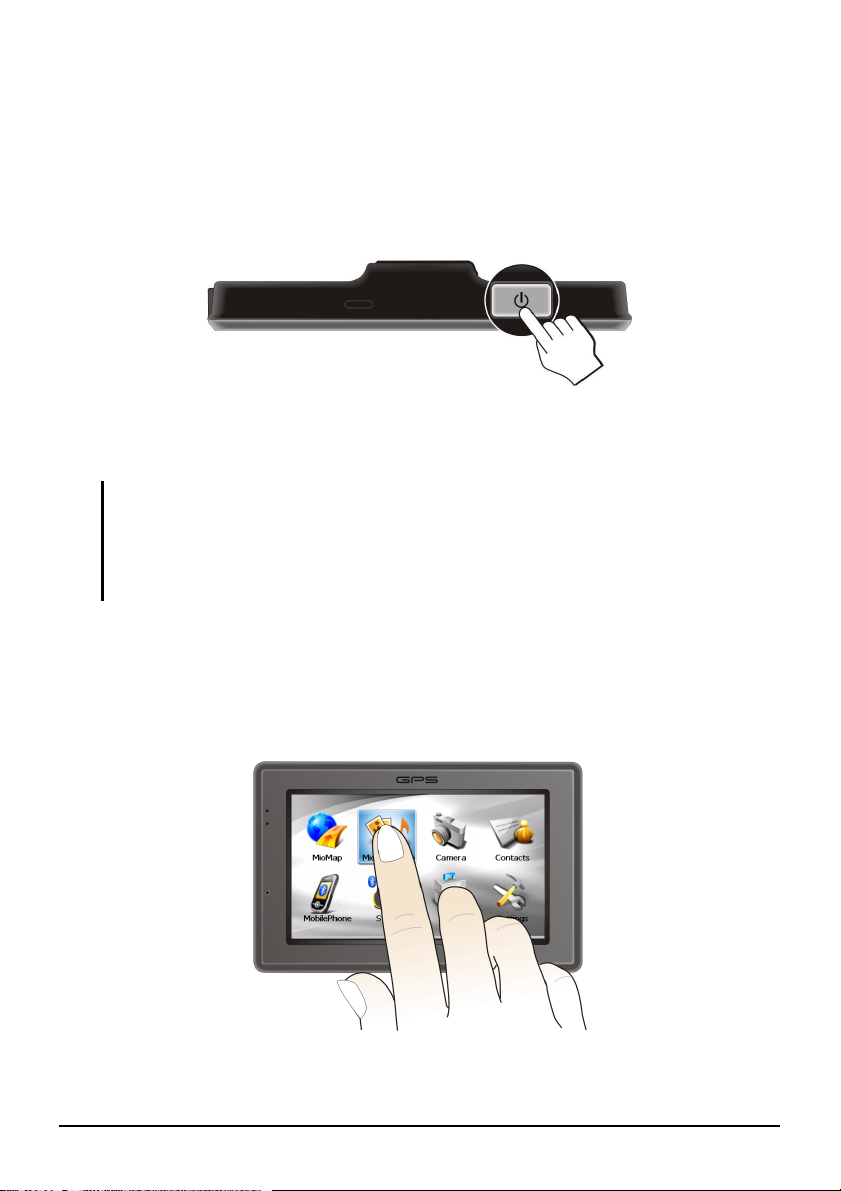
1.6 Operating Basics
Turning On and Off
For normal operation, turn off the device by briefly pressing the power button.
The device enters a suspended state.
When you next briefly press the power button, the system resumes. You will
either be back to where you left off or see the Home screen.
NOTE:
z The screen you see after resuming depends on the program you were using when you
suspended the device. Some programs will be closed when you suspend the device,
meaning you can only see the Home screen after resuming.
z Pressing the power button for a longer duration has a different effect. See Section 15.1 for
more information.
Navigating on the Screen
To operate your device, touch the screen with your fingertip. You can perform the
following actions:
10
Page 21
z Tap
Touch the screen once with your fingertip to open items or select onscreen
buttons or options.
z Drag
Hold your fingertip on the screen and drag up/down/left/right or across the
screen. (Not all programs support this operation.)
z Tap and hold
Tap and hold your fingertip until an action is complete, or a result or menu is
shown. (Not all programs support this operation.)
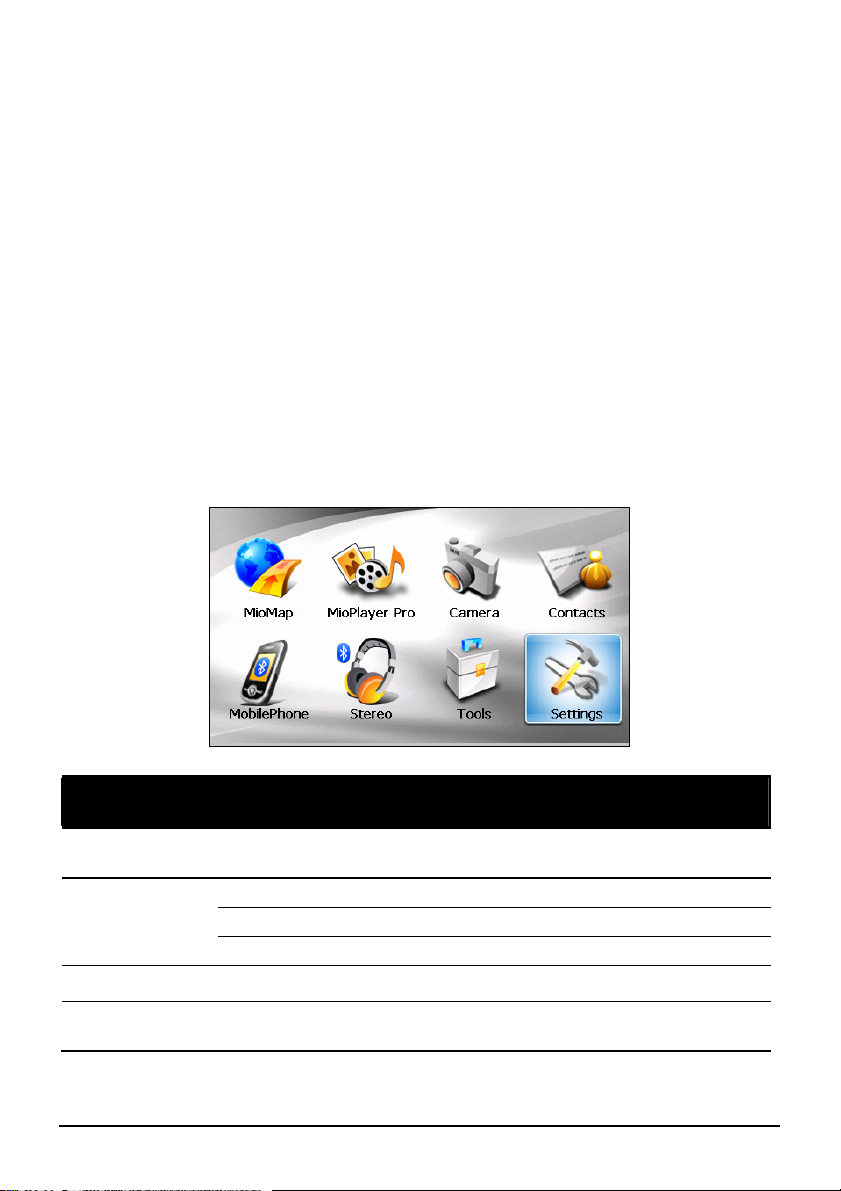
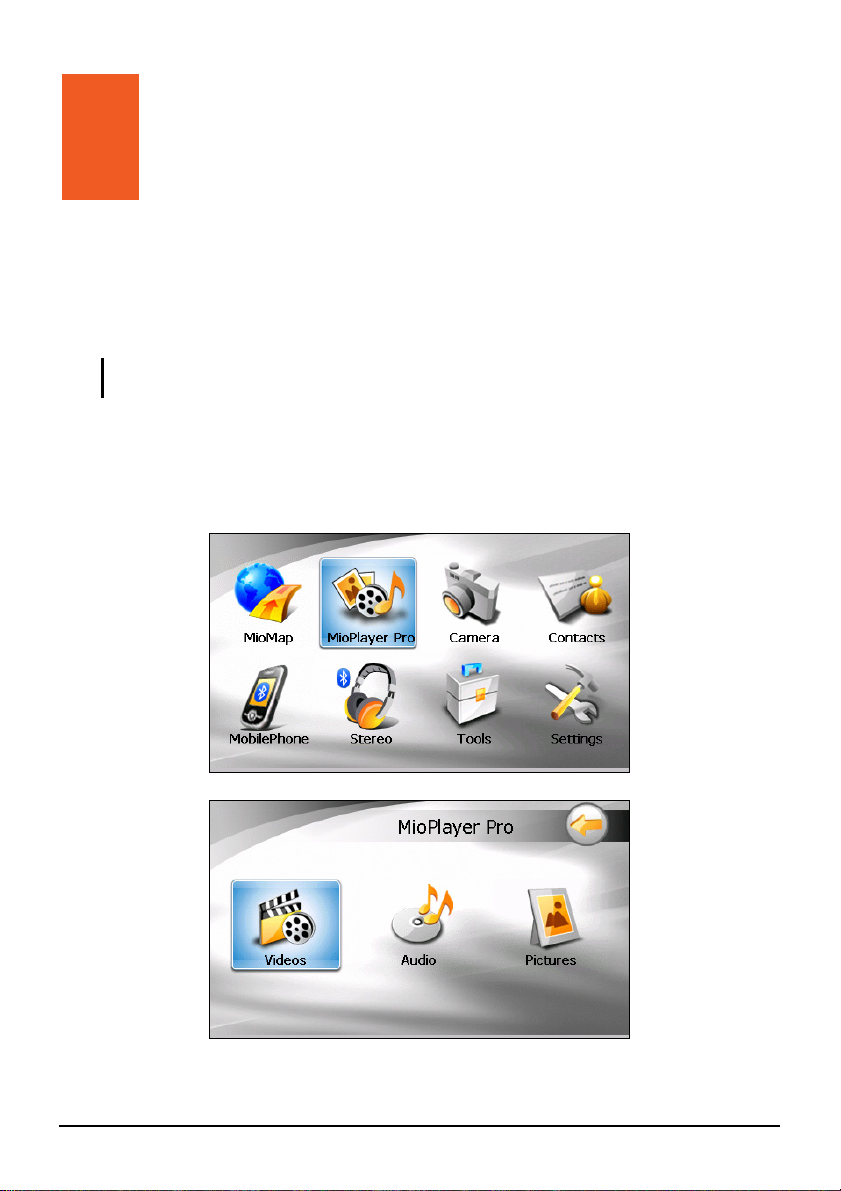
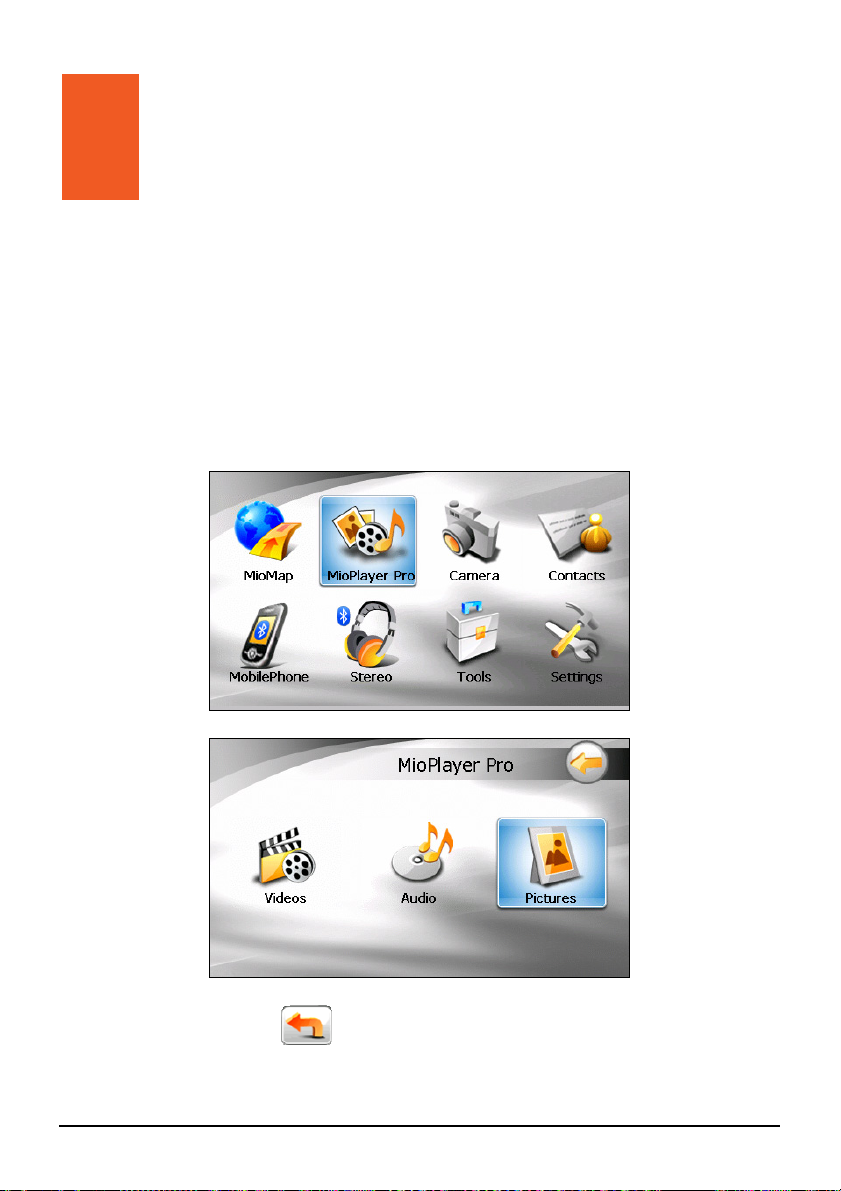
Home Screen
The first time you initialize your device, the Home screen appears. The Home
screen is your starting place for various tasks. Tap a button to start a program or
open another menu. When you exit a program, you are back to the Home screen.
n o p q
r s t u
No.
Button
Name
MioMap Starts the navigation software. See the MioMap
n
MioPlayer
o
Pro
Camera Take photos or record videos. Chapter 5
p
Contacts Keeps a list of names, addresses, and phone
q
Videos plays video files. Chapter 2
Audio plays audio files. Chapter 3
Pictures displays picture files. Chapter 4
numbers.
Description
For Detailed
Information
manual
Chapter 6
11
Page 22
No.
r
Button
Name
Mobile
r
Phone
Stereo Searches for Bluetooth headsets or car stereos for
s
Tools
t
Settings Customizes the system settings. Chapter 11
u
Searches for Bluetooth mobile phones for a
connection.
a connection.
Card Scanner allows you to scan and recognize
business cards for storing contacts information.
Calculator provides basic arithmetic, currency
conversion, and measure conversion functions.
File Manager transfers multimedia files between
a storage card and the device’s flash memory.
Description
For Detailed
Information
Chapter 7
Chapter 7
Chapter 8
Chapter 9
Chapter 10
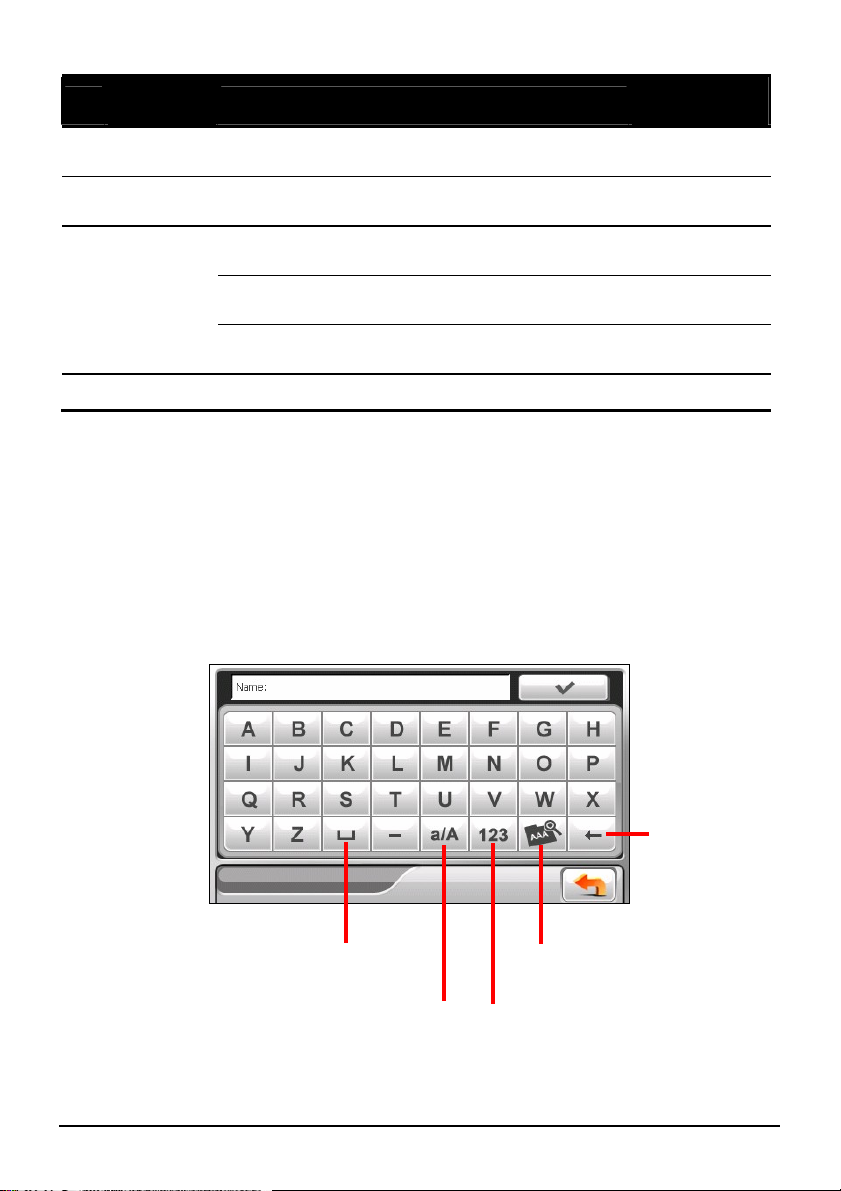
Using the Soft Keyboard
There are occasions when you input text or numbers to your device. For example,
you have to enter names, addresses, and phone numbers in the Contacts program.
On such occasions, the soft keyboard as shown below will appear on the screen.
Depending on the current operation, either the alphabet keypad or the
number/symbol keypad appears.
Alphabet Keypad
12
Spaceba
Switch to lower case or
upper case.
Backspace
Enable umlaut.
Switch to the
number/symbol keypad.
Page 23
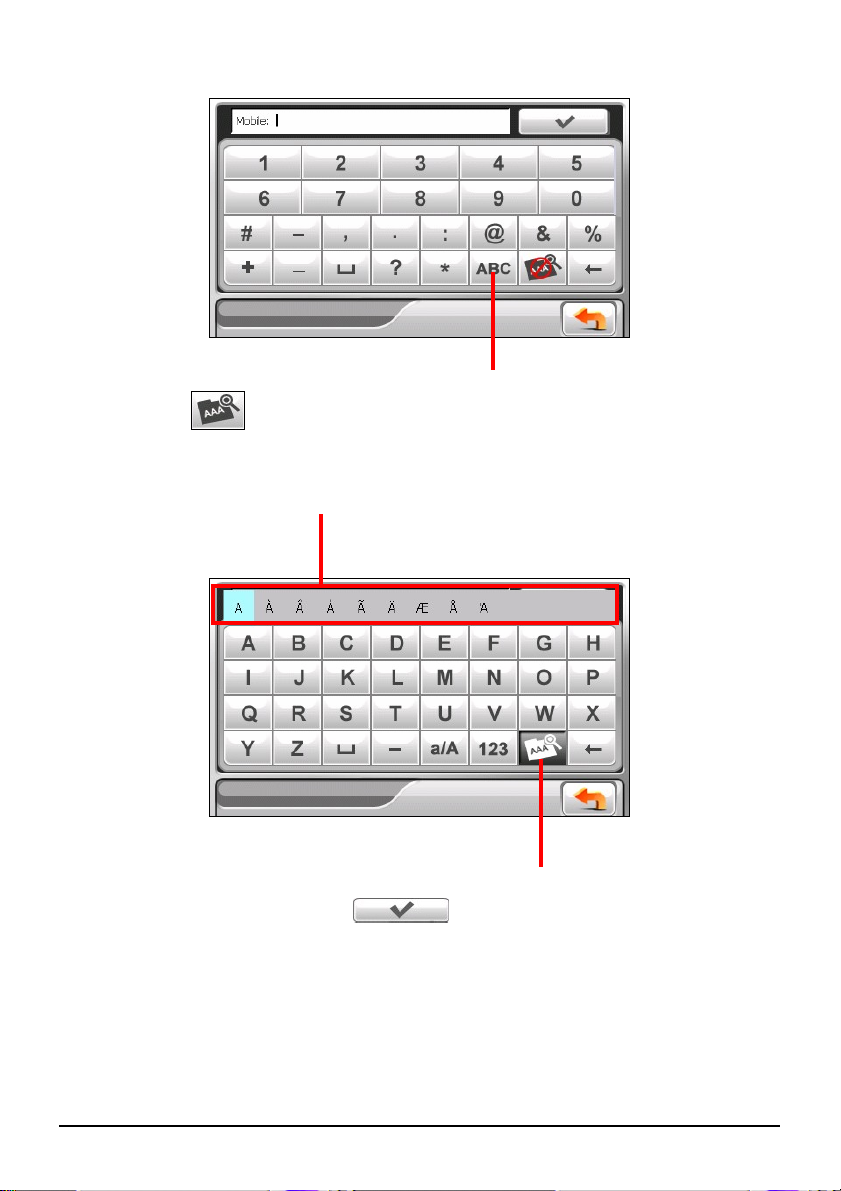
Number/symbol Keypad
Switch to the alphabet keypad.
When you tap
to enable umlaut, you can tap a vowel letter repeatedly to
input a different form of the letter. Alternatively, you can tap the letter in the
pop-up window as shown below.
“Umlaut” means letters with
diacritical marks.
After you complete an input, tap
.
Umlaut enabled. Tap the
button again to disable it.
13
Page 24
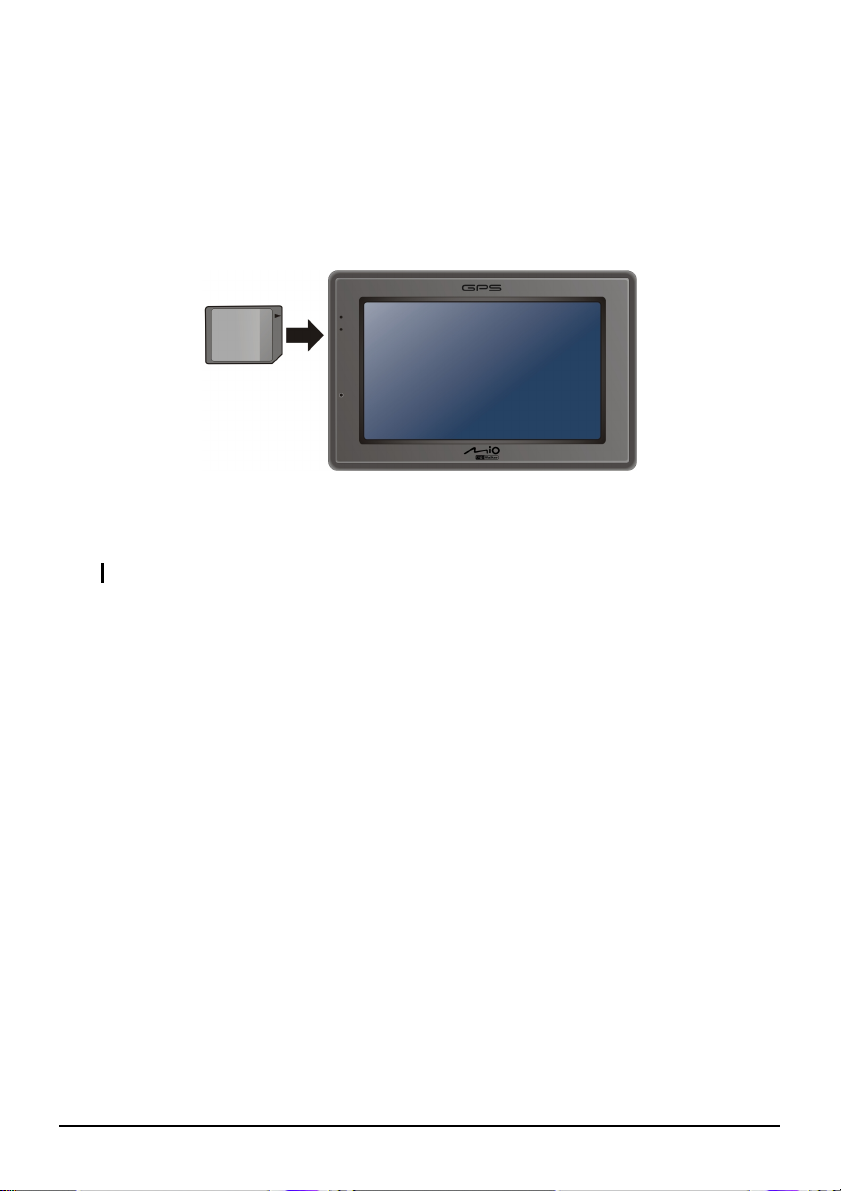
1.7 Inserting a SD/SDHC/MMC Card
Your device has a storage card slot where you can insert an SD, SDHC, or MMC
storage card.
To use a storage card, insert it into the slot, with the connector pointing to the slot
and its label facing the front of the device.
To remove a card, first make sure that no application is accessing the card, then
slightly push the top edge of the card to release it and pull it out of the slot.
NOTE: Make sure that no foreign objects enter the slot.
14
Page 25
2 Videos
2.1 Starting and Exiting Videos
CAUTION: DO NOT view videos while driving. It may be illegal in your state for a display
showing a video to be in view of the driver.
Videos allows you to watch the video clips on your device. (See later section for the formats that your device supports.)
MioPlayer Pro on the Home screen and then tap Videos to start the program.
Tap
↓
15
Page 26
To exit the program, tap .
2.2 Preparing the Video Files for Your Device
Before using the program, have the files ready on either your device’s My Flash
Disk\ My Videos folder or on a storage card.
Note that your device only supports video files in the following formats:
Formats Video Codec Audio Codec
MP4 (.mp4) MPEG4 AAC/AAC+/eAAC+
MP4 (.mp4) H.263 AAC/AAC+/eAAC+
MP4 (.mp4) MPEG4 AMR-NB
MP4 (.mp4) H.263 AMR-NB
QuickTime Movie (.mov) MPEG4 AAC/AAC+/eAAC+
QuickTime Movie (.mov) H.263 AAC/AAC+/eAAC+
AVI (.avi) MPEG4 ADPCM
AVI (.avi) DivX MP3
3GP(.3gp) MPEG4 AAC/AAC+/eAAC+
3GP(.3gp) H.263 AAC/AAC+/eAAC+
3GP(.3gp) MPEG4 AMR-NB
3GP(.3gp) H.263 AMR-NB
ASF(.asf) MPEG4 ADPCM
WMV (.wmv) WMV WMA
NOTE: AVI supports only DivX 4 and DivX 5 playback.
Use Video ToolBox supplied with your device to convert video files to the format
supported by your device. (See Chapter 13 for information.)
A tool called Mio Transfer is supplied for you to easily copy the files from your
computer to the correct location. (See Section 12.3 for information.)
16
Page 27
2.3 Playing Video Clips
1. If your files are in a storage card, insert the card into your device.
2. Tap
MioPlayer Pro on the Home screen and then tap Videos to start the program.
3. The program will search the matching files in the specific folder on your
device and in all folders on a storage card. It then displays the video file list.
The change of color
indicates the file is
Indicate the format
Total number of files.
selected.
of the video file.
Selected file/
Exit
Play the selected file.
NOTE: The file information such as the length of the video and file size is displayed together
with the file name.
Delete the
selected file.
4. To play a video file, tap
filename and tap
in front of the filename. Or, you can tap the
. (See the next section for descriptions of the
onscreen control buttons.)
17
Page 28
2.4 Video Playback Controls
During the playback, tap anywhere on the screen to open or close the onscreen
control buttons. When the control buttons are closed, the video shows in full
screen.
Back
You can drag the knob or tap a point in
the track bar to move to a different
location for the playback.
Control Button Name Description
/
Play/Pause Play or pause the playback.
Stop Stop the playback.
Fast Forward
Fast forward the video. Tap the button to switch to
the next speed.
18
/
/
Playback
Mode
Backlight
Volume
Exit
Æ Æ
Switch to the next mode:
Single playback.
Repeated playback.
Increase or decrease the video backlight. The
indicator at the bottom shows the current brightness
level.
Increase or decrease the volume. The indicator at the
bottom shows the current volume level.
Stop the video playback and return to the video list
screen.
Page 29
3 Audio
3.1 Starting and Exiting Audio
Audio features:
z Playback of MP3/WAV/WMA files
z Basic playback controls such as play, pause, stop, next and previous
z Playback includes single selection playback, repeat, single repeat, sampling
playback, normal sequence and random sequence.
z 11 preset equalizer audio profiles
z Play list support
z Background playback
z Lyrics display
Tap
MioPlayer Pro on the Home screen and then tap Audio to start the program.
↓
19
Page 30
The control panel appears on the screen where you can easily control the player by
tapping the control buttons.
To exit the program, tap
.
3.2 Preparing the Audio Files for Your Device
Before using the program, have the files (.mp3, .wav, or .wma) ready on either
your device’s My Flash Disk\My Audio folder or on a storage card.
A tool called MioTransfer is supplied for you to easily copy the files from your
computer to the correct location. (See section 12.3 for information.)
20
Page 31
3.3 Playing Audio Files
1. If your files are in a storage card, insert the card into your device.
2. Tap
Audio on the Home screen to start the program.
3. The program will search for the supported audio files in your device and in the
storage card. When files are detected, they will be added to the play list.
NOTE: You can create your own play lists for future playback. (See section 3.6 for details.)
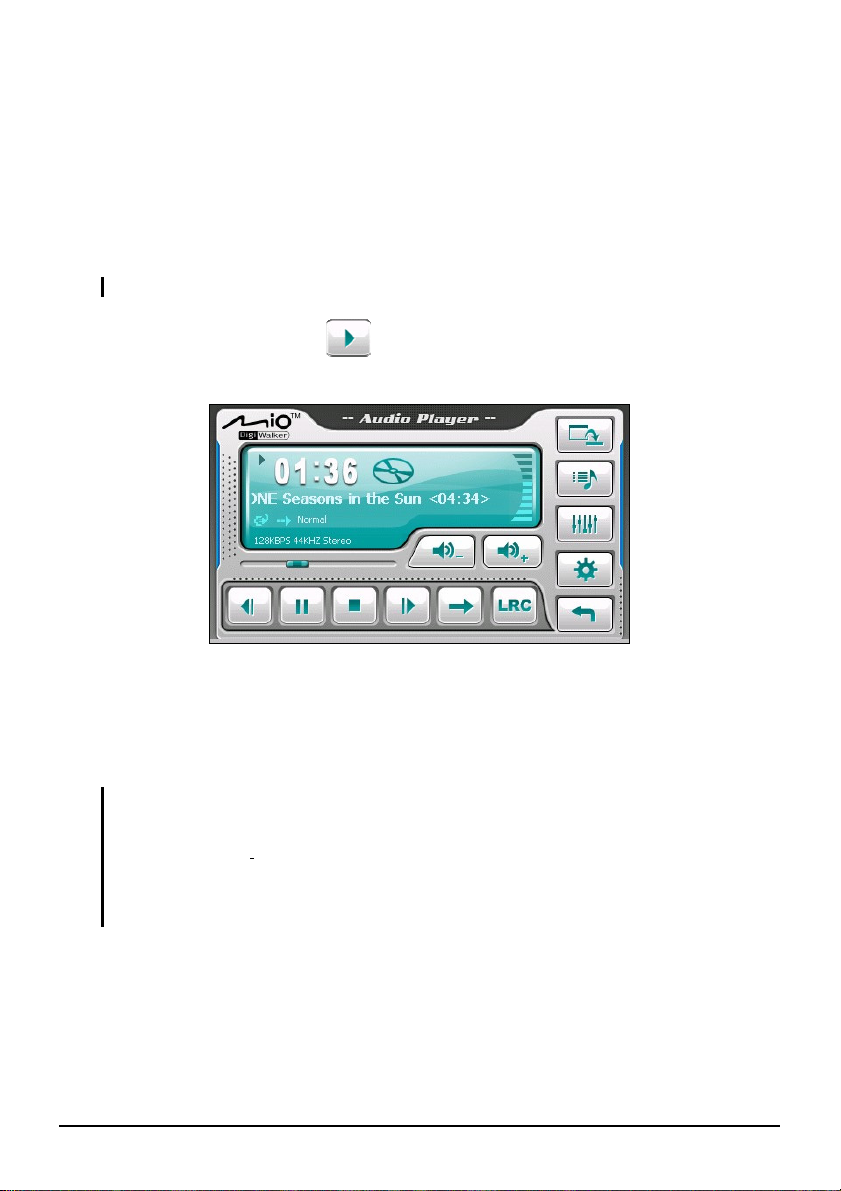
4. To start the playback, tap
. To control the playback, use the control
buttons as described later.
The information area displays the current status including the play/pause/stop
status, the elapsed time, the power status, the playback mode, the volume
level, and the properties of the current song such as the artist (if available with
the file), filename, total length, and stereo/mono information.
NOTE:
z During the playback, the screen will automatically blank out if you haven’t tapped the
screen within the preset time (30 seconds by default).The screen will restore when you
press the power button or when the playback of the current play list has ended.
z If the total length of a song exceeds 99 minutes and 59 seconds, the information area
cannot correctly display the length because the maximum number allowed is 99:59.
However, the playback of the song is not affected.
21
Page 32

3.4 Playback Controls
Control Button Name Description
Play/Pause Plays or pauses the playback.
/
Stop Stops the playback.
Previous/
/
/
Next
Volume Increase or decrease the volume.
Track Bar You can tap on a point along the track bar to move
Playback
Mode
Lyrics
Minimize Minimizes the control panel and play the music in
Play List Opens the play list. (See Section 3.6 for more
Equalizer Opens the equalizer panel.
Settings Opens the Settings screen for setting up power
Exit Closes the program and returns to the Home
Plays the previous or next file.
The indicator on the panel shows the current
volume level.
directly to a different location for the playback.
Switches to the next mode:
Repeated playback of the current file.
Repeated playback of all files in the current play
list in sequence.
Playback of all files in the current play list in
random order.
Sampling (10 seconds) playback of all files in the
current play list in random order.
Playback of all files in the current play list in
sequence.
Opens the lyrics display. Available only if the
current song is with lyrics. (See Section 3.5 for
more information.)
the background.
information.)
(See Section 3.7 for more information.)
saving mode and accessing help. (See Section 3.8
for more information.)
screen.
22
Page 33

3.5 Displaying Lyrics
The program allows you to display the real-time lyrics on the screen while playing
songs. This feature is especially handy for you to sing along with the songs.
Preparing the Lyrics Files for your Device
To display the lyrics, you need to have the lyrics files (.lrc) ready on your device’s
\My Flash Disk\My Audio\Lyric\ folder or the \My Audio\Lyric\ folder on your
storage card.
NOTE: You can search and download these .lrc files from the Internet.
Use MioTransfer to copy the lyrics to the correct location of your device. (See
section 12.3 for information.) When copying a lyric file to your device, be sure to
use the same filename as the audio file. For example, if a MP3 file is named My
Love.mp3, the lyrics filename must be My Love.lrc.
NOTE: When playing songs with lyrics, the 30-second screen off feature will not take effect.
Playing Songs with Lyrics
The button is available when you’re playing a song with lyrics. Tap this
button to view the lyrics.
As the song plays, the lyrics scroll line by line on the screen, with the current line
highlighted by a different color. The background image changes in turn at a
specific time interval.
23
Page 34

To close the lyrics screen and go back to the control panel, tap anywhere on the
screen.
3.6 Using the Play Lists
You can create your own play lists for future use.
Creating a Play List
1. Tap on the control panel to open the play list screen. The screen shows
the current play list.
Play the
selected file.
Add song
Remove the selected
song from the list or from
the storage media.
Clear all songs from the current
play list. (No files are deleted.)
Save the play list.
Open the list of play lists.
Back
2. To add a song to the play list, tap
.
3. A screen appears displaying all the audio files. Tap the song(s) you wish to
add and then tap
.
24
Page 35

Back
A
Add the selected song(s)
to the play list.
dd all songs to the
play list.
4. To save the play list, tap
.
5. The keyboard screen appears where you can change the default name of the
play list. Rename the play list if you want. Tap
when finished.
6. To return to the control panel, tap
.
Opening a Play List
To open one of the play lists that you have created:
1. Tap
on the control panel.
2. Tap
to display all the play lists you have created.
25
Page 36

3. Tap the play list you want to open and tap .
Rename the
selected play list.
Delete the
selected play list.
Delete all play lists.
Back
Open the selected play list.
4. To return to the control panel, tap
.
3.7 Equalizer
The program provides 11 preset audio profiles. Tap to open the equalizer
panel.
Tap
Jazz, Classical, Dance, Heavy, Disco, Soft, 3D and Hall.
or to cycle through the available options: Default, Rock, Pop,
26
Page 37

Tap to save your selection and return to the control panel.
To select the Default profile, tap
.
3.8 Settings
Tap on the control panel. The Settings screen appears.
NOTE: To know the function of each button, you can tap
list to display a description line on the right side of the screen.
Tap the check box (√) to turn on the power saving mode. Tap the up/down button
to set the timer to 10 seconds, 30 seconds, 1 minute, or 5 minutes. During the
playback, the screen will automatically blank out f if you haven’t tapped the
screen within the preset time (30 seconds by default).The screen will restore when
you press the power button or when the playback of the current play list has ended.
Help
. Then tap the button on the
Tap
to save any changes you have made.
27
Page 38

Page 39
4 Pictures
4.1 Starting and Exiting Pictures
Pictures allows you to view pictures in JPG, JPEG, and BMP formats and view the slideshow of the pictures on your device.
Tap
MioPlayer Pro on the Home screen and then tap Pictures to start the program.
↓
To exit the program, tap
.
29
Page 40

4.2 Preparing the Pictures for Your Device
A
Before using the program, have the files (.jpg, .jpeg, or .bmp) ready on either your
device’s My Flash Disk\My Pictures folder or on a storage card.
NOTE: The Pictures program does not support the display of BMP files in 32-bit and above
color depth formats.
A tool called MioTransfer is supplied for you to easily copy the files from your
computer to the correct location. (See section 12.3 for information.)
4.3 Viewing Pictures in Thumbnail View
1. If your files are in a storage card, insert the card into your device.
2. Tap
Pictures on the Home screen o start the program.
3. The program will search the matching files in the specific folder on your
device and in all folders on a storage card. It then displays the pictures in the
thumbnail view.
frame indicates
the picture is
selected.
Scroll up
The satellite icon
indicates the photo
contains geographic
coordinates
information.
Scroll down
Selected file/
Total number of files
Start the slideshow.
Delete all pictures.
Delete the selected picture.
Set the length of time each slide is displayed
before moving on to the next slide. Tap the
button to switch to the next available option
(1 second/3 seconds/5 seconds).
Exit
30
Page 41

4.4 Viewing a Picture in Full Screen
When you tap a picture twice in the thumbnail view, the picture is displayed in full
screen.
Previous
Next
To go back to the thumbnail view, tap anywhere on the screen to display the
control buttons and then tap
.
4.5 On-Screen Control Buttons
On-screen control buttons provide various functions and settings. Tap anywhere
on the picture to display the buttons as shown below. To close the buttons, tap the
picture again.
31
Page 42
Control
Button
Name Description
Slideshow Starts the slideshow. (See section 4.6 for detailed
Rotate
Information Enables or disables the displaying of the name and date of
Delete Deletes the current picture.
Brightness Tap the button to adjust the brightness of the picture.
Zoom Tap the button to zoom in to 1.2x, 1.5x, 1.8x, or 2.0x, or,
Back
information.)
Rotate clockwise by 90 degrees.
the file.
after zooming in, to zoom out.
When you have zoomed in the picture, you can drag the
picture to view other parts of the picture.
Goes back to the thumbnail view.
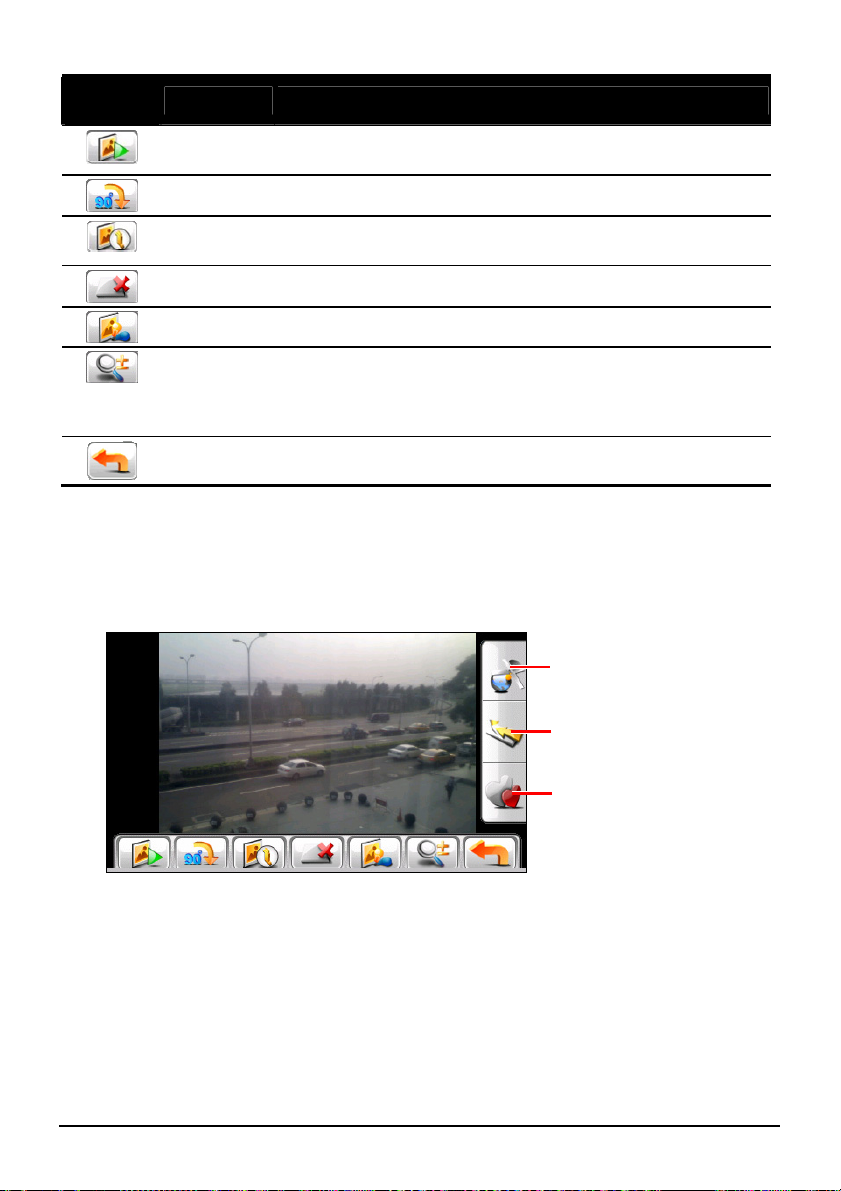
If you open a photo that contains geographic coordinates information, three
additional control buttons appear along the right side of the screen as shown
below. (You can take photos to include geographic coordinates information using
the Camera program. See Section 5.3 for details.)
Starts MioMap to display the
location on the map.
32
Starts MioMap to navigate to the
shooting location of the photo.
Starts MioMap to save the
location as a favorite location.
Page 43

4.6 Viewing the Slideshow
To view the slideshow of all your pictures, use one of the following ways:
z When in the thumbnail view, tap
z When in full screen, tap anywhere on the picture to display the on-screen
control buttons. Then tap
To stop the slideshow, tap anywhere on the screen.
to start the slideshow.
to start the slideshow.
33
Page 44

Page 45

5 Camera
5.1 Starting and Exiting Camera
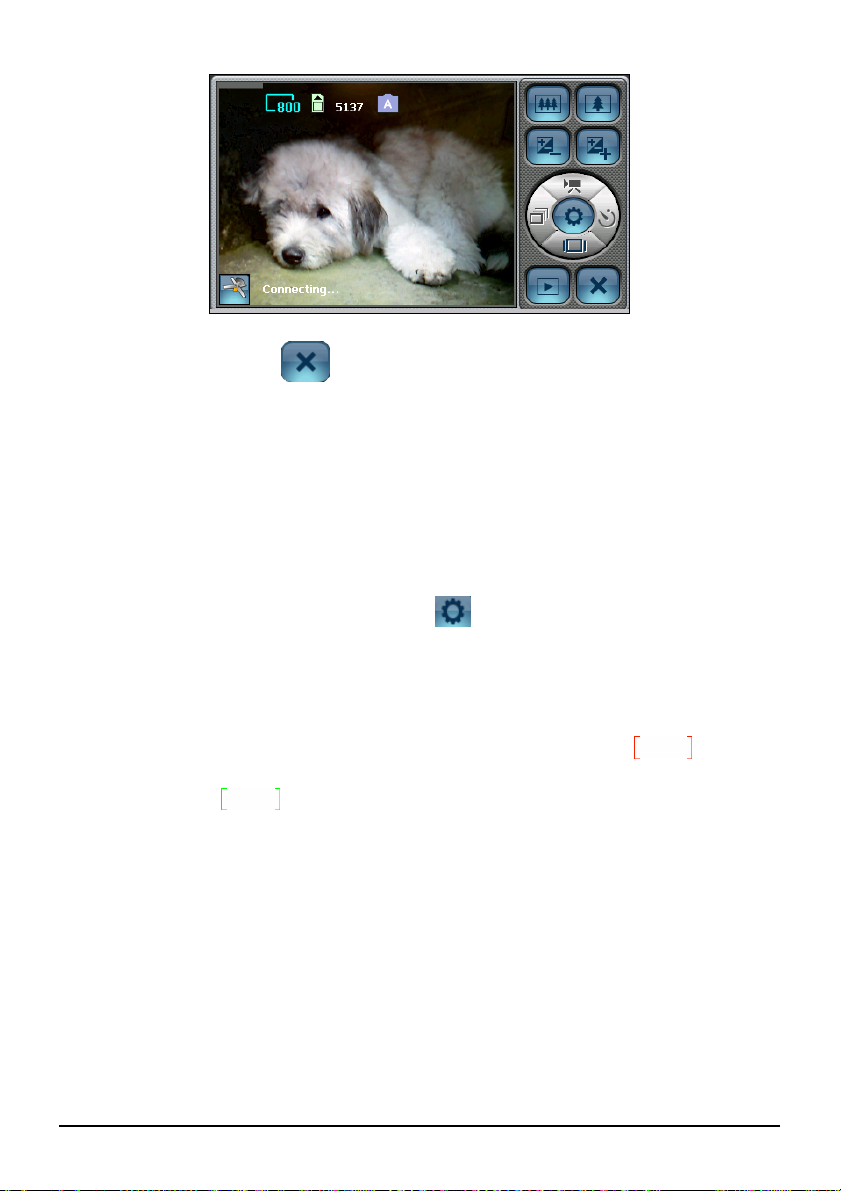
Camera allows you to take photos or record videos. You can view your photos and videos in the program.
There are two ways to start the Camera program:
z Tap Camera on the Home screen.
z Press the Camera button on the top of the device. (This will close the current
program.)
NOTE: When using the MioMap navigation program, the Camera button is disabled.
35
Page 46
To exit the program, tap
.
5.2 Taking a Photo
1. Insert a storage card if you want to store your photos to it. Make sure that the
correct storage location is specified. (See Section 5.4 for information.)
2. Start the Camera program (as described in 5.1). The program will be in the
Camera mode by default.
3. If you need to change the settings, tap
4. Compose your photograph. You can use the control button on the right to
adjust the camera lens (details provided in following sub-section).
5. The program has an auto-focus function. When ready, press lightly (halfway
down) on the Camera button and hold. A red focus bracket (
appear in the center of the screen. When the color of the bracket changes from
red to green (
Camera button to take the photo. The system will play a sound to indicate that
the shutter has been released.
), focusing is completed. Now press fully down on the
. (See Section 5.4 for information.)
) will
36
Page 47
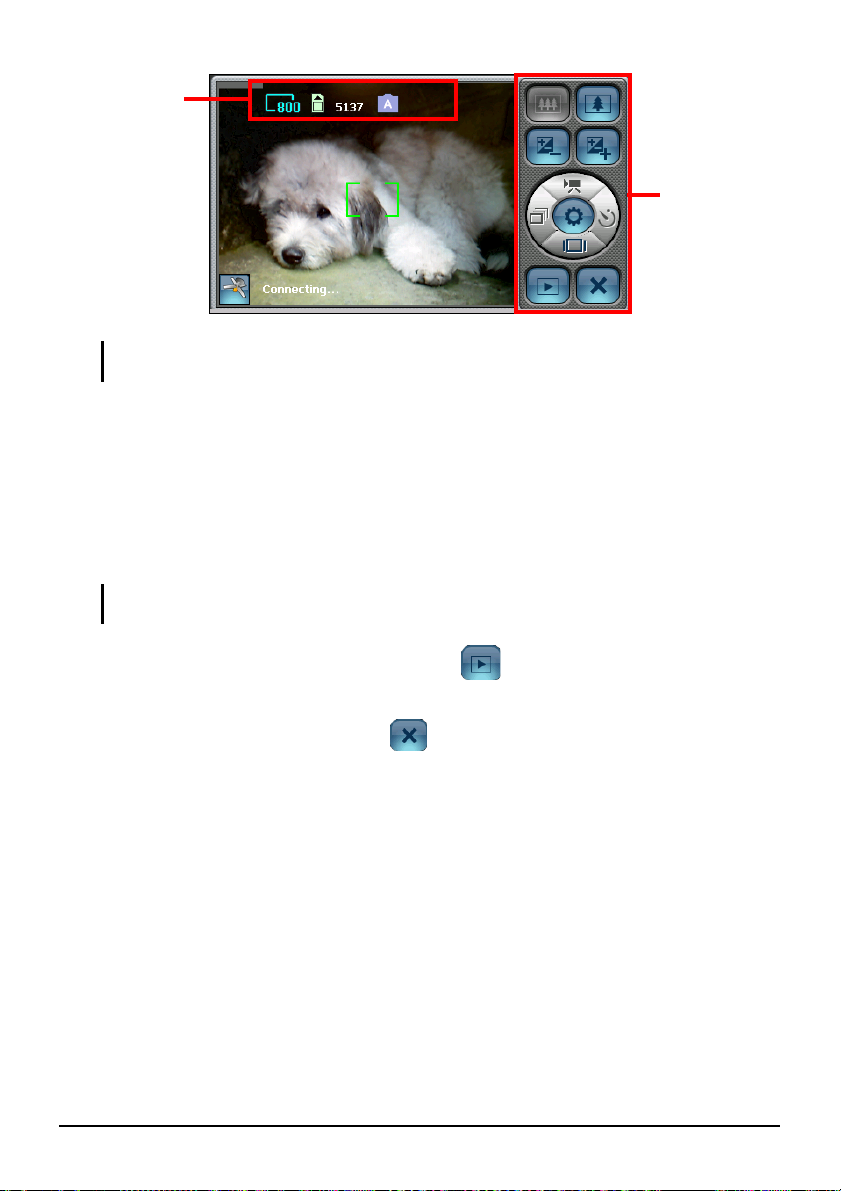
Status Bar
Control Panel
NOTE: The red focus bracket will blink in red to indicate that the program cannot focus on the
current target.
6. After taking a photo, the program saves it with the filename DSCxxxxx.JPG
(where xxxxx is a sequential number, e.g. DSC00001.JPG).
If you have already inserted a storage card and specified it as the storage
location, the photo will be saved to the card in the \My Pictures\ folder. The
photo will otherwise be stored in the device’s \My Flash Disk\My Pictures\
folder.
NOTE: If you have deleted all photo files in the storage device, the numbering of the
filenames will restart from 00001.
7. To view the photo that you just took, tap
. (See Section 5.7 for
information.)
8. To exit the Camera program, tap
.
37
Page 48

Camera Screen Elements
Camera Status Icons
Several icons appear at the top of the screen to indicate the current status:
Icon Name Description
Resolution The number indicates the resolution is set to 320 x 240, 336 x
Storage
Location
Remaining
Shots
Scene Mode
Timer This icon appears if the Timer function is enabled. The number
Continuous
Shot
GPS Stamp This icon appears in the lower left corner of the screen when the
252, 400 x 300, 640 x 480, 800 x 600, 1280 x 960 or 1600 x
1200. (Only the front number is displayed.)
− the device’s internal memory
− the storage card
The number indicates how many more shots can be taken and
saved to the current storage location. The number of shots is
determined by the amount of space remaining in memory and
the selected resolution.
− Auto Mode
− Night Mode
− Sports Mode
− Indoor Mode
− Outdoor Mode.
within the icon indicates the timer duration (5 sec or 10 sec).
This icon appears when the continuous shot function is enabled.
GPS stamp function is enabled.
38
Page 49

Camera Control Panel
The control panel to the right of the screen provides these buttons:
Control
Button
Name Description
Zoom In/
Zoom Out
Exposure
Compensation
Change
Function
Continuous
Shot
Display Enables or disables the display of the status icons.
Timer Enables or disables the timer function. (See later
Settings Opens the Camera Settings screen. (See Section 5.4 for
View Switches to the View mode. (See Section 5.7 for
Tap
tap
1x, 1.25x, and 2x. A scale will appear at the bottom of the
screen showing the current zoom ratio.
NOTE: If you are using a resolution higher than (but not
including) 800 x 600, the Zoom function will not be
available.
Adjusts the brightness of the photo. The available
settings are –1.5, -1, -0.5, 0, 0.5, 1, and 1.5. A scale will
appear at the bottom of the screen showing the current
brightness level.
Switches to the Video Mode.
Enables or disables the continuous shot function. (See
later sub-section on “Using the Continuous Shot
Function” for details.)
sub-section on “Using the Timer” for details.)
information.)
information.)
to zoom in the camera lens; when zoomed in,
to zoom out. The available zoom settings are
39
Page 50

5.3 Using the Special Camera Functions
Using the Continuous Shot Function
The program offers a Continuous Shot function so each release of the shutter takes
four photos in a row.
1. Tap
2. The
the Continuous Shot function is enabled. To take photos, follow the
instructions as described in the “Taking a Photo” section.
NOTE: Photos taken using Continuous Shot are limited to 640 x 480 resolutions.
3. Once the Continuous Shot function is enabled, it will remain active until you
turn it off or exit the program. To stop using this function, turn it off by
tapping the
on the control panel.
icon will appear in the top right corner of the screen to indicate that
button again.
Using the Timer
The program offers the Timer function so a photo is only taken 5 or 10 seconds
after you release the shutter.
1. Tap
Section 5.4 for details.)
2. The
the Timer function is enabled. To take photos, follow the instructions as
described the “Taking a Photo” section. The program will take a photo after
the set delay.
on the control panel. (The Timer can be set to 5 or 10 seconds. See
icon will appear in the top right corner of the screen to indicate that
3. Once the Timer function is enabled, it will remain active until you turn it off
or exit the program. To stop using this function, turn it off by tapping the
button again.
40
Page 51

Storing Geographic Coordinates
Apart from taking photos, the Camera program also offers GPS Stamp function.
This will store the geographic coordinates of your location as you take a photo. In
the future you can use the MioMap navigation program to directly navigate to the
shooting location of the photo.
1. Start the Camera program (as described in 6.1). If the GPS Stamp function is
not enabled, tap
Æ Æ Æ to enable it.
2. The
the program has activated its GPS port and is now searching for GPS
satellites.
NOTE: If a GPS fix can’t be achieved within 2 minutes the icon will have an X symbol.
You can tap this icon to try to connect again.
3. After a GPS fix, your current coordinates will show at the bottom of the
screen. To take photos, follow the instructions as described in the “Taking a
Photo” section.
4. Once the GPS Stamp function is enabled, it will remain active until you turn it
off.
icon will appear in the lower left corner of the screen to indicate that
41
Page 52

5.4 Camera Settings
Tap on the control panel while in Camera mode and the Camera Settings
screen as shown below appears.
Tap the set value for an item to open the sub-menu (except for the Reset item). In
the sub-menu, select the desired value. A check indicates the current value.
Item Name Description
Scene Mode Sets the scene mode to Auto, Night, Sports, Indoor, or
Resolution Sets the resolution to 320 x 240, 336 x 252, 400 x 300,
Timer Sets the countdown delay time for the Timer to 5 seconds
Effect Allows you to apply different effects to the photo.
GPS Stamp When enabled, you can store the GPS coordinates of
Storage
Location
Continuous
Shots
Shutter
Sound
Frequency
Control
Outdoor.
640 x 480, 800 x 600 (default), 1280 x 960, or 1600 x
1200.
(default) or 10 seconds.
Options are Normal (default), Sepia, and Mono.
your current location to the photo file.
Selects whether to store photos to the device memory in
the \My Flash Disk\My Pictures\ folder or to the
storage card’s \My Pictures\ folder (must be inserted
first).
Enables or disables (default) the four-picture continuous
shot function.
Sets the sound effect to play when you release the shutter
(3 sound effects available); You can also disable the
shutter sound.
Selects the refresh frequency for fluorescent lights: 50Hz
or 60Hz (default).
42
Page 53

Item Name Description
Reset Restore the Camera settings to their factory defaults.
To leave the Settings screen, tap
stored and retained until you change them again.
. Any changes that you have made will be
5.5 Recording Videos
1. Insert a storage card if you want to store your videos to it. Make sure that the
correct storage location is specified. (See Section 5.6 for information.)
2. Start the Camera program (as described in 5.1). The program will be in the
Camera mode by default. Tap
indicated by the
on the screen.
to switch to the Video mode. This will be
3. If you need to change the settings, tap
4. Aim the camera lens at your target. You can use the control button on the right
to adjust the camera lens (details provided in following section).
5. To begin recording, fully press the Camera button.
The system will play a beep sound and the red icon will appear on the
screen to indicate that recording is in progress. The number to the side shows
the length of video recorded so far (e.g.
limited to a length of 15 seconds. (You can change this in Video Settings.)
6. To manually end the recording, press the Camera button again. The system
will play a beep sound to indicate that the recording has been stopped.
. (See Section 5.6 for information.)
). By default, videos are
43
Page 54

7. After recording, he program will save it with the filename MOVxxxxx.MP4
(where xxxxx is a sequential number, e.g.MOVC00001.MP4).
NOTE:
z If you have deleted all video files in the storage device, the numbering of the file names will
restart from 00001.
z By default the file format is MP4. You can also change the format to 3GP. (See 5.6 for
more information)
If you have already inserted a storage card and specified it as the storage
location, the video will be saved on the card in the \My Videos\ folder. The
video will otherwise be stored in the device’s \My Flash Disk\My Videos\
folder.
8. To view the video that you just recorded, tap
9. To exit the program, tap
.
. (See Section 5.7.)
Video Screen Elements
Video Status Display
Several icons appear at the top of the screen to indicate the current status:
Icon Name Description
Resolution The number indicates the resolution is 128 x 96 or 176 x
Storage
Location
Video Mode Indicates that you are currently in Video mode.
Recorded
Time
Remaining
Recording
Time
144. (Only the front number is displayed.)
− the device’s internal memory
− the storage card
The red icon indicates that recording is in progress. The
changing number shows the amount of time recorded so
far.
The number indicates the length of video that can still be
stored at the storage location. The length is determined by
the amount of space remaining in memory and the selected
resolution. (The maximum value that can be displayed on
the screen is 99. Therefore, if the remaining time is greater
than 99, only 99 will be shown on screen.)
44
Page 55

Video Control Panel
The control panel to the right of the screen provides these buttons:
Control
Button
Name Description
Change
Function
Zoom In/
Zoom Out
Settings Opens the Video Settings screen. (See Section 5.6 for more
View Switches to the View mode. (See Section 5.7 for more
Switch to the Camera mode.
Tap
1.25x, and 2x. A scale will appear at the bottom of the
screen showing the current zoom ratio.
information)
information)
to zoom in the camera lens; when zoomed in, tap
to zoom out. The available zoom settings are: 1x,
5.6 Video Settings
Tap on the control panel while in Video mode and the Video Settings screen
as shown below appears.
Tap the set value for an item to open the sub-menu (except for the Reset item). In
the sub-menu select the desired value. A check indicates the current value.
45
Page 56

Item Name Description
Resolution Sets the video resolution to 128 x 96 or 176 x 144.
Recording
Limit
Record
Sound
Video
Format
Storage
Location
Reset Restore the Video settings to their factory defaults.
Sets the maximum length of video to record. Options are
10 seconds, 15 seconds (default), and off.
Enables (default) or disables the sound recording
function.
Sets the video format to 3G or MP4 (default).
Selects whether to store videos to the device memory in
the \My Flash Disk\My Videos\ folder or to the storage
card’s \My Videos\ folder (must be inserted first).
To leave the Settings screen, tap
. Any changes that you have made will be
stored and retained until you change them again.
5.7 View Mode
In the Camera or Video mode, tap to switch to the View mode.
When viewing a photo:
46
Page 57

When viewing a video:
The control buttons in View mode are:
Control
Button
/
Table Notes:
* Only when viewing a photo.
** Only when viewing a video.
Name Description
Zoom * Zooms in or out on the image. When zoomed in, you can
drag on the screen to view other parts of the image.
Delete Deletes the current file.
Edit * Edits the current photo. (See the next sub-section for
details.)
Pictures * Starts the Pictures program. (This closes the Camera
program.)
Videos ** Starts the Videos program. (This closes the Camera
program.)
Previous/
Next
Play/Stop ** Starts or stops video playback.
Display * Enables or disables the display of file information.
Camera Returns to the Camera/Video mode.
Exit Closes the program and returns to the Home screen.
Goes to the previous or next file.
47
Page 58
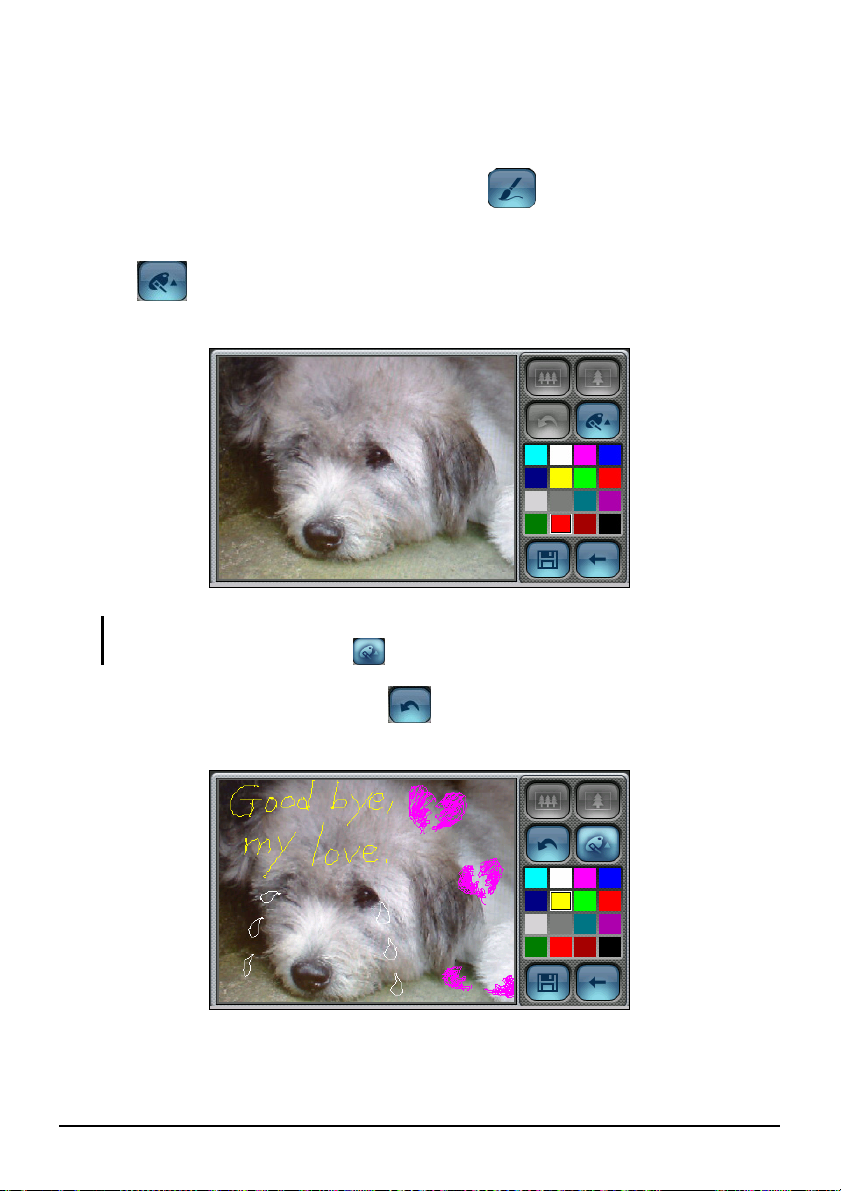
Editing Photos
You can use the paintbrush tool to touch up the photos and create special effects.
1. When viewing the photo in View mode, tap
2. Select the size of the photo that you wish to save.
3. Tap
draw or write on the screen.
NOTE: If you selected 640 x 480, you can drag on the screen to go to other parts of the photo
for editing. But you must first tap to disable the Paintbrush function.
4. To undo the previous stroke, tap
allowed.)
to enable the Paintbrush function. Select the desired color and then
. (A maximum of 3 undo operations is
.
48
Page 59

5. Tap to save the edited photo as a different file. To leave without saving,
tap
. You will return to the View screen.
49
Page 60

Page 61

6 Contacts
6.1 Starting and Exiting Contacts
Contacts allows you to keep a list of names, addresses, and phone numbers.
NOTE: If you have created Microsoft Outlook Contacts information on your computer, you
can copy the information to your device. (See Section 12.4 for information.)
Tap
Contacts on the Home screen to start the program. The contacts list appears.
↓
To exit the program, tap
.
51
Page 62
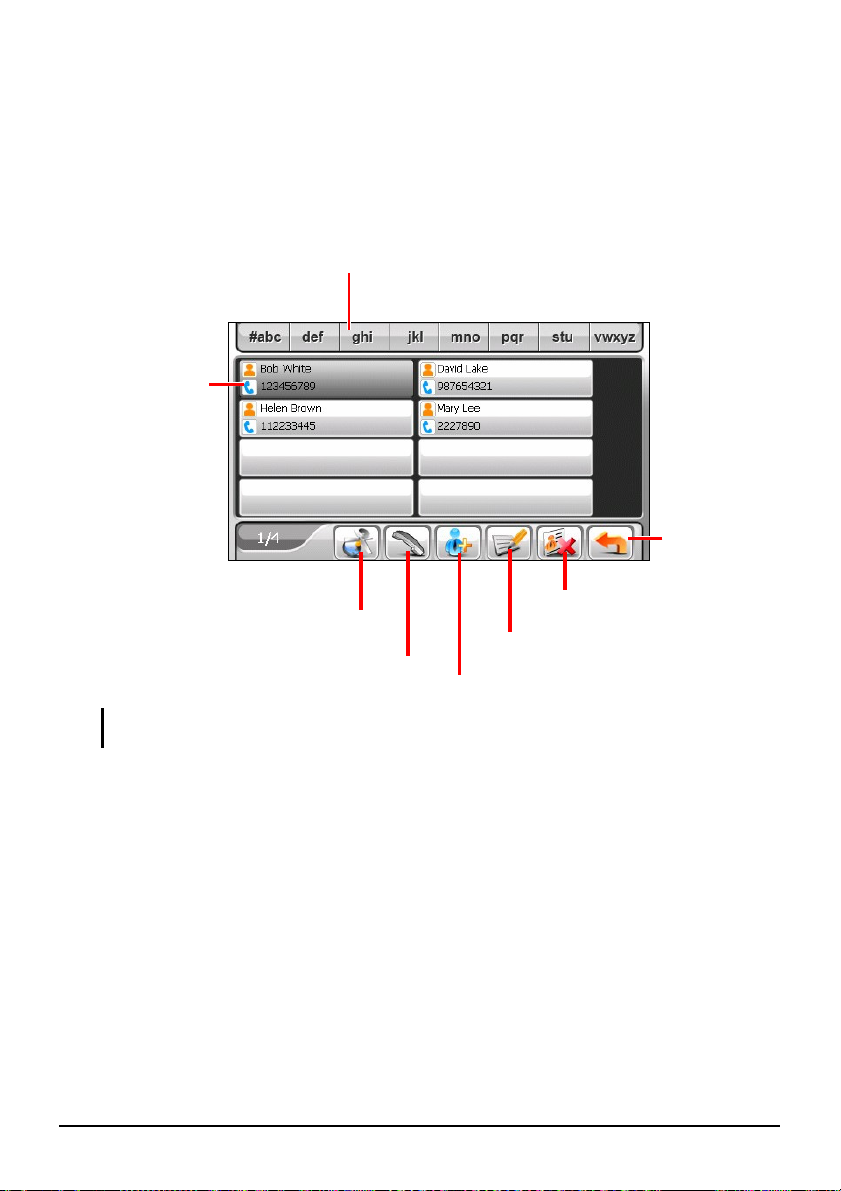
6.2 Using the Contacts List
A
f
After starting Contacts, the contacts list appears. It shows the names and phone
numbers (mobile phone numbers by default) of your contacts.
You can use the various buttons on the screen to search a contact, navigate to the
address of a contact, call a contact, and so on.
Tap twice to display
the summary screen
of a contact.
Navigate to the address o
the selected contact.
Call the selected contact.
Tap one of the alphabet sets to
quickly find a contact.
Edit the selected contact.
dd a contact.
Delete the selected contact
NOTE: If you have transferred the phone book from a Bluetooth mobile phone to your device
(as described in Section 7.3), the contacts will also appear in the list.
Exit
52
Page 63

6.3 Using the Summary Screen
In the contact list, tapping a contact twice displays the summary screen of the
contact.
Tap to scroll through the
entry fields.
Back
6.4 Navigating to a Contact’s Address
You can set a contact’s address as your GPS navigation destination.
NOTE: For the navigation software to navigate to an address in Contacts, there should be no
Suite #, Apartment # or other additional information on the Street Address line, as these may
prevent correct navigation. You might consider saving the additional Suite, Apartment or
other numbers to a different field such as the “Department” field.
1. Tap the
Contacts button on the Home screen to start the program.
2. In the contact list, select the desired contact and tap
3. Tap
to select the home address or
to select the work address.
.
53
Page 64

4. The navigation program starts. (See the document supplied with the
navigation software for more information.)
6.5 Making a Phone Call to a Contact
1. Connect your device with a Bluetooth mobile phone as described in Section
7.2.
2. Tap the
3. In the contact list, select the desired contact and tap
4. Tap
mobile phone number.
Contacts button on the Home screen to start the program.
.
NOTE: The call button is available for use only when a Bluetooth mobile phone is connected.
to call the home number, the work number, or the
54
Page 65

6.6 Managing Contacts
Adding a Contact
1. Tap the Contacts button on the Home screen to start the program.
2. Tap
3. Tap an entry field twice
appears.
.
. Or, tap a field and then tap .The soft keyboard
55
Page 66

4. Use the soft keyboard to enter the information in the field and tap
5. Enter the information in other fields such as address and phone number fields.
You will need to scroll down to see all available fields.
NOTE: When entering the address, the soft keyboard guides you through different parts of
the address including country, city, street, and house number. After entering a part, tap
to proceed to the next part.
.
56
Page 67

6. Tap save the contact’s information and return to the contact list.
Editing a Contact
To modify a contact’s information:
1. In the contact list, tap the contact twice to open the summary screen.
- or -
In the contact list, tap the contact and then tap
2. Tap twice the field you want to edit and use the soft keyboard to edit. If you
want to clear a field, tap the field and then tap
3. Tap
to save the changes.
.
.
Deleting a Contact
In the contact list, select the contact you want to delete and tap .
57
Page 68

Page 69

7 Bluetooth
7.1 About Bluetooth Profiles
Your device incorporates Bluetooth wireless communications technology.
Devices with Bluetooth capabilities can exchange information over a distance of
about 10 meters (30 feet) without requiring a physical connection.
Your device supports Bluetooth profiles as below:
z Hands-free Profile (HFP)
Allows your device to serve as a hands-free device for a Bluetooth mobile
phone. You can tap your device to place and receive phone calls instead of
picking up the mobile phone, and can use the built-in speakers and
microphone for your conversation.
z Advanced Audio Distribution Profile (A2DP)
Allows your device to transfer a 2-channel stereo audio stream, like MP3
music, to compatible Bluetooth stereo headsets or car stereos.
NOTE: Not all Bluetooth devices support all profiles. Check the document of a Bluetooth
device to know its Bluetooth capabilities.
59
Page 70

7.2 Connecting a Bluetooth Mobile Phone
Connecting a Mobile Phone for the First Time
NOTE: This chapter tells you how to initiate the Bluetooth connection from your device. If you
want to initiate the Bluetooth connection from a Bluetooth mobile phone, make sure that your
device is in discoverable mode. (See Section 11.8 for information.)
1. Make sure that the Bluetooth mobile phone is in discoverable mode.
2. Tap
3. The program will search for nearby Bluetooth mobile phones if this is the first
Mobile Phone on the Home screen.
If the Bluetooth radio is currently off, a message will pop up asking you to
turn on the Bluetooth radio. Tap
NOTE: When necessary, you can turn off the Bluetooth radio on your device. (See Section
11.8 for information on Bluetooth settings.)
time you try to connect a mobile phone.
Yes to proceed.
60
Page 71

NOTE: If no device is detected, the screen shows the shortcut menu. (See the shortcut
descriptions later in this section.)
4. The search result will show on the screen. Tap the mobile phone you want to
connect.
5. Tap the soft keyboard to enter the passkey (within 16 characters).
6. Enter the same passkey on your Bluetooth mobile phone so that the
connection can be established. Depending on the mobile phone model, you
may need to select the hands-free service to complete the connection.
7. When the connection is completed, a message will appear on the screen. Tap
Yes.
8. The shortcut menu appears with the name of the connected device on top of
the screen. A check mark indicates that the device is connected. Tap
Back to
display the Mobile Phone main menu.
61
Page 72
9. In the Mobile Phone main menu, you can place phone calls by tapping buttons
on the screen. (See Section 7.3 for information.)
10. You can tap
62
Back to minimize the screen and use other functions of the device.
Page 73

Connecting a Different Mobile Phone
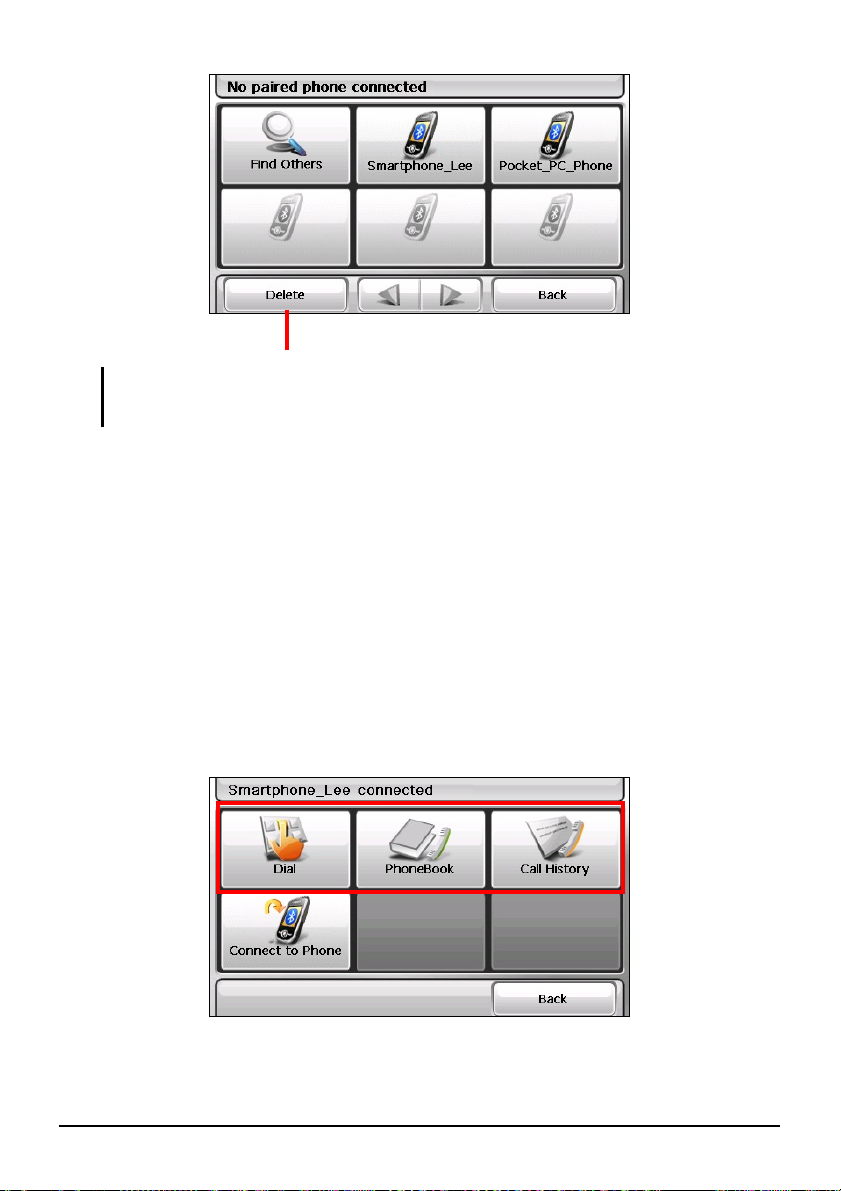
To connect a mobile phone that is not already in the shortcut list:
1. If you are in the Mobile Phone main menu, tap
2. In the shortcut menu, tap
Find Others.
Connect to Phone.
Using the Mobile Phone Shortcut
Once a Bluetooth connection has been established, the shortcut will be saved.
When you next tap the
try to connect the last paired mobile phone.
You can also tap a particular shortcut button in the shortcut menu to connect the
particular mobile phone.
Mobile Phone button on the Home screen, the program will
63
Page 74
Delete the selected shortcut.
NOTE:
z All shortcuts will be cleared if you shut down the device.
z The program can save up to 15 shortcuts. A 16th shortcut will replace the oldest one.
Disconnecting the Mobile Phone
Tap the connected device in the shortcut menu and tap Disconnect when the
message appears asking you to select your operation.
7.3 Phone Operations
Placing a Call
After pairing with a mobile phone (as described in Section 7.2), you can place a
call with the onscreen keypad, phone book, or call history.
64
Page 75

Dial
By tapping the Dial button in the Mobile Phone main menu, you can enter the
telephone number with the onscreen keypad. After entering the telephone number,
tap
to place the call.
NOTE:
z International calls require a country code to be included in the phone number. On your
device, the country code is separated from the rest of the number sequence by a plus (+)
sign. If you are making an international call, tap and hold the 0 key until the + sign appears.
z To delete the last digit entered, tap the Backspace button. Tap and hold the button for
about 1 second will clear the entire number.
Phone Book
By tapping the Phonebook button on the Mobile Phone main menu, you can select
a phone number to call.
The program can display two types of phone books.
z Local phone book
This is the phone book from the device’s Contacts program. (See Chapter 6.)
z Remote phone book
This is the phone book downloaded from the mobile phone during the first
time connection. Depending on your mobile phone, this type of information
may not be downloadable.
65
Page 76

NOTE:
z When a mobile phone different from the previous one is connected, a message will appear
asking if you want to replace the previous remote phone book with the current remote
phone book.
z If you need to refresh the remote phone book, tap Get Phone Number to download the
phonebook from the mobile phone again.
This icon indicates a
contact from the mobile
phone’s phone book.
When a contact has more than one phone numbers, all numbers will appear in the
list with the letter “m” meaning mobile phone, “h” meaning home, and “w”
meaning work.
On the phonebook screen, tap the phone number to call.
NOTE: To remove the mobile phone’s phone book from your device, use Bluetooth settings
as described in Section 11.8.
Call History
By tapping the Call History button on the Mobile Phone main menu, you can select
a recent phone number to call.
The program can display two types of call history.
z Local call history
This is the call history from your device.
z Remote call history
This is the call history from the connected mobile phone. Depending on your
mobile phone, this type of information may not be downloadable.
NOTE: When a mobile phone different from the previous one is connected, a message will
appear asking if you want to replace the previous remote call history with the current remote
call history.
66
Page 77
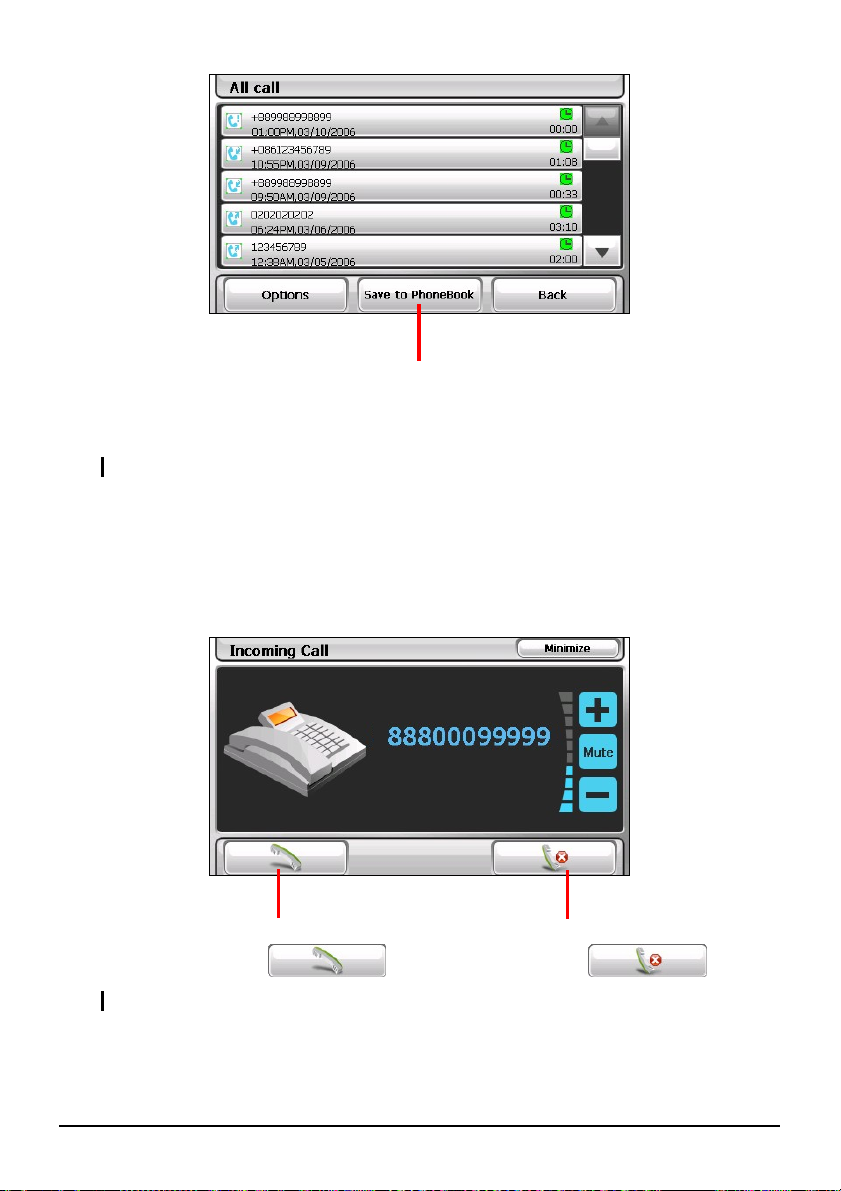
r
Save the selected phone number to
the Contacts program.
By default, the list shows the incoming, outgoing, and missed calls. You can filter
the calls by tapping
NOTE: To clear the call history, use Bluetooth settings as described in Section 11.8.
Options.
Receiving a Call
After pairing with a mobile phone (as described in Section 7.2), your device will
ring and display the incoming call screen when there is an incoming call.
Answe
To receive the call, tap
NOTE: You can have the device automatically answer an incoming call. (See Section 11.8.)
Reject
. To reject the call, tap .
67
Page 78

Operations during a Call
During a phone call:
z If you need to input other numbers, such as an extension number, tap Keyboard
to open the keypad and tap the digits.
z Tap Mute to mute your sound so that the other party cannot hear you. To end
the mute mode, tap the button again.
z Tap to end the call.
z Tap Voice to Phone to switch the call to your mobile phone. To transfer back,
tap the button again.
z Tap Minimize to minimize the screen and to back to the previous screen.
68
Page 79
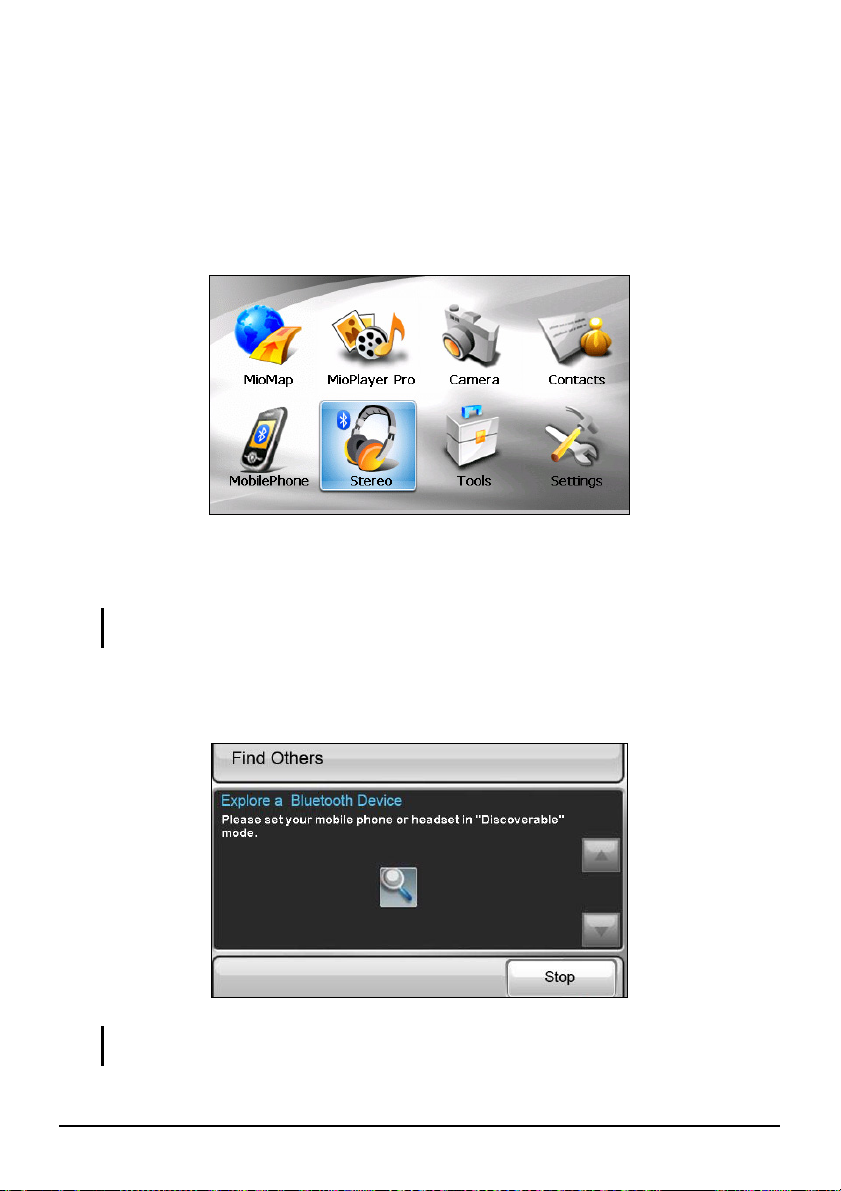
7.4 Connecting a Bluetooth Headset
Connecting a Headset for the First Time
1. Make sure that the headset to connect is a stereo Bluetooth headset.
2. Tap
3. The program will search for nearby Bluetooth headsets if this is the first time
Stereo on the Home screen.
If the Bluetooth radio is currently off, a message will pop up asking you to
turn on the Bluetooth radio. Tap
NOTE: When necessary, you can turn off the Bluetooth radio on your device. (See Section
11.8 for information on Bluetooth settings.)
you try to connect a headset.
Yes to proceed.
NOTE: If no device is detected, the screen shows the shortcut menu. (See the shortcut
descriptions later in this section.)
69
Page 80

4. The search result will show on the screen. Tap the headset you want to
connect.
5. Tap the soft keyboard to enter the passkey. (Check the headset manual for the
passkey.)
6. When the connection is completed, a message will appear on the screen. Tap
Yes.
7. The shortcut menu appears with the name of the connected device on top of
the screen. A check mark indicates that the device is connected.
70
Page 81

8. You can tap
Back to go back to the Home screen.
Connecting a Different Headset
To connect a headset that is not already in the shortcut list, tap Find Others in the
shortcut menu.
Using the Headset Shortcut
Once a Bluetooth connection has been established, the shortcut will be saved.
When you next tap the
will try to connect the last paired headset.
You can also tap a particular shortcut button to connect the particular headset.
Connect to Headset button on the Home screen, the program
Delete the selected shortcut.
NOTE:
z All shortcuts will be cleared if you shut down the device.
z The program can save up to 15 shortcuts. A 16th shortcut will replace the oldest one.
71
Page 82

Disconnecting the Headset
Tap the connected device in the shortcut menu and tap Disconnect when the
message appears asking you to select your operation.
72
Page 83

8 Card Scanner
8.1 Starting and Exiting Card Scanner
Card Scanner allows you to photograph a business card, recognize its contents, and then store the information to your Contacts database.
Tap
Tools on the Home screen and then tap Card Scanner to start the program.
↓
The initial screen appears.
73
Page 84

To exit the program, tap
.
8.2 Using the Card Scanner
1. Tap Tools on the Home screen and then tap Card Scanner to start the program.
2. Tap
3. Aim the camera lens at the business card. When ready, press lightly (halfway
down) on the Camera button and hold. A red focus bracket (
appear in the center of the screen. When the color of the bracket changes from
red to green (
Camera button to take the photo. The system will play a sound to indicate that
the shutter has been released.
. You will see the Camera screen (with limited functions).
) will
), focusing is completed. Now press fully down on the
NOTE: In the Camera screen. Only the , and buttons are available.
4. After taking the photo, you will see the image screen.
74
Page 85

Language
Recognize
Back
Camera
Rotate counter-clockwise
by 90 degrees
Rotate clockwise by 90
degrees
Zoom In
Zoom out
Reset
5. Tap
6. Tap
to choose the language.
to scan the text and numbers on the business card.
7. The program tries to recognize the text and numbers. When succeeded, it
displays the output screen with data falling into different categories.
Scroll up
Scroll down
Back
Add Field
Re-scan
Save
8. If a category doesn’t match the data, you can tap the down arrow button in the
left column and select the correct category. Tap
to confirm your
selection.
75
Page 86

9. If any text or number is not recognized correctly in a field on the right, you
can edit it by tapping the field and then entering the correct content in the
input area. When the input is completed, tap
.
10. If there is missing or incorrect data that needs to be re-scanned, tap
choose the area you wish to re-scan. (See Section 8.3 for more information.)
11. If you wish to manually enter information not provided on the business card,
tap
12. Once all the information is correct and ready, check (
wish to export, and tap
device’s Contacts database.
13. To exit the program, select
When you next start Contacts, you will see the newly added information in your
contacts list.
. (See Section 8.4 for more information.)
) the fields that you
. The selected data will be exported to the
.
to
76
Page 87

Important Notes
Due to a variety of business card formats, font styles and sizes, the way some
addresses are broken up on the card, or background artwork, the Card Scanner
program may not always recognize business cards perfectly.
After scanning your card and saving the data, it is important that you open
Contacts and use the edit function to make sure that the various address fields
contain the correct data.
For the navigation software to navigate to an address in Contacts, there should be
no Suite #, Apartment # or other additional information on the Street Address line,
as these may prevent correct navigation. You might consider saving the additional
Suite, Apartment or other numbers to a different field such as the “Department”
field.
8.3 Manually Scanning a Specific Area
If there is missing or incorrect data that needs to be re-scanned, you can manually
select the area to be scanned. Only one part can be scanned at a time.
1. In the output screen, tap
around the text/number indicate fields that have already been recognized.
2. You can zoom in or drag the screen to the appropriate area. You may also
need to specify a language.
3. Tap
4. For the area you wish to re-scan, select its category from the categories list
and tap
5. Use your fingertip to drag and create a border around the part that you wish to
re-scan. This border will be in blue and once you complete dragging, the
program will begin recognizing the text/number inside.
6. The result will display in the data field at the top of the screen. Tap
confirm.
.
.
to open the Re-scan screen. The black boxes
to
77
Page 88

Crop
Language
8.4 Adding Card Information
You can also manually enter information not provided on the card.
Zoom in
Zoom out
Reset
Back
1. In the output screen, tap
2. Select the category you wish to add and tap
. A list of available categories appears.
.
3. Tap the blank input field on the right and when the soft keyboard appears,
enter the data.
78
Page 89

4. Once input is complete, tap
output screen. The category and data that you have entered will appear in the
list.
to save your input and return to the
79
Page 90

Page 91

9 Calculator
9.1 Starting and Exiting Calculator
Calculator provides three modes: Calculator, Currency, and Conversion. You
can use these modes to perform basic arithmetic, currency conversion, and
measure conversion functions.
Tap
Tools on the Home screen and then tap Calculator to start the program.
↓
You will see the calculator screen. To switch to another mode, tap one of the
buttons at the top right corner of the screen.
81
Page 92

Switch to
Calculator mode.
Switch to Currency
mode.
Switch to Conversion
mode.
Exit
To exit the program, tap
.
9.2 Using the Calculator Mode
The Calculator mode allows you to perform any of the standard operations for
which you would normally use a handheld calculator.
If you are currently not in the Calculator mode, tap the
Tap the numeric keypad to enter numbers and mathematical symbols. Then tap
the
button to generate the result.
button.
82
Page 93

Calculator Memory
Memory indicator
Memory buttons
Button Name Description
Memory Cancel Clears the value in memory.
Memory Recall Shows the value in memory.
Memory Plus Adds the current value to the value in memory.
Memory Minus Subtracts the current value from the value in memory.
9.3 Using the Currency Mode
Use the Currency mode to perform the currency conversion. You can also edit the
exchange rate.
1. Start the Calculator program as described in Section 9.1.
2. Tap
to switch to the Currency mode.
83
Page 94

r
3. Tap the down arrow next to the input field to display a list of currencies and
select the currency to convert from. When a currency is selected, the
abbreviation of the currency will be displayed on the upper left corner of the
input field.
Currency indicator
Currency scroll list
Input field
Tap to go to the
editing screen.
Scroll ba
4. Tap the down arrow next to the output field to display a list of currencies and
select the currency to convert to. When a currency is selected, the
abbreviation of the currency will be displayed on the upper left corner of the
output field.
84
Page 95
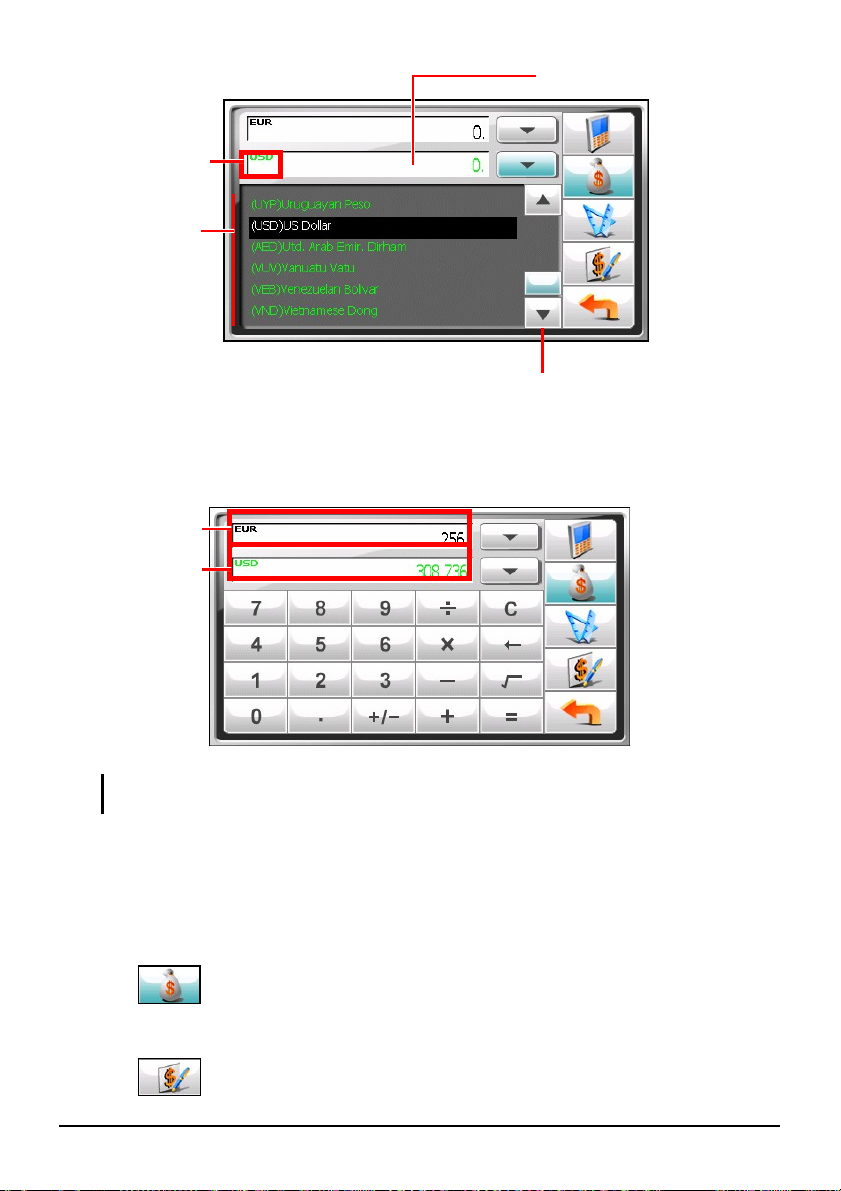
r
Currency indicator
Currency scroll list
Output field
Scroll ba
5. Enter the currency value in the input field by tapping the number buttons on
the numeric keypad. You can also perform basic arithmetic in the input field.
The converted currency immediately appears in the output field.
Input value
Output value
NOTE: The program uses the default exchange rates unless you change them. (See the
sub-section below for information.)
Editing Exchange Rate
Before performing the currency conversion, you can edit the exchange rate to the
most up-to-date one.
1. Tap
2. Select the source and target currency.
3. Tap
on the Calculator screen.
.
85
Page 96

4. Enter the exchange rate and tap to save the changes and go back
to the previous screen.
9.4 Using the Conversion Mode
The Conversion mode allows you to convert measures from one unit to another.
1. Start the Calculator program as described in Section 9.1.
2. Tap
3. Tap the measure button to display a scroll list of measures. Select the desired
measure from the list.
to switch to the Conversion mode.
86
Page 97

4. Tap the down arrow next to the input field to display a list of units and select
the unit to convert from. When a unit is selected, the abbreviation of the unit
will be displayed on the upper left corner of the input field.
Unit indicator
Unit scroll list
Input field
5. Tap the down arrow next to the output field to display a list of units and select
the unit to convert to. When a unit is selected, the abbreviation of the unit will
be displayed on the upper left corner of the output field.
87
Page 98

Unit indicator
Unit scroll list
Output field
6. Enter the value in the input field by tapping the number buttons on the
numeric keypad. You can also perform basic arithmetic in the input field.
The converted value immediately appears in the output field.
Input value
Output value
88
Page 99

10 File Manager
10.1 Starting and Exiting File Manager
File Manager allows you to transfer multimedia files between your device and a
storage card.
NOTE: To transfer multimedia files between your device and a computer, please install the
provided MioTransfer program. (See Chapter 12.)
Tools on the Home screen and then tap File Manager to start the program.
Tap
↓
89
Page 100

The File Manager screen shows specific folders of your device in the left column
and the folder(s)/file(s) of the storage card, if inserted, in the right column.
NOTE: The left column shows only “specific” folders in the My Flash Disk of your device.
“Specific” folders refer to pre-defined data folders for multimedia programs (such as My
Audio folder for the Audio program). Other folders are not accessible within the File Manager
program.
To exit the program, tap
.
10.2 Transferring Files
From the Storage Card to Your Device
1. Insert the storage card.
2. Tap
Tools on the Home screen and then tap File Manager to start the program.
By default, the first folder of your device’s My Flash Disk is highlighted.
90
 Loading...